TL/DR: Let’s take a look at everything required to build custom error handling logic in both Spring Boot Web and Spring Boot Security
REST applications developed in Spring Boot automatically take advantage of its default error handling logic. Specifically, whenever an error occurs, a default response containing some information is returned. The problem is that this information may be poor or insufficient for the API callers to deal with the error properly. This is why implementing custom error handling logic is such a common and desirable task. Achieving it requires more effort than you might think, and you need to delve into a few essential Spring Boot notions. Let’s see everything required to get started with custom error handling in Spring Boot and Java.
Prerequisites
This is the list of all the prerequisites for following the article:
- Java >= 1.8 (Java >= 13 recommended)
- Spring Boot >= 2.5
- Spring Boot Starter Web >= 2.5
- Spring Security >= 5.5
- Project Lombok >= 1.18
- Gradle >= 4.x or Maven 3.6.x
Default Error Handling in Spring Boot
By default, Spring Boot offers a fallback error-handling page, as well as an error-handling response in case of REST requests. Particularly, Spring Boot looks for a mapping for the /error endpoint during the start-up. This mapping depends on what is set on a ViewResolver class. When no valid mappings can be found, Spring Boot automatically configures a default fallback error page. This so-called Whitelabel Error Page is nothing more than a white HTML page containing the HTTP status code and a vague error message. This is what such a page looks like:
<html>
   <head></head>
   <body data-new-gr-c-s-check-loaded="14.1026.0" data-gr-ext-installed="">
      <h1>Whitelabel Error Page</h1>
      <p>This application has no explicit mapping for /error, so you are seeing this as a fallback.</p>
      <div id="created">Sun Aug 15 14:32:17 UTC 2021</div>
      <div>There was an unexpected error (type=Internal Server Error, status=500).</div>
      <div></div>
   </body>
</html>
This is what the Whitelabel HTML page looks like in your browser:

The Spring Boot Whitelabel HTML Error Page
Similarly, when dealing with REST requests, Spring Boot automatically returns a default JSON response in case of errors. This contains the same information as the aforementioned Whitelabel HTML error page and looks as follows:
{
  "timestamp": "2021-15-08T14:32:17.947+0000",
  "status": 500,
  "error": "Internal Server Error",
  "path": "/test"
}
As you can see, the default Spring Boot error handling responses for REST does not provide much information. This can quickly become a problem, especially when trying to debug. It is also problematic for front-end developers, who need detailed information coming from API error response messages to be able to explain to the end users what happened properly.
Let’s see how to replace this default response with custom-defined messages. While this may appear like an easy task, this is actually a tricky one. To achieve it, you first need to know a few Spring Boot fundamentals. Let’s learn more about them.
Custom Error Handling in Spring Boot
You are about to see two different approaches to custom error handling in Spring Boot REST applications. Both are based on a @ControllerAdvice annotated class handling all exceptions that may occur. So, let’s first see what a @ControllerAdvice annotated class is, why to use it, how, and when. Then, you will learn how to implement the two different approaches in detail. Finally, the pros and cons of each method will be explained.
Handling Exceptions with @ControllerAdvice
The @ControllerAdvice annotation was introduced in Spring 3.2 to make exception handling logic easier and entirely definable in one place. In fact, @ControllerAdvice allows you to address exception handling across the whole application. In other words, a single @ControllerAdvice annotated class can handle exceptions thrown from any place in your application. Thus, classes annotated with @ControllerAdvice are powerful and flexible tools. Not only do they allow you to centralize exception-handling logic into a global component, but also give you control over the body response, as well as the HTTP status code. This is especially important when trying to achieve custom error handling. Let’s see @ControllerAdvice in action.
Now, you are about to see everything required to implement two custom error handling approaches based on @ControllerAdvice. First, you should clone the GitHub repository supporting this article. By analyzing the codebase, going through this article will become easier. Also, you will be able to immediately see the two approaches in action.
So, clone the repository with the following command:
git clone https://github.com/Tonel/spring-boot-custom-error-handlingThen, run the DemoApplication main class by following this guide from the Spring Boot official documentation, and reach one of the following 4 endpoints to see the custom error handling responses:
http://localhost:8080/test-custom-data-not-found-exceptionhttp://localhost:8080/test-custom-parameter-constraint-exception?value=12http://localhost:8080/test-custom-error-exceptionhttp://localhost:8080/test-generic-exception
The first two APIs apply the first approach to error handling you are about to see, while the third API uses the second approach. The fourth and last API shows the fallback error handling logic presented above in action. Now, let’s delve into implementing these two approaches to custom error handling in Spring Boot.
Both of them rely on an ErrorMessage class representing the custom error body placed in an error package, containing everything needed to deal with custom error handling logic. This can be implemented as follows:
// src/main/java/com/customerrorhandling/demo/errors/ErrorResponse.java

package com.customerrorhandling.demo.errors;

import com.fasterxml.jackson.annotation.JsonFormat;
import lombok.Getter;
import lombok.Setter;
import org.springframework.http.HttpStatus;
import java.util.Date;

@Getter
@Setter
public class ErrorResponse {
    // customizing timestamp serialization format
    @JsonFormat(shape = JsonFormat.Shape.STRING, pattern = "dd-MM-yyyy hh:mm:ss")
    private Date timestamp;

    private int code;

    private String status;

    private String message;

    private String stackTrace;

    private Object data;

    public ErrorResponse() {
        timestamp = new Date();
    }

    public ErrorResponse(
            HttpStatus httpStatus,
            String message
    ) {
        this();

        this.code = httpStatus.value();
        this.status = httpStatus.name();
        this.message = message;
    }

    public ErrorResponse(
            HttpStatus httpStatus,
            String message,
            String stackTrace
    ) {
        this(
                httpStatus,
                message
        );

        this.stackTrace = stackTrace;
    }

    public ErrorResponse(
            HttpStatus httpStatus,
            String message,
        String stackTrace,
            Object data
    ) {
        this(
                httpStatus,
                message,
        stackTrace
        );

        this.data = data;
    }
}
The @Getter and @Setter annotations used in the code examples above are part of the Project Lombok. They are used to automatically generate getters and setters. This is not mandatory and is just an additional way to avoid boilerplate code. Read this article to find out more about Lombok.
ErrorResponse carries information such as an HTTP status code and name, a timestamp indicating when the error occurred, an optional error message, an optional exception stacktrace, and an optional object containing any kind of data. You should try to provide values to the first three fields, while the latter should be used only when required. In particular, the stackTrace field should be valorized only in staging or development environments, as explained here. Similarly, the data field should be used only when additional data is required. Specifically, to explain in detail what happened or let the front-end better handle the error.
This class can be used to achieve a custom response when handling exceptions with @ControllerAdvice as below:
// src/main/java/com/customerrorhandling/demo/errors/CustomControllerAdvice.java

package com.customerrorhandling.demo.errors;

import exceptions.CustomDataNotFoundException;
import exceptions.CustomErrorException;
import exceptions.CustomParameterConstraintException;
import org.springframework.http.HttpStatus;
import org.springframework.http.ResponseEntity;
import org.springframework.web.bind.annotation.ControllerAdvice;
import org.springframework.web.bind.annotation.ExceptionHandler;
import java.io.PrintWriter;
import java.io.StringWriter;

@ControllerAdvice
class CustomControllerAdvice {
    @ExceptionHandler(NullPointerException.class) // exception handled
    public ResponseEntity<ErrorResponse> handleNullPointerExceptions(
        Exception e
    ) {
        // ... potential custom logic

        HttpStatus status = HttpStatus.NOT_FOUND; // 404

        return new ResponseEntity<>(
            new ErrorResponse(
              status,
              e.getMessage()
            ),
            status
        );
    }

    // fallback method
    @ExceptionHandler(Exception.class) // exception handled
    public ResponseEntity<ErrorResponse> handleExceptions(
        Exception e
    ) {
        // ... potential custom logic

        HttpStatus status = HttpStatus.INTERNAL_SERVER_ERROR; // 500

    // converting the stack trace to String
    StringWriter stringWriter = new StringWriter();
    PrintWriter printWriter = new PrintWriter(stringWriter);
    e.printStackTrace(printWriter);
    String stackTrace = stringWriter.toString();

        return new ResponseEntity<>(
            new ErrorResponse(
              status,
              e.getMessage(),
              stackTrace // specifying the stack trace in case of 500s
            ),
            status
        );
    }
}
As you can see, @ControllerAdvice works by employing the @ExceptionHandler method-level annotation. This annotation allows you to define which method should be called in case of an error. Specifically, the exception thrown is compared to the exceptions passed as parameters to @ExceptionHandler based on type. The first method where there is a match is called. If none matched, then the exception’s parent class is tested, and so on. This is also why you should implement a fallback method to cover all remaining cases. You can achieve this by passing the Exception class to the @ExceptionHandler annotation, just like in the handleExceptions method. In fact, any exception in Java must have Exception as one of its ancestors in their inheritance chain. So, they all extend directly — or as subclasses — the Exception superclass.
Then, each method handles the error and might even implement custom logic, such as logging. In this example, each exception is handled by returning a ResponseEntity having the desired HttpStatus. This will be used as an HTTP status code associated with the error response. Similarly, the ErrorResponse instance passed to the ResponseEntity constructor will be automatically serialized in JSON and used as the message body. This way, custom error handling has just been achieved.
Now, you will dive into how to use @ConfrollerAdvice to implement two different approaches to custom error handling for REST in Spring Boot Web. The first one involves boilerplate code, but it is clean and best-practice based. In contrast, the second represents a good solution in terms of convenience, although it is a bit dirty.
Defining Many Custom Exceptions
This approach involves having as many methods in your @ControllerAdvice as many HTTP error status codes you want to handle. These methods will be related to one or more exceptions and return an error message with a particular HTTP status code. Implementing such an approach required three steps. First, you have to think about all the HTTP error status codes you want your application to return. Then, you have to define a method for each of them in your @ControllerAdvice annotated class. Lastly, you have to associate these methods with their exceptions with the @ExceptionHandler annotation.
This means that all exceptions of a particular type will be traced back to their relative method in the @ControllerAdvice annotated class. This may represent a problem, especially considering some exceptions are more common than others, such as NullPointerException. Since these exceptions can be thrown in many parts of your logic, they might have different meanings. Thus, they represent various errors and, therefore, other HTTP status codes.
The solution is to introduce new custom exceptions wrapping these frequent exceptions. For example, a NullPointerException can become a CustomParameterConstraintException exception at the controller layer, and a CustomDataNotFoundException at the DAO (Data Access Object) layer. In this case, the first one can be associated with a 400 Bad Request, and the second with a 404 Not Found HTTP status. The idea behind these exceptions is to give the error that occurred a more specific meaning. This better characterizes the error and makes it more handleable in the @ControllerAdvice annotated class accordingly. So, you should define a custom exception for each particular error you want to handle. Also, using custom exception classes represents undoubtedly a clean code principle. Thus, by adopting it, you are going to have more than one benefit.
So, let’s see this approach in action through an example. Firstly, you have to define custom exceptions, as shown here:
// src/main/java/exceptions/CustomParameterConstraintException.java

package exceptions;

public class CustomParameterConstraintException extends RuntimeException {
    public CustomParameterConstraintException() {
        super();
    }

    public CustomParameterConstraintException(String message) {
        super(message);
    }
}
// src/main/java/exceptions/CustomDataNotFoundException.java
package exceptions;
public class CustomDataNotFoundException extends RuntimeException {
public CustomDataNotFoundException() {
super();
}
public CustomDataNotFoundException(String message) {
super(message);
}
}Then, use them to wrap frequent exceptions, or to throw them in case of particular circumstances representing errors in your business logic. Let’s see how with two examples:
// DAO-level method
public Foo retrieveFooById(
    int id
) {
    try {
        // data retrieving logic
    } catch (NullPointerException e) {
        throw new CustomDataNotFoundException(e.getMessage());
    }
}
As shown above, a generic NullPointerException is turned into a more meaningful CustomDataNotFoundException.
// controller-level method method
public ResponseEntity<Void> performOperation(
    int numberOfAttempts
) {
    if (numberOfAttempts <= 0 || numberOfAttempts >= 5)
        throw new CustomParameterConstraintException("numberOfAttempts must be >= 0 and <= 5!");

    // business logic
}
Here, a particular behavior that should not happen is intercepted. Then, the custom CustomParameterConstraintException exception describing it is thrown.
Finally, all you have to do is add two particular methods to your @ControllerAdvice annotated class, one for each specific error.
// src/main/java/com/customerrorhandling/demo/errors/CustomControllerAdvice.java

package com.customerrorhandling.demo.errors;

import exceptions.CustomDataNotFoundException;
import exceptions.CustomErrorException;
import exceptions.CustomParameterConstraintException;
import org.springframework.http.HttpStatus;
import org.springframework.http.ResponseEntity;
import org.springframework.web.bind.annotation.ControllerAdvice;
import org.springframework.web.bind.annotation.ExceptionHandler;
import java.io.PrintWriter;
import java.io.StringWriter;

@ControllerAdvice
class CustomControllerAdvice {
    // ...

    @ExceptionHandler(CustomDataNotFoundException.class)
    public ResponseEntity<ErrorResponse> handleCustomDataNotFoundExceptions(
        Exception e
    ) {
        HttpStatus status = HttpStatus.NOT_FOUND; // 404

    // converting the stack trace to String
    StringWriter stringWriter = new StringWriter();
    PrintWriter printWriter = new PrintWriter(stringWriter);
    e.printStackTrace(printWriter);
    String stackTrace = stringWriter.toString();

        return new ResponseEntity<>(
            new ErrorResponse(
              status,
              e.getMessage(),
          stackTrace, // assuming to be in staging environment, otherwise stackTrace should not be valorized
            ),
            status
        );
    }

    @ExceptionHandler(CustomParameterConstraintException.class)
    public ResponseEntity<ErrorResponse> handleCustomParameterConstraintExceptions(
        Exception e
    ) {
        HttpStatus status = HttpStatus.BAD_REQUEST; // 400

        return new ResponseEntity<>(
            new ErrorResponse(
              status,
              e.getMessage()
            ),
            status
        );
    }

    // ...
}
Et voilà! Both errors originally related to the same exception were first characterized and then handled accordingly.
Now, let’s see the difference. This is what the default error response would look like on a 404 error:
{
  "timestamp": "2021-15-08T14:32:17.947+0000",
  "status": 404,
  "error": "Not Found",
  "path": "/test404"
}
And this is what the custom error response just implemented looks like:
{
  "timestamp": "2021-15-08 14:32:17",
  "code": 404,
  "status": "NOT_FOUND",
  "message": "Resource not found",
  "stackTrace": "Exception in thread "main" com.example.demo.exceptions.CustomDataNotFoundException
        at com.example.demo.AuthorController.getAuthor(AuthorController.java:16)
        at com.example.demo.AuthorService.getAuthor(AuthorService.java:37)
        at com.example.demo.AuthorDao.getById(AuthorDao.java:24)"
}
Defining a Single Custom Exception Carrying All Data
This approach involves defining a custom exception carrying the HTTP status to use, and all the data required to describe the error that occurred. The idea is to turn every exception you want to handle, or you would like to throw under special circumstances, into an instance of this particular exception. This way, you are spreading the error characterization logic into all your code. So, you will only have to add a new method in your @ControllerAdvice annotated class to handle this custom exception accordingly.
First, you have to define a custom error handling exception. This can be achieved as follows:
// src/main/java/exceptions/CustomErrorException.java

package exceptions;

import lombok.Getter;
import lombok.Setter;
import org.springframework.http.HttpStatus;

@Getter
@Setter
public class CustomErrorException extends RuntimeException {
    private HttpStatus status = null;

    private Object data = null;

    public CustomErrorException() {
      super();
    }

   public CustomErrorException(
      String message
   ) {
      super(message);
   }

    public CustomErrorException(
        HttpStatus status,
        String message
    ) {
        this(message);
        this.status = status;
    }

    public CustomErrorException(
        HttpStatus status,
        String message,
        Object data
    ) {
        this(
          status,
      message
        );
        this.data = data;
    }
}
Again, the @Getter and @Setter annotations were used to avoid boilerplate code and are not mandatory. As you can see, the CustomErrorException class carries the same data used in the ErrorResponse class to better describe what happened and present the errors to the end-users.
So, you can use this exception to wrap other exceptions, or you can throw it in case of particular circumstances constituting errors in your business logic. Now, let’s see how with two examples:
// DAO-level method
public Foo retrieveFooById(
    int id
) {
    try {
        // data retrieving logic
    } catch (NullPointerException e) {
        throw new CustomErrorException(
          HttpStatus.NOT_FOUND,
          e.getMessage(),
          (Integer) id
        );
    }
}
Here, an insufficiently significant NullPointerException is turned into a more detailed CustomErrorException containing all the data to describe why the error occurred.
// controller-level method method
public ResponseEntity<Void> performOperation(
    int numberOfAttempts
) {
    if (numberOfAttempts <= 0 || numberOfAttempts >= 5) {
        throw new CustomErrorException(
          HttpStatus.BAD_REQUEST,
          "numberOfAttempts must be >= 0 and <= 5!",
          (Integer) numberOfAttempts
        );
    }

    // business logic
}
Similarly, a particular behavior that is not supposed to happen is intercepted. Consequently, a CustomErrorException exception containing all the useful data to represent the error is thrown.
Lastly, add one method to handle CustomErrorException exception instances to your @ControllerAdvice annotated class, as below:
// src/main/java/com/customerrorhandling/demo/errors/CustomControllerAdvice.java

package com.customerrorhandling.demo.errors;

import exceptions.CustomDataNotFoundException;
import exceptions.CustomErrorException;
import exceptions.CustomParameterConstraintException;
import org.springframework.http.HttpStatus;
import org.springframework.http.ResponseEntity;
import org.springframework.web.bind.annotation.ControllerAdvice;
import org.springframework.web.bind.annotation.ExceptionHandler;
import java.io.PrintWriter;
import java.io.StringWriter;

@ControllerAdvice
class CustomControllerAdvice {
    // ...

    @ExceptionHandler(CustomErrorException.class)
    public ResponseEntity<ErrorResponse> handleCustomErrorExceptions(
            Exception e
    ) {
        // casting the generic Exception e to CustomErrorException
        CustomErrorException customErrorException = (CustomErrorException) e;

        HttpStatus status = customErrorException.getStatus();

        // converting the stack trace to String
        StringWriter stringWriter = new StringWriter();
        PrintWriter printWriter = new PrintWriter(stringWriter);
        customErrorException.printStackTrace(printWriter);
        String stackTrace = stringWriter.toString();

        return new ResponseEntity<>(
                new ErrorResponse(
                        status,
                        customErrorException.getMessage(),
                        stackTrace,
                        customErrorException.getData()
                ),
                status
        );
    }

    // ...
}
Note that @ExceptionHandler can accept more than one exception type. This means that the parameter of the method representing the exception must be downcasted. Otherwise, a ClassCastException will be throw. So, upcast the exception e to CustomErrorException inside the method. Then, you will be able to access its particular fields and define a valid ErrorResponse instance.
Done! This way each error that occurs is encapsulated into an exception containing everything required to describe it.
Now, let’s see the difference. This is what the default error response on a 404 error would look like:
{
  "timestamp": "2021-15-08T14:32:17.947+0000",
  "status": 404,
  "error": "Not Found",
  "message": "",
  "path": "/test404"
}
And this is what the custom error response just implemented looks like:
{
  "timestamp": "2021-15-08 14:32:17",
  "code": 404,
  "status": "NOT_FOUND",
  "message": "Resource not found",
  "stackTrace": "Exception in thread "main" com.example.demo.exceptions.CustomErrorException
        at com.example.demo.AuthorController.getAuthor(AuthorController.java:16)
        at com.example.demo.AuthorService.getAuthor(AuthorService.java:37)
        at com.example.demo.AuthorDao.getById(AuthorDao.java:24)"
}
Pros and Cons of Each Approach
The first approach should be used when you do not want to spread error handling logic all over your codebase. In fact, the HTTP status code is only associated with errors in your @ControllerAdvice annotated class. This means that no layer knows how the error will be handled and presented to users. Although this should be the desired behavior because it respects the principle of least privilege, it does involve boilerplate code. In fact, you may easily end up with dozens of custom exceptions, and define them is a tedious and not-scalable approach.
So, you may want a less restricting approach, and this is why the second approach was presented. Unfortunately, this one is definitely dirtier. In fact, it requires you to spread detail about error handling logic in many different points of your code. In contrast, it is scalable and quicker to be implemented. So, despite not being the cleanest approach, it allows you to achieve the desired result with little effort. Plus, it is more maintainable than the first approach because it involves only a custom exception.
Custom Error Handling in Spring Security
Spring Security is a powerful and highly customizable framework that provides both authentication and authorization. It is one of the most widely used Spring dependencies and represents the de-facto standard for securing a Spring Boot application.
In case of authentication and authorization failures, AuthenticationException and AccessDeniedException are thrown respectively. Then, Spring Security takes care of encapsulating them in default error handling responses. If you want to customize them, the two approaches presented above are of no use. This is because @ControllerAdvice can handle only exceptions thrown by controllers, but AuthenticationException and AccessDeniedException are thrown by the Spring Security AbstractSecurityInterceptor component — which is not a controller. In other words, a @ControllerAdvice annotated class cannot catch them. Achieving this requires custom logic.
Implementing Custom Error Handling Logic in Spring Security
Let’s take a look at how to implement custom error handling in Spring Security. Luckily, this is not too complex since you can easily provide Spring Security with two components to handle authentication and authorization errors, respectively. What you need to do is to provide the AuthenticationFailureHandler interface with implementation, as follows:
// src/main/java/com/auth0/hotsauces/security/CustomAuthenticationFailureHandler.java

package com.auth0.hotsauces.security;

import com.fasterxml.jackson.annotation.JsonFormat;
import com.fasterxml.jackson.databind.ObjectMapper;
import org.springframework.http.HttpStatus;
import org.springframework.security.core.AuthenticationException;
import org.springframework.security.web.authentication.AuthenticationFailureHandler;
import java.util.*;
import javax.servlet.http.HttpServletRequest;
import javax.servlet.http.HttpServletResponse;
import java.util.HashMap;

public class CustomAuthenticationFailureHandler implements AuthenticationFailureHandler {
    // Jackson JSON serializer instance
    private ObjectMapper objectMapper = new ObjectMapper();

    @Override
    public void onAuthenticationFailure(
      HttpServletRequest request,
      HttpServletResponse response,
      AuthenticationException exception
    ) throws IOException, ServletException {
        HttpStatus httpStatus = HttpStatus.UNAUTHORIZED; // 401

        Map<String, Object> data = new HashMap<>();
        data.put(
          "timestamp",
          new Date()
        );
        data.put(
          "code",
          httpStatus.value();
        );
        data.put(
          "status",
          httpStatus.name();
        );
        data.put(
          "message",
          exception.getMessage()
        );

        // setting the response HTTP status code
        response.setStatus(httpStatus.value());

        // serializing the response body in JSON
        response
          .getOutputStream()
          .println(
              objectMapper.writeValueAsString(data)
          );
    }
}
This will be used to handle AuthenticationExceptions.
Similarly, you can provide the AccessDeniedHandler interface with implementation to handle AccessDeniedExceptions.
// src/main/java/com/auth0/hotsauces/security/CustomAccessDeniedHandler.java

package com.auth0.hotsauces.security;

import com.fasterxml.jackson.annotation.JsonFormat;
import com.fasterxml.jackson.databind.ObjectMapper;
import org.springframework.http.HttpStatus;
import org.springframework.security.core.AuthenticationException;
import org.springframework.security.web.authentication.AuthenticationFailureHandler;
import java.util.*;
import javax.servlet.http.HttpServletRequest;
import javax.servlet.http.HttpServletResponse;
import java.util.HashMap;

public class CustomAccessDeniedHandler implements AccessDeniedHandler {
    // Jackson JSON serializer instance
    private ObjectMapper objectMapper = new ObjectMapper();

    @Override
    public void handle(
      HttpServletRequest request,
      HttpServletResponse response,
      AccessDeniedException exception
    ) throws IOException, ServletException {
        HttpStatus httpStatus = HttpStatus.FORBIDDEN; // 403

        Map<String, Object> data = new HashMap<>();
        data.put(
          "timestamp",
          new Date()
        );
        data.put(
          "code",
          httpStatus.value();
        );
        data.put(
          "status",
          httpStatus.name();
        );
        data.put(
          "message",
          exception.getMessage()
        );

        // setting the response HTTP status code
        response.setStatus(httpStatus.value());

        // serializing the response body in JSON
        response
          .getOutputStream()
          .println(
              objectMapper.writeValueAsString(data)
          );
    }
}
Now, you just need to register these two custom implementations as authentication and authorization error handlers. You can do this as below:
// src/main/java/com/auth0/hotsauces/security/SecurityConfig.java

package com.auth0.hotsauces.security;

import org.springframework.beans.factory.annotation.Value;
import org.springframework.context.annotation.Bean;
import org.springframework.security.config.annotation.web.builders.HttpSecurity;
import org.springframework.security.config.annotation.web.configuration.EnableWebSecurity;
import org.springframework.security.config.annotation.web.configuration.WebSecurityConfigurerAdapter;
import org.springframework.security.oauth2.core.DelegatingOAuth2TokenValidator;
import org.springframework.security.oauth2.core.OAuth2TokenValidator;
import org.springframework.security.oauth2.jwt.*;
import org.springframework.security.oauth2.server.resource.web.BearerTokenAuthenticationFilter;
import org.springframework.security.web.access.AccessDeniedHandler;
import org.springframework.security.web.authentication.AuthenticationFailureHandler;

@EnableWebSecurity
public class SecurityConfig extends WebSecurityConfigurerAdapter {
    // ...

    @Override
    protected void configure(HttpSecurity http)
      throws Exception {
        http
          .authorizeRequests()
          .anyRequest()
          .authenticated()
          .and()
          .formLogin()
          .failureHandler(authenticationFailureHandler())
          .and()
          .exceptionHandling()
          .accessDeniedHandler(accessDeniedHandler());
    }

    @Bean
    public AuthenticationFailureHandler authenticationFailureHandler() {
        return new CustomAuthenticationFailureHandler();
    }

    @Bean
    public AccessDeniedHandler accessDeniedHandler() {
        return new CustomAccessDeniedHandler();
    }
}
Et voilà! Custom error handling in Spring Boot has just been achieved thanks to the failureHandler and accessDeniedHandler methods, which allows you to register a custom authentication error handler and a custom authorization error handler.
Spring Security Custom Error Handling in Action
Now, let’s see how to implement it in a real-world example. First, read this article on how to protect APIs with Spring Security and Auth0. In the demo application produced in that article, no custom error handling is implemented. So, by making a request to a protected API including a wrong access token, the default Spring Boot error handling logic is applied. Let’s test it out.
If you are a macOS or Linux user, enter this command into the terminal:
curl -i --request GET
     --url http://localhost:8080/api/hotsauces/
     -H "Content-Type: application/json"
     -H "authorization: Bearer wrong-token"
Otherwise, if you are a Windows user, enter this command into PowerShell:
$accessToken = "wrong-token"
$headers = @{
    Authorization = "Bearer $accessToken"
}
$response = Invoke-RestMethod "http://localhost:8080/api/hotsauces/" `
    -Headers $headers
$response | ConvertTo-Json
Then, the following response will be returned:
Invoke-WebRequest: The remote server returned an error: (401) Unauthorized.
At line:1 char:1
+ Invoke-WebRequest "http://localhost:8080/api/hotsauces/"
+ ~~~~~~~~~~~~~~~~~~~~~~~~~~~~~~~~~~~~~~~~~~~~~~~~~~~~~~~~
+ CategoryInfo          : InvalidOperation: (System.Net.HttpWebRequest:HttpWebRequest) [Invoke-WebRequest], WebExc
   eption
+ FullyQualifiedErrorId : WebCmdletWebResponseException,Microsoft.PowerShell.Commands.InvokeWebRequestCommand
As you can see, a 401 error status code is returned, but with no details on what happened.
Now, let’s test the demo application extended with custom error handling logic. You can find it in this GitHub repository. The application is exactly the same as the previous one, except for the error handling logic. In particular, the aforementioned presented logic was implemented.
In this case, by launching the commands above, this message will be returned:
Invoke-RestMethod : {"code":401,"message":"An error occurred while attempting to decode the Jwt: Invalid JWT serialization: Missing dot delimiter(s)","timestamp":1629880611013,"status":"UNAUTHORIZED"}
At line:1 char:1
+ $response = Invoke-RestMethod "http://localhost:8080/api/hotsauces/"  ...
+ ~~~~~~~~~~~~~~~~~~~~~~~~~~~~~~~~~~~~~~~~~~~~~~~~~~~~~~~~
+ CategoryInfo          : InvalidOperation: (System.Net.HttpWebRequest:HttpWebRequest) [Invoke-WebRequest], WebExc
   eption
+ FullyQualifiedErrorId : WebCmdletWebResponseException,Microsoft.PowerShell.Commands.InvokeWebRequestCommand
As you can see, a JSON message representing the custom error handling logic was returned as expected. This contains the status code, the exception message, a timestamp, and the HTTP status code name, as follows:
{
  "code": 401,
  "message": "An error occurred while attempting to decode the Jwt: Invalid JWT serialization: Missing dot delimiter(s)",
  "timestamp": 1629880611013,
  "status": "UNAUTHORIZED"
}
Conclusion
In this article, we looked at how to implement custom error handling logic when dealing with REST applications in Spring Boot. This is not as easy a task as it may seem, and it requires knowing a few Spring Boot fundamentals. First, we delved into default error handling in Spring Boot and saw how poor the responses are. Then, we looked at @ControllerAdvice and learn everything required to implement custom error handling logic. In particular, two different approaches were shown. Both allow you to define custom error handling responses but have specific pros and cons. Finally, we learned how to achieve the same result when dealing with Spring Boot Security errors, which requires specific logic. As shown, achieving custom error handling in Spring Boot is not easy but definitely possible, and explaining when, why, and how to do it was what this article was aimed at.
Thanks for reading! I hope that you found this article helpful. Feel free to reach out to me with any questions, comments, or suggestions.
Make sure that your main class is in a root package above other classes.
When you run a Spring Boot Application, (i.e. a class annotated with @SpringBootApplication), Spring will only scan the classes below your main class package.
com
   +- APP
         +- Application.java  <--- your main class should be here, above your controller classes
         |
         +- model
         |   +- user.java
         +- controller
             +- UserController.java
![]()
m00am
5,67211 gold badges55 silver badges67 bronze badges
answered Aug 18, 2016 at 12:07
![]()
vignesh Subashvignesh Subash
2,4971 gold badge10 silver badges15 bronze badges
11
When we create a Spring boot application we annotate it with @SpringBootApplication annotation. This annotation ‘wraps up’ many other necessary annotations for the application to work. One such annotation is @ComponentScan annotation. This annotation tells Spring to look for Spring components and configure the application to run.
Your application class needs to be top of your package hierarchy, so that Spring can scan sub-packages and find out the other required components.
package com.test.spring.boot;
import org.springframework.boot.SpringApplication;
import org.springframework.boot.autoconfigure.SpringBootApplication;

@SpringBootApplication
public class App {
    public static void main(String[] args) {
        SpringApplication.run(App.class, args);
    }
}
Below code snippet works as the controller package is under com.test.spring.boot package
package com.test.spring.boot.controller;

import org.springframework.web.bind.annotation.RequestMapping;
import org.springframework.web.bind.annotation.RestController;

@RestController
public class HomeController {

    @RequestMapping("/")
    public String home(){
        return "Hello World!";
    }
}
Below code snippet does NOT Work as the controller package is NOT under com.test.spring.boot package
package com.test.controller;

import org.springframework.web.bind.annotation.RequestMapping;
import org.springframework.web.bind.annotation.RestController;

@RestController
public class HomeController {

     @RequestMapping("/")
     public String home(){
         return "Hello World!";
     }
 }
From Spring Boot documentation:
Many Spring Boot developers always have their main class annotated
with@Configuration,@EnableAutoConfigurationand@ComponentScan.
Since these annotations are so frequently used together (especially if
you follow the best practices above), Spring Boot provides a
convenient@SpringBootApplicationalternative.The
@SpringBootApplicationannotation is equivalent to using
@Configuration,@EnableAutoConfigurationand@ComponentScanwith their
default attributes
answered Jan 19, 2017 at 19:18
![]()
Somnath MusibSomnath Musib
3,4403 gold badges32 silver badges46 bronze badges
0
You can solve this by adding an ErrorController in your application. You can have the error controller return a view that you need.
Error Controller in my application looks like below:
import org.springframework.boot.autoconfigure.web.ErrorAttributes;
import org.springframework.boot.autoconfigure.web.ErrorController;
import org.springframework.http.HttpStatus;
import org.springframework.http.ResponseEntity;
import org.springframework.stereotype.Controller;
import org.springframework.web.bind.annotation.RequestMapping;
import org.springframework.web.bind.annotation.ResponseBody;
import org.springframework.web.context.request.RequestAttributes;
import org.springframework.web.context.request.ServletRequestAttributes;
import org.springframework.web.servlet.ModelAndView;

import javax.servlet.http.HttpServletRequest;
import java.util.Map;

/**
 * Basic Controller which is called for unhandled errors
 */
@Controller
public class AppErrorController implements ErrorController{

    /**
     * Error Attributes in the Application
     */
    private ErrorAttributes errorAttributes;

    private final static String ERROR_PATH = "/error";

    /**
     * Controller for the Error Controller
     * @param errorAttributes
     */
    public AppErrorController(ErrorAttributes errorAttributes) {
        this.errorAttributes = errorAttributes;
    }

    /**
     * Supports the HTML Error View
     * @param request
     * @return
     */
    @RequestMapping(value = ERROR_PATH, produces = "text/html")
    public ModelAndView errorHtml(HttpServletRequest request) {
        return new ModelAndView("/errors/error", getErrorAttributes(request, false));
    }

    /**
     * Supports other formats like JSON, XML
     * @param request
     * @return
     */
    @RequestMapping(value = ERROR_PATH)
    @ResponseBody
    public ResponseEntity<Map<String, Object>> error(HttpServletRequest request) {
        Map<String, Object> body = getErrorAttributes(request, getTraceParameter(request));
        HttpStatus status = getStatus(request);
        return new ResponseEntity<Map<String, Object>>(body, status);
    }

    /**
     * Returns the path of the error page.
     *
     * @return the error path
     */
    @Override
    public String getErrorPath() {
        return ERROR_PATH;
    }


    private boolean getTraceParameter(HttpServletRequest request) {
        String parameter = request.getParameter("trace");
        if (parameter == null) {
            return false;
        }
        return !"false".equals(parameter.toLowerCase());
    }

    private Map<String, Object> getErrorAttributes(HttpServletRequest request,
                                                   boolean includeStackTrace) {
        RequestAttributes requestAttributes = new ServletRequestAttributes(request);
        return this.errorAttributes.getErrorAttributes(requestAttributes,
                includeStackTrace);
    }

    private HttpStatus getStatus(HttpServletRequest request) {
        Integer statusCode = (Integer) request
                .getAttribute("javax.servlet.error.status_code");
        if (statusCode != null) {
            try {
                return HttpStatus.valueOf(statusCode);
            }
            catch (Exception ex) {
            }
        }
        return HttpStatus.INTERNAL_SERVER_ERROR;
    }
}
The above class is based on Springs BasicErrorController class.
You can instantiate the above ErrorController like this in a @Configuration file:
 @Autowired
 private ErrorAttributes errorAttributes;

 @Bean
 public AppErrorController appErrorController(){return new AppErrorController(errorAttributes);}
You can choose override the default ErrorAttributes by implementing ErrorAttributes. But in most cases the DefaultErrorAttributes should suffice.
![]()
axiopisty
4,8708 gold badges43 silver badges72 bronze badges
answered Aug 5, 2015 at 16:50
![]()
owaismowaism
1,0981 gold badge8 silver badges21 bronze badges
2
In my case the controller class was annotated with @Controller. Changing that to @RestController resolved the problem.
Basically @RestController is @Controller + @ResponseBody
So either use @RestController , or @Controller with @ResponseBody annotation with each method.
Some useful notes here : https://www.genuitec.com/spring-frameworkrestcontroller-vs-controller/
![]()
Markus
2,0614 gold badges22 silver badges44 bronze badges
answered Sep 13, 2017 at 5:43
![]()
mykeymykey
1,64318 silver badges13 bronze badges
3
in my case it because of package position , meaning package of controller must be above main class package
if my main class package is package co.companyname.spring.tutorial; any controller package should package co.companyname.spring.tutorial.WHAT_EVER_HERE;
package co.companyname.spring.tutorial; // package for main class
@SpringBootApplication
public class FirstProjectApplication {

    public static void main(String[] args) {
        SpringApplication.run(FirstProjectApplication.class, args);
    }
}


package co.companyname.spring.tutorial.controllers; // package for controllers

import org.springframework.web.bind.annotation.RequestMapping;
import org.springframework.web.bind.annotation.RestController;

@RestController
public class HelloController {

@RequestMapping("/hello")
public String hello() {
 return "Hello, world";
 }}
after finish coding press boot dashboard
one last thing to make sure your controller is mapping or not just console you should see somehting smilliar
Mapped "{[/hello]}" onto public java.lang.String co.companyname.spring.tutorial.controllers.HelloController.hello()
happy coding
answered Sep 28, 2016 at 12:31
![]()
Mina FawzyMina Fawzy
20.6k16 gold badges130 silver badges149 bronze badges
Try adding the dependency.
<dependency>
    <groupId>org.springframework.boot</groupId>
    <artifactId>spring-boot-starter-thymeleaf</artifactId>
</dependency>
answered Dec 6, 2016 at 12:22
![]()
SreeSree
1531 silver badge2 bronze badges
4
This happens when an explicit error page is not defined. To define an error page, create a mapping of /error with a view.
e.g. the below code maps to a string value being returned in case of an error.
package com.rumango.controller;

import org.springframework.boot.web.servlet.error.ErrorController;
import org.springframework.stereotype.Controller;
import org.springframework.web.bind.annotation.RequestMapping;
import org.springframework.web.bind.annotation.ResponseBody;
@Controller
public class IndexController implements ErrorController{
    private final static String PATH = "/error";
    @Override
    @RequestMapping(PATH)
    @ResponseBody
    public String getErrorPath() {
        // TODO Auto-generated method stub
        return "No Mapping Found";
    }

}
![]()
Mohit Kanwar
2,8797 gold badges38 silver badges58 bronze badges
answered Nov 12, 2018 at 6:55
![]()
2
By default spring boot will scan current package for bean definition. So if your current package where main class is defined and controller package is not same or controller package is not child package of your main app package it will not scan the controller. To solve this issue one can include list of packages for bean definition in main package
@SpringBootApplication(scanBasePackages = {"com.module.restapi1.controller"})
or create a hierarchy of package where child package is derived from main package
package com.module.restapi;
package com.module.restapi.controller
answered Apr 24, 2020 at 10:08
![]()
1
In the main class, after the configuration «@SpringBootApplication», adding «@ComponentScan» without having any arguments, worked for me !!!
Main Class :
@SpringBootApplication
@ComponentScan
public class CommentStoreApplication {

    public static void main(String[] args) {
        SpringApplication.run(CommentStoreApplication.class, args);

    }
}
RestController Class :
@RestController
public class CommentStoreApp {

    @RequestMapping("/")
    public String hello() {
        return "Hello World!";
    }
}
P.S: Don’t miss to run mvn clean and mvn install commands, before launching the application
answered Mar 1, 2018 at 11:28
![]()
HarikaHarika
711 silver badge1 bronze badge
1
I am developing Spring Boot application for a few weeks.. And I was gettig same error like below;
Whitelabel Error Page
This application has no explicit mapping for /error, so you are seeing this as a fallback.
Thu Jan 18 14:12:11 AST 2018
There was an unexpected error (type=Not Found, status=404).
No message available
When I get this error massage I realized my controller or rest controller class is not defined in my project. I mean our all controller packages aren’t same package with main class which include @SpringBootApplication annotation.. I mean you need to add you controller package’s name to @ComponentScan annotation to your main class which is includes @SpringBootApplication annotation. If you write codes of below your problem will be solving… Most important thing is you have to add your all controller’s package to @ComponentScan annotation like I did in the below
package com.example.demo;

import org.springframework.boot.SpringApplication;
import org.springframework.boot.autoconfigure.SpringBootApplication;
import org.springframework.context.annotation.ComponentScan;

@SpringBootApplication
@ComponentScan({ "com.controller.package1, com.controller.package2, com.controller.package3, com.controller.packageN", "controller", "service" } // If our Controller class or Service class is not in the same packages we have //to add packages's name like this...directory(package) with main class
public class MainApp {
    public static void main(String[] args) {
        SpringApplication.run(MainApp.class, args);
    }
}
I hope this codes are going to help someone…
If you find another way to solve this error or you have some suggestions for me,
please write to comments… thanks…
answered Jan 18, 2018 at 11:33
![]()
I added this dependency and it solved my problem.
<dependency>
    <groupId>org.springframework.boot</groupId>

    <artifactId>spring-boot-starter-thymeleaf</artifactId>
</dependency>
![]()
Pang
9,365146 gold badges85 silver badges121 bronze badges
answered Mar 19, 2017 at 14:21
![]()
1
You might be getting the error i.e.
«This application has no explicit mapping for /error, so you are seeing this as a fallback.»
This is because it is not scanning your Controller & Service classes which you have to specify in your main() class like this,
package com.example.demo;
import org.springframework.boot.SpringApplication;
import org.springframework.boot.autoconfigure.EnableAutoConfiguration;
import org.springframework.context.annotation.ComponentScan;
import org.springframework.context.annotation.Configuration;
@Configuration
@EnableAutoConfiguration
**@ComponentScan({"com.example.demo", "controller", "service"})**
public class SpringBootMvcExample1Application {
    public static void main(String[] args) {
        SpringApplication.run(SpringBootMvcExample1Application.class, args);
    }
}
Note: Here, I have specified various classes like demo, controller and service to be scanned then only it will work properly.
![]()
Soren
14.3k4 gold badges40 silver badges67 bronze badges
answered May 21, 2017 at 18:11
![]()
Quite late to the party. As per spring official documentation «Spring Boot installs a whitelabel error page that you see in a browser client if you encounter a server error.»
https://docs.spring.io/spring-boot/docs/current/reference/htmlsingle/#howto-customize-the-whitelabel-error-page
- You can disable the feature by setting
server.error.whitelabel.enabled=falsein application.yml or application.properties file.
2.Recommended way is set your error page so that end user can understand. Under resources/templates folder create a error.html file and add dependency in pom.xml file
<dependency>
<groupId>org.springframework.boot</groupId>
<artifactId>spring-boot-starter-thymeleaf</artifactId>
</dependency>
Spring will automatically choose the error.html page as the default error template.
Note:- Don’t forget to update maven project after adding dependency.
answered Sep 8, 2019 at 12:12
![]()
1
You have to organize the packages so that the package containing public static main(or where you wrote @SpringBootApplication), the father of all your other packages.
![]()
ppreetikaa
1,1292 gold badges15 silver badges22 bronze badges
answered May 9, 2019 at 10:16
![]()
1
The problem is that you are navigating to localhost:8080/ instead of localhost:8080/upload as prescribed in the guide. Spring Boot has a default error page used when you navigate to an undefined route to avoid giving away server specific details (which can be viewed as a security risk).
You’re options are to either: visit the right page, add your own landing page, or override the white error page.
To simplify this particular situation, I updated the guide so that it uses / instead of /upload.
answered Apr 25, 2016 at 15:46
![]()
gregturngregturn
2,6253 gold badges25 silver badges40 bronze badges
I too got the same error and was able to resolve the error by adding the below dependency to my pom.xml.
<dependency>
    <groupId>org.apache.tomcat.embed</groupId>
    <artifactId>tomcat-embed-jasper</artifactId>
    <scope>provided</scope>
</dependency>
Reason is we are using JSP as the view. Default embedded servlet container for Spring Boot Starter Web is tomcat.
To enable support for JSP’s, we would need to add a dependency on tomcat-embed-jasper.
In my case I was returning a JSP as view from controller.
Hope this answer helps someone who are struggling with same issue.
answered Nov 24, 2017 at 12:50
![]()
SujanaSujana
3311 gold badge3 silver badges12 bronze badges
I know it’s not exactly answer to question, but this question is first which appears on Google 
Problem («This application has no explicit mapping for /error») appears when trying to access Swagger UI.
In my case problems were caused by @RestController(«/endpoint»), which isn’t handled properly by swagger.
So, this resulted in errors:
@RestController("/endpoint")
public class EndpointController {
And this was fine
@RestController
@RequestMapping("/endpoint")
public class EndpointController {
answered Apr 17, 2018 at 13:28
![]()
ElasElas
2125 silver badges15 bronze badges
this can happen if you forget the @RestController annotation on top of your controller class
import import org.springframework.web.bind.annotation.RestController;
and add the annotation as below
refer the simple example below
import org.springframework.web.bind.annotation.RestController;
import org.springframework.web.bind.annotation.RequestMapping;


@RestController
public class HelloController {
@RequestMapping("/")
    public String index() {
        return "Greetings from Spring Boot!";
    }

}
answered Feb 7, 2019 at 5:57
![]()
I need to mention this way and give the reference to packages and it worked out. You may exclude @EnableAutoConfiguration this annotation but required for me to bypass any DB related depenencies.
@SpringBootApplication
@EnableAutoConfiguration(exclude={DataSourceAutoConfiguration.class})
@ComponentScan(basePackages = {"your package 1", "your package2"})

public class CommentStoreApplication {

    public static void main(String[] args) {
        SpringApplication.run(CommentStoreApplication.class, args);

    }
}
answered Oct 31, 2019 at 11:31
![]()
SureshSuresh
1,3072 gold badges20 silver badges26 bronze badges
Same problem I have faced recently. I have solved it by just getter and setter method spelling correction!
answered Nov 18, 2021 at 23:47
![]()
1
The tutorial expects you to have the Thymeleaf template engine in classpath. I ran into the same problem and finally figured this out. I’ll reach out to the tutorial author to include that info.
The easiest way if you’ve followed the tutorial is to add the dependency to your pom.xml in the project root folder. Next time you run your app Spring will detect Thymeleaf and use the uploadform template
<dependency>
  <groupId>org.springframework.boot</groupId>
  <artifactId>spring-boot-starter-thymeleaf</artifactId>
</dependency>
For the full example see their Github repository.
answered Apr 22, 2016 at 15:25
![]()
toomasrtoomasr
4,6712 gold badges31 silver badges36 bronze badges
1
Change @Controller to @RestController in your controller class and everything should go smoothly.
answered Nov 16, 2017 at 16:08
![]()
supernovasupernova
2,9614 gold badges32 silver badges30 bronze badges
I was facing the same problem, using gradle and it got solved on adding following dependencies-
compile('org.springframework.boot:spring-boot-starter-data-jpa')
compile('org.springframework.boot:spring-boot-starter-web')
testCompile('org.springframework.boot:spring-boot-starter-test')
compile('org.apache.tomcat.embed:tomcat-embed-jasper')
earlier I was missing the last one causing the same error.
answered Jul 18, 2018 at 12:34
![]()
2
I was facing this issue and then later realized that I was missing the @Configuration annotation in the MvcConfig class which basically does the mapping for ViewControllers and setViewNames.
Here is the content of the file :
import org.springframework.context.annotation.Configuration;
import org.springframework.web.servlet.config.annotation.ViewControllerRegistry;
import org.springframework.web.servlet.config.annotation.WebMvcConfigurer;
**@Configuration**
public class MvcConfig implements WebMvcConfigurer{
   public void addViewControllers(ViewControllerRegistry registry)
   {
      registry.addViewController("/").setViewName("login");
      registry.addViewController("/login").setViewName("login");
      registry.addViewController("/dashboard").setViewName("dashboard");
   }
}
Hope this helps somebody!!
![]()
Unheilig
16.1k193 gold badges67 silver badges96 bronze badges
answered Oct 8, 2018 at 4:03
![]()
1
Make sure @RestController annotation is added right after the @SpringBootApplication.
RestController annotation tells Spring that this code describes an endpoint that should be made available over the web.
answered Aug 1, 2020 at 18:43
![]()
You may have not included thymleaf in your pom.xml file.
answered Apr 12, 2021 at 14:12
![]()
I had a similar problem. And I had Main.class on the top of all the controllers, yet I was facing this issue. All I needed to do is to create a separate swagger configuration file and initialize docket bean in it.
note: location of this file should be either in the same package of the Main.class file or in a package inside that main package.
SwaggerCongiguration.java file
package com.example.springDataJPAUsingGradle;

import org.springframework.context.annotation.Bean;
import org.springframework.context.annotation.Configuration;

import springfox.documentation.spi.DocumentationType;
import springfox.documentation.spring.web.plugins.Docket;
import springfox.documentation.swagger2.annotations.EnableSwagger2;

@Configuration
@EnableSwagger2
public class SwaggerConfig {
    @Bean
    public Docket docket() {
        return new Docket(DocumentationType.SWAGGER_2).select().build();
    }
}
I also had to add @RequestMapping("/api") in my controller.java.
Here’s how:
package com.example.springDataJPAUsingGradle.controller;

import org.springframework.beans.factory.annotation.Autowired;
import org.springframework.web.bind.annotation.GetMapping;
import org.springframework.web.bind.annotation.RequestBody;
import org.springframework.web.bind.annotation.RequestMapping;
import org.springframework.web.bind.annotation.RestController;

import com.example.springDataJPAUsingGradle.service.StudentService;

@RestController
@RequestMapping("/api")
public class StudentController {

    @Autowired(required = true)
    @GetMapping("/home")
    public String home() {
        return "Welcome to home page";
    }
}
Then after hitting the url: http://localhost:9090/your-app-root/swagger-ui/ swagger UI will be visible.
For eg, in my case the url is: http://localhost:9090/students/swagger-ui/
answered Jul 7, 2021 at 7:58
![]()
0
All I have done to solve this kind of problem is to mention anotation @Configuration in MVCConfig Class.
Like this one :
package com.example;

/**
 * Created by sartika.s.hasibuan on 1/10/2017.
 */
import org.springframework.boot.autoconfigure.EnableAutoConfiguration;
import org.springframework.context.annotation.ComponentScan;
import org.springframework.context.annotation.Configuration;
import org.springframework.web.servlet.config.annotation.ViewControllerRegistry;
import org.springframework.web.servlet.config.annotation.WebMvcConfigurerAdapter;

@EnableAutoConfiguration
@Configuration
@ComponentScan
public class MvcConfig extends WebMvcConfigurerAdapter {

    @Override
    public void addViewControllers(ViewControllerRegistry registry) {
        registry.addViewController("/home").setViewName("home");
        registry.addViewController("/").setViewName("home");
        registry.addViewController("/hello").setViewName("hello");
        registry.addViewController("/login").setViewName("login");
    }

}
![]()
Ole V.V.
79.7k15 gold badges133 silver badges153 bronze badges
answered Jan 10, 2017 at 4:19
![]()
I had a similar mistake, I use the spring boot and velocity, my solution is to check the file application.properties, spring.velocity.toolbox-config-location found that this property is wrong
answered Apr 24, 2017 at 14:22
![]()
叶为正叶为正
811 silver badge2 bronze badges
0
В этой статье — обзор способов обработки исключений в Spring Boot.
Приложение
Мы рассмотрим простое REST API приложение с одной сущностью Person и с одним контроллером.
Класс Person:
@Entity
@NoArgsConstructor
@AllArgsConstructor
@Data
public class Person {
    @Id
    @GeneratedValue(strategy = GenerationType.IDENTITY)
    private Long id;
    private String name;

}
Контроллер PersonController:
@RestController
@RequestMapping("/persons")
public class PersonController {

    @Autowired
    private PersonRepository personRepository;

    @GetMapping
    public List<Person> listAllPersons() {
        List<Person> persons = personRepository.findAll();
        return persons;
    }

    @GetMapping(value = "/{personId}")
    public Person getPerson(@PathVariable("personId") long personId){
        return personRepository.findById(personId).orElseThrow(() -> new MyEntityNotFoundException(personId));
    }

    @PostMapping
    public Person createPerson(@RequestBody Person person) {
        return personRepository.save(person);
    }

    @PutMapping("/{id}")
    public Person updatePerson(@RequestBody Person person, @PathVariable long id)  {
        Person oldPerson = personRepository.getOne(id);
        oldPerson.setName(person.getName());
        return personRepository.save(oldPerson);
    }

}
При старте приложения выполняется скрипт data.sql, который добавляет в базу данных H2 одну строку — Person c id=1. То есть Person c id=2 в базе отсутствует.
При попытке запросить Person c id=2:
GET localhost:8080/persons/2
метод контроллера getPerson() выбрасывает исключение — в данном случае наше пользовательское MyEntityNotFoundException:
public class MyEntityNotFoundException extends RuntimeException {

    public MyEntityNotFoundException(Long id) {
        super("Entity is not found, id="+id);
    }
}
BasicErrorController
По умолчанию все исключения попадают на адрес /error в BasicErrorController, в метод error():
@Controller
@RequestMapping({"${server.error.path:${error.path:/error}}"})
public class BasicErrorController extends AbstractErrorController {

...
    @RequestMapping
    public ResponseEntity<Map<String, Object>> error(HttpServletRequest request) {
        HttpStatus status = this.getStatus(request);
        if (status == HttpStatus.NO_CONTENT) {
            return new ResponseEntity(status);
        } else {
            Map<String, Object> body = this.getErrorAttributes(request, this.getErrorAttributeOptions(request, MediaType.ALL));
            return new ResponseEntity(body, status);
        }
    }
 ...
}
Если поставить в этом методе break point, то будет понятно, из каких атрибутов собирается ответное JSON сообщение.
Проверим ответ по умолчанию, запросив с помощью клиента Postman отсутствующий Person, чтобы выбросилось MyEntityNotFoundException:
GET localhost:8080/persons/2
Получим ответ:
{
    "timestamp": "2021-02-28T15:33:56.339+00:00",
    "status": 500,
    "error": "Internal Server Error",
    "message": "Entity is not found, id=2",
    "path": "/persons/2"
}
Причем для того, чтобы поле message было непустым, в application.properties нужно включить свойство:
server.error.include-message=always
В текущей версии Spring сообщение не включается по умолчанию из соображений безопасности.
Обратите внимание, что поле status JSON-тела ответа дублирует реальный http-код ответа. В Postman он виден:
Поле message заполняется полем message выброшенного исключения.
Независимо от того, какое исключение выбросилось: пользовательское или уже существующее, ответ стандартный — в том смысле, что набор полей одинаковый. Меняется только внутренняя часть и, возможно, код ответа (он не обязательно равен 500, некоторые существующие в Spring исключения подразумевают другой код).
Но структура ответа сохраняется.
Проверим это.
Не пользовательское исключение
Например, если изменить код, убрав пользовательское MyEntityNotFoundException, то при отсутствии Person исключение будет все равно выбрасываться, но другое:
@GetMapping(value = "/{personId}")
public Person getPerson(@PathVariable("personId") long personId){
    return personRepository.findById(personId).get();
}
findById() возвращает тип Optional, а Optional.get() выбрасывает исключение NoSuchElementException с другим сообщением:
java.util.NoSuchElementException: No value present
в итоге при запросе несуществующего Person:
GET localhost:8080/persons/2
ответ сохранит ту же структуру, но поменяется поле message:
{
    "timestamp": "2021-02-28T15:44:20.065+00:00",
    "status": 500,
    "error": "Internal Server Error",
    "message": "No value present",
    "path": "/persons/2"
}
Вернем обратно пользовательское исключение MyEntityNotFoundException.
Попробуем поменять ответ, выдаваемый в ответ за запрос. Статус 500 для него явно не подходит.
Рассмотрим способы изменения ответа.
@ResponseStatus
Пока поменяем только статус ответа. Сейчас возвращается 500, а нам нужен 404 — это логичный ответ, если ресурс не найден.
Для этого аннотируем наше исключение:
@ResponseStatus(HttpStatus.NOT_FOUND)
public class MyEntityNotFoundException extends RuntimeException {

    public MyEntityNotFoundException(Long id) {
        super("Entity is not found, id="+id);
    }
}
Теперь ответ будет таким:
{
    "timestamp": "2021-02-28T15:54:37.070+00:00",
    "status": 404,
    "error": "Not Found",
    "message": "Entity is not found, id=2",
    "path": "/persons/2"
}
Уже лучше.
@ControllerAdvice
Есть еще более мощный способ изменить ответ — @ControllerAdvice, и он имеет больший приоритет, чем @ResponseStatus.
В @ControllerAdvice можно не только изменить код ответа, но и тело. К тому же один обработчик можно назначить сразу для нескольких исключений.
Допустим мы хотим, чтобы ответ на запрос несуществующего Person имел такую структуру:
@Data
@AllArgsConstructor
@NoArgsConstructor
public class ApiError {
    private String message;
    private String debugMessage;
}
Для этого создадим обработчик в @ControllerAdvice, который перехватывает наше исключение MyEntityNotFoundException:
@ControllerAdvice
public class RestExceptionHandler {


    @ExceptionHandler({MyEntityNotFoundException.class, EntityNotFoundException.class})
    protected ResponseEntity<Object> handleEntityNotFoundEx(RuntimeException ex, WebRequest request) {
      ApiError apiError = new ApiError("entity not found ex", ex.getMessage());
      return new ResponseEntity<>(apiError, HttpStatus.NOT_FOUND);
    }

}
Теперь в ответ на запрос
GET localhost:8080/persons/2
мы получаем статус 404 с телом:
{
    "message": "entity not found ex",
    "debugMessage": "Entity is not found, id=2"
}
Но помимо MyEntityNotFoundException, наш обработчик поддерживает и javax.persistence.EntityNotFoundException (см. код выше).
Попробуем сделать так, чтобы оно возникло.
Это исключение EntityNotFoundException возникает в методе updatePerson() в контроллера. А именно, когда мы обращаемся с помощью метода PUT к несуществующей сущности в попытке назначить ей имя:
PUT localhost:8080/persons/2

{
    "name": "new name"
}
В этом случае мы тоже получим ответ с новой структурой:
{
    "message": "entity not found ex",
    "debugMessage": "Unable to find ru.sysout.model.Person with id 2"
}
Итого, обработчик в @ControllerAdvice позволил изменить не только код ответа, но и тело сообщение. Причем один обработчик мы применили для двух исключений.
Последовательность проверок
Обратите внимание, что MyEntityNotFoundException мы «обработали» дважды — изменили код с помощью @ResponseStatus (1) и прописали в @ContollerAdvice — тут изменили как код, так и тело ответа (2). Эти обработки могли быть противоречивы, но существует приоритет:
- Когда выбрасывается исключение MyEntityNotFoundException, сначала Spring проверяет @ControllerAdvice-класс. А именно, нет ли в нем обработчика, поддерживающего наше исключение. Если обработчик есть, то исключение в нем и обрабатывается. В этом случае код @ResponseStatus значения не имеет, и в BasicErrorController исключение тоже не идет.
- Если исключение не поддерживается в @ControllerAdvice-классе, то оно идет в BasicErrorController. Но перед этим Spring проверяет, не аннотировано ли исключение аннотацией @ResponseStatus. Если да, то код ответа меняется, как указано в @ResponseStatus. Далее формируется ответ в BasicErrorController.
- Если же первые два условия не выполняются, то исключение обрабатывается сразу в BasicErrorController — там формируется стандартный ответ со стандартным кодом (для пользовательских исключений он равен 500).
Но и стандартный ответ можно изменить, для этого нужно расширить класс DefaultErrorAttributes.
Попробуем это сделать.
Изменение DefaultErrorAttributes
Давайте добавим в стандартный ответ еще одно поле. Для этого расширим класс:
@Component
public class CustomErrorAttributes extends DefaultErrorAttributes {


    @Override
    public Map<String, Object> getErrorAttributes(WebRequest webRequest, ErrorAttributeOptions options) {
        Map<String, Object> errorAttributes=super.getErrorAttributes(webRequest, options);
        errorAttributes.put("newAttribute", "value");
        return errorAttributes;
    }

}
В Map errorAttributes перечисляются поля ответа. Мы взяли их из родительского метода и добавили свое поле newAttribute.
Чтобы выполнить проверку, надо убрать @ControllerAdvice, поскольку он самый приоритетный и с ним мы даже не дойдем до BasicErrorController со «стандартными» полями.
Далее запросим ресурс:
localhost:8080/persons/2
Получим ответ:
{
    "timestamp": "2021-02-28T18:50:14.479+00:00",
    "status": 404,
    "error": "Not Found",
    "message": "Entity is not found, id=2",
    "path": "/persons/2",
    "newAttribute": "value"
}
В JSON-ответе появилось дополнительное поле.
ResponseStatusException
Рассмотрим еще один вариант, позволяющий сразу протолкнуть код ответа и сообщение стандартные поля, не прописывая обработку пользовательских или встроенных исключений. А вместо этого просто выбросив специально предназначенное исключение ResponseStatusException.
Изменим код метода контроллера getPerson():
@GetMapping(value = "/{personId}")
public Person getPerson(@PathVariable("personId") long personId){
    return personRepository.findById(personId).orElseThrow(() -> new ResponseStatusException(
            HttpStatus.NOT_FOUND, "Person Not Found"));
}
Теперь тут не выбрасывается ни MyEntityNotFoundException, ни java.util.NoSuchElementException. А выбрасывается ResponseStatusException с заданным сообщением и кодом ответа.
Теперь при запросе
GET localhost:8080/persons/2
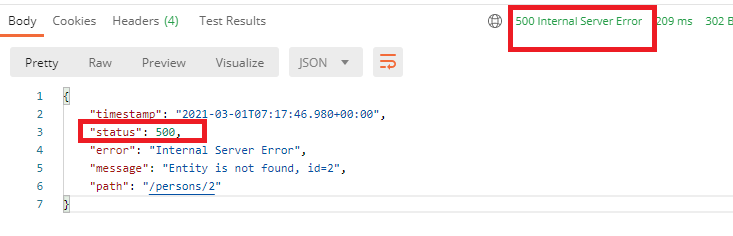
ответ будет таким:
{
    "timestamp": "2021-03-01T07:42:19.164+00:00",
    "status": 404,
    "error": "Not Found",
    "message": "Person Not Found",
    "path": "/persons/2",
    "newAttribute": "value"
}
Как код, так и сообщение появилось в полях стандартного ответа.
ResponseStatusException не вступает в конкуренцию ни со способом @ControllerAdvice, ни с @ResponseStatus — просто потому, что это другое исключение.
Итоги
Код примера доступен на GitHub. В следующей части мы унаследуем RestExceptionHandler от ResponseEntityExceptionHandler. Это класс-заготовка, которая уже обрабатывает ряд исключений.