- All Implemented Interfaces:
SecurityConfigurer<DefaultSecurityFilterChain,H>
- Since:
- 3.2
-
Constructor Summary
Constructors
-
Method Summary
Forward Authentication Failure Handler
voidinit(H http)Specifies the URL to send users to if login is required.
The HTTP parameter to look for the password when performing authentication.
Forward Authentication Success Handler
The HTTP parameter to look for the username when performing authentication.
Methods inherited from class org.springframework.security.config.annotation.web.configurers.AbstractAuthenticationFilterConfigurer
authenticationDetailsSource, configure, defaultSuccessUrl, defaultSuccessUrl, failureHandler, failureUrl, getAuthenticationEntryPoint, getAuthenticationEntryPointMatcher, getAuthenticationFilter, getFailureUrl, getLoginPage, getLoginProcessingUrl, isCustomLoginPage, loginProcessingUrl, permitAll, permitAll, registerAuthenticationEntryPoint, registerDefaultAuthenticationEntryPoint, securityContextRepository, setAuthenticationFilter, successHandler, updateAccessDefaults, updateAuthenticationDefaultsMethods inherited from class java.lang.Object
clone, equals, finalize, getClass, hashCode, notify, notifyAll, toString, wait, wait, wait
-
Constructor Details
-
FormLoginConfigurer
public FormLoginConfigurer()
Creates a new instance
- See Also:
-
HttpSecurity.formLogin()
-
-
Method Details
-
loginPage
Specifies the URL to send users to if login is required. If used with
EnableWebSecuritya default login page will be generated when this
attribute is not specified.If a URL is specified or this is not being used in conjunction with
EnableWebSecurity, users are required to process the specified URL to
generate a login page. In general, the login page should create a form that submits
a request with the following requirements to work with
UsernamePasswordAuthenticationFilter:- It must be an HTTP POST
- It must be submitted to
AbstractAuthenticationFilterConfigurer.loginProcessingUrl(String) - It should include the username as an HTTP parameter by the name of
usernameParameter(String) - It should include the password as an HTTP parameter by the name of
passwordParameter(String)
Example login.jsp
Login pages can be rendered with any technology you choose so long as the rules
above are followed. Below is an example login.jsp that can be used as a quick start
when using JSP’s or as a baseline to translate into another view technology.<c:url value="/login" var="loginProcessingUrl"/> <form action="${loginProcessingUrl}" method="post"> <fieldset> <legend>Please Login</legend> <!-- use param.error assuming FormLoginConfigurer#failureUrl contains the query parameter error --> <c:if test="${param.error != null}"> <div> Failed to login. <c:if test="${SPRING_SECURITY_LAST_EXCEPTION != null}"> Reason: <c:out value="${SPRING_SECURITY_LAST_EXCEPTION.message}" /> </c:if> </div> </c:if> <!-- the configured LogoutConfigurer#logoutSuccessUrl is /login?logout and contains the query param logout --> <c:if test="${param.logout != null}"> <div> You have been logged out. </div> </c:if> <p> <label for="username">Username</label> <input type="text" id="username" name="username"/> </p> <p> <label for="password">Password</label> <input type="password" id="password" name="password"/> </p> <!-- if using RememberMeConfigurer make sure remember-me matches RememberMeConfigurer#rememberMeParameter --> <p> <label for="remember-me">Remember Me?</label> <input type="checkbox" id="remember-me" name="remember-me"/> </p> <div> <button type="submit" class="btn">Log in</button> </div> </fieldset> </form>Impact on other defaults
Updating this value, also impacts a number of other default values. For example,
the following are the default values when only formLogin() was specified.- /login GET — the login form
- /login POST — process the credentials and if valid authenticate the user
- /login?error GET — redirect here for failed authentication attempts
- /login?logout GET — redirect here after successfully logging out
If «/authenticate» was passed to this method it update the defaults as shown below:
- /authenticate GET — the login form
- /authenticate POST — process the credentials and if valid authenticate the user
- /authenticate?error GET — redirect here for failed authentication attempts
- /authenticate?logout GET — redirect here after successfully logging out
- Overrides:
loginPagein classAbstractAuthenticationFilterConfigurer<H extends HttpSecurityBuilder<H>,FormLoginConfigurer<H extends HttpSecurityBuilder<H>>,UsernamePasswordAuthenticationFilter>- Parameters:
loginPage— the login page to redirect to if authentication is required (i.e.
«/login»)- Returns:
- the
FormLoginConfigurerfor additional customization
-
usernameParameter
The HTTP parameter to look for the username when performing authentication. Default
is «username».- Parameters:
usernameParameter— the HTTP parameter to look for the username when
performing authentication- Returns:
- the
FormLoginConfigurerfor additional customization
-
passwordParameter
The HTTP parameter to look for the password when performing authentication. Default
is «password».- Parameters:
passwordParameter— the HTTP parameter to look for the password when
performing authentication- Returns:
- the
FormLoginConfigurerfor additional customization
-
failureForwardUrl
Forward Authentication Failure Handler
- Parameters:
forwardUrl— the target URL in case of failure- Returns:
- the
FormLoginConfigurerfor additional customization
-
successForwardUrl
Forward Authentication Success Handler
- Parameters:
forwardUrl— the target URL in case of success- Returns:
- the
FormLoginConfigurerfor additional customization
-
init
public void init(H http)
throws ExceptionInitialize the
SecurityBuilder. Here only shared state should be created
and modified, but not properties on theSecurityBuilderused for building
the object. This ensures that theSecurityConfigurer.configure(SecurityBuilder)method uses
the correct shared objects when building. Configurers should be applied here.- Specified by:
initin interfaceSecurityConfigurer<DefaultSecurityFilterChain,H extends HttpSecurityBuilder<H>>- Overrides:
initin classAbstractAuthenticationFilterConfigurer<H extends HttpSecurityBuilder<H>,FormLoginConfigurer<H extends HttpSecurityBuilder<H>>,UsernamePasswordAuthenticationFilter>- Throws:
Exception
-
createLoginProcessingUrlMatcher
protected RequestMatcher createLoginProcessingUrlMatcher(String loginProcessingUrl)
- Specified by:
createLoginProcessingUrlMatcherin classAbstractAuthenticationFilterConfigurer<H extends HttpSecurityBuilder<H>,FormLoginConfigurer<H extends HttpSecurityBuilder<H>>,UsernamePasswordAuthenticationFilter>- Parameters:
loginProcessingUrl— creates theRequestMatcherbased upon the
loginProcessingUrl- Returns:
- the
RequestMatcherto use based upon the loginProcessingUrl
-
Содержание
- Form Login
- Spring Custom Login Form
- Настройка HttpSecurity
- Контроллер
- Шаблон
- usernameParameter() и passwordParameter()
- loginProcessingUrl()
- Creating a Custom Login Form
- Setting up the sample
- Obtaining the sample project
- Import the hellomvc sample application
- Running the hellomvc application
- Overriding the default configure(HttpSecurity) method
- Default configure(HttpSecurity)
- Configuring a custom login page
- Granting access to unauthenticated users
- Creating a login page
- Configuring a login view controller
- Creating a login view
- Grant access to remaining resources
- Conclusion
Form Login
Spring Security provides support for username and password being provided through an HTML form. This section provides details on how form based authentication works within Spring Security.
This section examines how form-based login works within Spring Security. First, we see how the user is redirected to the login form:
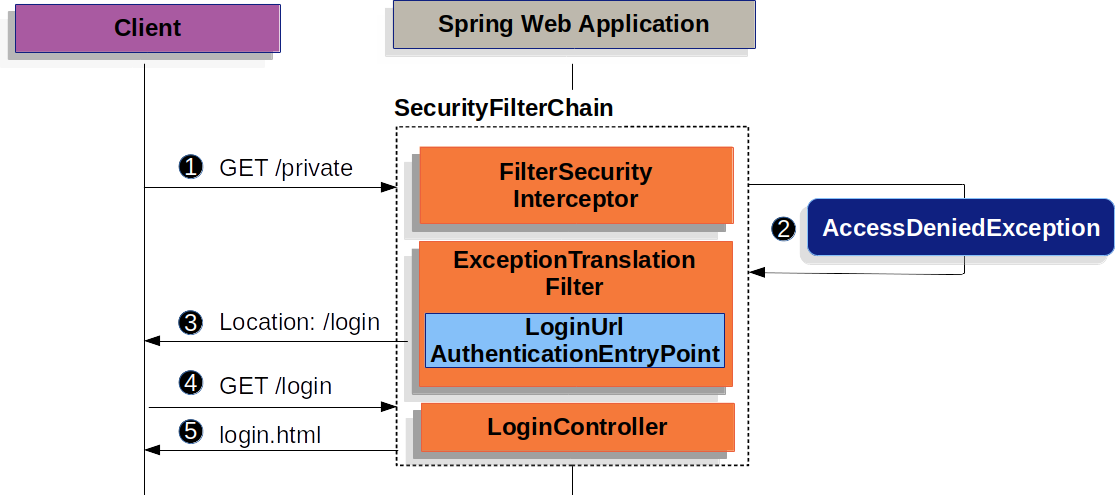
The preceding figure builds off our SecurityFilterChain diagram.
First, a user makes an unauthenticated request to the resource ( /private ) for which it is not authorized.
Spring Security’s FilterSecurityInterceptor indicates that the unauthenticated request is Denied by throwing an AccessDeniedException .
Since the user is not authenticated, ExceptionTranslationFilter initiates Start Authentication and sends a redirect to the login page with the configured AuthenticationEntryPoint . In most cases, the AuthenticationEntryPoint is an instance of LoginUrlAuthenticationEntryPoint .
The browser requests the login page to which it was redirected.
Something within the application, must render the login page.
When the username and password are submitted, the UsernamePasswordAuthenticationFilter authenticates the username and password. The UsernamePasswordAuthenticationFilter extends AbstractAuthenticationProcessingFilter, so the following diagram should look pretty similar:
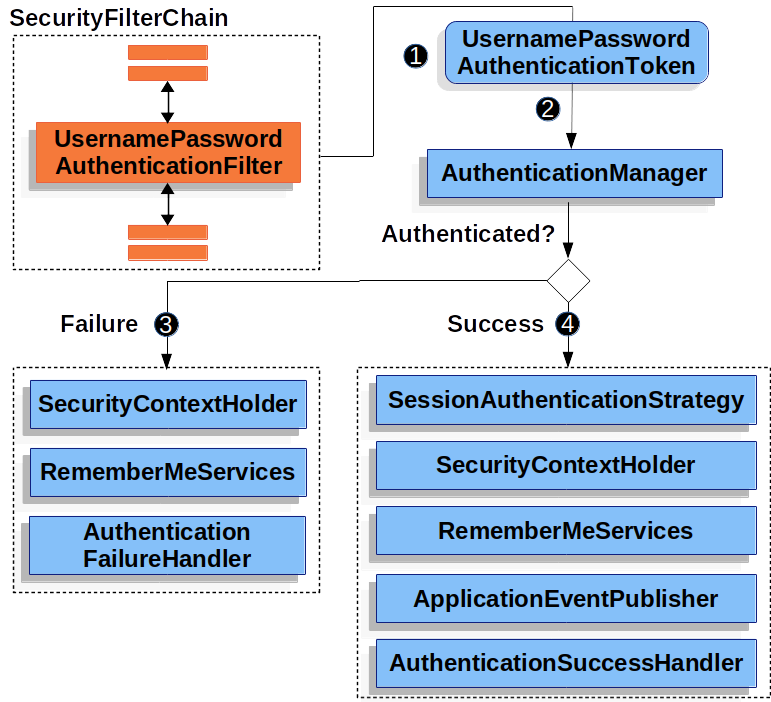
The figure builds off our SecurityFilterChain diagram.
When the user submits their username and password, the UsernamePasswordAuthenticationFilter creates a UsernamePasswordAuthenticationToken , which is a type of Authentication , by extracting the username and password from the HttpServletRequest instance.
Next, the UsernamePasswordAuthenticationToken is passed into the AuthenticationManager instance to be authenticated. The details of what AuthenticationManager looks like depend on how the user information is stored.
If authentication fails, then Failure.
RememberMeServices.loginFail is invoked. If remember me is not configured, this is a no-op. See the RememberMeServices interface in the Javadoc.
AuthenticationFailureHandler is invoked. See the AuthenticationFailureHandler class in the Javadoc
If authentication is successful, then Success.
SessionAuthenticationStrategy is notified of a new login. See the SessionAuthenticationStrategy interface in the Javadoc.
The ref:servlet/authentication/architecture.adoc#servlet-authentication-authentication[Authentication] is set on the SecurityContextHolder. See the SecurityContextPersistenceFilter class in the Javadoc.
RememberMeServices.loginSuccess is invoked. If remember me is not configured, this is a no-op. See the RememberMeServices interface in the Javadoc.
ApplicationEventPublisher publishes an InteractiveAuthenticationSuccessEvent .
The AuthenticationSuccessHandler is invoked. Typically, this is a SimpleUrlAuthenticationSuccessHandler , which redirects to a request saved by ExceptionTranslationFilter when we redirect to the login page.
By default, Spring Security form login is enabled. However, as soon as any servlet-based configuration is provided, form based login must be explicitly provided. The following example shows a minimal, explicit Java configuration:
There are a few key points about the default HTML form:
The form should perform a post to /login .
The form needs to include a CSRF Token, which is automatically included by Thymeleaf.
The form should specify the username in a parameter named username .
The form should specify the password in a parameter named password .
If the HTTP parameter named error is found, it indicates the user failed to provide a valid username or password.
If the HTTP parameter named logout is found, it indicates the user has logged out successfully.
Many users do not need much more than to customize the login page. However, if needed, you can customize everything shown earlier with additional configuration.
If you use Spring MVC, you need a controller that maps GET /login to the login template we created. The following example shows a minimal LoginController :
Источник
Spring Custom Login Form
В этой статье рассмотрим, как заменить автоматически генерируемую форму ввода имени и пароля на свою собственную на Thymeleaf.
Метод formLogin() генерирует как саму форму логина, так и конечную точку обработки имени и пароля, приходящих с формы. Конечную точку, обрабатывающую по POST-запросу имя и пароль, переписывать не нужно, а вот саму html-форму, выдающуюся по методу GET /login обычно требуется заменить.
Настройка HttpSecurity
Чтобы это сделать, при настройке HttpSecurity нужно указать не просто formLogin(), как мы делали раньше, а еще .loginPage(«/login») с адресом шаблона:
На адрес /login (указанный в loginPage(), адрес можно указать и другой) необходимо добавить контроллер, который выдает шаблон.
Контроллер
Как видите, мы передали tittle в модель, но это необязательно — его можно сразу прописать в шаблоне.
Шаблон
 Пользовательская форма входа
В шаблоне обратите внимание на ряд параметров, которые важны для конечной точки, обрабатывающей имя и пароль по POST-запросу.
Во-первых, это имена элементов input — они превращаются в имена параметров POST-запроса.
usernameParameter() и passwordParameter()
В автоматически генерируемой форме они называются username и password, а поскольку у нас это user и pass (см. атрибуты name):
то в коде настройки HttpSecurity мы должны переопределить их в методах:
Эти строки есть в первом сниппете.
loginProcessingUrl()
Также переопределен loginProcessingUrl():
Это адрес конечной точки, куда по методу POST отправляются имя и пароль при нажатии кнопки входа. Адрес переопределен, но сама точка осталась автогенерируемой (ее генерирует Spring Security).
В шаблоне этот адрес соответствует action формы:
Прошу прощения: на комментарии временно не отвечаю.
Источник
Creating a Custom Login Form
This guide builds off of Hello Spring MVC Security Java Config to explain how to configure and use a custom login form with Spring Security Java Configuration.
Setting up the sample
This section outlines how to setup a workspace within Spring Tool Suite (STS) so that you can follow along with this guide. The next section outlines generic steps for how to apply Spring Security to your existing application. While you could simply apply the steps to your existing application, we encourage you to follow along with this guide in order to reduce the complexity.
Obtaining the sample project
Extract the Spring Security Distribution to a known location and remember it as SPRING_SECURITY_HOME.
Import the hellomvc sample application
In order to follow along, we encourage you to import the hellomvc sample application into your IDE. You may use any IDE you prefer, but the instructions in this guide will assume you are using Spring Tool Suite (STS).
The completed sample application can be found at SPRING_SECURITY_HOME/samples/javaconfig/form
If you do not have STS installed, download STS from https://spring.io/tools
Start STS and import the sample application into STS using the following steps:
File→Import
Existing Maven Projects
Click Next >
Click Browse…
Navigate to the samples (i.e. SPRING_SECURITY_HOME/samples/javaconfig/hellomvc) and click OK
Click Finish
Running the hellomvc application
In the following exercise we will be modifying the spring-security-samples-javaconfig-hellomvc application. Before we make any changes, it is best to verify that the sample works properly. Perform the following steps to ensure that spring-security-samples-javaconfig-hellomvc works.
Right click on the spring-security-samples-javaconfig-hellomvc application
Select Run As→Run on Server
Select the latest tc Server
Click Finish
Verify the application is working:
A page displaying a user’s inbox can be seen at http://localhost:8080/sample/ after authenticating with the username user and the password password.
Try clicking on the Compose link and creating a message. The message details should be displayed.
Now click on the Inbox link and see the message listed. You can click on the summary link to see the details displayed again.
Overriding the default configure(HttpSecurity) method
Default configure(HttpSecurity)
The default configuration for the configure(HttpSecurity) method can be seen below:
The configuration ensures that:
123
| every request requires the user to be authenticated |
| form based authentication is supported |
| HTTP Basic Authentication is supported |
Configuring a custom login page
We will want to ensure we compensate for overriding these defaults in our updates. Open up the SecurityConfig and insert the configure method as shown below:
The line loginPage(«/login») instructs Spring Security
when authentication is required, redirect the browser to /login
we are in charge of rendering the login page when /login is requested
when authentication attempt fails, redirect the browser to /login?error (since we have not specified otherwise)
we are in charge of rendering a failure page when /login?error is requested
when we successfully logout, redirect the browser to /login?logout (since we have not specified otherwise)
we are in charge of rendering a logout confirmation page when /login?logout is requested
Go ahead and start up the server and try visiting http://localhost:8080/sample/ to see the updates to our configuration. In many browsers you will see an error similar to This webpage has a redirect loop. What is happening?
Granting access to unauthenticated users
The issue is that Spring Security is protecting access to our custom login page. In particular the following is happening:
We make a request to our web application
Spring Security sees that we are not authenticated
We are redirected to /login
The browser requests /login
Spring Security sees that we are not authenticated
We are redirected to /login …
To fix this we need to instruct Spring Security to allow anyone to access the /login URL. We can easily do this with the following updates:
The method formLogin().permitAll() statement instructs Spring Security to allow any access to any URL (i.e. /login and /login?error) associated to formLogin() .
Granting access to the formLogin() URLs is not done by default since Spring Security needs to make certain assumptions about what is allowed and what is not. To be secure, it is best to ensure granting access to resources is explicit.
Start up the server and try visiting http://localhost:8080/sample/ to see the updates to our configuration. You should now get a 500 error stating Error resolving template «login».
Creating a login page
Within Spring Web MVC there are two steps to creating our login page:
Creating a controller
Creating a view
Configuring a login view controller
Within Spring Web MVC, the first step is to ensure that we have a controller that can point to our view. Since our project adds the javaconfig/messages project as a dependency and it contains a view controller for /login we do not need to create a controller within our application. For reference, you can see the configuration below:
Creating a login view
Our existing configuration means that all we need to do is create a login.html file with the following contents:
12345
| The URL we submit our username and password to is the same URL as our login form (i.e. /login), but a POST instead of a GET. |
| When authentication fails, the browser is redirected to /login?error so we can display an error message by detecting if the parameter error is non-null. |
| When we are successfully logged out, the browser is redirected to /login?logout so we can display an logout success message by detecting if the parameter logout is non-null. |
| The username should be present on the HTTP parameter username |
| The password should be present on the HTTP parameter password |
Do not display details about why authentication failed. For example, we do not want to display that the user does not exist as this will tell an attacker that they should try a different username.
We use Thymeleaf to automatically add the CSRF token to our form. If we were not using Thymleaf or Spring MVCs taglib we could also manually add the CSRF token using .
Start up the server and try visiting http://localhost:8080/sample/ to see the updates to our configuration. We now see our login page, but it does not look very pretty. The issue is that we have not granted access to the css files.
Grant access to remaining resources
We need to update our configuration to allow anyone to access our resources and our logout pages. Update the configuration as shown below:
12
| This allows anyone to access a URL that begins with /resources/. Since this is where our css, javascript, and images are stored all our static resources are viewable by anyone. |
| As you might expect, logout().permitAll() allows any user to request logout and view logout success URL. |
Restart the server and try visiting http://localhost:8080/sample/ to see the updates to our configuration. We now see a custom login page that looks like the rest of our application.
Try entering an invalid username and password. You will see our error message is displayed.
Try entering a valid username (user) and password (password). You will be authenticated successfully.
Try clicking the Log Out button. You will see our logout success message
Conclusion
You should now know how to add a custom login form using Spring Security’s Java Configuration. To learn more refer to the Spring Security Guides index page.
Источник
In the previous topic, we have learned to use a custom login page in Spring Security rather than the framework’s built-in login page. With this login page, we had no concept of showing an error message if the user passes the wrong credentials. Now, we will create a login page that will show an error message.
To implement this feature, Spring provides a JSTL core library that helps to write Expression Language. Put the below code at the top of the login page.
<%@ taglib uri="http://java.sun.com/jsp/jstl/core" prefix="c"%>After adding the above line to the JSP page, use the below code that will show an error message if the error parameter is attached to the URL. If the user enters the wrong credentials then Spring Security responds by attaching an error parameter to the URL.
<c:if test="${param.error!=null}">
    <p style="color: red">You entered wrong credentials!</p>
</c:if>
Project Source Code
The following are the files of the project. You can use these in your project to test the application.
// AppConfig.java
This is our application configuration file that implements WebMvcConfugurer interface to make this MVC application and created a method viewResolver to map our views files(JSP).
package com.studytonight;

import org.springframework.context.annotation.Bean;
import org.springframework.context.annotation.ComponentScan;
import org.springframework.context.annotation.Configuration;
import org.springframework.web.servlet.ViewResolver;
import org.springframework.web.servlet.config.annotation.EnableWebMvc;
import org.springframework.web.servlet.config.annotation.WebMvcConfigurer;
import org.springframework.web.servlet.view.InternalResourceViewResolver;

@EnableWebMvc
@Configuration
@ComponentScan("com.studytonight.controller")
public class AppConfig implements WebMvcConfigurer{
	@Bean
	public ViewResolver viewResolver() {
		InternalResourceViewResolver irvr = new InternalResourceViewResolver();
		irvr.setPrefix("WEB-INF/views/");
		irvr.setSuffix(".jsp");
		irvr.setOrder(0);
		return irvr;
	}
}
// MainApp.java
This class initialize our web application and creates ServletContext by using that we register our AppConfig class(above file).
package com.studytonight;

import javax.servlet.ServletContext;
import javax.servlet.ServletException;
import javax.servlet.ServletRegistration;
import org.springframework.web.WebApplicationInitializer;
import org.springframework.web.context.support.AnnotationConfigWebApplicationContext;
import org.springframework.web.servlet.DispatcherServlet;
public class MainApp implements WebApplicationInitializer {

	@Override
	public void onStartup(ServletContext servletContext) throws ServletException {
		System.out.println("started");
		AnnotationConfigWebApplicationContext context = new AnnotationConfigWebApplicationContext();
		context.register(AppConfig.class);
		context.setServletContext(servletContext);
		ServletRegistration.Dynamic servlet = servletContext.addServlet("dispatcher", new DispatcherServlet(context));
		servlet.setLoadOnStartup(1);
		servlet.addMapping("/");
		context.close();
	}
}
// SecurityAppInitializer.java
This is the Security initializer class that extends AbstractSecurityWebApplicationInitializer and we passed our SecurityConfig class so that it can read security configurations.
package com.studytonight;

import org.springframework.security.web.context.AbstractSecurityWebApplicationInitializer;
public class SecurityAppInitializer  extends AbstractSecurityWebApplicationInitializer {

	public SecurityAppInitializer() {
		super(SecurityConfig.class);
	}
}
// SecurityConfig.java
This is our security configuration file that extends WebSecurityConfigurerAdapter class and provides several methods such as configure() to configure the security. Spring Security provides AuthenticationManagerBuilder class that works as an Authentication Manager and provides several methods to authenticate the user. Here, we are using inMemoryAuthentication concept that allows mapping hard-coded user values.
We used HttpSecurity class to configure the login page. The loginPage() method is used to specify our login.jsp page. We can also use any other name for the login form such as login-form.jsp or user-login.jsp and then specify the mapping to this method. The «/login» value passed here will map to the controller’s action and then render the JSP page.
package com.studytonight;

import org.springframework.beans.factory.annotation.Autowired;
import org.springframework.context.annotation.Configuration;
import org.springframework.security.config.annotation.authentication.builders.AuthenticationManagerBuilder;
import org.springframework.security.config.annotation.web.builders.HttpSecurity;
import org.springframework.security.config.annotation.web.configuration.EnableWebSecurity;
import org.springframework.security.config.annotation.web.configuration.WebSecurityConfigurerAdapter;
import org.springframework.security.core.userdetails.User;
import org.springframework.security.core.userdetails.User.UserBuilder;

@Configuration
@EnableWebSecurity
public class SecurityConfig extends WebSecurityConfigurerAdapter{

	@Override
	protected void configure(AuthenticationManagerBuilder auth) throws Exception {

		UserBuilder users = User.withDefaultPasswordEncoder();
		auth.inMemoryAuthentication()
			.withUser(users.username("studytonight").password("abc123").roles("admin"));
	}

	@Autowired
	protected void configure(HttpSecurity hs) throws Exception {
		hs.authorizeRequests().anyRequest()
		.authenticated()
		.and()
		.formLogin()
		.loginPage("/login")
		.loginProcessingUrl("/authenticateTheUser")
		.permitAll();
	}
}
// UserController.java
This is our controller class that works as a user request handler and maps user requests with the resources and returns responses accordingly. We created the login() method to render the login page and the home() method to show the index.jsp page and course() method to display course.jsp page.
package com.studytonight.controller;

import org.springframework.stereotype.Controller;
import org.springframework.web.bind.annotation.GetMapping;

@Controller
public class UserController {

	@GetMapping("/login")
	public String login() {
		return "login";
	}

	@GetMapping("/")
	public String home() {
		return "index";
	}

	@GetMapping("/java-course")
	public String course() {
		return "course";
	}

	@GetMapping("/premium-courses")
	public String premiumCourse() {
		return "premium-courses";
	}
}
View Files
These are views files of our project that displayed to the browser. See the code.
// premium courses.jsp
<%@ page language="java" contentType="text/html; charset=UTF-8"
	pageEncoding="UTF-8"%>
<!DOCTYPE html>
<html>
<head>
<meta charset="UTF-8">
<title>Course Page</title>
</head>
<body>
	<h2>List of Premium Courses</h2>
	<ul>
		<li>Spring Framework</li>
		<li>Pandas</li>
		<li>Spring Security</li>
	</ul>
</body>
</html>
// course.jsp
<%@ page language="java" contentType="text/html; charset=UTF-8"
	pageEncoding="UTF-8"%>
<!DOCTYPE html>
<html>
<head>
<meta charset="UTF-8">
<title>Course Page</title>
</head>
<body>
	<h2>List of Courses</h2>
	<ul>
		<li>Java</li>
		<li>Python</li>
		<li>C++</li>
		<li>Linux</li>
	</ul>
</body>
</html>
// index.jsp
<%@ page language="java" contentType="text/html; charset=UTF-8"
	pageEncoding="UTF-8"%>
<!DOCTYPE html>
<html>
<head>
<meta charset="UTF-8">
<title>Home Page</title>
</head>
<body>
	<h2>Welcome to Studytonight!</h2>
	<h3><a href="java-course">Study Java</a></h3>
	<h2><a href="premium-courses">Study Premium Courses</a></h2>
</body>
</html>
// pom.xml
This file contains all the dependencies of this project such as spring jars, servlet jars, etc. Put these dependencies into your project to run the application.
<project xmlns="http://maven.apache.org/POM/4.0.0"
	xmlns:xsi="http://www.w3.org/2001/XMLSchema-instance"
	xsi:schemaLocation="http://maven.apache.org/POM/4.0.0 https://maven.apache.org/xsd/maven-4.0.0.xsd">
	<modelVersion>4.0.0</modelVersion>
	<groupId>com.studytonight</groupId>
	<artifactId>springwithsecurity</artifactId>
	<version>0.0.1-SNAPSHOT</version>
	<packaging>war</packaging>
	<properties>
		<spring.version>5.2.8.RELEASE</spring.version>
	</properties>
	<dependencies>
		<dependency>
			<groupId>org.springframework</groupId>
			<artifactId>spring-core</artifactId>
			<version>${spring.version}</version>
		</dependency>
		<dependency>
			<groupId>org.springframework</groupId>
			<artifactId>spring-context</artifactId>
			<version>${spring.version}</version>
		</dependency>
		<dependency>
			<groupId>org.springframework</groupId>
			<artifactId>spring-webmvc</artifactId>
			<version>${spring.version}</version>
		</dependency>
		<!-- https://mvnrepository.com/artifact/javax.servlet/servlet-api -->
		<!-- https://mvnrepository.com/artifact/javax.servlet/javax.servlet-api -->
		<dependency>
			<groupId>javax.servlet</groupId>
			<artifactId>javax.servlet-api</artifactId>
			<version>4.0.1</version>
		</dependency>
		<!-- https://mvnrepository.com/artifact/jstl/jstl -->
        <dependency>
            <groupId>jstl</groupId>
            <artifactId>jstl</artifactId>
            <version>1.2</version>
        </dependency>

		<!-- https://mvnrepository.com/artifact/javax.servlet.jsp/javax.servlet.jsp-api -->
		<dependency>
			<groupId>javax.servlet.jsp</groupId>
			<artifactId>javax.servlet.jsp-api</artifactId>
			<version>2.3.3</version>
		</dependency>
		<!-- https://mvnrepository.com/artifact/javax.servlet.jsp.jstl/jstl-api -->
		<dependency>
			<groupId>javax.servlet.jsp.jstl</groupId>
			<artifactId>jstl-api</artifactId>
			<version>1.2</version>
		</dependency>


		<!-- https://mvnrepository.com/artifact/javax.xml.bind/jaxb-api -->
		<dependency>
			<groupId>javax.xml.bind</groupId>
			<artifactId>jaxb-api</artifactId>
			<version>2.3.0</version>
		</dependency>
		<!-- https://mvnrepository.com/artifact/org.springframework.security/spring-security-web -->
		<dependency>
			<groupId>org.springframework.security</groupId>
			<artifactId>spring-security-web</artifactId>
			<version>5.4.2</version>
		</dependency>
		<!-- https://mvnrepository.com/artifact/org.springframework.security/spring-security-config -->
		<dependency>
			<groupId>org.springframework.security</groupId>
			<artifactId>spring-security-config</artifactId>
			<version>5.4.2</version>
		</dependency>
	</dependencies>
	<build>
		<plugins>
			<plugin>
				<artifactId>maven-war-plugin</artifactId>
				<version>3.2.3</version>
				<configuration>
					<warSourceDirectory>WebContent</warSourceDirectory>
				</configuration>
			</plugin>
			<plugin>
				<groupId>org.apache.maven.plugins</groupId>
				<artifactId>maven-compiler-plugin</artifactId>
				<version>3.5.1</version>
				<configuration>
					<source>11</source>
					<target>11</target>
				</configuration>
			</plugin>
		</plugins>
	</build>
</project>
Project Structure
After creating these files our project will look like the below. You can refer to this to understand the directory structure of the project.

Run the Application
After successfully completing the project and adding the dependencies run the application and you will get the output as below.
Note: In our application, we created a login.jsp page and configured with the Spring Security. Now, when we run the application it renders a login page which is our own page.
It will match the username and password with the credentials provided in the SecurityConfig.java file.
Provide the Wrong Username and Passwords

Custom Error Message
This error message is actually the message that we added to our login.jsp page. You can see the login page again to verify this message.

Provide Correct Username and Password

Home page
Now, you are successfully logged in to the application. This is our index.jsp file renders as a home page to the browser.

Till here, we have learned to show a custom error message if the user enters the wrong username and password. This is our own custom login page and we will add a logout feature in it in our next topic.
In this post, we will look at the spring security login example. Login is part of the Spring Security authentication process. We already covered the Spring Security Authentication Providers which is core to the spring security login process.
Introduction
For most of the web application, the common mode of authentication works where user provides the username and password and system validate the credentials to make sure they are valid. Spring security supports the following mode for the login process.
- Form login (custom fill the username and password)
- Basic authentication.
- Digest
When we provide the credentials, spring has multiple ways to read the details for the authentication, which includes.
- In Memory Storage (Not useful in the real-world applications)
- JDBC Authentication.
- Custom User Details Service (We will use this approach)
- LDAP (Mostly for Intranet applications)
Before we move with the code, it’s very important that we have the clarity of the login workflow.
Let’s look at the login workflow:
Let’s take a quick look at the workflow:
- User trying to access secured resource (We allow access to log in user).
- The Spring security filter chain will throw exception, showing that it does not allow the access to the unauthenticated user.
- The
ExceptionTranslationFilterstarts Start<em>Authentication</em>and send the customer to the login page. - Browser request for the login page.
- It shows the login screen to the customer.
Now we understand the workflow, let’s build our application to allow customer login.
2. Default Security Login Page
By default, Spring security will show the default login page. If you don’t do any customization or configuration, you might see a similar login page on your application.
Most application will like to have their own customize login page. Spring security provides a flexible option to configure custom login page for our application. The next section will cover the customization and configuration of the login page.
3. Security Security Custom Login Page
To enable the custom login page, override the configure(HttpSecurity http) method by extending the WebSecurityConfigurerAdapter class. Let’s look at the configuration:
@Override
protected void configure(HttpSecurity http) throws Exception {
    http.authorizeRequests()
        .formLogin(form - > form
            .loginPage("/login")
            .defaultSuccessUrl("/home")
            .failureUrl("/login?error=true")
        );
}
Setting up few things in above code:
- We are configuring the login page URL as
/login, this tells spring security to call this URL before displaying the login page. - We need to create a controller mapped to the “
/login” get request. Our controller is now responsible to return the login page HTML. - On the successful login, we are redirecting the user to the
/homeURL. This will display the home page to the customer. - For failed login attempt, we keep user on the same URL but add a param as “error=true“.
In the later part of this series, we will also configure the success and failure handlers. Handlers are a great way to post processing.
3.1. Login Controller
With the above configuration, we also need the login controller to maps GET /login to our controller. Our controller will return the custom login page. Here is the login page controller for your reference:
package com.javadevjournal.web.controller;

import org.springframework.stereotype.Controller;
import org.springframework.web.bind.annotation.GetMapping;

@Controller
public class LoginPageController {

    @GetMapping("/login")
    public String login(){
        return "account/login";
    }
}
There is nothing special about the spring security login controller.
3.2. Login Page
We need to create a login page as per our design. Our controller will return this page. I am using Thymeleaf to build the page, but you can use any other templating engine of your choice.
<!DOCTYPE html>
<html xmlns:th="http://www.thymeleaf.org" lang="en">

<head th:replace="core/header :: head">
    <meta charset="utf-8">
</head>
<body class="hold-transition login-page">
    <div class="login-box">
        <div class="login-logo">
            <div class="card">
                <div class="card-body login-card-body">
                    <p class="login-box-msg">Sign in to start your session</p>
                    <p th:if="${loginError}" class="error">Wrong user or password</p>
                    <form th:action="@{/login}" method="post">
                        <div th:if="${param.error}">
                            <div class="alert alert-danger">
                                Invalid username or password.
                            </div>
                        </div>
                        <div class="input-group mb-3">
                            <input type="email" class="form-control" name="username" placeholder="Email">
                            <div class="input-group-append">
                                <div class="input-group-text">
                                    <span class="fas fa-envelope"></span>
                                </div>
                            </div>
                        </div>
                        <div class="input-group mb-3">
                            <input type="password" name="password" class="form-control" placeholder="Password">
                            <div class="input-group-append">
                                <div class="input-group-text">
                                    <span class="fas fa-lock"></span>
                                </div>
                            </div>
                        </div>

                        <div class="row">
                            <div class="col-4">
                                <button type="submit" class="btn btn-primary btn-block">Sign In</button>
                            </div>
                            <!-- /.col -->
                        </div>
                    </form>
</body>
</html>
It’s a simple HTML page, but let’s highlight a few important points in the HTML.
- Our form will perform a post request to
/login. - The
/loginhandled automatically by Spring security. We need not create any controller method for the post request. - From field parameters should be
usernameandpassword(make sure they have exactly same name as the/loginmapping expecting these parameters). - For the failed login attempt, it sends back an HTTP parameter. We are using the parameter to display the error message to the customer (check
param.errorin the HTML).
Spring security will automatically include CSRF token as a hidden field. This is a security feature. We will discuss it in the later section of this course.
4. Spring Security Login Configurations
We have completed the custom login page for the spring security, basic configurations are also in place. For the Spring Boot application, spring security will be active by adding the spring security stater in the classpath. It will start prompting for username and password.
To enable the Spring Security’s web security support and provide the Spring MVC integration, we will add the @EnableWebSecurity to our security configuration class.We also need some additional steps for the security configuration.
- We want to allow certain pages to be accessible without forcing the user to login.
- Certain part of the application should be secure and we will force the customer to login.
- We like the CSS and other static content outside of the security (until you want to secure them)
Here is our security configuration class:
@EnableWebSecurity
public class AppSecurityConfig extends WebSecurityConfigurerAdapter {

    @Override
    protected void configure(HttpSecurity http) throws Exception {
        http.authorizeRequests()
            .antMatchers("/login", "/register")
            .permitAll()
            .antMatchers("/account/**").access("hasRole('ROLE_ADMIN')")
            .and()
            .formLogin(form - > form
                .loginPage("/login")
                .defaultSuccessUrl("/home")
                .failureUrl("/login?error=true")
            );
    }

    @Override
    public void configure(WebSecurity web) {
        web.ignoring()
            .antMatchers("/resources/**", "/static/**");
    }
}
Here are some important points to consider:
- Login and register page to be accessible without any login. Permitting it to all users using the
antMatcherspattern. - We are allowing only logged is customer to access URLs matching with pattern
/account/**. Looking for a certain role before allowing the user to access the URL. - WebSecurityConfigurerAdapter provides a set of methods to enable specific web security configuration.
@EnableWebSecurityenable spring security supports with support for the Spring MVC integration.configure(HttpSecurity http)method is used to configure distinct security points for our application (e.g. secure and non-secure urls, success handlers etc.).
4.1. Landing Page for Successful Authentication
After the successful authentication, we want to redirect customer to the home screen. Spring security provide flexible way to do this.
http.authorizeRequests()
    ....
    .formLogin(form - > form
        .defaultSuccessUrl("/home")
    );
4.2. Landing Page Failure
If we like, we can redirect the user to different URL in case of authentication failure. This can be easily done using the security configuration.
http.authorizeRequests()
    ....
    .formLogin(form - > form
        .failureUrl("/login?error=true")
    );
5. Configuring the Security Authentication Provider
The last part of the application is to configure the authentication provider. We will inject the custom UserDetailService in the authentication provider.
@Bean
public DaoAuthenticationProvider authProvider() {
    DaoAuthenticationProvider authProvider = new DaoAuthenticationProvider();
    authProvider.setUserDetailsService(userDetailsService);
    authProvider.setPasswordEncoder(passwordEncoder);
    return authProvider;
}

@Override
protected void configure(AuthenticationManagerBuilder auth) {
    auth.authenticationProvider(authProvider());
}
For more details, read spring security authentication provider (I assume that you are following the complete series). Before we start the login process, make sure you have followed the spring security account registration process.
6. Spring Security Custom UserDetailService
If you look closely, we are injecting custom UserDetailService in the DAOAuthenticationProvider. This UserDetailsService class will help us with following tasks.
- Try to find the customer in the database based on our data model (Remember Spring security needs to load customer information before authentication).
- Provide information about the user authorities.
- Authorities helps spring security to decide if a customer can access a resource or not.
@Service
public class CustomUserDetailService implements UserDetailsService {

    @Autowired
    UserRepository userRepository;

    @Override
    public UserDetails loadUserByUsername(String email) throws UsernameNotFoundException {
        final UserEntity customer = userRepository.findByEmail(email);
        if (customer == null) {
            throw new UsernameNotFoundException(email);
        }
        UserDetails user = User.withUsername(customer.getEmail())
            .password(customer.getPassword())
            .authorities("USER").build();
        return user;
    }
}
We are setting the valid user authority as “USER“. This will help the security allow access to URL’s with pattern /account/**.
We will learn more about the roles, authorities and how to use them during this course.
7. Test Login Process
It’s time to test the login process. Build and run the application. Once the application start, we will run the following test cases.
- Directly access secure URL (e.g. any URL with pattern
/account/**), Spring security will force the login by redirecting us to /login page. - Acess the non-secure URL. We should be able to access those with no issue.
- try login with a valid and invalid credentials.
Let’s look at each test case:
7.1. Login With Valid Credential
Once application up, open the http://localhost:8080/login URL in your browser. We will have the custom login page from spring security.
Provide the valid credentials (which you used while registration), click on the “Sign In” button. Spring security will validate the credentials and will redirect us based on our configuration (.defaultSuccessUrl("/home")).
If you provide an invalid credential, we will get the login screen with the error message.
Also, try to access the following
http://localhost:8080/account/starter, security configuration will redirect you to the login page. Remember, we have the following in our security configurationantMatchers("/account/**").access("hasRole('ROLE_USER')")
8. Spring Security Login Workflow
We will enhance our login process in this series (Will add remember me service etc.) but I like to revisit the login workflow
Let’s talk about the above workflow:
- Customer fills out the credentials on the login page.
- On form submission, the
UsernamePasswordAuthenticationFiltercreates aUsernamePasswordAuthenticationTokenby extracting the username and password from the request parameters. - The
AuthenticationManageris responsible to validate the user based on the supplied credentials (Look in to theUserUserDetailServiceto understand how it works). - If authenticated, Spring security performs several additional operations.
SessionAuthenticationStrategyis notified for new login. This handles the HTTP session and makes sure a valid session exists and handles any against session-fixation attacks.- Spring security store the user authentication details in the
SecurityContextHolder. It will update the SecurityContextHolder with authentication details. - If
RememberMeServicesservice is active, it will activate theloginSuccessmethod. This service is useful if you want to remember user for sometime (remember, on many sites, we have the option “Keep me Logged in”. We can create a similar feature using this service). - It will publish an
InteractiveAuthenticationSuccessEven. - The
AuthenticationSuccessHandleris invoked. This success handler will try to redirect the user to the location when we redirect to the login page (e.g. If you were moving to my account and got the login page, on successful login, it will redirect you to the account page.)
- For the fail attempt, Spring security will also perform a few important steps to make sure it clears out all sensitive and secure information.
- I will clear the
SecurityContextHolderout. - Call the
loginFailmethod of theRememberMeServicesservice to remove cookies and other related information. - The
AuthenticationFailureHandlertriggers to perform any additional clean-up action.
- I will clear the
Here is another overview of the form based login process.
9. Spring Security Success Handler
The Spring Security Success Handlers are a powerful mechanism and strategy to handle a successful user authentication. With .defaultSuccessUrl("/home"), we can redirect the user to a pre-defined location, however, for enterprise application, we may like to execute certain operations before redirecting user. Let’s think about an eCommerce application, we may like to do following operations after authentication and before user landing on a certain page.
- We may like to set user default currency and other details in session.
- Like to restore the customer shopping cart.
- Like to redirect the user to certain workflow based on the profile.
The security success handlers are a great way to handle all these business workflows. Spring security provides few success handlers used automatically during the login process.
SavedRequestAwareAuthenticationSuccessHandler.SimpleUrlAuthenticationSuccessHandler
On successful authentication, Spring security automatically invoke AuthenticationSuccessHandler and it will make sure that customer is redirected to the requested page when we redirect the customer to the login page. To create custom security handler, we have the following 2 options:
- Create success handler by implementing the
AuthenticationSuccessHandlerinterface. - Extend the sucess handler available with Spring security like
SimpleUrlAuthenitcaionSuccessHandler.
Summary
In this article, we discuss the spring security login, we discuss the distinct feature of the login process. To summarize we discuss following points in this post.
- How Spring security login process works?
- Configure and use custom login page in spring security.
- How to configure the success and failure process for our application?
- In the last section, we covered the spring security login workflow.
The source code for this article is available on the GitHub.
Advertisements

Этот урок освещает процесс создания простого web-приложения с ресурсами, которые защищены Spring Security.
Что вы создадите
Вы создадите Spring MVC приложение, которое обеспечивает защиту страницы входа фиксированным списком пользователей.
Что вам потребуется
- Примерно 15 минут свободного времени
- Любимый текстовый редактор или IDE
- JDK 6 и выше
-
Gradle 1.11+ или
Maven 3.0+ - Вы также можете импортировать код этого урока, а также просматривать web-страницы прямо из
Spring Tool Suite (STS),
собственно как и работать дальше из него.
Как проходить этот урок
Как и большинство уроков по Spring, вы можете начать с
нуля и выполнять каждый шаг, либо пропустить базовые шаги, которые вам уже знакомы. В любом случае,
вы в конечном итоге получите рабочий код.
Чтобы начать с нуля, перейдите в Настройка проекта.
Чтобы пропустить базовые шаги, выполните следующее:
- Загрузите и
распакуйте архив с кодом этого урока, либо кнонируйте из репозитория с помощью
Git:
git clone https://github.com/spring-guides/gs-securing-web.git - Перейдите в каталог
gs-securing-web/initial - Забегая вперед, настройте Spring Security
Когда вы закончите, можете сравнить получившийся результат с образцом в gs-securing-web/complete.
Настройка проекта
Для начала вам необходимо настроить базовый скрипт сборки. Вы можете использовать любую систему сборки,
которая вам нравится для сборки проетов Spring, но в этом уроке рассмотрим код для работы с
Gradle и
Maven. Если вы не знакомы ни с одним из них, ознакомьтесь
с соответсвующими уроками Сборка Java-проекта с использованием Gradle
или Сборка Java-проекта с использованием Maven.
Создание структуры каталогов
В выбранном вами каталоге проекта создайте следующую структуру каталогов; к примеру,
командой mkdir -p src/main/java/hello для *nix систем:
└── src
    └── main
        └── java
            └── hello
Создание файла сборки Gradle
Ниже представлен начальный файл сборки Gradle.
Файл pom.xml находится здесь.
Если вы используете Spring Tool Suite (STS),
то можете импортировать урок прямо из него.
Если вы посмотрите на pom.xml, вы найдете, что указана версия для maven-compiler-plugin.
В общем, это не рекомендуется делать. В данном случае он предназначен для решения проблем с нашей CI системы,
которая по умолчанию имеет старую(до Java 5) версию этого плагина.
build.gradle
buildscript {
    repositories {
        maven { url "http://repo.spring.io/libs-release" }
        mavenLocal()
        mavenCentral()
    }
    dependencies {
        classpath("org.springframework.boot:spring-boot-gradle-plugin:1.1.8.RELEASE")
    }
}

apply plugin: 'java'
apply plugin: 'eclipse'
apply plugin: 'idea'
apply plugin: 'spring-boot'

jar {
    baseName = 'gs-securing-web'
    version =  '0.1.0'
}

repositories {
    mavenLocal()
    mavenCentral()
    maven { url "http://repo.spring.io/libs-release" }
}

dependencies {
    compile("org.springframework.boot:spring-boot-starter-thymeleaf")
    testCompile("junit:junit")
}

task wrapper(type: Wrapper) {
    gradleVersion = '1.11'
}
Spring Boot gradle plugin
предоставляет множество удобных возможностей:
-
Он собирает все jar’ы в classpath и собирает единое, исполняемое «über-jar», что
делает более удобным выполнение и доставку вашего сервиса - Он ищет
public static void main()метод, как признак исполняемого класса -
Он предоставляет встроенное разрешение зависимостей, с определенными номерами версий для соответсвующих
Spring Boot зависимостей.
Вы можете переопределить на любые версии, какие захотите, но он будет по умолчанию для Boot
выбранным набором версий
Создание незащищенного web приложения
До того, как применить защиту к вашему приложению, вам необходимо само приложение.
Шаги в этой главе освещают процесс создания очень простого web-приложения. Затем в следующей главе
вы защитите его с помощью Spring Security.
Приложение включает два простых представления: домашнюю страницу и «Hello World» страницу. Домашняя
страница предствлена ниже как Thymeleaf шаблон:
src/main/resources/templates/home.html
<!DOCTYPE html>
<html xmlns="http://www.w3.org/1999/xhtml" xmlns:th="http://www.thymeleaf.org" xmlns:sec="http://www.thymeleaf.org/thymeleaf-extras-springsecurity3">
    <head>
        <title>Spring Security Example</title>
    </head>
    <body>
        <h1>Welcome!</h1>

        <p>Click <a th:href="@{/hello}">here</a> to see a greeting.</p>
    </body>
</html>
Как вы можете увидеть, это простое приложение включает ссылку на страницу «/hello»,
которая представлена ниже также как Thymeleaf шаблон.
src/main/resources/templates/hello.html
<!DOCTYPE html>
<html xmlns="http://www.w3.org/1999/xhtml" xmlns:th="http://www.thymeleaf.org"
      xmlns:sec="http://www.thymeleaf.org/thymeleaf-extras-springsecurity3">
    <head>
        <title>Hello World!</title>
    </head>
    <body>
        <h1>Hello world!</h1>
    </body>
</html>
Приложение основано на Spring MVC. Т.о. вам необходимо настроить Spring MVC и контроллеры
представлений для отображения этих шаблонов. Ниже конфигурационный класс для настройки Spring
MVC в приложении.
src/main/java/hello/MvcConfig.java
package hello;

import org.springframework.context.annotation.Configuration;
import org.springframework.web.servlet.config.annotation.ViewControllerRegistry;
import org.springframework.web.servlet.config.annotation.WebMvcConfigurerAdapter;

@Configuration
public class MvcConfig extends WebMvcConfigurerAdapter {

    @Override
    public void addViewControllers(ViewControllerRegistry registry) {
        registry.addViewController("/home").setViewName("home");
        registry.addViewController("/").setViewName("home");
        registry.addViewController("/hello").setViewName("hello");
        registry.addViewController("/login").setViewName("login");
    }

}
Метод addViewControllers() (переопределение метода с таким же названием в
WebMvcConfigurerAdapter), добавляющий четыре контроллера. Двое из них настроены
на представление с именем «home»(home.html), другой настроен на «hello».
Четвертый контроллер настроен на представление с названием «login». Вы создадите это представление
в следующей главе.
На данном этапе вы можете перейти к созданию приложения исполняемым
и запустить приложени без входа в систему.
Фундамент простого web-приложения создано, теперь вы можете добавить защиту к нему.
Настройка Spring Security
Предположим, что вы хотите предотвратить неавторизованный доступ к просмотру представления
«/hello». Сейчас, если пользователь нажмет на ссылку на домашней странице, он увидит приветствие
без каких либо помех к нему. Вам необходимо добавить барьер, который заставляет пользователя
войти в систему до того, как он увидит страницу.
Для этого вы настраиваете Spring Security в приложении. Если Spring Security в classpath’е,
Spring Boot автоматически обеспечивает защиту для всех HTTP путей
с «базовой» аутентификацией. Но вы сможете в дальнейшем изменить под себя настройки безопасности.
Первое, что вам нужно сделать, это добавить Spring Security в classpath.
C Gradle это достигается одной строчкой в блоке dependencies:
build.gradle
dependencies {
    ...
    compile("org.springframework.boot:spring-boot-starter-security")
    ...
}
C Maven — добавлением дополнительного блока в <dependencies>:
pom.xml
<dependencies>
    ...
        <dependency>
            <groupId>org.springframework.boot</groupId>
            <artifactId>spring-boot-starter-security</artifactId>
        </dependency>
    ...
</dependencies>
Ниже приведена настройка безопасности, которая гарантирует, что только авторизованные
пользователи могут увидеть секретное приветствие:
src/main/java/hello/WebSecurityConfig.java
package hello;

import org.springframework.context.annotation.Configuration;
import org.springframework.security.config.annotation.authentication.builders.AuthenticationManagerBuilder;
import org.springframework.security.config.annotation.authentication.configurers.GlobalAuthenticationConfigurerAdapter;
import org.springframework.security.config.annotation.web.builders.HttpSecurity;
import org.springframework.security.config.annotation.web.configuration.WebSecurityConfigurerAdapter;
import org.springframework.security.config.annotation.web.servlet.configuration.EnableWebMvcSecurity;

@Configuration
@EnableWebMvcSecurity
public class WebSecurityConfig extends WebSecurityConfigurerAdapter {
    @Override
    protected void configure(HttpSecurity http) throws Exception {
        http
            .authorizeRequests()
                .antMatchers("/", "/home").permitAll()
                .anyRequest().authenticated();
        http
            .formLogin()
                .loginPage("/login")
                .permitAll()
                .and()
            .logout()
                .permitAll();
    }

    @Configuration
    protected static class AuthenticationConfiguration extends
            GlobalAuthenticationConfigurerAdapter {

        @Override
        public void init(AuthenticationManagerBuilder auth) throws Exception {
            auth
                    .inMemoryAuthentication()
                    .withUser("user").password("password").roles("USER");
        }

    }

}
Класс WebSecurityConfig содержит аннотацию @EnableWebMvcSecurity
для включения поддержки безопасности Spring Security и Spring MVC интеграцию. Он также
расширяет WebSecurityConfigurerAdapter и переопределяет пару методов для
установки некоторых настроек безопасности.
Метод configure(HttpSecurity) определяет, какие URL пути должны быть защищены,
а какие нет. В частности, «/» и «/home» настроены без требования к авторизации. Ко всем
остальным путям должна быть произведена аутентификация.
Когда пользователь успешно войдет в систему, он будет перенаправлен на предыдущую запрашиваемую
страницу, требующую авторизацию. Здесь вы определили собственную «/login» страницу в loginPage()
и каждый имеет доступ к ней.
Что касается метода configure(AuthenticationManagerBuilder), то он создает
в памяти хранилище пользователей с единственным пользователем. Этому пользователю дано
имя «user», пароль «password» и роль «ROLE».
Теперь нам нужно создать страницу входа. Т.к. уже есть сопоставление контроллера с представлением
«login», то вам нужно только создать это представления входа:
src/main/resources/templates/login.html
<!DOCTYPE html>
<html xmlns="http://www.w3.org/1999/xhtml" xmlns:th="http://www.thymeleaf.org"
      xmlns:sec="http://www.thymeleaf.org/thymeleaf-extras-springsecurity3">
    <head>
        <title>Spring Security Example </title>
    </head>
    <body>
        <div th:if="${param.error}">
            Invalid username and password.
        </div>
        <div th:if="${param.logout}">
            You have been logged out.
        </div>
        <form th:action="@{/login}" method="post">
            <div><label> User Name : <input type="text" name="username"/> </label></div>
            <div><label> Password: <input type="password" name="password"/> </label></div>
            <div><input type="submit" value="Sign In"/></div>
        </form>
    </body>
</html>
Как видите, этот Thymeleaf шаблон просто представляет собой форму, которая собирает значения
имени пользователя и пароля и отправляет их к «/login». Рассмотрим, как настроен Spring Security
фильтр, который перхватывает запрос и идентифицирует пользователя. Если пользователь не прошел
проверку, то он будет перенаправлен на страницу «/login?error» и наша страница отобразит соответсвующее
сообщение об ошибке. При удачной авторизации, приложение отправит к «/login?logout» и наша
страница отобразит соответственное сообщение об успехе.
Последнее, что нам нужно, это предоставить пользователю способ для отображения текущего имени и
выхода из системы. Обновим hello.html, чтобы сказать привет текущему пользователю и
добавить в форму «Sign Out», как показано ниже:
src/main/resources/templates/hello.html
<!DOCTYPE html>
<html xmlns="http://www.w3.org/1999/xhtml" xmlns:th="http://www.thymeleaf.org"
      xmlns:sec="http://www.thymeleaf.org/thymeleaf-extras-springsecurity3">
    <head>
        <title>Hello World!</title>
    </head>
    <body>
        <h1 th:inline="text">Hello [[${#httpServletRequest.remoteUser}]]!</h1>
        <form th:action="@{/logout}" method="post">
            <input type="submit" value="Sign Out"/>
        </form>
    </body>
</html>
Мы отображаем имя пользователя с использованием интеграции Spring Security с
HttpServletRequest#getRemoteUser(). По кнопке «Sign Out» форма отправляет
POST запрос к «/logout». При успешном выходе пользователь будет перенаправлен к
«/login?logout».
Создание приложения исполняемым
Несмотря на то, что пакет этого сервиса может быть в составе web-приложения и
WAR файлов,
более простой подход, продемонстрированный ниже создает отдельное самостоятельное приложение.
Вы упаковываете все в единый, исполняемый JAR-файл, который запускается через хорошо знакомый
старый main() Java-метод. Попутно, вы используете поддержку Spring для встроенного
Tomcat
контейнера сервлетов как HTTP среду выполнения вместо развертывания на сторонний экземпляр.
src/main/java/hello/Application.java
package hello;

import org.springframework.boot.autoconfigure.EnableAutoConfiguration;
import org.springframework.boot.SpringApplication;
import org.springframework.context.annotation.ComponentScan;
import org.springframework.context.annotation.Configuration;

@EnableAutoConfiguration
@Configuration
@ComponentScan
public class Application {

    public static void main(String[] args) throws Throwable {
        SpringApplication.run(Application.class, args);
    }

}
main() метод передает управление вспомогательному классу
SpringApplication,
где Application.class — аргумент его run() метода. Это сообщает Spring
о чтении метаданных аннотации из Application и управлении ею как компонента в
Spring application context.
Аннотация @ComponentScan говорит Spring’у рекурсивно искать в пакете hello
и его потомках классы, помеченные прямо или косвенно Spring аннотацией
@Component.
Эта директива гарантирует, что Spring найдет и зарегистрирует WebConfig и WebSecurityConfig,
потому что он отмечен @Configuration, который, в свою очередь, является своего рода
@Component аннотацией. По факту, эти конфигурационные классы также используются для настройки Spring.
Аннотация @EnableAutoConfiguration
переключает на приемлемое по умолчанию поведение, основанное на содержании вашего classpath. К примеру,
т.к. приложение зависит от встраиваемой версии Tomcat (tomcat-embed-core.jar), Tomcat сервер установлен
и сконфигурирован на приемлемое по умолчанию поведение от вашего имени. И т.к. приложение также
зависит от Spring MVC (spring-webmvc.jar), Spring MVC
DispatcherServlet
сконфигурирован и зарегестрирован для вас — web.xml не нужен! Автоконфигурация полезный и
гибкий механизм. Подробную информацию смотрите в
API документации.
Сборка исполняемого JAR
Вы можете собрать единый исполняемый JAR-файл, который содержит все необходимые зависимости,
классы и ресурсы. Это делает его легким в загрузке, версионировании и развертывании сервиса как
приложения на протяжении всего периода разработки, на различных средах и так далее.
./gradlew build
Затем вы можете запустить JAR-файл:
java -jar build/libs/gs-securing-web-0.1.0.jar
Если вы используете Maven, вы можете запустить приложение, используя mvn spring-boot:run,
либо вы можете собрать приложение с mvn clean package и запустить JAR примерно так:
java -jar target/gs-securing-web-0.1.0.jar
Если вы используете Gradle, вы можете запустить ваш сервис из командной строки:
./gradlew clean build && java -jar build/libs/gs-securing-web-0.1.0.jar
Если вы используете Maven, то можете запустить ваш сервис таким образом:
mvn clean package && java -jar target/gs-securing-web-0.1.0.jar.
Как вариант, вы можете запустить ваш сервис напрямую из Gradle примерно так:
./gradlew bootRun
С mvn — mvn spring-boot:run.
... app starts up ...
как только приложение запустится, откройте в вашем браузере адрес
http://localhost:8080.
Вы должны увидеть домашнюю страницу:

Когда вы нажмете на ссылку, то она попытается открыть вам сстраницу приветствия
/hello. Но т.к. эта страница защищена и вы ещё не вошли в систему,
вы увидите страницу входа:

Если вы перешли на сюда с главы по незащищенной версии, то вы не увидите этой
страницы входа. Вы смело можете вернуться обратно и дописать остальную часть
кода, связанную с безопасностью.
На странице входа войдите под тестовым пользователем, введя «user» и «password»
в соответствующие поля. Как только вы отправите форму, вы авторизуетесь и увидите
страницу приветствия:

Если вы нажмете на кнопку «Sign Out», ваша авторизация отменится и вы вернетесь к
странице входа с сообщением о том, что вы вышли из системы.
Итог
Поздравляем! Вы только что разработали простое web-приложение, которое защищено Spring Security.
С оригинальным текстом урока вы можете ознакомиться на
spring.io.
comments powered by
В этой статье рассмотрим, как заменить автоматически генерируемую форму ввода имени и пароля на свою собственную на Thymeleaf.
Метод formLogin() генерирует как саму форму логина, так и конечную точку обработки имени и пароля, приходящих с формы. Конечную точку, обрабатывающую по POST-запросу имя и пароль, переписывать не нужно, а вот саму html-форму, выдающуюся по методу GET /login обычно требуется заменить.
Настройка HttpSecurity
Чтобы это сделать, при настройке HttpSecurity нужно указать не просто formLogin(), как мы делали раньше, а еще .loginPage(«/login») с адресом шаблона:
@Override
protected void configure(HttpSecurity http) throws Exception {

    http.authorizeRequests()
            .antMatchers("/**").hasRole("USER")
            .and()
            .formLogin().permitAll()
            .loginPage("/login")
            .loginProcessingUrl("/perform-login")
            .usernameParameter("user")
            .passwordParameter("pass")
            .defaultSuccessUrl("/");
}
На адрес /login (указанный в loginPage(), адрес можно указать и другой) необходимо добавить контроллер, который выдает шаблон.
Контроллер
@Controller
public class LoginController {

    @GetMapping("/login")
    public String get(Model model) {
        model.addAttribute("title", "Форма входа");
        return "login";
    }

}
Как видите, мы передали tittle в модель, но это необязательно — его можно сразу прописать в шаблоне.
Шаблон
<html xmlns="http://www.w3.org/1999/xhtml"
      xmlns:th="http://www.thymeleaf.org">
<head>
    <title th:text="${title}"></title>
</head>

<body>
<div>
    <form name="f" th:action="@{/perform-login}" method="post">
        <fieldset>
            <legend>Войдите</legend>
            <div th:if="${param.error}" class="alert alert-error">
                Неправильные имя и пароль.
            </div>

            <div th:if="${param.logout}" class="alert alert-success">
                You have been logged out.
            </div>
            <label for="user">Имя</label>
            <input type="text" id="user" name="user"/>
            <label for="pass">Пароль</label>
            <input type="password" id="pass" name="pass"/>
            <div class="form-actions">
                <button type="submit" class="btn">Войти</button>
            </div>
        </fieldset>
    </form>
</div>
</body>
</html>
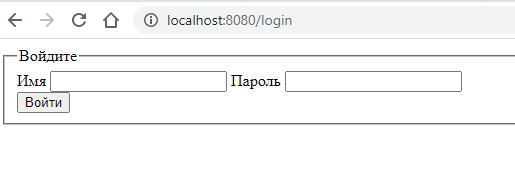
Выглядит так:
В шаблоне обратите внимание на ряд параметров, которые важны для конечной точки, обрабатывающей имя и пароль по POST-запросу.
Во-первых, это имена элементов input — они превращаются в имена параметров POST-запроса.
usernameParameter() и passwordParameter()
В автоматически генерируемой форме они называются username и password, а поскольку у нас это user и pass (см. атрибуты name):
<input type="text" id="user" name="user"/>

<input type="password" id="pass" name="pass"/>
то в коде настройки HttpSecurity мы должны переопределить их в методах:
.usernameParameter("user")
.passwordParameter("pass")
Эти строки есть в первом сниппете.
loginProcessingUrl()
Также переопределен loginProcessingUrl():
.loginProcessingUrl("/perform-login")
Это адрес конечной точки, куда по методу POST отправляются имя и пароль при нажатии кнопки входа. Адрес переопределен, но сама точка осталась автогенерируемой (ее генерирует Spring Security).
В шаблоне этот адрес соответствует action формы:
<form name="f" th:action="@{/perform-login}" method="post">
defaultSuccessUrl()
Наконец, можно задать
.defaultSuccessUrl("/");
это адрес страницы, куда пользователь перенаправляется при успешном входе.
Обычно он перенаправляется на ту самую закрытую страницу, куда пытался попасть (а после этого был перенаправлен на страницу входа /login).
Но если он не пытался попасть на закрытую страницу, а сразу заходил с /login, то куда-то его надо перенаправить. Вот тут и указывается этот адрес. У нас это главная страница.
Сообщение об ошибке
Наконец, если были введены неправильные имя и пароль, необходимо перенаправить пользователя на страницу с ошибкой. По умолчанию этот тот же адрес /login, но с параметром:
/login?error
В шаблоне есть обработка этого параметра:
<div th:if="${param.error}" class="alert alert-error">
    Неправильные имя и пароль.
</div>
Не стоит пытаться уточнять сообщение (что именно неправильное: имя или пароль). Spring Security рекомендует оставить все как есть, чтобы злоумышленник не пытался подобрать другое имя — в общем лишней информации тут давать не нужно.
Исходный код
Скачать пример полностью можно на GitHub.
Каждый раз, когда я начинаю реализацию нового REST API с помощью Spring, мне сложно решить, как выполнять валидацию запросов и обрабатывать бизнес-исключения. В отличие от других типичных проблем API, Spring и его сообщество, похоже, не согласны с лучшими методами решения этих проблем, и трудно найти полезные статьи по этому поводу.
В этой статье я обобщаю свой опыт и даю несколько советов по валидации интерфейсов.
Архитектура и терминология
Я создаю свои приложения, которые предоставляют веб-API, следуя шаблону луковой архитектуры (Onion Architecture). Эта статья не об архитектуре Onion, но я хотел бы упомянуть некоторые из ее ключевых моментов, которые важны для понимания моих мыслей:
-
Контроллеры REST и любые веб-компоненты и конфигурации являются частью внешнего «инфраструктурного» уровня .
-
Средний «сервисный» уровень содержит сервисы, которые объединяют бизнес-функции и решают общие проблемы, такие как безопасность или транзакции.
-
Внутренний уровень «домена» содержит бизнес-логику без каких-либо задач, связанных с инфраструктурой, таких как доступ к базе данных, конечные точки web и т.д.

Архитектура допускает зависимости от внешних уровней к внутренним, но не наоборот. Для конечной точки REST поток запроса может выглядеть следующим образом:
-
Запрос отправляется контроллеру на уровне «инфраструктуры».
-
Контроллер десериализует запрос и — в случае успеха — запрашивает результат у соответствующего сервиса на уровне сервисы.
-
Служба проверяет, есть ли у текущего пользователя разрешение на вызов функции, и инициализирует транзакцию базы данных (при необходимости).
-
Затем он извлекает данные из репозиториев домена , манипулирует ими и, возможно, сохраняет их обратно в репозиторий.
-
Сервис также может вызывать несколько репозиториев, преобразовывать и агрегировать результаты.
-
Репозиторий на уровне домена возвращает бизнес-объекты. Этот уровень отвечает за поддержание всех объектов в допустимом состоянии.
-
В зависимости от ответа сервиса, который является допустимым результатом или исключением, уровень инфраструктуры сериализует ответ.

В этой архитектуре у нас есть три интерфейса, для каждого из которых требуется разная валидация:
-
Контроллер определяет первый интерфейс. Чтобы десериализовать запрос, нужно выполнить его валидацию по нашей схеме API . Это делается неявно с помощью фреймворка маппирования, такого как Jackson, и явно с помощью ограничений, таких как @NotNull. Мы называем это валидацией запроса .
-
Сервис может проверять права текущего пользователя и обеспечивать выполнение предварительных условий, которые сделают возможным вызов уровня домена. Назовем это валидацией сервиса.
-
В то время как предыдущие валидации обеспечивают выполнение некоторых основных предварительных условий, только уровень домена отвечает за поддержание допустимого состояния. Валидация уровня домена является наиболее важной.
Валидация запроса
Обычно мы десериализуем входящий запрос, для которого уже выполнена неявная валидация параметров запроса и тела запроса. Spring Boot автоматически настраивает Jackson десериализацию и общую обработку исключений. Например, взгляните на пример контроллера моей демонстрации BGG:
@GetMapping("/newest")
Flux<ThreadsPerBoardGame> getThreads(@RequestParam String user, @RequestParam(defaultValue = "PT1H") Duration since) {
    return threadService.findNewestThreads(user, since);
}
Оба вызова с отсутствующим параметром и неправильным типом возвращают сообщения об ошибках с правильным кодом состояния :
curl -i localhost:8080/threads/newest
HTTP/1.1 400 Bad Request
Content-Type: application/json
Content-Length: 189

{"timestamp":"2020-04-15T03:40:00.460+0000","path":"/threads/newest","status":400,"error":"Bad Request","message":"Required String parameter 'user' is not present","requestId":"98427b15-7"}

curl -i "localhost:8080/threads/newest?user=chrigu&since=a"
HTTP/1.1 400 Bad Request
Content-Type: application/json
Content-Length: 156

{"timestamp":"2020-04-15T03:40:06.952+0000","path":"/threads/newest","status":400,"error":"Bad Request","message":"Type mismatch.","requestId":"7600c788-8"}
С конфигурацией по умолчанию Spring Boot мы также получим трассировки стека . Я выключил их, установив
server:
  error:
    include-stacktrace: never
в application.yml . Эта обработка ошибок по умолчанию обеспечивается BasicErrorController в классическом Web MVC и по DefaultErrorWebExceptionHandler в WebFlux, и извлечение тела ответа от ErrorAttributes.
Связывание данных
В приведенных выше примерах демонстрируются атрибуты @RequestParam или любой простой атрибут метода контроллера без аннотации. Проверка запроса становится иной при проверке @ModelAttribute , @RequestBody или непростых параметров, как в
@GetMapping("/newest/obj")
Flux<ThreadsPerBoardGame> getThreads(@Valid ThreadRequest params) {
    return threadService.findNewestThreads(params.user, params.since);
}

static class ThreadRequest {
    @NotNull
    private final String user;
    @NotNull
    private final Duration since;

    public ThreadRequest(String user, Duration since) {
        this.user = user;
        this.since = since == null ? Duration.ofHours(1) : since;
    }
}
Если аннотации @RequestParam могут использоваться, чтобы сделать параметр обязательным или со значением по умолчанию , в командных объектах это делается с помощью ограничений проверки bean-компонентов, таких как @NotNull и простой Java / Kotlin. Чтобы активировать проверку bean-компонента, аргумент метода должен быть аннотирован @Valid.
Когда проверка bean-компонента завершается неудачно, в реактивном стеке выдается исключение BindException или WebExchangeBindException . Оба исключения реализуют BindingResult, который предоставляет вложенные ошибки для каждого недопустимого значения поля. Вышеуказанный метод контроллера приведет к сообщениям об ошибках, например
curl "localhost:8080/java/threads/newest/obj" -i
HTTP/1.1 400 Bad Request
Content-Type: application/json
Content-Length: 1138

{"timestamp":"2020-04-17T13:52:39.500+0000","path":"/java/threads/newest/obj","status":400,"error":"Bad Request","message":"Validation failed for argument at index 0 in method: reactor.core.publisher.Flux<ch.chrigu.bgg.service.ThreadsPerBoardGame> ch.chrigu.bgg.infrastructure.web.JavaThreadController.getThreads(ch.chrigu.bgg.infrastructure.web.JavaThreadController$ThreadRequest), with 1 error(s): [Field error in object 'threadRequest' on field 'user': rejected value [null]; codes [NotNull.threadRequest.user,NotNull.user,NotNull.java.lang.String,NotNull]; arguments [org.springframework.context.support.DefaultMessageSourceResolvable: codes [threadRequest.user,user]; arguments []; default message [user]]; default message [darf nicht null sein]] ","requestId":"c87c7cbb-17","errors":[{"codes":["NotNull.threadRequest.user","NotNull.user","NotNull.java.lang.String","NotNull"],"arguments":[{"codes":["threadRequest.user","user"],"arguments":null,"defaultMessage":"user","code":"user"}],"defaultMessage":"darf nicht null sein","objectName":"threadRequest","field":"user","rejectedValue":null,"bindingFailure":false,"code":"NotNull"}]}
Настройка обработки исключений
Приведенное выше ответное сообщение не является удобным для клиента, поскольку оно содержит имена классов и другие внутренние подсказки, которые не могут быть понятны клиентом API. Еще худший пример обработки исключений по умолчанию Spring Boot:
curl "localhost:8080/java/threads/newest/obj?user=chrigu&since=a" -i
HTTP/1.1 500 Internal Server Error
Content-Type: application/json
Content-Length: 513

{"timestamp":"2020-04-17T13:56:42.922+0000","path":"/java/threads/newest/obj","status":500,"error":"Internal Server Error","message":"Failed to convert value of type 'java.lang.String' to required type 'java.time.Duration'; nested exception is org.springframework.core.convert.ConversionFailedException: Failed to convert from type [java.lang.String] to type [java.time.Duration] for value 'a'; nested exception is java.lang.IllegalArgumentException: Parse attempt failed for value [a]","requestId":"4c0dc6bd-21"}
Он также возвращает неправильный код ошибки, подразумевающий ошибку сервера, даже если клиент указал неправильный тип для параметра since. Оба примера были сгенерированы с помощью реактивного стека, MVC имеет лучшие значения по умолчанию. Для обоих случаев нам нужно настроить обработку исключений. Это можно сделать, предоставив собственный bean-компонент ErrorAttributes , который записывает желаемое тело ответа. Код состояния ответа предоставляется значением status.
Или мы можем пойти на меньшее вмешательство и использовать реализацию DefaultErrorAttributes, либо добавив в исключения аннотацию @ResponseStatus, либо позволив всем исключениям расширять ResponseStatusException . Оба способа позволяют настроить статус ответа и значение сообщения. К сожалению, большинство исключений, создаваемых на уровне инфраструктуры, предоставляются фреймворком и не могут быть настроены, поэтому нам нужно другое решение. Одна из возможностей для аннотированных контроллеров — использовать @ExceptionHandler для отдельных исключений. Тогда мы могли бы создать ответ с нуля, но это пропустило бы обработку исключений по умолчанию, и мы хотели бы иметь одинаковую обработку для каждого исключения. Таким образом, чтобы улучшить ответ выше, просто повторно вызовите исключения (rethrow):
@ControllerAdvice
class GlobalExceptionHandler {

    @ExceptionHandler(TypeMismatchException::class)
    fun handleTypeMismatchException(e: TypeMismatchException): HttpStatus {
        throw ResponseStatusException(HttpStatus.BAD_REQUEST, "Invalid value '${e.value}'", e)
    }

    @ExceptionHandler(WebExchangeBindException::class)
    fun handleWebExchangeBindException(e: WebExchangeBindException): HttpStatus {
        throw object : WebExchangeBindException(e.methodParameter!!, e.bindingResult) {
            override val message = "${fieldError?.field} has invalid value '${fieldError?.rejectedValue}'"
        }
    }
}
Резюме
Я много писал о конфигурациях Spring Boot по умолчанию, которые, на мой взгляд, всегда являются хорошим началом для Spring. С другой стороны, обработка исключений по умолчанию довольно сложна, и вы можете начать вмешиваться на многих уровнях, сверху вниз:
-
Непосредственно в контроллере с помощью try/catch (MVC) или onErrorResume() (Webflux). Я не рекомендую это в большинстве случаев, потому что сквозная проблема, такая как обработка исключений, должна быть определена глобально, чтобы гарантировать согласованное поведение.
-
Перехватить исключения в функциях @ExceptionHandler . Создайте свои собственные ответы с помощью @ExceptionHandler (Throwable.class) для случая по умолчанию.
-
Или повторно генерируйте исключения , аннотируйте их с помощью @ResponseStatus или расширяйте ResponseStatusException, чтобы настроить ответ для определенных случаев.
Мне нравится запускать приложения Spring Boot с конфигурацией по умолчанию и заменять части там, где это необходимо. В этом случае я рекомендовал начать с третьего варианта, а если требуется дополнительная настройка, переключиться на второй.
В этом блоге я лишь поверхностно коснулся всего того, чему я научился за эти годы. Существует гораздо больше тем, касающихся валидации и обработки исключений, таких как внутренняя обработка сообщений об ошибках, пользовательские аннотации ограничений, различия между Java и Kotlin, автоматическое документирование ограничений и, конечно же, проверка данных на внутренних уровнях. Я продолжу эту тему в будущих статьях начиная с внутренних слоев и свяжу их.