Содержание
- Причины неполадок с подключением SSD
- Причина 1: Диск не инициализирован
- Причина 2: Отсутствие буквы накопителя
- Причина 3: Отсутствие разделов
- Причина 4: Скрытый раздел
- Причина 5: Неподдерживаемая файловая система
- Причина 6: Проблемы с БИОС и оборудованием
- Заключение
- Вопросы и ответы
Твердотельный диск по сравнению с жестким обладает такими достоинствами, как высокий уровень производительности и надежности, низкое энергопотребление, отсутствие шума и многое другое. Поэтому все больше пользователей выбирают ССД в качестве системного. При подключении такого накопителя можно обнаружить, что он не определяется системой или даже не отображается в БИОС. Это может выглядеть как отсутствие диска в «Проводнике», настройках Виндовс или в перечне выбора загрузки BIOS.
Проблемы с отображением ССД в системе могут возникать по таким причинам, как отсутствие буквы диска или инициализации, наличие скрытых разделов и несовместимая с Windows файловая система. В то же время это может происходить из-за неправильных настроек БИОС и физических повреждений самого диска или одного из элементов соединений между материнской платой и ССД.
Причина 1: Диск не инициализирован
Часто случается так, что новый диск не инициализируется при подключении к компьютеру и, как следствие, его не видно в системе. Решением является выполнение процедуры в ручном режиме согласно следующему алгоритму.
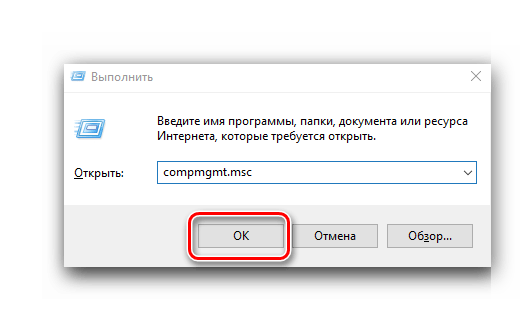
- Нажмите одновременно «Win+R» и в появившемся окне введите
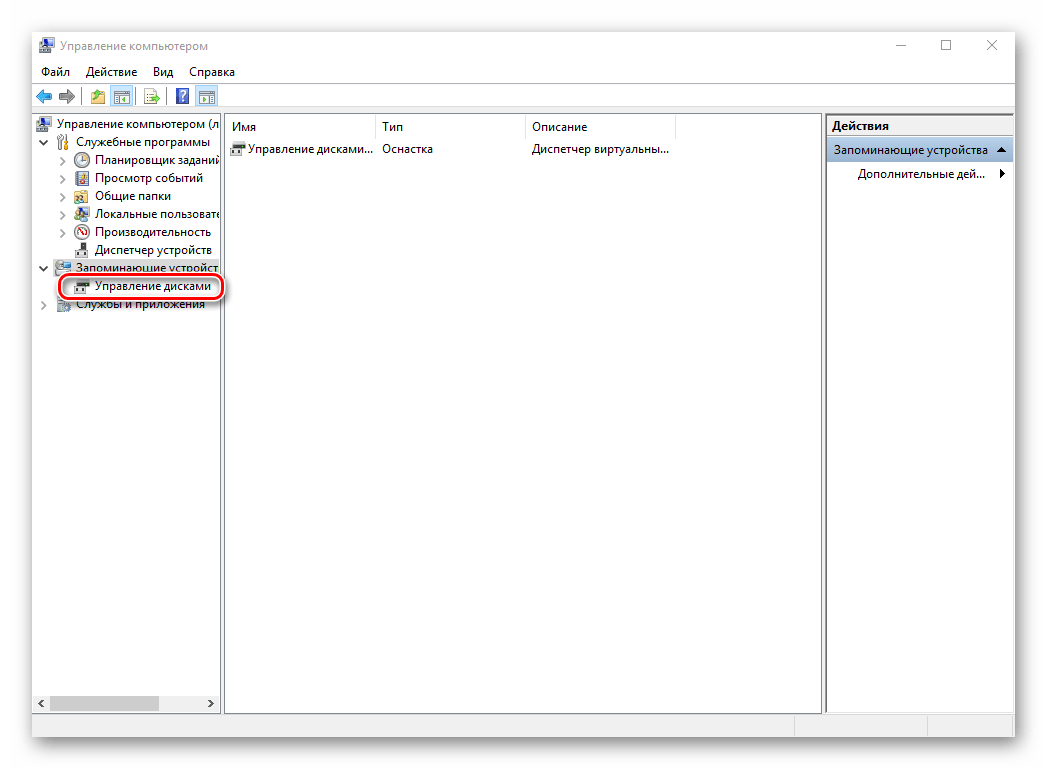
compmgmt.msc. Затем кликайте «ОК». - Откроется окно, где следует кликнуть «Управление дисками».
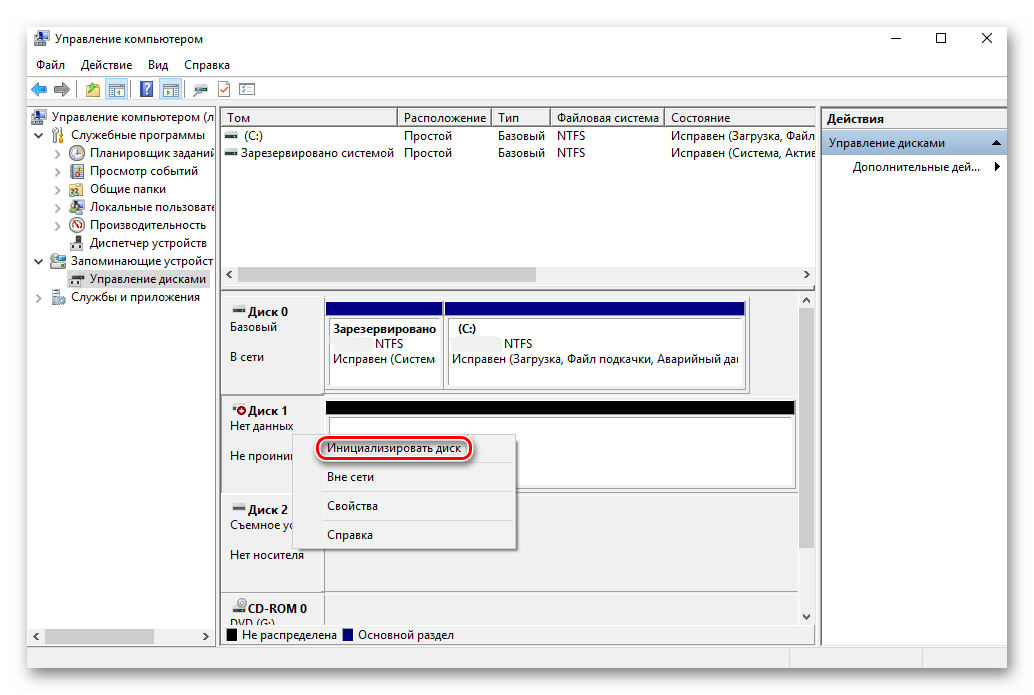
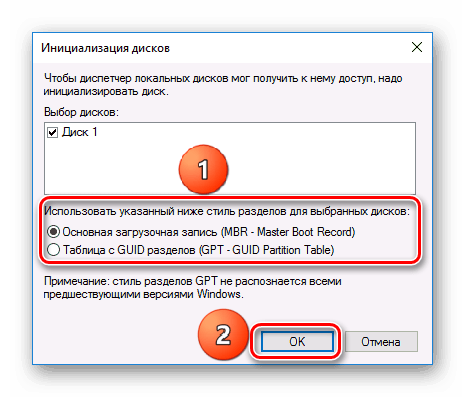
- Щелкайте по нужному накопителю правой кнопкой мыши и в открывшемся меню выберите «Инициализировать диск».
- Далее удостоверьтесь, что в поле «Диск 1» стоит галочка, и установите маркер напротив пункта с упоминанием MBR или GPT. «Основная загрузочная запись» совместима со всеми версиями Виндовс, но если вы планируете использовать только актуальные релизы этой ОС, лучше выбрать «Таблица с GUID разделов».
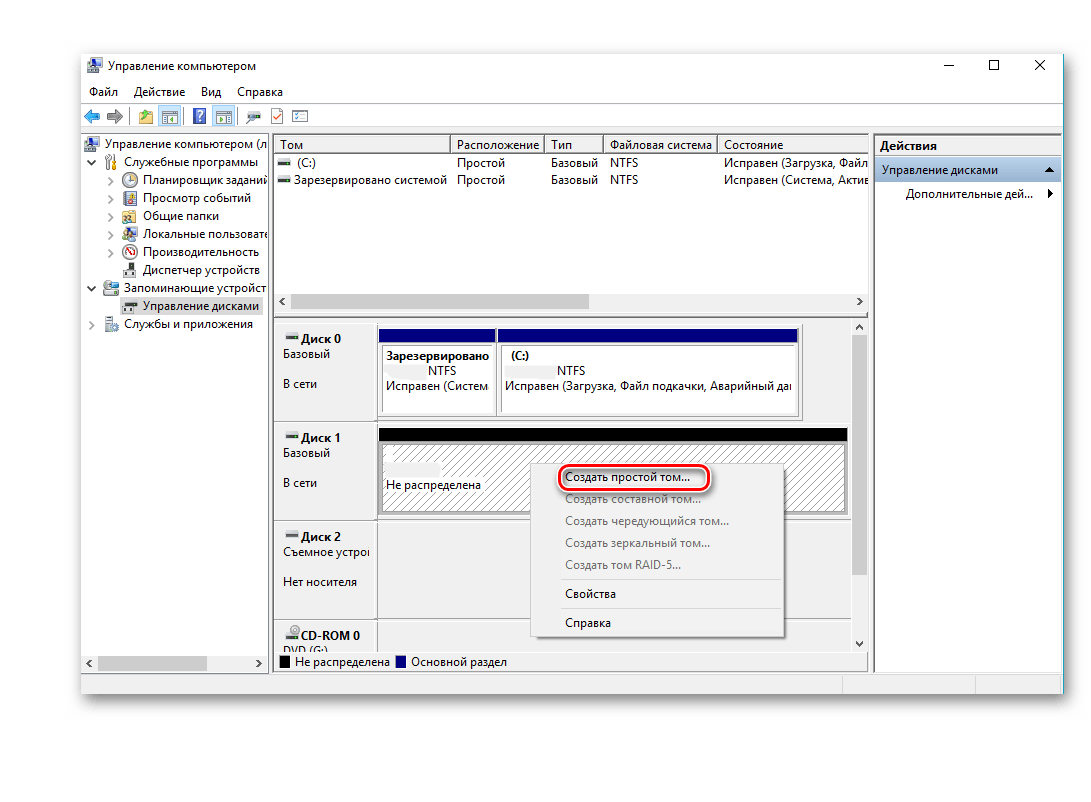
- После завершения процедуры следует создать новый раздел. Для этого кликайте по диску и выберите «Создать простой том».
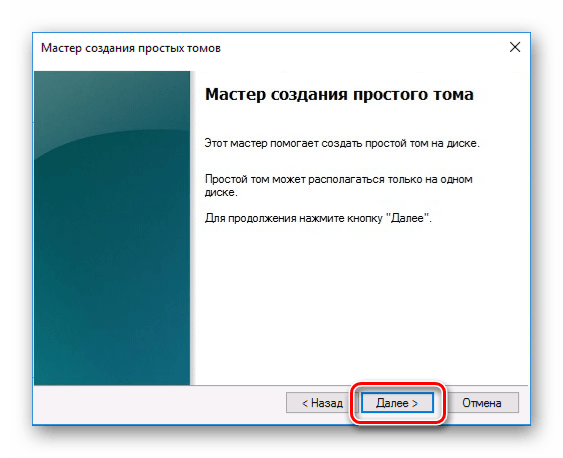
- Откроется «Мастер создания нового тома», в котором жмем «Далее».
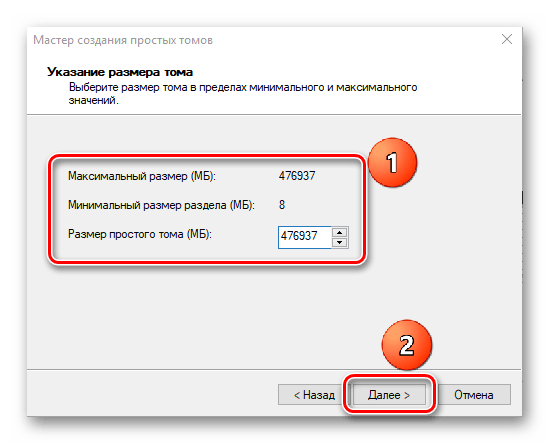
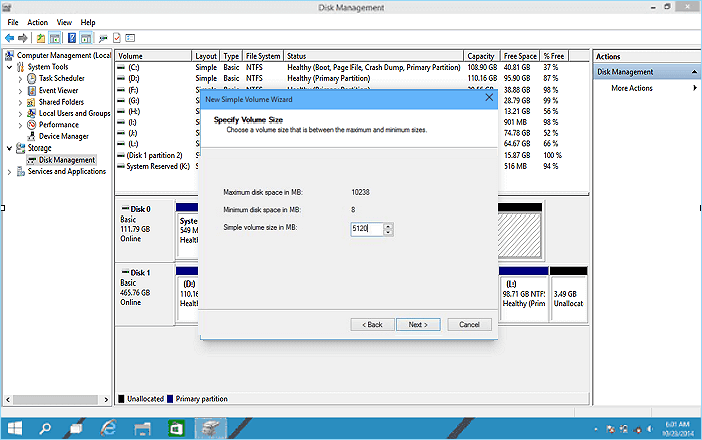
- Затем надо указать размер. Можно оставить значение по умолчанию, которое равно максимальному размеру диска, или выбрать меньшую величину. После внесения необходимых изменений кликаем «Далее».
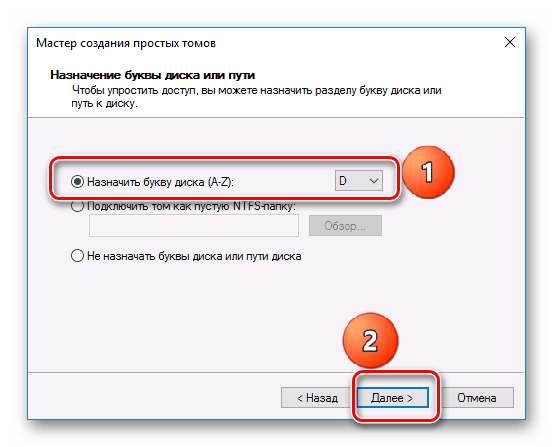
- В следующем окне соглашаемся с предложенным вариантом буквы тома и нажимаем «Далее». При желании можно присвоить другую букву, главное, чтобы она не совпадала с имеющейся.
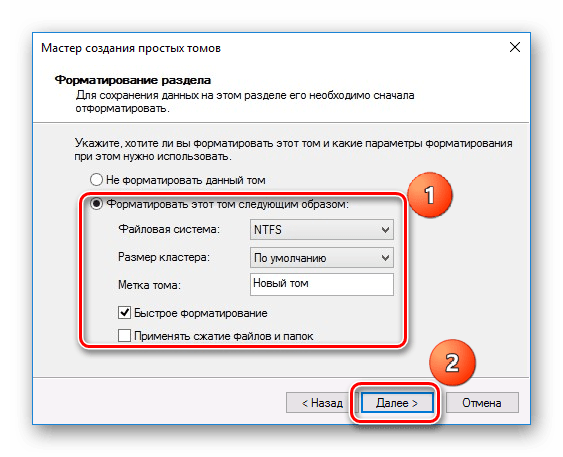
- Далее необходимо выполнить форматирование. Оставляем рекомендованные значения в полях «Файловая система», «Метка тома» и вдобавок включаем опцию «Быстрое форматирование».
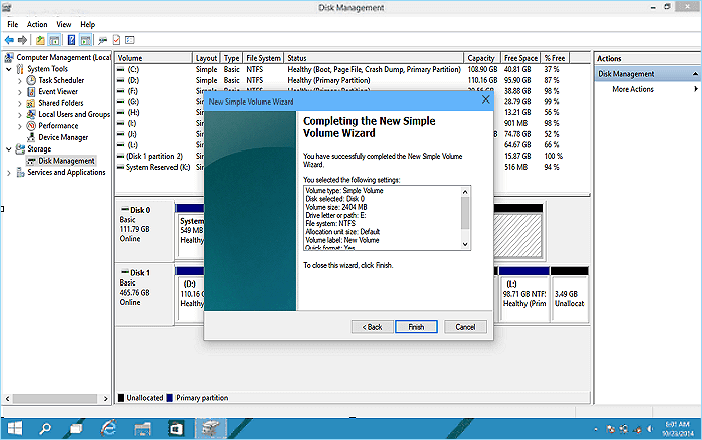
- Кликаем «Готово».
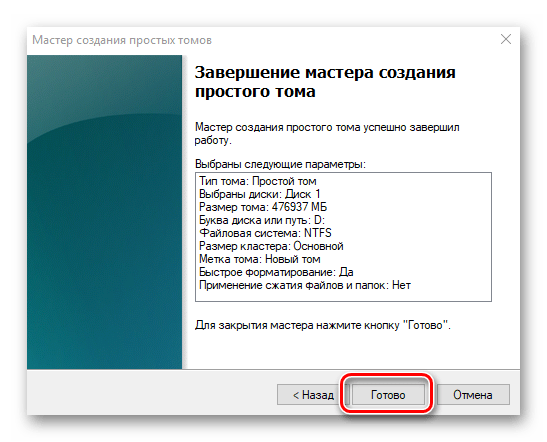
В результате диск должен будет появиться в системе.

Причина 2: Отсутствие буквы накопителя
Иногда SSD не имеет буквы и поэтому не отображается в «Проводнике». В таком случае нужно присвоить ему букву.
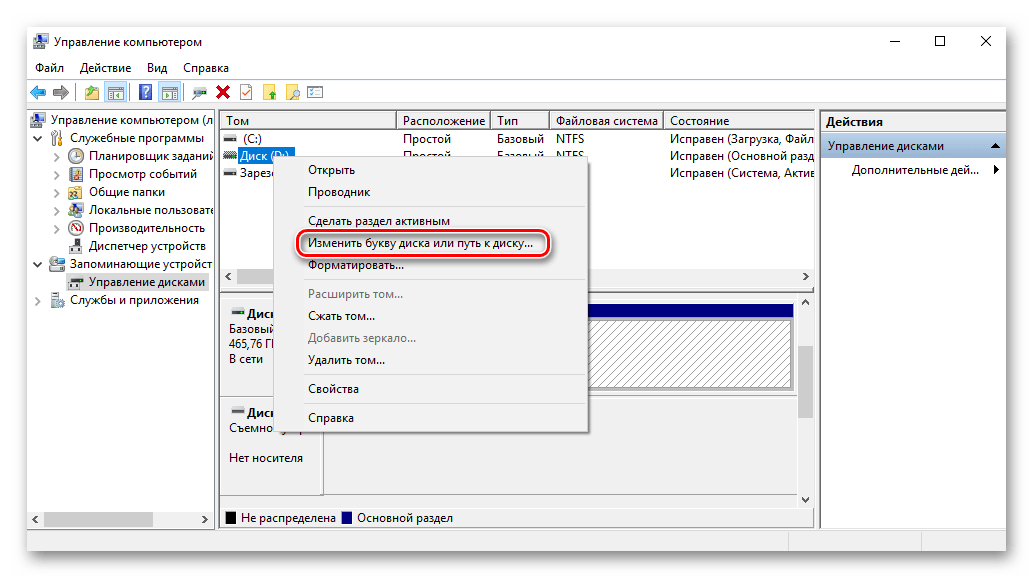
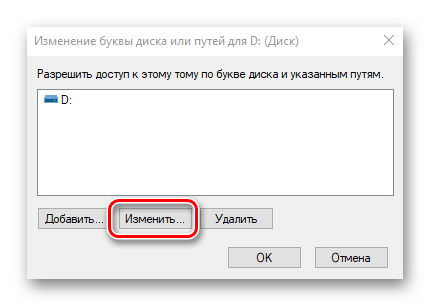
- Зайдите в «Управление дисками», повторив описанные выше шаги 1-2. Кликните ПКМ по ССД и выберите пункт «Изменить букву диска или путь к диску».
- В появившемся окошке жмите на «Изменить».
- Выбираем из списка букву для диска, а потом щелкаем «ОК».
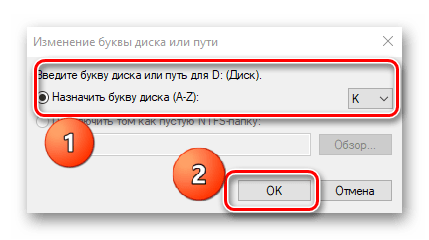
После этого указанное устройство хранения информации распознается ОС, можно проводить с ним стандартные операции.
Причина 3: Отсутствие разделов
Если приобретенный диск не новый и уже использовался в течение длительного времени, он тоже может не отображаться в «Моем компьютере». Причиной этому может быть повреждение системного файла или таблицы MBR из-за сбоя, заражения вирусным файлом, неправильной эксплуатации и т.д. При этом ССД отображается в «Управление дисками», но его статус — «Не инициализирован». В этом случае обычно рекомендуется выполнить инициализацию, однако из-за риска потери данных делать этого все же не стоит.
Кроме того, возможна еще такая ситуация, в которой накопитель отображается как одна нераспределенная область. Создание нового тома, как это делается обычно, также может привести к потере данных. Здесь решением может стать восстановление раздела. Для выполнения этого требуется определенные знания и софт, например, MiniTool Partition Wizard, который имеет соответствующую опцию.
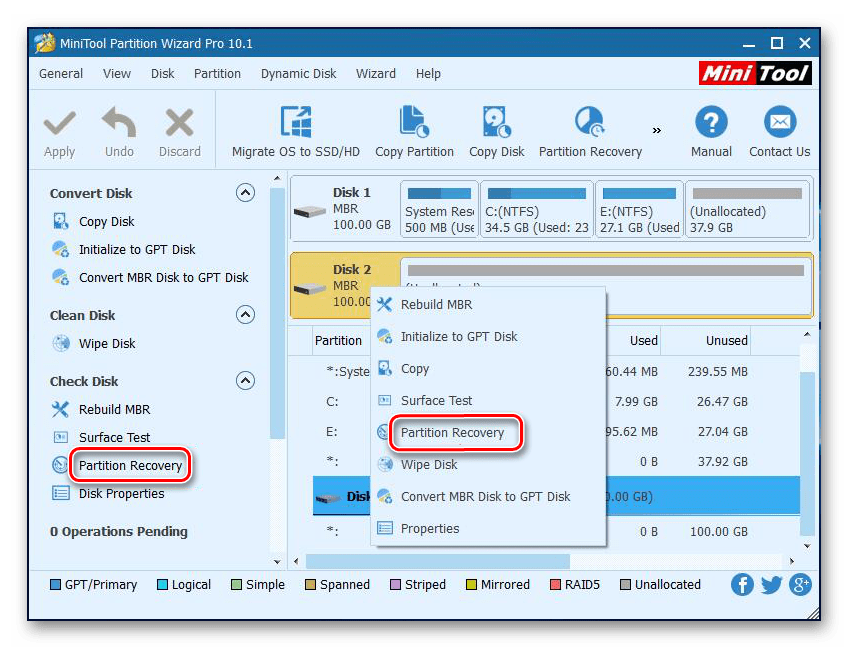
- Запустите MiniTool Partition Wizard, а затем выберите строку «Partition Recovery» в меню «Check Disk» после указания целевого SSD. Как вариант, можно щелкнуть правой кнопкой мыши на диске и выбрать одноименный пункт.
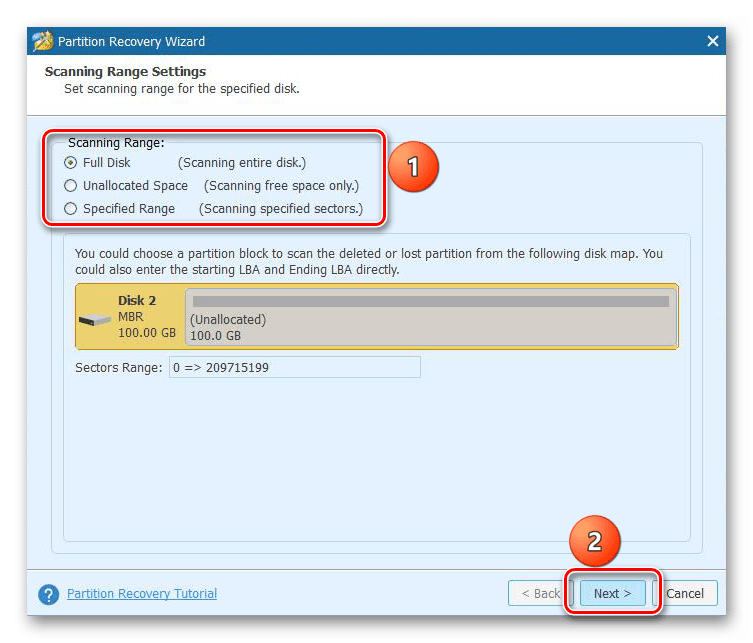
- Далее необходимо выбрать диапазон сканирования ССД. Доступны три варианта: «Full Disk», «Unallocated Space» и «Specified Range». В первом случае поиск производится по всему диску, во втором – только на свободном пространстве, в третьем – на определенных секторах. Оставляем «Full Disk» и нажимаем «Next».
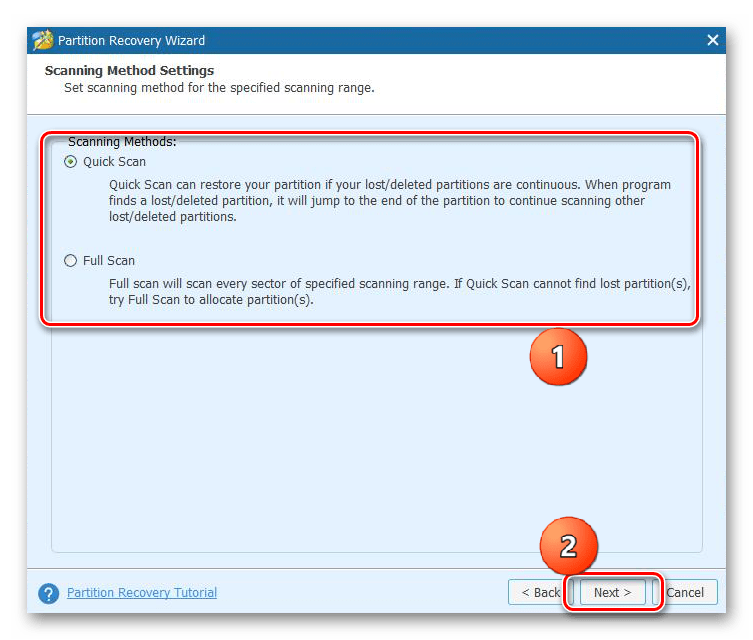
- В следующем окне на выбор предлагаются два варианта режима сканирования. В первом — «Quick Scan» — восстанавливаются скрытые или удаленные разделы, которые являются непрерывными, а во втором — «Full Scan» — сканируется каждый сектор указанного диапазона на SSD.
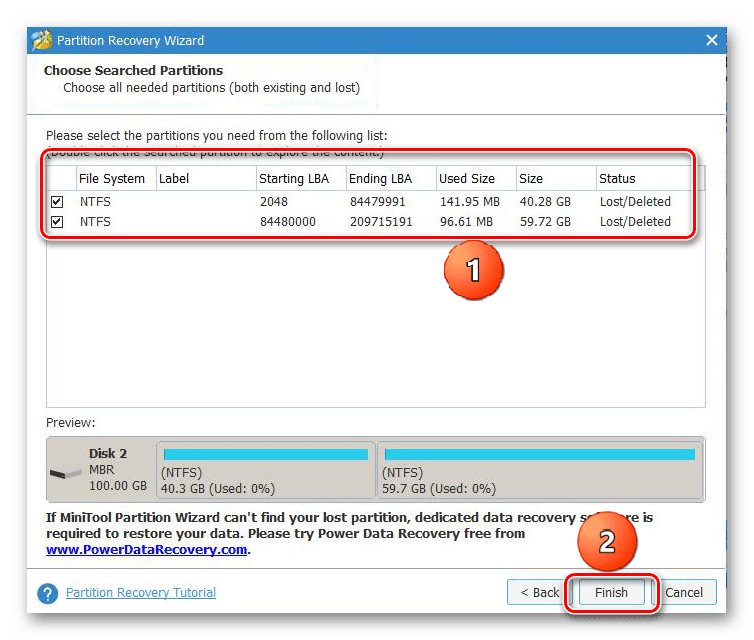
- После завершения сканирования диска все найденные разделы выводятся в виде списка в окне результатов. Выберите все необходимые и жмите «Finish».
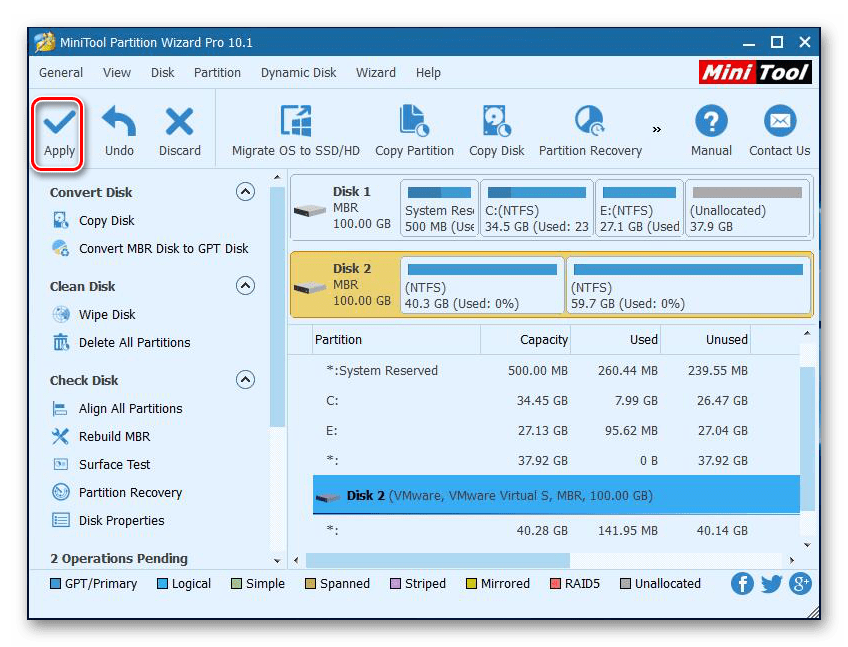
- Далее подтвердите выполнение операции восстановления, нажав на «Apply». После этого все разделы на SSD появятся в «Проводнике».
Это должно помочь решить проблему, однако в ситуации, когда нет необходимых знаний и на диске находятся нужные данные, лучше обратиться к профессионалам.
Причина 4: Скрытый раздел
Иногда SSD не отображается в Windows из-за наличия в нем скрытого раздела. Это возможно, если пользователь скрыл том с помощью стороннего ПО, чтобы предотвратить возможность доступа к данным. Решением является восстановление раздела при помощи софта для работы с дисками. Тот же MiniTool Partition Wizard хорошо справляется с такой задачей.
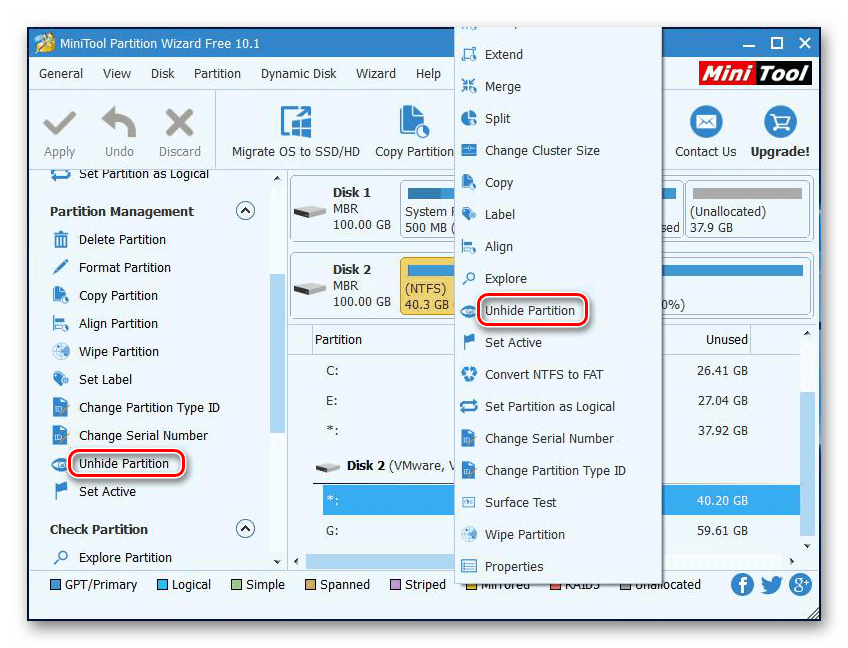
- После запуска приложения щелкните правой кнопкой мыши на целевом диске и выберите «Unhide Partition». Эта же функция запускается выбором одноименной строки в меню слева.
- Затем назначаем букву для этого раздела и кликаем «ОК».
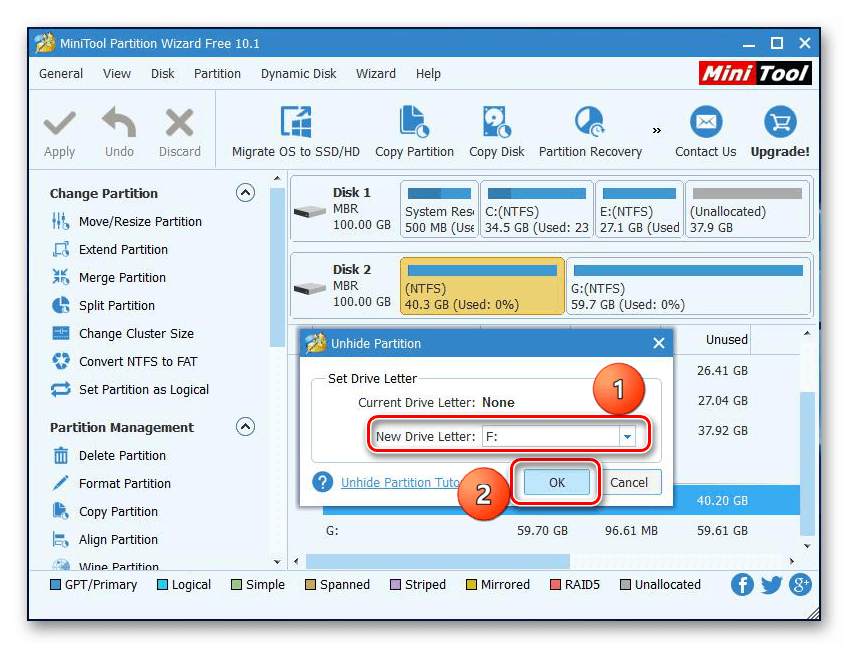
После этого скрытые разделы появятся в «Проводнике».
Причина 5: Неподдерживаемая файловая система
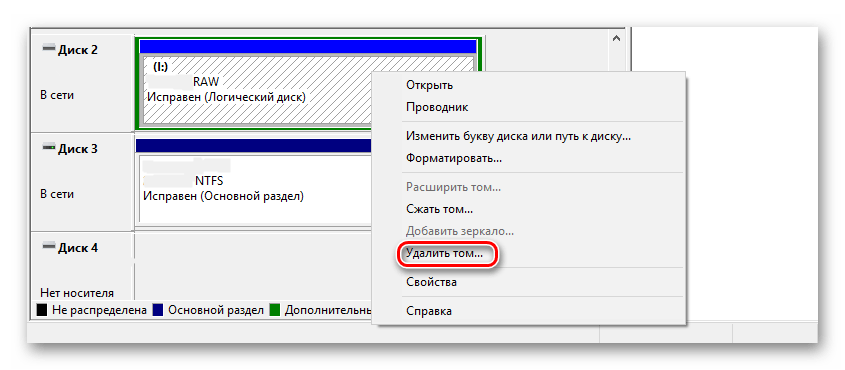
Если после выполнения вышеописанных действий SSD по-прежнему не появляется в «Проводнике», возможно, файловая система диска является отличной от FAT32 или NTFS, с которыми работает Windows. Обычно такой накопитель отображается в менеджере дисков как область «RAW». Для исправления проблемы нужно выполнить действия по следующему алгоритму.
- Запустите «Управление дисками», повторив шаги 1-2 из инструкции выше. Далее нажмите по необходимому разделу и выберите строку «Удалить том».
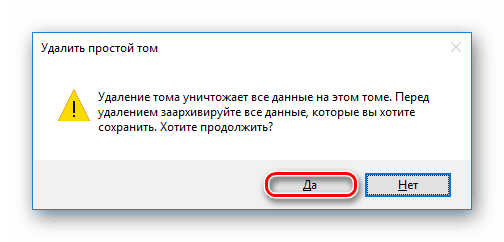
- Подтвердите удаление, кликнув «Да».
- Как можно увидеть, статус тома сменился на «Свободно».
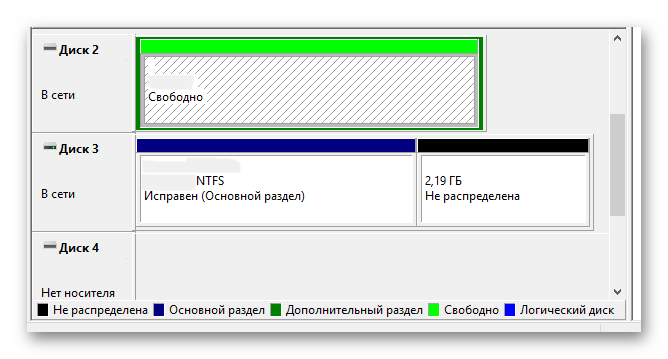
Далее создайте новый том согласно вышеприведенной инструкции.
Причина 6: Проблемы с БИОС и оборудованием
Существует четыре основные причины, согласно которым BIOS не обнаруживает наличие внутреннего твердотельного накопителя.
SATA отключен или имеет неправильный режим
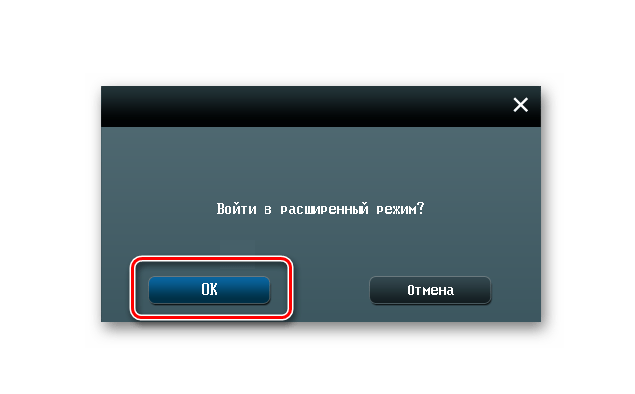
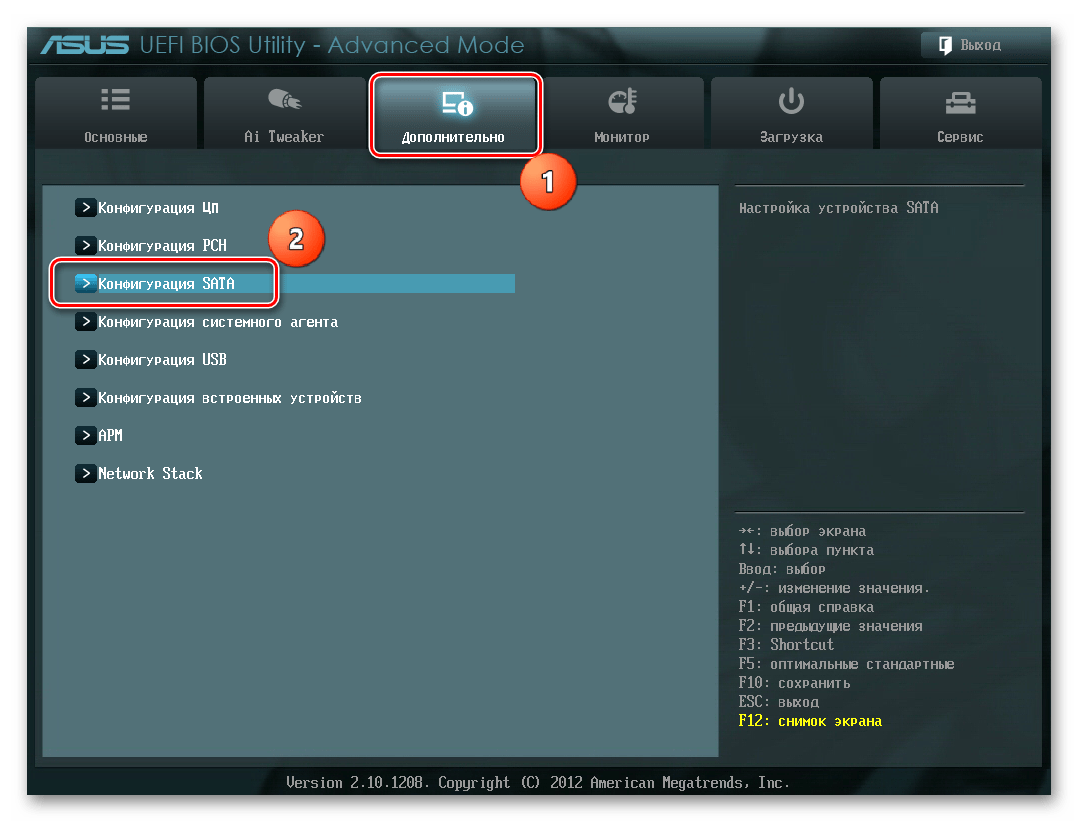
- Для его включения заходим в БИОС и активируем расширенный режим отображения настроек. Для этого надо щелкнуть по кнопке «Дополнительно» или нажать «F7». В примере ниже все действия показаны для графического интерфейса UEFI.
- Подтверждаем вход нажатием «ОК».
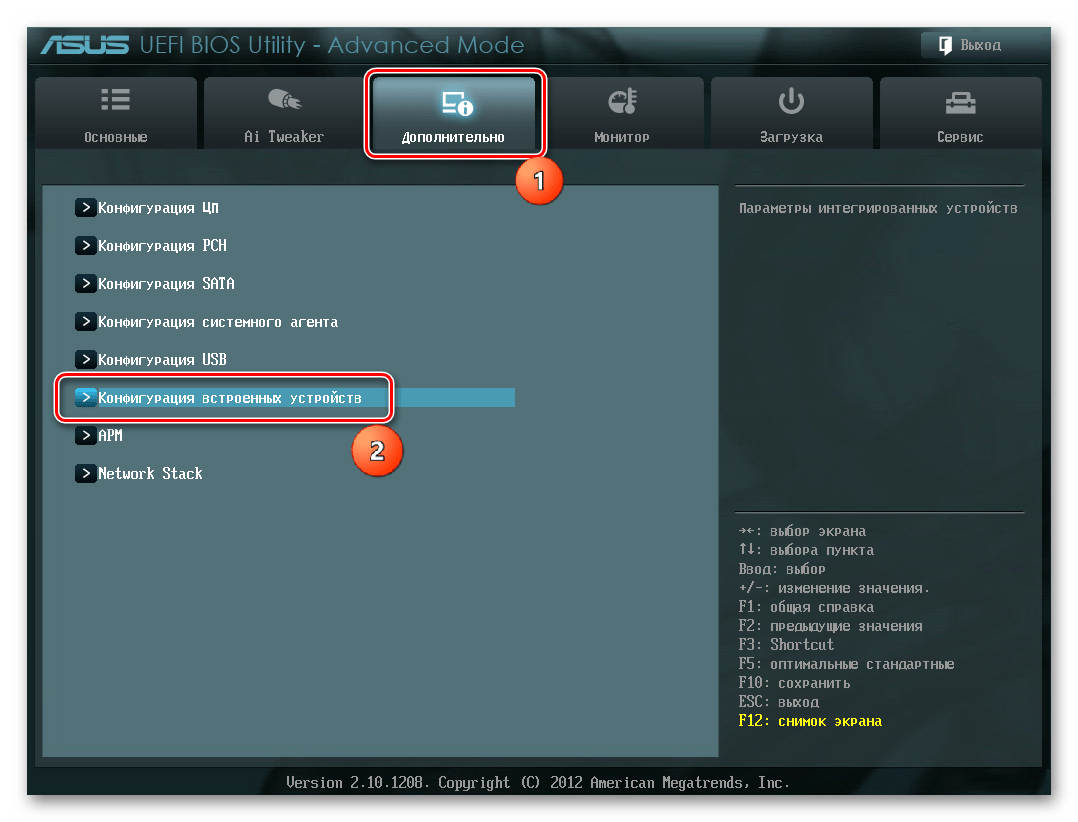
- Далее находим Конфигурация встроенных устройств во вкладке «Дополнительно».
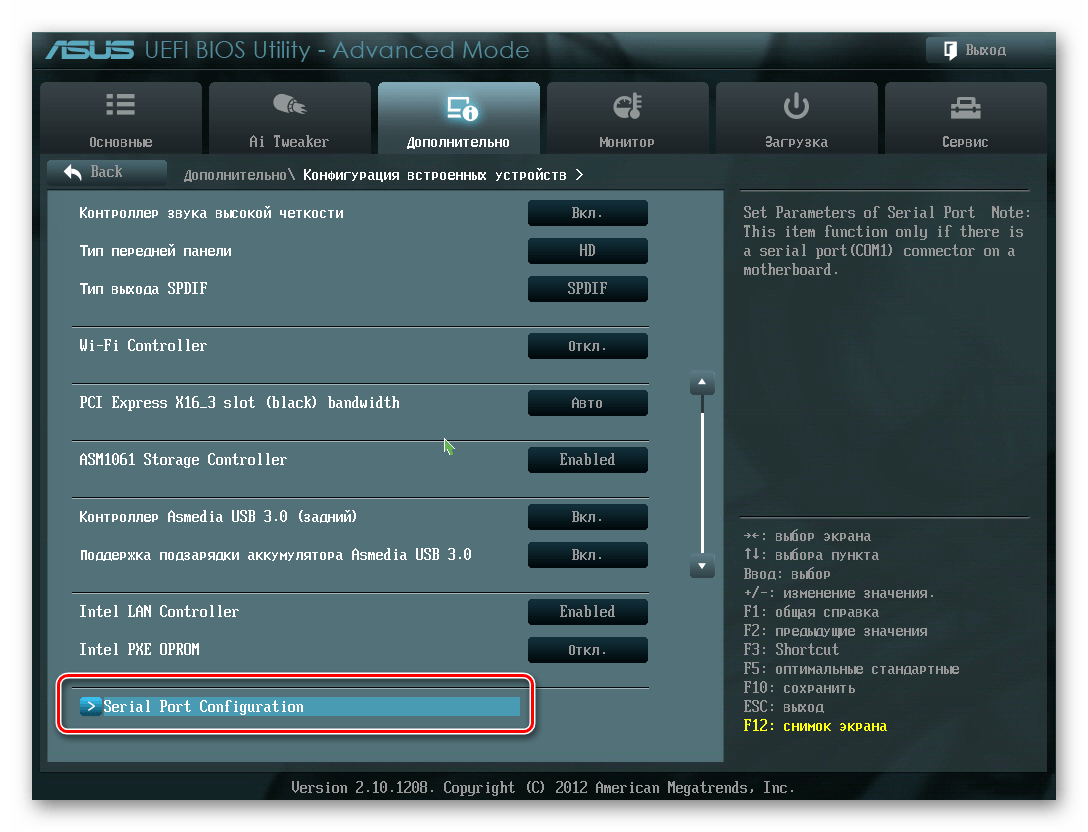
- Жмем по строке «Serial Port Configuration».
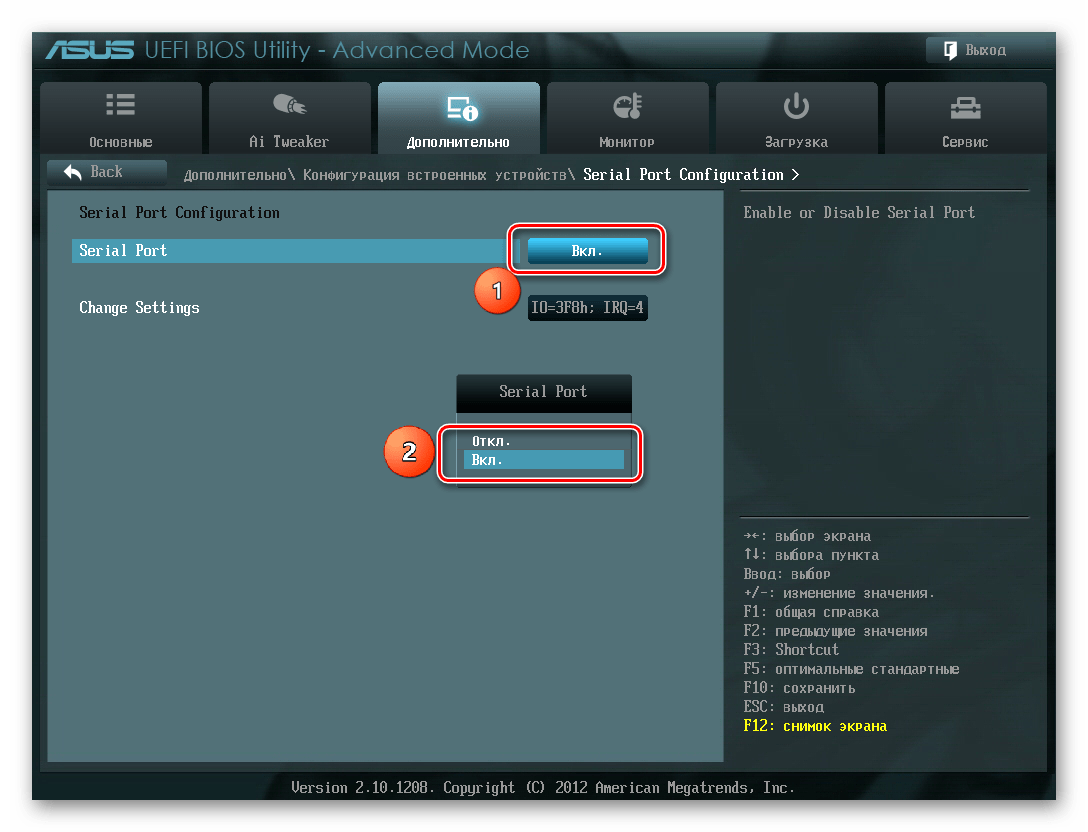
- В поле «Serial Port» должно отображаться значение «Вкл». Если нет, то жмем мышкой по нему и в появившемся окошке выбираем «Вкл».
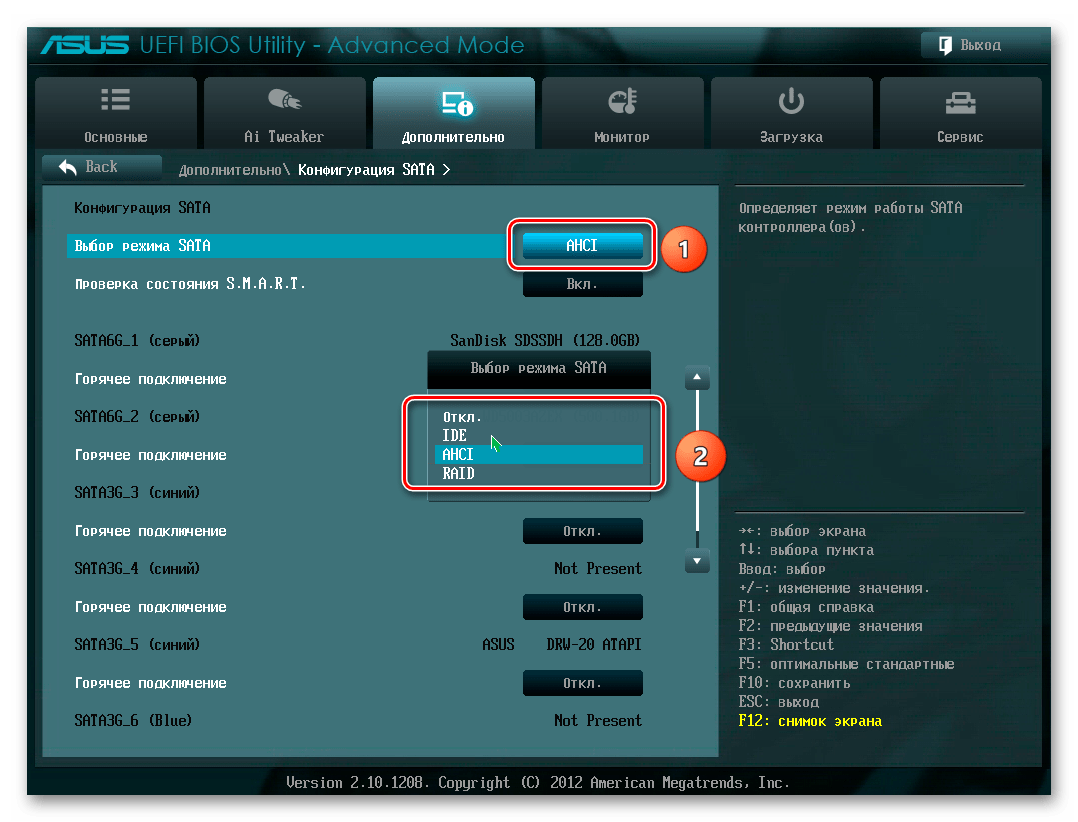
- Если все еще остается проблема с подключением, можно попробовать переключение режима SATA с AHCI на IDE или наоборот. Для этого сначала следует зайти в раздел «Конфигурация SATA», расположенный во вкладке «Дополнительно».
- Нажимаем кнопку в строке «Выбор режима SATA» и в появившемся окошке выбираем IDE.

Неправильные настройки БИОС
BIOS также не распознает диск, если имеют место неверные настройки. Это легко проверить по системной дате — если она не соответствует истинной, это свидетельствует о сбое. Для его устранения требуется выполнить сброс и возврат к стандартным параметрам согласно приведенной ниже последовательности действий.
- Отключите ПК от сети.
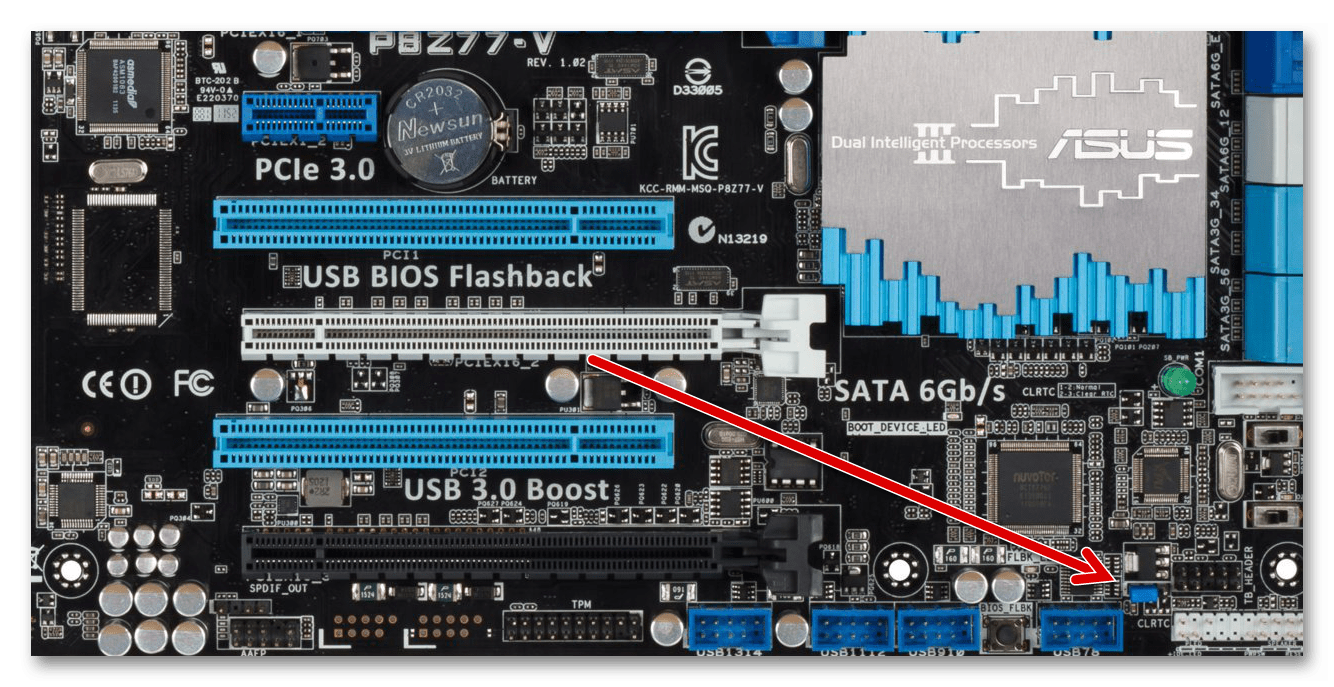
- Откройте системный блок и отыщите на материнской плате перемычку с надписью «CLRTC». Обычно она находится около батареи.
- Вытащите джампер и установите его на контакты 2-3.
- Подождите около 30 секунд и верните перемычку на исходные контакты 1-2.
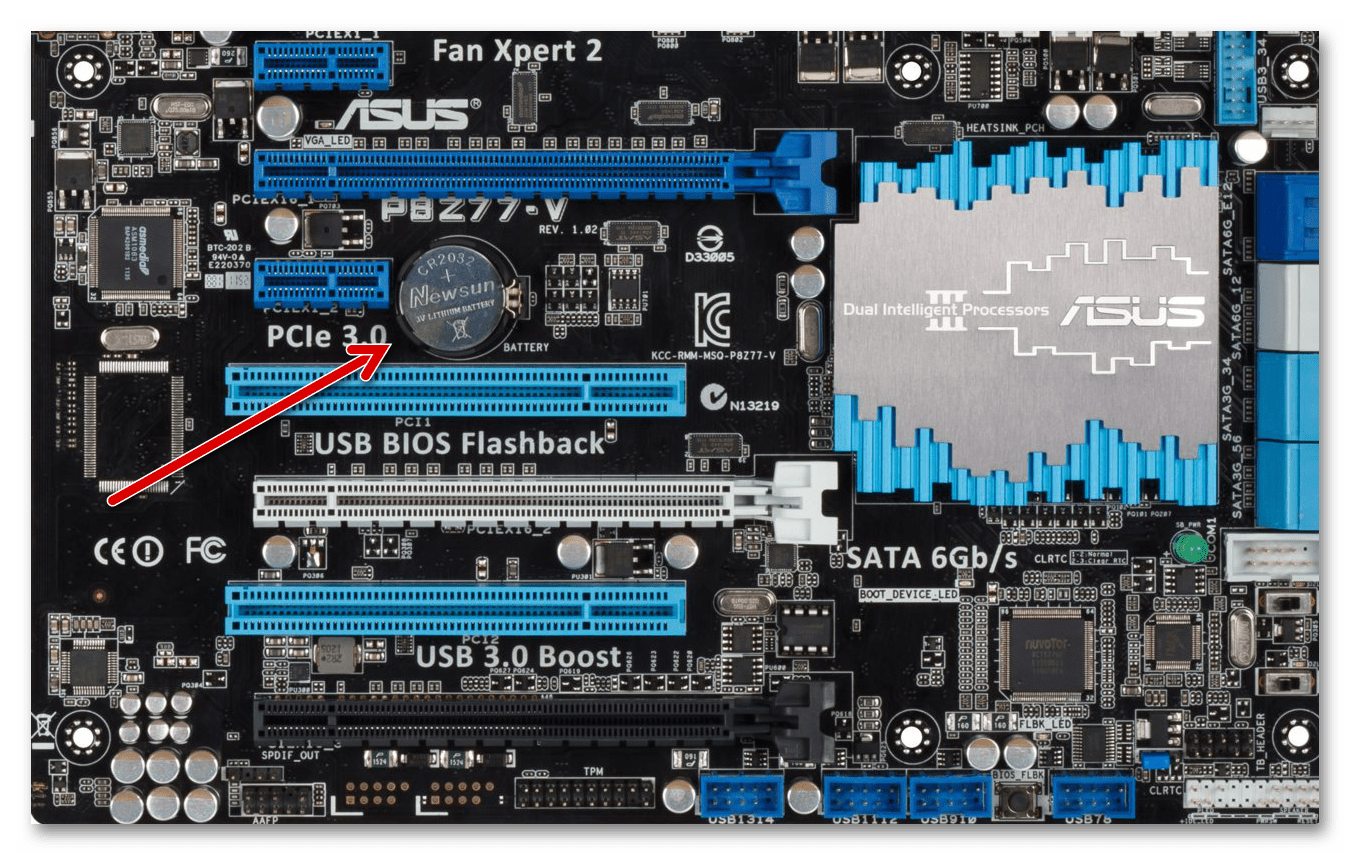
Как вариант, можно извлечь батарею, которая находится в нашем случае рядом с разъемами PCIe.
Неисправен кабель для передачи данных
BIOS также не обнаружит SSD, если кабель САТА имеет повреждения. В таком случае необходимо проверить все соединения между материнской платой и SSD. Желательно не допускать при прокладке каких-либо изгибов или защемлений кабеля. Это все может привести к повреждению проводов внутри изоляции, хотя внешне материал может выглядеть нормально. Если есть сомнение в состоянии кабеля, лучше заменить его. Для подключения устройств SATA компания Seagate рекомендует использовать кабели длиной менее 1 метра. Более длинные иногда могут выпадать из разъемов, поэтому обязательно проверьте, чтобы они были плотно подключены к портам SATA.
Неисправный твердотельный диск
Если после проведения вышеуказанных процедур диск все еще не отображается в БИОС, скорее всего, имеет место заводской брак или физическое повреждение устройства. Здесь необходимо обратиться в мастерскую по ремонту компьютеров или к поставщику ССД, предварительно убедившись в наличии гарантии.
Заключение
В этой статье мы рассмотрели причины отсутствия твердотельного накопителя в системе или в БИОС при его подключении. Источником возникновения такой проблемы может быть как состояние диска или кабеля, так и различные программные сбои и неправильные настройки. Перед тем как приступить к исправлению одним из перечисленных способов, рекомендуется проверить все соединения между ССД и материнской платой, попробовать заменить кабель SATA.
Summary: SSD showing Unallocated in Disk Management? What are the causes for it? Read this guide to learn the best ways to fix unallocated SSD and recover data with a powerful data recovery tool. The reasons why SSD becomes unallocated are also mentioned in post.

I swapped out my hard drive to an SSD and cloned the drive. The initial drive was 500 GB and the new SSD has 1Tb capacity. Everything went well, however when I tried to access my SSD drive, I couldn’t open it. To check if everything is fine, I opened Disk Management. The drive was appearing as unallocated. Please tell me how I can fix this. Any help would be appreciated!
Solid State Drives (SSDs) are significantly faster and improve the system’s performance. Also, these drives offer more reliability as compared to conventional HDDs. However, like any other drive, SSDs may become unallocated due to corrupt file system. There could be several reasons behind file system corruption such as virus attack or bad sectors in the drive. The SSD with the corrupt file system doesn’t appear in File Explorer. Though you can verify the status of the drive in the Disk Management. If you find the drive showing as ‘Unallocated’ (See Image 1) you may fix it with the best methods given in this blog.

The unallocated SSD becomes inaccessible, which means you may not access your data stored on the drive. No need to worry! You may recover the data with the help of an efficient data recovery tool.
Read on to know the best troubleshooting techniques to fix unallocated SSD to make it accessible again and use it as new.
Best Methods to Fix Unallocated SSD
Method 1: Assign a Drive Letter
You can try fixing the unallocated SSD by assigning the drive letter and later on formatting it and providing a file system to it.
a. Go to Windows Search Box and open Computer Management. (See Image 2)

b. Go to System tool and then click Device Manager (See Image 3)

c. Go to Storage and double-click on Disk Management and you will see the unallocated drive. (See Image 4)

d. Find the drive with unallocated space, right-click on it and select New Simple Volume. (See Image 5)

e. Click Next on the next prompt and then click Next again to specify volume size. (See Image 6)

f. Then assign the drive letter from the available options and click Next. (See Image 7)

g. Mark ‘Do not format this volume’ and click Next. (See image 8)

h. Finish the process. Once it’s done, you will be able to see the drive with a letter. However, the drive will turn RAW. (See Image 9)

As you chose to not format the drive, the drive turns RAW, but the data remains on the drive. So, you may recover data from RAW drive with a data recovery tool and then proceed with the next method.
Method 2: Format the Unallocated SSD
To get back your access to the solid-state drive (SSD), you may format the drive and provide it a file system with the help of the following steps:
a. Go to Disk Management and right-click on the RAW SSD.
b. Follow the on-screen instructions and proceed.
c. Click ‘Format this volume with the following settings’, choose NTFS as a file system and click Next. (See Image 10)

d. Click Finish to complete the process.
Formatting the drive to wipe out the data stored on it, can result in you losing all your important files, documents and other data. If you have already recovered the data from the drive, you can format the drive.
However, if you lose data after formatting the drive, the recovery is still possible with Stellar Data Recovery software. This DIY data retrieval tool lets you recover lost documents, email files, photos, videos, and more. The software can retrieve all types of hard drive and SSDs, SD/ Memory cards, USB drives & more. The data can even be retrieved from formatted, corrupted, or encrypted devices. The RAW SSD drive recovery is also possible. Check out the video to get back your data.
Method 3: Try Using Diskpart Utility
You may use Diskpart utility to fix the unallocated SSD. With the help of this command-line utility, you can quickly format the drive partition or change the drive partition to NTFS or FAT32.
Caution: Using Diskpart utility will format the drive, due to which, you will end up losing the data stored on the SSDs. Therefore, before proceeding, create a backup of your data.
Follow the below-said troubleshooting steps:
a. Open Command Prompt, and type diskpart command.
b. Next, type list disk and then type Select Disk 0 (Where disk 0 is the unallocated drive) and hit Enter. (See Image 11)

c. Type clean command on the next prompt.
d. Afterward, type create partition primary and hit Enter.
e. Then type format fs=fat32 quick or fs=ntfs quick, hit Enter and proceed. (See Image 12)

f. Let the process finish and restart the system. Check if the error is fixed.
This method may lead you to a data loss situation. So, you must keep a data recovery tool handy to recover lost data from SSD.
Wrapping up
Solid-State Drives are increasingly replacing mechanical hard drives. They offer better firmware encryption, ensuring better data privacy. However, SSDs are also prone to corruption, formatting, or virus attacks. Due to these reasons, SSD becomes unallocated. And, to fix the unallocated SSD, you may try all the methods given in this post. However, recovering data from SSDs is a little bit tricky, but you may use an efficient data recovery tool such as Stellar Data Recovery software to get back your data. This easy-to-use software can even restore data from formatted and corrupted Windows PCs as well as external storage devices.
About The Author
Mansi
Mansi Verma is a Technology Writer at Stellar®. She is a Tech enthusiast, holding over 7 years of experience in Data Recovery, IoT, Artificial Intelligence, and the Robotics technology domain. She loves researching and providing DIY solutions and tips & tricks to solve Windows technical issues. In her spare time, she likes reading novels, and poetry. She also enjoys traveling and trekking.
Best Selling Products

Stellar Data Recovery Professional
Stellar Data Recovery Professional softw
Read More

Stellar Data Recovery Premium
Stellar Data Recovery Premium for Window
Read More

Stellar Data Recovery Technician
Stellar Data Recovery Technician intelli
Read More

Stellar Data Recovery Toolkit
Stellar Data Recovery Toolkit is an adva
Read More
When your external hard drive becomes unallocated, relax! Follow solutions on this page to fix external hard drive unallocated errors without losing any data.
How to access unallocated external hard drive data
«Hey there, do you know how to fix an external hard drive with an unallocated error? My 1TB WD external hard drive suddenly shows up as unallocated in Disk Management on my PC. I don’t want to format it for that I’ve saved quite a lot of important files on it.
I cannot access saved data on the unallocated external hard drive, either. Help me please.»
So how does your external hard drive become unallocated? Here is a list of reasons that may cause external hard drives or storage devices unallocated:
- File system and internal device error
- Improper operations
- Virus attack
- Outdated disk driver
If you are experiencing the same issue on an external hard drive, USB drive, SD card or memory card, etc., stop using the device. In the following, you’ll learn how to restore data, repair the unallocated external hard drive, and tips to avoid the unallocated issue.
Part 1. Restore data from unallocated external hard drive
Most users use an external hard drive to save valuable files and essential data. And when the external hard drive becomes unallocated, restoring data becomes the top priority.
With the help of professional data recovery software such as EaseUS Data Recovery Wizard, you still have a chance to recover data from the drive. How?
This software enables you to recover lost data from unallocated space on a hard drive or external hard drive with ease. Download EaseUS hard disk recovery software here and follow the guide below to restore data:
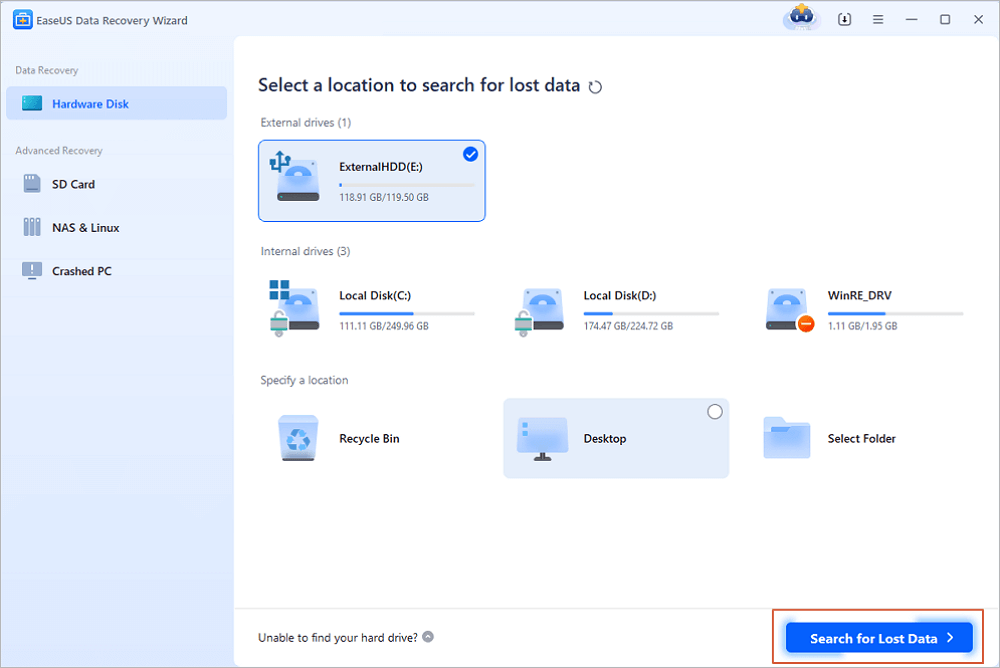
Step 1. Use a correct USB cable to connect your external hard drive to your computer. Run EaseUS Data Recovery Wizard and you will see your external disk under External drives. This software supports all the popular external disk brands, including WD, Seagate, Toshiba, LaCie, SanDisk, Samsung, etc.
Select the external hard drive and then click the «Scan» button.
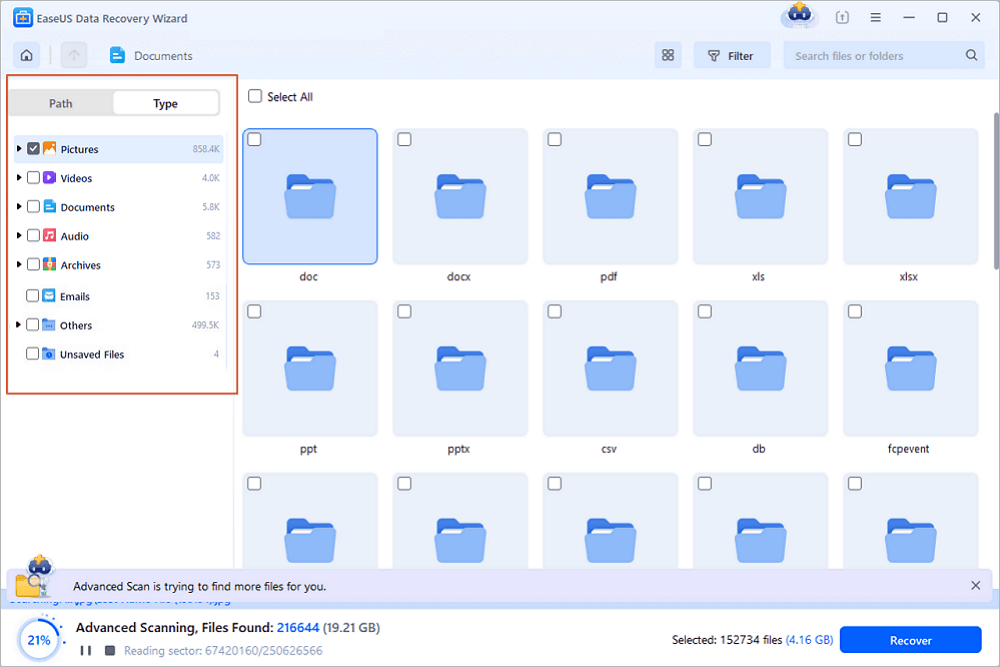
Step 2. As soon as the scan process starts, the software will find more and more lost and deleted data and display the data in the scan results. The recovered data will be nicely organized. You can quickly find the target files/folders by file type or search in the search box with exact file name.
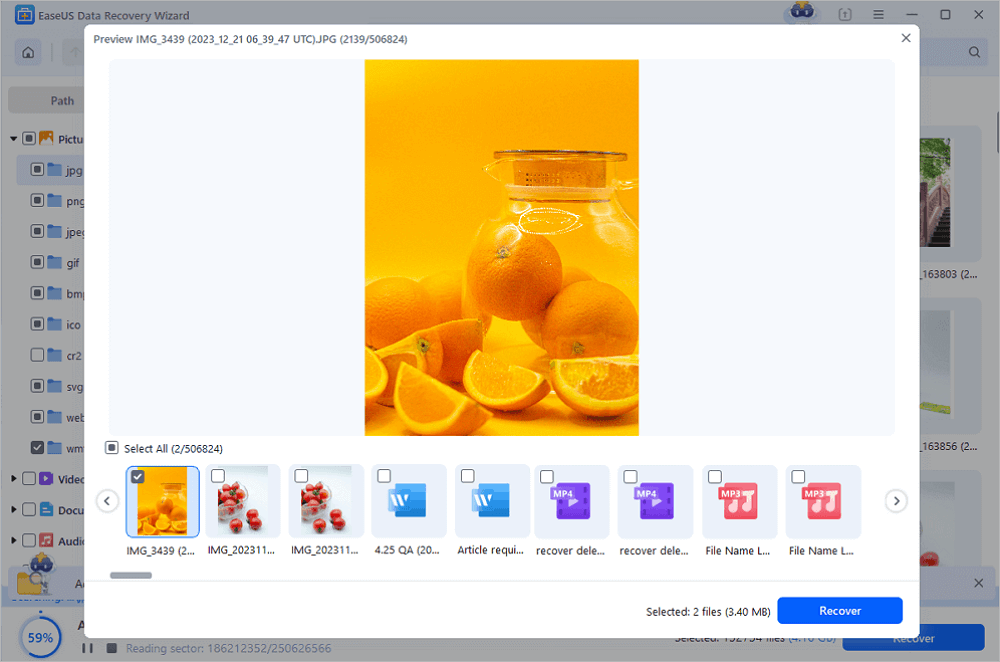
Step 3. You can preview the files found by EaseUS Data Recovery Wizard’s scanning algorithms. Then, select files and click «Recover». To avoid data overwriting, we recommend that you save the recovered data to a different drive than the original Seagate drive.
Activation is required when you tend to restore all found files. Also, remember to save the recovered data to another secure device.
It’s easy to fix the external hard drive unallocated issue. All you need is to create a new partition on the external hard drive, set NTFS or FAT32 as its file system.
Here, you can try two free methods provided below for help.
1. [Automated] Repair unallocated external hard drive with partition manager freeware
By creating a new partition on the unallocated external hard drive with a compatible file system, users can store files on the device again.
Free partition manager software like EaseUS Partition Master Free supports to do so within 3 steps:
- Notice:
- If you want to create a partition on an empty USB, SD card or external hard drive, connect it to your PC in advance.
Step 1. Launch EaseUS Partition Master. On the main window, right-click on the unallocated space on your hard drive or external storage device and select «Create».
Step 2. Adjust the partition size, file system (Choose the file system based on your need), label, etc. for the new partition and click «OK» to continue.
Step 3. Click on the «Execute 1 Task(s)» button and create a new partition by clicking «Apply».
Watch the following video tutorial and learn how to create a partition in NTFS, FAT, or EXT file system.
After this, you can save the previously restored data back to the external hard drive and even save more files on it again.
2. [Manual] Create a new partition on an external hard drive with Disk Management
Another free method that you can try is to create a partition on the unallocated device by using Disk Management. Be careful while following steps here to fix the unallocated external hard drive issue:
Step 1: Connect the unallocated external hard drive to the PC, enter Disk Management.
Right-click on This PC/My Computer > Manage > Disk Management.
Step 2: Locate and right-click on the unallocated space of the external hard drive, select «New Simple Volume».
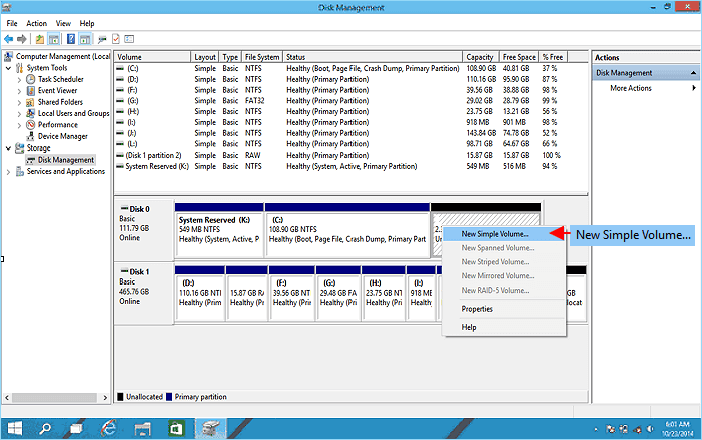
Step 3: Set partition size, drive letter and file system (NTFS), etc.
Step 4: Click «Finish» to complete the process.
After this, you’ll be able to use the external hard drive to save and store important data again. You can also transfer the previously restored data back into the external hard drive again.
Tips to prevent the external drives from becoming unallocated
Here are some practical tips that you can follow to prevent further unallocated errors from happening on your external hard drive and other storage devices:
- 1. Update external hard drive driver.
- 2. Recover NTFS partition on external hard drive with CHKDSK or EaseUS partition manager software.
- 3. Run anti-virus software to clean up viruses in PC and external hard drive.
- 4. Use storage devices and unplug carefully from your PC.
Repair Unallocated External Hard Drive FAQs
We have prepared four additional questions to help you learn more about repairing unallocated external hard drives:
How to repair an unallocated external hard drive manually?
You can fix an unallocated external hard drive by creating new partitions:
- 1. Connect your external hard drive to your computer.
- 2. Open Disk Management on your computer.
- 3. Right-click the unallocated space and choose «New Simple Volume».
- 4. Set the size, letter, and format. Then you should wait and click «Finish» to complete the process.
How to fix WD external hard drive not showing up?
There are four ways to fix WD external hard drive not showing up on your computer:
- 1. Check the USB ports and cables.
- 2. Run an antivirus tool or use CMD to remove the virus.
- 3. Turn on the USB Root Hub in «Power Management».
Why is my external hard drive unallocated?
The external hard drive may appear to be «uninitialized» or «unallocated» for a number of frequent causes, such as sudden power outages, improper insertion or extraction, faulty sectors, physical damage, etc.
How to recover data from an unallocated external hard drive?
You can recover data from an unallocated external hard drive with EaseUS Data Recovery Wizard or find a data recovery service.
- 1. Scan the external hard drive and scan the lost partition.
- 2. Filter the files to find the required files easier.
- 3. Preview the data and click «Recover» to retrieve the files from the external hard drive.