Understand SSL Certificate Errors and Handle Them in Android Devices
The world of technology has been growing rapidly and its impact can see through the growing figure of desktop and mobile devices usage. In era of digital technology, users want to secure their website information and user data on desktop along with mobile devices too.
SSL certificate is an essential aspect of website development and its compulsory asset of online business which helps to secure website and user data on the Internet. Our experts have evaluated various styles of SSL certificate errors that need to be resolve when it comes to SSL certificate security Android-based mobile devices.
Let’s take a broad view of types of SSL certificate errors in Android-based devices.
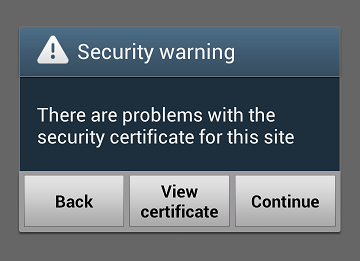
“SSL Certificate is not trusted on Android Device Only”
The following error of SSL certificate on mobile devices is just because of a chain certificate. Android OS devices have always importance in the ordering of SSL certificates. If you have a chain certificate then you must have the right order of certificate such as intermediate certificate and then primary certificate.
The solution for the above error is just re-order your certificates in the right order on the server because Android OS is more stringent about the order of certificate.
“SSL Certificate is not accepted by Android Device”
In above error of SSL certificate, you must have the right order of certificates installed on the server such as you must have chain, server, root and intermediate certificate to get verified on the Android devices.
SSL Error “Your Connection is Not Private” on Android Device
SSL Connection Error “Your Connection is Not Private” is one of the common errors faced by many Android and other devices. In simple terms, it means your Internet connection, or your Android device is preventing you from loading the page privately & securely.
Some of the common reason you face this error are:
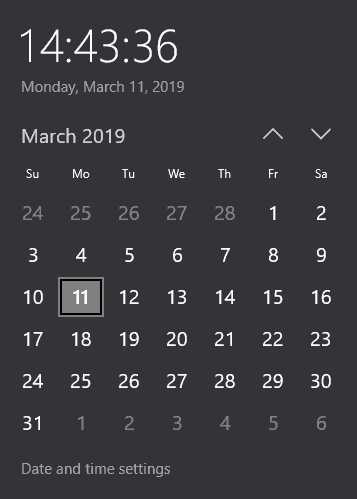
- Invalid System Time
- Firewall blocking the website or IP address
- Browser extension blocking the website
- Cookies and Cache not cleared for a long time
- If SSL/TLS Certificate is not installed correctly on the website server
- If there’s a mixed content of HTTP & HTTPS on the website
The solution to fix ‘Your Connection is Not Private Error’ in Android
- Invalid Date & Time
- Cache & Browser History
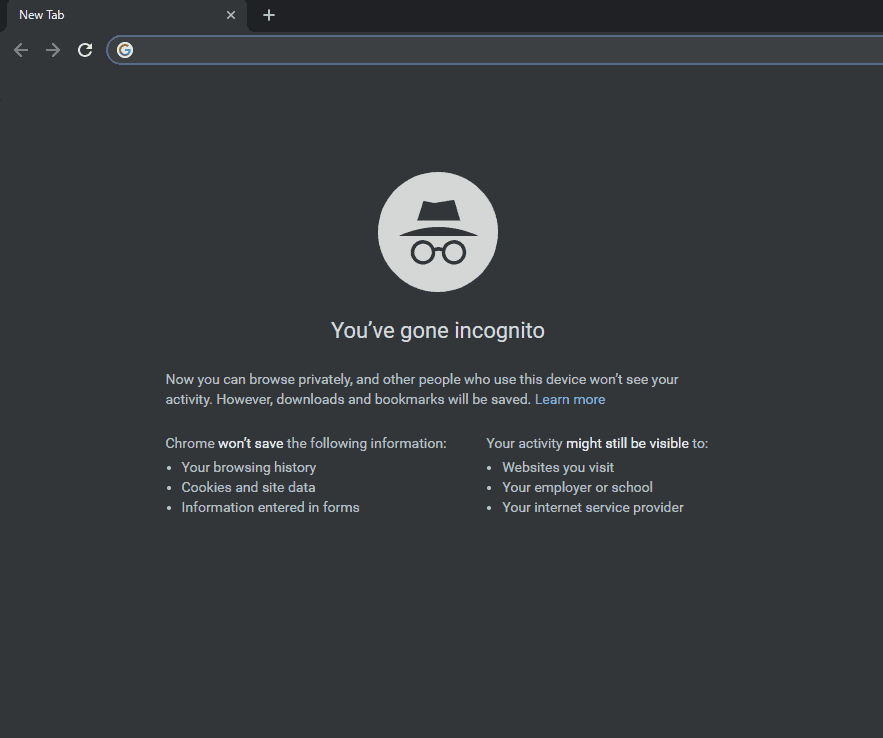
- Visit website in Incognito (Private) Mode
- Antivirus or Security Application
- Network problem
- Update Browser
- Factory Reset your Android Device
Solution #1: Invalid Date & Time:
It’s not going to happen; again there could be a slim chance that current time and date is not set on your Android device. It’s better you check it once. If it’s wrong, correct it by going into Settings & enabling Automatic Date & Time.
Solution #2: Cache & Browser History:
It could be possible that your device might have stored several cookies from different websites you visited, or you haven’t cleared the history and cache files for a long time. It’s better to clear these cookies and history.
In PC: Press Ctrl + Shift + Delete and clear the data.
In a Mobile Phone: Chrome menu → Settings → Privacy → Clear Browsing Data

Solution #3: Visit website in Incognito (Private) Mode:
There’s a possibility while browsing in the normal window you might face this error. Try to open in private mode/window of the browser.
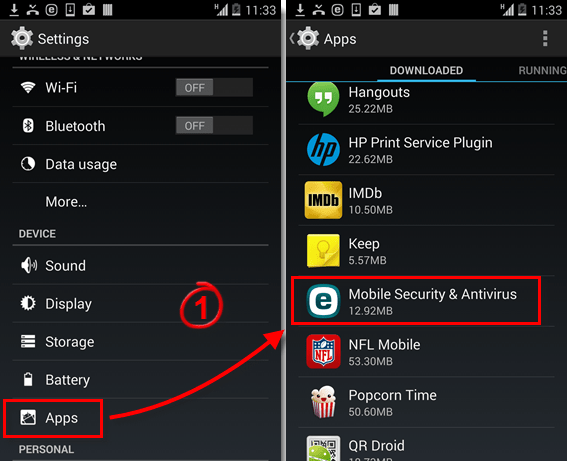
Solution #4: Antivirus or Security Application:
If you’re using any Antivirus or Security Application, there’s a possibility it might be blocking it. Disable it temporarily by going to Settings > Apps
Solution #5: Network problem:
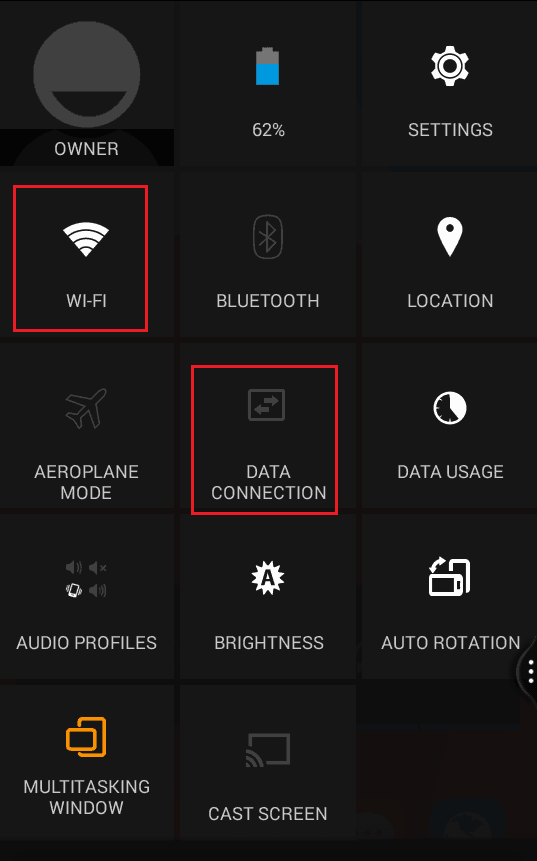
If you’re still facing the problem, there’s a chance that the internet network you’re using could be making a problem. Switch to another Wi-Fi or mobile data network.
Solution #6: Update Browser:
If you haven’t, update it, there’s nothing wrong. It could be a culprit.
Solution #7: Factory Reset your Android Device:
If none of the above steps worked for you, there’s one more way. Factory Reset. If you choose this option, be sure to have a proper back up of all your essential data.
Go to Settings > Backup & Reset.
Finally, click on Factory Data Reset.

More information about SSL certificate documents in Android Devices visit the official website of Android Developers.
Related Posts:
![]()
$6.55
Vendor Price: $41.73
Coupon Code: ASCSCPSSL4
Get It Now
![]()
$13.45
Vendor Price: $69
Coupon Code: ASRSRSSL2
Get It Now
![]()
$17.54 – 2 SAN Included
Vendor Price: $41.73
Coupon Code: ASCSCPMD4
Get It Now
Disclosure: AboutSSL appreciates your continuous support. It helps us tremendously to keep moving in the competitive SSL industry. Here most of the links which direct you to buy any SSL/TLS related service or products earns us a certain percentage of referral commission. Learn More
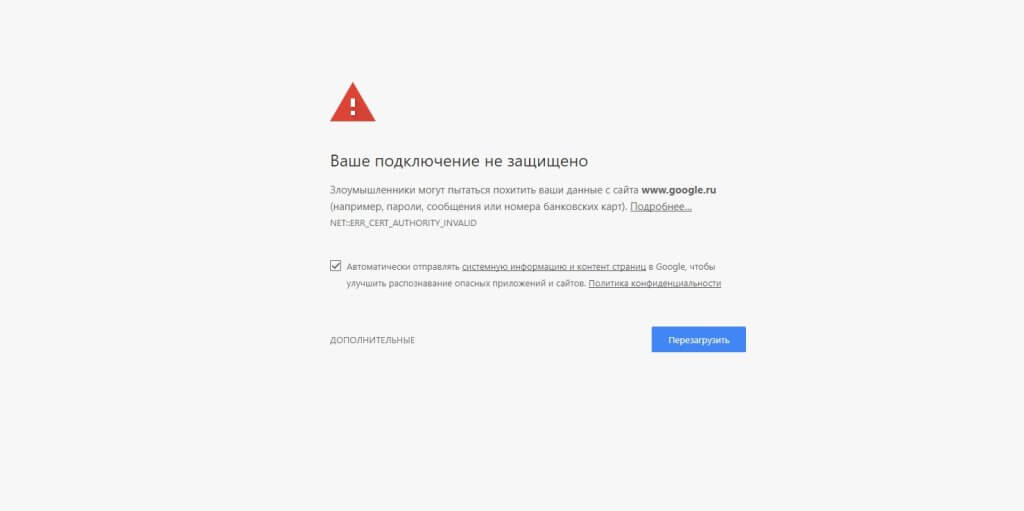
Одна из наиболее частых проблем на устройствах Android представлена в виде уведомления браузера, в котором сообщается: «Ваше соединение не является безопасным». Это может вызвать сомнение. Такое сообщение всплывает даже на новейших устройствах с последними обновлениями и текущей ОС. Это не большая проблема, но все же возникает вопрос: «Как исправить ошибки соединения SSL на устройствах Android?»
Начнем с сертификатов SSL / TLS
Немного об SSL. Сертификат SSL, наверняка, как Вы знаете, предназначен для аутентификации подлинности web-сайта. Центр сертификации, который выдает сертификат, гарантирует пользователю, находящемуся на другом конце вашего соединения, что весь обмен данными между вашим браузером и web-сервером зашифрованы.Это крайне необходимо, поскольку без SSL шифрования все операции, которые вы совершаете на web-странице, находятся в открытом доступе и могут быть перехвачены или обработаны третьей стороной. Однако с помощью SSL-сертификата эта связь шифруется и может быть расшифрована только самим сайтом. Посещение сайта без безопасного соединения может закончиться для вас плачевными последствиями! Что бы полностью во всем разобраться, понадобится еще одна важная информация. SSL на данный момент является только разговорным термином для протокола. SSL расшифровывается как Secure Socket Layer, это был оригинальный протокол для шифрования, но TLS или Transport Layer Security заменили его некоторое время назад. Оба они выполняют практически одно и то же, но на данный момент истинный SSL был постепенно прекращен (Android больше не поддерживает SSL 3.0 — его последнюю версию), и мы действительно говорим о сертификатах TLS.
Как исправить ошибки SSL соединения на устройствах Android
Когда Вы получите сообщение об ошибке SSL-сертификата на вашем смартфоне Android, Вы можете исправить эту проблему несколькими способами. Если какой-то из них не работает, попробуйте следующий. В конечном итоге, проблема будет решена.
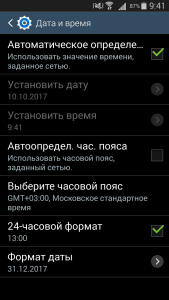
1) Исправьте дату и время в своем смартфоне
Это простая причина, которую можно решить на Android. Просто убедитесь, что дата и время верны. Для этого перейдите в «Настройки» и выберите «Дата и время». Оттуда просто активируйте опцию «автоматическое определение даты и времени».
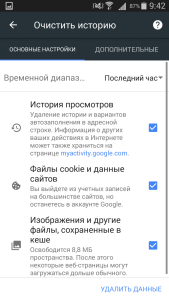
2) Очистить кэш в браузере (Chrome, Opera, Edge и т.д).
Если исправление даты и времени не сработают, вам следует очистить историю просмотров в браузере. Это еще один простой способ. К примеру, возьмем Chrome. Начните с открытия браузера и затем нажмите «Меню». Перейдите в «Конфиденциальность» и выберите «Настройки». Затем выберите «Очистить данные просмотра». Проверьте все флажки на экране, а затем нажмите «Очистить».
3) Изменение Wi-Fi-соединения
Попробуйте изменить соединение Wi-Fi на своем устройстве, если очистка данных и сброс вашего времени и даты не сработали. Возможно, вы пользуетесь общедоступным Wi-Fi соединением, которое, как известно, небезопасно. Найдите частное соединение Wi-Fi и проверьте, исправлена ли ошибка на Android.
4) Временное отключение антивируса
Если на Вашем устройстве Android установлен антивирус или другое защитное приложение, попробуйте временно отключить его, а затем снова включите. Иногда эти приложения могут создавать помехи для вашего браузера, таким способом приводя к сбою SSL-соединения.
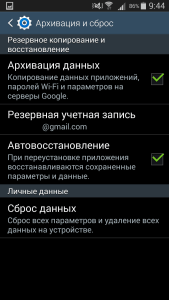
5) Сбросьте все настройки на своем устройстве Android
Это крайний вариант, но если все другие вышеупомянутые предложения не смогли решить проблему SSL-сертификата, Вам может потребоваться отформатировать устройство. Первым шагом в этом случае является резервное копирование вашего телефона, чтобы Вы не потеряли все, что Вы сохранили на нем. После этого выберите «Настройки», а затем «Резервное копирование и сброс». Затем нажмите «Сброс заводских настроек»
Надеемся, что это руководство показало Вам, как исправить ошибки соединения SSL на ваших устройствах Android.
Ни перезагрузка интернета, ни перезапуск браузера не помогают избавиться от ошибки. К счастью, существует ряд способов исправить проблему с подключением к нужной странице.
Отладка интернет-соединения
Прежде всего стоит использовать альтернативную точку доступа: подключиться к Wi-Fi, если у вас мобильный интернет, или наоборот – отключиться от стационарной точки доступа и использовать сотового оператора.
Попробуйте загрузить другой веб-сайт. Возможно, проблема не в вашем подключении, а в неполадках на стороне провайдера или самого сайта. Если это так, проблему скорее всего уже решают, так как ошибки при соединении в этом случае будут не у вас одного.
Иногда после очередного обновления в работе приложения могут наблюдаться сбои. В этом случае стоит попробовать полностью сбросить сетевые настройки.
- Перейдите в настройки смартфона.
- Найдите меню «сброс и восстановление» (в разных смартфонах оно может находиться либо в самом низу списка настроек, либо в одном из подпунктов).
- В меню «сброс и восстановление» выберите «сброс сетевых настроек».
Дата и время как виновники всех проблем
В современных гаджетах многие приложения (в особенности сетевые программы) синхронизируются с часами. Любая манипуляция с текущей датой приводит к ошибкам приложения. Об ошибочной дате может сообщить сам гаджет: он попросит перевести часы в соответствие с текущим временем.
Чтобы не настраивать каждый раз время на телефоне вручную, поставьте галочку в настройках «дата и время» напротив пункта «дата и время сети» или «синхронизировать время по сети»
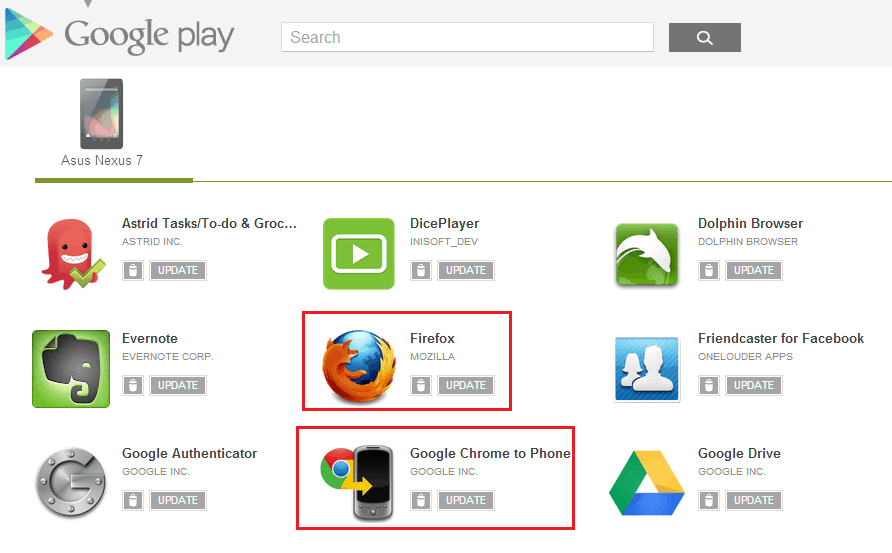
Всегда обновляйте устаревшие приложения
Ошибка SSL-подключения может возникать и при долгом отсутствии обновлений. Связано это с просроченным сертификатом текущей программы, так как действие сертификатов ограничено из целей безопасности.
Чтобы обновить текущий софт на смартфоне, необходимо:
- зайти в меню Play Market;
- выбрать пункт «мои приложения и игры»;
- нажать кнопку «обновить все».
Если вы не желаете обновлять некоторые приложения, всегда можно провести процесс в ручном режиме. Для удобства рекомендуется зайти непосредственно в настройки приложения и отметить галочкой пункт «автоматическое обновление».
Проводите регулярную очистку кэша в браузере
При обновлении софта нередко остаются кэшированные данные, которые мешают корректно обрабатывать текущие страницы сайта, из-за чего возникают ошибки с сертификатом.
Чтобы очистить кэш, можно использовать внутренние настройки самого браузера либо универсальную утилиту для очистки системы Android.
Для чистки кеша необходимо:
- зайти в настройки телефона;
- выбрать меню «приложения»;
- найти веб-обозреватель и тапнуть по нему.
В зависимости от операционной системы здесь может возникнуть необходимость зайти в пункт «память». В общем, найдите кнопку «очистить кеш» и смело жмите на нее.
Антивирус мешает корректной работе в сети
Хоть антивирус и предназначен для поиска уязвимостей в системе и предотвращения несанкционированного доступа в систему, он может блокировать и текущее подключение к сети, выдавая SSL-ошибку. Есть вероятность, что в эту самую минуту он отражает атаку, поэтому ошибке стоит уделить особое внимание и отключиться от текущей сети, особенно если вы используете публичную точку доступа.
Полное восстановление устройства из бэкапа
Знайте, что иногда восстановить смартфон в первоначальное состояние куда проще, чем искать виновника проблем. Если ничего не помогло и вы решились на кардинальные меры, необходимо:
- перейти в настройки смартфона;
- отыскать пункт «сброс и восстановление»;
- в подпункте выбрать «полный сброс до заводских настроек».
Нетрудно догадаться, что все ваши личные данные будут утеряны безвозвратно. Поэтому рекомендуется использовать резервную копию данных контактов и заметок. Если при первой настройке вы соглашались резервировать свои данные в Google-облако, то после сброса до заводского состояния используйте свой аккаунт для восстановления данных.
Однако это не распространяется на фото, видео и музыкальные файлы, поэтому перед форматированием скопируйте мультимедиа с памяти устройства на свой компьютер.
Новые публикации
Самые свежие публикации на сайте
SSL connection error on Android occurs when you try to access the website on a web browser and it can’t verify the SSL certificate installed on a site.
In this article, we will discuss SSL connection error on Android. Before it, we need to understand a little about SSL certificate.
SSL encodes the information sent to the web thus preventing it from eavesdropping by the third party. Only the receiver who has a private key can decrypt the communication in this case.
SSL was the original encryption protocol which was later replaced by TLS. It is one of the measures of ranking factors whereby google uses it in case the certificate is not trusted. While using an Android phone to surf a type of SSL error known as “Your Connection is Not Private”, “This site certificate is not trusted”.

Sometimes it’s very hard to solve the error. The main issue may either lie in the server or the website. SSL certificate is compulsory while doing online business and is meant to secure the website by identifying the website and authenticating it thus it is easy to know who one is communicating to.

Reason for SSL Connection Error on Android Device
- The time in the system might be invalid. This means that Android time and browser time do not match.
- The network device is responsible for monitoring the traffic to or from your device networks thus keeping the device from destructive network elements, commonly known as firewalls might have blocked the website and the IP Address. Firewalls used are mainly of three types; the proxy server, the packet filters and the stateful inspection firewalls.
- Having the cookies and cache staying for a long period of time without being cleared.
- The Transport Layer Security (T.S.L) and the Security Socket Layer (S.S.L) might have been wrongly installed on the website server.
- Having a mixed context of Hypertext Transfer Protocol (HTTP) and Hypertext Transfer Protocol Secure (HTTPS). HTTPS is a layer protocol application which mainly focuses on to present a piece of certain information on the computer to the user without addressing the data transfer from one point to another thus creating a room for alteration by a third party. While HTTPS works like HTTP though it works in alliance with SSL to transfer data safely.
How to Fix SSL Connection Error On Android?
Below is the step-by-step guide to solving SSL Connection Error On Android.
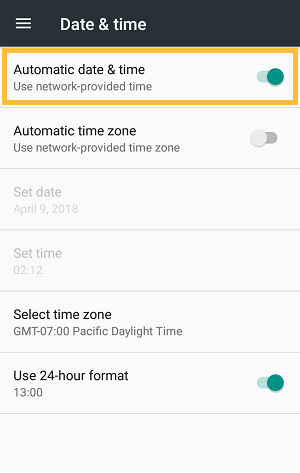
Step #1. The correct date and time should be set
Time and date should be automatically set so that the server time may match with the Android phone. One should go to settings and save the changes of automatic time and date then close all tabs and restart your Android device.
(Settings> Date and Time> automatic date and time.)
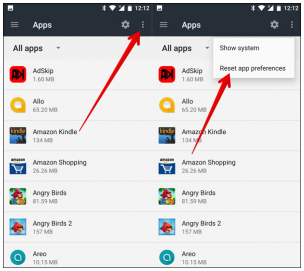
Step #2. The app preferences are reset
In order to reset the app preference all apps are set as default. also, the recently installed apps are deleted. The process starts by going to the settings, clicking on the apps and finally on the app preferences.
(Settings> apps> menu icon reset app preferences.)
Step #3. Initiating the incognito mode
In the incognito mode, the browsing data of chrome is cleared completely. It entails clear browsing history, clear the cache and finally clear the cookies site data. This is done by opening chrome, going to menu, settings and finally the browsing data chrome.
(Settings> apps> scroll down to chrome browser> clear browsing data)

Step #4. Changing the connection of the Wi-Fi
If after resetting of the time, time and data don’t work, try to use a private Wi-Fi which is more secure compared to a public Wi-Fi. This might help to resolve the error.
In order to know if the issue is within the phone settings, it is advisable for one to use a different phone with a higher network connection like 4G or by changing the Wi-Fi network used. In this case, if a different phone can access the same network then the phone settings are the ones which have a problem. On the other hand, if the same phone can access a different network and not the one being used, the network itself has an issue and needs to be changed.
The issue here might either lie within the phone or within the internet where the network providers are informed in order to help.
Step #5. Antivirus protection is turned off
The antivirus protection in some apps sometimes causes failure in SSL connection. Turning off the antivirus can cause the SSL connection to work where it had failed. The antivirus protection though meant to protect some apps is temporarily turned off and then browsing is done again. Once browsing is complete. It can be turned on.
Step #6. The factory data reset of the Android phone is done
While doing this it means that all the personal data is lost, and the phone appears as new as only the software data is retained. It is, therefore, advisable that before doing a factory data reset, the personal data should be backed up. The process tends to reset all the settings.
There are several steps carried out in chrome in order to do this;
- Visit the settings apps on any android phone which one might be using
- Scroll down until you find backup and reset
- Tap on the backup and reset then tap on the factory data reset then choose the phone reset tool.

The android device will now appear as newly purchased. Chrome is then installed. The errors will by then, have completely cleared.
Related Post:
- How To Fix “The Server’s Security Certificate Is Revoked!” Error?
- How To Stop “Secure And Nonsecure Items” Warning On Your Site?
- Fix “ERR_SSL_PROTOCOL_ERROR” for Google Chrome?
![]()
Recently I was working on a chat application for the android platform, everything regarding the remote/networking implementation worked flawlessly. I used the Retrofit networking library and socket.io. At the time, the base url was without SSL (that is the HTTP scheme — http://api.example.com)
Just before we rolled out the MVP for beta testing, we acquired a domain name and enabled SSL on the server. This meant the base URL scheme became HTTPS (e.g https://api.example.com).
The change on the app to use a secured URL broke the entire app. All the endpoints were not connecting to the server successfully. Basically the network handshake process between the client and server wasn’t successful. Below is what the the error on the log was like
<-- HTTP FAILED: javax.net.ssl.SSLHandshakeException: java.security.cert.CertPathValidatorException: Trust anchor for certification path not found.
Enter fullscreen mode
Exit fullscreen mode
After doing a little research I discovered it was an issue with the server certificate not being trusted by the android system. This could be because of any of the reasons below:
-
The Certificate Authority (CA) that issued the server certificate was unknown.
-
The server certificate wasn’t signed by a CA, but was self signed.
-
The server configuration is missing an intermediate CA.
In my case, this issue existed because the server certificate was self signed.
From android documentation there is a clean way to configure the app to trust your own self-signed certificates, which I will outline in 3 steps.
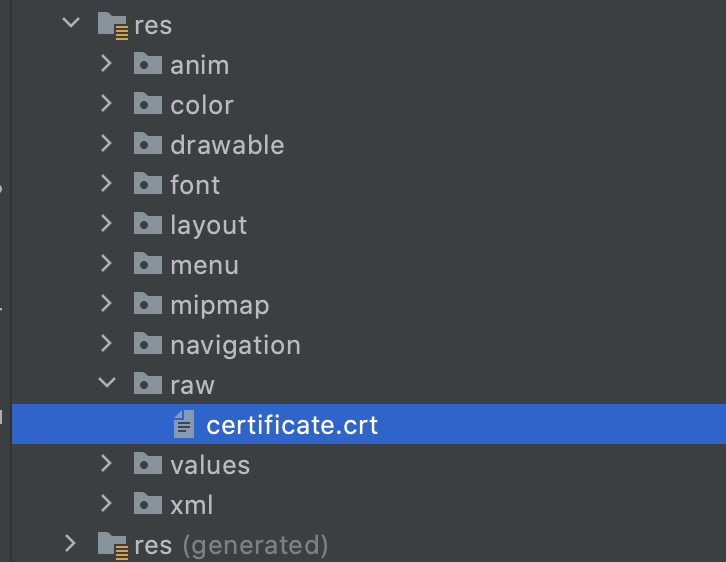
Step 1
Add the crt file to the raw folder.
This file will be retrieved from the server. You can request for the digital certificate from the backend engineer. It should come in a .crt extension.
Step 2
Create an XML network security config file (network_security_config.xml) like below:
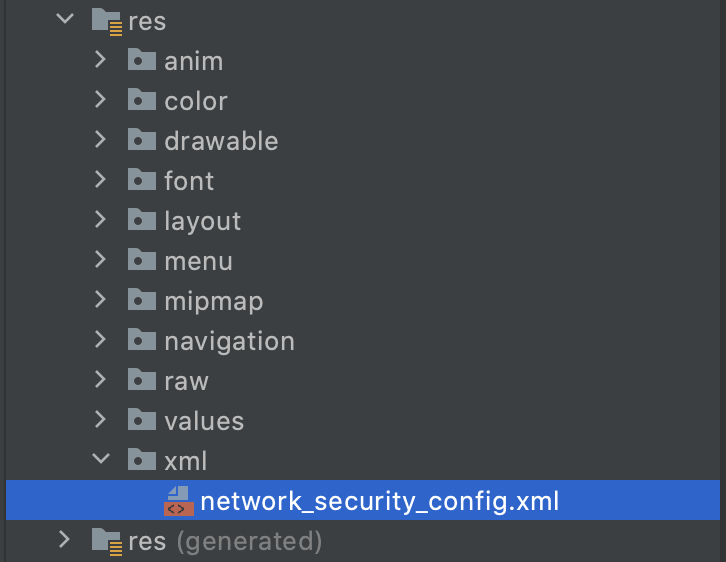
network_security_config.xml
<?xml version="1.0" encoding="utf-8"?>
<network-security-config>
    <domain-config>
        <domain includeSubdomains="true">api.example.com</domain>
        <trust-anchors>
            <certificates src="@raw/certificate" />
        </trust-anchors>
    </domain-config>
</network-security-config>
Enter fullscreen mode
Exit fullscreen mode
Step 3
Specify the network configuration settings in the Manifest.xml file of your application.
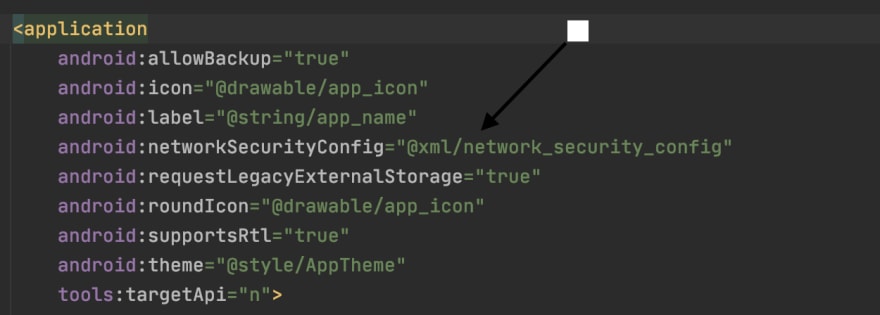
With these 3 steps done, you should connect seamlessly with the backend without any further issues.
Ошибка сертификата при открытии сайта с уcтройства Android
Андройд ругается на ssl сертификат.
С этого поста я начинаю свой блог. Писать я особо не умею, но решил написать данный пост т.к. решил актуальную проблему, а в инете решения четкого нет. Искал решение как побороть ошибку подключения ssl на андроид, часа три и все же с миру по нитке насобирал какие-то ответы на свои вопросы, а главное решил задачу.
Итак, у меня была ситуация, когда заказчику надоел свой хостер timeweb (главная причина медленная и тупая тех поддержка) и поставил он на меня задачу найти подходящий сервер для своего интернет магазина на битрикс, главные критерии — быстрота работы и адекватная поддержка . И конечно же все остальное:
- Размер жесткого диска 30Г+
- Тестовый период
- Web сервер apache + nginx – это лучшая связка под битрикс
- Php как модуль apache – лучшая производительность
- Доступ по SSH
- Адекватная техническая поддержка
- Возможность увеличивать CPU, RAM и HDD, без смены тарифа
Выбор пал на ispserver. Заказал обычный виртуальный хостинг, для теста, но как выяснилось, он не подходит для нашего проекта, по тому как для корректной работы битрикс необходимо изменение многих директив и модулей php и самого сервера, а изменить или добавить подобные параметры нет возможности, так как они общие для всех клиентов, по крайней мене так заявил сам хостер.
Попросил для теста Виртуальный выделенный сервер VDS. Как оказалось, после теста — хороший хостинг, подходит по всем параметрам. Настроил сервер под проект, перенес сайт.
Задача осталась за малым — перенести ssl сертификат с таймвеба. Скопировал с сервера все нужные файлы, а именно
- сертификат в формате xxx_a9e57_2bd75_1491868799_c5…10.crt
- и ключ к нему в формате a9e57_2bd75_2b…2e.key
В isp manager создал новый существующий сертификат.
В нужные поля вставил сертификат и ключ. Но вот было еще поле цепочка сертификатов, которое я не заполнил.

И при нажатии на кнопку сохранить, вуаля, все применилось. Далее осталось только привязать данный сертификат по ссылке «WWW-домены» к самому домену.

И еще, как в последствии оказалось, в файле конфигурации (у меня Centos7 поэтому /etc/httpd/conf/vhosts/www-root/site.ru) прописать, чтобы обращение к сайту было по 443 порту. Просто добавить запись ServerName site.ru:443 И все заработало.
Спустя как время, после проверки на усройстве с Андройд, во всех браузерах начала появляться ошибка подлинности сертификата и другие ошибки:
- Идентификационные данные этого сайта не проверены
- Сертификат сервера не является доверенным
- Соединение с сервером зашифровано с помощью устаревших наборов шрифтов
- Ваше соединение не защищено
- Владелец неправильно настроил свой веб-сайт
- Злоумышленники могут пытаться похитить ваши данные с сайта
- NET::ERR_CERT_COMMON_NAME_INVALID
- err ssl protocol error на телефоне андроид
И так далее и тому подобное.

Самое интересное, что десктопные компьютеры открывают сайт как положено, а браузеры на Android, в частности Сhrom, Yandex и Opera, выдают ошибку на ssl сертификат.
Долгое время искал ответ на вопрос.
После выполнения следующей команды в консоли сервера под Centos 7, выяснилось что проблема на стороне сервера, а не в андройде или браузее как могло показаться.
openssl s_client -connect site.ru:443
CONNECTED(00000003)
depth=0 OU = Domain Control Validated, OU = PositiveSSL, CN = site.ru
verify error:num=20:unable to get local issuer certificate
verify return:1
depth=0 OU = Domain Control Validated, OU = PositiveSSL, CN = site.ru
verify error:num=27:certificate not trusted
verify return:1
depth=0 OU = Domain Control Validated, OU = PositiveSSL, CN = site.ru
verify error:num=21:unable to verify the first certificate
verify return:1
---

Данные ошибки свидетельствуют о том, нет сертификата удостоверяющего центра.
В итоге проблема оказалась в том, что — пропушенная тогда цепочка сертификатов, оказалась всему виной.
Как я решил проблему.
Открыл сайт на десктопе в на иконке замка рядом с доменом, после надписи Защищенное соединение нажал ссылку подробнее. (или F12) В открывшемся внизу консоли во вкладке Security нажал view certificate и во вкладке Путь сертификации моему взору открылись все промежуточные центры сертификации до корневого. Осталось составить цепочку из этих центров сертификации.

Значит выделяем предыдущий центр, который следует до вашего сертификата, нажимаем «Просмотр сертификата» и во вкладке «Состав» находим открытый ключ и копируем его в файл при помощи одноименной кнопки. У меня не сразу получилось это сделать, но если потыкать и подключить сообразительность минут 10 и у вас все получится.
И так мы сохраняем все сертификаты у каждого промежуточного центра вплоть до корневого.
Далее составляем цепочку сертификатов.
В поле «Цепочка сертификатов», при создании сертификата в isp manager (или ispmgr), сначала необходимо вставить сертификаты всех промежуточных центров и в конце главного корневого центра. Обратите особое внимание на то, что один идет сразу после другого с новой строки в порядке того, кем выдавался сертификат и без пробелов. Конечно не забудьте, заполнить поля «Сертификат» и «Приватный ключ»
После сохранения и применения данного сертификата к вашему доменному имени в браузерах под андройд Ваш сайт будет открываться без ошибок, так получилось и у меня. Доволен и я и заказчик. Желаю вам справиться с этой несложной задачей.
A brief guide to fix SSL Connection Error on Android Phone
If you browse the websites on your android devices, there’s a chance that you’ve encountered with SSL connection error “Your connection is not private“. It looks something like this:

Most of the times it disappears itself when you refresh the page. However, sometimes it appears again and again. In that situation you may find yourself pretty helpless, because even Google won’t open up to help you solve the issue. So in this article we’re going to share with you 5 methods that you can use to fix SSL Connection Error on Android Phone.

Pinpointing the Problem
Before you begin the diagnosis of an SSL error on your Android device the first thing that you should do is pinpointing the problem. SSL connection error does not come because of something being wrong on your end — sometimes the server that you’re trying to access may also have something messed up. To figure out who’s at fault try opening other SSL secured websites (Google and Facebook are two common examples) on your device. If website runs without any issues then most probably the problem is with web server that you’re trying to access. You don’t need to do anything on your device then.
Fix SSL Connection Error on Android Phones
However, if you are facing SSL connection error when browse SSL secure websites on your android devices then you should proceed with below given methods.
Method #1: Check Your Date and Time
This is the most common reason behind SSL certificate errors. If there’s a mismatch between the clock on your device and the clock of web server that you’re trying to access then SSL certificate of website won’t be verified. As a result, you’ll get an SSL error. Especially the Date parameter is most important here as minor differences in time don’t really matter much.

You should check the date on your Android device and ensure that it’s set to the actual date. You can also turn on “Automatic Date and Time” from Date and Time settings of your phone to always keep your date and time synchronized with actual time across the globe.
Method #2: Check Your Internet Connection
Sometimes an SSL error may also come because of any issues with your internet connection. Follow the steps given below:
- Try connecting to SSL secured sites using some other internet connection (i.e. other Wi-Fi network, other cellular data connection etc). If error goes away then probably there’s some problem either with your internet connection or with internet settings of your phone.
- To figure out whether the culprit is your internet connection or internet settings of your Android device test the connection with some other devices as well. If SSL error doesn’t appear on other devices then the problem is with internet settings of your Android device. Otherwise if it appears on other devices as well then something is messed up with internet connection itself.
Method #3: Clear Browsing Data
If above given things didn’t solve the problem for you, next thing that you should try is clearing the browser data. Cache and cookies may sometimes lead to that irritating SSL error which you face, so find out the options to delete them from your browser and do it. The location of these options will vary depending on the browser that you’re using, but I’m going to explain the procedure for Chrome as it’s the default browser on most Android devices. Follow the steps given below to delete browser data on your phone’s Chrome app:

- Launch Chrome and tap the 3 dots appearing in bottom right corner of address bar;
- Tap Settings;
- Find Privacy Settings in the “Advanced” section and open them;
- Towards the bottom of Privacy Settings you’ll find the option to Clear Browsing Data. Open it;
- Once you’re in, set the Time Range to “All Time” and then delete all your data by hitting the Clear Data button in bottom.
That’s it. Now try opening secured websites that were not opening before.
Method #4: Disable Your Antivirus
Sometimes anti-virus apps also play evil as they block certain websites. In that case disabling your antivirus temporarily can solve the problem. Once you’ve visited the website you can turn your antivirus ‘On’ once again.
Method #5: Factory Data Reset
If everything given above fails to solve your problem then most probably your device is in some serious trouble. The SSL error may be because of some malware/virus, and the only thing that can solve it in this case is a Factory Data Reset.

You can reset your phone by navigating to Settings >> Backup and Reset >> Factory data reset. Don’t forget backing up your important files before proceeding with this step as you’ll lose all data saved in the internal memory of your phone.
Hopefully above given solutions will help you solve the issue of persisting SSL error on your Android device.
Related Article:
- How to fix SSL Connection Error on Chrome?
- Fix Mixed Content (nonsecure items) Error on SSL Secure Site