-

Member
- Join Date: Feb 2023
- Posts: 94
Hey guys, so Im workin on a fairly large area and am trying to light it up appropriately.. but whenever I click build all, Id get an error saying something about an invalid lightmapcoordinateindex and so i looked up some lightmass tutorials and I found one and i made a large build brush that surrounded the entire area and built a lightmass volume but it still did not work, it continues to say «lighting build failed!» and right after that, a window pops up that looks like this

has anyone had this happen to them before? i cant even play my level because it refuses to build
-
Senior Member
- Join Date: Feb 2023
- Posts: 3519
Externally referenced — Uh ohs, some how these brushes have been stored some where random. Delete the brushes if you can.
Lightmap Coordinate Index is invalid — This means that your static meshes do not point to a unique UV set such as 1 / 2 / 3. This is fixed by adjusting the value within the Static Mesh asset within the Static Mesh Editor.
Static mesh actor has NULL StaticMesh property — This means that this static mesh actor does not have a StaticMesh asset assigned to it. This is fixed by either deleting the static mesh actor or assigning it a static mesh asset within its static mesh component.
Comment
-
Member
- Join Date: Feb 2023
- Posts: 98
Regarding your lightmapcoordinateindex error: A recent update changed the default way static meshes are lit. Older versions used vertex lighting by default and had the option to use lightmaps. The latest builds use lightmaps by default which means you need to have a correct set of lightmap UVs or you get this warning. To fix this warning you should either update your meshes with a proper lightmap UV set or make them use vertex lighting again. This is done by overriding the lightmap resolution for a mesh and setting it to 0.
This however should not make your build fail, nor is it the cause of any of the visible warnings in your log. the warnings you show seem to indicate missing packages. Did you get an error about this when you opened the package? Ignoring a missing package warnings resets the missing meshes to NULL as seems to have happened in your case. Also I doubt it’s a good idea to have a brush externally referenced, was there a specific reason you did that?
Still even with all those meshes missing it should build, are there any other errors (not warnings) in the map check list?
Comment


Сообщения: 21
https://s21.postimg.org/9g35iwxnb/strange.jpg
Текстура ствола дерева и ветки разные. Но я рисовал их в одной гамме. Единственное различие что ветка это plate.
В движке пробовал подгонять яркость и контраст, но это не то.
Что посоветуете?

Сообщения: 354
Цитата:
Единственное различие что ветка это plate.
Должно быть, план? т.е плоскость? ))
галочку двустороннему материалу поставил?
еще есть момент, когда выставляешь на сцену даже замкнутые меши, но в настройках объекта (F4) не назначено юзание 2-стороннего освещения, рендерит светлее, чем те, у которых назначено.
Еще момент — могут быть флипнутые фейсы стволов. То есть изнанкой наружу, поэтому темные.
Сообщения: 21
А можно поподробнее про последний пункт?

Сообщения: 995
Honrai писал(а):
А можно поподробнее про последний пункт?
На геометрии нормали завернуты внутрь(не в наружу), а т.к. материал двухсторонний текстурит темней — иначе бы вы видели внутрению сторону геометрии.
Сообщения: 21
Нормали смотрят в нужном направлении и при юзании 2 стороннего освещения ничего не происходит.
Прикол в том, что даже сбоку в библиотеке, куда я импортирую, материал отображается правильно а в рабочей среде нет.
Будут ещё версии?

Сообщения: 584
Цитата:
Будут ещё версии?
Оба объекта статики? Оба динамики? (должно быть что-то одно, но одинаковое).
Расчет освещения выполнен?
И потом… Почему их не соединить в единую сетку в 3D редакторе? и тем самым не исключить неоднозначность?
Сообщения: 21
Да, оба Статика. РАсчёт сделал, выдал предупреждение что ветка — Static mesh actor has NULL StaticMesh Property, не думаю что это важно, так как в данном случае ветка имеет правильный цвет.
А по поводу соединения, можно по подробнее?
Спасибо.
Сообщения: 584
Цитата:
А по поводу соединения, можно по подробнее?
Серьезно?!)))
Например 3ds max: выделить один объект, в модификаторе EditPoly выбрать — Attach, нажать на второй объект — все, оба объекта (ствол и ветка) теперь единая сетка…
Все )))
Сообщения: 21
Сообщения: 584
Покажи развертки второго канала — под лайтмапу, или первого, если ты его используешь.
Группы сглаживания, надеюсь, настроены корректно?
Как вариант — некорректное наложение лайтмапы, или неправильная реакция на свет из-за групп сглаживания (хотя это моловероятно, конечно, коли в редакторе все пучком)
-
Add bookmark
-
#21
-

Sans titre.jpg
100.2 KB
· Views: 0

-
Add bookmark
-
#22
Alternatively, make batch file.
Copy-n-paste the following in a text file (*.txt). I use windows notepad.
cd c:
cd Program Files (x86)SteamsteamappscommonRed Orchestra 2BinariesWin64
rogame brewcontent TE-mymapname
pause
Replace TE-mymapname with the name of your map. After saving the text file and closing it, rename and change the extension of the text file to brew.bat
I keep mine on the desktop.
Go ahead, double click it. Providing your installation is in the same path as above, it will open two console windows. If there are no errors, after brewing it will display the time it took to complete. Close it, then press any key to close the initial window. The resulting brewed map roe file will be in the published folder, and the unpublished file will remain as it was.
Remember to delete (move out) previous versions of brewed roe’s before brewing again. It also helps to only keep files you are brewing in the unpublished folder, store back-ups and other WIPs somewhere else to speed up the brew.
Last edited: Sep 6, 2014
-
Add bookmark
-
#23
Thx for that! Btw, this is another thing i could not find is how to spawn transport vehicles. All i have to do is plant a ROvehiclefactory or make it just like players spawn?
Last edited: Sep 9, 2014
-
Add bookmark
-
#24
The set up for transports would take some explaining. Better to copy/paste the vehicle factory from a working map, then change the ROplayerstart volume field in it’s advanced properties to the one you put it into your map. Yes, it needs to be in a ROplayerstart volume, and that needs to be activated in Kismet.
One thing to remember is the yaw value needs to be 0 or 180 degrees, or the factory may not work. Adjusting pitch/roll is pointless, as the vehicle spawns, then finds its collision.
Last edited: Sep 9, 2014
-
Add bookmark
-
#25
I am currently working on a darkest hour recreation, Foy to be precise, i have been looking around snow based maps like Commissars house and such, i noticed standard sandbags, vehicles and such have this icy snowy glare to them, but when i right click them and click Find In Content Browser it goes to the regular sandbags,vehicles, etc…
So how do you add this frosty/icy layer on static meshes?
-
Add bookmark
-
#26
Cut-n-paste them from an existing snowy map, or assign the snow/ice material in the static mesh’s advanced properties. More than likely the snow/ice material will actually be a MIC (material instance constant).
-
Add bookmark
-
#27
I am currently doing a revised map of StalingradKessel. I didn’t like it in Ostfront and I don’t like the ported version either too much.
I remember that in Combined Arms, there was this version here:
Red Orchestra Teaser — RO-StalingradKessel_revised — YouTube
Now, as I started working on this map, I had my UDK working fine until I thought about doubling a brush and every time I try the UDK crashes. Anybody else experiencing this? It’s quite disturbing as it hinders my work effort.
-
Add bookmark
-
#28
Make sure you have enough RAM. 8GB will let you open the editor and play for a short while. If you want to load packages, 16GB.
Last edited: Oct 5, 2014
-
Add bookmark
-
#29
Okay, that explains quite something as I still have my stock 8GB. I gotta buy two 4GB for my machine then.
-
Add bookmark
-
#30
Cut-n-paste them from an existing snowy map, or assign the snow/ice material in the static mesh’s advanced properties. More than likely the snow/ice material will actually be a MIC (material instance constant).
I tried this, but for some reason the package of those maps wont stay loaded, so i add the MIC to like a log, and than when i want to save i get a cant find object in package something something error, i tried importing the map via the load external package, and still it wont work.
Last edited: Oct 7, 2014
-
Add bookmark
-
#31
Can I open 2 maps at same time or do I always have to close one before I open another?
And how do I Cut and Paste assets between maps?
I keep getting a grid reference error after importing another maps static mesh.
Last edited: Oct 9, 2014
![]()
-
Add bookmark
-
#32
Can I open 2 maps at same time or do I always have to close one before I open another?
And how do I Cut and Paste assets between maps?
I keep getting a grid reference error after importing another maps static mesh.
Yes, you can have 2 maps open at the same time by having 2 instances of the editor open. The way I do it is dumb but here’s what I do.
1. Open the editor as usual and open «your map»
2. TaskManager>Processes>Steam.exe>EndProcesses
3. Open the editor as usual
4. Now you have 2 editors open. Use the second window to open what ever maps you want. This might make your computer a little unhappy.
Cut and Paste:
1.find a thing in a stock map you like.
2. click on it and select «copy»
3. go back to your map, find the spot where you want it and select «paste here». If you just select «paste» it will paste the item at the grid location on the other map.
Now, if you happen to get the «cross package reference» error, here’s a way to fix it. Click on the offending mesh then right-click>find in content browser. It will find the mesh in the browser. Now, select the mesh in the browser and go back to the offending mesh and right-click>replace with>add static mesh…
this will remove the reference to the other package but you will have to go back and replace any special material, etc… that might have been a part of the original mesh.
-
Add bookmark
-
#33
Yes, you can have 2 maps open at the same time by having 2 instances of the editor open. The way I do it is dumb but here’s what I do.
1. Open the editor as usual and open «your map»
2. TaskManager>Processes>Steam.exe>EndProcesses
3. Open the editor as usual
4. Now you have 2 editors open. Use the second window to open what ever maps you want. This might make your computer a little unhappy.Cut and Paste:
1.find a thing in a stock map you like.
2. click on it and select «copy»
3. go back to your map, find the spot where you want it and select «paste here». If you just select «paste» it will paste the item at the grid location on the other map.Now, if you happen to get the «cross package reference» error, here’s a way to fix it. Click on the offending mesh then right-click>find in content browser. It will find the mesh in the browser. Now, select the mesh in the browser and go back to the offending mesh and right-click>replace with>add static mesh…
this will remove the reference to the other package but you will have to go back and replace any special material, etc… that might have been a part of the original mesh.
Sweet! Got both instances open perfect, Thanks. When I copy a static mesh and paste it into my map it shows up in the «Scene» tab in the COntent Browser but not on the map itself. I get the error:
StaticMeshActor_1895: Static Mesh actor has NULL StaticMesh Property
![]()
-
Add bookmark
-
#34
Is the object you are trying to copy a staticmeshdestructable? If not what object is it?
-
Add bookmark
-
#35
Is the object you are trying to copy a staticmeshdestructable? If not what object is it?
Its showing as an ROStaticMeshObstacle. Its the Tiger frome Nightfire’s Donner map. I grabbed the tank off of Apartments instead and it worked.
Edit: Now I see the tank from apartments is in the content browser (Detroyed Panzer). Im still not sure why I could not get the Tiger from Donner to copy correctly.
Last edited: Oct 10, 2014
![]()
-
Add bookmark
-
#36
Its showing as an ROStaticMeshObstacle. Its the Tiger frome Nightfire’s Donner map. I grabbed the tank off of Apartments instead and it worked.
Edit: Now I see the tank from apartments is in the content browser (Detroyed Panzer). Im still not sure why I could not get the Tiger from Donner to copy correctly.
The StaticMeshObstacle class (along with a few others) is kind of a «generic» class that requires you to add a specific static mesh to it in the actor properties. You’re sort of saying, «hey, I want an obstacle here and I want it to be X». The Tiger you want only exists in the package for Donner (not in the regular content browser packages) so when you copy and paste it into your map the SDK looks in the content browser for the static mesh reference (in this case, the Tiger) and because it’s not in the regular content browser it gives you that error because it can’t find it. I hope that made sense.
To get the Tiger into your map you’re going to need to sweet talk Sgt. NightFire into letting you borrow the un-brewed Tiger. Then you’ll be able to import it into your package then you can do what ever you want with it.
-
Add bookmark
-
#37
Wonderful, that makes perfect sense. Do you find yourself drinking more when designing maps…?
![]()
-
Add bookmark
-
#38
Wonderful, that makes perfect sense. Do you find yourself drinking more when designing maps…?
")
Drinking more is the first step, along with sleeping less. Once you really get going you’ll start waking up earlier to mess with your map for a few minutes before heading into work. Then you’ll find out about «LogMeIn» which you can use to log into your home computer from your work computer. You’ll start by «just sneaking in a little mapping» while the boss isn’t looking or during your lunch hour. This will be OK for a while but the horrible lag will get the best of you and you’ll start looking for a way to install Steam and the SDK on your work computer. For this you’re going to need a buddy in IT who can hook you up with Admin. rights and more RAM. When you’ve reached the most depraved depths of SDK addiction you’ll find yourself trying to sneak your home computer into work. Just make sure to have a blanket or something you can throw over it so no one sees it sitting under your desk.
-
Add bookmark
-
#39
Drinking more is the first step, along with sleeping less. Once you really get going you’ll start waking up earlier to mess with your map for a few minutes before heading into work. Then you’ll find out about «LogMeIn» which you can use to log into your home computer from your work computer. You’ll start by «just sneaking in a little mapping» while the boss isn’t looking or during your lunch hour. This will be OK for a while but the horrible lag will get the best of you and you’ll start looking for a way to install Steam and the SDK on your work computer. For this you’re going to need a buddy in IT who can hook you up with Admin. rights and more RAM. When you’ve reached the most depraved depths of SDK addiction you’ll find yourself trying to sneak your home computer into work. Just make sure to have a blanket or something you can throw over it so no one sees it sitting under your desk.
This is Pure Gold! LOL (And Im guessing its all true) Thanks for all of your help so far.
-
Add bookmark
-
#40
Two things this time:
First, I made new areas and rooms available so far in my version of Stalingradkessel. The problem now is that I fell through the floor in the warehouses. Checking with the object properties it says «blockALL» and «collision» says «Yes». How is that possible? Rendering error?
Second one, I have searched everywhere but I can’t find the CTF flag models. Where are they hidden? I would love to add a *** in there but I can’t find them.
Many thanks!
Исправление сбоя Unreal Engine для всех игр
Unreal Engine Crashing Fix
Unreal Engine 4 вылетает внезапно или случайно без причины? Вот 8 эффективных методов быстрого устранения сбоев. Это руководство поможет вам решить эту проблему.
Unreal Engine 4 продолжает вылетать на вашем ПК? Вы определенно не одиноки. Тысячи игроков недавно сообщили о той же проблеме. Какая досада! Особенно, когда вы находитесь в середине игры или редактируете. Но хорошая новость в том, что вы можете это исправить. Вот список решений, которые оказались полезными для многих игроков.
Попробуйте эти исправления
Возможно, вам не придется пробовать их все; просто продвигайтесь вниз по списку, пока не найдете тот, который работает.
Исправление 1: обновите свой Unreal Engine 4
Разработчики Unreal Engine продолжайте выпускать новые версии, поэтому проверьте, установлена ли у вас последняя версия, и установите ее, если нет. Это самое простое решение проблемы сбоя.
1) Откройте Пусковая установка нажмите Unreal Engine вкладка, затем перейдите в свой вкладка библиотеки .
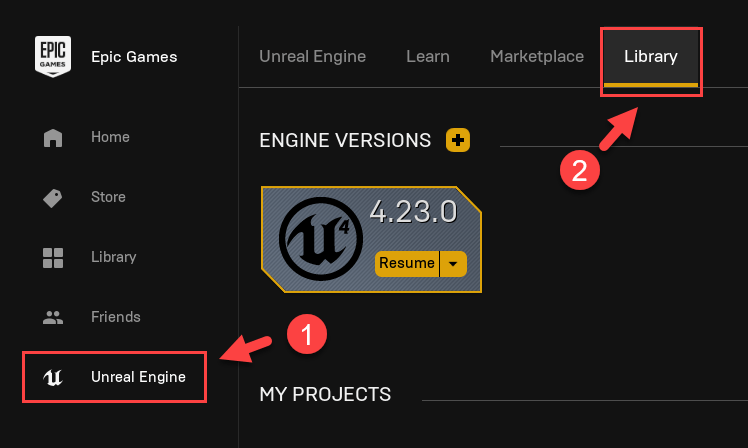
2) Вверху вы должны увидеть Версии двигателя , и щелкните маленькая стрелка вниз чтобы убедиться, что у вас установлена самая последняя версия.
3) Если доступна новая версия, выберите последнюю версию и нажмите Установить .
Как только он будет установлен, вы увидите, все ли у вас работает нормально. Надеюсь, это так. Но если нет, можно попробовать еще несколько исправлений.
Исправление 2: обновите драйверы вашего устройства
Ошибка сбоя может возникнуть, если видеокарта устарела или повреждена. По мнению многих пользователей, обновление драйверов всегда может решить их проблемы. Он может исправить ошибки и улучшить игровую производительность и удобство.
Есть два способа обновить драйвер — вручную и автоматически.
Вариант 1. Вручную
Чтобы обновить драйверы таким образом, вам потребуются навыки работы с компьютером и терпение. Чтобы получить драйвер устройства, вам необходимо перейти на веб-сайт его производителя, загрузить последний и правильный драйвер, а затем установить его вручную.
Вариант 2: Автоматически
Если у вас нет времени, терпения или компьютерных навыков для обновления драйвера вручную, вы можете сделать это автоматически с помощью Водитель Easy .
Водитель Easy автоматически распознает вашу систему и найдет для нее правильный драйвер. Вам не нужно точно знать, на какой системе работает ваш компьютер, вам не нужно рисковать, загружая и устанавливая неправильный драйвер, и вам не нужно беспокоиться о том, чтобы сделать ошибку при установке.
Вы можете обновить драйвер автоматически с помощью БЕСПЛАТНОЙ или Pro версии Driver Easy. Но с версией Pro это занимает всего 2 клика (и вы получаете полную поддержку и 30-дневную гарантию возврата денег).
1) Скачать и установите Driver Easy.
2) Запустите Driver Easy и нажмите Сканировать сейчас кнопка. Driver Easy просканирует ваш компьютер и обнаружит проблемы с драйверами.

3) Щелкните значок Обновить рядом с каждым устройством, чтобы загрузить для него последнюю версию и правильный драйвер, а затем вы можете установить его вручную.
Или щелкните Обновить все кнопку для автоматического обновления всех устаревших или отсутствующих драйверов на вашем компьютере (для этого требуется Pro версия — вам будет предложено выполнить обновление, когда вы нажмете «Обновить все»).
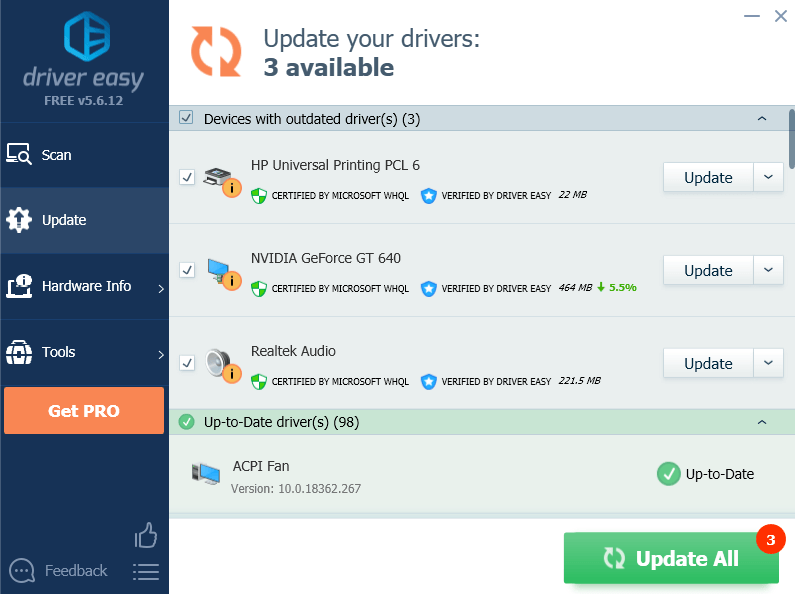
4) После обновления драйверов перезагрузите компьютер.
Исправление 3: проверьте установку
Проверка установочных файлов иногда может исправить проблемы со сбоями. Если на вашем компьютере установлен Epic Launcher, вы можете использовать встроенный инструмент для проверки установленных файлов на наличие повреждений.
1) Откройте Эпическая пусковая установка .
2) Щелкните значок Вкладка библиотеки , затем щелкните маленькая стрелка вниз чтобы раскрыть раскрывающийся список. Нажмите Проверить .
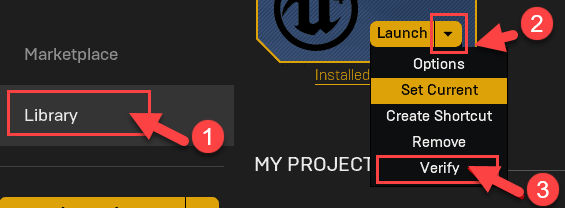 Если Unreal Engine вылетает во время игры, вы можете перейти к игре в своем Библиотека и нажмите на винтик значок> свойства > локальные файлы > проверить .
3) Дождитесь завершения сканирования. После проверки появится опция запуска. Нажмите Запуск .
Посмотрите, решит ли это вашу проблему. Если нет, не волнуйтесь, попробуйте следующее решение, чтобы решить вашу проблему.
Исправление 4: прекратите разгон процессора
Чтобы улучшить игровой процесс, вы, возможно, изменили настройки процессора на самый высокий режим. Однако это приведет к чрезмерному потреблению энергии, что может привести к аварии.
Поэтому, если вы разгоняете графический процессор, вы можете попытаться вернуть тактовую частоту процессора к значениям по умолчанию. Многие пользователи считают это полезным после этого.
Кроме того, уменьшение всех настроек графики до минимума может помочь вашему Unreal Engine работать бесперебойно.
Если это решит ваши проблемы со сбоями, поздравляю! Но если нет, вы можете попробовать следующее исправление.
Исправление 5. Измените видеокарту по умолчанию.
Есть ли Unreal Engine завершает работу из-за потери устройства D3D предупреждение на вашем экране? В этом случае проблема может быть вызвана вашей встроенной видеокартой из-за ее ограниченной производительности.
Если на вашем ПК установлена выделенная видеокарта, вы можете установить выделенную видеокарту в качестве видеокарты по умолчанию, чтобы исправить эту ошибку.
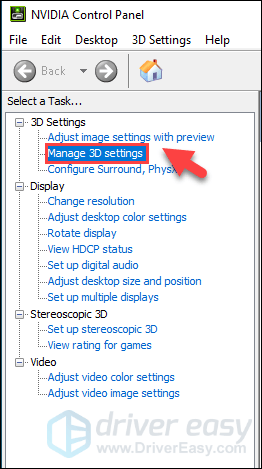
1) На экране щелкните правой кнопкой мыши и выберите Панель управления NVIDIA .
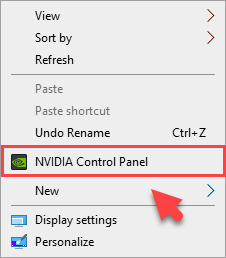
2) Нажмите Управление настройками 3D .
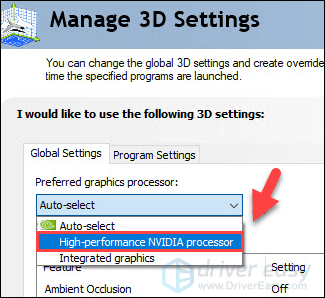
3) Под Вкладка ‘Глобальные настройки’ , Выбрать Высокопроизводительный процессор NVIDIA в раскрывающемся списке. Наконец, нажмите Применять .
4) Перезагрузите компьютер и посмотрите, решена ли проблема. Если нет, попробуйте следующее исправление.
Исправление 6. Измените настройки реестра.
Твой Unreal Engine 4 может произойти сбой из-за настроек уровня восстановления TDR. Попробуйте изменить настройки и посмотрите, работает ли.
TDR (Обнаружение и восстановление тайм-аута) проверяет, правильно ли работают ваша видеокарта и компьютер, и сбрасывает графическую карту и графический процессор, если нет.
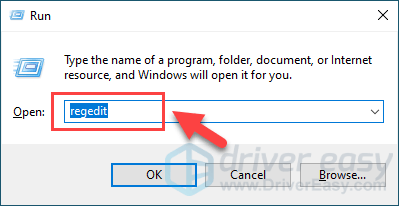
1) На клавиатуре нажмите кнопку Windows logo key и р в то же время призвать Бежать коробка.
2) Тип regedit и нажмите Войти открыть Редактор реестра .
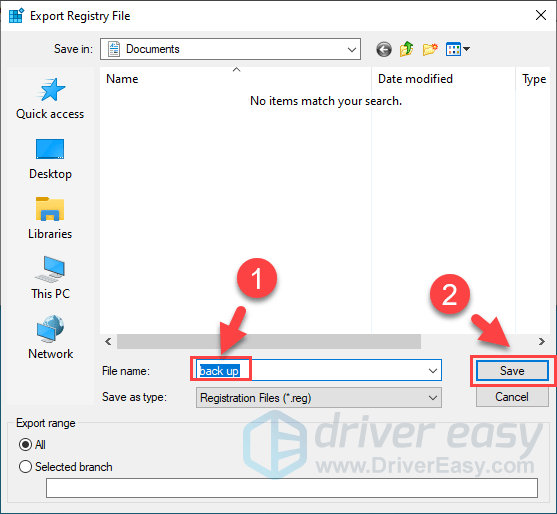
3) Нажмите файл , затем щелкните Экспорт .

4) Выберите место, где вы хотите сохранить резервную копию, затем введите имя в Имя файла коробка. Нажмите Сохранить .
5) Вернитесь к Редактор рижистики , затем перейдите к HKEY_LOCAL_MACHINE SYSTEM CurrentControlSet Control GraphicsDrivers
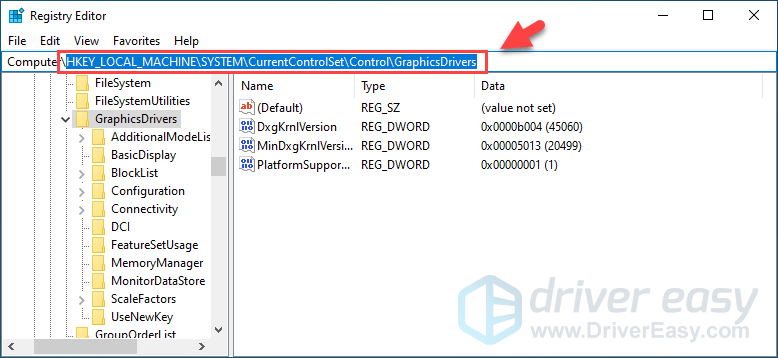
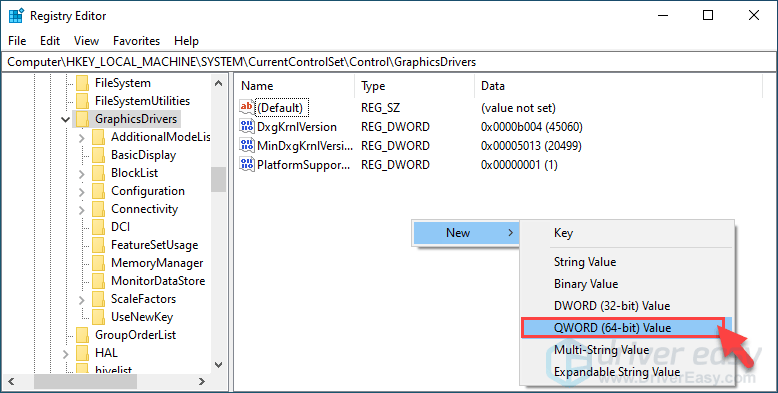
4) В пустом месте щелкните правой кнопкой мыши, затем наведите указатель мыши на Новый и нажмите QWORD (64-бит) Значение .
5) Назовите новое значение TdrLevel .
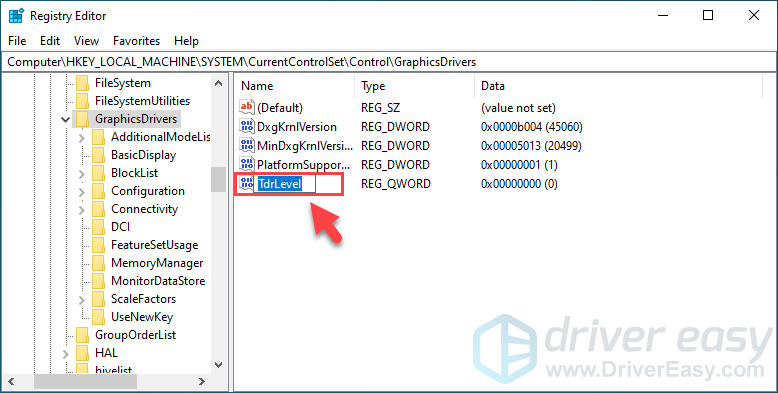
6) Дважды щелкните TdrLevel . Убедитесь, что для его данных значения установлено значение , затем щелкните Хорошо .
7) Закрыть Редактор реестра и перезагрузите компьютер. Затем проверьте, сохраняется ли проблема. Если нет, попробуйте исправить это ниже.
Исправление 7: Временно отключите антивирус
Unreal Engine 4 Проблема сбоя иногда возникает из-за вмешательства вашего антивирусного программного обеспечения. Чтобы убедиться, что проблема в этом, временно отключите антивирусную программу и проверьте, сохраняется ли проблема. (За инструкциями по отключению обратитесь к документации по антивирусу.)
Если ваша игра работает нормально после отключения антивирусного программного обеспечения, обратитесь к поставщику вашего антивирусного программного обеспечения и попросите его совета или установите другое антивирусное решение.
Будьте особенно осторожны с тем, какие сайты вы посещаете, какие электронные письма открываете и какие файлы загружаете, когда ваш антивирус отключен.
Если сбой возникает снова, вы можете попробовать переустановить Unreal Engine, чтобы исправить проблему.
Исправление 8: выполните переустановку
Многие считают, что чистая переустановка может решить проблему. Просто убедитесь, что вы очистили все (включая записи реестра), назначенные Epic Launcher и Unreal Engine 4.
Не забудьте сделать резервную копию своих проектов перед переустановкой.
После завершения установки проверьте, сохраняется ли проблема.
Решили ли указанные выше исправления вашу проблему? Не стесняйтесь оставлять нам комментарии и делиться своим опытом с другими пользователями!
- крушение
- Программа запуска Epic Games
- игры
Источник
Map Check Errors
Descriptions of errors generated during map builds or running a map check in Unreal Editor.
Choose your operating system:
Unreal Engine provides a mechanism for alerting you to potential problems in the form of map check errors and warnings instead of having to hunt down issues manually without knowing what is causing the problem or how to fix it. These errors are an automated way to find out where problems lie and allows you to get them fixed before they have a serious impact on your game.
Performing a Map Check
Map check errors and warnings are displayed following performing a build all of a map and can also be performed separately using the Map Check option in the Level Editor Toolbar ‘s Build menu.
Errors
Errors are critical problems that can potentially cause execution failure. These need to be fixed before proceeding.
Lighting
[LightActor] has same light GUID as [LightActor] (Duplicate and replace the orig with the new one)
Duplicate and replace the original with the new one.
Warnings
Warnings are issues which, while not critical, can cause your game to not function properly or with sub-optimal performance. These should be addressed but are not showstoppers.
Actor
[Actor] : Large Actor casts a shadow and will cause an extreme performance hit unless bUseBooleanEnvironmentShadowing is set to true
A large Actor has been set to cast shadows — this will cause extreme performance issues and should have bUseBooleanEnvironmentShadowing set to true.
[Volume] causes damage, but has no damagetype defined.
This warning is caused when there is a volume that is set to cause damage but does not have a damage type defined. A damage type is important because it tells the game code how to handle a Actor’s reaction to taking damage. This can be solved by going to the Actor’s Property Window->Physics Volume and setting the ‘DamageType’ property.
[Actor] : Brush has non-coplanar polygons
This warning is caused when there is a brush in the level that has non-coplanar polygons. This is usually caused by using brush editing tools in geometry mode in extreme ways and can cause missing polygons in the level. This warning can be resolved by deleting the brush and recreating it.
[Actor] in same location as [Another Actor]
This warning is caused when there is an Actor that is in the same exact location as another Actor. This warning is usually the result of an accidental duplication or paste operation. It can be fixed by deleting one of the Actors, or disregarded if the placement was intentional.
[Actor] has invalid DrawScale/ DrawScale3D
This warning is caused when either DrawScale, DrawScale3D X, DrawScale3D Y, or DrawScale 3D Z is equal to zero. Meaning that the Actor will not be shown because it is being scaled to zero on one of its axis. To solve this problem, change any DrawScale’s that are zero to be non-zero by selecting the Actor and changing its drawscale at the bottom of the main UnrealEd window.
[Actor] is obsolete and must be removed!
This warning is caused when there is an instance of an Actor in a level that has been marked deprecated. This is usually because an Actor was marked deprecated after the level was created, but the map was never updated. This can be fixed by simply deleting the Actor.
[Actor] bStatic true, but has Physics set to something other than PHYS_None!
This warning is caused when an Actor has its bStatic flag set to true but its Physics is set to PHYS_None. Since bStatic means that the Actor will not be moving, having Physics set to PHYS_None is contradictory. Actors set with the bStatic flag are also not ticked(updated). This error can be solved by going to the Actor’s properties and changing its Physics to PHYS_None.
[Actor] : Volume Actor has NULL collision component — please delete
The specified volume Actor has a NULL collision component and should probably be deleted.
[Actor] : Volume Actor has a collision component with 0 radius — please delete
The specified volume Actor has a zero radius for its collision component and should probably be deleted.
[Actor] (LOD [Index]) has hand-painted vertex colors that no longer match the original StaticMesh [StaticMesh]
It looks like the original mesh was changed since this instance’s vertex colors were painted down — this may need a refresh.
[Actor] has collision enabled but StaticMesh [StaticMeshName] has no simple or complex collision.
You want to either set Collision Enabled to No Collision on the Actor, or add collision to the mesh (by adding simple collision shapes, and/or enabling collision on sections)
Actor casts dynamic shadows and has a BoundsScale greater than 1! This will have a large performance hit
Serious performance warning. either reduce BoundsScale to be less than or equal to 1 or remove dynamic shadows.
[ActorName] has WorldTrace blocked. It will be considered to be world geometry
BSP Brush
[Brush Actor] : Brush has zero polygons — please delete!
This warning indicates that you have a brush in the level that does not have any polygons associated with it. The brush should be deleted as it is not doing anything useful.
Run ‘Clean BSP Materials’ to clear [count] references
This warning indicates that there are material references on brush faces that are not contributing to the BSP, and that applying the Tools->’Clean BSP Materials’ operation can clean up these references.
[Actor] : Brush has NULL BrushComponent property — please delete!
This warning is caused when there is a Brush with a «None» ConstraintInstance component. It is usually found in older maps where duplication was used to create a Brush and can be fixed by deleting the Brush causing the warning and creating a new one.
[Brush] : Brush is planar
Planar brush used — please note that this may not work well with collision.
Camera
Camera has AspectRatio=0 — please set this to something non-zero
Class
[ ]::[ ] is obsolete and must be removed (Class is abstract)
[ ]::[ ] is obsolete and must be removed (Class is deprecated)
Foliage
Foliage instances for a missing Static Mesh have been removed.
Foliage in this map is missing [MissingCount] cluster component(s) for Static Mesh [MeshName]. Opening the Foliage tool will fix this problem.
Landscape
[LandscapeComponent] : Fixed up deleted layer weightmap
[LandscapeComponent] : Fixed up incorrect layer weightmap texture index
Fixed up shared weightmap texture for layer [Layer] in component [Component] (shares with [Name])
Landscape ([ProxyName]) has overlapping render components at location ([X,Y])
Level
Duplicate level info
Two WorldInfos somehow exist.
Map should have KillZ set.
This warning is caused when the map’s KillZ in the WorldInfo properties is set to the default value. All maps should specify a KillZ appropriate for the level so that players cannot simply fall forever until they reach the playable world bounds.
Lighting
[Actor] : Light Actor has NULL LightComponent property — please delete!
This warning is caused when there is a Light Actor with a «None» LightComponent. It is usually found in older maps where duplication was used to create the Actor and can be fixed by deleting the Actor causing the warning and creating a new one.
Maps need lighting rebuilt
This warning is caused when lighting has been invalidated by moving or modifying a light Actor. This can cause problems because the rendered lighting in the level is not accurately representing the current state of lights in the level. This error can be solved by going to the Build menu and rebuilding lighting for a map.
Component is a static type but has invalid lightmap settings! Indirect lighting will be black. Common causes are lightmap resolution of 0, LightmapCoordinateIndex out of bounds.
Navigation
Paths need to be rebuilt
Particle System
[Actor] : Emitter Actor has NULL ParticleSystemComponent property — please delete!
This warning is caused when there is an Emitter Actor with a «None» ParticleSystemComponent. It is usually found in older maps where duplication was used to create the Actor and can be fixed by deleting the Actor causing the warning and creating a new one.
PSysComp has an empty parameter Actor reference at index [Index] ([Actor])
Param.Actor should not be NULL.
PSysComp has an empty parameter material reference at index [Index] ([Actor])
Param.Material should not be NULL.
Skeletal Mesh
[Actor] : SkeletalMeshActor has no PhysicsAsset assigned.
In order for a SkeletalMesh to have an accurate bounding box, it needs to have a PhysicsAsset assigned in its SkeletalMeshComponent. An incorrect or inaccurate bounding box can lead to the mesh vanishing when its origin is not in view, or to poor shadow resolution because the bounding box is too big.
[Actor] : Skeletal Mesh Actor has NULL SkeletalMeshComponent property
The specified SkeletalMeshActor has a NULL SkeletalMeshComponent.
[Actor] : Skeletal Mesh Actor has NULL SkeletalMesh property
The specified SkeletalMeshActor has a NULL SkeletalMesh.
Sound
[Actor] : Ambient sound Actor has NULL AudioComponent property — please delete!
This warning is caused when there is an Ambient sound Actor with a «None» AudioComponent. It is usually found in older maps where duplication was used to create an Actor and can be fixed by deleting the Actor causing the warning and creating a new one.
Ambient sound Actor’s AudioComponent has a NULL SoundCue property!
This warning is caused when there is a AmbientSound Actor with a NULL SoundCue property. This is a problem because the Actor will not actually be playing any sounds. This can be fixed by first choosing a sound cue in the generic browser and then going to the Actor’s Property Window->Audio Category->Audio Component and setting the ‘SoundCue’ property.
Static Mesh
[Static Mesh Actor] : Static Mesh Actor has NULL StaticMesh property
This warning is caused when there is a Static Mesh Actor in a level with a NULL StaticMesh property. This can be a problem because the Actor exists and is using memory, but does not have a Static Mesh to actually draw. This warning is usually the result of creating a StaticMesh Actor without first selecting a StaticMesh in the generic browser. This warning can be fixed by first selecting a Static Mesh in the generic browser and then going to the StaticMesh Actor’s Property Window->StaticMeshActor Category->StaticMeshComponent->StaticMeshComponent Category to set the ‘StaticMesh’ Property.
[Actor] : Static Mesh Actor has NULL StaticMeshComponent property — please delete!
This warning is caused when there is a Static Mesh Actor with a «None» StaticMeshComponent component. It is usually found in older maps where duplication was used to create the Actor and can be fixed by deleting the Actor causing the warning and creating a new one.
[StaticMesh] has simple collision but is being scaled non-uniformly — collision creation will fail
Simple collision cannot be used with non-uniform scale. Please either fix the scale or the collision type.
More overridden materials [Count] on Static Mesh component than are referenced [Count] in source mesh [StaticMesh]
[Count] element(s) with zero triangles in Static Mesh [StaticMesh]
Volume
LevelGridVolumes are only allowed in the persistent level
This warning is caused when a LevelGridVolume is placed in a streaming level. These types of volumes are only allowed in the persistent level. This problem can be fixed by moving the LevelGridVolume to the persistent level.
LevelStreamingVolume is not in the persistent level — please delete
This warning is caused when there is a level streaming volume that does not exist in the persistent level. This can be problematic because the volume will not be considered when checking to see if a streaming level should be loaded or unloaded. You can fix this problem by deleting the level streaming volume and recreating it.
No levels are associated with streaming volume.
This warning is caused when there are no levels associated with a LevelStreamingVolume, making it non-functional. This problem can be fixed by associating one or more streaming levels with the offending LevelStreamingVolume.
Uncategorized
Filename [Filename] is too long — this may interfere with cooking for consoles. Unreal filenames should be no longer than [Length] characters.
Please rename the file to be within the length specified.
[ObjectName] : Externally referenced
Infos
Infos are issues which do not need to be addressed by the user but may be useful to know.
Actors
[Actor] : Repaired painted vertex colors
Painted vertex colors were repaired on this Actor.
Источник
StaticMeshs являются одним из основополагающих видов отображаемый геометрии в Unreal Engine.
Перетаскивая на уровень из Content Browser любой объект он автоматически преобразуются в StaticMeshActors
Хотя они и называются StaticMeshActors, это просто геометрические сетки StaticMeshActor они могут быть статичным.
StaticMeshActor может быть создан подвижным, чтобы он мог эмитировать лифт или сделал, чтобы имитировать физику так что он может раздавить игрока.

StaticMeshActors размещены на картах с использованием стандартных методов размещения Актеов; либо через щелкните правой кнопкой мыши контекстного меню в окнах просмотра или перетаскивания объектов из Content Browser .
Просто перетащите объект на сцену
1. В Content Browser, найдите StaticMesh вы хотите добавить на сцену как StaticMeshActor.
2. Щелкните левой кнопкой мыши на StaticMesh в Content Browser и перетащите его мышью (удерживая левую кнопку мыши) из Content Browser к месту в окне, где вы хотите разместить его.
3. Отпустите левую кнопку мыши, чтобы поместить сетку в карте как StaticMeshActor.

Перенос с помощью контекстного меню
1. В Content Browser, выберите StaticMesh который вы хотите добавить к карте как StaticMeshActor.
2. Щелкните правой кнопкой мыши в окне, где вы хотите добавить сетку и выберите Добавить актера: Выбор из контекстного меню. Расположение не должны быть точными. Вы всегда можете изменить, повернуть, масштабировать сетку после этого.
3. StaticMesh был помещен на карте в качестве StaticMeshActor, как видно в окне свойств.

Добавление подвижных StaticMeshActor
Для того, чтобы перемещать, вращать или масштабировать StaticMeshActor во время игры, вы должны сначала сделать его подвижным.
Включение параметров StaticMeshActor для симуляции физики
Добавление материала
Материал(ы) применяется к StaticMesh может быть назначен каждому актеру. Это позволяет один StaticMesh, который будет использоваться несколько раз в одной карте, давая каждому из них уникальный образ.
Свойства материалов расположены в категории Rendering StaticMeshComponent в StaticMeshActor является массив материалов, которые непосредственно отображается на те, которые применяются к активу StaticMesh через редактор Static Mesh .
Материалы могут быть назначены в массив вручную или они могут быть применены непосредственно к сетке в окне путем перетаскивания из Content Browser.
Ручное назначение материалов
1. В видовом экране выберите StaticMeshActor на которых будем назначить материал.
2. В области сведений, в категории материалы, Вы увидите все материалы, возложенных на StaticMeshActor.
3. В Content Browser, выберите материал, который вы хотите применить к StaticMeshActor
4. Кнопка для соответствующего элемента массива материалов, чтобы назначить материал. Сетки теперь отображается с материалом, примененным.
ИЛИ
5. Щелкните левой кнопкой мыши и перетащите материал из Content Browser, чтобы назначить материал на деталь в StaticMeshActor

Перетаскивание
1. В Content Browser, найдите материал, который вы хотите применить к StaticMeshActor на карте.
2. Щелкните левой кнопкой мыши на материале в Content Browser и перетащить мышью (удерживая левую кнопку мыши ) от Content Browser в разделе StaticMeshActor в окне просмотра вы хотите применить материал.
3. Отпустите левую кнопку мыши, чтобы применить материал. Сетки теперь отображается с материалом
