В этом руководстве мы покажем вам все возможные способы исправления ошибки несоответствия ctsProfile на любом устройстве Android с root-доступом. Хотя производители смартфонов и Google, в частности, не против настройки и настройки, они следят за тем, чтобы обычные пользователи не оказались на стороне пользовательской разработки всего за несколько кликов.
Таким образом, OEM-производители начинают с блокировки загрузчика на своих устройствах, но они все же оставляют небольшое окно возможностей для технических энтузиастов. Таким образом, они могли затем разблокировать загрузчик устройства и установить множество пользовательских двоичных файлов. Это может включать установку пользовательских ПЗУ, установку пользовательского восстановления, такого как TWRP, или рутирование устройства через Magisk.
После рутирования вы получаете доступ к системному разделу и можете устанавливать модули Magisk, Xposed Framework, темы Substratum и тому подобное. Но это путешествие легче сказать, чем сделать. Начнем с того, что OEM-производители, такие как Nokia и Huawei, чрезвычайно усложнили разблокировку загрузчика.
В том же духе Xiaomi усугубила положение технических энтузиастов, заблокировав режим EDL для обычных пользователей. Точно так же, если вы успешно разблокировали загрузчик и рутировали свое устройство, вам придется согласиться на некоторые компромиссы. Эти компромиссы достигаются благодаря тесту SafetyNet от Google.
Если ваше устройство не пройдет этот тест (что при нормальных обстоятельствах произойдет со всеми рутированными устройствами), то некоторые функции устройства будут ограничены. В результате становится все более важным исправить ошибку несоответствия ctsProfile на вашем корневом устройстве Android. И если вы хотите сделать то же самое на своем устройстве, то это руководство поможет вам.
Что такое ctsProfile и SafetyNet?
SafetyNet — это механизм безопасности, реализованный Google на всех устройствах Android, основной задачей которого является проверка того, проходит ли ваше устройство набор тестов совместимости или нет. Итак, как ваше устройство пройдет этот CTS? Ну, это просто — если на вашем устройстве нет изменений на системном уровне, целостность вашего профиля CTS сохраняется.
В результате SafetyNet выдаст сообщение True. Однако, если вы выполните какую-либо пользовательскую настройку разработки, которая внесет изменения в системный раздел, CTS сразу же выйдет из строя. Другими словами, рутирование вашего устройства приведет к сбою CTS. И, следовательно, тест SafetyNet хорошо выдает результат False как при проверке ctsProfile, так и при проверке basicIntegrity.
Неудачный тест SafetyNet: последствия
Так каковы же последствия провала этого теста? Другими словами, зачем нам вообще нужно исправлять ошибку несоответствия ctsProfile на нашем корневом устройстве Android? Что ж, их довольно много, и большинство из них влияет на повседневное использование приложений. Например, большинство банковских приложений (например, Google Pay) обнаружат, что ваше устройство было взломано (т.е. рутировано).
Ошибка ctsProflie
Следовательно, они откажутся работать на вашем устройстве в целях безопасности. Точно так же некоторые игры, такие как Pokemon GO, не будут работать должным образом. Причина в том, что многие рутированные пользователи подделывали свое фактическое местоположение и ловили самых редких или редких существ! Более того, потоковые сервисы, которые соблюдают сертификат DRM, также сталкиваются с рядом проблем.
Например, в случае с Netflix, Amazon Prime Video и т. п. сертификат WideVine L1 будет понижен до уровня L3. В результате вы не сможете транслировать видео в формате HD. Следовательно, именно по этим причинам многие пользователи. Чтобы преодолеть эти ограничения, вам необходимо исправить ошибку несоответствия ctsProfile на вашем корневом устройстве Android. Итак, без лишних слов, приступим.
Приведенные ниже инструкции были разбиты на отдельные разделы для простоты понимания. Обязательно следуйте в той же последовательности, как указано. Droidwin и его участники не будут нести ответственность в случае термоядерной войны, если ваш будильник не разбудит вас, или если что-то случится с вашим устройством и данными, выполнив следующие шаги.
ШАГ 1. Включите Magisk Hide для сервисов Google Play.
Прежде всего, вам придется скрыть root от всех приложений, служб и платформ Google. Вот как это можно сделать:
- Запустите приложение Magisk Manager на своем устройстве.
- Затем нажмите на значок настроек, расположенный в правом верхнем углу.
- Прокрутите до раздела Magisk и включите переключатель MagiskHide.
- Затем вернитесь в главное меню и коснитесь значка щита, расположенного в нижнем меню.
- Нажмите на MagiskHide, а затем установите флажок «Сервисы Google Play».
- Наконец, включите переключатель рядом с каждым приложением и службой Google.
ШАГ 2. Пройдите базовую целостность Magisk на рутированном Android 11
Прежде чем вы на самом деле перейдете к исправлению ошибки несоответствия ctsProfile на вашем корневом устройстве Android, вам нужно будет пройти базовый тест Magisk на целостность. Для этого обратитесь к нашему подробному руководству: Как пройти Magisk SafetyNet на рутированном Android 11. Выполнив шаги, упомянутые в этом руководстве, вы сможете убедиться, что вы действительно прошли тест или нет.
- Для этого запустите приложение Magisk Manager на своем устройстве.
- Затем нажмите на кнопку «Проверить SafetyNet». Если вы выполняете этот тест впервые, Magisk предложит вам загрузить некоторые дополнительные зависимости, поэтому нажмите «ОК».
- Необходимые дополнения будут загружены в течение нескольких секунд. После этого результаты теста будут прямо перед вами.
- На данный момент вы по-прежнему будете получать сообщение об ошибке аттестации, но почему? Ну, это потому, что мы прошли только тест basicIntegrity, нам еще предстоит пройти тест ctsProfile.
Если вы также посмотрите на скриншот выше, вы заметите галочку рядом с basicIntegrity, но по-прежнему знак минус рядом с ctsProfile. Итак, давайте теперь обратим наше внимание на последний. Итак, вот шаги, чтобы исправить ошибку несоответствия ctsProfile на вашем корневом устройстве Android.
ШАГ 3. Удалите данные сервисов Google Play
Пришло время удалить данные сервисов Google Play. Вот как это можно сделать:
- Перейдите в «Настройки» на вашем Android-устройстве.
- Затем перейдите в Приложения и уведомления.
- Прокрутите до Сервисов Google Play и перейдите в раздел «Хранилище и кеш».
- Нажмите «Очистить хранилище» и, наконец, кнопку «Очистить все данные». Вот и все.
ШАГ 4: проверьте ctsProfile Test через Magisk
Теперь, когда мы выполнили все предварительные условия, пришло время проверить, были ли эти усилия плодотворными или нет. Другими словами, давайте проверим, смогли ли вы исправить ошибку несоответствия ctsProfile на вашем корневом устройстве Android.
- Итак, запустите приложение Magisk Manager на своем устройстве.
- Затем нажмите на кнопку «Проверить SafetyNet». Теперь вы должны получить сообщение об успешном завершении.
- Точно так же рядом с basicIntegrity и ctsProfile будет стоять галочка.
Итак, на этом мы завершаем руководство о том, как исправить ошибку несоответствия ctsProfile на вашем корневом устройстве Android. Если у вас все еще есть какие-либо вопросы относительно вышеупомянутых шагов, сообщите нам об этом в разделе комментариев ниже. Мы вернемся к вам с решением в ближайшее время. В этой заметке, если вы все еще не смогли пройти этот тест, вот несколько других обходных путей, которые вы могли бы попробовать.
Обходные пути для исправления ошибки ctsProfile MisMatch на рутированном Android
Ниже приведены некоторые удобные настройки, которые, как известно, дают желаемые результаты, когда дело доходит до этой проблемы. Имейте в виду, что не существует какого-либо универсального решения для решения этой проблемы. Возможно, вам придется попробовать все нижеперечисленные обходные пути, пока проблема не будет устранена.
Совет 1: Добавьте Google Apps в черный список под Xposed
Xposed Framework, в отличие от Magisk, не работает бессистемно. Поскольку они напрямую вносят изменения в системный раздел, SafetyNet обязательно сработает. Так что если вы используете Xposed, вам придется обойти это ограничение. Для этого рассмотрите возможность добавления всех приложений и служб Google в черный список внутри Xposed Framework.
Для этого обратитесь к нашему подробному руководству: Как пройти тест SafetyNet после установки Xposed или EdXposed. Посмотрите, может ли это исправить ошибку несоответствия ctsProfile на вашем корневом устройстве Android.
Совет 2. Используйте режим «Только ядро» для исправления Magisk ctsProfile
Magisk также поставляется с режимом «Только ядро», который включает только основные функции Magisk, отключая менее важные. Большинство модулей не будут загружены. В этом режиме будут включены только несколько важных функций, таких как MagiskSU, MagiskHide, бессистемные хосты и busybox. С учетом сказанного, если вы хотите включить эту функцию, обратитесь к нашему подробному руководству: Как использовать только основной режим в Magisk Manager?
Итак, все это было из этого руководства о том, как исправить ошибку несоответствия ctsProfile на вашем корневом устройстве Android. Мы будем постоянно обновлять это руководство с дальнейшими настройками, как только нам удастся получить то же самое.
В данной статье мы попытались собрать абсолютно все способы решения проблемы в Magisk «SafetyNet не пройден: несовпадение профиля CTS».
Большинство пользователей которые ранее пользовались SuperSU переходят на новый Magisk, так как он имеет довольно множество плюшек, о которых мы говорили ранее.
Одной из главных достоинств Magisk — это возможность прятать от банковских и других приложений наличие Root прав, так как при их обнаружение, они останавливают свою работу.
Но многие пользователи, что установили Magisk Manager, столкнулись с проблемой «SafetyNet не пройден: несовпадение профиля CTS» и в этой статье мы предложим вариантов как ее исправить.
Ниже будут представлены 6 шагов для исправления «SafetyNet не пройден».
Шаг 1 — Избавиться от SuperSU
Если вы получали Root права с помощью ZIP файла SuperSU или CF Auto Root, который установил SuperSU на ваш Android, а после решили поменять на Magisk, то это может быть первой проблемой с SafetyNet.
Удалите SuperSu из вашего смартфона или планшета, а после прошить в Recovery файл UPDATE-unSU-signed.zip чтобы полностью вычистить все из системы.
Шаг 2 — Изменить режим SELinux
Попробуйте установить режим работы SELinux в «Permissive», а после вернуть обратно «Enforcing» и перезагрузить Android.
Шаг 3 — Отключить «отладку по USB»
Если у вас до последнего момента у вас была включена «отладка по USB«, тогда перейдите в меню «Настройки»-> «Для разработчиков» и отключить «отладку» и перезагрузить Android.
Шаг 4 — Используете другое ядро
Поищите в сети интернет стороннее ядро для своего Android, после чего проверьте не исчезла ли проблема в Magisk «SafetyNet не пройден: несовпадение профиля CTS».
Шаг 5 — Другие проблемы
Перейдите в меню настроек Magisk и отключите Busybox и Systemless hosts и перезагрузите Android.
Шаг 6 — включить режим Magisk Core Only Mode
Если все предыдущее шаги вам не помогли, тогда попробуйте включить режим работы Magisk Core Only Mode, который отключает дополнительные возможности Magisk.
Шаг 7 — добавить строки build.prop
С оригинальной прошивки (если вы используете кастом) в файле build.prop, который находиться в разделе /system, скопируйте поля со значения:
- ro.build.description=xxxx
- ro.build.fingerprint=xxxx
И добавьте их в файл build.prop установленной прошивки.
Шаг 8 — ввести команду в терминале
Установите приложение терминал на Android и введите в него следующие команды:
su
 sh /magisk/.core/magiskhide/disable
 sh /magisk/.core/magiskhide/enable
Шаг 9 — Начать все с начала
Если вам ничего не помогло, тогда попробуйте переустановить прошивку на вашим Android, а после получить Root с помощью Magisk, чтобы избавиться от проблемы «SafetyNet не пройден: несовпадение профиля CTS».
Остались еще вопросы? Пишите их в комментариях, рассказывайте, что у вас получилось или наоборот!
Вот и все! Больше статей и инструкций читайте в разделе Статьи и Хаки Android. Оставайтесь вместе с сайтом Android +1, дальше будет еще интересней!
Are you looking for the latest working guide to bypass Safetynet issue? If the answer is yes, then you are in right place. Here we are going to show you how to fix Safetynet issue with the simple android app or Magisk module. The module called universal SafetyNet Fix let you run the apps which require the google new security measure aka Safety Net.
Magisk Manager is one of the fastest-growing Non-Playstore App which means unknown sources app which is only designed for the rooting devices systemlessly. One of the Xda forum members has made this app for hiding root access from some of the high-security applications. Topjohnwu is the creator of the Magisk Su. It works as same as Chainfire’s Super Su. But Super Su fails the Safety Net pass so most of the people switch to Magisk Root.

Table Of Contents
- 1 What is SafetyNet?
- 1.1 How to Bypass SafetyNet Issue with Universal Safetynet FIX?
- 1.2 Requirements:-
- 2 Steps to Fix SafetyNet on most of the android devices
- 2.1 How to Install Universal Safetynet Fix with TWRP (Custom Recovery)?
What is SafetyNet?
Safety net is the Topmost Security measure that ensures the device is safe to run some of the android applications mostly Banking applications. Recently it was developed by Google to improve the security of the android platform.
You might hear about Android Pay which is introduced by Google available in some countries now. This app will check the safety net thing and if it confirms that then it will work. As like this one, most of the banking applications follow the same procedure to run their apps on the android device.
Even it spread to Netflix. Only Netflix works when it confirms that the device passes the safety net. By Rooting the device, you will lose the warranty along with the Safety Net pass. That may tend to your device being out of support for these kinds of apps.
How to Bypass SafetyNet Issue with Universal Safetynet FIX?
If you are using the SuperSu root binaries, then you must switch to the Magisk Su. Here is the best guide for installing Magisk Su. After installing Magisk Root binaries then this process will work for you as like a charm.
Fix Safetynet issue possible with the Magisk Module which is called as Universal Safety Net Fix. Deiki is the XDA forum member and the creator of this Module.
Currently, it is in the Beta version so in some of the devices it may not work properly. I recommended you to bookmark this page it will help you to get the app updates quickly. Or you will check the updates from the Magisk Manager.
Requirements:-
- Magisk 20+ (How to Install Magisk Su and Magisk manager Guide here)
- Magisk Manager
- New* Latest Module By Didgeridoohan that will help you to Pass the Safetynet measure. – Download
- Universal Safetynet fix – Download
- One more module suggested by a community member – HiddenCore Module – Download
- PetNoire’s SafetyNet Spoofer – Download
Steps to Fix SafetyNet on most of the android devices
- Download the Universal Safetynet fix flashable zip file from the requirements section according to the Magisk version.
- Open Magisk Manager and drag the menu from left to right.
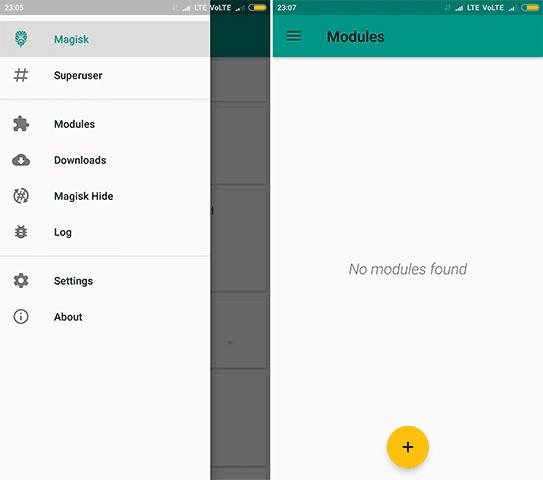
- You will see the Module section. Open it.
- Now, click on the Yellow color + button. It will open the file manager of your device. Select the Universal safety net fix.Zip file.
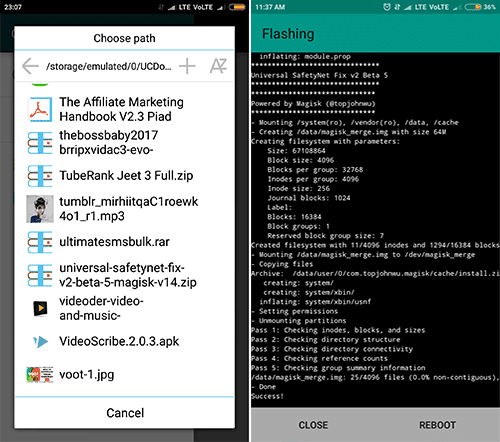
- After that Reboot your device.
How to Install Universal Safetynet Fix with TWRP (Custom Recovery)?
In some of the beta versions, installing directly with the magisk manager is not possible. It will Show some error message when flashing module .zip file. In that case better to flash with custom recovery EG:- TWRP.
- After downloading the above zip file according to the magisk version.
- Now, Boot your device into Custom Recovery mode.
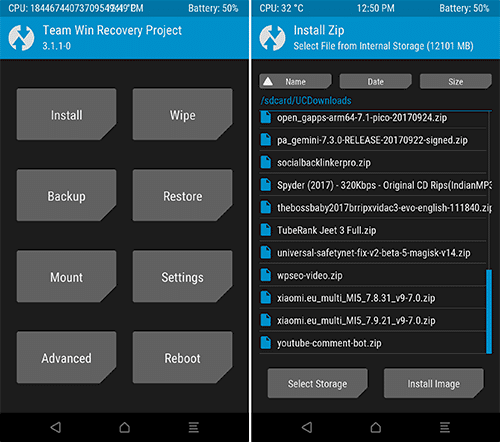
- In the TWRP’s Home select the Install button. Find the required zip file from your Storage.
- Swipe the install Button. It will take some time to complete the installation procedure. Then simply tap on the reboot button.
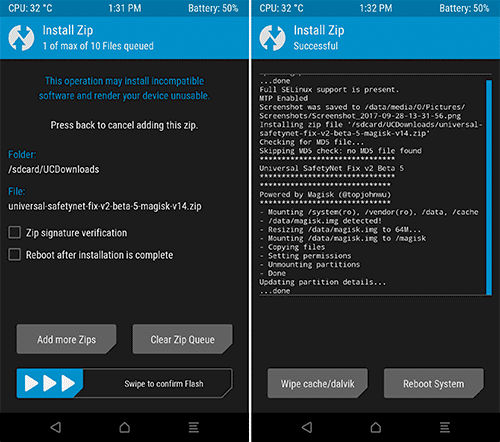
- Now, the phone will open normally and check the Safety net pass on the Magisk Manager App.

Final Words:
Working Guide to bypass Safetynet issue on most of the Android ROMs. I hope this guide will help you as much as I think. So, If you have any further queries regarding bypass Safetynet issue comment below. we will help you out as fast as we can.
If this is useful for you then don’t be shy to share this post with your friends.

Мы уже рассказывали о том, что компания Google проверяет все устройства с её фирменной операционной системой Android на борту на наличие сертификации, а также о том, что делать при её отсутствии, а сегодня хотим познакомить с еще одним методом решения этой проблемы.
Речь пойдет об устройствах с альтернативными (кастомными) прошивками, многие из которых не имеют сертификации Google и о том, как убрать в Google Play Маркет сообщение о том, что устройство не сертифицировано после установки такой прошивки.
Чтобы справиться с этой проблемой вам нужно будет установить на свой смартфон Magisk, что будет совсем несложно, если вы уже справились с процедурой прошивки.
Для этого вам потребуется:
1. Скачать свежие стабильные версии Magisk (Latest Stable) и Magisk Manager (Latest Magisk Manager) от его разработчика из этой ветки форума XDA-Developers
2. Перезагрузить ваш смартфон в рекавери. У большинства тех, кто имеет кастомную прошивку — это TWRP рекавери.
3. В рекавери нажать кнопку «Install» и выбрать zip-файл с Magisk (в примере на скриншоте ниже он находится в папке Dowload)

4. После выбора файла для установки сдвиньте ползунок внизу экрана вправо, чтобы установить его. После успешной установки, процедура которой выглядит как на скриншоте ниже, справа нажмите на кнопку «Reboot System», чтобы перезапустить ваш смартфон.

5. Установите приложение Magisk Manager, запустите его и проверьте статус Safety Net.

Если в результате проверки никаких ошибок не обнаружено, переходите к шестому пункту.
Если появляется сообщение CtsProfile: false то вам нужно будет попробовать следующее:
– Скрыть Magisk от Google Services Framework и Google Play Маркет. Для этого перейдите в меню Magisk Hide, выберите опцию показа системных приложений и поставьте отметки напротив соответствующих пунктов.

– Включить Magisk Core в меню настроек Magisk Manager

Не забывайте перезагружать смартфон после каждой из манипуляций.
6. Удалите данные Google Play Маркет. Для этого перейдите в меню настроек системы, раздел «Приложения», найдите в нем Play Маркет, остановите его и удалите все данные этого приложения («Очистить хранилище»), после чего перезагрузите смартфон.

7. Запустите Play Маркет, зайдите в меню приложения -> «Настройки» и в самом низу вы должны увидеть надпись о том, что ваше устройство сертифицировано в Play Защите.

Похожие материалы:
Советы Android. Как отключить Ассистент Google
Запустить Android 9 Pie на ПК или ноутбуке можно с помощью Bliss OS
Cбросить адаптивную яркость в Android 9 Pie теперь можно без очистки данных о батарее
Как удалить установленные с завода приложения на Android смартфоне или планшете без Root
Android Q. Всплывающие пузырьки уведомлений в стиле Chatheads для всех приложений появились в тестовой версии операционной системы (Как включить их и отключить)
UPDATE – JANUARY, 2023 – UPDATED SAFETYNET FIX BY kdrag0n (Magisk 24 and newer)
Kdrag0n released a new version at the beginning of 2023, and here are the highlights of the v2.4.0 –
- Play Integrity bypass without breaking device checks or causing other issues
- Disabled use of hardware attestation on Pixel 7 and newer (@anirudhgupta109)
- Updated instructions for newer Android and Magisk versions
- Better debugging for future development
Kdrag0n mentioned that he wanted to make sure that this module won’t cause any unnecessary breakage. The spoofing will happen dynamically at runtime and only when necessary, minimizing the adverse effects.
DOWNLOAD UNIVERSAL SAFETYNET FIX v2.4.0
UPDATE – JUNE 2022 – UPDATED SAFETYNET FIX BY kdrag0n (Zygisk only)
After almost six months, Kdrag0n has released the new version of the SafetyNet fix, and this one only supports Zygisk (Magisk 24 and newer). Here are the highlights of this new version –
- Fixed fingerprint on OxygenOS/ColorOS 12
- Support for Magisk 24+ module updates
- Restored support for Android 7
DOWNLOAD UNIVERSAL SAFETYNET FIX v2.3.1
UPDATE – DECEMBER 2021 – UNIVERSAL SAFETYNET FIX BY kdrag0n (Zygisk and Riru versions)
kdrag0n has released new versions of the Universal SafetyNet Fix, both Riru and Zygisk versions. So what to choose?
Well, for those using Magisk Canary, go with the Zygisk Version.
For those using the stable Magisk, go with the Riru version. Remember that if you go with the Riru version of this universal SafetyNet fix, you must install the Riru module through Magisk Manager.
Here are the links to the two versions –
DOWNLOAD UNIVERSAL SAFETYNET FIX v2.2.1 (Zygisk)
DOWNLOAD UNIVERSAL SAFETYNET FIX v2.2.1 (Riru)
Android versions 7–12 are supported, including OEM skins such as Samsung One UI and MIUI.
UPDATE – SEPTEMBER 2021 – NEW FIX FOR SAFETYNET FAILED ISSUE
So recently, for some reason, SafetyNet has started failing even after installing the below-mentioned Universal Fix by kdrag0n. Thanks to TeamFiles on Telegram., we have another fix that works for this new issue. This fix requires you first to download a few files. Here are the ones you need to download and keep on your phone before starting with the steps –
- Riru – Latest Release
- LSPosed – Latest Release
- XPrivacyLua – Download the Apk
You can also download a Zip file that has all these three files included in it. Here is the link to that.
Before starting, make sure you back up everything as this fix has not been tested for all the devices, so it may cause issues in your phone. Also, make sure the latest Stable version of Magisk is there on your phone. We won’t be responsible for any damage happening to your phone.
Here are the steps –
- First, go to Magisk and install the Riru Module. Once the installation succeeds, come back to the modules page. Do not reboot yet!
- Next, install the LSPosed Module. Once that installs successfully, reboot your phone. This is important! Do not reboot in the first step.
- Once the phone reboots, you will see a new LSPosed app installed.
- Now, you need to install the third apk file that you downloaded. Once that installs, go to the LSPosed app and go to Modules.
- There, choose the XPrivacyLua and ensure you “Enable Module.” Initially, make sure the “System Framework” and “Settings Storage” options are checked.
- Now, go to the top right and tap on the three-dot menu. Select “Hide” and uncheck the “System Apps.”
- So now, you need to scroll down and find Google Play Services among all the apps. Just Check that. Now Reboot your phone again.
- When your phone reboots, you must go back to the LSPosed app and ensure that three options are checked in the XPrivacyLua module. There are – “System Framework,” “Settings Storage,” and “Google Play Services.”
- Once that is all right, close LSPosed, and there will be another app installed on your phone named “XPrivacyLua.” Open that. Click “I Agree.”
- Here, find Google Play Services and tap on that. Now, you need to check only one option there. And that’s “Use Tracking.” That should be the last option there.
- Finally, Clear all the data and cache of the Google Play Store and Google Play Services. Also, Hide Magisk and change its name.
- And now, do a final reboot!
And that’s it! If everything goes well, you will no longer have the SafetyNet Failed Issue on your phone, and the Play Store will show Device is Certified. If Banking apps are not working even after fixing the SafetyNet with this method, then you need to check “Use Tracking” for those apps in “XPrivacyLua.” Just like what we did with Play Services. And then, the same steps, i.e., clear data and reboot. For a better understanding, here is the full video tutorial by Munchy –
UPDATE – JULY 4, 2021 – UNIVERSAL FIX FOR SAFETYNET (ALL THANKS TO kdrag0n)
kdrag0n has shared a Universal Fix for Google SafetyNet on Android devices with hardware attestation and unlocked bootloaders. You can now install a Magisk Module that will fix the ctsProfile Failed issue. On the official Github page, kdrag0n has mentioned that –
This Fix defeats both hardware attestation and the new CTS profile updates, without any changes to device or model names, as long as you can pass basic attestation (i.e. fingerprints). No device-specific features (such as the Pixel-exclusive Google Assistant design) will be lost. MagiskHide is required if the device is rooted. Android versions 8–11 are supported. Heavy OEM skins are not officially supported, but they may work depending on your luck and the particular ROM in question.
Anyways, here are the steps –
- Download this Magisk Module (For Android 8-11) – SAFETYNET-FIX-v1.2.0
- Open Magisk and go to the Modules tab
- Install the Magisk Module that you downloaded
- Reboot your phone, and that’s it.
v1.2.0 Changelog:
- Added support for Android 12 Beta 2
- Fixed boot loop after major Android updates
PREVIOUS VERSIONS OF THE FIX –
NOTE – DONT INSTALL MODULE FOR Android 11 on Android 10 and vice versa as it will result in BOOTLOOP !!!
- SAFETYNET-FIX-v1.1.1(ANDROID 8-11)
- SAFETYNET-FIX-v1.1.0 (ANDROID 8 – 11)
- SAFETYNET-FIX-v1.0.2 (ANDROID 11)
- SAFETYNET-FIX-v1.0.2 (ANDROID 10)
- SAFETYNET-FIX-v1.0.0 (ANDROID 11)
UPDATE – HERE IS ANOTHER METHOD THAT WILL HOPEFULLY HELP YOU FIX THE CTS PROFILE FALSE ISSUE
NOTE – TRY THESE STEPS ON YOUR OWN RISK. WE WON’T BE RESPONSIBLE IF ANYTHING GOES WRONG.
Here are the steps –
- First, go to the Google Play Store & download “Termux,” an Android terminal emulator and Linux environment app.
- Next, open Magisk Manager & from the left side menu and select the “Downloads” option.
- There, you need to Install two Magisk Modules – Busybox for Android NDK & MagiskHide Props Config.
- You can either Install one Module & then reboot and then Install the other, or Install One, go back, install the second, and then reboot. Both will work.
- Once the phone reboots, we need to do one final thing, which is the most important step. Before moving to the next step, check if both modules are shown as installed or not in Magisk Manager.
- Open the Termux app & then type “su” and press Enter. This will grant Superuser Rights to the app.
- Next, type “props” & press Enter. You will see a lot of options & numbers in front of them to choose from.
- You need to choose the option that says “Edit Device Fingerprint.” It should be the Number “1,” but double-check it on your device.
- Enter that Number & press Enter.
- Again, you’ll see some options & from there, choose the one that says “Pick a certified fingerprint.” This time, instead of numbers, you will see letters in front of each option like “f,” “v,” “s,” “b,” etc. Enter the letter in front of the option (Pick a Certified Fingerprint) & press Enter.
- Now, you’ll see a long list of various Smartphone companies, so from here, you need to choose your phone’s company. For Example, if your phone is the Asus Zenfone Max Pro M1, choose “Asus.” Here also, you need to type the number in front of the company name & then press Enter.
- Now, it’ll show you various devices from that company. If your device is there on the list, you’re good to go. Otherwise, you’re not lucky, so you will have to wait for another method.
- Select the number in front of your Phone’s name & then press Enter.
- Finally, it will ask if you want to continue. If you have followed everything above & selected the right options, write “y” & press Enter.
- Finally, press “y” to reboot your device & press Enter. Now, your phone will reboot.
After all these steps, you will see that in the Magisk Manager, it no longer says “false” in front of the ctsProfile option. Also, in the play store, it’ll say “Device in Certified.” Hopefully, you will also be able to use Payment apps like Google Pay on your device (Hopefully).
Thanks to Crazy Customization (YouTube) for the video tutorial.
UPDATE: 2020 – IN MARCH 2020, GOOGLE MADE SOME CHANGES THAT RESULTED IN MAGISK NOT BEING ABLE TO PASS SAFETYNET. HERE IS A WORKAROUND FOR THAT TO FIX THE CTS PROFILE FALSE ERROR (SAFETYNET FAILED).
We will use Xposed Framework for the Workaround, but you need to have your device rooted via Magisk and have the Magisk Manager installed on your phone since we need the Magisk Modules. Now, there is no way to know if Xposed Framework will work on all the devices, so there are chances of it not working on your device.
First of all, here are all the files that you need to download on your device –
- LATEST MAGISK
- HIDDENCORE XPOSED MODULE
- MAGISK RIRU-CORE MODULE ZIP FILE
- EDEXPOSED SANDHOOK OR YAHFA VERSION (Whichever works for you. We suggest trying Yahfa first).
- EdXPOSED MANAGER APK FILE
- RIRU MANAGER APK
HERE ARE THE STEPS TO FIX THE MAGISK CTS PROFILE FALSE ERROR WITH THE NEW METHOD
- First, Install Riru Manager. If you get the Unknown Sources error, enable ‘Allow from this source and Install it.
- Once you install it, go to Magisk Manager, then, from the left side menu, go to the Modules section. Tap on the Plus Button.
- If you don’t have the ‘Show Internal Storage’ option enabled in File Manager, tap on the three dots in the top right corner and select it. In case it is already enabled, you will see the ‘Hide Internal Storage’ option in its place. So you don’t need to do anything.
- Navigate to the folder in the internal storage where you have all the downloaded files, and then select the ‘MAGISK RIRU-CORE’ ZIP file. Once installed, Reboot the phone. (Check the Modules section in the Magisk Manager to see if the module has been installed properly. You will see a checkmark if it is installed successfully).
- In the App Drawer, you will now see a new app called ‘Riru.’ Open it, and if it says ‘Everything Looks Fine,’ you’re all set to follow the next steps. If you get any errors, try installing Riru Module again.
- Now, once again, go to the Magisk Manager > Modules and then press the Plus button. Now, we need to install the ‘EdExposed Module,’ and as mentioned above, there are two versions to choose from. You have to try and see which one works for your device. We will recommend starting with the ‘Yahfa’ version first. Once again, once installed, reboot the phone. After reboot, once again, confirm if the module is installed properly.
- Go to the File Manager and install the ‘EdExposed Manager’ via the APK file. You will see the App in the App Drawer.
- Open it to see if there are any errors or not. If there are any, the ‘Yahfa’ version didn’t work. So, in that case, go to the Module section, remove the Yahfa version, reboot the phone, and then install the ‘Sandhook’ version.
- Finally, install the ‘HiddenCore’ Xposed Module via its APK file. Now, go to ‘EdExposed Manager,’ swipe from the left side, select the ‘Modules’ option, then enable the ‘HiddenCore’ Module. Now, reboot your phone.
- After Reboot, you should check if the ‘HiddenCore’ module has been enabled successfully in the EdExposed Manager.
Well, that’s it! Now, go to Magisk Manager, tap to start the SafetyNet Check, and see that the ‘ctsProfile’ shows as True! This means we successfully did the SafetyNet Bypass.
NOTE THAT IF THIS METHOD ALSO DOESN’T WORK, THEN WE WILL HAVE TO WAIT FOR THE DEVELOPERS TO FIND ANOTHER FIX FOR THIS.
Props to ‘Munchy‘ for sharing this method on his YouTube Channel.
CONCLUSION
This detailed guide was about fixing the CTS Profile Mismatch Error or Magisk Basic integrity False error even with Magisk installed. If the steps mentioned above don’t work, you need to start from scratch, i.e., flash Stock ROM, install TWRP, flash Magisk ZIP and do the same thing again. Did the steps work for you? Do let us know via the comments section.
What is CTS profile mismatch?
CTS means Compatibility Test Suite & CTS Profile Mismatch is an error that causes SafetyNet check to fail, even if you have Magisk on your device.
What is the SafetyNet Check?
Google Developed SafetyNet & it is an API (Application Programming Interface) that is used to detect if a certain device is in a good state or not.
How Do I Fix How do I fix Magisk SafetyNet?
1. Use MagiskSu2. Try unSU3. Turn OFF USB Debugging4. Set Selinux Back to Enforcing5. Try a Custom Kernel
How do I Enable Magisk Hide?
Open Magisk Manager App, then swipe from the left & select Magisk Hide. Now, you can turn on and off it for certain apps.

-
#1
 We’re aware that the CTS profile is failing for most of you guys out here . It’s not an issue with the ROM or Device . It’s because recently Google made security changes which make sure safety-net fails check when Magisk is installed or when the bootloader is unlocked . We’re not sure if they’re just testing it like before or if they have implemented it already . We will share possible solutions here with everyone as soon as possible .
Update ( Tested on 21.1.6 MIUI 12.5 A11 ) :
1.Tried the Riru method , Riru Cored installed successfully , Edxposed Yafha = Bootloops , EdXposed Sandhook = EdXposed Manager Crashes before starting .
2. Tried Spoofer module — CTS Profile still false
3. Tried tweaking around with Magisk Hide Props — CTS remains false
Not my post
Post is from one of the admins of https://t.me/XiaomiEUK20Pro Group
Sent from my Mi 9T Pro using Tapatalk

-
#2
it seems that safetynet now is working as it should
for apps which check the status on the device you can try the «hidden core modul» -> cts profile -> true
it will fake the status on the device not on the servers ….
Update: @DamonSalvatore07 posted a MagiskModule fix:

Last edited: Jan 13, 2021
-
#3
it seems that safetynet now is working as it should
for apps which check the status on the device you can try the «hidden core modul» -> cts profile -> true
it will fake the status on the device not on the servers ….*** gpay will not work with that module others perhaps will work ***
View attachment 34054
Share the module please !
Sent from my Mi 9T Pro using Tapatalk
-
#4
Share the module please !
Sent from my Mi 9T Pro using Tapatalk
Install edXposed and there you can download it or google it
PS: Please rename the thread: Something like «safetynet / cts profile false»
Last edited: Jan 13, 2021
-
#5
I also have ctsprofile failed, but banking apps and GPay still seem to be working. No edXpose or whatever modules installed, only Magisk. Strange, isn’t it?
-
#6
I installed hiddencore in edxposed and enabled it in edxposed manager and then rebooted. What is the next step? I don’t see any options for CTS profile.
-
#7
I also have ctsprofile failed, but banking apps and GPay still seem to be working. No edXpose or whatever modules installed, only Magisk. Strange, isn’t it?
Yeah all my banking apps and gpay work. All except Macdonalds app. The mac sure takes security seriously
-
#8
Eh, I waste much time to fix that SafetyNet. Yesterday it worked ok. I thought I set something wrong and that’s google changes broke that again. :/
-
#11
Thing is I dont have a root and still have the same issue that device is not certified from today, and Google Pay doesnt allow NFC payments, I paid with this yesterday … So your solution with Magisk is for rooted, I would like to make it work without it.
-
#12
Hmm, I have Play Store Certified, but can’t install Netflix and other Widevine L1 apps. What can I do? Yesterday I haven’t problem with that. I cleaned data and cache, didn’t help.
-
#13
Hmm, I have Play Store Certified, but can’t install Netflix and other Widevine L1 apps. What can I do? Yesterday I haven’t problem with that. I cleaned data and cache, didn’t help.
you can install this magisk module if you have android 11
-
#14
I installed that. SafetyNet has ok status. But I can’t install Netflix with Play Store Certified status.

-
#15
you can install this magisk module if you have android 11
And for Android 10 Xiaomi.eu stable rom ?
-
#16
I installed that. SafetyNet has ok status. But I can’t install Netflix with Play Store Certified status.
on my Mi9 it is working … newest xiaomi version / magisk / magisk hide / magisk hide app and so on …

SafetyNet Bypass: Fix CTS Profile Failed issue. Are you getting annoyed by the SafetyNet security measure in a rooted android device and wanna install all the Banking and OTT apps in it? Do you’ve taken tremendous steps to come out from this problem and don’t got succeed in a single one?
If Yes, then you don’t have to get worried for one more second, since here we’ll apprise you about the most useful Magisk Module which is the best measure for this case.
Moreover, we’ll also provide you with this Magisk Module below.
Must go through the complete article carefully and, you’ll definitely evolve a lot to bypass the SafetyNet issue in your Magisk rooted smartphone.

What is SafetyNet?
SafetyNet is one of the sumptuous security standards established by Google Co. Also, it’s an advanced security barrier that is damn hard to bypass easily. It basically blocks the rooted devices to download most of the signed and credential android applications like Banking apps, OTT platforms, Google LLC’s apps, as well as all the trading and money-based platform apps.
Well, it was first only applicable for the banking software, but right now, streaming apps also have adopted this measure and are working on it. It means that you won’t be able to use the fascinating service by Netflix and Amazon Prime until you break Google’s SafetyNet wall.
After lots of holdups, finally, we’re here with a fabulous Magisk Module that will help you in bypassing the SafetyNet Issue conveniently. Yes, you don’t have to process a lot from now for bypassing the SafetyNet and watching your favorite content or paying online bills. It’s right now possible in just a few clicks.
Universal Safety Net Fix is all you need for getting rid of this matter. It’s developed by Deiki, a member of the XDA forum.
Well, this module is only installable for the Magisk Su, which means that it won’t run in any other root manager. So if you’re operating the SuperSu root binaries or any other one, then you need to switch to Magisk Su to bypass the SafetyNet issue.
Universal Safety net Fix is the most convenient module that you can easily download below. If the Magisk App installation process won’t work, then please try to install it on TWRP Recovery mode.
Prerequisites
- The rooted device with Magisk App (Magisk Manager).
- Magisk version must have to be Magisk 20+. – Magisk App 22.0
- Universal SafetyNet Fix Magisk Module – Download (Latest) | Github releases page
- MagiskHide Props Config Module – Download (Latest) | Github releases page
Note – It’s the beta version of the SafetyNet bypasser, so possibly it won’t run on some Android devices. So If you’re unable to install and use it on your smartphone, you can check for it later on the same website.
Since we’ll update it whenever the developer posts one. Be updated!!!
Steps to fix Fix SafetyNet Hardware Attestation on any Android devices
1.) Enable MagiskHide and Pass Basic Attestation
2.) Install Universal Safetynet Fix Module with TWRP (Custom Recovery)
3.) Install MagiskHide Props Config to Pass CTS Profile
По просьбе уважаемого esleer
выкладываю гайд по установке Magisk на аппарат Lenovo P2
и обход блокировки Android Pay
на рутованном телефоне.
Небольшой дисклеймер: все действия выполняются вами на свой страх и риск. Окирпичить этот телефон кривыми действиями сложно, но тем не менее. Нижеследующая инструкция является по сути повторением инструкции с сайта XDA (искать в гугле по кейворду «XDA Lenovo P2 Magisk») с некоторыми дополнениями от меня лично. Глубинного понимания процессов, происходящих в результате выполнения нижеприведенных действий у меня нет, поэтому буду рад любым уточнениям, дополнениям и исправлениям.
Для установки Magisk, нам понадобится сам аппарат Lenovo P2
c разблокированным загрузчиком
и установленным TWRP
. Как сделать то и другое — читайте в соответствующих разделах форума. Наличие или отсутствие ранее установленного рута нам не принципиально, так как в процессе мы все равно будем устанавливать дефолтную прошивку, и затирать все следы его присутствия.Также желательно иметь флешку
, куда удобно будет записывать бэкапы и установочные файлы.
0: Подготовительные мероприятия: делаем бэкап системы через TWRP. Выключаем аппарат, зажимаем все три клавиши на боку устройства, входим в TWRP, пункт «резервное копирование», выбираем флешку в качестве места сохранения, выделяем все разделы кроме data, и делаем свайп вправо для старта процесса бэкапа. Небольшой момент: если в системе перед бэкапом уже установлен какой-то другой рут, предварительно удаляем само приложение рута из телефона. Сливаем с флешки папку TWRP на компьютер, сохраняем все нужные вам файлы с внутренней памяти устройства. Крайне рекомендую
после создания бэкапа и перед прошивкой, избавиться от всех следов аккаунта Google и прочих сторонних аккаунтов на устройстве. Это сильно упростит жизнь при последующей установке чистой прошивки и избавит от непонятных глюков Magisk-а. Для удаления аккаунтов, заходим в настройки, раздел «Безопасность», отключаем полностью блокировку аппарата (пункт «нет»), далее в разделе «Личные данные», заходим в пункт «Аккаунты», «Google», тап по трем точкам сверху справа, «Удалить аккаунт». Таким же образом удаляем и остальные аккаунты из списка.
1: Входим в TWRP, «Очистка > Выборочная очистка». Ставим галочку напротив раздела System. «Восстановить или изменить файловую систему > Изм. файловую систему > EXT4 > свайп слева направо»
Таким образом, мы изменяем файловую систему раздела System на ext4, делая возможной корректную работу Magisk на данном устройстве.
2: Теперь нам понадобится полностью обновить прошивку устройства. Автор оригинальной инструкции утверждает, что может прокатить и простое обновление без вайпа, но не рекомендует делать этого. Поэтому крайне желательно сделать прошивку с полным сбросом всех данных.
Скачиваем вашу версию прошивки в профильной теме на форуме. Лично я проводил все операции на 251й прошивке, по словам автора поддерживаются версии 233/244 и новее, видимо. Устанавливаем её на телефон посредством программы ADB, переведя устройство в режим fastboot. Инструкция по прошивке посредством fastboot также есть на форуме. В процессе прошивки, также прошьется оригинальный образ boot.img, затерев все следы предыдущего рута, если таковой был установлен ранее. Не забываем установить нужный регион-пакет (набрать в диалере код
####682# и выбрать RU или иной), если для вас это принципиально.
3: Снова устанавливаем TWRP.
4: Скачиваем из данной темы последнюю версию программы Magisk: zip архив для установки через TWRP и инсталлятор Magisk Manager. Желательно сразу скачать самые свежие версии, чтобы потом не заморачиваться с переустановками и обновлениями. Также можно скачать Safety Net Fix отсюда же, но его установка опциональна, лично мне он не пригодился. Складываем скачанные файлы в корень карточки памяти.
5: Входим в TWRP, выбираем пункт «Установка» и карту памяти в качестве источника данных, находим на ней zip файл инсталлятора Magisk и устанавливаем свайпом. Если на этом этапе возникают проблемы, например установка не доходит до конца, устройство внезапно выключается, перезагружается и т. п., попробуйте перезагрузиться в ОС устройства, после чего снова войти в TWRP и попробовать еще раз. Мне помогло. После установки желательно очистить кэш, как это предлагается в меню загрузчика после установки.
6: Загружаем телефон, смотрим в списке приложений появился ли Magisk Manager, если нет, то через проводник телефона находим apk-файл на карточке и ставим вручную. Не забываем включить разрешение установки приложений из неизвестных источников.
7: Запускаем Magisk Manager, нажимаем меню в верхнем левом углу, заходим в «Настройки», активируем переключатели «Magisk Hide» и «Systemless hosts» («Внесистемные хосты»). Выходим на основную страницу программы. Снова тап по меню в верхнем левом углу, пункт «Magisk Hide». Находим в списке (можно воспользоваться поиском) и выделяем галочками приложения Google Services Framework
и Play Market
. Позднее, нужно будет добавить в этот список приложений для скрытия ваши банковские клиенты и прочие программы, которым не следует знать о руте на вашем устройстве)
8: Заходим в плей-маркет, ищем и устанавливаем оттуда программу Kernel Adiutor
,
она бесплатная. Запускаем, разрешаем рут-права, тапаем на меню в верхнем левом углу, прокручиваем список вниз до пункта Init.d, входим. Нажимаем розовый плюс, пишем любое название скрипта, скажем, «Run». Открывается окно редактирования скрипта. Копируем туда (можно прямо из браузера телефона) следующие строчки:
#!/system/bin/sh
echo «deleting magisk properties»
resetprop —delete init.svc.magisk_pfs
resetprop —delete init.svc.magisk_pfsd
resetprop —delete init.svc.magisk_service
resetprop —delete persist.magisk.hide
resetprop —delete ro.magisk.disable
resetprop —delete magisk.version
resetprop —delete persist.magisk.busybox
resetprop —delete persist.magisk.hide
Сохраняем тапом на дискету, нажимаем в списке появившийся скрипт и выполняем его. Перезагружаем телефон.
9: Теперь тестируем, проходит ли телефон проверку SafetyNet. Заходим в Magisk Manager и нажимаем на основной странице «Проверить статус SafetyNet». Если видим две зеленые галочки — поздравляю, у вас получилось). Если нет, придется доустановить Safety Net Fix. Заходим в меню Magisk Manager, тапаем пункт «Модули», желтый плюс, находим на вашей карточке файл с патчем, делаем по нему длинный тап и выбираем «Открыть». После отработки установщика, перезагружаем телефон и делаем проверку SafetyNet еще раз.
10: Восстанавливаем бэкап с флешки, если это необходимо. Входим в TWRP, пункт «Восстановление», находим в списке ваш предварительно сделанный на флешку бэкап, тапаем по нему и восстанавливаем свайпом. Лично я не стал восстанавливаться, поскольку телефон был новый и совершенно «голый» в плане софта, но проблем по идее возникнуть не должно. Если будут возникать какие-то проблемы после восстановления, отпишитесь здесь.
11: Теперь можно устанавливать из стора Android Pay, следуя инструкциям привязывать карту, устанавливать другие банковские приложения, тот же Сбербанк Онлайн например, и пользоваться ими без ограничений.
Отредактировал 24 февраля, 2018 qastron
исправил мелкие недочёты
2 пользователям понравился пост
This article is all about the CTS Profile Mismatch Error and how to fix it.
Before starting with the steps to fix the Magisk CTS Profile False
/Mismatch
Errors, let’s first understand what is ‘SafetyNet.’ We all know that rooting our Android phones give us a lot of freedom and we can do some great things with a rooted smartphone like installing a custom ROM, a custom Kernel, overclocking the processor, etc.
But, if you have a device with which you use Google’s Android Pay, then it won’t work if you root your phone. SafetyNet is a thing that Google uses to detect whether your Android smartphone is rooted or not and if it detects that you have a rooted phone, certain apps can block you from accessing them. We have seen this with the Netflix app that users cannot even find the app to download from the Play Store if their devices are rooted.
Magisk, as most of you might know, is a Universal Systemless Interface, to create an altered mask of the system without changing the system itself. (Thanks, XDA). With Magisk and Systemless root, we can skip most of the SafetyNet tests, revert but the thing is that the Google’s Compatibility Test Suite (CTS) is still a problem.
So, you might get the ‘Magisk safetynet CTS Profile Mismatch Error’
even if you have the Magisk installed on your android phone. So, assuming that you have already installed the Magisk, let’s start with the steps to fix this error.
TIP – You can check your SafetyNet status from the Magisk Manager. You will find an option that says ‘Tap to start SafetyNet Check.’ Tap on that, and it will show you the status.
STEPS TO FIX THE CTS PROFILE MISMATCH ERRORS – FIX CTS PROFILE MATCH FALSE
1. WHY NOT USE MAGISKSU?

So, the thing is that if you have rooted your smartphone and it is having any other root manager than the MagiskSU, then the chances are that it doesn’t hide from Google’s SafetyNet and you get the error. SuperSU, which is the most popular root manager app, is on almost every rooted device so, if you want to get rid of the CTS error, make sure that you are using the MagiskSU and not SuperSU. So, here is how to switch from SuperSU to MagiskSU –
- If you have the Xposed Installer installed, then uninstall it. No need to worry about all the modules you were using. You can install the systemless version of the Xposed using Magisk. To uninstall Xposed, go to Framework > Uninstaller and choose ‘Uninstall’ option. After the process completes, reboot your device by tapping on the ‘Reboot’ option.
- This step is a bit trickier, and if, you have made any changes in the system after rooting your phone, you need to revert them. For Example, let’s suppose you removed the bloatware apps via Titanium Backup. So, you need to install them again. Or, let’s assume that you used AdAway to remove ads. So, you need to remove that also. And we all know what’s the best way to revert all the changes – Flashing the Stock System Image of your phone.
- Now, you need to Unroot via the option in SuperSU and then, restore the Stock Boot Image of your phone. For that, Go to the SuperSU app and then settings. There, you will find an option called ‘ Full Root.’ Just tap on that and tap ‘Continue.’ Now, it will ask you if you want to restore the stock boot image. Here, make sure that you tap on ‘Yes’ option. Now, for installing Magisk, you need TWRP installed, so if you already have TWRP, you need to tap on ‘No’ when SuperSU asks if you want to restore the stock recovery image.
- Now, you need to install the Magisk zip. For this, head to the Magisk Manager app and go the Install section. Here, you will find an option named ‘Download.’ Tap on that and once downloaded, boot into recovery. Once you are in TWRP, tap on ‘Install’ and select the Magisk ZIP file from the Magisk Manager folder. To flash the ZIP file, slide the button to the right and when finished, tap on ‘Reboot System.’
- Now, got to Magisk Manager app, and go to settings. Here, make sure to enable Magisk Hide, BusyBox, and Systemless hosts options. Lastly, clear the data of the Play Store by going to Settings > Apps > Play Store > Manage Space > Clear Data.
Now, head to the Magisk Manager app and go to Magisk Hide. Make sure that this option is enabled and it will be used to hide additional apps like Google Play Store and Google Services Framework and other apps that you think are having the issues with SafetyNet.
2. WHAT ABOUT TRYING unSU?

If you are unable to fix the CTS Profile Mismatch error even after doing everything mentioned above, you can try unSU. We have to use this because, i.e., even after doing the ‘Full Unroot’ via the SuperSU, not all the data of the SuperSU is removed. The developer osm0sis has created a flashable zip that you can download and flash via TWRP. The flashing procedure is same as you flashed the MagiskSU ZIP.
3. IS USB DEBUGGING ON? TURN IT OFF!
![]()
So, we also don’t know why but the CTS Profile Mismatch error can occur even with Magisk installed if you have turned on the ‘USB Debugging’ Option. So, you need to head to the Settings? Developer Options and then, turn off the ‘USB Debugging.’ Lastly, do a reboot and check if the issue has been fixed or not.
4. SET SELinux BACK TO ‘ENFORCING’ MODE
This is a pretty simple step. So, back in time if you ever changed the SELinux mode to ‘Permissive,’ then you need to revert it to ‘Enforcing,’ i.e., the default mode. So, open the same app via which you change the SETLinux Mode to Permissive and change the mode back to ‘Enforcing’. Now, you need to reboot the phone. You can find the apps to do so on XDA easily.
5. TRY A CUSTOM KERNEL

Having a custom ROM? Well, then you can try installing a custom Kernel. Why are we saying this? Well, the CTS is used by Google to verify that the device and its firmware meet the certification standards. A phone with custom ROM won’t pass this test. But, there is still a way. You need to install a custom Kernel known as the ‘Franco Kernel’ and to install this, you need to buy an app called ‘Franko Kernel Updater’ or ‘FKU.’ Once you have installed it, open it and then tap on ‘Download’ option. Don’t wanna spend money? Well, head to XDA, and you can find the best ‘Franco Kernel’ ZIP file for your smartphone for free.
The Franco Kernel helps in such a way that the apps that use SafetyNet check the Basic Integrity don’t get any error.
6. ENABLE MAGISK CORE ONLY MODE

This is probably the best thing to do if all the things mentioned above aren’t working at all. See, when you head over to the settings of Magisk Manager, you will see an option that says ‘Magisk Core Only Mode’ under the ‘Magisk’ options. Many users have reported that turning this particular option ON fixes the magisk CTS Profile false error. Google has already updated its SafetyNet to check if there is Magisk on a particular device or not. So, enabling the Core Only Mode helps a lot in this case.
So, what this option does? Well, enabling Masigk Core Only Mode means that all the Magisk Modules currently active are disabled and so, the only thing your phone has is the Superuser from Magisk and the root access. This step helps because sometimes, there are certain Magisk modules that cause issues with the SafetyNet test. And yes, make sure to reboot once you enabled the Magisk Core only mode.
7. SOME USERS FIXED IT LIKE THIS

A lot of users have recommended some more ways to fix the CTS Profile Mismatch error on their device. First, you need to go into the Magisk Settings and there, check if the ‘Magisk Hide’ option is turned on or not. If it is turned on, then simply turn it OFF and again turn it ON. Check if the error is there or not. If it is, then turn off the Magisk Hide option, reboot the phone, open Magisk Settings and turn On the Magisk Hide again.

If this too doesn’t fix it, then there is one more method suggested by some users who faced this problem. In the Magisk Settings, you will find two options – ‘Systemless Hosts’ and ‘Enable Busybox’. Disabling these two options may also help in fixing the CTS Profile False error.
8. WELL, YOU HAVE TO DO IT NOW!
This is a step that no one would like to take if the CTS Profile False issue occurs. Well, if nothing works, then the only way you have left to fix that error is to install the stock ROM again, install the custom recovery again, then flash Magisk ZIP file to gain the root access and check if the issue persists now or not. If you are lucky, the issue will be gone completely.
Because of Android»s new system, certain apps can now block rooted users or prevent you from accessing them altogether — but at least for now, there are still ways around these restrictions.
You can pass most of SafetyNet»s checks with and , but Google»s (CTS) remains a hurdle in some cases. With certain setups, you»ll still get a «CTS Profile Mismatch» error that causes the SafetyNet check to fail, even with Magisk installed.
If this has happened to you, there are a number of potential causes, ranging from incompatible root management apps to issues with Magisk Hide. So to help you get to the bottom of the issue, we»ll go over seven solutions below.
Before You Begin
This guide assumes you»ve already installed Magisk, which is a systemless root utility that can hide its presence from SafetyNet. If you haven»t already done this, head to get started.
When it comes to actually checking your SafetyNet status, the easiest way to do that would be to open the Magisk Manager app and tap the «SafetyNet Check» button at the bottom of the screen. So while following this guide, periodically re-check your SafetyNet status by opening the Magisk Manager app, swiping down to refresh, then tapping the «SafetyNet Check» button again.


Checking SafetyNet status in Magisk Manager.
Step 1: Get Rid of SuperSU and Use MagiskSU with Magisk Hide
The most likely cause of a CTS profile mismatch is a root management app that doesn»t hide itself from SafetyNet. This is the case with Chainfire»s SuperSU, which is the most popular root management out there.
Chances are, you originally rooted your phone using the SuperSU ZIP or CF Auto Root, which both install SuperSU as the default root management app. If you did that, and then
installed Magisk, the leftover root binaries from SuperSU will cause SafetyNet to trip.
So if this is the cause of your CTS issues, you»ll need to uninstall SuperSU»s binaries and replace them with Magisk»s built-in root management app. But there»s one more wrinkle: If you have the Xposed Framework installed or if you»ve modified any system files using root access, you»ll need to undo those changes as well. Not to worry, though, we»ve outlined that entire process with a separate guide, so head to the following link to get squared away.
Once you»ve done that, make sure the «Magisk Hide» option is enabled in your Magisk Manager app. From there, you may want to hide additional apps using Magisk Hide, which essentially prevents the apps from knowing that you»re rooted.
To do that, head to the side navigation menu in your Magisk Manager app and select «Magisk Hide.» From here, it may be helpful to tick the boxes next to Google Play Store
and Google Services Framework
as well as any other app you»re having SafetyNet issues with.


Step 2: Still No Good? Try Flashing unSU
If the above guide didn»t fix your CTS profile mismatch problems and you»re certain you»ve undone any system mods, it»s possible that you still have a few bits of data left over from SuperSU. The «Full Unroot» option in the SuperSU app is supposed
to get rid of everything, but it»s not always perfect.
So to make sure you»ve completely eradicated SuperSU and its binaries, you can use a flashable ZIP created by developer osm0sis . To start, just tap the following link from your Android device, then boot into custom recovery.

From there, tap the «Install» button in TWRP»s main menu, then navigate to your Download
folder and select UPDATE-unSU-signed.zip
. After that, swipe the slider to flash the ZIP and eradicate all traces of SuperSU, and when you»re done, go back and re-flash the Magisk ZIP. After rebooting, check your SafetyNet status again — if you still don»t pass, move onto the next step.


Step 3: Change SELinux to Enforcing
If you»re still stuck, this next step is rather simple, though it would only apply if you»ve previously used an app to set your SELinux mode to «Permissive.» Magisk attempts to hide your SELinux status from SafetyNet, but it»s not always perfect, so your best bet is to set SELinux back to its default mode of «Enforcing.»
So open whichever SELinux mode changer app you used to set the mode to «Permissive» in the first place, then toggle the setting back to «Enforcing» and reboot. Sadly, we can»t share apps that change SELinux modes since Google blacklists sites that do, so if you»ve uninstalled the app, you»ll have to find it again on your own. That»s easy, though — just head to the XDA forums and search for «SELinux.»
Step 4: Turn Off USB Debugging
For some strange reason, a fairly common cause of SafetyNet issues with Magisk is the «USB Debugging» setting in Developer options. So if you have this option enabled, head to your Settings menu to disable it, then reboot and see if that solved your SafetyNet issues.


Step 5: Custom ROM? Try a Custom Kernel
As I mentioned earlier, CTS
stands for «Compatibility Test Suite.» This is the process Google uses to verify that a device and its firmware meet certification standards, and to put it simply, a will never officially pass this test.
However, some custom kernels can help with this issue. The most popular kernel that»s been known to help with custom ROM incompatibility is Franco Kernel. It»s available for all Nexus, Pixel, and OnePlus devices, as well as the Redmi Note3, and the easiest way to install it would be to purchase the FKU app
, then tap the «Download» button on the main page. Otherwise, you can search your device»s XDA forum to find a free flashable ZIP.


For some custom ROMs (particularly Lineage OS), this option may not fully solve the problem. However, many apps that use SafetyNet only check one CTS-related aspect called «Basic Integrity,» and flashing Franco kernel will usually fix that aspect. So while Magisk Manager may still report a CTS mismatch, you may very well be able to use all of your apps now.
Finally, for Xiaomi users that are running a custom ROM, there»s another option. This Magisk module by developer Deic will reportedly make your phone pass the CTS test, so try installing it, then rebooting.
Step 6: Address Other Potential Problems
Before you take the nuclear approach outlined in Step 8 below, there are a few less-common issues that might cause SafetyNet to fail based on a CTS profile mismatch, so they»re worth a shot.
First, it»s possible that the Magisk Hide daemon isn»t starting properly on your phone. To fix that, try heading to the settings menu in your Magisk Manager app, then toggling the «Magisk Hide» option off and back on. Failing that, disable Magisk Hide, reboot, then re-enable the option.


Some users have also reported that Magisk»s «Systemless hosts» and «BusyBox» options caused them to experience issues with SafetyNet. As such, you may want to disable these two options in the Magisk Manager app»s settings menu, though note that disabling systemless hosts may cause issues with ad blockers like AdAway.

Step 7: Enable Core Only Mode
As a last-ditch effort, you can try enabling the «Core only mode» option in Magisk Manager»s settings. This will disable any Magisk modules you»ve installed which could be causing conflicts with SafetyNet, leaving you only with Magisk SU and root.
It may not be the ideal solution, but after Google updated SafetyNet to detect Magisk, enabling «Core only mode» seems to be the only fix that helps most users pass the CTS test. To try it out, head to the settings menu in Magisk Manager and tick the box next to «Core only mode,» then reboot and run the SafetyNet check again.


Step 8: If All Else Fails, Start from Scratch
We»ve saved this step for last because it»s a catchall solution, but it»s a painful pill to swallow. If all else fails, simply restore your device»s stock firmware, reinstall custom recovery, then flash the Magisk ZIP that you can download in the Magisk Manager app. This will work in almost all cases.
The process of restoring your stock firmware will vary depending on the device, but if your phone has a bootloader menu that supports Fastboot commands, we»ve covered the process at . Failing that, your best bet would be to do a Google search for «restore stock firmware .» When you»re done there, you can reference for re-installing TWRP.
So have you finally solved your CTS profile mismatch issues? Do you have any other tips that will help get people past that dreaded SafetyNet check? If so, drop us a line in the comment section below.
Cover image and screenshots by Dallas Thomas/Gadget Hacks
Related
-

Magisk 101
:How to Install Magisk & Root with TWRP
-
How To
:Fix Play Store Uncertified Errors When You Forget to Flash Magisk
-
Magisk 101
:How to Install Magisk Modules from the Repo or Third-Party Sources
-
News
:T-Mobile Galaxy S8 Update Breaks SafetyNet & Android Pay
-
Magisk 101
:How to Switch from SuperSU to Magisk & Pass SafetyNet
-
SafetyNet Explained
:Why SafetyNet Shows That Google Actually Cares About Android Root
-
How To
:Use Twitter Custom Timelines
-
Tasker 101
:How to Import Tasks & Profiles
-
How To
:Use the align command to fix normals in modo 101
-
News
:Rooters Beware, Google Will Soon Start Locking You Out of Apps
-
News
:Google»s March Security Update Breaks Android Pay on Some Pixel & Nexus Devices
-
Tasker 101
:How to Create an Exit Task
-
How To
:Root Your OnePlus 6 with Magisk — A Beginner»s Guide
-
How To
:Root Your OnePlus 6T with Magisk
-
How To
:Easily Change Your Phone»s Font Without Tripping SafetyNet
-
News
:Good place to set up a profile
-
How To
:fix the error «transaction was not successful»
-
Last Updated on June 14th, 2017
Before we go into the guide on , first let’s know about SafetyNet
. This is a feature which Google uses to determine whether your Android device is rooted or not and if its found rooted then certain apps will cease to work. For example, Android Pay wouldn’t work on a rooted device – courtesy SafetyNet. Nowadays, rooting an Android device is a normal thing as it gives you power over the OS. You can do many things with a rooted Android device which are otherwise not possible. With a rooted Android device, you can install a custom ROM, a custom Kernel, or overclock the processor etc.Magisk is a systemless root utility which hides its presence from SafetyNet. Means, with Magisk installed, SafetyNet won’t be able to detect that your Android device is rooted. However, Google’s CTS is still a problem and even with Magisk installed you might get ‘SafetyNet Failed: CTS Profile Mismatch Error’. Anyhow, in this Android Tutorial we will guide you How to Fix CTS Profile Mismatch Errors. Before we start, we are assuming that Magisk is already installed on your device.
Switch From SuperSU to MagiskSU to bypass SafetyNet
CTS Profile Mismatch Error is, in majority cases, caused because of the root management app. SuperSU is one of the most popular root management app in the market. But unfortunately, it’s not systemless and doesn’t hide from SafetyNet. Therefore, it’s highly likely that you will face CTS profile mismatch errors. So, first thing you need to do is to switch from SuperSU to MagiskSU to Fix CTS profile mismatch errors. Follow below steps carefully to successfully switch from SuperSU to MagiskSU.
- Uninstall Xposed Installer if it’s already installed on your device. To keep using Xposed modules, you can install systemless version of Xposed using Magisk. Once it’s uninstalled, reboot your device.
- As you rooted your device so it’s obvious that you must have installed apps which changed the core system files. You need to uninstall all such apps, or undo any changes made in the system files. The easiest way to revert back all the changes is to Flash the Stock System Image of your phone.
- Now you need to Unroot your Android Device. To do so, launch SuperSU and head towards Settings. In Settings, you will find an option called “Full Root”, tap on it and then tap on Continue. Here tap on “Yes” when it asks you that if you want to restore the stock boot image.
- Next, it will ask if you want to restore the stock recovery image. Tap on “No” option as TWRP custom Recovery is required to flash Magisk.
- Now open the Magisk Manager App and head towards the Install section. Here tap on the option named “Download”. Once the file is downloaded, reboot your device into recovery mode. Once you are in TWRP menu tap on Install and select Magisk.zip from the MagiskManager folder. To install the ZIP file, slide the button to the right and when finished, tap on ‘Reboot System.’
- Now go to Magisk Manager App >> Settings >> here enable Magisk Hide, BusyBox , and Systemless hosts options. The last thing is to clear Google Play Store data, to do so go to Settings > Apps > Play Store > Manage Space > Clear Data.
This is it! This should fix CTS profile mismatch errors. If the error is still bothering you then head towards the next solution.
Flash unSU to Fix CTS Profile Mismatch Errors
If the above method failed to work and you are still getting CTS Profile Mismatch Errors then try a flashable zip called unSU developed by osm0sis, and XDA developer. You had to come to this step because doing “Full Unroot” via SuperSU didn’t work and not all the data of SuperSU is removed. Therefore, flashing unSU via TWRP will ensure that no bits of SuperSU are left behind.
Turn Off USB Debugging to Fix CTS Profile Mismatch Errors
For some reason, if your USB Debugging option is On with Magisk installed, there are high chances that CTS Profile Mismatch errors will occur. Therefore, turn off USB Debugging option by going to Settings >> Developer Options >> here turn off the USB Debugging Option.
Set SELinux Back To ‘ENFORCING’ Mode
If you are still facing CTS Profile Mismatch Errors then this rather simple step. If at some point you changed the mode of SELinux to “Permissive” then it’s time to change the mode back to “Enforcing” which the default mode. Open the same app via which you changed the mode to “Permissive” and revert it back to the default “Enforcing” mode.
Install a Custom Kernel
If you are using a Custom ROM then obviously your device won’t pass Google’s certification tests and as result might face CTS profile mismatch errors. However, to overcome this issue you need to install a custom kernel called “Franco Kernel”. And to install Franco Kernel you need to buy an app called “Franco Kernel Updater” or “FKU”. Once FKU is installed, open it and Tap on “Download” option.
By now you must have got ridden of the CTS Profile Mismatch Errors, but if, the error is still popping up then you must take the hard route. You will have to take things from scratch like flash Stock ROM, install TWRP, and flash Magisk ZIP. We hope it doesn’t come to this. Please let us know at which point you stopped facing CTS Profile Mismatch Errors.
* Recommended to upload a 720*312 image as the cover image
Article Description
MIUI Еженедельные советы от Ru_Ivan #47 — Решение проблемы с SafetyNet при помощи: Magisk+Magisk safetynet fix.У Вас установлен Magisk, но что бы Вы ни делали при проверке SafetyNet у вас возникает проблема с ctsProfile. Решить эту проблему вполне возможно. Не будем тянуть время и перейдем к решению.Что нужно сделать:Первым делом — делаем полный бекап системы!Заряд батареи не менее 60%За все действия над устройством несете ответственность только Вы.Для Magisk ver 13.x/14.01. Для Magisk версии Magisk 13.х/14.0, версии 15+ не поддерживается. Нужно: скачать фикс для SafetyNet с XDA.2. Установить используя Magisk — модули, либо TWRP.3. Перезагрузить смартфонДля Magisk 15.xОгромная благодарность — Eni_Fadilah за статью на en.miui.com, в которой был выложен файл фикса SafetyNet универсайльный, но подготовленый для Redmi 4X (Santony). — Если у Вас Redmi 4x (Santony):1. Качаем фикс SafetyNet (оригинал) — Google disk2. Устанавливаем при помощи Magisk manager или TWRP3. Перезагружаем смартфонЧто в пакете?Помимо всего прочего:- SafetyNet Fix- Разблокирует полноэкранные функции- Boot анимация Miui 9- Selinux Permissive mode- Build.prop Tweak- Папка 4X3 (Launcher)- Шторка 5X3- Ручной режим в камере- Захват объекта нажатием на экран в камере- Меняет host- Открывает меню выбора цвета светодиода (не обольщайтесь на многих моделях действительно только белый цыет работает)Первый метод помогает и на др. моделях смартфонов, но лично я не хочу терять свой файл host. И в настройках системы мне не нужны разные цвета индикатора, т.к. он у меня не RGB, а просто белый. А также изменения в сетки рабочего стола и шторке – я для себя давно уже сделал необходимые изменения интерфейса и мне этого достаточно.- Если Вы все же хотите минимум изменений и чтобы проходил SafetyNet, но смартфон у Вас не SANTONY:1. Качаем отредактированный mod (проверена работа на Redmi 5 plus с прошивкой MIUI.su, бетка)2. Устанавливаем также через Magisk manager или TWRP3. Перезагружамем смартфон.P.S. некоторая часть изменений все же произойдет в системе, не критичные изменения.- Если есть желание, то можно к Magisk_у плюсом внести изменения в build.prop, который находится.system Изменения необходимо произвести всего в двух строках:ro.build.description=xxxxro.build.fingerprint=xxxxзначения этих строк (вместо хххх необходимо скопировать и вставить от Глобальной стабильной версии)Файл build.prop от Redmi 5 plus Global Stable — (удаляем.zip)НЕ ЗАБЫВАЕМ: в пункте Magisk Hide выбрать программы от которых прятать Root.Скриншоты сделаны на XIAOMI Redmi 5 plus.Google play market стал считать прошивку от MIUI.su (beta) за сертифицированную.Статьи из раздела Инструкция по установке MagiskЧто есть Magisk


