Обновлено: 09.02.2023
Help: Steam registry path is not currently writable
I keep getting this Steam error message while trying to install Steam on a new Windows 10 PC—I can choose to ignore or repair, but repair doesn’t do anything, just loops back to the same error message. I tried disabling my antivirus and firewall. Any suggestions on what to do?
I got the same problem, but i cant help you. Im just as lost as you are. :c
HUUUUUUUUUGE EDIT: Turns out i had a virus that somehow doesnt let me install stuffs. I just ran Malwarebytes and it was gone.
i was so desperate that i set my computer to factory new, and that seemed to work.
what do we do if we dont have access to admin? im not even meant to have steam pls help id even know how ive gotten this far..
I have The same problem, and i am on a school comuter with no access to admin. In fact, steam is installed in a folder on my desktop, bc i cant get t installed in Program files bc my school district is stupid and wont let kids install stuff. Ive tried turnong off read only on some of the folders, and that didnt seem to work.
I have The same problem, and i am on a school comuter with no access to admin. In fact, steam is installed in a folder on my desktop, bc i cant get t installed in Program files bc my school district is stupid and wont let kids install stuff. Ive tried turnong off read only on some of the folders, and that didnt seem to work.
Permission settings for a PC at your school are set that way for obvious reasons. This is not a Steam issue. Take it up with your school’s IT admin.
The steam registry path is currently not writable что делать
when i start up steam i get an error message saying
«The Steam registry path is currently not writable which can cause issues with some Steam features and running games.
Steam needs to repair this problem and then restart.»
with the options of IGNORE or REPAIR
repair just loops back to the same error message, and ignore brings me to another error message saying
«In order to run Steam properly on this version of windows, the Steam service component must be installed. The service installation process requires administrator privileges.»
with two more options, INSTALL SERVICE or CANCEL
install brings up steam, cancel closes it.
point is, multiple games (including garry’s mod, space engineers,civilization V, etc.) are not working and pop up the install service error and doesn’t do anything.

Стёпа Кузнецов
30.10.2019
Главная › Коды ошибок
Когда запускаю стим пишет
«The steam registry path is currently not writable which can cause issues with some Steam features and running games.
Steam needs to repair this problem and then restart.».
Дальше идёт два варианта: «IGNORE», и «REPAIR». Выбирал каждый вариант, при следущем запуске то же самое! Что делать?

Иван Иванов
30.10.2019

kazanova54
06.09.2020
привет. У меня такая проблема… Создаю новый акаунт. Доказываю что я не робот… (вздох) ПОТОМ ВЫЛАЗИЕТ ОШИБКА В ПОЛЕ САРТСНА! Помогите пожалуйста
The steam registry path is currently not writable что делать

Что делать?
покупал 2 штуки 1 мне, 1 другу
у меня работает, у друга эта ошибка
Как очистить долбаный Steam Cloud. Либо это баг, либо я не знаю что это. Я не могу загрузить мод

Вот ошибка
Ошибка при установки Steam
Скачиваю стим и тут такое

Дополнено (1).
Кто играет в Unturned в Steam помогите, дисконектит сервер
У меня такая проблема, я создал сервер по туториалам с ютуба, все работает и мы играем с братом но тут сверху вылезает ошибка
Server not responded in:
Automatically disconnecting in:
Кто в это разбираеться помогите пожалуйста, сервер не лагает да и консоль постоянно включенаа при запуске сервера
Кто поможет с ошибкой облачного сохранения в лаунчерах кроме стим у меня с ним все норм это: юбисофт и оригин?
Кто поможет с ошибкой облачного сохранения в лаунчерах кроме стим у меня с ним все норм это: юбисофт и оригин?
Не получается обновить Steam клиент
Скачал Steam с официального сайта, скачивается обновление, загрузка идет идет и резко сбрасывается почти до начала, причем всегда по разному то доходит до половины сбрасывается до 1/4, то вообще почти к началу… После всех этих «приколов» вылезает ошибка «steam needs to be online to update please confirm your network» не понимаю что делать помогите пожалуйста… Заранее спасибо.
При. Обновлении стим, через минут 5 после начала загрузки обновления, вылетает ошибка: о плохом интернете
Хотя загрузка шла до 30.000 кб. Пробовал и через кабель и от Wi-Fi, но все равно вылетает ошибка. Еще при загрузки обновления было несколько раз замеченно, как счетчик загруженных кб либо обнулялся либо количество кб очень сильно уменшалось.
Стим не заходит, что делать?
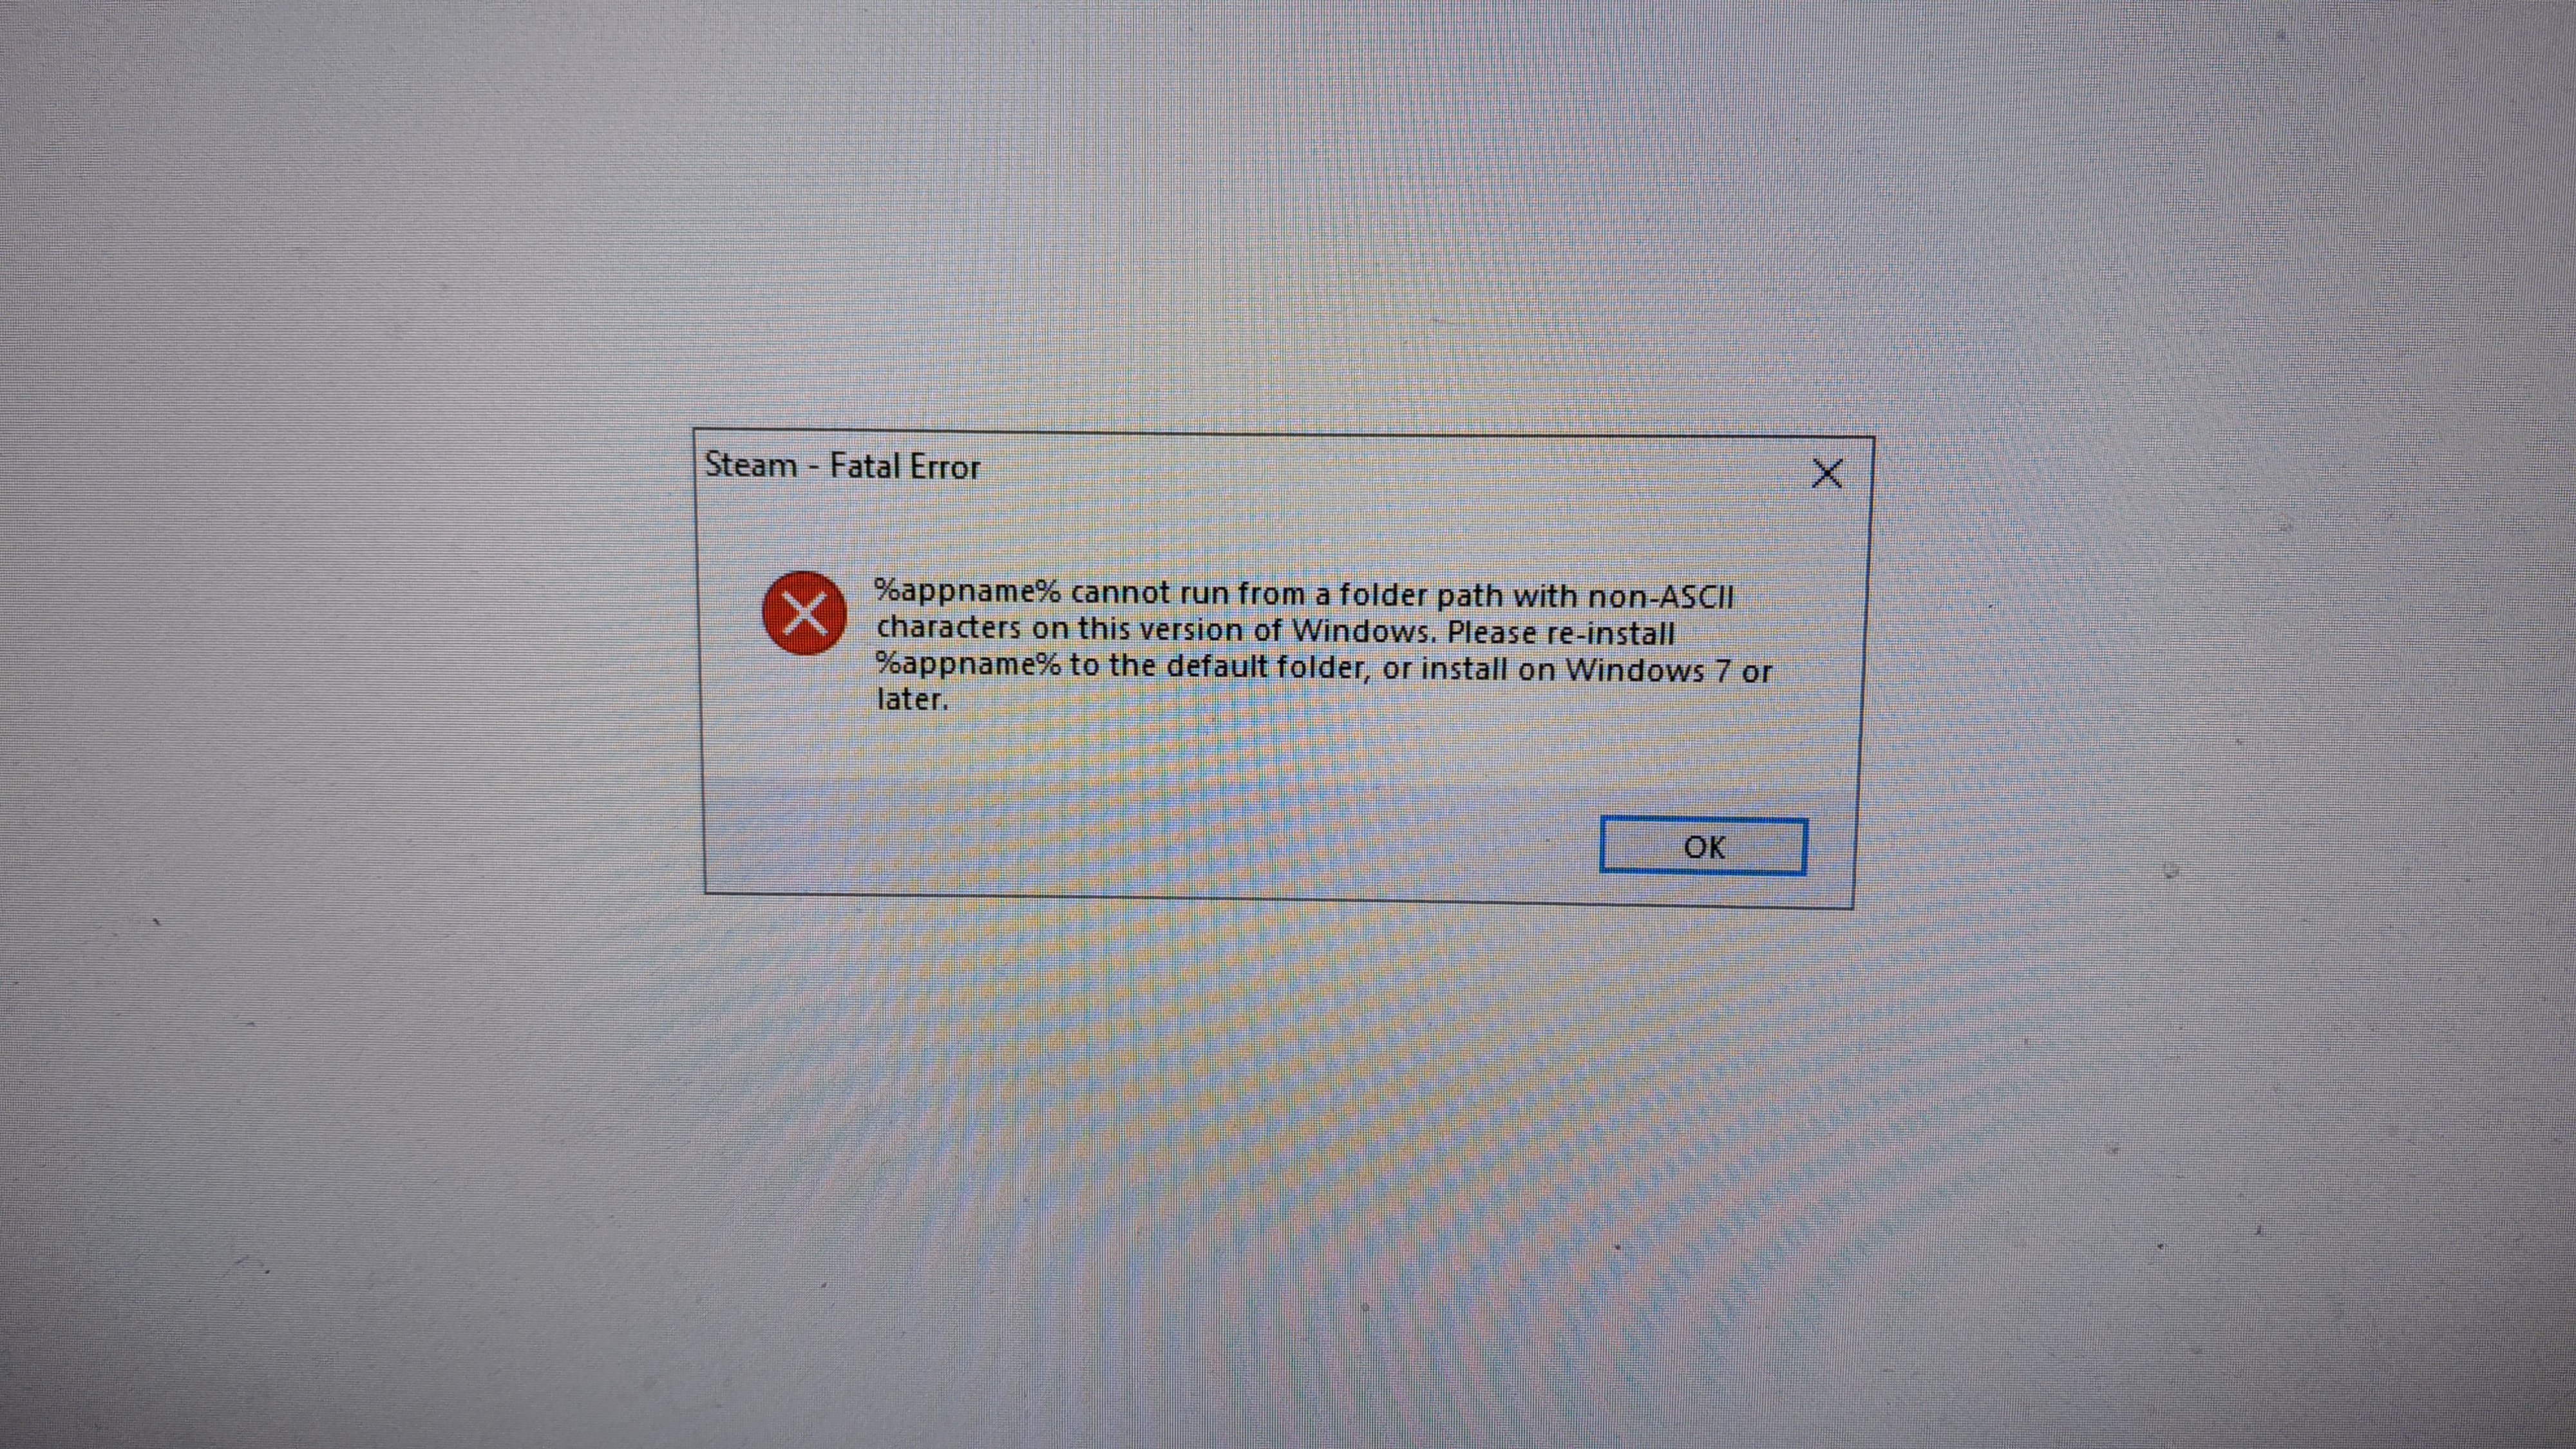
Был Стим, переустановил Винду, начал скачивать Стим, включил выдает ошибку на фото, что делать, как включить Стим?
Steam и его установка
Решил я в общем обновить наконец-таки стим, но мне ударили предметом для игры во взрослые игры по лицу: эта хрень не хотела качать обнову, встаёт на месте, обнуляет обнову, начинает сначала, так раз по 5 а потом летит ошибка мол нужно быть в онлайне, честно перепробовал много способов, даже сам стим переустанавливал.
Дополнено (1). Сеть вполне стабильная, перезагрузить пекарню пробовал
Steam и его обновление, Fatal Error
Решил проверить бета-версию нового стима, перезапускаю, жду обновления, и тут вот, оно останавливается, откатывается на ноль, качается заново, и так по кругу раз 5-10, потом и вовсе fatal error и «для обновления steam должен быть онлайн». Я уже многое перепробовал, прошу помощи, схожу с ума, думаю уже что вирус, проверился, ничего нет.
Читайте также:
- Что нужно для карьеры армия в симс 3
- Как одеваются мафия в японии
- Прицел как у вспышки для world of tanks
- Одоната варфрейм как использовать
- Mass effect legendary edition скриншоты где хранятся
You may start be removing read-only permissions from the steamapp folder
by Tashreef Shareef
Tashreef Shareef is a software developer turned tech writer. He discovered his interest in technology after reading a tech magazine accidentally. Now he writes about everything tech from… read more
Updated on December 5, 2022
Reviewed by
Alex Serban

After moving away from the corporate work-style, Alex has found rewards in a lifestyle of constant analysis, team coordination and pestering his colleagues. Holding an MCSA Windows Server… read more
- Some Steam users reported that the library folder is not writable, which happens most of the time after manually changing the library location.
- The first thing to do is check if the SteamApp folder has some specific options turned on.
- Steam Download Cache might be why the library folder is not writable on Steam, so you might need to clear it.
- You’ll probably need to change the Steam library folder to solve this issue.
XINSTALL BY CLICKING THE DOWNLOAD FILE
This software will repair common computer errors, protect you from file loss, malware, hardware failure and optimize your PC for maximum performance. Fix PC issues and remove viruses now in 3 easy steps:
- Download Restoro PC Repair Tool that comes with Patented Technologies (patent available here).
- Click Start Scan to find Windows issues that could be causing PC problems.
- Click Repair All to fix issues affecting your computer’s security and performance
- Restoro has been downloaded by 0 readers this month.
By default, Steam stores all games and the data in a standard directory where the installation is available. This can change only if you choose a specific location when installing the software.
The default installation location will be in the C partition, in the Program Files folder, while the bulk of data will be stored in the Steam folder.
However, the user can change the library location for Steam games manually. This can sometimes create issues with the Steam app resulting in the library folder not being writable.
Fortunately, we’ve compiled a list of practical solutions to fix this annoying problem.
What does it mean if a folder is not writable?
There are a few common causes, at the top of these are the following:
- The SteamApp folder doesn’t have the necessary permissions – In this case, you should check if the folder has the Read-Only permission activated.
- Hard drive issues – While we may be unable to pinpoint the specific problems, users with errors on the drive have also experienced this Steam problem.
- Antivirus programs – Certain files are known to be blocked by your antivirus app even though they are perfectly safe. You should only use the best antivirus.
- Temporary bugs in the game – These might determine the need to reinstall the Steam app. However, it would be best if you considered this as the last solution to try.
Users have also encountered the following errors.
- Steam failed to add new library – This error can be problematic, and it can prevent you from playing your favorite games. Fortunately, we have the perfect solutions you can try to fix it.
- Failed to load library steam.hdll in Dead Cells – This is a pretty popular error but can be easily solved by following our recommended steps.
- Steam game doesn’t show up in the library – No matter what the exact circumstances are in your case, not being able to find your game in the Steam Library is incredibly infuriating for all users. So, if you face it, it is essential to have some options to help you fix it.
Regardless of your specific issue, it would be best to try the solutions below.
How do I fix the Steam library folder if it’s not writable?
1. Check if steamapps folder has Read-Only permission
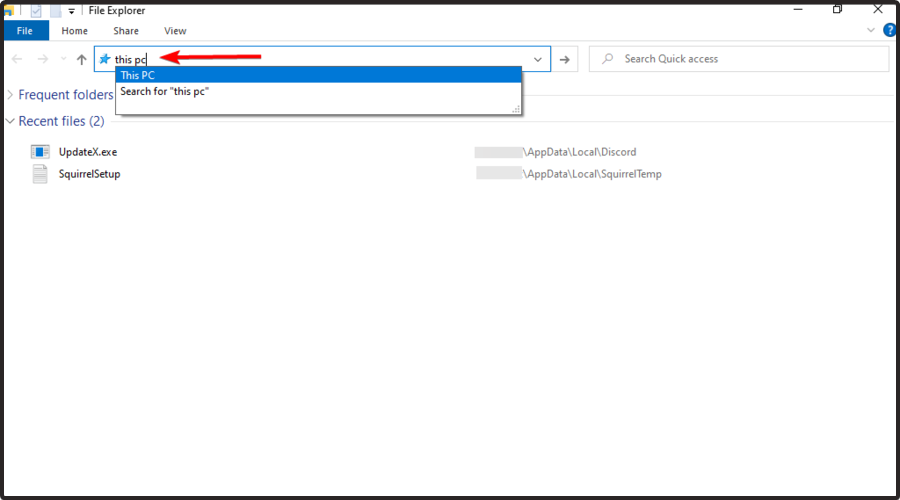
- Use the following keyboard shortcut to open File Explorer: Windows + E.
- In the search bar, type This PC, then hit the Enter key.

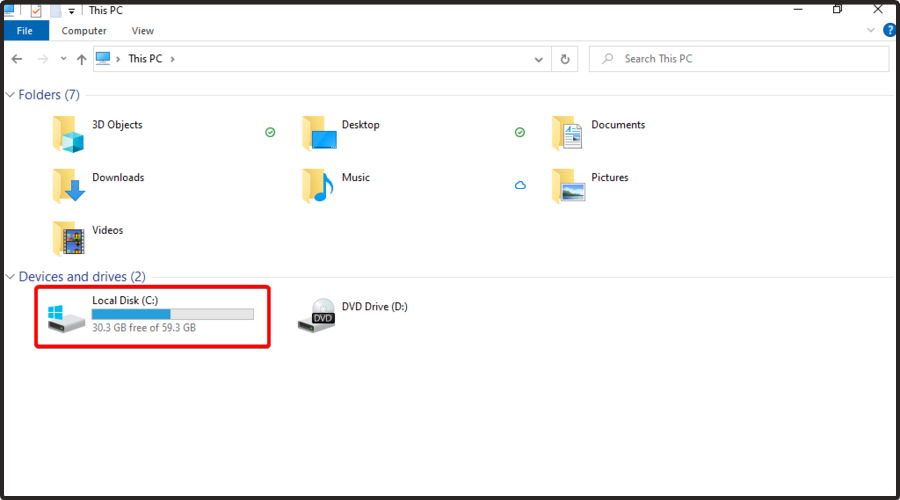
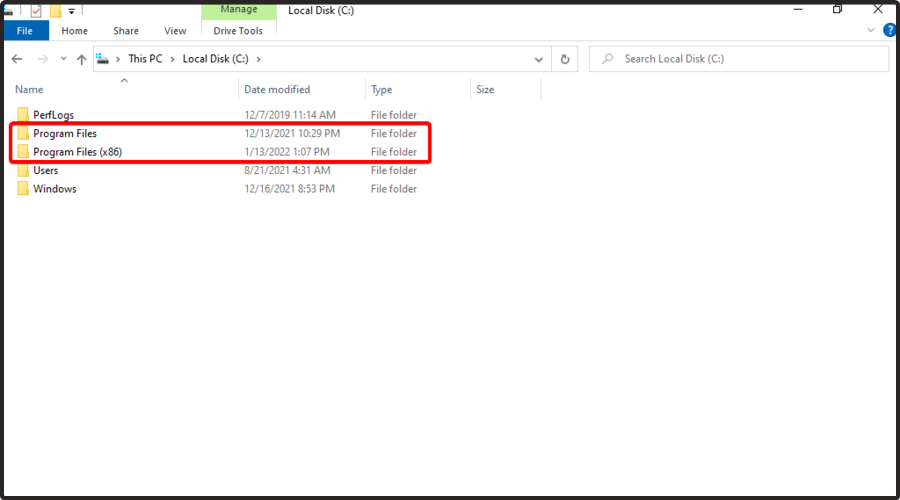
- Navigate to Local Disk (C:).
- Now, go to the Program files (x86).
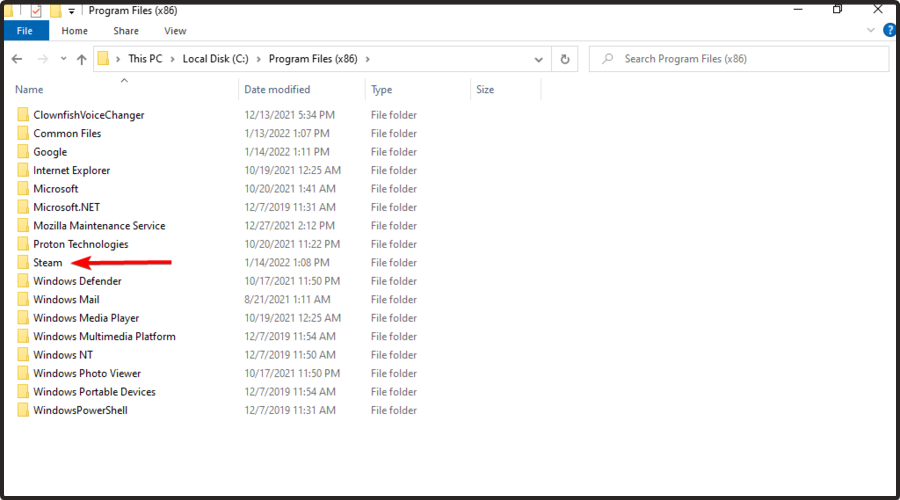
- Double-click on the Steam folder.
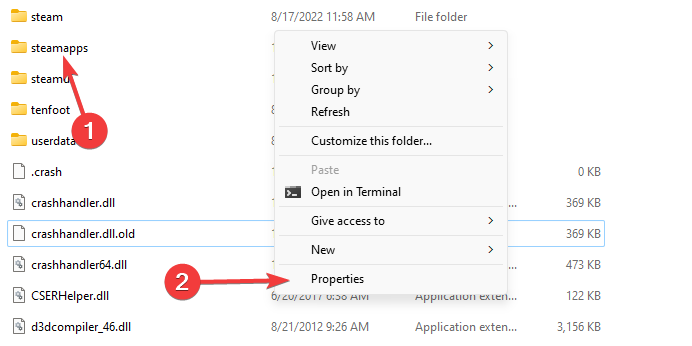
- Right-click on the steamapps folder and select Properties.

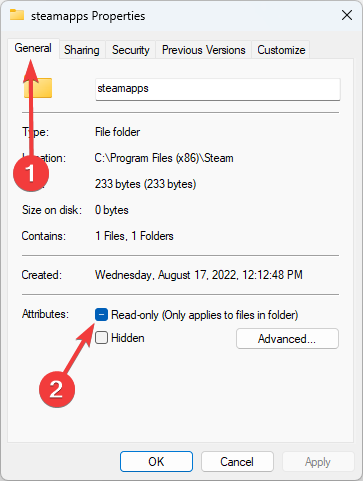
- In the General tab, under the Attributes section, uncheck the Read-only box.

- Click Apply and click OK to save the changes.
Some PC issues are hard to tackle, especially when it comes to corrupted repositories or missing Windows files. If you are having troubles fixing an error, your system may be partially broken.
We recommend installing Restoro, a tool that will scan your machine and identify what the fault is.
Click here to download and start repairing.
The error may occur if the Steamapps folder does not have the necessary permission to write into the folder and if the folder permission is set to write only. Here is how to fix it.
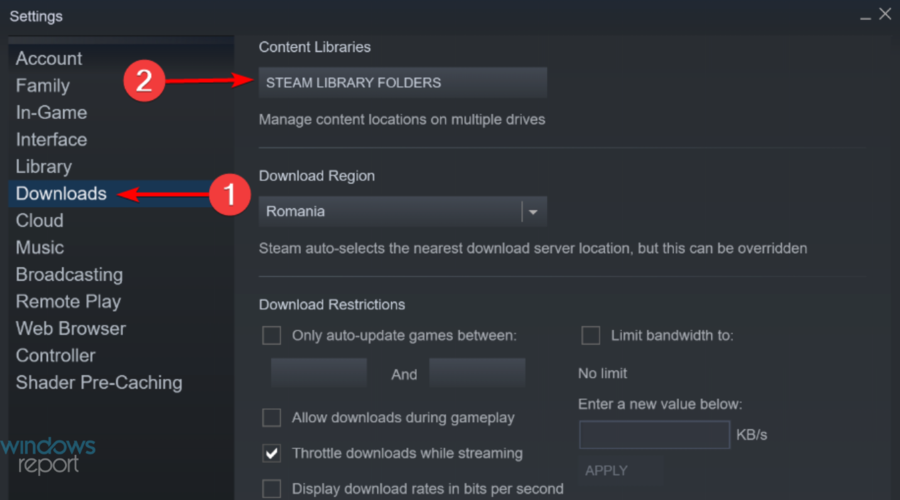
2. Repair the Library folder using Steam
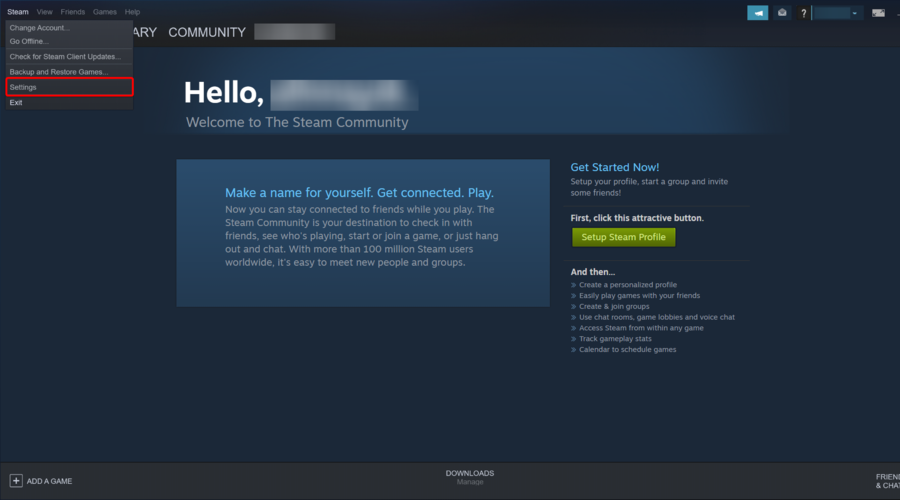
- Hit the Windows key, type Steam, then open the first result.
- From the top-left corner of the window, click on Steam.
- Go to Settings.
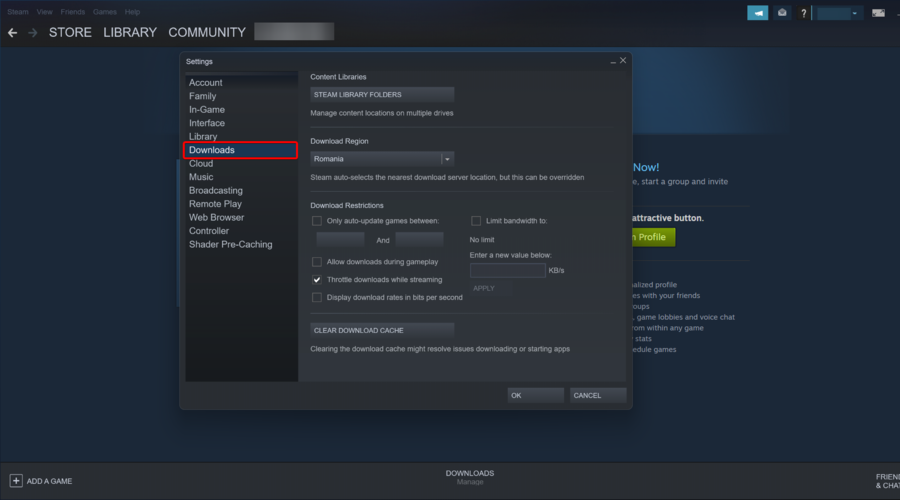
- Now, click on the Downloads tab.
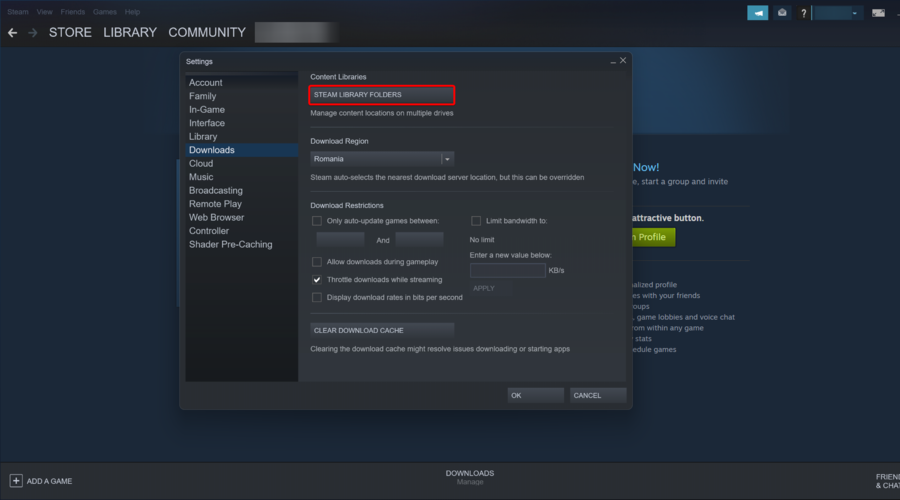
- In the right pane, click on Steam Library Folder.
- Right-click on the folder that is giving the error and select Repair Library Folder.
- Steam will run the troubleshooter and fix any problem with the folder.

Your Steam app comes with a built-in library folder repair option that can be used to repair the game folder causing the error. Here is how to do it.
3. Clean Download Cache
- Hit the Windows key, search for Steam, then open the desktop client.
- From the top-left corner of the window, click on Steam.
- Now, navigate to Settings.
- From the left window pane, click on the Download tab.
- In the right pane, click on the Clear Download Cache button at the bottom of the page.
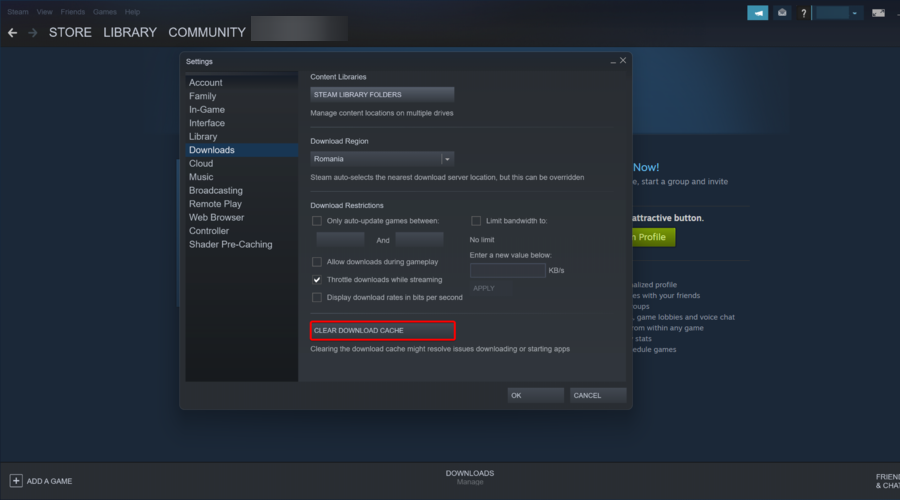
The download cache in steam helps with a faster connection. However, the bad cache can create problems with the game starting and downloading. Try clearing the download cache and see if that resolves the error.
- Fix disk space errors on Steam [Simplest methods]
- Play Age of Mythology on Windows 10 With These Simple Steps
4. Change Steam Library Folder
- Press the Windows key, type Steam, and click on the first result.
- From the top-left corner of the window, click on Steam.
- Navigate to Settings.
- Go to the Downloads tab, then click on Steam Library Folders.
- Click on the Add icon. Here you can either select an existing folder or create a new folder.

- Select the folder and close the settings window. Ensure the select folder has enough free storage space to install the games.
- Now try to download the game again and check for any improvement.
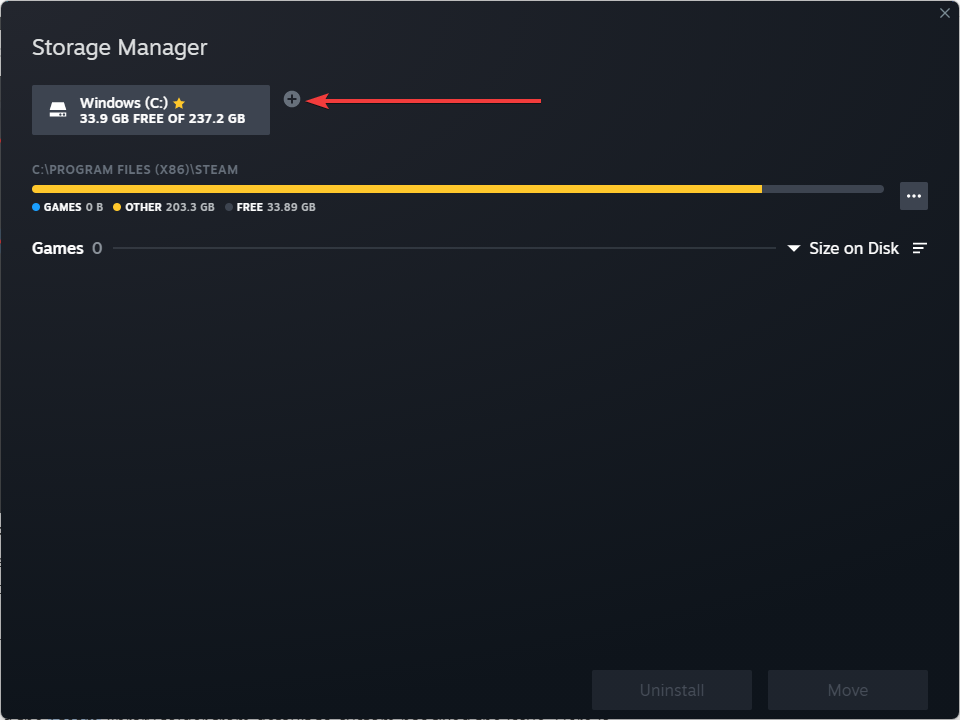
If you haven’t changed the default Steam library folder yet, it might be time to do so. Some users have reported that changing the Steam library folder from default to custom has fixed the issue. Here is how to do it.
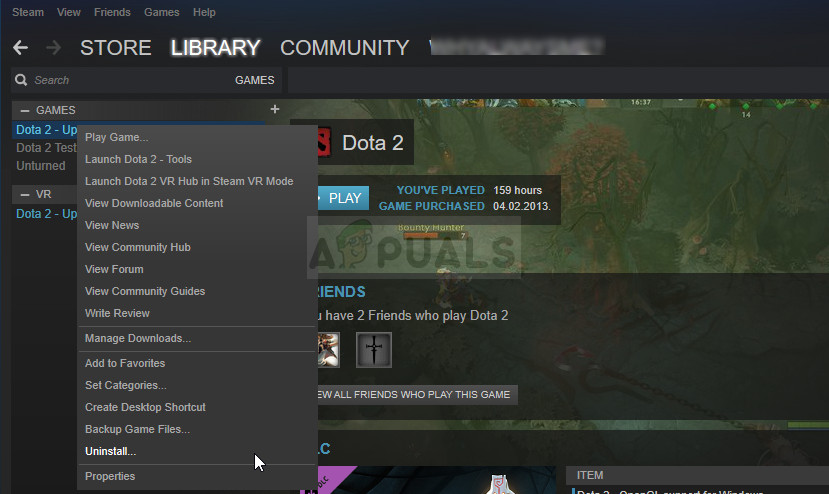
5. Reinstall the Game
- Hit the Windows key, type Steam, then open the app.
- From the main menu, click on Library.
- Right-click on the problematic game, then choose to Uninstall it.
- When asked to confirm, click on Delete to uninstall the game completely.
- Launch Steam again, and click on Store.
- Search for the game in the Steam store, then download and install the game to see if uninstalling the game fixed the error.
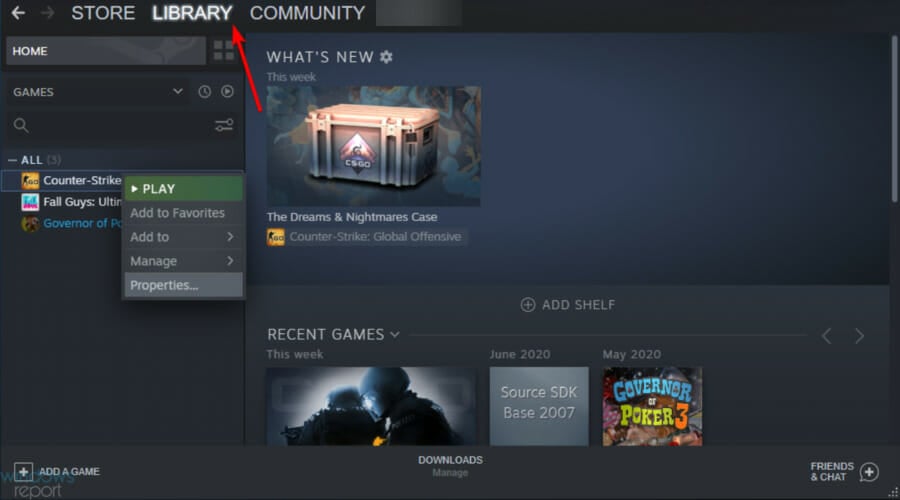
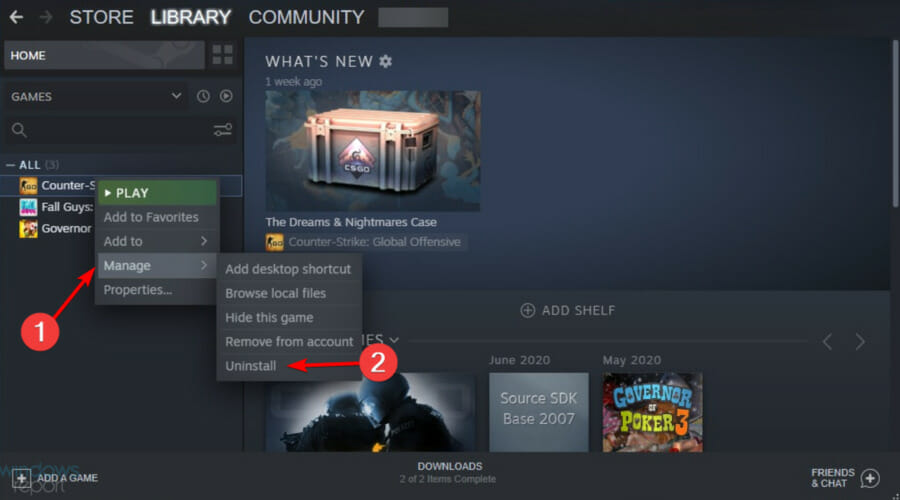
If the error occurs while trying to play the game or during the update, you can try uninstalling and reinstalling the game to fix the issue.
Uninstalling the game will not delete your game data as it is synced with your Steam account, but you will have to download the game files from scratch.
These were the best solutions you can try to make your library folder writable on Steam.
If you have additional questions, do not hesitate to comment in the section below.
Still having issues? Fix them with this tool:
SPONSORED
If the advices above haven’t solved your issue, your PC may experience deeper Windows problems. We recommend downloading this PC Repair tool (rated Great on TrustPilot.com) to easily address them. After installation, simply click the Start Scan button and then press on Repair All.
![]()
Newsletter
На чтение 4 мин. Просмотров 4k. Опубликовано 03.09.2019
По умолчанию Steam хранит все игры и данные в общем каталоге, в котором доступна установка Steam. Обычно вы можете найти данные в Program files/steam/steamapps/common.
Однако пользователь может изменить местоположение библиотеки для игр Steam вручную. Иногда это может создать проблемы с приложением Steam, в результате чего папка библиотеки будет недоступна для записи. Исправьте это с помощью наших решений.
Содержание
- Исправлена ошибка, из-за которой папка библиотеки Steam не записывалась.
- 1. Проверьте, имеет ли папка SteamApp разрешение «Только чтение».
- 2. Восстановить папку библиотеки с помощью Steam
- 3. Чистый кэш загрузок
- 4.Изменить папку библиотеки Steam
- 5. Переустановите игру
Исправлена ошибка, из-за которой папка библиотеки Steam не записывалась.
- Проверьте, имеет ли папка SteamApp разрешение только для чтения
- Восстановить папку библиотеки с помощью Steam
- Очистить кэш загрузок
- Изменить папку библиотеки Steam
- Переустановите игру
1. Проверьте, имеет ли папка SteamApp разрешение «Только чтение».
Ошибка может возникнуть, если папка Steamapps не имеет необходимых разрешений для записи в папку и если для папки задано разрешение только на запись. Вот как это исправить.
-
Откройте «Проводник» и перейдите в следующее местоположение:
C: Program Files (x86) Steamsteamapps . -
Щелкните правой кнопкой мыши Steamapp f старше и выберите Свойства.

- На вкладке Общие в разделе Атрибуты снимите флажок Только для чтения.
- Нажмите Применить и нажмите ОК , чтобы сохранить изменения.

Запустите Steam и проверьте, устранена ли ошибка. Если нет, попробуйте удалить загружаемую игру и перезапустить. Вот как это сделать.
- Откройте проводник и перейдите на страницу C: Program Files (x86) Steam.
- Откройте SteamApps.
-
Затем нажмите Загрузка.
- Steam хранит каждую игру с номером в папке загрузки. Если вы столкнулись с проблемой при загрузке игры, проверьте дату изменения папки и удалите самую последнюю папку.
- Если вы не уверены, какая папка принадлежит какой игре, перейдите на страницу steamapp info и найдите игру. Запишите идентификатор приложения игры.
- Вернитесь в папку SteamApps/Downloading . Щелкните правой кнопкой мыши по идентификатору игры и удалите папку.

Если вы получаете сообщение об ошибке, в котором говорится, что папка не может быть удалена вашей учетной записью пользователя, вам может потребоваться иметь старую версию путем изменения разрешения. Вот как это сделать.
- Нажмите правой кнопкой мыши папку с игрой, которую хотите удалить, и выберите Свойства.
-
Перейдите на вкладку Безопасность и нажмите кнопку Дополнительно .
-
Нажмите ссылку Изменить в окне Дополнительные параметры безопасности .
-
Введите имя своей учетной записи и нажмите Проверить имена.
- Нажмите ОК. Нажмите Применить , а затем нажмите ОК , чтобы сохранить изменения.
- Закройте окно свойств и запустите приложение Steam.


Попробуйте скачать игру и проверить наличие улучшений.
2. Восстановить папку библиотеки с помощью Steam
Ваше приложение Steam поставляется со встроенной опцией восстановления папки библиотеки, которую можно использовать для восстановления папки игры, которая вызывает ошибку. Вот как это сделать.
- Запустите приложение Steam с рабочего стола.
-
Нажмите Steam (верхнее меню) и выберите Настройки.
-
В разделе Настройки перейдите на вкладку Загрузки .
-
На правой панели нажмите Папка библиотеки Steam.
- Он покажет все папки библиотеки Steam. Щелкните правой кнопкой мыши папку, в которой произошла ошибка, и выберите Восстановить папку библиотеки .
- Steam запустит средство устранения неполадок и исправит любую проблему с папкой.


3. Чистый кэш загрузок
Кэш загрузки в steam помогает с более быстрым подключением. Однако плохой кеш может создать проблемы с запуском и загрузкой игры. Попробуйте очистить кеш загрузки и посмотреть, устранит ли это ошибку.
- Запустите приложение Steam с рабочего стола.
- Нажмите Steam и выберите Настройки.
-
Нажмите на вкладку Загрузить .
- На правой панели нажмите кнопку «Очистить кэш загрузки» в нижней части страницы.

4.Изменить папку библиотеки Steam
Если вы еще не изменили папку библиотеки Steam по умолчанию, возможно, пришло время сделать это. Некоторые пользователи сообщают, что изменение папки библиотеки Steam со стандартного на пользовательское исправило проблему. Вот как это сделать.
- Запустите приложение Steam .
-
Нажмите Steam и выберите Настройки.
- Перейдите на вкладку Скачать и нажмите Папка библиотеки Steam в разделе Библиотеки контента.
-
Нажмите Добавить папку библиотеки.
- Здесь вы можете выбрать существующую папку или создать новую папку.
- Выберите папку и закройте окно настроек. Просто убедитесь, что в выбранной папке достаточно свободного места для установки игр.
- Теперь попробуйте снова загрузить игру и проверьте, нет ли улучшений.


5. Переустановите игру
Если ошибка возникает при попытке играть в игру или во время обновления, вы можете попробовать удалить и переустановить игру, чтобы исправить проблему. Удаление игры не приведет к удалению данных игры, поскольку они синхронизируются с вашей учетной записью Steam, но вам придется загружать файлы игры с нуля.
Удалить паровую игру очень просто.
-
Запустите приложение Steam в своей системе Windows.
-
Щелкните правой кнопкой мыши проблемную игру и выберите Удалить.
- Когда появится запрос на подтверждение, нажмите Удалить , чтобы полностью удалить игру.
- Запустите Steam снова и найдите игру в магазине Steam.
- Загрузите и установите игру, чтобы увидеть, если удаление игры исправило ошибку


-
#1
I built a PC recently and am hoping you can help me. Build details at the bottom. Of note, I am running an unactivated copy of Windows 10.
Randomly when turning it on I will see the MSI logo for the mobo and then the display turns black. The PC seems to be running but no display. My keyboard doesn’t seem to be receiving a signal either. This occurs randomly and after restarting it gives me a message that the computer did not start properly. From there, it is usually fine. I have tried taking the battery out of the mobo, reseating the RAM, reseating the GPU, trying a different display port on the GPU for the monitor.
Other issues
- The Audio Service is not running. No audio and troubleshooting in the windows tool doesn’t seem to work
- Cannot open device manager. I open the start menu, search it, and click it but nothing happens.
- When I try to open Steam, I receive the message «Steam registry path is currently not writable». Repairing does not work.
Thank you in advance!!
Build:
CPU: Intel Core i7-12700K 3.6 GHz 12-Core Processor
CPU Cooler: NZXT Kraken Z63 RGB 91.19 CFM Liquid CPU Cooler
Motherboard: MSI MAG Z690 TOMAHAWK WIFI DDR4 ATX LGA1700 Motherboard
Memory: ADATA XPG SPECTRIX D50 16 GB (2 x 8 GB) DDR4-3200 CL16 Memory
Storage: x2 HP EX950 1 TB M.2-2280 NVME Solid State Drive
Video Card: (Used) MSI GeForce RTX 2070 8 GB GAMING Z Video Card
Case: Phanteks Eclipse P360A ATX Mid Tower Case
Power Supply: Super Flower Leadex III Gold 850 W 80+ Gold Certified Fully Modular ATX Power Supply
Monitor: MSI Optix 27″ Class FHD IPS Gaming Monitor (Optix G273)

-
- Oct 11, 2014
-
- 30,491
-
- 2,409
-
- 138,240
- 7,072
-
#2
Event Viewer can be used in the same manner but is not as user friendly.
-
#3
After the next successful boot look in Reliability History for error codes, warnings, and even information events that may have been captured just before or at the time of the problems.Event Viewer can be used in the same manner but is not as user friendly.
Thank you! I am trying a fresh install of Windows for the other issues first and then I’ll see what happens. I wasn’t able to open settings for user privileges either.
-
- Sep 1, 2015
-
- 368
-
- 10
-
- 10,865
- 32
-
#4
Does your pc have a HDD LED on the front? When screen goes black and nothing responds next, is it still flashing/stuck on or off?
-
#5
What do you mean by the keyboard not getting a signal? I wasn’t lighting up, bluetooth wasn’t connecting, no keypresses going through? Bit vague.Does your pc have a HDD LED on the front? When screen goes black and nothing responds next, is it still flashing/stuck on or off?
Sorry for the vagueness! When there is no display, the keyboard does not light up as usual and nothing happens when I hit the keys. It is wired.
I don’t know what an HDD LED is. I am using two SSDs. The mobo red LED does not light up when this occurs I don’t think. It does light up after the PC goes to sleep and I wake it up and log back in though
-
- Jan 23, 2021
-
- 2,431
-
- 550
-
- 4,040
- 176
-
#6
-
- Sep 1, 2015
-
- 368
-
- 10
-
- 10,865
- 32
-
#7
Sorry for the vagueness! When there is no display, the keyboard does not light up as usual and nothing happens when I hit the keys. It is wired.I don’t know what an HDD LED is. I am using two SSDs. The mobo red LED does not light up when this occurs I don’t think. It does light up after the PC goes to sleep and I wake it up and log back in though
Thanks. An HDD led simply lights up when there is data going to or from a hard drive, it should work with a ssd also. It would help clarify if the pc is still working while the display was black.
Your motherboard is equipped with ez debug LED:

You must try booting and tell is exactly which light is turning on/staying on/flashing from this part of your motherboard
-
#8
Motherboard BIOS up to date?
I haven’t made any updates to it. It seemed daunting and I read it could brick the PC. Is this something I should do?
Thanks. An HDD led simply lights up when there is data going to or from a hard drive, it should work with a ssd also. It would help clarify if the pc is still working while the display was black.Your motherboard is equipped with ez debug LED:
You must try booting and tell is exactly which light is turning on/staying on/flashing from this part of your motherboard
On a normal boot, the CPU lights up for a moment, followed by the DRAM for a moment, then the CPU light again for a moment, then VGA for slightly longer. None remain lit up. After the PC goes to sleep and I wake it up, the CPU light stays on and does not go away until I restart the computer.
I installed a fresh copy of Windows 10 and updated my GPU drivers and starting to do mobo drivers now. Seems ok at the moment. CPU light still goes on after waking it up from sleep mode.
Next time I have the display issue I’ll make note of the LEDs
-
- Sep 1, 2015
-
- 368
-
- 10
-
- 10,865
- 32
-
#9
Have you changed any of the BIOS sleep state settings? (S1 S2…4) I’m not sure every single one is compatible with every cpu.
Things to take note if the issue is CPU related;
If it has happened ever since the pc was made, and not a recent thing like your first post suggests, I have to ask if you seated the CPU cooler properly and remembered to apply paste?
Also, the cpu/board pins are VERY delicate, you did not squash it in or force in any way?
Finally, have you just instantly begun restarting the pc when the screen goes black? Have you tried giving it 5-10 min to see if it fixes itself? If the cpu is hanging somewhere, it might help to let it do its thing, it might even help point out the problem if the PC has a record of it taking so long on that specific thing in the event viewer.
-
#10
Hmm ok. Is it only after the pc sleeps the monitor goes black? Randomly?Have you changed any of the BIOS sleep state settings? (S1 S2…4) I’m not sure every single one is compatible with every cpu.
Things to take note if the issue is CPU related;
If it has happened ever since the pc was made, and not a recent thing like your first post suggests, I have to ask if you seated the CPU cooler properly and remembered to apply paste?
Also, the cpu/board pins are VERY delicate, you did not squash it in or force in any way?Finally, have you just instantly begun restarting the pc when the screen goes black? Have you tried giving it 5-10 min to see if it fixes itself? If the cpu is hanging somewhere, it might help to let it do its thing, it might even help point out the problem if the PC has a record of it taking so long on that specific thing in the event viewer.
The random black monitor occurs during initial boot up. I bought a new display cable, so I will try swapping that out next time it occurs.
I haven’t changed any of the bios, was hoping it was something simple first. Should I do this?
This has happened since I built the PC. My CPU temps hover around 28 during regular internet browsing and 40/50 when gaming. I did apply paste. Of note, the initial cooler I received from NZXT was not functioning properly and the first few boot ups the CPU temp reached 70 degrees a few times (according to BIOS) before I shut it down. As far as CPU installation, I made sure it was seated properly and the arrows lined up. It took some force when I used the little metal lever to close the bracket thing it over it, but anything I’d say was abnormal. I looked at it afterwards and saw no visible damage either.
Next time I have the display issue, I’ll give it some time. The most I’ve given it was just a few minutes. Thats a good idea, I’ll try that next time! Thank you
-
#11
Next time I will try using an HDMI cable in the event that the port on the monitor for the display cable is faulty. I guess next if that doesn’t work I will connect the HDMI cable to the mobo to rule out a bad GPU?
-
- Sep 1, 2015
-
- 368
-
- 10
-
- 10,865
- 32
-
#12
The pc cannot transfer display to igpu partway through something, so if there’s an error it will either stop or instantly crash.
I’d try the motherboard hdmi asap
-
#13
Yeah, if your display is off but like you said you can still activate sticky keys (nice idea btw) then input is fine. Main suspects are cable and video card right now.The pc cannot transfer display to igpu partway through something, so if there’s an error it will either stop or instantly crash.
I’d try the motherboard hdmi asap
So next step, I should plug HDMI to mobo and wait until I have another display issue?
-
- Sep 1, 2015
-
- 368
-
- 10
-
- 10,865
- 32
-
#14
You have no display, and your CPU error light stays on, if igpu gets a display it will point to GPU or pcie
-
#15
All I’m trying to do is get your monitor to display something, then we’re on the right track.
You have no display, and your CPU error light stays on, if igpu gets a display it will point to GPU or pcie
Gotcha. I have no issues with the monitor at the moment. Its just random on boot up and when I restart it is fine.
The CPU error light is only after I wake the PC up after it goes to sleep. No other issues accompany that.
-
#16
-
#17
I then did the following:
-Reseated ram — No change
-Moved display cable from GPU to mobo — No Change. Though the MIS Mag logo freezes this time instead of going black
-Reseated boot drive — No change
-Moved cable back to GPU and it magically works
Interestingly, Discord is now corrupt so I had to reinstall.
| Thread starter | Similar threads | Forum | Replies | Date |
|---|---|---|---|---|
|
B
|
Question New 4090 Build Powering Down at Random Intervals | Systems | 4 | Yesterday at 9:08 PM |
|
|
Question Random reboots and BSOD on a full AMD build | Systems | 0 | Jan 24, 2023 |
|
C
|
Question Random static/stuttering while gaming/watching videos on new PC build ? | Systems | 0 | Jan 22, 2023 |
|
|
[SOLVED] Recently changed PC parts, now getting random lag spikes? | Systems | 2 | Jan 14, 2023 |
|
|
Question New build just turns off randomly ? | Systems | 12 | Dec 23, 2022 |
|
1
|
Question Random PC Stuttering, Audio crackling, random restarts on new build | Systems | 2 | Dec 14, 2022 |
|
J
|
Question PC giving random black screen and restart ? | Systems | 2 | Dec 13, 2022 |
|
|
Question New PC build experiencing random stutters during gaming/watching streams, even after a few hardware changes ? | Systems | 18 | Dec 12, 2022 |
|
|
Question New Build Randomly Reboots | Systems | 10 | Dec 11, 2022 |
|
J
|
Question Random black screens when gaming on new build ? | Systems | 3 | Dec 5, 2022 |


- Advertising
- Cookies Policies
- Privacy
- Term & Conditions
- Topics

Ошибка Файл манифеста недоступен в Steam появляется из-за невозможности клиента заполучить информацию о манифесте – списке необходимых файлов. Из-за этой проблемы у пользователей пропадает возможность обновлять или вообще загружать игры.
В руководстве расскажем про все способы как исправить ошибку Файл манифеста недоступен.
Содержание
- Что значит файл манифеста недоступен в Стим
- Что делать если файл манифеста недоступен в Steam
- Обновление загрузки
- Перезагрузка интернет-соединения
- Отключение антивируса
- Отключение брандмауэра Windows
- Сброс настроек интернета
- Смена региона загрузки
Что значит файл манифеста недоступен в Стим
Файл манифеста – специальный список, который хранит в себе порядок файлов и папок с ними. Благодаря этому загрузка разбивается на небольшие части. Предварительно качается манифест, а после него в определенной очередности загружаются файлы игры.
Если же этот файл недоступен, то у клиента не получится распознать, какие данные и в каком порядке нужно качать. Следовательно, обновление или загрузка игры не сможет совершаться.
Если при обновлении произошла ошибка Файл манифеста недоступен, можно прибегнуть к одному из следующих способов.
Обновление загрузки
Один из простейших способов – обновить загрузку. Для начала нажмите повторно на значок обновления загрузки, если не помогло, то перезайдите в Steam и начните процесс снова. Это особенно часто может выручить с играми, которые только что вышли (предзагрузка), либо с крупными обновлениями в популярных проектах. В такие моменты нагрузка на сервера значительно выше, из-за чего могут появляться ошибки.
Перезагрузка интернет-соединения
Еще один крайне очевидный способ, который, однако, может решить проблему. В случае возникновения ошибки попробуйте перезагрузить свой роутер, переподключиться к интернету или обновить передачу мобильных данных. Кроме того, проверьте, не используется ли на устройстве VPN и прокси.
Отключение антивируса
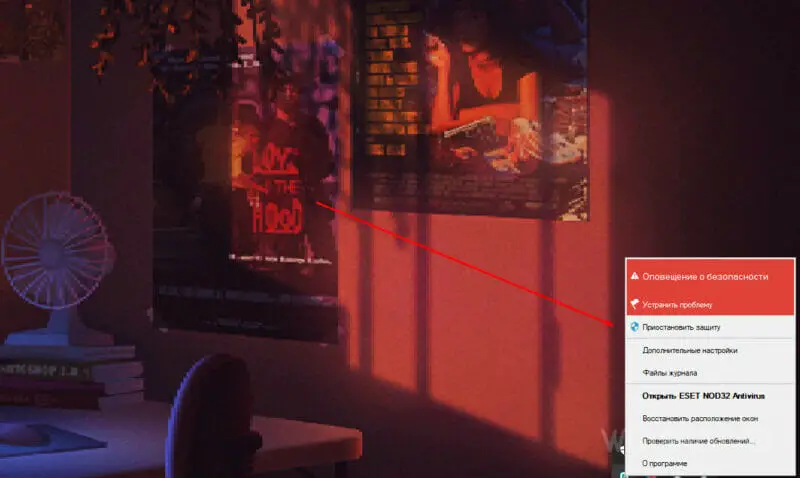
Зачастую Steam может конфликтовать с антивирусным программным обеспечением. В таком случае стоит выключить антивирус на некоторое время, приостановив защиту, скачать игру, после чего включить приложение снова. Ошибка манифеста Стим временна, поэтому также можно внести Steam в список исключений, однако, вероятно, эти действия не потребуются вновь.
Отключение брандмауэра Windows
Брэндмауэр Windows особенно часто является причиной проблем с различным программным обеспечением.
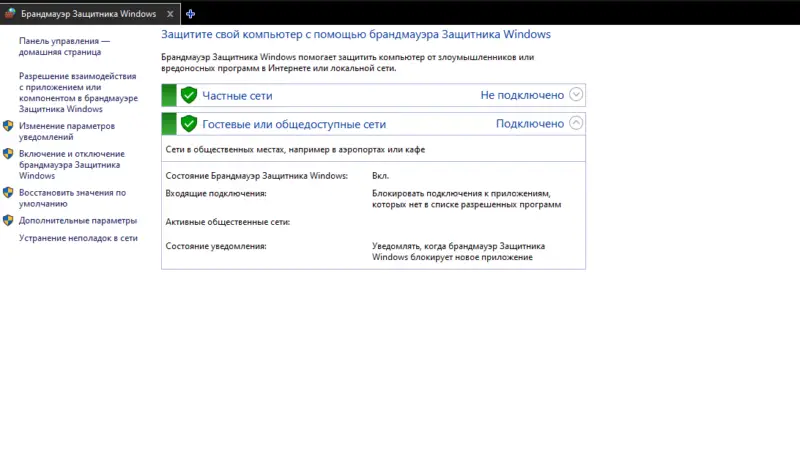
В поиске Windows впишите «Брандмауэр Windows». В открывшемся окне обратите внимание на панель слева, нужно найти раздел «Включение и отключение».
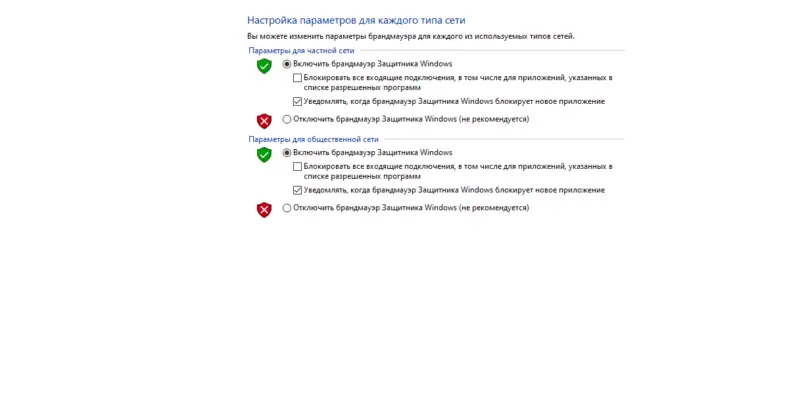
Когда перейдете в настройки параметров для каждого типа сети, необходимо выставить в обоих разделах «Отключить брандмауэр Защитника Windows». Затем нажмите «ОК».
Сброс настроек интернета
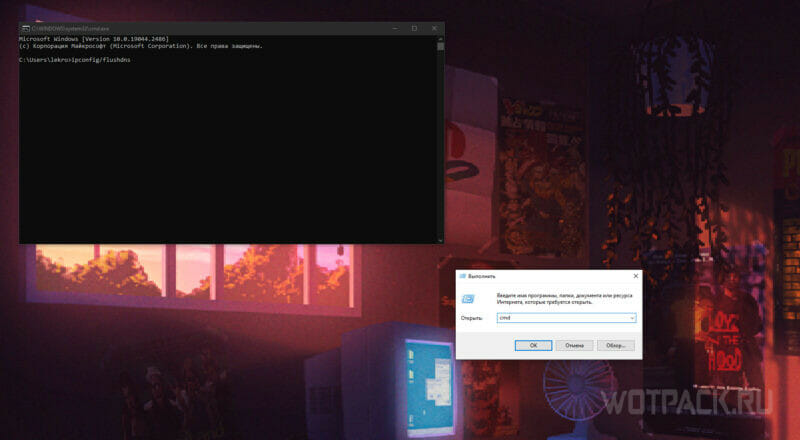
Иногда из-за интернета файл манифеста недоступен. В данном случае выполните следующие действия:
- Нажмите «Win+R», чтобы открыть строку выполнения.
- В строке впишите «steam: // flushconfig», затем нажмите «Окей».
- В диалоговом окне очистки загрузочного кэша Steam нажмите ОК.
- Снова откройте «Win+R».
- Введите «cmd» и откройте командную строку.
- В открывшемся окне пропишите «ipconfig/flushdns», затем нажмите «Return».
- Закройте командную строку и перезагрузите устройство.
После этого проблема вероятнее всего исчезнет, если же нет, то попробуйте следующий метод.
Смена региона загрузки
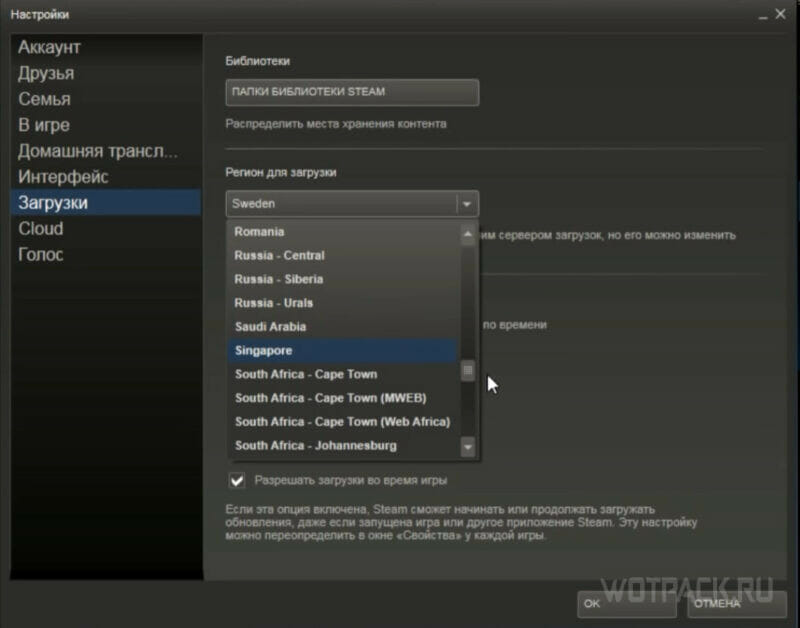
Еще один способ – изменить регион загрузки. Он, если верить Стиму, выбирается автоматически и является оптимальным, однако это не всегда так. Выполните следующие действия:
- Откройте «Настройки» в левом верхнем углу окна, нажав на «Steam».
- В панели слева нажмите на раздел «Загрузки».
- В графе «Регион для загрузки» необходимо выбрать другой регион, желательно, чтобы он находился поближе к месту жительства.
- Полностью выйдите из Стима и зайдите вновь.
Надеемся, наше руководство помогло вам разобраться, что делать если файл манифеста отсутствует или недоступен. Если остались какие-либо вопросы – задавайте их в комментарии, мы подскажем решение.
The default location for new Steam games is located at the same folder where you decided to install Steam in and that is usually in Program Files >> Steam >> SteamApps >> Common. However, certain problems begin to appear if you try and create a new library for Steam games, especially if that library is located on an external SSD or HDD drive.
This problem does not appear exclusively in this scenario and there are many different causes for it. Still, you can follow some of the methods below to try and solve the problem quite easily!
Solution 1: Make Sure the Folder is not Read-Only
If the problem occurs during an installation or the updating process of a Steam game, you might as well try and navigate to your library folder and check to see if the folder has the read-only properly turned on. If it does, try turning it off and check to see if that actually solves the problem.
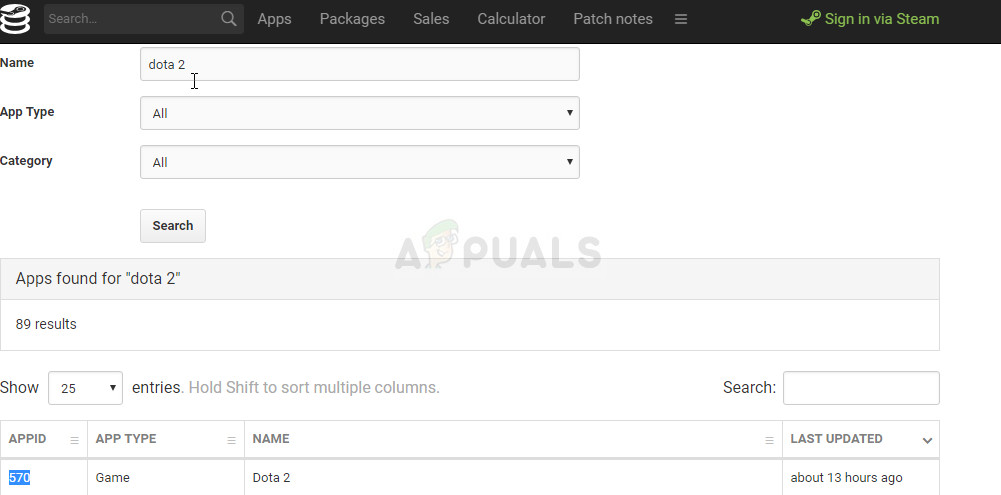
- First of all, let’s clear the downloading process in order to restart it. Close your Steam client completely by right-clicking its icon at the system tray and choosing the Exit option.
- Navigate to the C >> Program Files >> Steam >> SteamApps >> downloading folder and delete the numbered folder corresponding to the problematic game. You can find that number here by searching for your game and checking the AppID number next to it.
- If the folder can’t be deleted, you may need to take ownership of it. Right-click the folder, click Properties, and then click the Security tab. Click the Advanced button. The “Advanced Security Settings” window will appear. Here you need to change the Owner of the key.
- Click the Change link next to the “Owner:” label The Select User or Group window will appear.
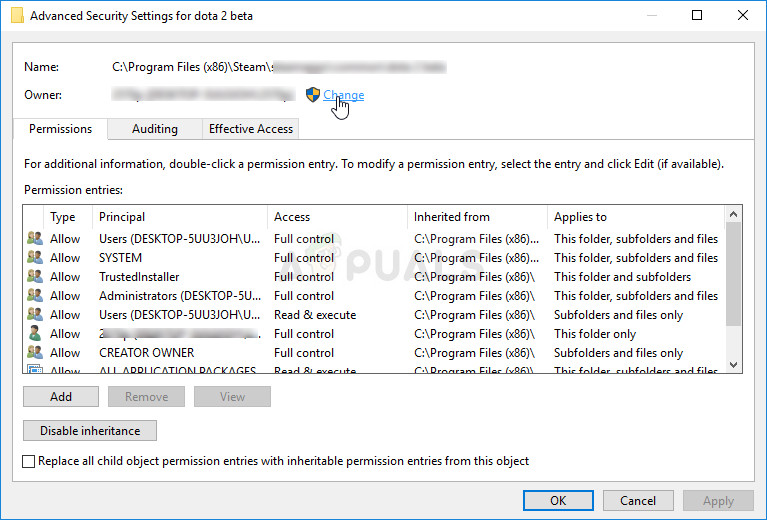
- Select the user account via the Advanced button or just type your user account in the area which says ‘Enter the object name to select’ and click OK. Add your user account.
- Optionally, to change the owner of all subfolders and files inside the folder, select the check box “Replace owner on subcontainers and objects” in the “Advanced Security Settings” window. Click OK to change the ownership. Try deleting it afterwards.
After this, we will try to remove the read-only property from the library folder you are using at that helped most users solve their problem immediately.
- Locate the library folder where your games should install and download. The usual location is C >> Program Files >> Steam >> SteamApps. However, the error usually appears with user-added folders so make sure you navigate to it.
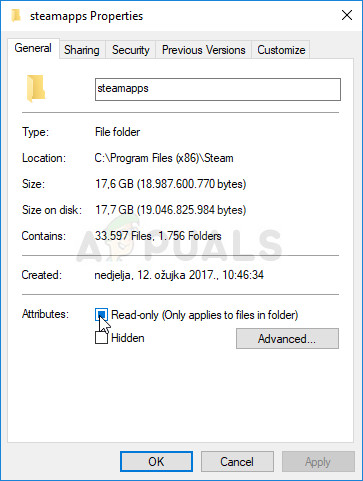
- Right-click on the problematic folder and click the Properties option from the context menu. Stay in the General tab and locate the Attributes section at the bottom. Clear the box next to the Read-only option and click on Apply before exiting. Check to see if the problem still appears.
Solution 2: Reinstall the Problematic Game
If the problem appears during an update for an existing game on your computer and if the problem didn’t appear before for the same game and for the same folder, it might just be a bug which can be fixed by reinstalling the game.
It’s an easy, but time-consuming process because of the fact that you will have to redownload the game files. The good thing is that you won’t lose any of your progress as it’s linked to your Steam account.
- First of all, make sure you are logged in with an administrator account as you won’t be able to delete programs using any other account.
- Make sure your files are backed up using Steam Cloud in order to make sure you don’t lose your in-game progress.
- Click on the Start menu and open Control Panel by searching for it. Alternatively, you can click on the gear icon in order to open settings if you are using Windows 10.
- In Control Panel, select to View as: Category at the top right corner and click on Uninstall a Program under the Programs section.
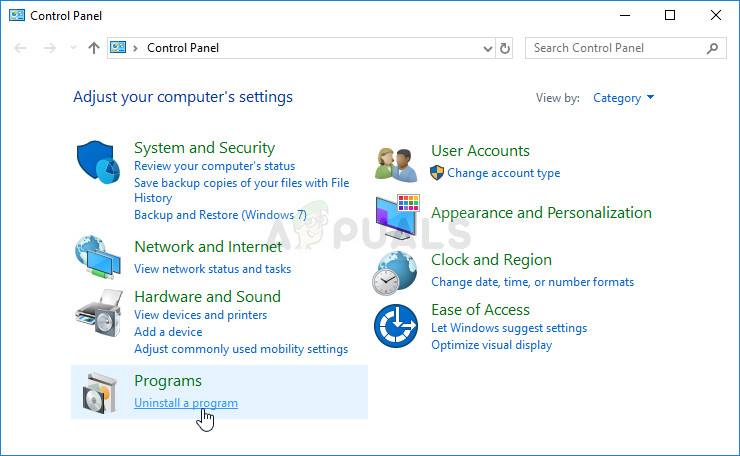
- If you are using the Settings app on Windows 10, clicking on Apps should immediately open a list of all installed programs on your PC.
- Locate the problematic game in Control Panel or Settings and click on Uninstall.
- Steam client should launch after a while and ask you to confirm your choice and delete the game files from your computer. Make sure you confirm your choice and stay patient for the process to finish.
- Reinstall the game by navigating to the Library area of your Steam client and locating your game from the list at the left side of the window. Right-click on the game and choose the Install game option. It should start the downloading and installing process immediately. Check to see if you still receive the same error.
Solution 3: Perform a Folder Fix from the Client
The Steam client actually has a method to fix the current library folder easily and this feature has proven itself useful even when dealing with these errors. There are plenty of users who claim that this simple method has managed to solve their problem after the solutions above have failed so make sure you try it out!
- Open your Steam client by double-clicking its icon on the Desktop or by searching for it in the Start menu and clicking on the first result.
- Click on the Steam option at the menu at the top of the client’s window and choose Settings. In the Settings window navigate to the Downloads tab and click on the Steam library folders button at the top of the window.
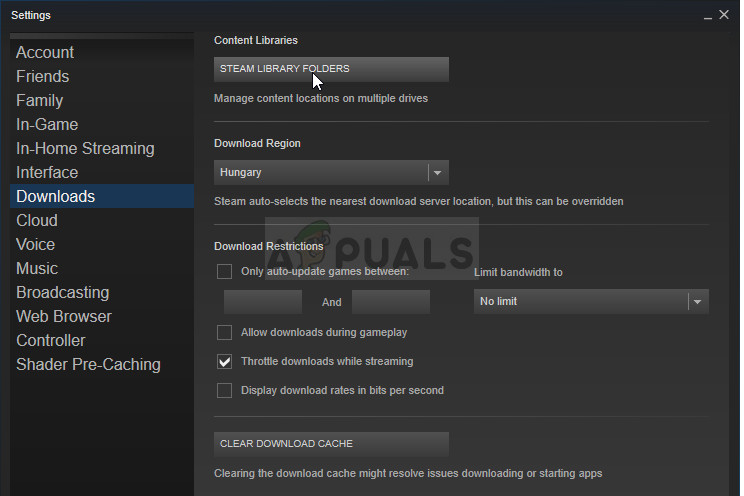
- Locate the folder where your problematic game is located. You should be able to see the default library folder (C >> Program Files >> Steam) as well as all folders you have added manually. Choose the one you want to fix, right-click on it and choose the Repair Library Folder option.
- Confirm any UAC prompts and you should see a Steam Client Service window open with a “Command-Prompt-like” interface. Wait for a while in order to repair the folder- It should close on its own so check to see if your problem is solved afterwards.
Solution 4: Use a Folder Other Than Program Files
If the Program Files folder on your computer has become write-protected in a way, you might want to change the default library folder on your computer and set it to a new one, hopefully solving the problem you are facing. Good luck!
- Create a folder anywhere you want. That folder is where the problematic game will be downloaded so make sure there is plenty of space at that specific location. Make sure you disable its read-only property just like in Solution 2, the second part.
- Right-click on your Steam client either on the Desktop or in Start menu and choose Run as administrator.

- After that, click on the Steam option at the menu at the top of the client’s window and choose Settings. In the Settings window navigate to the Downloads tab and click on the Steam library folders button at the top of the window.
- Click on Add Library Folder and select the folder you have created in the step 1 of this solution. Now, every time you try and download and install a game, you will be prompted by a choice of where to install.
- Uninstall the game by navigating to the Library tab in the Steam client, locating your game in the list at the left side of the window, right-clicking on it, and choosing the Uninstall option.
- Try to install it again from Library and make sure you select the new folder for the installation. Right-click on the game in the Library and choose Install. Check to see if the problem is gone.
Solution 5: Restart Your Computer
This may look like the simplistic solution which never actually works but there are plenty of users who simply didn’t think restarting the computer will solve it but it did, eventually. Make sure you restart your computer often enough as there are bugs which appear when the system has been running for too long and restarting it sort of fixes this issue.
Click on the Start menu and click the power button. Choose Restart and wait for your computer to boot again. Check to see if the problem is gone now.
Solution 6: Check Your Drive for Errors
If the problem is not directly linked to Steam issues, it may be your hard drive corruption which is causing the issue or there might have been some bugs which can be solved easily. Either way, there is a simple way you can run a scan for errors on your hard drive (or any other storage device where your games might be located). This has helped several users and it’s very easy to do it!
- Open This PC or My Computer depending on the version of Windows you have installed. You can get there by opening your Windows Explorer interface and clicking on This PC/My Computer at the left side navigation pane.
- Right-click on the drive where your problematic game is located and choose the Properties option. In the Properties window, navigate to the Tools tab and click on Check under the Error checking section.
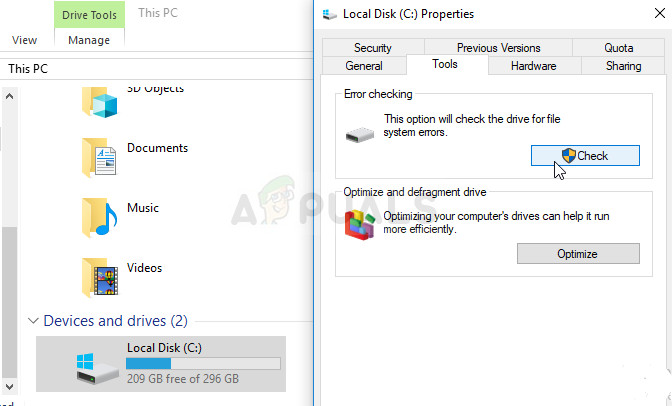
- Follow the instructions on screen in order to progress and be patient for the tool to scan your hard drive as it will definitely take a while. Restart your computer afterwards and check to see if the problem is gone.
Solution 7: Make Sure You Add Steam to Antivirus’ Exceptions
Antivirus tools should not disturb the operations of normal, trustworthy programs such as Steam but they sometimes do that and that is a fact that has been going on for years now. This often occurs with free antivirus tools such as Avast or AVG but the problem can be resolved simply by adding Steam to the exceptions list, without needing to uninstall or change the antivirus you are using.
- Open the antivirus user interface by double-clicking on its icon at the system tray (right part of the taskbar at the bottom of the window) or by searching for it in the Start menu.
- The Exceptions or Exclusions setting is located in different spots with respect to different antivirus tools. It can often be found simply without much hassle but here are some quick guides on how to find it in the most popular antivirus tools:
Kaspersky Internet Security: Home >> Settings >> Additional >> Threats and Exclusions >> Exclusions >> Specify Trusted Applications >> Add.
AVG: Home >> Settings >> Components >> Web Shield >> Exceptions.
Avast: Home >> Settings >> General >> Exclusions.
- You will need to add Steam’s main executable file in the box which will appear prompting you to navigate to the file. It should be in the same directory where you installed it (C >> Program Files >> Steam >> Steam.exe is the usually location). If you have a shortcut on the desktop, right-click on it and choose Open file location.
- Check to see if you are now able to open the file. If it still won’t work, try restarting your computer and try again.
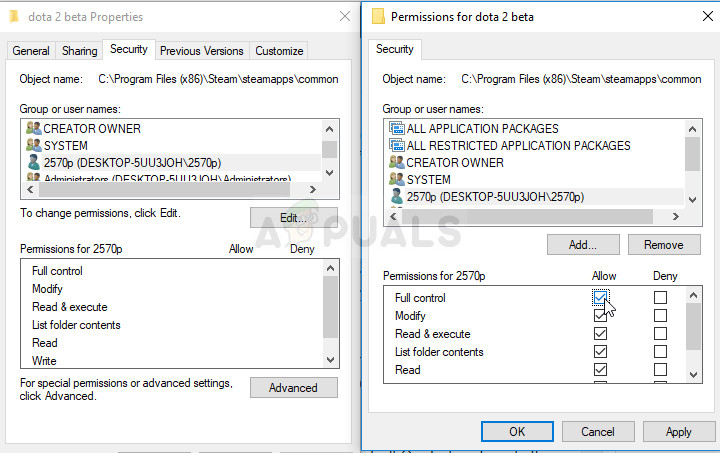
Solution 8: Take Ownership of the Folder and Give Write Permissions
If the error says that the folder is not writeable, it’ quite possible that you don’t have the sufficient permissions to write and read from that folder. This can occur because of a variety of different reasons and it’s quite straightforward to fix it if you have the patience.
- Right-click the library folder you are using, click Properties, and then click the Security tab. Click the Advanced button. The “Advanced Security Settings” window will appear. Here you need to change the Owner of the key.
- Click the Change link next to the “Owner:” label The Select User or Group window will appear.
- Select the user account via the Advanced button Add your user account.
- Optionally, to change the owner of all subfolders and files inside the folder, select the check box “Replace owner on subcontainers and objects” in the “Advanced Security Settings” window. Click OK to change the ownership.
- In the Security tab of the library folder’s Properties window, click on Edit in order to change permissions and select your personal user account you set the ownership to. Change permissions to Full Control and apply the changes. Check to see if the problem occurs anymore.

Kevin Arrows
Kevin is a dynamic and self-motivated information technology professional, with a Thorough knowledge of all facets pertaining to network infrastructure design, implementation and administration. Superior record of delivering simultaneous large-scale mission critical projects on time and under budget.