Enable Reporting Additional Information in Streamlabs DesktopWhen you experience a crash, should also immediately enable additional reporting…
Last Updated on April 07, 2022
Enable Reporting Additional Information in Streamlabs Desktop
When you experience a crash, should also immediately enable additional reporting information to better enable the development team to investigate your crashing issue.
If you can open Streamlabs Desktop:
- Go to Settings > General
- Tick the box for «Enable reporting additional information on a crash» (requires restart)
- Restart Streamlabs Desktop
> Note: Streamlabs Desktop needs to crash again to proceed to the next step
- You should see a prompt asking «Share additional information to the developers?», click «Yes»
- Once you see additional debug information saved successfully, click «Yes» again.
- When the progress bar has filled, and it indicates `Successfully uploaded the additional debug information, please highlight the filename and copy it (either right-click > copy or CTRL+C)
- Paste the file name into your chat with support.
> Please note this process can take several minutes
If you can’t open Streamlabs Desktop:
- Copy: %appdata% then press the Windows Key on your keyboard, Press CTRL + V, then press Enter.
- Find the slobs-client folder and create a new folder named «CrashMemoryDump»
- Please try to launch Streamlabs Desktop. It should prompt you with a window asking to provide additional information to the developers. Click «Yes».
- Once you see additional debug information saved successfully, click «Yes» again.
- When the progress bar has filled, and it indicates «Successfully uploaded the additional debug information», please highlight the filename and copy it (either right-click > copy or CTRL+C)
- Paste the file name into the chat with support
>Please note this process can take several minutes
Preparation
Before we get into solutions and breakdown of what happens when Streamlabs Desktop crashes, you should always ensure that your drivers are up to date.
Updating Windows
- Search «update» in your Windows Start Menu > Check System Updates. You can then press the Check for Updates button to see if you’re on the latest update.
- Install Microsoft Visual C++ 2022 redistributable (both x64-bit and x32-bit)
If you get a setup failed error, please go to windows apps and find the newest c++ entries (usually bottom of the list) and click on each one. Choose to modify then repair and restart after repairing both of them
Updating GPU Drivers
- NVIDIA
- AMD
Another option is to perform a clean install of your GPU drivers. We have a guide on how to do this here.
Solutions
- Re-Download Streamlabs Desktop and run the installer as administrator. (Right-click the installer file > run as administrator)
- Start Streamlabs Desktop as administrator. (Right-click the shortcut > run as administrator)
- Open your Firewall as well as allow Streamlabs Desktop through any Antivirus software you run
- IPv6 Fix
- Install DirectX (If DirectX does not work, then please try this as well.)
If you are still having the issue, you will need further support from our team- Please submit a ticket
Further reading
Troubleshooting Going Live Issues in Streamlabs Desktop
First, try the following:Install Microsoft C++ Redistributables for 2022 and restart your PC after you do.Log out from Streamlabs Desktop, restart…
Streamlabs Desktop Chatbot FAQs & Troubleshooting [Desktop Chatbot]
If you’re on Windows 7 and the bot no longer boots up it’s due to .Net 4.7.1 being pushed to your system as a Windows update (Which is broken). In…
Dropped Frames, CPU/GPU Issues, and Improving Stream Quality
First, check out this video that breaks down this topic in 3 parts:https://www.youtube.com/watch?v=WnRhaZaQ2nsBefore we discuss fixes, there are the 3…
Streamlabs Errors — How to fix common errors!
In this article we will tell you how to fix common streaming software Streamlabs errors.
Posted at January 28, 2022
1 Streamlabs problems and errors
Streamlabs OBSis a powerful streaming software that usually works well and causes a few problems, but as with any program, errors can occur with Streamlabs OBS that initially baffle the user. Whether it is compatibility issues, mishandling, or hardware errors, the range of errors that can occur when using Streamlabs is diverse. That’s why our experts have taken it upon themselves to analyze the various problems and their causes so that you won’t be alone in fixing them. So, this article is all about understanding the program and getting to the root of errors like Streamlabs Lagging or Streamlabs Black Screen and fixing them.
2 Streamlabs OBS — These are the most common errors
Experience has shown that it is usually always the same errors that occur when using Streamlabs OBS. We have taken a look at this topic and, based on intensive research, we have selected the most common problems with Streamlabs in order to present them to you. If you experience problems as well, you will almost certainly find the solution here!
2.1 Streamlabs Lagging
Lags are not desirable in livestreaming — neither for the creator nor for the viewer. It leads to delays and problems with the connection, which does not leave a good impression on the viewer and in extreme cases can even be very annoying. Lags can manifest themselves in different ways — so-called frame skips can occur, where the image hangs constantly and shortly afterward picks up where the actual livestream is. This can result in seconds-long jumps, which is of course not nice to look at for anyone. The biggest problem, however, is that you as a streamer often don’t even notice the Streamlabs lagging. Because the problem is often not with the program or you, but with your internet connection or the Streamlabs settings.
If you experience such lags, it is recommended to check the settings of the program for possible sources of error. It is often the case that the selected livestream settings exceed the performance of your internet connection and the program permanently demands more from your line than it is able to provide. So, if Streamlabs lags, you should throttle the settings and adjust them to your line. Here’s what you can do to counteract lags:
- Reduce bitrate.
- Change encoder (from hardware to software or vice versa).
- Change the quality control method.
- Decrease quality presets.
You can find these settings by starting Streamlabs OBS, opening the preferences and then clicking on the «Output» menu tab. Finally, under «Stream» you will find all the options to change the quality of your stream and thus prevent lags. Of course, you should note that preventing Streamlabs from lagging will in most cases result in a drop in the image quality of the stream. However, experience shows that viewers clearly prefer a smooth stream over a high picture quality with lags.
2.2 Streamlabs Black Screen
You’ve set up a scene, added one or more sources to the scene, and now you’re wondering why you see nothing but a black screen in the preview? This phenomenon is known as Streamlabs Black Screen and is usually fixed with a few clicks.
Many creators who are just starting to stream and set up Streamlabs make a crucial mistake when creating the main scene, which causes the screen to remain black. Especially when you want to grab gameplay and present it to your viewers. When creating the source, a gameplay shot is often added here. However, this is wrong, at least if you are not streaming with a capture card. If you want to stream a game from a PC, you should opt for window or screen capture. Game capture is quite misleading and often causes perplexed streamers afterward. This is because it is only used to record or transmit capture card content.
However, if you choose a window or screen capture, either a specific window (game.exe) or a specific whole screen is displayed. And that’s exactly what you want when transferring PC games. Note, however, that with screen capture, viewers may also see when you switch to the desktop while playing. We, therefore, recommend that you use window recording, which is only activated once the game has started.
2.3 Streamlabs crashes
With a complex computer program like Streamlabs OBS, many different processes are running at the same time and especially when the tool is running at full speed during a recording or during streaming, unwanted crashes can occur. The causes of these crashes can be various and have to do with the own system, an error in the program code or with a short-circuit of the program. We can’t tell you for sure in this guide why Streamlabs crashes on you, but we can give you some tips to prevent crashes.
- Restart Streamlabs after the crash. Usually, crashes are one-time events.
- Check if your system is powerful enough to handle streaming with Streamlabs and playing video games at the same time. It’s best to install a system monitor tool to keep an eye on CPU and graphics card usage.
- In case of persistent crashes, a Streamlabs OBS update may be necessary and provide a remedy. How to update the tool, you can read in our guide to the topic.
- Check your computer for viruses and malware.
- If all solutions did not help, you can try uninstalling Streamlabs OBS and then reinstalling it.
2.4 Streamlabs does not start
You click on the Streamlabs OBS icon and nothing happens. Not good, but no need to worry. If Streamlabs does not start properly, there are no serious reasons for this problem. With a few quick actions, you can try to fix the error.
- Press the key combination CTRL + ALT + Del. And open the Windows Task Manager. Click on the «Processes» tab and look for the process «Streamlabs Desktop» in the list. Right-click on this entry and then click on «End Task» to close the program that is running in the background but did not open properly. After the process is terminated, click the Streamlabs icon again. Now Streamlabs OBS should open normally again.
- Restart your PC and try to open the program again after the restart.
- Uninstall Streamlabs OBS, delete the associated local folders and files, and perform a fresh installation.
- Perform a Streamlabs OBS update. How to do that you can read here.
2.5 Streamlabs bad stream quality
As a streamer, you always have an eye on the chat. If you get a lot of messages that the quality of the stream is not good enough, you should seriously think about whether this problem is caused by you or Streamlabs OBS. If such messages appear in the chat, you will not be able to avoid dealing with them. We have summarized the most common causes of poor stream quality for you.
- Your internet connection is under significant load and can’t be fully used for your stream. Often it’s because downloads are still running in the background or your partner is using streaming services like Netflix or AmazonPrime in your living room.
- The Streamlabs OBS settings do not match the performance of your internet connection. You can, for example, increase the bitrate or turn up the general quality settings.
- Your PC is running at full capacity.
- There are problems with the servers of the streaming platform. Unfortunately, you have no influence on this rather rare circumstance.
3 Conclusion
If you use Streamlabs OBS, you have actually chosen a good streaming tool, which runs stable and causes hardly any problems if used correctly. Nevertheless, it is in the nature of things with a complex program like this that here and there, bugs will appear and they need to be fixed. Due to the fact that the developers of Streamlabs always keep an eye on it, serious problems should be fixed quickly in the form of updates. If the error is not in the program itself, it can usually be fixed with a few clicks on your part.
Источник
How To Fix ‘Error Fetching Your Channel Information’ in StreamLabs
The error fetching your channel information occurs in Streamlabs OBS for users attempting to stream content on Twitch. This problem is not OS exclusive as it’s reported to occur on Windows 7, Windows 8.1, and Windows 10.
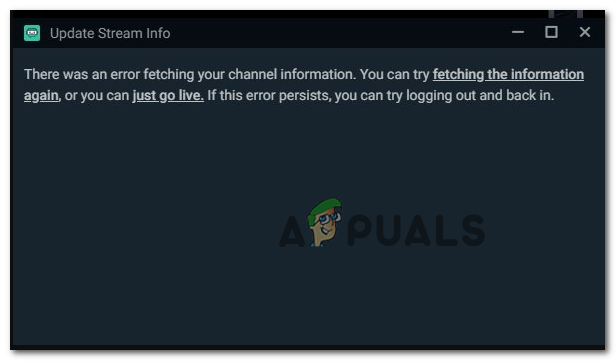 ‘Error Fetching your Channel Information’ in Streamlabs
After investigating this particular issue, it turns out that there are multiple scenarios that will cause this behavior with StreamLabs. Here’s a shortlist of potential culprits that might cause this problem:
- Sign in issue – Some users that were also encountering this issue have reported that they’ve managed to fix this issue by accessing their Twitch account from a browser and disallowing the StreamLab OBS connection.
- Corrupted Twitch cookie – Another reason that might cause this error is a corrupted Twitch cookie that ends up interfering with StreamLabs. To resolve the issue in this case you’ll need to clear every Twitch cookie from your default browser.
- Stream language glitch – As it turns out, this problem can also occur due to a well known StreamLab bug having to do with the default language. In this case, you should be able to resolve the problem by changing the Streaming language to something different before changing it back to the correct one.
- Missing Visual C++ Redist 2017 package – One very recent Windows version, you can expect to see this error if your OS installation doesn’t include the Visual C++ Redist 2017 interaction. You can fix this problem by installing it manually via the official channels.
- Leftover obs-plugin files – If you previously installed a StreamLab plugin, leftover files might end up causing streaming issues now that the main plugin is removed. To fix this problem, you’ll need to delete the frontend-tools.dll from the installation folder.
- The stream is not bonded to an IP – Sometimes you’ll see this error due to the fact that the streaming attempt is not using your machine IP. This happens if you leave the default choice instead of picking the correct IP from the Network menu. You can resolve this issue by selecting the correct IP manually.
- Missing .NET Framework 4.72. – While this .NET framework is an integral part of Windows 10, you need to install it manually on Windows 7 and Windows 8.1 in order to facilitate SteamLabs the correct infrastructure to run correctly.
- Missing admin access – If you don’t allow admin access to the StreamLab installer, it might be unable to copy over certain files. To make sure that doesn’t happen, you can reinstall it and force the installer to open with admin access.
Method 1: Signing out & back into StreamLabs
If you haven’t tried this yet, you should start this troubleshooting attempt by signing out of the problematic account in StreamLabs before signing back in.
Several affected users that where also troubleshooting the same error message have reported that the issue was finally resolved after they’ve signed out & then right-back in into the affected Twitch account from the StreamLabs application.
If you’re not sure how to do this, follow the instructions below:
Note: This operation is not done from the StreamLabs application. You need to do it directly from the Twitch account.
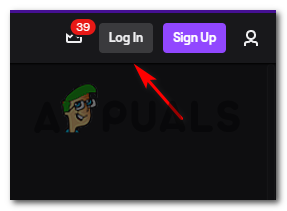
- Open your default browser, visit Twitch.tvand sign in with the same account you currently have linked in StreamLabs. On the Twitch.tv site, click on the Log In button (top-right corner of the screen.
 Logging out & in of your Twitch account
 - Once you are successfully logged in, click on your account icon (top-right section), then click on Settings from the newly appeared context menu. Accessing the Settings menu of Twitch
- Once you’re inside the Settings menu, click access the Connections menu, then scroll down to the Other Connections section and click the Disconnect button related to StreamLabs.Disconnecting Twitch from SteamLabs
- Once the StreamLabs connection is terminated, return to the StreamLabs and connect your Twitch account once again to see if the problem is now resolved.
 Logging out & in of your Twitch account
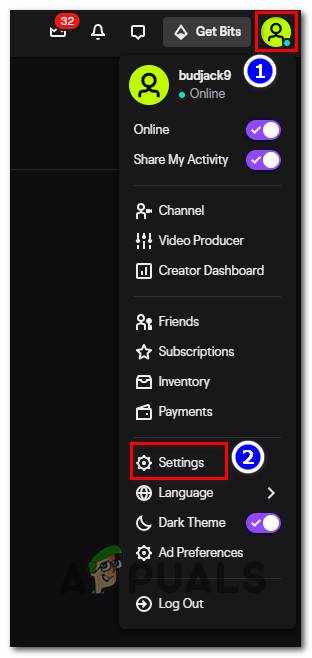 Accessing the Settings menu of Twitch
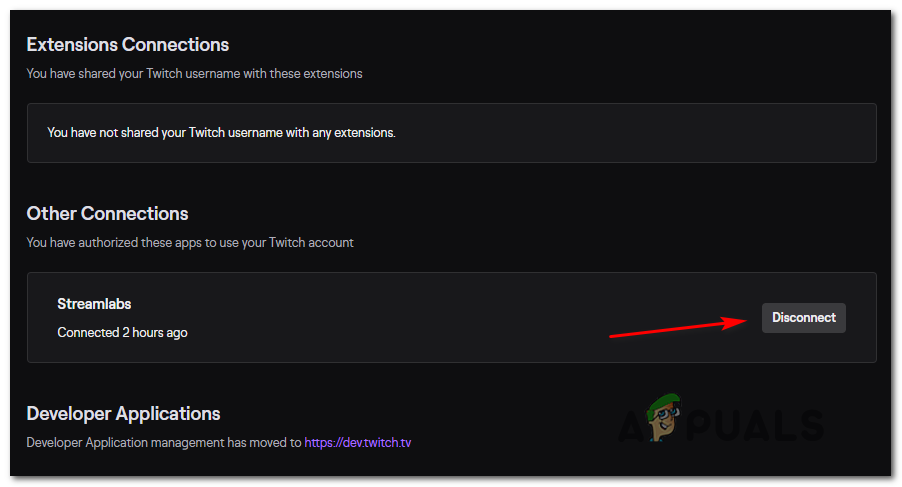 Disconnecting Twitch from SteamLabs
If you are still seeing the same fetching your channel information error when attempting to go live, move down to the next potential fix below.
Method 2: Clearing every Twitch cookie
According to a lot of affected users, you might expect to see this error code due to a Twitch cookie issue. Even though you are using StreamLabs OBS, the app still relies on your browser for certain interactions, so a corrupted cookie might be responsible for the ‘fetching your channel information’ error.
If this scenario is applicable, you should be able to fix this problem in 2 different ways:
- You can either go specifically after Twitch cookies and delete them solely
- You can clear the entire cookie folder from your browser.
If you want to go for the focused approach, here’s how to clean the specific Twitch cookies from your browser. When you’re inside the cleanup window, use the search function to find and delete every Twitch cookie.
On the other hand, if you want to go for a full cleanup, follow these instructions on cleaning the cache & the cookies from your browser.
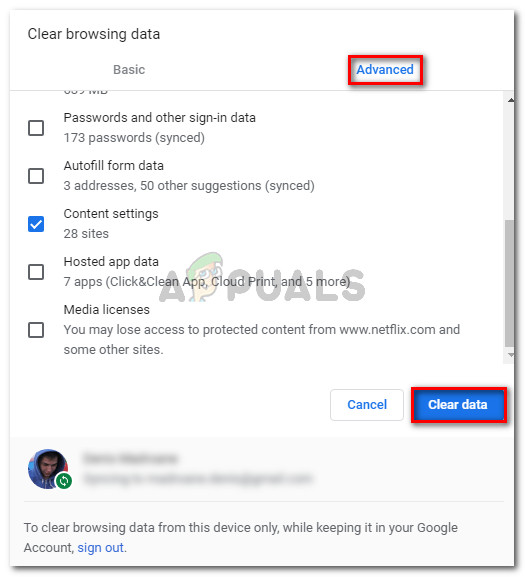 Deleting cookies and another type of browsing data
In case you already cleared the cookies and you’re still dealing with the same error code, move down to the next potential fix below.
Method 3: Changing the Streaming Language
Although this might seem like a weird fix, some users that were also dealing with the error fetching your channel information have managed to resolve the problem entirely by reselecting a different language, then changing it back again to the previous value.
We haven’t been able to find an official explanation from the developers, but affected users suspect that this behavior resulted from a StreamLabs glitch.
If you want to attempt this potential workaround, follow the instructions below to temporarily change the Streaming language from the StreamLabs application:
- Open the StreamLabs account and login with the Twitch account that you’re encountering issues with.
- Once you have successfully signed in, go ahead and click on Settings (gear icon located in the bottom-left corner of the screen). Accessing the Settings menu of StreamLabs
- From the Settings menu of StreamLabs, select the General tab from the left-hand column, then move over to the right section and use the drop-down menu under Language to change it to something different. Changing the default language in StreamLabs
- Hit Done to save the changes, then close the StreamLabs app before starting it again.
- At the next application startup, open the Settings screen again and change the language back to what it was previously.
- Initiate another streaming attempt and see if you managed to get rid of the fetching your channel information error.
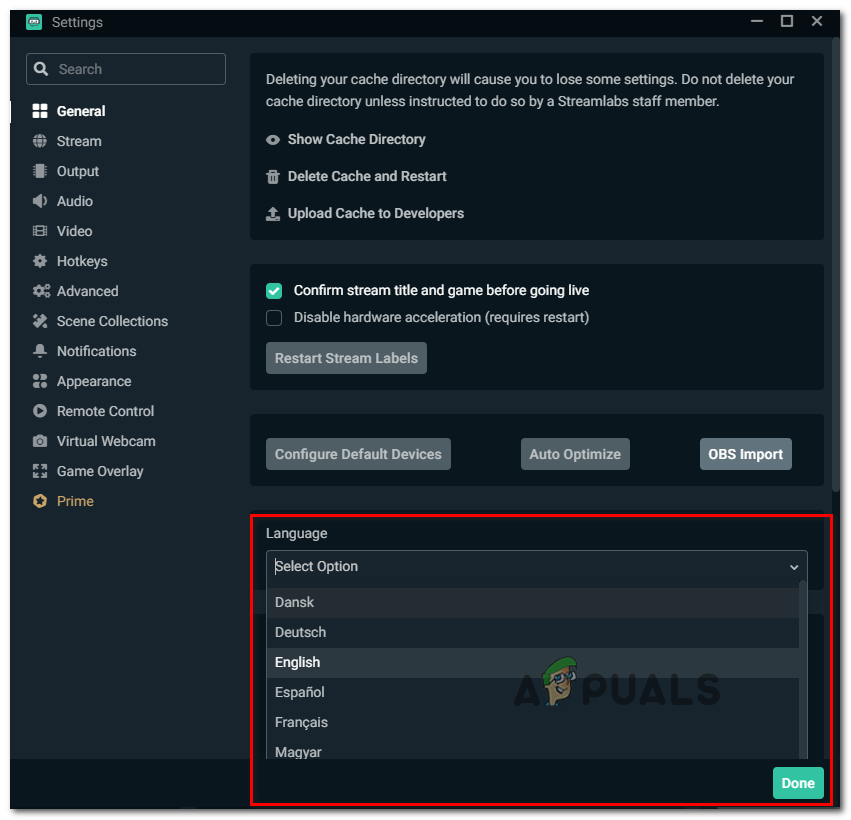 Changing the default language in StreamLabs
If the problem is still not resolved, move down to the next potential fix below.
Method 4: Installing Visual C++ Redist 2017
According to some affected users, you might also expect to see this error in instances where the computer where the StreamLabs OBS application is installed is missing a critical C++ Redist needed to facilitate gameplay streaming.
Several users that were previously encountering the same problem have confirmed that they managed to fix this problem by downloading and installing a compatible version of the Visual C++ 2017 package.
If you’re unsure on how to do this, follow the instructions below to install the correct version of the Visual C++ Redist 2017 x64 package:
- Open your browser and visit the official MIcrosoft.com download page of the Visual C++ Redist 2017 download pack.
- Once you’re on the correct page, scroll down to the Visual Studio 2015, 2017, and 2019 section and click on vc_redist.x86.exe if your Windows version is on 32-bit or vc_redist.x64.exe if your Windows version is on 64 bit. Downloading the correct VC version
- Once the download is complete, double-click on the .exe installer, click Install, then follow the on-screen prompts to install the missing Visual C++ Redist package. installing the missing redist packages
- Once the installation is complete, restart your computer if you’re not prompted to do so automatically and see if the error is resolved once the next startup is complete.
 Downloading the correct VC version
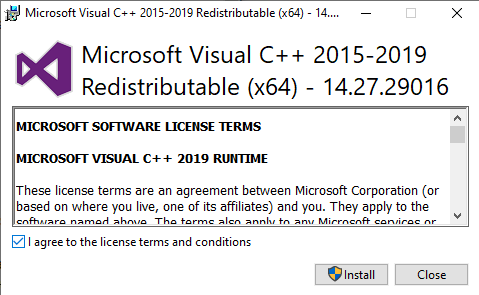 installing the missing redist packages
In case you still end up with the fetching your channel information error when you try to use StreamLabs to stream on Twitch, move down to the next potential fix below.
Method 5: Deleting the frontend-tools.dll file
As it turns out, this problem can also occur due to some type of corrupted files left behind in the obs-plugins folder of Streamlabs OBS. In most cases, this problem will start occurring after the user attempts to uninstall a plugin for StreamLabs.
If this scenario is applicable, you should be able to fix the problem by navigating to the location where StreamLabs stores the plugin files and deleting the frontend-tools.dll.
This workaround is confirmed to be effective by several users that managed to resolve the error. Follow the instructions below to clear it:
- Open File Explorer and navigate to the following location:
Note: If you installed StreamLabs in a custom location, navigate there instead.
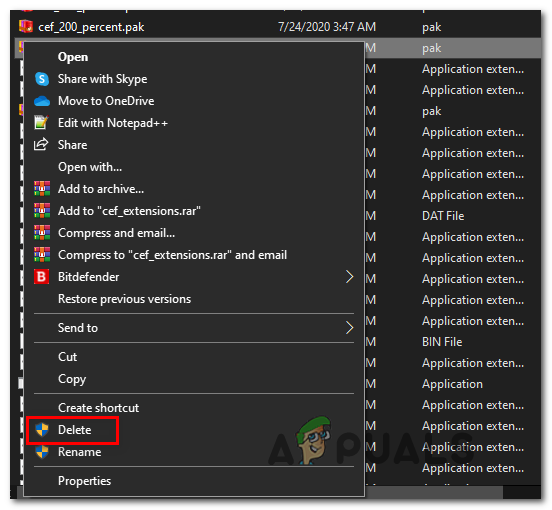 Deleting the frontend-tools.dll
Note: You might get a warning about ‘scene corruption’, but don’t worry as it will go away the next time you open the app.
Method 6: Binding StreamLabs to an IP
As it turns out, this problem can originate from a TCP or IP issue. If your streaming attempts are constantly denied by the fetching your channel information error or a different error message (like ‘Invalid Path or Connection URL‘ error), one thing you can try to do is to bind the streaming attempt to your machine IP.
This operation will require that you know your IP so you can bind it in the StreamLab application.
If you want to enforce this potential fix, start following the instructions below:
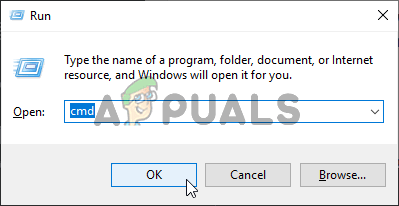
- Press Windows key + R to open up a Run dialog box. Next, type ‘cmd’ inside the text box and press Ctrl + Shift + Enter to open up an elevated Command Prompt.
 Running the Command Prompt
 Note: When you see the UAC (User Account Prompt), click Yes to grant admin access.
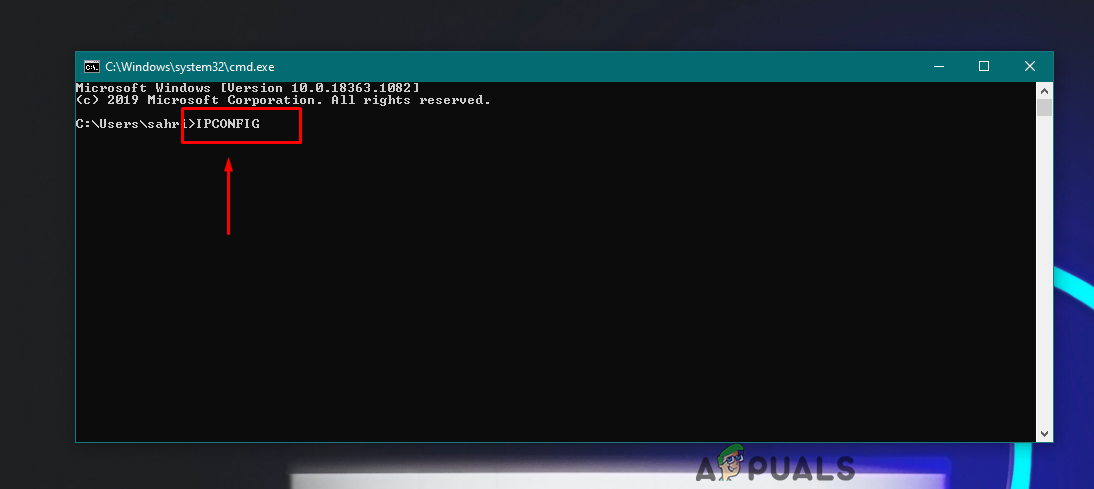 Running the ‘ipconfig’ command
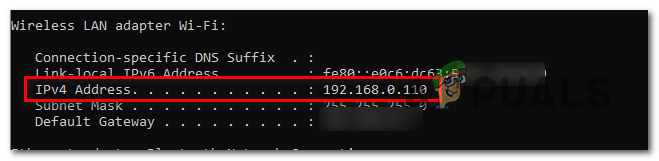 Fetching the IPV4 address
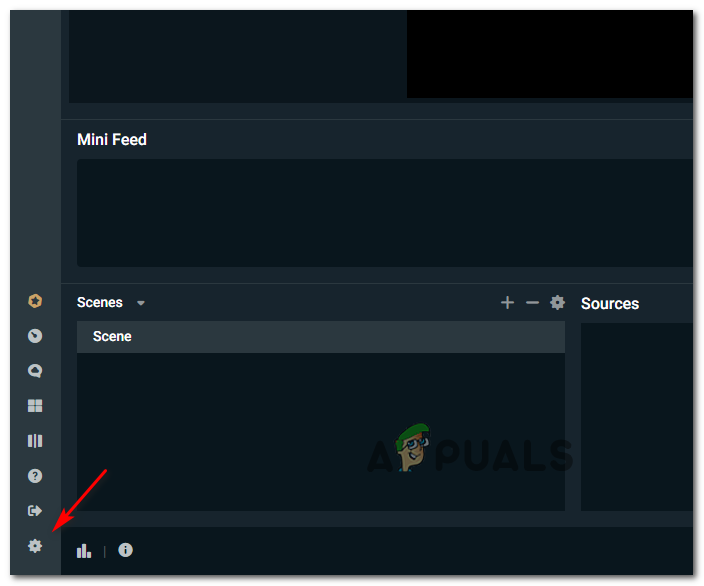 Accessing the Settings menu of StreamLabs
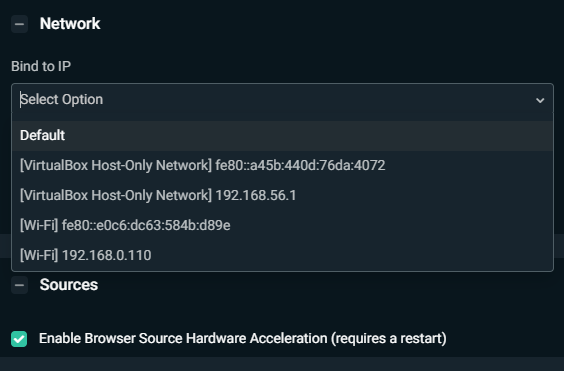 Selecting the correct IP address
If the same problem is still occurring, move down to the next method below.
Method 7: Download .NET Framework 4.7.2 (Windows 7/8 ONLY)
If you’re encountering this problem on Windows 7 or on Windows 8.1, keep in mind that there’s an additional requirement that you need to fulfill before you’ll be able to stream content from the StreamLabs application.
Since the installation of .NET Framework 4.7.2 is not handled by the WU component (like on Windows 10), you will need to install it manually using the official channels.
Some users that where also encountering this error message in StreamLabs on Windows 7 and Windows 8 have confirmed that the problem was fixed once the missing .NET framework was installed.
Here’s a quick step-by-step guide on how to install the missing .NET framework on your computer:
- Open your default browser and navigate to the official download page of the .NET Framework 4.7.2.
- Once you arrive to the correct location, scroll down to the Runtime section and click on Download .NET Framework 4.7.2 Runtime. Downloading the Runtime version of the .NET framework
- Once the download is complete, open the installer and follow the on-screen prompts to complete the installation of the missing .NET Framework, then restart your computer.
- After your computer boots back up, open StreamLabs and see if the problem is resolved by attempting to go live once again.
 Downloading the Runtime version of the .NET framework
If the same problem is still occurring, move down to the next potential fix below.
Method 8: Reinstalling StreamLabs with admin access
If none of the fixes above have worked for you, one last thing you can try is to reinstall the StreamLab application and ensure that you allow the installed admin rights. This might be effective since the installer might have trouble copying over some files in case it has no admin rights.
If you think this scenario might applicable, follow the instructions below to reinstall the StreamLabs apps with admin rights:
- Press Windows key + R to open up a Run dialog box. Next, type ‘appwiz.cpl’ inside the text box and press Enter to open up the Programs and Features menu. Type appwiz.cpl and Press Enter to Open Installed Programs List
- Once you’re inside the Programs and Features menu, scroll down through the list of installed applications and locate StreamLabs OBS. When you see it, right-click on it and choose Uninstall from the context menu. Uninstalling the StreamLabs OBS application
- Follow the uninstallation instructions to get rid of the app, then restart your computer.
- Once the next startup is complete, visit the official download page of StreamLabs and initiate the installation.
- After the download is complete, don’t open it conventionally. Instead, navigate to the location where it was downloaded, right-click on it and choose Run as Administrator. Running installer as administrator
- After the installation is complete, open StreamLabs, sign in with your Twitch account once again and see if the error is now resolved.
 Type appwiz.cpl and Press Enter to Open Installed Programs List
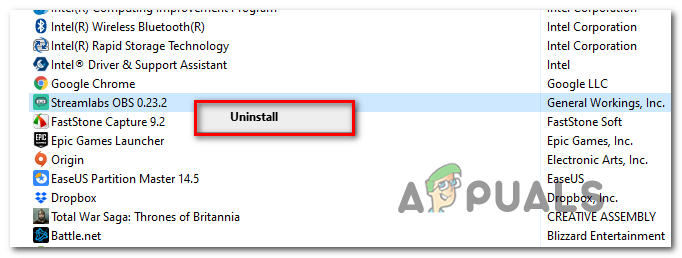 Uninstalling the StreamLabs OBS application
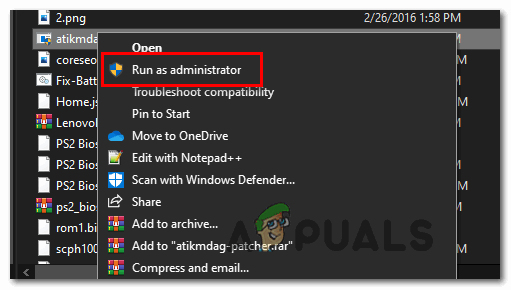 Running installer as administrator
Источник
Getting started with Streamlabs Desktop
Have updated drivers and software
Always have up-to-date software and drivers of your hardware if you encounter any issues.
Especially make sure your video drivers are up to date to the latest version.
Streamlabs Desktop Issues and Solutions
- Backups > Always make backups during beta testing! Settings > Scene Collections > Export
- User Data > User data can be found in
%appdata%slobs-client
Install Visual C++ Redistributable
Streamlabs Desktop requires some additional files (Visual C++ 2017 Redistributables) that might not be currently installed on your system. Please download and run both of these Microsoft Visual C++ 2017 redistributables. Restart your computer after installing this.
- Visual C++ 2017 Redistributable [64bit]
- Visual C++ 2017 Redistributable [32bit]
Both the 32 bit and 64 bit versions should be installed, even if you have a 64 bit version of Windows.
Cannot maximize/open Streamlabs Desktop from taskbar*
If your Streamlabs Desktop is open but you are unable to see the window, but it is on the taskbar where you see a preview of the window please select the program so it is highlighted on the taskbar. Then you press left alt+spacebar. This should open a context menu on the top-left of your screen, where you select Maximize.
If that did not work you could try selecting Streamlabs OBS in the task bar and use winlogo+shift and use the left/right arrow key to try moving the window to another screen.
Streamlabs Desktop is stuck maximized*
Close Streamlabs Desktop and navigate to %appdata%slobs-client in Windows (by Search, winlogo+r, or in Explorer address bar) and in here delete the file window-state.json and start Streamlabs OBS again.
If you are having issues navigating to the folder, in Streamlabs Desktop settings, click Show Cache Directory and open the slobs-client folder found in the folder that opens.
Game optimized encoder settings
The game-aware optimized encoder settings can be enabled before you go live when you have «Confirm stream title and game before going live» enabled. When available you can then enable the «Use optimized encoder settings» which then applies the optimized game-specific encoding settings when you go live.
Using this, will override the set preset and any custom x264 flags you have set, with the machine learned values.
A list of optimized games can be found here and if the game is not on the list, generic optimization settings will be applied specific for gameplay footage so you will always get better results.
Streamlabs Desktop crashes during startup
Do not try to run Streamlabs Desktop on a Mac(book) with bootcamp or on macOS with Wine. These are currently not supported and we cannot provide any assistance with this. Most likely the cause for Bootcamp users is the lack of proper updated video drivers, and for Wine it would be vital required components.
- Reboot your computer.
- Try starting Streamlabs Desktop as administrator.
- Update your video drivers and other hardware drivers/software (reboot after updating).
- Install Windows C++ Redistributable
- Download latest installer and run this as administrator while any AV is disabled temorarily.
- Add
%appdata%slobs-clientdirectory to your Anti-Virus whitelist to not scan/block there.
If you are still having the issue you could try to clear the user data of Streamlabs Desktop and see if that could resolve the issue with starting up. Do keep in mind by doing so you are deleting user data and you need to login, redo your settings and potentially re-adjust your scenes and scene collections depending on the cloud recovery.
- Make sure Streamlabs Desktop is closed and not running in the background in task manager.
- Navigate to
%appdata%in Windows (winlogo+r or search). - Delete or rename (to keep a backup)
slobs-clientthat is found here. - Try starting Streamlabs Desktop again (as administrator)
If you are on Windows 7 please do the following if experiencing crashing issues when launching Streamlabs Desktop
Please enable Aero on Windows 7:
- Close Streamlabs Desktop and then select an Aero Theme
Note: pick this default theme if you do not know which one to pick: https://prnt.sc/nhhh9s - If Aero is ON (check this screenshot to verify: https://prnt.sc/nhhhdp) then simply run Streamlabs OBS but if not please continue to the next step
- Make sure Streamlabs Desktop is closed and that an Aero Theme is selected then search for cmd in windows search bar & run it as admin.
- Enter two lines of command, first type net stop uxsms hit enter and let it process (few secs) then type net start uxsms and hit enter again.
- Aero should now be on and you can open Streamlabs OBS again. Refer to this screenshot to ensure that it is on: https://prnt.sc/nhhhdp
Streamlabs Desktop randomly crashes during streaming
- Update your video drivers and other hardware drivers/software.
- Install Windows C++ Redistributable
- Try running Streamlabs Desktop as administrator.
- Disable 3rd party in-game overlays
Streamlabs Desktop crashes when switching scene collections when using a stinger transition
This is due to Streamlabs Desktop trying to fire a stinger transition when switching scene collections. This happens if the scene collections were originally duplicated at some point. We have two solutions here until it is fixed.
- Delete the scene collection that was duplicated and set it up fresh. You can copy and paste your sources just make sure you do not use the duplicate scene collection option.
- If you do not want to do the first option you can disable the stinger transition in the meantime which will stop the crash occuring.
Stream goes offline when switching scenes (0kbps bug)
If you are still experiencing the issue where the encoder fails when switching scenes you will need to open the transition menu and add a new transition of any type. Once you have done this simply deleting the previous transition should resolve the issue.
Gif of how to do this:
Game crashes or drops FPS while trying to capture with Streamlabs Desktop
In some cases using 3rd party in-game overlays could cause additional FPS drop or instabilities, especially when you have multiple. If you ever encounter any issues, try disabling them and see if that would increase your performance or stability. A few examples of 3rd party software providing in-game overlays that you can disable if needed;
- Nvidia GeForce Experience In-Game Overlay
- Settings (top-right gear icon) -> General -> In-Game Overlay switch.
- Discord In-Game Overlay
- User Settings (bottom-left gear icon) -> Overlay -> Enable in-game overlay switch.
- Steam/UPlay/Origin In-Game Overlay
If you are using Windows 10, make sure that in Windows Settings you have disabled at least the Game DVR feature, and you can also try to disable the Game Bar features but this can cause issues with certain Windows Store games and applications if they are using this. You can find these options via the Windows 10 new settings panel -> Gaming.
Furthermore, try to limit the frames output by the GPU with the likes of V-Sync, G-Sync or Free-sync to the monitors refresh rate, as rendering more frames is a waste of resources if this is causing issues while capturing the game. You could even play and limit the games to 120FPS by using 120Hz as monitor refresh rate, as this is a nice number to be divided to 30 and 60fps for streaming!
If you do encounter issues while having G-Sync enabled, try disabling G-Sync first to see if that helps and keep it disabled for further troubleshooting the issue.
Capture Not Working (Black Screen)
-
Delete the capture source, restart Streamlabs Desktop as administrator, and re-add source.
- Right click the shortcut on your desktop and select
Run as Administrator.
- Right click the shortcut on your desktop and select
-
Have Streamlabs Desktop installed in Program Files (default install location).
- Some games and Windows Store games, like Sea of Thieves, need this due to given additional permissions.
-
Use
Capture Specific WindoworCapture foreground window with hotkeyto force the capture to the game. -
Try toggling the Anti-cheat hook on or off.
-
Disable 3rd party in-game overlays
-
Install Visual C++ Redistributable
-
Have updated drivers and software
-
If that did not help, adjust in-game settings to borderless fullscreen instead of (exclusive) fullscreen if used or try a window capture then instead (while using borderless fullscreen). Some games are also impossible to capture with a game capture.
Display capture not working for Nvidia notebook users
First disable Force GPU as render device in Settings > Advanced (Video section) https://prnt.sc/mzzm1s and restart Streamlabs Desktop. If that does not resolve the display capture issue then also do the following;
- Have Streamlabs Desktop shortcut on your desktop, if not add it.
- Right-click the
Streamlabs Desktopshortcut and selectRun with graphics processor -> Integrated graphics.- https://prnt.sc/kwyv9x
If you cannot find the option Run with graphics processor in the context menu then follow the following extra steps.
- Open up the
Nvidia Control Panel.- Normally found by right-clicking on the desktop if added to the context menu.
- Can be found in the system
Control Panel -> Appearance and Personalization.
- Select
Desktopin the menu bar. - Enable
Add "Run with graphics processor" to Context Menuoption.
If you receive an error saying you do not have the privilege to select the graphics processor in this menu: Right click Streamlabs Desktop > Properties > Compatability > Untick «Always run as admin» > http://prntscr.com/kzh8as
AMD/ATI Notebeook users with latest Windows 10 April 2018 (1803) update
First disable Force GPU as render device in Settings > Advanced (Video section) https://prnt.sc/mzzm1s and restart Streamlabs OBS. If that does not resolve the display capture issue then also do the following;
- Open Windows 10 settings
- Select
System - Select
Graphic settings(found at the bottom of the Display settings page).- This is in the
Displaysettings that should be selected by default.
- This is in the
- Select
Classic appand browse to the Streamlabs OBS executable.- Default location:
C:Program FilesStreamlabs OBS>Streamlabs OBS.exe
- Default location:
- Select the newly created Streamlabs Desktop and hit options.
- Select
Power Saving Modeand Save.
Force Streamlabs Desktop To Use AMD Graphics Card
Open the AMD Catalyst Control Center app by right-clicking on an empty area on your desktop. Select ‘Catalyst Control Center’ from the context menu. From the list of panels on the left, select ‘Power’. Under ‘Power’, select ‘Switchable application graphics settings’.
Here you will see a list of apps that AMD already recognizes as needing better GPU support. On this panel is an ‘Add Application’ button. Click it and select the EXE of the app you want to force to use the AMD graphics card.
After you add the application, open the dropdown next to it for setting graphics options. Select ‘High performance’ and you’re done. The app will always use AMD graphics card.
We should mention that some options may differ depending on your driver version and the GPU model you have. These solutions will still work but the options may be found under a different menu.
Not capturing desktop audio
-
Make sure the audio source is not muted in the mixer on Streamlabs Desktop.
-
Some audio management software, like
Nahimic 2,Sonic studio soundor motherboard audio software likeRealtek HD Audio ManagerorSound Blaster Reconare known to cause issues. Try closing that kind of software, and also check Windows taskmanager if any processes with a similar name are running to be closed. If this doesn’t work, try going in to your Windows Playback Devices in your Windows Audio Settings, right click on the sound device you are using and click on Properties, then go to the Advanced Tab and uncheck the box that says «Give exclusive mode applications priority» and that should resolve it. -
Select manually the desktop audio device (audio settings), you use as default device in Windows Sound, not setting it to default. Alternatively you can set it to disabled and add in the scene you want desktop audio an
Audio Output Captureand select the device that is set as default device in Windows Sound. -
Install Windows C++ Redistributable
-
As last resort, you can temporary use an alternative program to capture audio like
VoiceMeeter Banana. This program allows you to set it as default device, and then use a virtual audio cable into Streamlabs Desktop to capture the desktop audio. You can find various guides on the internet and YouTube.
Not going live on the service
- Log out from Streamlabs Desktop, restart the application as administrator and log back in. If using Twitch ensure your not running a rerun of a previous stream as this will prevent you going live. If you are simply end it and hit go live again.
- Double check your stream key if this is still correct.
- If using Advanced Output Mode and using NVENC/AMD make sure GPU is set to
0. - Install Windows C++ Redistributable
- If signed into Streamlabs Desktop with Twitch you can run the auto-optimizer found in General Settings.
If this did not work either or get the following error;
Invalid Path or Connection URL. Please check your settings to confirm that they are valid.
- Go to
Streamin Settings and select a different service than you want to use. - Select the streaming service you want to use again, this reloads the available servers.
- Select the server you want to use (do not use auto)
- Try going live again.
If this did not work either or get the following error;
Failed to connect to the streaming server. Please check your internet connection.
- Go to Settings > Advanced and scroll down to the Bind to IP option. Change it from Default to your local machines.
- Default local IP address begin with 192.168.x.x or 10.0.x.x
- You can use
ipconfig /allin command prompt (cmd.exe) to see to PC’s local IP address.
- Try going live again.
If none of these steps work, reach out to our support team in our discord discord.gg/stream
Recording is not working or saved
No errors, but no recording file created.
- Install Windows C++ Redistributable
- Have up-to-date video drivers of your graphics card
Error; An unexpected error occured:
- Install Windows C++ Redistributable
Error; An unexpected error occurred: Unable to write to. Make sure you’re using a recording path which your user account is allowed and that there is sufficient disk space.
Recording + Streaming Performance Issues
If you have performance issues while streaming and recording, check if you are not using twice of the same encoder, like x264 or NVENC for both streaming and recording. For best performance use either x264 or NVENC/AMD for streaming and then record ‘same as stream’ (only available in simple output mode at the moment). For better quality recordings and having enough system resources, use x264 as stream encoder and NVENC/AMD as recording encoder.
Modifier Keys and Mouse Buttons as Hotkey
Mouse bindings and certain modifier keys are not yet supported to be used as hotkey.
Razer Ripsaw & Avermedia LGP
For the Razer Ripsaw, try to select HDMI + Aux as audio input for the HDMI video input which you can find via configure device. If this does not work, try the following down below;
High CPU usage in Idle
Ensure that you have updated Windows 10 to it’s latest patch.
- Make sure all drivers are up-to-date and are matching 64-bit versions of your system.
- Almost every source you use, uses CPU to be functioning properly. The more you have the higher the total CPU usage would be.
- Downloaded animated overlays can cause high CPU usage due to the webm video files used as overlays.
- Using many different browser sources can cause high CPU usage, try limiting them or create references.
- You can delete Streamlabs Desktop browser source cache that can cause high CPU usage;
- Navigate (or winlogo + r) in Windows to
%appdata%slobs-clientplugin_configobs-browser - Delete
Cache - Start Streamlabs Desktop again
- Navigate (or winlogo + r) in Windows to
Enabling Performance mode in Streamlabs Desktop will help reduce load on the GPU/CPU slightly. This can be done by right clicking on the preview and selecting «Performance Mode»
I cannot find the side-dock with chat
The side-dock with chat can only be shown when the total width of Streamlabs Desktop is 1100px or greater. So monitors that have a horizontal resolution less than that (or you are using portrait, causing this) chat is currently unavailable. If the total width of Streamlabs OBS does meet this criteria you’ll see a thin bar either on the left or right (depending on your appearance settings) to slide open the dock.
Set side-dock with the chat to left side
In Settings > Appearance you can checkmark Show the live dock (chat) on the left side.
Stream is losing frames
These issues are most likely caused by overloading either the GPU and CPU. At all times keep and eye out for both the total CPU and GPU usage in Windows task manager (if you do not have GPU in Windows 10, update to the latest major update). Some games are known to be broken and like to use all available CPU or GPU resources and cause issues for streaming software.
- Lagged Frames; Compositor overloaded, commonly high GPU usage.
- Skipped Frames; Encoder overloaded, commonly high CPU usage on x264.
- Dropped Frames; Network issues, try other servers or restart equipment.
By default ‘Detect lagged frames’ notification is disabled by Streamlabs OBS. For troubleshooting please enable this via
Settings -> Notificationsand set the thresholds of the three to 10%.
Lagged frames
IF you are getting lagged frames or the game is having slow FPS then your GPU is being overloaded. Lower the graphics quality in-game so streaming software gets more breathing room to compose the frames for the encoder. You can also limit the FPS or use v-sync. One could even consider locking to 120FPS as this is a nice /2 division for 60FPS and /4 division for 30FPS streaming. You can also enable V-sync to lock the FPS if availble. If you are using G-Sync you can try disabling this and see if that would help.
In addition you can try the following few steps as well to further optimize your system for streaming.
Regardless of software or hardware encoding selection, streaming software requires shared GPU to compose the frames (combine sources) for the encoder to encode.
Skipped frames
If you are using software (x264) encoding and are running into high CPU usage issues, causing skipped frames, consider using a faster preset or start using hardware encoding (NVENC/AMD) as that wont load the CPU extra to encode the stream.
Dropped frames
If you are having dropped frames this is most likely the network/internet connection to the selected server. Try selecting the closest Twitch server manually (not auto), and if already done so, try another (like 2nd closest) server. You can also try to restart your local network gear (modem, router, and switches) and see if that helps.
In addition to the dropped frames, make also sure the video + audio bitrate is not exceeding or is getting close to your internet upload speed. Having other users on same network using upload (like cloud storage) will lower the throughput of the upload.
If you are using Twitch you can test various Twitch servers with this with this tool, as your ISP routing can be messed up as well.
StreamLabs продолжает обслуживать постоянно растущее число стримеров по всему миру. Это бесплатное программное обеспечение является одной из самых простых потоковых платформ, которые интегрируют программное обеспечение Open Broadcaster (OBS). Обычно StreamLabs работает без каких-либо осложнений. Но иногда вы можете увидеть это сообщение об ошибке «Ошибка получения информации о вашем канале» при запуске трансляции. Вы не сможете транслировать дальше, если не решите проблему самостоятельно.
Обходные пути –
1. Проверьте настройки подключения в вашей системе.
2. Закройте StreamLabs и снова запустите его.
Сначала попробуйте выйти из StreamLabs, а затем снова войти в него.
[NOTE – You have to use your browser to enact this solution, not the StreamLabs. ]
Шаг 1 – Отключить
1. Прежде всего, откройте браузер.
2. Затем перейдите на Twitch.TV и войдите в систему с той же учетной записью, которая связана с StreamLabs.
3. Просто нажмите «Войти», чтобы войти в Twitch.
4. После входа в Twitch нажмите на значок шестеренки в правом верхнем углу.
5. Щелкните значок «Настройки».
6. Теперь перейдите на вкладку «Подключения».
7. Здесь вы заметите все связи. Прокрутите вниз до вкладки «Другие подключения».
8. Вы заметите здесь «StreamLabs». Нажмите «Отключить», чтобы отключить StreamLabs от Twitch.
9. Наконец, нажмите «Да, отключить», чтобы отключить StreamLabs.
ШАГ 2 – ПОВТОРНОЕ ПОДКЛЮЧЕНИЕ
Теперь вам нужно повторно подключить StreamLabs к сервису Twitch.
1. Поскольку вы отключились от Twitch, StreamLabs должен автоматически отключиться от Twitch.
2. Нажмите «Войти», чтобы войти в StreamLabs.
3. Затем выберите значок «Twitch» из доступных вариантов входа.
4. Введите свои учетные данные Twitch и войдите в свою учетную запись. Нажмите «Авторизовать», чтобы авторизовать настройку учетной записи и завершить процесс.
Теперь попробуйте выполнить потоковую передачу еще раз. Вы больше не увидите раздражающее сообщение об ошибке.
[NOTE – We have explained the process with Twitch. This method is the same and efficient for other log-in options (like – YouTube, Mixer, etc.).]
Исправление 2. Запустите StreamLabs от имени администратора.
Попробуйте запустить StreamLabs от имени администратора.
1. Перейдите на рабочий стол.
2. Затем щелкните правой кнопкой мыши «StreamLabs» и выберите «Запуск от имени администратора», чтобы запустить его с правами администратора.
Попробуйте стримить и проверить дальше.
Исправление 3 — изменить язык StremLabs
Некоторые пользователи решили эту проблему странным решением.
1. Откройте StreamLabs на своем компьютере.
2. Затем щелкните значок настроек в виде шестеренки слева, чтобы открыть настройки.
3. В окне «Настройки» перейдите на вкладку «Общие» с левой стороны.
4. После этого щелкните раскрывающийся список «Язык» и выберите любой язык, кроме языка, который в данный момент использует StreamLabs (обычно английский язык является языком по умолчанию).
(Пример — просто для примера мы переключили его на «Deutsch».)
5. Теперь вам будет предложено перезапустить приложение, нажмите «Да».
Дождитесь запуска StreamLabs.
6. Снова щелкните значок шестеренки в левом углу.
7. Как и раньше, нажмите на первую опцию (это «Общие» настройки независимо от языка) на левой панели экрана настроек.
8. С правой стороны вы увидите только одну раскрывающуюся опцию (это «Язык»). Нажмите на него и выберите «Английский».
9. Наконец, нажмите на первый вариант подсказки, чтобы подтвердить перезапуск.
Как только StreamLabs появится на вашем компьютере, попробуйте запустить новый поток.
Исправление 4 — удалить файл frontend.dll
Одной из причин этой ошибки может быть повреждение файлов frontend.dll в каталоге StreamLabs.
1. Откройте окно Проводника.
2. Затем перейдите в это место —
C:Program FilesStreamlabs OBSresourcesapp.asar.unpackednode_modulesobs-studio-nodeobs-pluginsbit
[If you have installed the StreamLabs on your computer, go to that location instead.]
3. Здесь попробуйте найти файл «frontend-tools.dll».
4. Затем щелкните правой кнопкой мыши конкретный файл и нажмите «Удалить», чтобы удалить файл dll с вашего компьютера.
После того, как вы удалили определенные файлы DLL, перезагрузите компьютер. Откройте StreamLabs после перезагрузки системы. Попробуйте выполнить потоковую передачу еще раз и проверьте, помогает ли это.
Исправление 4 — привязка к определенному IP
Вы можете привязать StreamLabs к конкретному IP-адресу, на который настроен ваш сетевой адаптер.
ШАГ 1
1. Нажмите клавишу Windows и начните вводить «cmd».
2. Теперь щелкните правой кнопкой мыши «Командная строка» и выберите «Запуск от имени администратора».
3. Чтобы проверить все конфигурации всех сетевых подключений, написать эту команду и нажмите Enter.
ipconfig /all
4. Проверьте, какую сетевую конфигурацию использует ваш компьютер.
5. Теперь внимательно запишите «Адрес IPv4».
Затем закройте окно командной строки.
ШАГ 2 —
1. Откройте StreamLabs на своем компьютере.
2. Затем с левой стороны щелкните значок шестеренки слева.
3. В окне «Настройки» нажмите «Дополнительные» настройки слева.
4. После этого пролистайте правую часть вниз, прокрутите вниз до раздела «Сеть».
5. Теперь щелкните раскрывающийся список «Привязать к IP» и выберите конкретный IP-адрес, который вы отметили в терминале.
6. Наконец, нажмите «Готово», чтобы сохранить изменения.
Это должно помочь вам решить проблему. Проверьте, получается ли это.
Исправление 6 — Используйте оптимизатор
Вы можете использовать встроенный оптимизатор для оптимизации StreamLabs в соответствии со спецификациями вашей системы.
1. Прежде всего откройте оптимизатор на своем компьютере.
2.Затем с левой стороны щелкните значок шестеренки в левом углу.
3. После этого нажмите на «Общие» настройки.
4. Затем нажмите «Автоматическая оптимизация» справа.
5. Чтобы начать процесс оптимизации, просто нажмите «Старт».
Теперь все, что вам нужно сделать, это дождаться, пока оптимизатор оптимизирует StreamLabs в соответствии с доступной пропускной способностью и спецификациями системы.
После этого закройте StreamLabs и снова запустите его.
Затем проверьте, не сталкиваетесь ли вы с проблемой.
Исправление 7 — проверьте правильность ключа потока
Иногда, если ключ потока неверен, вы можете столкнуться с этим сообщением об ошибке.
1. Запустите Twitch из браузера.
2. Войдите в Twitch и щелкните значок своего канала в правом углу.
3. Затем нажмите «Панель инструментов для авторов», чтобы открыть ее.
4. Когда откроется панель инструментов Creator, с левой стороны разверните «Настройки» и нажмите «Поток».
5. На правой панели вы увидите «Основной ключ потока». Нажмите «Копировать», чтобы скопировать первичный ключ потока оттуда.
После того, как вы скопировали первичный ключ трансляции, закройте Twitch.
6. После этого откройте StreamLabs в своей системе.
7. Снова нажмите на шестеренку, чтобы открыть панель настроек.
8. В окне «Настройки» нажмите «Поток» слева.
9. После этого справа нажмите «Stream to custom ingest».
10. Затем вам нужно вставить скопированный ключ потока в специальное поле «Ключ потока».
11. Наконец, нажмите «Готово», чтобы завершить процесс.
Это должно было решить вашу проблему с StreamLabs.
Исправление 8 — Загрузите и установите Visual C++ Redist 2017
1. Нажмите на это ссылка на сайт посетить страницу загрузки Распространяемый компонент Visual C++ для Visual Studio 2017.
2.Здесь, в соответствии со спецификациями вашей системы, нажмите на определенные ссылки.
Для 64-битных систем — затем нажмите «vc_redist.x64.exe».
Для 32-разрядных систем — затем нажмите «vc_redist.x86.exe».
Для систем ARM64 — нажмите «vc_redist.arm64.exe».
Через несколько секунд процесс загрузки будет завершен.
Закройте окно браузера.
3. После этого двойной щелчок на «vcredist.exe».
6. Нажмите «Выполнить», когда ‘Вы хотите запустить этот файл?‘ появляется подсказка.
7. Примите условия. Нажмите «Установить», чтобы начать процесс установки.
8. Процесс установки будет завершен в течение минуты.
9. Когда вы видите ‘Установка прошла успешноНа экране появилось сообщение, нажмите «Перезагрузить», чтобы перезагрузить компьютер.
После перезагрузки компьютера проверьте, работает ли это.
Исправление 9. Удалите и переустановите StreamLabs.
Если у вас пока ничего не получилось, попробуйте удалить и установить StreamLabs.
1. Сначала щелкните правой кнопкой мыши значок Windows и выберите «Выполнить».
2. Введите эту команду запуска и нажмите Enter.
appwiz.cpl
3. Когда программа и компоненты откроются, прокрутите вниз, чтобы найти приложение «StreamLabs».
4. Затем щелкните правой кнопкой мыши «StreamLabs» и выберите «Удалить».
Затем следуйте инструкциям на экране, чтобы удалить StreamLabs с вашего компьютера.
5. Закончив удаление приложения, нажмите «Готово».
Перезагрузите компьютер. После перезагрузки системы выполните следующие действия, чтобы установить последнюю версию StreamLabs.
6. Первым делом заходим в СтримЛабс сайт.
7. Затем нажмите «Загрузить», чтобы загрузить StreamLabs.
8. После этого щелкните правой кнопкой мыши «Настройка StreamLabs» и выберите «Запуск от имени администратора».
Завершите процесс установки. Откройте StreamLabs и войдите в систему, используя свои учетные данные.
Ваша проблема должна быть решена.