Практически все параметры Sublime Text настраиваются вручную через файлы конфигурации. Это не самый удобный способ на свете, но зато очень гибкий. При желании, например, можно задать настройки для конкретного типа файлов или для отдельного проекта.
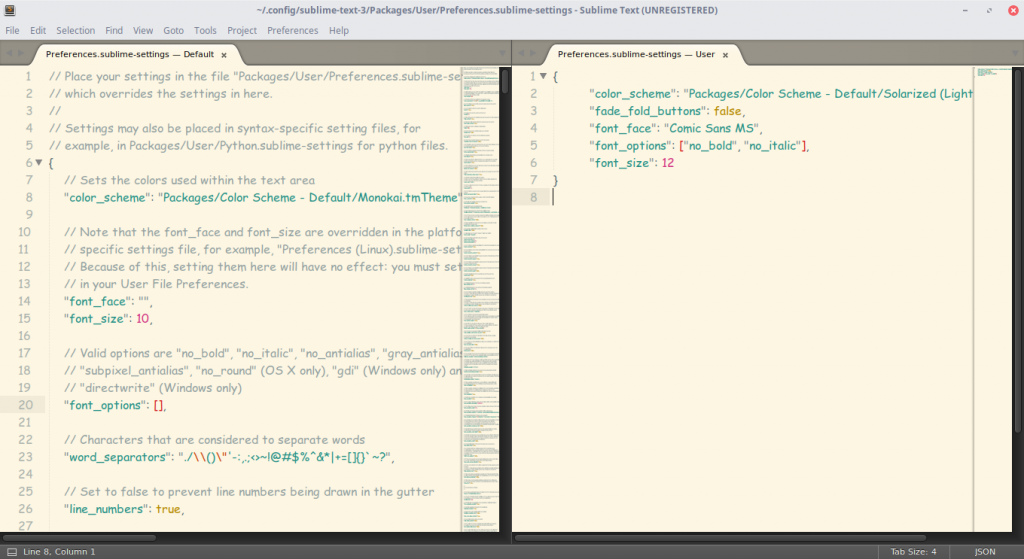
Для того, чтобы увидеть все доступные параметры, выберите пункт меню . В окне редактора откроется файл, который физически располагается тут: Packages/Default/Preferences.sublime-settings. Редактировать значения в нем крайне нежелательно, так как при следующем обновлении они скорее всего будут перезаписаны.
Основные настройки
Если вы хотите изменить какой-либо из параметров, откройте пользовательский файл настроек и скопируйте в него необходимый параметр. Например:
{
«tab_size»: 4,
«translate_tabs_to_spaces»: false
}
Отдельные настройки для каждого языка
Кроме этого, можно задать специфичные настройки для каждого языка. Откройте какой-нибудь файл для редактирования, а затем выберите пункт меню . Редактор сам создаст нужный файл настроек. Таким образом, например, можно задать цветовую схему для каждого типа файлов.

Настройки для проектов
Если вы используете проекты, то для них тоже можно переопределить некоторые параметры.
Подробнее на странице описания работы с проектами.
Настройка отвлеченного режима
Настройки отвлеченного режима из меню .
Параметры и горячие клавиши
Большинство опций, доступных в меню, переключаются сочетанием горячих клавиш. Но если нужный вам параметр такового не имеет, его можно задать самому. Для этого используется команда toggle_setting. Выберите пункт меню . Вставьте, например, следующий код:
[
{
«keys»: [«alt+w»],
«command»: «toggle_setting»,
«args»:
{
«setting»: «word_wrap»
}
}
]
Теперь, в текущем файле, при кажом нажатии altw будет включаться или отключаться перенос слов.
Если необходимо задать параметр со значением, используйте команду set_setting. Вставьте, например, следующий код:
[
{
«keys»: [«ctrl+k», «ctrl+c»],
«command»: «set_setting»,
«args»:
{
«setting»: «color_scheme»,
«value»: «Packages/Color Scheme — Default/Cobalt.tmTheme»
}
}
]
Теперь, при последовательном нажатии двух сочетаний клавиш ctrlk, ctrlc в текущем файле подсветка синтаксиса переключится на тему Cobalt.
Приоритет файлов настроек
При конфигурации редактора следует иметь ввиду порядок, в котором файлы настроек переопределяют друг друга:
- Packages/Default/Preferences.sublime-settings
- Packages/Default/Preferences (<platform>).sublime-settings
- Packages/User/Preferences.sublime-settings
- <Project Settings>
- Packages/<syntax>/<syntax>.sublime-settings
- Packages/User/<syntax>.sublime-settings
- <Buffer Specific Settings>
Решение проблем
Так как одни и те же настройки могут быть заданы в различных местах, бывает полезно определить, какое значение имеет тот или иной параметр в текущем файле. Например, для параметра font_face, откройте консоль и наберите:
view.settings().get(‘font_face’)
Привет, друзья! По многочисленным просьбам обновил руководство по быстрой настройке редактора кода Sublime Text 3, установке необходимых для верстки плагинов и создании своего пресета настроек для быстрого старта на новом рабочем месте.

Вам наверняка знакома ситуация, когда на новом рабочем месте необходимо быстро установить и настроить Sublime Text для работы над новыми проектами. Как правило, тонкая настройка Sublime Text занимает много времени и выполнять ее каждый раз не практично и долго.
Сегодня мы рассмотрим максимально быструю настройку Sublime Text, самые популярные среди верстальщиков плагины для ускорения верски и установим одну из лучших и комфортных тем оформления редактора One Dark Material Theme.
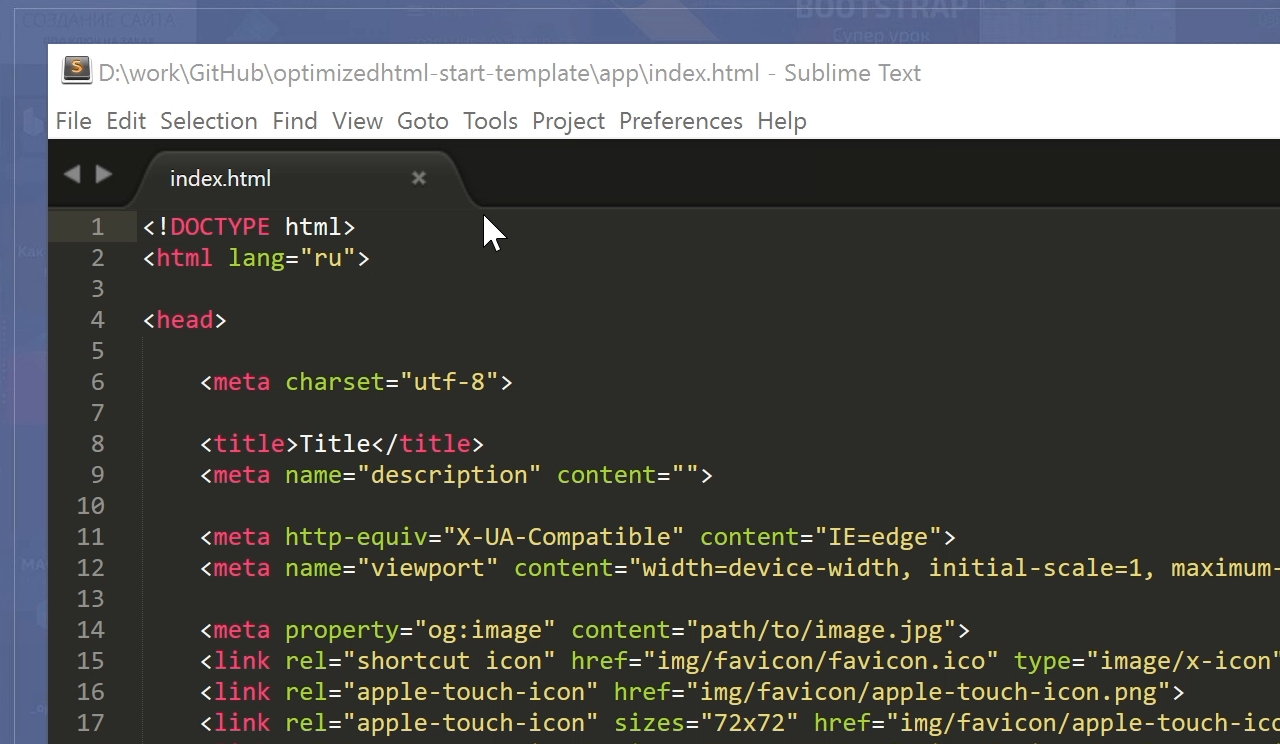
По умолчанию Sublime Text выглядит довольно печально:
Установка Package Control в Sublime Text
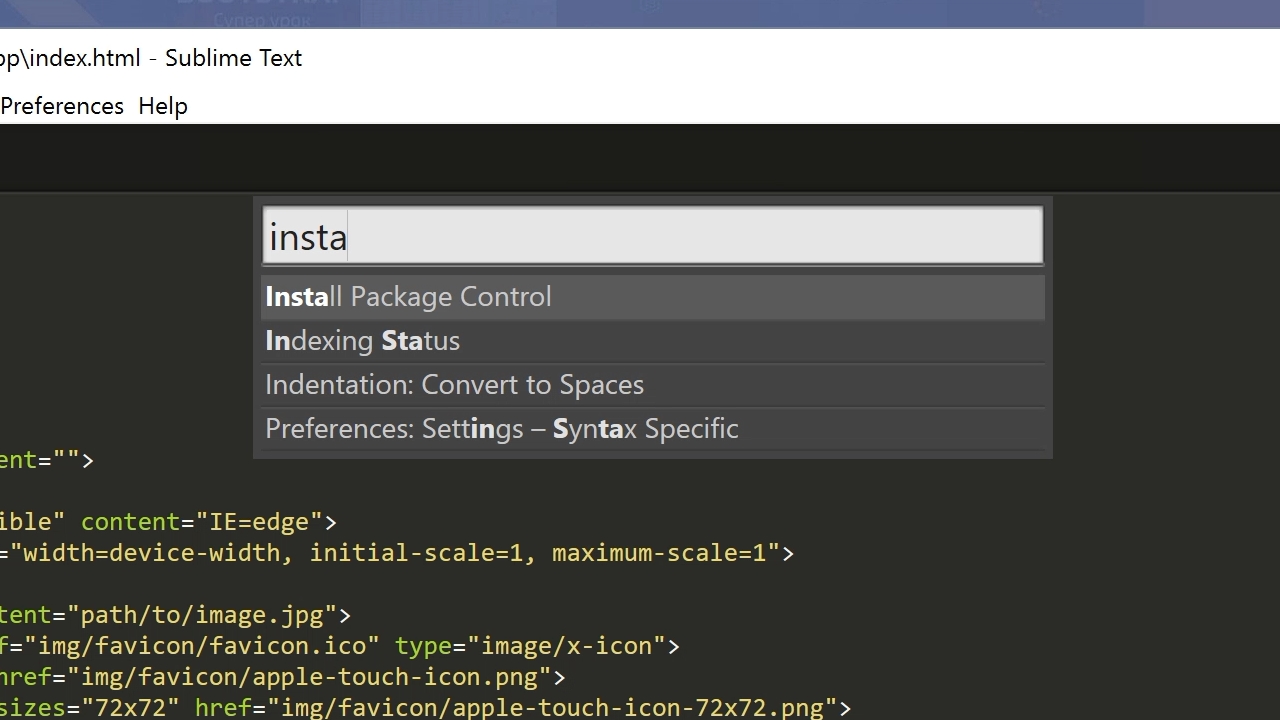
Для начала необходимо настроить Package Control. Для этого нажимаем хоткей Ctrl+Shift+P. Во всплывающем окне набираем Install Package Control и выбираем соответствующий пунк. Через несколько секунд Package Control будет установлен, о чем вы получите соответствующее уведомление.
Если вы пользователь MacOS, необходимо нажать на клавиатуре Cmd+Shift+P.
Package Control необходим для того, чтобы вы могли устанавливать дополнения и плагины в Sublime Text 3 из репозитория пакетов.
Установка плагинов в Sublime Text
Далее необходимо установить нужные для работы плагины. Мы рассмотрим установку самых популярных среди верстальщиков плагины, которые значительно упрощают разработку. Вы также можете поэкспериментировать с другими плагинами в Package Control, может быть вам понравятся и другие из огромного количества доступных пакетов.
Для установки плагинов в Sublime Text через Package Control необходимо вызвать меню, как мы это делали ранее: Ctrl+Shift+P. Затем вводим команду «Install Package» и выбираем нужный пакет из списка.

Самые популярные плагины для Sublime Text:
- Emmet — ускоряет написание HTML и CSS кода до скорости света. Урок по Emmet
- AutoFileName — дополняет код при написании путей до файлов в верстке;
- Gist — подключает в Sublime Text возможность использовать сервис сниппетов кода GitHub Gist. Урок по Gist;
- Sass — плагин для подсветки Sass синтаксиса в Sass и Scss файлах. Раскрывает Emmet в Sass файлах.
- terminus — плагин встроенного терминала Sublime Text.
- W3CValidators — мощный набор валидаторов для HTML разметки, CSS, SVG и т.д.
Установка внешнего оформления Sublime Text
Мне очень нравится тема оформления One Dark Material Theme и подсветка кода соответствующей цветовой гаммой. Это наиболее сбалансированные, достаточно контрастные, но не слишком резкие цвета для комфортной работы в редакторе.
Дя установки цветового оформления One Dark нам необходимо доустановить следующие пакеты через Package Control:
- One Dark Color Scheme — цветовая схема для подсветки кода;
- One Dark Material — Theme — тема оформления UI Sublime Text.
Установка плагина вручную
Некоторые плагины более не обновляются в Package Control или просто там не фигурируют. Кое-какие из этих плагинов имеют жизненную необходимость при работе с кодом и их приходится устанавливать вручную.
Один из таких плагинов BufferScroll — потрясающий плагин, который при повторном открытии документа устанавливает курсор на том месте, на котором вы закончили редактирование в прошлый раз, тем самым сокращая время на поиск нужной позиции для продолжения работы.
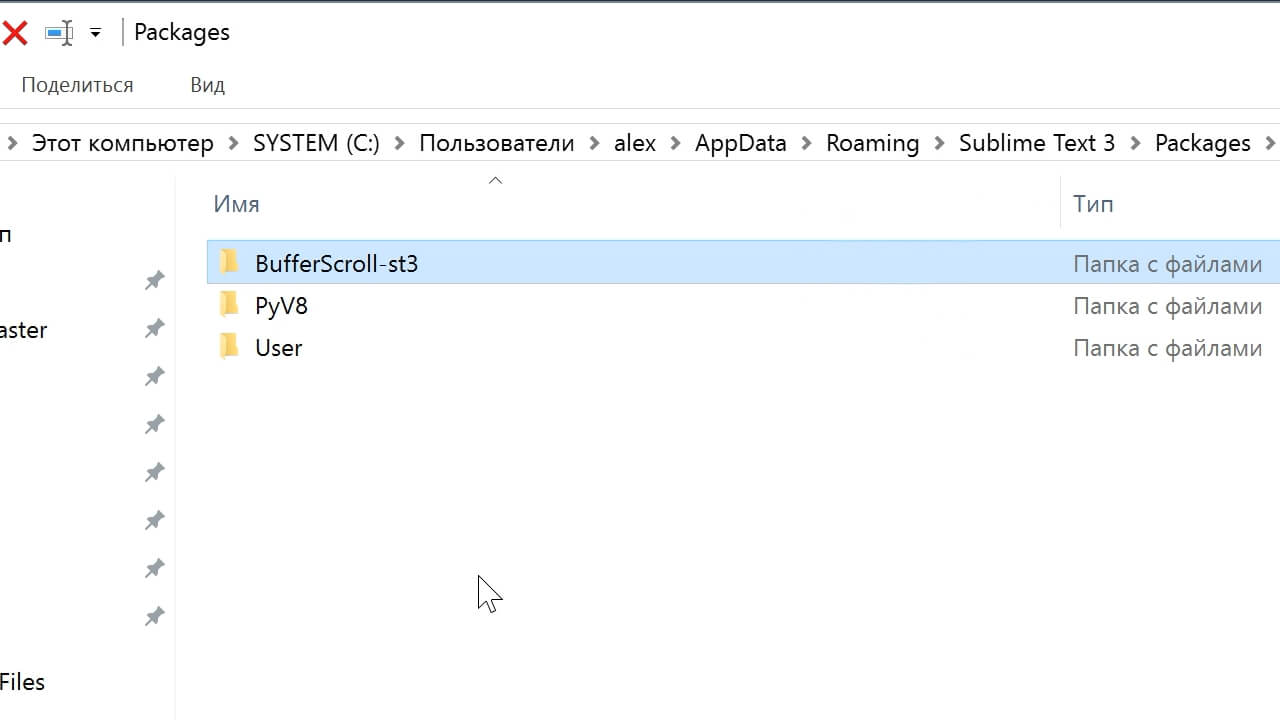
Для установки BufferScroll вручную, скачайте его и распакуйте в любое удобное место на вашем диске. Далее в Sublime Text выбираем пункт меню Preferences > Browse Packeges. Откроется папка пользовательских данных на вашем диске. Скопируйте сюда папку, содержащую файлы Buffer Scroll и перезапуститие Sublime Text. Теперь плагин работает.

Тонкая настройка редактора, пресет моих настроек
Переходим к настройкам Sublime Text.
Предтавляю мой пресет настроек, который я всегда использую для стартовой настройки редактора Sublime Text на новом рабочем месте или после переустановки системы. Вы можете использовать данный пресет в вашем редакторе и кастомизировать его при необходимости:
Keymap (Windows Users):
[
{ "keys": ["alt+shift+f"], "command": "reindent" },
]
Settings:
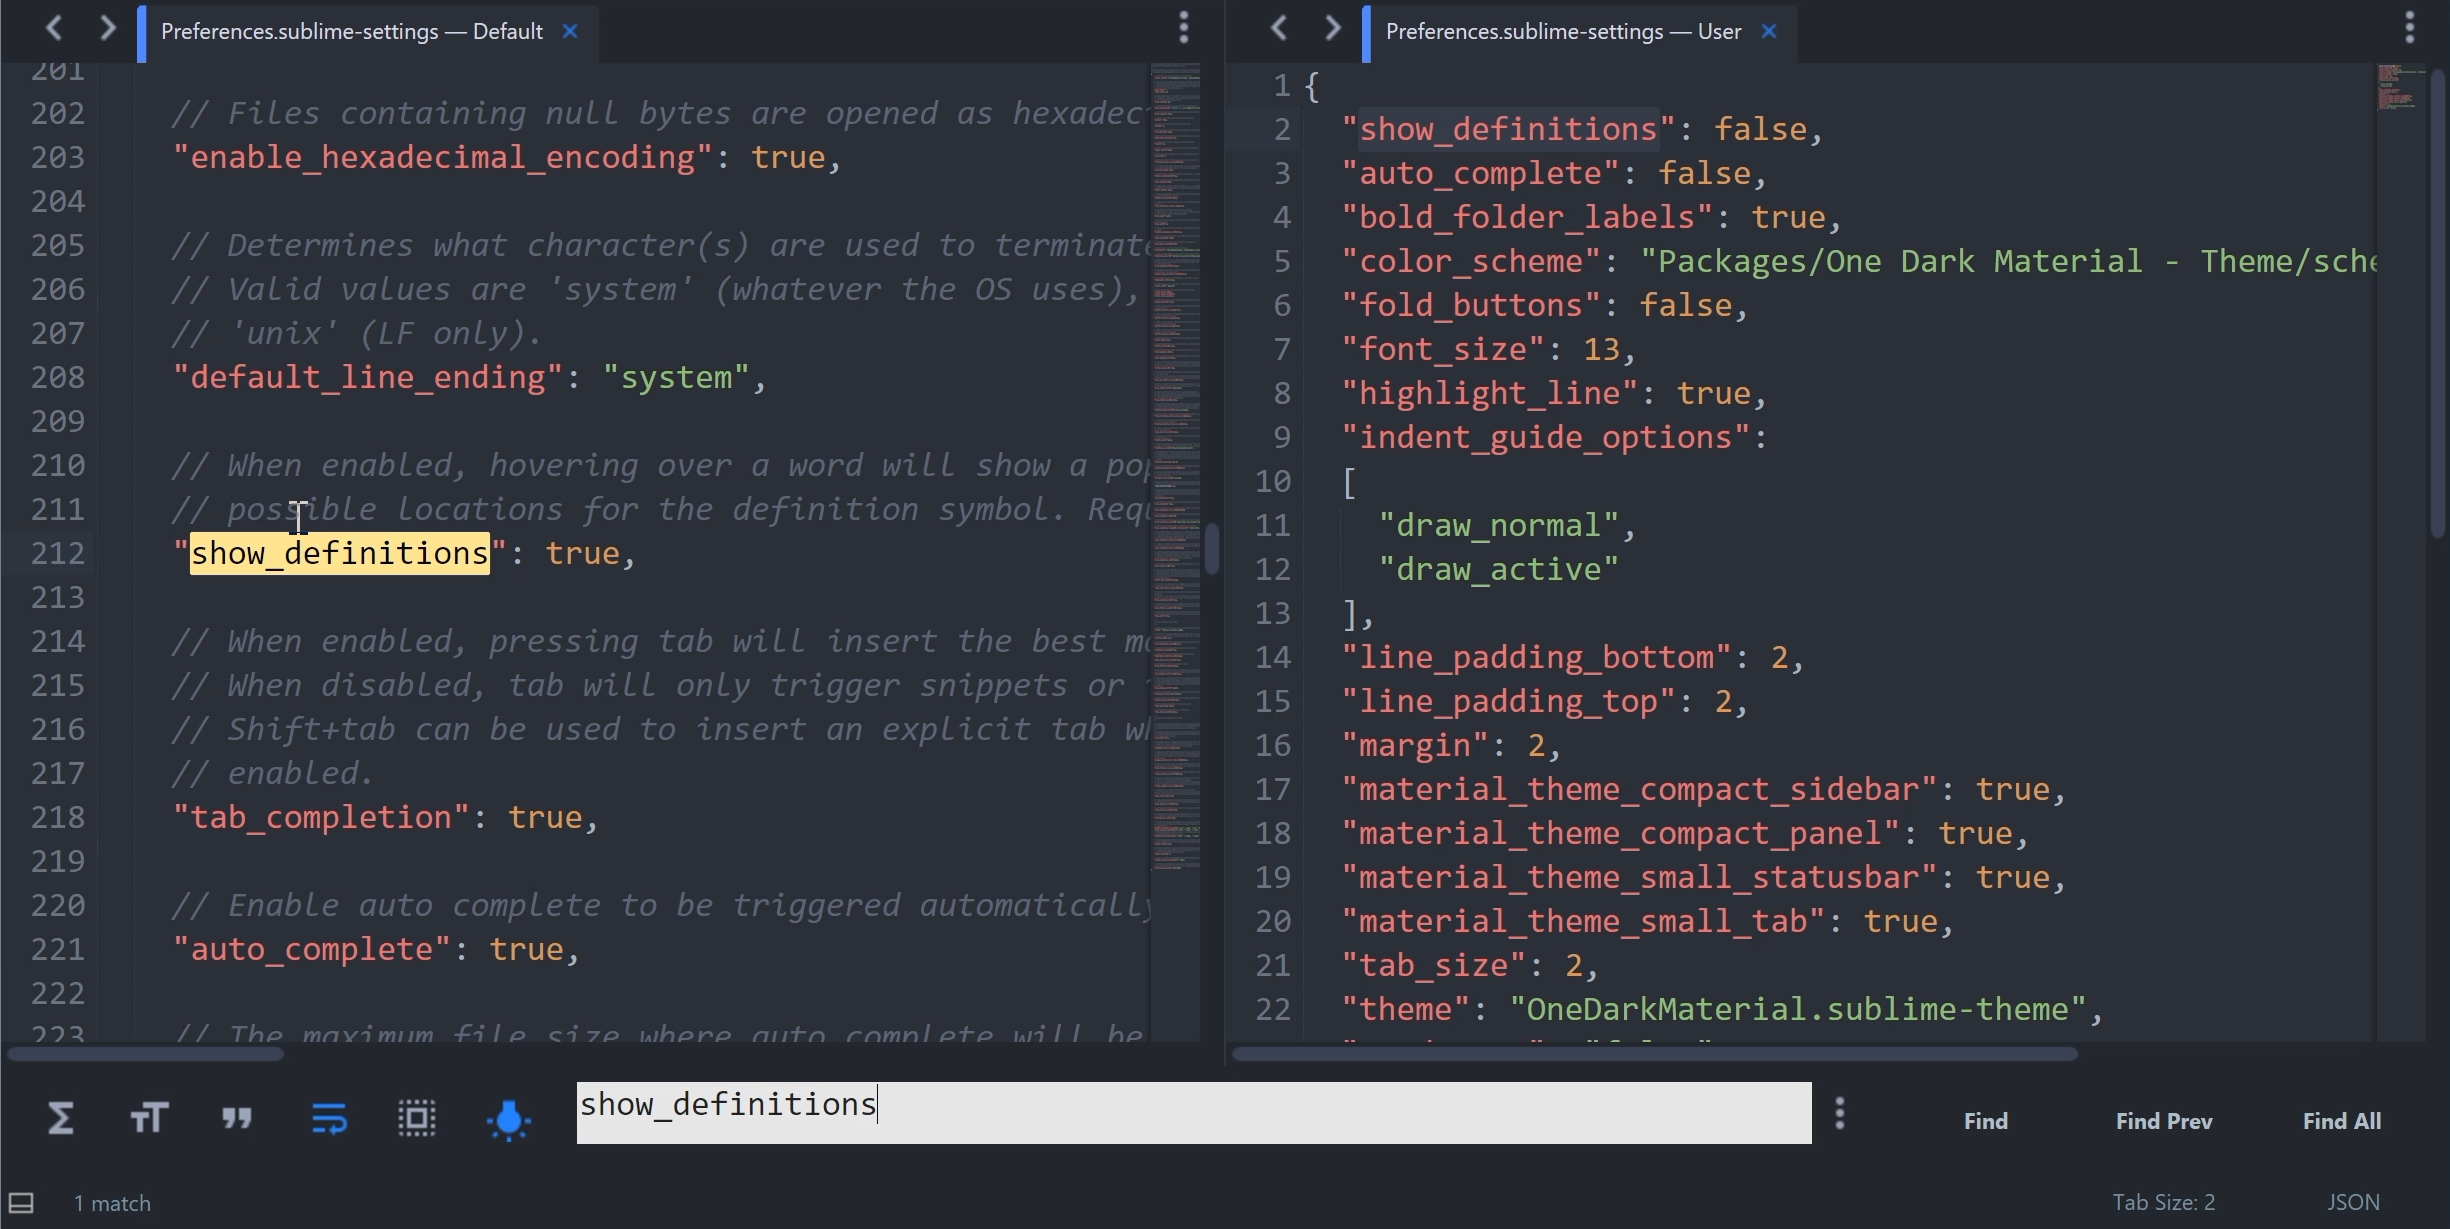
{
"show_definitions": false,
"auto_complete": false,
"bold_folder_labels": true,
"color_scheme": "Packages/One Dark Material - Theme/schemes/OneDark.tmTheme",
"fold_buttons": false,
"font_size": 13,
"highlight_line": true,
"indent_guide_options":
[
"draw_normal",
"draw_active"
],
"line_padding_bottom": 2,
"line_padding_top": 2,
"margin": 2,
"material_theme_compact_sidebar": true,
"material_theme_compact_panel": true,
"material_theme_small_statusbar": true,
"material_theme_small_tab": true,
"tab_size": 2,
"theme": "OneDarkMaterial.sublime-theme",
"word_wrap": "false",
}
Код пресета для пользовательских настроек (Preferences.sublime-settings | Preferences > Settings) — отдельно:
{
	"show_definitions": false,
	"auto_complete": false,
	"bold_folder_labels": true,
	"color_scheme": "Packages/One Dark Material - Theme/schemes/OneDark.tmTheme",
	"fold_buttons": false,
	"font_size": 13,
	"highlight_line": true,
	"indent_guide_options":
	[
		"draw_normal",
		"draw_active"
	],
	"line_padding_bottom": 2,
	"line_padding_top": 2,
	"margin": 2,
	"material_theme_compact_sidebar": true,
	"material_theme_compact_panel": true,
	"material_theme_small_statusbar": true,
	"material_theme_small_tab": true,
	"tab_size": 2,
	"theme": "OneDarkMaterial.sublime-theme",
	"word_wrap": "false",
}
Код пресета для пользовательских клавиатурных сокращений (Default (Windows).sublime-keymap | Preferences > Key Bindings) — отдельно:
[
	{ "keys": ["alt+shift+f"], "command": "reindent" },
]
Теперь при выделении и по нажатию Alt+Shift+F ваш код будет автоматически выравниваться отступами с соответствующей иерархией вложенности элементов.
Разместив данные сниппеты в соответствующих файлах настроек вы получите полностью готовый к рабое, настроенный Sublime Text или можете настроить редактор под себя. В настройках есть два поля — левое с дефолтными настройками и правое с пользовательскими. В дефолтных настройках вы можете увидеть подсказки к каждому свойству и применить его в правой части скопировав и установив свое значение.
Узнать какое свойство за что отвечает довольно просто — все свойства имеют интуитивно понятные наименования на английском языке. Любое свойство из большого обилия доступных настроек можно просто перевести на русский язык и понять, что оно означает.
Для того, чтобы сделать бэкап всех ваших настроек и быстро развернуть Sublime Text на другом рабочем месте, достаточно скопировать папку
«C:Users{Ваш пользователь}AppDataRoamingSublime Text 3»
в потаенное резервное место на вашем диске или на флешку, а затем разместить у другого юзера или на другом компьютере в этой-же директории под пользователем.
Также дополнительно на ваше усмотрение можно отключить миникарту справа и скрыть меню. Это можно сделать перейдя в меню View > Hide Minimap и View > Hide Menu. Показать меню можно нажатием клавишы Ctrl на клавиатуре.
Премиум уроки от WebDesign Master
Другие уроки по теме «Инструменты»
- Настройка VS Code для верстки
- Simple Starter — простой стартер для верстки | Материалы урока
- Windows 11: Делаем вкладки в проводнике. Настройка QTTabBar от А до Я
- Хостинг от А до Я: Сайты, базы, домены, SSL, SSH, sFTP, перенос, деплой, секреты, лайфхаки
- Gulp 4 — Актуальное и исчерпывающее руководство для самых маленьких
- Актуальный способ установки и настройки окружения Windows WSL 2 (Windows Subsystem for Linux)
Sublime Text 3 — один из самых распространенных текстовых редакторов для программистов. Он предоставляет своим пользователям уникальные возможности, которых нет больше нигде. Одни из самых главных достоинств — кроссплатформенность и расширяемость.
Здесь можно настроить все — от внешнего вида до компонентов программы (плагинов). Но и уровень настройки у Sublime Text соответствующий — как редактор для программистов, он настраивается через исходный код, что под силу не каждому. В этой статье мы рассмотрим как выполняется настройка Sublime Text 3.

Для Sublime Text с первых же версий возможности были гораздо выше, чем у других редакторов. Шутка ли — полностью настраиваемый интерфейс, возможность настроить поведение программы, а не просто вводить текст? Что уж говорить о плагинах — код, написанный на Python, позволяет пользователю управлять редактором так, как укротитель змей, играя на магической дудочке, заставляет гигантского удава трепетать перед ним. Однако, как бы нам ни было жаль, именно это и отпугивает новичков — будучи не в состоянии настроить редактор, они перестают им пользоваться.
Настройка Sublime Text 3
Сначала поговорим про внешний вид, а затем перейдем к настройке горячих клавиш и плагинов.
1. Внешний вид Sublime Text
Итак, пора запустить Sublime Text (статья про установку — тут). Многим дизайн программы нравится, другим же — нет. И сейчас перед вами встает уникальная возможность поменять интерфейс до неузнаваемости!
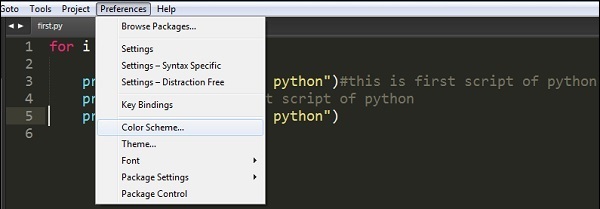
Самый простой с виду способ — выбрать тему через настройки. Для этого идем в меню «Preferences» -> «Color Scheme» и выбираем нужную вам тему. Но это способ лишь поменяет расцветку редактора, и ничего более.

Другой, более сложный, но верный вариант — разобраться с файлом настроек. Чтобы открыть его, перейдите в меню «Preferences» -> «Settings». И вот, перед вами не что иное, как громада текста. Но не все так сложно, как кажется! Слева — настройки по умолчанию, их трогать не надо. Их можно взять за пример. А вот справа нужно разместить свои настройки — взять, скопировать нужную строку и поменять ее значение. Основные настройки:
- «color_scheme» — цветовая тема. Можно выбрать из существующих, а можно скачать в папку Packages/Color Scheme — Default/.
- «font_face» — шрифт текста. Важно, чтобы он был в системе. Чтобы посмотреть список доступных шрифтов, откройте любой текстовый редактор, к примеру, Lible Office Writer.
- «font_size» — размер шрифта, устанавливающийся дробным или целочисленным значением.
- «font_options» — дополнительные опции шрифта типа «no_bold», «no_italic».
- «word_separators» — разделители слов.
- «line_numbers» — настройка нумерации строк.
- «gutter» — отображать ли «канавку» (в ней располагаются номера строк и закладки).
- «margin» — длина отступа от «канавки».
- «fold_buttons» — если навести курсор на «канавку», то будут видны треугольные стрелки, позволяющие скрыть или показать фрагмент кода между фигурными скобками. Их тут можно отключить или включить.
- «fade_fold_buttons» — если поставить значение false, то треугольные кнопки не будут скрываться.
Вот пример действия настроек (не забудьте сохранить файл):
Вы можете поэкспериментировать здесь сами. А мы идем дальше.
2. Настройка сочетаний клавиш
Да-да, вы не ослышались! Любой может настроить сочетания по-своему, присвоив им другие значения. Чтобы открыть файл, перейдите в «Preferences» -> «Key Bindings».
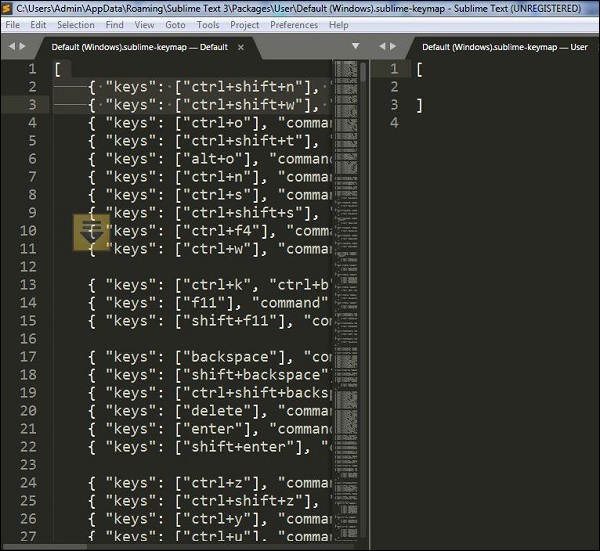
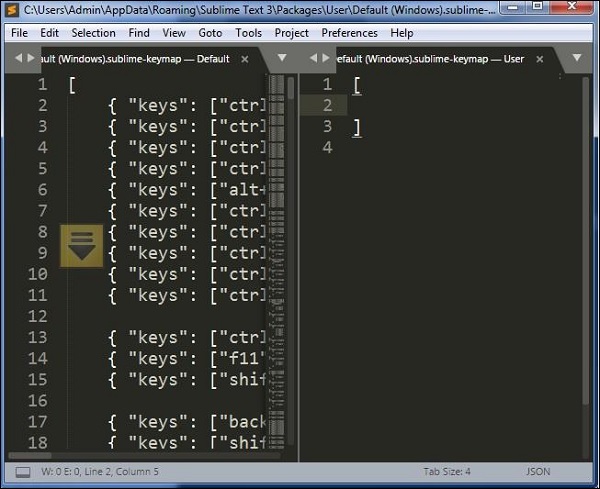
Перед нами снова два файла, один из которых — настройки по умолчанию, а другой — ваши персональные настройки. Чтобы поменять сочетание, необходимо скопировать одну или несколько строк, заключенных между фигурными скобками. Вот пример моего файла:

Конечно, это ничего не меняет (это сочетание клавиш для закрытия любого приложения), однако данный файл является лишь примером.
Ну вот и все, Sublime Text стал таким, каким он вам нужен и вы знаете как настроить Sublime Text 3. А сейчас пора двигаться дальше — к установке плагинов.
3. Установка Package Control
Как уже говорилось ранее, редактор имеет возможность добавления плагинов, будь то собственные или скачанные с сайта разработчика. Однако, несмотря ни на что, установка плагинов вручную не очень удобна, и поэтому нужно скачать и установить дополнительный компонент.
Package Control — предназначен для более быстрой и удобной установки плагинов. Он позволяет устанавливать их через визуализированный интерфейс, а не через код.
Для начала установим Package Control с официального сайта. Это не значит, что мы его будем скачивать!
- Скопируем текст из соответствующего текстового поля (в зависимости от версии Sublime Text).
- С помощью сочетания клавиш «Ctrl + ~» вызываем встроенную в редактор консоль (да-да, есть и такое!).
- Вставляем скопированный код в текстовое поле и ждем успешной установки.
- Перезапускаем редактор.
Package Control установлен! Теперь пора разобраться с тем, как им пользоваться.
4. Работа с плагинами в Package Control
Чтобы запустить Package Control, необходимо набрать сочетание клавиш «Ctrl + Shift + P» и из списка выбрать элемент Package Control: Install Package.
И перед нами долгожданная установка плагинов! Теперь есть возможность быстрого их поиска и выбора, а если выбрать другие команды для Package Control, то можно и удалять, и изменять элементы редактора. Теперь надо потренироваться на установке. Уставноим Material Theme и выполним настройки темы sublime text 3.
- Запускаем установщик плагинов.
- Набираем в поле поиска Material Theme.
- Нажимаем и ждем, внизу должна появиться надпись «Installing package Material Theme». В процессе установки будет запрошено добавление еще одного плагина, разрешаем.
Чтобы применить тему, необходимо перейти в меню «Preferences» -> «Color Scheme» -> «Material Theme» -> «schemes», а далее — тема, которая вам больше всего понравится.
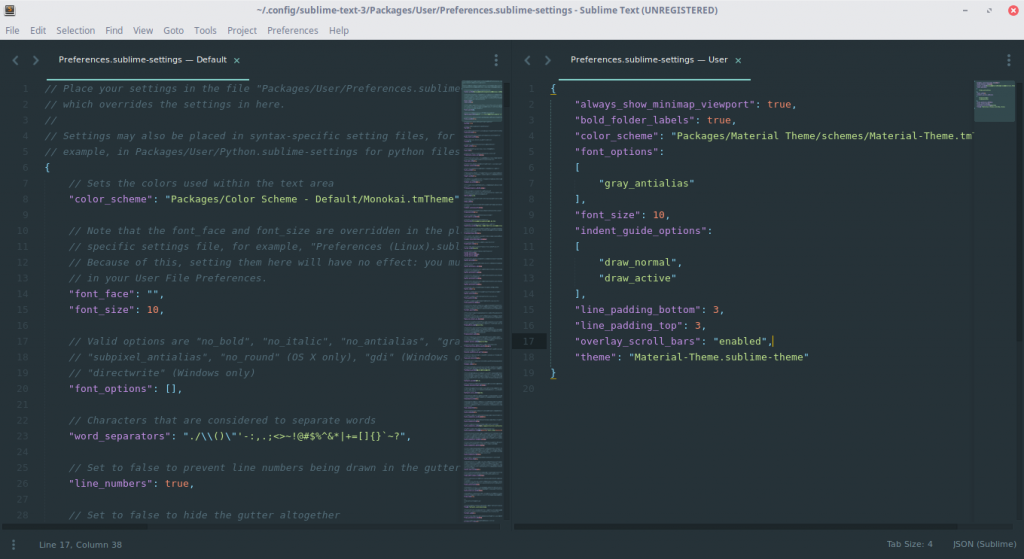
Однако это еще не все. Несмотря на установку темы в качестве плагина, она активируется не до конца. Чтобы исправить это, зайдите в файл настроек и допишите следующий текст:
"theme": "Material-Theme.sublime-theme",

"color_scheme": "Packages/Material Theme/schemes/Material-Theme.tmTheme",

"overlay_scroll_bars": "enabled",

"line_padding_top": 3,

"line_padding_bottom": 3,

// On retina Mac

"font_options": [ "gray_antialias" ],

"always_show_minimap_viewport": true,

"bold_folder_labels": true,

// Highlight active indent

"indent_guide_options": [ "draw_normal", "draw_active" ]
Вид редактора после применения к нему темы:
Неплохо, да? Настройка Sublime Text 3 почти завершена. А сейчас пора установить что-нибудь более существенное. Давайте ознакомимся с самыми популярными плагинами для Sublime Text.
Топ 5 плагинов для Sublime Text 3
1. Emmet
Emmet — плагин, позволяющий сделать отображение кода более удобным. Здесь используются сочетания клавиш. К примеру, «html + tab» создает каркас документа, а «div.wrapper + tab» превратится в полноценный код:
<div class="wrapper"></div>
2. JavaScript & NodeJS Snippets
Этот плагин представляет собой коллекцию сокращений снипсетов для JavaScript. Длина набираемого текста с помощью подсказок правда уменьшается! К примеру, вместо набора «document.querySelector(‘selector’);» можно просто набрать «qs + Tab».
3. Advanced New File
Зачем искать место для нового файла в неудобном дереве каталога? Данный плагин позволит быстро и эффекстивно ввести нужные данные, и файл будет создан буквально за пару нажатий клавиш!
4. Git

Название этого плагина говорит само за себя: вы сможете выполнять все необходимые действия в рамках Git’а, не выходя из редактора!
5. GitGutter
Этот плагин позволит пользователю не только обращаться с обычными командами Git, но и работать с изменением версий: отлавливать их, просматривать, сравнивать — и все в режиме реального времени.
Выводы
Как писать код — дело каждого. Но есть удобные вещи, которые доступны всем, и нет смысла от них отказываться! Такие редакторы, как Sublime Text, особенно важны веб-разработчикам. А пока вы можете настроить редактор под себя сами — пусть это станет ВАШ собственный Sublime Text, в который вы вложили частичку собственной души. Удачи!

Статья распространяется под лицензией Creative Commons ShareAlike 4.0 при копировании материала ссылка на источник обязательна .
Sublime Text has many different settings to customize its behavior. Settings are
changed by editing text files: while this is a little trickier than using a
GUI, you’re rewarded with a flexible system.
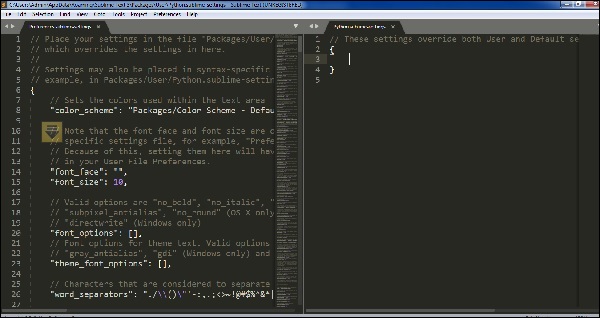
Settings are accessed via the menu item. The
left-hand pane contains all of the default settings, along with a description
of each. The right-hand pane is where customization can be saved.
-
Categories
-
Settings Files
-
Syntax-Specific Settings
-
Project Settings
-
Distraction Free Settings
-
Changing Settings with a Key Binding
-
Troubleshooting
Categories🔗
The settings in Sublime Text are organized into three categories. The default
settings file organizes the settings into sections for easier distinction.
-
Editor Settings: These settings affect the behavior and functionality
presented when editing text in a file. Examples include thefont_face,
tab_sizeandspell_check. These settings are presented in the first
section of the default settings file. -
User Interface Settings: These settings affect the general user
interface, across all open windows. Examples include thetheme,
animation_enabledandoverlay_scroll_bars. These settings are
presented in the second section of the default settings file. -
Application Behavior Settings: These settings affect the behavior of the
application, across all open windows. Examples include thehot_exit,
index_filesandignored_packages. These settings are presented in the
third section of the default settings file.
The User Interface Settings and Application Behavior Settings are global to the
entire application and can not be controlled by a syntax specific settings file,
nor the settings key in a .sublime-project.
Settings Files🔗
Settings files are consulted in this order:
-
Packages/Default/Preferences.sublime-settings
-
Packages/Default/Preferences (<platform>).sublime-settings
-
Packages/User/Preferences.sublime-settings
-
<Project settings>
-
Packages/<syntax>/<syntax>.sublime-settings
-
Packages/User/<syntax>.sublime-settings
-
<Buffer-specific settings>
In general, you should place your settings
in Packages/User/Preferences.sublime-settings, which is opened in the
right-hand pane when selecting the menu item . If
you want to specify settings for a certain file type, for example, Python, you
should place them in Packages/User/Python.sublime-settings. This can be
accessed via the right-hand pane when a Python file is open, and the menu
item is selected.
Syntax-Specific Settings🔗
Settings may be specified on a per-syntax basis. Common uses for this are to
have different indentation settings or the color scheme vary by file type.
You can edit the settings for the syntax of the current file by selecting
the menu item.
Note that only Editor Settings can be specified in syntax-specific settings.
Project Settings🔗
Settings can be set on a per-project basis, details are in the Project
Documentation.
Note that only Editor Settings can be specified in project settings.
Distraction Free Settings🔗
Distraction Free Mode has an additional settings file
applied (Distraction Free.sublime-settings). You can place file
settings in here to have them only apply when in Distraction Free Mode – access
it from the menu item.
Changing Settings with a Key Binding🔗
The toggle_setting command can be used to toggle a setting. For example, to
make a key binding that toggles the word_wrap setting on the current file,
you can use (in ):
{
    "keys": ["alt+w"],
    "command": "toggle_setting",
    "args":
    {
        "setting": "word_wrap"
    }
}
The set_setting command can be used to set a setting to a specific value.
For example, this key binding makes the current file use the Cobalt color
scheme:
{
    "keys": ["ctrl+k", "ctrl+c"],
    "command": "set_setting",
    "args":
    {
        "setting": "color_scheme",
        "value": "Packages/Color Scheme - Default/Cobalt.tmTheme"
    }
}
The settings modified here are buffer specific settings: they override any
settings placed in a settings file, but apply to the current file only.
Troubleshooting🔗
As settings can be specified in several different places, sometimes in can be
helpful to view the applied setting that’s actually being used by the current
file. You can do this by using the console:
view.settings().get('font_face')
Переходим на сайт редактора Sublime Text https://www.sublimetext.com/
Находим вкладку Download.
Выбираем Windows 64 bit и скачиваем инсталлятор Sublime Text Build 3211 x64 Setup.exe.
Запускаем инсталлятор. Нажимаем Запустить.

В следующем окне видим стандартный путь для установки программы. Нажимаем Next.

Далее инсталлятор предлагает включить запуск программы в контекстное меню, т.е. при нажатии на файл правой кнопкой мыши в контекстном меню мы будем видеть SublimeText для открытия файла. Это очень удобно. Поэтому устанавливаем флажок Add to explorer context menu и нажимаем кнопку Next.

В следующем окне нажимаем Install.

По окончании установки нажимаем Finish.
После этого запускаем программу, щелкнув по ярлыку на рабочем столе.

Программа платная, но разработчики не ограничивают ее использование ни по функциональным возможностям, ни по времени.
Отличие бесплатной версии от платной в том, что в шапке программы присутствует надпись UNREGISTERED

И иногда появляется окно, предлагающее зарегистрировать и оплатить программу. Можно нажать Отмена и работать дальше.

Настройка внешнего вида программы Sublime Text. Настройка цветовых схем
Сначала отобразим боковую панель. Для этого надо выполнить команду Yiew – Side Bar – Show Side Bar

Слева откроется панель, в которой будут отображаться файлы и папки верстки.

Можно перетащить папку с файлами на левую панель.

Настроим цветовую схему программы и кода. Для этого откроем файл с кодом html и перейдем по команде Preference – Color Scheme…

Открывается окно с предустановленными цветовыми схемами

При выборе любой из схем, изменяется цветовое оформление окна программы Sublime Text.
Можно установить дополнительные цветовые схемы, которые можно найти на сайте с дополнениями SublimeText — https://packagecontrol.io/ в разделе https://packagecontrol.io/browse/labels/color%20scheme
Для того, чтобы подгружать в программу дополнительные цветовые схемы, необходимо сначала установить установщик.
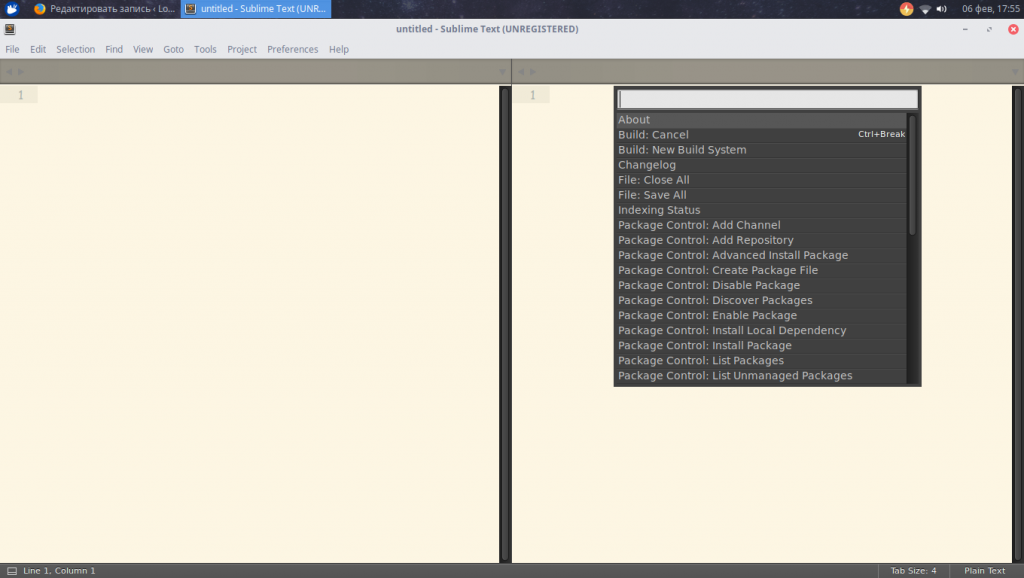
Для этого переходим в меню Tools – Command Palette…

Появится окно с полем поиска.

В поле поиска вводим install, пока не появится Install Package Control и нажимаем на него.

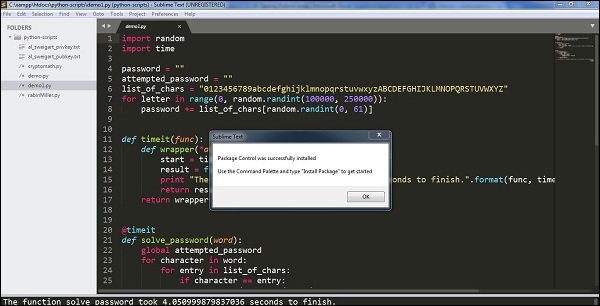
Через некоторое время появится окно об успешной установке Package Control.

Снова вызываем команду меню Tools – Command Palette…, в поле вводим install, пока не появится Package Control: Install Package и нажимаем на него.

Через некоторое время появится окно со списком доступных дополнений.

В поле поиска вводим название темы Base 16 Color Scheme.

Нажимаем на этот пункт и ждем установки.
После установки переходим к смене схем. Выполняем команду Preferences – Color Scheme.

И видим, что в списке появилось гораздо больше цветовых схем.

Наберем в строке поиска Ocean и выбираем эту тему.

Видим, что цветовое оформление изменилось.

Методом перебора Вы можете подобрать для себя другую понравившуюся цветовую схему.
После этого выберем команду Preference – Theme…

И в появившемся окне щелкнем по Adaptive.sublime-theme.

После этого левая панель программы и окружение также стали темными.

Сделаем еще дополнительные настройки. Выполним команду Prefernce — Settings

Откроется новое окно, разделенное на две части. В левой части прописаны настройки по умолчанию. Их изменить нельзя, их можно только переопределить в правой части. Каждая следующая настройка должна отделяться запятой.

В правом окне уже прописаны некоторые настройки цветовой схемы.
Внесите запись «margin»: 0, //Убираем отступ
И сохраните файл командой File – Save. Весь код немного подвинулся влево.

Чтобы увеличить или уменьшить размер шрифта в окне программы, достаточно зажать клавишу Ctrl и крутить колесико. Чтобы вернуться к настройкам по умолчанию, надо выполнить команду Preference – Font – Reset

Пропишем еще несколько настроек:
“tab_size”: 3, //Размер табуляции – т.е. насколько сместится курсор влево при нажатии клавиши Tab
«word_wrap»: «true», //Перенос строк всегда

Закройте это окно.
Продолжим настраивать окно программы. Часто в ходе верстки необходимо отображать два файла: html и css. Для этого необходимо разделить окно программы на две части. Сделать это можно командой Yiew – Layout – Columns: 2

Теперь мы можем расположить два файла с кодом рядом.

Синтаксис имеет определенную подсветку для каждого языка. Чтобы увидеть весь список языков и синтаксисов, надо нажать в правом нижнем углу программы на пиктограмму языка. Например, для файла html в правом нижнем углу будет запись HTML, для файла css соответственно запись CSS. Надо щелкнуть по этой записи и появится весь доступный список.

Но, чтобы синтаксис подсвечивался должны быть установлены соответствующие схемы.
Установим дополнительные схемы подсветки синтаксиса.
Например, для файлов SCSS в программе нет предустановленной подсветки синтаксиса. Если мы откроем файл SCSS, то увидим только белый цвет.

Выбираем команду меню Tools – Command Palette…, далее вводим install и выбираем Package Control: Install Package.

Вводим SCSS.

После установки в левом нижнем углу окна программы появится запись об успешной установке, но запись быстро исчезнет. Можно проверить, что синтаксис SCSS появился в общем списке. Т.е. в правом нижнем углу вызываем список и видим SCSS в конце списка.

Установка необходимых плагинов
Auto File Name – необходим для того, чтобы Sublime Text автоматически прописывал пути к файлам, например, к картинкам.
Выполняем знакомую нам команду Tools – Command Palette…, далее вводим install и выбираем Package Control: Install Package и затем AutoFileName.

После установки этого плагина в коде можно видеть содержимое папки, например, img и выбрать соответствующий файл.

Bracket Highlighter – плагин подсветки начальных и конечных элементов, например открывающего и закрывающего тегов, начальной и конечной кавычки, открывающей и закрывающей скобки и т.д.

Color Highlighter – показывает образец цвета в коде. Например, на рисунке ниже рядом с записью color: #f00 появился желтый квадрат (образец цвета). Так работает плагин Color Highlighter.

Дополнительные настройки плагина можно сделать, выполнив команду Tools – Color Highlighter

Emmet – позволяет с помощью сокращений писать команды кода.
Например, чтобы написать такой код <div class=”main”></div> необходимо в редакторе набрать только имя класса и нажать клавишу Tab. Т.е. надо записать .main и нажать Tab
После установки необходимо перезапустить программу.
Список сокращений Emmet можно посмотреть по ссылке https://webdesign-master.ru/blog/html-css/2.html
Goto Css Declaration – навигация в коде. Например, чтобы найти блок стилей для какого-либо класса в большом файле css, необходимо в html файле установить курсор на имя этого класса и нажать горячую клавишу. После этого в файле css курсор автоматически переместится в соответствующий блок стилей.
Чтобы создать горячую клавишу, необходимо после установки плагина выполнить команду Preferences – Key Bindings.

После этого появится экран из двух окон. В левом окне предустановленные настройки, которые нельзя изменить, но можно переопределить в правом окне.
Например, сделаем следующую запись
[
{
«keys»: [«ctrl+q»], «command»: «goto_css_declaration»,
«args»: {«goto»: «next»}
}
]

Тогда переход из html файла на нужный класс в таблице стилей css будет по нажатию клавиш ctrl+q. Не забываем, что в html-файле курсор должен стоять на имени класса, который ищем в таблице стилей.
eCSStractor – плагин позволяет извлекать селекторы sass из html-кода.
Выберите в меню программы Preferences – Package Settings – eCSStractor – Key Bindings – User. Наберите следующий код.

Выберите в меню программы Preferences – Package Settings – eCSStractor – Settings – User. Наберите следующий код.

Теперь можно извлекать селекторы, соответствующие методолигии БЭМ, прямо из HTML кода сочетанием клавиш Ctrl+`(ё).
Tag – позволяет извлекать css селекторы из выделенного фрагмента html-кода.
Устанавливает плагин вручную. Сначала скачайте сам плагин здесь. Затем распакуйте в папку по следующему адресу
C;UsersТвое имя пользователяAppDataRroamingSublime Text 3 Packages

После этого надо перезапустить Sublime Text.
Теперь надо добавить горячую клавишу. Заходим Preferences – Key Bindings. Если была предыдущая запись, новую пишем через запятую. Введите следующий код.

Весь наш файл с учетом предыдущих установок и настроек выглядит следующим образом. У Вас он может выглядеть по-другому. Главное обратите внимание на то, что записи разделяются запятыми (строки 5 и 9).

Таким образом:
Ссылки для редактора Sublime Text:
Сайт программы — https://sublimetext.com/
Дополнения — https://packagecontrol.io/
Цветовые схемы — https://packagecontrol.io/browse/labels/color%20scheme
Необходимые плагины:
AutoFileName – необходим для того, чтобы Sublime Text автоматически прописывал пути к файлам, например, к картинкам.
BracketHighlighter – плагин подсветки начальных и конечных элементов, например открывающего и закрывающего тегов, начальной и конечной кавычки, открывающей и закрывающей скобки и т.д.
ColorHighlighter – показывает образец цвета в коде. Например, на рисунке ниже рядом с записью color: #f00 появился желтый квадрат (образец цвета).
Emmet – позволяет с помощью сокращений писать команды кода. https://emmet.io/
Ссылка на справочник сокращений плагина Emmet – https://webdesign-master.ru/blog/html-css/2.html
Goto-CSS-Declaration – навигация в коде. Чтобы найти блок стилей для какого-либо класса в большом файле css, необходимо в html файле установить курсор на имя этого класса и нажать горячую клавишу. После этого в файле css курсор автоматически переместится в соответствующий блок стилей.
eCSStractor – плагин позволяет извлекать селекторы sass из html-кода. https://packagecontrol.io/packages/eCSStractor
Tag – позволяет извлекать селекторы css из выделенного фрагмента html-кода.Tag.zip Путь для распаковки плагина — C:Users Твое имя пользователя AppDataRoamingSublime Text 3Packages
а также цветовую схему Base16 Color Scheme и подсветку синтаксиса SASS.
Просмотреть все установленные плагины в Sublime Text можно командой Preferences – Package Settings

Sublime Text — это на мой взгляд, один из лучших редакторов для написания различного кода. Особенно он хорош для верстки сайтов. Если Sublime правильно настроить, то создание html и css вы можете ускорить раза в 3 или 4.
В этой статье речь пойдет о том, как настроить Sublime под себя, каие плагины лучше всего устанавливать, как это сделать и какие настройки нужно включить, чтобы работа с кодом доставляла одно удовольствие.
Я сознательно пропущу ту часть где вы скачиваете Sublime, думаю эта часть у всех получилась довольно легко и не надо заострять на этом внимание, мы же с вами пишем код, скачивать проги мы точно все умеем.
Для того, чтобы скачать какую-либо утилиту или плагин в Sublime Text для начала нужно установить утилиту Package Control. Чтобы установить эту утилиту нажимаем Ctrl + Shift + P и в появившемся окне вводим install Package.

Затем, кликаем на install Package Control и ждем появления уведомления о том, что утилита установлена. Теперь мы можем устанавливать плагины, расширения или темы.

А теперь, погнали устанавливать расширения. И первым из них будет Emmet — крутейшая вещь, ускоряющая написание и правку html в разы.
Устанавливаем Emmet
Нажимаем Ctrl + Shift + P, в появившемся окне вводим Package Control install Package, кликаем по нему. Далее в появившемся окне вводим emmet и кликаем по названию.

Ждем уведомления об успешной установке (доли секунды вообще). И все — самое нужное расширение у нас уже установлено.
Что он вообще позволяет сделать, зачем мы его ставили? Если коротенько, то Emmet позволяет вот такой код .new-page-link нажатием кнопки Tab привести к виду <div class=»new-page-link»></div>. Круто не павда ли? А если написать немного по-другому p.yellow, то на выходе мы получим <p class=»yellow»></p>. Или еще немного магии. Чтобы получить стандартную разметку html документа нужно просто написать ! и нажать Tab.

Важна вещь! После того как вы скачали какой-либо плагин Sublime Text нужно перезапустить, чтобы изменения применились.
Устанавливаем AutoFileName
Установка аналогична предыдущему расширению Нажимаем Ctrl + Shift + P, в появившемся окне вводим Package Control install Package, кликаем по нему. Далее в появившемся окне вводим AutoFileName и кликаем по названию.
Что позволяет делать это расширение? Оно автоматически подставляет имена файлов и папок. Т.е., допустим надо нам поместить картинку, мы разметили <img src=» «> и вот, как раз в src и включится AutoFileName, он сперва предложит нам выбрать папку из имеющихся в проекте, а затем предложит выбрать файл из этой папки.

Т.е. не нужно ничего писать руками и судорожно вспоминать, как же называется файл или папка. Удобно? Еще как.
Работаем в двух окнах
Sublime позволяет нам работать разделив экран на две части. Что супер удобно при верстке, когда слева у тебя открыт html, а справа css. И не нужно при этом постоянно метаться между вкладками туда-сюда.
Чтобы это реализовать нужно просто перейти в меню View — Layout — Columns 2 (либо нажать Alt + Shift +2).

И теперь мы получаем вот такое чупер мега удобное рабочее пространство.

На этом основная настройка Sublime завершена. Все самые нужные и необходимые расширения установлены, а рабочее пространство приведено в удобный вид. Вообще в Sublime довольно много всяких интересных фишек, но чтобы про все рассказать потребуется больше одной статьи, поэтому я расскажу о них в следующих статьях своего блога.
Sublime Text — Introduction
Sublime Text Editor is a full featured Text editor for editing local files or a code base. It includes various features for editing code base which helps developers to keep track of changes. Various features that are supported by Sublime are as follows −
- Syntax Highlight
- Auto Indentation
- File Type Recognition
- Sidebar with files of mentioned directory
- Macros
- Plug-in and Packages
Sublime Text editor is used as an Integrated Development Editor (IDE) like Visual Studio code and NetBeans. The current version of Sublime Text editor is 3.0 and is compatible with various operating systems like Windows, Linux and MacOS.
Why Sublime Text?
When you use a suitable Text editor, you can enjoy its rich beneficial features. Sublime Text offers its users the following benefits −
- Ability to solve linker errors.
- Keeping track of all files and folders to work with.
- Connectivity with version control systems like Git, Mercurial.
- Problem solving capabilities.
- Keeping color combination for syntax combination.
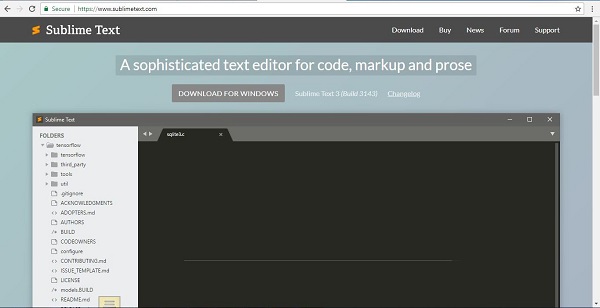
You can download Sublime Text from its official Website − www.sublimetext.com. In the next chapter, we will learn about installation procedure of Sublime Text editor in various operating systems.
Sublime Text — Installation
Sublime Text editor is supported by the following major operating systems −
- Windows
- Linux and its distributions
- OS X
You can download Sublime Text from its official website − www.sublimetext.com
In this chapter, you will learn about the installation of Sublime Text on various operating systems.
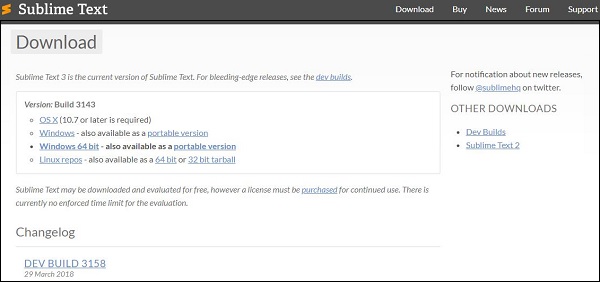
Installation on Windows
You will have to go follow the steps shown below to install Sublime Text on Windows −
Step 1 − Download the .exe package from the official website as shown below −
https://www.sublimetext.com/3
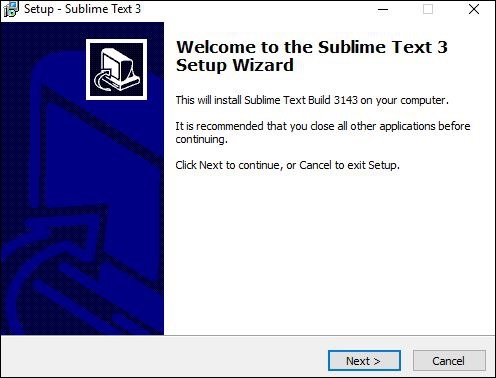
Step 2 − Now, run the executable file. This defines the environment variables. When you run the executable file, you can observe the following window on your screen. Click Next.
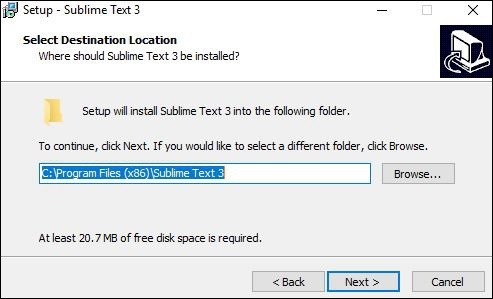
Step 3 − Now, choose a destination location to install Sublime Text3 and click Next.
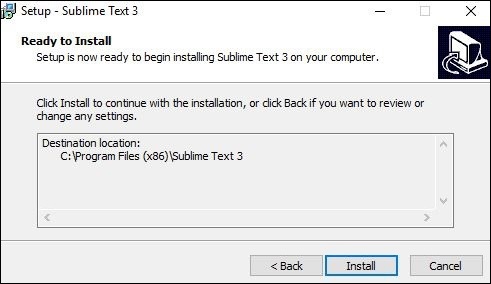
Step 4 − Verify the destination folder and click Install.
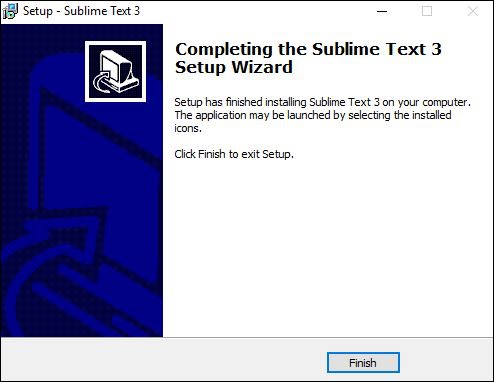
Step 5 − Now, click Finish to complete the installation.
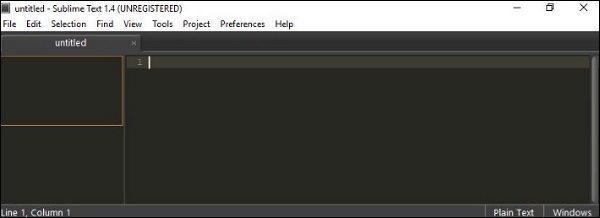
Step 6 − Upon a successful installation, your editor will appear as shown below −
Installation on Linux
You will have to follow the steps shown below to install Sublime Text on Linux distributions −
Step 1 − Using the command line terminal, install the packages for Sublime Text editor, using the command given below −
sudo add-apt-repository ppa:webupd8team/Sublime-Text-3
Step 2 − Update the packages using the following command −
sudo apt-get update
Step 3 − Install the Sublime Text repository using the following command −
sudo apt-get install Sublime-Text
After the successful execution of above mentioned commands, you will find that Sublime Text editor is installed on the system.
Installation on OSX
For OSX operating systems,
-
Download the .dmg file of Sublime Text Editor.
-
Open it and drag-and-drop in the Applications folder.
-
Follow the steps that you have seen in above two cases.
-
Launch the application.
Sublime Text — Data Directory
Throughout this tutorial, we will be focusing on using the subversion control system, Git and bit bucket in combination with Sublime Text editor.
As with any other Text editor, working on a specific repository is the key aspect of Sublime Text. It is shown in detail in the steps given below −
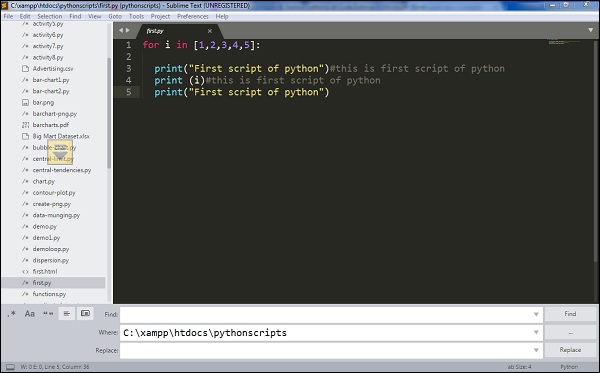
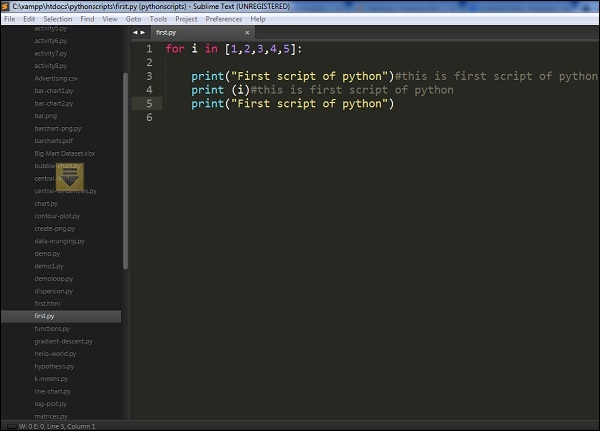
Step 1 − Consider a repository to be cloned from the bit bucket. Please note that we will be working with Python scripts throughout this tutorial.
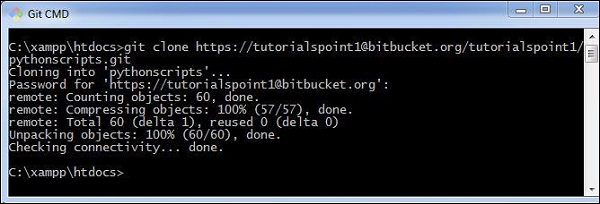
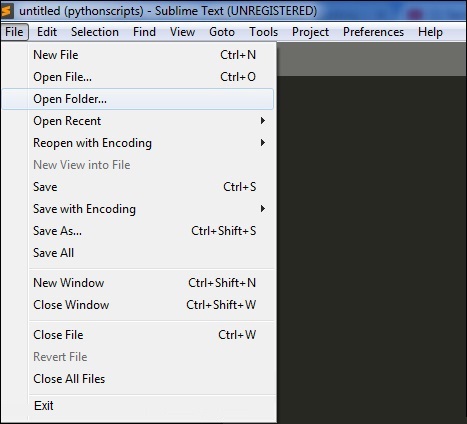
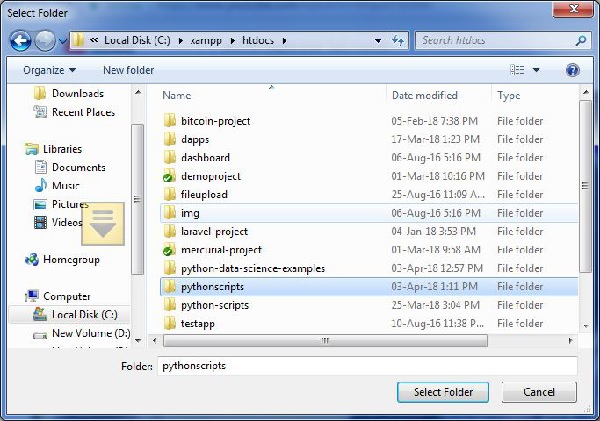
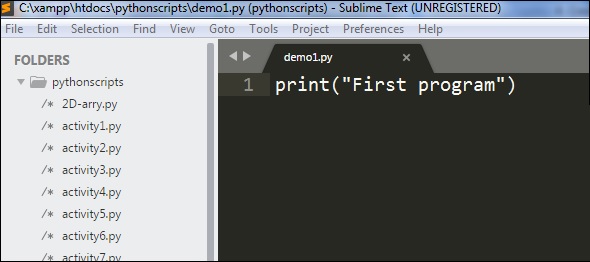
Step 2 − Include the repository in Sublime Text editor using the Open Folder option, as shown below.
Step 3 − After including the repository, the screen of Sublime Text editor will be as shown below −
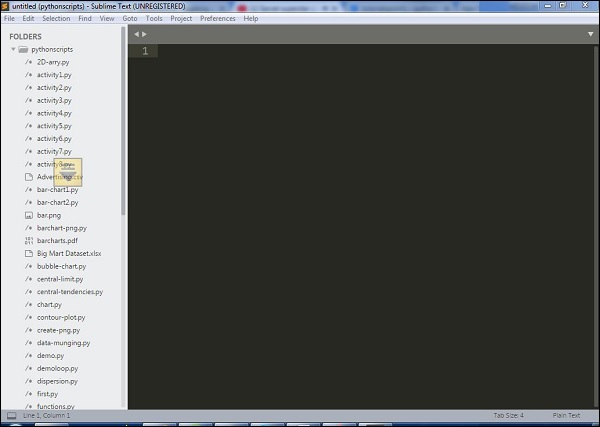
You can choose the file you wish to open from the list that is displayed in the left hand side of the screen, as shown in the image below −

Note that the color combination gives recognition of keywords and packages included in the code.
Sublime Text — Creating First Document
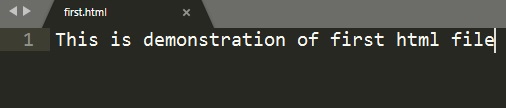
In this chapter, you will learn step by step how to create a file in Sublime Text.
Step 1 − Use the option New File to create a file in Sublime Text editor.
Step 2 − Once the new file is available, you can insert the code, similar to any other text editor, and save the file in your working repository.
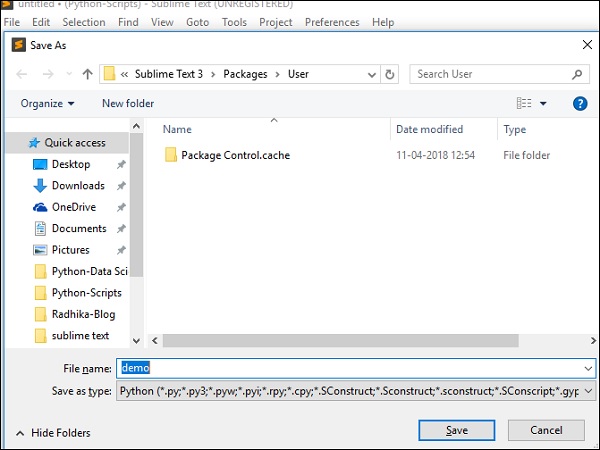
Step 3 − Once you save the associated file, Sublime Text editor provides a variety of options based on the type of file, for example .php for PHP scripts, .py for Python scripts and .java for Java code base.
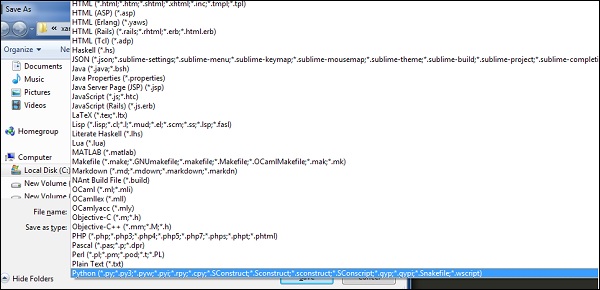
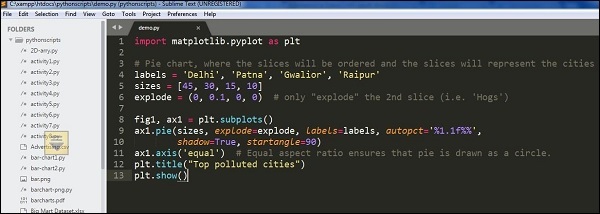
Step 4 − As our code repository is on Python project, we will save the file as demo1.py, as shown below −

Sublime Text — Editing First Text Document
Code editors allow the users to edit the code scripts and text documents with various shortcut keys. In this chapter, let us understand through various examples about editing options of first text document in Sublime Text.
Simultaneous Write-Up
In this example, you will see how to add print statements at two locations.
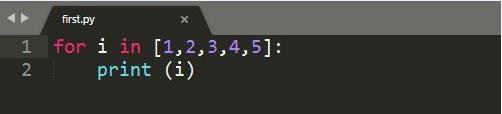
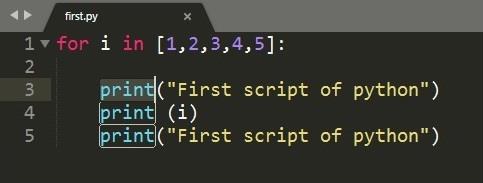
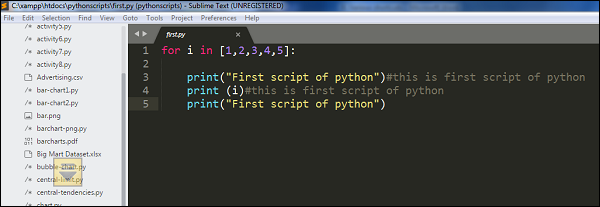
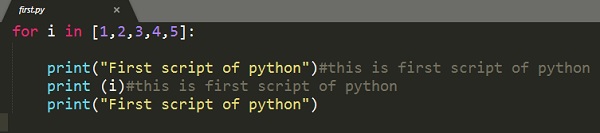
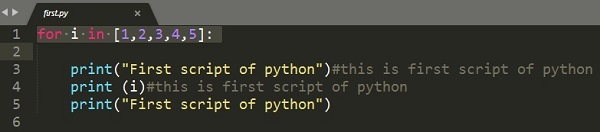
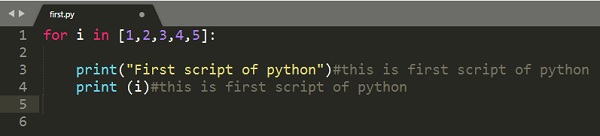
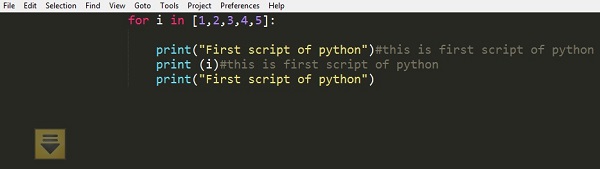
Step 1 − Consider the first script of Python with the following code in it −
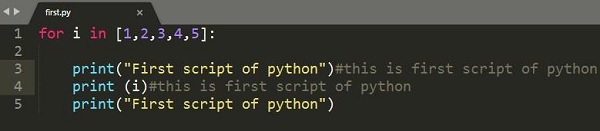
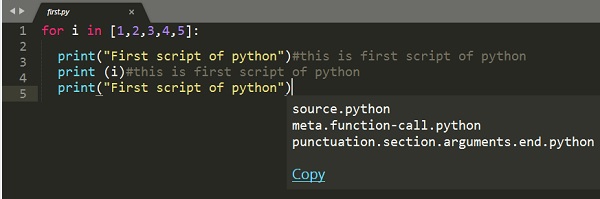
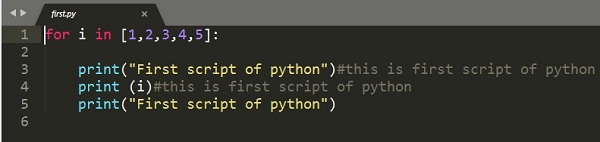
Step 2 − Let us suppose that, in the given script you want to mention the starting and ending points of the loop, using simple statements. You can write the print statement wherever required, however, in Sublime Text editor you can simultaneously add comments and statements in two places with a shortcut of Ctrl+cursor point for Windows or Linux, and Cmd+cursor point for Mac. Then, you can see the cursor points as mentioned below −
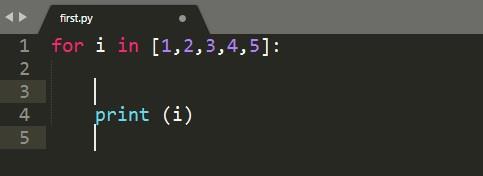
Step 3 − Now, you can insert the print statements at both the locations of the mentioned cursor points, as shown in the image below.

Finding Occurrences
Sublime Text editor includes a feature to find the occurrences of the keywords included in the scripts. The shortcut key for finding occurrences of the keyword is Ctrl+D after highlighting the associated keyword.
If you want to search for a keyword, say print from the given code, you can use Ctrl+D or Cmd+D to get the count of occurrences of the associated keyword.
Appending Comments in Line
We can append comments at the end of line using the shortcut key Ctrl+Shift+L for Windows and Cmd+Shift+L for Mac operating system after selecting the code section where you actually need the comment.
Sublime Text — Patterns of Code Editing
There are various types of code editing and shortcut keys used in Sublime Text editor −
- Splitting the selection into lines
- Wrapping the complete paragraph in HTML file
- Finding all occurrences
This chapter discusses each of them in detail.
Splitting the Selection into Lines
The key combination Ctrl+Shift+L allows you to select the blocks of lines and split them, on Windows. The screenshot given below explains this −
Wrapping Complete Paragraph in HTML File
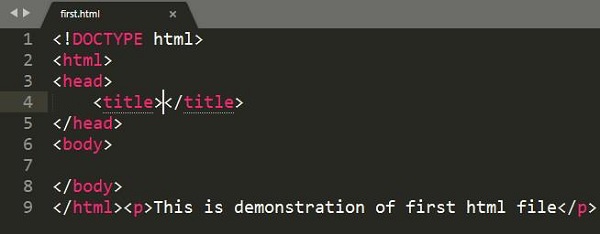
The key combination Alt+Shift+w for Windows and Cmd+Shift+w for Mac, allows the user to split the sections of code and create various paragraphs. It is referred as a wrap selection with html tag. This also allows you to include HTML tags using Sublime editor.
The screenshot given below explains wrapping text with a HTML tag −
After wrapping the text, the text wrapped with a HTML tag will be seen as shown below −

Finding all Occurrences
The key pattern Ctrl+Shift+f allows you to find a keyword in a given project. The screenshot given below explains this −
The shortcut key opens a window with three options included in it, namely find, where and replace,
where,
-
find refers to the search of the particular keyword,
-
where mentions the section as to which repository is searched, and
-
replace mentions the keyword which is replaced instead of find keyword.
Sublime Text — Sublime Linter
Linting is the process of flagging suspicious constructs and likely to be bugs in any programming language.
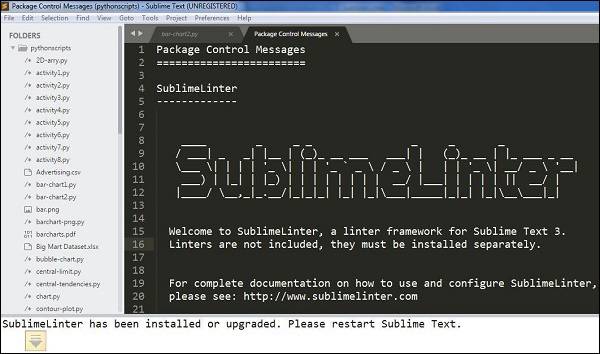
Sublime Linter is the package of Sublime Text that helps you to perform linting in Sublime. It helps in creating files in different modes for the manipulation of code base. It is not an in built package and you need to install it manually.
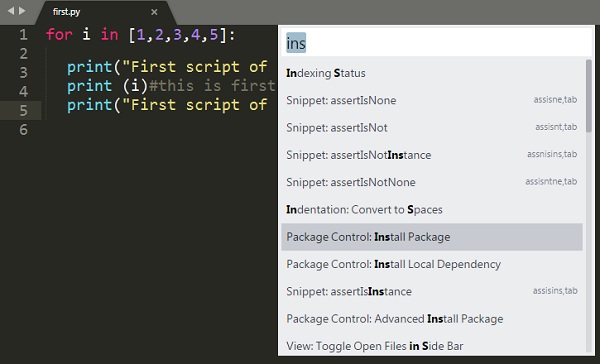
You can install any package control in Sublime Text editor using the shortcut key combination Ctrl+Shift+P, and selecting the Package Control: Install Package option.
Select the associated package to install in Sublime Text editor. To install Sublime Linter, you need to select the option of SublimeLinter plugin.
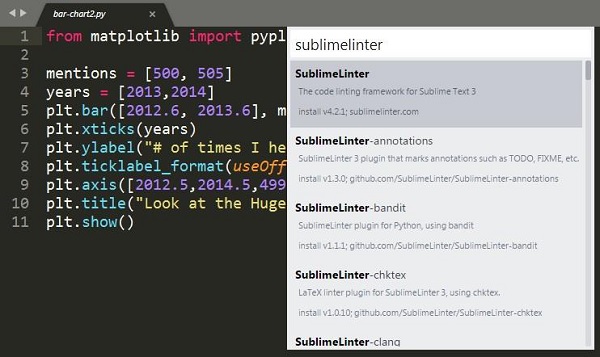
On successful installation, your screen will look as shown below −
Modes of Sublime Linter
Sublime Linter runs in four different modes as mentioned below −
Background Mode
When the Sublime Linter key is set to true, linting is performed in the background constantly each time the file is modified.
Load-Save Mode
When the Sublime Linter key is set to , linting load savewill be performed when a file is loaded from the repository.
Save-Only Mode
When the Sublime Linter key is set to save only mode, linting is performed while saving the particular file in working repository.
On Demand Mode
In the on-demand mode, the Sublime Linter will be set to true, using the shortcut Ctrl+Alt+L, which sets up the linter to detect bugs, if any present in the code.
Sublime Text — Shortcuts
Sublime Text editor includes shortcuts and methods for manipulating the output. This chapter discusses in detail about these shortcuts with the help of suitable illustrations.
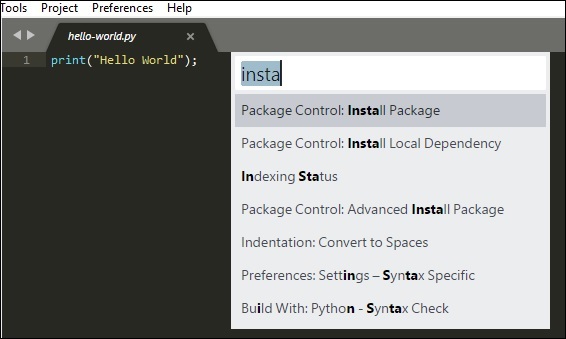
Opening the Command Palette
Command palette in Sublime Text editor includes options for installing packages and console. The shortcut key for this purpose is Ctrl+Shift+P for Windows and Cmd+Shift+P for Mac. The screenshot given below shows opening the command palette using this shortcut.
Toggle Side Bar
Sublime text editor includes a side bar which displays the scripts or the file names. You can use the shortcut key Ctrl+KB on Windows and Cmd+KB for Mac for this purpose.
Display Scope in Status Bar
The shortcut key Ctrl+Shift+Alt+P for Windows and Ctrl+Shift+P for Mac displays scope in the status bar. The following screenshot shows an illustration of this shortcut.
Python Console
When you are working with Python scripts using Sublime Text editor, you can use Ctrl+` for Windows or Control + ` for Windows, to operate the Python console.
New Window
With new windows, you can manage a number of projects simultaneously. You can use the shortcut key Ctrl+Shift+N on Windows and Cmd+Shift+N for Mac to create a new window on Sublime Text editor.
Sublime Text — Snippets
Snippets are the smart templates which can be reused whenever needed. Sublime text editor includes snippets feature for HTML templates. In this chapter, you will learn about them in detail.
Understanding Snippets
Snippets are simple XML supported files with various attributes. They include an extension called sublime-snippet. The root tag of XML element will be the <snippet> tag. Snippets created are saved in the Packages folder and are considered to live in this folder.
The file format and syntax of snippets are discussed in detail as follows −
-
Content −This section includes description of the snippet.
-
tabTrigger − It includes a sequence of characters which trigger when the snippet is written.
-
Scope − It defines the scope in which the snippet remains active.
-
Description − It includes all the meta description. It will be displayed when snippet’s menu is open.
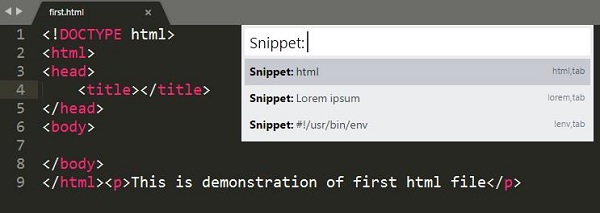
Creating First Snippet
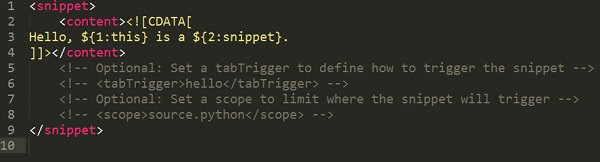
You can create the default snippet using Tools → Developer → Snippet option.
Then, a demo snippet with the associated tags will be created as shown below −
To create a first snippet in Sublime Text editor, click the Tools menu and select the Snippets option from the drop down window, as shown in the screenshot here.
Now, choose Snippet:html from the options displayed.
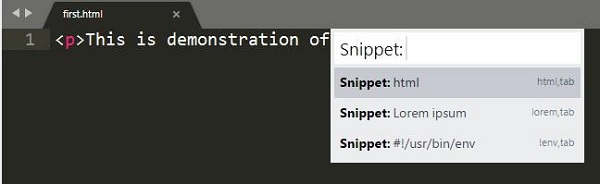
This creates a default snippet on the specified html file as shown below.
Note that there are various snippets for different types of files. For html files in the code base, there are three snippets defined in Sublime Text editor, as shown below.
Package Control Snippets
Control snippets are primarily used for product development. With install packages option in Sublime editor, you can download any snippet needed for web development and install it.
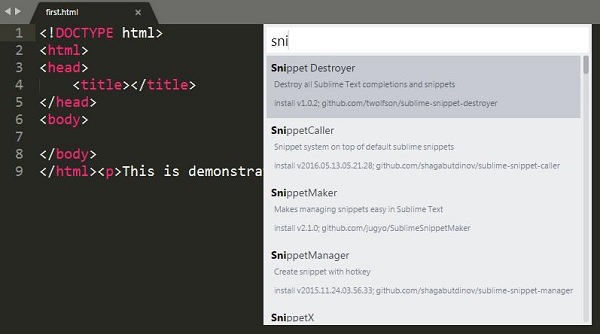
You may need the following packages for web development −
- EverCodeLab Sublime supports for Ruby on Rails
- Additional PHP snippets for PHP
- HTML snippets for HTML files
- Twitter Bootstrap snippets for Twitter Bootstrap
- JavaScript snippets for JS files
- jQuery snippets pack for jQuery
Sublime Text — Macros
Macros are the basic automation facility that includes a sequence of commands. You can use macros whenever you need to perform an operation which includes same steps.
Macro files are JSON files with an extension called .sublime-micro and are considered to be very helpful.
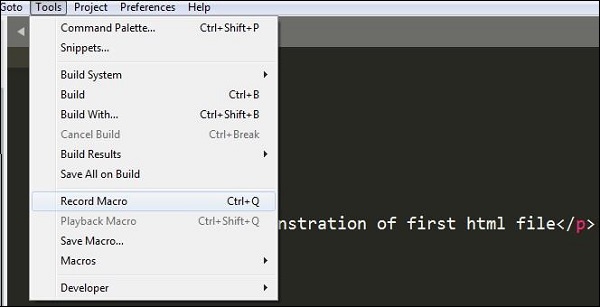
Recording a Macro
Recording a macro defines the procedure to keep a set of commands needed for the given file. You can record a macro in two ways −
-
Use the shortcut key Ctrl+Q for recording a macro in Windows and Cmd+Q in Mac.
-
Use the record option in Tools → Record Macro.
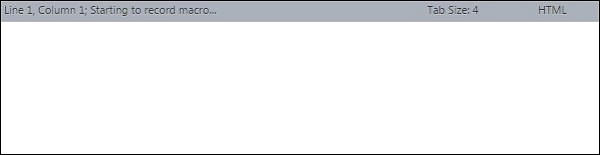
Once the macro has started recording, you can see the following message in Sublime Text editor −
Playing a Macro
You can use the shortcut key Ctrl+Shift+Q on Windows and Cmd+Shift+Q for Mac, to play a macro recorded by the user in Sublime Text. Note that this shortcut plays the last recorded macro in Sublime.
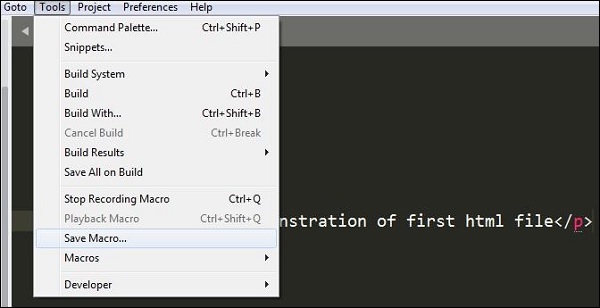
Saving a Macro
You can save a recorded macro using the option Tools → Save Macro. The following screenshot shows how to save a macro using this option.
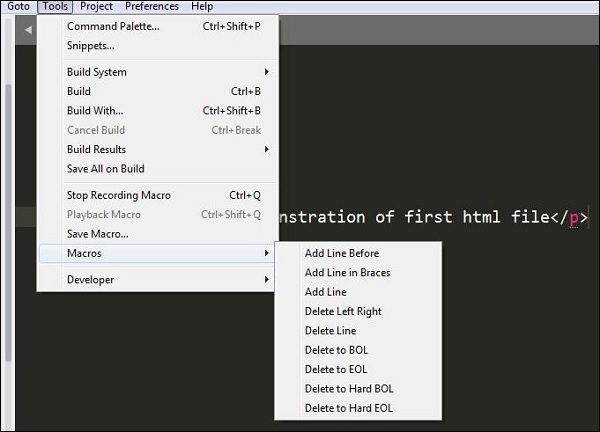
You can also redefine the macros using various options in Tool menu bar, as shown below −
Sublime Text — Key Bindings
Key bindings in Sublime Text helps a user to process and map the sequences of key presses to actions. They are defined in the JSON format and are stored in .sublime-keymap files.
For better integration, it is important to keep separate key map files for Linux, OSX and Windows. Key maps of the corresponding platform will be loaded in the Sublime Text editor.
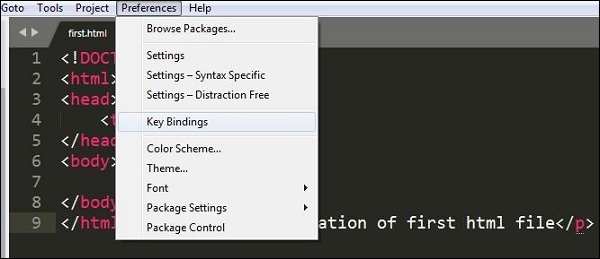
A user can open the keymap file or default key bindings using the option Preferences → Key Bindings.
The following example shows how to perform key bindings in Windows −
[
   { "keys": ["ctrl+shift+n"], "command": "new_window" },
   { "keys": ["ctrl+shift+w"], "command": "close_window" }
]
Defining Key Bindings
Sublime Text editor includes an option to define a key map. The key bindings defined in the file .sublime-keymap includes all the key value combinations.
You can include the following key binding set into this file and save them to check the execution, with the help of the code shown below −
[
   {
      "keys": ["super+alt+;"], "command": "run_macro_file",
      "args":
      {"file": "Packages/User/semicolon.sublime-macro"}
   }
]
Here super is the Winkey in Windows or Linux, and a command on OSX operating system. Note that this code will run the macro that is located in Packages/User and is named semicolon.sublime-macro on pressing the Super+Alt+ keys.
Sublime Text — Column Selection
In this chapter, you will learn various shortcuts keys to move and select the columns of a file in Sublime Text.
Moving the Pointer to the Beginning of Code
You can use the shortcut Ctrl+Home to move the pointer to the beginning of the code in Sublime Text editor.
Observe the sample code shown here.
The screenshot given below shows the same code where the cursor is moved to its beginning.
Extending a Column
You can use the shortcut Ctrl+L to extend a specified column. This shortcut will select the column which includes the pointer. The following screenshot explains this in a detailed manner −
Trimming a column
You can use the shortcut Ctrl+K to trim the specified column of the file. For OSX, you will have to use the key combination Cmd+K for this purpose.
The example shown here displays the code where the line mentioned in the fifth column is trimmed.
Split a Block of Text
You can use the shortcut Ctrl+Shift+K to split a selected block of text into two selections.

Note − The difference in key combinations from the previous key combination is that columns are visible. Ctrl+Shift+K removes the column number from the specified code, whereas Ctrl+K keeps the column number intact after trimming the entire column.
Sublime Text — Indentation
Indentation is the process of maintaining the code blocks of programming languages to maintain a systematic structure. It helps to convey the developers a better structure of program. This chapter explains you in detail about indentation in Sublime Text editor.
Importance of Indentation
Indentation helps to maintain the code structure such that it is easily understood by anyone who accesses it. Proper indentation imparts the following features to the code −
- Readability
- User-friendliness
- Adaptability
- Ease of maintenance
Options for Indentation in Sublime Text
Sublime Text editor provides various options for code indentation as shown in the following screenshot −
The usage of these options is discussed in detail here −
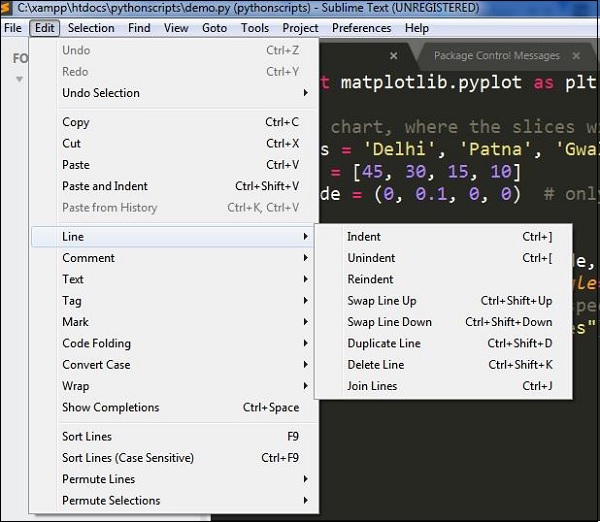
Indent Option
Indent option helps to create indentation of the specified code. You have to select the code specified and select the Indent option. You can also use the shortcut Ctrl+[ after selecting the required code that is to be indented. Refer to the following screenshot for a better understanding −

Unindent Option
Unindent option works in the reverse of indent procedure. The shortcut for the unindent option is Ctrl+]. Refer to the following screenshot for a better understanding −
Reindent Option
Reindent option is used to undo the unindent option and revert the code back to the same condition. Refer to the following screenshot for a better understanding −
Benefits of Indentation
Proper indentation offers various benefits to the code and developers. They are discussed below −
-
Code blocks will be visible without much effort.
-
Developer can focus on lines of code that are necessary and easily ignore the irrelevant ones.
-
A developer using the same kind of code structure multiple times need not focus on the start of block and end of block statements.
-
Any misplaced lines of code can be easily identified.
Sublime Text — Base Settings
Base settings of the Sublime Text editor are the configuration needed for editor such as font size, display of line numbers or color scheme of the editor.
All the base settings are configured in JSON format. To view the list of settings, go to menu of Preferences -> Settings.
The settings include two types of configurations namely −
- Default
- User
Default includes all the default configurations and user defines the customized settings for base settings.
For the scenario mentioned above, the customized settings are as mentioned below −
"font_size": 15,
   "ignored_packages":
   [
      "Vintage"
   ]
Categories of Settings
Various categories of the settings in Sublime Text are as follows −
Editor Settings
These include the basic settings for editing the files of the code base. Examples include font_face, font_size and tab_size. The settings are present in the default configuration.
User Interface Settings
These include the general settings which specifically focus on background, theme and various color combinations. These settings are appended in the second section of the default configuration.
Application Behavior
These settings focus on behavior of the application included in Sublime Text editor across open windows. These settings are included in the third section of default configuration settings.
Syntax — Specific Settings
These settings are used for designing the syntax of Sublime Text editor. To get the list of syntax specific settings, the user needs to use option Preferences − Syntax-Specific.
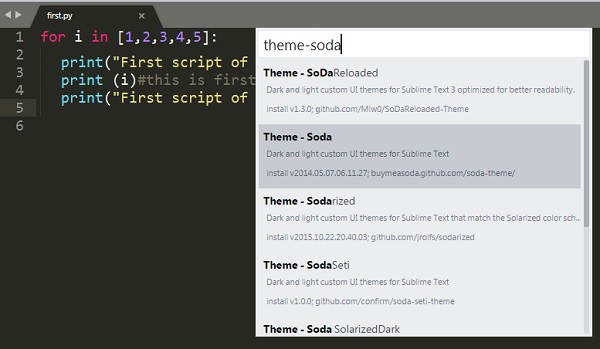
Sublime Text — Theme Management
Theme management in Sublime text editor implies enhancing the appearance of editor with colors and attractive backgrounds. Themes are JSON formatted values with .sublime-theme extension and manage the appearance of the user interface of the editor by changing the colors of elements of the IDE.
Installing and Applying Themes
The following steps will guide you about installing and applying themes in Sublime Text editor −
Step 1 − Use the Install Package of the Sublime Text to install package for themes, as shown in the screenshot here −
Step 2 − You can see a list of options with Install Package option and you can download them and install in Sublime Text editor.
Step 3 − Once you select a theme, activate it.

Step 4 − Now select your desired theme from the list of installed theme list. This automatically changes the appearance of the editor.
Color Schemes
Color schemes are XML formatted files located at the Packages folder with color schemes. They are an awesome way for the customization of Sublime text colors, unlike themes which are specific to UI elements.
You can choose color schemes using option Preferences → Color Scheme. Refer to the following screenshot that shows the same.

Color schemes include various options such as Breakers, Mariana, Monokai, and Sixteen. The appearance of the editor depends on the color scheme that you choose. Note that these patterns will only focus on color syntax.
Sublime Text — Understanding Vintage Mode
Vintage mode in Sublime text editor is a package that includes a combination of editing features of vi. Vintage Mode lets you to use a list of vi commands in the Sublime editor.
Vintage mode is an open source project and you can download it from the link −
https://github.com/sublimehq/Vintage
Understanding vi editor
Vi is a primitive and popularly used text editor. It was originally created for UNIX operating system and with basic functionality of scripts execution. It is a popularly used command line editor across various operating systems because it does not require mouse for operations.
Sublime includes vim, which is an advanced section of vi editor, and includes customization of macros, snippets and plugins.
Enabling Vintage Mode
You can enable Vintage mode through the following steps −
-
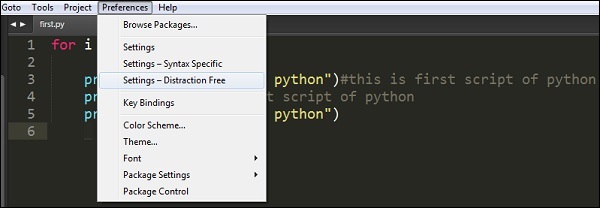
Select the option Preferences → Settings
-
Edit the json file of the settings configuration with key name as ignored_packages. Vintage package is included in the ignored_packages section.

-
Remove the attribute of Vintage from the configurations to enable Vintage property in Sublime text editor.
"ignored_packages": []
-
Your vintage mode editor will appear as shown in the following screenshot −
Sublime Text — Vintage Commands
Vintage mode includes a variety of commands similar to the vi editor. This includes the basic settings of Sublime Text editor as shown in the code given below −
{
   "color_scheme": "Packages/Color Scheme - Default/Monokai.tmTheme",
   "font_size": 15,
   "ignored_packages":
   [

   ],
   "vintage_start_in_command_mode": true,
   "theme": "Soda Dark.sublime-theme"
}
| Mode | Description | Key |
|---|---|---|
| Command Mode | Waits for the user to enter a command | Esc |
| Insert Mode | Text can be inserted in different positions | i/I/a/A |
| Visual Mode | Select/highlight the text using the Movement Commands | V |
| Visual Line Mode | Select/highlight lines of text using the arrow keys | Shift + V |
Vintageous Mode
Vintageous is the package used for the descriptive analysis of vi editor. It can be downloaded using package control as mentioned below −
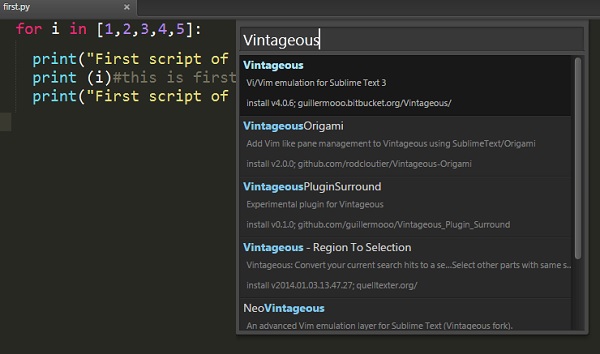
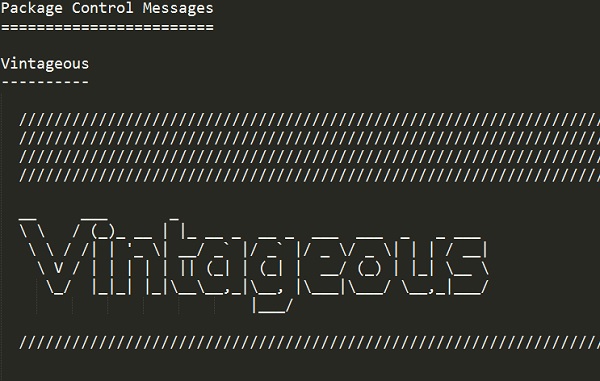
Once you successfully install the vintageous package, your screen will look like as shown in the following screenshot −
Sublime Text — Testing Javascript
Sublime Editor includes testing modules for various programming languages. This helps in unit testing of files and scripts and helps developers to analyze bugs, errors and issues, if any.
Sublime Text editor includes 3 modules which are necessary for testing and deployment of JavaScript. This chapter discusses them in detail.
JsFormat
JsFormat is a JavaScript plugin used for formatting the script lines which eases the unit testing process. Behind the scenes, it uses JS beautifier (http://jsbeautifier.org/) to format the full JS or portions of JS files. JSFormat can be installed using the Install Package option of Sublime editor.
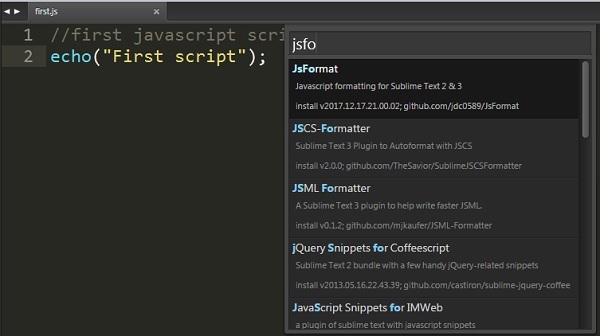
Features
JsFormat offers the following features to the script −
- Eases JS and JSON file formatting.
- Offers full text formatting and selected formatting.
- Provides customizable settings for formatting options.
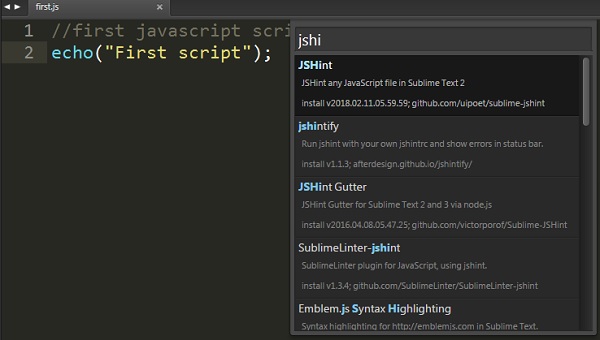
JSHint
JSHint is a community driven tool used for analyzing the mistakes through hints. This helps to detect errors and potential problems. JSHint is an open source package, simple and easy to understand. You can install JSHine in Sublime Text editor through Install Package mode.
To implement JSHint plugin in Sublime Text Editor, you can use the shortcut Alt+J on Windows and Cmd+j on OSX systems.
JavaScriptNext
This script is used to highlight the syntax of JS file and its associated meaning. It includes a feature of syntax highlight with various modules, arrow functions, classes and generators.
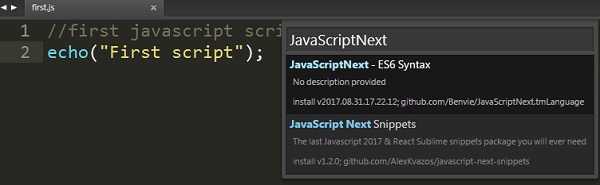
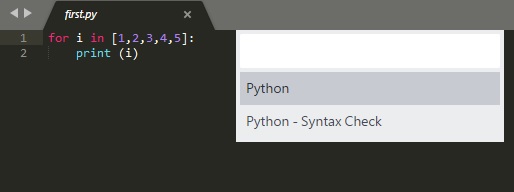
You can perform syntax check on a file using the syntax list as shown in the screenshot below −
Sublime Text — Testing Python Code
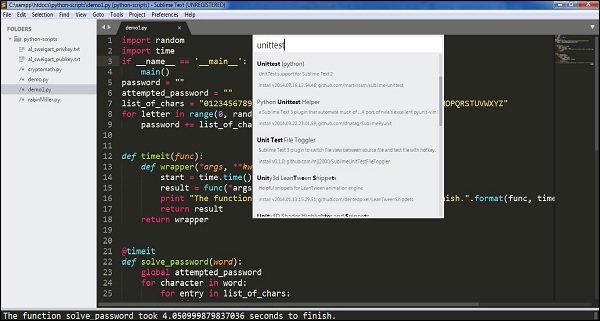
Python offers unittest, an official unit testing framework for unit testing the scripts designed before deployment. It is also called as PyUnit. Python unit tests used in Sublime Text editor are called as sublime-unittests and they are available in the following link −
https://github.com/martinsam/sublime-unittest
These unit tests contain a number of useful snippets to ease the writing of unit test cases.
Installation of UnitTest
The package control of Sublime manages the installation of unittests and the following steps describe it in detail −
Step 1 − Use the command palette of Sublime Editor Ctrl+Shift+P for installation of the package, as shown in the screenshots given below −
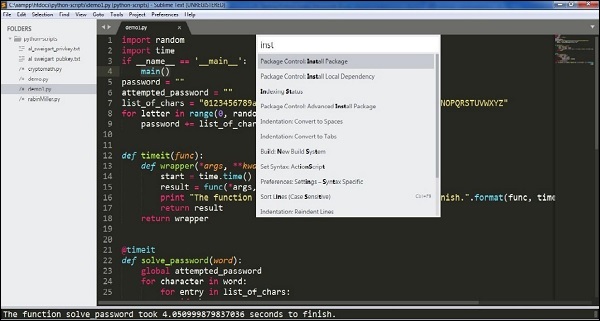
Step 2 − The installed packages use the following two main snippets −
-
testclass which is used to create a new test class
-
testfunc which is used to create a new test function for us to fill out
Step 3 − The console computes test results as shown in the screenshot below. Note that the result depends on the success or failure of the test.
Success Result
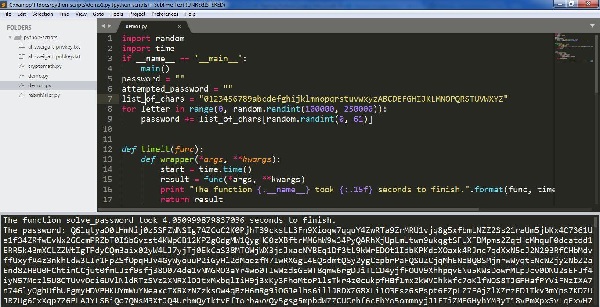
Failure Result
Note − Unit test cases work as a compiler for computing scripts in python.
Sublime Text — Spell Check
Sublime Text Editor uses Hunspell for spell checking process. Hunspell is the spell checker of LibreOffice, Mozilla Thunderbird, Google chrome and many proprietary packages. Sublime Text editor includes dictionary support for proper spell check of words.
Dictionaries
Sublime Text includes UTF-8 encoded dictionaries. To implement a dictionary with Sublime Text editor, it should be first converted into UTF-8. If the user has UTF-8 encoded dictionary, it can be installed using the Preferences option in Sublime Text editor.
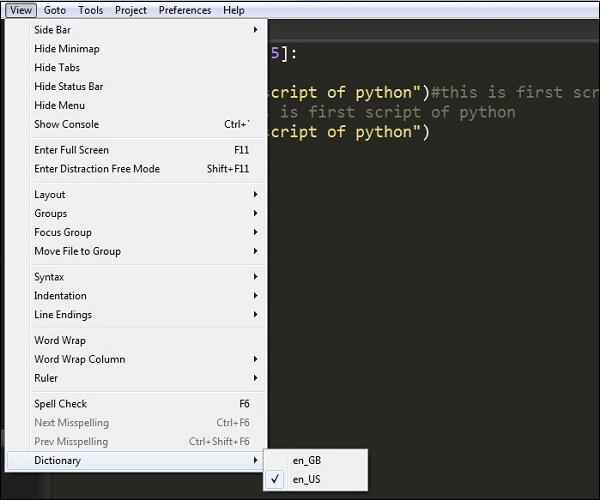
You can select the dictionary from View → Dictionary menu as shown in the given screenshot −
Settings for Dictionary
There are two settings defined for the spell check of Sublime Text Editor −
- Spell_check
- Dictionary
// Set to true to turn spell checking on by default
"spell_check": false,

// Word list to use for spell checking
"dictionary": "Packages/Language - English/en_US.dic"
These configurations are included in the settings file. Added and ignored words are stored in the user settings under the added_words and ignored_words keys, respectively.
Sublime Text — Packages
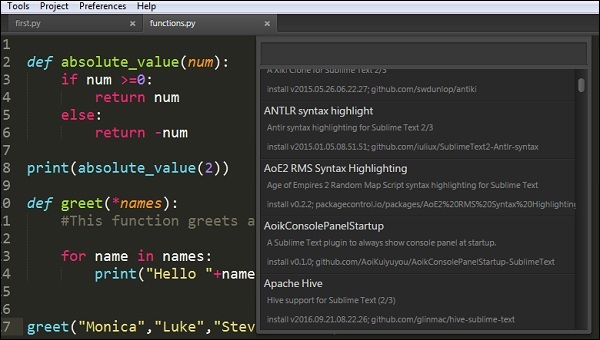
Software packages are installed in Sublime Text for additional functionalities. You can see the list of software packages through the shortcut key Ctrl+Shift+P on Windows and Cmd+Shift+P on Mac. Observe the following screenshots for a better understanding −
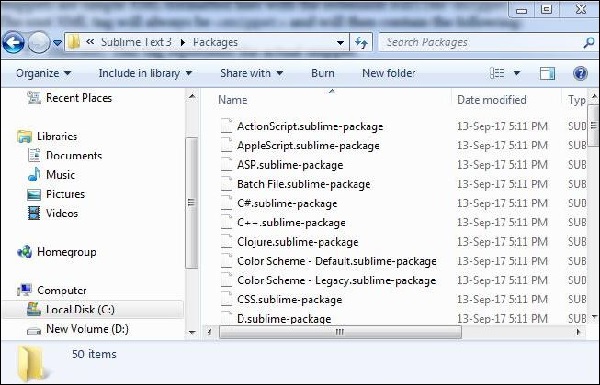
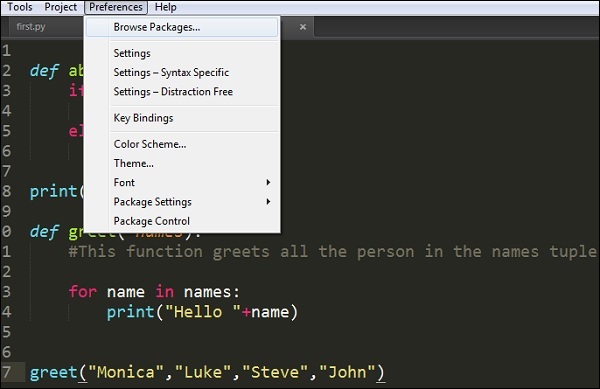
These packages are installed in the Packages → User directory which includes the entire necessary configuration. To browse the packages, select Preferences → Browse Packages option, as shown in the screenshot below −
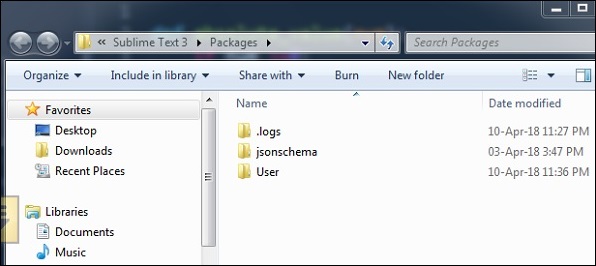
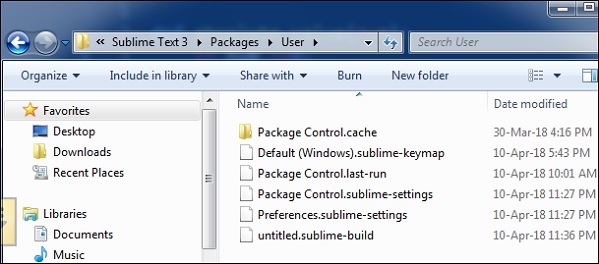
These files are the customized configuration which can be changed as and when needed. The packages are created in JSON format.
Consider the sublime-keymap package created which includes following code −
[
   {
      "keys": ["super+alt+;"],
      "command": "run_macro_file",
      "args": {"file": "Packages/User/semicolon.sublime-macro"}
   }
]
Sublime Text — Menus
In this chapter, you will learn about the primary options of File, Edit and Goto menus of Sublime Text editor.
Save with Encoding
This option is included in the File menu which helps in saving the scripts and file with appropriate encoding. Sublime Text Editor includes a variety of options for encoding Python scripts, as shown in the following screenshot −
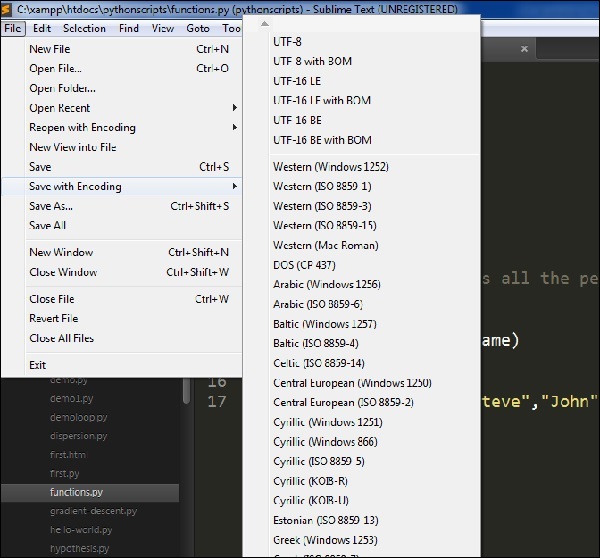
Encoding process helps the scripts to be secured from third-party attacks and allows the perceived item of use or interest which to be converted into a construct.
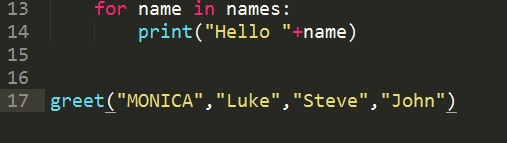
Convert Case
Convert case helps in the conversion of upper case to lower case and vice versa. Refer to the following screenshot for a better understanding −
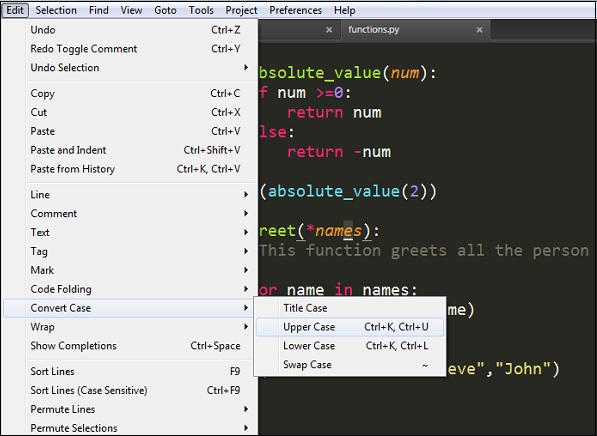
For example, consider a keyword Monica included in the file and let us convert it to uppercase. Refer to the following screenshot for a better understanding −
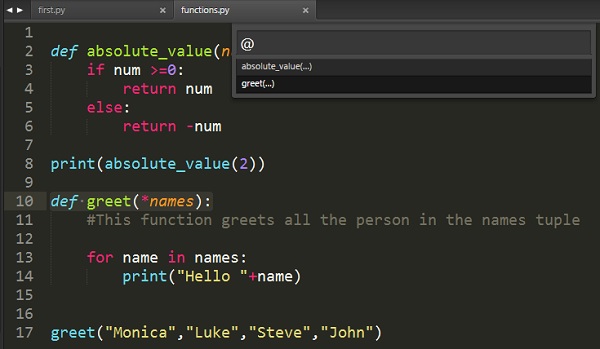
Goto Symbol
With this option, a user can search or get the appropriate keyword or any function. This option is very beneficial when we have more than 1000 lines of code and user got to search a unique line or annotation.
The following screenshot shows the demonstration of Goto Symbol −
Sublime Text — Sub Menus of Font
The previous chapters discussed various options related to the Preferences menu. In this chapter, you will learn in detail about the Font settings of Sublime Text editor.
Sublime Editor offers three dimensions of font sizes − Larger, Smaller and Reset option to undo the particular changes made. Implementing the specified font is possible once the user selects the appropriate paragraph or text in editor.
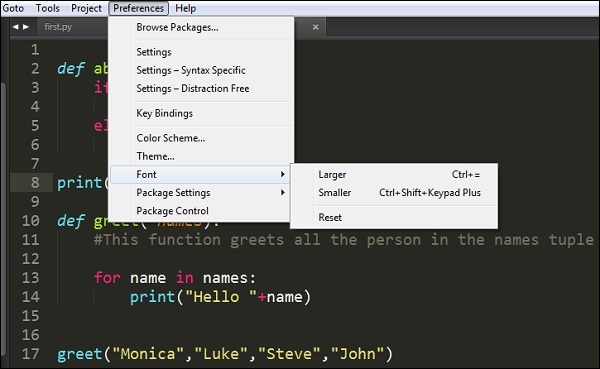
Consider a selected text in the file functions.py where the you need to make desired changes −
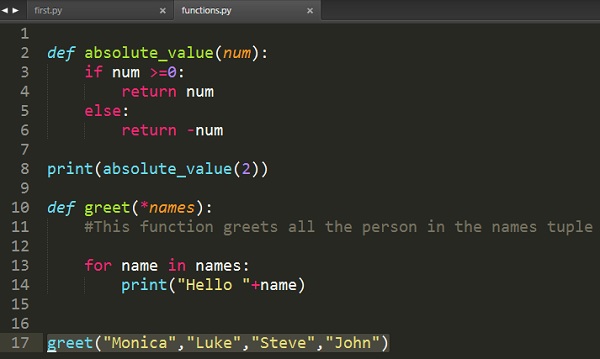
Observe that after the implementation of larger font, the dimensions and font size of the scripts will be automatically changed to larger dimension.

Sublime Text — Developing Plugin
Every editor includes plugin for the development, that triggers set of activities and default packages. Sublime Text editor includes a feature for developing your own customized plugin. This chapter discusses in detail about developing your own plugin in Sublime Text.
Developing Plugin
The following steps show you in detail how to develop a plugin in Sublime Text −
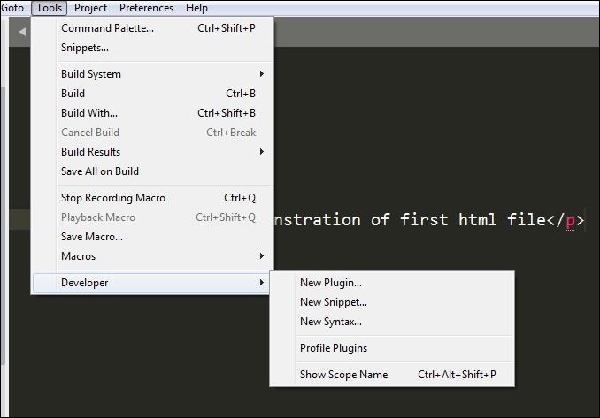
Step 1 − Select the New Plugin option by navigating through Tools → Developer → New Plugin as shown below −

Step 2 − The basic code of a plugin includes import of two main libraries: sublime and sublime_plugin.
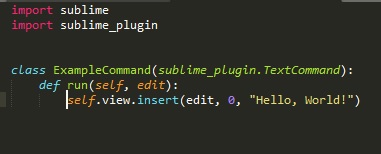
The code for the plugin is −
import sublime
import sublime_plugin
class ExampleCommand(sublime_plugin.TextCommand):
   def run(self, edit):
      self.view.insert(edit, 0, "Hello, World!")
Step 3 − The customized plugins are saved in Packages → User folder. Refer to the following screenshot that gives you the complete understanding of the plugins saved in Sublime Text editor.
Running the plugin
When you have created a plugin and saved it, open the console using the shortcut key Ctrl+` on Windows and Cmd+` on OSX, and execute the command shown here −
view.run_command(plugin-name)
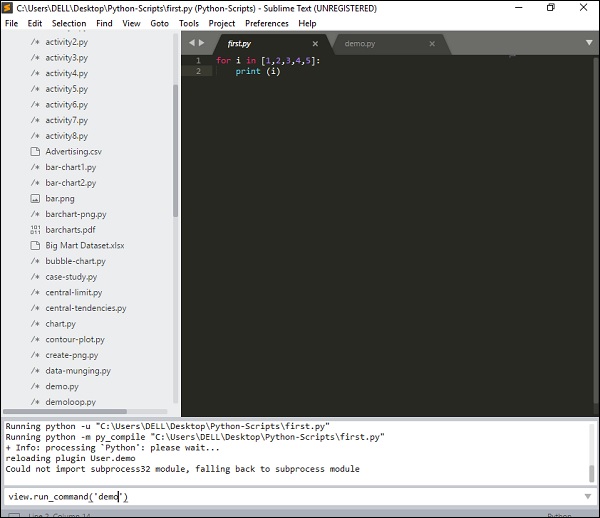
This command will execute the plugin defined by the user with the list of activities included in it.
Sublime Text — Command Palette
Command Palette includes a list of items or commands which are used frequently. The entries of commands are included in the .sublime-commands file.
Using Command Palette
To open a command palette in Sublime Text editor, you can use the shortcut key combination Ctrl+Shift+P on Windows and Cmd+Shift+P on OSX.
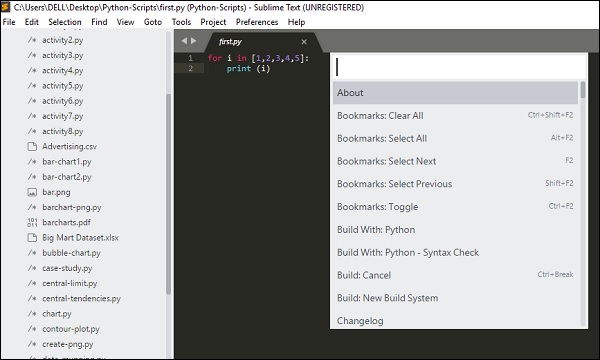
The commonly used commands from the palette are −
- Build with Python
- Install Packages
Build with Python
This will generate all the dependencies and build the specified code of a given Python file.
Install Packages
With this command, we get list of packages which can be installed which is not included earlier.
All the commands included in the command palette are stored in the Packages directory. The basic example of command declared inside the Default.sublime-commands file is shown in the code given below −
[
   { "caption": "Project: Save As", "command": "save_project_as" },

   { "caption": "Project: Close", "command": "close_project" },

   { "caption": "Project: Add Folder", "command": "prompt_add_folder" },
]
Note − The JSON file includes 3 main keys for every command −
- Name/Caption
- Location
- Content
Sublime Text — Debugging PHP Application
Debugging is the process of finding errors and bugs in the given code and fixing them. Sublime editor includes various plugins that have debugging features, which helps in finding errors easily.
In this chapter, you will learn how to debug a PHP web application. Sublime uses Sublime TestX debug plugin for this purpose. The features of this plugin are −
-
It is an extension used for debugging the PHP files and scripts.
-
Provides a list of debugging and profiling capabilities.
-
Maintains stack traces and real time parameters like display and functionalities.
Installation of Sublime Plugin
To install Sublime Text Xdebug plugin, you will have to take the following steps −
Step 1 − Install package control palette installation with the shortcut of Ctrl+Shift+P or Cmd+shift+P.

Step 2 − After the successful installation of Xdebug client, the configuration file will be kept in the Installed Packages folder. The configuration file is the JSON file which includes the parameters for debugging a PHP web application.
Step 3 − Start the debug session of PHP file using the shortcut Ctrl+F9. You can also do it using the Start Debug option using command palette.
Step 4 − The split windows of XdebugClient will show the output of PHP file. It keeps a process of debugging code line by line. Refer to the following screenshot for a better understanding −
Debugging Javascript Application
Sublime Text Editor has a plugin Web Inspector for debugging JavaScript code. It helps us to set breakpoints, examine the console and evaluate sections of code. In this chapter, you will learn in detail about this plugin.
Installation of Sublime Web Inspector
The following steps show the installation of Sublime Web Inspector −
Step 1
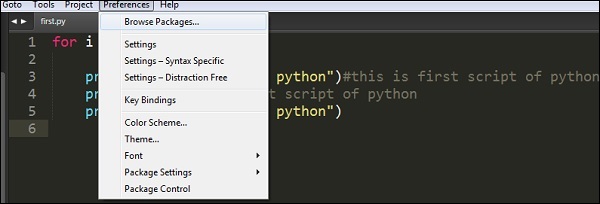
Use the menu option Preferences → Browse Packages to get the path of installed packages as shown in the given screenshot.

Step 2
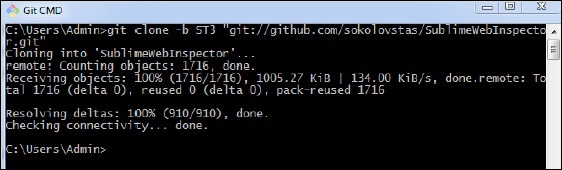
With the help of git command prompt, clone the packages of Debugging Javascript web application using the git repository, as shown in the command given below −
git clone -b ST3 "git://github.com/sokolovstas/SublimeWebInspector.git"
Step 3
To test the installation, open a command palette and start the web inspector. You can use the shortcut key for web inspector Ctrl+Shift+R on Windows and Cmd+Shift+R on OSX systems. You can see all the breakpoints needed for JavaScript application, as shown below −

Sublime Text — Batch Processing
Batch processing in Sublime Text also refers to Build systems. Build systems helps user to run files through external programs such as make, tidy and interpreters.
The following points are worth notable while working with Build systems −
-
They are JSON files and have the extension .sublime-build.
-
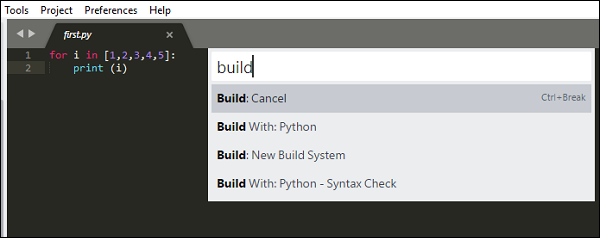
To initiate the build process, you can select the option Tools → Build or the shortcut Ctrl+B on Windows and Cmd+B for OSX system.
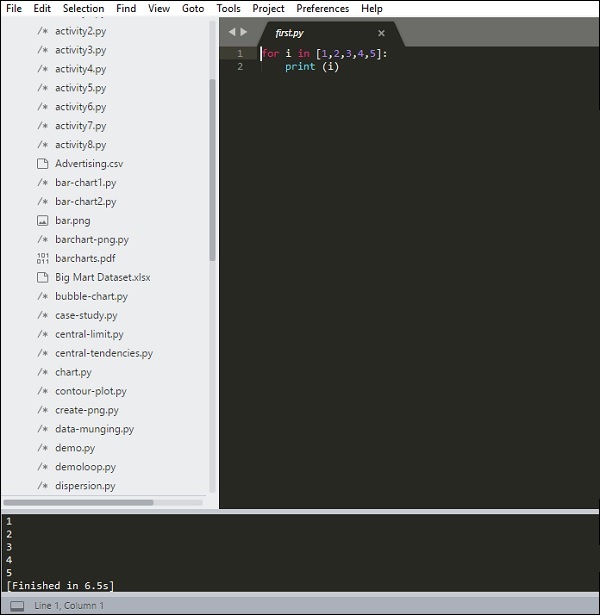
Recall that throughout this tutorial, we are focusing on Python files. Sublime text includes two build modes for python files.
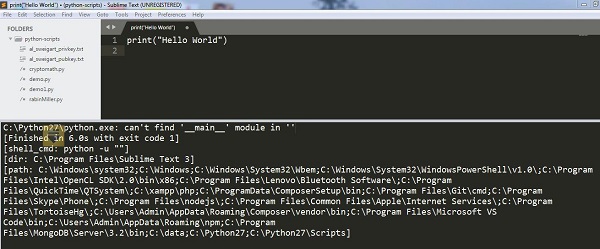
Once the build for Python is completed, you can observe the following output on the editor −
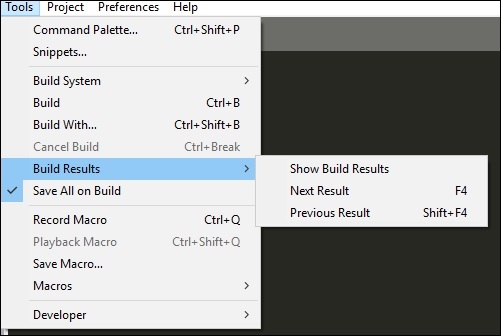
You can see the list of build results created for the specific project in Sublime Text editor using the option Tools → Build Results → Show Build Results.
Note that build systems and the complete files associated with batch processing must be located under the Packages folder (Packages/user). Many packages in Sublime Editor include their own build systems.
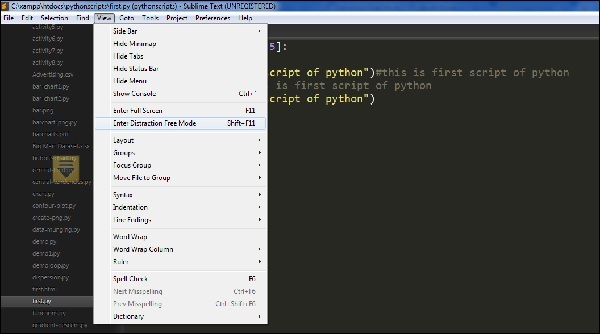
Sublime Text — Distraction Free Mode
Distraction Free Mode in Sublime Text editor allows displaying the code and files full screen. You can enter distraction free mode via option View → Enter distraction mode menu item.
Once the distraction mode is enabled in the Sublime Text editor, the output will be visible as below −
All UI chrome accessible items are hidden, but accessible in distraction mode.
Customization
All the properties of customization of distraction free mode of Sublime Text editor are included in Distraction Free.sublime-settings JSON file as shown in the screenshot given below.
The following screenshot shows the properties included in Distraction free mode of Sublime editor −

Note that the attributes like line_numbers, gutter, draw_centered, wrap_width, word_wrap and scroll_past_end are such that they enable attractive distraction free mode.
Sublime Text — SublimeCodeIntel Plugin
SublimeCodeIntel is an important plugin for the Sublime Text editor. It offers the following features −
-
Jump to symbol feature, which helps the user to jump to the file and the specified line of the symbol.
-
Includes library of autocomplete and displays the modules/symbols in real time.
-
Tooltips display information in the status bar about the associated function.
Installation
You can install the SublimeCodeIntel plugin through the following steps −
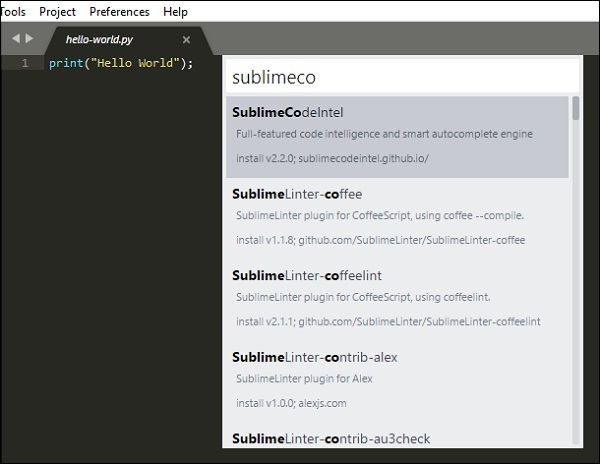
Step 1 − Get the install package functionality of Sublime Text editor using the shortcut Ctrl+Shift+P on Windows and Cmd+Shift+P for OSX system. Refer to the following screenshot for better understanding −
Step 2 − Now, select the plugin SublimeCodeIntel for installation and restart the Sublime Text editor.
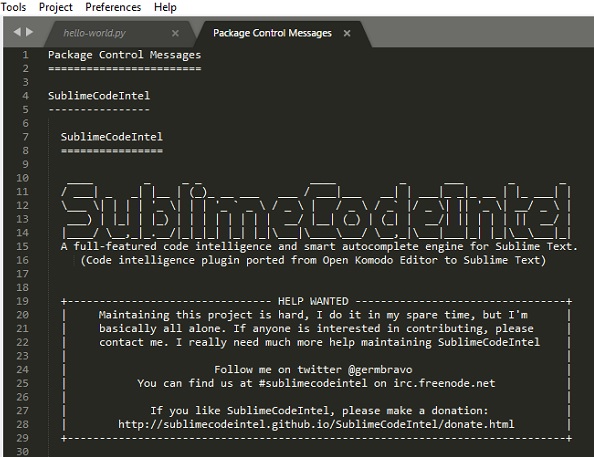
Step 3 − On successful installation of SublimeCodeIntel plugin, your screen will look like this −
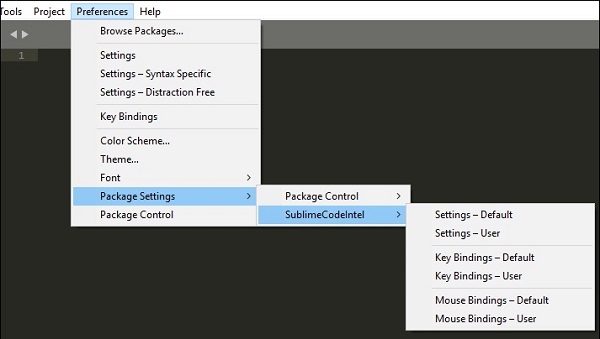
Configuration
There are two in built configurations of SublimeCodeIntel −
- Settings − Default
- Settings − User
Refer to the following screenshot that shows these configurations −
The configuration for SublimeCodeIntel is included in the JSON file called SublimeCodeIntel.sublime-settings. The configuration needed for each language is included in SublimeCodeIntel plugin as below −
/*
   Defines a configuration for each language.
*/

"codeintel_language_settings": {
   "Python3": {
      "python3": "/usr/local/bin/python3.3",
      "codeintel_scan_extra_dir": [
         "/Applications/Sublime Text.app/Contents/MacOS",
         "~/Library/Application Support/Sublime Text 3/Packages/SublimeCodeIntel/arch",
         "~/Library/Application Support/Sublime Text 3/Packages/SublimeCodeIntel/libs"
      ],
      "codeintel_scan_files_in_project": true,
      "codeintel_selected_catalogs": []
   },

   "JavaScript": {
      "codeintel_scan_extra_dir": [],
      "codeintel_scan_exclude_dir":["/build/", "/min/"],
      "codeintel_scan_files_in_project": false,
      "codeintel_max_recursive_dir_depth": 2,
      "codeintel_selected_catalogs": ["jQuery"]
   },

   "PHP": {
      "php": "/Applications/MAMP/bin/php/php5.5.3/bin/php",
      "codeintel_scan_extra_dir": [],
      "codeintel_scan_files_in_project": true,
      "codeintel_max_recursive_dir_depth": 15,
      "codeintel_scan_exclude_dir":["/Applications/MAMP/bin/php/php5.5.3/"]
   }
}
These configurations can be customized as and when needed. It depends on the number of modules/libraries installed by the user with various parameters such as the size and complexity of the project a user is working on.
Sublime Text — Introduction
Sublime Text Editor is a full featured Text editor for editing local files or a code base. It includes various features for editing code base which helps developers to keep track of changes. Various features that are supported by Sublime are as follows −
- Syntax Highlight
- Auto Indentation
- File Type Recognition
- Sidebar with files of mentioned directory
- Macros
- Plug-in and Packages
Sublime Text editor is used as an Integrated Development Editor (IDE) like Visual Studio code and NetBeans. The current version of Sublime Text editor is 3.0 and is compatible with various operating systems like Windows, Linux and MacOS.
Why Sublime Text?
When you use a suitable Text editor, you can enjoy its rich beneficial features. Sublime Text offers its users the following benefits −
- Ability to solve linker errors.
- Keeping track of all files and folders to work with.
- Connectivity with version control systems like Git, Mercurial.
- Problem solving capabilities.
- Keeping color combination for syntax combination.
You can download Sublime Text from its official Website − www.sublimetext.com. In the next chapter, we will learn about installation procedure of Sublime Text editor in various operating systems.
Sublime Text — Installation
Sublime Text editor is supported by the following major operating systems −
- Windows
- Linux and its distributions
- OS X
You can download Sublime Text from its official website − www.sublimetext.com
In this chapter, you will learn about the installation of Sublime Text on various operating systems.
Installation on Windows
You will have to go follow the steps shown below to install Sublime Text on Windows −
Step 1 − Download the .exe package from the official website as shown below −
https://www.sublimetext.com/3
Step 2 − Now, run the executable file. This defines the environment variables. When you run the executable file, you can observe the following window on your screen. Click Next.
Step 3 − Now, choose a destination location to install Sublime Text3 and click Next.
Step 4 − Verify the destination folder and click Install.
Step 5 − Now, click Finish to complete the installation.
Step 6 − Upon a successful installation, your editor will appear as shown below −
Installation on Linux
You will have to follow the steps shown below to install Sublime Text on Linux distributions −
Step 1 − Using the command line terminal, install the packages for Sublime Text editor, using the command given below −
sudo add-apt-repository ppa:webupd8team/Sublime-Text-3
Step 2 − Update the packages using the following command −
sudo apt-get update
Step 3 − Install the Sublime Text repository using the following command −
sudo apt-get install Sublime-Text
After the successful execution of above mentioned commands, you will find that Sublime Text editor is installed on the system.
Installation on OSX
For OSX operating systems,
-
Download the .dmg file of Sublime Text Editor.
-
Open it and drag-and-drop in the Applications folder.
-
Follow the steps that you have seen in above two cases.
-
Launch the application.
Sublime Text — Data Directory
Throughout this tutorial, we will be focusing on using the subversion control system, Git and bit bucket in combination with Sublime Text editor.
As with any other Text editor, working on a specific repository is the key aspect of Sublime Text. It is shown in detail in the steps given below −
Step 1 − Consider a repository to be cloned from the bit bucket. Please note that we will be working with Python scripts throughout this tutorial.
Step 2 − Include the repository in Sublime Text editor using the Open Folder option, as shown below.
Step 3 − After including the repository, the screen of Sublime Text editor will be as shown below −
You can choose the file you wish to open from the list that is displayed in the left hand side of the screen, as shown in the image below −
Note that the color combination gives recognition of keywords and packages included in the code.
Sublime Text — Creating First Document
In this chapter, you will learn step by step how to create a file in Sublime Text.
Step 1 − Use the option New File to create a file in Sublime Text editor.
Step 2 − Once the new file is available, you can insert the code, similar to any other text editor, and save the file in your working repository.
Step 3 − Once you save the associated file, Sublime Text editor provides a variety of options based on the type of file, for example .php for PHP scripts, .py for Python scripts and .java for Java code base.
Step 4 − As our code repository is on Python project, we will save the file as demo1.py, as shown below −
Sublime Text — Editing First Text Document
Code editors allow the users to edit the code scripts and text documents with various shortcut keys. In this chapter, let us understand through various examples about editing options of first text document in Sublime Text.
Simultaneous Write-Up
In this example, you will see how to add print statements at two locations.
Step 1 − Consider the first script of Python with the following code in it −
Step 2 − Let us suppose that, in the given script you want to mention the starting and ending points of the loop, using simple statements. You can write the print statement wherever required, however, in Sublime Text editor you can simultaneously add comments and statements in two places with a shortcut of Ctrl+cursor point for Windows or Linux, and Cmd+cursor point for Mac. Then, you can see the cursor points as mentioned below −
Step 3 − Now, you can insert the print statements at both the locations of the mentioned cursor points, as shown in the image below.
Finding Occurrences
Sublime Text editor includes a feature to find the occurrences of the keywords included in the scripts. The shortcut key for finding occurrences of the keyword is Ctrl+D after highlighting the associated keyword.
If you want to search for a keyword, say print from the given code, you can use Ctrl+D or Cmd+D to get the count of occurrences of the associated keyword.
Appending Comments in Line
We can append comments at the end of line using the shortcut key Ctrl+Shift+L for Windows and Cmd+Shift+L for Mac operating system after selecting the code section where you actually need the comment.
Sublime Text — Patterns of Code Editing
There are various types of code editing and shortcut keys used in Sublime Text editor −
- Splitting the selection into lines
- Wrapping the complete paragraph in HTML file
- Finding all occurrences
This chapter discusses each of them in detail.
Splitting the Selection into Lines
The key combination Ctrl+Shift+L allows you to select the blocks of lines and split them, on Windows. The screenshot given below explains this −
Wrapping Complete Paragraph in HTML File
The key combination Alt+Shift+w for Windows and Cmd+Shift+w for Mac, allows the user to split the sections of code and create various paragraphs. It is referred as a wrap selection with html tag. This also allows you to include HTML tags using Sublime editor.
The screenshot given below explains wrapping text with a HTML tag −
After wrapping the text, the text wrapped with a HTML tag will be seen as shown below −
Finding all Occurrences
The key pattern Ctrl+Shift+f allows you to find a keyword in a given project. The screenshot given below explains this −
The shortcut key opens a window with three options included in it, namely find, where and replace,
where,
-
find refers to the search of the particular keyword,
-
where mentions the section as to which repository is searched, and
-
replace mentions the keyword which is replaced instead of find keyword.
Sublime Text — Sublime Linter
Linting is the process of flagging suspicious constructs and likely to be bugs in any programming language.
Sublime Linter is the package of Sublime Text that helps you to perform linting in Sublime. It helps in creating files in different modes for the manipulation of code base. It is not an in built package and you need to install it manually.
You can install any package control in Sublime Text editor using the shortcut key combination Ctrl+Shift+P, and selecting the Package Control: Install Package option.
Select the associated package to install in Sublime Text editor. To install Sublime Linter, you need to select the option of SublimeLinter plugin.
On successful installation, your screen will look as shown below −
Modes of Sublime Linter
Sublime Linter runs in four different modes as mentioned below −
Background Mode
When the Sublime Linter key is set to true, linting is performed in the background constantly each time the file is modified.
Load-Save Mode
When the Sublime Linter key is set to , linting load savewill be performed when a file is loaded from the repository.
Save-Only Mode
When the Sublime Linter key is set to save only mode, linting is performed while saving the particular file in working repository.
On Demand Mode
In the on-demand mode, the Sublime Linter will be set to true, using the shortcut Ctrl+Alt+L, which sets up the linter to detect bugs, if any present in the code.
Sublime Text — Shortcuts
Sublime Text editor includes shortcuts and methods for manipulating the output. This chapter discusses in detail about these shortcuts with the help of suitable illustrations.
Opening the Command Palette
Command palette in Sublime Text editor includes options for installing packages and console. The shortcut key for this purpose is Ctrl+Shift+P for Windows and Cmd+Shift+P for Mac. The screenshot given below shows opening the command palette using this shortcut.
Toggle Side Bar
Sublime text editor includes a side bar which displays the scripts or the file names. You can use the shortcut key Ctrl+KB on Windows and Cmd+KB for Mac for this purpose.
Display Scope in Status Bar
The shortcut key Ctrl+Shift+Alt+P for Windows and Ctrl+Shift+P for Mac displays scope in the status bar. The following screenshot shows an illustration of this shortcut.
Python Console
When you are working with Python scripts using Sublime Text editor, you can use Ctrl+` for Windows or Control + ` for Windows, to operate the Python console.
New Window
With new windows, you can manage a number of projects simultaneously. You can use the shortcut key Ctrl+Shift+N on Windows and Cmd+Shift+N for Mac to create a new window on Sublime Text editor.
Sublime Text — Snippets
Snippets are the smart templates which can be reused whenever needed. Sublime text editor includes snippets feature for HTML templates. In this chapter, you will learn about them in detail.
Understanding Snippets
Snippets are simple XML supported files with various attributes. They include an extension called sublime-snippet. The root tag of XML element will be the <snippet> tag. Snippets created are saved in the Packages folder and are considered to live in this folder.
The file format and syntax of snippets are discussed in detail as follows −
-
Content −This section includes description of the snippet.
-
tabTrigger − It includes a sequence of characters which trigger when the snippet is written.
-
Scope − It defines the scope in which the snippet remains active.
-
Description − It includes all the meta description. It will be displayed when snippet’s menu is open.
Creating First Snippet
You can create the default snippet using Tools → Developer → Snippet option.
Then, a demo snippet with the associated tags will be created as shown below −
To create a first snippet in Sublime Text editor, click the Tools menu and select the Snippets option from the drop down window, as shown in the screenshot here.
Now, choose Snippet:html from the options displayed.
This creates a default snippet on the specified html file as shown below.
Note that there are various snippets for different types of files. For html files in the code base, there are three snippets defined in Sublime Text editor, as shown below.
Package Control Snippets
Control snippets are primarily used for product development. With install packages option in Sublime editor, you can download any snippet needed for web development and install it.
You may need the following packages for web development −
- EverCodeLab Sublime supports for Ruby on Rails
- Additional PHP snippets for PHP
- HTML snippets for HTML files
- Twitter Bootstrap snippets for Twitter Bootstrap
- JavaScript snippets for JS files
- jQuery snippets pack for jQuery
Sublime Text — Macros
Macros are the basic automation facility that includes a sequence of commands. You can use macros whenever you need to perform an operation which includes same steps.
Macro files are JSON files with an extension called .sublime-micro and are considered to be very helpful.
Recording a Macro
Recording a macro defines the procedure to keep a set of commands needed for the given file. You can record a macro in two ways −
-
Use the shortcut key Ctrl+Q for recording a macro in Windows and Cmd+Q in Mac.
-
Use the record option in Tools → Record Macro.
Once the macro has started recording, you can see the following message in Sublime Text editor −
Playing a Macro
You can use the shortcut key Ctrl+Shift+Q on Windows and Cmd+Shift+Q for Mac, to play a macro recorded by the user in Sublime Text. Note that this shortcut plays the last recorded macro in Sublime.
Saving a Macro
You can save a recorded macro using the option Tools → Save Macro. The following screenshot shows how to save a macro using this option.
You can also redefine the macros using various options in Tool menu bar, as shown below −
Sublime Text — Key Bindings
Key bindings in Sublime Text helps a user to process and map the sequences of key presses to actions. They are defined in the JSON format and are stored in .sublime-keymap files.
For better integration, it is important to keep separate key map files for Linux, OSX and Windows. Key maps of the corresponding platform will be loaded in the Sublime Text editor.
A user can open the keymap file or default key bindings using the option Preferences → Key Bindings.
The following example shows how to perform key bindings in Windows −
[
   { "keys": ["ctrl+shift+n"], "command": "new_window" },
   { "keys": ["ctrl+shift+w"], "command": "close_window" }
]
Defining Key Bindings
Sublime Text editor includes an option to define a key map. The key bindings defined in the file .sublime-keymap includes all the key value combinations.
You can include the following key binding set into this file and save them to check the execution, with the help of the code shown below −
[
   {
      "keys": ["super+alt+;"], "command": "run_macro_file",
      "args":
      {"file": "Packages/User/semicolon.sublime-macro"}
   }
]
Here super is the Winkey in Windows or Linux, and a command on OSX operating system. Note that this code will run the macro that is located in Packages/User and is named semicolon.sublime-macro on pressing the Super+Alt+ keys.
Sublime Text — Column Selection
In this chapter, you will learn various shortcuts keys to move and select the columns of a file in Sublime Text.
Moving the Pointer to the Beginning of Code
You can use the shortcut Ctrl+Home to move the pointer to the beginning of the code in Sublime Text editor.
Observe the sample code shown here.
The screenshot given below shows the same code where the cursor is moved to its beginning.
Extending a Column
You can use the shortcut Ctrl+L to extend a specified column. This shortcut will select the column which includes the pointer. The following screenshot explains this in a detailed manner −
Trimming a column
You can use the shortcut Ctrl+K to trim the specified column of the file. For OSX, you will have to use the key combination Cmd+K for this purpose.
The example shown here displays the code where the line mentioned in the fifth column is trimmed.
Split a Block of Text
You can use the shortcut Ctrl+Shift+K to split a selected block of text into two selections.
Note − The difference in key combinations from the previous key combination is that columns are visible. Ctrl+Shift+K removes the column number from the specified code, whereas Ctrl+K keeps the column number intact after trimming the entire column.
Sublime Text — Indentation
Indentation is the process of maintaining the code blocks of programming languages to maintain a systematic structure. It helps to convey the developers a better structure of program. This chapter explains you in detail about indentation in Sublime Text editor.
Importance of Indentation
Indentation helps to maintain the code structure such that it is easily understood by anyone who accesses it. Proper indentation imparts the following features to the code −
- Readability
- User-friendliness
- Adaptability
- Ease of maintenance
Options for Indentation in Sublime Text
Sublime Text editor provides various options for code indentation as shown in the following screenshot −
The usage of these options is discussed in detail here −
Indent Option
Indent option helps to create indentation of the specified code. You have to select the code specified and select the Indent option. You can also use the shortcut Ctrl+[ after selecting the required code that is to be indented. Refer to the following screenshot for a better understanding −
Unindent Option
Unindent option works in the reverse of indent procedure. The shortcut for the unindent option is Ctrl+]. Refer to the following screenshot for a better understanding −
Reindent Option
Reindent option is used to undo the unindent option and revert the code back to the same condition. Refer to the following screenshot for a better understanding −
Benefits of Indentation
Proper indentation offers various benefits to the code and developers. They are discussed below −
-
Code blocks will be visible without much effort.
-
Developer can focus on lines of code that are necessary and easily ignore the irrelevant ones.
-
A developer using the same kind of code structure multiple times need not focus on the start of block and end of block statements.
-
Any misplaced lines of code can be easily identified.
Sublime Text — Base Settings
Base settings of the Sublime Text editor are the configuration needed for editor such as font size, display of line numbers or color scheme of the editor.
All the base settings are configured in JSON format. To view the list of settings, go to menu of Preferences -> Settings.
The settings include two types of configurations namely −
- Default
- User
Default includes all the default configurations and user defines the customized settings for base settings.
For the scenario mentioned above, the customized settings are as mentioned below −
"font_size": 15,
   "ignored_packages":
   [
      "Vintage"
   ]
Categories of Settings
Various categories of the settings in Sublime Text are as follows −
Editor Settings
These include the basic settings for editing the files of the code base. Examples include font_face, font_size and tab_size. The settings are present in the default configuration.
User Interface Settings
These include the general settings which specifically focus on background, theme and various color combinations. These settings are appended in the second section of the default configuration.
Application Behavior
These settings focus on behavior of the application included in Sublime Text editor across open windows. These settings are included in the third section of default configuration settings.
Syntax — Specific Settings
These settings are used for designing the syntax of Sublime Text editor. To get the list of syntax specific settings, the user needs to use option Preferences − Syntax-Specific.
Sublime Text — Theme Management
Theme management in Sublime text editor implies enhancing the appearance of editor with colors and attractive backgrounds. Themes are JSON formatted values with .sublime-theme extension and manage the appearance of the user interface of the editor by changing the colors of elements of the IDE.
Installing and Applying Themes
The following steps will guide you about installing and applying themes in Sublime Text editor −
Step 1 − Use the Install Package of the Sublime Text to install package for themes, as shown in the screenshot here −
Step 2 − You can see a list of options with Install Package option and you can download them and install in Sublime Text editor.
Step 3 − Once you select a theme, activate it.
Step 4 − Now select your desired theme from the list of installed theme list. This automatically changes the appearance of the editor.
Color Schemes
Color schemes are XML formatted files located at the Packages folder with color schemes. They are an awesome way for the customization of Sublime text colors, unlike themes which are specific to UI elements.
You can choose color schemes using option Preferences → Color Scheme. Refer to the following screenshot that shows the same.
Color schemes include various options such as Breakers, Mariana, Monokai, and Sixteen. The appearance of the editor depends on the color scheme that you choose. Note that these patterns will only focus on color syntax.
Sublime Text — Understanding Vintage Mode
Vintage mode in Sublime text editor is a package that includes a combination of editing features of vi. Vintage Mode lets you to use a list of vi commands in the Sublime editor.
Vintage mode is an open source project and you can download it from the link −
https://github.com/sublimehq/Vintage
Understanding vi editor
Vi is a primitive and popularly used text editor. It was originally created for UNIX operating system and with basic functionality of scripts execution. It is a popularly used command line editor across various operating systems because it does not require mouse for operations.
Sublime includes vim, which is an advanced section of vi editor, and includes customization of macros, snippets and plugins.
Enabling Vintage Mode
You can enable Vintage mode through the following steps −
-
Select the option Preferences → Settings
-
Edit the json file of the settings configuration with key name as ignored_packages. Vintage package is included in the ignored_packages section.
-
Remove the attribute of Vintage from the configurations to enable Vintage property in Sublime text editor.
"ignored_packages": []
-
Your vintage mode editor will appear as shown in the following screenshot −
Sublime Text — Vintage Commands
Vintage mode includes a variety of commands similar to the vi editor. This includes the basic settings of Sublime Text editor as shown in the code given below −
{
   "color_scheme": "Packages/Color Scheme - Default/Monokai.tmTheme",
   "font_size": 15,
   "ignored_packages":
   [

   ],
   "vintage_start_in_command_mode": true,
   "theme": "Soda Dark.sublime-theme"
}
| Mode | Description | Key |
|---|---|---|
| Command Mode | Waits for the user to enter a command | Esc |
| Insert Mode | Text can be inserted in different positions | i/I/a/A |
| Visual Mode | Select/highlight the text using the Movement Commands | V |
| Visual Line Mode | Select/highlight lines of text using the arrow keys | Shift + V |
Vintageous Mode
Vintageous is the package used for the descriptive analysis of vi editor. It can be downloaded using package control as mentioned below −
Once you successfully install the vintageous package, your screen will look like as shown in the following screenshot −
Sublime Text — Testing Javascript
Sublime Editor includes testing modules for various programming languages. This helps in unit testing of files and scripts and helps developers to analyze bugs, errors and issues, if any.
Sublime Text editor includes 3 modules which are necessary for testing and deployment of JavaScript. This chapter discusses them in detail.
JsFormat
JsFormat is a JavaScript plugin used for formatting the script lines which eases the unit testing process. Behind the scenes, it uses JS beautifier (http://jsbeautifier.org/) to format the full JS or portions of JS files. JSFormat can be installed using the Install Package option of Sublime editor.
Features
JsFormat offers the following features to the script −
- Eases JS and JSON file formatting.
- Offers full text formatting and selected formatting.
- Provides customizable settings for formatting options.
JSHint
JSHint is a community driven tool used for analyzing the mistakes through hints. This helps to detect errors and potential problems. JSHint is an open source package, simple and easy to understand. You can install JSHine in Sublime Text editor through Install Package mode.
To implement JSHint plugin in Sublime Text Editor, you can use the shortcut Alt+J on Windows and Cmd+j on OSX systems.
JavaScriptNext
This script is used to highlight the syntax of JS file and its associated meaning. It includes a feature of syntax highlight with various modules, arrow functions, classes and generators.
You can perform syntax check on a file using the syntax list as shown in the screenshot below −
Sublime Text — Testing Python Code
Python offers unittest, an official unit testing framework for unit testing the scripts designed before deployment. It is also called as PyUnit. Python unit tests used in Sublime Text editor are called as sublime-unittests and they are available in the following link −
https://github.com/martinsam/sublime-unittest
These unit tests contain a number of useful snippets to ease the writing of unit test cases.
Installation of UnitTest
The package control of Sublime manages the installation of unittests and the following steps describe it in detail −
Step 1 − Use the command palette of Sublime Editor Ctrl+Shift+P for installation of the package, as shown in the screenshots given below −
Step 2 − The installed packages use the following two main snippets −
-
testclass which is used to create a new test class
-
testfunc which is used to create a new test function for us to fill out
Step 3 − The console computes test results as shown in the screenshot below. Note that the result depends on the success or failure of the test.
Success Result
Failure Result
Note − Unit test cases work as a compiler for computing scripts in python.
Sublime Text — Spell Check
Sublime Text Editor uses Hunspell for spell checking process. Hunspell is the spell checker of LibreOffice, Mozilla Thunderbird, Google chrome and many proprietary packages. Sublime Text editor includes dictionary support for proper spell check of words.
Dictionaries
Sublime Text includes UTF-8 encoded dictionaries. To implement a dictionary with Sublime Text editor, it should be first converted into UTF-8. If the user has UTF-8 encoded dictionary, it can be installed using the Preferences option in Sublime Text editor.
You can select the dictionary from View → Dictionary menu as shown in the given screenshot −
Settings for Dictionary
There are two settings defined for the spell check of Sublime Text Editor −
- Spell_check
- Dictionary
// Set to true to turn spell checking on by default
"spell_check": false,

// Word list to use for spell checking
"dictionary": "Packages/Language - English/en_US.dic"
These configurations are included in the settings file. Added and ignored words are stored in the user settings under the added_words and ignored_words keys, respectively.
Sublime Text — Packages
Software packages are installed in Sublime Text for additional functionalities. You can see the list of software packages through the shortcut key Ctrl+Shift+P on Windows and Cmd+Shift+P on Mac. Observe the following screenshots for a better understanding −
These packages are installed in the Packages → User directory which includes the entire necessary configuration. To browse the packages, select Preferences → Browse Packages option, as shown in the screenshot below −
These files are the customized configuration which can be changed as and when needed. The packages are created in JSON format.
Consider the sublime-keymap package created which includes following code −
[
   {
      "keys": ["super+alt+;"],
      "command": "run_macro_file",
      "args": {"file": "Packages/User/semicolon.sublime-macro"}
   }
]
Sublime Text — Menus
In this chapter, you will learn about the primary options of File, Edit and Goto menus of Sublime Text editor.
Save with Encoding
This option is included in the File menu which helps in saving the scripts and file with appropriate encoding. Sublime Text Editor includes a variety of options for encoding Python scripts, as shown in the following screenshot −
Encoding process helps the scripts to be secured from third-party attacks and allows the perceived item of use or interest which to be converted into a construct.
Convert Case
Convert case helps in the conversion of upper case to lower case and vice versa. Refer to the following screenshot for a better understanding −
For example, consider a keyword Monica included in the file and let us convert it to uppercase. Refer to the following screenshot for a better understanding −
Goto Symbol
With this option, a user can search or get the appropriate keyword or any function. This option is very beneficial when we have more than 1000 lines of code and user got to search a unique line or annotation.
The following screenshot shows the demonstration of Goto Symbol −
Sublime Text — Sub Menus of Font
The previous chapters discussed various options related to the Preferences menu. In this chapter, you will learn in detail about the Font settings of Sublime Text editor.
Sublime Editor offers three dimensions of font sizes − Larger, Smaller and Reset option to undo the particular changes made. Implementing the specified font is possible once the user selects the appropriate paragraph or text in editor.
Consider a selected text in the file functions.py where the you need to make desired changes −
Observe that after the implementation of larger font, the dimensions and font size of the scripts will be automatically changed to larger dimension.
Sublime Text — Developing Plugin
Every editor includes plugin for the development, that triggers set of activities and default packages. Sublime Text editor includes a feature for developing your own customized plugin. This chapter discusses in detail about developing your own plugin in Sublime Text.
Developing Plugin
The following steps show you in detail how to develop a plugin in Sublime Text −
Step 1 − Select the New Plugin option by navigating through Tools → Developer → New Plugin as shown below −
Step 2 − The basic code of a plugin includes import of two main libraries: sublime and sublime_plugin.
The code for the plugin is −
import sublime
import sublime_plugin
class ExampleCommand(sublime_plugin.TextCommand):
   def run(self, edit):
      self.view.insert(edit, 0, "Hello, World!")
Step 3 − The customized plugins are saved in Packages → User folder. Refer to the following screenshot that gives you the complete understanding of the plugins saved in Sublime Text editor.
Running the plugin
When you have created a plugin and saved it, open the console using the shortcut key Ctrl+` on Windows and Cmd+` on OSX, and execute the command shown here −
view.run_command(plugin-name)
This command will execute the plugin defined by the user with the list of activities included in it.
Sublime Text — Command Palette
Command Palette includes a list of items or commands which are used frequently. The entries of commands are included in the .sublime-commands file.
Using Command Palette
To open a command palette in Sublime Text editor, you can use the shortcut key combination Ctrl+Shift+P on Windows and Cmd+Shift+P on OSX.
The commonly used commands from the palette are −
- Build with Python
- Install Packages
Build with Python
This will generate all the dependencies and build the specified code of a given Python file.
Install Packages
With this command, we get list of packages which can be installed which is not included earlier.
All the commands included in the command palette are stored in the Packages directory. The basic example of command declared inside the Default.sublime-commands file is shown in the code given below −
[
   { "caption": "Project: Save As", "command": "save_project_as" },

   { "caption": "Project: Close", "command": "close_project" },

   { "caption": "Project: Add Folder", "command": "prompt_add_folder" },
]
Note − The JSON file includes 3 main keys for every command −
- Name/Caption
- Location
- Content
Sublime Text — Debugging PHP Application
Debugging is the process of finding errors and bugs in the given code and fixing them. Sublime editor includes various plugins that have debugging features, which helps in finding errors easily.
In this chapter, you will learn how to debug a PHP web application. Sublime uses Sublime TestX debug plugin for this purpose. The features of this plugin are −
-
It is an extension used for debugging the PHP files and scripts.
-
Provides a list of debugging and profiling capabilities.
-
Maintains stack traces and real time parameters like display and functionalities.
Installation of Sublime Plugin
To install Sublime Text Xdebug plugin, you will have to take the following steps −
Step 1 − Install package control palette installation with the shortcut of Ctrl+Shift+P or Cmd+shift+P.
Step 2 − After the successful installation of Xdebug client, the configuration file will be kept in the Installed Packages folder. The configuration file is the JSON file which includes the parameters for debugging a PHP web application.
Step 3 − Start the debug session of PHP file using the shortcut Ctrl+F9. You can also do it using the Start Debug option using command palette.
Step 4 − The split windows of XdebugClient will show the output of PHP file. It keeps a process of debugging code line by line. Refer to the following screenshot for a better understanding −
Debugging Javascript Application
Sublime Text Editor has a plugin Web Inspector for debugging JavaScript code. It helps us to set breakpoints, examine the console and evaluate sections of code. In this chapter, you will learn in detail about this plugin.
Installation of Sublime Web Inspector
The following steps show the installation of Sublime Web Inspector −
Step 1
Use the menu option Preferences → Browse Packages to get the path of installed packages as shown in the given screenshot.
Step 2
With the help of git command prompt, clone the packages of Debugging Javascript web application using the git repository, as shown in the command given below −
git clone -b ST3 "git://github.com/sokolovstas/SublimeWebInspector.git"
Step 3
To test the installation, open a command palette and start the web inspector. You can use the shortcut key for web inspector Ctrl+Shift+R on Windows and Cmd+Shift+R on OSX systems. You can see all the breakpoints needed for JavaScript application, as shown below −
Sublime Text — Batch Processing
Batch processing in Sublime Text also refers to Build systems. Build systems helps user to run files through external programs such as make, tidy and interpreters.
The following points are worth notable while working with Build systems −
-
They are JSON files and have the extension .sublime-build.
-
To initiate the build process, you can select the option Tools → Build or the shortcut Ctrl+B on Windows and Cmd+B for OSX system.
Recall that throughout this tutorial, we are focusing on Python files. Sublime text includes two build modes for python files.
Once the build for Python is completed, you can observe the following output on the editor −
You can see the list of build results created for the specific project in Sublime Text editor using the option Tools → Build Results → Show Build Results.
Note that build systems and the complete files associated with batch processing must be located under the Packages folder (Packages/user). Many packages in Sublime Editor include their own build systems.
Sublime Text — Distraction Free Mode
Distraction Free Mode in Sublime Text editor allows displaying the code and files full screen. You can enter distraction free mode via option View → Enter distraction mode menu item.
Once the distraction mode is enabled in the Sublime Text editor, the output will be visible as below −
All UI chrome accessible items are hidden, but accessible in distraction mode.
Customization
All the properties of customization of distraction free mode of Sublime Text editor are included in Distraction Free.sublime-settings JSON file as shown in the screenshot given below.
The following screenshot shows the properties included in Distraction free mode of Sublime editor −
Note that the attributes like line_numbers, gutter, draw_centered, wrap_width, word_wrap and scroll_past_end are such that they enable attractive distraction free mode.
Sublime Text — SublimeCodeIntel Plugin
SublimeCodeIntel is an important plugin for the Sublime Text editor. It offers the following features −
-
Jump to symbol feature, which helps the user to jump to the file and the specified line of the symbol.
-
Includes library of autocomplete and displays the modules/symbols in real time.
-
Tooltips display information in the status bar about the associated function.
Installation
You can install the SublimeCodeIntel plugin through the following steps −
Step 1 − Get the install package functionality of Sublime Text editor using the shortcut Ctrl+Shift+P on Windows and Cmd+Shift+P for OSX system. Refer to the following screenshot for better understanding −
Step 2 − Now, select the plugin SublimeCodeIntel for installation and restart the Sublime Text editor.
Step 3 − On successful installation of SublimeCodeIntel plugin, your screen will look like this −
Configuration
There are two in built configurations of SublimeCodeIntel −
- Settings − Default
- Settings − User
Refer to the following screenshot that shows these configurations −
The configuration for SublimeCodeIntel is included in the JSON file called SublimeCodeIntel.sublime-settings. The configuration needed for each language is included in SublimeCodeIntel plugin as below −
/*
   Defines a configuration for each language.
*/

"codeintel_language_settings": {
   "Python3": {
      "python3": "/usr/local/bin/python3.3",
      "codeintel_scan_extra_dir": [
         "/Applications/Sublime Text.app/Contents/MacOS",
         "~/Library/Application Support/Sublime Text 3/Packages/SublimeCodeIntel/arch",
         "~/Library/Application Support/Sublime Text 3/Packages/SublimeCodeIntel/libs"
      ],
      "codeintel_scan_files_in_project": true,
      "codeintel_selected_catalogs": []
   },

   "JavaScript": {
      "codeintel_scan_extra_dir": [],
      "codeintel_scan_exclude_dir":["/build/", "/min/"],
      "codeintel_scan_files_in_project": false,
      "codeintel_max_recursive_dir_depth": 2,
      "codeintel_selected_catalogs": ["jQuery"]
   },

   "PHP": {
      "php": "/Applications/MAMP/bin/php/php5.5.3/bin/php",
      "codeintel_scan_extra_dir": [],
      "codeintel_scan_files_in_project": true,
      "codeintel_max_recursive_dir_depth": 15,
      "codeintel_scan_exclude_dir":["/Applications/MAMP/bin/php/php5.5.3/"]
   }
}
These configurations can be customized as and when needed. It depends on the number of modules/libraries installed by the user with various parameters such as the size and complexity of the project a user is working on.