The Linux operating system is one of the most stable and secure desktop and server operating systems, no wonder that it is the go-to operating system for most servers.
System administrators and engineers love Linux for its stability and performance, but occasionally Linux too experiences performance hiccups.
The «read-error on swap-device» is a relatively common failure on Linux that can cause your system to crash or be non-responsive rendering it unusable. This guide will show you how to fix the read-error on swap-device failure on Ubuntu Linux.
Why Use a Swap File?
A swap file can be a physical storage medium such as a USB drive, a file on a hard drive, or a dedicated partition on a storage medium.
Swap files play an important role because they act as a supplementary medium to the physical RAM on your PC. When you are running memory-intensive processes and your RAM runs out of storage, Linux will use the swap file to run the other applications or store variable data.
Starting with Ubuntu Linux 18.04, the swap area is by default a swap file, prior to that the swap area used to be a dedicated swap partition.
Common Causes of the Read-Error on Swap-Device Failure
Some of the most common causes of failures on swap devices or files include the following:
- Very low RAM on your PC: When you have very low memory left on your system, then most applications will forcibly store variable data in a swap file. Unfortunately reading data from a swap file is much slower than reading from RAM.
- Low swap device storage: Problems will occur if you have a very small swap file with a lot of data stored as variable data, which in turn will lead to low performance of the system.
Looking at the causes mentioned above, we can say that increasing the size of RAM or the swap file can help in fixing the read-error on swap-device issue in Ubuntu.
Viewing Swap File Size
To fix the read-error on the swap device failure, you have to make sure that you have enough storage space on your swap file. Ideally, the size of your swap file should slightly match the size of your RAM.
Run the following command to check the size of your swap file on Ubuntu Linux. In addition, it also lists the RAM space.
swapon --show

As you can see from the output above, this particular PC has a swap file storage of 2GB.
Alternatively, you can also the GUI interface to check the swap file and memory in use. Press the Super + A keyboard keys and search for System Monitor. The graph in the middle shows your memory and swap file usage.
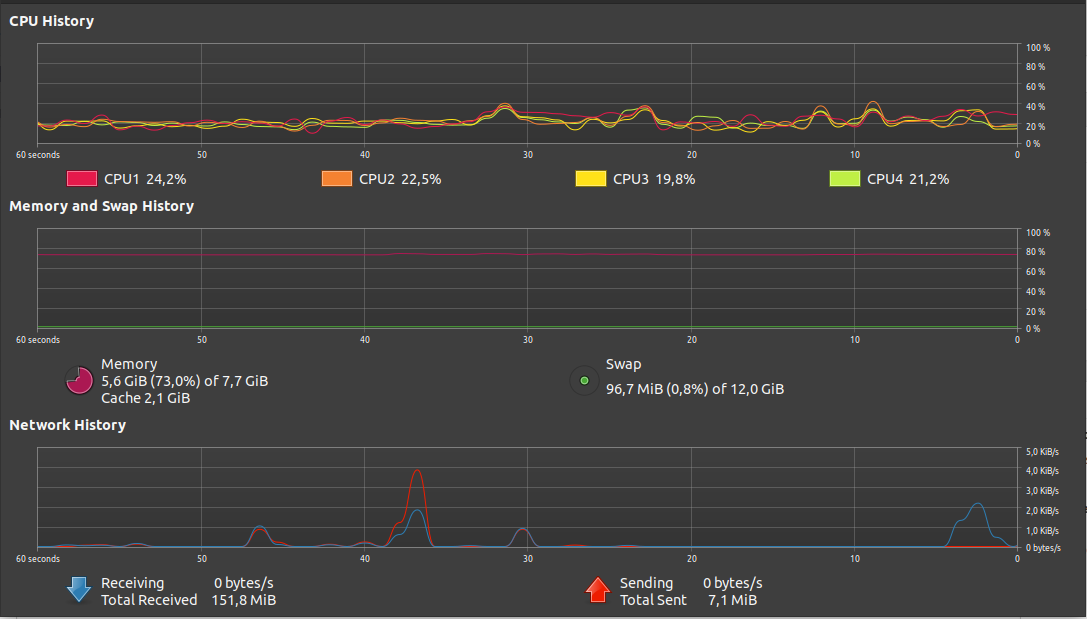
Knowledge of swap file and RAM usage is important for making informed decisions while managing your RAM on Linux.
Creating a Swap File
Before you create or increase the size of your swap file, make sure that you disable the /swapfile using the command below.
sudo swapoff /swapfile
Once the swap file has been disabled, you are ready to create a new swap file. For example, to create a swap file of 4G, run the following command.
sudo fallocate -l 4G /swapfile
For security purposes, you should assign your swap file with only read-write permissions on the root user, using the command below.
sudo chmod 600 /swapfile
You can specify that the /swapfile is a swap area using the mkswap utility as below.
sudo mkswap /swapfile
Finally, you can enable or start your swap file by running the following command.
sudo swapon /swapfile
Monitoring Your Memory Usage on Linux
Now that you have a swap file with sufficient memory in place, your Linux system will use it accordingly. You can monitor the swap file and RAM usage using the tools defined in this guide. Another option for checking swap file and RAM usage is to use the free -m command.
Low system memory is the primary reason why programs become unresponsive on a computer. Knowing how to kill such programs can be a lifesaver in such situations.

Imagine this: your library is trying to step up its game and compete in the Internet age. Rather than you browsing the shelfs, trying to remember how the Dewey Decimal works, you’ll enter your book selections from your phone. A librarian will then bring your books to the front desk.
You place your book order on a busy weekend morning. Rather than getting all of your books, the librarian just brings one back. Sometimes the librarian even asks for your book back, tells you to walk out the door to make room for others, and lets someone else read their book for a bit. They then call you back in, shuffling you and the other book readers in-and-out.
What’s going on? Is the librarian insane?
This is the life of the Linux’s memory management unit (librarian) and processes (you and the other book readers). A page fault happens when the librarian needs to fetch a book.
How can you tell if page faults are slowing you down, and — above all — how can you avoid being shuffled in-and-out of the library?
More about pages
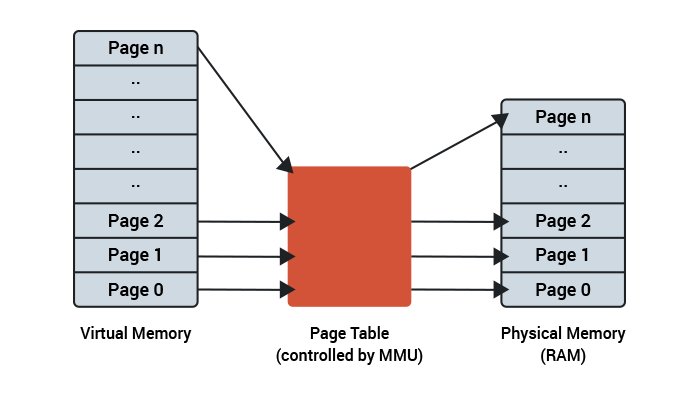
Linux allocates memory to processes by dividing the physical memory into pages, and then mapping those physical pages to the virtual memory needed by a process. It does this in conjunction with the Memory Management Unit (MMU) in the CPU. Typically a page will represent 4KB of physical memory. Statistics and flags are kept about each page to tell Linux the status of that chunk of memory.
These pages can be in different states. Some will be free (unused), some will be used to hold executable code, and some will be allocated as data for a program. There are lots of clever algorithms that manage this list of pages and control how they are cached, freed and loaded.
What’s a page fault? An example.
Imagine a large running program on a Linux system. The program executable size could be measured in megabytes, but not all that code will run at once. Some of the code will only be run during initialization or when a special condition occurs. Over time Linux can discard the pages of memory which hold executable code, if it thinks that they are no longer needed or will be used rarely. As a result not all of the machine code will be held in memory even when the program is running.
A program is executed by the CPU as it steps its way through the machine code. Each instruction is stored in physical memory at a certain address. The MMU handles the mapping from the physical address space to the virtual address space. At some point in the program’s execution the CPU may need to address code which isn’t in memory. The MMU knows that the page for that code isn’t available (because Linux told it) and so the CPU will raise a page fault.
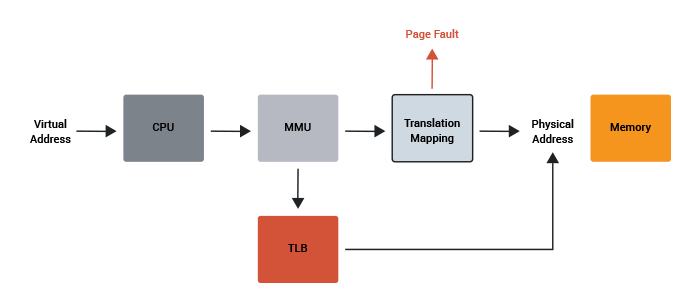
The name sounds more serious than it really is. It isn’t an error, but rather a known event where the CPU is telling the operating system that it needs physical access to some more of the code.
Linux will respond by allocating more pages to the process, filling those pages with the code from the binary file, configuring the MMU, and telling the CPU to continue.
A page fault is you requesting the next book in the Lord of the Rings Trilogy from the librarian, the librarian retrieving the book from the shelfs, and notifying you that the book is now at the front desk.
Minor page faults?
There is also a special case scenario called a minor page fault which occurs when the code (or data) needed is actually already in memory, but it isn’t allocated to that process. For example, if a user is running a web browser then the memory pages with the browser executable code can be shared across multiple users (since the binary is read-only and can’t change). If a second user starts the same web browser then Linux won’t load all the binary again from disk, it will map the shareable pages from the first user and give the second process access to them. In other words, a minor page fault occurs only when the page list is updated (and the MMU configured) without actually needing to access the disk.
A minor page fault is your friend requesting to read your checked out copy of The Two Towers and you saying «hey, lets just make a copy of mine!» OR you returning a book, but then immediately checking it out again before the book was even returned to a shelf.
Copy on Write?
A similar thing happens for data memory used by a program. An executable can ask Linux for some memory, say 8 megabytes, so that it can perform some task or other. Linux doesn’t actually give the process 8 megabytes of physical memory. Instead it allocates 8 megabytes of virtual memory and marks those pages as «copy on write.» This means that while they are unused there is no need to actually physically allocate them, but the moment the process writes to that page, a real physical page is allocated and the page assigned to the process.
This happens all the time on a multi-user, multitasking system. The physical memory is used in the most efficient way possible to hold the parts of memory that are actually needed for processes to run.
Copy on Write is you telling the librarian you’ll be there in 15 minutes and you want your The Return of the King book when you get there. The librarian notes where the book is so they can quickly find it when you arrive.
How frequent are page faults?
One of the easiest ways to see the number of major and minor page faults on a Linux system is with the ps command. Try the following:
ps -eo min_flt,maj_flt,cmd
This will list the current running processes on the system along with the number of minor and major page faults that each process has generated.
The way to see the page faults that are generated by an executable is the use the /usr/bin/time command with the -v option. Note: It is important to specify /usr/bin/time rather than just typing time because your shell likely has a time command, which although similar won’t do exactly the same thing.
Try this:
/usr/bin/time -v firefox
After you exit Firefox you will be presented with a set of statistics about how the program ran. Among them will be «Major (requiring I/O) page faults» and «Minor (reclaiming a frame) page faults». The first time you run the browser you will likely see a number of major page faults. On my test machine it was around 40. However the minor page faults is quite large, around 30000 on my test setup.

Now if you run the command again you will see that the number of major faults has dropped to zero, but the minor page faults remains high. This is because on the second go around there were no page faults generated which required the kernel to fetch the executable code from the disk, as they were still somewhere in memory from the first go around. However the number of minor page faults remained the same as the kernel found the pages of memory needed for various shareable libraries etc., and quickly made them available to the process.
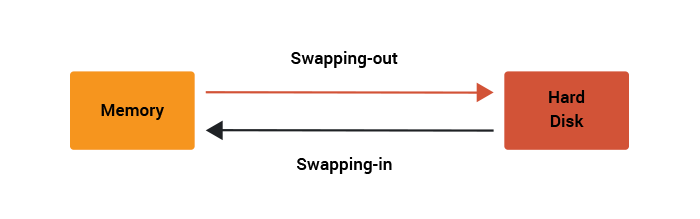
Swapping
Under normal operation, the kernel is managing pages of memory so that the virtual address space is mapped onto the physical memory and every process has access to the data and code that it needs. But what happens when the kernel doesn’t have any more physical memory left? Assuming that we would like the system to keep running then the kernel has a trick it can use. The kernel will start to write to disk some of the pages which it is holding in memory, and use the newly freed pages to satisfy the current page faults.
Writing pages out to disk is a relatively slow process (compared to the speed of the CPU and the main memory), however it is a better option than just crashing or killing off processes.
The process of writing pages out to disk to free memory is called swapping-out. If later a page fault is raised because the page is on disk, in the swap area rather than in memory, then the kernel will read back in the page from the disk and satisfy the page fault. This is swapping-in.
If a system is heavily loaded then an undesirable situation can occur when the latest page fault requires a page to be swapped-in but there still isn’t enough free memory. So to satisfy the swap-in the kernel must first swap-out. At this stage there is a danger that the system performance will degrade. If this is only a temporary situation and more free system memory becomes available, then this isn’t a problem.
However, there is a worse scenario. Imagine a situation where the kernel must first swap-out some pages in order to free some memory for a swap-in. But then the pages which were just swapped-out are needed again (because of a new page fault) and so must be swapped-in again. To satisfy this swap-in the previous pages that were just swapped-in are now swapped-out. And so on. This is known as thrashing. When a computer system starts thrashing it spends more time trying to satisfy major page faults than it does in actually running processes. The result is an unresponsive system and a very busy hard disk.
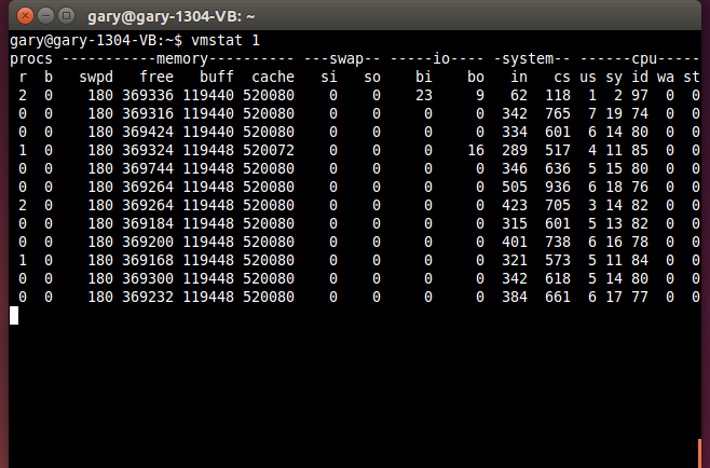
You can use the top command to see how much swap space is being used on your system and the vmstat command to see the current numbers of swap-in si and swap-out so operations.
Try:
vmstat 1
Swapping is you requesting a lot of books — too many to hold at the front desk. The librarian needs to keep the rest in a storage room in the basement, and it takes a long time to go back-and-forth.
When should you worry about page faults and swapping?
Most of the time, your primary performance worry is a high rate of swap-in/out’s. This means your host doesn’t have physical memory to store the needed pages and is using the disk often, which is significantly slower than physical memory.
What metrics should you monitor?
- Swap Activity (swap-ins and swap outs)
- Amount of swap space used
Swap activity is the major performance factor with memory access; simply using a moderate amount of swap space isn’t necessarily an issue if the pages swapped out belong to a mostly idle process. However when you begin to use a large amount of swap space there is a greater chance of swap activity impacting your server performance.
One more thing
The kernel’s aggressiveness in preemptively swapping-out pages is governed by a kernel parameter called swappiness. It can be set to a number from 0 to 100, where 0 means that more is kept in memory and 100 means that the kernel should try and swap-out as many pages as possible. The default value is 60. Kernel maintainer Andrew Morton has stated that he uses a swappiness of 100 on his desktop machines, «my point is that decreasing the tendency of the kernel to swap stuff out is wrong. You really don’t want hundreds of megabytes of BloatyApp’s untouched memory floating about in the machine. Get it out on the disk, use the memory for something useful.»
TL;DR
- The total amount of virtual address space for all the running processes far exceeds the amount of physical memory.
- The mapping between the virtual address space and physical memory is handled by the Linux kernel and by the CPU’s MMU using pages of memory.
- When the CPU needs to access a page that isn’t in memory it raises a page fault.
- A major page fault is one that can only be satisfied by accessing the disk.
- A minor page fault can be satisfied by sharing pages that are already in memory.
- Swapping occurs when pages are written to the disk to free memory so that a major page fault can be satisfied.
- Swap activity is the primary performance concern when it comes to page faults.
More servers? Or faster code?
Adding servers can be a band-aid for slow code. Scout APM helps you find and fix your inefficient and costly code. We automatically identify N+1 SQL calls, memory bloat, and other code-related issues so you can spend less time debugging and more time programming.
Ready to optimize your site? Sign up for a free trial.
Also see
- Restricting process CPU usage using nice, cpulimit, and cgroups
- Slow Server? This is the Flow Chart You’re Looking For
- Understanding CPU Steal Time — when should you be worried?
- Understanding Linux CPU Load — when should you be worried?
Updated version of an article first published in 2015.
I am seeing a few of my services suffering/crashing with errors along the lines of «Error allocating memory» or «Can’t create new process» etc.
I’m slightly confused by this since logs show that at the time the system has lots of free memory (around 26GB in one case) of memory available and is not particularly stressed in any other way.
After noting a JVM crash with similar error with the added query of «Out of swap space?» it made me dig a little deeper.
It turns out that someone has configured our zone with a 2GB swap file. Our zone doesn’t have capped memory and currently has access to as much of the 128GB of the RAM as it need. Our SAs are planning to cap this at 32GB when they get the chance.
My current thinking is that whilst there is memory aplenty for the OS to allocate, the swap space seems grossly undersized (based on other answers here). It seems as though Solaris is wanting to make sure there’s enough swap space in case things have to swap out (i.e. it’s reserving the swap space).
Is this thinking right or is there some other reason that I get memory allocation errors with this large amount of memory free and seemingly undersized swap space?
asked Apr 14, 2010 at 20:32
![]()
1
Unlike some other OSes that implement the obnoxious out of memory killer or equivalent, Solaris doesn’t overcommit memory (unless you are using very specific allocation techniques). When regular memory allocations are made, the OS make sure this memory will be available when required (i.e. reservation). The drawback is you need to have enough virtual memory space to store this potentially partially unused memory.
Free RAM is unrelated but it accounts in virtual memory size too.
Have a look at «swap -s» output when the problem occurs.
Note that you can easily increase the swap area by adding swap files or devices.
answered Apr 15, 2010 at 0:57
![]()
jlliagrejlliagre
8,77118 silver badges36 bronze badges
2
Check the System for Swap Information
Before we begin, we will take a look at our operating system to see if we already have some swap space available. We can have multiple swap files or swap partitions, but generally one should be enough.
We can see if the system has any configured swap by typing:
sudo swapon -s
Filename Type Size Used Priority
If you only get back the header of the table, as I’ve shown above, you do not currently have any swap space enabled.
Another, more familiar way of checking for swap space is with the free utility, which shows us system memory usage. We can see our current memory and swap usage in Megabytes by typing:
free -m
total used free shared buffers cached
Mem: 3953 154 3799 0 8 83
-/+ buffers/cache: 62 3890
Swap: 0 0 0
As you can see above, our total swap space in the system is «0». This matches what we saw with the previous command.
Check Available Space on the Hard Drive Partition
The typical way of allocating space for swap is to use a separate partition devoted to the task. However, altering the partitioning scheme is not always possible. We can just as easily create a swap file that resides on an existing partition.
Before we do this, we should be aware of our current disk usage. We can get this information by typing:
df -h
Filesystem Size Used Avail Use% Mounted on
/dev/sda 70G 5.3G 64G 4% /
none 4.0K 0 4.0K 0% /sys/fs/cgroup
udev 2.0G 12K 2.0G 1% /dev
tmpfs 396M 312K 396M 1% /run
none 5.0M 0 5.0M 0% /run/lock
none 2.0G 0 2.0G 0% /run/shm
none 100M 0 100M 0% /run/user
As you can see on the first line, our hard drive partition has 70 Gigabytes available, so we have a huge amount of space to work with.
Although there are many opinions about the appropriate size of a swap space, it really depends on your personal preferences and your application requirements. Generally, an amount equal to or double the amount of RAM on your system is a good starting point.
Since our system has 8 Gigabytes of RAM, so we will create a swap space of 8 Gigabytes to match my system’s RAM.
Create a Swap File
Now that we know our available hard drive space, we can go about creating a swap file within our filesystem.
We will create a file called swapfile in our root (/) directory. The file must allocate the amount of space we want for our swap file. There are two main methods of doing this:
The Slower Method
Traditionally, we would create a file with preallocated space by using the dd command. This versatile disk utility writes from one location to another location.
We can use this to write zeros to the file from a special device in Linux systems located at /dev/zero that just spits out as many zeros as requested.
We specify the file size by using a combination of bs for block size and count for the number of blocks. What we assign to each parameter is almost entirely arbitrary. What matters is what the product of multiplying them turns out to be.
For instance, in our example, we’re looking to create a 4 Gigabyte file. We can do this by specifying a block size of 1 Gigabyte and a count of 4:
sudo dd if=/dev/zero of=/swapfile bs=1G count=8
8+0 records in
8+0 records out
8589934592 bytes (8.3 GB) copied, 18.6227 s, 231 MB/s
Check your command before pressing ENTER because this has the potential to destroy data if you point the of (which stands for output file) to the wrong location.
We can see that 8 Gigabytes have been allocated by typing:
ls -lh /swapfile
-rw-r—r— 1 root root 8.0G Nov 22 10:08 /swapfile
If you’ve completed the command above, you may notice that it took quite a while. In fact, you can see in the output that it took my system 36 seconds to create the file. That is because it has to write 8 Gigabytes of zeros to the disk.
If you want to learn how to create the file faster, remove the file and follow along below:
sudo rm /swapfile
The Faster Method
The quicker way of getting the same file is by using the fallocate program. This command creates a file of a preallocated size instantly, without actually having to write dummy contents.
We can create a 8 Gigabyte file by typing:
sudo fallocate -l 8G /swapfile
The prompt will be returned to you almost immediately. We can verify that the correct amount of space was reserved by typing:
ls -lh /swapfile
-rw-r—r— 1 root root 8.0G Nov 22 10:10 /swapfile
As you can see, our file is created with the correct amount of space set aside.
Enabling the Swap File
Right now, our file is created, but our system does not know that this is supposed to be used for swap. We need to tell our system to format this file as swap and then enable it.
Before we do that though, we need to adjust the permissions on our file so that it isn’t readable by anyone besides root. Allowing other users to read or write to this file would be a huge security risk. We can lock down the permissions by typing:
sudo chmod 600 /swapfile
Verify that the file has the correct permissions by typing:
ls -lh /swapfile
-rw——- 1 root root 8.0G Nov 22 10:11 /swapfile
As you can see, only the columns for the root user have the read and write flags enabled.
Now that our file is more secure, we can tell our system to set up the swap space by typing:
sudo mkswap /swapfile
Setting up swapspace version 1, size = 8388600 KiB
no label, UUID=e3f2e7cf-b0a9-4cd4-b9ab-814b8a7d6933
Our file is now ready to be used as a swap space. We can enable this by typing:
sudo swapon /swapfile
We can verify that the procedure was successful by checking whether our system reports swap space now:
sudo swapon -s
Filename Type Size Used Priority
/swapfile file 8388600 0 -1
We have a new swap file here. We can use the free utility again to corroborate our findings:
free -m
total used free shared buffers cached
Mem: 7906 202 7704 0 5 30
-/+ buffers/cache: 66 7446
Swap: 8190 0 8190
Our swap has been set up successfully and our operating system will begin to use it as necessary.
Make the Swap File Permanent
We have our swap file enabled, but when we reboot, the server will not automatically enable the file. We can change that though by modifying the fstab file.
Edit the file with root privileges in your text editor:
sudo nano /etc/fstab
At the bottom of the file, you need to add a line that will tell the operating system to automatically use the file you created:
/swapfile none swap sw 0 0
Save and close the file when you are finished.
Swap Settings
There are a few options that you can configure that will have an impact on your system’s performance when dealing with swap.
The swappiness parameter configures how often your system swaps data out of RAM to the swap space. This is a value between 0 and 100 that represents a percentage.
With values close to zero, the kernel will not swap data to the disk unless absolutely necessary. Remember, interactions with the swap file are «expensive» in that they take a lot longer than interactions with RAM and they can cause a significant reduction in performance. Telling the system not to rely on the swap much will generally make your system faster.
Values that are closer to 100 will try to put more data into swap in an effort to keep more RAM space free. Depending on your applications’ memory profile or what you are using your server for, this might be better in some cases.
We can see the current swappiness value by typing:
cat /proc/sys/vm/swappiness
60
For a Desktop, a swappiness setting of 60 is not a bad value. For a Server, we’d probably want to move it closer to 0.
We can set the swappiness to a different value by using the sysctl command.
For instance, to set the swappiness to 10, we could type:
sudo sysctl vm.swappiness=10
vm.swappiness = 10
This setting will persist until the next reboot. We can set this value automatically at restart by adding the line to our /etc/sysctl.conf file:
sudo nano /etc/sysctl.conf
At the bottom, you can add:
vm.swappiness=10
Save and close the file when you are finished.
Another related value that you might want to modify is the vfs_cache_pressure. This setting configures how much the system will choose to cache inode and dentry information over other data.
Basically, this is access data about the filesystem. This is generally very costly to look up and very frequently requested, so it’s an excellent thing for your system to cache. You can see the current value by querying the proc filesystem again:
cat /proc/sys/vm/vfs_cache_pressure
100
As it is currently configured, our system removes inode information from the cache too quickly. We can set this to a more conservative setting like 50 by typing:
sudo sysctl vm.vfs_cache_pressure=50
vm.vfs_cache_pressure = 50
Again, this is only valid for our current session. We can change that by adding it to our configuration file like we did with our swappiness setting:
sudo nano /etc/sysctl.conf
At the bottom, add the line that specifies your new value:
vm.vfs_cache_pressure = 50
Save and close the file when you are finished.
Conclusion
If you are running into OOM (out of memory) errors, or if you find that your system is unable to use the applications you need, the best solution is to optimize your application configurations or upgrade your server. Configuring swap space, however, can give you more flexibility and can help buy you time on a less powerful server.