Афоризм
Ничего страшного, если над тобой смеются. Гораздо хуже, когда над тобой плачут.
Михаил Жванецкий
Поддержка проекта
Если Вам сайт понравился и помог, то будем признательны за Ваш «посильный» вклад в его поддержку и развитие
• Yandex.Деньги
410013796724260
• Webmoney
R335386147728
Z369087728698
Библиотека Swing включает богатый выбор стандартных диалоговых окон, существенно упрощающих и
ускоряющих вывод простой информации типа сообщений о работе программы, ошибках и нестандартных
ситуациях. Для вывода в графический интерфейс приложения разнообразной информации и выбора простых
данных предназначен класс JOptionPane, работа с которым связана с вызовом одного из многочисленных
статических методов, создающих и выводящих на экран модальное диалоговое окно стандартного вида.
В диалоговых окнах JOptionPane можно выводить самую разнообразную информацию и,
при необходимости, размещать в них дополнительные компоненты.
JOptionPane унаследован от базового класса JComponent библиотеки Swing, так что можно работать
с ним напрямую, т.е. создавать экземпляры класса JOptionPane и настраивать их свойства.
Использование стандартных диалоговых окон существенно упрощает разработку приложения и позволяет ускорить
процесс освоения пользователем интерфейса.
Все стандартные диалоговые окна Swing имеют собственные UI-представители, отвечающие за интерфейс
окна в используемом приложении. Это особенно важно для внешних видов окон, имитирующих известные
платформы, пользователи которых не должны ощущать значительной разницы при переходе от «родных»
приложений к Java-приложениям.
Класс JOptionPane
Интерфейс экземпляра класса JOptionPane имеет структуру, представленную на следующем рисунке.
Иконка в интерфейсе может отсутствовать.

Основные диалоговые методы JOptionPane
| Наименование метода | Описание |
|---|---|
| showMessageDialog | Диалоговое окно вывода сообщения |
| showConfirmDialog | Диалоговое окно подтверждения, с включением кнопок типа yes/no/cancel |
| showInputDialog | Диалоговое окно с выбором |
Конструкторы окна сообщений showMessageDialog
// Простое диалоговое окно с заголовком «Message»
public static void showMessageDialog(Component parent,
                                     Object message)
                                            throws HeadlessException
// Диалоговое окно с заголовком и типом сообщения
public static void showMessageDialog(Component parent,
                                     Object message,
                                     String title,
                                     int messageType)
                                            throws HeadlessException
// Диалоговое окно с заголовком, типом сообщения и иконкой
public static void showMessageDialog(Component parent,
                                     Object message,
                                     String title,
                                     int messageType,
                                     Icon icon)
                                            throws HeadlessException
Конструкторы окна подтверждения showConfirmDialog
// Простое диалоговое окно подтверждения с кнопками Yes, No, Cancel и
// с заголовком «Select an Option»
public static void showConfirmDialog(Component parent,
                                     Object message)
                                         throws HeadlessException
// Окно подтверждения с заголовком и кнопками, определенными
// опцией optionType
public static void showConfirmDialog(Component parent,
                                     Object message,
                                     String title,
                                     int optionType)
                                         throws HeadlessException
// Окно подтверждения с заголовком, кнопками, определенными
// опцией optionType, и иконкой
public static void showConfirmDialog(Component parent,
                                     Object message,
                                     String title,
                                     int optionType,
                                     Icon icon)
                                         throws HeadlessException
Конструкторы окна выбора showInputDialog
// Диалоговое окно с полем ввода
public static void showInputDialog(Component parent,
                                   Object message)
                                          throws HeadlessException
// Диалоговое окно с полем ввода, инициализируемое initialSelectionValue
public static void showInputDialog(Component parent,
                                   Object message,
                                   Object initialSelectionValue)
                                          throws HeadlessException
// Диалоговое окно с полем выбора из списка selectionValues
public static void showInputDialog(Component parent,
                                   Object message,
                                   String title,
                                   int messageType,
                                   Icon icon,
                                   Object[] selectionValues,
                                   Object initialSelectionValue)
                                          throws HeadlessException
parent — родительское окно.
message — отображаемый в окне текст сообщения. В большинстве случаев это строка, но может
быть использован массив строк String[], компонент Component, иконка Icon, представленная меткой
JLabel, объект Object, конвертируемый в строку методом toString().
title — заголовок окна.
messageType — тип диалогового окна :
- INFORMATION_MESSAGE — стандартное диалоговое окно для вывода информации со значком
соответствующего вида; - WARNING_MESSAGE — стандартное диалоговое окно для вывода предупреждающей информации
со значком соответствующего вида; - QUESTION_MESSAGE — стандартное диалоговое окно для вывода информации. Как правило,
не используется для информационных сообщений; - ERROR_MESSAGE — стандартное диалоговое окно для вывода информации об ошибке со значком
соответствующего вида; - PLAIN_MESSAGE — стандартное диалоговое окно для вывода информации без значка.
optionType — опция определения кнопок управления :
- DEFAULT_OPTION
- YES_NO_OPTION
- YES_NO_CANCEL_OPTION
- OK_CANCEL_OPTION
selectionValues — список возможных значений. В диалоговом окне InputDialog список
будет представлен в компоненте JComboBox или JList. Если selectionValues = null, то в окне
будет определено поле JTextField, в которое пользователь может ввести любое значение.
initialSelectionValue — инициализируемое значение.
icon — отображаемая в диалоговом окне иконка.
Локализация кнопок JOptionPane
Кнопки управления, как правило, имеют заголовки «Yes», «No», «Cancel». Для локализации кнопок
диалогового компонента JOptionPane можно использовать UIManager
следующим образом :
UIManager.put("OptionPane.yesButtonText"   , "Да"    );
UIManager.put("OptionPane.noButtonText"    , "Нет"   );
UIManager.put("OptionPane.cancelButtonText", "Отмена");
UIManager.put("OptionPane.okButtonText"    , "Готово");
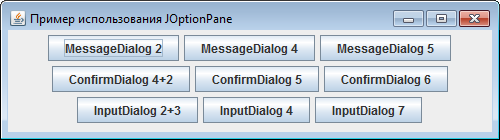
Пример использования JOptionPane
Пример JOptionPaneTest.java включает использование всех типов диалоговых
окон JOptionPane. В интерфейсе окна, представленном на следующем скриншоте, размещаются
кнопки, по нажатию на которые формируются соответствующие диалоговые окна JOptionPane.
Листинг примера JOptionPane
// Пример использования диалоговых окон JOptionPane

import javax.swing.*;
import java.awt.event.*;

public class JOptionPaneTest extends JFrame
{
    private        JPanel  contents       = null;
    private        JButton btnMessage1    = null;
    private        JButton btnMessage2    = null;
    private        JButton btnMessage3    = null;

    private        JButton btnConfirm1    = null;
    private        JButton btnConfirm2    = null;
    private        JButton btnConfirm3    = null;

    private        JButton btnInput1      = null;
    private        JButton btnInput2      = null;
    private        JButton btnInput3      = null;

    private      ImageIcon  icon          = null;
    private final  String   TITLE_message = "Окно сообщения";
    private final  String   TITLE_confirm = "Окно подтверждения";
    private        String[] drink         = {"Сок",
                                             "Минералка",
                                             "Лимонад"  ,
                                             "Пиво"};
    public JOptionPaneTest()
    {
        super("Пример использования JOptionPane");
        setDefaultCloseOperation(EXIT_ON_CLOSE);

        // Локализация кнопок
        UIManager.put("OptionPane.yesButtonText"   , "Да"    );
        UIManager.put("OptionPane.noButtonText"    , "Нет"   );
        UIManager.put("OptionPane.cancelButtonText", "Отмена");

        contents = new JPanel();
        // Иконка для отображения в окне сообщений
        icon = new ImageIcon("images/warning.png");

        // Кнопка формирования окна по 2-м параметрам
        btnMessage1 = new JButton("MessageDialog 2");
        // Кнопка формирования окна по 4-м параметрам
        btnMessage2 = new JButton("MessageDialog 4");
        // Кнопка формирования окна по 5-и параметрам
        btnMessage3 = new JButton("MessageDialog 5");

        // Кнопки вывода сообщений подтверждения
        btnConfirm1 = new JButton("ConfirmDialog 4+2");
        btnConfirm2 = new JButton("ConfirmDialog 5");
        btnConfirm3 = new JButton("ConfirmDialog 6");

        btnInput1 = new JButton("InputDialog 2+3");
        btnInput2 = new JButton("InputDialog 4");
        btnInput3 = new JButton("InputDialog 7");

        addMessageListeners();
        addConfirmListeners();
        addInputListeners  ();

        // Размещение кнопок в интерфейсе
        contents.add(btnMessage1);
        contents.add(btnMessage2);
        contents.add(btnMessage3);

        contents.add(btnConfirm1);
        contents.add(btnConfirm2);
        contents.add(btnConfirm3);

        contents.add(btnInput1);
        contents.add(btnInput2);
        contents.add(btnInput3);

        setContentPane(contents);
        // Вывод окна на экран
        setSize(500, 140);
        setVisible(true);
    }
}
В методах addMessageListeners(), addConfirmListeners(),
addInputListeners() определяются слушатели, обрабатывающие нажатие соответствующих
кнопок.
Окна вывода сообщений MessageDialog
Листинг процедуры создания слушателей, формирующие диалоговые окна вывода сообщений.
private void addMessageListeners()
{
    btnMessage1.addActionListener(new ActionListener() {
        public void actionPerformed(ActionEvent e) {
            JOptionPane.showMessageDialog(JOptionPaneTest.this,
                 "<html><h2>Текст</h2><i>в виде разметки HTML</i>");
            }
        });
    btnMessage2.addActionListener(new ActionListener() {
        public void actionPerformed(ActionEvent e) {
            JOptionPane.showMessageDialog(JOptionPaneTest.this,
                    new String[] {"Сообщение в виде массива строк :",
                                  " - первая строка",
                                  " - вторая строка"},
                                  TITLE_message,
                                  JOptionPane.ERROR_MESSAGE);
            }
        });
    btnMessage3.addActionListener(new ActionListener() {
        public void actionPerformed(ActionEvent e) {
            // Включение в интерфейс иконки
               JOptionPane.showMessageDialog(JOptionPaneTest.this,
                    "Использование изображения в окне сообщений",
                    TITLE_message, JOptionPane.INFORMATION_MESSAGE,
                    icon);
        }
    });
}
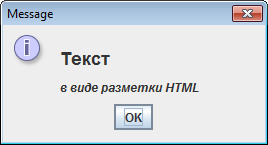
1. Интерфейс окна вывода сообщений по нажатию на кнопку btnMessage1. Конструктор
получает 2 параметра : родитель и текст сообщения. В заголовок подставляется значение «Message».
Текст сообщения имеет HTML разметку.
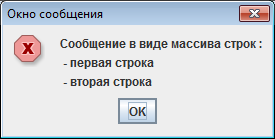
2. Интерфейс окна вывода сообщений по нажатию на кнопку btnMessage2. Конструктор
получает 4 параметра : родитель, текст сообщения в виде массива строк, строку заголовка окна и
тип сообщения.
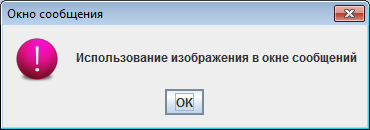
3. Интерфейс окна вывода сообщений по нажатию на кнопку btnMessage2. Конструктор
получает 5 параметров : родитель, текст сообщения, строку заголовка окна, тип сообщения и иконку.
Диалоговые окна подтверждений ConfirmDialog
Листинг процедуры создания слушателей, формирующие диалоговые окна подтверждений.
private void addConfirmListeners()
{
    btnConfirm1.addActionListener(new ActionListener() {
        public void actionPerformed(ActionEvent e) {
            // Окно подтверждения c 4-мя параметрами
               int result = JOptionPane.showConfirmDialog(
                                      JOptionPaneTest.this,
                                      "Вам это нужно?",
                                      TITLE_confirm,
                                      JOptionPane.YES_NO_CANCEL_OPTION);
            // Окна подтверждения c 2-мя параметрами
            if (result == JOptionPane.YES_OPTION)
                JOptionPane.showConfirmDialog(JOptionPaneTest.this,
                                              "Вы не отказываетесь?");
            else if (result == JOptionPane.NO_OPTION)
                JOptionPane.showConfirmDialog(JOptionPaneTest.this,
                                              "Вы отказались?");
        }
    });
    btnConfirm2.addActionListener(new ActionListener() {
        public void actionPerformed(ActionEvent e) {
            JOptionPane.showConfirmDialog(JOptionPaneTest.this,
                                          "Вы не отказываетесь?",
                                          TITLE_confirm,
                                          JOptionPane.YES_NO_OPTION,
                                          JOptionPane.WARNING_MESSAGE);
    }});
    btnConfirm3.addActionListener(new ActionListener() {
        public void actionPerformed(ActionEvent e) {
            JOptionPane.showConfirmDialog(JOptionPaneTest.this,
                                         "Вам нравится значок?",
                                          TITLE_confirm,
                                          JOptionPane.YES_NO_OPTION,
                                          JOptionPane.ERROR_MESSAGE,
                                          icon);
    }});
}
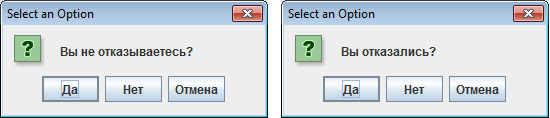
1. Интерфейс окна подтверждения по нажатию на кнопку btnConfirm1. Конструктор
получает 4 параметра : родитель, текст сообщения, строка заголовка и опция кнопок управления

В зависимости от нажатой кнопки открываются следующее окно подтверждение (одно из окон на
следующем скриншот), конструктор которого получает 2 параметра. Текст заголовка имеет значение по
умолчанию «Select an Option».
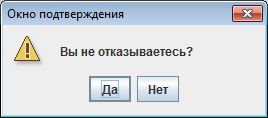
2. Интерфейс окна подтверждения по нажатию на кнопку btnConfirm2. Конструктор
получает 5 параметров : родитель, текст сообщения, строка заголовка, опция кнопок управления и
тип сообщения.
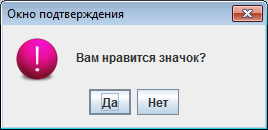
3. Интерфейс окна подтверждения по нажатию на кнопку btnConfirm3. Конструктор
получает 6 параметров : родитель, текст сообщения, строка заголовка, опция кнопок управления,
тип сообщения и иконка.
Диалоговые окна выбора данных InputDialog
Листинг процедуры создания слушателей, формирующие диалоговые окна выбора
private void addInputListeners()
{
    btnInput1.addActionListener(new ActionListener() {
        public void actionPerformed(ActionEvent e) {
            // Диалоговое окно ввода данных : родитель, HTML сообщение
            String result = JOptionPane.showInputDialog(
                                          JOptionPaneTest.this,
                                          "<html><h2>Добро пожаловать");
            JOptionPane.showInputDialog(JOptionPaneTest.this,
                                       "Вы ответили", result);
        }
    });
    btnInput2.addActionListener(new ActionListener() {
        public void actionPerformed(ActionEvent e) {
            // Диалоговое окно ввода данных : родитель, сообщение в виде
            // массива строк, тип диалогового окна (иконки)
            JOptionPane.showInputDialog(JOptionPaneTest.this,
                              new String[] {"Неверно введен пароль!",
                                            "Повторите пароль :"},
                                            "Авторизация",
                                            JOptionPane.WARNING_MESSAGE);
        }
    });
    btnInput3.addActionListener(new ActionListener() {
        public void actionPerformed(ActionEvent e) {
            // Диалоговое окно ввода данных
            Object result = JOptionPane.showInputDialog(
                                        JOptionPaneTest.this,
                                        "Выберите любимый напиток :",
                                        "Выбор напитка",
                                        JOptionPane.QUESTION_MESSAGE,
                                        icon, drink, drink[0]);
            // Диалоговое окно вывода сообщения
            JOptionPane.showMessageDialog(JOptionPaneTest.this, result);
        }
    });
}
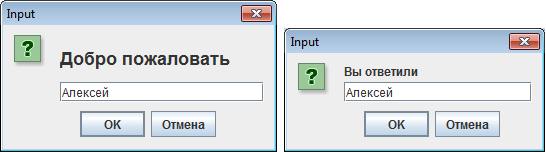
1. Интерфейс окна ввода данных по нажатию на кнопку btnInput1 представлен на скриншоте
слева. Конструктор получает 2 параметра : родитель и текст сообщения с разметкой HTML. После ввода
значения и нажатия на одну из клавиш открывается окно, представленное на скриншоте справа.
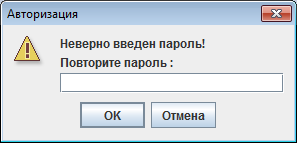
2. На следующем скриншоте представлен интерфейс окна ввода данных, создаваемое конструктором,
которому в качестве текста передается родитель, текстовое сообщение в виде массива строк, строка
заголовка и тип диалогового окна (иконки).
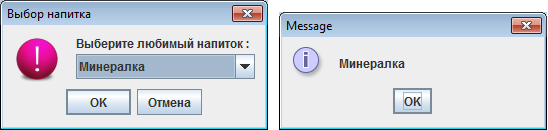
3. Интерфейс окна ввода данных по нажатию на кнопку btnInput3 представлен на следующем
скриншоте слева. Конструктор получает все возможные параметры : родитель, текстовое сообщение,
строка заголовка, тип диалогового окна, иконка, массив строк и выделенное значение по умолчанию.
В диалоговом окне возможные значения представлены в компоненте выпадающего списка. После выбора
значения и нажатия на одну из клавиш открывается окно вывода сообщения, представленное на
скриншоте справа.
Скачать примеры
Исходные коды примеров, рассмотренных на странице, можно
скачать здесь (2.25 Кб).
Table of Contents
- 1 How do I show error message in swing?
- 2 How do you add text to swing?
- 3 How do you create a dialog box in a swing?
- 4 Where is JDialog used in an application?
- 5 What is a dialog box give an example?
How do I show error message in swing?
Swing Examples – Show Error message Dialog
- JOptionPane − To create a standard dialog box.
- JOptionPane. showMessageDialog() − To show the message alert.
- JOptionPane. ERROR_MESSAGE − To mark the alert message as error.
How do you add text to swing?
To create a label for text:
- JLabel label1 = new JLabel(“Test”); To change the text in the label:
- label1. setText(“Label Text”); And finally to clear the label:
- label1. setText(“”); And all you have to do is place the label in your layout, or whatever layout system you are using, and then just add it to the JFrame…
What is the difference between frame and JFrame in Java?
Now Frame is an AWT component , where as JFrame is a Swing component . You can also that see JFrame extends Frame. But JFrame, provides lots of functinality and flexibility as compared to Frame, we can even say this that Swing provides better functionality with ease of implementing them.
How can I call JDialog from JFrame?
- import java.awt.GridLayout; import java.awt.event.ActionEvent;
- searchbutton.addActionListener( new java.awt.event.ActionListener() { public void actionPerformed(java.awt.event.ActionEvent evt) {
- You never add anything to the JDialog1 instance. It has an internal JDialog with the contents, but that never gets shown.
How do you create a dialog box in a swing?
Java JOptionPane Example: showMessageDialog()
- import javax.swing.*;
- public class OptionPaneExample {
- JFrame f;
- OptionPaneExample(){
- f=new JFrame();
- JOptionPane.showMessageDialog(f,”Successfully Updated.”,”Alert”,JOptionPane.WARNING_MESSAGE);
- }
- public static void main(String[] args) {
Where is JDialog used in an application?
Conclusion. JDialog is one of the important features of JAVA Swing contributing to interactive desktop-based applications. This is used as a top-level container on which multiple lightweight JAVA swing components can be placed to form a window based application.
Is JDialog a container?
As we mentioned before, Swing provides three generally useful top-level container classes: JFrame , JDialog , and JApplet .
What are different types of dialog box are used in Java describe each of them?
What are the different types of JOptionPane dialogs in Java?
- MessageDialog – dialog box that displays a message making it possible to add icons to alert the user.
- ConfirmDialog – dialog box that besides sending a message, enables the user to answer a question.
- InputDialog – dialog box that besides sending a message, allows entry of a text.
What is a dialog box give an example?
A dialog box is a temporary window an application creates to retrieve user input. An application typically uses dialog boxes to prompt the user for additional information for menu items. Windows also provides predefined dialog boxes that support common menu items such as Open and Print.
How do I show error message in Swing?
Table of Contents
- 1 How do I show error message in Swing?
- 2 What is JDialog in Java Swing?
- 3 Is the Java Swing tutorial written in Java?
- 4 How to create a swing button in Java?
How do I show error message in Swing?
Following example showcase how to show an error message alert in swing based application….Swing Examples – Show Error message Dialog
- JOptionPane − To create a standard dialog box.
- JOptionPane. showMessageDialog() − To show the message alert.
- JOptionPane. ERROR_MESSAGE − To mark the alert message as error.
Is Swing outdated in Java?
If you’re an experienced Java programmer, you have undoubtedly worked with Swing to create user interfaces. Oracle hasn’t completely abandoned Swing — it isn’t deprecated, and Swing applications continue to work. But no work is being done anymore to enhance Swing, and Oracle has made it clear that JavaFX is the future.
How do you fix a Java program error?
Below are a few popular ways:
- A conditional breakpoint: For debugging a Java code in Eclipse IDE, a breakpoint is a good approach.
- Exception breakpoints: Runtime exceptions like NullPointerException and ArrayIndexOutofBoundException are the errors encountered most often.
What is JDialog in Java Swing?
JDialog is a part Java swing package. The main purpose of the dialog is to add components to it. JDialog can be customized according to user need . Constructor of the class are: JDialog() : creates an empty dialog without any title or any specified owner.
Is swing still used in 2020?
Swing is still used heavily, and will continue to be for a long while — after all, it was the only choice for Java for a loooong time. JavaFX , however, is refreshingly nice, and very-much-so worth learning.
Why Swing components are called lightweight components?
A Swing component is said to be a lightweight component because it written entirely in Java and does the high-level display work itself, rather than relying on code provided by your computer’s operating system.
Is the Java Swing tutorial written in Java?
Java Swing tutorial is a part of Java Foundation Classes (JFC) that is used to create window-based applications. It is built on the top of AWT (Abstract Windowing Toolkit) API and entirely written in java.
How to ask a question in Java Swing?
Asking for help, clarification, or responding to other answers. Making statements based on opinion; back them up with references or personal experience. To learn more, see our tips on writing great answers. Not the answer you’re looking for? Browse other questions tagged java swing or ask your own question.
How to solve a common problem in Java?
Problem: Whenever the text in my text field updates, the text field’s size changes. You should specify the preferred width of the text field by specifying the number of columns it should have room to display. To do this, you can use either an int argument to the JTextField constructor or the setColumns method.
How to create a swing button in Java?
Let’s see a simple swing example where we are creating one button and adding it on the JFrame object inside the main () method. import javax.swing.*; We can also write all the codes of creating JFrame, JButton and method call inside the java constructor.
How do I show error message in swing?
Table of Contents
- 1 How do I show error message in swing?
- 2 How do you show messages on JOptionPane?
- 3 How to create GUI error message in swing?
- 4 How to create a GUI error message in Java?
How do I show error message in swing?
Following example showcase how to show an error message alert in swing based application….Swing Examples – Show Error message Dialog
- JOptionPane − To create a standard dialog box.
- JOptionPane. showMessageDialog() − To show the message alert.
- JOptionPane. ERROR_MESSAGE − To mark the alert message as error.
How do you show errors in Java?
Java Exceptions
- In Java, errors are handled by an Exception object. Exceptions are said to be thrown, and it’s your job to catch them.
- try {
- }
- catch ( ExceptionType error_variable ) {
- }
- The try part of the try … catch block means “try this code”.
- try { int x = 10;
- System.out.println( z ); }
How do you show messages in Java?
Message dialogs are created with the JOptionPane. showMessageDialog() method. We call the static showMessageDialog() method of the JOptionPane class to create a message dialog….Message Dialogs in Java (GUI)
- ERROR_MESSAGE.
- WARNING_MESSAGE.
- QUESTION_MESSAGE.
- INFORMATION_MESSAGE.
How do you show messages on JOptionPane?
Java JOptionPane Example: showMessageDialog()
- import javax.swing.*;
- public class OptionPaneExample {
- JFrame f;
- OptionPaneExample(){
- f=new JFrame();
- JOptionPane.showMessageDialog(f,”Successfully Updated.”,”Alert”,JOptionPane.WARNING_MESSAGE);
- }
- public static void main(String[] args) {
What is the error in Java?
Error : An Error “indicates serious problems that a reasonable application should not try to catch.” Both Errors and Exceptions are the subclasses of java. lang. Throwable class. Errors are the conditions which cannot get recovered by any handling techniques.
What are the types of messages and its description?
There are three types of messages: Nominal, Expressive and Predicative.
How to create GUI error message in swing?
A: If the weight of an object is greater than 99999 your code should print a GUI driven error message, and force the user to reenter the weight of the object. B: If a user enters a negative weight, your code should display a GUI warning message. ? import javax.swing.*; String ObjectName = JOptionPane.showInputDialog (“What is the Objects name?”);
How to use the message dialog in Java?
The simplest way to use the message dialog. Example with Component set to null and a String as second argument: SimpleDialog1.java. package com.mkyong.messageDialog; import javax.swing.JOptionPane; public class SimpleDialog1 { public static void main(String [] args) { JOptionPane.showMessageDialog ( null, “Simple Information Message” ); } }.
Why does Java joptionpane not display error message?
I have this code that asks for a username and password. Just a simple JOptionPane. The program should ask an input and if the user did not write any input in the username, it should display an error message and displays the same, previous dialog box asking for a username. However, it does not work that way.
How to create a GUI error message in Java?
Help with creating GUI Error Messages. A: If the weight of an object is greater than 99999 your code should print a GUI driven error message, and force the user to reenter the weight of the object. B: If a user enters a negative weight, your code should display a GUI warning message. ? import javax.swing.*;
Improve Article
Save Article
Improve Article
Save Article
Message dialogs provide information to the user. Message dialogs are created with the JOptionPane.showMessageDialog() method.
We call the static showMessageDialog() method of the JOptionPane class to create a message dialog. We provide the dialog’s parent, message text, title, and message type. The message type is one of the following constants :
- ERROR_MESSAGE
- WARNING_MESSAGE
- QUESTION_MESSAGE
- INFORMATION_MESSAGE
Methods Used :
- setLayout(…): method helps us to set the layout of the container, often a JPanel, to say FlowLayout, BorderLayout, GridLayout, null layout, or whatever layout we want to add on container.
- setBounds(…): method is used to set the location and size of components like JButton, and is only useful if null layout is used in JFrame.
- setVisible(…): method is used to set the Visibility status of JFrame.
- setVisible(true) will set JFrame visible to user.
- setVisible(false) will set JFrame not visible to user.
- getSource(): An event object contains a reference to the component that generated the event. To extract that reference from the event object we use getSource() Method.
- add(): It is used to add components like JButton etc, to the container of JFrame.
Below is the implementation of above discussed method to show Message Dialogs :
Java
import java.awt.*;
import java.awt.event.*;
import javax.swing.*;
class Demo extends JFrame implements ActionListener
{
JButton b1;
Demo()
{
this.setLayout(null);
b1 = new JButton("Button 1");
b1.setBounds(130, 05, 100, 50);
this.add(b1);
b1.addActionListener(this);
}
public void actionPerformed(ActionEvent evt)
{
if (evt.getSource() == b1)
{
JOptionPane.showMessageDialog(this, "Enter a valid Number",
"ERROR", JOptionPane.ERROR_MESSAGE);
}
}
}
class MessageDialogs1 {
public static void main(String args[])
{
Demo f = new Demo();
f.setBounds(200, 200, 400, 300);
f.setResizable(false);
f.setVisible(true);
}
}
Output :

Java
import java.awt.*;
import java.awt.event.*;
import javax.swing.*;
class Demo extends JFrame implements ActionListener
{
JButton b1;
Demo()
{
this.setLayout(null);
b1 = new JButton("Button 2");
b1.setBounds(130, 05, 100, 50);
this.add(b1);
b1.addActionListener(this);
}
public void actionPerformed(ActionEvent evt)
{
if (evt.getSource() == b1) {
JOptionPane.showMessageDialog(this, "Enter a valid String",
"WARNING", JOptionPane.WARNING_MESSAGE);
}
}
}
class MessageDialogs2 {
public static void main(String args[])
{
Demo f = new Demo();
f.setBounds(200, 200, 400, 300);
f.setResizable(false);
f.setVisible(true);
}
}
Output :

Java
import java.awt.*;
import java.awt.event.*;
import javax.swing.*;
class Demo extends JFrame implements ActionListener
{
JButton b1;
Demo()
{
this.setLayout(null);
b1 = new JButton("Button 3");
b1.setBounds(130, 05, 100, 50);
this.add(b1);
b1.addActionListener(this);
}
public void actionPerformed(ActionEvent evt)
{
if (evt.getSource() == b1)
{
JOptionPane.showMessageDialog(this, "Do you want to quit",
"Question", JOptionPane.QUESTION_MESSAGE);
}
}
}
class MessageDialogs3 {
public static void main(String args[])
{
Demo f = new Demo();
f.setBounds(200, 200, 400, 300);
f.setResizable(false);
f.setVisible(true);
}
}
Output :

Java
import java.awt.*;
import java.awt.event.*;
import javax.swing.*;
class Demo extends JFrame implements ActionListener
{
JButton b1;
Demo()
{
this.setLayout(null);
b1 = new JButton("Button 4");
b1.setBounds(130, 05, 100, 50);
this.add(b1);
b1.addActionListener(this);
}
public void actionPerformed(ActionEvent evt)
{
if (evt.getSource() == b1)
{
JOptionPane.showMessageDialog(this, "You Pressed Button FOUR",
"INFORMATION",
JOptionPane.INFORMATION_MESSAGE);
}
}
}
class MessageDialogs4 {
public static void main(String args[])
{
Demo f = new Demo();
f.setBounds(200, 200, 400, 300);
f.setResizable(false);
f.setVisible(true);
}
}
Output :

Any type of Graphical User Interface (GUI) application, designed based on any functional requirement, will assume user interaction as part of its standard functionality. Therefore, almost all GUIs allow users to enter data and manipulate it. After the information is gathered from the user, it typically needs to be either stored, locally or remotely, or used in the application in real time. But, before doing something with the data, applications usually need to check it for correctness. In this article, I will concentrate on form validation and dynamic creation of notification messages in Java Swing GUI applications. I will also go over a few useful tips for GUI developers such as adding listeners to multiple components and using regular expressions for easy validations.
Because Java/J2EE became de facto for enterprise rapid development and deployment environments, especially in the financial industry, the Java Swing framework became a favorite choice for desktop applications as well. With Swing, programmers can create extremely robust GUI applications in a short period of time and deploy them on any platform, without recompilation or any other changes for that matter. The applications will behave exactly the same on multiple platforms, and the only downside will be a need to have the Java Runtime Environment (JRE) installed on the target machines.
User Form
To demonstrate user form validation, I created a small application based on fictional requirements that entail a user entry screen that gathers rudimentary information, such as first and last name, and machine IP address. A form with several text fields takes user data and, after checking it, allows the user to proceed.

The fictional requirements also say that user may want to press the “Enter” key after entering data in any field to proceed, in addition to being able to click on the “Next” button. Moreover, the IP address needs to be checked for correct format (IPv4).
Dynamic Validation
Although the basics of creating the Swing GUI is beyond the scope of this article, you should be familiar with creating simple interfaces, using any layout manager either manually or with an IDE. For this article, I have used JBuilderX to create a frame with GridBagLayout and add all the required components. The form in the sample application is trivial because it contains only a few labels and text fields. Nevertheless, validation needs to be done on every component and the technique to do it can be applied to any GUI, no matter how complex. For instance, all fields need to be filled before the user can proceed and the IP field needs to have an additional check for the correct format.
The simplest way to check fields would be to add an action that listens to the “NEXT” button, and when a new action event is fired (on button press), check every field one by one for correctness and display an error message if something is wrong.
Ex. method checkFields () {    // pseudo code
   if (field1 is not right)
   show error
   if (field2 is not right)
   show new error
   ... etc ...
}
The problem with this approach is that when multiple fields are incorrect, the user would see a lot of error massages at the same time—several pop-ups, for instance. Another problem is that every field needs to have its own code to show the error message. Therefore, if the logic to display errors is not as simple as printing out to an output stream somewhere, it would have to be redundantly used to display every error statement.
In this case, the requirement is to show a pop-up dialog such as JOptionPane.showMessageDialog.
The solution to having multiple dialogs pop up at the same time could be breaking out of the check method after the first error was found, but this still does not solve the redundancy of implementing and showing a new dialog for every error condition. Redundancy can become abundant if the GUI is very complex.
So, what is the graceful solution?
An important, not well known, property of Java dialogs is that they can take an array of an object as a parameter to display multi-line messages. For example:
JOptionPane.showMessageDialog(this, new String[]{"Hello", "World"});

You can even pass in objects with different text properties color, font, and so forth. The solution, therefore, is to display only one dialog at the end of the validation routine and pass in an array of error messages. The array would be dynamically created based on errors found and the user would see all of them in one pop-up.
In the case of my simple application, the code looks like this; a new array list is initialized and, on every error condition, a string message is added to it. At the end, if array is empty, nothing is displayed; if it’s not empty, it is passed to the dialog as a parameter, and a dynamic pop-up is shown.
private boolean checkFields() {
   // init array
   ArrayList msg = new ArrayList(0);
   // check if first name is blank
   if (getRoleNameTF().getText() == null ||
      getRoleNameTF().getText().equals("")) {
      msg.add("Please enter First Name Field - it is required!");
   }
   // check if last name is blank
   if (getRoleURNTF().getText() == null ||
      getRoleURNTF().getText().equals("")) {
      msg.add("Please enter Last Name Field - it is required!");
   }
   // check if ip is blank
   if (getRoleIPTF().getText() == null ||
      getRoleIPTF().getText().equals("")) {
      msg.add("Please check IP Field - format ###.###.###.###");
   // check if ip is correct format
   else if (!getRoleIPTF().getText().matches(
         "([d]{1,3}.){3}[d]{1,3}")) {
      msg.add("IP Field Incorrect - format ###.###.###.###");
   }
   // dynamic dialog
   if (!msg.isEmpty()) {
      JOptionPane.showMessageDialog(this, msg.toArray());
      return false;
   }
   return true;
}

public void actionPerformed(ActionEvent e) {
   if (checkFields()){
      // all ok do something
      JOptionPane.showMessageDialog(this, "All fields are ok!");
      parent.next();
   }
}
Note the IP is also checked for correctness with a regular expression. Because the message is dynamic, it will be different depending on the errors found:


Implementing this technique solved both problems of multi pop-ups and code reuse, and it can be applied to GUIs of any complexity and size. The resulting array of error massages can be passed or used in any context and not necessarily in JDialogs.
Adding Multiple Action Listeners
The validation was initialized when the user clicks on the “NEXT” button because it has an action listener associated with it. If the requirements say that the user needs to be able to simply press the Enter key while the focus is on any field, we need to add a key listener to every single text field. This would require adding some Key adapter or implementing a key listener interface and then checking whether the key pressed was indeed an “Enter” key. Besides, every text filed also would need to register to generate key events. Luckily, there is another way.
Java 2 provides an extremely useful feature built in specifically for capturing an Enter key press on the text fields. Simply attaching an action listener to any text field component would generate an action event if Enter was pressed on it. However, this still necessitates explicitly attaching an action listener to every field.
To solve this, I interrogated the parent component panel for the list of all text fields added to it and, as I traversed through them, I attached the listeners dynamically.
Component fields[] = this.getComponents();
   for (int i = 0; i < fields.length; i++) {
      if (fields[i] instanceof JTextField) {
         ((JTextField) fields[i]).addActionListener(this);
      }
   }
This method can also be used to add any kind of listeners to GUIs of any complexity—because you can recursively navigate down if the component in scope is in another container.
For instance, passing a top parent GUI container to this method will recursively add action listeners to all text fields, even those that are added to the child containers.
public void attachAnyListener(JComponent component){
   Component fields[] = component.getComponents();
      for (int i = 0; i < fields.length; i++) {
         if (fields[i] instanceof JComponent) {
            attachAnyListener(fields[i]);
         }
         if (fields[i] instanceof JTextField) {
               ((JTextField) fields[i]).addActionListener(this);
            }
         //other listener attachments here
      }
}
Note: The recursive mechanism also can be used to detect any changes to the user-entered information in large GUIs by using focus listeners or change listeners. Eventually, you prompt the user whether changes need to be saved on exit.
After attaching action listeners to the text fields, the application will start checking all fields. It doesn’t just check the “NEXT” button press; it also checks on an “Enter” key press on any text field by calling checkFields() in the actionPerformed method.
The last validation check was for the IP address format. I used a regular expression feature available in the matches() String class method. The field is checked by a pattern of the simple IPv4 format that can be only 1 to 3 digits followed by a period, repeating 3 times, and followed by another set of 1 to 3 digits.
matches("([d]{1,3}.){3}[d]{1,3}"))
The regular expressions (regex) are built into Java and even have a separate package in JDK java.util.regex. The Sting class uses pattern matching capabilities of regular expressions in several methods (please see the JDK API documentation for more information). The regex are very powerful and can allow for very complex matching, such as «^(([^:/?#]+):)?((//([^/?#]*))?([^?#]*)(?([^#]*))?)?(#(.*))?» or something even worse looking.
Conclusion
In this article, I’ve shown how to dynamically generate notification/validation messages. The technique can be applied to any GUI developed in Swing. I have also described how to add action listeners to any component implicitly and validate data using regular expressions. Even though the validation and notification is specific to the Java Swing toolkit, the technique can be applied to the most modern GUI toolkits.
Download the Code
You can download the source code used in this article here.
References
Java Swing, 2nd Edition by Marc Loy, Robert Eckstein, Dave Wood, James Elliott, and Brian Cole. November 2002. ISBN: 0-596-00408-7.
The Java Developers Almanac 1.4: http://javaalmanac.com/egs/java.util.regex/pkg.html
About the Author
Vlad Kofman is a System Architect working on projects under government defense contracts. He has also been involved with enterprise-level projects for major Wall Street firms and the U.S. government. His main interests are object-oriented programming methodologies and design patterns.