Содержание
- Синтаксическая ошибка
- Поддержка и обратная связь
- Syntax Error VBA
- Warning Messages for Syntax Errors
- Common Syntax Errors
- VBA Coding Made Easy
- VBA Code Examples Add-in
- Syntax error
- Support and feedback
- Помогите пожалуйста, выкидывает ошибку когда пишу программу на языке VBA в Excel Ошибка (Compile error: Syntax error)
- Error Types (Visual Basic)
- Syntax Errors
- Run-Time Errors
- Logic Errors
Синтаксическая ошибка
Visual Basic не может определить действие, которое требуется выполнить. Эта ошибка имеет следующие причину и решение:
Написание ключевых слов и именованных аргументов должно в точности совпадать с определенным в спецификации синтаксиса. Уточните правильное написание в интерактивной справке и при необходимости исправьте его.
Неверное сочетание знаков препинания. Например, если вы опускаете необязательный позиционно расположенный аргумент, необходимо заменить запятую (,), которая выступает как заполнитель для аргумента.
Проверьте правильность написания имени процедуры.
Попытка одновременно указать аргументы Optional и ParamArray в объявлении процедуры. Аргумент ParamArray не может иметь тип Optional. Удалите один из этих аргументов.
Попытка определить процедуру события с параметром Optional или ParamArray. Удалите ключевое слово Optional или ParamArray из спецификации параметра.
Попытка использовать именованный аргумент в операторе RaiseEvent. События не поддерживают названные аргументы.
Для получения дополнительной информации выберите необходимый элемент и нажмите клавишу F1 (для Windows) или HELP (для Macintosh).
Поддержка и обратная связь
Есть вопросы или отзывы, касающиеся Office VBA или этой статьи? Руководство по другим способам получения поддержки и отправки отзывов см. в статье Поддержка Office VBA и обратная связь.
Источник
Syntax Error VBA
This tutorial will explain what a VBA Syntax Error means and how it occurs.
VBA code has to be constructed in a certain way in order to run. A syntax error occurs in VBA when the code is not constructed correctly. These errors are shown in the VBE Editor in red which makes them easy to identify.
(See our Error Handling Guide for more information about VBA Errors)
Warning Messages for Syntax Errors
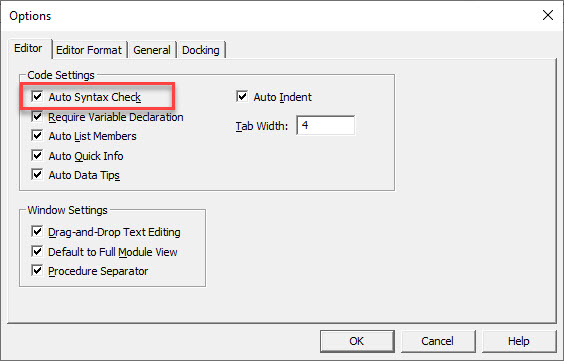
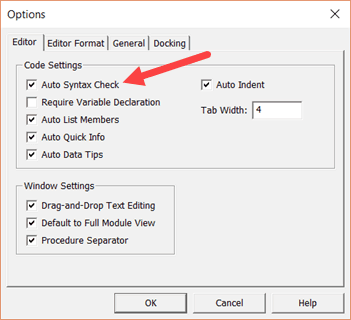
If you have the option for Syntax Check switch on in your VBE, then a message box will appear when you make a syntax error.
If a message box does not appear, the incorrect code will still show up in red as in the graphic above but a warning message will not be displayed. It is up to you whether or not you want these warning message to appear as you can switch this option
To switch on this option, in the Menu, select Tools > Options. In the Editor Tab, make sure that the option Auto Syntax Check is ticked.
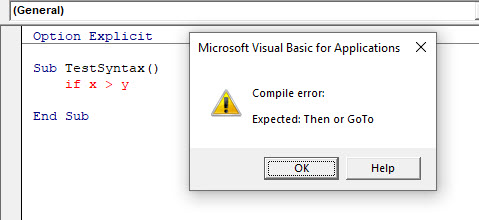
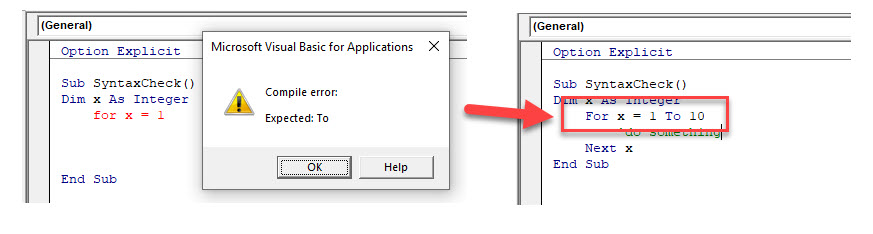
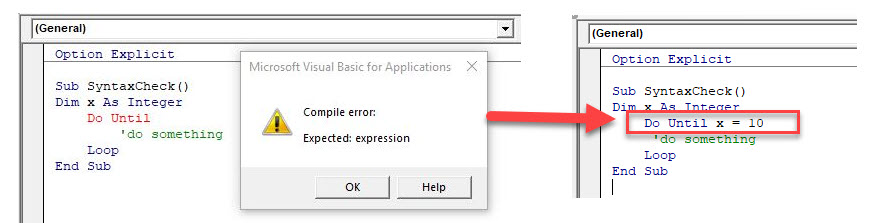
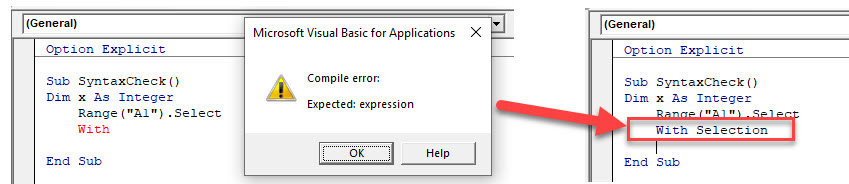
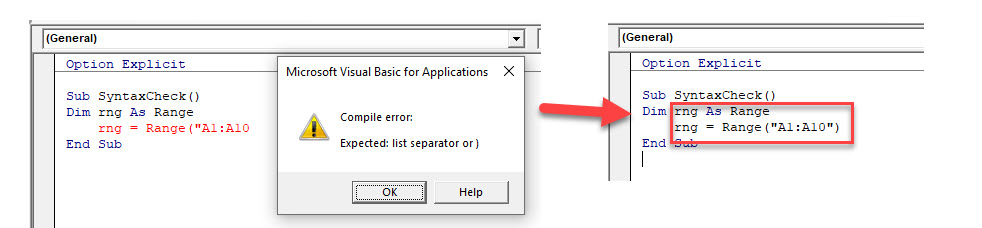
Common Syntax Errors
Syntax errors occur due to misspelling or missing code – like the omission of a Then when we are writing the first line of an If statement.
Some other common error are listed below.
For without a To :
Do Until without specifying the condition:
With without specifying what is included in the with:
Not Closing Brackets or Leaving out Punctuation:
VBA Coding Made Easy
Stop searching for VBA code online. Learn more about AutoMacro — A VBA Code Builder that allows beginners to code procedures from scratch with minimal coding knowledge and with many time-saving features for all users! 

VBA Code Examples Add-in
Easily access all of the code examples found on our site.
Simply navigate to the menu, click, and the code will be inserted directly into your module. .xlam add-in.
Источник
Syntax error
Visual Basic can’t determine what action to take. This error has the following causes and solutions:
A keyword or argument is misspelled.
Keywords and the names of named arguments must exactly match those specified in their syntax specifications. Check online Help, and then correct the spelling.
Punctuation is incorrect. For example, when you omit optional arguments positionally, you must substitute a comma (,) as a placeholder for the omitted argument.
A procedure isn’t defined.
Check the spelling of the procedure name.
You tried to specify both Optional and ParamArray in the same procedure declaration. A ParamArray argument can’t be Optional. Choose one and delete the other.
You tried to define an event procedure with an Optional or ParamArray parameter. Remove the Optional or ParamArray keyword from the parameter specification.
You tried to use a named argument in a RaiseEvent statement. Events don’t support named arguments.
For additional information, select the item in question and press F1 (in Windows) or HELP (on the Macintosh).
Support and feedback
Have questions or feedback about Office VBA or this documentation? Please see Office VBA support and feedback for guidance about the ways you can receive support and provide feedback.
Источник
Помогите пожалуйста, выкидывает ошибку когда пишу программу на языке VBA в Excel Ошибка (Compile error: Syntax error)
‘стоимость пылесоса
Dim cena(3) Аs Double
‘количество (по декадам)
Dim koll(3,3) As Integer
‘доход за декаду
Dim doh_t(3) As Double
‘количество пылесосов за месяц
Dim doh(4) As Double
‘доход за декаду и за месяц
Dim koll_n(3) As Integer
‘декада с наибольшим доходом.
Dim tip As Integer
‘тип с наименьшим доходом
Dim dhd As Double
‘счетчики циклов
Dim i As Integer, j As Integer
For i = 1 То 3
kol_n(i) = 0
Next
For j=1 То 3 doh(j) =0
Nехt
Sheets(»Нач_д » ).Select
For i = 1 То 3
сеnа (i) = Cells(3 + i, 2)
Next
For i = 1 Тo 3
For j = 1 Тo 3
koll(i, j) = Cells(3 + i, 2 + j)
Next j
Next i
Sheets(«Результат»). Select
Sheets(«Результат»).Cells(1, 1) = «Количество проданной бытовой техники»
Sheets(«Результат»).Cells(2, 1) = «Наименование изделия»
Sheets(«Результат»).Cells(2, 2) = «Стоимость 1 шт. «
Sheets(«Результат»).Cells(2, 3) = «Проданно»
Sheets(«Результат»).Cells(3, 3) = «1-ая декада»
Sheets(«Результат»).Cells(3, 4) = «2-ая декада «
Sheets(«Результат»).Cells(3, 5) = «3-ая декада «
Sheets(«Результат»).Cells(3, 6) = «Всего»
Sheets(«Результат»).Cells(4, 1) = «Пылесос 1 типа «
Sheets(«Результат»).Cells(5, 1) = «Пылесос 2 типа «
Sheets(«Результат»).Cells(6, 1) = «Пылесос 3 типа «
For i = 1 То 3
Sheets(«Результат»).Сеlls(3 + i, 2) = cena(i)
For j = 1 То 3
Sheets(«Результат»).Сеlls(3 + i, 2 + j) = koll(i, j)
koll_n (i) = koll_n (i) + koll(i, j)
Next j
Sheets(«Результат»).Сеlls(3 + i, 6) = koll_n(i)
Next i
Sheets(«Результат»).Сеlls(8,1) =«Результат в денежном эквиваленте»
Sheets(«Результат»).Сеlls(9,1) =«Наименование изделия»
Sheets(«Результат»).Сеlls(9,2) =«Стоимость 1 шт.»
Sheets(«Результат»).Сеlls(9,3) =«Доход»
Sheets(«Результат»).Сеlls(10,3) = «1-ая декада»
Sheets(«Результат»).Сеlls(10,4) =«2-ая декада»
Sheets(«Результат»).Сеlls(10,5) =«3-ая декада»
Sheets(«Результат»).Сеlls(14,6) =«Всего»
Sheets(«Результат»).Сеlls(11,1) =«Пылесос 1 типа»
Sheets(«Результат»).Сеlls(12,1) =«Пылесос 2 типа»
Sheets(«Результат»).Сеlls(13,1) =«Пылесос 3 типа»
Sheets(«Результат»).Сеlls(14,1) =«ИТОГО»
For i = 1 То 3 For j = 1 То 3
Sheets(«Результат»).Сеlls(10 + i, 2 + j) = koll(i, j) * сеna(i)
doh(j) = doh(j) + koll(i, j) * сеna(i)
doh(4) = doh(4) + koll(i, j) * сеnа (i)
Next j
Sheets(«Результат»).Сеlls(10 + i, 2) = сеnа (i)
Sheets(«Результат»).Сеlls(10 + i, 6) = сеnа (i) * koll_n (i)
doh_t (i) = сеnа (i) * koll_n (i)
Next i
For j = 1 То 3
Sheets(«Результат»).Сеlls(11, 5 + j) = doh(j)
If –doh_t(j) Голосование за лучший ответ
Источник
Error Types (Visual Basic)
In Visual Basic, errors fall into one of three categories: syntax errors, run-time errors, and logic errors.
Syntax Errors
Syntax errors are those that appear while you write code. If you’re using Visual Studio, Visual Basic checks your code as you type it in the Code Editor window and alerts you if you make a mistake, such as misspelling a word or using a language element improperly. If you compile from the command line, Visual Basic displays a compiler error with information about the syntax error. Syntax errors are the most common type of errors. You can fix them easily in the coding environment as soon as they occur.
The Option Explicit statement is one means of avoiding syntax errors. It forces you to declare, in advance, all the variables to be used in the application. Therefore, when those variables are used in the code, any typographic errors are caught immediately and can be fixed.
Run-Time Errors
Run-time errors are those that appear only after you compile and run your code. These involve code that may appear to be correct in that it has no syntax errors, but that will not execute. For example, you might correctly write a line of code to open a file. But if the file does not exist, the application cannot open the file, and it throws an exception. You can fix most run-time errors by rewriting the faulty code or by using exception handling, and then recompiling and rerunning it.
Logic Errors
Logic errors are those that appear once the application is in use. They are most often faulty assumptions made by the developer, or unwanted or unexpected results in response to user actions. For example, a mistyped key might provide incorrect information to a method, or you may assume that a valid value is always supplied to a method when that is not the case. Although logic errors can be handled by using exception handling (for example, by testing whether an argument is Nothing and throwing an ArgumentNullException), most commonly they should be addressed by correcting the error in logic and recompiling the application.
Источник
No matter how experienced you’re with VBA coding, errors are always going to be a part of it.
The difference between a novice and an expert VBA programmer is that the expert programmers know how to effectively handle and use errors.
In this tutorial, I will show you various ways you can use to handle errors effectively in Excel VBA.
Before we get into VBA error handling, let’s first understand the different types of errors you are likely to encounter when programming in Excel VBA.
Types of VBA Errors in Excel
There are four types of errors in Excel VBA:
- Syntax errors
- Compilation errors
- Runtime errors
- Logical Errors
Let’s quickly understand what these errors are and when you’re likely to encounter these.
Syntax Error
A syntax error, as the name suggests, occurs when VBA finds something wrong with the syntax in the code.
For example, if you forget a part of the statement/syntax that is needed, then you will see the compile error.
In the below code, as soon as I hit enter after the second line, I see a compile error. This is because the IF statement needs to have the ‘Then‘ command, which is missing in the below code.

Note: When you are typing a code in Excel VBA, it checks for each sentence as soon as you hit enter. If VBA finds something missing in the syntax, it instantly shows a message with some text that can help you understand the missing part.
To make sure you see the syntax error whenever there is something missing, you need to make sure Autosyntax check is enabled. To do this, click on ‘Tools’ and then click on ‘Options’. In the options dialog box, make sure that the ‘Auto Syntax Check’ option is enabled.
If the ‘Auto Syntax Check’ option is disabled, VBA will still highlight the line with the syntax error in red, but it will not show the error dialog box.
Compile Error
Compile errors occur when something is missing that is needed for the code to run.
For example, in the below code, as soon as I try to run the code, it will show the following error. This happens as I have used the IF Then statement without closing it with the mandatory ‘End If’.
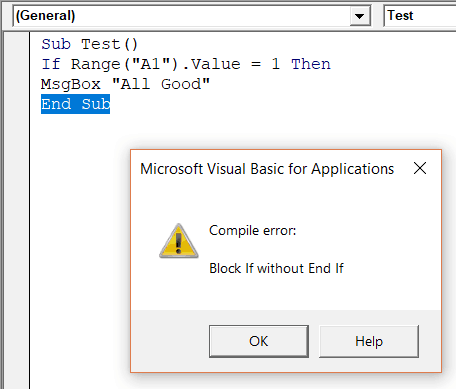
A syntax error is also a type of compile error. A syntax error occurs as soon as you hit enter and VBA identifies that something is missing. A compilation error can also occur when VBA doesn’t find anything missing while typing the code, but it does when the code is compiled or executed.
VBA checks each line as you’re typing the code and highlights the syntax error as soon as the line is incorrect and you hit enter. Compile errors, on the other hand, are only identified when the entire code is analyzed by VBA.
Below are some scenarios where you’ll encounter the compile error:
- Using an IF Statement without the End IF
- Using For statement with the Next
- Using Select statement without using the End Select
- Not declaring the variable (this works only when Option Explicit is enabled)
- Calling a Sub/Function that does not exist (or with wrong parameters)
Note about ‘Option Explicit’: When you add ‘Option Explicit’, you will be required to declare all the variables before running the code. If there is any variable that has not been declared, VBA would show an error. This is a good practice as it shows an error in case you have a misspelled variable. You can read more about Option Explicit here.
Run Time Errors
Runtime errors are those that occur when the code is running.
Run time errors will occur only when all the syntax and compile errors are being taken care of.
For example, if you run code that is supposed to open an Excel workbook, but that workbook is unavailable (either deleted or name changed), your code would give you a runtime error.
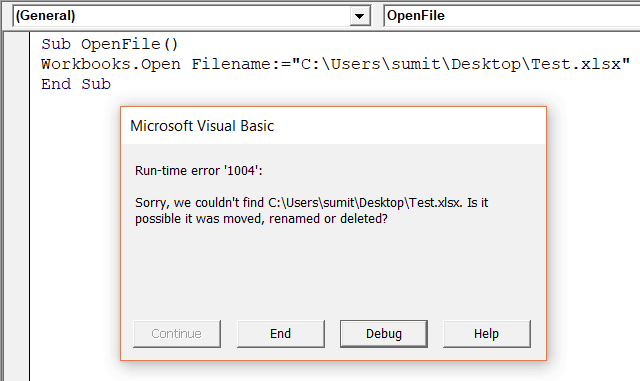
When a runtime error occurs, it will stop the code and show you the error dialog box.
The message in the Run-time error dialog box is a little more helpful. It tries to explain the problem that can help you correct it.
If you click on the Debug button, it will highlight the part of the code that is leading to the error.

If you have corrected the error, you can click on the Run button in the toolbar (or press F5) to continue running the code from where it left.
Or you can also click on the End button to come out of the code.
Important: In case you click the End button in the dialog box, it will stop the code at the line at which is encountered. However, all the lines of code before that would have been executed.
Logical Errors
Logical errors would not make your code stop but can lead to wrong results. These could also be the most difficult types of errors to troubleshoot.
These errors are not highlighted by the compiler and need to be manually tackled.
One example of logical error (that I often find myself stuck with) is running into an endless loop.
Another example could be when it gives a result which is wrong. For example, you may end up using a wrong variable in the code or add two variables where one is incorrect.
There are a few ways I use to tackle logical errors:
- Insert Message Box at some place in the code and highlight values/data that can help understand if eberything is going as expected.
- Instead of running the code at one go, go through each line one by one. To do this, click anywhere in the code and press F8. you would notice that each time you press F8, one line gets executed. This allows you to go through the code one line at a time and identify the logical errors.
Using Debug to Find Compile/Syntax Errors
Once you’re done with the code, it’s a good practice to first compile it before running.
To compile a code, click on the Debug option in the toolbar and click on Compile VBAProject.
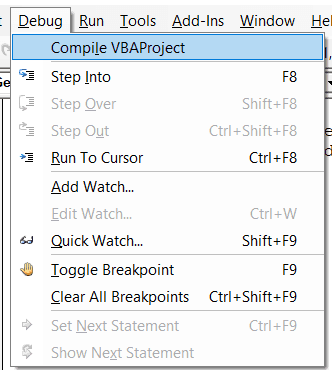
When you compile a VBA project, it goes through the code and identifies errors (if any).
In case it finds an error, it will show you a dialog box with the error. It finds errors one by one. So if it finds an error and you have corrected it, you need to run compile again to find other errors (if there are).
When you’re code is free of errors, the Compile VBAProject option will be greyed out.
Note that Compiling will only find ‘Syntax’ errors and ‘Compile’ errors. It will NOT find the run-time errors.
When you’re writing VBA code, you don’t want the errors to crop up. To avoid this, there are many error-handling methods you can use.
In the next few sections of this article, I will be covering the methods you can use for VBA error handling in Excel.
Configure Error Settings (Handled Vs Unhandled Errors)
Before you start working with your code, you need to check for one setting in Excel VBA.
Go to the VBA toolbar and click on Tools and then click on Options.
In the Options dialog box, click on the General tab and make sure that within the ‘Error Trapping’ group, ‘Break on Unhandled Errors’ is checked.
Let me explain the three options:
- Break on All Errors: This will stop your code on all types of errors, even when you have used the techniques to handle these errors.
- Break in Class Module: This will stop your code on all unhandled errors, and at the same time, if you’re using objects such as Userforms, it will also break within those objects and highlight the exact line causing the error.
- Break on Unhandled Errors: This will stop your code only for those errors that are not handled. This is the default setting as it ensures any unhandled errors are brought to your notice. If you’re using objects such as Userforms, this will not highlight the line causing the error in the object, but will only highlight the line that’s referring to that object.
Note: If you work with objects such as Userforms, you can change this setting to ‘Break on Class Modules’. The difference between #2 and #3 is that when you use Break in Class Module, it will take you to the specific line in the object that is causing the error. You can also choose to go with this instead of ‘Break on Unhandled Errors’.
So in a nutshell – if you’re just starting with Excel VBA, ensure ‘Break on Unhandled Errors’ is checked.
VBA Error Handling with ‘On Error’ Statements
When your code encounters an error, there are a few things you can do:
- Ignore the error and let the code continue
- Have an error handling code in place and run it when an error occurs
Both of these error handling methods ensures that the end user will not get to see an error.
There are a few ‘On Error’ statements that you can use to get these done.
On Error Resume Next
When you use ‘On Error Resume Next’ in your code, any encountered error will be ignored and the code will continue to run.
This error handling method is used quite often, but you need to be cautious when using it. Since it completely ignores any error that may occur, you may not be able to identify the errors that need to be corrected.
For example, if the below code is run, it will return an error.
Sub AssignValues()
x = 20 / 4
y = 30 / 0
End Sub
This happens because you can not divide a number by zero.
But if I use the ‘On Error Resume Next’ statement in this code (as shown below), it will ignore the error and I will not know that there is an issue that needs to be corrected.
Sub AssignValues()
On Error Resume Next
x = 20 / 4
y = 30 / 0
End Sub
On Error Resume Next should be used only when you clearly know the kind of errors your VBA code is expected to throw and it’s alright to ignore it.
For example, below is the VBA event code that would instantly add the date and time value in cell A1 of a newly inserted sheet (this code is added in the worksheet and not in a module).
Private Sub Workbook_NewSheet(ByVal Sh As Object)
Sh.Range("A1") = Format(Now, "dd-mmm-yyyy hh:mm:ss")
End Sub
While this works great in most cases, it would show an error if I add a chart sheet instead of a worksheet. Since a chart sheet does not have cells, the code would throw an error.
So, if I use the ‘On Error Resume Next’ statement in this code, it will work as expected with worksheets and do nothing with chart sheets.
Private Sub Workbook_NewSheet(ByVal Sh As Object)
On Error Resume Next
Sh.Range("A1") = Format(Now, "dd-mmm-yyyy hh:mm:ss")
End Sub
Note: On Error Resume Next Statement is best used when you know what kind of errors you’re likely to encounter. And then if you think it’s safe to ignore these errors, you can use it.
You can take this code to the next level by analyzing if there was an error, and displaying a relevant message for it.
The below code would show a message box that would inform the user that a worksheet has not been inserted.
Private Sub Workbook_NewSheet(ByVal Sh As Object)
On Error Resume Next
Sh.Range("A1") = Format(Now, "dd-mmm-yyyy hh:mm:ss")
If Err.Number <> 0 Then
MsgBox "Looks like you inserted a chart sheet" & vbCrLf & "Error - " & Err.Description
End If
End Sub
‘Err.Number’ is used to get the error number and ‘Err.Description’ is used to get the error description. These will be covered later in this tutorial.
On Error GoTo 0
‘On Error GoTo 0’ will stop the code on the line that causes the error and shows a message box that describes the error.
In simple terms, it enables the default error checking behavior and shows the default error message.
Then why even use it?
Normally, you don’t need to use ‘On Error Goto 0’, but it can be useful when you use it in conjunction with ‘On Error Resume Next’
Let me explain!
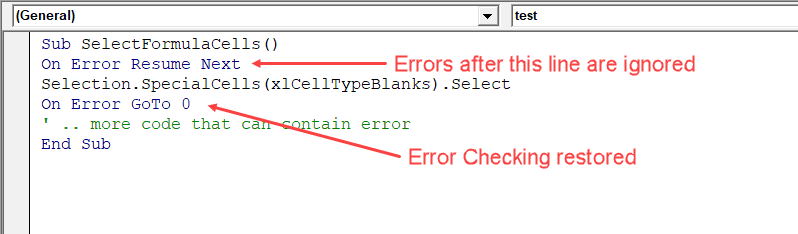
The below code would select all the blank cells in the selection.
Sub SelectFormulaCells()
Selection.SpecialCells(xlCellTypeBlanks).Select
End Sub
But it would show an error when there are no blank cells in the selected cells.
So to avoid showing the error, you can use On Error Resume next’
Now, it will also show any error when you run the below code:
Sub SelectFormulaCells()
On Error Resume Next
Selection.SpecialCells(xlCellTypeBlanks).Select
End Sub
So far, so good!
The problem arises when there is a part of the code where error can occur, and since you’re using ‘On Error Resume Next’, the code would simply ignore it and move to the next line.
For example, in the below code, there would no error prompt:
Sub SelectFormulaCells()
On Error Resume Next
Selection.SpecialCells(xlCellTypeBlanks).Select
' .. more code that can contain error
End Sub
In the above code, there are two places where an error can occur. The first place is where we are selecting all blank cells (using Selection.SpecialCells) and the second is in the remaining code.
While the first error is expected, any error after that is not.
This is where On Error Goto 0 comes to rescue.
When you use it, you reset the error setting to default, where it will start showing errors when it encounters it.
For example, in the below code, there would be no error in case there are no blank cells, but there would be an error prompt because of ’10/0′
Sub SelectFormulaCells()
On Error Resume Next
Selection.SpecialCells(xlCellTypeBlanks).Select
On Error GoTo 0
' .. more code that can contain error
End Sub
On Error Goto [Label]
The above two methods – ‘On Error Resume Next’ and ‘On Error Goto 0’ – doesn’t allow us to truly handle the error. One makes the code ignore the error and the second one resume error checking.
On Error Go [Label] is a way with which you can specify what you want to do in case your code has an error.
Below is the code structure that uses this error handler:
Sub Test()

On Error GoTo Label:
X = 10 / 0    'this line causes an error
' ....your remaining code goes here
Exit Sub

Label:
    ' code to handle the error
End Sub
Note that before the Error handling ‘Label’, there is an Exit Sub. This ensures that in case there are no errors, the sub is exited and the ‘Label’ code is not executed. In case you don’t use Exit Sub, it will always execute the ‘Label’ code.
In the example code below, when an error occurs, the code jumps and executes the code in the handler section (and shows a message box).
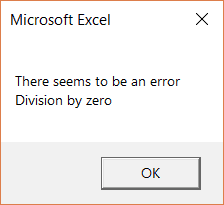
Sub Errorhandler()
On Error GoTo ErrMsg
X = 12
Y = 20 / 0
Z = 30
Exit Sub
ErrMsg:
MsgBox "There seems to be an error" & vbCrLf & Err.Description
End Sub
Note that when an error occurs, the code has already run and executed the lines before the line causing the error. In the above example, the code sets the value of X as 12, but since the error occurs in the next line, it doesn’t set the values for Y and Z.
Once the code jumps to the error handler code (ErrMsg in this example), it will continue to execute all the lines in and below the error handler code and the exit the sub.
On Error Goto -1
This one is a bit complicated, and in most cases, you’re unlikely to use this.
But I will still cover this as I have faced a situation where this was needed (feel free to ignore and jump to the next section if you’re only looking for basics).
Before I get into the mechanics of it, let me try and explain where can it be useful.
Suppose you have a code where an error is encountered. But all is good as you have one error handler in place. But what happens when there is another error in the error handler code (yeah.. somewhat like the inception movie).
In such a case, you can not use the second handler as the first error has not been cleared. So while you have handled the first error, in VBA’s memory it still exists. And the VBA memory only has a place for one error – not two or more than that.
In this scenario, you can use On Error Goto -1.
It clears the error and frees up VBA memory to handle the next error.
Enough talk!
Let’s me explain now by using examples.
Suppose I have the below code. This will throw an error as there is division by zero.
Sub Errorhandler()
X = 12
Y = 20 / 0
Z = 30
End Sub
So to handle it, I use an error handler code (with the name ErrMsg) as shown below:
Sub Errorhandler()

On Error GoTo ErrMsg

X = 12
Y = 20 / 0
Z = 30
Exit Sub

ErrMsg:
MsgBox "There seems to be an error" & vbCrLf & Err.Description
End Sub
All is good now again. As soon as the error occurs, the error handler is used and shows a message box as shown below.
Now, I expand the code so that I have more code in or after the error handler.
Sub Errorhandler()

On Error GoTo ErrMsg

X = 12
Y = 20 / 0
Z = 30
Exit Sub

ErrMsg:
MsgBox "There seems to be an error" & vbCrLf & Err.Description
A = 10 / 2
B = 35 / 0
End Sub
Since the first error has been handled but the second has not been, I again see an error as shown below.
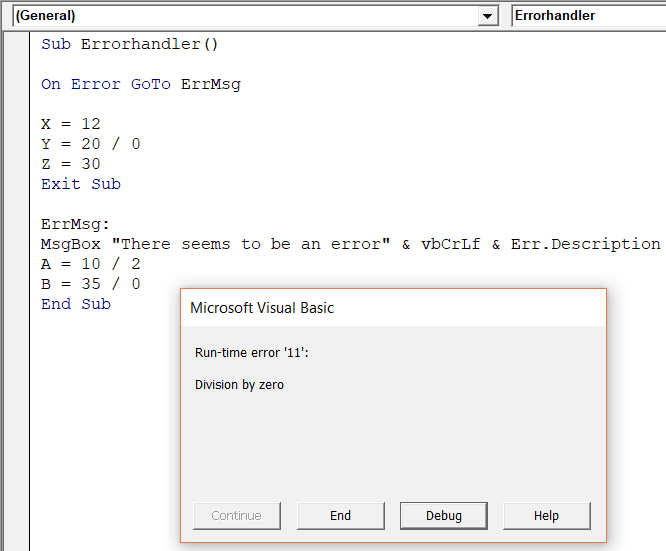
Still all good. The code is behaving in the way we expected it to.
So to handle the second error, I use another error handler (ErrMsg2).
Sub Errorhandler()

On Error GoTo ErrMsg

X = 12
Y = 20 / 0
Z = 30
Exit Sub

ErrMsg:
MsgBox "There seems to be an error" & vbCrLf & Err.Description
On Error GoTo ErrMsg2
A = 10 / 2
B = 35 / 0
Exit Sub

ErrMsg2:
MsgBox "There seems to be an error again" & vbCrLf & Err.Description

End Sub
And this is where it doesn’t work as expected.
If you run the above code, it will still give you a run-time error, even after having the second error handler in place.
This happens as we didn’t clear the first error from VBA’s memory.
Yes, we handled it! But it still remains in the memory.
And when VBA encounters another error, it’s still stuck with the first error, and hence the second error handler is not used. The code stops at the line that caused the error and shows the error prompt.
To clear VBA’s memory and clear the previous error, you need to use the ‘On Error Goto -1’.
So if you add this line in the below code and run it, it will work as expected.
Sub Errorhandler()

On Error GoTo ErrMsg
X = 12
Y = 20 / 0
Z = 30
Exit Sub

ErrMsg:
MsgBox "There seems to be an error" & vbCrLf & Err.Description
On Error GoTo -1
On Error GoTo ErrMsg2
A = 10 / 2
B = 35 / 0
Exit Sub

ErrMsg2:
MsgBox "There seems to be an error again" & vbCrLf & Err.Description

End Sub
Note: The error automatically gets cleared when a subroutine ends. So, ‘On Error Goto -1’ can be useful when you’re getting two or more than two errors in the same subroutine.
The Err Object
Whenever an error occurs with a code, it’s the Err object that is used to get the details about the error (such as the error number or the description).
Err Object Properties
The Err Object has the following properties:
| Property | Description |
| Number | A number that represents the type of error. When there is no error, this value is 0 |
| Description | A short description of the error |
| Source | Project name in which the error has occurred |
| HelpContext | The help context id for the error in the help file |
| HelpFile | A string that represents the folder location and the file name of the help file |
While in most cases you don’t need to use Err object, it can sometimes be useful while handling errors in Excel.
For example, suppose you have a dataset as shown below and for each number, in the selection, you want to calculate the square root in the adjacent cell.
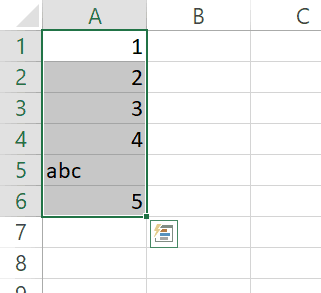
The below code can do it, but since there is a text string in cell A5, it shows an error as soon as this occurs.
Sub FindSqrRoot()
Dim rng As Range
Set rng = Selection

For Each cell In rng
    cell.Offset(0, 1).Value = Sqr(cell.Value)
Next cell

End Sub

The problem with this type of error message is that it gives you nothing about what has gone wrong and where the issue occurred.
You can use the Err object to make these error messages more meaningful.
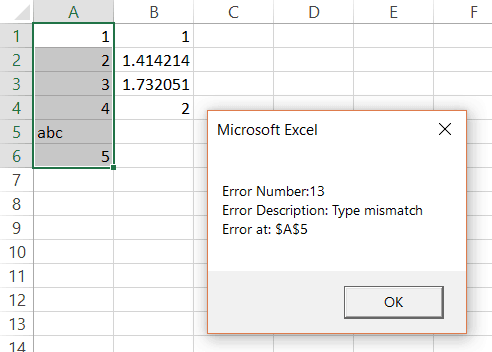
For example, if I now use the below VBA code, it will stop the code as soon as the error occurs and show a message box with the cell address of the cell where there is an issue.
Sub FindSqrRoot()
Dim rng As Range
Set rng = Selection

For Each cell In rng
    On Error GoTo ErrHandler
    cell.Offset(0, 1).Value = Sqr(cell.Value)
Next cell

ErrHandler:
MsgBox "Error Number:" & Err.Number & vbCrLf & _
    "Error Description: " & Err.Description & vbCrLf & _
    "Error at: " & cell.Address

End Sub
The above code would give you a lot more information than the simple ‘Type Mismatch’, especially the cell address so that you know where the error occurred.
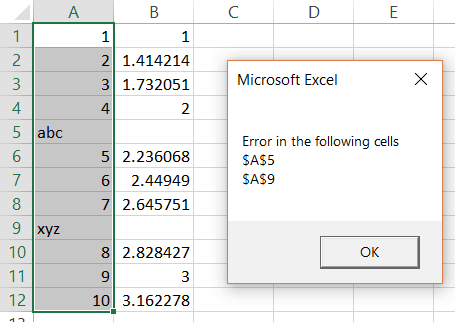
You can further refine this code to make sure your code runs until the end (instead of breaking at each error) and then gives you a list of cell address where the error occurs.
The below code would do this:
Sub FindSqrRoot2()
Dim ErrorCells As String
Dim rng As Range

On Error Resume Next

Set rng = Selection
For Each cell In rng
cell.Offset(0, 1).Value = Sqr(cell.Value)

If Err.Number <> 0 Then
ErrorCells = ErrorCells & vbCrLf & cell.Address
On Error GoTo -1
End If
Next cell
MsgBox "Error in the following cells" & ErrorCells
Exit Sub

End Sub
The above code runs until the end and gives the square root of all the cells that have numbers in it (in the adjacent column). It then shows a message that lists all the cells where there was an error (as shown below):
Err Object Methods
While the Err properties are useful to show useful information about the errors, there are two Err methods as well that can help you with error handling.
| Method | Description |
| Clear | Clears all the property settings of the Err object |
| Raise | Generates a run-time error |
Let’s quickly learn what these are and how/why to use these with VBA in Excel.
Err Clear Method
Suppose you have a dataset as shown below and you want to get the square root of all these numbers in the adjacent column.
The following code will get the square roots of all the numbers in the adjacent column and show a message that an error occurred for cell A5 and A9 (as these have text in it).
Sub FindSqrRoot2()
Dim ErrorCells As String
Dim rng As Range

On Error Resume Next

Set rng = Selection
For Each cell In rng
cell.Offset(0, 1).Value = Sqr(cell.Value)

If Err.Number <> 0 Then
ErrorCells = ErrorCells & vbCrLf & cell.Address
Err.Clear
End If
Next cell
MsgBox "Error in the following cells" & ErrorCells

End Sub
Note that I have used the Err.Clear method within the If Then statement.
Once an error has occurred and trapped by the If condition, Err.Clear method resets the error number back to 0. This ensures that IF condition only trap the errors for cells where it is raised.
Had I not used the Err.Clear method, once the error occurs, it would always be true in the IF condition, and the error number has not been reset.
Another way of making this work is by using the On Error Goto -1, which resets the error completely.
Note: Err.Clear is different from On Error Goto -1. Err.Clear only clears the error description and the error number. it doesn’t completely reset it. This means that if there is another instance of error in the same code, you won’t be able to handle it before resetting it (which can be done with ‘On Error Goto -1’ and not by ‘Err.Clear’).
Err Raise Method
The Err.Raise method allows you to raise a run-time error.
Below is the syntax of using the Err.Raise method:
Err.Raise [number], [source], [description], [helpfile], [helpcontext]
All these arguments are optional and you can use these to make your error message more meaningful.
But why would you ever want to raise an error yourself?
Good question!
You can use this method when there is an instance of an error (which means that there is going to an error anyway) and then you use this method to tell the user more about the error (instead of the less helpful error message that VBA shows by default).
For example, suppose you have a dataset as shown below and you want all the cells to have numeric values only.
Sub RaiseError()
Dim rng As Range
Set rng = Selection

On Error GoTo ErrHandler

For Each Cell In rng
If Not (IsNumeric(Cell.Value)) Then
Err.Raise vbObjectError + 513, Cell.Address, "Not a number", "Test.html"
End If
Next Cell

ErrHandler:
MsgBox Err.Description & vbCrLf & Err.HelpFile
End Sub
The above code would show an error message that has the specified description and the context file.
Personally, I have never used Err.Raise as I mostly work with Excel only. But for someone who uses VBA to work with Excel along with other applications such as Outlook, Word or PowerPoint, this can be useful.
Here is a detailed article on Err.Raise method in case you want to learn more.
VBA Error Handling Best Practices
No matter how skilled you get a writing VBA code, errors are always going to be a part of it. The best coders are those who have the skills to handle these errors properly.
Here are some best practices you can use when it comes to error handling in Excel VBA.
- Use ‘On Error Go [Label]’ at the beginning of the code. This will make sure any error that can happen from there is handled.
- Use ‘On Error Resume Next’ ONLY when you’re sure about the errors that can occur. Use it with expected error only. In case you use it with unexpected errors, it will simply ignore it and move forward. You can use ‘On Error Resume Next’ with ‘Err.Raise’ if you want to ignore a certain type of error and catch the rest.
- When using error handlers, make sure you’re using Exit Sub before the handlers. This will ensure that the error handler code is executed only when there is an error (else it will always be executed).
- Use multiple error handlers to trap different kinds of errors. Having multiple error handler ensures that an error is properly addressed. For example, you would want to handle a ‘type mismatch’ error differently than a ‘Division by 0’ run-time error.
Hope you found this Excel article useful!
Here are some more Excel VBA Tutorials that you may like:
- Excel VBA Data Types – A Complete Guide
- Excel VBA Loops – For Next, Do While, Do Until, For Each
- Excel VBA Events – An Easy (and Complete) Guide
- Excel Visual Basic Editor – How to Open and Use it in Excel
При выполнении макросов Excel могут возникнуть ошибки, которые в VBA делят на три категории:
- Ошибки компиляции
- Ошибки выполнения
- Логические ошибки (баги)
Далее мы поговорим о каждом из трёх типов ошибок VBA подробно.
Содержание
- Ошибки компиляции
- Ошибки выполнения
- Перехват ошибок выполнения
- Логические ошибки
Ошибки компиляции
Компилятор VBA рассматривает ошибки компиляции как недопустимые и выделяет их в коде ещё до того, как дело дойдёт до запуска макроса.
Если при написании кода допущена синтаксическая ошибка, то редактор VBA сигнализирует об этом немедленно: либо при помощи окна с сообщением, либо выделяя ошибку красным цветом, в зависимости от статуса режима Auto Syntax Check.
Примечание: При включённом режиме Auto Syntax Check каждый раз, при появлении в редакторе Visual Basic во введённом коде синтаксической ошибки, будет показано соответствующее сообщение. Если же этот режим выключен, то редактор VBA продолжит сообщать о синтаксических ошибках, просто выделяя их красным цветом. Опцию Auto Syntax Check можно включить/выключить в меню Tools > Options редактора Visual Basic.
В некоторых случаях ошибка компиляции может быть обнаружена при выполнении компиляции кода, непосредственно перед тем, как макрос будет выполнен. Обычно ошибку компиляции несложно обнаружить и исправить, потому что компилятор VBA даёт информацию о характере и причине ошибки.

Например, сообщение «Compile error: Variable not defined» при попытке запустить выполнение кода VBA говорит о том, что происходит попытка использовать или обратиться к переменной, которая не была объявлена для текущей области (такая ошибка может возникнуть только если используется Option Explicit).
Ошибки выполнения
Ошибки выполнения возникают в процессе выполнения кода и приводят к остановке выполнения программы. Этот тип ошибок VBA, как правило, также не сложно обнаружить и исправить, так как сообщается информация о характере ошибки и место в коде, где произошла остановка.
Примером такой ошибки может служить попытка выполнить деление на ноль. В результате будет показано сообщение «Run-time error ’11’: Division by zero«.

В зависимости от структуры проекта VBA, может быть предложено выполнить отладку кода (как показано на рисунке ниже). В этом случае при нажатии на кнопку Debug (в окне сообщения о необходимости отладки) будет выделена цветом строка кода, которая стала причиной ошибки VBA.
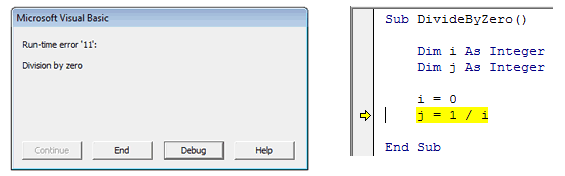
Получив такое сообщение и видя выделенную строку кода, как в приведённом выше примере, обнаружить причину ошибки будет совсем не сложно.
В случае если код сложнее, чем в нашем примере, то, чтобы получить больше информации о причине возникновения ошибки VBA, можно проверить значения используемых переменных. В редакторе VBA для этого достаточно навести указатель мыши на имя переменной, или можно открыть окно отслеживания локальных переменных (в меню редактора View > Locals Window).
Коды различных ошибок выполнения расшифрованы на сайте Microsoft Support (на английском). Наиболее часто встречающиеся ошибки VBA перечислены в этой таблице:
| 5 | Недопустимый вызов процедуры (Invalid procedure call) |
| 7 | Недостаточно памяти (Out of memory) |
| 9 | Индекс вне заданного диапазона (Subscript out of range)
Эта ошибка возникает при попытке обратиться к элементу массива за пределами заданного размера массива – например, если объявлен массив с индексами от 1 до 10, а мы пытаемся обратиться к элементу этого же массива с индексом 11. |
| 11 | Деление на ноль (Division by zero) |
| 13 | Несоответствие типа (Type mismatch)
Эта ошибка возникает при попытке присвоить переменной значение не соответствующего типа – например, объявлена переменная i типа Integer, и происходит попытка присвоить ей значение строкового типа. |
| 53 | Файл не найден (File not found)
Иногда возникает при попытке открыть не существующий файл. |
Перехват ошибок выполнения
Не все ошибки выполнения бывают вызваны недочётами в коде. Например, ошибки VBA не удастся избежать, если для работы макроса необходимо открыть файл с данными, а этого файла не существует. В таких случаях признаком профессионализма будет перехват ошибок и написание кода VBA, который будет выполняться при их возникновении. Таким образом, вместо неприятных сбоев будет происходить изящное завершение работы макроса.
Для того, чтобы помочь справиться с возникающими ошибками, VBA предоставляет разработчику операторы On Error и Resume. Эти операторы отслеживают ошибки и направляют выполнение макроса в специальный раздел кода VBA, в котором происходит обработка ошибки. После выполнения кода обработки ошибки, работа программы может быть продолжена с того места, где возникла ошибка, или макрос может быть остановлен полностью. Далее это показано на примере.
'Процедура Sub присваивает переменным Val1 и Val2 значения,
'хранящиеся в ячейках A1 и B1 рабочей книги Data.xlsx расположенной в каталоге C:Documents and Settings

Sub Set_Values(Val1 As Double, Val2 As Double)

   Dim DataWorkbook As Workbook

   On Error GoTo ErrorHandling

      'Открываем рабочую книгу с данными

      Set DataWorkbook = Workbooks.Open("C:Documents and SettingsData")

      'Присваиваем переменным Val1 и Val2 данные из рабочей книги DataWorkbook

      Val1 = Sheets("Лист1").Cells(1, 1)
      Val2 = Sheets("Лист1").Cells(1, 2)

      DataWorkbook.Close

   Exit Sub

ErrorHandling:

   'Если файл не найден, предлагаем пользователю разместить его в
   'нужном месте и продолжить работу

   MsgBox "Рабочая книга не найдена! " & _
      "Пожалуйста добавьте книгу Data.xlsx в каталог C:Documents and Settings и нажмите OK."

   Resume

End Sub
В этом коде производится попытка открыть файл Excel с именем Data. Если файл не найден, то пользователю будет предложено поместить этот файл в нужную папку. После того, как пользователь сделает это и нажмёт ОК, выполнение кода продолжится, и попытка открыть этот файл повторится. При желании вместо попытки открыть нужный файл, выполнение процедуры Sub может быть прервано в этом месте при помощи команды Exit Sub.
Логические ошибки
Логические ошибки (или баги) возникают в процессе выполнения кода VBA, но позволяют ему выполняться до самого завершения. Правда в результате могут выполняться не те действия, которые ожидалось, и может быть получен неверный результат. Такие ошибки обнаружить и исправить труднее всего, так как компилятор VBA их не распознаёт и не может указать на них так, как это происходит с ошибками компиляции и выполнения.
Например, при создании макроса в процедуре случайно были просуммированы не те переменные, которые требовалось просуммировать. Результат будет ошибочным, но макрос будет продолжать выполняться до завершения.
Редактор Excel VBA предоставляет набор инструментов отладки, которые помогут найти и исправить логические ошибки в коде VBA. В данной статье мы не будем рассматривать подробно эти инструменты. Любознательный пользователь может найти обзор инструментов отладки VBA на сайте Microsoft Help & Support (на английском).
Оцените качество статьи. Нам важно ваше мнение:
Just like any other programming language, VBA has no luck when it comes to errors and you have to deal with them, no matter what. They may come from different sources, like bad coding, impossible operations (like zero division), or unexpected errors.
The best way to deal with it is to have a proper understanding of all the possible outcomes of the result that you could get with code. Look at the below example where we have a VBA code that calculates the square root of the number using the value which you have in the selected cell.
Sub Square_Root()
ActiveCell.Value = ActiveCell.Value ^ (1 / 2)
End Sub
But if the active cell has a value other than a number, you’ll get a run-time error, just like below.

Error Settings in VBA (Error Trapping)
In the VBA option, you can configure the setting to deal with errors before you start writing codes. To open the VBA settings, go to Tools ➤ Options ➤ Generals ➤ Error Trapping. Here you have three options which you can use.

- Break on All Errors: If you have this option activated, VBA will stop the code for all types of errors even if you have used all kinds of error handling techniques.
- Break-in Class Module: With this option, VBA will stop all your codes that are not handled by any technique. And if you’re using objects such as Userforms, it will also break within those objects and highlight the exact line where the error is.
- Break on Unhandled Errors: This is the default setting that helps you to know about all the errors where you are not using any error handling technique and stop the code for all the unhandled errors. (But, if you’re using objects such as Userforms, this will not highlight the line causing the error in the object but will only highlight the line that’s referring to that object).
Types of VBA Errors
To understand VBA errors, you can split them into four categories, and below is the explanation of these types of errors.
1. Syntax Errors
While writing VBA code you need to follow a particular Syntax and when you skip it or don’t write it in the way it should be you can face SYNTAX error (also called Language error). It’s like typos that you do while writing your codes.
Well, VBA helps you by pointing out these errors by showing an error message. You just need to make sure you have “Auto Syntax Check” activated in your VB editor.
Go to the Tool ➤ Options and make sure to tick the “Auto Syntax Check”. With this, whenever you make a SYNTAX error, VBA will show an error message.

But if “Auto Syntax Check” is disabled VBA still highlights the line of code with the error but won’t show the error message.
2. Compile Errors
It comes when you write code to perform an activity, but that activity is not valid or can’t be performed by VBA. The best example is where you have a code using the IF statement but missed to add END IF at the end of the statement and now when you run this VBA will show you a compilation error message.

Apart from this, there are some other examples of compile errors:
- Using For without Next (For Next).
- Select without End Select (Select Case).
- Not Declaring a Variable when you have “Option Explicit” enabled.
- Calling a Sub/Function that does not exist.
3. Runtime Errors
A runtime error occurs at the time of executing the code. Remember the example, I shared with you above when the code calculated the square root of a number.

When a runtime error occurs while running code, it stops the code and shows you the error dialog box and that error box talks about the nature of the error you have. Let’s say you have written a code that opens a workbook from the location which you have specified but now that workbook is relocated or deleted by someone.

So, when you run the code, VBA will show you a runtime error as it can’t find that file on that location. The message you get in a run time error describes the reason which helps you to understand the reason for the error.

And when a runtime error occurs it stops the execution of the code. If you click on the “Debug” button it shows you the line of code that has that error by highlighting it yellow. Or you can click on the “End” button to stop the code to execute and close the error message.
4. Logical Error
It’s not an error but a mistake while writing code. These types of errors sometimes can give you nuts while finding them and correcting them.
Let’s say you write code and while declaring a variable you used the wrong data type, or you have used the wrong calculation steps. In this case, your code will work fine, and you won’t find this error easily. The best way to deal with this kind of problem is to run each line of code one by one.
Using Debug Tools in VBA
VBA provides you a set of tools to debug your code and remove bugs from your codes.
1. Compile VBA Project
In Visual Basic Editor, there’s an option that you can use instantly after completing your code. These compile options scan each line of your code and show a message box if there is an error in your code.
Note: Compile VBA option only traces Syntax and Compile errors, not runtime errors as these errors only rise when a code is running. To use Compile VBA Project, go to ➤ Debug ➤ Compile VBA Project.

Once you run “Compile VBA Project” and you have no error in your code, the options will be greyed out.
2. Run Each Line of Code One by One
This is how I do it. When I complete a code, I simply run it line by line to check if there’s an error occurring. It may take time, but it helps you to get to about all the errors (Syntax, Compile, and Run-Time).
On the “Debug Toolbar”, there’s a button “Step In” which you can use to execute a code line by line or you can simply press F8 to execute a single line and then press it again to execute the next line in the code.

Using “On ERROR” Statement to Handle VBA Errors
It’s important to check your codes and find possible errors in all the debugging ways you have. But, the best and most effective way is to create error-handling statements that can deal with an error and make your code flawless while executing. Let’s learn about these statements. When an error occurs in a VBA code the best possible ways to handle that error can be:
- Let the VBA ignore the error and execute the code
- Let a special set of statements to run when an error occurs.
In both solutions, you can use “On Error” statements. Below four “On Error” statements that you can use. And now, let’s look at each statement one by one.
1. On Error Resume Next
This simple line of code lets VBA continue executing the code despite the occurrence of an error. The IDEA is simple: Move to the next line of the code if there’s an error found somewhere while executing.
In the below code, you have two lines of code:
- The first line says the value of cell A1 is 25 divided by 0
- And the second line says the value cell A2 is 10 divided by 5
Now there’s a problem with the code which you have inline one. As you know if you divide anything with 0 the result will be an error. So, when you run this code VBA will show an error message “Run-time error ‘11’ Division by Zero” and stop the execution.
But when you add the “On Error Resume Next” at the very beginning of the code and run the code, VBA simply skips that line of code where the error occurs and continues with the second line and add that value in cell A2.
Sub myDivide()
On Error Resume Next
    Range("A1").Value = 25 / 0
    Range("A2").Value = 10 / 5
End Sub
So, whenever you want your code to get executed despite an error occurring anywhere simply use the “On Error Resume Next” statement in your code.
But here’s one more thing you need to note down: It will only skip errors that occur after it.
Let’s say if an error occurs at line 5 and you have added “On Error Resume Next” on line 8 then it would not skip that error. So, the best way is to add it as the first line of the code in the procedure.
2. On Error GoTo 0
It’s the default behavior of VBA that when an error occurred it stops the execution of the code.
Well, using “On Error GoTo 0” make no difference in your code. VBA will simply stop the code and show a message with a description of the error. Then why would I bother to use it? Smart Question. Let’s use the example you have used above in “On Error Resume Next”.
In this code whenever an error will occur VBA will resume to the next line of code and run it and you won’t see any error message. But let’s say you have more lines in your code and you don’t want to surpass those lines if there’s an error in the code.
So, if you enter “On Error GoTo 0” after the second line of code it will restore the VBA’s default error handler which shows error messages each time an error occurs.
3. On Error GoTo [Label]
Think about a place in a building where you can head up in an emergency. In the same way, using “On Error GoTo [Label]”, you can simply create a separate block of code in your main code to deal with an error.
Actually, “On Error GoTo [Label]” is a far better and more convenient way to deal with errors. In the below code, you have “On Error GoTo Oh!Error” now in this line statement the word “Oh!Error” is the label.
If you look at the end of the code where you have a specific starting with the label name and then a code for a message box with a message about the code.
Now, what happens if an error occurs the VBA will jump to the label “Oh!Error” and run the block of code which you have after that label.
But there’s one thing you need to take care of: If an error doesn’t occur even then the label you have in your code will get executed. There are two things you need to do:
- First, make sure to add your Error label at the end of the code.
- Second, add an “Exit Sub” before the error label.
With this, you’ll benefit in both situations. Let’s say if an error occurs and VBA jumps to the label you specified there would only be code from the label itself to code. And if an error doesn’t occur “Exit Sub” statement which you have before the label will exit the procedure without executing the error label.
4. On Error GoTo -1
Before we get into this, let me share something with you. When an error occurs in a code VBA stores that error log in its memory and only clears it when the routine ends.
O VBA! Live in Present
To deal with the second error in a VBA code you need to clear the first error from VBA’s memory. In the below code, you have two “On Error GoTo [Label]” statements that deal with errors from two different blocks of code.
But if you run this code, when the second error VBA won’t jump to the label which you have defined and instead show the error message “Type Mismatch”.
Sub Square_Root()
On Error GoTo myError1
Range("A1").Value = Range("A1").Value ^ (1 / 2)
myError1:
MsgBox "There's some problem with the value you have in the cell A1."
On Error GoTo myError2
Range("A2").Value = Range("A2").Value ^ (1 / 2)
myError2:
MsgBox "There's some problem with the value you have in the cell A2."
End Sub
To fix this problem you can use “On Error GoTo -1” which makes VBA remove the current error from its storage memory.
Sub Square_Root()
 On Error GoTo myError1
 Range("A1").Value = Range("A1").Value ^ (1 / 2)
 myError1:
 MsgBox "There's some problem with the value you have in the cell A1."
 On Error GoTo -1
 On Error GoTo myError2
 Range("A2").Value = Range("A2").Value ^ (1 / 2)
 myError2:
 MsgBox "There's some problem with the value you have in the cell A2."
 End Sub
Now when you run this code, “On Error GoTo -1” removes the error from the memory and VBA deals with the error in the second statement as you want.
What Else Do I Need to Know to Handle Errors in VBA?
Apart from using error handling techniques, there are a few other things that you can use to deal with errors in a better way.
Err Object
When an error occurred while executing of code, you can use the Err object to get details about that error. There are a few properties and methods which you can use with Err object. Let’s learn them one by one.
Properties
Below are the properties which you can use with the Err object:
- Err.Number: With an error occurred there’s a number stored in the Err Object. In the below code, when occurred the message box will show the error number.
- Err.Description: This property shows the description of the error which can help you to understand the reason for the error.
- Err.Source: This property shows you in which project the error has occurred.
- Err.HelpContext: This property returns the help context id for the error in the help file.
- Err.HelpContext: This is a string value for the location of the help file.
Normally when you are dealing with errors using error handling techniques you won’t be using the Err Object that much in your codes. But below is a simple example to use it.
Sub Square_Root()
On Error GoTo myError1
    Range("A1").Value = Sqr(Range("A1").Value)
Exit Sub
myError1:
    MsgBox "There's some problem with the value you have in the cell A1." & vbCrLf & _
                "Error Number: " & Err.Number  & vbCrLf & _
                "Error Description: " & Err.Description
End Sub
When you run the above code, and if an error occurred, it will show a message box with the error number and description of the error.
Methods
With Err Object there are two methods that you can also use.
- Err.Clear: This method clears the error number and error description from VBA’s memory (It’s different from “On Error GoTo -1” as it doesn’t completely reset the error).
- Err.Raise: With this method, you can generate a run time error in your code intentionally, and below is the syntax which needs to follow:
Err.Raise [number], [source], [description], [helpfile], [helpcontext]
Quick Tips on Error Handling
Here are a few quick tips which you can use to deal with VBA errors in a better way.
- Use “On Error Resume Next” only when you know for sure about an error to occur and it’s OK to skip the line of code with an error and it’s safe to skip to the next line.
- The best way to deal with run-time errors is by using “Error Handler” with “On Error GoTo [Label]”. This ensures that whenever the error occurs you will know about it, but it won’t show that nasty error message.
- Whenever you use the error handler make sure to use “Exit Sub” before it.
There’s More
Below are some of the links which could be useful for you to learn more about error handling in VBA, make sure to check out all of these:
Type Mismatch (Error 13) | Runtime (Error 1004) | Object Required (Error 424) | Out of Memory (Error 7) | Object Doesn’t Support this Property or Method (Error 438) | Invalid Procedure Call or Argument (Error 5) | Overflow (Error 6) | Automation error (Error 440) | VBA Error 400 | VBA Subscript Out of Range Runtime Error 9
So far we’ve assumed that everything has worked first time with no problems.
Sadly, this isn’t a true reflection of how things will go in the real world!
This part of the lesson explains how to deal with common problems that arise
when writing and running VBA code.
Files Needed
You can use the file you have created over the previous parts of this
lesson. If you don’t have this code you can click
here to download a
copy.
Completed Code
The completed code for this part of the lesson is identical to that in the
Files Needed section above.
To begin this part of the lesson you’ll need a copy of the procedure we’ve
been creating over the previous parts. You can either use the copy you’ve
been writing yourself, download a copy using the link in the Files
Needed section above, or copy and paste the code shown below into a new
module:
Sub My_First_Program()
Worksheets.Add
Range(«A1»).Value = «Wise Owl»
Range(«A2»).Value = Date
Range(«A3»).Value = Time
Range(«A1:A3»).Interior.Color = rgbCornflowerBlue
Range(«A1:A3»).Font.Color = rgbWhite
Columns(«A»).AutoFit
End Sub
Syntax Errors
The first type of problem you’re likely to encounter in VBA is called a
syntax error. A syntax error is a mistake in the punctuation of an
instruction that you’ve written. Syntax errors are highlighted when you
write or edit an instruction and then move the cursor to another line. To
demonstrate this, try editing the line of code shown in the image below:
![]()
Position the cursor next to the double-quote after the cell reference
A1.
![]()
Now delete the double-quote character.
The VBE won’t detect the syntax error until you move the text cursor onto a
different line. Try doing this now either by clicking on a different line
or by using the cursor keys :

The offending line will be highlighted
in red. You’ll also see a dialog box appear with a message that is often difficult to decipher!
To fix a syntax error, you simply need to punctuate your instruction correctly!
![]()
Add a double-quote in the correct position and move the cursor to a different line of code to check that you’ve fixed the syntax error.
The messages that accompany syntax errors are often unhelpful. If you
prefer, you can disable these messages. To do this, choose
Tools | Options…
from the VBE menu and complete the dialog box as shown below:

On the
Editor tab, uncheck the box labelled
Auto Syntax Check and click OK.
The next time you make a syntax error you’ll still see the offending line in
red, but you won’t see an annoying popup message!
Compile Errors
Syntax errors are easy to spot as the VBE warns you about them as soon as you
create them. Another type of problem that is less easy to spot is called a
compile error. You can think of a compile error as a mistake in
the structure of your code,
the grammar of an instruction or, sometimes, in the spelling of a keyword in the
instruction.
Compile errors are detected automatically when you choose to run a subroutine
but you can check for them at any time by choosing
Debug | Compile VBAProject from the VBE menu:

Choose this option to check the entire project for compile errors.
To demonstrate a compile error, let’s use the wrong method to attempt to create a new
worksheet. Edit the first line of the subroutine:

Alter this line by removing the
Add keyword.

Replace
Add with Insert.
Although Insert is a valid keyword in Excel VBA, you can’t
apply it to the Worksheets object to create a new worksheet.
When you move the cursor to another line you won’t see any code highlighted
in red. This simply means that you don’t have any syntax errors
in your code:

Just because you don’t have any red text doesn’t mean that things can’t go wrong!
Compile your project by choosing Debug | Compile VBAProject from the VBE menu:

Compile errors are indicated by highlighting the offending piece of code in blue and displaying a message box.
To fix this problem, click OK on the message box,
then alter the line of code to use the Add method:

Change the code back to its original form to solve the compile error.
You may wish to compile your project once more to establish that you’ve solved
the problem.
Run-time Errors
The final type of error that you’re likely to encounter is referred to as a
run-time error. As its name suggests, this type of error occurs
when your program encounters a problem while it is running. Run-time
errors can occur for all kinds of reasons, some of which may not even be your
fault!
As it can be difficult to anticipate when run-time errors will occur, it’s
important to know how to write code to deal with them. You’ll learn how to
write error-handling code in a later module.
To demonstrate a simple run-time error, let’s make a mistake in the line
which changes the value of cell A1:

Change the cell reference from
A1 (that’s the number, one)…

…to
Al (that’s a lower case letter L).
This type of mistake is difficult to spot when you’re writing code — the
difference between the digit 1 and a lower case L
is very slight. Try moving the cursor to a different line of code to check
that you haven’t created a syntax error. Choose Debug | Compile VBAProject
from the menu to check that you don’t have any compile errors.
Now try running the subroutine (you can press F5
to do this):

You should see a message
like this one informing you that something has
gone wrong.
You can stop the subroutine by clicking End on
the dialog box shown above. However, you’ll get an extra clue about what
has gone wrong by clicking Debug instead:

Clicking Debug pauses your subroutine on the line which has caused the run-time error,
which is helpfully highlighted in yellow.
While your code is paused you can attempt to identify the problem and make
changes to fix it:

When you edit the code, the yellow highlighting will disappear until you move the cursor to another line. Here we’ve replaced the lower case
L with a number 1.
At this point you can either:
- Continue running the subroutine from the highlighted line
(choose Run |
Continue); or - Stop the procedure then run it again from the beginning
(choose Run |
Reset, followed by
Run | Run Sub/UserForm).
Congratulations! At this point your code should be error-free again and
you can run your subroutine without issues. You can now either spend more
time practising in the Extra Practice section below, or move on
to the next part of this lesson.
Syntax Errors
To practise dealing with syntax errors:
- Using the subroutine you’ve been working with in this lesson
so far, edit the following three lines of code to introduce some
syntax errors:

Delete a double-quote from each of the first two lines, and a full stop from the third line.
- Now replace the characters that you have deleted
to clear the three syntax errors:

For reference, this is what the code should look like without syntax errors.
Compile Errors
To practise dealing with compile errors:
- Edit the following three lines of code to introduce some
compile errors:

Remove the = sign from each of the three lines.
- Confirm that your code won’t compile by choosing
Debug | Compile
VBAProject from the menu:

Choose this option to reveal the first compile error in your code.
- Click OK on the
message that appears:

Click OK to close the message that appears.
- Fix the first compile error by replacing the =
sign and then choose to compile the project again:

You still have two errors to fix!
Click OK to close
the message.
- Replace the = sign on each of the remaining two
lines and choose Debug |
Compile VBAProject from
the menu to confirm that you’ve solved all of the errors.
Run-time Errors
To practise dealing with run-time errors:
- Edit the following line of code to introduce a run-time
error:
![]()
Change the cell reference from
A1 to 1A.
- Run the procedure to confirm that you see a
run-time error:

Click Debug to see which line has caused the error.
- Find the line which has generated the run-time
error:

This line should be quite easy to spot!
- Fix the error by changing the cell reference back
to A1. - Reset the procedure by choosing
Run |
Reset
from the menu. - Run the subroutine again to confirm that it works.
This page has 0 threads
Add post
Syntax Errors
Syntax errors occur as you are writing your code. If you have a syntax error the offending code will be displayed in red and a Compile error warning will be displayed.
Click here to Enrol on the Ultimate Excel VBA Course
30+ hrs — includes certification.
All purchases help to support this blog — thanks!
Syntax errors occur when you make a grammatical error in your code like leaving out speech marks when referring to a range…

… or leaving out brackets where they are needed.

For both of the above syntax errors you get the same Compile error message. For the second error it’s pretty useful for the first, not so useful.

You may want to turn Syntax error warnings off in Tools | Options | [Editor Tab]. Untick the option Auto Syntax Check. Syntax errors will still be displayed in red when you untick this option – so you will still be able to spot them!

Compile Errors
Click here to Enrol on the Ultimate Excel VBA Course
30+ hrs — includes certification.
All purchases help to support this blog — thanks!
Compile errors only become apparent when you compile your code. Code will always compile before it runs but you can compile without running it by clicking Debug |Compile VBA Project.
Compile errors are not shown in red, but you do get an error message when you compile the procedure. In the example below, the Worksheets object name is spelt incorrectly.

When you attempt to run the procedure you get this error message…

… and the code enters break mode. You can see below that the first line of code is highlighted in yellow with a yellow arrow in the margin – this is the breakpoint (meaning the code couldn’t execute beyond this point) and the offending keyword is highlighted in blue.

Now you can fix the spelling error, Reset the procedure with VBE’s Reset button as shown below and attempt to run the code again.
If you just compile the procedure rather than compile and run, the code will not enter break mode.
Using Option Explicit
Always use Option Explicit so any errors you make referring to variable names or other misspellings are picked up when you compile your code. For example the misspelling or vbRed in the code below is only picked up as a compile error if Option Explicit is used.

![]()
Click here to Enrol on the Ultimate Excel VBA Course
30+ hrs — includes certification.
All purchases help to support this blog — thanks!
Run-time Errors
Run-time errors do not appear in red like a syntax error, nor do they occur when you compile a procedure (compile without running), but they do occur when you attempt to run a procedure.
The code below attempts to select a sheet that is not available and therefore produces a run-time error. Run-time errors put your procedure into break mode: break mode temporarily stops the code running until you fix the problem and resume execution.
The yellow arrow and yellow highlighting indicate the position at which the code stopped – the break point. Lines of code above the break point have been successfully executed.
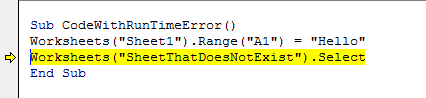
This is the run-time error displayed for this code.

To fix the error, you need to click on the Debug button on the run-time error dialog box. This will allow you to fix your code and then resume code execution from the break point. Use the VBE’s Continue button to resume running the code or use the F5 keyboard shortcut.
![]()
Error Handling
Some run-time errors occur not because of errors in your code necessarily but because the procedure encounters unexpected things in your data like missing workbooks, worksheets or values, or unexpected data types. For this reason you will need to build error handling code into your procedures in expectation of any of these problems.
Run-time error are covered in more depth in the tutorial on Error Trapping and Handling.
Stepping Through Code
Click here to Enrol on the Ultimate Excel VBA Course
30+ hrs — includes certification.
All purchases help to support this blog — thanks!
When you step through code you are executing one line of code at a time. This might be useful if your procedure produces unexpected results or an error. By stepping through code you are much more likely to identify and resolve any problems.
To step through code you need to put your procedure into break mode: Click Debug | Step Into or use the F8 shortcut key.

The first line of code will be highlighted in yellow and when you press F8 again, that line of code will be executed. Press F8 again and the next line of code will be executed and so on and so on.
To see what your code is actually doing, split your screen so that the VBE and Excel are both visible.
Breakpoints
You can set a breakpoint in your code so that all code above it is executed normally but from your breakpoint onwards you can step through the code. This is useful in long procedures where it would be tedious to step through every line of code before you get to the part that you are trying to debug.
You can click into the grey margin to set a breakpoint or click into a line of code and then select Debug | Toggle Breakpoint or use the F9 shortcut key.

To remove the breakpoint click the breakpoint circle.
Immediate Window
The Immediate Window can be used to display the current value assigned to a variable or property: useful information when debugging code! To show the Immediate Window click View | Immediate Window or use the keyboard shortcut CTRL G.
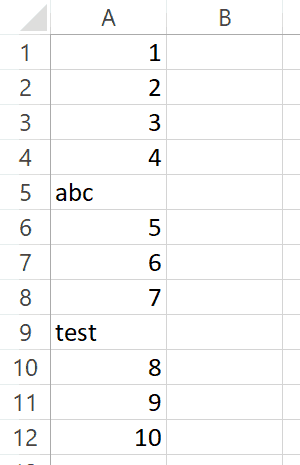
Take this simple example. Our code is going to loop through the numbers on our worksheet and multiply each number by 10. When it gets to Goat the code will produce a run-time error.

The code for the procedure is as follows…
Sub UsingImmediateWindow()
Dim rg As Range, MyData As Range
Set MyData = Range("A1:A12")
For Each rg In MyData
    Debug.Print rg
    rg = rg * 10
Next rg
End Sub
Using Debug.Print
Notice the line of code that reads
Click here to Enrol on the Ultimate Excel VBA Course
30+ hrs — includes certification.
All purchases help to support this blog — thanks!
Debug.Print rg
The Debug.Print code will display the value of the variable rg in the Immediate Window as shown below. The run- time error means that only 5 values are shown in the Immediate Window.
From a debugging point of view this is a great bit of information as we can see exactly why the data has caused an error.

If I wanted to find out the cell address for the word Goat, I can type ? rg.Address into the Immediate Window, press ENTER and the answer is displayed on the line below.

I could even change the value of rg in the Immediate Window by typing rg = 5 which fixes the problem and I am now able to execute the remainder of the code.

Using ? In the Immediate Window
You do not have to use Debug.Print in your code to show variable or property values in the Immediate Window.
As you are stepping through code or at the point you have a debug error, just type a question mark to the left of the variable or property you want to examine. Press ENTER and the answer will appear on the line below.

Watch Window
The Watch Window allows you to place a watch on the value of a variable or property. As with the Immediate Window this is a useful tool when you are trying to debug code.
To show the Immediate Window click View | Watch Window.
The easiest way to add a watch is to right-click on the variable or property and select Add Watch…
The Watch Window will only show values when you are in break mode.
In this example we want to format cell background colours based on the value in the cell. The cell’s value will be used to set the colour index number of the cell’ s interior property. There are 56 colours available in the colour index palette. You will notice two values that could be problematic: 200 in cell A20 and TRUE is A28. 200 will cause a run-time error but TRUE won’t.

Here is the code for our procedure
Sub UsingWatchWindow()
Dim rg As Range, MyData As Range
Dim FontColour As Byte
Set MyData = Worksheets("Using Watch Window").Range("A1:A56")
MyData.ClearFormats
For Each rg In MyData
    FontColour = WorksheetFunction.RandBetween(1, 56)
    rg.Interior.ColorIndex = rg
    rg.Font.ColorIndex = FontColour
Next rg
End Sub
We are going to add a watch for rg and rg.address before we run the code.
Right-click on the rg variable any place it appears in the code and click Add Watch…

Click on OK to confirm and the watch is added to the Watch Window.
To add a watch for rg.address do the same thing again but edit the expression to include .address
Click on OK to confirm and the watch is added to the Watch Window.
Lastly we are going to add a watch that puts the code into break mode if rg is a logical value. Repeat as before to add a watch and edit the expression so it reads as…
WorksheetFunction.IsLogical(rg)
Change the Watch Type to Break When Value is True

Click on OK to confirm and the watch is added to the Watch Window.
Our three watches…

When we run the code a run-time error occurs as we expected. Hit Debug and the Watch Window shows us the offending value and cell address.

I can now quickly find and change the value on my worksheet. Once done I click Continue in the VBE to take my procedure out of break mode. The procedure goes into break mode again, not because of run-time error but because of my third watch which stops the code if rg is a logical value. Without this watch the code would have continued and I would have a missed a potential problem in my data.

Click here to Enrol on the Ultimate Excel VBA Course
30+ hrs — includes certification.
All purchases help to support this blog — thanks!
Locals Window
Click here to Enrol on the Ultimate Excel VBA Course
30+ hrs — includes certification.
All purchases help to support this blog — thanks!
The Locals Window shows a complete list of all your procedure’s variable when in break mode. To show the Locals Window, click View | Locals Window.
In this example we are going to encounter a run-time overflow error when x * y exceeds the Byte storage limit of 255.
Sub UsingLocalsWindow()
    Dim x As Byte
    Dim y As Byte
        For x = 1 To 100
            For y = 1 To 100
                Cells(x, y) = x * y
            Next y
        Next x
End Sub
If we weren’t quite sure how to debug our run-time error we could look at the Locals Windows to see the values assigned to x and y.
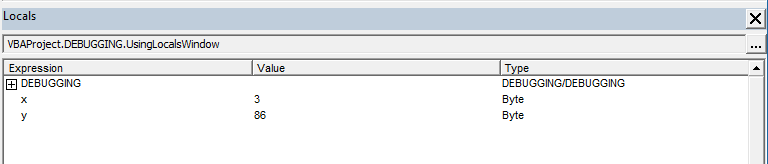
So we could work out that 3 x 86 = 258 and together with the run-time error message work out that we need to declare x and y with a data type of Integer.
