Windows Vista Enterprise 64-bit Edition Windows Vista Home Basic 64-bit Edition Windows Vista Home Premium 64-bit Edition Windows Vista Ultimate 64-bit Edition Windows Vista Business Windows Vista Business 64-bit Edition Windows Vista Enterprise Windows Vista Home Basic Windows Vista Home Premium Windows Vista Starter Windows Vista Ultimate More…Less
Symptoms
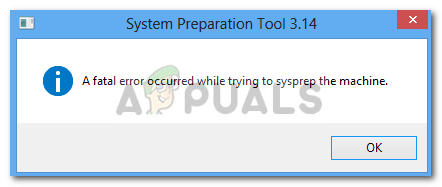
When you use the System Preparation (Sysprep) tool on a Windows Vista-based computer, you may receive the following error message:
A fatal error occurred while trying to sysprep the machine.
Additionally, an error message that resembles the following is logged in the Setuperr.log file:
Date
Time, Error [0x0f0073] SYSPRP RunExternalDlls:Not running DLLs; either the machine is in an invalid state or we couldn’t update the recorded state, dwRet = 31
Cause
This error message is designed to prevent the deployment of a corrupted image. When you run the Sysprep tool, its progress is tracked through each of the phases of Sysprep. Sysprep does not have a way to roll back when it experiences errors.
Resolution
When you experience this error, you must re-create the image. You cannot correct the problem with the image. When the Sysprep tool runs, it clears the %windir%system32syspreppanthersetupact.log file. Therefore, it is not possible to see what failed the last time that the Sysprep tool was run. To see what failed when you last ran the Sysprep tool, you must have a copy of the %windir%system32syspreppanthersetupact.log file that existed before you ran Sysprep.
Note Before you create a new image or run the Sysprep tool again, we recommend that you save the contents of the following folders:
-
%Windir%Panther
-
%Windir%System32SysprepPanther
Note Make sure that you save the contents of all the subfolders of these two folders.
Need more help?
- Remove From My Forums
-
Question
-
On the 4th attempt to sysprep a Windows 7 Enterprise system, I get the dreaded, ‘A fatal error occurred while trying to sysprep the machine.’
The setuperr.log shows:
2010-08-04 13:57:58, Error [0x0f0073] SYSPRP RunExternalDlls:Not running DLLs; either the machine is in an invalid state or we couldn’t update the recorded state, dwRet = 31
2010-08-04 13:57:58, Error [0x0f00ae] SYSPRP WinMain:Hit failure while processing sysprep cleanup external providers; hr = 0x8007001fI’ve seen articles referring to the Windows Software Licensing Rearm program may have issues running more than three times in a single Windows image and to add <SkipRearm>1</SkipRearm> in the /unattend file… but this did not help.
The Windows Media Player Network Sharing Service has also been disabled which is often referred to in other posts.The KB article: http://support.microsoft.com/kb/947212/en-us indicated that the resolution is to re-create the image for the machine… This is very frustrating. I’m hoping that there is
a better resolution???How do you sysprep a machine more than three times to avoid this error?
Thanks!!
930193
-
Edited by
Wednesday, August 4, 2010 9:17 PM
typo
-
Edited by
Answers
-
Hi,
Thanks for posting in Microsoft TechNet forums.
This error shows that sysprep was run multiple times on the machine, please open a command prompt, type:
slmgr /dlv to view how many times of remaining Windows Activation count. Generally speaking, to sysprep the image on a single computer for multiple times, you need to configure the
Microsoft-Windows-Security-SPP |
SkipRearm to 1 in the unattend.xml file. I am assuming whether you configure the
Microsoft-Windows-Security-Licensing-SLC |
SkipRearm to 1 instead of SPP, the SLC setting is deprecated and should not be used.As a work around of this problem, please type: regedit in the Start Search box to open Registry Editor, set the value of
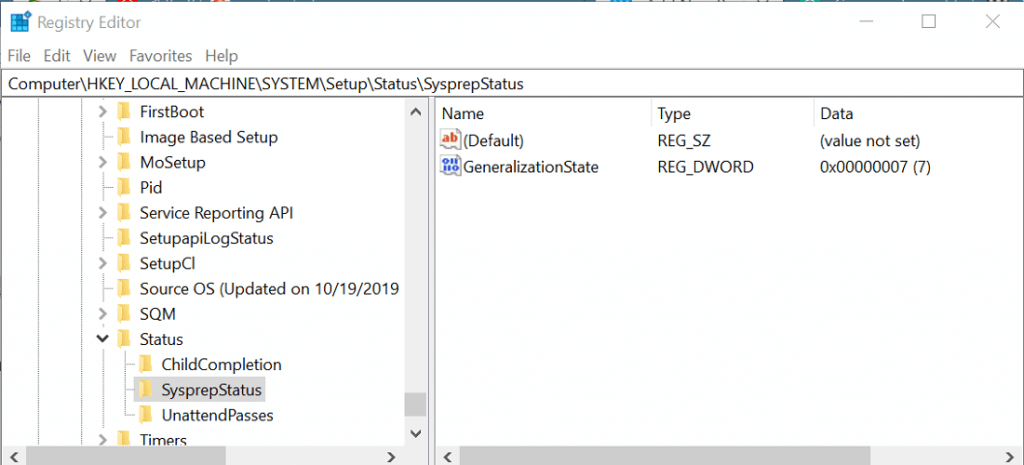
GeneralizationState under HKEY_LOCAL_MACHINESYSTEMSetupStatusSysprepStatus to
7, then run sysprep again.If the same issue still persists, please unistall the MSDTC and Reinstall it, then try the sysprep.
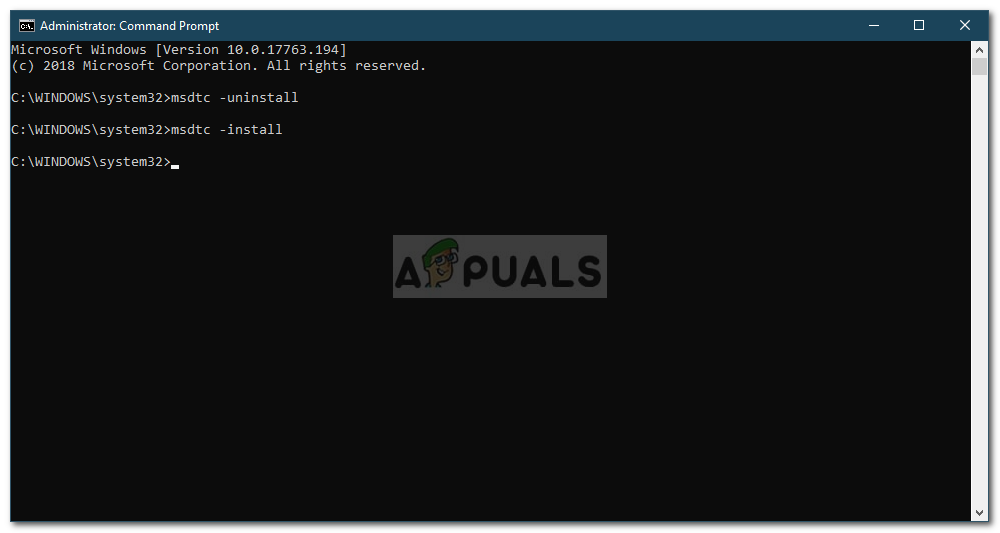
To uninstall MSDTC :— msdtc -uninstall
To reinstall
MSDTC :— msdtc –installBest Regards
Dale Qiao
TechNet Subscriber Support in forum. If you have any feedback on our support, please contact
tngfb@microsoft.com
Please remember to click “Mark as Answer” on the post that helps you, and to click “Unmark as Answer” if a marked post does not actually answer your question. This can be beneficial to other community members reading the thread. ”
-
Marked as answer by
rosenstc
Thursday, August 5, 2010 5:47 PM
-
Marked as answer by
by Tashreef Shareef
Tashreef Shareef is a software developer turned tech writer. He discovered his interest in technology after reading a tech magazine accidentally. Now he writes about everything tech from… read more
Updated on August 26, 2020

XINSTALL BY CLICKING THE DOWNLOAD FILE
This software will repair common computer errors, protect you from file loss, malware, hardware failure and optimize your PC for maximum performance. Fix PC issues and remove viruses now in 3 easy steps:
- Download Restoro PC Repair Tool that comes with Patented Technologies (patent available here).
- Click Start Scan to find Windows issues that could be causing PC problems.
- Click Repair All to fix issues affecting your computer’s security and performance
- Restoro has been downloaded by 0 readers this month.
The System Preparation tool is an essential part of the Windows OS and helps in duplicating, testing, and delivering new installations. However, while running the System Preparation Tool, you may encounter a fatal error occurred while trying to sysprep the machine error.
This error occurs if the Windows Software Licensing Rearm program has run more than three-time in a single Windows image.
If you are also troubled by this error, here are a couple of troubleshooting tips to help you resolve it in Windows 10.
How do I fix Sysprep’s fatal error?
1. Edit SkipRearm Key

- Press Windows Key + R to open Run.
- Type regedit and click OK to open Registry Editor.
- In the Windows Registry Editor, navigate to the following location:
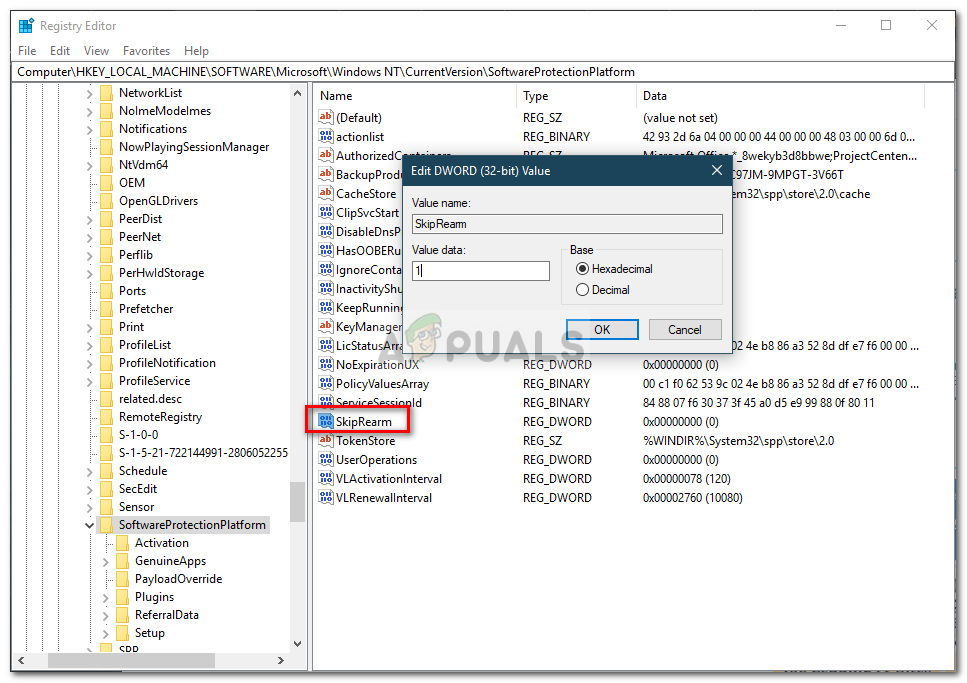
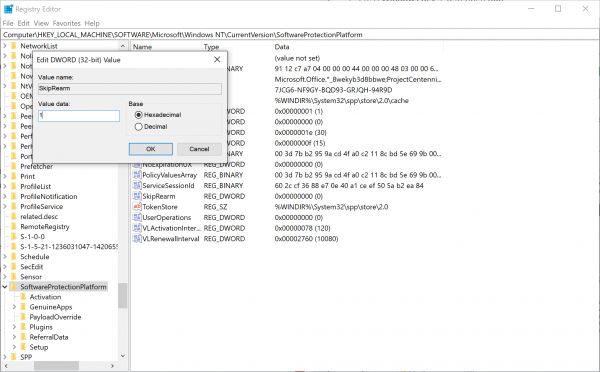
HKEY_LOCAL_MACHINESOFTWAREMicrosoftWindows NTCurrentVersionSoftwareProtectionPlatform - On the right pane, locate the SkipRearm key.
- Double-click on the SkipRearm key to open Properties.
- In the Value data field, enter 1 click OK.
- Close the Registry Editor and check if the error is resolved.
By editing the SkipRearam key, you can fix the Sysprep fatal error issue in Windows. Make sure you create a restore point before editing any registry keys.
If you can’t edit your Windows 10’s registry, read this handy guide and find the quickest solutions to the issue.
Can’t access the Registry Editor? Things aren’t as scary as they seem. Check out this guide and solve the issue quickly.
2. Edit GeneralizationState and CleanupState keys
- Press Windows Key + R to open Run.
- Type regedit and click OK to open Registry Editor.
- In the registry editor, navigate to the following location:
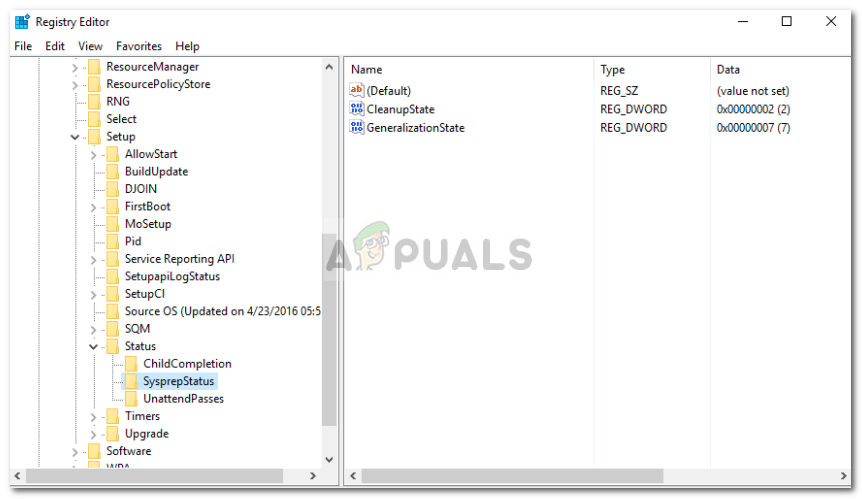
HKEY_LOCAL_MACHINESYSTEMSetupStatusSysprepStatus - In the right pane locate and double-click on GeneraliazationState key.
- In the Value data field, enter 7 and click OK.
- Next, locate and double-click the CleanupState key.
- In the Value data field, enter 2 and click OK.
- If you can’t find the CleanupState key, skip the steps.
- Run System Preparation Tool and check for any improvements.
Editing GenealizationState and CleanupState key and changing the values in the Value data field can help you fix errors related to System Preparation Tool.
3. Repair Windows 10 image
- Press the Windows key to bring up the search bar.
- Type cmd.
- Right-click on Command Prompt and select Run as Administrator.
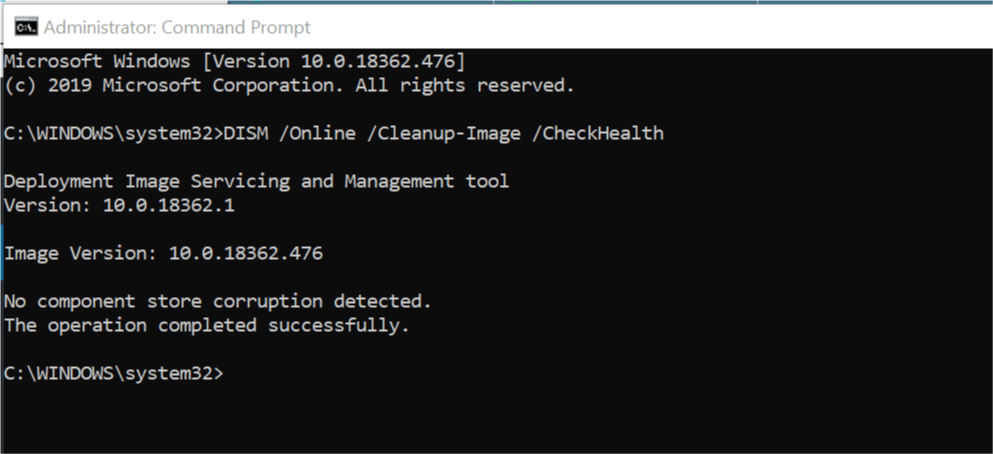
- In the command prompt, enter the following command and hit enter:
DISM /Online /Cleanup-Image /CheckHealth - The above command will perform a quick health check and detect if there is any data corruption that needs fixing.
- If any issues are detected, you can rebuild the Windows image using the following command:
DISM /Online /Cleanup-Image /RestoreHealth - The process may take a few minutes to complete.
- Upon completion, it will display a success message.
- Close the command prompt and start the System Preparation Tool.
If you’re having trouble accessing Command Prompt as an admin, then you better take a closer look at this guide.
It seems that everything is lost when DISM fails on Windows? Check out this quick guide and get rid of the worries.
4. Uninstall MSDTC
- Click on Start and type cmd.
- Right-click on Command Prompt and select Run as Administrator.
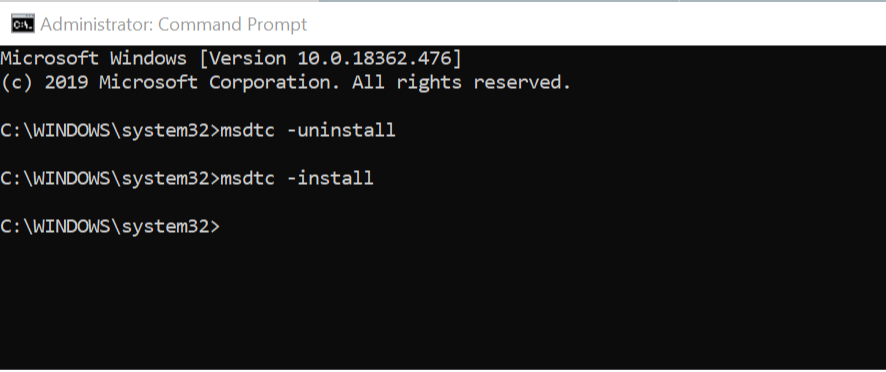
- In the command prompt, type the following command and hit enter:
msdtc -uninstall - The above command will uninstall the server.
- To reinstall the service, type the following command and hit enter:
msdtc -install - Run System Preparation Tool and check for improvements.
The a fatal error occurred while trying to sysprep the machine error can occur due to file corruption. Follow all the steps in this article one by one to resolve the issue.
Don’t forget to leave any other questions or suggestions that you may have in the comments section below.
READ ALSO:
- Where are Chkdsk logs stored in Windows 10?
- How to disable USB selective suspend in Windows 10
- How to boot from USB in Windows 10
Still having issues? Fix them with this tool:
SPONSORED
If the advices above haven’t solved your issue, your PC may experience deeper Windows problems. We recommend downloading this PC Repair tool (rated Great on TrustPilot.com) to easily address them. After installation, simply click the Start Scan button and then press on Repair All.
![]()
Newsletter
The ‘A fatal error occurred while trying to sysprep the machine’ error often occurs when you have used Sysprep more than three times. Sysprep, also known as System Preparation Tool, is developed by Microsoft that you can use to install Windows onto other hardware. This tool was mainly designed for system administrators, OEM manufacturers etc. which you can use to install Windows on multiple computers.
Once you have gone through the initial steps of installation, you can run Sysprep tool to clone the computer and install Windows on the rest of the systems. Not many people know about this, but there is a limit to how many times you can run it on a single Windows image. Nonetheless, the fix is quite straightforward and you will be able to use it again once you have implemented the fix. Go through the article to learn more about the causes and the solution.
What causes the ‘A Fatal Error Occurred While Trying to Sysrep the Machine’ Error on Windows 10?
There is but only one reason that can cause the error which is —
- Limit exceeded: Well, as we mentioned, there is a limit to how many times you can use the tool. Once you have exceeded the limit, the next time you run the tool, you will be prompted with the said error. The limit is three.
Now, to fix your issue you can use the following solutions. There are a few solutions to this error which include Registry modification etc., therefore, make sure to follow the instructions carefully in order to avoid any mistakes which can potentially result in something critical.
Solution 1: Editing SkipRearm Key
To fix the issue, you can try to edit the SkipRearm key found in the Windows Registry and then run sysprep again. Here’s how to do it:
- Press Windows Key + R to open Run.
- Type in ‘regedit’ and then hit Enter.
- In the Windows Registry, navigate to the following location:
HKEY_LOCAL_MACHINESOFTWAREMicrosoftWindows NTCurrentVersionSoftwareProtectionPlatform
- In the right-hand side pane, locate SkipRearm key and double-click it.
- Change its value to 1 and click OK.

Changing the SkipRearm Value to 1
Solution 2: Editing GeneralizationState and CleanupState Key
Another way of fixing the issue would be to edit a specific entry in the Windows Registry. The error occurs when sysrep GeneralizationState key is set to 9 in the Windows Registry. Therefore, you will have to change the value. Here’s how to do it:
- Press Windows Key + R to open Run.
- Type in ‘regedit’ and press Enter.
- Navigate to the following location:
HKEY_LOCAL_MACHINESYSTEMSetupStatusSysprepStatus
- Double-click the GeneralizationState key.
- Change the value to 7 and click OK.
- Then, double-click the CleanupState key and set the value to 2.
- Click OK.

GeneralizationState and CleanupState Keys - If there’s no CleanupState key, don’t worry, just edit the GeneralizationState key.
- Run sysprep again.
Solution 3: Uninstall MSDTC
Lastly, if the issue doesn’t fix even after changing the GeneralizationState key value, you will have to uninstall MSDTC and then reinstall it. Here’s how to do it:
- Press Windows Key + X and select Command Prompt (Admin) from the list to open an elevated command prompt.
- Type in the following and then press enter:
msdtc -uninstall
- This will uninstall the service. Now to install it again, type in:
msdtc -install

Reinstalling MSDTC - This will install the service again. Run sysprep again.

Kevin Arrows
Kevin is a dynamic and self-motivated information technology professional, with a Thorough knowledge of all facets pertaining to network infrastructure design, implementation and administration. Superior record of delivering simultaneous large-scale mission critical projects on time and under budget.
- Error occurs when the Windows software license management tool or the Rearm command has been run three or more times in a single Windows image.
- There are solutions to this error, which include editing the registry, etc.
- If you exceed the limit, you will encounter this error message the next time you run the tool.
- By changing the SkipRearm key, you can resolve the fatal Sysprep error in Windows.
- Be sure to create a restore point before changing the registry keys.
Companies are starting to take a look and utilize Bitlocker more often now. I have had many customers ask me about Bitlocker and what the easiest way to deploy it companywide would be. Usually when I am having discussions with people, it is during an upgrade, hardware refresh, or a new build out, so in my opinion, this is a key time to deploy. If you are already utilizing SCCM to do your OS builds, upgrades and refreshes, it is not too much to add a step that will enable Bitlocker. You just have to note a few key items which are listed below.
There was a problem running the system preparation tool when you tried to Sysprep a machine if you received an error message indicating a fatal error. Windows’ duplicate creation tool, tests, and new installation tools rely on this tool. It is an important part of the operating system.
When your Windows image has been rearm three or more times, the error is caused by the license management tool or the Rearm command.
You can then use Sysprep to clone your computer and install Windows on the remaining systems after completing the initial installation steps. You can run it multiple times on one Windows image, but it has a limit. The solution is easy to implement, so you can use it again after you’ve implemented it once. If you’re interested in learning more about the causes and how to fix them, read this article.
What causes the error message “A fatal error occurred while trying to Sysprep the machine”?

In the case of this error, there can only be one possible cause.
- Exceeded limit: As we mentioned earlier, there is a limit to the number of times you can use the tool. If you exceed the limit, you will encounter this error message the next time you run the tool. The limit is three.
Here are some solutions to this error. Editing the registry is one of the solutions. It is essential that you follow the instructions carefully in order to avoid errors that could have drastic consequences.
How to fix the error “A fatal error occurred while trying to Sysprep the machine”
In this article, you will find all the steps you need to follow to resolve the fatal error. All the steps in this article should be followed one by one to resolve the error.

Change the SkipRearm key
- Run can be opened by pressing Windows + R.
- The registry editor is opened by typing Regedit and clicking OK.
- You can find these values in the registry editor of Windows:
MicrosoftWindows NTCurrentVersionSoftwareProtectionPlatform is stored in HKEY_LOCAL_MACHINESOFTWAREMicrosoftWindows. - The SkipRearm key can be found in the right pane.
- Open SkipRearm’s properties by double-clicking it.
- Click OK once you’ve entered the value 1.
- Once the error has been corrected, close the registry editor.
If you change the SkipRearm key in the registry, the Sysprep error will be resolved. Before making any changes to the registry, make sure that you create a restore point.
Here are some quick solutions for Windows 10 users who are unable to edit the registry.
Change the GeneralizationState and CleanupState keys
- Run can be opened by pressing Windows + R.
- The registry editor will open after you type Regedit and hit OK.
- The following location can be found in the registry editor:
- SetupStatusSysprepStatus within HKEY_LOCAL_MACHINESYSTEM.
- You can double-click the GeneralizationState key in the right pane.
- To enter a value, type 7 into the Value field.
- Double-click CleanupState after finding it.
- The Value data field should be filled in with 2. Click OK to continue.
- This step can be skipped if the CleanupState key cannot be found.
- Take a look at whether any improvements have been made after running the system preparation program.
It is possible to fix system preparation errors by editing the GenealizationState and CleanupState keys as well as the Value data field.
Fix a Windows 10 image
- A search bar will appear as soon as you press the Windows key.
- Type cmd.
- Choose Run as administrator from the menu when you right-click the command line.
- The following command must be typed and entered at the command prompt:
- DISM/Online/Clean-Image/CheckHealth.
- Using the above command, we can quickly check the health of the data and fix any errors we find.
- Following are the steps you need to perform if problems are detected when restoring a Windows image:
- Cleanup-Image /RestoreHealth /DISM.
- Several minutes may pass before the process is complete.
- Screen will display success message when it is complete.
- The system preparation tool will begin as soon as you close the command line.
Remove the MSDTC
- Type cmd into Start.
- Choose Run as administrator from the menu when you right-click the command line.
- The following command must be typed and entered at the command prompt:
- Uninstall msdTC.
- Servers can be uninstalled by the above command.
- Type and press Enter to reinstall the service:
- msdc – install.
- Check if any improvements have been made by running the system preparation tool.
It appears that a corrupted file has caused a fatal error during Sysprep. Complete the steps in this article one by one in order to resolve the issue.
Frequently Asked Questions
- Use PowerShell to uninstall the package and remove the installation.
- Stop the tile model service.
- Use the registry editor.
- Remove your antivirus software.
- Download the latest version of Windows 10 and use it for Sysprep.
- Run an SFC scan.
- Run DISM.
The Sysprep tool logs Windows installation actions in different directories depending on the configuration run.
Sysprep does not remove applications. Some applications are sensitive to Sysprep, but these are rare exceptions. Sometimes the program checks the machine key or SID as part of license activation.
- Press the Windows + X logo key at the same time.
- Type cd WindowsSystem32Sysprep and press Enter.
- Type Sysprep, then press Enter to open the Sysprep GUI mode.
- Select Enter Out-Of-Offsystem Experience (OOBE) and check the Generalize checkbox.

Mark Ginter
Mark Ginter is a tech blogger with a passion for all things gadgets and gizmos. A self-proclaimed «geek», Mark has been blogging about technology for over 15 years. His blog, techquack.com, covers a wide range of topics including new product releases, industry news, and tips and tricks for getting the most out of your devices. If you’re looking for someone who can keep you up-to-date with all the latest tech news and developments, then be sure to follow him over at Microsoft.
Download PC Repair Tool to quickly find & fix Windows errors automatically
When a user is running Windows on a Virtual Machine, there are various types of errors that can occur. The operating system understands the difference between booting up on a standalone computer or a Virtual Machine. Hence, some specific drivers and system capabilities are used while emulating Windows operating system on software. During this phase, sometimes System Preparation may throw up the following error:
A fatal error occurred while trying to sysprep the machine
This issue occurs because of a race condition. This race condition occurs when the Sysprep command tries to stop the Microsoft Distributed Transaction Coordinator (MSDTC) service and the VMware tool tries to start the MSDTC service.

The following messages may be logged in the Setuperr.log file:
- [0x0f0082] SYSPRP LaunchDll:Failure occurred while executing ‘C:Windowssystem32msdtcprx.dll,SysPrepDtcCleanup’, returned error code -2146434815[gle=0x000000b7]
- [0x0f0070] SYSPRP RunExternalDlls:An error occurred while running registry sysprep DLLs, halting sysprep execution. dwRet = -2146434815[gle=0x000000b7]
- [0x0f00a8] SYSPRP WinMain:Hit failure while processing sysprep cleanup providers; hr = 0x80100101[gle=0x000000b7].
Fix 0x0f0082, 0x0f0070, 0x0f00a8 Sysprep errors
We will be taking a look at the following fixes to get rid of Sysprep errors 0x0f0082, 0x0f0070 and 0x0f00a8,
- Check ststau of MSDTC Service.
- Check Registry Settings.
1] Using Command Prompt
This error is caused due to the MSDTC Service being malfunctioned or not working properly.
To resolve this issue, you need to Uninstall and then Reinstall the MDSTC Service.
Run Command Prompt as Administrator and execute the following command:

msdtc -uninstall
This will uninstall the MSDTC Service on your computer.
Now, in order to install the MSDTC Service, you need to type in the following command in the Command Prompt command line,
msdtc -install
Now, all you need to do is close the Command Prompt window and check if this has fixed your issues.
This method has proven to be an effective fix for a number of users.
Both of these are fixes that apply to other versions of the Windows operating system including Windows 10, but this error is mostly encountered on Windows 7.
Read: Sysprep was not able to validate your Windows installation.
2] Check Registry Settings
Hit the WINKEY+R button combination to launch the Run utility, type in regedit and hit Enter. Once Registry Editor opens, navigate to the following key-
HKEY_LOCAL_MACHINESOFTWAREMicrosoftWindows NTCurrentVersionSoftwareProtectionPlatform
Now, check if you find a DWORD value named as SkipRearm.
Double-click on it and change its Value data to as 1.
Reboot your computer for the changes to take effect.
Read: A fatal error occurred while trying to sysprep the machine.
Let us know if our suggestions helped.

Ayush has been a Windows enthusiast since the day he got his first PC with Windows 98SE. He is an active Windows Insider since Day 1 and has been a Windows Insider MVP.
Содержание
- Error message when you use the Sysprep tool on a Windows Vista-based computer: «A fatal error occurred while trying to sysprep the machine»
- Symptoms
- Cause
- Resolution
- Error message when you use the Sysprep tool on a Windows Vista-based computer: «A fatal error occurred while trying to sysprep the machine»
- Symptoms
- Cause
- Resolution
- A fatal error occurred while trying to Sysprep the machine error when running Sysprep /generalize
- Symptoms
- Cause
- Resolution
- Workaround
- More information
- FIX: A fatal error occurred while trying to sysprep machine
- How do I fix Sysprep’s fatal error?
- 1. Edit SkipRearm Key
- 2. Edit GeneralizationState and CleanupState keys
- 3. Repair Windows 10 image
- 4. Uninstall MSDTC
- «A fatal error occurred» error message when you run the Sysprep command on a VMware virtual machine that is running Windows Vista, Windows Server 2008, Windows 7, or Windows Server 2008 R2
- Symptoms
- Cause
- Resolution
- Hotfix information
- Prerequisites
- Registry information
- Restart requirement
- Hotfix replacement information
- File information
Symptoms
When you use the System Preparation (Sysprep) tool on a Windows Vista-based computer, you may receive the following error message:
A fatal error occurred while trying to sysprep the machine.
Additionally, an error message that resembles the following is logged in the Setuperr.log file:
Date
Time, Error [0x0f0073] SYSPRP RunExternalDlls:Not running DLLs; either the machine is in an invalid state or we couldn’t update the recorded state, dwRet = 31
Cause
This error message is designed to prevent the deployment of a corrupted image. When you run the Sysprep tool, its progress is tracked through each of the phases of Sysprep. Sysprep does not have a way to roll back when it experiences errors.
Resolution
When you experience this error, you must re-create the image. You cannot correct the problem with the image. When the Sysprep tool runs, it clears the %windir%system32syspreppanthersetupact.log file. Therefore, it is not possible to see what failed the last time that the Sysprep tool was run. To see what failed when you last ran the Sysprep tool, you must have a copy of the %windir%system32syspreppanthersetupact.log file that existed before you ran Sysprep.
Note Before you create a new image or run the Sysprep tool again, we recommend that you save the contents of the following folders:
Note Make sure that you save the contents of all the subfolders of these two folders.
Источник
A fatal error occurred while trying to Sysprep the machine error when running Sysprep /generalize
This article solves the issue that you can’t run the System Preparation Tool (Sysprep) in Windows 7 by using the /generalize option.
Applies to: В Windows 7 Service Pack 1, Windows Server 2012 R2
Original KB number: В 929828
Symptoms
When you try to run the Sysprep in Windows 7, and you use the /generalize option, you may receive this error message:
A fatal error occurred while trying to Sysprep the machine.
The Setuperr.log file may contain lines that resemble the following:
The Setuperr.log file is located in the WindowsSystem32SysprepPanther folder.
Cause
This error may occur if the Windows Software Licensing Rearm program has run more than three times in a single Windows image.
Resolution
To resolve this issue, you must rebuild the Windows image.
Workaround
To work around this issue, use the setting in an XML answer file (Unattend.xml) to skip the Rearm process when you build the Windows image.
The following text is an example of an XML answer file for Windows 7:
You must make sure that the setting is removed from the final unattended file that is used to deploy computers in a production environment. If is not removed from the unattended file that is used to deploy computers in a production environment, the KMS current client count does not increase for new clients that are added to the network.
For more information about the skipRearm tag of Microsoft-Windows-Security-Licensing-SLC component, see SkipRearm.
For more information about skipRearm tag of Microsoft-Windows-Security-SPP component, see Microsoft-Windows-Security-SPP.
More information
The Windows Software Licensing Rearm program restores the Windows system to the original licensing state. All licensing and registry data related to activation is either removed or reset. Also, any grace period timers are reset.
To run the Rearm process in Windows 7, use one of the following methods:
- Run Sysprep /generalize on the computers that are used to build the custom Windows image.
- Run the Slmgr.vbs script in an elevated Command Prompt window. For example, run cscript c:windowssystem32slmgr.vbs -rearm .
Administrative credentials are required to run the Rearm process. The Rearm process can be run a maximum of three times in a Windows image.
Источник
FIX: A fatal error occurred while trying to sysprep machine

- Download Restoro PC Repair Tool that comes with Patented Technologies (patent available here) .
- Click Start Scan to find Windows issues that could be causing PC problems.
- Click Repair All to fix issues affecting your computer’s security and performance
- Restoro has been downloaded by 0 readers this month.
The System Preparation tool is an essential part of the Windows OS and helps in duplicating, testing, and delivering new installations. However, while running the System Preparation Tool, you may encounter a fatal error occurred while trying to sysprep the machine error.
This error occurs if the Windows Software Licensing Rearm program has run more than three-time in a single Windows image.
If you are also troubled by this error, here are a couple of troubleshooting tips to help you resolve it in Windows 10.
How do I fix Sysprep’s fatal error?
1. Edit SkipRearm Key
- Press Windows Key + R to open Run.
- Type regedit and click OK to open Registry Editor.
- In the Windows Registry Editor, navigate to the following location:
HKEY_LOCAL_MACHINESOFTWAREMicrosoftWindows NTCurrentVersionSoftwareProtectionPlatform - On the right pane, locate the SkipRearm key.
- Double-click on the SkipRearm key to open Properties.
- In the Value data field, enter 1 click OK.
- Close the Registry Editor and check if the error is resolved.
By editing the SkipRearam key, you can fix the Sysprep fatal error issue in Windows. Make sure you create a restore point before editing any registry keys.
If you can’t edit your Windows 10’s registry, read this handy guide and find the quickest solutions to the issue.
2. Edit GeneralizationState and CleanupState keys
- Press Windows Key + R to open Run.
- Type regedit and click OK to open Registry Editor.
- In the registry editor, navigate to the following location:
HKEY_LOCAL_MACHINESYSTEMSetupStatusSysprepStatus - In the right pane locate and double-click on GeneraliazationState key.
- In the Value data field, enter 7 and click OK.
- Next, locate and double-click the CleanupState key.
- In the Value data field, enter 2 and click OK.
- If you can’t find the CleanupState key, skip the steps.
- Run System Preparation Tool and check for any improvements.
Editing GenealizationState and CleanupState key and changing the values in the Value data field can help you fix errors related to System Preparation Tool.
3. Repair Windows 10 image
- Press the Windows key to bring up the search bar.
- Type cmd.
- Right-click onCommand Prompt and select Run as Administrator.
- In the command prompt, enter the following command and hit enter:
DISM /Online /Cleanup-Image /CheckHealth - The above command will perform a quick health check and detect if there is any data corruption that needs fixing.
- If any issues are detected, you can rebuild the Windows image using the following command:
DISM /Online /Cleanup-Image /RestoreHealth - The process may take a few minutes to complete.
- Upon completion, it will display a success message.
- Close the command prompt and start the System Preparation Tool.
If you’re having trouble accessing Command Prompt as an admin, then you better take a closer look at this guide .
4. Uninstall MSDTC
- Click on Start and type cmd.
- Right-click on Command Prompt and select Run as Administrator.
- In the command prompt, type the following command and hit enter:
msdtc -uninstall - The above command will uninstall the server.
- To reinstall the service, type the following command and hit enter:
msdtc -install - Run System Preparation Tool and check for improvements.
The a fatal error occurred while trying to sysprep the machine error can occur due to file corruption. Follow all the steps in this article one by one to resolve the issue.
Don’t forget to leave any other questions or suggestions that you may have in the comments section below.
READ ALSO:
Still having issues? Fix them with this tool:
Источник
«A fatal error occurred» error message when you run the Sysprep command on a VMware virtual machine that is running Windows Vista, Windows Server 2008, Windows 7, or Windows Server 2008 R2
Symptoms
Assume that you install Windows Vista, Windows Server 2008, Windows 7, or Windows Server 2008 R2 on a VMware virtual machine. However, if you run the Sysprep command just after you start the computer, you receive an error message that resembles the following:
A fatal error occurred while trying to sysprep the machine
When this issue occurs, several error messages may be logged.
The following error message may be logged in the Setuperr.log file:
[0x0f0082] SYSPRP LaunchDll:Failure occurred while executing ‘C:Windowssystem32msdtcprx.dll,SysPrepDtcCleanup’, returned error code -2147024864[gle=0x000000b7]
[0x0f0070] SYSPRP RunExternalDlls:An error occurred while running registry sysprep DLLs, halting sysprep execution. dwRet = -2147024864[gle=0x000000b7]
[0x0f00a8] SYSPRP WinMain:Hit failure while processing sysprep cleanup providers; hr = 0x80070020[gle=0x000000b7]
The following error messages may be logged In the DtcInstall.log:
DTC Install error = -2147023844, SysPrepDtcCleanup : TakeOffline failed, d:w7rtmcomcomplusdtcdtcadmedeployment.cpp (1777)
DTC Install error = -2147467259, SysPrepDtcCleanup : TakeOffline failed, d:w7rtmcomcomplusdtcdtcadmedeployment.cpp (1777)
Additionally, the following event may be logged in the Application event log:
Cause
This issue occurs because of a race condition. This race condition occurs when the Sysprep command tries to stop the Microsoft Distributed Transaction Coordinator (MSDTC) service and the VMware tool tries to start the MSDTC service.
Resolution
Hotfix information
A supported hotfix is available from Microsoft. However, this hotfix is intended to correct only the problem that is described in this article. Apply this hotfix only to systems that are experiencing the problem described in this article. This hotfix might receive additional testing. Therefore, if you are not severely affected by this problem, we recommend that you wait for the next software update that contains this hotfix.
If the hotfix is available for download, there is a «Hotfix download available» section at the top of this Knowledge Base article. If this section does not appear, contact Microsoft Customer Service and Support to obtain the hotfix.
Note If additional issues occur or if any troubleshooting is required, you might have to create a separate service request. The usual support costs will apply to additional support questions and issues that do not qualify for this specific hotfix. For a complete list of Microsoft Customer Service and Support telephone numbers or to create a separate service request, visit the following Microsoft website:
http://support.microsoft.com/contactus/?ws=supportNote The «Hotfix download available» form displays the languages for which the hotfix is available. If you do not see your language, it is because a hotfix is not available for that language.
Prerequisites
To apply this hotfix, you must be running one of the following operating systems:
Windows Vista Service Pack 2 (SP2)
Windows Server 2008 Service Pack 2(SP2)
Windows 7 Service Pack 1 (SP1)
Windows Server 2008 R2
Windows Server 2008 R2 Service Pack 1 (SP1)
For more information about how to obtain a Windows Vista service pack, click the following article number to view the article in the Microsoft Knowledge Base:
935791 How to obtain the latest Windows Vista service pack
For more information about how to obtain a Windows 7 or Windows Server 2008 R2 service pack, click the following article number to view the article in the Microsoft Knowledge Base:
976932 Information about Service Pack 1 for Windows 7 and for Windows Server 2008 R2
Registry information
To apply this hotfix, you do not have to make any changes to the registry.
Restart requirement
You must restart the computer after you apply this hotfix.
Hotfix replacement information
This hotfix does not replace a previously released hotfix.
File information
The global version of this hotfix installs files that have the attributes that are listed in the following tables. The dates and the times for these files are listed in Coordinated Universal Time (UTC). The dates and the times for these files on your local computer are displayed in your local time together with your current daylight saving time (DST) bias. Additionally, the dates and the times may change when you perform certain operations on the files.
Windows Vista, Windows Server 2008, Windows 7 and Windows Server 2008 R2 file information notes
Important Windows 7 hotfixes and Windows Server 2008 R2 hotfixes are included in the same packages. However, hotfixes on the Hotfix Request page are listed under both operating systems. To request the hotfix package that applies to one or both operating systems, select the hotfix that is listed under «Windows 7/Windows Server 2008 R2» on the page. Always refer to the «Applies To» section in articles to determine the actual operating system that each hotfix applies to.
Important Windows Vista hotfixes and Windows Server 2008 hotfixes are included in the same packages. However, only «Windows Vista» is listed on the Hotfix Request page. To request the hotfix package that applies to one or both operating systems, select the hotfix that is listed under «Windows Vista» on the page. Always refer to the «Applies To» section in articles to determine the actual operating system that each hotfix applies to.
The files that apply to a specific product, milestone (RTM, SPn), and service branch (LDR, GDR) can be identified by examining the file version numbers as shown in the following table:
Источник
If you try to run Sysprep on Windows, more than three (3) times, then you will receive the following error message «A fatal error occurred while trying to Sysprep the machine» and the following explanation message is displayed inside the sysprep error log file (setuperr.log): «Date Time, Error [0x0f0073] SYSPRP RunExternalDlls:Not running DLLs; either the machine is in an invalid state or we couldn’t update the recorded state, dwRet = 31«.

Microsoft says that this error message «is designed to prevent the deployment of a corrupted image», but this is not true, because the error was caused when you reached the three rearm limit (you cannot run sysprep more than three times on the same machine).
In this tutorial you will find detailed instructions on how you can Sysprep your Windows 7, 8 or 10 machine more than three times and bypass the «Date Time, Error [0x0f0073] SYSPRP RunExternalDlls:Not running DLLs; either the machine is in an invalid state or we couldn’t update the recorded state, dwRet = 31» fatal error while running Sysprep.
How to fix SysPrep Fatal error «dwRet = 31» and Sysprep your machine more than three (3) times.
Step 1. Modify SysprepStatus, CleanupState & SkipRearm Registry Values
1. Open Windows Registry Editor. To do that:
- Press “Windows”
 + “R” keys to load the Run dialog box.
 - Type “regedit” and press Enter.

2. Inside Windows Registry, navigate (from the left pane) to this key:
HKEY_LOCAL_MACHINESystemSetupStatusSysprepStatus

3a. At the right pane change the CleanupState value to 2 and click OK.

3b. Change the GeneralizationState value to 7 and click OK.

4. At the left pane navigate to the following key:
HKEY_LOCAL_MACHINESoftwareMicrosoftWindowsNTCurrentVersionSoftwareProtectionPlatform
 times")
5. At the right pane, change the SkipRearm value to 1.

6. Close Registry Editor.
Step 2. Uninstall and then re-install the MDSTC service (Microsoft Distributed Transaction Coordinator)
1. Open command prompt with Administrative privileges. To do that:
In Windows 7 & Vista go to:
- Start > All Programs > Accessories
- Right-click to “Command prompt” item and choose “Run as administrator”.

In Windows 10, 8 & 8.1:
- Right-click at the screen’s bottom-left corner (Start menu) and from the pop-up menu, choose “Command Prompt (Admin)”.

2. In command prompt window type the following command and press Enter to uninstall the MSDTC service:
msdtc –uninstall

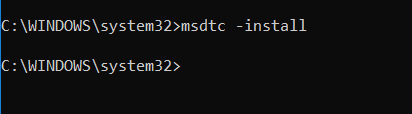
3. Then re-install the MSDTC service by typing the following command (and press Enter).
msdtc –install

4. Close command prompt.
Step 3. Delete the Panther folder.
1. Open Windows Explorer and navigate to C:WindowsSystem32sysprep folder.
2. Delete (or Rename) the Panther folder.

3. Now run sysprep again. Sysprep should run now without any problems.
You ‘re done! Let me know if this guide has helped you by leaving your comment about your experience. Please like and share this guide to help others.
If this article was useful for you, please consider supporting us by making a donation. Even $1 can a make a huge difference for us in our effort to continue to help others while keeping this site free:

If you want to stay constantly protected from malware threats, existing and future ones, we recommend that you install Malwarebytes Anti-Malware PRO by clicking below (we
do earn a commision from sales generated from this link, but at no additional cost to you. We have experience with this software and we recommend it because it is helpful and useful):