Содержание
- Как удалить дампы памяти Windows 10
- Ручное удаление файлов из их расположения
- Удаление дампов памяти в Параметрах Windows 10
- Использование утилиты «Очистка диска» для удаления дампов памяти
- Surface Pro
- Как удалить файлы дампа системных ошибок с помощью Параметров
- Как удалить файлы дампа системных ошибок с помощью Очистки диска
- Как удалить файлы дампа системных ошибок с помощью Командной строки
- Добавить комментарий Отменить ответ
- How to remove system error memory dump files on Windows 10
- Methods to delete memory dump files Windows 10:
- Delete system error dump files with Revo Uninstaller Pro
- Clean system error dump files with Disk Cleanup
- Remove system error dump files with Windows Settings
- Erase system error dump files with Command Prompt
- Delete memory dump files from the File Location
- Turn off Crash Dumps
- We can help you every time when…
- 6 Comments
Как удалить дампы памяти Windows 10
 По умолчанию, Windows 10 создает дампы памяти и минидампы при сбоях системы — синих экранах BSoD. Эти файлы могут быть полезны для диагностики проблемы, но занимают место на диске, которое, особенно в случае небольших SSD может быть критичным. Можно ли удалить дампы памяти? — да, сделать это можно и к каким-либо последствиям не приведёт.
В этой простой инструкции подробно о способах удалить файлы дампов памяти Windows 10 и минидампы. При желании вы можете отключить создание дампов памяти при сбоях, используйте инструкцию Как включить создание дампа памяти в Windows 10, но установите «Нет» в параметрах записи отладочной информации.
Ручное удаление файлов из их расположения
Дамп памяти Windows 10 по умолчанию — это файл C:WindowsMemory.dmp, размер которого может превышать 800 Мб, минидампы хранятся в виде файлов папке C:WindowsMinidump.

Если у вас есть права администратора на вашем компьютере, вы можете удалить эти файлы средствами Windows 10 также, как и любой другой файл (используйте Shift+удаление, чтобы файл не был помещен в корзину).
Удаление возможно и другими методами, в частности — с помощью встроенных инструментов очистки диска Windows 10 от ненужных файлов.
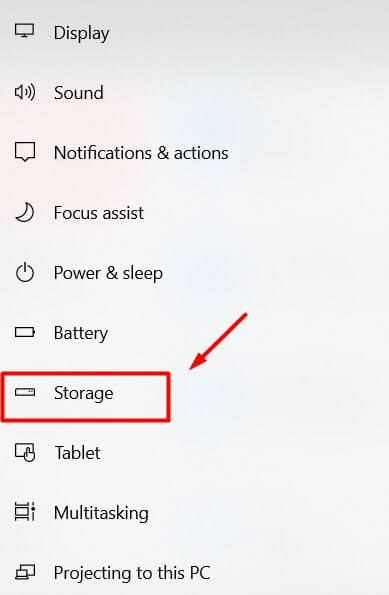
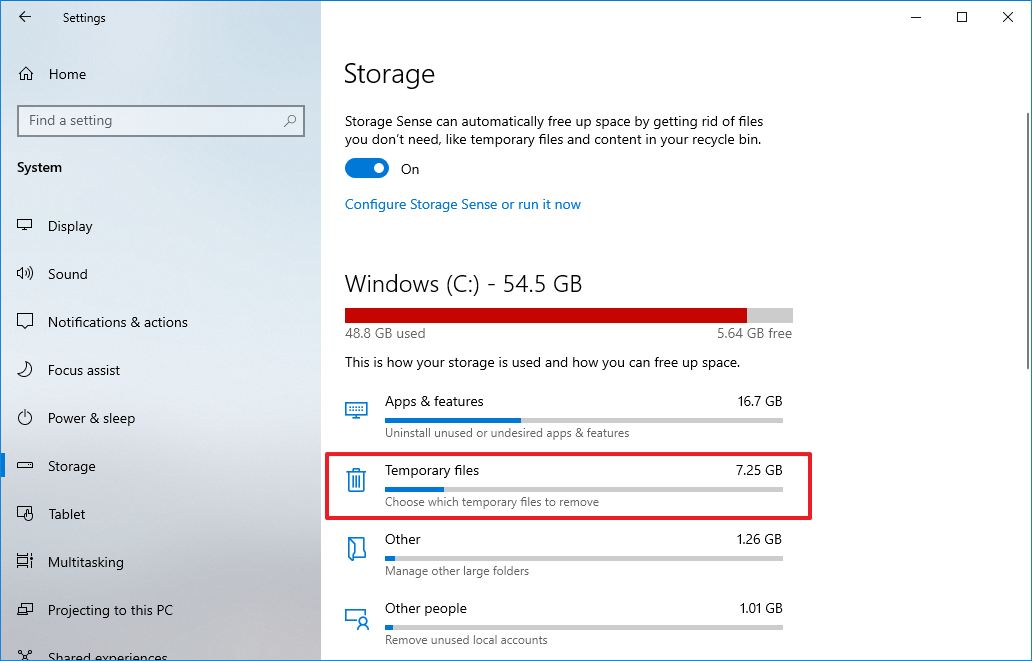
Удаление дампов памяти в Параметрах Windows 10
Для того, чтобы удалить дампы памяти в параметрах, выполните следующие шаги:
- Откройте параметры Windows 10 (для этого можно нажать клавиши Win+I на клавиатуре).
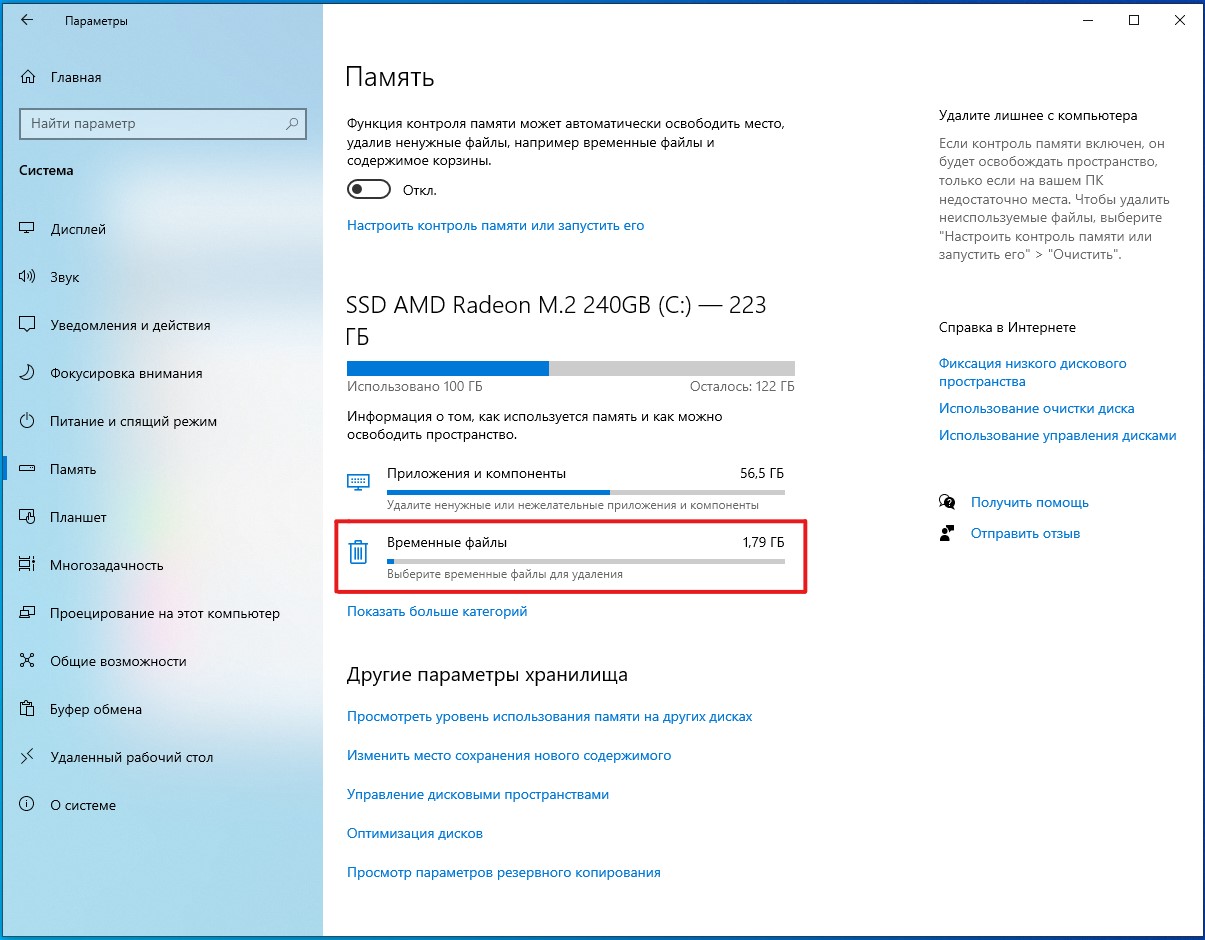
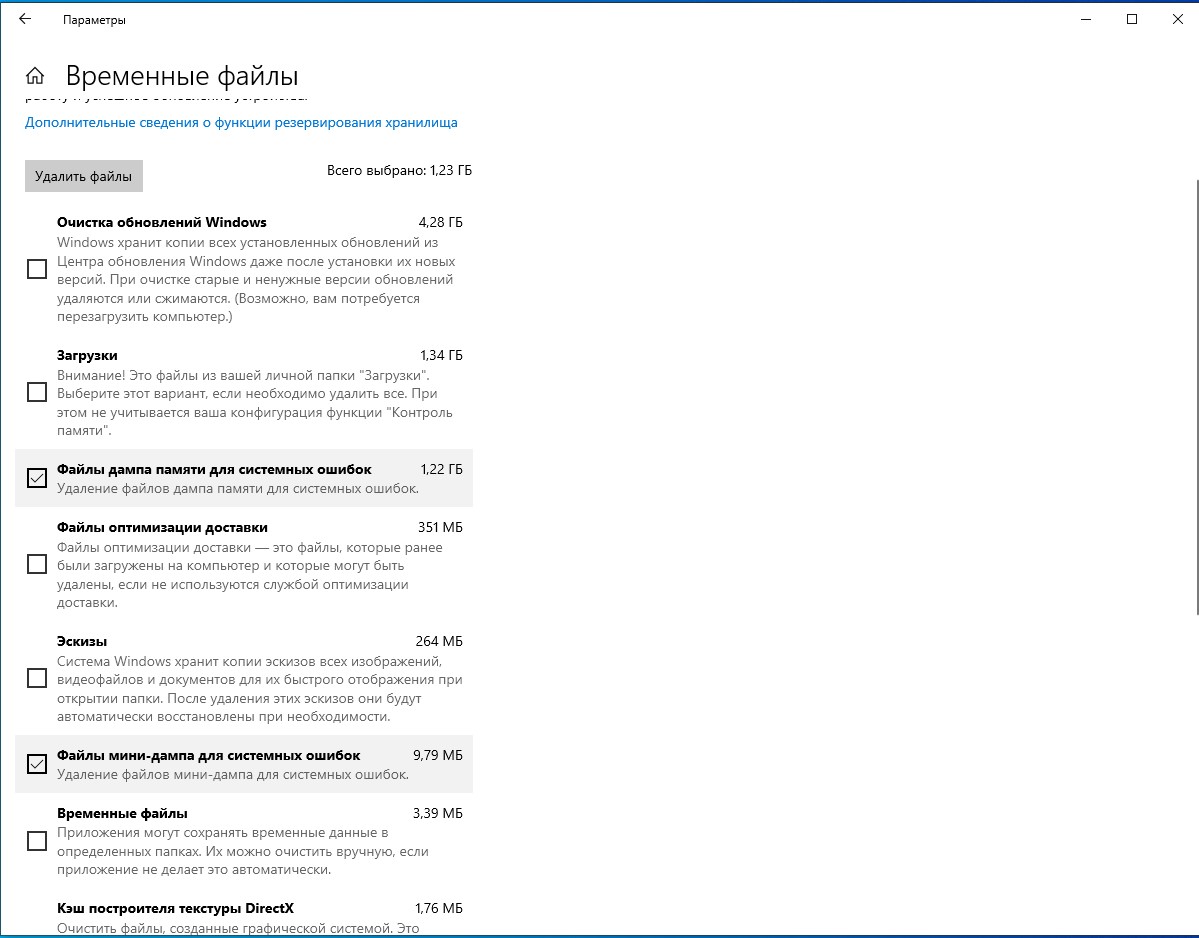
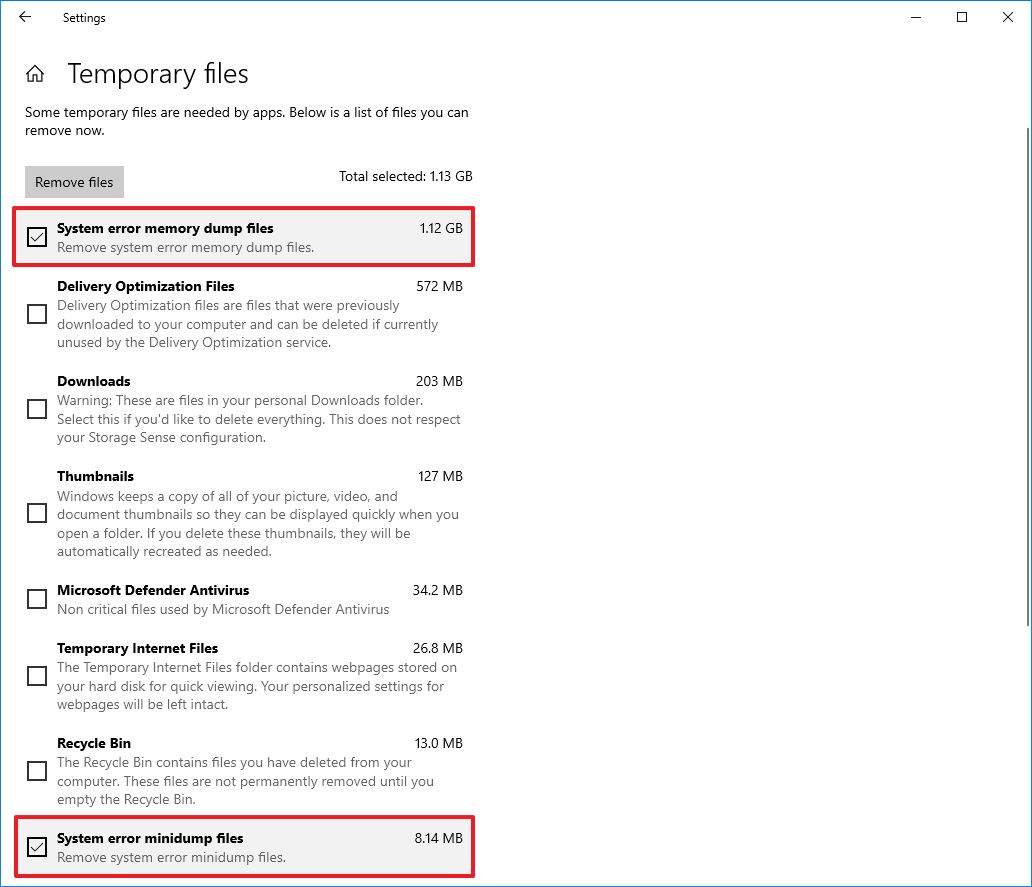
- Перейдите в раздел «Система» — «Память», а затем откройте пункт «Временные файлы».

- Отметьте пункты «Файлы дампа памяти для системных ошибок» и, при желании — «Файлы мини-дампа для системных ошибок».
- Нажмите кнопку «Удалить файлы» вверху окна.

Файлы дампа памяти и остальные отмеченные вами элементы будут удалены с диска компьютера.
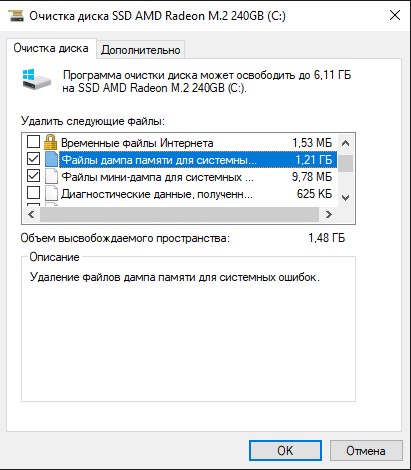
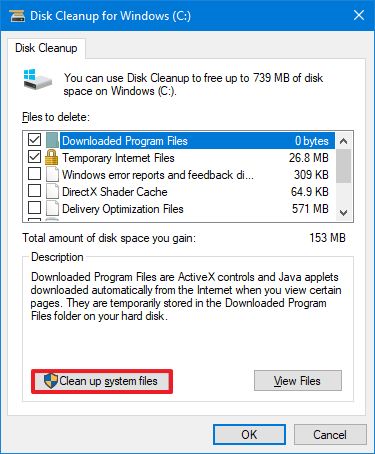
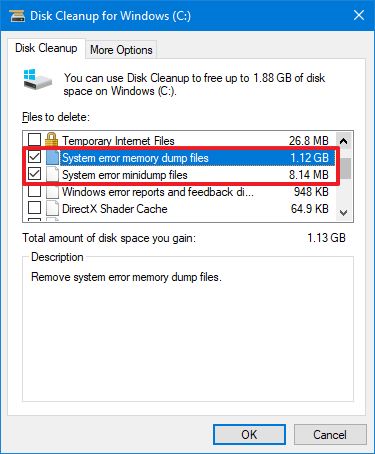
Использование утилиты «Очистка диска» для удаления дампов памяти
Также можно использовать классическую утилиту очистки диска для удаления рассматриваемых файлов:
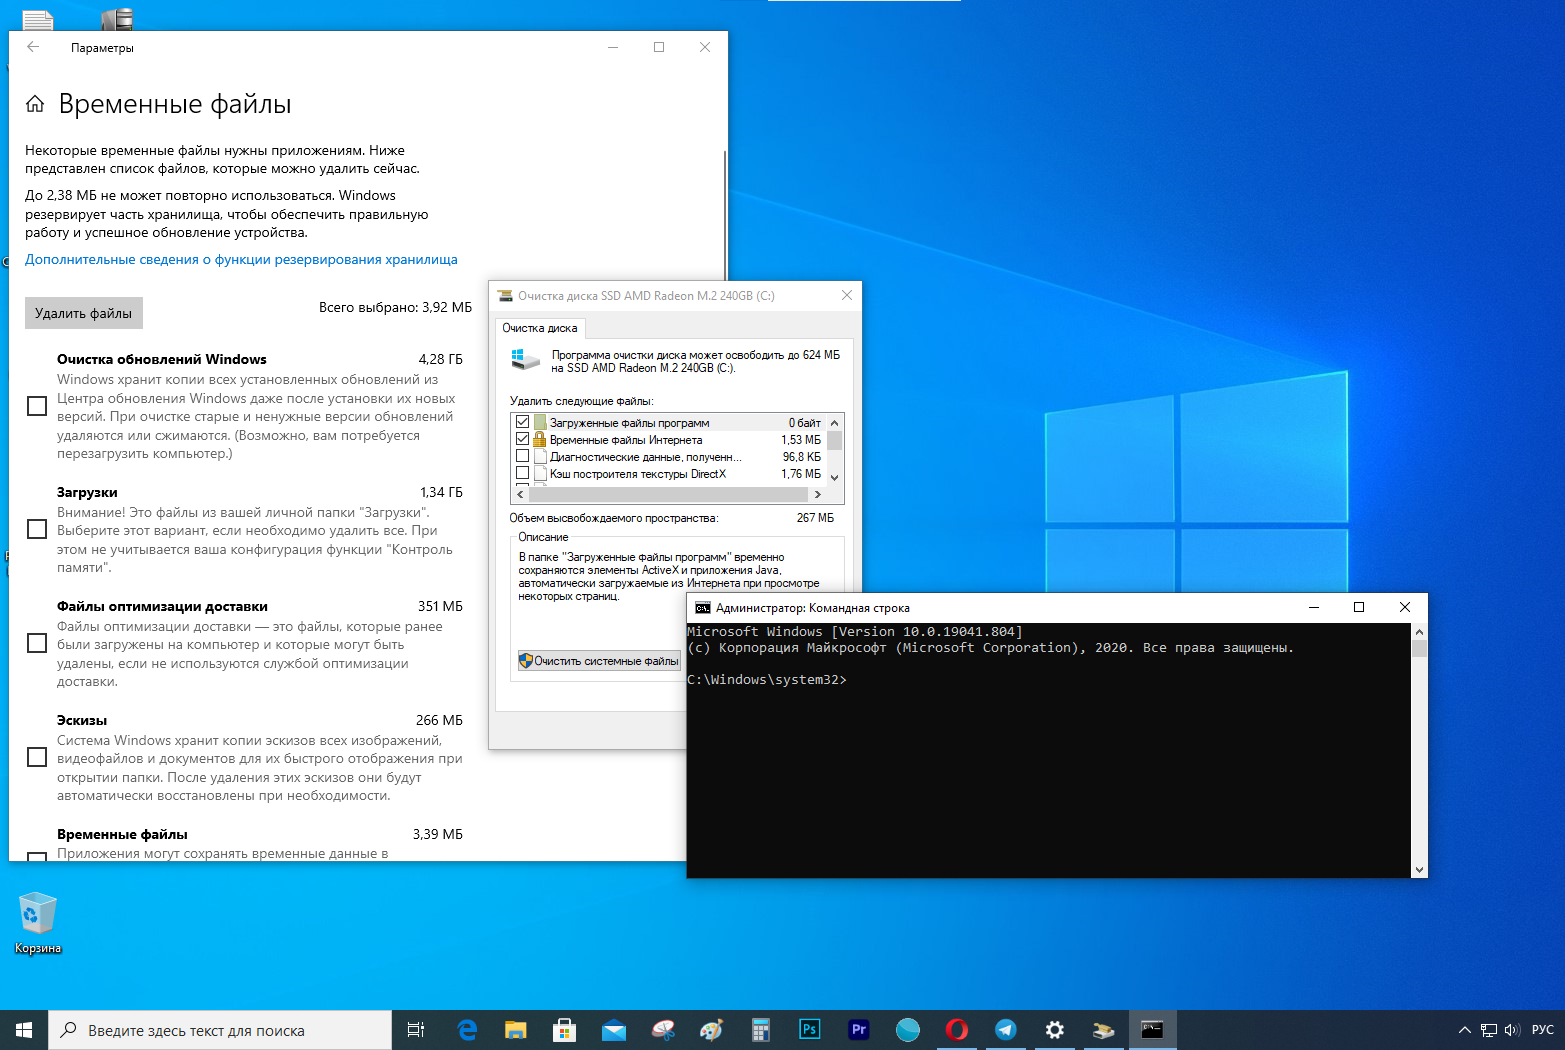
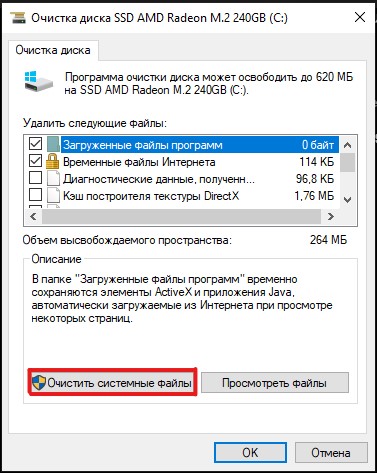
- Нажмите клавиши Win+R на клавиатуре, введите cleanmgr и нажмите Enter.
- После запуска утилиты очистки диска нажмите по кнопке «Очистить системные файлы».
- Отметьте пункты для удаления дампов памяти и нажмите кнопку «Ок».
- Дождитесь завершения очистки.


Источник
Surface Pro
Когда в Windows 10 возникает критическая ошибка — например, появляется синий экран смерти — система создает файлы дампа памяти. В этих файлах содержится копия системной памяти на момент ошибки — она может помочь определить причину проблемы.
Файлы дампа системных ошибок могут пригодиться во многих ситуациях, но если вы не разработчик и отправлять файлы в службу поддержки Microsoft не планируете, они будут только тратить место на жестком диске.
Если у вас на компьютере не хватает места, или вы просто решили избавиться от ненужного балласта, есть целых три метода безопасного удаления этих файлов: с помощью приложения Параметры, Очистки диска и Командной строки.
В этой инструкции мы расскажем, как найти и удалить файлы дампа системных ошибок.
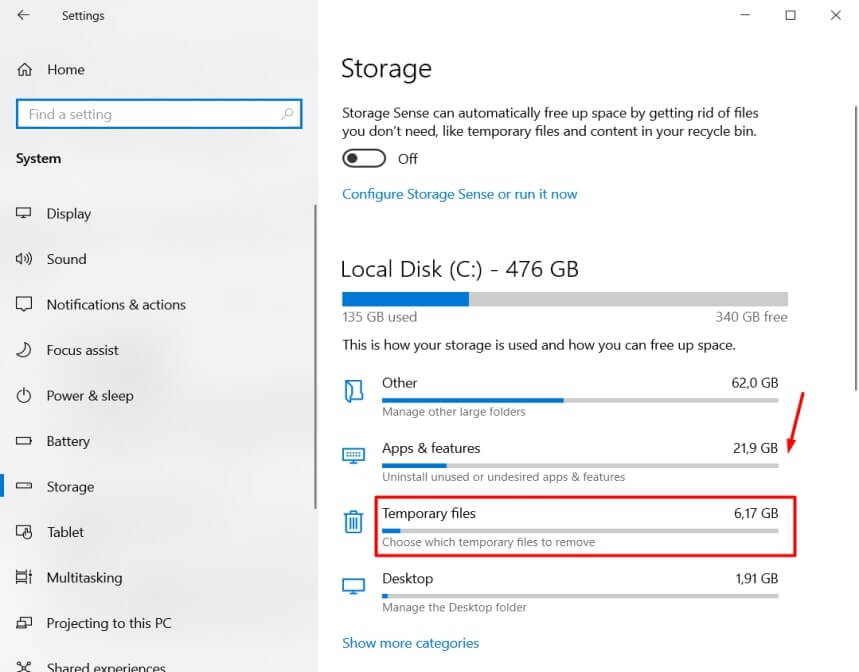
Как удалить файлы дампа системных ошибок с помощью Параметров
Чтобы удалить файлы, проделайте следующее:
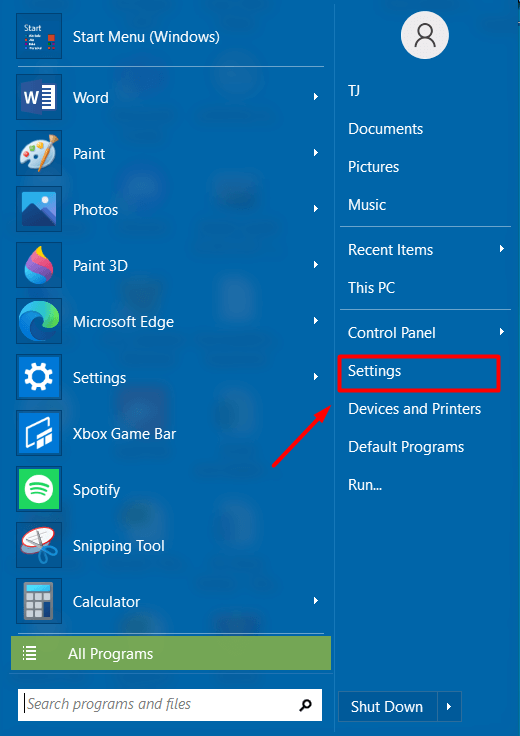
- Откройте Параметры.
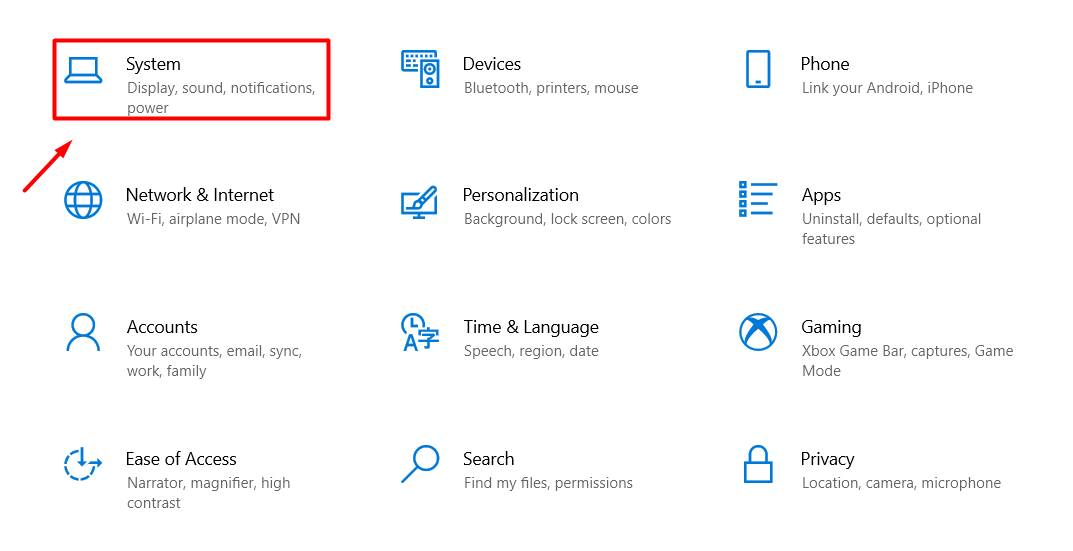
- Выберите Система.
- Выберите Память.
- В разделе основного диска выберите Временные файлы.
- Отметьте опцию Файлы дампа памяти системных ошибок.
- (Опционально) Отметьте опцию файлы небольшого дампа системных ошибок.
На заметку: файлы дампа памяти содержат все доступные данные памяти и из-за этого, как правило, имеют объем, равный объему памяти. Файлы небольшого дампа занимают всего несколько мегабайт и содержат только основную информацию о сбое. - Уберите галочки возле остальных доступных вариантов.
- Нажмите Удалить файлы.
После выполнения этих шагов файлы будут удалены с вашего компьютера, освободив дополнительное пространство для более важных вещей.
Как удалить файлы дампа системных ошибок с помощью Очистки диска
Чтобы удалить файлы дампа системы с помощью очистки диска, проделайте следующее:
- Откройте Пуск.
- В Средствах администрирования Windows найдите приложение Очистка диска и откройте его.
- Нажмите Очистить системные файлы.
- Отметьте опцию Файлы дампа памяти системных ошибок.
- (Опционально) Отметьте опцию файлы небольшого дампа системных ошибок.
- Нажмите ОК.
После выполнения этих шагов файлы дампа и небольшого дампа будут удалены с устройства.
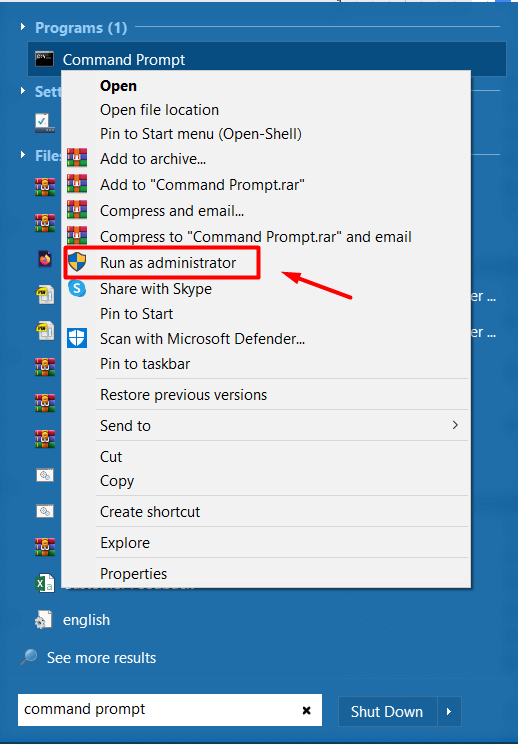
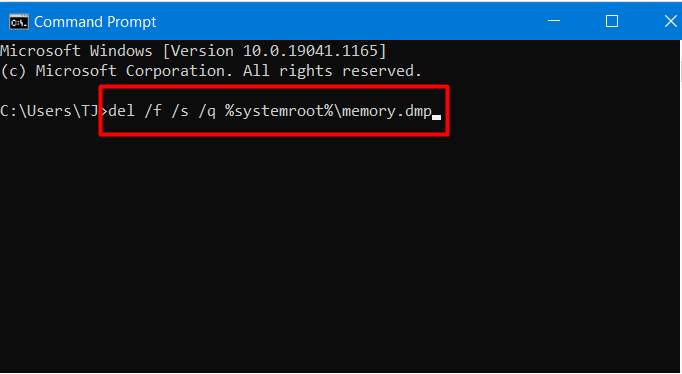
Как удалить файлы дампа системных ошибок с помощью Командной строки
Чтобы удалить файлы дампа системы с помощью Командной строки, проделайте следующее:
- Откройте Пуск.
- В разделе Служебные программы найдите Командную строку, щелкните правой кнопкой мыши верхний результат и выберите Запуск от имени администратора.
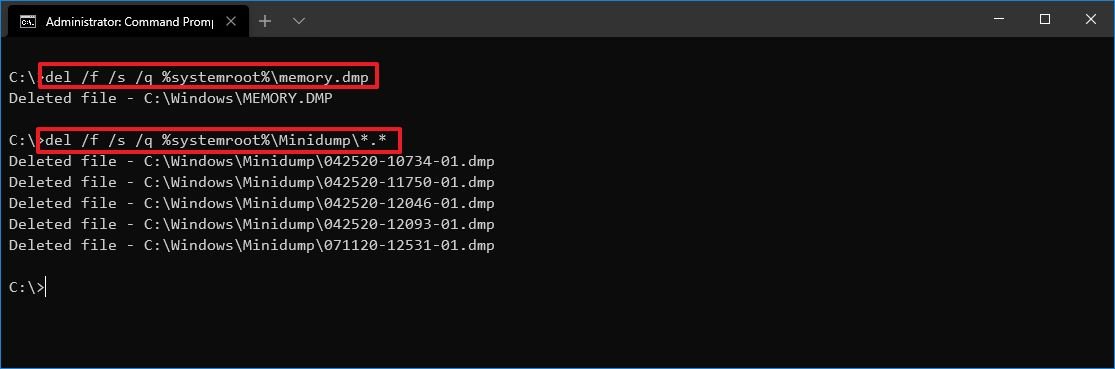
- Введите следующую команду и нажмите Enter:
del /f /s /q %systemroot%memory.dmp - (Опционально) Введите следующую команду, чтобы удалить также файлы небольшого дампа, и нажмите Enter:
del /f /s /q %systemroot%Minidump*.*
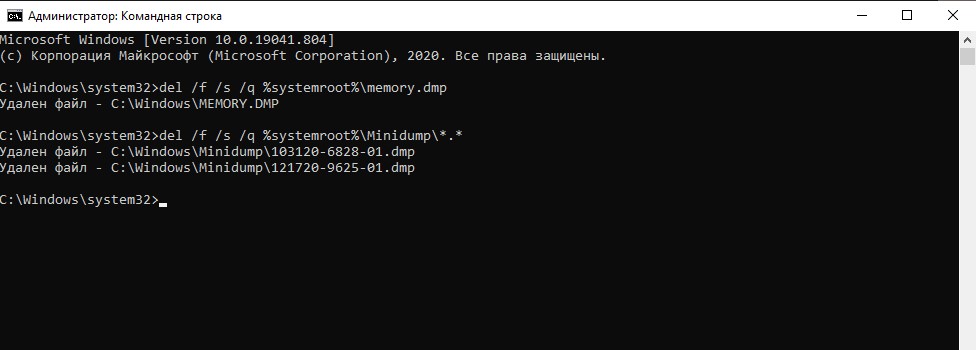
После выполнения этих действий будут удалены memory.dmp и все файлы небольшого дампа.
Если никаких критических ошибок за последнее время не случалось или производилась очистка памяти устройства, скорее всего, никаких файлов дампа на нем и не будет. В таком случае, соответствующей графы в Параметрах не окажется, и в системных папках файлы также будут отсутствовать.
Добавить комментарий Отменить ответ
Для отправки комментария вам необходимо авторизоваться.
Источник
How to remove system error memory dump files on Windows 10
Published on September 1, 2021
If your PC gets a critical error(such as Blue Screen of Death(insert why my computer freezes link)) on Windows 10, the system creates a file called memory dump file. These files store data that contains information on why exactly did the critical error happen. It can help you to diagnose and determine the reason behind your problem.
The system error dump files can be very useful in situations where you plan to explore why you are getting errors on your PC or you plan to send them to the Microsoft support team for analysis. If that is not the case they are just wasting space on your hard drive. They can become as large as the total physical memory, and they will continue to grow larger over time.
In case you are running out of space on your PC(insert how to uninstall programs with Revo), or your problem is resolved, there are several methods that you can use to delete memory dump files on Windows 10
Methods to delete memory dump files Windows 10:
- Delete system error dump files with Revo Uninstaller Pro
- Clean system error dump files with Disk Cleanup
- Remove system error dump files with Windows Settings
- Erase system error dump files with Command Prompt
- Delete dump files from the File Location
- Turn off Crash Dumps
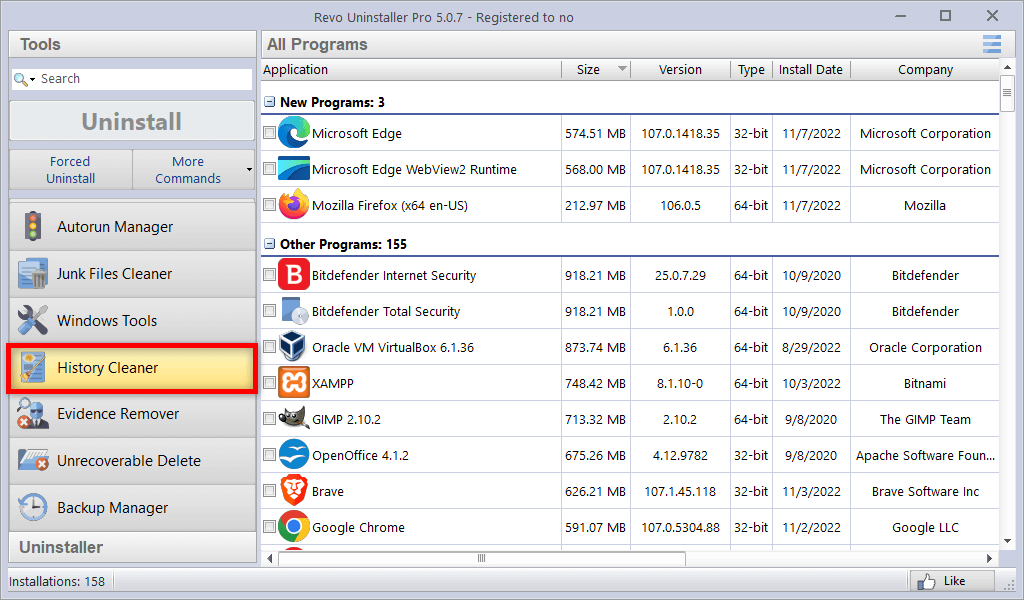
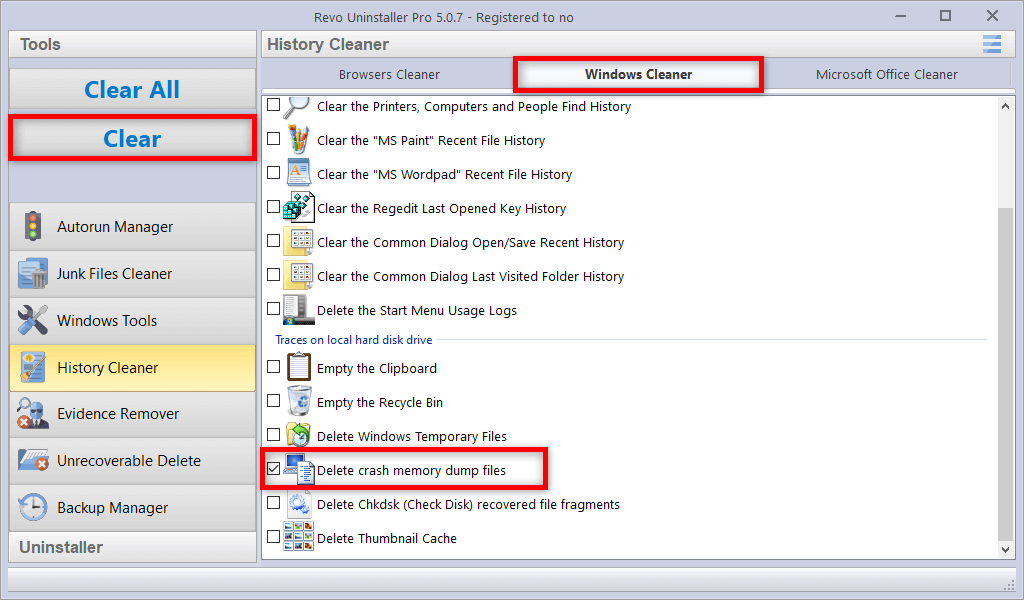
Delete system error dump files with Revo Uninstaller Pro
- Open Revo Uninstaller Pro
- Navigate to Tools
- Click on History Cleaner
- Select Windows Cleaner
- Select “Delete crash memory dump files”
- Click Clear
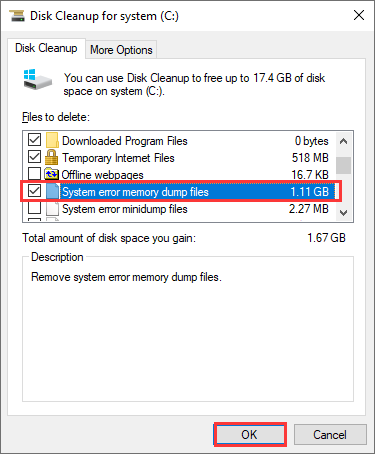
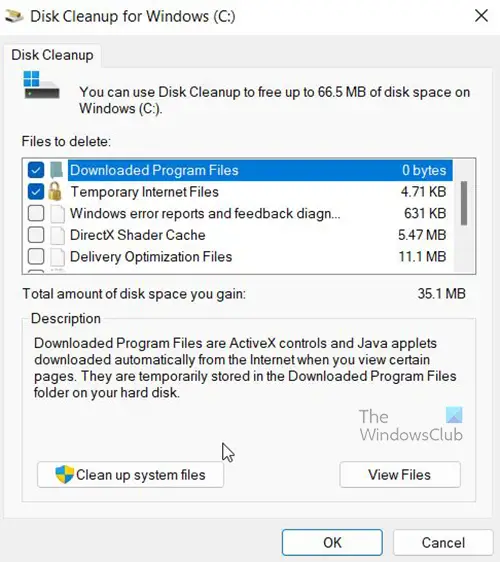
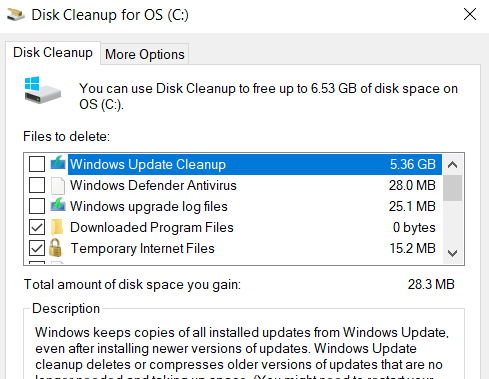
Clean system error dump files with Disk Cleanup
- Open the Start Menu
- In the search bar type Disk Cleanup and click the top result to open it
- Select the drive you want to clean(the system error dump files are stored in C:)
- Check the System error memory dump files option and the System error minidump files option
- Click the OK button
After the process is completed the memory dump and minidump files will be removed from your computer.
Remove system error dump files with Windows Settings
- Open the Start Menu and click PC Settings
- Click on System
- Click on Storage
- In the Storage, section select Temporary Files
- Check the System error memory dump file option
- Again optionally you can check the System error minidump files option
- Click the Remove files button
Erase system error dump files with Command Prompt
- Open the Start Menu
- Search for Command Prompt. Right-click the top result and select the Run as administrator option
- Type the following commands in the windows and press Enter:
del /f /s /q %systemroot%memory.dmp - To optionally delete the system error minidump files type this command and press Enter:
del /f /s /q %systemroot%Minidump*.*
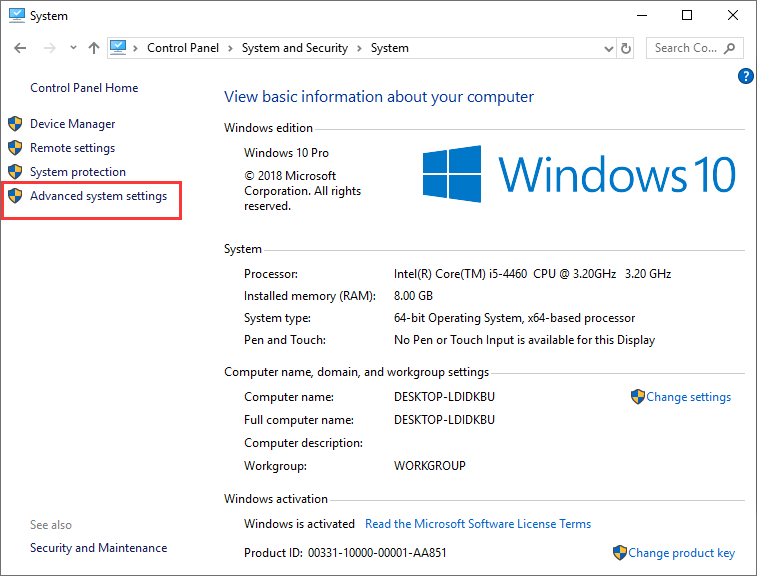
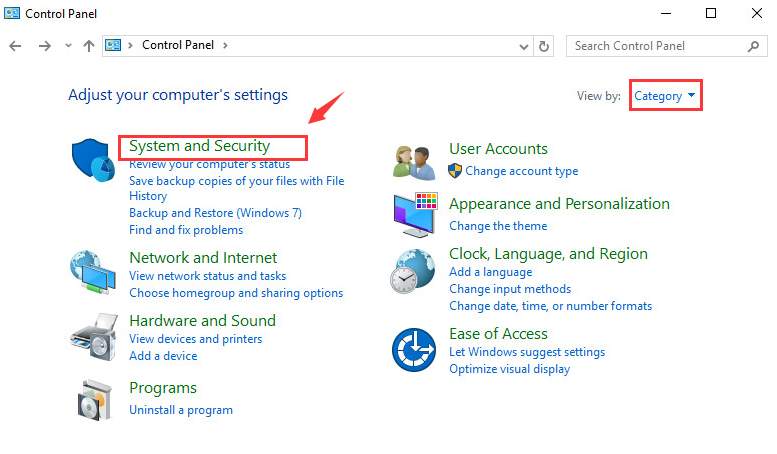
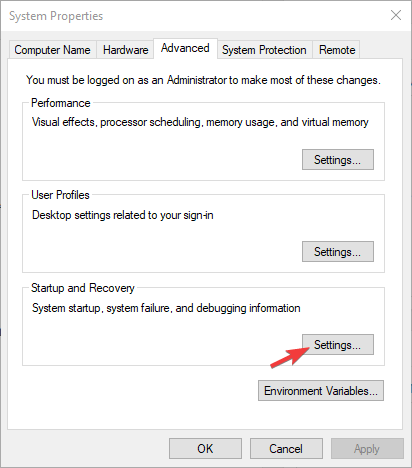
Delete memory dump files from the File Location
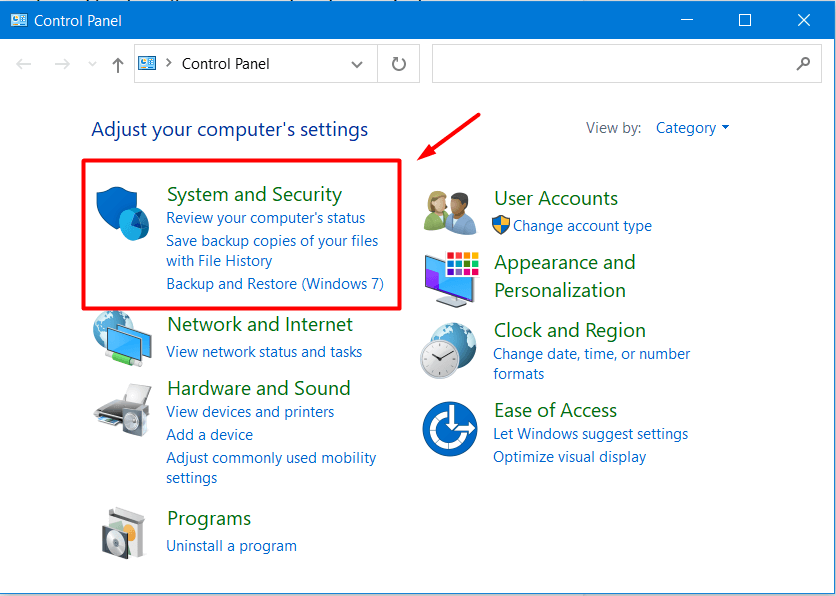
- Open the Start Menu and type Control Panel in the search bar
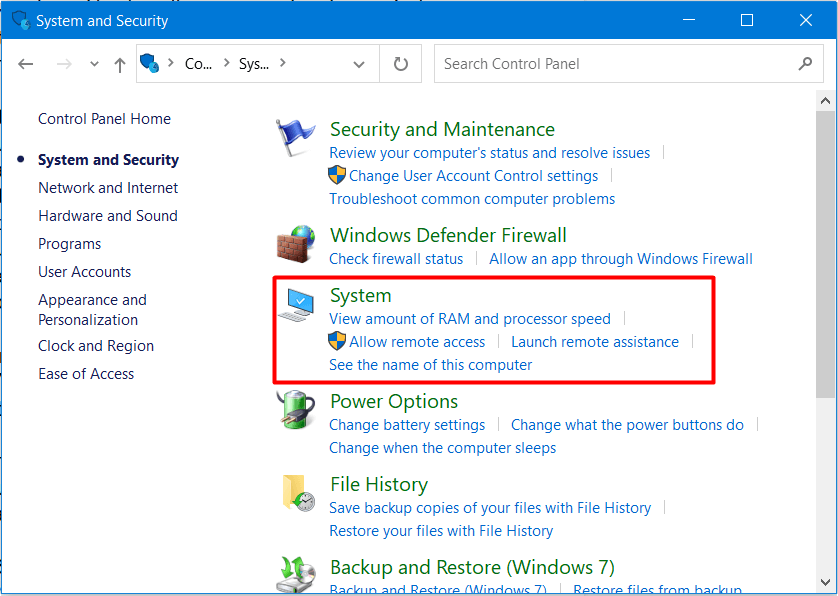
- Click the top result and navigate to System and Security
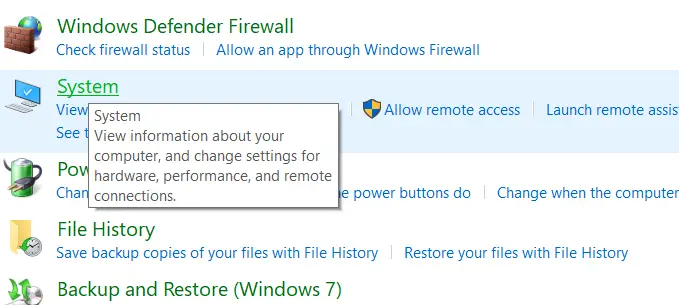
- Click the System category
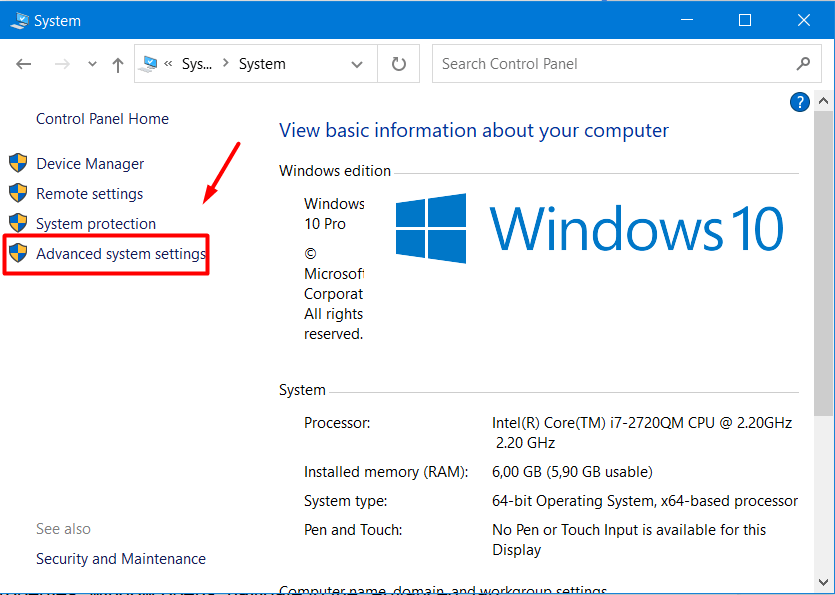
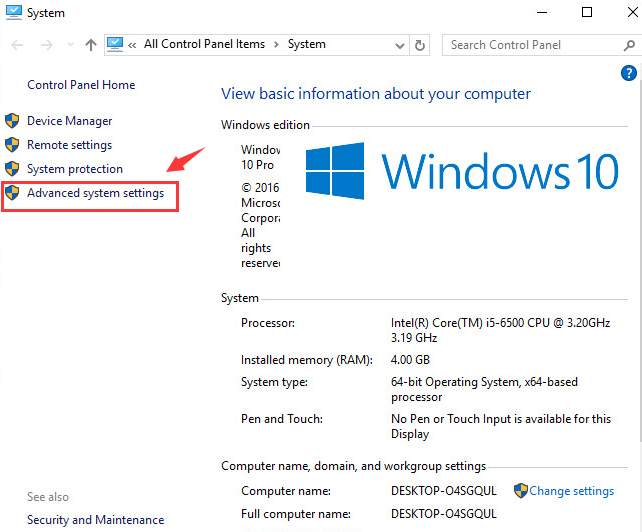
- Open the Advanced system settings
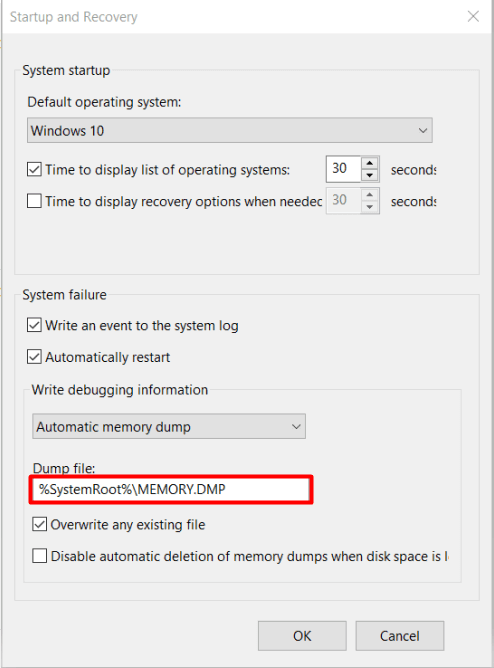
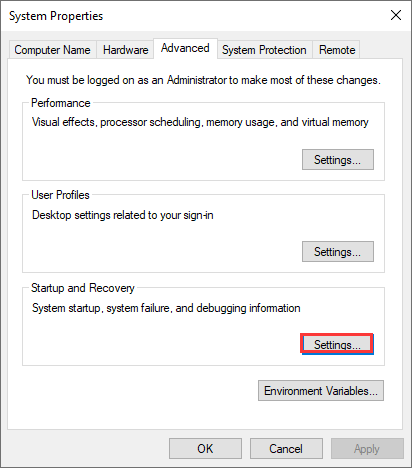
- Click the Settings button under Startup and Recovery
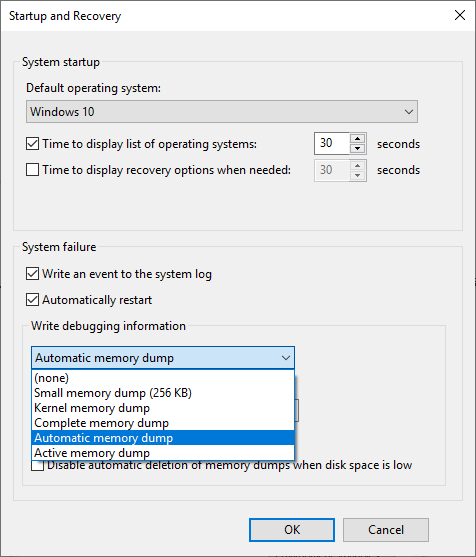
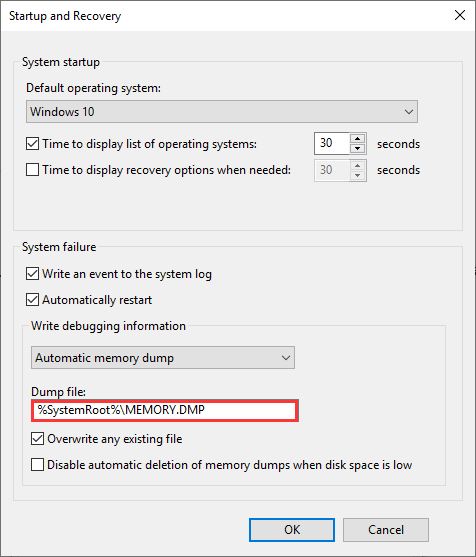
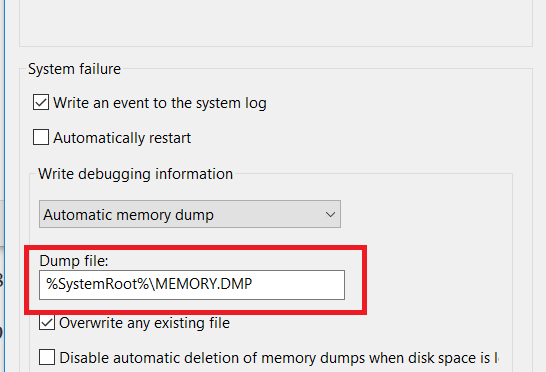
- Navigate to Write debugging information. Click on the drop-down menu and select a type of dump file. Now you can see where the files are stored.
- Copy the location of the dump file
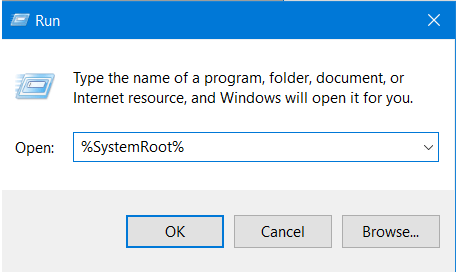
- Open Run by pressing Win Key + R and paste the dump file location and hit Enter
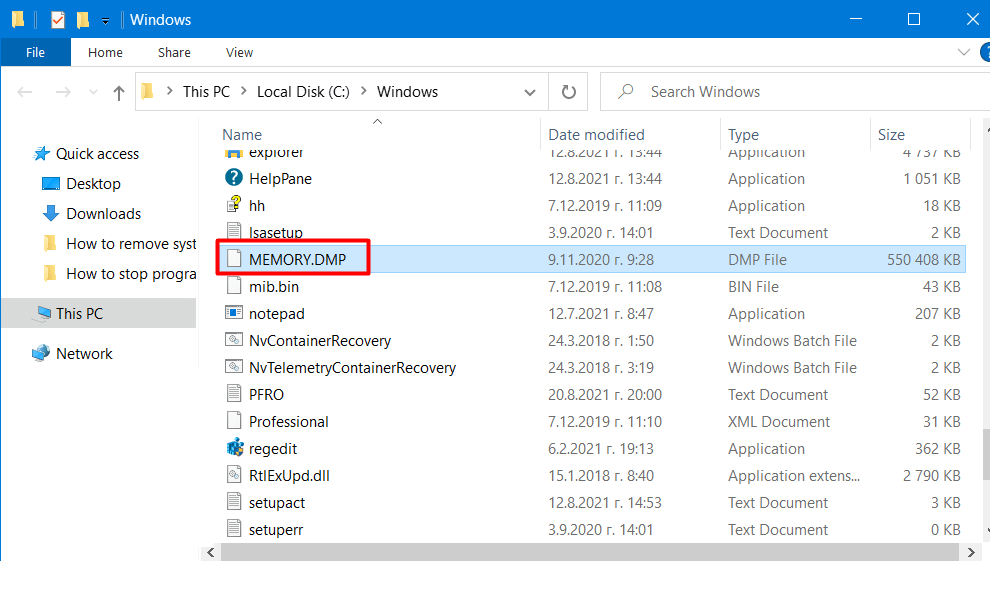
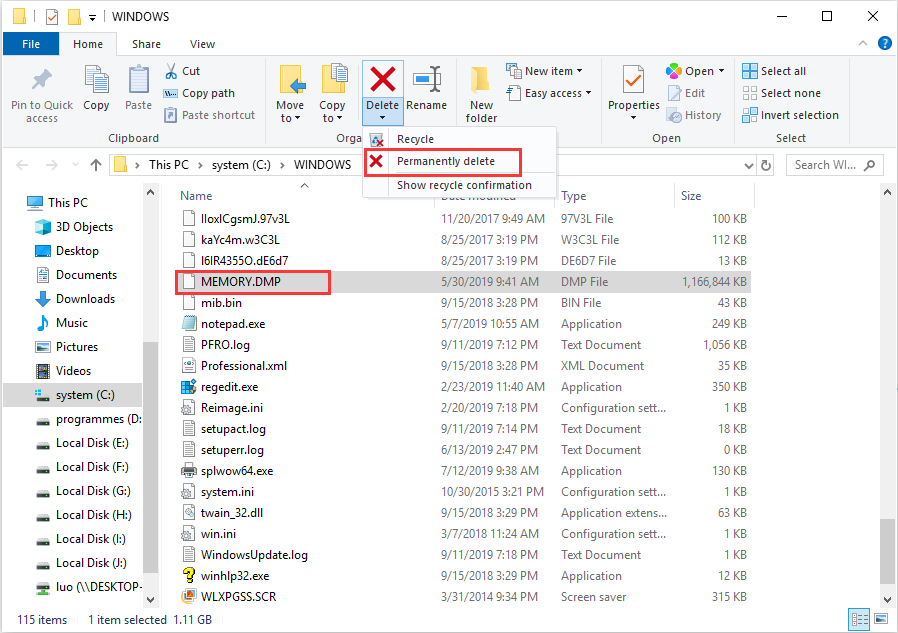
- Select the MEMORY.dmp file and delete it permanently
- Restart your computer and the dump files will be removed

Turn off Crash Dumps
- Open the Start Menu and in the search bar type Settings
- Click the top result and click on System
- Click the “About” option
- Under the “Related Settings” section, click on the “Advanced System Settings” option
- Once the “System Properties” window opens, navigate to the “Advanced” tab
- Click “Settings” under the “Startup and Recovery” section
- Under the “Write debugging information” section, use the drop-down menu and select the “(none)” option
Once you complete the process, the system will no longer store system error memory dump files. If you change your mind, you can always revert the settings.
Deleting your system error memory dump files can free up a lot of storage space. In case that your device did not run into any problems recently or you like to regularly clean your junk files, there is a good chance that there won’t be any dump files to delete. Products such as Revo Uninstaller Pro give you the convenience to clean your computer easily and quickly with a couple of clicks.
Thank you for your feedback. We are happy that you find the provided information useful.
Thank you for your feedback. Please tell us how we can improve this content.
Thank you for your time and feedback.
We can help you every time when…
- you cannot find the program in the Apps & Features list
- the program’s built-in uninstaller is non-functional
- you have a lot of leftovers slowing down your computer’s performance
- you want to batch uninstall
Download Now
There is one thing that always puts me off pressing that button and that is the warnings about what you are about to do. It asks me if I really want to do it, which I do, but I feel if I do click it and I lose a lot of files or end up with a blue screen, I won’t be able to kick myself hard enough. What would be great is advice on clicking that button when you get asked if you REALLY want to do it.
Ein sehr hilfreicher Artikel. Leider musste ich erst Ihre Mail übersetzen, da ich kein englisch kann.
Ik kan niet alle Engelse woorden vertalen naar het Nederlands.
Also, you should mention that before delete them, send dump files to Microsoft is a good idea, because there are teams which review them and they try to investigate the cause and resolve it either through Windows Update or notify you about possible solution in Action Center
very helpful indeed ..too many junk fies and history
plus edivence remover …thank you REVO
what about how to fix non volatile memory is about full??
Источник
What are system error memory dump files? Is it safe to delete system error memory dump files? In this post from MiniTool, this article will show you what system error memory dump files are and how to delete them with detailed steps.
What Are System Error Memory Dump Files
After performing a disk cleanup on your PC, you may find that the system error memory dump files take up much space. You want to delete it to release some free space but you don’t know what it is and whether it is safe to delete it.
Actually, it is not hard to understand what the system error memory dump files are. When your Windows operating system crashes or encounters error like BSOD (Blue Screen of Death), Windows collects all available information stored in memory at the time of the crash and «dumps» it into a file, which is helpful to be used to diagnose the system error.
Here are four kinds of memory dump files. All of these dump files are stored on the drive where your operating system installed, normally the C drive.
- Complete memory dump: this type of memory dump file takes up the most disk space, as it contains a copy of all the data used by your operating system in the physical memory. Let me explain it to you with an example: If Windows uses 6GB at the time of the system crash, the memory dump will be of 4GB as well.
- Small memory dump (256 Kb): this type of memory dump takes up the least disk space. It contains very little information but it is very useful in the debugging process.
- Kernel memory dump: this type of memory dump is the 1/3rd the size of your physical memory. It includes the memory allocated to Windows kernel and hardware abstraction level.
- Automatic memory dump: this type of memory dump has the exact same size of memory of Kernel memory dump.
Is It Safe to Delete System Error Memory Dump Files?
Support engineers can use dump files to determine and diagnose the possible reasons for the system error. However, for ordinary users, they will not use the dump files for debugging.
Besides, as the dump files keep accumulating, they also take up a lot of disk space. Sometimes the system error memory dump files can even reach the size of 100GB, which may affect your computer performance.
At this, some users wonder: can I delete system error memory dump files? Is it safe to delete system error memory dump files? Well, deleting the files will not affect the normal use of your computer. So it is safe to delete system error memory dump files.
By deleting system error memory dump files, you can get some free space on your system disk. However, dump files can be recreated automatically every time when there is a system crash. So it is necessary to delete system error memory dump files on a regular basis.
However, some users report that they are unable to delete the system error memory dump files Windows 10 by using Disk Cleanup utility on Windows operating system. Is there any other way to delete system error memory dump files Windows 10/8/7? Don’t worry. The following will show you 5 effective methods to delete system error memory dump files with detailed steps and screenshots.
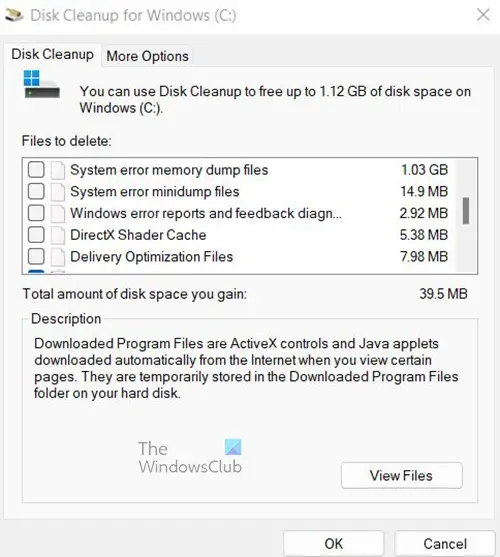
Method 1. Delete Dump Files via Elevated Disk Cleanup
If the normal disk cleanup utility cannot help you delete system error memory dump files, you can run elevated disk cleanup instead. Here are the detailed steps.
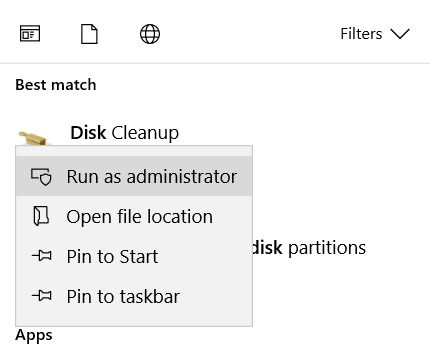
Step 1. Type disk cleanup in the Windows 10 Cortana search box. You can also press Windows + S keys on the keyboard to open the search box.
Step 2. Right click on the best match Disk Cleanup and choose Run as administrator.
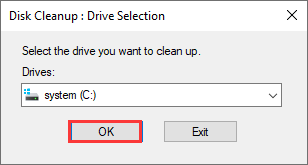
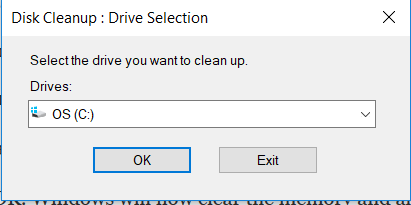
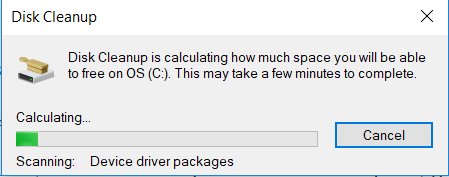
Step 3. Select the drive you want to clean up. If your operating system is installed on C drive, just select C drive and click OK. Then wait patiently when the tool scans your drive.
Step 4. Check all the boxes which you want to remove and press OK. Windows will automatically check some useless files by default. Scroll down and you will see the system error memory dump files listed, check it and click OK.
Method 2. Delete Dump Files via Third-party Space Analyzer
Using third-party space analyzer is also a simple way for you to delete the system error memory dump files on the C drive. And I recommend you to use the Space Analyzer embedded in MiniTool Partition Wizard Free Edition, for it is a piece of 100% safe and reliable partition and disk management software.
MiniTool Partition Wizard Free Edition is an all-in-one partition manager. It can help you extend C drive without data loss, migrate OS from HDD to SSD, convert MBR to GPT to enjoy the benefits of GPT disk, format partition, convert FAT to NTFS and so on.
And its Space Analyzer feature is extremely useful when your hard drive is running out of space, and you wonder which file is taking up too much space. The Space Analyzer uses graphics to give a better view of the hard drive space usage.
Next I will show you how to use the Space Analyzer feature to find and delete the system error dump files on your PC. Before proceeding, you can download the free software by clicking the following button.
Free Download
Then follow the steps below to go ahead.
Step 1. After downloading the MiniTool Partition Wizard Free Edition, install it on your PC and launch it to get the main interface. If you have not downloaded yet, click the following button.
Free Download
Step 2. On the main interface, select the Space Analyzer feature from the top toolbar to launch it.
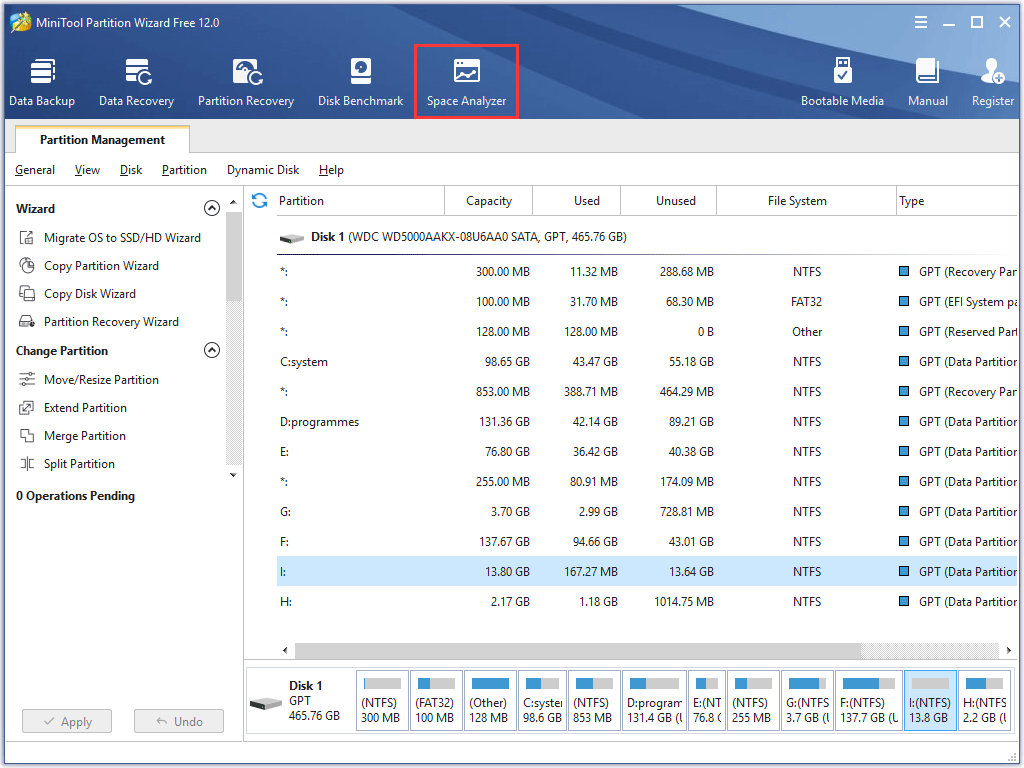
Step 3. Choose a partition to scan from the drop-down menu and click Scan. To find the system error memory dump files, you should choose the drive where your operating system installed, usually C drive.
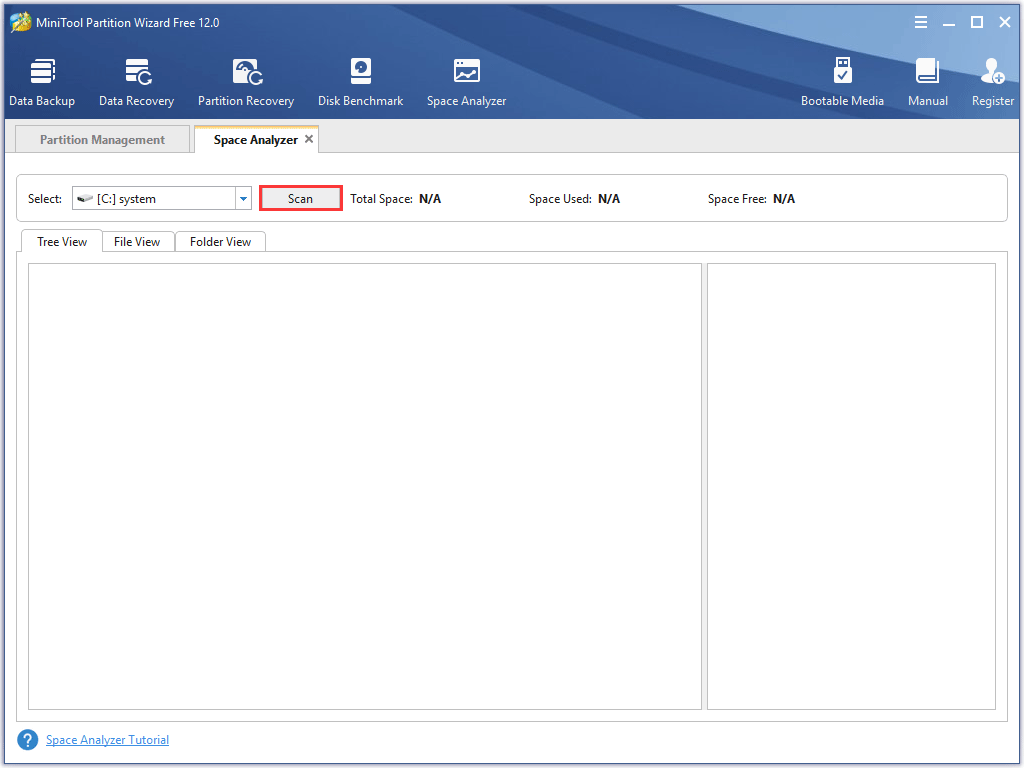
Step 4. Wait for the completion of the scanning. Depending on the number and size of files, the time for analyzing the disk usage may vary from a few minutes to hours for files.
Step 5. Here you might have noticed that the interface is divided into two parts. Double click the .dmp file extension from the right side of the panel.
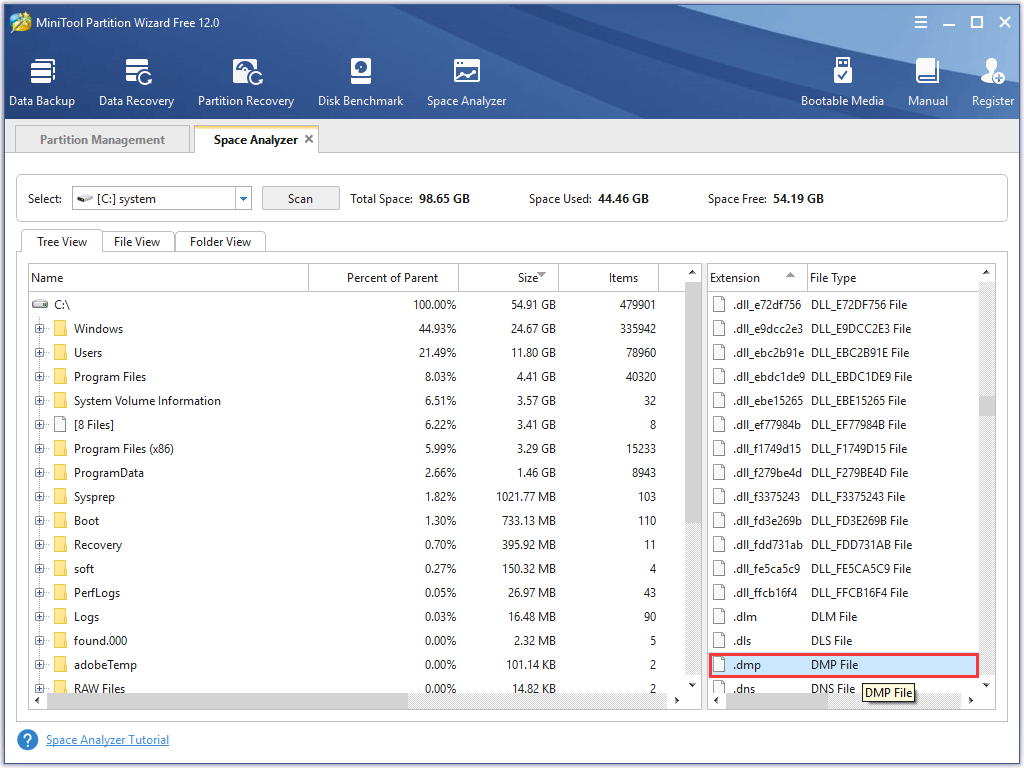
Step 6. Then you get the following interface. Right-click the MEMORY.DMP files from the list and choose Delete (Permanently) from the menu.
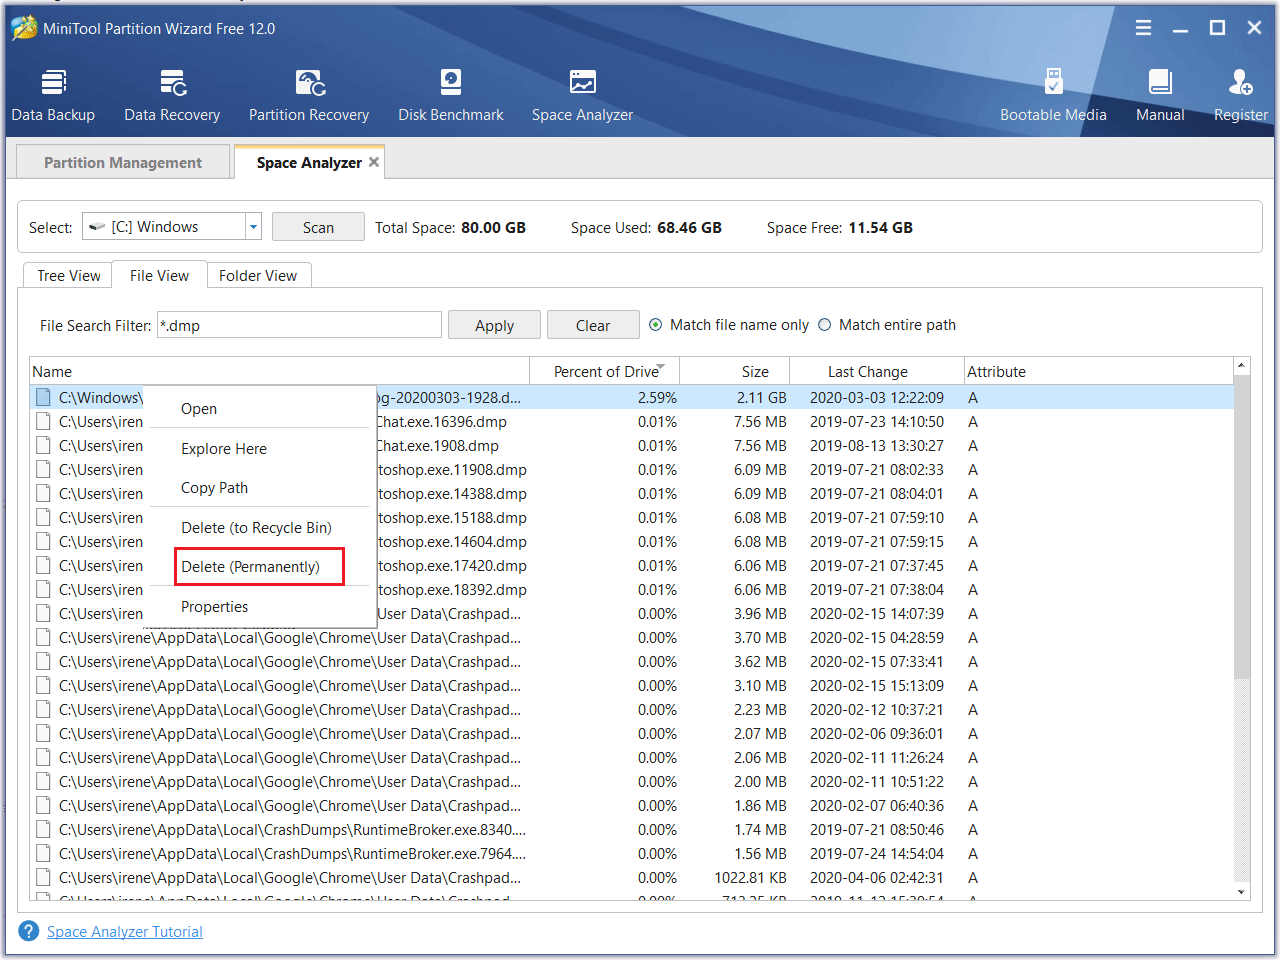
When the system error memory dump files are deleted successfully, you can close the Space Usage Analyzer. You can also delete other types of useless dump files on your PC if they take up too much disk space.
You see, how simple it is to delete system error memory dump files with this Space Analyzer. If you need to delete dump files or free up disk space on your Windows PC, you can download the free software.
Free Download
Method 3. Delete Dump Files via Extended Disk Cleanup Utility
You can use the Extended Disk Cleanup utility to clean system error memory dump files if the normal Disk Cleanup tool doesn’t work. Let’s see how to run this tool and delete system error memory dump files via it.
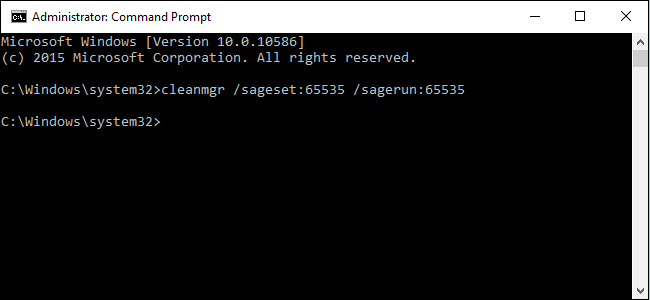
Step 1. Type command prompt in the dialogue box.
Step 2. Right click the best match Command Prompt and choose Run as administrator from the right-click menu.
Step 3. In the command prompt window, copy and paste the following command and hit Enter.
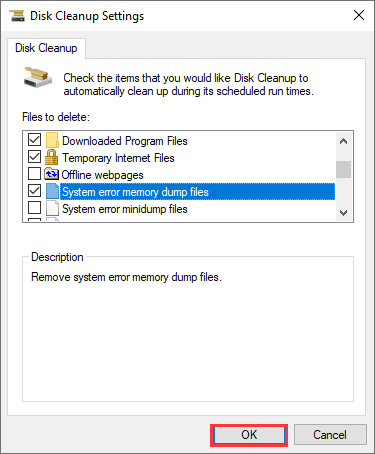
cmd.exe /c Cleanmgr /sageset:65535 & Cleanmgr /sagerun:65535
Step 4. Then the Disk Cleanup Settings window will pop up. Select the files you want to delete including the system error memory dump files and click OK.
Step 5. Restart your computer and check if system error memory dump files have been deleted.
Method 4. Delete the Dump Files from the File Location
If the above two solutions don’t work, you can try deleting the files physically. First, navigate to the dump file location via Windows File Explorer and then delete the system error memory dump files manually. Here are detailed steps.
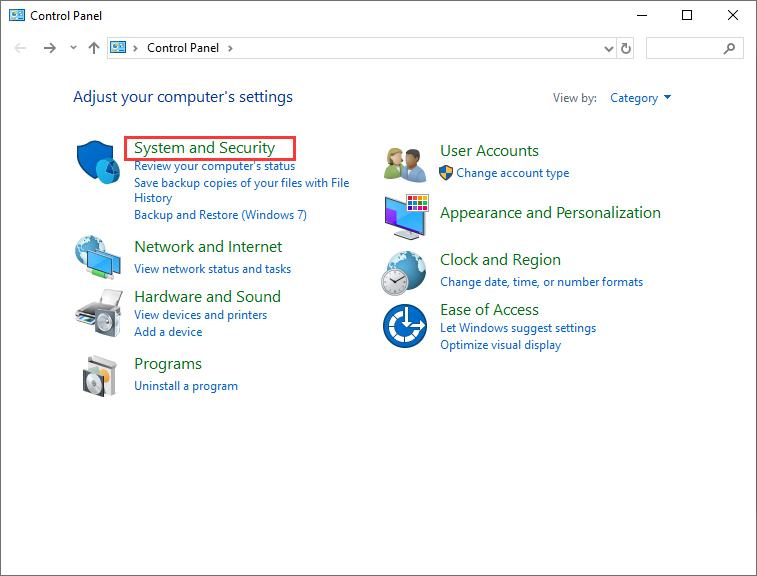
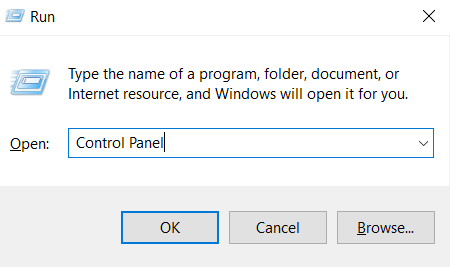
Step 1. Type Control Panel in the Windows 10 Cortana search box and click the best match to launch it.
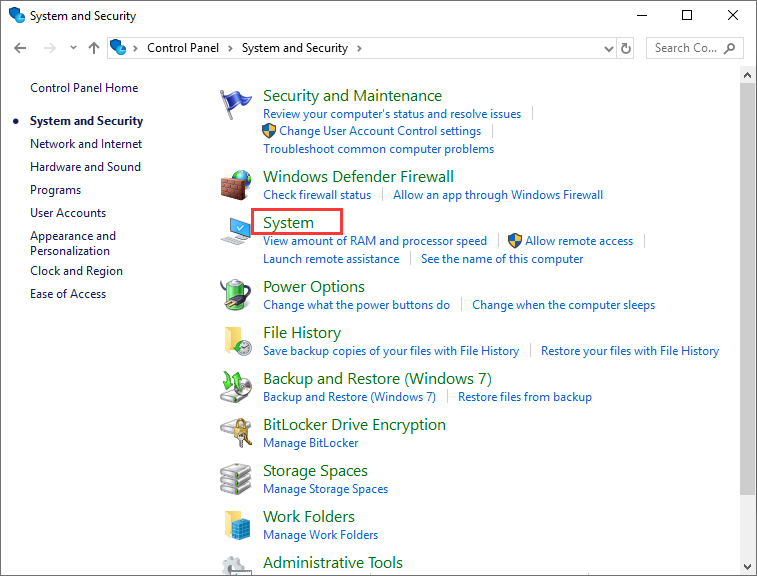
Step 2. Then select System and Security.
Step 3. Click the System category on the panel.
Step 4. Click Advanced system settings.
Step 5. Click Settings button under Startup and Recovery.
Step 6. Now you can see that the dump files are saved in the system root folder. Click on the drop-down menu under the Write debugging information; you can select a type of dump files and check where it is stored.
Step 7. Then copy the location of the dump file. Don’t copy and paste the whole path, as you just want to navigate to the location but not to open. As for the screenshot, you just need to copy %SystemRoot%.
Step 8. Press Windows + R keys to open the Run dialog box. Then paste the dump file location to the Run box and hit Enter.
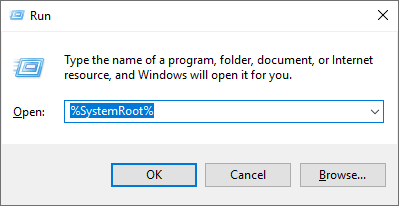
Step 9. Search for the file named MEMORY.DMP and delete it permanently.
Step 10. Restart your PC and the dump files will disappear.
Method 5. Delete Dump Files via CMD Commands
You can delete system error memory dump files via Command Prompt. By running commands listed in this part, you can remove dump files and other unnecessary files on your PC, such as system log files, temporary files, etc. Now follow the steps below.
Step 1. Type cmd in the Windows 10 search box. You can also press Windows + S keys on the keyboard to launch the search box.
Step 2. Right click the best match Command Prompt and select Run as administrator.
Step 3. On the Command Prompt window, type the following command one by one and hit Enter after each.
fsutil usn deletejournal /d /n c:
del “%temp%*” /s /f /q
del “C:$Recycle.bin*” /s /f /q
del “%systemroot%temp*” /s /f /q
vssadmin delete shadows /for=c: /all /quiet
Dism /Online /Cleanup-Image /StartComponentCleanup /ResetBase
Step 4. Restart your computer.
By following the steps in this post, I successfully deleted the system error memory dump files on my C drive. And Method 2 is awesome!Click to Tweet
Bottom Line
Now you should know what system error memory dump files are and how to delete it with 5 different methods if the normal Disk Cleanup utility doesn’t work. If you want to delete system error memory dump files Windows 10 to release some free space, try the above method right now!
If you have any question about how to delete system error memory dump file on a Windows PC, you can leave a message in the following comment zone and we will reply as soon as possible. If you have other better solutions, we are glad to have you share it with us. If you need any help when using MiniTool software, you may contact us via [email protected].
System Error Memory Dump Files FAQ
What are system error memory dump files in disk cleanup?
System error memory dump files are generated when your operating system crashes or encounters various blue screen errors. The dump files are stored on the C drive. If you run disk cleanup to scan C drive, you will find the system error memory dump files. You can delete them via disk cleanup.
How do I get rid of system error memory dump files?
The disk cleanup utility can be used to get rid of the system error memory dump files stored on the C drive. Besides, third-party space analyzer such as MiniTool Partition Wizard Free Edition can also help to find the memory dump files by the .dmp file extension and get rid of those memory dump files though its Delete option.
Where is system error memory dump files?
System error memory dump files are stored on the drive where the Windows operating system is installed. So, normally the system error memory dump files will be stored on the C drive.
How do I delete a win dump file?
- Type disk cleanup in the Windows search box.
- Right click on Disk Cleanup and choose Run as administrator.
- Select the drive (normally C drive) to clean up and click OK.
- Scroll down to find the system error memory dump files on the list.
- Check the box next the system error memory dump files and click OK to delete the win dump file.
System Error Memory Dump Files or Win Dump Files are like reports created whenever your computer experiences a crash. As the name suggests, they are Dump Files that are created and stored with information about each crash event and can be used to diagnose the problem that caused the crash. There are two major types of memory dump files, Memory.dmp and minidump. Memory Dump Files are important; however, they do take up a bit of space, and that can be a problem for users, especially if the storage is small.

When Windows crashes, it collects information about the crash during the time that the Crash Screen is displayed. At this point, the OS collects information from running applications, drivers, memories, etc., to create the Win dump files, also known as crash dumps files. These files together can be used to determine the cause of the crash. It is like analyzing stores of data that are saved over some time, the data will contain patterns that can be used to diagnose the cause of the problems.
Types of Windows Dump Files

Five types of Memory Dump Files can be created during a crash. They are:
- Complete Memory Dump Files,
- Kernel Memory Dump Files,
- Small Memory Dump Files,
- Automatic Memory Dump Files, and
- Active Memory Dump Files.
Read: How to manually create a Crash Dump file in Windows
Complete Memory Dump Files in Windows
A Complete Memory Dump File is a copy of the entire Windows physical memory at the time that the crash occurred. This type of Memory Dump is the largest. The default location for the Complete Memory Dump File is %SystemRoot%Memory.dmp. The old file is overwritten each time a new file is created.
TIP: You can analyze Windows Memory Dump .dmp files with WhoCrashed.
Kernel Memory Dump Files in Windows
Kernel memory dump files contain Windows kernel and hardware abstraction level kernel-mode drivers. Kernel memory dump files have smaller sizes than complete memory dump files because they don’t contain unallocated memory and memory allocated to user-mode applications. The default location for kernel memory dump file is %SystemRoot%Memory.dmp. The old one is overwritten when a new one is created.
Read: How to manually create a Crash Dump file in Windows
Small Memory Dump Files (256 kb) in Windows
Small memory dump files contain information related to the list of loaded drivers, the running process, and the kernel. They are the smallest Win dump files and have lesser details and usefulness. The default location for the small memory dump file is %SystemRoot%Minidump. When a new file is created, the older file is preserved.
Read: How to open and read Small Memory Dump (DMP) files
Automatic Memory Dump Files in Windows
Automatic Memory Dump and Kernel Memory Dump contains the same information. The difference between the two is the way that Windows sets the size of the system paging file.
If the system paging file size is set to System managed size, and the kernel-mode crash dump is set to Automatic Memory Dump, then Windows can set the size of the paging file to less than the size of RAM. In this case, Windows sets the size of the paging file large enough to ensure that a kernel memory dump can be captured most of the time.
If the computer crashes and the paging file is not large enough to capture a kernel memory dump, Windows increases the size of the paging file to at least the size of RAM. The time of this event is recorded here in the Registry:
HKLMSYSTEMCurrentControlSetControlCrashControlLastCrashTime
The increased Paging file size stays in place for 4 weeks and then returns to the smaller size. If you want to return to the smaller paging file before 4 weeks, you can delete the Registry entry.
To see the Page file settings:
- Go to Control Panel > System > Advanced system settings.
- Under Performance, select Settings.
- On the Advanced tab, under Virtual memory, select Change.
- In the Virtual Memory dialog box, you can see the paging file settings.
By default the Automatic Memory Dump file is written to %SystemRoot%Memory.dmp.
Active Memory dump Files in Windows
An Active Memory Dump is similar to a Complete Memory Dump, but it filters out pages that are not likely to be relevant to troubleshooting problems on the computer. Because of this filtering, it is typically significantly smaller than a complete memory dump. This dump file does include any memory allocated to user-mode applications. It also includes memory allocated to the Windows kernel and hardware abstraction layer (HAL), as well as memory allocated to kernel-mode drivers and other kernel-mode programs.
An Active Memory Dump is particularly useful when Windows is hosting virtual machines (VMs). When taking a complete memory dump, the contents of each VM is included. When there are multiple VMs running, this can account for a large amount of memory in use on the host system. Many times, the code activities of interest are in the parent host OS, not the child VMs. An active memory dump filters out the memory associated with all child VMs. The default location for the Active Memory Dump File is %SystemRoot%Memory.dmp. The Active Memory Dump is available in Windows 11/10 and later.
Read: Free Crash Dump Analyzer software for Windows
What is the System Error Memory Dump Files Location?
The default location for the System Error Dump Files or Win Dump Files is on the drive that the Operating System is installed. In most cases that is the drive C:. you can search for:
- %systemroot%minidump
- %systemroot%memory.dmp
or
- C:Windowsminidump
- C:Windowsmemory.dmp
If the Operating System is installed on a drive with another drive letter, then that drive letter would replace C:.
In most cases, you will see both minidump and Memory.dmp on your computer. This is so because all other Memory Dump files will be stored in the memory.dmp while the small dump file will be stored in minidump file.
If you can’t find the Memory Dump Files it could mean that they were deleted possibly in a clean-up. It could also mean that no crash was recorded.
In Windows 11, dump files can also be stored as smaller memory dump files called Minidump. You can find minidump.dmp dump files in C:WindowsMinidump.dmp. Some minidump files will have their own names, usually numbers such as the date and time of the crash incident.
Read:
- Windows Memory Dump Settings
- How to change the number of Memory Dump Files, Windows creates and saves
Is it safe to delete System Error Memory Dump Files?
Yes, it is safe to delete System Error Memory Dump Files. All System Memory Dump Files contain some information about a system crash. Each time the system crashes a System Error Dump File is created. These files can be used to analyze the cause of the crash. Deleting these files will not directly affect the system, however, they might hold valuable data. It would be wise to make a backup of the System Error Memory Dump Files for future reference. Files that are older than 30 days may be deleted if you wish if there are no problems. The urge to delete the Dump Files is usually because of the space they take up on the computer. You can choose to backup the files externally for 30 days and delete them if there are no problems.
The files may also be sent to Microsoft for analysis. it is a good idea to report them to Microsoft before deleting them. Sending dump files to Microsoft is a good idea because there are teams that review them and try to investigate the cause and resolve it either through Windows Update or notify you about possible solutions in Action Center.
How to Delete Memory Dump Files in Windows?
To delete Memory Dump Files you can find them on the hard drive and delete them. You can also delete it using the Windows Disk Cleanup Tool.
Open This PC in the left panel.
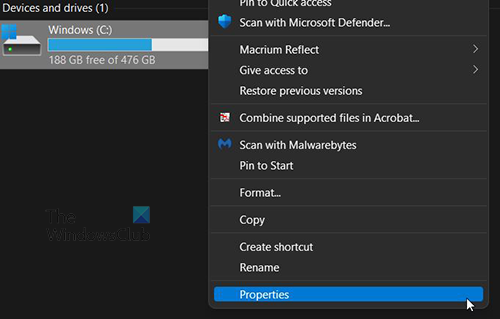
Right Click on the C: drive and click Properties.
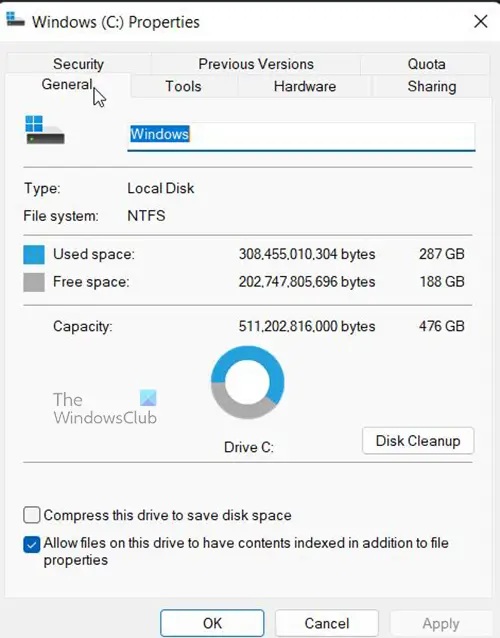
A window will appear. Click Disk Cleanup, and it will load.
A window will appear, look to see that any files you need to delete are selected then click Clean Up System Files then wait for it to finish.
Another window will appear showing a list of things that can be cleaned up. You will notice some files selected and the amount of space that will be freed up if those files are deleted.
System Error Memory Dump files and System Error Minidump files are unselected. You can choose to delete them by selecting them and clicking ok,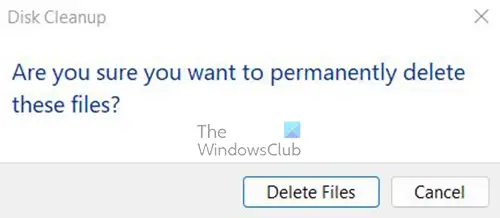
You will be asked to confirm the delete. Confirm by clicking Delete Files.
What are System Error Memory Dump Files?
System Error Memory Dump Files are basically error logs that are created whenever your computer crashes. They can hold small amount of information about the crash or very large amounts of information. The System Error Memory Dump Files can be used by users or technicians to see why the crash happened and they can decide what to do. If these files are sent to Microsoft, they can use them to make corrections to whatever caused the crash.
Related reads:
- Physical Memory Limits in Crash Dump files
- Configure Windows to create Crash Dump Files on Blue Screen
How Long Should Error Memory Dump Files be Kept?
Error Memory Dump Files can be kept for 30 days or 60 days. They can be deleted after that time if the crash is not happening anymore. If the crash keeps happening then the larger Error Dump Files will get written over. The Complete Memory Dump File is the largest of the five types because it contains more data about the crash. This is usually the one that concerns users because of the size. If you want to keep them longer but you are low on disk space, you can choose to save them externally.
(Image credit: Windows Central)
On Windows 10, when a critical error occurs (such as Blue Screen of Death (BSoD)), the system creates memory dump files (also known as «crash dumps»). These files contain a copy of the system memory at the moment of the crash, which can help to diagnose and determine the reason for the problem.
Although these system error dump files can come in handy in many situations, unless you are a developer or planning to send the files to Microsoft support or software engineer for analysis, they will only be wasting space on the hard drive since they can be as large as the total size of the physical memory, and they can grow larger over time.
If you are running out of space on your computer, or you do not need these files because the problem has been resolved, Windows 10 includes at least three methods to safely delete them using the Settings app, Disk Cleanup, and Command Prompt.
In this Windows 10 guide, we will walk you through the steps to find and delete system error dump files wasting space on your device.
- How to delete system error dump files with Settings
- How to delete system error dump files with Disk Cleanup
- How to delete system error dump files with Command Prompt
How to delete system error dump files with Settings
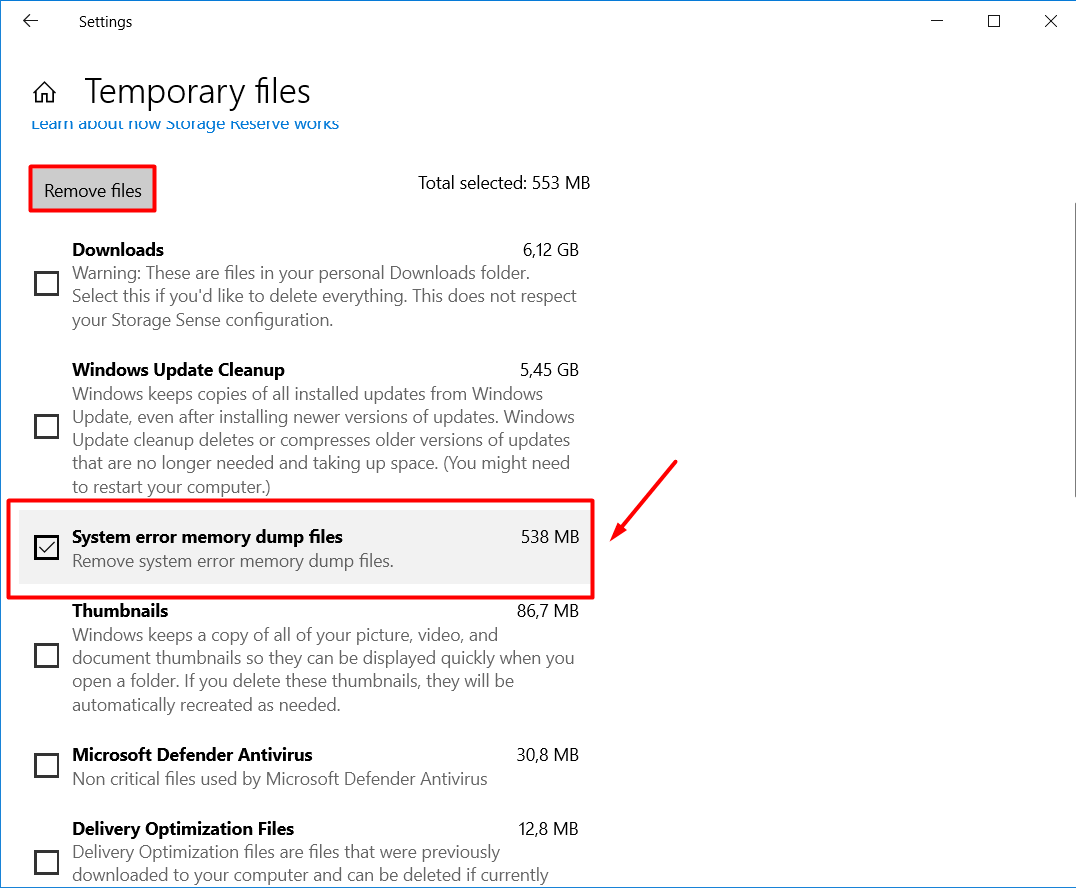
To remove the system error dump files on Windows 10, use these steps:
- Open Settings.
- Click on System.
- Click on Storage.
- Under the main drive section, click the Temporary files option.
- Check the System error memory dump files option.
- (Optional) Check the System error minidump files option.Quick note: The memory dump files contain everything available in memory and are usually as large as the memory size. In contrast, the minidump files are only several megabytes in size, and they contain only basic information about the crash.
- Clear the other selected items.
- Click the Remove files button.
Once you complete the steps, the files will be deleted from your computer, making additional space for more important files.
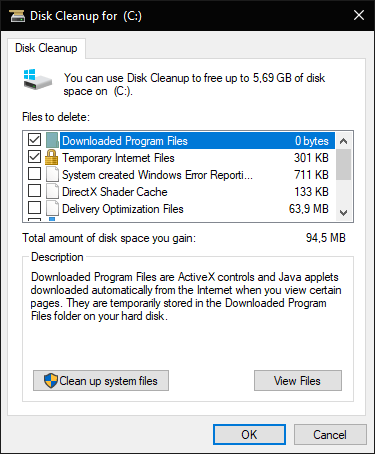
How to delete system error dump files with Disk Cleanup
To delete the system dump files with Disk Cleanup, use these steps:
- Open Start.
- Search for Disk Cleanup and click the top result to open the app.
- Click the Clean up system files button.
- Check the System error memory dump files option.
- (Optional) Check the System error minidump files option.
- Click the OK button.
After you complete the steps, the memory dump and minidump files will be removed from your device.
How to delete system error dump files with Command Prompt
To delete the error dump files with Command Prompt, use these steps:
- Open Start.
- Search for Command Prompt, right-click the top result, and select the Run as administrator option.
- Type the following command to delete the system error memory dump files and press Enter:
del /f /s /q %systemroot%memory.dmp
- (Optional) Type the following command to delete the system error minidump files and press Enter:
del /f /s /q %systemroot%Minidump*.*
Once you complete the steps, the commands will delete the «memory.dmp» and all the error dump files inside the Minidump system folder.
If the device has not run into a problem, or has recently performed some storage maintenance, there is a good chance that there are no dump files to delete. If this is the case, you won’t find the options in the Settings or Disk Cleanup, and nothing will be available in the Windows or Minidump folders.
Get the best of Windows Central in in your inbox, every day!
Mauro Huculak is technical writer for WindowsCentral.com. His primary focus is to write comprehensive how-tos to help users get the most out of Windows 10 and its many related technologies. He has an IT background with professional certifications from Microsoft, Cisco, and CompTIA, and he’s a recognized member of the Microsoft MVP community.
System Error Memory Dump Files are created when your system encounters a crash or runs into some Blue Screen of Death error, it collects a copy of your computer’s memory at that time. It will help to diagnose the reason for the discrepancy.
There are different types of these dumps:
- Complete memory dump: The largest type of dump. Contains a copy of all data used by the operating system. If Windows was using 4GB at the time of the crash, the memory dump is of 4GB as well.
- Small memory dump: Smallest known of 256Kb only. Contains very little information, useful when debugging a problem.
- Kernel memory dump: It occupies 1/3rd of your physical memory size. It includes memory allocated to Windows kernel and hardware abstraction level.
- Automatic memory dump: Exact same size as of the kernel memory dump.
See Also: Fix The Error: ‘System Restore Does Not Appear To Be Functioning Correctly On This System’ Easily
The disk cleanup utility can be used to delete these files and free up space. Sometimes these dumps keep accumulating and reach a size up to 100GB. Many times, the disk cleanup utility fails. Below we have given specific solutions that will help you tackle the problem.
Method #0 Use Advanced System Repair Pro (Strongly Recommended)
Our tool will quickly repair common computer errors, protect you from file or data loss, malware, trojans, hardware failure and optimize your PC to boost for maximum performance. Fix PC issues now using 3 easy steps:
- Download this PC Repair Tool rated as «Excellent» on TrustPilot.com.
- Click on Start Scan button to find errors related to Windows.
- Click Repair All to fix all issues with Patented Technologies.
Using Elevated Cleanup
You can use the elevated clean-up utility to delete system error memory dump files. If memory dump is in the process to be analyzed, normal clean-up utility will not help.
1. At First, press the Windows and S keys simultaneously. It will open the Search bar.
2. Then type in “disk cleanup.” Afterward, hit Enter.
3. Then right-click on the result that comes up. Then select Run as administrator.
4. A small window will ask which drive you to want to clean up. Then select local disk C if your operating system exists in it. Afterward, press OK.
5. Windows will scan all files. Then it shows how much space can be freed.
6. Check all those boxes which you want to remove. Then Click OK. Windows will now clear the memory and allocate free space.
You can again check for space by running the clean-up utility. Elevated cleanup and normal cleanup may give different values. Larger values in elevated version is not a thing to worry. You can still remove the files.
Solutions to other errors –
- 11 Ways to Fix This App Can’t Open in Windows 10
- 10 Ways to Fix Critical Process Died Error in Windows 10
- What is RAVBg64.exe? 8 Ways to Fix it
- 8 Ways to Fix the Default Gateway is Not Available
Make Use Of The Extended Disk Cleanup
The extended disk cleanup utility gives you more options to choose when deleting system error memory dump files. It also provides you with increased details. You need administrator privileges for this solution.
1. At First, press the Windows and S keys together. The search bar comes up.
2. Then type in Command Prompt. Afterward, Right click on the result that shows, and select Run as administrator.

3. In the command prompt window, type in the following message & hit Enter.
Cleanmgr /sageset:65535 & Cleanmgr /sagerun:65535
4. You will be able to see various other options available in the extended disk clean-up utility.
5. Then select all those which you want to remove and click OK.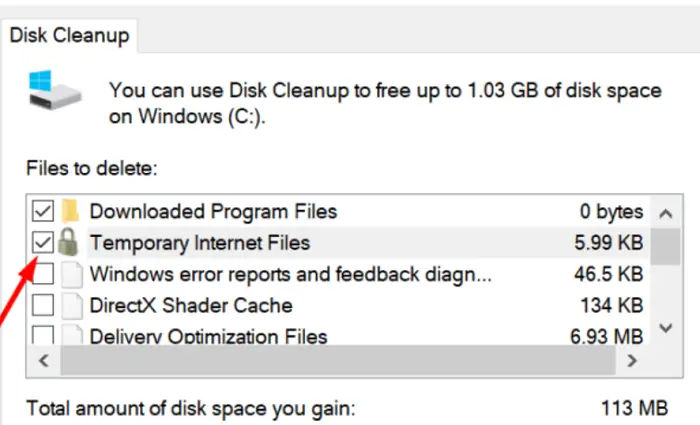
6. Finally, reboot your system.
Check if this solution works for you.
Check Out: 5 Ways to Fix Critical Structure Corruption Error in Windows 10
Deleting The Dump Files Physically
Now you can try to delete the system error memory dump files physically. First, we find the location of dump files. Then we navigate to that folder and delete the files manually.
1. At First, press the Windows and R keys simultaneously. It will open the Run dialog box.

2. Then type in Control Panel and hit Enter.
3. When in the Control Panel, go to System and Security.
4. Afterward, keep navigating through the options until you find the System category.
5. Then inside this, click on Advanced system settings. It is present on the left side.
6. Then under the Startup and Recovery tab, select Settings.
7. Then in the Dump file dialogue box, you can see where the dump files are being stored. Also in the drop-down list, you can check the storage for each type of dump files.
8. Afterward, press the Windows + R keys. Soon paste in the copied storage location of the dump file.
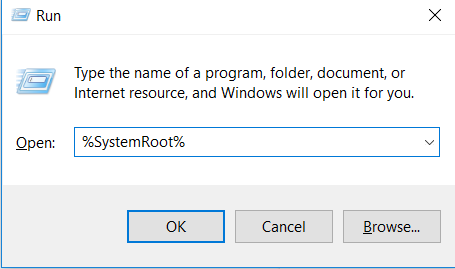
9. Then search for the file named as MEMORY.DMP. Delete it with administrator privilege confirmed.
Also, read –
- 3 Ways to Fix Error Code 0x8007000D in Windows
- {Solved} Fix Program Can’t Start Because d3dx9_43.dll is Missing
- 8 Ways to Fix Kernel Security Check Failure in Windows 10
- {Solved} Fix Unmountable Boot Volume (STOP: 0x000000ED)
Finally, restart your system to see if you have resolved System Error Memory Dump Files.
Disabling Indexing In Local Disk C
Indexing maintains an index for most of the files in the computer. This is done for easier searching and file retrieval. But, in some cases, indexing eats up a lot of space. Then this solution here is helpful if some unknown object occupies space.
1. At First, within your file explorer, go to This PC.
2. Then right-click on local disk C, or whichever drive has your operating system. Afterward, click on Properties.
3. In the Properties window, there will be an option at the bottom that says Allow files on this drive to have contents indexed in addition to filing properties. Uncheck this option.
4. Then click on Apply to save the changes.
5. Finally, reboot your system and see if the system error memory dump files exist.
Executing Commands In The Command Prompt
You can try a few commands in the Command Prompt which can help you free the System Error Memory Dump Files. You need an administrator account to follow this solution.
1. At First, press the Windows and S keys together. The search bar comes up.
2. Then type in Command Prompt. Afterward, right-click on the result that shows, and select Run as administrator.
3. In the command prompt window, type in the following commands. Then press Enter after typing in each command.
fsutil usn deletejournal /d /n c:
chkdsk /scan
compact /CompactOs:never
winmgmt /salvagerepository
del “%temp%*” /s /f /q
then del “C:$Recycle.bin*” /s /f /q
del “%systemroot%temp*” /s /f /q
vssadmin delete shadows /for=c: /all /quiet
Dism /Online /Cleanup-Image /StartComponentCleanup /ResetBase
4. Finally, restart your system and check if the current problem is solved.
Verdict
So, these were a few methods that should help in deleting the system error memory dump files. Also, do share and comment below if either of these methods helped you.
See Also: Should I Delete Windows Setup Files? (10 Step Guide)

Gravit Sinha is the founder of ValidEdge. Ever since he was a kid, he has been a problem fixer and that passion is what inspired him to start and grow this website! 🙂
Многие пользователи жалуются на различные сообщения об ошибках Дампа Памяти в системе Windows 10, 8.1. Для начинающего пользователя может быть действительно трудно узнать, что является основной причиной этой проблемы в системе. Давайте постараемся разобрать в этом руководстве, как исправить ошибку memory.dump в Windows 10, 8.1.
Решения для устранение ошибки memory.dump в Windows 10/8.1
1. Включить функцию автоматического обновления
В Windows 10/8.1 автоматическое обновление включено по умолчанию, но вы наверняка отключили его и забыли. Это не правильный подход. Система должна все время обновляться и развиваться, тем самым в этих же обновлениях могут приходить критические исправления различных ошибок. Включите функцию автоматического обновления навсегда. Рассмотрим ниже несколько рекомендаций.
- Если вы отключили его с помощью специальной утилиты, то включите обратно.
- Проверьте в службах, работает ли «Центр обновления Windows».
- Постарайтесь обновить свою систему до последней версии.
2. Ручное обновление для системного драйвера
Вручную обновите все установленные системные драйверы, такие как видео, USB и аудио, до последней версии используя Интернет. Часто устаревшие системные драйверы являются причинами ошибок memory.dump.
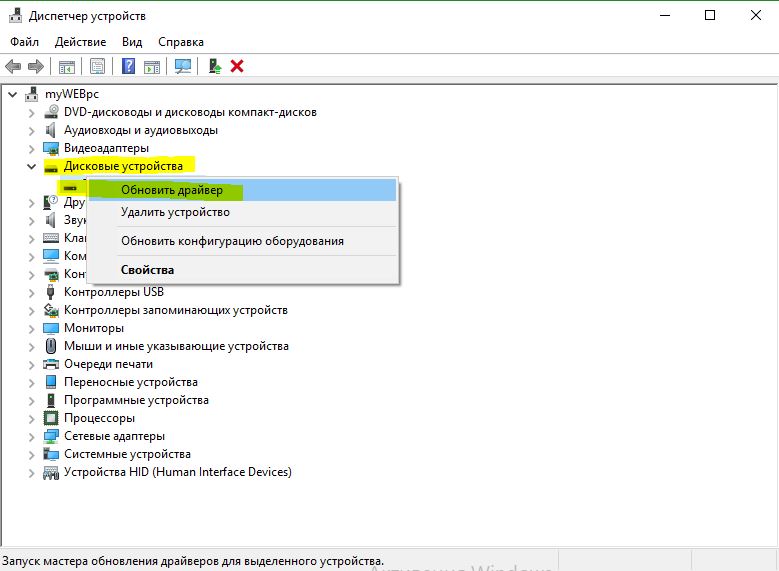
- Нажмите Win + R и введите devmgmt.msc, чтобы открыть «Диспетчер устройств».
- У вас появится список всех устройств. Обновите их все по порядку, нажав правой кнопкой мыши и выбрав «Обновить драйвер«.
3. Отключить функцию быстрого запуска
Функция Hybrid Shutdown или Fast startup была добавлена в Windows 8 для быстрого запуска в Windows 10, 8. Но число людей жаловалось на то, что Hybrid shutdown выдает различные проблемы, когда она работает с Fast startup, и обе эти функции несут ответственность за создание ошибок memory.dump в системе Windows 10/8. Отключим функцию Hybrid shutdown в системе.

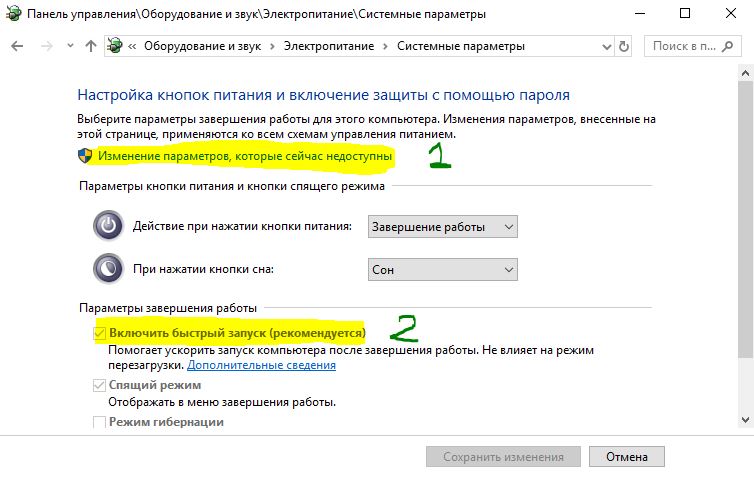
- Перейдите в раздел «Электропитание» с панели управления. Далее нажмите справа на «Действия кнопок питания«.

- Нажмите на «Изменение параметров, которые сейчас недоступны», чтобы вы смогли пользоваться ниже параметрами.
- Теперь Вам доступны параметры снизу. Отключите «Быстрый запуск» убрав галочку. Сохраните изменения.
4. Восстановление системных файлов и жесткого диска
Попробуем исправить поврежденные системные файлы, если они имеются, и восстановить жесткий диск.
- Запустите командную строку от имени администратора и введите команду
sfc /scannow, чтобы проверить системные файлы.
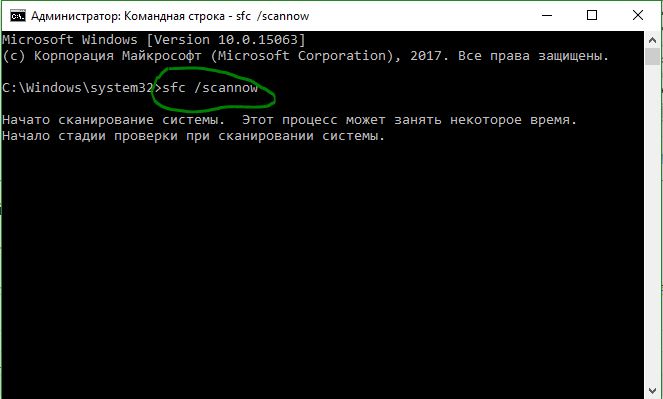
- Запустите командную строку от имени администратора и введите
chkdsk /f /r, чтобы проверить и восстановить ошибки на жестком диске.

Смотрите еще:
- Как проверить оперативную память на ошибки в Windows
- Как увеличить оперативную память с помощью флешки ReadyBoost
- Сжатая память Windows 10: Что это? Как работает? Как Отключить?
- Почему Ntoskrnl.exe System грузит ЦП и Память в Windows 10
- Как снять защиту от записи с USB флешки и карт памяти
[ Telegram | Поддержать ]
Содержание
- Как исправить ошибку memory.dump в Windows 10/8.1
- Решения для устранение ошибки memory.dump в Windows 10/8.1
- 1. Включить функцию автоматического обновления
- 2. Ручное обновление для системного драйвера
- 3. Отключить функцию быстрого запуска
- 4. Восстановление системных файлов и жесткого диска
- Анализ аварийных дампов Windows
- Содержание
- Анализ аварийного дампа утилитой BlueScreenView
- Анализ аварийного дампа отладчиком WinDbg
- Установка Debugging Tools for Windows (WinDbg)
- Настройка отладочных символов
- Анализ аварийного дампа
- Получение информации о проблемном драйвере
- Аппаратные причины возникновения критических ошибок
- Диагностика неисправностей диска
- Диагностика неисправностей памяти
- Настройка параметров сохранения аварийного дампа
- How to delete system error memory dump files in Windows
- How do I delete System Memory dump files in Windows?
- 1. Delete Crash Dumps With Disk Clean-up>
- 2. Delete Crash Dumps With CCleaner
- 3. Delete Crash Dumps Via the Command Prompt
- 4. Turn Off Crash Dumps
Как исправить ошибку memory.dump в Windows 10/8.1
Многие пользователи жалуются на различные сообщения об ошибках Дампа Памяти в системе Windows 10, 8.1. Для начинающего пользователя может быть действительно трудно узнать, что является основной причиной этой проблемы в системе. Давайте постараемся разобрать в этом руководстве, как исправить ошибку memory.dump в Windows 10, 8.1.
Решения для устранение ошибки memory.dump в Windows 10/8.1
1. Включить функцию автоматического обновления
В Windows 10/8.1 автоматическое обновление включено по умолчанию, но вы наверняка отключили его и забыли. Это не правильный подход. Система должна все время обновляться и развиваться, тем самым в этих же обновлениях могут приходить критические исправления различных ошибок. Включите функцию автоматического обновления навсегда. Рассмотрим ниже несколько рекомендаций.
- Если вы отключили его с помощью специальной утилиты, то включите обратно.
- Проверьте в службах, работает ли «Центр обновления Windows».
- Постарайтесь обновить свою систему до последней версии.
2. Ручное обновление для системного драйвера
Вручную обновите все установленные системные драйверы , такие как видео, USB и аудио, до последней версии используя Интернет. Часто устаревшие системные драйверы являются причинами ошибок memory.dump.
- Нажмите Win + R и введите devmgmt.msc, чтобы открыть «Диспетчер устройств».
- У вас появится список всех устройств. Обновите их все по порядку, нажав правой кнопкой мыши и выбрав «Обновить драйвер«.
3. Отключить функцию быстрого запуска
Функция Hybrid Shutdown или Fast startup была добавлена в Windows 8 для быстрого запуска в Windows 10, 8. Но число людей жаловалось на то, что Hybrid shutdown выдает различные проблемы, когда она работает с Fast startup, и обе эти функции несут ответственность за создание ошибок memory.dump в системе Windows 10/8. Отключим функцию Hybrid shutdown в системе.
- Перейдите в раздел «Электропитание» с панели управления. Далее нажмите справа на «Действия кнопок питания«.
- Нажмите на «Изменение параметров, которые сейчас недоступны», чтобы вы смогли пользоваться ниже параметрами.
- Теперь Вам доступны параметры снизу. Отключите «Быстрый запуск» убрав галочку. Сохраните изменения.
4. Восстановление системных файлов и жесткого диска
Попробуем исправить поврежденные системные файлы, если они имеются, и восстановить жесткий диск.
- Запустите командную строку от имени администратора и введите команду sfc /scannow , чтобы проверить системные файлы .
- Запустите командную строку от имени администратора и введите chkdsk /f /r , чтобы проверить и восстановить ошибки на жестком диске .
Анализ аварийных дампов Windows
В случае критической ошибки система останавливает свою работу, отображает синий экран смерти (BSOD), информация об ошибке и содержимое памяти сохраняется в файле подкачки. При последующей загрузке системы, на основе сохраненных данных, создается аварийный дамп c отладочной информацией. В системном журнале событий создается запись о критической ошибке.
Если критическая ошибка возникла на ранней стадии загрузки системы или в результате ошибки произошел отказ дисковой подсистемы, аварийный дамп сохранен не будет.
Аварийный дамп может быть проанализирован с помощью утилиты BlueScreenView или системного отладчика WinDbg (Debugging Tools for Windows).
Содержание
Анализ аварийного дампа утилитой BlueScreenView
Простейшим инструментом для анализа аварийных дампов является утилита BlueScreenView от NirSoft.
BlueScreenView сканирует папку с минидампами и отображает информацию по найденным отказам.
По каждому отказу отображается дата, данные об ошибке и драйвер, который предположительно вызвал отказ.
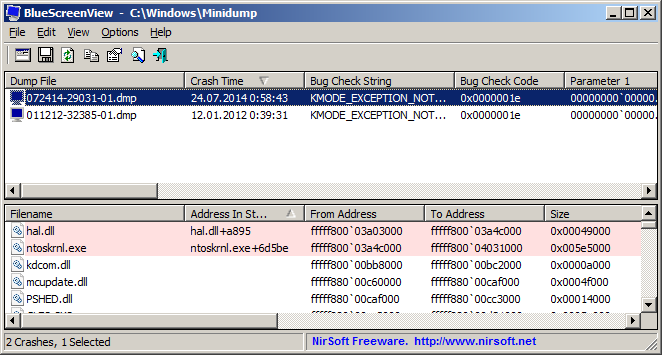
В нижней части окна отображается список загруженных в системе драйверов. Модули, к которым выполнялось обращение в момент отказа, выделены цветом, на них следует обратить особое внимание, они могут быть причиной отказа.
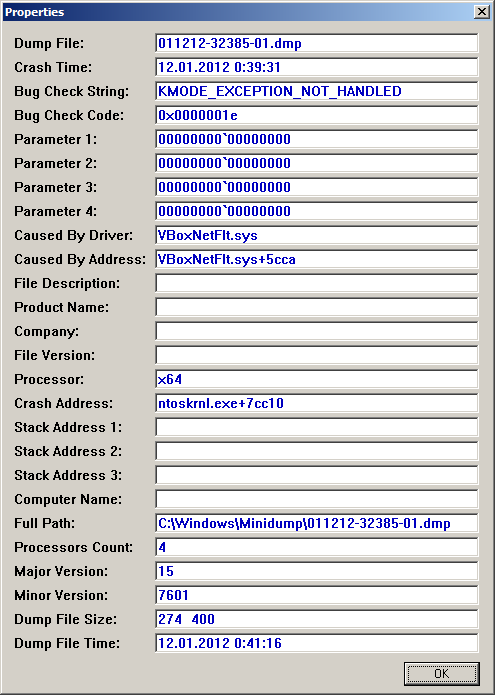
По двойному клику отображается дополнительная информация.
Анализ аварийного дампа отладчиком WinDbg
С помощью WinDbg из аварийного дампа можно вытащить более детальную информацию, включая расшифровку стека.
Установка Debugging Tools for Windows (WinDbg)
Microsoft распространяет WinDbg только в составе SDK, загрузить веб-установщик можно на странице загрузки.
Для анализа аварийных дампов установка SDK не требуется. Скачать Debugging Tools for Windows (WinDbg) отдельным пакетом можно здесь.
После установки, корректируем ярлык для запуска WinDbg. В свойствах ярлыка, устанавливаем флажок запуска от имени администратора. Также, в качестве рабочей папки, задаем: %SystemRoot%Minidump.
Настройка отладочных символов
Отладочные символы содержат символические имена функций из исходного кода. Они необходимы для расшифровки и интерпретации аварийного дампа.
При первом запуске WinDbg, необходимо указать путь к отладочным символам, для этого открываем меню File, Symbol File Path, или используем комбинацию Ctrl+S.
Следующей строкой включаем загрузку отладочных символов из сети, задаем локальный путь для сохранения файлов и адрес для загрузки из интернета:
Анализ аварийного дампа
В меню выбираем File, Open Crash Dump, или нажимаем Ctrl+D.
Указываем путь к дампу %SystemRoot%MEMORY.DMP или %SystemRoot%Minidumpфайл.dmp.
Загрузка отладочных символов из интернета может занять некоторое время.
Для получения детальной информации выполняем команду:
Дебаггер сам вам предложит ее выполнить, достаточно навести указатель мыши на ссылку и кликнуть.
В результате получаем следующий вывод:
Получение информации о проблемном драйвере
Если удалось обнаружить драйвер, в котором возникла ошибка, имя драйвера будет отображено в полях MODULE_NAME и IMAGE_NAME.
Чтобы получить путь к файлу и прочую информацию, щелкаем по ссылке на модуль:
Если полный путь к драйверу не указан, по умолчанию используется папка %SystemRoot%system32drivers.
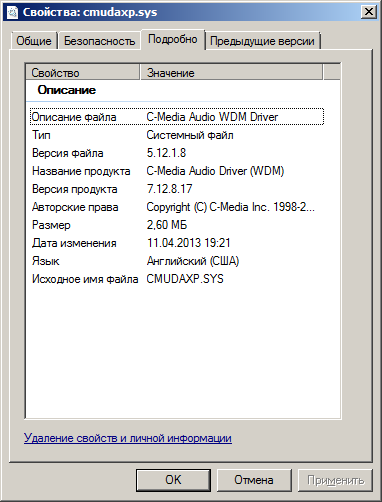
Находим указанный файл, и изучаем его свойства.
Обновляем проблемный драйвер.
Аппаратные причины возникновения критических ошибок
Источником критических ошибок нередко бывают неисправности в дисковой подсистеме, или в подсистеме памяти.
Диагностика неисправностей диска
В случае ошибок дисковой подсистемы, аварийный дамп может не сохраняться.
Чтобы исключить проблемы с диском, проверяем системный журнал событий на наличие ошибок чтения и записи на диск.
Проверяем параметры S.M.A.R.T жесткого диска, получить их можно, например, с помощью программы SpeedFan.
Особое внимание обращаем на параметры: «Current Pending Sector Count» и «Uncorrectable Sector Count», ненулевые значения этих параметров сигнализируют о неисправности диска.
Ненулевое значение параметра: «UltraDMA CRC Error Count», сигнализирует о проблеме с SATA-кабелем.
Подробнее о параметрах S.M.A.R.T. читаем в статье Википедии.
Диагностика неисправностей памяти
Проблемы с памятью нередко могут стать причиной самых разнообразных глюков, включая различные синие экраны, зависания, аварийное завершение программ, повреждение реестра, повреждение файловой системы и данных.
Выявить проблемы с памятью можно с помощью утилиты Memtest86+.
Загружаем образ по ссылке, записываем на диск, загружаемся с диска, запускается тест.
Начиная с Windows Vista, в системе имеется свой тест памяти. Для его запуска нажимаем «Пуск», в строке поиска набираем «памяти«, выбираем «Средство диагностики памяти Windows».
Проблемы с памятью в некоторых случаях могут быть устранены обновлением BIOS.
Настройка параметров сохранения аварийного дампа
Для изменения параметров сохранения аварийного дампа нажимаем кнопку «Пуск», щелкаем на «Компьютер» правой кнопкой мыши, в контекстном меню выбираем «Свойства». В окне «Система» слева выбираем «Дополнительные параметры системы», в группе «Загрузка и восстановление» нажимаем кнопку «Параметры».
How to delete system error memory dump files in Windows

- The Windows system might just be man’s new best friend. On top of its numerous advantages, it also provides a process designed to store your RAM content in case of a system crash and dump it in a data file. This is what system memory dump files are for.
- The crash files are obviously useful and can help devs to further fix and prevent BSOD errors, but they tend to pile up and claim quite a chunk of your storage space so you might want to delete them from time to time. Here are 4 efficient manners to help you do so.
- Want to know more about system files? Do explore our page and take all the information you can handle.
- If you really mean to step up your game, dive into our Windows 10 errors hub and master all the expert fixes in no time.
Memory dump files, otherwise crash dumps, are system files saved during blue screen crashes. When a BSOD error message appears, Windows saves a copy of the system memory.
Those crash dump files can then assist developers to fix BSOD system crashes. Users can send the crash dumps to developers when they file support tickets.
Memory dump files can waste a lot of hard drive space. They can hog gigabytes of hard drive storage. Windows only automatically delete crash dump files when HDD space is limited.
However, users can also erase crash dumps with cleanup utilities.
How do I delete System Memory dump files in Windows?
1. Delete Crash Dumps With Disk Clean-up>
- Users can erase crash dumps with Windows’ very own Disk Clean-up. To do that, launch Run with the Windows key + R keyboard shortcut.
- Enter cleanmgr in Run’s Open text box.
- Press Ctrl + Shift + Enter to open Disk Clean-up as administrator.
- Select the C: drive on the Drive selection window, and click the OK button.
- Select the System error memory dump files check box.
- Then click the OK button.
- Users who can’t find a System error memory dump files option in Disk Clean-up should open that utility via an elevated Command Prompt. Enter
in the Prompt, and press the Return key. That will open Disk Clean-up with more checkbox options.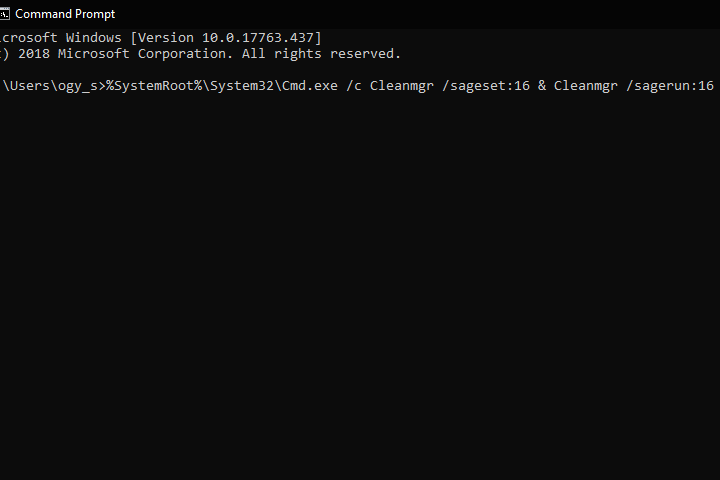
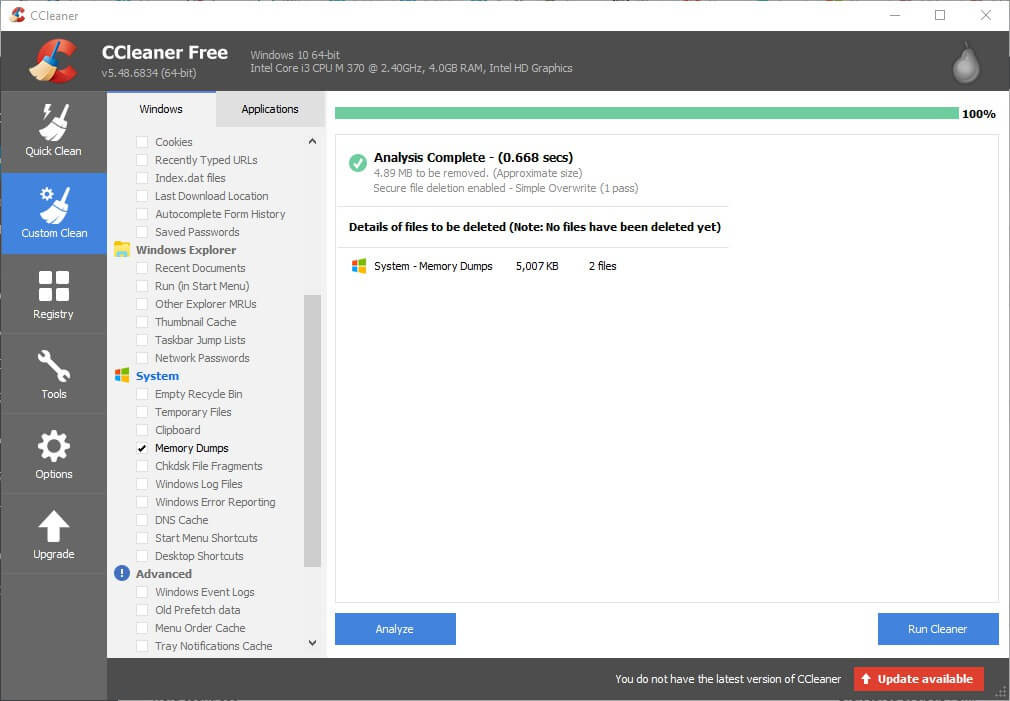
2. Delete Crash Dumps With CCleaner
- Alternatively, users can erase crash dumps with the freeware CCleaner. To do that, click the green Download xtannotation”> button on CCleaner’s webpage.
- Add CCleaner to Windows with its setup wizard.
- Launch the CCleaner utility.
- Select Custom Clean on the left of CCleaner.
- Then select the Memory Dumps check box.
- Press the Analyze button.
- Select the Run Cleaner option to erase the crash dumps.
3. Delete Crash Dumps Via the Command Prompt
- Users can also erase crash dumps with a series of Command Prompt commands. To do so, open the Run accessory.
- Enter cmd in Run, and press the Ctrl + Shift + Enter keys.
- Then enter the following separate commands in the Prompt, and press Enter after entering each one.
fsutil usn deletejournal /d /n c:
del “%temp%*” /s /f /q
del “C:$Recycle.bin*” /s /f /q
del “%systemroot%temp*” /s /f /q
vssadmin delete shadows /for=c: /all /quiet
Dism /Online /Cleanup-Image /StartComponentCleanup /ResetBase
4. Turn Off Crash Dumps
- Users can turn off crash dumps to ensure they don’t hog any more HDD storage space. Enter Control Panel in Run’s Open text box and press Return.
- Then click System to open the Control Panel applet shown directly below.
- Click Advanced system settings on the left of the window to open an Advanced tab.
- Then press the Settings button under Startup and Recovery.
- Select the (none) option on the drop-down menu shown directly below to turn off crash dumps.
- Then click the OK button.
So, there are a few ways users can erase crash dumps in Windows. Deleting the crash dumps might free up quite a bit of hard drive storage space so make sure to do so.
Let us know which was your method of choice in the comments section below.