This is how I debug SystemStackError when there is no stack trace.
My first attempt was:
begin
  a_method_that_causes_infinite_recursion_in_a_not_obvious_way
rescue SystemStackError
  puts caller
end
But that was a total fail because the stack trace I got was this:
(irb):2:in `irb_binding'
/Users/jordan/.rvm/rubies/ruby-1.9.3-p286-perf/lib/ruby/1.9.1/irb/workspace.rb:80:in `eval'
/Users/jordan/.rvm/rubies/ruby-1.9.3-p286-perf/lib/ruby/1.9.1/irb/workspace.rb:80:in `evaluate'
/Users/jordan/.rvm/rubies/ruby-1.9.3-p286-perf/lib/ruby/1.9.1/irb/context.rb:254:in `evaluate'
/Users/jordan/.rvm/rubies/ruby-1.9.3-p286-perf/lib/ruby/1.9.1/irb.rb:159:in `block (2 levels) in eval_input'
/Users/jordan/.rvm/rubies/ruby-1.9.3-p286-perf/lib/ruby/1.9.1/irb.rb:273:in `signal_status'
/Users/jordan/.rvm/rubies/ruby-1.9.3-p286-perf/lib/ruby/1.9.1/irb.rb:156:in `block in eval_input'
/Users/jordan/.rvm/rubies/ruby-1.9.3-p286-perf/lib/ruby/1.9.1/irb/ruby-lex.rb:243:in `block (2 levels) in each_top_level_statement'
/Users/jordan/.rvm/rubies/ruby-1.9.3-p286-perf/lib/ruby/1.9.1/irb/ruby-lex.rb:229:in `loop'
/Users/jordan/.rvm/rubies/ruby-1.9.3-p286-perf/lib/ruby/1.9.1/irb/ruby-lex.rb:229:in `block in each_top_level_statement'
/Users/jordan/.rvm/rubies/ruby-1.9.3-p286-perf/lib/ruby/1.9.1/irb/ruby-lex.rb:228:in `catch'
/Users/jordan/.rvm/rubies/ruby-1.9.3-p286-perf/lib/ruby/1.9.1/irb/ruby-lex.rb:228:in `each_top_level_statement'
/Users/jordan/.rvm/rubies/ruby-1.9.3-p286-perf/lib/ruby/1.9.1/irb.rb:155:in `eval_input'
/Users/jordan/.rvm/rubies/ruby-1.9.3-p286-perf/lib/ruby/1.9.1/irb.rb:70:in `block in start'
/Users/jordan/.rvm/rubies/ruby-1.9.3-p286-perf/lib/ruby/1.9.1/irb.rb:69:in `catch'
/Users/jordan/.rvm/rubies/ruby-1.9.3-p286-perf/lib/ruby/1.9.1/irb.rb:69:in `start'
/Users/jordan/.rvm/gems/ruby-1.9.3-p286-perf/gems/railties-3.1.10/lib/rails/commands/console.rb:45:in `start'
/Users/jordan/.rvm/gems/ruby-1.9.3-p286-perf/gems/railties-3.1.10/lib/rails/commands/console.rb:8:in `start'
/Users/jordan/.rvm/gems/ruby-1.9.3-p286-perf/gems/railties-3.1.10/lib/rails/commands.rb:40:in `<top (required)>'
script/rails:6:in `require'
script/rails:6:in `<main>'
Yeah, so nothing useful. I expected to see thousands of method calls! Instead I see no methods beyond the IRB prompt.
No worries, ruby has tracing functionality built-in, so I used that instead. Here’s the one I wrote. This will spit out a ton of information, so the challenge is filtering so that you only capture useful information. Oh, and, uh… you want to write this to a file because otherwise it will flood your irb prompt.
$enable_tracing = false
$trace_out = open('trace.txt', 'w')

set_trace_func proc { |event, file, line, id, binding, classname|
  if $enable_tracing && event == 'call'
    $trace_out.puts "#{file}:#{line} #{classname}##{id}"
  end
}

$enable_tracing = true
a_method_that_causes_infinite_recursion_in_a_not_obvious_way
Now let’s check to see if I have some methods…
$ ls -lH | grep trace
-rw-r--r--   1 jordan  staff   5.1M Jan  9 09:03 trace.txt
$ wc -l trace.txt
   37841 trace.txt
I sure do! 37841 method calls in fact. I’ll leave it to an excercise for the reader to find out what’s causing the stack overflow 😉


-
#1
This is a common problem: you’ve got an infinite recursive loop going on somewhere.
Question is, how to deal with it as a developer. It’s not always immediately obvious why it occurs.
After a few minutes of searching I came across this question
http://stackoverflow.com/questions/11544460/how-to-get-a-backtrace-from-a-systemstackerror-stack-level-too-deep
And one of the answers was to write something like
raise «crash me» if caller.length > 500caller is defined in Kernel, btw.This is very easy to do when you’re debugging your scripts: figure out where the recursion is occurring, and then insert the line right before it.
For example, given the following code
def test1 test2enddef test2 test1endNow call `test1` or `test2` somewhere in your script.It is trivial, but you know there’s a recursive loop and you’re going to blow the stack eventually.
If you’re printing the stacktrace to console using a script like cidiomar’s full error backtrace, it will tell you which line basically blew the stack (I think), but it doesn’t tell you anything else.

Ok so now we know line 2 was being visited frequently, so we use the trick above like this
def test1 raise «crash me» if caller.length > 20 test2 # this line was being called recursively repeatedly at some point # so let’s interrupt it before ruby complainsenddef test2 test1endI set it to 20 because you shouldn’t be calling test2 that many times anyways.Now when you run it, you’ll see this in the console:

Now, whether you have any programming experience or not, you can look at the stacktrace and see that there’s some repetition going on, and get a better idea where the problem is.
In my case, you can see that the two methods are just calling each other infinitely.
What kind of techniques do you use when it comes to SystemStackError debugging?
Last edited by a moderator: Apr 15, 2015

-
#2
I haven’t really formalized any particular strategy against infinite loops. I find them generally easy to solve as they usually are easy to reproduce and have a distinct flavor/smell to them.
Look at the stack trace is a good idea as it can contain valuable information.
For RMXP I typically just wrap a begin-rescue block around the $scene.main call in the Main loop.
while $scene != nil begin $scene.main rescue StandardError => err printErrorMessage(err) # With backtrace and all raise if $DEBUG end end
More annoying are the stack overflows not triggered by an infinite recursion. The stack btw. is used for your position in the program. When you call a method it puts the method on the stack and runs it. Once the method has been executed it pops off the method and continues from the previous method. (It probably does something more advanced, but you get the gist)
This stack has a limited size and each method in the call chain takes up some space. Should you exceed the limit, well you get a stack overflow error. To me it seems that the limit is very small in RMXP at least.
Recursive algorithms can sometimes be used to hide complexity in the call chain. You could for example imagine a pathfinding or tree searching algorithm you consider your current node and recursively considers other nodes. In this case the length of the path may differ depending on the situation, which as you can guess sometimes may lead to a stack overflow exception and other times not.
A solution could be to rewrite the algorithm to an iterative variant.
I guess you could also without any recursion hit the limit. I haven’t encounter it myself, but I bet it would truly be annoying to fix.
*hugs*

-
#4
I use basically the same thing. Perhaps a bit differently though, and from a different source.
https://gist.github.com/jbgo/4493822
Anyway, I myself did a test once, and the stack was pretty high.
By the way, it’s one of the things people blame on using aliases, while in reality stack overflows aren’t caused by that. In most cases, even with fifty scripts aliasing the same method, there shouldn’t be any problems for the first ten or twenty iterations.

Shaz
Global Moderators

-
#5
Giraki, please do not hijack other people’s threads with your own unrelated questions. Please start a NEW thread in RGSSx Script Support asking for help — and provide more information — nobody can help you if they can’t see what you’ve done.
Hiding off-topic posts.
-
#6
Sorry sir, I thought It was a system stack, Ill go start a new thread.
Shaz
Global Moderators
-
#7
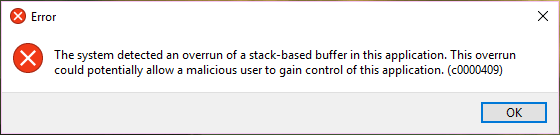
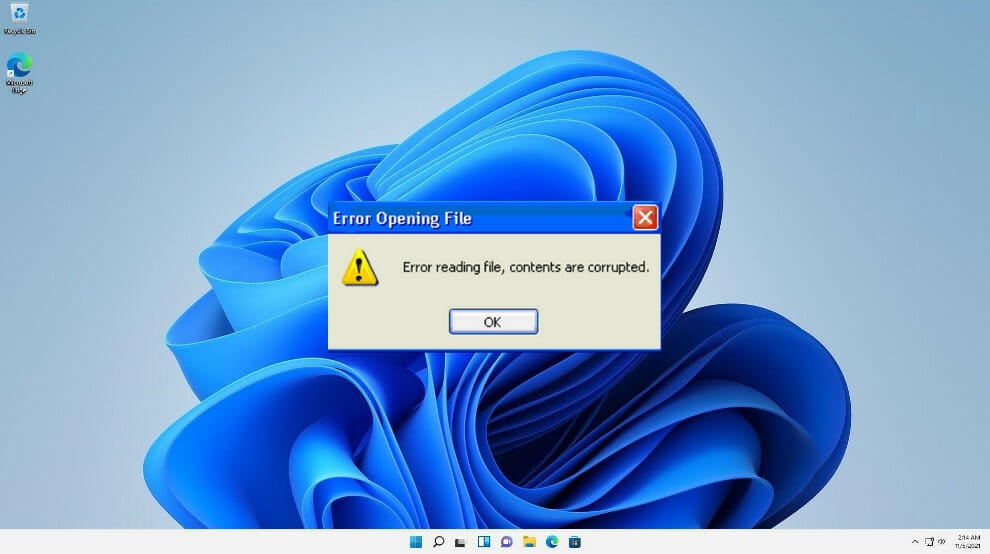
System Stack errors actually SAY System Stack Error, as shown in the OP’s screenshots. However, even if it was, this is not a thread for getting help finding your particular error. It is introducing a way (and asking for other ways in use) to help track one down when you have one.
Some users has reported that they are prompted that the system detected an overrun of a stack-based buffer for odd reasons. In this post, you will fully learn about this issue and get several possible solutions provided by MiniTool Software.
About Stack-based Buffer Overrun Error
Stack-based buffer overrun (or stack-based buffer overflow) is a kind of bug indicating that a program writes more data to a buffer located on the stack than that is actually allocated for the buffer. It is a general programming malfunction.
This issue might happen to your driver and lead to the driver overran stack buffer blue screen of death error. But more commonly, it’s related to your applications, and once it comes up, the adjacent data on the stack might be corrupted and the program is likely to crash or operate improperly.
The stack-based buffer error has been reported by plenty of users on the forum, and a case is displayed here:
Basically, I keep getting an error and the error is this – “The system detected an overrun of a stack-based buffer in this application. This overrun could potentially allow a malicious user to gain control of this application. (c0000409)” I have a build that can run AAA games ultra, so it’s not my hardware. I’m running it off my SSD; all drivers are updated; Windows 10 64-bit is fully updated; I’ve uninstalled the game multiple times and let the cache re-download. Does anyone have any advice that could possibly give me? — from www.reddit.com
According to the reports from the users who are experiencing the issue, the overrun of a stack-based buffer error message mainly appears in following 2 situations:
- After opening computer in Safe Mode due to the Windows running into certain problems, such as explorer.exe keeps opening.
- When trying to install the Twitch or Discord desktop applications.
you might have tried various solutions but in vain. To get rid of this issue, I collect some possible methods and put them altogether in this post. Hopefully, they could be helpful for you.
Note: If this error prevents you from accessing the apps or settings normally, you might need to boot your computer into Safe Mode and then try the following solutions. What’s more, as this issue might lead to data loss, you’d better recover the lost data before you take action to fix it.
How to Fix Overrun of a Stack-Based Buffer Issue
- Scan Your Computer for Virus or Malware
- Run SFC And DISM Command
- Clean Boot the Computer
- Perform System Restore
- Try Startup Repair
- Back up Data and Reinstall Your Windows
Fix 1: Scan Your Computer for Virus or Malware
As the error message suggests, the specific program might be running with special privileges, and give the control to a malicious user, and thus be affected by certain malicious code or program. So, it’s necessary to scan your computer for any potential virus or malware.
It’s recommended to perform the Windows Defender Offline scan and here’s how to do it:
Step 1: Right-click the Start button and choose Settings from the menu.
Step 2: Navigate to Update & Security > Windows Security.
Step 3: Click Virus & threat protection in Protection areas section of the right pane.
Step 4: When you get the Windows Defender Security Center window, click Run a new advanced scan.
Step 5: Then, choose Windows Defender Offline scan and click Scan now button.
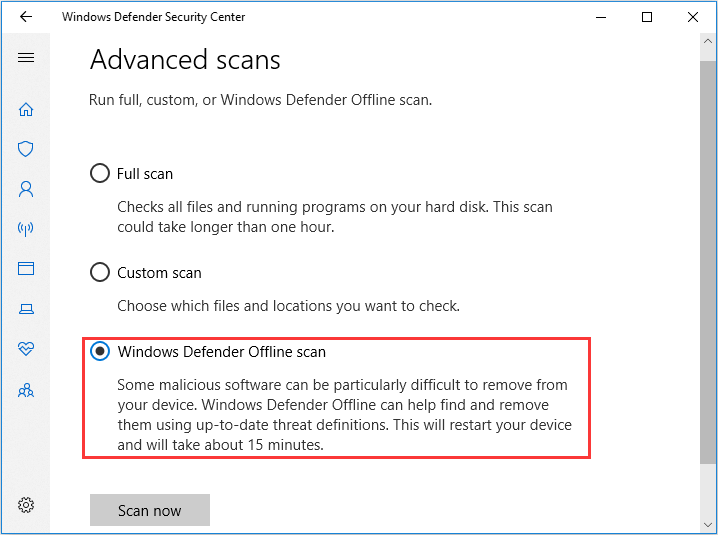
This kind of scan will help you remove malicious software that is difficult to remove, and it requires a restart to complete the process. It takes about 15 minutes and you should wait patiently until the scanning is finished.
Fix 2: Run SFC And DISM Command
In addition, the corrupted system files or Windows image files could also lead to buffer overrun detected on your computer. To fix stack-based buffer overrun issue in this case, you can try using System File Checker (SFC) and Deployment Image Servicing and Management (DISM) utilities.
Note: As running DISM requires the internet connection, you should start computer in the Safe Mode with Networking if you cannot boot it normally.
Step 1: Press Windows + R to invoke Run dialog.
Step 2: Input cmd and press Ctrl + Shift + Enter to open Command Prompt as administrator.
Step 3: Type the command sfc /scannow and press Enter to start scanning the system files. Once any corrupted files are found, this tool will replace them with the cached copies and the scanning process will take some time. If this resolves the issue successfully, it’s fine. Otherwise, you need to continue with the next step.
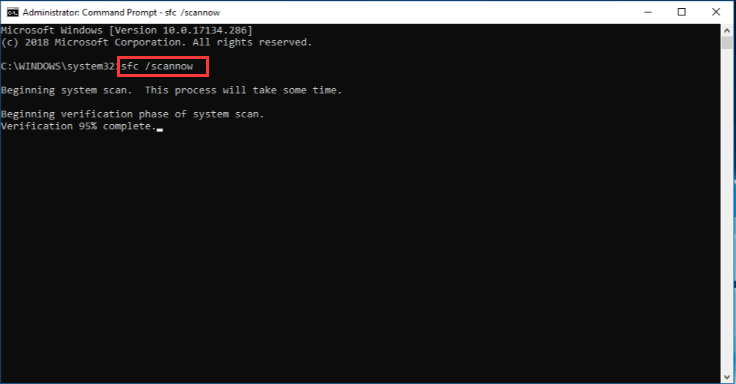
Step 4: Input the following command lines and press Enter after each to execute them:
- DISM /online /Cleanup-Image / ScanHealth
- DISM /Online /Cleanup-Image /RestoreHealth
After the operation is completed successfully, exit the window and restart your computer. Then, check if the stack-based buffer overrun issue has been resolved. Besides, you can run the SFC scan again as your needs.
Fix 3: Clean Boot the Computer
It’s possible that the system might detect an overrun of a stack-based buffer if a certain third-party application which starts with the system gets corrupted or runs into problems. In this case, you can clean boot your computer to prevent all the third-party programs or services from starting with the system. To do that, just follow the instructions below:
Step 1: Press Windows + S, input msconfig and click System Configuration from the search results to open it.
Step 2: Go to Services tab, check Hide all Microsoft services and click Disable all button to stop all the third-party services.
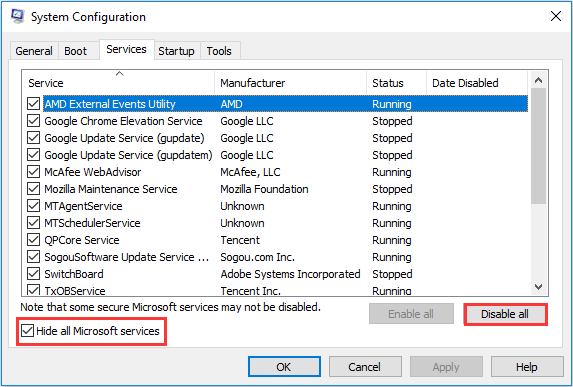
Step 3: Switch to Startup tab and click Open Task Manager.
Step 4: Then, select a program and click Disable. Repeat the operation to other programs in the list to prevent these third-party apps from starting with the system and confirm changes.
Step 5: When you back to the System Configuration window, click Apply and OK to save the changes.
After that, restart your computer to take effect the changes and the issue should have been resolved. By the way, you can re-enable these programs one by one to find out the problematic one and then keep it disabled or remove it.
Fix 4: Perform System Restore (If Available)
If you have enabled System Protection feature to protect your computer and created a restore point at least before the stack-based buffer overrun issue occurs, perhaps you can try reverting your computer to a previous restore point to fix the problem.
Note: If you are unable to get into the Safe Mode, you can choose System Restore module directly in the Advanced Options page before going to Startup Settings.
Step 1: Type restore in the Search box and choose Create a restore point from the results.
Step 2: The System Properties windows will appear and you need to click System Restore button under System Protection tab.
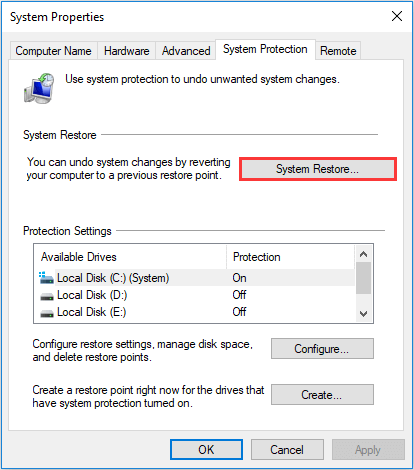
Step 3: Skip the welcome page. Choose the latest restore point and click Next button.
Tip: To make sure the programs to be uninstalled or changed during the process, just click Scan for affected programs.
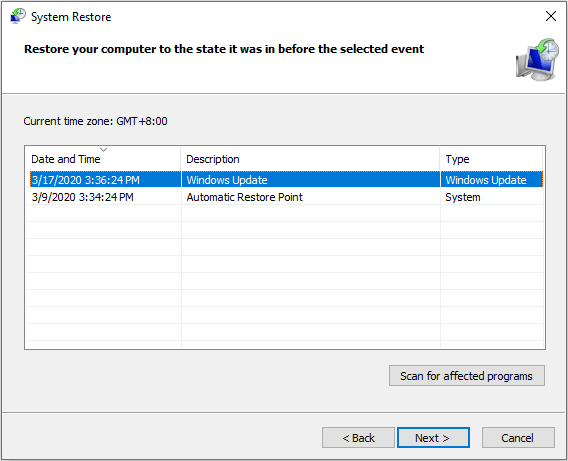
Step 4: You will be required to confirm the restore point in the next page. Make sure all the tasks are saved and then click Finish button to execute this operation which needs to restart your computer to apply changes.
After that, the issue should be removed hopefully.
Fix 5: Try Startup Repair
As mentioned before, if buffer overrun is detected by your system, it is possible that your computer gets frozen or cannot boot. If the above methods cannot fix the issue for you, it’s high time to try the Startup Repair.
To do that, you don’t have to start into the Safe Mode and here are 2 common options for you – perform the operation in Advanced Startup Settings or using Bootable Media. Let’s see them one by one.
Option 1: Perform Startup Repair in Advanced Startup Settings
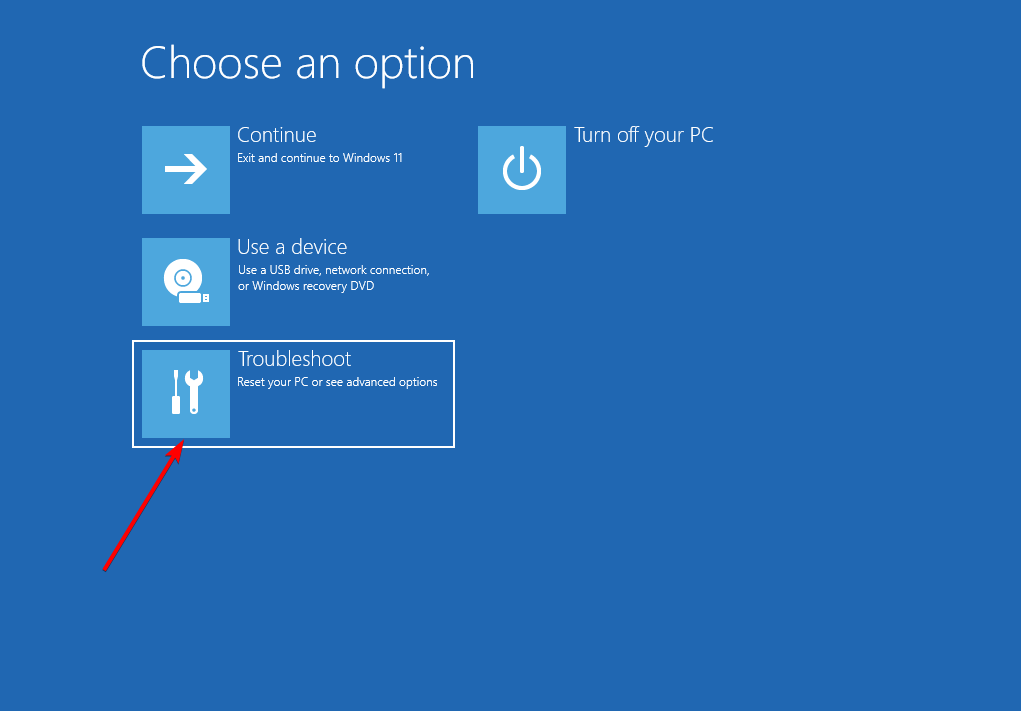
Step 1: Forcefully shut down your computer for 3 times to enter Windows recovery environment and then click See advanced repair options.
Step 2: Go to Troubleshoot > Advanced options and choose Startup Repair.
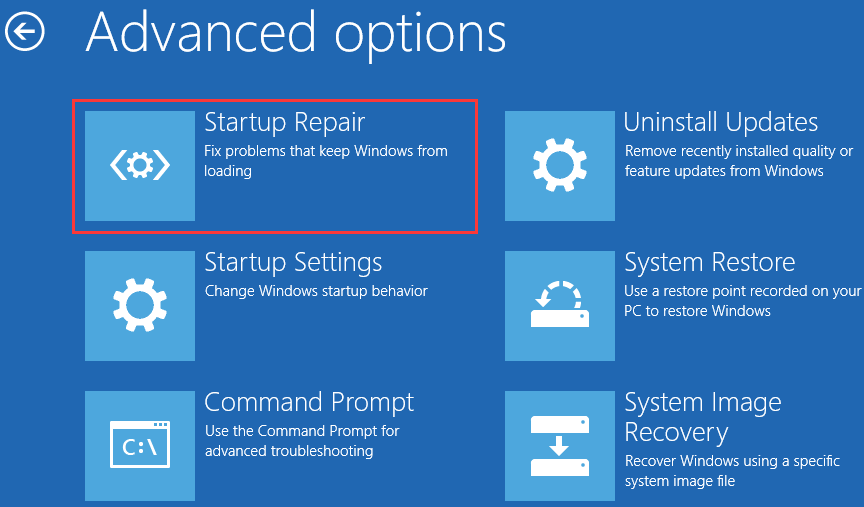
Step 3: Then, you will be required to choose a user account and input the corresponding password. Just do as the onscreen message prompts and click Continue button.

This tool will start diagnosing your computer and fix the detected potential problems that prevent it loading properly. The repair process will take some time to complete and you should wait patiently.
During the process, a log file named SrtTrail.txt is created and saved in the directory of C:WindowsSystem32LogFilesSrt. You can check it for the detailed information of this repair.
Option 2: Perform Startup Repair Using Windows Installation Media
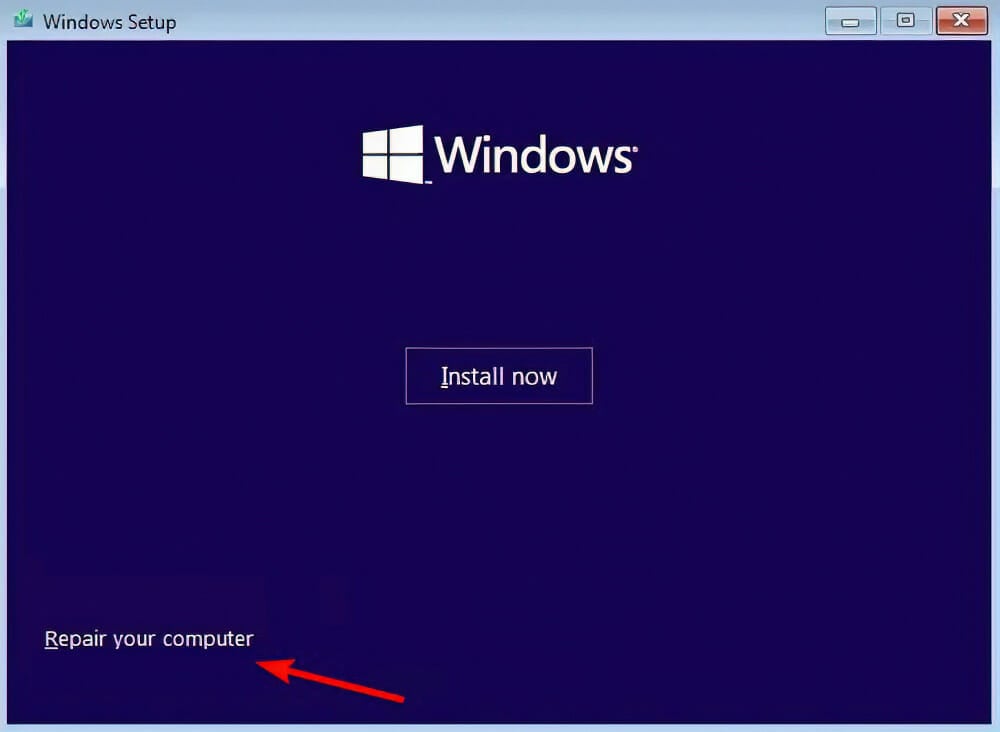
If you cannot access the recovery environment using the common way, you can choose to employ an installation media, such as USB bootable media.
Step 1: Burn a USB installation media using Windows 10 Media Creation Tool in a normal computer.
Step 2: Connect the bootable USB drive to the problematic device and boot from it by changing the BIOS settings.
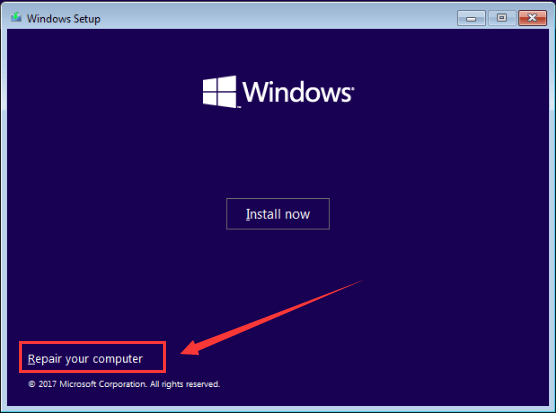
Step 3: When you get the Windows Setup window, enter your language and other preferences and click Next button.
Step 4: Click Repair your computer to enter the recovery environment and launch Startup Repair by referring to the steps in the above content.
Fix 6: Back up Data and Reinstall Your Windows
If none of the above methods help to get rid of stack-based buffer overrun error message, you might need to reinstall Windows to make your device work normally again.
This is a last resort, as reinstalling Windows will result in data loss on the system disk. So, you have to backup or transfer the needed files in advance. If there are a large number of files you want to backup, the easiest way should be back up the entire disk. To achieve that, you can use MiniTool Partition Wizard utility.
Step 1: Register to MiniTool Partition Wizard Pro Ultimate edition with a purchased license key.
Buy Now
Note: If you cannot access the desktop normally, you need to create a bootable media in another normal computer. Then, boot your computer from the media and enter MiniTool recovery environment to execute the following operation.
Step 2: In the main interface, select the system disk and click Copy Disk from the left pane.
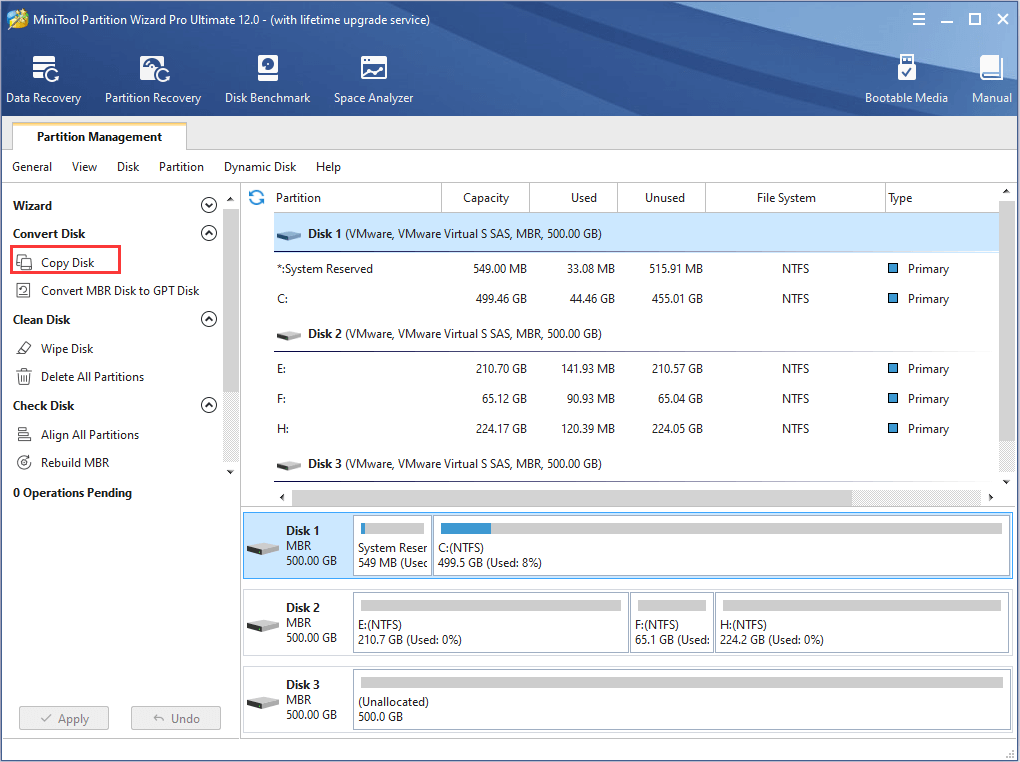
Step 3: Select the target disk to hold the backup and click Next.
Warning: All the data on the target disk will be destroyed, so make sure there’s not important data.
Step 4: Choose the Copy Options (the default setting is fine), confirm the size and location of partitions on the new disk and click Next.
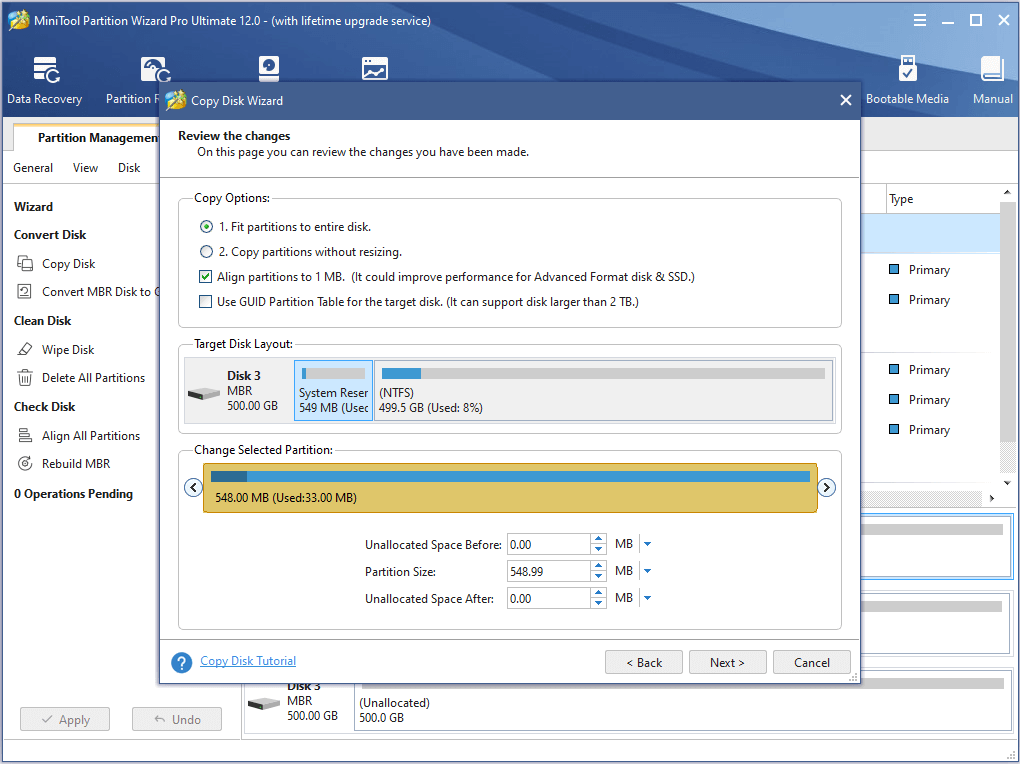
Step 5: Read the information about how to boot from the destination disk and click Finish. After back to the main interface, click Apply to execute the pending operation.
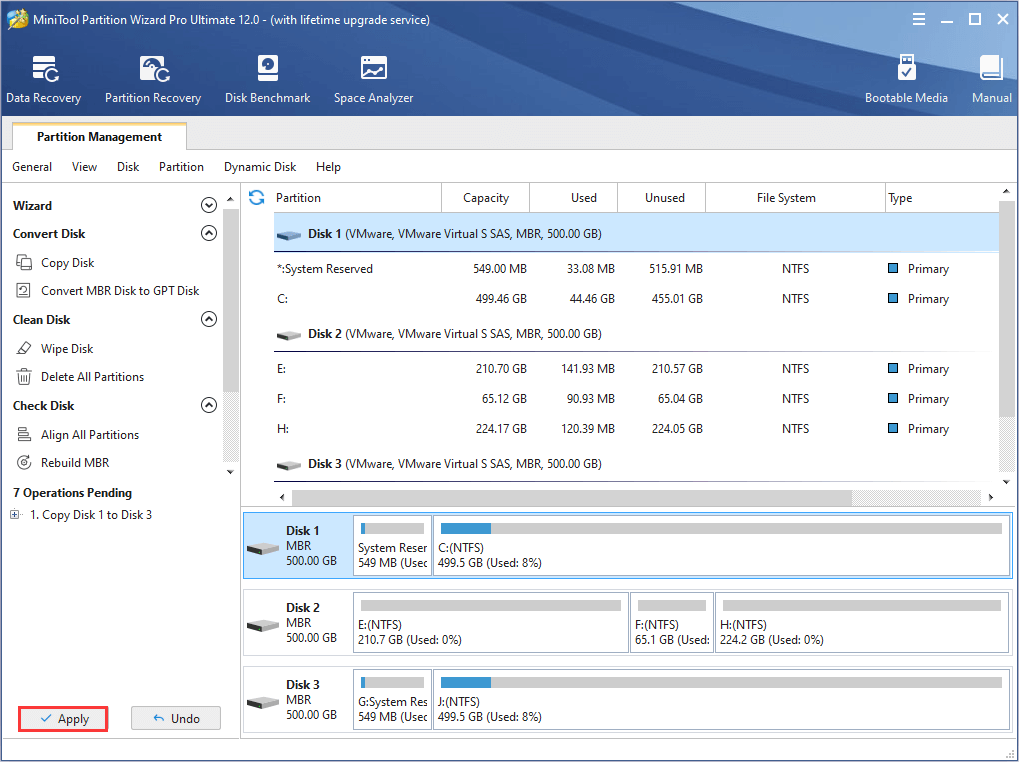
Thanks to MiniTool Partition Wizard, I have backed up all the data on the drive quickly.Click to Tweet
Now that you have backed up the system disk, you can reinstall Windows without any worries.
To do that, you can continue using the Windows installation media you create in previous mentioned method. After entering the Setup windows, please click Install now instead of Repair your computer, and then follow the given instructions to complete the installation.
“The system detected an overrun of a stack-based buffer in this application” is really an annoying problem for me. Luckily, I have fixed it by myself with one of the methods provided in this post.Click to Tweet
Bottom Line
Do you have any problems about this post? Or do you have any better methods to resolve the issue under our discussion? Please let us know. You can leave a message in the comment box below, or contact us via [email protected].
System Detected Stack-Based Buffer Overrun FAQ
????What are buffer overflow attacks?
Buffer overflow (or buffer overrun) attacks is a kind of common programming malfunction and it is part of stack smashing attack.
????What is the difference between stack overflow and buffer overflow?
The stack overflow refers to the situation that the execution stack goes beyond the space reserved for the executing program, while that buffer overflow means that a program writes data beyond the memory allocated for a buffer. The stack overflow is a specific type of buffer overflow.
????Why buffer overflow is dangerous?
Because buffer overflow can lead to some serious problems for your computer, such as system crash and even security vulnerability.
The system scans below will restore your PC’s functionality
by Loredana Harsana
Loredana is a passionate writer with a keen interest in PC software and technology. She started off writing about mobile phones back when Samsung Galaxy S II was… read more
Updated on August 31, 2022
Reviewed by
Vlad Turiceanu

Passionate about technology, Windows, and everything that has a power button, he spent most of his time developing new skills and learning more about the tech world. Coming… read more
- After upgrading to Windows 11, our users reported several issues with booting their PC due to the Exception on Invalid Stack error.
- Some of the causes that triggered the issue could be corrupted boot data or files.
- Performing the SFC scan or the CHKSDK scan will solve the problem and allow you to boot up normally.
XINSTALL BY CLICKING THE DOWNLOAD FILE
- Download Restoro PC Repair Tool that comes with Patented Technologies (patent available here).
- Click Start Scan to find Windows 11 issues that could be causing PC problems.
- Click Repair All to fix issues affecting your computer’s security and performance
- Restoro has been downloaded by 0 readers this month.
Users have been excited to take advantage of Microsoft’s Windows 11 operating system, but due to its complex system, issues can occur at any second. The Exception on Invalid Stack error is a great example.
Some Windows 11 clients reported that unexpectedly, their PC crashed and failed to boot up, after displaying the error Exception on Invalid File.
In today’s guide, we will show you three different methods to fix the error, as well as how to avoid it in the future.
What causes the Exception on Invalid File error?
➡ Corrupted system files are by far the most common reason why you get an invalid file type of error, yet there are still other possible reasons why you could be experiencing the current issue.
A corrupted file is one that is damaged and does not perform as it should. This can apply to any type of document, from program files to system documents. You will most definitely encounter issues as such at some point or another in time.
Before we jump into the solution list, we must understand why the error appeared in the first place. Amongst the many causes that can lead to the Exception on Invalid File error, here are the three most common reasons you might encounter:
➡ Corrupted boot-related data is another possible reason for your problem. In this case, you will have to perform a System File Checker scan from the Advanced Options Menu or write a few lines in the Command Prompt to fix the corrupted configuration data.
➡ Bad drive sector is the next possible reason why you get the error above. What this means is one of your drives is starting to fail. But don’t panic! If the damage is minimal, you can get away without changing the drive. Running the CHKDSK utility will replace all the sectors that went bad with unused sound equivalents.
We prepared for you a list of recommended solutions that you must try out before you decide to reinstall Windows 11 altogether.
How do I fix the Exception on Invalid Stack error in Windows 11?
1. Run a quick SFC Scan
1. Insert a compatible Windows 11 installation media, then press any key to boot from it.

2. After your PC boots from the installation media, click on Repair your computer in the bottom left corner.
3. When the Advanced Startup menu pops up, click on Troubleshoot.
4. Next, select Advanced Options.

5. Open the Command Prompt window.
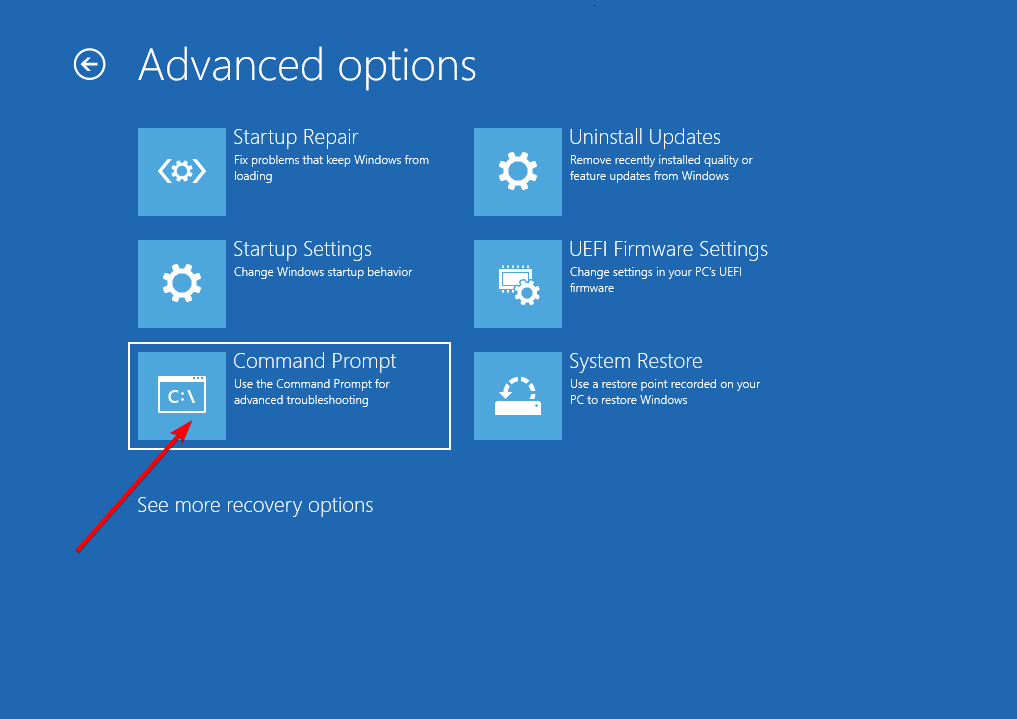
6. Type or paste the following command and press Enter to run it: sfc /scannow
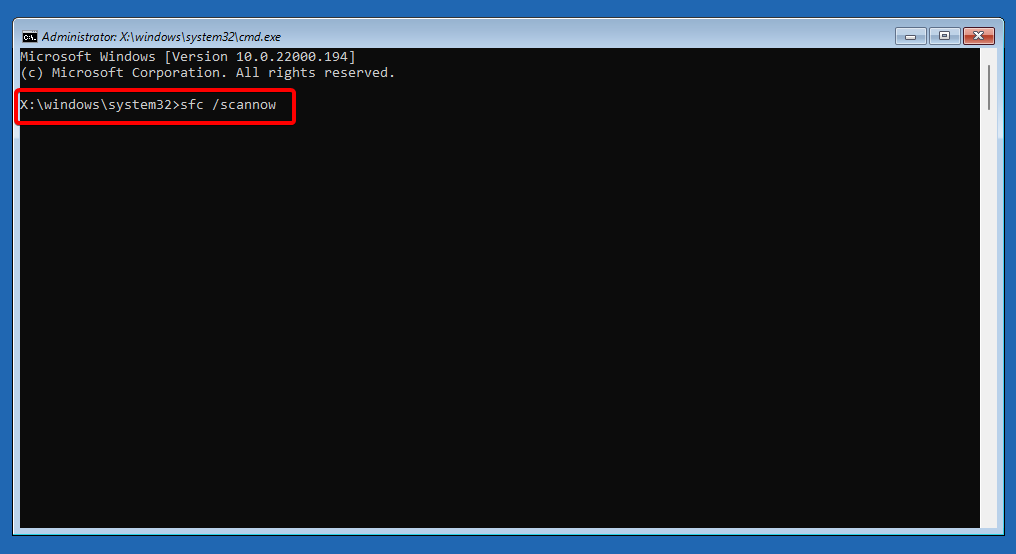
7. Wait until the operation is complete, then close the cmd prompt.
8. Allow your PC to boot normally.
Some PC issues are hard to tackle, especially when it comes to corrupted repositories or missing Windows files. If you are having troubles fixing an error, your system may be partially broken.
We recommend installing Restoro, a tool that will scan your machine and identify what the fault is.
Click here to download and start repairing.
9. Check if the Exception on Invalid File error is gone.
Given the fact that corrupted system files are the most likely cause for the exception on invalid stack BSOD error, scanning for them is the first thing you should do. You can perform a safe SFC scan via Command Prompt with a bootable Windows 11 installation media.

NOTE
If you don’t have a compatible Windows 11 installation media, you can create one by following this guide on how to make a bootable USB drive in no time.
In case you prefer an automated method to run thorough scans for your PC, we kindly suggest you use Restoro and fix Windows issues fast, without other technical knowledge.
2. Run a CHKDSK scan
- Restart your computer while holding the Shift button.

- After the Advanced Startup menu will open, click on Troubleshoot.

- Click on Advanced Options.

- Once you’re inside the Advanced options menu, tap on Command Prompt.

- Type or paste the following command then press Enter:
chkdsk c: /f /r /x
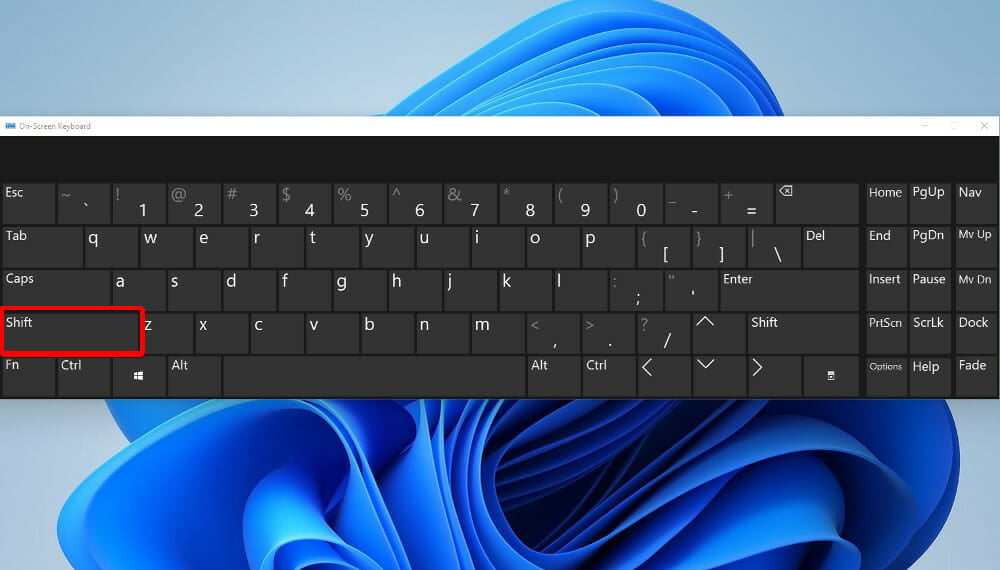
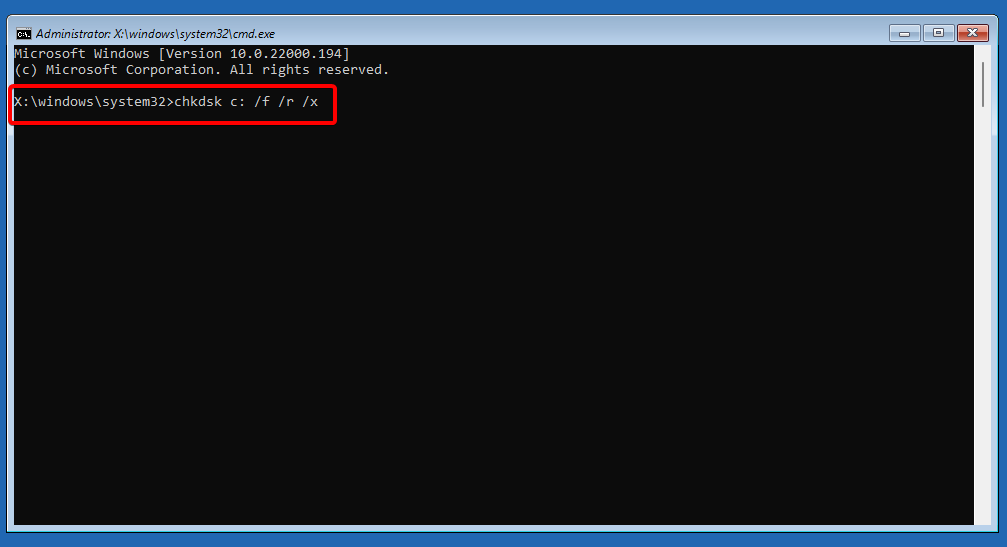
After you enter the command above, close the Command Prompt and return to the first screen in order to continue with the normal booting process. Then, check if the Exception on Invalid File in Windows 11 error has been solved.
- FIX: chkdsk got stuck in Windows 10/11
- Where are Chkdsk logs stored in Windows 10/11?
- FIX: Chkdsk.exe runs on every Boot
- Insert a compatible Windows 11 installation media and press any key to boot from it.

- Click on Repair your computer in the bottom left corner.

- After the Advanced Startup menu pops up, click on Troubleshoot.
- Click on Advanced Options.
- Once you are inside the Advanced Options menu, click on Command Prompt.
- Type or paste the following commands one by one and press Enter:
bootrec.exe /fixmbr
bootrec.exe /fixmbr
bootrec.exe /fixboot
bootrec.exe /scanos
bootrec.exe /rebuildbcd
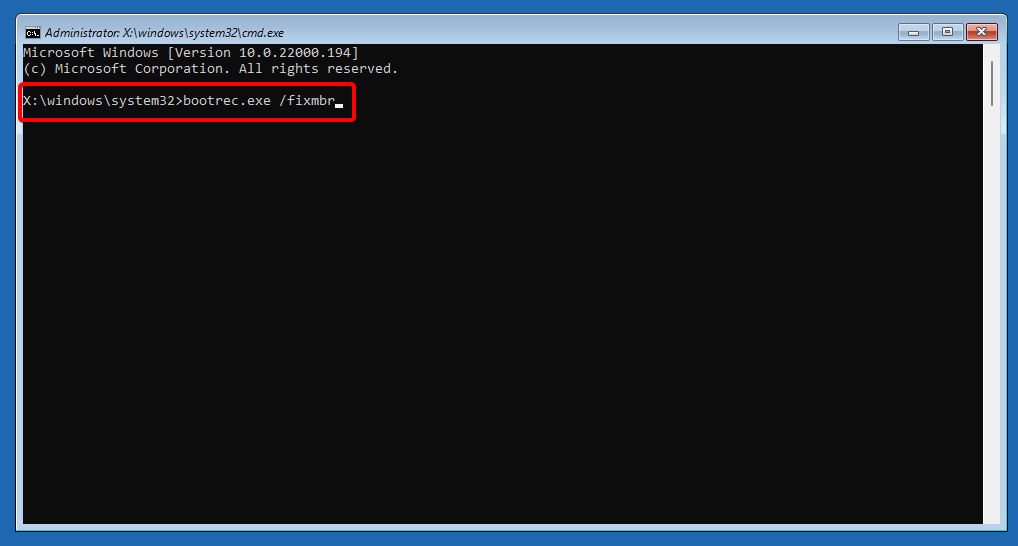
Once all the commands above have been processed successfully, close the prompt and allow your computer to boot up normally. The error should now be resolved.
What to do if the exception on invalid file error persists?
If your PC still fails to boot, it is pretty clear that you need to replace all the Windows files with new ones that aren’t corrupted.
To achieve this, you have to perform a clean install, which will definitely fix any underlying corruption issues that you have, but it will delete all of your personal documents as well. Unless you had backed up your data in advance, prepare to lose everything.
An alternative to losing your data is to perform a repair install which allows you to keep your personal documents on the same partition as your Windows installation.
How do I fix an Invalid File Name error?
Every file on your computer has a particular structure and content that it needs to comply with. When the information is in the right place and properly arranged, it will work normally.
But, if the wrong information is introduced voluntarily or involuntarily into a document, it will affect the way the data is used. 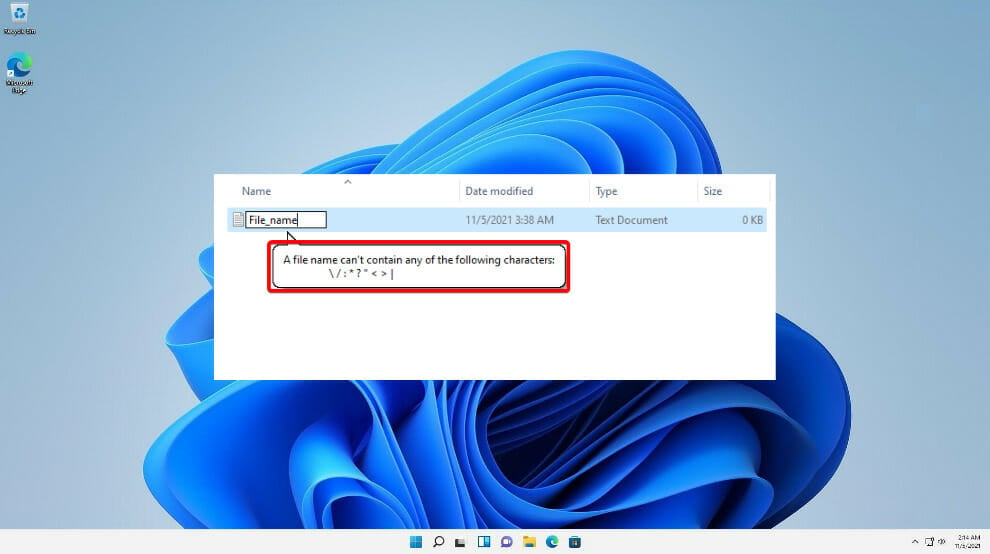
One aspect that you need to pay attention to is how you name your documents. When you try to save, create or rename documents, keep in mind a few rules in order to avoid errors such as an invalid file. Document names act as their ID and you can’t have two people with the same ID.
Another aspect to remember is the characters that you use. Control characters or forward slashes aren’t accepted in the name field of a document. The Windows operating system has additional rules that the filename needs to comply to:
- The filename can’t begin or end with a space or a period sign
- There are certain names reserved by Windows that can’t be used
- Any of the following characters must be avoided: double quote (“”), asterisk (*), less than (<), greater than (>), question mark (?), backslash (), pipe (|), forward slash (/), colon (:)
To fix an Invalid File Name error, you simply have to rename it keeping in mind the rules above, especially the colliding aspect of names.
Booting errors can be cumbersome sometimes. If the above solutions don’t meet your requirements or if you consider the idea of reinstalling Windows 11, check out our thorough guide on how to perform a Windows 11 installation in the simplest manner.
Alternatively, rolling back to Windows 10 might be a solution for you. If you feel uneasy about which OS to choose, check out our article on the main differences between Windows 10 and Windows 11.
Feel free to use the comments section below in case you have any further questions, and let us know which solution worked best for you as well as what triggered the error in the first place.
Still having issues? Fix them with this tool:
SPONSORED
If the advices above haven’t solved your issue, your PC may experience deeper Windows problems. We recommend downloading this PC Repair tool (rated Great on TrustPilot.com) to easily address them. After installation, simply click the Start Scan button and then press on Repair All.
![]()