overview
There are two parts to your question:
- fixing temporary resolve messages
- fixing the package management issues
Temporary resolve
It is likely that this issue is either:
- temporary due to your Internet Service Provider not correctly forwarding internet naming (DNS) to either its or external DNS servers, or
- due to a change in your network has similarly blocked this naming — for example, new router/modem, reconfiguring a switch with a new configuration.
Lets look at the possible DNS resolving issues.
First, temporarily add a known DNS server to your system.
echo "nameserver 8.8.8.8" | sudo tee /etc/resolv.conf > /dev/null
Then run sudo apt-get update.
If this fixes your temporary resolving messages then either wait for 24 hours to see if your ISP fixes the issue for you (or just contact your ISP) — or you can permanently add a DNS server to your system:
echo "nameserver 8.8.8.8" | sudo tee /etc/resolvconf/resolv.conf.d/base > /dev/null
8.8.8.8 is Google’s own DNS server.
source
Another example DNS server you could use is OpenDNS — for example:
echo "nameserver 208.67.222.222" | sudo tee /etc/resolvconf/resolv.conf.d/base > /dev/null
package-management issues
In addition to the temporary resolve issues — you have a few package management issues that need to be corrected — I’m assuming you have tried recently to upgrade from one Ubuntu version to the next recommended version — in your case from Natty (11.04) to Oneiric (11.10)
Open a terminal and type
sudo nano /etc/apt/sources.list
Look for lines that have your a different distribution name in the list than you were expecting — in your case — you have upgraded to oneiric but you have another release name natty
For example, look for lines that look like deb http:/archive.canonical.com/ natty backports
Add a # to the beginning of the line to comment it out — for example
#deb http:/archive.canonical.com/ natty backports
Save and re-run:
sudo apt-get update && sudo apt-get upgrade
You should not have any more release naming errors.
At the time of writing this, possible common release names include lucid, maverick, natty, oneiric, precise, quantal, raring, saucy, trusty, utopic and vivid.
Just got a new VPS running Ubuntu 11.04 and tried to update it. I got this error. I get the same error whenever using apt-get
login as: root
root@199.193.248.80's password:
Welcome to Ubuntu 11.04 (GNU/Linux 2.6.38-8-generic-pae i686)

 * Documentation:  https://help.ubuntu.com/
Last login: Mon May  7 19:55:45 2012 from 108.192.44.54
root@Rx:~# apt-get update
Err http://security.ubuntu.com natty-security InRelease

Err http://archive.ubuntu.com natty InRelease

Err http://security.ubuntu.com natty-security Release.gpg
  Temporary failure resolving 'security.ubuntu.com'
Err http://archive.ubuntu.com natty-updates InRelease

Err http://archive.ubuntu.com natty Release.gpg
  Temporary failure resolving 'archive.ubuntu.com'
Err http://archive.ubuntu.com natty-updates Release.gpg
  Temporary failure resolving 'archive.ubuntu.com'
Reading package lists... Done
W: Failed to fetch http://archive.ubuntu.com/ubuntu/dists/natty/InRelease

W: Failed to fetch http://archive.ubuntu.com/ubuntu/dists/natty-updates/InRelease

W: Failed to fetch http://security.ubuntu.com/ubuntu/dists/natty-security/InRelease

W: Failed to fetch http://security.ubuntu.com/ubuntu/dists/natty-security/Release.gpg  Temporary failure resolving 'security.ubuntu.com'

W: Failed to fetch http://archive.ubuntu.com/ubuntu/dists/natty/Release.gpg  Temporary failure resolving 'archive.ubuntu.com'

W: Failed to fetch http://archive.ubuntu.com/ubuntu/dists/natty-updates/Release.gpg  Temporary failure resolving 'archive.ubuntu.com'

W: Some index files failed to download. They have been ignored, or old ones used instead.
root@Rx:~#
If needed, here is my /etc/apt/sources.list
root@Rx:/etc# more /etc/apt/sources.list
deb http://archive.ubuntu.com/ubuntu natty main
deb http://archive.ubuntu.com/ubuntu natty-updates main
deb http://security.ubuntu.com/ubuntu natty-security main
deb http://archive.ubuntu.com/ubuntu natty universe
deb http://archive.ubuntu.com/ubuntu natty-updates universe
And if needed, I did a ping test:
root@Rx:~# ping -n 8.8.8.8
PING 8.8.8.8 (8.8.8.8) 56(84) bytes of data.
64 bytes from 8.8.8.8: icmp_req=1 ttl=56 time=13.3 ms
64 bytes from 8.8.8.8: icmp_req=2 ttl=56 time=13.2 ms
64 bytes from 8.8.8.8: icmp_req=3 ttl=56 time=13.4 ms
64 bytes from 8.8.8.8: icmp_req=4 ttl=56 time=13.3 ms
^C
--- 8.8.8.8 ping statistics ---
4 packets transmitted, 4 received, 0% packet loss, time 3005ms
rtt min/avg/max/mdev = 13.243/13.326/13.428/0.066 ms
root@Rx:~#
This is /etc/resolv.conf
root@Rx:~# more /etc/resolv.conf
nameserver 199.193.248.1
Uncommenting DOCKER_OPTS="--dns 8.8.8.8 --dns 8.8.4.4" in /etc/default/docker as Matt Carrier suggested did NOT work for me. Nor did putting my corporation’s DNS servers in that file. But, there’s another way (read on).
First, let’s verify the problem:
$ docker run --rm busybox nslookup google.com   # takes a long time
nslookup: can't resolve 'google.com'   # <--- appears after a long time
Server:    8.8.8.8
Address 1: 8.8.8.8
If the command appears to hang, but eventually spits out the error «can’t resolve ‘google.com'», then you have the same problem as me.
The nslookup command queries the DNS server 8.8.8.8 in order to turn the text address of ‘google.com’ into an IP address. Ironically, 8.8.8.8 is Google’s public DNS server. If nslookup fails, public DNS servers like 8.8.8.8 might be blocked by your company (which I assume is for security reasons).
You’d think that adding your company’s DNS servers to DOCKER_OPTS in /etc/default/docker should do the trick, but for whatever reason, it didn’t work for me. I describe what worked for me below.
SOLUTION:
On the host (I’m using Ubuntu 16.04), find out the primary and secondary DNS server addresses:
$ nmcli dev show | grep 'IP4.DNS'
IP4.DNS[1]:              10.0.0.2
IP4.DNS[2]:              10.0.0.3
Using these addresses, create a file /etc/docker/daemon.json:
$ sudo su root
# cd /etc/docker
# touch daemon.json
Put this in /etc/docker/daemon.json:
{
    "dns": ["10.0.0.2", "10.0.0.3"]
}
Exit from root:
# exit
Now restart docker:
$ sudo service docker restart
VERIFICATION:
Now check that adding the /etc/docker/daemon.json file allows you to resolve ‘google.com’ into an IP address:
$ docker run --rm busybox nslookup google.com
Server:    10.0.0.2
Address 1: 10.0.0.2
Name:      google.com
Address 1: 2a00:1450:4009:811::200e lhr26s02-in-x200e.1e100.net
Address 2: 216.58.198.174 lhr25s10-in-f14.1e100.net
REFERENCES:
I based my solution on an article by Robin Winslow, who deserves all of the credit for the solution. Thanks, Robin!
«Fix Docker’s networking DNS config.» Robin Winslow. Retrieved 2016-11-09. https://robinwinslow.uk/2016/06/23/fix-docker-networking-dns/
Добрый день.
У меня очень странная проблема с разрешением доменных имен на Убунте 16.04.
Бьюсь над проблемой с пятницы, и до сих пор не нашел решения…
Есть сервер в локальной сети с двумя интерфейсами: внутренний и наружный. Оба со статическими адресами (чуть ниже будет конфигурация). Внешний интерфейс без прокси — то есть там реальный внешний ip адрес.
С марта все работало нормально, периодически обновлялось. В пятницу я решил снова обновить его (последний раз обновление было пару месяцев назад где-то), и вот тут началось…
apt update
Welcome to Ubuntu 16.04.2 LTS (GNU/Linux 4.4.0-93-generic x86_64)
~$ sudo apt update
Err:1 http://us.archive.ubuntu.com/ubuntu xenial InRelease
Temporary failure resolving 'us.archive.ubuntu.com'
Err:2 http://security.ubuntu.com/ubuntu xenial-security InRelease
Temporary failure resolving 'security.ubuntu.com'
Err:3 http://us.archive.ubuntu.com/ubuntu xenial-updates InRelease
Temporary failure resolving 'us.archive.ubuntu.com'
Err:4 http://us.archive.ubuntu.com/ubuntu xenial-backports InRelease
Temporary failure resolving 'us.archive.ubuntu.com'
Reading package lists... Done
Building dependency tree
Reading state information... Done
195 packages can be upgraded. Run 'apt list --upgradable' to see them.
W: Failed to fetch http://us.archive.ubuntu.com/ubuntu/dists/xenial/InRelease Temporary failure resolving 'us.archive.ubuntu.com'
W: Failed to fetch http://us.archive.ubuntu.com/ubuntu/dists/xenial-updates/InRelease Temporary failure resolving 'us.archive.ubuntu.com'
W: Failed to fetch http://us.archive.ubuntu.com/ubuntu/dists/xenial-backports/InRelease Temporary failure resolving 'us.archive.ubuntu.com'
W: Failed to fetch http://security.ubuntu.com/ubuntu/dists/xenial-security/InRelease Temporary failure resolving 'security.ubuntu.com'
W: Some index files failed to download. They have been ignored, or old ones used instead.
При предыдущих обновлениях такого не было, соответственно баг возник при последнем обновлении, как мне кажется. И тем более, что сервер используется в основном с ip-адресами, поэтому точно отследить эту ошибку по времени не представляется возможным.
ping/telnet
~$ ping google.com
ping: unknown host google.com
~$ ping 8.8.8.8
PING 8.8.8.8 (8.8.8.8) 56(84) bytes of data.
64 bytes from 8.8.8.8: icmp_seq=1 ttl=58 time=3.87 ms
64 bytes from 8.8.8.8: icmp_seq=2 ttl=58 time=3.93 ms
64 bytes from 8.8.8.8: icmp_seq=3 ttl=58 time=3.88 ms
--- 8.8.8.8 ping statistics ---
3 packets transmitted, 3 received, 0% packet loss, time 2003ms
rtt min/avg/max/mdev = 3.870/3.898/3.939/0.077 ms
~$ telnet 8.8.8.8 53
Trying 8.8.8.8...
Connected to 8.8.8.8.
Escape character is '^]'.
Connection closed by foreign host.
ifconfig
~$ ifconfig
enp29s0   Link encap:Ethernet  HWaddr 00:10:18:25:cd:40
          inet addr:#.#.#.#  Bcast:#.#.#.#  Mask:255.255.255.248
          inet6 addr: fe80::210:18ff:fe25:cd40/64 Scope:Link
          UP BROADCAST RUNNING MULTICAST  MTU:1500  Metric:1
          RX packets:145862 errors:0 dropped:0 overruns:0 frame:0
          TX packets:119991 errors:0 dropped:0 overruns:0 carrier:0
          collisions:0 txqueuelen:1000
          RX bytes:14777641 (14.7 MB)  TX bytes:22823397 (22.8 MB)
enp3s0 Link encap:Ethernet HWaddr 00:1a:64:c9:93:f8
inet addr:10.0.35.115 Bcast:10.255.255.255 Mask:255.0.0.0
inet6 addr: fe80::21a:64ff:fec9:93f8/64 Scope:Link
UP BROADCAST RUNNING MULTICAST MTU:1500 Metric:1
RX packets:779951 errors:0 dropped:0 overruns:0 frame:0
TX packets:608340 errors:0 dropped:0 overruns:0 carrier:0
collisions:0 txqueuelen:1000
RX bytes:514425482 (514.4 MB) TX bytes:189891768 (189.8 MB)
lo Link encap:Local Loopback
inet addr:127.0.0.1 Mask:255.0.0.0
inet6 addr: ::1/128 Scope:Host
UP LOOPBACK RUNNING MTU:65536 Metric:1
RX packets:2145438 errors:0 dropped:0 overruns:0 frame:0
TX packets:2145438 errors:0 dropped:0 overruns:0 carrier:0
collisions:0 txqueuelen:1
RX bytes:1185976997 (1.1 GB) TX bytes:1185976997 (1.1 GB)
/etc/network/interfaces
~$ cat /etc/network/interfaces
# This file describes the network interfaces available on your system
# and how to activate them. For more information, see interfaces(5).
source /etc/network/interfaces.d/*
# The loopback network interface
auto lo
iface lo inet loopback
# The primary network interface - Internal
auto enp3s0
iface enp3s0 inet static
address 10.0.35.115
netmask 255.0.0.0
network 10.0.0.0
broadcast 10.255.255.255
# gateway 10.1.10.102
# # dns-* options are implemented by the resolvconf package, if installed
# dns-nameservers 10.1.10.102
metric 20
# The secondary network interface - External
auto enp29s0
iface enp29s0 inet static
address #.#.#.#
netmask 255.255.255.248
# network #.#.#.#
# broadcast #.#.#.#
gateway #.#.#.#
dns-nameservers 8.8.8.8 8.8.4.4
metric 10
#auto enp6s0
iface enp6s0 inet manual
/etc/resolv.conf
~$ ls -la /etc/resolv.conf
lrwxrwxrwx 1 root root 27 Oct 14 01:46 /etc/resolv.conf -> /run/resolvconf/resolv.conf
~$ cat /etc/resolv.conf
# Dynamic resolv.conf(5) file for glibc resolver(3) generated by resolvconf(8)
# DO NOT EDIT THIS FILE BY HAND -- YOUR CHANGES WILL BE OVERWRITTEN
nameserver 8.8.8.8
nameserver 8.8.4.4
При этом nmcli не показывает, что DNS настроен.
nmcli
~$ nmcli dev show | grep 'DNS'
~$ nmcli dev show | grep 'IP4'
IP4.ADDRESS[1]: #.#.#.#/29
IP4.GATEWAY: #.#.#.#
Что я делал:
- рестарты systemd-resolved, NetworkManager
- рестарты сервера
- играл с настройками «dns=dnsmasq» в /etc/NetworkManager/NetworkManager.conf
- играл с настройкой DNSSEC
- делал /etc/resolv.conf статическим файлом, а не символической ссылкой, возвращал символическую ссылку
Ничего не помогло.
Сегодня, Пнд 16 Окт
Сегодня смог обновить систему до 16.04.3 — в /etc/apt/source.list заменил доменные имена на их ip-адреса. Не помогло (сервер перезагружал).
/etc/nsswitch.conf
Удалил «лишнее» для строки hosts, и оставил самый минимум.
~$ cat /etc/nsswitch.conf
# /etc/nsswitch.conf
#
# Example configuration of GNU Name Service Switch functionality.
# If you have the `glibc-doc-reference' and `info' packages installed, try:
# `info libc "Name Service Switch"' for information about this file.
passwd: compat
group: compat
shadow: compat
gshadow: files
#hosts: files mdns4_minimal [NOTFOUND=return] dns
hosts: files dns
networks: files
protocols: db files
services: db files
ethers: db files
rpc: db files
netgroup: nis
nslookup на другой сервер
И, наконец, то, что я вообще никак не могу понять. Сделал запрос на OpenDNS сервер…
~$ nslookup yandex.ru 208.67.222.222
;; connection timed out; no servers could be reached
…снял tcpdump — показывал много записей «bad udp cksum»…
~# sudo tcpdump -vvv -B 4096 -i enp29s0 host 208.67.222.222 and port 53
tcpdump: listening on enp29s0, link-type EN10MB (Ethernet), capture size 262144 bytes
16:01:57.043326 IP (tos 0x0, ttl 64, id 30657, offset 0, flags [none], proto UDP (17), length 55)
     #.#.#.#.55778 > 208.67.222.222.domain: [bad udp cksum 0x445e -> 0x6d74!] 47660+ A? yandex.ru. (27)
…утилитой ethtool выключил создание контрольных сумм…</p>
~$ sudo ethtool --offload enp29s0 rx off tx off
Actual changes:
rx-checksumming: off
tx-checksumming: off
    tx-checksum-ipv4: off
tcp-segmentation-offload: off
    tx-tcp-segmentation: off [requested on]
    tx-tcp-ecn-segmentation: off [requested on]
…и проверил tcpdump снова:
~# cat tcpdump.log
15:26:08.451181 IP (tos 0x0, ttl 64, id 65257, offset 0, flags [none], proto UDP (17), length 55)
    #.#.#.#.54228 > 208.67.222.222.domain: [udp sum ok] 23065+ A? yandex.ru. (27)
15:26:08.498299 IP (tos 0x0, ttl 57, id 4778, offset 0, flags [DF], proto UDP (17), length 119)
    208.67.222.222.domain > #.#.#.#.54228: [udp sum ok] 23065 q: A? yandex.ru. 4/0/0 yandex.ru. [4m4s] A 77.88.55.80, yandex.ru. [4m4s] A 5.255.255.80, yandex.ru. [4m4s] A 77.88.55.50, yandex.ru. [4m4s] A 5.255.255.60 (91)
15:26:13.451133 IP (tos 0x0, ttl 64, id 537, offset 0, flags [none], proto UDP (17), length 55)
    #.#.#.#.54228 > 208.67.222.222.domain: [udp sum ok] 23065+ A? yandex.ru. (27)
15:26:13.498225 IP (tos 0x0, ttl 57, id 5523, offset 0, flags [DF], proto UDP (17), length 119)
    208.67.222.222.domain > #.#.#.#.54228: [udp sum ok] 23065 q: A? yandex.ru. 4/0/0 yandex.ru. [3m59s] A 5.255.255.80, yandex.ru. [3m59s] A 77.88.55.50, yandex.ru. [3m59s] A 5.255.255.60, yandex.ru. [3m59s] A 77.88.55.80 (91)
15:26:18.451231 IP (tos 0x0, ttl 64, id 1389, offset 0, flags [none], proto UDP (17), length 55)
    #.#.#.#.54228 > 208.67.222.222.domain: [udp sum ok] 23065+ A? yandex.ru. (27)
15:26:18.498305 IP (tos 0x0, ttl 57, id 6088, offset 0, flags [DF], proto UDP (17), length 119)
    208.67.222.222.domain > #.#.#.#.54228: [udp sum ok] 23065 q: A? yandex.ru. 4/0/0 yandex.ru. [3m54s] A 77.88.55.50, yandex.ru. [3m54s] A 5.255.255.60, yandex.ru. [3m54s] A 77.88.55.80, yandex.ru. [3m54s] A 5.255.255.80 (91)
То есть получается, что система вполне себе нормально отрабатывает — посылает запрос, получает ответ. Но почему-то не может разобрать этот ответ что ли…
И теперь мои мысли закончились.
Все ли выполнено правильно? Или чего-то не хватает?
Куда еще посмотреть, какие настройки?
The apt command-line tool is one of the critical components of Debian and Ubuntu-based Linux distros. It facilitates retrieval and installation of packages reliably, thus, allowing users to enjoy the hassle-free installation of software and its dependencies. It is certainly one of the distinguishing features of Linux.
Sometimes, you may encounter the annoying Failed to fetch error while trying to use the apt tool which may look something like the following:
W: Failed to fetch http://in.archive.ubuntu.com/ubuntu/dists/precise/Release.gpg
  Temporary failure resolving 'in.archive.ubuntu.com'
In this tutorial, we will take a look at possible reasons one may encounter this error and its solutions.
Are there any pre-requisites?
There are no major pre-requisites for being able to fix this issue but keep in mind that you need to have the superuser privilege for your device. If you are not the admin or do not have access to the password of the device, you might not be able to fix this issue.

With the pre-requisites out of the way, now let us look at the possible reasons this error may occur.
Reason 1: Issues with your internet connection
As the apt command fetches packages from the web servers, there is no doubt that you must to have a proper internet connection.
If you are unsure why the terminal is unable to connect to the internet, go through the following steps to perform a diagnosis.
Diagnosis: Run the ping tool
The best way to determine whether the terminal is connected to the internet is by trying to ping a host. Enter the following command:
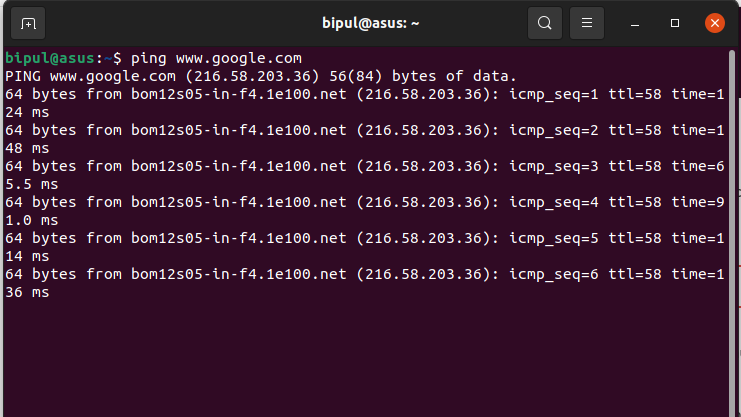
If you are getting a continuous sequence of replies from the host as shown in the above image, it means that your internet is working fine. Press Ctrl+C to stop the ping tool.
Solution: Fixing the internet connection
One of the following things might get you back online:
- Look for disconnected ethernet cables.
- The WiFi/Network adapter might be switched off, try turning it on.
- Look for malfunctions in your network devices.
- Try contacting the ISP.
Reason 2: You might be connected to a proxy network
If your device is connected to a network belonging to an organization (like your office, university, library, etc.), chances are, you might be connected to the internet through a proxy server.
You will need to configure the proxy settings for APT to work. Follow the steps below:
Solution 1: Configuring the proxy settings for APT
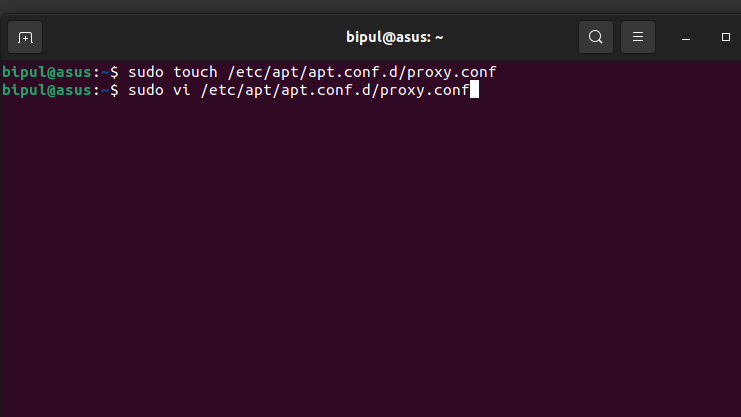
We have to manually create a separate configuration file called proxy.conf in the apt configuration folder.
- Enter the following code in the terminal:
sudo touch /etc/apt/apt.conf.d/proxy.conf
When prompted, enter the password. This code will create the desired proxy.conf file in the location /etc/apt/apt.conf.d/proxy.conf.
2. Using the Vi editor, now we will edit the text file. Enter the following code:
sudo vi /etc/apt/apt.conf.d/proxy.conf
3. You will enter the edit mode, now add the following piece of code:
Acquire {
  HTTP::proxy "http://<proxy-hostname>:<proxy-port>";
  HTTPS::proxy "http://<proxy-hostname>:<proxy-port>";
}
Make sure that you replace the <proxy-hostname> with your proxy server hostname and <proxy-port> with the port. For example, if your proxy hostname is 10.32.0.1 and port is 8080, the code will look like this:
Acquire {
  HTTP::proxy "http://10.32.0.1:8080";
  HTTPS::proxy "http://10.32.0.1:8080";
}

4. Exit the vi editor saving the changes by entering :wq!
5. Restart your device and check if your problem is resolved.
Reason 3: You are using a release that has reached its EoL (End of Life)
If you are using an old or interim release (like the Ubuntu 21.04), it might have reached its end of life and isn’t supported anymore. You will need to upgrade to a newer version for the proper function of APT.
Solution 1: Upgrading your system to the latest version
1. First, you need to retrieve the updated package list:
2. Now, run the below codes to download and install the required packages:
sudo apt-get upgrade
sudo apt-get dist-upgrade
3. You will need to install the update manager:
sudo apt-get install update-manager-core
4. Reboot your device, then enter the following code to start downloading and upgrading your distribution:
Now the system will start downloading the latest version. It might take hours depending on the download size and your device specification.
References
Ubuntu Help & Ask Ubuntu: EOLUpgrades – Community Help Wiki (ubuntu.com) | Setting proxy for apt from the terminal – Ask Ubuntu
Conclusion
Unless one fully understands the details behind the exceptions thrown by the terminal in Linux, solving issues like this can become somewhat tricky. Nevertheless, I hope that the above-mentioned guide was able to solve the problems.