Today we discuss about some e question regarding Text Mesh Pro like
What is Text Mesh Pro in unity?
Advantages of using Text Mesh Pro?
You will see how to use Text Mesh Pro is an example?
How to use Text Mesh Pro in a 3D Game?
How to create a custom font asset in Text Mesh Pro?
How to create a glow effect in unity?
How to outline and shadow effect in Text.
You will learn the Text Mesh Pro with a step by step guide.+
Text Mesh Pro Introduction:
- In Unity 2019.4 TextMesh Pro is available by default.
- TextMesh Pro is the ultimate text solution for Unity.
- It provides so many features for text formatting and your layouts. It’s very flexible during text styling and texturing.
- you can create 2D/3D fonts with effects in the TextMesh Pro.
- you can use the TextMesh Pro as UI Text Element and also as a 3D game object.
Text Mesh Pro Demo
Open unity hub and create a new unity project with a 3D template.

TextMesh Pro as 3D Object
- In Hierarchy Window, create a new 3D text object as below.

- If you are using TextMesh Pro for the first time in the current project then you see popup box about TextMesh Import settings as below
- Import TMP Essentials(useful library and class).


- Also, Import the example files of TextMesh Pro

- TextMesh Pro Package imported in the root folder.

- Now you have 3D Text as 3D object.

Create a 3D Environment in scene.
Change Directional Light Color to White.

Add a 3d object – plane in the current scene and rename it as “Ground”.
Set properties of “Ground” object as below.

Create a new folder with name “Materials”.
Create a new material for the Ground object in the Materials folder.

Change the material name as “Ground_Material”.
Change the material properties as below.

Open Lighting setting menu from the window menu

Adjust Lighting window with Inspector window.
Change properties of Environment lighting for better lighting condition.

Change the color of the ground material as below

Add a 3d cube object in the current scene.

rename this cube object as “Player”.
Create a material for the Player Object and rename it as “Player_Material”.
Change properties of Player_Material as below image.

Create a new material for the skybox in Materials folder.

Assign a new skybox material in lighting settings.

Output after scene setup.

- Rename the TextMesh Pro text as “Name_TMP_Text” in the hierarchy window.
- Change the width and the height of Name_TMP_Text as below.

Properties of the TextMesh Pro Text component
- Change the properties of the TextMesh Pro Text component of the Name_TMP_Text as below.
Change Text Input

- If RTL Editor is enabled then you can write in reverse order.

- Text Input Box: Here you can type text which will be rendered. You can write multiple lines here. you can use special characters & Rich Text tags like
- n – new line
- t – tab
- <b>Bold</b>
- <i>Italics</i>
- <u>Underline</u>
- <s>Strikethrough</s>
- <sup>Superscript</sup>
- <sub>Subscript</sub>
- <size=48>Point size 48</size>
- <size=+18>Point size increased by 18</size>
- <size=-18>Point size decreased by 18</size>
- <pos=5.5>Characters positioned about 5.5 characters from left side. <color=yellow>Yellow text</color>
Change font style

- here you see that Font style applied on text.
- Font Style : applies different font styles like Bold, Italic, Underline, Lowercase, Uppercase, Smallcaps, etc…
Change Font Size

- if you want to adjust your text as per the Text component’s width and height, enable the Auto Size feature as below.
Change Vertex Color

- Apply color on each character in the text.
- here word “Player” did not change its color because we set the color tag in Text Input Field. Note: Vertex Color was not applied to the character which has the color tag.
Change Color Gradient
- By default this property is disabled.
- If you enable this property then it will show you more sub-properties as in the image below

Here you can select already created color gradient from the “Color Present” field or you create your own gradient using the Color Mode & the Colors field.
- Let’s select one gradient color from the Color Present Field as below image
Output :

Here you notice that Vertex color + Color Gradient mix together so give another color.
Color of Player word not changed due to color tag.
How to create own customize gradient color for TextMesh Pro Text
- Remove the Color Preset and select Color Mode property.
- choose the color mode from the list.

- set Vertex Color as white.
- Now you see the original gradient color.

Override Tags
By default this property is disabled. If you enable this property then you will get output like

Now you notice that the Player Word also changes into the new gradient color. it means if you enable the “Override Tags” property then colors which you applied by tag in the Text Input Box will no longer work, as they are overridden.
Spacing Options
- Spacing Option Property is used to set space between two words or lines or characters or even paragraphs.
- Here we change the text and Spacing option to understand its process.
Alignments
- It will control the alignment of the text. Options are Left, Center, Right, and Justified. When Justified is selected, the ratio controls how additional spacing is added between words and characters.


Wrapping
- It wraps text to the next line when reaching the edge of the container.
Example:
Wrapping – Enable

Wrapping – Disable

Overflow
- It will provide ways to display text which past edge of the container.
- example: if we select Ellipsis type then the extra text will be display as (… ellipses) format.
Mapping
Mapping is used to map characters or words or lines or whole paragraphs with shader. We will discuss later in shader topics.

Extra Settings
- Margins – space between text and text container.
- Sorting in Layer – when we work with many texts, it helps in sorting.
- Order in Layer – A higher number means higher priority Here In the image, we add another text in the scene and set different color modes and order in the layer so the second text sets the front side of the first text.

- Remove the second text.
- Orthographic Mode – It is useful when you are working with an orthographic camera.
- Rich Text – It will enable the use of Rich Tags like <font>, <color> in TextMesh text otherwise rich tags will not work and it looks like normal text.
Example:
Rich Text = disabled

Rich Text = enabled

- Parse Escape Character – If enabled then “n” works as escape character otherwise just a simple Text.
- Extra Padding – it will add extra padding between the characters and the edge of Textmesh so it reduces graphical errors.
How to Create Custom Font in TextMesh Pro???
- If you want to use custom font then you have to create font asset for TextMesh Pro Text.
- Download free font from website which offer free fonts.


- Click here to Download Fonts
- Create a new folder with name as “Fonts” and add new font file here.

- Open the Font Asset Creator Menu from window.

Font Asset Creator
- Here you can add and create new font assets with various settings.

- Source Font File: assign a font that you want to create as an asset.
- Sampling Point Size determines at what point size the font will be created. You can either manually select the size of the font or use the Auto Sizing mode which will find the largest possible font size to fit in the given Atlas Resolution. It is recommended to use Auto Sizing.
- Font Padding determines how much space in pixel units between each character. For an Atlas Resolution of 512 X 512, a value of 5 for padding is perfect.
- Atlas Resolution determines the size of the Font Atlas. For most fonts which include the full ASCII character set, a size of 512 X 512 works usually well for Signed Distance Field Render Mode.
- Character Set determines what characters will be included in the font atlas.

- Click on save button.

- Select file path to Asset>TextMesh Pro> Fonts

- Now Select a Text object and assign a new Font in Font Asset Property

Now change few property for perfect text as below.


Final Output

How to create new material for Text Mesh Pro Text??
create new material in the Materials folder with the name “Text Glow Material”.

In-Text Glow Material,
Change shader

Open debug setting part & assign font atlas file which you created in Font Asset Creator.

How to create Glow Text Effect in Unity
- Create a new scene with name as “Glow Text”.

- Create another material for the skybox.
- Duplicate current skybox material and create another material with the name “Skybox_black“.

- Assign this skybox material in the current lighting setting.

- Add new TextMesh Pro Text in Hierarchy Window.
- Rename this text as “TextGlowEffect“.
- Change properties of the Rect transform of “TextGlowEffect” text.

- Change properties of TextMesh Pro Component of “TextGlowEffect” text.

- Change properties of the material of the “TextGlowEffect” text.


Final Output

How to create an Outline effect in TextMesh Pro
- Create a new scene with name as “Outline Text“.
- Add a new TextMesh Pro text object with name as “TextOutlineEffect” in the Hierarchy Window.
- Create a new skybox for this “Outline Text” scene.

- Create a new material for text for the “TextOutlineEffect” text.
- Go to the materials folder, Duplicate the “Text Glow Material”.
- Reset value of duplicated material and rename it as “Text Outline Material”

Assign this newly created material in the TextMesh Pro Component.

Change properties of the TextMesh Pro component of the “TextOutlineEffect” text as below.

- Now change properties of shader values in material for Outline Effect.

Final Output

How to create a Shadow effect in TextMesh Pro
- Create a new scene with name as “Shadow Text“.
- Add a new TextMesh Pro text object with name as “TextShadowEffect” in the Hierarchy Window.
- Assign white skybox material to the scene.

- Create a new material for text for the “TextShadowEffect” text.
- Go to the materials folder, Duplicate the “Text Glow Material”.
- Reset value of duplicated material and rename it as “Text Shadow Material”

- Assign this newly created material in the TextMesh Pro component.

- Change properties of the TextMesh Pro component of TextShadowEffect” text as below.

Now change properties of shader values in material for Shadow Effect.

Final Output

How to apply 3D text effect in unity
- Create a new scene with a name as “3d Text”.
- Add a new TextMesh Pro text object with name as “TextOutlineEffect” in the Hierarchy Window.
- Assign a black skybox in this scene.

- Create a new material for text for the “Text3DEffect” text.
- Go to the materials folder, Duplicate the “Text Glow Material”.
- Reset value of duplicated material and rename it as “Text 3D Material”

- Assign this new created material in TextMesh Pro Component.

- Change properties of the TextMesh Pro component of the “Text3DEffect” text as below.

- Now change properties of shader values in material for 3D Effect.

Final Output

Summary
In this Article, we learn about TextMesh Pro with all its properties in details.
В этом руководстве мы рассмотрим объект GUI TextMesh Pro. TextMesh Pro используется вместе с обычными игровыми объектами и помещается в сцену в трехмерном пространстве. Он идеально подходит для приложений XR, где текст часто является частью существующей сцены и не упоминается в 3D-меню.
TextMesh Pro — это идеальное текстовое решение для Unity. Это идеальная замена текста пользовательского интерфейса Unity и старой текстовой сети. Он мощный и простой в использовании, в нем используются передовые методы рендеринга текста, а также ряд настраиваемых шейдеров. Он предлагает значительные улучшения визуального качества и дает пользователям невероятную гибкость в дизайне и текстурировании текста. TextMesh Pro предлагает улучшенный контроль над форматированием и компоновкой текста с такими функциями, как интервалы между символами, словами, строками и абзацами, кернинг, выровненный текст, ссылки, более 30 доступных тегов форматированного текста, поддержка нескольких шрифтов и спрайтов, настраиваемые стили и многое другое. . Хорошая производительность. Поскольку геометрия, созданная TextMesh Pro, использует два треугольника на символ, как и текстовые компоненты Unity, нет дополнительных затрат на производительность для этого улучшенного визуального качества и гибкости. В этом руководстве мы рассмотрим объект GUI TextMesh Pro. TextMesh Pro используется вместе с обычными игровыми объектами и помещается в сцену в трехмерном пространстве. Он идеально подходит для приложений XR, где текст часто является частью существующей сцены и не упоминается в 3D-меню.
TextMeshTextMesh Pro — это простая в использовании система для высококачественного текста. Он имеет множество опций для отображения и форматирования текста и представляет собой простой способ добавить профессиональный вид пользовательскому интерфейсу проекта. В статье показано, как можно подготовить шрифты для использования в TextMesh Pro, создать новые объекты TextMesh Pro и изменить эти объекты.
1. Создайте текстовый объект TextMesh Pro:
1. Выберите GameObject из раскрывающегося списка или правой кнопкой мыши в окне иерархии UI> TextMesh Pro — Text.
2. Если вы впервые используете TextMesh Pro (TMP) в проекте, Unity предлагает импорт пакетов TMP Essentials и примеров и дополнительных компонентов (если вы еще не импортировали пакет TextMesh Pro Asset). Щелкните Импортировать TMP Essentials и закройте окно.
TMP также можно импортировать как включенный пакет активов при создании проекта.
3. Если текст не отображается на вкладке «Сцена», выделите его в иерархии и нажмите клавишу «F» на клавиатуре, когда указатель мыши находится в обзоре сцены.
4. Щелкните замок в правом верхнем углу Инспектора, чтобы перевести фокус на текстовый объект TextMesh Pro.
5. Установите размер текстовой области 300 x 100 в настройках преобразования прямоугольника.
Преобразование прямоугольника управляет положением и размером текстовой области.
6. Включите перенос и переполнение текста в разделе «Параметры шрифта» инспектора UGUI Text Mesh Pro.
TextMesh Pro предлагает множество вариантов макета и отображения.
7. Попробуйте изменить предустановку материала и различные настройки шрифта. Вы можете установить цвет шрифта, изменив цвет вершины или в настройках материала. Щелкните треугольник в Материале в нижней части Инспектора, чтобы увидеть настройки шрифта, контура и подложки (тени).
Щелкните серые полосы за пределами двух флажков, чтобы показать или скрыть свойства для этого конкретного параметра шрифта.
8. Установите флажок в правой половине раздела «Структура» и щелкните в любом месте раздела, чтобы открыть настройки.
9. Отрегулируйте цвет и толщину текста.
Добавление контура к тексту может упростить просмотр в загруженных местах.
10. Попробуйте изменить настройки подложки и переднего плана. Щелкните шестеренку в правом верхнем углу и выберите «Сброс», чтобы вернуться к настройкам по умолчанию.
В этом меню вы можете вернуться к исходным настройкам материала, перенести свойства материала и создать предварительные настройки материала.
11. Поэкспериментируйте с предустановками материала шрифта и отрегулируйте настройки шрифта по своему усмотрению.
TextMesh Pro поставляется с тремя предустановками материалов, которые можно использовать для быстрого изучения эффектов различных настроек.
2. Доступ к объектам TextMeshPro в коде:
Здесь мы используем пространство имен System в нашем скрипте для доступа к функциям даты и времени. TextMesh Pro требует только пространства имен TMPro.
1. В раскрывающемся списке «GameObject» выберите «Создать пустой» и назовите его «ClockDisplay».
2. Создайте новый сценарий под названием «Часы» и прикрепите его к ClockDisplay. Дважды щелкните Часы в окне проекта, чтобы открыть Visual Studio или MonoDevelop. Удалите метод Start (), поскольку мы не будем использовать его в этом упражнении.
3. Введите следующее из строки 4:
с использованием TMPro;
с помощью системы;
4. Введите следующее в строке 8:
общедоступный TMP_Text clockText;
5. Введите следующее в Обновить в строке 12:
clockText.text = DateTime.Now.ToString();
6. Сценарий часов готов.
Сохраните изменения и вернитесь в Unity.

Готовый сценарий просмотра:
7. Перетащите объект TextMesh Pro, созданный в упражнении 1, в область, обозначенную «Текст часов» в Инспекторе часов.
8. Нажмите Play, чтобы начать демонстрацию. Текущая дата и время отображаются с параметрами материала, указанными в TextMesh Pro Text Inspector.
9. Когда вы закончите, выйдите из режима воспроизведения.
3. Создайте шрифт для использования с TextMesh Pro.
1. Если у вас еще нет папки ресурсов в Assets, создайте ее и создайте в ней папку с именем «Fonts». Здесь вы сохраняете созданный вами ресурс шрифта.
2. Перетащите файл шрифта (OpenType или TrueType) в папку «Ресурсы».
3. В раскрывающемся списке «Окно» выберите TextMesh Pro> Font Asset Creator.
4. Щелкните кружок рядом со слотом источника шрифта и выберите свой шрифт.
Вы также можете перетащить шрифт прямо из окна проекта в слот. Ресурсы шрифтов можно повторно использовать в проектах.
5. Щелкните «Создать атлас шрифтов».
6. Щелкните Сохранить.
7. Перейдите к Assets> Resources> Fonts, назовите свой шрифт и нажмите Save.
8. Если он по-прежнему не отображается в инспекторе, щелкните объект TextMesh Pro Text в окне «Иерархия», чтобы выделить его.
9. Щелкните кружок рядом с параметром «Набор шрифтов» и выберите только что созданный набор шрифтов.
10. Активируйте режим воспроизведения, чтобы увидеть ваш новый ресурс шрифта в действии.
11. Выйдите из режима воспроизведения.
TextMesh Pro очень универсален. Его можно использовать в любой ситуации, когда требуется текст, включая игры, графические приложения, видео и многое другое.
TextMesh Pro: основы
В этом руководстве мы рассмотрим объекты GUI TextMesh Pro и TextMesh Pro. TextMesh Pro используется вместе с обычными игровыми объектами и помещается в сцену в трехмерном пространстве. Он идеально подходит для приложений XR, где текст часто является частью существующей сцены и не упоминается в 3D-меню. Компонент TextMesh Pro UGUI работает с системой холста и предназначен для замены и расширения текстового компонента пользовательского интерфейса улучшенными функциями.
Темные времена
Все текстовые компоненты в Unity используют текстуры для хранения глифов — визуального представления символов. Старые текстовые компоненты (TextMesh и UI-Text) используют растрированные растровые изображения для визуализации этих глифов. TextMesh Pro в первую очередь использует подписанные дистанционные поля (SDF) для аппроксимации формы символов перед их рендерингом в текстуру. Представьте, что мы пытаемся визуализировать фигуру в сетке 10х10 пикселей, не вдаваясь в технические подробности. В растровой текстуре каждая позиция сетки может содержать белый, серый или черный пиксель, в зависимости от информации о цвете в этой конкретной позиции. В текстуре SDF каждая позиция сетки будет содержать расстояние до следующего объекта формы, что приведет к лучшему рендерингу исходной формы в фиксированной пиксельной сетке. Если шейдер растрового изображения рисует эту фигуру 1: 1, это просто поиск текстуры для указанной позиции пикселя. Если он содержит пиксель, он будет отрисован; В противном случае это не так. Текстуры содержат конечное количество пикселей. При увеличении или уменьшении масштаба шейдер должен регулировать размер каждого пикселя в зависимости от разрешения дисплея устройства. В результате форма становится блочной, размытой или слишком резкой. Шейдер SDF выполняет тот же поиск текстуры, но на этот раз возвращает пример расстояния. В зависимости от расстояния шейдер рисует либо полностью непрозрачный пиксель, либо пиксель с альфа-смешением. При увеличении или уменьшении масштаба шейдер интерполирует между примерами расстояний, поэтому фигуры (текст) могут быть четко отрисованы в Unity независимо от разрешения экрана, масштабирования и масштаба. Чтобы визуализировать растровый текст чисто, глифы должны быть нарисованы в соотношении 1: 1, причем каждый глиф должен быть пересчитан для каждого размера шрифта. Однако текстуры SDF должны содержать только одно представление каждого глифа, что приводит к гораздо более эффективному использованию пространства текстуры. На следующих рисунках показаны самые большие визуальные различия между старой и новой системой.
 Эти примеры хороши тем, что, несмотря на превосходное качество рендеринга SDF, как SDF, так и растеризованный текст используют одинаковое количество полигонов (четырехугольников) для рендеринга текста. Это означает, что производительность TextMesh Pro не пострадает. Мы добавим в нашу сцену объект TextMesh Pro и TextMesh Pro GUI и посмотрим на каждый объект в инспекторе.
Добавление TextMesh Pro в ваши GameObjects
Добавить TextMesh Pro в новый или существующий GameObject относительно просто.
Щелкните правой кнопкой мыши в любом месте окна иерархии и перейдите к 3D-объектам> Текст — TextMeshPro. Как вариант, TextMeshPro можно добавить к существующему объекту: [GameObject]> Добавить компонент> Сетка> TextMeshPro — Текст.


Оба метода создают новый GameObject с четырьмя новыми компонентами:
Прямоугольное преобразование: Контейнер для вашего текстового объекта, аналогичный тем, которые используются в Microsoft Office или Photoshop. Вы можете изменить размер, положение и поворот вашего контейнера.
Средство визуализации сетки: Визуализирует и позиционирует текст в трехмерном пространстве.
TextMeshPro — Текст: The Главный компонент, в котором вы можете писать текст, изменять элемент шрифта, предустановку материала, размер шрифта, изменять стили абзацев, активировать цвета / градиенты и выбирать ряд других элементов.
Параметры форматирования и стиля: Попробуйте поиграть с этим.
Предварительная настройка материала: Материал, используемый шрифтовым ассетом, на который есть ссылка в компоненте TextMeshPro. Материалы определяют внешний вид ваших игровых объектов. Вы также можете определить здесь внешний вид текста и найти параметры, варьирующиеся от контуров до свечения, скосов, текстур и т. Д.
Дополнительные настройки: Эти настройки позволяют, среди прочего, настраивать поля текста, назначать ресурсы спрайтов и настраивать, на каком слое отображается текст.
Перед вводом текста убедитесь, что в компоненте TextMesh Pro включены обтекание и переполнение. Эти параметры ограничивают текст прямоугольным объектом преобразования.
Благодаря автоматическому размеру размер образца вашего шрифта динамически адаптируется к преобразованию прямоугольника. Будьте осторожны при использовании автоматического размера. Включение этого параметра даст вам оптимальный размер выборки (например, для мобильных приложений, где может быть сложно предсказать целевое разрешение для каждого устройства). Однако его следует отключить, как только вы выберете подходящий размер, чтобы избежать ненужной производительности.
Добавление TextMesh Pro в ваш пользовательский интерфейс

Добавление TextMeshPro в пользовательский интерфейс — очень похожий процесс: перейдите в иерархии к UI> Text — TextMeshPro. За исключением средства визуализации холста, он идентичен предыдущей версии. Это создаст новый GameObject Canvas с GameObject TextMesh Pro. Родительство означает, что текст перемещается по холсту. Компоненты в UI TextMesh Pro визуализируются с использованием этого объекта холста вместо средства визуализации Unity Mesh.
This article explains how to place text on a scene in Unity.
In the first half of the article, we will explain how to use Unity’s default text feature.
In the second half of the article, we will explain how to use Text Mesh Pro.
- 1 Samples
- 2 Placing Text
- 2.1 How to Create Text on Canvas
- 2.1.1 Inspector Settings
- 2.1.2 When the Text is Blurred
- 2.1.3 About Render Mode
- 2.2 How to Create 3D Text
- 2.2.1 Inspector Settings
- 2.2.2 When the Text is Blurred
- 2.2.3 Text is Displayed at the Forefront
- 2.3 How to Change or Add Fonts
- 2.3.1 Changing the Font
- 2.3.2 Adding a Font
- 2.1 How to Create Text on Canvas
- 3 Placing Text Using Text Mesh Pro
- 3.1 How to Install Text Mesh Pro
- 3.2 How to Create a Text
- 3.2.1 How to Create Text(TMP) on Canvas
- 3.2.2 How to Create a 3D Text (TMP)
- 3.3 Setting up Text Mesh Pro
- 3.4 How to Change the Font
- 4 How to Upload to STYLY
Samples
Here are some sample images of various text.
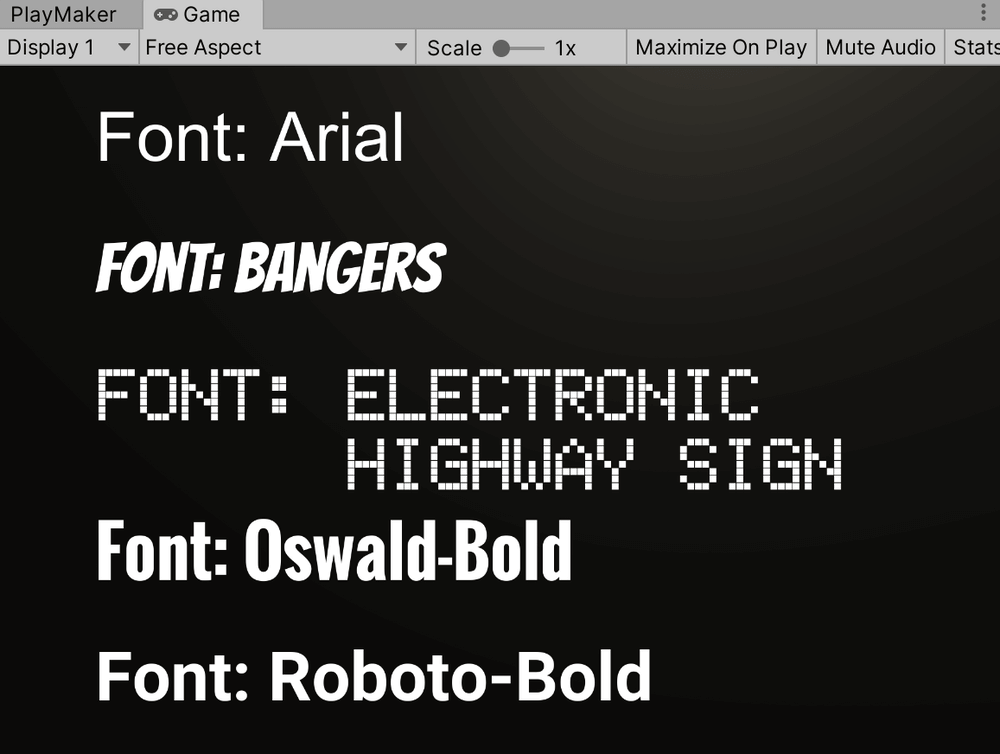
Various fonts.
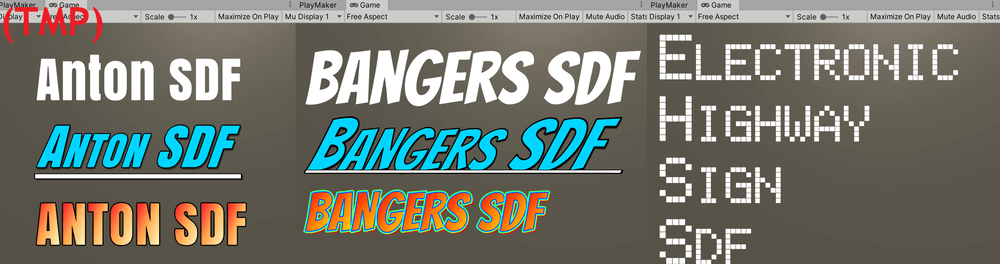
Various decorations of Text Mesh Pro.

Text of World Space.

Text of Screen Space.
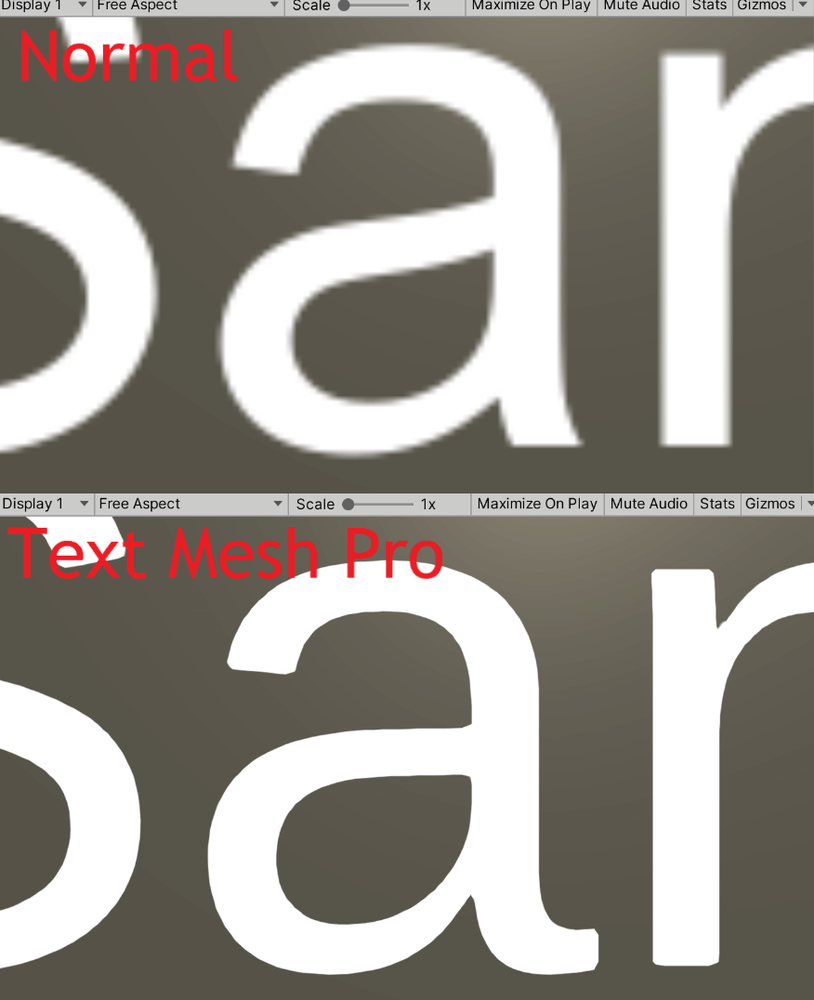
Zoomed comparison of normal text and Text Mesh Pro text.
Placing Text
There are two ways to place text in a scene.
One is to create a Text on Canvas, and the other is to create a 3D Text.
Both methods will be explained below.
How to Create Text on Canvas
If there is not a Canvas in your scene, click “GameObject” at the top of the screen, and select UI→Text.
Click on GameObject from the tab at the top of the screen, and select UI→Text.
A new Canvas is created at the same time as the Text.
If you already have a Canvas in your scene, right-click on the Canvas you want to add text to in the Hierarchy window, and select UI→Text.
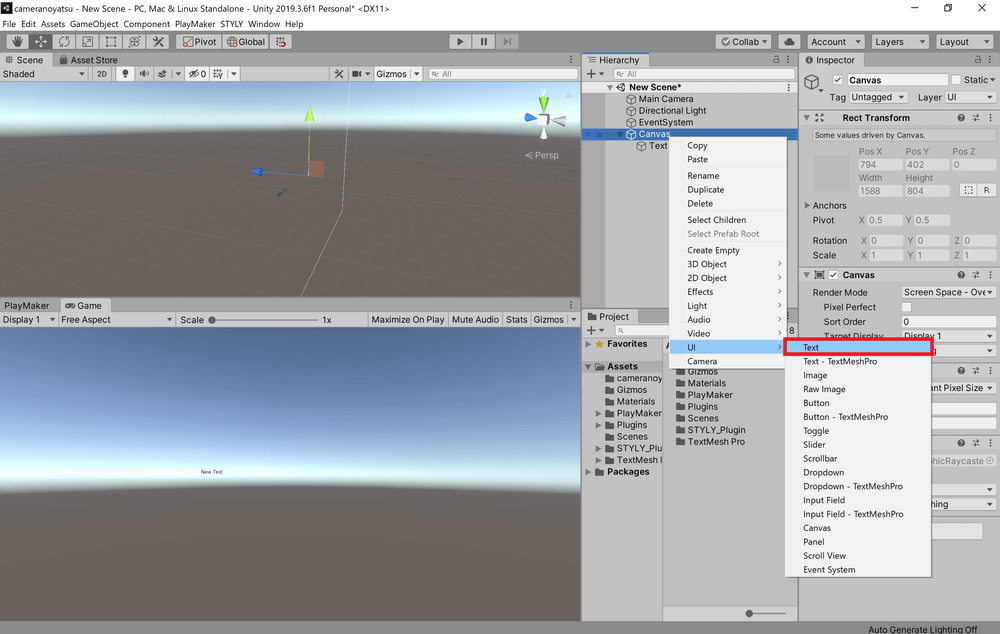
Right-click on the Canvas and select UI→Text.
Also, you can rename the newly created Text and Canvas as you wish.
Inspector Settings
The Inspector for the text you created contains a component called “Text”.
By modifying this component, you can give various changes to the text.
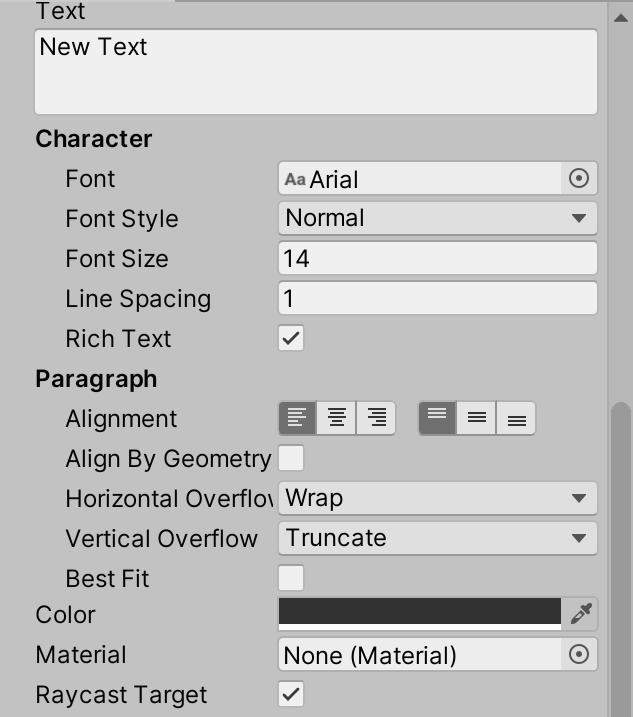
Text component.
The following table summarizes some of the most commonly used properties of Text.
| Property Name | Description |
| Text | Allows you to enter text. |
| Font | You can change the font of the text. |
| Font Style | Allows you to change the text to bold, italic, etc. |
| Font Size | Allows you to change the size of the text. |
| Line Spacing | Allows you to change the line spacing. |
| Rich Text | If checked, tags can be used. |
| Alignment | Allows you to change the alignment of the text by a combination of horizontal and vertical alignment. |
| Horizontal Overflow | If checked, the text will be displayed horizontally beyond the text frame. Wrap will wrap the text horizontally so that it fits into the text frame, and truncate the text that still extends horizontally. |
| Vertical Overflow | When set to Overflow, the text will be displayed vertically out of the text frame. If Truncate is checked, the text will be truncated vertically so that it fits into the text frame. |
| Best Fit | If checked, the Font Size will be automatically adjusted so that the text fits into the frame. The Min Size and Max Size displayed when checked are the lower and upper limits of the Font Size that will be automatically adjusted. |
| Color | Allows you to change the color of the entire text. |
| Material | Allows you to apply a material to the text. |
| Raycast Target | Check this box to cast a ray. |
When the Text is Blurred
If the displayed text is blurry and difficult to read, you can improve it by increasing the Font Size of the Text component and decreasing the Scale of the Transform component.
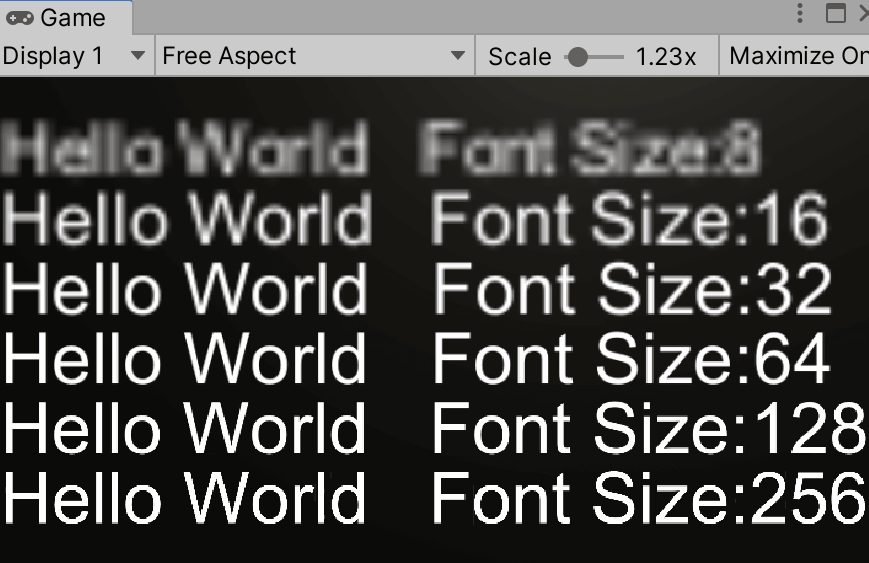
Text with Font Size of 8, 16, 32, 64, 128, and 256 from the top.
Increasing the Font Size will consume a lot of memory, so it is recommended to use a Font Size of 64 or 128.
About Render Mode
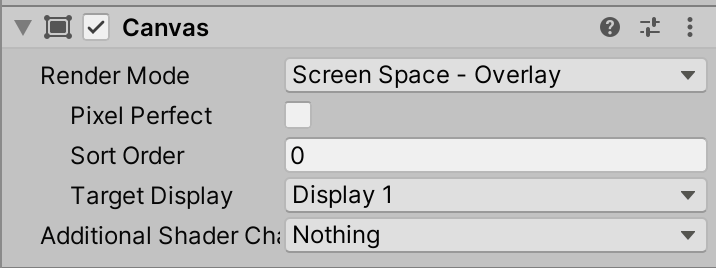
Inspector→Canvas.
In the Canvas Inspector, there is a property called “Render Mode” in the Canvas section.
There are two main Render Mode options: “World space” and “Screen space”.
If you select “World space”, you can place the canvas in the scene.
World space text.
*If you select World space, you will get an error message if you don’t select Event camera, but you can ignore it if you don’t want to use Canvas as UI.
If you select Screen space, Canvas will be fixed on the screen or camera.
Screen Space text.
Screen space is a great advantage of creating text on Canvas.
These settings can also be applied to Text Mesh Pro as described below.
How to Create 3D Text
Click on GameObject at the top of the screen and select 3D Object→3D Text.
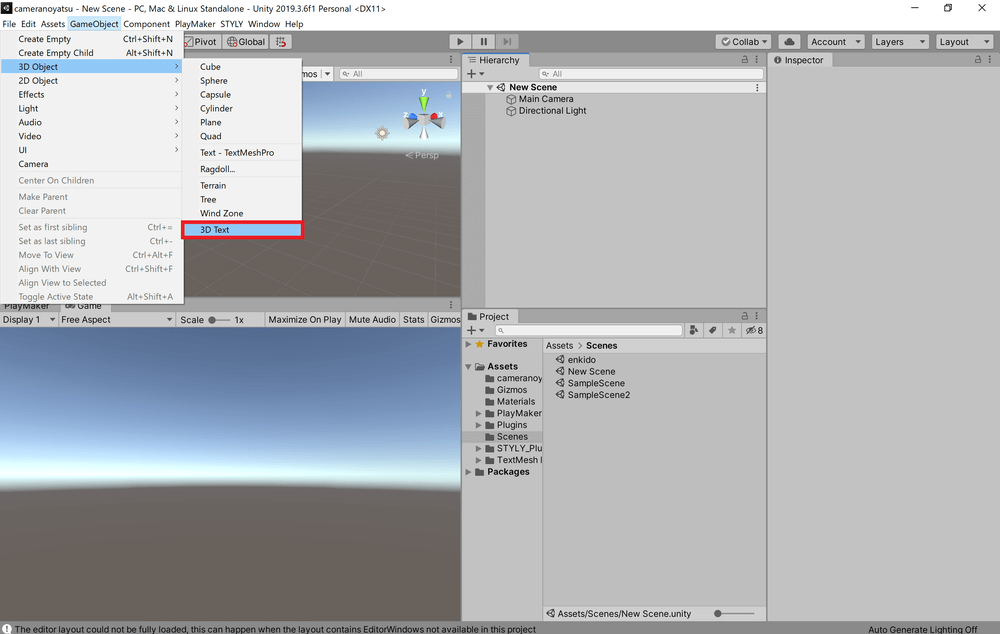
Click on the GameObject from the tab at the top of the screen and select 3D Object→3D Text.
You can then create a New Text in the scene.
You can rename it as you like.
Inspector Settings
The Inspector of the text you created contains a component called “Text Mesh”.
By modifying the inside of this component, you can give various changes to the text.

Inspector→Text Mesh.
The following table summarizes the most commonly used properties of Text Mesh.
| Property Name | Description |
| Text | Allows you to enter text. |
| Offset Z | Allows you to change how much the text is displaced from the specified coordinates in the z axis when drawn. |
| Character Size | Allows you to change the size of the text. |
| Line Spacing | Allows you to change the line spacing. |
| Anchor | Allows you to adjust the position of the anchor. |
| Alignment | Allows you to change the alignment of the text to left, center, or right. |
| Tab Size | Allows you to change the width of the tab character. |
| Font Size | Allows you to change the resolution of the text. |
| Font Style | Allows you to change the text to bold, italic, etc. |
| Rich Text | If checked, tags can be used. |
| Font | Allows you to change the font of the text. |
| Color | Allows you to change the color of the entire text. |
When the Text is Blurred
If the text displayed in 3D Text is blurry and difficult to read, you can improve it by increasing the Font Size value of the Text Mesh component and decreasing the Character Size value of the Text Mesh component or the Scale value in Transform.
Text with Font Size of 8, 16, 32, 64, 128, 256 from the top.
If you increase the Font Size, it will consume a lot of memory, so it is recommended to use a Font Size of 64 or 128.
Text is Displayed at the Forefront
3D text will appear in front of the camera regardless of its position in relation to other objects.
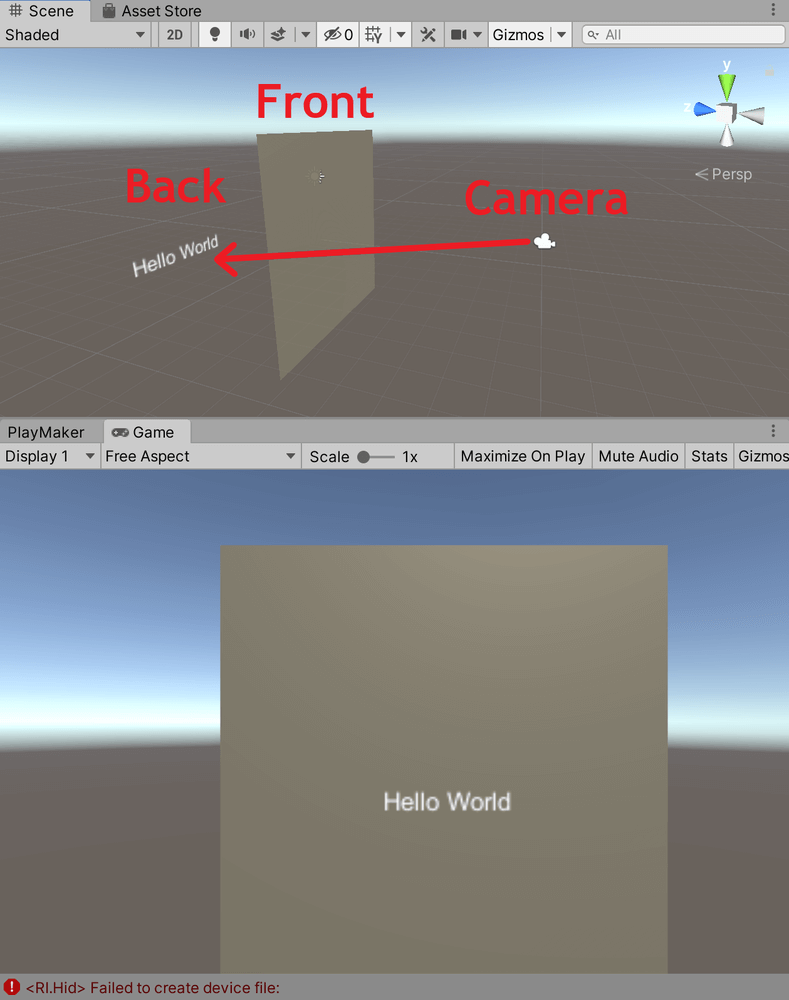
The plane is in front of the camera and the 3D text is at the back, but in the camera image, the 3D text appears to be in front through the plane.
This can be remedied by using Text Mesh Pro (see below).
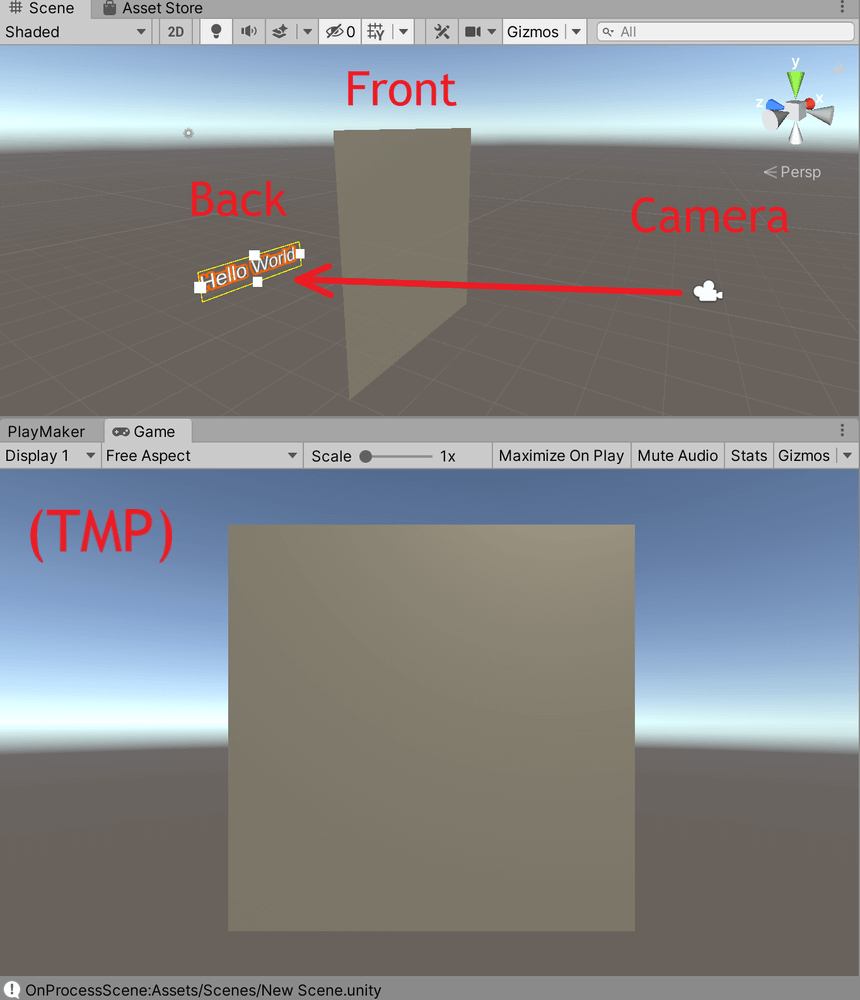
The plane is in the foreground and the 3D Text (TMP) is in the background, and the 3D Text (TMP) is hidden behind the plane in the camera image.
There are many advantages to using Text Mesh Pro, please read the second half of the article if you are interested.
How to Change or Add Fonts
Changing the Font
Clicking on the round symbol of the Font property contained in the Text component or the Text Mesh component will open a window to select a font.

Click on the round symbol of the Font property in the Text Inspector.
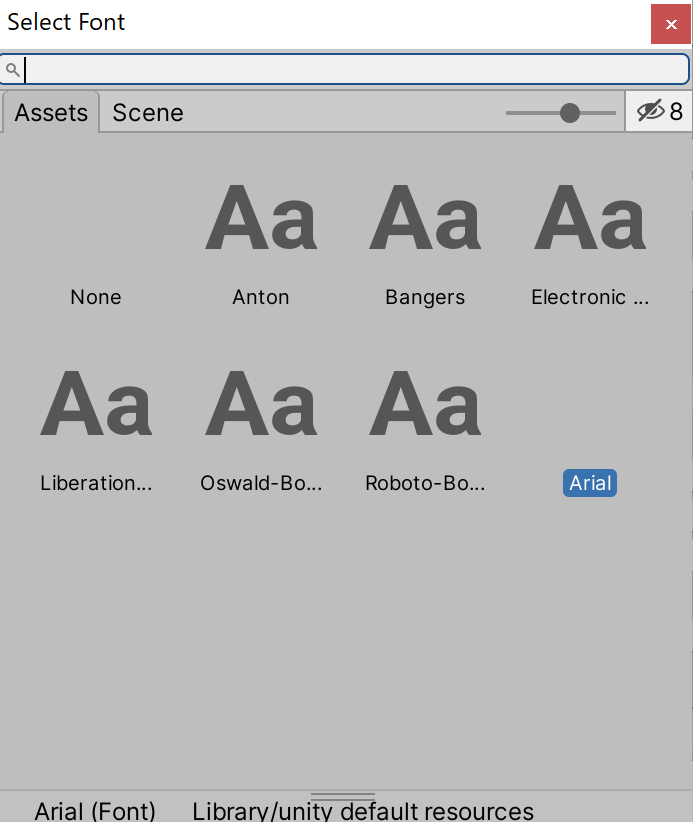
The window for selecting a font.
You can change the font of your text by double-clicking on the font you want to use from this list.
Adding a Font
Prepare a ttf file or otf file of the font you want to use.
Drag and drop the prepared file to Unity’s Project view.
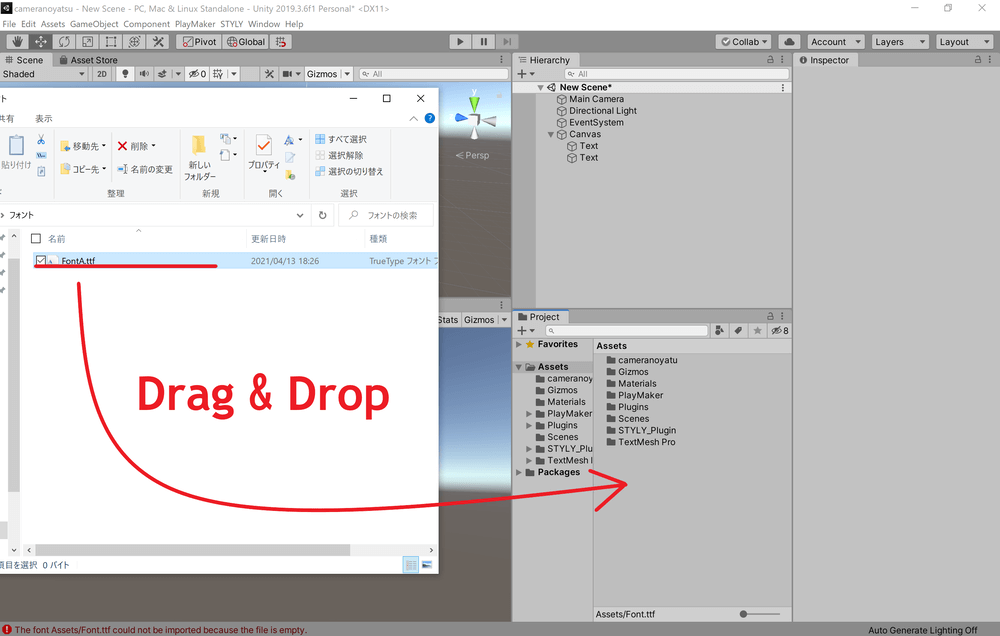
Drag and drop the file to Unity’s Project view.
The chosen font will be reflected in the Project view and the font you added when selecting the font will be displayed.
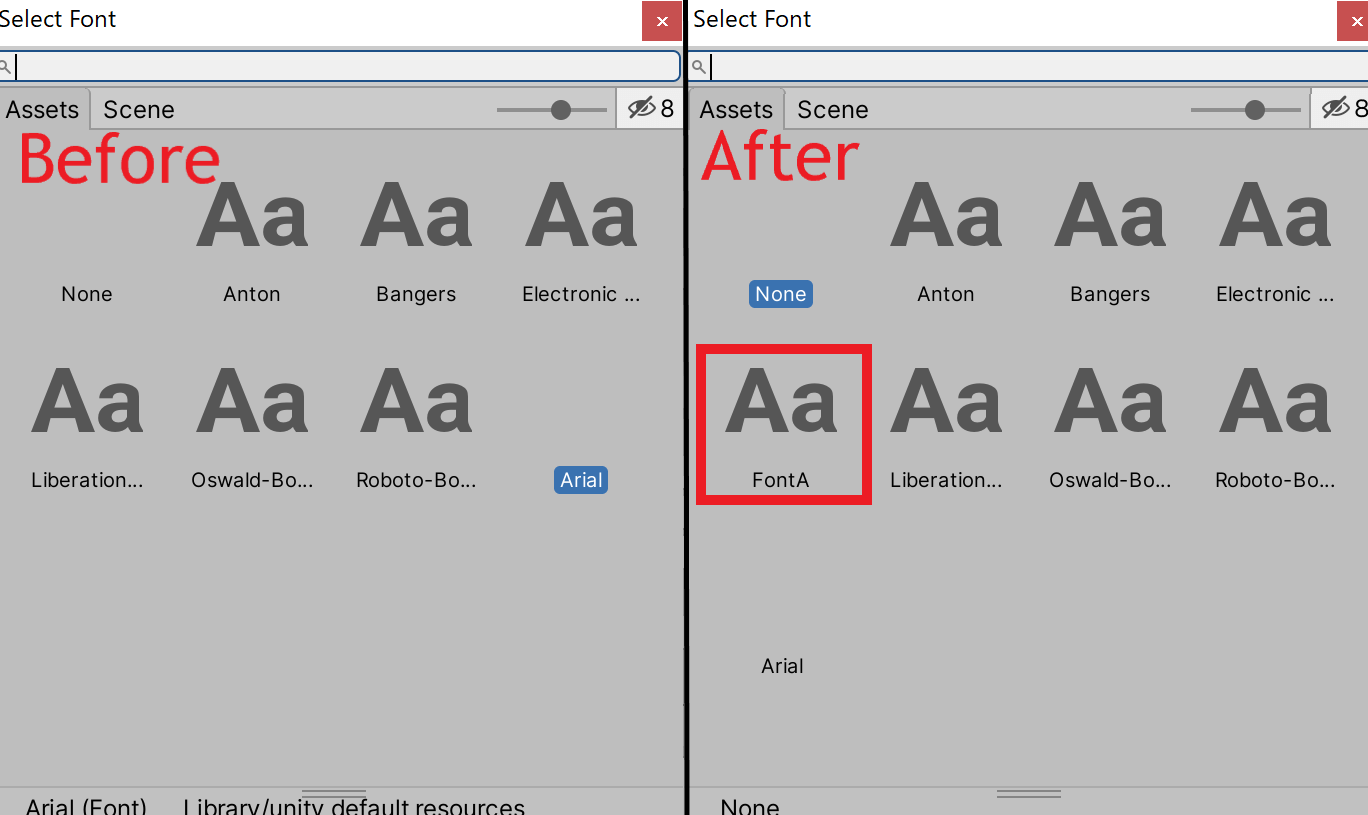
The added font will be displayed when selecting a font.
Placing Text Using Text Mesh Pro
With Text Mesh Pro, you can place text in your scene with less blur, the text will be displayed correctly even when it is placed as 3D text, and the text decoration can be made more attractive.
Zoomed-in comparison of normal text and Text Mesh Pro text.

Text with various decorations added.
How to Install Text Mesh Pro
When you create a Text Mesh Pro text for the first time, you will see the following window.
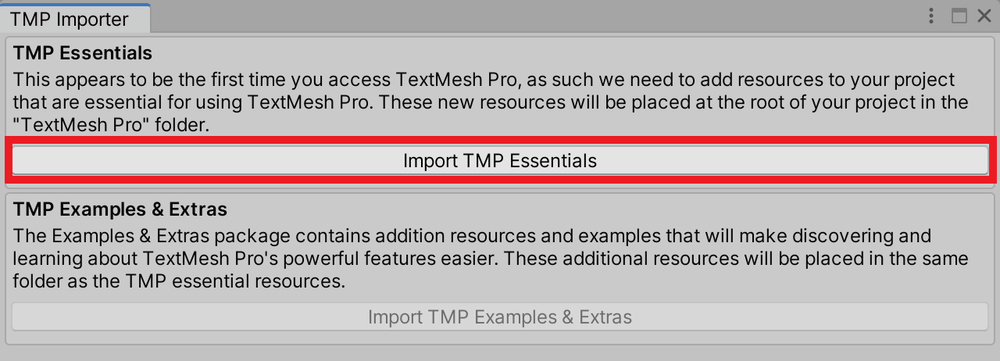
Click “Import TMP Essentials”.
Click “Import TMP Essentials” in the red frame of the image, and Text Mesh Pro will be available.
How to Create a Text
When you use Text Mesh Pro, the way to create a text is almost the same as the default text feature. You can either create a Text(TMP) on Canvas or a 3D Text(TMP).
Both methods will be explained below.
How to Create Text(TMP) on Canvas
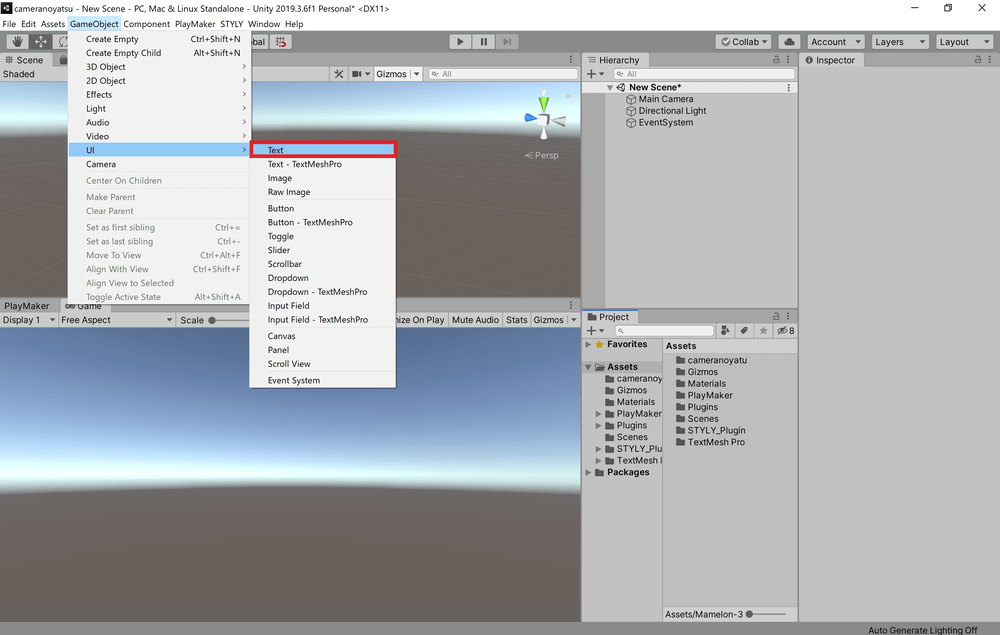
If there is no Canvas in the scene, click GameObject at the top of the screen, and select UI→Text – TextMeshPro.
Click on GameObject from the tab at the top of the screen and select UI→Text – TextMeshPro.
At this time, a new Canvas is created at the same time as the Text (TMP).
If you already have a Canvas in your scene, right-click on the Canvas you want to add text to in the Hierarchy window and select UI→Text – TextMeshPro.
Right-click on the Canvas and select UI→Text – TextMeshPro.
Also, you can rename the newly created Text (TMP) and Canvas as you wish.
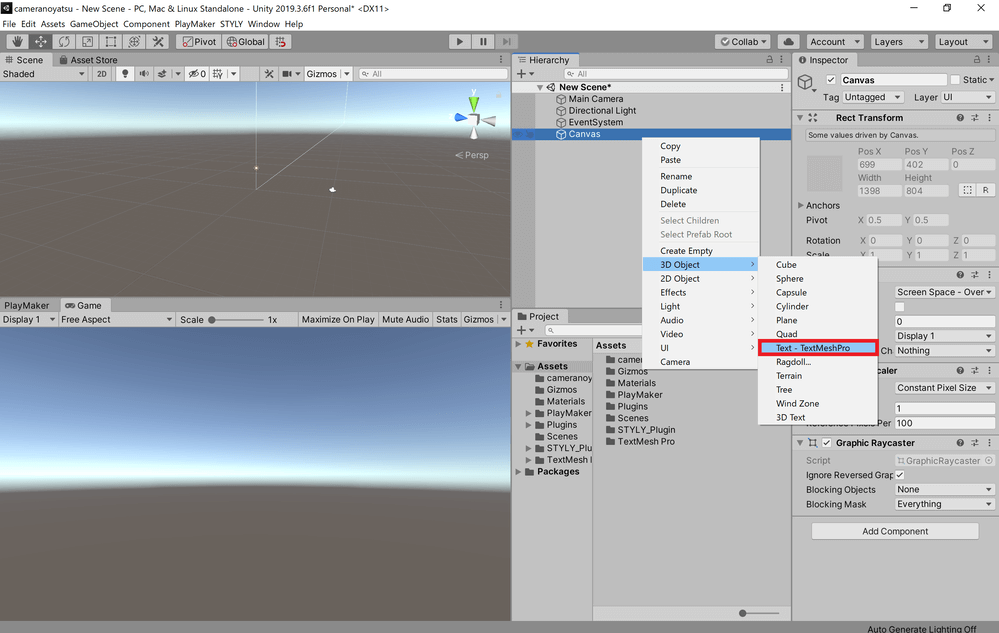
How to Create a 3D Text (TMP)
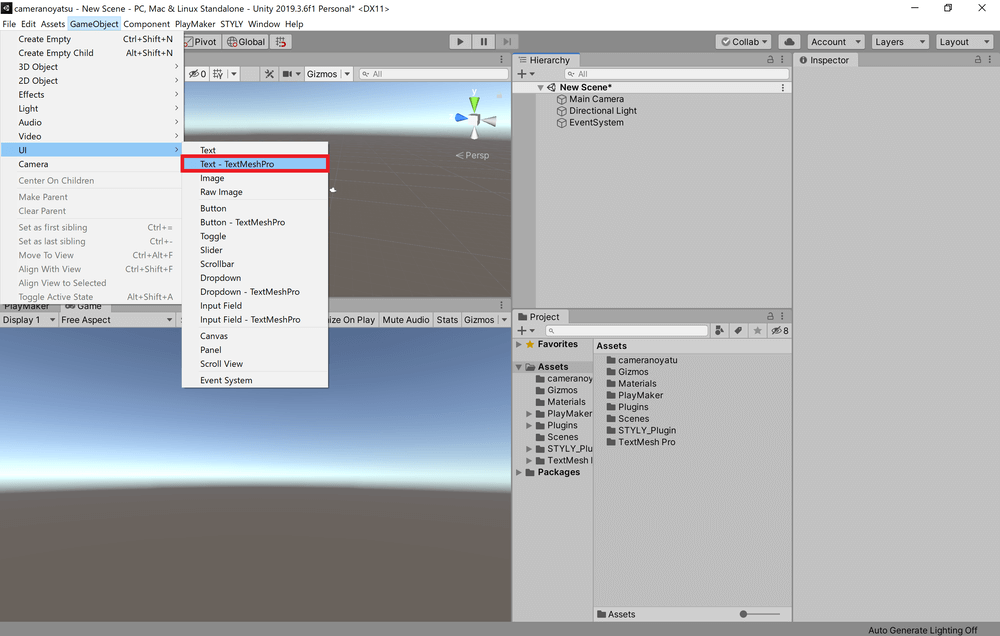
Click on GameObject from the tab at the top of the screen and select 3D Object→Text – TextMeshPro.

Click on GameObject from the tab at the top of the screen and select 3D Object→Text – TextMeshPro.
You can then create a Text (TMP) in your scene.
You can rename it as you like.
Setting up Text Mesh Pro
In the Inspector for the created text, there is a component called “TextMeshPro – Text”.
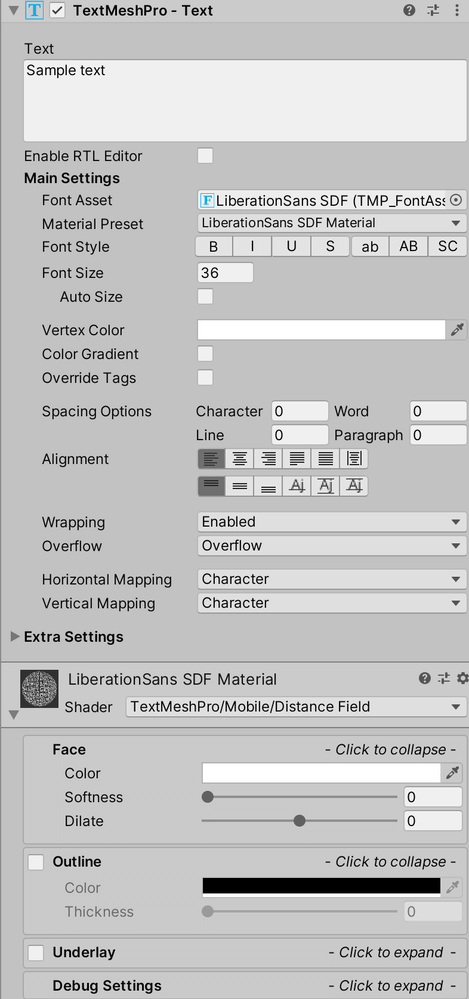
TextMeshPro – Text component.
By modifying this component, you can make various changes to the text.
The following table summarizes the most commonly used properties of TextMeshPro – Text.
| Property Name | Discription |
| Text | Allows you to enter a text sentence. |
| Enable RTL Editor | When checked, text can be written from right to left. |
| Font Asset | Allows you to change the font of the text. |
| Material Preset | Allows you to change the material of the text. |
| Font Style | Allows you to change text to bold, italic, etc., and add underlines and strikethroughs. You can also change all letters to uppercase or lowercase, or capitalize all letters and make only the first letter of a word larger. |
| Font Size | Allows you to change the size of the text. |
| Auto Size | If checked, the text size will be automatically adjusted according to the available space. You can also set the maximum font size for auto-adjustment. |
| Vertex Color | Allows you to change the base color of the text vertices. |
| Color Gradient | If checked, a gradient color will be applied on top of the base color selected in Vertex Color. You can set the gradient color by yourself or select a preset. |
| Override Tags | If checked, the color set in the properties will take precedence even if you enter color tags in the text. |
| Spacing Options | Allows you to change the size of the spaces between characters, words, lines, and sentences. |
| Alignment | Allows you to change the alignment of text in a detailed way, using a combination of horizontal and vertical alignment. |
| Wrapping | When enabled, wraps text. |
| Overflow | Allows you to change how the text beyond the specified border will be displayed. |
| Horizontal Mapping Vertical Mapping |
Allows you to change how the text face and outline textures are mapped. |
| Margins | Allows you to change the distance between the text and the specified border. |
| Sorting Layer | Allows you to change the Sorting Layer. |
| Order in Layer | Sorting Allows you to change the order of the columns in the layer. |
| Orthographic Mode | If checked, perspective correction will not be applied when using an orthographic camera. |
| Rich Text | If checked, tags can be used. |
| Parse Escape Character | Check this box to display strings such as “n” as an escape character. If unchecked, strings such as “n” will be displayed as is. |
| Sprite Asset | Allows you to select a Sprite Asset. |
| Kerning | If checked, spaces between characters will be made character-specific. |
| Extra Padding | Check the Extra Padding checkbox to add whitespace between the text and the edge of the text mesh. This will reduce the chance of graphic errors when displaying small text. |
How to Change the Font
Prepare a ttf or otf file of the font you want to use.
Drag and drop the prepared file to the Project view of Unity.
Drag and drop the file to Unity’s Project view.
The font will then be reflected in the Project view.
Next, click “Window” from the tab at the top of the screen, and select “TextMeshPro -> Font Asset Creator” to open the “Font Asset Creator” window.
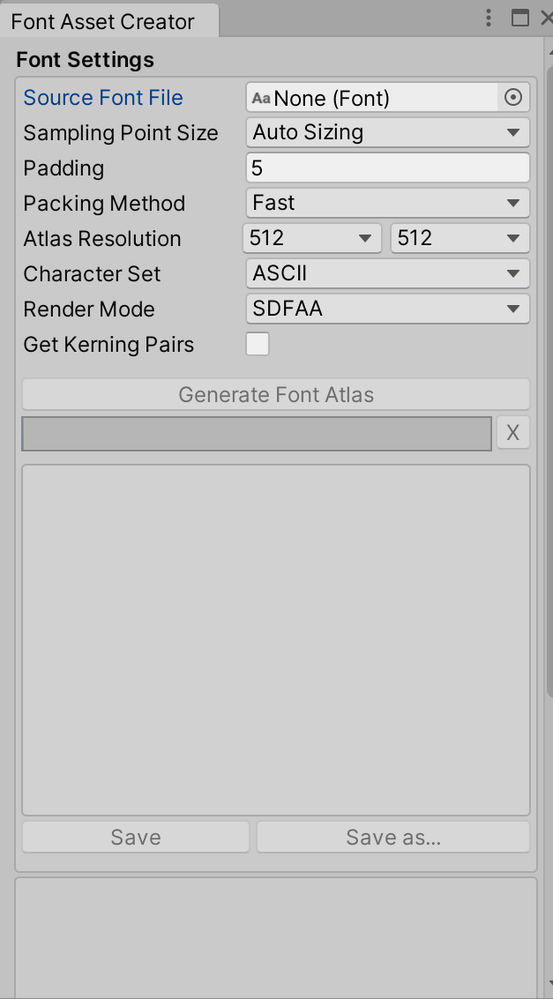
Font Asset Creator.
Change the “Source Font File” to the font you have added.
If the font you want to add is only available in English, click “Generate Font Atlas”.
If you want to use a font that is not added by default, such as Japanese, change the Character Set to Custom Characters, enter the characters you want to use in the Custom Character List that appears below the Character Set, and click Generate Font Atlas.
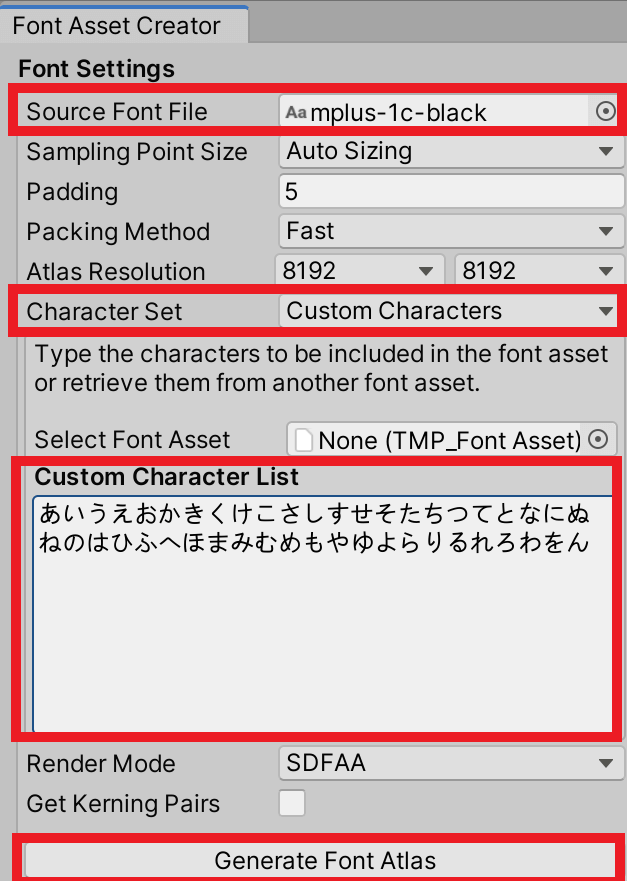
Font Asset Creator Settings for adding Japanese fonts, etc.
You will see the generated font image and the result of font generation in the window.

After generating Font Asset Creator.
*If you see characters under “Characters missing from font file”, it means that the characters you see are not included in the original font file and the generation failed.
*If the generated font image is strongly blurred, or if characters are displayed under “Characters excluded from packing” and are not included in the generated font image, the value of “Atlas Resolution” may not be sufficient. If the characters are displayed under the “Atlas Resolution” and are not included in the generated font image, the value of “Atlas Resolution” may be insufficient, so increase the value and try to generate again.
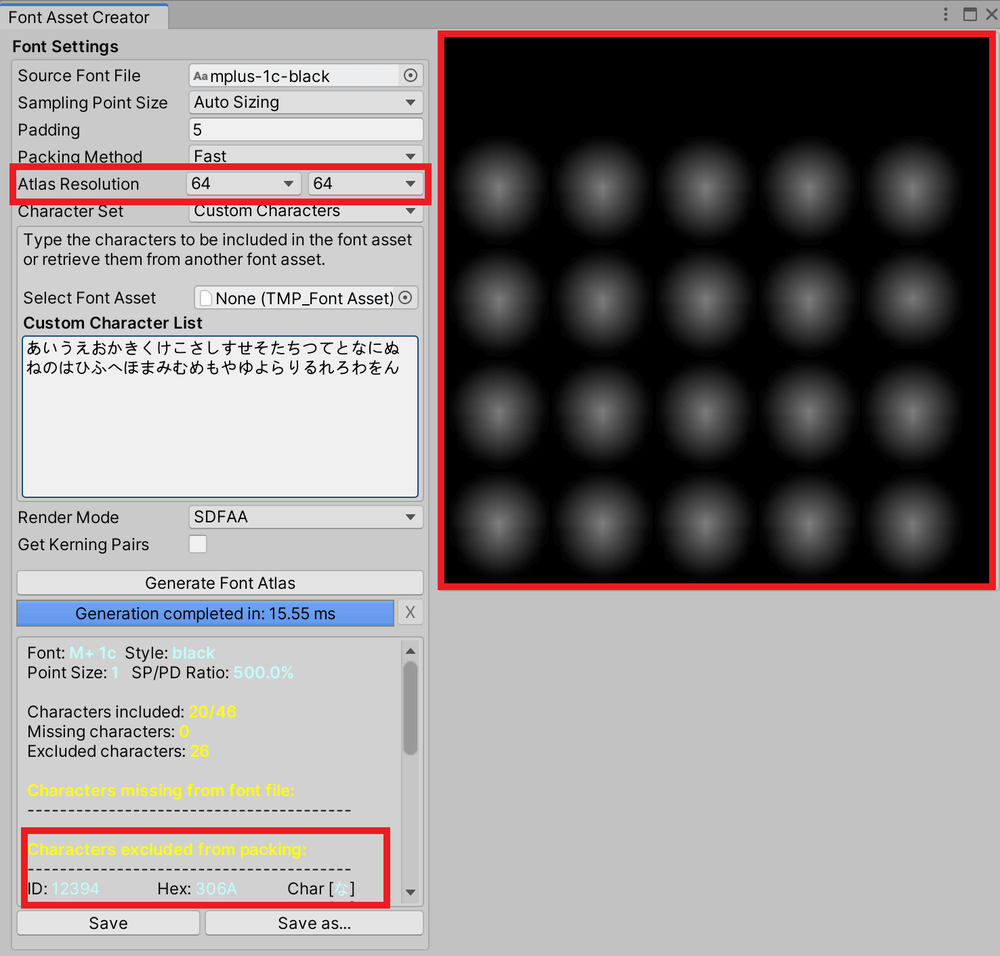
Example of failure after generating Font Asset Creator.
Click “Save” or “Save as…” to save the font. You can select the newly created font asset from the Font Asset property in the Inspector of Text Mesh Pro.
How to Upload to STYLY
Let’s upload the 3D model to STYLY.
*3D Text or 3D Text(TMP) can be prefabricated in Unity and uploaded to STYLY, but other text needs to be uploaded to STYLY for the whole scene, so please be careful when uploading.
Create a STYLY account
How to create a STYLY account
How to upload to STYLY
How to upload to STYLY from Unity