Download PC Repair Tool to quickly find & fix Windows errors automatically
In today’s post, we will attempt to show you how to resolve the issue The current BIOS setting do not fully support the boot device that you might encounter on your Windows 10 computer.

If you’re experiencing this issue, we suggest you try these solutions in no particular order:
- Check your HDD physically
- Perform Startup Repair
- Check boot device order
- Reset BIOS settings.
Now, let’s take a detailed look at the listed troubleshooting.
1] Check your HDD physically
This solution requires you to open the computer and disconnect and reconnect the hardware inside. Proceed only if you know what you are doing or take the computer to a hardware technician to perform the procedure.
If this is a new or relatively new build, check the HDD for connection issues. Open the computer and disconnect the SATA cable from the HDD and motherboard. Also, disconnect all the power from the HDD and leave the components idle for a few minutes. Now plug all the cables and connect the hard drive to your motherboard. Boot the computer and see if the issue is resolved.
If that does not work, try plugin the HDD to a different SATA port on the MOBO to see if that helps.
2] Perform Startup Repair
 Windows 10 Startup Repair is an alternate way to boot the PC and run recovery tools when something goes wrong with the operating system.
Do the following:
- Insert the Windows 10 installation DVD/USB and restart your computer.
- After you boot your computer using Windows DVD/USB or System Repair Disc, a black screen appears with gray text “Press any key to boot from CD or DVD”. Press any key.
- Select the correct time and Keyboard type.
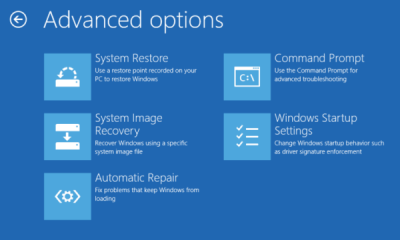
- Click Repair your computer in the lower-left corner.
- Select Troubleshoot from Choose an option screen.
- Click Advanced options in Troubleshoot screen.
- Click Automatic/Startup Repair.
Windows will then look for problems on the hard drive(s) and verify that all required files are intact.
3] Check boot device priority

- Start the computer and press ESC/F1/F2/F8 or F10 during the initial startup screen to enter the BIOS Setup screen
- Choose Enter BIOS setup option.
- Since the mouse does not work, use the arrow keys to navigate.
- Go to the Boot tab.
- Now check the boot device order. Make sure your HDD is selected as the priority device.
- Exit and restart the computer.
Check if the error is resolved. If not, proceed with the next solution.
4] Reset BIOS settings

To reset the BIOS settings, do the following:
- Restart your computer and repeatedly press ESC/F1/F2/F8 or F10 during the startup to get into BIOS.
- If you are using Windows 10, click on Start and select Power.
- Now press and hold the Shift key and press Restart.
- Go to Troubleshoot > Advanced Options > UEFI Firmware Settings and click on Restart.
- Once you are in BIOS, press F9 to open the Load Default Options dialogue box.
- Select Yes using the arrow keys to reset BIOS settings to factory default.
- Exit and restart the computer.
On boot, check to see if the BIOS error is resolved.
That’s all there’s to successfully resolving the issue.

Obinna Onwusobalu has studied Information & Communication Technology and is a keen follower of the Windows ecosystem. He has been a Windows Insider MVP (2020). He runs a computer software clinic.
Download PC Repair Tool to quickly find & fix Windows errors automatically
In today’s post, we will attempt to show you how to resolve the issue The current BIOS setting do not fully support the boot device that you might encounter on your Windows 10 computer.
If you’re experiencing this issue, we suggest you try these solutions in no particular order:
- Check your HDD physically
- Perform Startup Repair
- Check boot device order
- Reset BIOS settings.
Now, let’s take a detailed look at the listed troubleshooting.
1] Check your HDD physically
This solution requires you to open the computer and disconnect and reconnect the hardware inside. Proceed only if you know what you are doing or take the computer to a hardware technician to perform the procedure.
If this is a new or relatively new build, check the HDD for connection issues. Open the computer and disconnect the SATA cable from the HDD and motherboard. Also, disconnect all the power from the HDD and leave the components idle for a few minutes. Now plug all the cables and connect the hard drive to your motherboard. Boot the computer and see if the issue is resolved.
If that does not work, try plugin the HDD to a different SATA port on the MOBO to see if that helps.
2] Perform Startup Repair
Windows 10 Startup Repair is an alternate way to boot the PC and run recovery tools when something goes wrong with the operating system.
Do the following:
- Insert the Windows 10 installation DVD/USB and restart your computer.
- After you boot your computer using Windows DVD/USB or System Repair Disc, a black screen appears with gray text “Press any key to boot from CD or DVD”. Press any key.
- Select the correct time and Keyboard type.
- Click Repair your computer in the lower-left corner.
- Select Troubleshoot from Choose an option screen.
- Click Advanced options in Troubleshoot screen.
- Click Automatic/Startup Repair.
Windows will then look for problems on the hard drive(s) and verify that all required files are intact.
3] Check boot device priority
- Start the computer and press ESC/F1/F2/F8 or F10 during the initial startup screen to enter the BIOS Setup screen
- Choose Enter BIOS setup option.
- Since the mouse does not work, use the arrow keys to navigate.
- Go to the Boot tab.
- Now check the boot device order. Make sure your HDD is selected as the priority device.
- Exit and restart the computer.
Check if the error is resolved. If not, proceed with the next solution.
4] Reset BIOS settings
To reset the BIOS settings, do the following:
- Restart your computer and repeatedly press ESC/F1/F2/F8 or F10 during the startup to get into BIOS.
- If you are using Windows 10, click on Start and select Power.
- Now press and hold the Shift key and press Restart.
- Go to Troubleshoot > Advanced Options > UEFI Firmware Settings and click on Restart.
- Once you are in BIOS, press F9 to open the Load Default Options dialogue box.
- Select Yes using the arrow keys to reset BIOS settings to factory default.
- Exit and restart the computer.
On boot, check to see if the BIOS error is resolved.
That’s all there’s to successfully resolving the issue.
Obinna Onwusobalu has studied Information & Communication Technology and is a keen follower of the Windows ecosystem. He has been a Windows Insider MVP (2020). He runs a computer software clinic.
|
0 / 0 / 0 Регистрация: 08.03.2017 Сообщений: 6 |
|
|
1 |
|
Не определяется жесткий диск08.03.2017, 05:10. Показов 21981. Ответов 18
Ребята помогите кто может!!! The current bios settings do not fully support the boot device. С начала начала вылазить эта беда,но после ctrl+alt+del Windows загружалась нормально,особого значения не придал.Лень было колупаться. PS.- Когда комп долго работает то перезагружается без проблем.Беда эта после долгого простоя,когда на ночь комп выключаю.Создается впечатление что ему разогреться надо.Контакты шевелил не помогло
__________________
0 |

|
Programming Эксперт 94731 / 64177 / 26122 Регистрация: 12.04.2006 Сообщений: 116,782 |
08.03.2017, 05:10 |
|
18 |
|
Почетный модератор
28037 / 15768 / 981 Регистрация: 15.09.2009 Сообщений: 67,753 Записей в блоге: 78 |
|
|
08.03.2017, 06:27 |
2 |
|
95% проблемы с блоком питания. оставшиеся 5 — с самим винтом.
1 |
|
1146 / 954 / 76 Регистрация: 11.10.2010 Сообщений: 6,031 |
|
|
08.03.2017, 06:42 |
3 |
|
если с паяльником на дружите, то в сервис.
0 |
|
Заблокирован |
|
|
08.03.2017, 14:07 |
4 |
|
если с паяльником на дружите, то в сервис
0 |

 А что паять то предполагается?
|
1146 / 954 / 76 Регистрация: 11.10.2010 Сообщений: 6,031 |
|
|
08.03.2017, 16:08 |
5 |
|
vasfilin можно найти, а если найдешь…что делать? Ватсон, вам не кажется что мы ходим по кругу?
0 |

|
Заблокирован |
|
|
08.03.2017, 16:48 |
6 |
|
а если найдешь…что делать? Заменить негодное изделие — разве не так?
0 |
")
|
Модератор
20529 / 12415 / 2189 Регистрация: 23.11.2016 Сообщений: 62,100 Записей в блоге: 23 |
|
|
09.03.2017, 12:45 |
7 |
|
Wellcome, ну вы хоть Смарт для начала покажите… прежде, чем паять идти… График чтения без ремапа Викторией покажите. Шлейф замените. В другой порт перекомутируйте. А еще — БП огласите, полностью. А еще — проц и видеокарту, чтобы мы могли хоть примерно ситуацию с мощностью проверить.
0 |
|
0 / 0 / 0 Регистрация: 08.03.2017 Сообщений: 6 |
|
|
10.03.2017, 06:13 [ТС] |
8 |
|
Wellcome, ну вы хоть Смарт для начала покажите… прежде, чем паять идти… График чтения без ремапа Викторией покажите. Шлейф замените. В другой порт перекомутируйте. А еще — БП огласите, полностью. А еще — проц и видеокарту, чтобы мы могли хоть примерно ситуацию с мощностью проверить. Викторией проверял из 976773167 485 зеленых,36 оранжевых. Красных и битых не было. Проверял ни чего не выключая, в браузере ковыряясь, смотря видео, так что думаю если все отключить было бы меньше. Проц — DualCore Intel Core i3-3210, 3200 MHz Шлейф менял,на 100% рабочий не помогает,порты тоже менял.
0 |
|
Модератор
20529 / 12415 / 2189 Регистрация: 23.11.2016 Сообщений: 62,100 Записей в блоге: 23 |
|
|
10.03.2017, 08:19 |
9 |
|
Wellcome, С БП всё в норме, там с запасом. Слушайте, а скажите, у вас всё работало уже вот на таких параметрах, как сейчас, а потом перестало, или вы что-то сделали, а потом оно перестало? Спрашиваю потому, что изначально Compatibility Support Module — это средство нового биоса загружаться со старых каких-то загрузчиков, или чего-то в этом роде. Поэтому вам придётся разобраться с тем, какие именно настройки загрузки у вас там стоят. Эта надпись, которая у вас там появляется — это способ Биоса сообщить вам, что он не поддерживает загрузку с того, с чего у вас там оно пытается загрузиться. Если у вас установлена 7-ка или ХР-шка, то в загрузке должно присутствовать «Легаси», а вообще — сбросьте биос на дефолт для начала. Потом ставьте «Легаси», выбирайте в списке загрузки ваш винт, ставьте его первым и пробуйте.
0 |
|
0 / 0 / 0 Регистрация: 08.03.2017 Сообщений: 6 |
|
|
10.03.2017, 08:30 [ТС] |
10 |
|
Wellcome, С БП всё в норме, там с запасом. Слушайте, а скажите, у вас всё работало уже вот на таких параметрах, как сейчас, а потом перестало, или вы что-то сделали, а потом оно перестало? Спрашиваю потому, что изначально Compatibility Support Module — это средство нового биоса загружаться со старых каких-то загрузчиков, или чего-то в этом роде. Поэтому вам придётся разобраться с тем, какие именно настройки загрузки у вас там стоят. Эта надпись, которая у вас там появляется — это способ Биоса сообщить вам, что он не поддерживает загрузку с того, с чего у вас там оно пытается загрузиться. Если у вас установлена 7-ка или ХР-шка, то в загрузке должно присутствовать «Легаси», а вообще — сбросьте биос на дефолт для начала. Потом ставьте «Легаси», выбирайте в списке загрузки ваш винт, ставьте его первым и пробуйте. Так а я о чем писал ранее?
0 |
")
|
Модератор
20529 / 12415 / 2189 Регистрация: 23.11.2016 Сообщений: 62,100 Записей в блоге: 23 |
|
|
10.03.2017, 09:10 |
11 |
|
Wellcome, там где-то в настройках загрузчика должно настраиваться тип загрузки. можно выбирать из Legasy и UEFI. Попробуйте это найти и выбрать там вариант, в котором будет присутствовать Legasy. А потом найдите порядок загрузки и выставьте там ваш жесткий первым. Извините, если вы это уже делали, но
и переключений boot вклвыклавто это немного не то. Хотя Compatibility Support Module лучше выключите пока.
0 |
|
Модератор
4954 / 2311 / 141 Регистрация: 27.06.2011 Сообщений: 9,167 |
|
|
10.03.2017, 09:39 |
12 |
|
Wellcome, смарт то покажите или это настолько приватная информация…
0 |
|
Заблокирован |
|
|
10.03.2017, 11:45 |
13 |
|
Проц — DualCore Intel Core i3-3210, 3200 MHz Хмммм -предполагалось что имя «больного» тоже будет в этом списке, и даже на первом месте.
0 |
")
|
0 / 0 / 0 Регистрация: 08.03.2017 Сообщений: 6 |
|
|
11.03.2017, 04:40 [ТС] |
14 |
|
Wellcome, там где-то в настройках загрузчика должно настраиваться тип загрузки. можно выбирать из Legasy и UEFI. Попробуйте это найти и выбрать там вариант, в котором будет присутствовать Legasy. А потом найдите порядок загрузки и выставьте там ваш жесткий первым. Извините, если вы это уже делали, но это немного не то. Хотя Compatibility Support Module лучше выключите пока. При переключение SATA настроек с IDE на ACHI появляются эти пункты.И определяться жесткий даже начинает.Но винду то не загрузишь.При переключении обратно жесткий пропадает,ну не видит его биос и все, а надписи становятся статичными «empty».А так как биос не видит его, то и включить первым его не могу. Добавлено через 7 минут WDC WD5000AZRX-00L4HB0 ATA Device Не написал сразу, так как проверил подозрений к нему нет.
0 |
|
0 / 0 / 0 Регистрация: 08.03.2017 Сообщений: 6 |
|
|
11.03.2017, 04:54 [ТС] |
15 |
|
Wellcome, смарт то покажите или это настолько приватная информация…
0 |
|
1146 / 954 / 76 Регистрация: 11.10.2010 Сообщений: 6,031 |
|
|
11.03.2017, 06:45 |
16 |
|
шлейф менять пробовали?
0 |
|
Модератор
20529 / 12415 / 2189 Регистрация: 23.11.2016 Сообщений: 62,100 Записей в блоге: 23 |
|
|
13.03.2017, 10:37 |
17 |
|
Wellcome, смарт в норме.
При переключение SATA настроек с IDE на ACHI появляются эти пункты.И определяться жесткий даже начинает. Вот, так и оставьте. И не меняйте.
Но винду то не загрузишь. но винт определяется, и вот это:
The current bios settings do not fully support the boot device. уже не пишет, я правильно понимаю? Опишите пожалуйста еще раз, что происходит в этом случае.
0 |
|
0 / 0 / 0 Регистрация: 08.03.2017 Сообщений: 6 |
|
|
13.03.2017, 10:47 [ТС] |
18 |
|
kumehtar О чем вы?
0 |
|
Модератор
20529 / 12415 / 2189 Регистрация: 23.11.2016 Сообщений: 62,100 Записей в блоге: 23 |
|
|
14.03.2017, 11:52 |
19 |
|
Протоколы??? Добавлено через 52 секунды
0 |
by Tashreef Shareef
Tashreef Shareef is a software developer turned tech writer. He discovered his interest in technology after reading a tech magazine accidentally. Now he writes about everything tech from… read more
Updated on August 26, 2020
BIOS related errors in the Windows system are not common. However, when a BIOS related error occurs, it usually makes your system freeze, shut down, or the screen goes black. One such error is “the current BIOS settings do not fully support the boot device”.
Several users have reported similar errors in the Microsoft Community forum:
Getting the following message periodically, computer will freeze, shut down, screen goes black. After several attempts will revive.
<the current BIOS setting do not fully support the boot device>
If you are also troubled by this error, here are a couple of troubleshooting steps to help you resolve the error.
What can I do if my BIOS won’t support the boot device?
1. Check your HDD

- Assuming, you are having a problem with a new or relatively new build, check the HDD for connection issues.
- Open the computer and disconnect the SATA cable from the HDD and motherboard.
- Also, disconnect all the power from the HDD and leave the components idle for a few minutes.
- Now plug all the cables and connect the hard drive to your motherboard.
- Turn on the computer and check for any improvements.
If that does not work, try plugin the HDD to a different SATA port on the motherboard to see if that helps.
Note: This solution requires you to open the computer and disconnect and reconnect the hardware inside. Proceed only if you know what you are doing.
2. Run Startup Repair
- Insert the System Repair Disc or Windows DVD in the DVD/ USB flash drive.
- Restart your computer. The computer will boot using the inserted DVD drive.
- When the “Press any key to boot from CD or DVD” appears, press any key.
- Select the correct time and Keyboard type.
- Select the “Repair your computer” option in the lower-left corner.
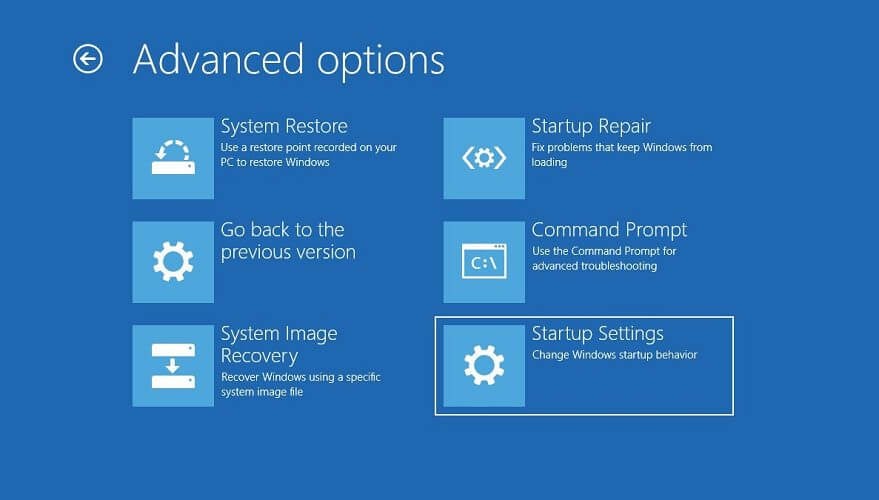
- Select the Troubleshoot option under the “Choose an option” screen.
- Under the Troubleshoot screen, click on Advanced Options.
- Click on Startup Repair.
- Windows will now scan for any issues with the system that is causing issues during the startup and fix them.
If you don’t have a Windows DVD, you can create one using Windows 10 ISO. Here is how to create a Windows 10 bootable drive.
Stuck on Automatic repair loop? Don’t worry, we’ll throw you this amazing lifeline.
3. Check boot device order
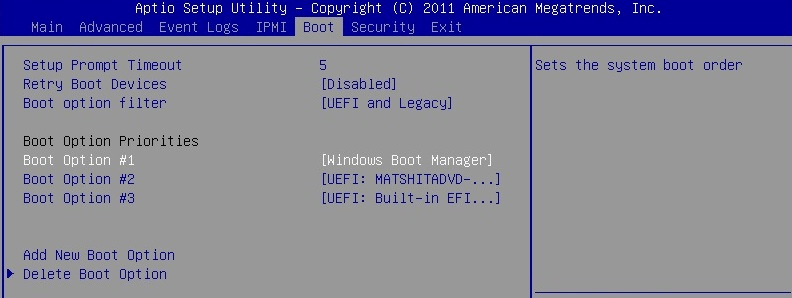
- Start the computer and press ESC/F1/F2/F8 or F10 during the initial startup screen.
- Choose enter BIOS setup option.
- Since the mouse does not work, use the arrow keys to navigate.
- Go to the Boot tab.
- Now check the boot device order. Make sure your HDD is selected as the priority device.
- Exit and restart the computer. Check if the error is resolved.
4. Reset BIOS settings
- Restart your computer and repeatedly press ESC/F1/F2/F8 or F10 during the startup to get into BIOS.
- If you are using Windows 10, click on Start and select Power. Now press and hold the Shift key and press Restart. Go to Troubleshoot > Advanced Options > UEFI Firmware Settings and click on Restart.
- Once you are in BIOS, press F9 to open the Load Default Options dialogue box.
- Select Yes using the arrow keys to reset BIOS settings to factory default.
- Exit and restart the computer and check for any improvements.
Accessing BIOS seems too big of a task? Let us make things easier for you with the help of this amazing guide!
The current BIOS settings do not fully support the boot device error occurs due to issues with the BIOS. Follow all the fixes in this article to resolve the issues and get your system back online.
If you have any other questions or suggestions, leave them in the comments section below and we’ll surely check them out.
RELATED STORIES YOU MAY LIKE:
- How to recover your lost BIOS password in Windows 10
- Can’t access BIOS on Windows 10 [FIXED]
- How to update BIOS on Windows 10 [COMPLETE GUIDE]
![]()
Newsletter
-
08-18-2017 02:40 AM
#1

ROG Member
Array
jnathanvp PC Specsjnathanvp PC Specs Laptop (Model) HP ProBook 4530s Motherboard Asus Sabertooth Z77 Processor Intel Core i7 2400 Memory (part number) 32 GB RAM Graphics Card #1 NVIDIA GeForce Sound Card On Board Monitor Acer Storage #1 HDD WD 500GB 7200rpm CPU Cooler Cooler Master V8 Case Cooler Master Power Supply APOWER 850W Keyboard Logitech Mouse Logitech Headset Logitech Mouse Pad Logitech Headset/Speakers Logitech OS Windows 7 Professional 64bits Asus Sabertooth Z77 (The current BIOS setting do not fully support the boot device)
Greetings everyone,
Recently I had some problem with my Sabertooth Z77 and do not know what is wrong, I have tried almost everything and still the same problem, first of all, I would like to tell you that this Motherboard was used already at the time that I bought it and I do not know what was happening with it in the past.
This is the problem that I have right now and I do not have the minimum idea how to fix it, if you can help me is going to be very helpful for me because I am using this computer everyday for working.
*After this problem I do not know how to fix it, I did try almost everything but maybe you know something more to help me…
And then is coming something really weird, now sometimes the Motherboard is recognizing my HDD and sometimes not and I really do not know what happen.
As you can see in that photo there is no HDD but sometimes appears down there in the list of Booting Devices but the most of the time not, it just disappears and this is what is weird for me. If you know where is this problem coming from, please, let me know because this is really a madness do not have your PC and well equipped because of one problem that you do not have the minimum idea.
This is what I have in my CSM, if you got this problem and you solved already just give me a hand with this. Thank you so much in advanced and have a great and wonderful day.
JnathanVP.*
-
08-18-2017 03:21 AM
#2
ROG Guru: Green Belt
Array
KPRage PC SpecsKPRage PC Specs Motherboard Maximus V Gene Processor 3570k Memory (part number) Vengance 1866 8Gb Ram Graphics Card #1 Zotac GTX 1070 Mini Graphics Card #2 ASUS R9 280 DC2 Graphics Card #3 Radeon 5850 HD Monitor ASUS VZ27AQ Storage #1 Samsun EVO 850 Pro Storage #2 3 1TB HDDs CPU Cooler H80 Case Merc Alpha Power Supply TX 650 80 plus Gold OS Win 7/ Win 8.1/ Win 10
Hey Jnathan,
Welcome to ROG.. Can you provide more details of the HDD you are connecting and, rest of your system details please.Cheers,
KPCPU: Intel i5 3570k OC’d to 4.6GHz @1.170V; Mobo: MVG; GPU: Zotac 1070 mini OC’d to +210MHz/+205MHz; Memory: 8GB (2X4GB dual channel) Corsair Vengeance 1333Mhz 9-10-9-T2; SSD: Samsung 840 pro; HDD: 1TB WD Green 6Gbps; PSU: Corsair GS 600w; Case: Bitfenix Merc Alpha:Hybrid Octane in progress; Cooler: Corsair H80 closed loop cooling @ high profile;
Pre & Post Build Guide
A lot of epic FAIL videos are made before one epic WIN video is made
-
08-18-2017 11:31 AM
#3
ROG Member
Array
jnathanvp PC Specsjnathanvp PC Specs Laptop (Model) HP ProBook 4530s Motherboard Asus Sabertooth Z77 Processor Intel Core i7 2400 Memory (part number) 32 GB RAM Graphics Card #1 NVIDIA GeForce Sound Card On Board Monitor Acer Storage #1 HDD WD 500GB 7200rpm CPU Cooler Cooler Master V8 Case Cooler Master Power Supply APOWER 850W Keyboard Logitech Mouse Logitech Headset Logitech Mouse Pad Logitech Headset/Speakers Logitech OS Windows 7 Professional 64bits Greetings and of course I can do that, first of all, thank you so much for the rapid response and here I will write all the information about the HDD and the whole system:
HDD Western Digital 500GB SATA / 32MB Cache WD5000AZLX 7200rpm (WD Blue PC Hard Drive).
Asus Sabertooth Z77
32 GB RAM
Runing Operative System Windows 7 Professional 64 bits
ATX 850 W
I was wondering from the beginning if I need to reset the BIOS of the motherboard, because I bought this tower from someone else and since that time I never touch the BIOS or change anything in there. The last owner of this PC was using it as a Server at that time and he was using 3 HDD in RAID mode.
If you need more information just let me know, thank once again for have answered me.
JnathanVP.
Last edited by jnathanvp; 08-18-2017 at 11:50 AM.
Reason: Note about where this PC coming from…
-
08-18-2017 12:20 PM
#4
ROG Guru: Black Belt
Array
Korth PC SpecsKorth PC Specs Motherboard ASUS X99 R5E (BIOS2101/1902) Processor Haswell-EP E5-1680-3 SR20H/R2 (4.4GHz) Memory (part number) Vengeance LPX 4x8GB SS DDR4-3000 (CMK32GX4M4C3000C15) Graphics Card #1 NVIDIA Quadro GP100GL/16GB, 16xPCIe3, NVLink1 (SLI-HB) Graphics Card #2 NVIDIA Quadro GP100GL/16GB, 16xPCIe3, NVLink1 (SLI-HB) Sound Card JDS Labs O2+ODAC (RevB), USB2 UAC1 Monitor ASUS PG278Q Storage #1 Samsung 850 PRO 512GB SSDs, 4xSATA3 RAID0 Storage #2 Comay BladeDrive E28 3200GB SSD, 8xPCIe2 CPU Cooler Raijintek NEMESIS/TISIS, AS5, 2xNH-A14 Case Obsidian 750D (original), 6xNH-A14 Power Supply Zalman/FSP ZM1250 Platinum Headset Pilot P51 PTT *modded* OS Arch, Gentoo, Win7x64, Win10x64 Network Router Actiontec T3200M VDSL2 Gateway Accessory #1 TP-Link AC1900 Archer T9E, 1xPCIe Accessory #2 ASUS/Infineon SLB9635 TPM (TT1.2/FW3.19) Accessory #3 ASUS OC Panel I (FW0501)
Check all voltages in BIOS hardware monitor (if you can), aging PSU may be failing or drifting out of tolerance (especially if it’s cheap and/or it’s often strained from overclocking, heavy duty-cycle, or «dirty» AC power input).
Check all the signal and power cables (along with connections on both ends) on your boot drive, inspect carefully for frayed insulation or bent/broken/dirty pins (and repair with electrical tape and needlenose/tweezers if needed). Swap boot drive power and SATA signal cables if you have any spares. Try using a different motherboard SATA port and PSU power input if you can.
Try the boot drive in another computer, if possible, to confirm it hasn’t died (or isn’t suffering intermittent failures).
Western Digital offers some free softwarehere to diagnose and troubleshoot failures on WD HDDs … but they’ll only work if the BIOS can detect the drive.
Check if the BIOS chip has creeped out of socket (and push it back down if needed).
Maybe time to reflash BIOS, the firmware could (somehow) be degraded or corrupted. (A chance to upgrade to the latest-and-greatest BIOS version, if you don’t already have it, along with a chance that it fixes some kind of drive-detection issue, lol. Write down all your important BIOS settings first, of course.)
It’s possible that your motherboard CR2032 coin battery is dead or dying (check with DMM, costs less than $1 to replace if less than 3.0V).
…
Incidentally — and off topic — you would see *amazing* performance increases (on startup/shutdown, file access, loading screens, general computing stuff, etc) if you upgraded your boot/system drive from HDD to SSD.
I see many2.5″ SATA SSDs at newegg.com — avoid the cheap-cheap «KingDian» S100/S200 SSDs because they’re actually slower than fast HDDs and they look (to me) to be of dubious reliability/longevity — but any good/fast/cheap SSD (like the $60 120GB Crucial/PNY/Kingston/ADATA models) would serve you very well. You honestly don’t need huge capacity on your system/boot drive — just enough for Windows and your page files and maybe a couple apps/games — most of your stuff can be installed on HDDs — but more speed makes a difference.
And you’ll be happy to know that (most of) today’s SSDs have greater longevity (and MTBF/MTTF) than HDDs.
(Although I don’t advise rushing off to buy a new drive until you’ve resolved the mystery problem with your old drive.)Last edited by Korth; 08-18-2017 at 12:41 PM.
«All opinions are not equal. Some are a very great deal more robust, sophisticated and well supported in logic and argument than others.» — Douglas Adams
[/Korth]
-
08-18-2017 07:53 PM
#5
ROG Member
Array
jnathanvp PC Specsjnathanvp PC Specs Laptop (Model) HP ProBook 4530s Motherboard Asus Sabertooth Z77 Processor Intel Core i7 2400 Memory (part number) 32 GB RAM Graphics Card #1 NVIDIA GeForce Sound Card On Board Monitor Acer Storage #1 HDD WD 500GB 7200rpm CPU Cooler Cooler Master V8 Case Cooler Master Power Supply APOWER 850W Keyboard Logitech Mouse Logitech Headset Logitech Mouse Pad Logitech Headset/Speakers Logitech OS Windows 7 Professional 64bits
Greetings,
I will do all what you are telling me, the HDD I already try and boot perfect in another PC, the BIOS that I have I think is the latest version coming out from Asus for this model. I will check everything and I let you know guys, thank you so much once again and have a great day.
JnathanVP.
-
08-18-2017 09:03 PM
#6
ROG Member
Array
jnathanvp PC Specsjnathanvp PC Specs Laptop (Model) HP ProBook 4530s Motherboard Asus Sabertooth Z77 Processor Intel Core i7 2400 Memory (part number) 32 GB RAM Graphics Card #1 NVIDIA GeForce Sound Card On Board Monitor Acer Storage #1 HDD WD 500GB 7200rpm CPU Cooler Cooler Master V8 Case Cooler Master Power Supply APOWER 850W Keyboard Logitech Mouse Logitech Headset Logitech Mouse Pad Logitech Headset/Speakers Logitech OS Windows 7 Professional 64bits *
As you can see in this photo, all my voltages look normal, the actual BIOS Version is 2104 and I really do not know if there is another one in Asus Official Web Page, I think is the same one that I have right know. I was noticing that at the beginning the motherboard recognize the WD HDD but then it shows me the same Message Box:
*And then the HDD Disappears from the list of the Boot Priority, this is what is weird, is not malfunction of the cables end to end or something like that I think, what I think is the BIOS having some problem. I was checking everything you guys told me before and nothing happened there in those areas you told me to take a look.
Another thing that I saw, as we can see in this photo, the motherboard is recognizing the Memory RAM as of 1333 and not as 1866 and what I have actually installed are 4 x 8GB 240-pin DIMM at 1866.
Even in this photo you can see the speed that the motherboard is recognizing of 1333MHz and not the 1866MHz that I actually have. I really do not know if this is important but I am just letting you know about it.
In other words I am still having this problem and I do not know where is this coming from, I do not what to think that this problem is because of the Motherboard and some physical damage on it, I would like to have the possibility to reset the BIOS and then let see what is going on. I was ready somewhere that some of this problem maybe came because of one update from Windows 7 Professional and some of the describe it but I did not find that note again.
When we go to my CSM this is what I actually got in there:
The thrid option which appears in that list, sometimes I chose «Ignore» and sometimes the MB recognize the HDD but then when the Message Box coming again the changing that I did is coming back alone to all of what you see in this photo.
This is what I have so far guys, I do thank you for all your help up to now, If you have any other ideas please share them with me because I am really having bad moments with this problem.
Thank you so much in advanced and have a great and wonderful day.
JnathanVP.*
-
08-19-2017 02:51 AM
#7
ROG Guru: Green Belt
Array
KPRage PC SpecsKPRage PC Specs Motherboard Maximus V Gene Processor 3570k Memory (part number) Vengance 1866 8Gb Ram Graphics Card #1 Zotac GTX 1070 Mini Graphics Card #2 ASUS R9 280 DC2 Graphics Card #3 Radeon 5850 HD Monitor ASUS VZ27AQ Storage #1 Samsun EVO 850 Pro Storage #2 3 1TB HDDs CPU Cooler H80 Case Merc Alpha Power Supply TX 650 80 plus Gold OS Win 7/ Win 8.1/ Win 10
Hey JnathanVP,
Have you tried loading the default settings in BIOS (Press F5 in BIOS) ? Also, regarding the RAM, for it to show 1866 MHz, you will have to select XMP mode in Memory Frequency. This will enable the 1866. By default, your RAM profile is at its base. XMP mode, extends it to the factory tested xtreme memory profile.Also, try to plug in a different SATA power cable and, different SATA data cable. If that results in a similar issue, plug the SATA Data Cable to a different Slot on Mobo.
Let us know if that works!! Cheers..
—
KPCPU: Intel i5 3570k OC’d to 4.6GHz @1.170V; Mobo: MVG; GPU: Zotac 1070 mini OC’d to +210MHz/+205MHz; Memory: 8GB (2X4GB dual channel) Corsair Vengeance 1333Mhz 9-10-9-T2; SSD: Samsung 840 pro; HDD: 1TB WD Green 6Gbps; PSU: Corsair GS 600w; Case: Bitfenix Merc Alpha:Hybrid Octane in progress; Cooler: Corsair H80 closed loop cooling @ high profile;
Pre & Post Build Guide
A lot of epic FAIL videos are made before one epic WIN video is made
-
08-22-2017 09:54 PM
#8
ROG Member
Array
jnathanvp PC Specsjnathanvp PC Specs Laptop (Model) HP ProBook 4530s Motherboard Asus Sabertooth Z77 Processor Intel Core i7 2400 Memory (part number) 32 GB RAM Graphics Card #1 NVIDIA GeForce Sound Card On Board Monitor Acer Storage #1 HDD WD 500GB 7200rpm CPU Cooler Cooler Master V8 Case Cooler Master Power Supply APOWER 850W Keyboard Logitech Mouse Logitech Headset Logitech Mouse Pad Logitech Headset/Speakers Logitech OS Windows 7 Professional 64bits Greetings everyone,
I did check completely the PC, I took it to the Geek Squead to check the voltages of the motherboard and the diagnostic have shown that the Power Supply is not good at all and I need to change it. I need to go from this one that I have to one of the newest now Gold Certified, they explain to me that because of I add the GeForce and two more RAM of 8 GB each one this pushed the Power Supply to the limit and now I need to go from 850W Bronce Certified to a Gold Certified at least 1000W. I hope this solve the problem, I have a very good feeling about this Geek Squad’s Diagnotic. In other words, if you have any recommendations of any Power Supply, please, let me know. Thank you so much for you help and I post the result of the upgrade when I finish.
JnathanVP.*
-
08-23-2017 06:00 AM
#9
ROG Guru: Black Belt
Array
Korth PC SpecsKorth PC Specs Motherboard ASUS X99 R5E (BIOS2101/1902) Processor Haswell-EP E5-1680-3 SR20H/R2 (4.4GHz) Memory (part number) Vengeance LPX 4x8GB SS DDR4-3000 (CMK32GX4M4C3000C15) Graphics Card #1 NVIDIA Quadro GP100GL/16GB, 16xPCIe3, NVLink1 (SLI-HB) Graphics Card #2 NVIDIA Quadro GP100GL/16GB, 16xPCIe3, NVLink1 (SLI-HB) Sound Card JDS Labs O2+ODAC (RevB), USB2 UAC1 Monitor ASUS PG278Q Storage #1 Samsung 850 PRO 512GB SSDs, 4xSATA3 RAID0 Storage #2 Comay BladeDrive E28 3200GB SSD, 8xPCIe2 CPU Cooler Raijintek NEMESIS/TISIS, AS5, 2xNH-A14 Case Obsidian 750D (original), 6xNH-A14 Power Supply Zalman/FSP ZM1250 Platinum Headset Pilot P51 PTT *modded* OS Arch, Gentoo, Win7x64, Win10x64 Network Router Actiontec T3200M VDSL2 Gateway Accessory #1 TP-Link AC1900 Archer T9E, 1xPCIe Accessory #2 ASUS/Infineon SLB9635 TPM (TT1.2/FW3.19) Accessory #3 ASUS OC Panel I (FW0501)
Your Intel CPU and NVIDIA GPU card do need a lot of power when running «heavy» games/software.
Your motherboard chipset and RAM use hardly any power and have little impact on PSU requirements.Assuming you have a 250W GPU card (like a GTX780Ti), your system needs ~650W PSU. I would recommend 750W~850W. You don’t really need ~1000W. PSUs with higher-Wattages cost more, even if you aren’t actually using them at full capacity. You can use an online
power supply calculator.
The 80Plus certifications (Bronze, Silver, Gold, Platinum, Titanium) only rate PSU electrical efficiencies. But a more efficient PSU requires better design and better parts, so a higher 80Plus rating basically assures better design and better parts and higher overall PSU quality (at higher cost).
Your Z77 Sandy Bridge system is «aging», it’s more sensitive to (and less able to compensate for) minor power fluctuations. So what you do need to assure best system stability is steady power delivery and tight power regulation. I’d recommend 750W Platinum to 850W Gold, I don’t think Bronze/Silver PSUs would be adequate quality for long, I don’t think paying more for Platinum/Titanium is necessary. Be sure you choose a PSU with «Active PFC» for best stability.
Warranty period is always a good rough indicator for PSU quality. It shows how much confidence the PSU manufacturer has in the actual longevity of their product. 3-years is typical, but 5-years to 7-years (or even 10-years) indicates a PSU that was built to keep working properly for a long time.
My «$150 on sale» recommendations —
https://www.newegg.com/Product/Produ…82E16817438092
https://www.newegg.com/Product/Produ…9SIA6ZP5708409Remember that the geek at Geek Squad is first and foremost a salesman. It’s in his best interest to upsell. It’s in his best interest to get rid of whatever PSUs are currently in stock. You may find it worth paying extra for the convenience, especially if Geek Squad installs/tests the PSU hardware for you.
«All opinions are not equal. Some are a very great deal more robust, sophisticated and well supported in logic and argument than others.» — Douglas Adams
[/Korth]

Содержание
- Keep current bios setting перевод
- Что значит «Please enter setup to recover bios setting»?
- Что делать, чтобы убрать ошибку?
- Принцип работы
- Стоит ли включать?
- Law (En-Ru)
- Исправление ошибки «Please enter setup to recover BIOS setting»
- Значение ошибки «Please enter setup to recover BIOS setting»
- Исправление проблемы
- Thread: Asus Sabertooth Z77 (The current BIOS setting do not fully support the boot device)
- Asus Sabertooth Z77 (The current BIOS setting do not fully support the boot device)
Keep current bios setting перевод
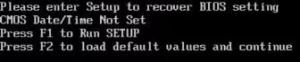
Данное сообщение при включении компьютера является довольно частым, особенно на компьютерах 4-ех летней давности и более. Сразу после фразы «Please enter setup to recover bios setting» обычно идут слова «press f1 to run setup» и «Press f2 to load default values and continue».
Сообщение please enter setup to recover bios setting
В данной статье мы расскажем вам о значении данного сообщения при включении компьютера , а также что сделать, чтобы оно больше не появлялось.
Что значит «Please enter setup to recover bios setting»?
Традиционно начнем с перевода на русский язык. Он звучит так: «Пожалуйста, войдите в настройки для восстановление параметров BIOS».
Получается, что по каким — то причинам сбились настройки BIOS, и компьютер просит их восстановить.
Что делать, чтобы убрать ошибку?
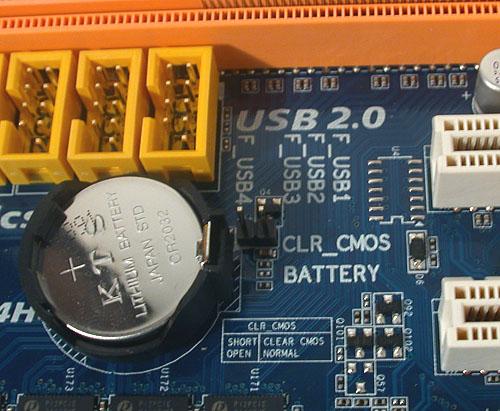
А наиболее вероятной причиной, как правило, является севшая батарейка на материнской плате. В этом случае также отображается ошибка Cmos CheckSum bad. Если вы давно или ни разу не меняли батарейку, то самое время это сделать.
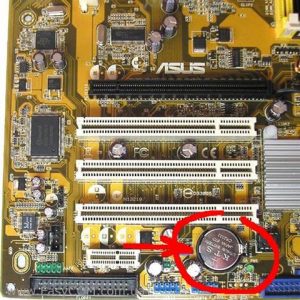
Как найти батарейку в компьютере. Ее вид.
Чтобы убрать ошибку и попробовать запустить операционную систему, нужно нажать кнопку F2 на клавиатуре. Этим вы установите настройки BIOS по умолчанию.
Если при загрузке Windows появляется экран и компьютер уходит на перезагрузку, то очень вероятно, что из сбоя настроек BIOS параметру «sata controller mode» (Режим работы жесткого диска) было присвоено неправильное значение и его нужно изменить вручную. Подробнее о значениях данного параметра читайте здесь.
Чтобы более точно определить причину появления сообщения «Please enter setup to recover bios setting» нужно обратить внимание на другие строчки, присутствующие выше или ниже этой фразы. Среди них могут быть:
- Cmos Checksum Bad (Cmos date/time not set) — появляется из-за севшей батарейки или ее плохого контакта с материнской платой;
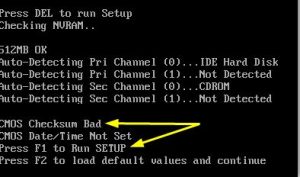
Ошибка при загрузке Cmos checksum bad
- No Keyboard Detected — проблема с определением клавиатуры. Попробуйте ее переключить в другой разъем или вовсе заменить на заведомо рабочую;
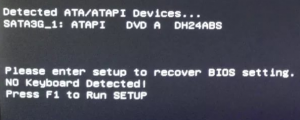
No Keyboard Detected
- Usb device over current status detected computer shut down over 15 sec — На одном или нескольких USB портах имеется замыкание. Отключите все устройства, подключенные по USB, а также проверьте нет ли повреждений или застрявших штекеров в usb разъемах (Спереди и сзади);
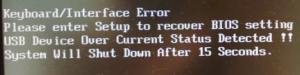
Usb device over current status detected computer shut down over 15 sec
Другие идентичные названия опции: Add On ROM Display Mode, Expansion Card Text.

Опция AddOn ROM Display Mode (Режим показа информации дополнительного BIOS) предназначена для настройки режима вывода на экран информации во время загрузки. Также эта опция может носить название Display Mode at Add-on ROM Init. Стандартными значениями опции являются варианты Force BIOS и Keep Current.
Принцип работы
Как вероятно, известно читателям, базовая система ввода-вывода компьютера (BIOS или БИОС) расположена на материнской плате и отвечает за проверку оборудования, обеспечение базовой функциональности процессов ввода-вывода информации, загрузку компьютера и запуск операционной системы. Однако БИОС материнской платы не является единственной БИОС, находящейся в персональном компьютере. Свои BIOS также могут иметь и многие другие компоненты компьютера, расположенные на платах расширения. В частности, это могут быть как графические карты, контроллеры SCSI и RAID, и т.д. Во время загрузки компьютера подобные платы также могут выводить на экран служебную информацию, наряду с информацией, выводимой БИОС материнской платы.
Опция AddOn ROM Display Mode предназначена для включения или выключения вывода дополнительной, не относящейся к основной BIOS, информации от плат расширения. Вариант опции, равный Force BIOS, позволяет включить вывод информации BIOS плат расширения на экран монитора, а выбор варианта Keep Current позволяет его отключить.
Стоит ли включать?
На этот вопрос нельзя ответить однозначно, поскольку все зависит от ситуации. С одной стороны, вывод на экран чрезмерного объема служебных данных может мешать пользователю во время загрузки. С другой, очень часто BIOS плат расширения может сигнализировать пользователю о каких-либо проблемах с этими платами. И довольно часто эти проблемы могут быть критичными для функционирования компьютера. Так, например, неработоспособность контроллера RAID может привести к невозможности загрузки операционной системы. Если в такой ситуации вывод сообщений БИОС контроллера будет заблокирован, то пользователь не сразу сможет установить причину возникшей проблемы. Поэтому в общем случае можно порекомендовать включить эту опцию, выбрав вариант Force BIOS. Само собой, если у вас в компьютере нет плат расширения, имеющих собственную БИОС, то выбор какого-либо из двух вариантов опции никак не скажется на выводе информации во время процесса загрузки.
[kiːp] брит. / амер.
гл. ; прош. вр. , прич. прош. вр. kept
держать , не отдавать
хранить ; сохранять ; беречь
утаивать , оберегать (чтобы никто не увидел, не узнал)
выполнять , осуществлять (что-л.)
соблюдать , сдержать (слово, обещание) , следовать (закону)
держаться , сохраняться , оставаться (в известном положении, состоянии)
(keep to) придерживаться ; следовать (чему-л.)
сохранять актуальность , значимость ; не устаревать
продолжать делать (что-л.)
(keep at) продолжать работать
вынуждать , заставлять (кого-л. что-л. делать)
(keep at) надоедать просьбами
иметь , содержать ; держать в услужении , в распоряжении
вести (что-л.) , управлять (чем-л.)
отмечать , праздновать , справлять
разг. ; брит. жить
уход , забота , попечение
содержание , средства на жизнь
цитадель , наиболее укрепленная часть крепости
Law (En-Ru)
держать ; хранить ; владеть
выполнять , соблюдать , не нарушать
Откройте все бесплатные
тематические словари
Источник
Исправление ошибки «Please enter setup to recover BIOS setting»

При запуске компьютера всегда производится проверка на различные программные и аппаратные неполадки, в частности, с BIOS. И если таковые будут обнаружены, то пользователь получит сообщение на экране компьютера или услышит звуковой сигнал.
Значение ошибки «Please enter setup to recover BIOS setting»
Когда вместо загрузки ОС на экране отображается логотип производителя BIOS или материнской платы с текстом «Please enter setup to recover BIOS setting», то это может значить, что произошли какие-то программные неполадке при запуске БИОС. Такое сообщение говорит о том, что компьютер не может загрузиться с текущей конфигурацией BIOS.
Причин этому может быть много, но самыми основными являются следующие:
- Проблемы с совместимостью некоторых устройств. В основном, если такое случается, то пользователь получает несколько другое сообщение, но если установка и запуск несовместимого элемента вызвали программный сбой в BIOS, то пользователь вполне может увидеть предупреждение «Please enter setup to recover BIOS setting».
- Разрядка батарейки CMOS. На старых материнских платах часто можно встретить такую батарейку. В ней хранятся все настройки конфигураций BIOS, что позволяет избежать их потерю при отключении компьютера от сети. Однако если батарейка разрядилась, то они сбрасываются, что может повлечь за собой невозможность нормальной загрузки ПК.
- Неверные настройки BIOS, выставленные пользователем. Самый распространённый вариант развития событий.
- Неправильное замыкание контактов. На некоторых материнских платах есть специальные CMOS-контакты, которые нужно замкнуть для сброса настроек, но если вы их замкнули неправильно или забыли вернуть в исходное положение, то скорее всего вместо запуска ОС вы увидите такое сообщение.
Исправление проблемы
Процесс возвращения компьютера в рабочее состояние может выглядеть немного по-разному в зависимости от ситуации, но так как чаще всего причиной подобной ошибки является некорректная настройка BIOS, всё можно решить простым сбросом настроек до заводского состояния.
Если же проблема связана с аппаратной частью, то рекомендуется воспользоваться следующими советами:
- Когда есть подозрения на то, что ПК не запускается из-за несовместимости определённых компонентов, то демонтируйте проблемный элемент. Как правило, проблемы с запуском начинаются сразу после его установки в систему, поэтому выявить дефектный компонент не составит труда;
- При условии, что вашему компьютеру/ноутбуку уже более 2 лет, и на его материнской плате есть специальная CMOS-батарейка (выглядит как серебристый блин), то это значит, что её нужно заменить. Найти и произвести замену несложно;
- Если на материнской плате есть специальные контакты для сброса настроек BIOS, то проверьте правильно ли установлены на них джамперы. Верную расстановку можно посмотреть в документации к материнской плате или найти в сети под вашу модель. Если вы не можете найти схему, где было бы нарисовано правильное расположение джампера, то попробуйте его переставлять до тех пор, пока компьютер не заработает нормально.
Исправить данную проблему не так трудно, как это может показаться на первый взгляд. Однако, если ничего из этой статьи вам не помогло, то рекомендуется отдать компьютер в сервисный центр или обратиться к специалисту, так как проблема может лежать глубже, чем в рассмотренных вариантах.
Источник
Thread: Asus Sabertooth Z77 (The current BIOS setting do not fully support the boot device)
Thread Tools
Search Thread
Display
ROG Member Array jnathanvp PC Specs
| jnathanvp PC Specs | |
| Laptop (Model) | HP ProBook 4530s |
| Motherboard | Asus Sabertooth Z77 |
| Processor | Intel Core i7 2400 |
| Memory (part number) | 32 GB RAM |
| Graphics Card #1 | NVIDIA GeForce |
| Sound Card | On Board |
| Monitor | Acer |
| Storage #1 | HDD WD 500GB 7200rpm |
| CPU Cooler | Cooler Master V8 |
| Case | Cooler Master |
| Power Supply | APOWER 850W |
| Keyboard | Logitech |
| Mouse | Logitech |
| Headset | Logitech |
| Mouse Pad | Logitech |
| Headset/Speakers | Logitech |
| OS | Windows 7 Professional 64bits |
Join Date Aug 2017 Reputation 10 Posts 6
Asus Sabertooth Z77 (The current BIOS setting do not fully support the boot device)
Recently I had some problem with my Sabertooth Z77 and do not know what is wrong, I have tried almost everything and still the same problem, first of all, I would like to tell you that this Motherboard was used already at the time that I bought it and I do not know what was happening with it in the past.
This is the problem that I have right now and I do not have the minimum idea how to fix it, if you can help me is going to be very helpful for me because I am using this computer everyday for working.
After this problem I do not know how to fix it, I did try almost everything but maybe you know something more to help me.
And then is coming something really weird, now sometimes the Motherboard is recognizing my HDD and sometimes not and I really do not know what happen.
As you can see in that photo there is no HDD but sometimes appears down there in the list of Booting Devices but the most of the time not, it just disappears and this is what is weird for me. If you know where is this problem coming from, please, let me know because this is really a madness do not have your PC and well equipped because of one problem that you do not have the minimum idea.
This is what I have in my CSM, if you got this problem and you solved already just give me a hand with this. Thank you so much in advanced and have a great and wonderful day.
ROG Guru: Green Belt Array KPRage PC Specs
| KPRage PC Specs | |
| Motherboard | Maximus V Gene |
| Processor | 3570k |
| Memory (part number) | Vengance 1866 8Gb Ram |
| Graphics Card #1 | Zotac GTX 1070 Mini |
| Graphics Card #2 | ASUS R9 280 DC2 |
| Graphics Card #3 | Radeon 5850 HD |
| Monitor | ASUS VZ27AQ |
| Storage #1 | Samsun EVO 850 Pro |
| Storage #2 | 3 1TB HDDs |
| CPU Cooler | H80 |
| Case | Merc Alpha |
| Power Supply | TX 650 80 plus Gold |
| OS | Win 7/ Win 8.1/ Win 10 |
Join Date Aug 2012 Reputation 26 Posts 572
Hey Jnathan,
Welcome to ROG.. Can you provide more details of the HDD you are connecting and, rest of your system details please.
CPU: Intel i5 3570k OC’d to 4.6GHz @1.170V; Mobo: MVG; GPU: Zotac 1070 mini OC’d to +210MHz/+205MHz; Memory: 8GB (2X4GB dual channel) Corsair Vengeance 1333Mhz 9-10-9-T2; SSD: Samsung 840 pro; HDD: 1TB WD Green 6Gbps; PSU: Corsair GS 600w; Case: Bitfenix Merc Alpha:Hybrid Octane in progress; Cooler: Corsair H80 closed loop cooling @ high profile;
A lot of epic FAIL videos are made before one epic WIN video is made 
ROG Member Array jnathanvp PC Specs
| jnathanvp PC Specs | |
| Laptop (Model) | HP ProBook 4530s |
| Motherboard | Asus Sabertooth Z77 |
| Processor | Intel Core i7 2400 |
| Memory (part number) | 32 GB RAM |
| Graphics Card #1 | NVIDIA GeForce |
| Sound Card | On Board |
| Monitor | Acer |
| Storage #1 | HDD WD 500GB 7200rpm |
| CPU Cooler | Cooler Master V8 |
| Case | Cooler Master |
| Power Supply | APOWER 850W |
| Keyboard | Logitech |
| Mouse | Logitech |
| Headset | Logitech |
| Mouse Pad | Logitech |
| Headset/Speakers | Logitech |
| OS | Windows 7 Professional 64bits |
Join Date Aug 2017 Reputation 10 Posts 6
Greetings and of course I can do that, first of all, thank you so much for the rapid response and here I will write all the information about the HDD and the whole system:
HDD Western Digital 500GB SATA / 32MB Cache WD5000AZLX 7200rpm (WD Blue PC Hard Drive).
Asus Sabertooth Z77
Runing Operative System Windows 7 Professional 64 bits
I was wondering from the beginning if I need to reset the BIOS of the motherboard, because I bought this tower from someone else and since that time I never touch the BIOS or change anything in there. The last owner of this PC was using it as a Server at that time and he was using 3 HDD in RAID mode.
If you need more information just let me know, thank once again for have answered me.
Last edited by jnathanvp; 08-18-2017 at 11:50 AM . Reason: Note about where this PC coming from.
ROG Guru: Black Belt Array Korth PC Specs
| Korth PC Specs | |
| Motherboard | ASUS X99 R5E (BIOS2101/1902) |
| Processor | Haswell-EP E5-1680-3 SR20H/R2 (4.4GHz) |
| Memory (part number) | Vengeance LPX 4x8GB SS DDR4-3000 (CMK32GX4M4C3000C15) |
| Graphics Card #1 | NVIDIA Quadro GP100GL/16GB, 16xPCIe3, NVLink1 (SLI-HB) |
| Graphics Card #2 | NVIDIA Quadro GP100GL/16GB, 16xPCIe3, NVLink1 (SLI-HB) |
| Sound Card | JDS Labs O2+ODAC (RevB), USB2 UAC1 |
| Monitor | ASUS PG278Q |
| Storage #1 | Samsung 850 PRO 512GB SSDs, 4xSATA3 RAID0 |
| Storage #2 | Comay BladeDrive E28 3200GB SSD, 8xPCIe2 |
| CPU Cooler | Raijintek NEMESIS/TISIS, AS5, 2xNH-A14 |
| Case | Obsidian 750D (original), 6xNH-A14 |
| Power Supply | Zalman/FSP ZM1250 Platinum |
| Headset | Pilot P51 PTT *modded* |
| OS | Arch, Gentoo, Win7x64, Win10x64 |
| Network Router | Actiontec T3200M VDSL2 Gateway |
| Accessory #1 | TP-Link AC1900 Archer T9E, 1xPCIe |
| Accessory #2 | ASUS/Infineon SLB9635 TPM (TT1.2/FW3.19) |
| Accessory #3 | ASUS OC Panel I (FW0501) |
Join Date Mar 2015 Reputation 152 Posts 2,719
Check all voltages in BIOS hardware monitor (if you can), aging PSU may be failing or drifting out of tolerance (especially if it’s cheap and/or it’s often strained from overclocking, heavy duty-cycle, or «dirty» AC power input).
Check all the signal and power cables (along with connections on both ends) on your boot drive, inspect carefully for frayed insulation or bent/broken/dirty pins (and repair with electrical tape and needlenose/tweezers if needed). Swap boot drive power and SATA signal cables if you have any spares. Try using a different motherboard SATA port and PSU power input if you can.
Try the boot drive in another computer, if possible, to confirm it hasn’t died (or isn’t suffering intermittent failures).
Western Digital offers some free software here to diagnose and troubleshoot failures on WD HDDs . but they’ll only work if the BIOS can detect the drive.
Check if the BIOS chip has creeped out of socket (and push it back down if needed).
Maybe time to reflash BIOS, the firmware could (somehow) be degraded or corrupted. (A chance to upgrade to the latest-and-greatest BIOS version, if you don’t already have it, along with a chance that it fixes some kind of drive-detection issue, lol. Write down all your important BIOS settings first, of course.)
It’s possible that your motherboard CR2032 coin battery is dead or dying (check with DMM, costs less than $1 to replace if less than 3.0V).
Incidentally — and off topic — you would see *amazing* performance increases (on startup/shutdown, file access, loading screens, general computing stuff, etc) if you upgraded your boot/system drive from HDD to SSD.
I see many 2.5″ SATA SSDs at newegg.com — avoid the cheap-cheap «KingDian» S100/S200 SSDs because they’re actually slower than fast HDDs and they look (to me) to be of dubious reliability/longevity — but any good/fast/cheap SSD (like the $60 120GB Crucial/PNY/Kingston/ADATA models) would serve you very well. You honestly don’t need huge capacity on your system/boot drive — just enough for Windows and your page files and maybe a couple apps/games — most of your stuff can be installed on HDDs — but more speed makes a difference.
And you’ll be happy to know that (most of) today’s SSDs have greater longevity (and MTBF/MTTF) than HDDs.
(Although I don’t advise rushing off to buy a new drive until you’ve resolved the mystery problem with your old drive.)
Last edited by Korth; 08-18-2017 at 12:41 PM .
Источник