New issue
Have a question about this project? Sign up for a free GitHub account to open an issue and contact its maintainers and the community.
By clicking “Sign up for GitHub”, you agree to our terms of service and
privacy statement. We’ll occasionally send you account related emails.
Already on GitHub?
Sign in
to your account
Closed
ramiy opened this issue
Feb 13, 2018
· 5 comments
Closed
Elementor Pro Form Widget — Styling Error Messages
#3462
ramiy opened this issue
Feb 13, 2018
· 5 comments
Comments
![]()
Description
Currently, the we can’t style the error messages in the Form Widget.
With dark backgrounds the errors can not be seen:

It says: The form was sent successfully!
Solution
In the Style Tab, add a new section called Error Messages with the following controls:
- Background Color
- Text Color
- Typography
- Border
- Padding
![]()
Copy link
Contributor
Author
It should be simple to implement, copy & paste the button controls to a new section for error messages. And update the CSS selectors.
![]()
![]()
I every time add padding, color and border through css. Why can’t you do as suggested above, i.e. in widget settings?
![]()
+1 don’t think this should be a CSS job
![]()
This needs to be sorted .. until then in ‘Edit Form’ add this to the custom CSS…
`
.elementor-message elementor-message-success {
font-size: 15px;
color: white;
}
[role=alert] {
font-size: 15px;
color: white;
}
`
Change colour and font size and add a different font if necessary to suit.
If you are having issues with Elementor forms, read through these frequently asked questions to find common solutions.
How can I save Elementor Form submissions in a database?
With the Elementor Form Submissions feature you can backup your form submissions data, access it whenever you want, and manage it all from one place. Having your submissions info allows you to gather insights, analyze a campaign’s data, or simply manage your submissions from within your WordPress dashboard.
Where have all my files gone after uploading?
Uploaded files are saved in a dedicated directory under ‘uploads/elementor/forms/’.
Why does my file name change after upload?
File names are set randomly, for security reasons (we don’t want users uploading ‘yo_mama.jpg’ now do we?).
I’ve set the number of Max. Files, but I’m still not able to upload as many files as the number I set. Why?
This setting does not override your host’s server setting.This option limits the number of files that can be uploaded from the form itself but only if this limit value does not exceed the PHP’s “max_file_uploads” value. If you need more, contact your to have the “max_file_uploads” value raised for your site.
How do I customize the date and time design in my forms?
The Date and Time fields can be styled using Custom CSS. On mobile, the browser’s native HTML5 design is used. You can switch on Native HTML5, so the browser’s design is used on all devices. Once you choose Date or Time, you’ll see the Native HTML5 switch.
Why can’t I see the placeholder of the date/time field on some mobile browsers?
The labels for date/time inputs are not properly supported by all browsers, especially by the browsers of mobile devices. This is why the placeholder may not always be visible.
![]()
This is not an issue that is specific to Elementor. This is a well-known development issue. There are no perfect solutions for solving this, but you can add code like the follow to the Advanced Tab > Custom CSS section of your Form Widget:
input[type='time']:after {
    color: #aaa;
    content: attr(placeholder);
}
input[type='date']:after {
    color: #aaa;
    content: attr(placeholder);
}
Note: The drawback to using this code is that the placeholder will still appear, even after selecting the time and the date.
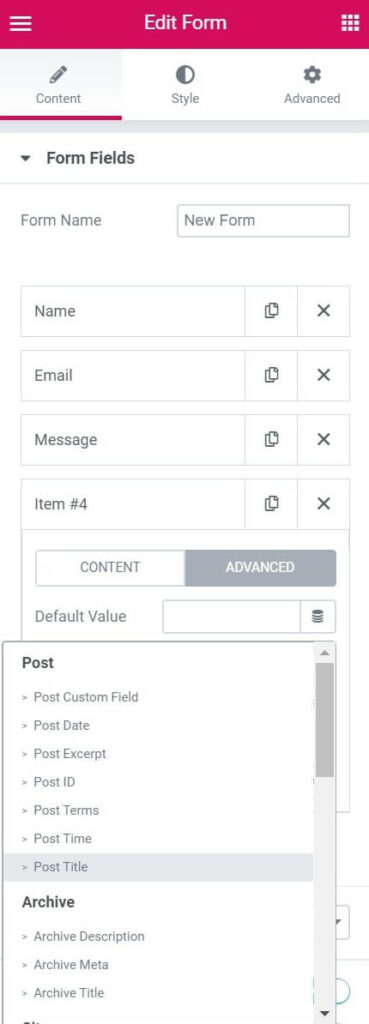
How can I place dynamic meta data into a form field?
- Click the form field’s Advanced tab as shown below.
- Click the dynamic icon to the right of the Default Value field.
- Select the desired meta data from the dropdown list.
Why is the Redirect not working?
Redirecting the user to a designated Thank You page is always a good idea. It takes your converted user to the next step, enabling you to upsell, track user funnels, and give your user a good experience.
To activate Redirect: Go to Actions After Submit, add Redirect and paste the full URL of your Thank You page.
Having Problems?
Here are some Troubleshooting ideas:
- Make sure you didn’t paste-in an empty character by mistake.
- Be sure you pasted the full URL and not a Relative URL. (‘/thank_you/’)
- Remove any Javascript from the page and try again. You can check for Javascript errors in the developer tools.
- Deactivate other Plugins and switch to theme GeneratePress and see if Redirect works.
Which Custom Messages Can I Modify in Forms?
Forms include 3 different types of messages:
- Browser messages – these are sent from the browser and can not be customized. For instance, if you do not enter a correct email address, you will get a message saying ‘Please include an @ in the email address’. These messages appear if the form was not filled in correctly before the form is sent.
- Server messages are sent from the server. You can format as you need, using custom CSS. These messages appear after the form is sent. There are a few custom options including Success, Error, Invalid, etc. Example: The form was sent successfully! You can always alter the content of the custom messages by going to Form > Additional Options, switch-on Custom Messages and locate the relevant message.
- Third-party servers. Error messages coming from Email Marketing service companies such as MailChimp cannot be modified. Please note that some of the error messages sent by these third-party products are shown to the admin only (you and not the subscribers) and this is not something that we can control.
How do I track form submissions and conversions using Google Analytics and Tag Manager?
Add your tracking code to a thank you page and redirect your form to that page after submission.
There is also a Javascript event that the form triggers automatically after submission, which can be used to add to your custom tracking code. These are added externally to Elementor, using functions.php for example.
Here is a base snippet you can build on:
//The event is submit_success so you can catch it for example:
jQuery( document ).ready(function( $ ){
	jQuery( document ).on('submit_success', function(){
		// form has been submitted do your tracking here...
	});
});
Make sure you replace the comment above “// form has been submitted do your tracking here … ” with your custom tracking code. Otherwise, the snippet won’t do anything.
How can I integrate another service with webhook and field mapping?
Elementor has a webhook option under Actions After Submit. By default, our webhook sends each field with the label as a name, or all fields in a single array when Advanced Data is on.
To control the field names, give your form fields a custom ID and use the following snippet.
Be sure to update the form name and your webhook URL.
Below is an example of customizing your webhook, where field IDs are sent instead of names.
add_action( 'elementor_pro/forms/new_record', function( $record, $handler ) {
	//make sure its our form
	$form_name = $record->get_form_settings( 'form_name' );
	if ( 'MY_FORM_NAME' !== $form_name ) {
		return;
	}

	$raw_fields = $record->get( 'fields' );
	$fields = [];
	foreach ( $raw_fields as $id => $field ) {
		$fields[ $id ] = $field['value'];
	}

	wp_remote_post( 'HTTP://YOUR_WEBHOOK_URL', [
		'body' => $fields,
	]);
});
How can I troubleshoot issues with forms which are not sent?
This happens generally because of server errors or fields not properly mapped. For further information, please read this guide.
“There’s something wrong. The form is invalid”
If you receive an error message such as “There’s something wrong. The form is invalid”, this could be due to several reasons.
- One reason is that the form has been added as a widget inside another widget via a shortcode. This is an unofficial and unreliable method of adding a form to a page, so this should be avoided.
Some Users Only Receive a Red X After Submitting A Form. Why?
MailChimp integration with the Elementor form widget only acts as a ‘sign up form’. Re-subscription via an Elementor form widget is not possible as the MailChimp API does not allow this. Re-subscription to a list is only through MailChimp hosted signup forms. This same situation may apply to other services that integrate with forms.
To handle these types of users, you can put a note somewhere below the form that mentions that if they were previously signed up to the list, then they cannot resubscribe this way. Give them a link to redirect them to the MailChimp hosted signup forms instead, so they can resubscribe there.
Learn more about the Form Widget (Pro)
When you have a business website, forms are a staple. They make it easier for customers to get in contact with you and provide important information and feedback. However, figuring out how to create them can be challenging.
If you’re looking for a simple, straightforward strategy, we recommend using Elementor forms. This popular page builder provides solutions for building various forms that are both aesthetically pleasing and easy to use.
In this post, we’ll discuss why you might want to create Elementor forms. Then, we’ll walk you through the process of doing so, and cover some helpful addons and troubleshooting tips. Let’s jump in!
Check Out Our Video Guide to Elementor Forms
Why Create Elementor Forms
There are many advantages to creating forms for your WordPress site. For starters, you can provide your visitors with a quick and simple method of communicating with you. Additionally, you can use them to generate leads and acquire important information from your audience.
Forms can also be useful tools for registering your users and accepting payments. However, if you want to add a form to your WordPress site, you need to use a plugin. Alternatively, you could use a page builder like Elementor.
Elementor lets you build stunning forms without touching a line of code. You can use the drag-and-drop editor to create responsive forms that match your branding and website aesthetic.
You can also choose from multiple types of forms, including:
- Elementor Contact Forms: you can use this feature to build a simple form for users to get in touch with you.
- Elementor Gravity Forms: this Gravity Forms widget gives you more flexibility in customizing and styling your forms.
- Elementor Register Forms: this feature lets you set up user registration forms on your website.
As you can see, each of these forms has its own specific use case and can help enhance the functionality of your site. Next, we’ll show you how to build a contact form using Elementor.
Want to use Elementor forms to connect with your customers? ✅ This guide is for you 🤝Click to Tweet
How To Create an Elementor Contact Form in WordPress (in 6 Steps)
Now that we understand more about why you might want to use Elementor forms, let’s look at how you can create one in a few simple steps. Note that for this tutorial, we’ll assume you already have Elementor installed and activated on your website.
There is a free tool and paid plugin. To access the form features, you’ll need the premium version.
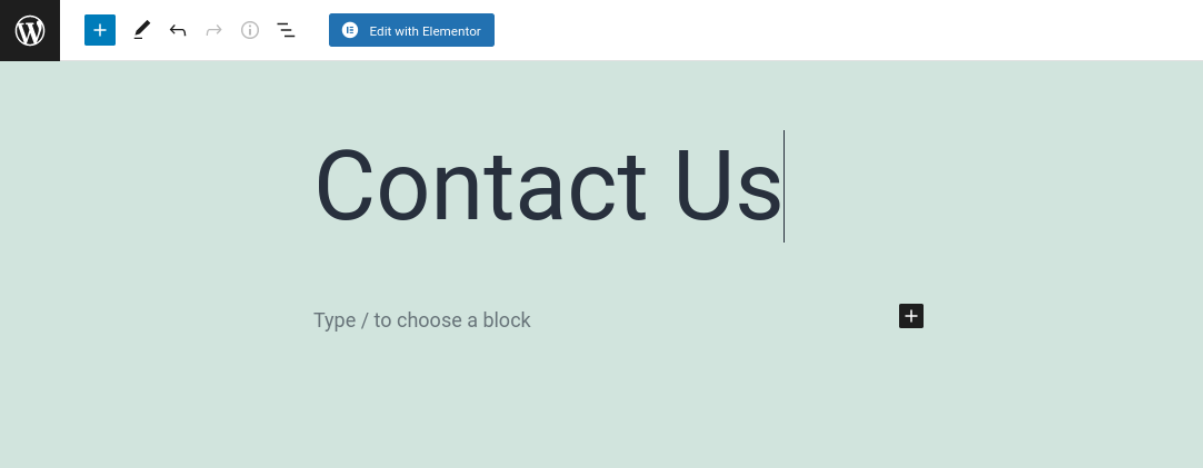
Step 1: Add the Elementor Contact Widget
To get started, navigate to the page or post where you want to insert your contact form. Then, click on the Edit with Elementor button at the top of the screen:
This will launch the Elementor editor interface. From the widgets on the left, search for and select the Form widget:
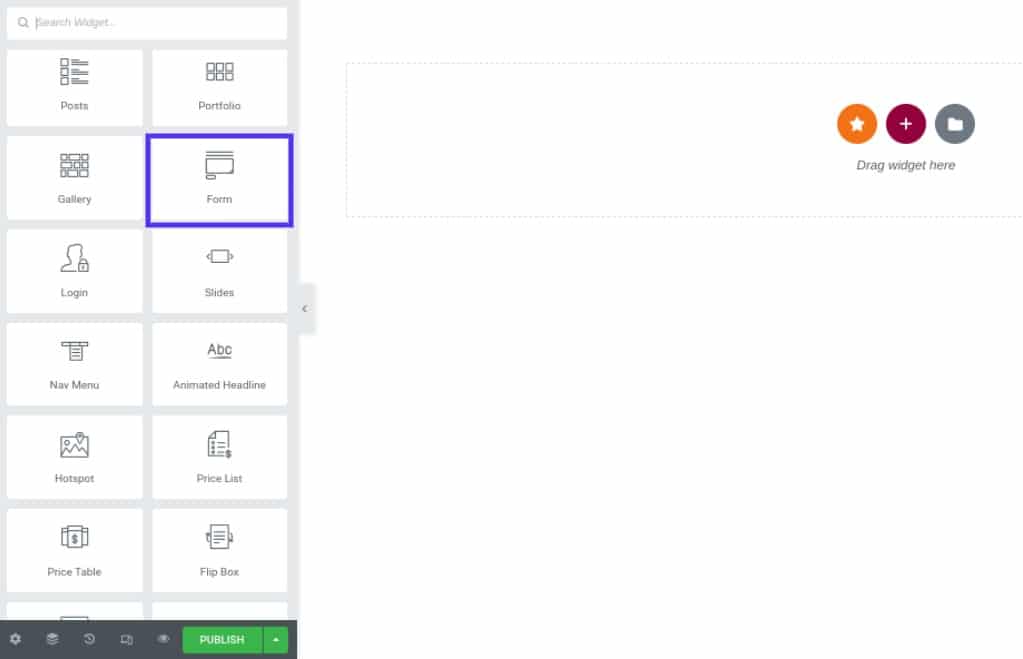
Then, you can drag and drop the widget onto your page. This will insert a standard contact form.
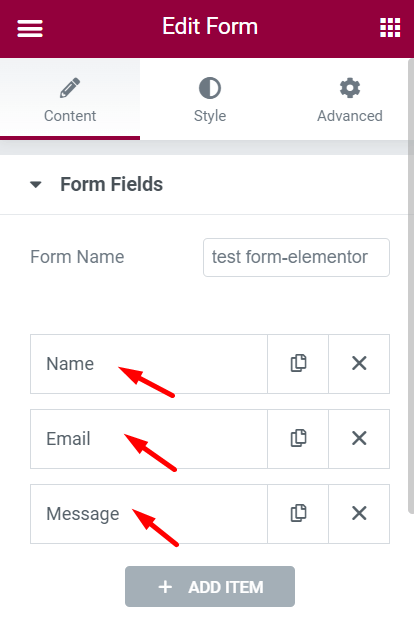
Step 2: Set Up Your Contact Form Fields
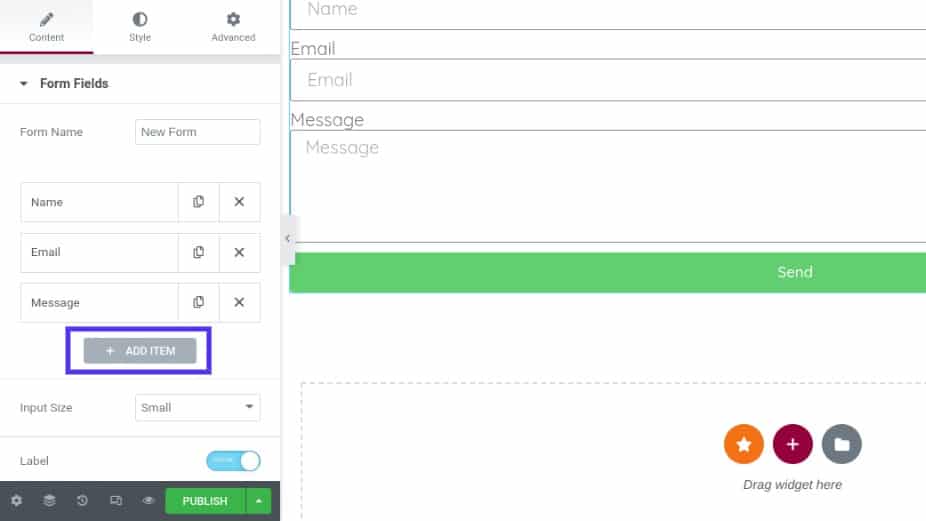
Once you place your contact form on the page, there are a handful of settings for you to configure. For now, let’s focus on setting up the form fields.
You can edit the basic form fields by clicking on the widget and customizing the text (if you want to change any of the default options). If you want to add additional fields, you can do so by selecting Add Item:
You can select the type of field you want to add from the drop-down list. Next, you can add a label, which is the name of the form field. This shows your visitors what input is expected.
For the Placeholder option, you can customize the text that appears in the form field before the user enters their information. You can use this to give visitors examples of the data you want them to provide.
Additionally, you can choose to enable the Required setting and modify the column width. You can also click on the Buttons panel to customize the appearance of your form buttons. You can change the sizing as well as the font and colors.
Step 3: Configure Your Form Submissions
After you’re finished creating the form fields, the next step is to configure your form submission settings. You can navigate to Email within the Elementor editor to access various options.
For example, you can input your email address in the To field where you want the submissions delivered. You can enter multiple email addresses if you wish:
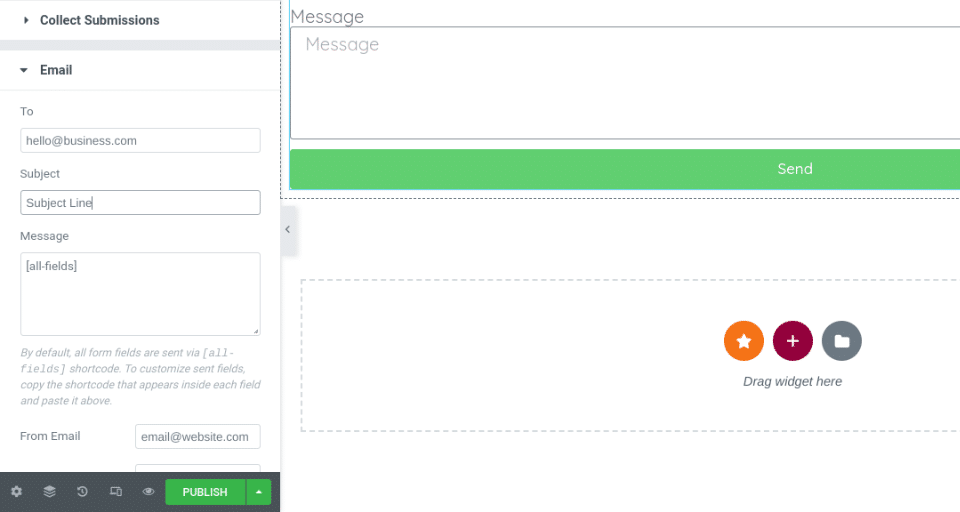
You can also customize the subject of the email and message. When you’re done configuring all of the options, make sure to save your changes.
Step 4: Customize Your Contact Form Messaging
If you want to further personalize your contact form, you can do so by enabling custom messaging. Select Additional Options, then move the toggle switch for Custom Messaging to Yes:

There are four types of messages you can modify:
- Success Message: this appears once a user submits the form
- Error Message: this will come up if there’s an issue during the submission process
- Required Message: to inform users that a particular field wasn’t completed
- Invalid Message: to let users know that something with the form submission is off
You can customize these messages to match your brand’s voice and style. For example, you can modify the wording to add a bit of personality.
Step 5: Styling Your Elementor Contact Form
Once you have the basic text and fields of your form taken care of, you can begin styling the design of your Elementor contact form. For example, you may want to make sure that it matches your branding.
To get started, you can click on the Style tab at the top of the widget editor:
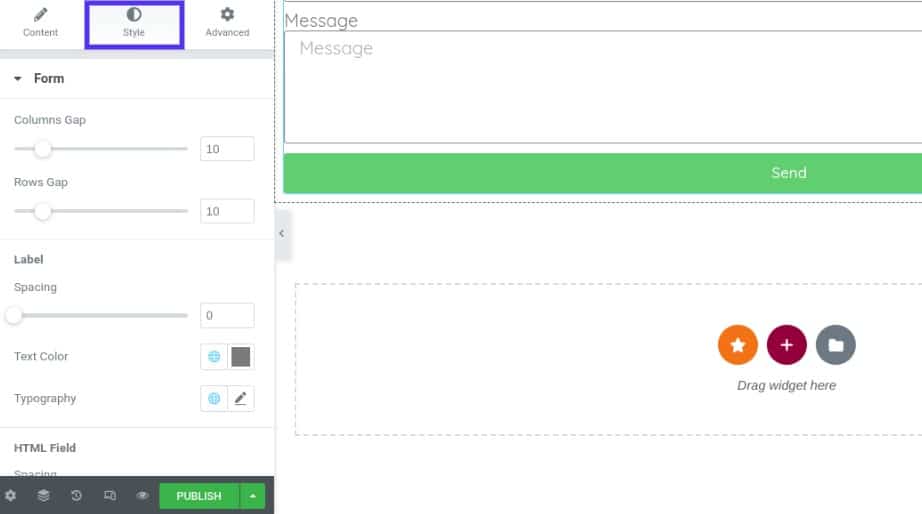
Here, you’ll find a wide variety of options and settings that you can use to customize the design of your contact form. For instance, you can adjust the spacing and padding, as well as change the colors, size, labels, and buttons.
Step 6: Save and Publish Your Form
When you’re satisfied with the look and contents of your Elementor contact form, the only thing left to do is to save and publish it. You can do so by selecting the Publish button at the bottom left side of the screen.
That’s it! Then you can preview your contact form on the front end to confirm that it looks as you want it to.
Top Addons for Elementor Forms
Out of the box, the Elementor page builder comes with plenty of options for building forms for your WordPress website. However, you might also consider adding plugins to help extend the functionality of your forms. Let’s take a look at some options.
Master Addons for Elementor

The Master Addons for Elementor plugin is a freemium tool that provides a collection of helpful tools for enhancing the page builder and, in turn, your website. It includes the following features:
- Header, footer, and comment form builder
- Mega Menu builder
- Image hover effects
- Display conditions
It’s also compatible with a wide variety of form plugins. This includes Contact Form 7, Ninja Forms, WP Forms, and Caldera Forms. To access all of the plugin’s features, you’ll need to purchase the pro version, which is available for $39 per year.
The Plus Addons

Another handy tool you can use with Elementor is Plus Addons. This plugin is packed with over 8,000 customization options and over 300 User Interface (UI) blocks that can help you create and design your pages and forms with ease.
Its features include:
- Icon boxes
- Map sections
- Forms
- Pricing tables
There are also more than 18 templates you can choose from. These were designed specifically for certain types of businesses, including agencies, restaurants, salons, and more.
There is a free version available. However, to leverage the entire suite of useful features, we recommend purchasing a premium license, available for $39 per year.
Additional Tips and Tricks for Creating Elementor Forms
If you want to create Elementor contact forms for your WordPress site without paying for a premium license, there are ways you can go about it. Doing so will require you to pair the page builder with another WordPress form plugin, such as WPForms or Formidable Forms.
Let’s say you opt for Formidable Forms. Once you install and activate the plugin on your site, you can navigate to Formidable > Forms > Add New:
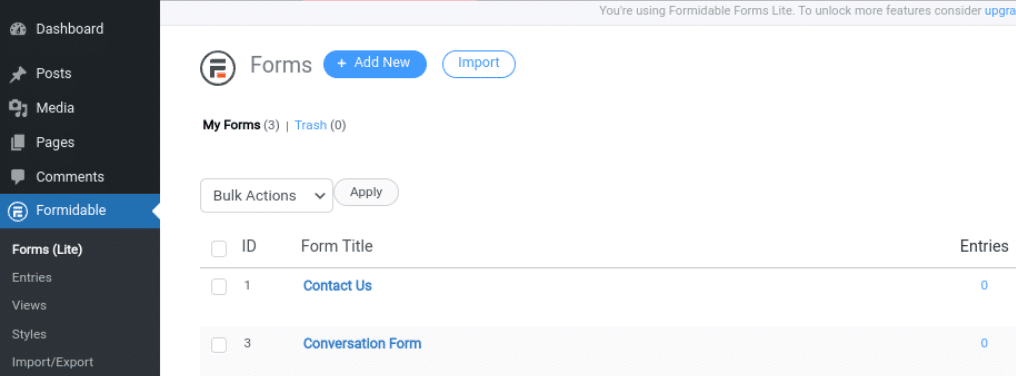
Next, you can select Contact Form from the list of options, and choose from a handful of premade templates. When you’re done building your form, browse to the page you want to place it on and launch the Elementor editor interface.
From the left-hand panel, search for and select the Formidable Forms widget. You can adjust the format, colors, buttons, text, etc.:
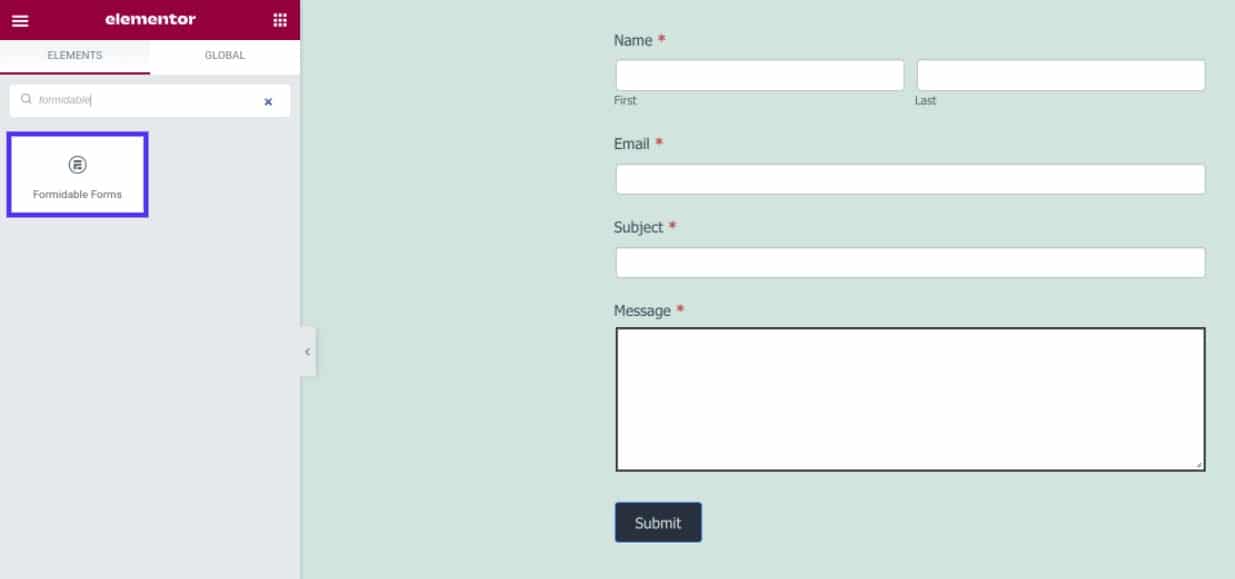
When you’re done, you can save and publish your changes. This method requires a bit more time and effort than would be necessary with the Elementor Pro plugin. However, it can help save you some money if you don’t want to purchase a premium plan.
Troubleshooting Elementor Forms
Elementor contact forms are pretty straightforward and easy to use. However, you may run into issues when using it. One of the most common problems that people report is undelivered emails.
Elementor uses the wp_mail function to distribute its emails. This means that your hosting provider takes the sent email and delivers it.
However, some hosts disable the PHP function that is typically used for sending emails, which is why this issue may occur. To resolve this error, we recommend getting in touch with your hosting provider and asking them to enable the send_mail function.
Alternatively, you can use a Simple Mail Transfer Protocol (SMTP) server. This is an email server that will route your email in forms to the inbox of your customers, using an external source like Gmail. This can reduce the chances of your emails ending up in spam folders. To set up SMTP, you can use a plugin such as WP MAIL SMTP.
Learn why you might want to create Elementor forms (and helpful addons to level them up!) in this guide ⬇️Click to Tweet
Summary
Forms play a pivotal role in websites. They enable customers to get in touch with you, register for an account, submit payment information, and much more. However, figuring out how to design aesthetically pleasing forms for your site can be challenging. Fortunately, Elementor makes it easy.
Once you add the Elementor form widget to your page, you can set up your fields and configure the form settings. You can also customize the design of your form so that it aligns with your branding.
Do you have any questions about creating Elementor forms in WordPress? Let us know in the comments section below!
Get all your applications, databases and WordPress sites online and under one roof. Our feature-packed, high-performance cloud platform includes:
- Easy setup and management in the MyKinsta dashboard
- 24/7 expert support
- The best Google Cloud Platform hardware and network, powered by Kubernetes for maximum scalability
- An enterprise-level Cloudflare integration for speed and security
- Global audience reach with up to 35 data centers and 275 PoPs worldwide
Test it yourself with $20 off your first month of Application Hosting or Database Hosting. Explore our plans or talk to sales to find your best fit.
When you have a business website, forms are a staple. They make it easier for customers to get in contact with you and provide important information and feedback. However, figuring out how to create them can be challenging.
If you’re looking for a simple, straightforward strategy, we recommend using Elementor forms. This popular page builder provides solutions for building various forms that are both aesthetically pleasing and easy to use.
In this post, we’ll discuss why you might want to create Elementor forms. Then, we’ll walk you through the process of doing so, and cover some helpful addons and troubleshooting tips. Let’s jump in!
Check Out Our Video Guide to Elementor Forms
Why Create Elementor Forms
There are many advantages to creating forms for your WordPress site. For starters, you can provide your visitors with a quick and simple method of communicating with you. Additionally, you can use them to generate leads and acquire important information from your audience.
Forms can also be useful tools for registering your users and accepting payments. However, if you want to add a form to your WordPress site, you need to use a plugin. Alternatively, you could use a page builder like Elementor.
Elementor lets you build stunning forms without touching a line of code. You can use the drag-and-drop editor to create responsive forms that match your branding and website aesthetic.
You can also choose from multiple types of forms, including:
- Elementor Contact Forms: you can use this feature to build a simple form for users to get in touch with you.
- Elementor Gravity Forms: this Gravity Forms widget gives you more flexibility in customizing and styling your forms.
- Elementor Register Forms: this feature lets you set up user registration forms on your website.
As you can see, each of these forms has its own specific use case and can help enhance the functionality of your site. Next, we’ll show you how to build a contact form using Elementor.
Want to use Elementor forms to connect with your customers? ✅ This guide is for you 🤝Click to Tweet
How To Create an Elementor Contact Form in WordPress (in 6 Steps)
Now that we understand more about why you might want to use Elementor forms, let’s look at how you can create one in a few simple steps. Note that for this tutorial, we’ll assume you already have Elementor installed and activated on your website.
There is a free tool and paid plugin. To access the form features, you’ll need the premium version.
Step 1: Add the Elementor Contact Widget
To get started, navigate to the page or post where you want to insert your contact form. Then, click on the Edit with Elementor button at the top of the screen:
This will launch the Elementor editor interface. From the widgets on the left, search for and select the Form widget:
Then, you can drag and drop the widget onto your page. This will insert a standard contact form.
Step 2: Set Up Your Contact Form Fields
Once you place your contact form on the page, there are a handful of settings for you to configure. For now, let’s focus on setting up the form fields.
You can edit the basic form fields by clicking on the widget and customizing the text (if you want to change any of the default options). If you want to add additional fields, you can do so by selecting Add Item:
You can select the type of field you want to add from the drop-down list. Next, you can add a label, which is the name of the form field. This shows your visitors what input is expected.
For the Placeholder option, you can customize the text that appears in the form field before the user enters their information. You can use this to give visitors examples of the data you want them to provide.
Additionally, you can choose to enable the Required setting and modify the column width. You can also click on the Buttons panel to customize the appearance of your form buttons. You can change the sizing as well as the font and colors.
Step 3: Configure Your Form Submissions
After you’re finished creating the form fields, the next step is to configure your form submission settings. You can navigate to Email within the Elementor editor to access various options.
For example, you can input your email address in the To field where you want the submissions delivered. You can enter multiple email addresses if you wish:
You can also customize the subject of the email and message. When you’re done configuring all of the options, make sure to save your changes.
Step 4: Customize Your Contact Form Messaging
If you want to further personalize your contact form, you can do so by enabling custom messaging. Select Additional Options, then move the toggle switch for Custom Messaging to Yes:
There are four types of messages you can modify:
- Success Message: this appears once a user submits the form
- Error Message: this will come up if there’s an issue during the submission process
- Required Message: to inform users that a particular field wasn’t completed
- Invalid Message: to let users know that something with the form submission is off
You can customize these messages to match your brand’s voice and style. For example, you can modify the wording to add a bit of personality.
Step 5: Styling Your Elementor Contact Form
Once you have the basic text and fields of your form taken care of, you can begin styling the design of your Elementor contact form. For example, you may want to make sure that it matches your branding.
To get started, you can click on the Style tab at the top of the widget editor:
Here, you’ll find a wide variety of options and settings that you can use to customize the design of your contact form. For instance, you can adjust the spacing and padding, as well as change the colors, size, labels, and buttons.
Step 6: Save and Publish Your Form
When you’re satisfied with the look and contents of your Elementor contact form, the only thing left to do is to save and publish it. You can do so by selecting the Publish button at the bottom left side of the screen.
That’s it! Then you can preview your contact form on the front end to confirm that it looks as you want it to.
Top Addons for Elementor Forms
Out of the box, the Elementor page builder comes with plenty of options for building forms for your WordPress website. However, you might also consider adding plugins to help extend the functionality of your forms. Let’s take a look at some options.
Master Addons for Elementor
The Master Addons for Elementor plugin is a freemium tool that provides a collection of helpful tools for enhancing the page builder and, in turn, your website. It includes the following features:
- Header, footer, and comment form builder
- Mega Menu builder
- Image hover effects
- Display conditions
It’s also compatible with a wide variety of form plugins. This includes Contact Form 7, Ninja Forms, WP Forms, and Caldera Forms. To access all of the plugin’s features, you’ll need to purchase the pro version, which is available for $39 per year.
The Plus Addons
Another handy tool you can use with Elementor is Plus Addons. This plugin is packed with over 8,000 customization options and over 300 User Interface (UI) blocks that can help you create and design your pages and forms with ease.
Its features include:
- Icon boxes
- Map sections
- Forms
- Pricing tables
There are also more than 18 templates you can choose from. These were designed specifically for certain types of businesses, including agencies, restaurants, salons, and more.
There is a free version available. However, to leverage the entire suite of useful features, we recommend purchasing a premium license, available for $39 per year.
Additional Tips and Tricks for Creating Elementor Forms
If you want to create Elementor contact forms for your WordPress site without paying for a premium license, there are ways you can go about it. Doing so will require you to pair the page builder with another WordPress form plugin, such as WPForms or Formidable Forms.
Let’s say you opt for Formidable Forms. Once you install and activate the plugin on your site, you can navigate to Formidable > Forms > Add New:
Next, you can select Contact Form from the list of options, and choose from a handful of premade templates. When you’re done building your form, browse to the page you want to place it on and launch the Elementor editor interface.
From the left-hand panel, search for and select the Formidable Forms widget. You can adjust the format, colors, buttons, text, etc.:
When you’re done, you can save and publish your changes. This method requires a bit more time and effort than would be necessary with the Elementor Pro plugin. However, it can help save you some money if you don’t want to purchase a premium plan.
Troubleshooting Elementor Forms
Elementor contact forms are pretty straightforward and easy to use. However, you may run into issues when using it. One of the most common problems that people report is undelivered emails.
Elementor uses the wp_mail function to distribute its emails. This means that your hosting provider takes the sent email and delivers it.
However, some hosts disable the PHP function that is typically used for sending emails, which is why this issue may occur. To resolve this error, we recommend getting in touch with your hosting provider and asking them to enable the send_mail function.
Alternatively, you can use a Simple Mail Transfer Protocol (SMTP) server. This is an email server that will route your email in forms to the inbox of your customers, using an external source like Gmail. This can reduce the chances of your emails ending up in spam folders. To set up SMTP, you can use a plugin such as WP MAIL SMTP.
Learn why you might want to create Elementor forms (and helpful addons to level them up!) in this guide ⬇️Click to Tweet
Summary
Forms play a pivotal role in websites. They enable customers to get in touch with you, register for an account, submit payment information, and much more. However, figuring out how to design aesthetically pleasing forms for your site can be challenging. Fortunately, Elementor makes it easy.
Once you add the Elementor form widget to your page, you can set up your fields and configure the form settings. You can also customize the design of your form so that it aligns with your branding.
Do you have any questions about creating Elementor forms in WordPress? Let us know in the comments section below!
Get all your applications, databases and WordPress sites online and under one roof. Our feature-packed, high-performance cloud platform includes:
- Easy setup and management in the MyKinsta dashboard
- 24/7 expert support
- The best Google Cloud Platform hardware and network, powered by Kubernetes for maximum scalability
- An enterprise-level Cloudflare integration for speed and security
- Global audience reach with up to 35 data centers and 275 PoPs worldwide
Test it yourself with $20 off your first month of Application Hosting or Database Hosting. Explore our plans or talk to sales to find your best fit.
|
1 / 1 / 0 Регистрация: 13.04.2015 Сообщений: 51 |
|
|
1 |
|
|
05.05.2022, 10:05. Показов 1270. Ответов 3
При попытке отправить форму на email с помощью Elementor выскакивает сообщение: Server error. Form not sent.
Как это исправить?
__________________
0 |


|
137 / 113 / 36 Регистрация: 21.06.2021 Сообщений: 825 |
|
|
05.05.2022, 11:04 |
2 |
|
а вообще письма с сайта уходят?
0 |
|
190 / 399 / 81 Регистрация: 26.02.2019 Сообщений: 2,038 Записей в блоге: 2 |
|
|
05.05.2022, 11:07 |
3 |
|
Решение
Form not sent. Ничего не знаю что и где настраивается в мышевозке (Elementor) но..
1 |
 Сообщение было отмечено Dim233 как решение

|
1 / 1 / 0 Регистрация: 13.04.2015 Сообщений: 51 |
|
|
05.05.2022, 11:30 [ТС] |
4 |
|
Ничего не знаю что и где настраивается в мышевозке (Elementor) но.. Спасибо! Выставил в поле почту в домене сайта и форма отправилась!
1 |
Sometimes I would like to hide the Elementor form after submission. However, the the default Elementor behavior is resetting the whole form with a successful message below the form. Let’s modify this by some simple jQuery codes.
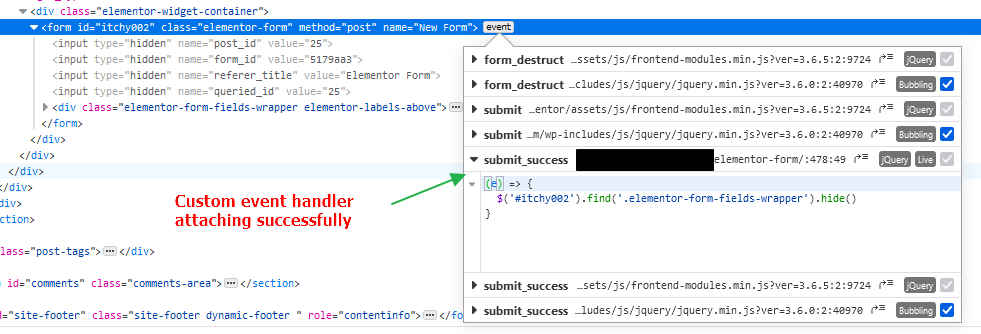
Elementor Form jQuery Events
First of all, we must need to know what event available on the Elementor form. From the developer tools, we could see there are form_destruct, submit, and submit_success.
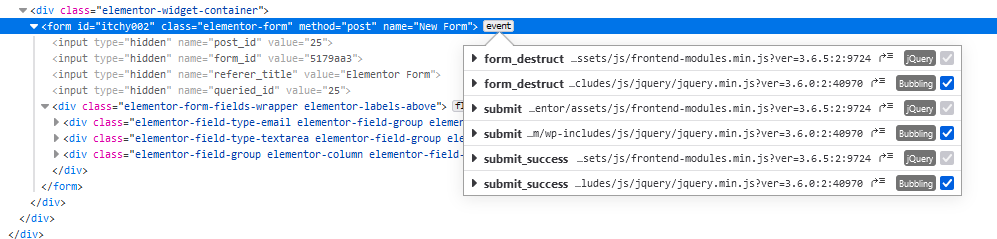
Obviously we will listen to submit_success event and hide the form. Bare in mind that it’s a jQuery event, so we will need to use jQuery .on() method to attach our custom event handler. (jQuery .on() documentation)
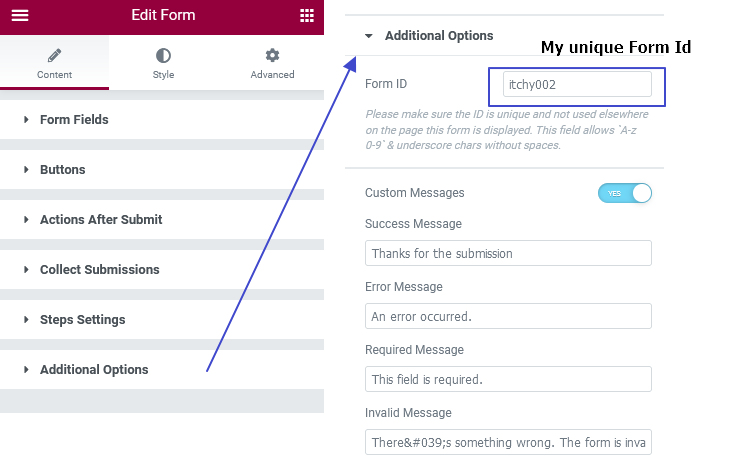
Assign Form Id
Before the coding part, I did assigned a form Id if you noticed my previous screenshot. You could do this as well, just simply put in a unique Id in Additional Options of the Form element.
Start Coding
I will use Elementor Custom Code to insert my jQuery codes this time. Heads to Elementor > Custom Code, and Add a new Custom Code.

Location I set as </body> End and Priority I leave it as 1

And the jQuery will be as simple as below. Basically just hide some elements when an event triggered.
<script>

	 (($)=>{

		 $(document).ready(()=>{

			 	// on submit_success event triggered on my specific form #itchy002
				$(document).on('submit_success', '#itchy002',(e)=>{
						// hide all fields in this form
						$('#itchy002').find('.elementor-form-fields-wrapper').hide()
				})

		 })

	 })(jQuery)

</script>
Please remember change the form Id to yours.
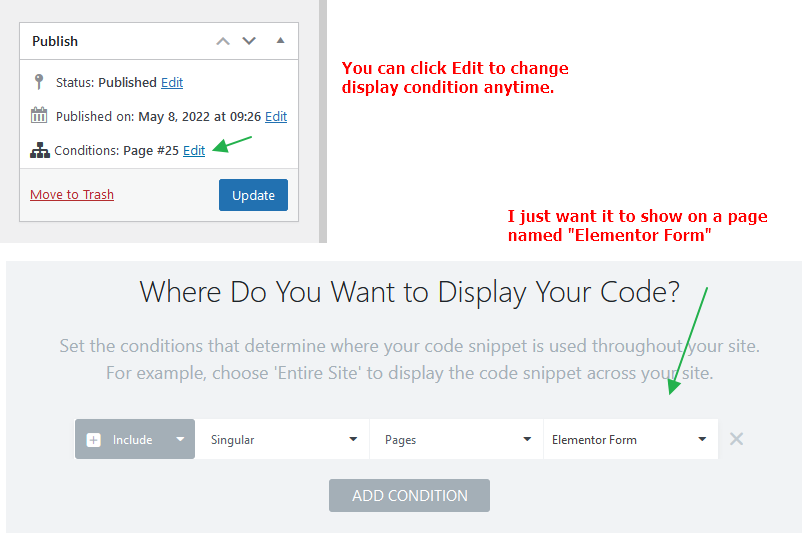
I set this custom code to only display on specific page which my form located at. You could adjust as you need by editing the conditions.
Alright, after published, you can inspect the form again and check if the custom event handler attached successfully. Mine is attaching fine!
Result
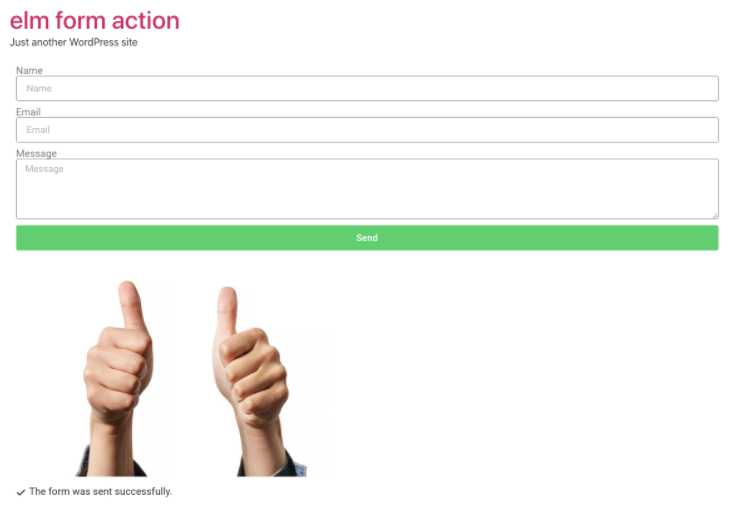
Try to submit and taa-daa~~ This is what I want!
The Form widget provided by Elementor Pro is a handy tool to easily add forms to your WordPress site. After defining the form fields, you can add “Actions After Submit” to select what you want to happen after the form is submitted. Elementor provides several options out of the box including, storing the submitted form data to your database, notifying the site admin, sending a confirmation email to the submitter, sending the form data to a third-party CRM, or even a generic webhook, which you can configure to run more actions.
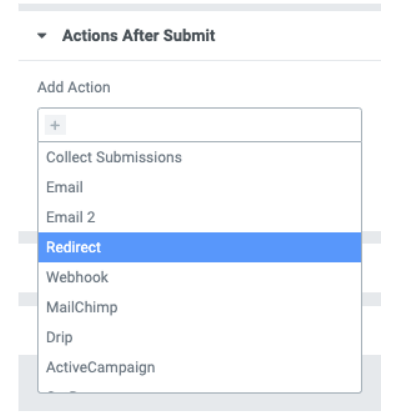
We’ve found these built-in options to be sufficient in the majority of cases, but sometimes we’ve needed to handle the form submissions in a unique way, such as when a webhook URL requires the data to be formatted in a specific manner. Thankfully, Elementor provides the Form Action API which allows developers to create custom form actions. The development process is similar to creating custom Elementor Widgets or Dynamic Tags. In the custom action, you define controls to display in the Elementor editor, and then you define a function that receives those control settings and does the custom work you need the action to do. Finally, you register your custom action with Elementor so that the action’s label appears in the action list, as shown in the screenshot above. We recommend adding the custom action code via a plugin so that the action can be reused on other sites too.
The Form Action API linked above outlines in detail the exact code you will need to create your custom action. The documentation is clear, but you might have some questions after implementing it, such as how to handle errors or display post-submission messages to the user. We’ll dive deep in this post and explore the questions you might have after implementing custom form actions using Elementor Form Action API.
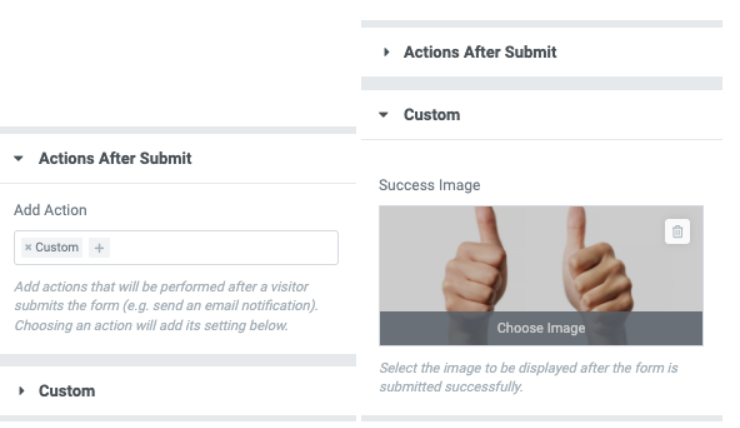
Success Image
Let’s create an action that displays an image after the form is submitted successfully. First, we need to add a control to select the image in Elementor. We do this with the register_settings_section method like so:
					public function register_settings_section( $widget ) {
		$widget->start_controls_section(
			'section_custom',
			[
				'label' => __( 'Custom', 'elmformaction' ),
				'condition' => [
					'submit_actions' => $this->get_name(),
				],
			]
		);

		$widget->add_control(
			'success_image',
			[
				'label' => __( 'Success Image', 'elmformaction' ),
				'type' => ElementorControls_Manager::MEDIA,
				'label_block' => true,
				'separator' => 'before',
				'description' => __( 'Select the image to be displayed after the form is submitted successfully.', 'elmformaction' ),
			]
		);

		$widget->end_controls_section();
	}
Notice the “condition” limits our control section to display only when our action has been selected. To select an image we need to add a MEDIA control. If you need a different control type for another feature, check the Elementor docs or class Controls_Manager in the Elementor plugin for all the control types available, including TEXT, SELECT, SWITCHER, ICON, WYSIWYG, URL, CODE, and many more.
Then in our action’s run function, we need to add the image to the data sent back in the form response. To do this we will use the $ajax_handler provided by Elementor Pro, which is a helper class that allows us to easily modify the ajax response with errors, messages, or any arbitrary data. The source can be reviewed at
elementor-pro/modules/forms/classes/ajax-handler.php.
						public function run( $record, $ajax_handler ) {
		$settings = $record->get( 'form_settings' );

		if ( empty( $settings['success_image'] ) ) {
			return;
		}

		$ajax_handler->add_response_data( 'success_image', $settings['success_image']['url'] );
	}
The important bit here is the add_response_data call where we add the image URL to the ajax response data.
Here’s our full class for reference:
					class CustomFormAction extends ElementorProModulesFormsClassesAction_Base {
	public function get_name() {
		return 'custom';
	}

	public function get_label() {
		return __( 'Custom', 'elmformaction' );
	}

	/**
	 * @param ElementorWidget_Base $widget
	 */
	public function register_settings_section( $widget ) {
		$widget->start_controls_section(
			'section_custom',
			[
				'label' => __( 'Custom', 'elmformaction' ),
				'condition' => [
					'submit_actions' => $this->get_name(),
				],
			]
		);

		$widget->add_control(
			'success_image',
			[
				'label' => __( 'Success Image', 'elmformaction' ),
				'type' => ElementorControls_Manager::MEDIA,
				'label_block' => true,
				'separator' => 'before',
				'description' => __( 'Select the image to be displayed after the form is submitted successfully.', 'elmformaction' ),
			]
		);

		$widget->end_controls_section();
	}

	/**
	 * @param ElementorProModulesFormsClassesForm_Record $record
	 * @param ElementorProModulesFormsClassesAjax_Handler $ajax_handler
	 */
	public function run( $record, $ajax_handler ) {
		$settings = $record->get( 'form_settings' );

		if ( empty( $settings['success_image'] ) ) {
			return;
		}

		$ajax_handler->add_response_data( 'success_image', $settings['success_image']['url'] );
	}

	public function on_export($element) {}
}
Finally, be sure to register this class as an action according to the example in the Form Action docs linked above. With that, we should have the action available, and when added we should be able to select an image.
Then we need to add some javascript to grab this image from the response data and add it to the page. Elementor emits the event submit_success when a form is submitted successfully, so we will listen for that event.
jQuery(function($) {
$( document ).on('submit_success', function(e, data) {
if (data.data.success_image) {
var img = $('![]() ', {
src: data.data.success_image
});
$(e.target).append(img);
}
});
});
', {
src: data.data.success_image
});
$(e.target).append(img);
}
});
});
With that, you can see the image added to the form after submission.
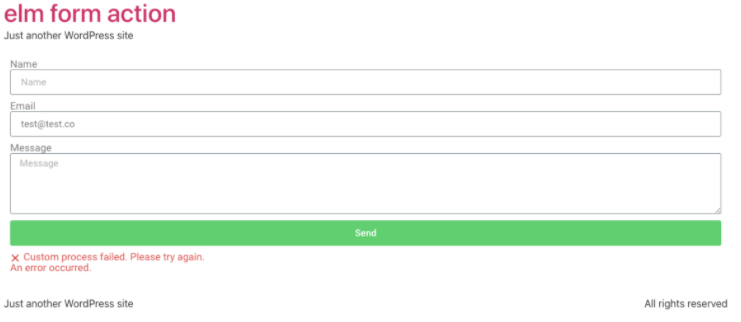
Error handling
If your action involves some other process that might fail, you should let the user know if something goes wrong. The $ajax_handler also provides a method for adding errors to the form submission called add_error_message. So then if something goes wrong in your action’s run function, you can call the method:
$ajax_handler->add_error_message( 'Custom process failed. Please try again' );
Then Elementor will display the message on the form.
The above should help you create your own form actions to use with the Elementor form builder. This will allow you greater flexibility in handling user interactions.
If you’d like a challenge, use the examples above as a guide to creating these features:
Change the success message to a thank you message that includes the name the user submitted in the form, e.g. “Thanks, John!”
Add a control to enter a shortcode to be displayed as the success message. Remember, Elementor templates can be rendered with shortcodes.
Table of Contents
- Getting Started
- Opening a Form
- Editing the Response Message
- Editing the Response Message Text
- Additional Customization Settings of the Response Message
- Adding Styling to the Response Message
Getting Started #
Customizing the response message is a pro feature of MetForm. This message is displayed after a user fills out a form.
It confirms the users whether their message has been successfully submitted or not. Either way, creating such a response message is quite easy for the MetForm pro users.
Here we will show you the procedure of editing the response message.
Opening a Form #
Follow the procedure below to open a form where you’ll add the response message.
- Login to the WordPress admin panel and create a new page.
- Open the page with the Elementor editor.
- Search for MetForm on the Elementor search panel and drag and drop the icon on the page.
- Click on the Edit Form button located on the left panel.
- Now, select an existing form or click the New button to create a new form.
- Add the required field and click on the UPDATE & CLOSE button.
To get a clear overview of creating a new form and adding the required field, follow the video guideline below –
Editing the Response Message #
The MetForm pro users can customize the response message text, appearance, and other stylings. Here’s the step-by-step procedure of editing the response message.
Editing the Response Message Text #
To customize the text, follow the procedure below:
- Browse the page or post that contains the form.
- Click on the Edit Form button and choose the form.
- Choose your form from the drop-down and click on the blue Edit Form button.
- Now, click on the FORM SETTINGS option in the upper left corner.
- Edit the Success Message input field and click on the Save Changes button.
- Lastly, click on the UPDATE & CLOSE button.
Now, look at the visual presentation of this entire procedure-

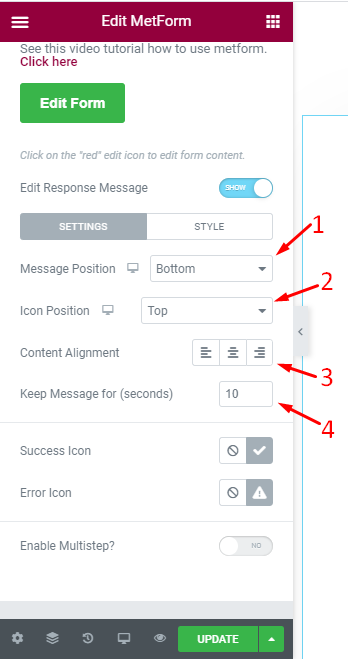
Additional Customization Settings of the Response Message #
Proceed to the page or post that contains the form and toggle the Edit Response Message button. It will show you the additional settings on your
- Click the Message Position option to determine whether you want to show the message on the top or bottom section.
- Choose the icon position by clicking on the Icon Position select the position.
- To choose the alignment, click on the Content Alignment section and choose one right alignment.
- Input the message visibility time on the input box titled as Keep Message for. Input how many seconds you want to keep the response message visible after submitting the form.
Adding Styling to the Response Message #
The STYLE tab is located under the Edit Response Message section. MetForm pro users can customize different styles of the response message from this section.
The available customization features on this section are –
- Icon Size
- Container Width
- Typography
- Success Message Color
- Error Message Color
- Success Icon Color
- Error Icon Color
- Success Message Background Color
- Error Message Background Color
![]()
In the following part, you will get the additional style customization settings regarding border type, margin, and padding. Here is the full list of available customization features –
- Border Type
- Border Radius
- Container Padding
- Icon Margin
- Container Margin
The available border types are solid, double, dotted, dashed, and groove. And you can edit the margin and padding section by following the common CSS units like pixel, percentage, and EM unit.
Point to be noted: This response message editing feature is available only for the pro license users and it doesn’t work while using a form via shortcode.
Additional Feature
On the bottom section, you might have already noticed another amazing feature called “Enable Multistep”. By enabling this feature you can create forms with multiple steps. Here’s the video guideline about creating a multistep form using MetForm.
Create Post with MetFormEntries
Elementor is one of the most popular page builder plugins for WordPress. Elementor Pro offers a form widget that helps create a diverse range of forms to collect email subscribers. It usually triggers an email to both the WordPress admin and the user when a form submission happens.
Although Elementor Form is very reliable, sometimes users can face problems when using this feature. One common issue is Elementor forms not sending emails or email notifications.
If you’ve run into the same problem, you’re in the right place. In this article, we’ll tell you why Elementor form is not sending emails and how to fix this issue.
Let’s get started!
Why is Elementor form not sending emails?
Elementor Form is designed to send email notifications to both the WordPress admin and the user when a form is submitted. If your Elementor contact form is not sending emails, there can be two reasons:
- The form isn’t configured properly
- Form submission emails are going to spam
Reason 1: The form isn’t configured properly
Elementor form automatically adapts to the default configuration set by WordPress itself. This is why it is important to recheck the form configuration if the Elementor form is not sending emails. The possible misconfigurations are mentioned below:
- Missing Field Id: If you notice a server_error or an error occurred message, it indicates that a field ID is missing in your Elementor form builder. In this case, you need to troubleshoot Elementor Form errors.
- Incorrect form notification setup: Another reason is incorrect email notification settings in your Elementor Form. This usually happens when the wrong From Email is set. So you need to check Elementor Form notification to solve the issue.
- Plugin conflict: Sometimes new themes or plugins can also break your forms. Notably, new caching plugins can cause issues with form submissions. In that case, you can troubleshoot Elementor Forms by removing plugins and themes you’ve installed recently.
Also, consider switching to a different form plugin. We recommend Fluent Forms, it’s a free yet extraordinary drag-n-drop form plugin with incredible features such as pre-built forms, conversational forms, visual reporting, conditional logic, spam protection, and many more!
The best part?
It works with Elementor!
Reason 2: Form submission emails are going to spam
While server errors and error messages indicate that form submissions aren’t going through, it’s also possible that your Elementor form submission emails are going to spam because of how WordPress handles email.
Maybe you know, or you don’t, WordPress doesn’t send emails to users. WordPress is a content management system, not an email server.
- WordPress emails are managed by the wp_mail() function, which is part of the core program of WordPress files. Plugins uses the wp_mail() function to send emails to WordPress.
- WordPress sends your hosting provider’s server this email request and processes the request using PHP email.
- Finally, PHP instructs the mail server at the hosting provider. Then your hosts’ email router pushes the emails to their correct recipients.
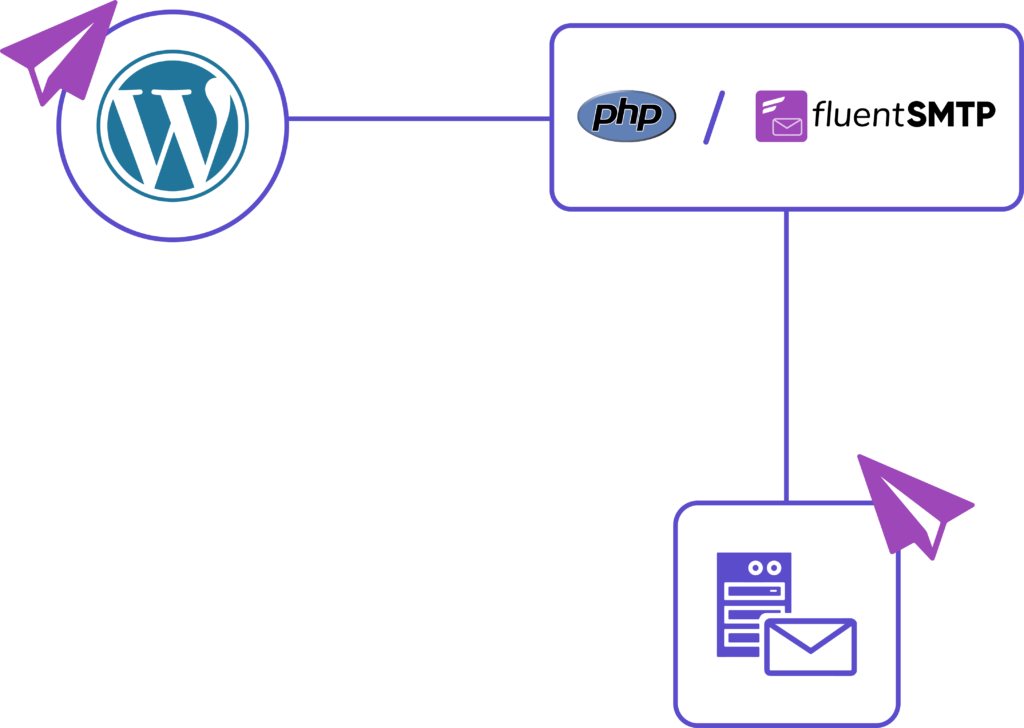
While many hosting providers do not have an email sending service, many block PHP emails by default. That’s why it’s ideal to install an SMTP plugin.
Elementor Form not sending email is a common yet frustrating issue for elementor users—but also one that you can also fix in three simple steps. Let’s get to it!
Step 1: Troubleshoot Elementor form errors
If you’re facing a Server_error or An error occurred issue, it’s probably because your form has a missing field ID. To troubleshoot if that’s causing the issue:
- Go to your WordPress dashboard and open the page containing your Elementor form.
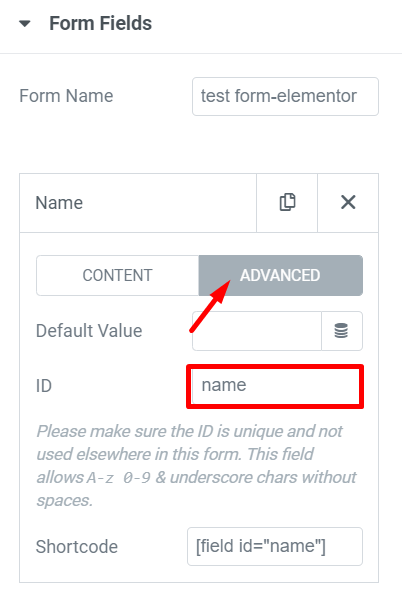
- Then, click each form field and check the Advanced tab one by one. There must be an ID assigned to every form field.
Check all the form fields and fix the ID issue if there are any.
Step 2: Check Elementor form notifications
The second step is to check that your contact form is set up correctly for email notifications. These steps vary based on how you’ve created your form.
- Open up your page with elementor page builder.
- Click Actions After Submit from the left-hand bar and check the action tags. Make sure that there is an email tag assigned.
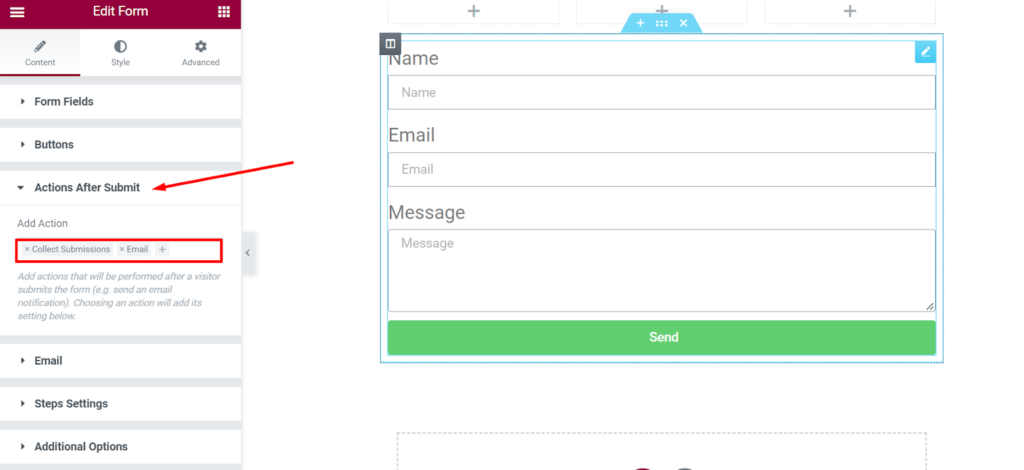
- Now scroll down once again to the Email tab to see the notification sent with each form submission.
Here, check all the information and check that your form notification is set up correctly. Setting the From email to an email address that matches your domain may help to avoid email delivery problems.
If you haven’t created an email that matches your domain, you can always create a custom domain email.
Step 3: Install an SMTP plugin
One of the easiest ways to define the solution and fix the email deliverability issue is by replacing the PHP mailing system with an SMTP plugin.
Simple Mail Transfer Protocol(SMTP) is the international standard communication protocol used for sending and receiving emails over the internet.
If your hosting provider doesn’t provide a hosting email facility on the server, you can use an SMTP plugin for sending WordPress emails reliably. SMTP plugins are relatively easy to install and use.
We recommend FluentSMTP, a free and open-source SMTP plugin for your WordPress. It can be paired with more than ten email sending services, including Sendgrid, AmazonSES, Google Workspace, Microsoft 365, etc.
Setting up FluentSMTP in WordPress
Setting up FluentSMTP is a relatively easy task, even if you are a complete non-techy. You can easily set up FluentSMTP with these below steps.
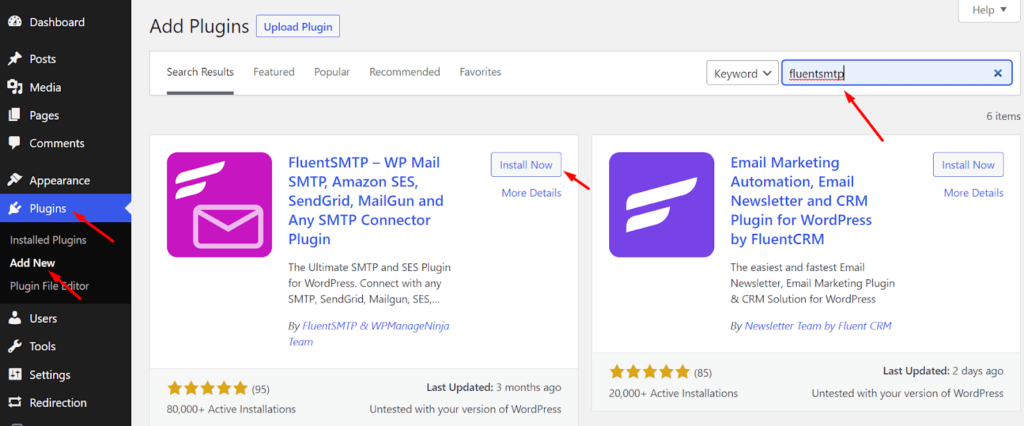
Go to your WordPress dashboard, roll down to the plugin section and click Add New button. Now search for the FluentSMTP plugin in the search box. Install and activate the plugin like the picture below.
Configuring FluentSMTP
To start configuring FluentSMTP, Follow the steps below,
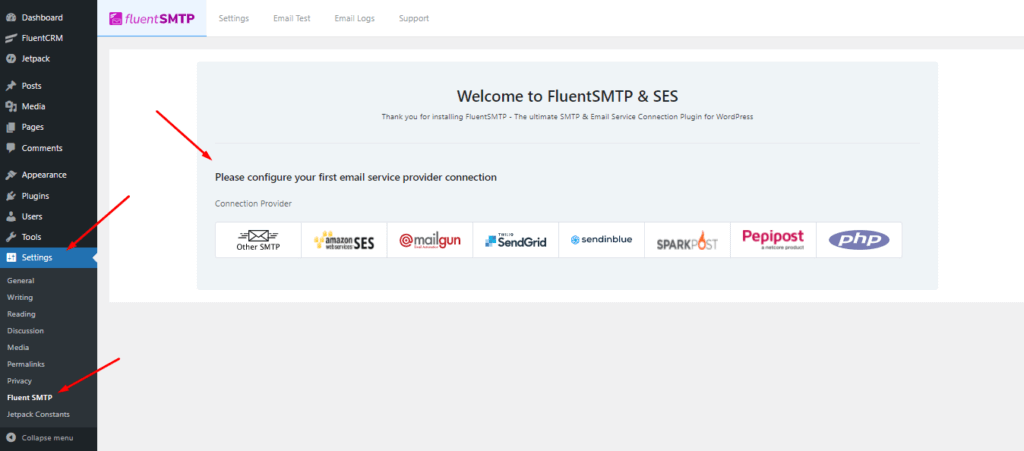
- Go to your WordPress dashboard. Click on Settings. Scroll down to FluentSMTP and click on it. Here you will be prompted to configure your email sending service.
If you haven’t signed up for an email sending service, you can check out some of the best transactional email sending services we recommend and sign up for one!
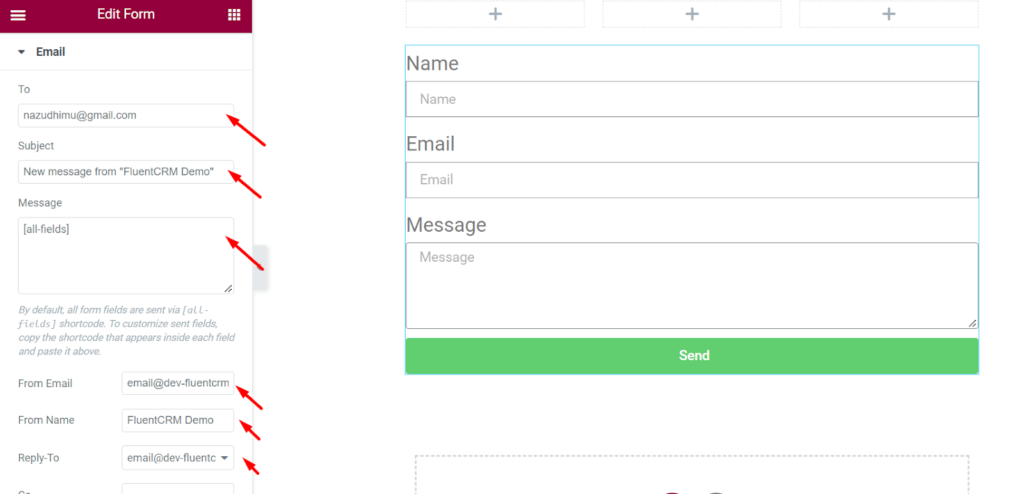
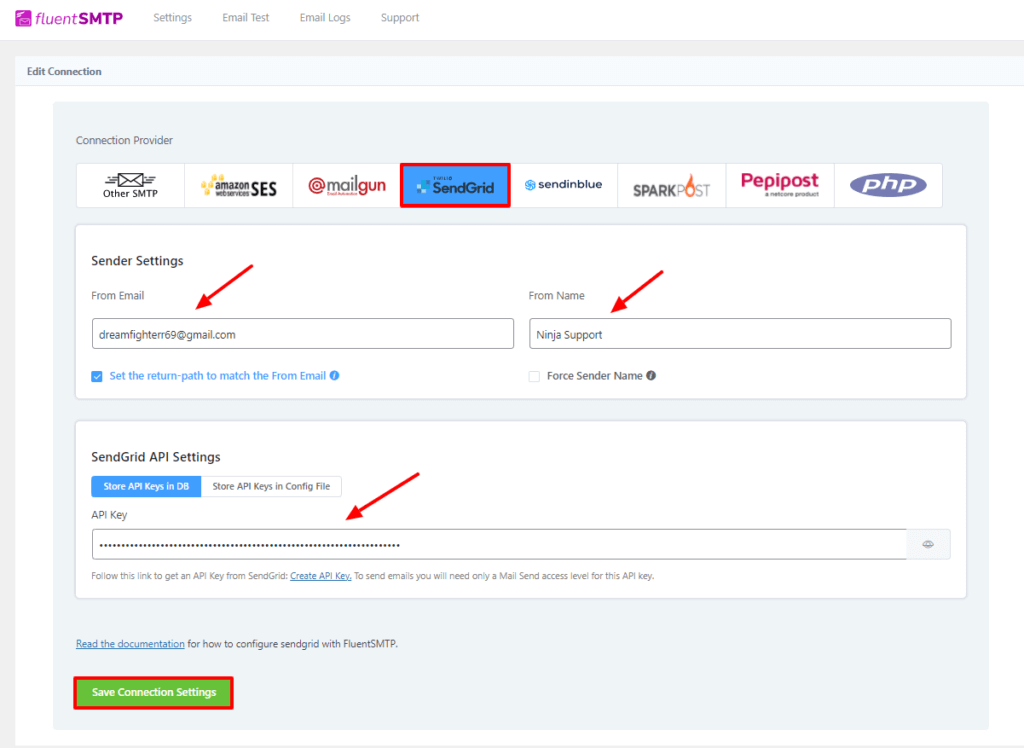
- Select your desired email service provider to configure it with FluentSMTP. Here, you’ll have to configure the sender details such as From Email and From Name.
The from name and from email have to be your verified email with your SMTP provider.
Also, don’t forget to check the box to set the return path to match the From email. The return path indicates where non-delivery receipts or bounce messages are sent. If unchecked, bounced emails will be lost.
After you’ve provided the credentials, click on Save Connection Settings!
Check email deliverability
The second step is to confirm that your emails get delivered. The log feature of the FluentSMTP plugin is the simplest approach to ensure the Elementor form’s email deliverability. This tool allows you to instantly log and view all of the emails that WordPress has sent.
To test whether your Elementor form’s emails are working or not:
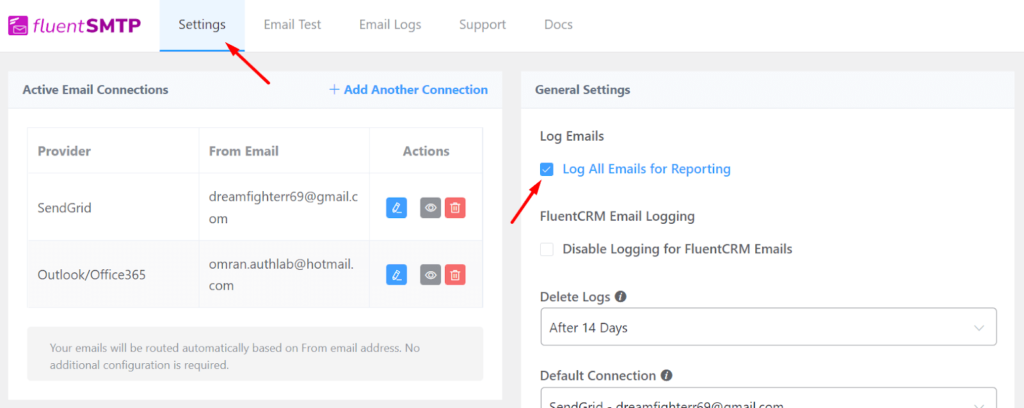
- Go to the Settings of your WordPress dashboard and scroll down to FluentSMTP.
- Click on Setting from the bar in the FluentSMTP dashboard.
- Check Log all Emails for Reporting.
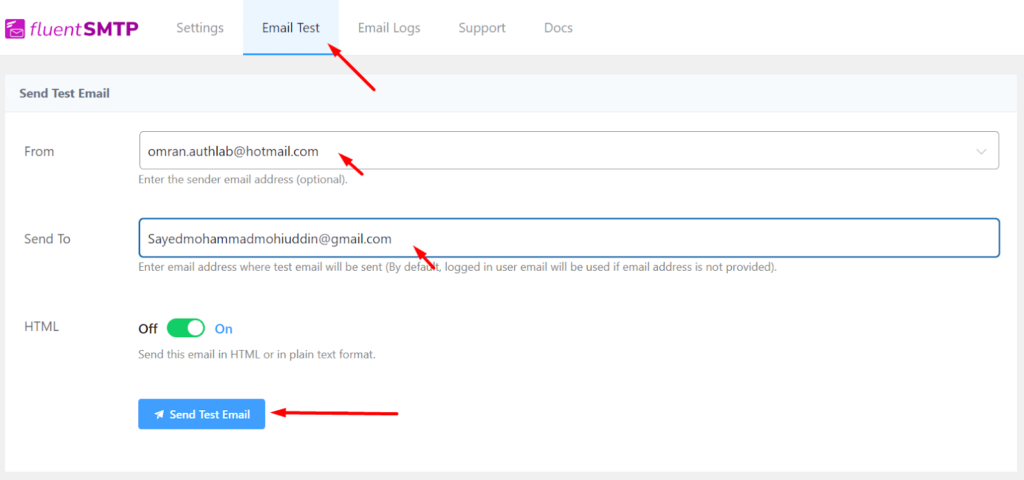
- Now click on the Email Test button on the upper bar. Select a From email, a To email, and send a test email to check email deliverability.
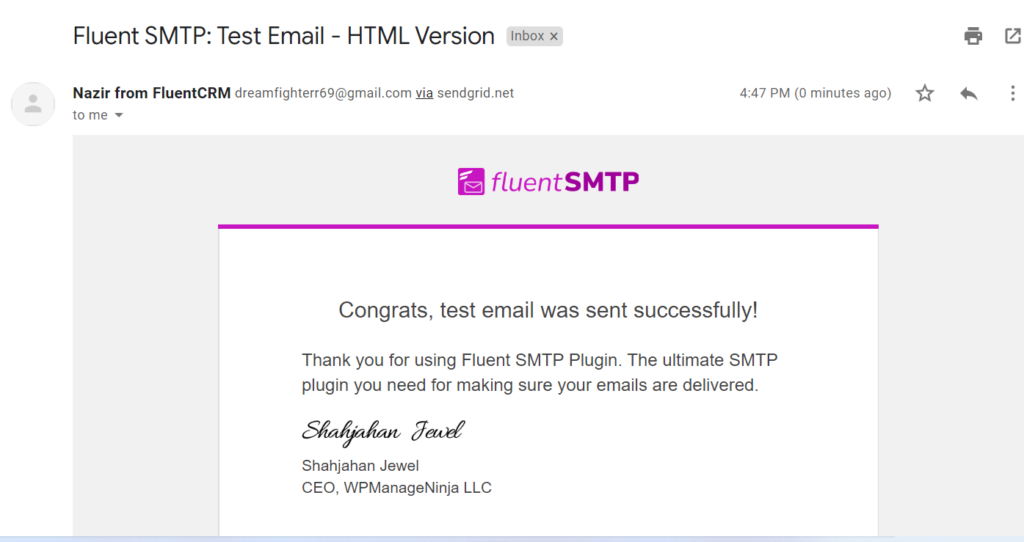
You can also check if the test email landed in your inbox successfully.
- Finally, click on Email Logs from the bar. Here you can see you sent emails with the email addresses. There are also resend, view, and delete buttons if needed.
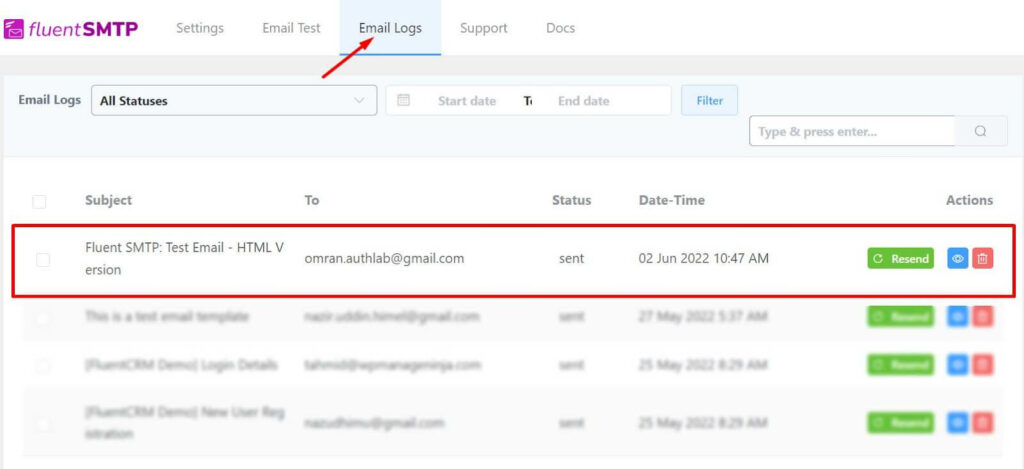
That’s how you can check your email deliverability from the FluentSMTP email log feature.
Wrapping up
Just in case you ever have any other issues with Elementor form not arriving in your inbox, you should have a backup. The last thing you want to do is miss out on business because you didn’t get the form submission.
Elementor does not come with database integration for its contact form submissions. WP Fluent Forms can be a good course of action here for storage, all kinds of form building, and plenty of integration.
Hopefully, this article helped you understand why you’re having problems with Elementor Form not sending emails and how you can fix things easily. If you have any queries about t, feel free to comment!