Автор:
Roger Morrison
Дата создания:
17 Сентябрь 2021
Дата обновления:
1 Февраль 2023

Содержание
- Что вызывает сообщение об ошибке «Импортер сообщил об общей ошибке» в Adobe Premiere?
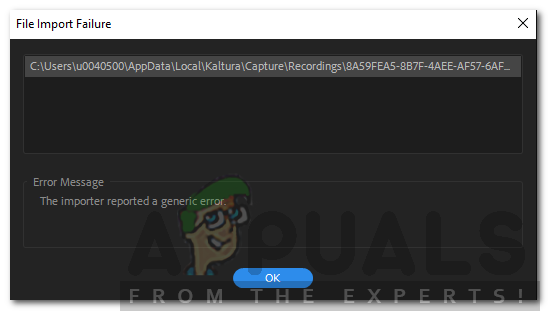
Adobe Premiere — одно из ведущих программ для редактирования видео. Adobe Premiere Pro является преемником Adobe Premiere. Программа была впервые представлена в 2003 году и вскоре получила известность благодаря удобному интерфейсу, функциям и эффективности. Как и любое другое приложение, оно время от времени вызывает у пользователей несколько ошибок. Один из них — «Импортер сообщил об общей ошибке‘ сообщение об ошибке. Это появляется, когда вы пытаетесь импортировать видео на временную шкалу с помощью импортера. Это может быть связано с множеством причин, например, неподдерживаемым кодеком или форматом видеофайла.

В этой статье мы рассмотрим сообщение об ошибке, обсудив его причины, а затем упомянем решения, которые вы можете применить, чтобы избавиться от сообщения об ошибке; тщательно. Итак, начнем с причин.
Как мы упоминали ранее, сообщение об ошибке появляется, когда вы используете импортер для импорта видеофайлов. Это может быть связано со следующими причинами:
- Неподдерживаемый кодек: Все устройства видеозаписи используют разные кодеки. Если кодек не поддерживается программным обеспечением Adobe Premiere Pro, вы не сможете импортировать его на шкалу времени. В таком случае вам придется изменить кодек видеофайлов.
- Неподдерживаемый формат видеофайлов: Adobe Premiere довольно щедро предлагает формат видеофайлов, однако он не поддерживает все форматы видеофайлов по очевидным причинам. Поэтому, если видео, которое вы пытаетесь импортировать, не поддерживается приложением, вы, в конечном итоге, наткнетесь на сообщение об ошибке.
- Проблемы с активацией: По словам Adobe, проблемы с активацией иногда могут нарушить некоторые функции импортера. Поэтому убедитесь, что программное обеспечение активировано и вы вошли в свою учетную запись Creative Cloud.
- Имя видео файла: В некоторых случаях проблема также может быть вызвана названием видеофайла. В имени файла могут быть символы, которые вызывают всплывающее окно.
С учетом сказанного, давайте перейдем к реальной части и поможем вам пройти через это испытание. Пожалуйста, следуйте всем предложенным решениям, если одно или два из них не работают для вас.
Решение 1. Проверьте формат видеофайла и кодек
Первое, что вам следует сделать, когда вы столкнетесь с сообщением об ошибке, — это убедиться, что формат видео и кодек поддерживается Adobe. Некоторые кодеки не поддерживаются Adobe Premiere, например, Adobe отказалась от поддержки кодека QuickTime. В таком случае вам придется перекодировать отснятый материал в более новый / современный кодек.
Точно так же, если формат видеофайла не поддерживается Adobe, вы не сможете импортировать файл. Точно так же вам придется изменить формат видеофайла, что довольно просто. Пожалуйста, обратитесь к этому ссылка на сайт список поддерживаемых форматов видеофайлов.
Решение 2. Очистка кеша файлов мультимедиа
Еще вы можете попытаться удалить кэш медиафайлов, а затем попытаться импортировать файлы. Когда вы импортируете видео или аудио файлы в Adobe Premiere, он сохраняет версии этих файлов, к которым он может быстро получить доступ снова для повышения производительности. Эти сохраненные версии называются файлами кэша мультимедиа. Вот как удалить файлы:
- близко Adobe Premiere Pro а затем перейдите к Users AppData Roaming Adobe Common каталог. Обратите внимание, что Данные приложения По умолчанию папка скрыта, поэтому убедитесь, что вы ее открыли.
- Если вы используете Mac, пожалуйста, перейдите к / Пользователи // Библиотека / Поддержка приложений / Adobe / Common каталог.
- Удалите файлы а затем запустите Adobe Premiere Pro.
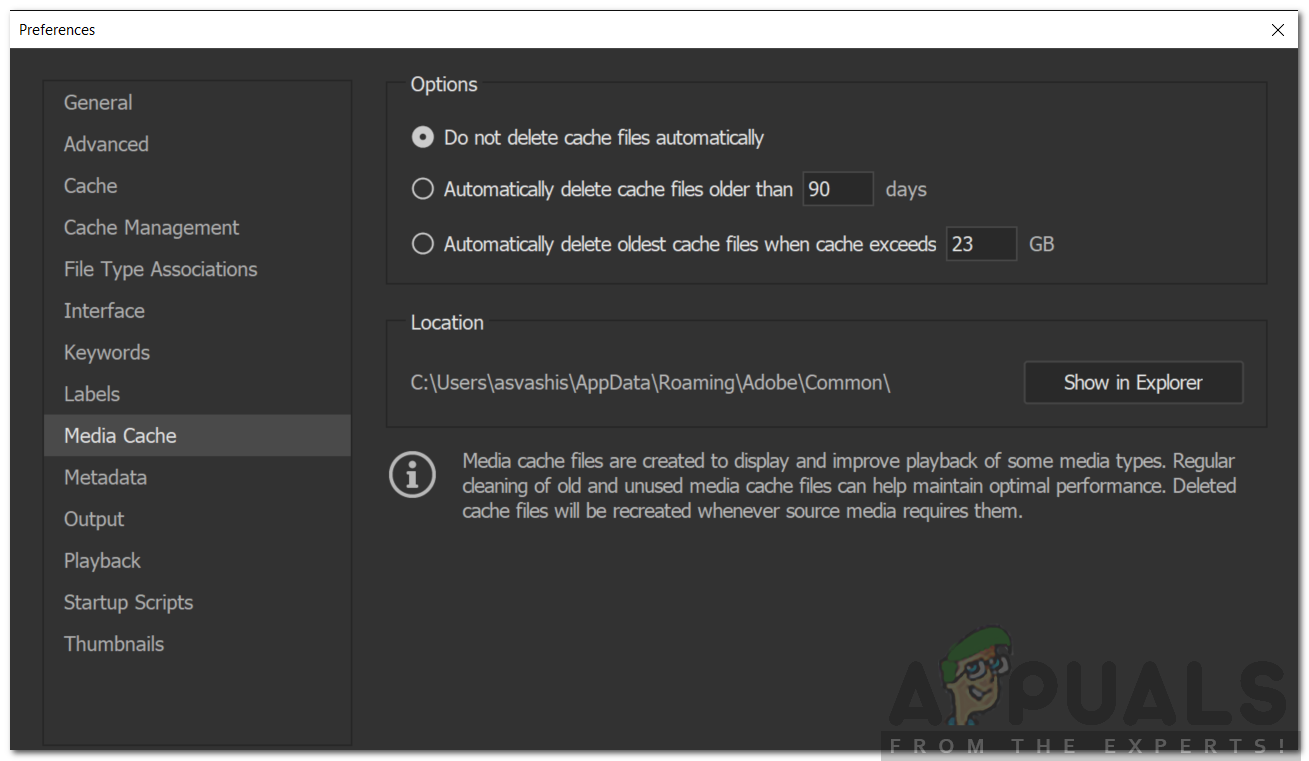
- Если у вас возникли трудности с поиском указанного выше пути, вы также можете просто перейти на Предпочтения а затем перейдите к Медиа-кеш таб.


Решение 3. Переместите файлы в другое место или переименуйте их
В некоторых случаях проблема может быть связана с указанным путем к видео- или аудиофайлам. В таком случае вам придется изменить путь к файлам, то есть переместить их на другой диск или просто в другую папку. Об этом сообщили многие пользователи, и это помогло им решить проблему.
Вы также можете попробовать просто переименовать файлы в том же каталоге, а затем попробовать импортировать файлы. Если не работает, просто переместите их в другое место.
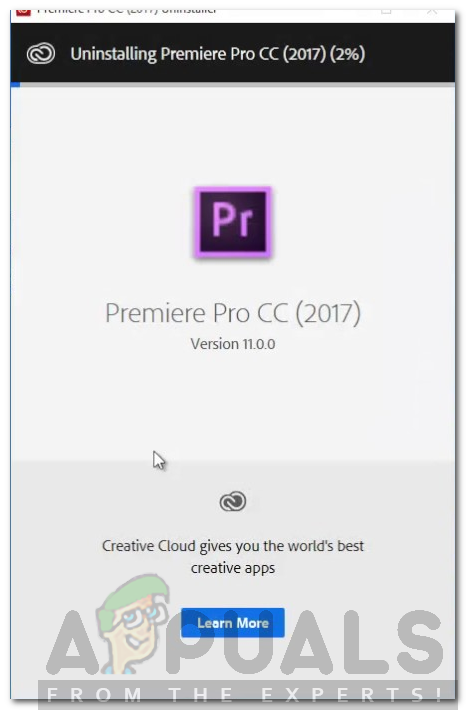
Решение 4. Переустановите Premiere Pro
Если все вышеупомянутые решения не работают для вас, возможно, возникла проблема с установкой программного обеспечения, и вам придется переустановить его. Вот как это сделать:
- Открыть Creative Cloud.
- Удалить Adobe Premiere Pro при сохранении настроек (опция при удалении).
- После этого установите его снова и посмотрите, решит ли он проблему.

Adobe Premiere is one of the leading video editing software. The Adobe Premiere Pro is the successor of Adobe Premiere. The software was first introduced in the year 2003 and soon gained notoriety for its user-friendly interface, features, and potency. Like every other application, it does happen to trouble its users with a few errors now and then. One of them being the ‘The importer reported a generic error’ error message. This appears when you are trying to import videos into the timeline using the importer. This can be due to a lot of reasons, for example, unsupported codec or video file format.
In this article, we will be going through the error message by discussing its causes and later on mentioning the solutions that you can apply to get rid of the error message; thoroughly. Hence, let us start with the causes.
As we have mentioned earlier, the error message appears while you are using the importer to import video files. This can be due to the following reasons:
- Unsupported Codec: All of the video recording devices use different codecs. In case the codec is not supported by the Adobe Premiere Pro software, you will not be able to import it into the timeline. In such a case, you will have to change the codec of the video files.
- Unsupported Video Files Format: Adobe Premiere is quite generous with the video files format, however, it does not support all of the video files formats for obvious reasons. Therefore, if the video that you are trying to import is not supported by the application, you will, eventually, stumble on the error message.
- Activation Issues: According to Adobe, activation issues can sometimes disrupt some of the functionality of the importer. Therefore, make sure the software is activated and you are logged in your Creative Cloud account.
- Video File Name: In some cases, the issue can also be caused by the name of the video file. There might be some symbols in the name of the file that is causing the issue to pop up.
With that being said, let us get into the real part and help you through this ordeal. Please follow all the solutions provided if one or two of them do not work out for you.
Solution 1: Check Video File Format and Codec
The first thing you should do when you face the error message is to verify that the format the video is in and the codec is supported by Adobe. Certain codecs are not supported by Adobe Premiere, for example, support for the QuickTime codec was dropped by Adobe. In such a case, you will have to transcode the footage to a newer/modern codec.
Similarly, if the video file format is not supported by Adobe, then, you will not be able to import the file. Likewise, you will have to change the format of the video file which is pretty easy. Please refer to this link for a list of supported video file formats.
Solution 2: Cleaning the Media File Cache
Another thing that you can do is try to delete the media files cache and then try to import your files. When you import video or audio files into Adobe Premiere, it stores versions of these files that it can quickly access again for better performance. These stored versions are referred to as Media Cache Files. Here’s how to delete the files:
- Close Adobe Premiere Pro and then navigate to the Users<username>AppDataRoamingAdobeCommon directory. Please note that the AppData folder is hidden by default, so make sure you have unhid it.
- In case you are using a Mac, please navigate to the /Users//Library/Application Support/Adobe/Common directory.
- Delete the files and then launch Adobe Premiere Pro.
- In case you are having difficulties locating the above path, you can also just go to Preferences and then navigate to the Media Cache tab.

Solution 3: Move the Files to a Different Location or Rename Them
In some scenarios, the issue might be due to the specified path of the video or audio files. In such a case, you will have to change the path of the files i.e move them to a different drive or just a different folder. This was reported by many users and has helped them resolve the issue.
You can also try to just simply rename the files in the same directory and then try importing the files. If it doesn’t work, then just move them to a different location.
Solution 4: Reinstall Premiere Pro
If all of the above-mentioned solutions do not work out for you, there might be an issue with the installation of the software and you will have to reinstall it. Here’s how to do it:
- Open up Creative Cloud.
- Uninstall Adobe Premiere Pro while keeping the preferences (an option while uninstalling).

- Once done, install it again and see if it resolves the issue.

Kevin Arrows
Kevin is a dynamic and self-motivated information technology professional, with a Thorough knowledge of all facets pertaining to network infrastructure design, implementation and administration. Superior record of delivering simultaneous large-scale mission critical projects on time and under budget.
Adobe’s Premiere Pro is one of the most popular video editing software on the planet with everyone from beginners to professional media houses using it to edit their movies. However, it’s far from perfect given the frequent bugs and crashes it faces.
In this article, we’re taking a look at the “the importer reported a generic error in Adobe Premiere” error in Premiere Pro, its causes and what you can do to solve the problem.
Also read: How to make text more readable in videos using Premiere Pro CC?
What causes this error?
The error generally gets triggered when you’re trying to import corrupt or incompatible video files. Some of the most popular reasons include:
- Unsupported codecs
- Premiere activation issues.
- Incompatible file name
- Unsupported file format
How to fix this?
Here are four fixes you can try out.
Check the video format and codec
The first thing to do is to check and see if the video format and codec that you’re trying to support are actually supported. You can refer to this page for a list of all supported video formats and codecs.
If the video you’re trying to import isn’t compatible with Premiere, you’re going to have to convert it into another format. We recommend using MP4 with H264 encoding as that’s the most hassle-free format and codec in Premiere.
Check the file name or location
The next thing to do is to check the file name or the location. Several characters that may be acceptable as file names in Windows or macOS might not work in Premiere Pro. Additionally, if the file is stored in a location where Premiere doesn’t have read access, you might not be able to import anything from that specific location.
The easiest way to get around this error is to just rename the file to a simpler name (preferably without any special characters) and move it to a more accessible location such as the root folder of a drive partition.
A corrupt media cache is the cause of a lot of different headaches in the program. Try clearing it to see if that makes a difference.
Step 1: Open Premiere Pro and head over to Edit, followed by Preferences and then Media Cache.
![]()
Step 2: Under Media Cache, click the Delete button to clear out your media cache.
![]()
Now restart Premiere and it should work just fine.
Reinstall Premiere
If nothing else works, try reinstalling the software from scratch to fix your issues. Reinstalling Premiere is also rather easy, although we recommend you do it from the Creative Cloud panel and not through Windows settings.
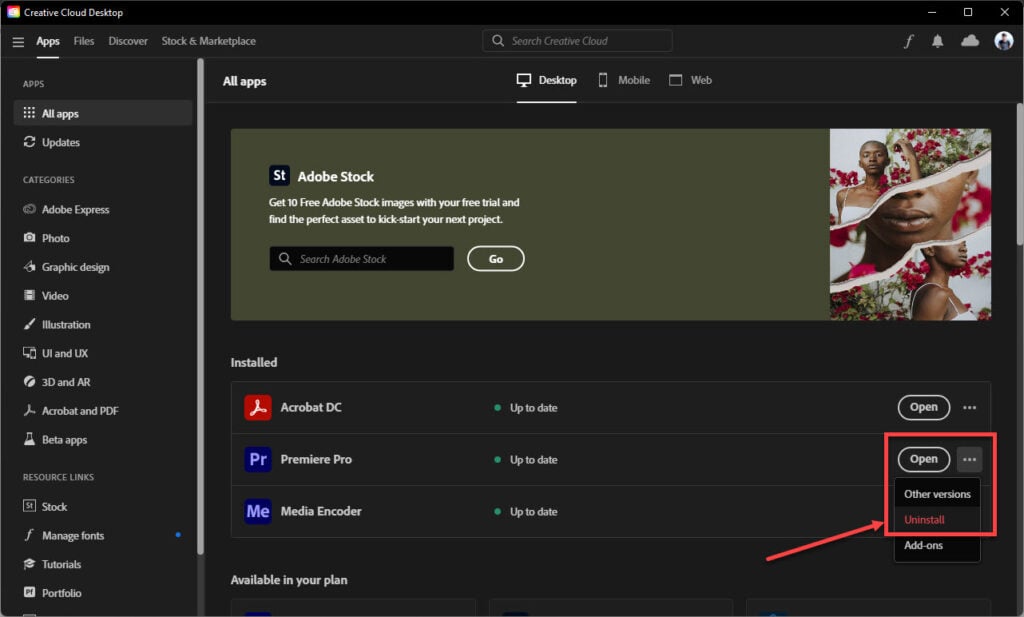
All you have to do is open Creative Cloud. head over to All Apps and you’ll see Premiere listed below. Click the three horizontal dots next to it and select Uninstall. Once the uninstallation is complete, you can use the Creative Cloud panel to install Premiere again and hopefully resolve any issues you’re facing.
Also read: How to make a Screen Mask Transition in Premiere Pro?

Someone who writes/edits/shoots/hosts all things tech and when he’s not, streams himself racing virtual cars.
You can contact him here: [email protected]

Updated February 2023: Stop these error messages and fix common problems with this tool. Get it now at this link
- Download and install the software.
- It will scan your computer for problems.
- The tool will then fix the issues that were found.
Adobe Premiere Pro is undoubtedly one of the most popular and widely used video editing software. This software has many advanced features that allow the user to create amazing movies and high-quality content.
Although Adobe Premiere Pro is very popular and widely used, it is sometimes characterized by instability and unusual behavior due to constant updates and new features.
So in this article, we will look at two of the most common issues with Premiere Pro, which is that The Premiere Pro Importer reports a common error.
Most of the time there is no problem with the video, it’s a problem related to the software not being able to process and detect it.
Regular development and flexibility can be a major factor in this regard. This is why beta and half-baked software is so common in today’s digital world. This results in the following problem: Importer reports a generic error, Importer Premiere Pro reports a generic error.

The codec is not supported:
All video capture devices use different codecs. If the codec is not supported in Adobe Premiere Pro, you will not be able to import it to the timeline. In this case, you must change the video file codec.
Unsupported video file format:
Adobe Premiere is quite generous with its video file format, but for obvious reasons, it doesn’t support all video file formats. Thus, if the video you’re trying to import isn’t supported by the application, you’ll end up getting an error message.
Activation issues:
According to Adobe, activation issues can sometimes interfere with some of the importer’s functions. So make sure that the program is activated and that you are logged into your Creative Cloud account.
Video File Name:
In some cases, the video file name may also cause a problem. Some characters in the file name may be causing the problem.
How to fix the error?
Updated: February 2023
This tool is highly recommended to help you fix your error. Plus, this tool offers protection against file loss, malware, and hardware failures, and optimizes your device for maximum performance. If you already have a problem with your computer, this software can help you fix it and prevent other problems from recurring:
- Step 1 : Install the PC Repair and Optimizer Tool. (Windows 10, 8, 7, XP, Vista).
- Step 2 : Click Start Scan to determine what problems you are experiencing with your computer.
- Step 3 : Click Repair Allto resolve all problems.

Solution 1: Check the format and codec of the video file
The first thing to do when you see an error message is to check if the video format and codec are supported by Adobe. Some codecs are not supported by Adobe Premiere, for example, support for the QuickTime codec has been removed by Adobe. In this case, you need to re-encode the movie to a newer/modern codec.
Also, if the video file format is not supported by Adobe, you will not be able to import the file. Likewise, you need to change the format of the video file, which is pretty easy. See this link for a list of supported video file formats.
Solution 2: Clear the media file cache
Another option is to clear the media cache and then try to import the files. When you import video or audio files into Adobe Premiere, the program saves versions of those files that you can quickly access again for better performance. These saved versions are called media cache files. Here’s how to delete the files :
1.) Close Adobe Premiere Pro and go to the Users<username>AppDataRoamingAdobeCommon directory. Note that the AppData folder is hidden by default, so make sure it is not visible.
2.) If you are using a Mac, go to /Users//Library/Application Support/Adobe/Common.
3.) Delete the files, and then start Adobe Premiere Pro.
4.) If you have trouble finding the above path, you can also just go to Preferences and then to the Media Cache tab.

Solution 3: Move the files to another location or rename them
In some cases, the problem may be related to the specified path to the video or audio files.
In this case, you need to change the path to the files, i.e. move them to another drive or just to another folder.
Many users have reported this and it has helped them solve the problem.
You can also try just renaming the files in the same directory and then try importing the files. If that doesn’t work, just move them to a different location.
Solution 4: Reinstall Premiere Pro
If all of the above solutions don’t work for you, there may be a problem with the software installation and you may need to reinstall it. Here’s how to do it:
1.) Open Creative Cloud.
2.) Uninstall Adobe Premiere Pro, keeping the default settings (uninstall option).

3.) Then reinstall it and see if that solves the problem.
APPROVED: To fix Windows errors, click here.
Frequently Asked Questions
1) Close Premiere Pro and open it again. Then create a new project and try importing the MP4 into Premiere Pro.
2) Save the other running projects and restart your computer.
3) Disable and re-enable hardware acceleration.
If you see the «File has unsupported compression type» error message, check the media cache and media cache database in Premiere Pro. Choose Edit > Preferences > Media Cache Database in Windows or Premiere Pro > Preferences > Media Cache Database in Mac OS. Make a note of this location.
One is the «Importer reported a common error» error message. It appears when you try to import video into the Timeline using the Importer. This can be caused by many things, such as an unsupported codec or video file format.
The only real way to open files that are not supported by the software you are using is to convert the file type to a supported file. The conversion ensures that the file remains intact and you can always open it with the program you need. You can do this with the help of online conversion sites.
Post Views: 262

Adobe Premiere Pro is a pretty popular editing software, and thousands of content creators tend to edit their videos in this tool. Apart from content creators, many other users also opt to edit the video in Premiere Pro, citing the remarkable features of the software. However, many people complained that Adobe Premiere Pro, the importer reported a generic error when they decided to import a video in Adobe Premiere. Irrespective of the reasons behind this issue, we’ll show how to get this problem solved in this guide.
Part 1: What Causes File Import Failure in Premiere Pro
If you’re encountering a «media encoder file import failure» issue, there might be some key reasons behind this.
Here’s the list of those reasons.
1. Unsupported Codecs
Every video recording device tends to use different codecs. If Adobe Premiere Pro doesn’t support the codecs used in a video, it won’t import the video. Hence, it would help if you considered altering the codec of your video files.
2. Unsupported Video file format
Although Adobe Premiere Pro supports many video file formats, it doesn’t recognize some video file formats. Thus, if you’re trying to import a video file in the Adobe Premiere that it doesn’t seem compatible with, you’ll probably receive the unwanted message you’re currently receiving.
3. Activation issues
Due to activation issues, you might face some difficulties importing files in Adobe Premiere Pro. Hence, you’ll need to activate the software according to the rules and regulations and use a Creative Cloud account.
4. Video File Name
Sometimes, the issue might be with the video file’s name. Some symbols in your video’s name can cause the issue you’re currently facing.
After knowing the root causes of the issues you’re facing, you can navigate the solutions section.
Part 2: How to Fix File Import Failure in Premiere Pro
There are several possible causes for this problem. Several solutions will be listed here, follow the steps below to find the right way to solve your problem.
1. Clear the Media File Cache
You can also clear the media files cache before importing a video in Premiere Pro to ensure you don’t face any issues with it. Moreover, clearing the caches will also help the Premiere Pro perform better.
Here’s how to do it.
Step 01After closing Adobe Premiere Pro, you’ll need to visit the Users icon and navigate the Common directory.
Step 02Moreover, you’ll need to visit App Data, Roaming, and Adobe icons before navigating to the Common directory. In addition, you’ll need to unhide AppData as it is hidden by default.
Step 03Launch the Premiere Pro after deleting the files.
2. Rename the file or move them to a different location
The specified path of your audio or videos might be the reason behind the issue you’re facing. You might consider changing the path of a video. For instance, you can transfer a video file to another folder to see how it goes.
Moreover, you can change the name of your file as it has been noted that Premiere Pro tends to have some issues with the video or audio files’ name.
3. Reinstall Premiere Pro
If nothing works for you and you’re still having trouble importing video files to Premiere Pro, you must consider reinstalling Premiere Pro. Sometimes, the installation file might get corrupted, which creates the whole chaos for you.
Follow the guide below to install the Premiere Pro again.
Step 01After launching Creative Cloud, you’ll need to uninstall Adobe Premiere Pro, having kept the preferences.
Step 02Now, you’ll need to install the Adobe Premiere Pro again and try importing a video file to see whether the issue you were facing is solved or not.
4. Check the Video File format and codec
First of all, you’ll need to check the codec of the video format of a video you intend to import into Premiere Pro. For instance, Premiere Pro doesn’t support the QuickTime codec, and you’ll need to convert the codec to Premiere Pro supported codec to fix the issue.
Similarly, Premiere Pro doesn’t support MKV format. Hence, it would help if you did not opt for the «MKV not supported Premiere Pro» format.
You can convert the video file to Premiere Pro-supported format by reading the guide below.
Part 3: How to Fix File Format Not Supported Premiere Pro with HitPaw Video Converter
If you’re facing a «Premiere Pro file import failure» issue, you can blame some things for causing this issue. For instance, Adobe Premiere file format not supported MKV, if you’re using MKV, you won’t be able to import and edit the video in Adobe Premiere Pro.
Hence, to ensure you don’t face issues editing a video in Premiere Pro, you’ll need to convert the video into Premiere Pro-supported format.
Many tools offer you to convert the videos, but HitPaw Video Converter remains top-notch and superior to its competitors. It is a remarkable and breathtaking video converter that holds the ability to convert your video or audio files into 1000+ file formats.
Surprisingly, the video you convert using HitPaw Video Converter won’t lose resolution quality, courtesy of the tool’s immaculate features.
Aside from video conversion, HitPaw is fairly effective at editing the video as it can perform basic editing operations on your video.
1. Features of HitPaw Video Converter:
-
1
HitPaw Video Converter allows you to transform the video into Premiere supported format video.
-
2
It allows you to edit the video and audio with minimal effort.
-
3
You can also download videos from thousands of online websites.
-
4
It supports converting videos or audio to 1000+ file formats.
-
5
The premium package of HitPaw Video Converter is available at affordable rates.
-
6
It doesn’t compromise the resolution quality of the video.
2. How to Get Adobe Premiere Supported Formats
Here’s the step-by-step guide to fixing the «file import failure media encoder» issue by converting the video to Premiere Pro supported file format.
Step 01Download and launch HitPaw Video Converter.


Step 02After visiting the HitPaw Video Converter’s interface, you’ll need to tap «Add Video» and import the video to the tool’s timeline.
Step 03Now, you can select the format in which you’d like to convert the video. For instance, you can convert the video to MP4, AVI or MOV and more.
Step 04After selecting the output format, you’ll need to hit «Convert» to start converting the video file for you.
Once the conversion process gets finished, you’ll need to import the converted video into the Premiere Pro timeline and check if the issue you were having is taken care of.
Conclusion
If you’re having issues uploading the video files due to the «Premiere Pro file format not supported» issue or other reasons, we’ve got the magnificent methods to fix this issue. However, if things don’t get better for you, don’t waste any before getting HitPaw Video Converter on board to convert the videos to Premiere Pro-supported video file format.
It is a mind-blowing tool that can convert the videos into your desired formats without compromising the quality of your video.
I know I know… Editing in Premiere Pro is not a smooth process like we all wish for. We all somehow encounter errors now and then. And one of the most common one is getting this error message when you are trying to import/locate footage from your previous folder/project files, that looks like this..

What causes the ‘The Importer Reported a Generic Error’ Error Message in Adobe Premiere?
- Unsupported Codec: All of the video recording devices use different codecs. In case the codec is not supported by the Adobe Premiere Pro software, you will not be able to import it into the timeline. In such a case, you will have to change the codec of the video files.
- Unsupported Video Files Format: Adobe Premiere is quite generous with the video files format, however, it does not support all of the video files formats for obvious reasons. Therefore, if the video that you are trying to import is not supported by the application, you will, eventually, stumble on the error message.
- Activation Issues: According to Adobe, activation issues can sometimes disrupt some of the functionality of the importer. Therefore, make sure the software is activated and you are logged in your Creative Cloud account.
- Video File Name: In some cases, the issue can also be caused by the name of the video file. There might be some symbols in the name of the file that is causing the issue to pop up.
When I was working with my client’s project; editing a wedding video -I encounter this error and the reasons were because I move the folder around that I previously edited in my external hard drives. When I was trying to edit it in my PC it could retrieve the location of the media properly due to “messy” cache files. So the solution that I did was;
Solution #1 – Cleaning my cache folders
- Close Adobe Premiere Pro and then navigate to the Users<username>AppDataRoamingAdobeCommon directory. Please note that the AppData folder is hidden by default, so make sure you have unhid it.
- In case you are using a Mac, please navigate to the /Users//Library/Application Support/Adobe/Common directory.
- Delete the files and then launch Adobe Premiere Pro.
- In case you are having difficulties locating the above path, you can also just go to Preferences and then navigate to the Media Cache tab.

Solution #2 – Move the Files to a Different Location or Rename Them
- Move the clips/footage folder that generate the errors to different folder and relocate again
- You can also try to rename them (this will create a new cache distinctively from the previous log cache)
- If it doesn’t work, then just move them to a different location.
**TIP: If none of the Methods have resolved the issue for you, I recommend you to re-install/update Adobe Premiere Pro.
-
Tags
error, import files, Video Editing
Обновлено 2023 января: перестаньте получать сообщения об ошибках и замедлите работу вашей системы с помощью нашего инструмента оптимизации. Получить сейчас в эту ссылку
- Скачайте и установите инструмент для ремонта здесь.
- Пусть он просканирует ваш компьютер.
- Затем инструмент почини свой компьютер.
Adobe Premiere является одним из ведущих программ для редактирования видео. Adobe Premiere Pro является преемником Adobe Premiere. Программа была впервые запущена в 2003 году и быстро стала известна своим простым в использовании интерфейсом, функциями и производительностью. Как и любое другое приложение, оно иногда беспокоит своих пользователей несколькими ошибками. Одно из них — сообщение об ошибке «Импортер сообщил об общей ошибке». Это появляется, когда вы пытаетесь импортировать видео на временную шкалу с помощью утилиты импорта. Для этого может быть несколько причин, например, неподдерживаемый кодек или формат видеофайла.

Пустые файлы медиа кеша
Убедитесь, что вы удалили папку Media Cache Files, затем запустите Premiere Pro 13.0 и импортируйте свои файлы Yi.
Когда вы импортируете видео- и аудиофайлы в Adobe Premiere Pro, он обрабатывает версии этих файлов, к которым он может легко получить доступ для повышения производительности. Эти файлы известны как файлы кэша мультимедиа. Они хранятся в папке Media Cache Files. Также есть папка с базой данных, которая содержит ссылки на каждый из файлов в медиа-кеше. Это файлы «базы данных медиа-кеша». Вы находитесь в папке Media Cache.
Обновление за январь 2023 года:
Теперь вы можете предотвратить проблемы с ПК с помощью этого инструмента, например, защитить вас от потери файлов и вредоносных программ. Кроме того, это отличный способ оптимизировать ваш компьютер для достижения максимальной производительности. Программа с легкостью исправляет типичные ошибки, которые могут возникнуть в системах Windows — нет необходимости часами искать и устранять неполадки, если у вас под рукой есть идеальное решение:
- Шаг 1: Скачать PC Repair & Optimizer Tool (Windows 10, 8, 7, XP, Vista — Microsoft Gold Certified).
- Шаг 2: Нажмите «Начать сканирование”, Чтобы найти проблемы реестра Windows, которые могут вызывать проблемы с ПК.
- Шаг 3: Нажмите «Починить все», Чтобы исправить все проблемы.

- Чтобы очистить (или «очистить») кэш мультимедиа, вы можете удалить эти файлы. Если Premiere Pro закрыт, перейдите к расположению этих папок и удалите файлы вручную. После удаления файлов очистите корзину.
- Обратите внимание, что после удаления файлов на жестком диске будет доступно дополнительное пространство, поскольку файлы в кэше мультимедиа могут занимать много места. Если вы завершили более старые проекты, лучше всего удалить эти файлы, чтобы сэкономить место и содержать жесткий диск вашего компьютера в порядке.
Обратите внимание, что даже после удаления всех файлов из кэша и открытия текущего проекта все равно будет задержка, поскольку для восстановления файлов потребуется время. Если у вас большой проект, вы должны выделить достаточно времени для восстановления файлов медиа-кэша. Это может быть сделано, например, в одночасье.

Проверка формата видеофайла и кодека
Первое, что нужно сделать, когда вы столкнулись с сообщением об ошибке, — это проверить, поддерживается ли формат, в котором находится видео, и кодек Adobe. Некоторые кодеки не поддерживаются Adobe Premiere, например, поддержка кодека Adobe QuickTime была прервана. В этом случае вам нужно будет преобразовать оборудование на более свежий или современный кодек.
Если формат видеофайла не поддерживается Adobe, вы не сможете импортировать файл. Вам также нужно будет изменить формат видеофайла, что очень просто. Список поддерживаемых форматов видеофайлов см. По этой ссылке.
Заключение
Adobe предполагает, что эти распространенные ошибки импорта могут быть вызваны проблемами активации. Вот почему я вышел из своей учетной записи Creative Cloud и снова вошел. Это не сработало.
Наконец, мне пришлось открыть Creative Cloud, удалить Premiere Pro (сохранить настройки) и переустановить Premiere Pro. Перезагрузка не требуется! Я до сих пор не знаю, почему это сработало, но это сработало. Может быть, мой опыт и мое решение сэкономят вам драгоценное время при устранении этой странной ошибки.
https://us.community.sony.com/s/question/0D50B00004YTXTmSAP/importing-sony-f65-footage-importer-reported-a-generic-error-premiere-pro-cc?language=en_US
Совет экспертов: Этот инструмент восстановления сканирует репозитории и заменяет поврежденные или отсутствующие файлы, если ни один из этих методов не сработал. Это хорошо работает в большинстве случаев, когда проблема связана с повреждением системы. Этот инструмент также оптимизирует вашу систему, чтобы максимизировать производительность. Его можно скачать по Щелчок Здесь

CCNA, веб-разработчик, ПК для устранения неполадок
Я компьютерный энтузиаст и практикующий ИТ-специалист. У меня за плечами многолетний опыт работы в области компьютерного программирования, устранения неисправностей и ремонта оборудования. Я специализируюсь на веб-разработке и дизайне баз данных. У меня также есть сертификат CCNA для проектирования сетей и устранения неполадок.
Сообщение Просмотров: 301