Windows Server 2012 R2 Datacenter Windows Server 2012 R2 Standard Windows Server 2012 R2 Essentials Windows Server 2012 R2 Foundation More…Less
This article describes an issue that occurs in a Windows Server 2012 R2-based Routing and Remote Access service (RRAS) server. A hotfix is available to fix this issue. The hotfix has a prerequisite.
Symptoms
Consider the following scenario:
-
You deploy DirectAccess and Layer Two Tunneling Protocol (L2TP) VPN connections in Windows Server 2012 R2.
-
An IP-HTTPS certificate from a public certification authority (CA) is installed.
-
A second certificate from an internal CA is installed for the L2TP/IPsec VPN connection.
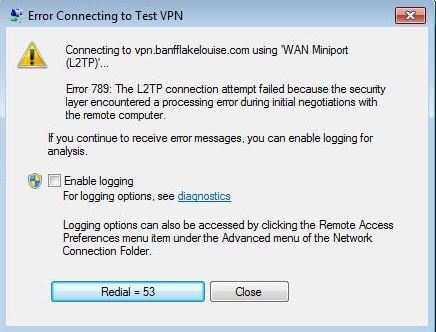
In this scenario, the L2TP/IPsec VPN connection doesn’t work, and you receive a 789 error code that looks something like this:
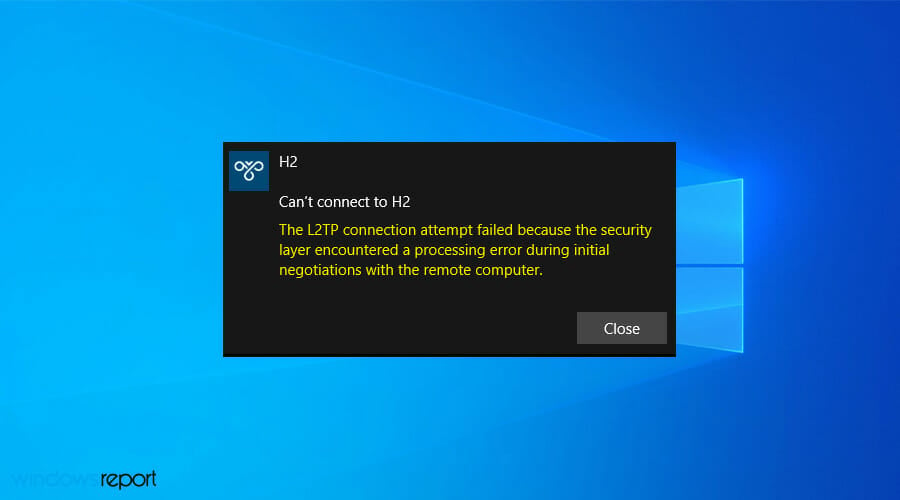
Error 789: The L2TP connection attempt failed because the security layer encountered a processing error during initial negotiations with the remote computer.
Hotfix information
Important If you install a language pack after you install this hotfix, you must reinstall this hotfix. Therefore, we recommend that you install any language packs that you need before you install this hotfix. For more information, see Add language packs to Windows.
A supported hotfix is available from Microsoft. However, this hotfix is intended to correct only the problem that’s described in this article. Apply this hotfix only to systems that are experiencing this specific problem.
If the hotfix is available for download, there’s a «Hotfix Download Available» section at the top of this Knowledge Base article. If this section doesn’t appear, submit a request to Microsoft Customer Service and Support to get the hotfix.
Note If additional issues occur or if any troubleshooting is required, you might have to create a separate service request. The usual support costs will apply to additional support questions and issues that don’t qualify for this specific hotfix. For a complete list of Microsoft Customer Service and Support telephone numbers or to create a separate service request, visit the following Microsoft website:
http://support.microsoft.com/contactus/?ws=supportNote The «Hotfix Download Available» form displays the languages for which the hotfix is available. If you don’t see your language, it’s because a hotfix isn’t available for that language.
Prerequisites
To apply this hotfix, you must have April 2014 update rollup for Windows RT 8.1, Windows 8.1, and Windows Server 2012 R2 (2919355) installed in Windows Server 2012 R2.
Registry information
After you install this hotfix, the following registry subkey is configured:
HKLMSystemCurrentControlSetServicesRemoteAccessParameters
Name: DoNotUpdateAuthCert
Type: REG_DWORD
Value: 0
To apply this hotfix, you have to change the value of the registry subkey to 1. Then, set the following registry subkey with the L2TP/IPsec certificate thumbprint:
HKLMSystemCurrentControlSetServicesRemoteAccessParameters : ServerAuthCert
Restart requirement
You may have to restart the computer after you apply this hotfix.
Hotfix replacement information
This hotfix doesn’t replace a previously released hotfix.
Status
Microsoft has confirmed that this is a problem in the Microsoft products that are listed in the «Applies to» section.
Cause
This issue occurs because DirectAccess populates the following registry subkey with the IP-HTTPS certificates hash during the configuration:
HKEY_LOCAL_MACHINESYSTEMCurrentControlSetServicesRemoteAccessParameters : ServerAuthCert
References
See the terminology that Microsoft uses to describe software updates.
File Information
The English (United States) version of this software update installs files that have the attributes that are listed in the following tables. The dates and times for these files are listed in Coordinated Universal Time (UTC). Be aware that dates and times for these files on your local computer are displayed in your local time and with your current daylight saving time bias. The dates and times may also change when you perform certain operations on the files.
Important Windows 8.1 hotfixes and Windows Server 2012 R2 hotfixes are included in the same packages. However, hotfixes on the Hotfix Request page are listed under both operating systems. To request the hotfix package that applies to one or both operating systems, select the hotfix that is listed under «Windows 8.1/Windows Server 2012 R2» on the page. Always refer to the «Applies To» section in articles to determine the actual operating system that each hotfix applies to.
-
The files that apply to a specific product, milestone (RTM, SPn), and service branch (LDR, GDR) can be identified by examining the file version numbers as shown in the following table:
Version
Product
Milestone
Service branch
6.3.960 0.18xxx
Windows Server 2012 R2
RTM
GDR
-
The MANIFEST files (.manifest) and the MUM files (.mum) that are installed for each environment are listed separately in the «Additional file information» section. MUM, MANIFEST, and the associated security catalog (.cat) files, are very important to maintain the state of the updated components. The security catalog files, for which the attributes aren’t listed, are signed with a Microsoft digital signature.
x64 Windows Server 2012 R2
|
File name |
File version |
File size |
Date |
Time |
Platform |
|---|---|---|---|---|---|
|
Raconfigtask.dll |
6.3.9600.18053 |
547,328 |
11-Sep-2015 |
23:44 |
x86 |
x64 Windows Server 2012 R2
|
File property |
Value |
|---|---|
|
File name |
Amd64_460549fc224692e8189024ad47235fff_31bf3856ad364e35_6.3.9600.18053_none_16a64ae36a86d55b.manifest |
|
File version |
Not applicable |
|
File size |
703 |
|
Date (UTC) |
11-Sep-2015 |
|
Time (UTC) |
23:46 |
|
Platform |
Not applicable |
|
File name |
Amd64_db9cbc30bfdc15358d803b34720914f0_31bf3856ad364e35_6.3.9600.18053_none_d3a150e6ca39d600.manifest |
|
File version |
Not applicable |
|
File size |
724 |
|
Date (UTC) |
11-Sep-2015 |
|
Time (UTC) |
23:46 |
|
Platform |
Not applicable |
|
File name |
Amd64_microsoft-windows-r..donotupdateservauth_31bf3856ad364e35_6.3.9600.18053_none_62c2c9dce0d4fb41.manifest |
|
File version |
Not applicable |
|
File size |
728 |
|
Date (UTC) |
11-Sep-2015 |
|
Time (UTC) |
15:44 |
|
Platform |
Not applicable |
|
File name |
Msil_microsoft-windows-raconfigtask_31bf3856ad364e35_6.3.9600.18053_none_5d768727a693015c.manifest |
|
File version |
Not applicable |
|
File size |
48,443 |
|
Date (UTC) |
11-Sep-2015 |
|
Time (UTC) |
23:46 |
|
Platform |
Not applicable |
|
File name |
Update.mum |
|
File version |
Not applicable |
|
File size |
2,103 |
|
Date (UTC) |
11-Sep-2015 |
|
Time (UTC) |
23:46 |
|
Platform |
Not applicable |
Need more help?
If you are getting the “The L2TP Connection Attempt Failed because the Security Layer Encountered a Processing Error” issue while trying to create a VPN connection between their computer and the VPN server. The L2TP type of connection is used most commonly in VPN connections and it provides encryption to the connection. However, the issue is most commonly faced because some features on your operating system might have been disabled.

After going through most of the solutions that worked for our users, we came to the conclusion that the following must be the most vital reasons behind its occurrence.
- Microsoft Chap V2 Protocol: It is sometimes possible that the Microsoft Chap V2 Protocol might have been disabled due to which The L2TP Connection Attempt Failed because the Security Layer Encountered a Processing Error might be getting triggered.
- Corrupted Network Drivers: Sometimes the Network Drivers that you have installed on the computer might be corrupted due to which the issue might be triggered. Therefore, we suggest that you try to reinstall the corrupted drivers and check to see if the issue is fixed.
- Missing Registry Values: Some users found that if certain Registry Entries haven’t been added, the error might be triggered because the connection to the VPN cannot be established. Therefore, we suggest that you try to add these as we have mentioned below.
- Glitched Service: In certain situations, some services responsible for the proper functioning of the computer might be glitched due to which the “The L2TP Connection Attempt Failed because the Security Layer Encountered a Processing Error” error is being triggered.
Now that you have been taken through most of the reasons behind this issue, we can finally start implementing the solutions.
Fixing The L2TP Connection Attempt Failed because the Security Layer Encountered a Processing Error Meraki
Method 1: Enable Microsoft CHAP V2 Protocol
- Press the “Window + R” keys combination on your keyboard to open the “Run” box, type “ncpa.cpl” and hit the “Enter” key.

Typing ncpa.cpl - From the “Network Connections” window, right-click on your VPN connection and select “Properties” from the context menu.
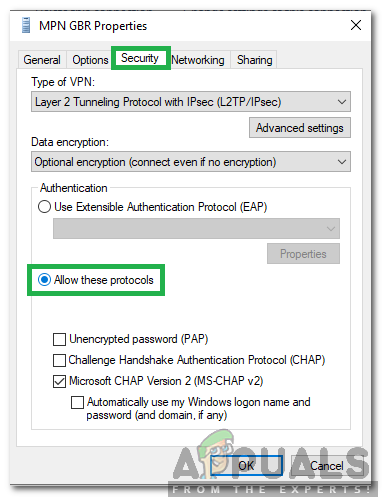
- Now navigate to the “Security” tab and click on the circle associated with “Allow these protocols” and afterwards checkmark the “Microsoft CHAP Version 2 (MS-CHAP v2)” box

Checkmark Microsoft CHAP Version 2 Box - Save the changes made and see if the issue is resolved.


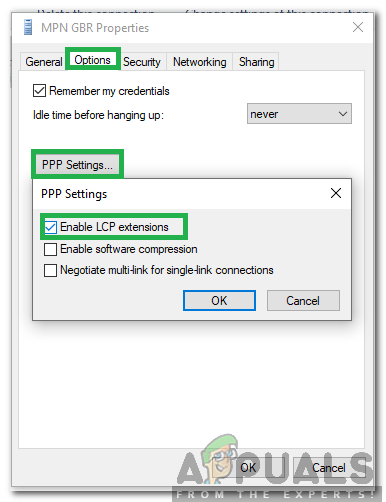
Method 2: Enable LCP Protocol Extensions
- Press the “Window + R” keys combination on your keyboard to open the search box, type “ncpa.cpl” and hit the “Enter” key.
Typing ncpa.cpl - From the “Network Connections” window, right-click on your VPN connection and select “Properties” from the context menu.
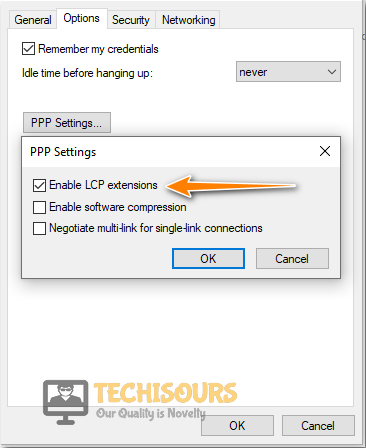
- Now navigate to the “Options” tab and click on the “PPP Settings…” button. In the following window, checkmark the box associated with “Enable LCP Extensions” and afterwards, click on “OK”.

Enable LCP Extensions - Finally, try reconnecting to your VPN and see if the issue persists.
Method 3: Restart IPSec Service
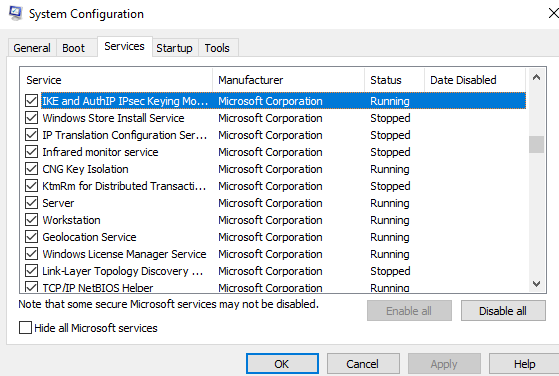
- For this purpose, press “Window + R” keys simultaneously on your keyboard to open the search box, type “services.msc” and hit the “Enter” key to open Service manager.

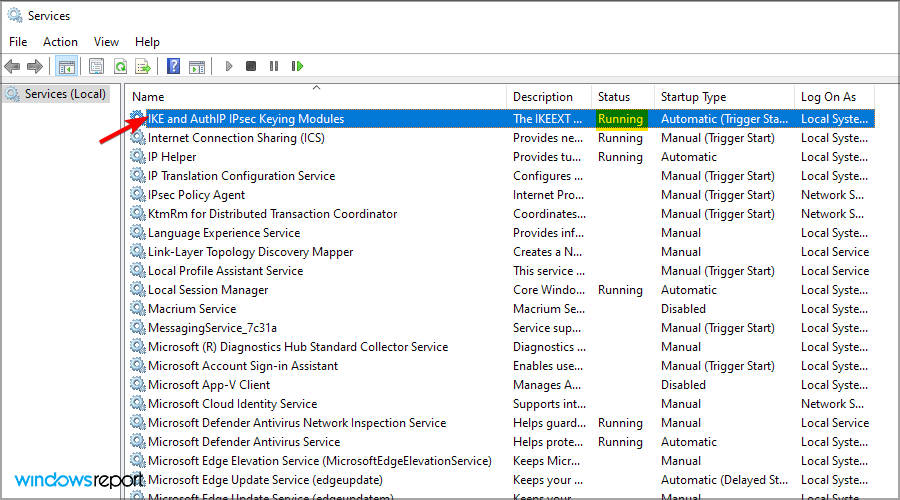
Typing in “services.msc” - Now locate the “IKE and AuthIP IPsec Keying Modules” service, right-click on it and select “Restart” from the context menu.

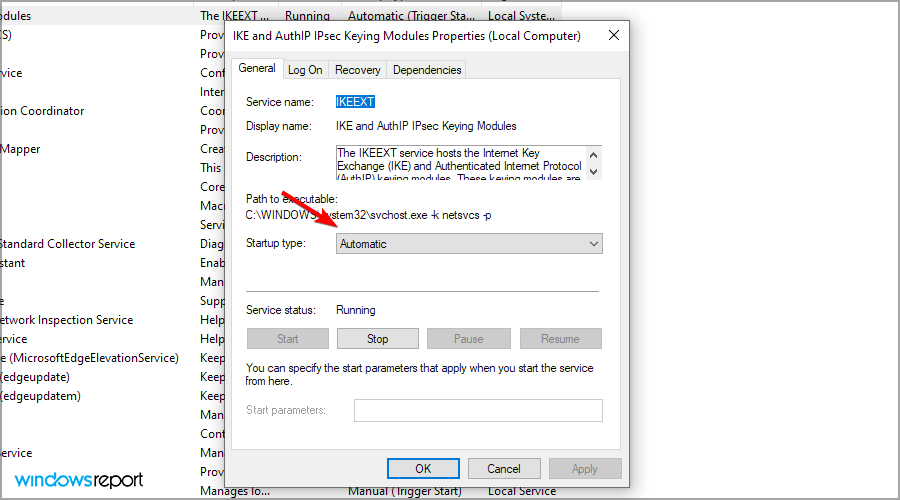
Restart IKE Module - After that, again right-click on it and select “Properties”. Navigate to the “General” tab and click on the dropdown next to “Start-up type” and then select “Automatic” from the menu.
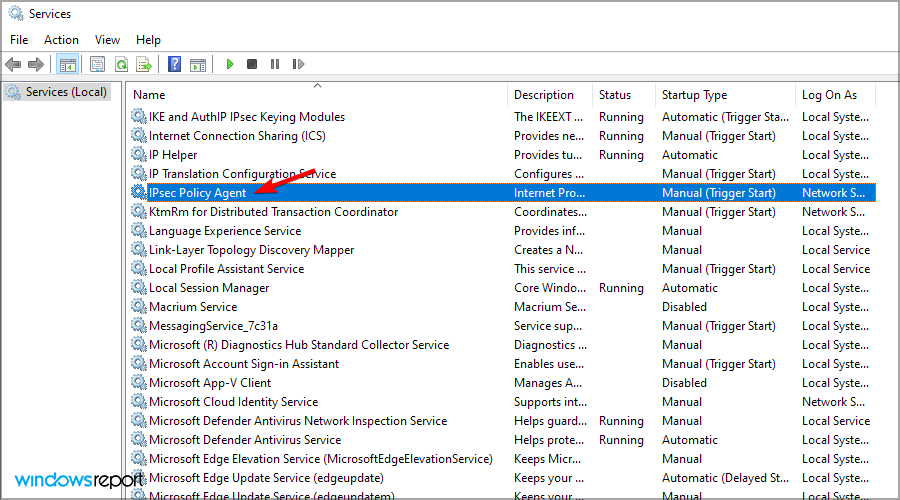
- Finally, save the changes made by clicking on Apply button and afterwards repeat the whole process for the “IPsec Policy Agent” service and see if the l2tp connection attempt failed because the security layer encountered a processing error unifi is rectified.


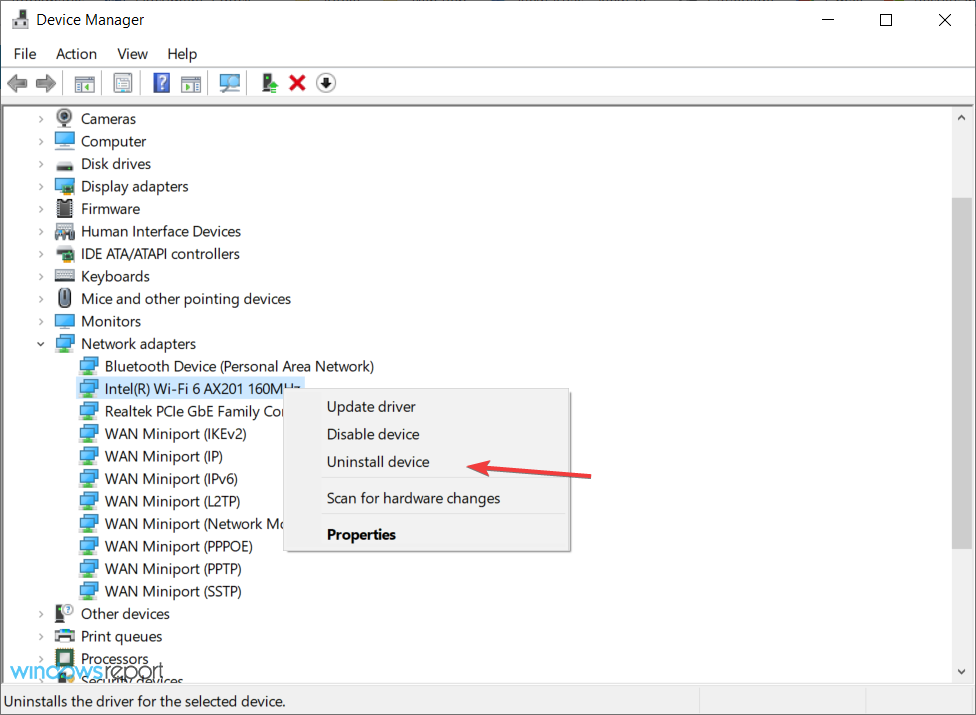
Method 4: Reinstall Network Drivers
- Press “Window + X” keys combination and select “Device Manager” from the list of options.
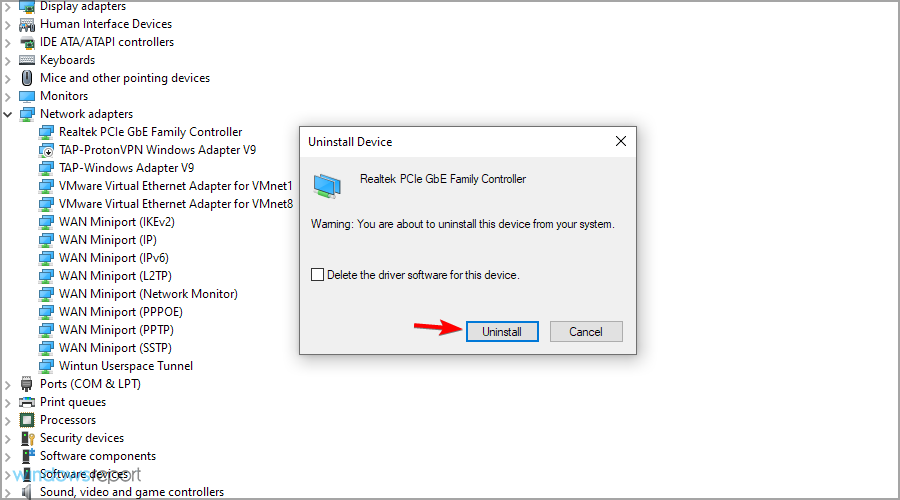
- After that, scroll down to “Network adapters” and click on it to expand its contents. Right-click on your installed network drivers and select “Uninstall driver” from the context menu.

Uninstall Network Driver - Now restart your device and again launch the device manager. Click on the “Scan for hardware changes” button at the top middle of the screen. Now a window will detect missing drivers and automatically install drivers on your device.

Scan For Hardware Changes


Method 5: Use Correct Certificates
This might be the most basic and root cause of this issue. There might be the possibility where certificates do not match on the server and client-side. If the correct certificate is not used on both sides, you will get this error and your VPN will cause an error connecting to the internet. The best solution in this regard is to ensure that Certificates on both sides match. If you are using a Pre Shared Key (PSK), ensure that the same PSK is configured on the client-side, and the VPN server machine.
Method 6: Add a New Value in Registry
- For this purpose, press “Window + R” keys simultaneously on your keyboard to open the “Run” box, type the “Regedit” command and hit the “Enter” key to open Registry Editor.
- Paste the following address in the address bar and hit the “Enter” key:
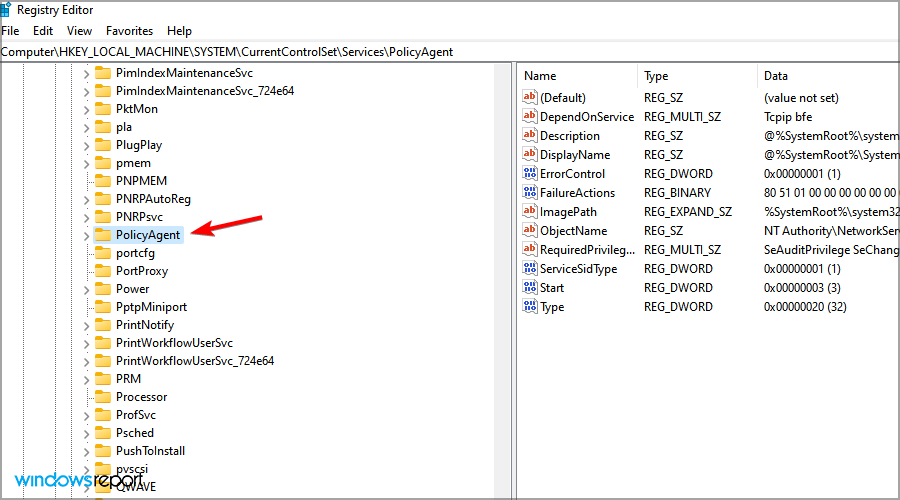
HKEY_LOCAL_MACHINESYSTEMCurrentControlSetServicesPolicyAgent
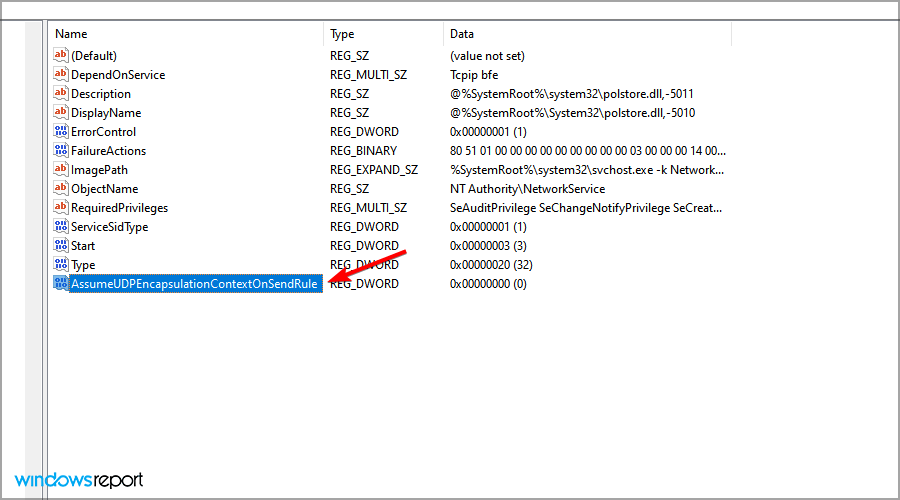
- Now right click on the right pane and select “New-> DWORD(32-bit)” and rename it to “AssumeUDPEncapsulationContextOnSendRule”.
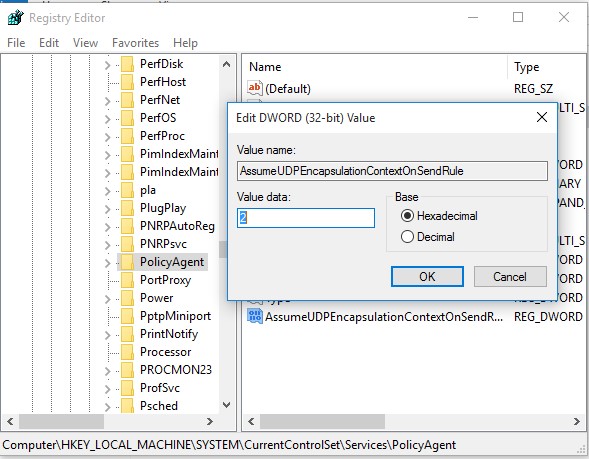
- After that, double click on it and set “Value Data” to “2”. Exit from the registry editor and restart your PC.
Method 7: Enable EAP-MSCHAPv2 Encryption
- First, press the “Window + R” keys combination from your keyboard to open the “Run” box, type “ncpa.cpl” and hit the “Enter” key:
Typing ncpa.cpl - In the “Network Connections” window, right-click on your VPN connection and select “Properties” from the context menu.
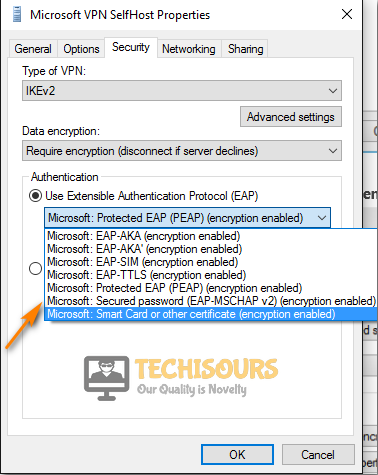
- Now navigate to the “Security” tab located under the “Authentication” section and select the “Use Extensible Authentication Protocol (EAP)” option.
- Then click on the dropdown below that and select “Microsoft: Secured password (EAP-MSCHAPv2) (encryption enabled)” from the menu.

Selecting the Secured Password Option - Save the changes made and hopefully now the l2tp connection attempt failed because the security layer encountered a processing error Meraki issue would be resolved.
Method 8: Create a New Entry in Registry
- For this purpose, press “Window + R” keys simultaneously from your keyboard to open the “Run” box and type “Regedit” and hit the “Enter” key to open Registry Editor.
Typing “Regedit” - Paste the following address in the address bar and hit the “Enter” key:

HKEY_LOCAL_MACHINESystemCurrentControlSetServicesRasmanParameters
- Now right click on the Right pane and select “New-> DWORD (32-bit)” and rename it to “AllowL2TPWeakCrypto”.
- After that, double click on it and set “Value Data” to “1” and exit from the registry editor, and restart your PC.
Method 9: Forward the Ports Manually
Note: If you are already familiar with the IP address of your router then skip steps from “1-3”.
- Press the “Window + R” keys simultaneously on your keyboard and type “cmd” in the “Run” dialogue box.

Typing in cmd - Then paste the following command in the command window and hit “Enter”:
ipconfig
- Under the Wireless LAN adapter option locate the options of “Default Gateway” and “IPv4 addresses”.
- Now first navigate to “Settings” and afterwards “Network”. Under “View Connection Status” find the IP address.
- Note this address and then copy-paste the default gateway in your browser and press “Enter”.
- Login to your account using the login credentials provided to you by your Internet Service Provider.
- Next, navigate to the “Forwarding” option from the left pane and enter this IP address in the “IP Address Box”.
- Then you have to open the connection ports required by the game.
- Here navigate to “Forwarding”, “Virtual Server” and then “Add New”.
- Now enter the following numbers:
TCP: 80, 443, 1935, 3478-3480

UDP: 3478-3479
- Finally, click on the “Save” button, exit from the browser.

Method 10: Update Windows
- First, Press the “Window + I” keys combination on your keyboard to open “Settings” and click on the “Update & Security” option.

Clicking on Update and Security - Then select “Windows Update” from the left column.
- Finally, click on the “Check for updates” button and download and install if any updates are available.

Check for updates


Method 11: Disable Avast
- Right-click on your Avast icon at the taskbar and select “Avast shield control” from the context menu.
- Now choose “Disable Permanently” and close all the windows.

Disable antivirus permanently

Method 12: Run Commands in Command Window
- Press the “Window + R” keys combination from your keyboard to open the “Run” prompt and type “cmd” and press the “Ctrl + Shift + Enter” keys combination to launch it with administrative privileges.
- Now type the following commands and hit “Enter”:
sc config IKEEXT start=demand

sc config PolicyAgent start=demand
- Restart your PC and the l2tp connection attempt failed because the security layer encountered a processing error unifi would be rectified.
Workaround:
If none of the above methods resolves your issue, then disconnect your VPN and try connecting with another VPN. There might be a possibility that the VPN you were using might not be compatible with the security layer. Use a VPN that has a security layer that matches your current settings.
If after trying all of these methods, the issue still persists for you, we recommend that you Contact Us for further troubleshooting.
An L2TP connection uses the Layer 2 Tunneling Protocol and is used mostly for supporting Virtual Private Networks. A Virtual Private Network(VPN) is used to mask the origin of connection by reflecting the connection over a server located in a different area than the origin of the connection. This can help many people to hide their locations from certain websites in order to bypass some security restrictions.
However, quite recently, a lot of reports have been coming in where users are unable to make a VPN connection and a “The L2TP connection attempt failed because the security layer encountered a processing error during the initial negotiations with the remote computer” Error is returned while trying to do so. In this article, we will discuss the reasons due to which it is triggered and also provide viable solutions to fix it completely.

What Causes the “L2TP Connection Attempt Failed” Error?
After receiving numerous reports from multiple users, we decided to investigate the issue and devised a set of solutions to fix it completely. Also, we looked into the reasons due to which it is triggered and listed them as follows.
- Disabled Protocols: In some cases, the error is triggered if the Microsoft CHAP v2 protocol is disabled inside the VPN Connection’s properties. This protocol needs to be enabled in order for most VPN connections to work.
- PPP Settings: The Point to Point protocol needs to be properly configured before users can attempt a VPN connection. This protocol contains an LCP protocol and the LCP Protocol has some further extensions that need to be enabled in order for the connection to work properly.
Now that you have a basic understanding of the nature of the problem, we will move on towards the solutions. Make sure to implement these in the specific order in which they are presented to avoid conflicts.
Solution 1: Enabling MS-CHAP v2
Since it is important that the Microsoft CHAP v2 protocol is enabled before trying to connect to a VPN in Windows 10, in this step, we will be enabling the protocol. For that:
- Make sure that the VPN connection has been properly configured to match the credentials of the VPN server that you are trying to connect to and add the connection.
- Once the connection has been added, it will appear in the network adapter list.
- Press “Windows” + “R” to open the “Run” prompt.
- Type in “ncpa.cpl” and press “Enter” to open the Network Adapter Settings.

Typing in “ncpa.cpl” and pressing “Enter” - Right-click on the “VPN” connection that has been added and select “Properties“.

Right-clicking on the VPN and selecting “Properties” - Click on the “Security” tab and check the “Allow These Protocols” option.

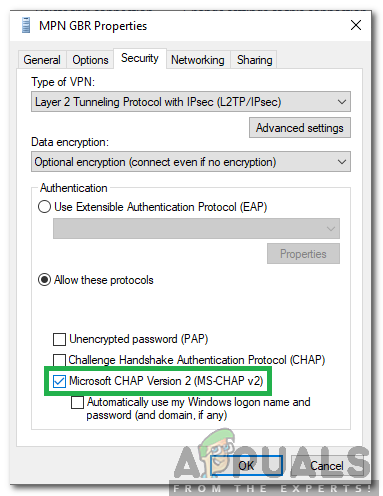
Selecting the “Allow these Protocols” option - Check the “Microsoft-CHAP Version 2” option and click on “OK”.

Checking the “Microsoft-CHAP Version 2” option - Try to connect to the VPN and check to see if the issue persists.


Solution 2: Enabling LCP Extensions
It is also important that the PPP Settings are configured to allow LCP Extensions, therefore, in this step, we will be changing the VPN properties and enabling the extensions. For that:
- Press “Windows” + “R” to open the “Run” prompt.

Opening Run Prompt - Type in “ncpa.cpl” and press “Enter” to open the Network Adapter Settings.
- Right-click on the “VPN” connection that has been added and select “Properties“.
Right-clicking on the VPN and selecting “Properties” - Click on the “Options” tab and select “PPP Settings“.
- Check the “Enable LCP Extensions” option and click on the “OK” button.

Checking the “Enable LCP Extensions” button and selecting “OK” - Again, select the “OK” option to save your settings.
- Try to connect to the VPN and check to see if the issue persists.


Kevin Arrows
Kevin is a dynamic and self-motivated information technology professional, with a Thorough knowledge of all facets pertaining to network infrastructure design, implementation and administration. Superior record of delivering simultaneous large-scale mission critical projects on time and under budget.
Back to top button
Repair L2TP VPN error using our practical solutions or VPN pick
by Milan Stanojevic
Milan has been enthusiastic about technology ever since his childhood days, and this led him to take interest in all PC-related technologies. He’s a PC enthusiast and he… read more
Updated on September 20, 2022
Reviewed by
Edgar Nicov

Since the dial-up Internet era, Edgar was interested in online resources. From forums to e-commerce websites, he started digging into how those resources could generate revenue. Today he… read more
- VPN error 789 appears when a Windows system isn’t configured properly while using the L2TP protocol.
- This error can be fixed with a quick network adapter reset from Device Manager.
- IPSec configuration should be changed as well as a fallback solution, so tweak the services as shown in our guide.
Using a VPN is a great way to protect your online privacy, but sometimes you might experience issues with it. Many Windows 10/11 users reported VPN error 789 which states the following message:
The L2TP connection attempt failed because the security layer encountered a processing error during initial negotiations with the remote computer
This issue will prevent you from achieving a safe connection on your PC, so it’s crucial that you fix it. So keep on reading to find out how to fix this problem once and for all.
Why does VPN error 789 appear?
This error pops up when your system is not properly set up to connect to an L2TP server, thus the connection attempt fails even before you establish a connection with the server.
It is also linked to the incorrect configuration of your operating system like Windows 10 in this case. This generic error is thrown when the IPSec negotiation fails for the L2TP/IPSec connections.
Other possible causes include:
- L2TP-based VPN client (or VPN server) is behind NAT
- The wrong certificate or pre-shared key is set on the VPN server or client
- A machine certificate or trusted root machine certificate is not present on the VPN server
- Machine Certificate on VPN Server does not have Server Authentication as the EKU
Before trying any of these solutions, ensure that L2TP and IPSec pass-through options are enabled from your router.
If you configured your VPN service manually, then make sure you use the preshared key 12345678. If this doesn’t work, here are more solutions you can use to fix this problem on your PC.
How do I fix the VPN error 789 on Windows 10 & 11?
- Reset network adapter
- Check the certificate
- Use a reliable VPN service
- Re-enable IPSec on your computer
1. Reset network adapter
- Press the Windows key + X and select Device Manager.

- Identify your network adapter and right-click on it then select Uninstall device.

- Click on Uninstall to confirm.

- Restart your computer. The device will reinstall and should reset it to default settings.

Refreshing the network adapter driver can make this problem go away quickly so make sure you try it out by performing the steps above.
2. Check the certificate
It is very important to ensure the correct certificate is used both on the client and the server side.
In case the two don’t match, you won’t be able to use the virtual private network. You might need to renew the certificate with your provider.
If you are using a Pre Shared Key (PSK), ensure that the same PSK is configured on the client-side, and the VPN server machine.
3. Use a reliable VPN service
It is very likely that the root of this problem is that the servers you use are not very optimal for your connection. For this reason, it is recommended to use a top-level VPN service.
To make sure you will not encounter this kind of issue in the future, look for a VPN service that has a large number of servers worldwide. That guarantees an increased chance of server availability and functionality.
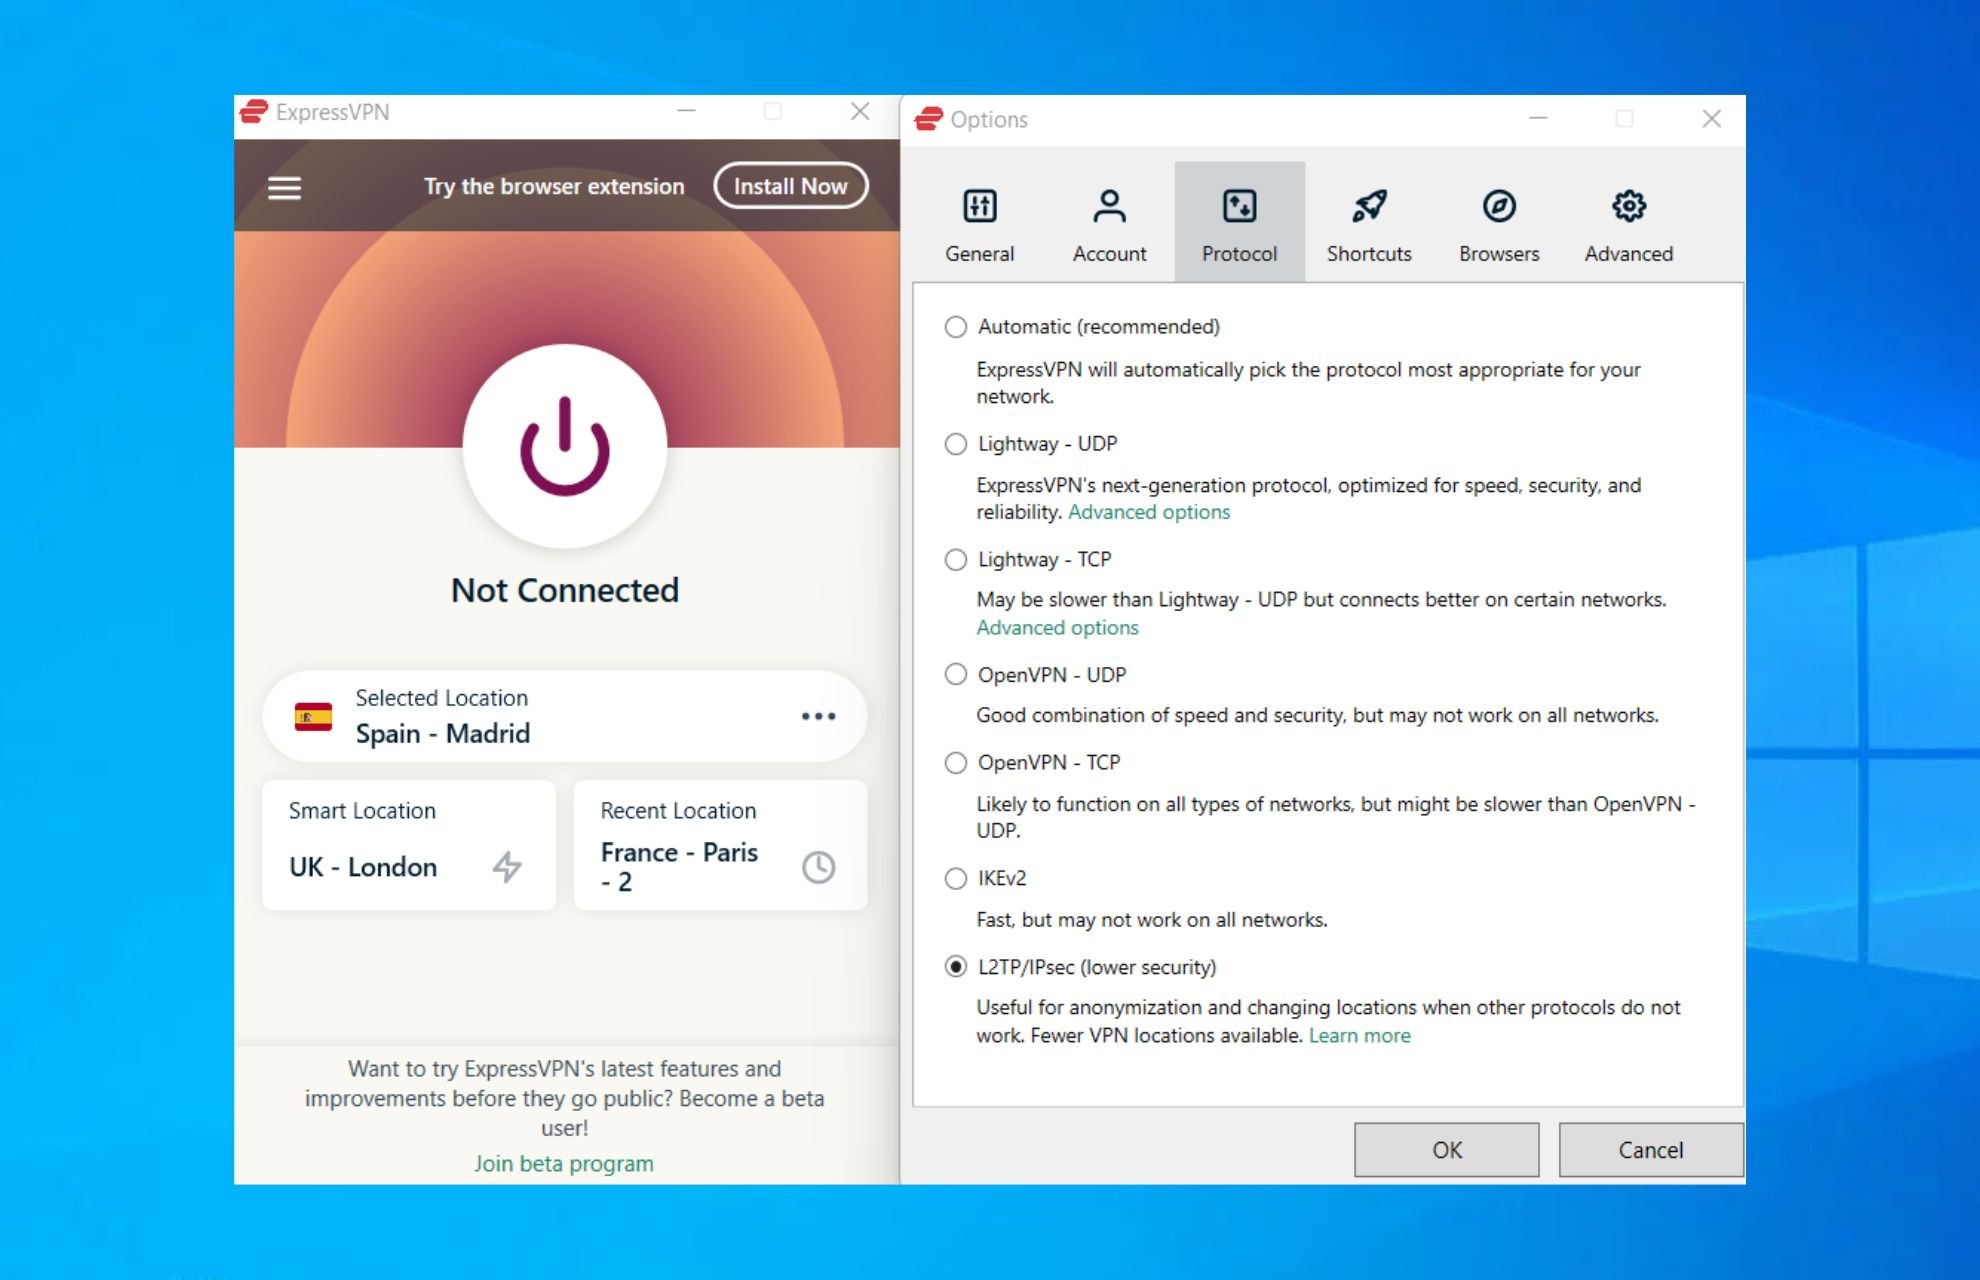
We used and tested ExpressVPN with 3,000 servers across the globe and multiple locations in the US to access restricted content like streaming shows or sports from overseas.
Plus, it is easy to use, you don’t need any level of proficiency to get an optimal connection.
To get started, select the subscription plan of your choice, create an account and install it. When the app is ready to open, connect to a secure server with just one click.
This VPN is amongst the most secure services out there, with a verified no-logs policy. It provides a remarkably fast connection and free content access for geo-blocked content globally.
ExpressVPN
Overcome the VPN error 789 and enjoy secure and fast browsing across the whole globe.
4. Re-enable IPSec on your computer
- Press the Windows key + R keyboard shortcut to start Run.
- Type services.msc and press Enter or click OK.
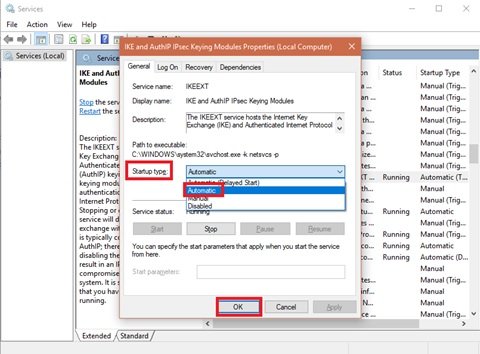
- Double-click the IKE and AuthIP IPSec Keying Modules service.
- Set the Startup type to Automatic. If the service is running, click Stop and then Start. If it’s disabled, just click Start.
- Find IPSec Policy Agent and double-click it.
- Set the Startup type to Automatic. If the service is running, stop it and start it again. If it’s not running, start it.
- Save the changes.
- Restart your VPN service.


Once you have done all the steps above carefully, the VPN should work smoothly as the protocol settings have been reset to default.
If, however, it doesn’t work, you have to manually set the encryption method both for the server and the client-side, in order for them to be compatible.
In case you have a user-specific issue on your computer yet you still get the L2TP connection attempt failed error, you can also contact the customer care or tech support team for your specific VPN provider.
- Windows 11 Hidden Icon Menu: How to Turn It On Or Off
- Windows XP Sounds for Windows 11: How to Download & Set Up
- Is your screen stretched on Windows 11? Here’s the solution
- How to Enable TLS 1.0 and 1.1 in Windows 11
How do I fix Windows 11’s VPN error 789?
The following guide presents a useful method to resolve the VPN 789 error on Windows 11 PC.
Before starting this system process, be sure you understood it correctly and apply the steps as shown below to avoid potential registry damages.

NOTE
This method works only if your system is behind a NAT.
- Press Windows key + R and enter regedit.
- Navigate to the following path:
HKEY_LOCAL_MACHINESYSTEMCurrentControlSetServicesPolicyAgent - Right-click the space in the right pane and expand the New section. Select DWORD (32-bit) Value.
- Enter AssumeUDPEncapsulationContextOnSendRule as the name of the DWORD and double-click it.
- Set the Value data to 2 and click OK to save changes.


How does L2TP work?
Layer 2 Tunneling Protocol, also known as L2TP, is a tunneling protocol used by many VPN software.
It combines the features of other protocols including PPTP and L2F and establishes a safe connection between the VPN client and the server.
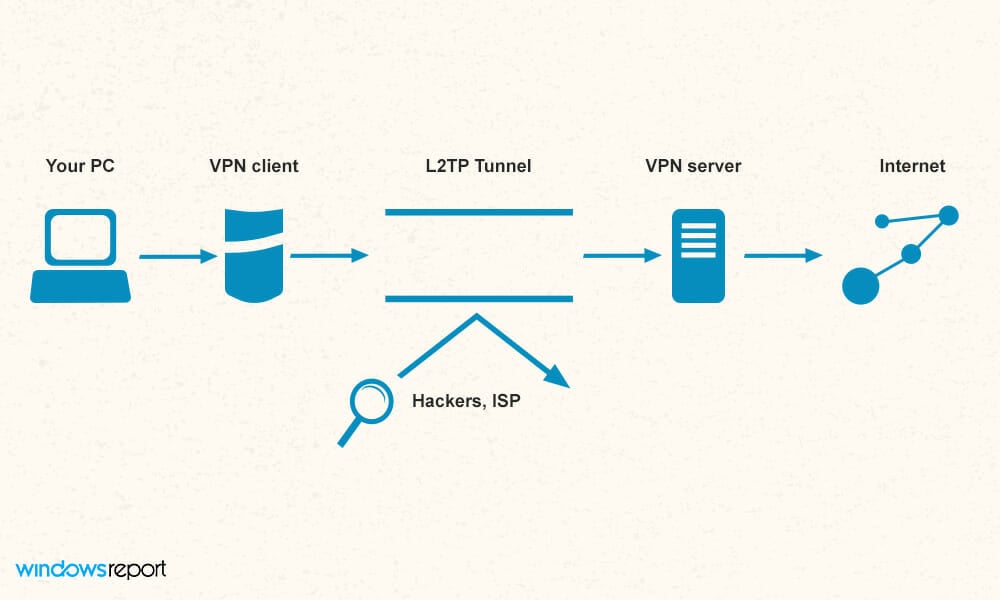
It’s important to mention that L2TP doesn’t offer encryption, and this is why it’s always paired with IPSec in order to provide the necessary security.
L2TP is also considered better than PPTP. It secures the traffic passing by it in an IPsec tunnel. If you have issues with it, we have an excellent guide on how to fix L2TP problems.
In addition, the ports you need to open are 500 and 4500 for UDP. You have the complete guide on unblocking L2TP for other ports and more.
Which is better, paid or free VPN?
While free VPNs are useful, they usually come with major limitations. In most cases, you’ll have a daily bandwidth cap. Other restrictions include the number of servers or the maximum speed that you can achieve.
With a reliable and paid VPN, you’ll have unlimited access to any server and no data restrictions, which makes it a superior choice for most users.
Fixing VPN error 789 is relatively simple, and we hope that this guide helped you solve the issue on your PC.
If the issue is still there, you can change your software completely. Just check our list including the best VPNs for Windows 10 and pick the one that suits your needs.
Do let us know if any of these solutions fixed VPN error 789 by leaving a comment in the section below.
![]()
Newsletter
Today one of my customers can’t connect to VPN because of error: «The L2TP connection attempt failed because the security layer encountered a processing error during initial negotiations with the remote computer».
After confirming that all L2TP VPN connection settings are correct, I discovered that the problem occurs after the KB5009543 update, in Windows 10, or the KB5009566 in Windows 11, as reported by many users in the Microsoft Q&A forums.

How to FIX: KB5009543 & KB5009566 updates breaks L2TP and IPSec VPN Connections. *
* Update (January 18, 2022): According Microsoft the issue is resolved in KB5010793 update for Windows 10 and in KB5010795 for Windows 11. So proceed to download and install the corresponding update from the Microsoft Update Catalog and see if the issue is fixed. (if not, then apply the steps below)
- Download KB5010793 update for Windows 10.
- Download KB5010795 update for Windows 11.
Step 1. Uninstall KB5009543 or KB5009566 updates
1. Open the Run utility by pressing the Windows + R keys on your keyboard.
2. Type cmd and press the keys Ctrl+Shift+Enter to open the Command Prompt in Admin mode. *
* Note: If you see any windows asking up for permission, click on Yes.

3. Type the following command according your OS and press Enter:
Windows 10:
- wusa /uninstall /kb:5009543

Windows 11:
- wusa /uninstall /kb:5009566
4. On the Confirmation dialogue box appears, click on Yes.

5. Once the uninstallation process is completed, restart the computer and try to connect to L2TP VPN. Normally, the problem should be solved. *
* Note: If the problem persists, follow the instructions on the following article: FIX: Cannot Connect to L2TP VPN in Windows 10
Step 2. Prevent the Reinstallation of the KB5009543 & KB5009566 updates.
Now proceed and prevent the reinstallation of the KB5009543 or KB5009566 update, by using the Show/Hide Updates utility.
1. Download the Show or Hide updates tool tool from: https://www.majorgeeks.com/files/details/wushowhide.html
2. Run the «wushowhide.diagcab», click Next and then click Hide Updates.

3. Select the 2022-01 Cumulative Update for Windows 10 (KB5009543) or the 2022-01 Cumulative Update for Windows 11 (KB5010795) and click Next.
4. When the operation is completed, click Finish and continue your work!
That’s it! Let me know if this guide has helped you by leaving your comment about your experience. Please like and share this guide to help others.
If this article was useful for you, please consider supporting us by making a donation. Even $1 can a make a huge difference for us in our effort to continue to help others while keeping this site free:

If you want to stay constantly protected from malware threats, existing and future ones, we recommend that you install Malwarebytes Anti-Malware PRO by clicking below (we
do earn a commision from sales generated from this link, but at no additional cost to you. We have experience with this software and we recommend it because it is helpful and useful):
Full household PC Protection — Protect up to 3 PCs with NEW Malwarebytes Anti-Malware Premium!
Столкнулись с интересной проблемой у одного из заказчиков после перенастройки VPN сервера Windows Server 2012 с PPTP на L2TP/ IPSec (из за отключения поддержки PPTP VPN в iOS). Изнутри корпоративной сети VPN клиенты без каких-либо проблем подключаются к VPN серверу, а вот внешние Windows клиенты при попытке установить соединение с L2TP VPN сервером, выдают такую ошибку:
The network connection between your computer and the VPN server could not be established because the remote server is not responding. This could be because one of the network devices (e.g. firewalls, NAT, routers, etc) between your computer and the remote server is not configured to allow VPN connections. Please contact your Administrator or your service provider to determine which device may be causing the problem.

В других версиях Windows о наличии аналогичной проблемы могут свидетельствовать ошибки VPN подключения 800, 794 или 809.
Стоит отметить, что данный VPN сервер находится за NAT, а на маршрутизаторе настроен проброс портов, необходимых для работы L2TP:
- UDP 1701 — Layer 2 Forwarding Protocol (L2F) & Layer 2 Tunneling Protocol(L2TP)
- UDP 500
- UDP 4500 NAT-T – IPSec Network Address Translator Traversal
- Protocol 50 ESP
В правилах Windows Firewall VPN сервера эти порты также открыты. Т.е. используется классическая конфигурация. Для подключения используется встроенный VPN клиент Windows.
Если подключаться к этому же VPN серверу через PPTP, подключение успешно устанавливается.
VPN ошибка 809 для L2TP/IPSec в Windows за NAT
Как оказалось, проблема эта уже известна и описана в статье https://support.microsoft.com/en-us/kb/926179. По умолчанию встроенный VPN клиент Windows не поддерживает подключение к L2TP/IPsec через NAT. Дело в том, что IPsec использует протокол ESP (Encapsulating Security Payload) для шифрования пакетов, а протокол ESP не поддерживает PAT (Port Address Translation). Если вы хотите использовать IPSec для коммуникации, Microsoft рекомендует использовать белые IP адреса на VPN сервере.
Но есть и обходное решение. Можно исправить этот недостаток, включив поддержку протокола NAT—T, который позволяет инкапсулировать пакеты протокола ESP 50 в UDP пакеты по порту 4500. NAT-T включен по-умолчанию почти во всех операционных системах (iOS, Android, Linux), кроме Windows.
Если VPN сервер L2TP/IPsec находится за NAT, то для корректного подключения внешних клиентов через NAT необходимо на стороне Windows сервера и клиента внести изменение в реестр, разрешающее UDP инкапсуляцию пакетов для L2TP и поддержку (NAT-T) для IPsec.
- Откройте редактор реестра
regedit.exe
и перейдите в ветку:- Для Windows 10,8.1,7 и Windows Server 2016,2012R2,2008R2 — HKEY_LOCAL_MACHINESYSTEMCurrentControlSetServicesPolicyAgent
- Для Windows XP/Windows Server 2003 — HKEY_LOCAL_MACHINESYSTEMCurrentControlSetServicesIPSec
- Создайте DWORD параметр с именем AssumeUDPEncapsulationContextOnSendRule и значением 2;

Примечание. Возможные значения параметра AssumeUDPEncapsulationContextOnSendRule:
- 0 – (значение по-умолчанию), предполагается, что VPN сервер подключен к интернету без NAT;
- 1 – VPN сервер находится за NAT;
- 2 — и VPN сервер и клиент находятся за NAT.
- Осталось перезагрузить компьютер и убедиться, что VPN туннель успешно создается.
Если и Windows VPN сервер и клиент находятся за NAT, нужно изменить это параметре на обоих системах.
Можно использовать командлет PowerShell для внесения изменений в реестр:
Set-ItemProperty -Path "HKLM:SYSTEMCurrentControlSetServicesPolicyAgent" -Name "AssumeUDPEncapsulationContextOnSendRule" -Type DWORD -Value 2 –Force;
После включения поддержки NAT-T, вы сможете успешно подключаться к VPN серверу с клиента через NAT (в том числе двойной NAT).
В некоторых случаях для корректной работы VPN необходимо открыть дополнительное правило в межсетевом экране для порта TCP 1701 (в некоторых реализациях L2TP этот порт используется совмести с UDP 1701).
NAT-T не корректно работал в ранних редакциях Windows 10, например, 10240, 1511, 1607. Если у вас старая версия, рекомендуем обновить билд Windows 10.
L2TP VPN не работает на некоторых Windows компьютерах в локальной сети
Есть еще один интересный баг. Если в вашей локальной сети несколько Windows компьютеров, вы не сможете установить более одного одновременного подключения к внешнему L2TP/IPSec VPN серверу. Если при наличии активного VPN туннеля с одного клиента, вы попытаетесь подключиться к тому же самому VPN серверу с другого компьютера, появится ошибка с кодом 809 или 789:
Error 789: The L2TP connection attempt failed because the security layer encountered a processing error during initial negotiations with the remove computer.
Что интересно, эта проблема наблюдется только с Windows-устройствами. На устройствах с Linux/MacOS/Android в этой же локальной сети таких проблем нет. Можно без проблем одновременно подключиться к VPN L2TP серверу с нескольких устройств.
По информации на TechNet проблема связана с некорректной реализацией клиента L2TP/IPSec клиента в Windows (не исправляется уже много лет).
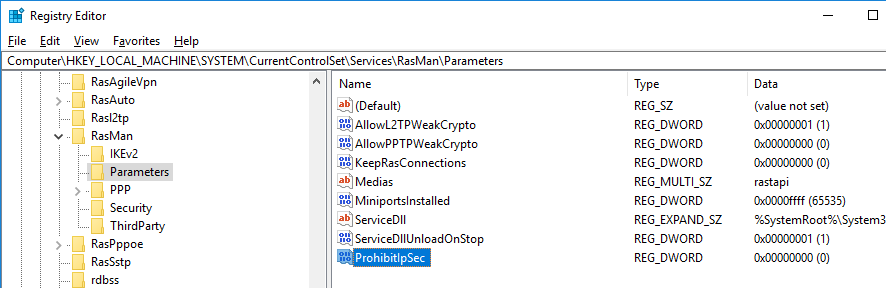
Для исправления этого бага нужно изменить два параметра реестра в ветке HKEY_LOCAL_MACHINESYSTEMCurrentControlSetServicesRasManParameters и перезагрузите компьютре:
- AllowL2TPWeakCrypto – изменить на 00000001 (ослабляет уровень шифрования, для L2TP/IPSec используются алгоритмы MD5 и DES)
- ProhibitIPSec – изменить на 00000000 (включает шифрование IPsec, которое часто отключается некоторыми VPN клиентами или утилитами)
Для изменения этих параметров реестра достаточно выполнить команды:
reg add "HKEY_LOCAL_MACHINESystemCurrentControlSetServicesRasmanParameters" /v AllowL2TPWeakCrypto /t REG_DWORD /d 1 /f
reg add "HKEY_LOCAL_MACHINESystemCurrentControlSetServicesRasmanParameters" /v ProhibitIpSec /t REG_DWORD /d 0 /f
Это включает поддержку нескольких одновременных L2TP/IPSec-подключений в Windows через общий внешний IP адрес (работает на всех версиях, начиная с Windows XP и заканчивая Windows 10).
Download PC Repair Tool to quickly find & fix Windows errors automatically
Most of us use VPNs to stay unidentified and protected when surfing the web, while these software’s are great, they come with certain limits. Very often, Internet users encounter various issues while trying to use this safe connection, and regardless of what operating system you are using, there is a great possibility of encountering several VPN error codes. Today, the error in recognition is VPN Error 789.
The L2TP connection attempt failed because the security layer encountered a processing error during initial negotiations with the remote computer.

VPN Error 789 is one of the most common errors which occurs when a user attempts to connect to L2TP. Here, the L2TP connection attempt failed because the security layer encountered a processing error initial negotiation with the remote computer.
One of the possible reasons this error may occur is when you establish a client session by using Windows 2000 Terminal Services. Or when your system is not configured to connect to the L2TP server correctly. Other possible causes for this are usually:
- L2TP based VPN client (or VPN server) is behind NAT.
- Wrong certificate or pre-shared key is set on the VPN server or client
- Machine certificate or trusted root machine certificate is not present on the VPN server.
- Machine Certificate on VPN Server does not have ‘Server Authentication’ as the EKU
All Windows OS versions are all vulnerable to this VPN error. And most VPN users will experience this problem especially through Windows 7 L2TP IPSEC.
Read: Common VPN error codes troubleshooting & solutions.
VPN Error 789 is one of the most common errors which occurs when a user attempts to connect to L2TP. You can opt for any of the following options to troubleshoot VPN Error 789:
- Reboot your VPN Network Adapter
- Check the certificate
- Re-enable IPsec Service
Let’s look at each of these troubleshooting options in detail.
Option 1: Reboot your VPN Network Adapter:
Before getting into full-on troubleshooting, try to this simple trick. Reboot your VPN and see if it works; here are the steps:
1] Right-click ‘Start’ and click on ‘Device Manager’
2] Find ‘Network adapters’ and click on the drop-down to expand the list.
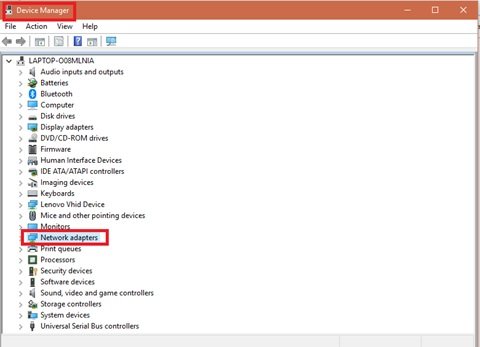
3] Find your ‘network adapter’
4] Right-click on it and select ‘Uninstall’
5] Now click ‘OK’
6] ‘Restart’ your system
The device will reinstall the network adapter with the next login and should reset it to its default factory settings. If this doesn’t help in fixing VPN error 789, try the next option.
Option 2: Check the certificate:
Here you will need to ensure that the correct certificate is used both on the client and the server-side. Also, in case Pre-Shared Key (PSK) is used, confirm that the same PSK is configured on the client-side, and the VPN server machine.
Option 3: Re-enable IPsec Service:
Here are the steps to re-enabling the IPsec Service:
1] Right-click ‘Start’ and hit ‘Run’
2] Type ‘services.msc’
3] Look for ‘IKE and AuthIP IPSec Keying Modules’ and ‘IPSec Policy Agent’
4] You will have to check the status of both these services. If it indicates ‘Started’ click to ‘Restart’. Also, if the ‘Started’ option is disabled, ‘Enable’ it.
5] Double click on both the services and select ‘Startup type’.
6] Change it to ‘Automatic’
7] Click ‘OK’ to save the changes
8] Now ‘Restart’ your VPN service and try to connect again.
If VPN Error 789 persists even after trying all the above options, you should immediately get in touch with your VPN service provider. Do let us know if any of these solutions fixed the Windows VPN error 789 by leaving a comment in the comments section below.
Related errors:
- VPN error 812, Connection prevented because of a policy configured on RAS/VPN server
- VPN Error 720, Error connecting to a VPN Connection
- Error 13801, IKE authentication credentials are unacceptable
- VPN Error 868, Name of the Remote Access Server did not resolve
- VPN Error 809, Network connection between your computer and the VPN server could not be established.

Ankit Gupta is a writer by profession and has more than 7 years of global writing experience on technology and other areas. He follows technological developments and likes to write about Windows & IT security. He has a deep liking for wild life and has written a book on Top Tiger Parks of India.
PC users sign up and install a VPN service on their Windows 10 computers to maximize privacy and security features when connecting to the Internet. A lot of various other reasons prompt anyone to use such a tool. However, not everything is smooth sailing when it comes to VPNs. Regardless of what operating system you are using, you are vulnerable to network errors.
Today we will be talking about VPN error 789 on Windows 10. This error is one of the most common VPN issues Windows users encounter on a regular basis. When you connect to the server using an L2TP protocol, the connection processing fails with error 789 followed by error 791. The client you are using might not be configured to connect to an L2TP VPN server. The error message says:
“The L2TP connection attempt failed because the security layer encountered a processing error during initial negotiations with the remote computer.”
Some of the possible causes of this error include a wrong certificate or pre-shared key, the VPN client is behind NAT, machine certificate is not present or does not have “Server Authentication” as EKU, possible third-party firewall issues, network driver errors as well as problems like missing Encapsulation Registry key and disabled IPsec Keying Modules & Policy Agent.
How to Fix VPN Error 789 when Trying to Establish L2TP Connection in Windows 10
Here are some troubleshooting tips you can try to help fix the VPN error 789 on Windows 10.
Method #1 – Verify Certificate and Pre-Shared Key is Correct
The first thing you need to do is to check and verify if the certificate or pre-shared key is correct. Both the client and VPN server needs to have the certificate and pre-shared key configured similarly.
Method #2 – Re-enable the IPsec Service
- Open the “Run” dialog, type “services.msc” and then hit the enter key.
- Now, find the “IKE and AuthIP IPSec Keying Modules” and “IPSec Policy Agent” services.
- Restart the service if the status is stated as “Started”. If not, you need to enable it to start the service.
- Then, select the “Startup Type” right after you double-click on each of the services and change the value to “Automatic”.
- Now, hit “OK” to save the changes.
SEE ALSO: How to Check and Fix if your VPN is Leaking your IP Address
After that, you can now restart the VPN service and try to initiate a connection again. See if the error appears.
Method #3 – Reset your Network Adapter
Another method is to reset the network adapter on your Windows 10 PC. To do this:
- Open the Device Manager from the Start menu.
- Find your network adapter.
- Now, right-click on it and then click Uninstall.
- Hit the OK button and restart your PC.
Windows 10 will automatically reinstall the network adapter driver upon reboot and reset it to default settings.
Method #4 – Create UDP Encapsulation Registry Key using Registry Editor

This troubleshooting method needs messing up with your Registry Editor. Take extra caution when working with this tool as it can irretrievably break your system.
This will help fix the issue if you are dealing with an L2TP VPN client or server that is behind a Network Address Translation or NAT.
- Open the Registry Editor on your PC by typing “regedit” on the Run dialog box.
- Click Yes to grant administrative privileges when the UAC prompt appears.
- Now, navigate to the following location on your Registry Editor:
- HKEY_LOCAL_MACHINESYSTEMCurrentControlSetServicesPolicyAgent
- Once there, you need to create a new value under this section.
- Right-click anywhere on the page then select New.
- Choose Dword (32-bit) Value from the options presented.
- Now, create a name for the new Dword Value:
- AssumeUDPEncapsulationContextOnSendRule
- Hit the Enter key to save your changes.
- Double-click on it and then, set the Base to Hexadecimal and the Value data to 2.
- Save the changes and restart your PC.
Method #5 – Try Other VPN Service Providers

Some industry-leading VPN service providers have minimal to zero issues with Windows 10 compatibility. This means, that errors like this can be avoided if not eliminated. You can check out these companies and sign up for a free trial to see which one works best for your needs.
- BullGuard
- CyberGhost
- ExpressVPN
- Hotspot Shield
- IPVanish
- NordVPN
- Surfshark
- Private Internet Access
- ProtonVPN
That’s it. You can also try to disable a 3rd-party firewall if you have one configured on your computer. If nothing works to fix the error 789, you might need to contact your VPN service provider to help you troubleshoot the problem.