- Remove From My Forums
-
Question
-
Hi,
I linked a remote SQL Server to my Azure VM SQL Server. Wrote couple of Stored Procs in Azure VM SQL Server to get the data from linked server (Remote on-premise SQL Server) and update couple of tables in Azure VM SQL Server. Everything is fine and the tables
are getting updated when ever I execute the stored proc on query window.Now I created a job to execute these stored procs on a daily basis. The fails on Authentication from the remote on premise server every time. I changed the user role..created the user in remote server…tried all the roles and users with god like permissions…
even at last for «sa» (call me stupid here) as well. Nothing works.What is that I am missing here?
Thanks in advance.
-SK
Answers
-
Hi SK,
The above error could occur when SQL Server Agent account doesn’t have permissions on linked server. Please go to linked server properties, in security tab, create a mapping for SQL Server Agent account on the local server to an existing or
new login on the remote server.There is a similar thread for your reference.
http://www.sqlservercentral.com/Forums/Topic1541303-391-1.aspxThanks,
Lydia ZhangIf you have any feedback on our support, please click
here.
Lydia Zhang
TechNet Community Support
-
Edited by
Tuesday, November 17, 2015 6:38 AM
-
Proposed as answer by
Visakh16MVP
Tuesday, November 17, 2015 6:39 AM -
Marked as answer by
Lydia ZhangMicrosoft contingent staff
Tuesday, November 24, 2015 8:05 AM
-
Edited by
![]()
WRITE FOR US
A few years ago I published an article about how to use linked servers to avoid performance issues. I wanted to follow up on that with a discussion of linked server security configuration because this is another big issue I see all too often with linked servers.
The first thing to understand is that all linked server objects are accessible by everyone in the public database role (normally everybody). So what you are doing when you configure the security for a linked server is determining what the security context of the login will be on the remote server. The permissions of that login on the remote server will ultimately determine what the user can and can’t do.
A 750-point Health Check from SQL Solutions Group includes a security audit.
Find out how healthy your SQL Server estate really is.
Learn More
What we will be looking at is the Security tab of the linked server dialog. We’ll also look at the system stored procedures being executed behind the scenes. You can see these yourself by clicking the Script button after configuring the security in the GUI.
Default Behavior for Unmapped Logins
The top part of the dialog box allows us to map local logins to remote logins. This is fairly straightforward and not where the problem usually lies so we’re going to focus on what happens if there is not a mapped login.
We’ll look at the options one at a time.
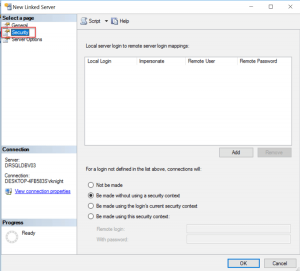
Not be made
In this case, all that is done is to create the linked server with no login behavior specified. Without any mapped logins, the linked server is useless.
EXEC master.dbo.sp_addlinkedserver @server = N'SERVER1', @srvproduct=N'SQL Server'If we try to execute a linked server query, we get the following results:
select name from SERVER1.master.sys.databasesMsg 18456, Level 14, State 1, Line 7 Login failed for user 'NT AUTHORITYANONYMOUS LOGON'.It tried to make an anonymous connection to the remote server which thankfully did not work.
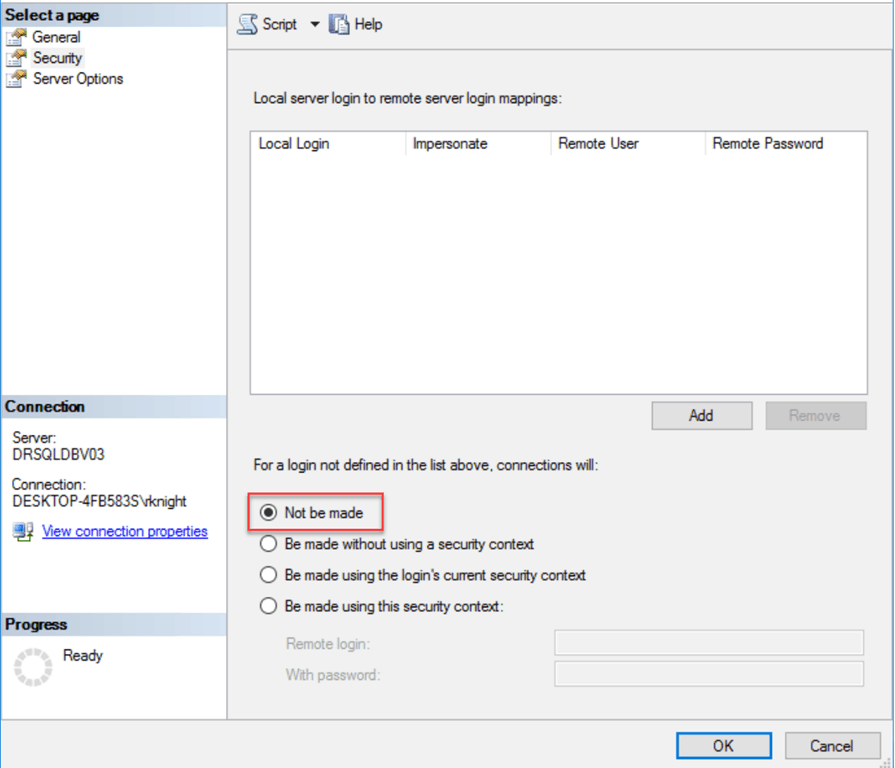
Be made without using a security context
In this case, it explicitly creates a mapped login of NULL with @useself = ‘False’. In other words we are explicitly telling it not to pass a security context to the remote server whereas in the first option it tried an anonymous connection.
EXEC master.dbo.sp_addlinkedserver @server = N'SERVER1', @srvproduct=N'SQL Server', @provider=N'SQLNCLI11', @datasrc=N'SERVER1' EXEC master.dbo.sp_addlinkedsrvlogin @rmtsrvname=N'SERVER1',@useself=N'False',@locallogin=NULL,@rmtuser=NULL,@rmtpassword=NULLLet’s see what happens when we execute the query here.
select name from SERVER1.master.sys.databasesOLE DB provider "SQLNCLI11" for linked server "SERVER1" returned message "Invalid authorization specification". Msg 7399, Level 16, State 1, Line 7 The OLE DB provider "SQLNCLI11" for linked server "SERVER1" reported an error. Authentication failed. Msg 7303, Level 16, State 1, Line 7 Cannot initialize the data source object of OLE DB provider "SQLNCLI11" for linked server "SERVER1".This option is more secure than the first one simply because it would not work even if the anonymous login worked on the remote server.
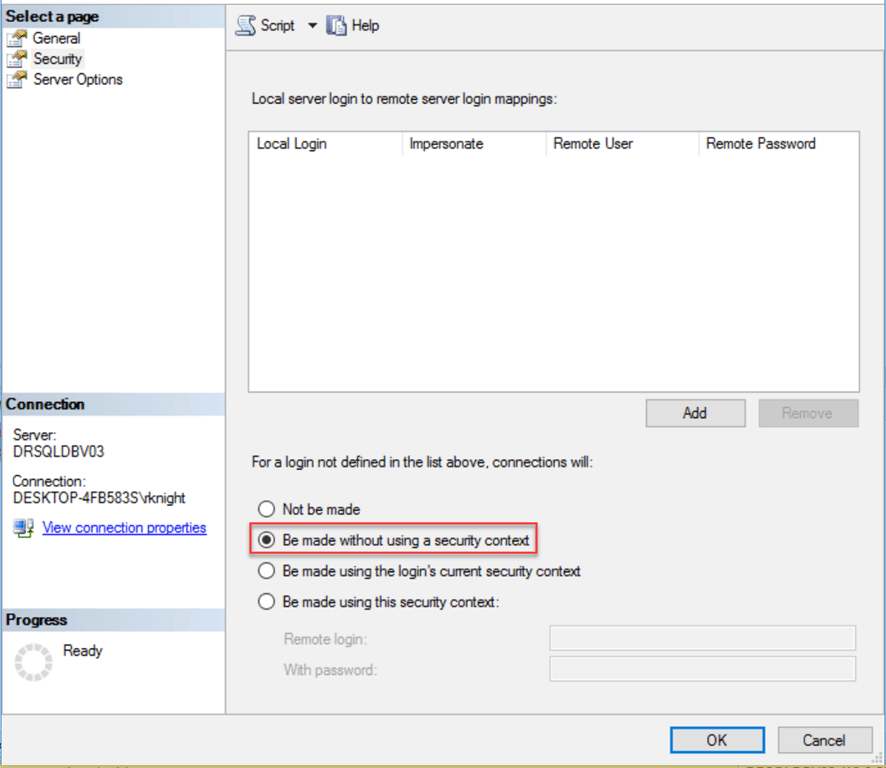
Be made using the login’s current security context
In this case, it is going to pass the security context of the local login to the remote login. If you have to have an option to connect without a mapped login, this is the best option. Note that the call to sp_addlinkedsrvlogin is almost the same as the last one. The only difference is that the @useself parameter is True.
EXEC master.dbo.sp_addlinkedserver @server = N'SERVER1', @srvproduct=N'SERVER1', @provider=N'SQLNCLI11', @datasrc=N'SERVER1' EXEC master.dbo.sp_addlinkedsrvlogin @rmtsrvname=N'SERVER1',@useself=N'True',@locallogin=NULL,@rmtuser=NULL,@rmtpassword=NULLLet’s see what happens when we execute the query here.
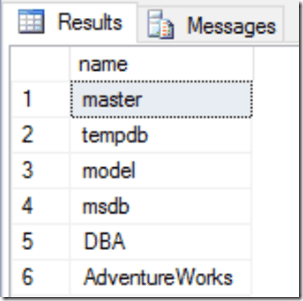
select name from SERVER1.master.sys.databases
It worked this time. The login used on the local server also existed on the remote server so the user connected as if they were directly connecting to the remote server. One thing to note is that with standard logins, this will only work if the login name AND password are the same on both instances. If the login name is the same and the password is different you will get the following error:
Msg 18456, Level 14, State 1, Line 11 Login failed for user 'UserA'.For this reason, this is a lot easier to deal with when using Active Directory accounts. As long as the AD-based login has permission on both instances it should work just fine, with one caveat. Depending on the configuration of the AD environment you’re in, you may run in what is known as the Kerberos Double Hop issue. Typically you’d be going from a user’s workstation to the local server to the remote server. So two hops. A full discussion of this is beyond the scope of this article but suffice it to say that Kerberos delegation must be properly configured in the environment for this to work.
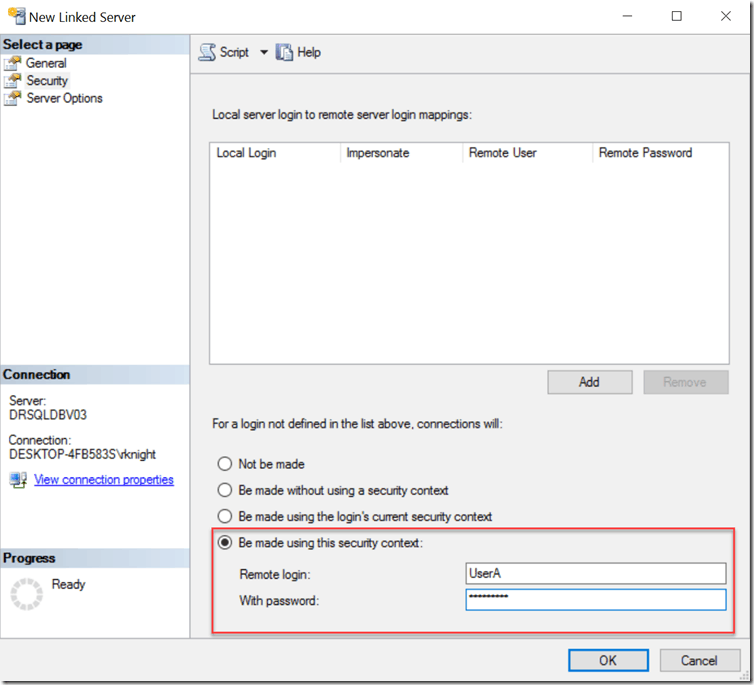
Be made using this security context
This is unfortunately both the most commonly used and the least secure way to address the security configuration of your linked server. What we are saying here is that every user who uses the linked server will be authenticated on the remote server using the credentials provided here. This is RARELY going to be the right thing to do in a secure environment. A user with public on the local server and nothing else will connect to the remote server using this login’s permissions which are usually higher than that. I’ve seen more than one environment using an account like linkedserver that exists and is a sysadmin on every server!
EXEC master.dbo.sp_addlinkedserver @server = N'SERVER1', @srvproduct=N'RKLAPTOPSS', @provider=N'SQLOLEDB', @datasrc=N'SERVER1' EXEC master.dbo.sp_addlinkedsrvlogin @rmtsrvname = N'SERVER1', @locallogin = NULL , @useself = N'False', @rmtuser = N'UserA', @rmtpassword = N'password'I won’t bother executing the query for this one because obviously it will work.
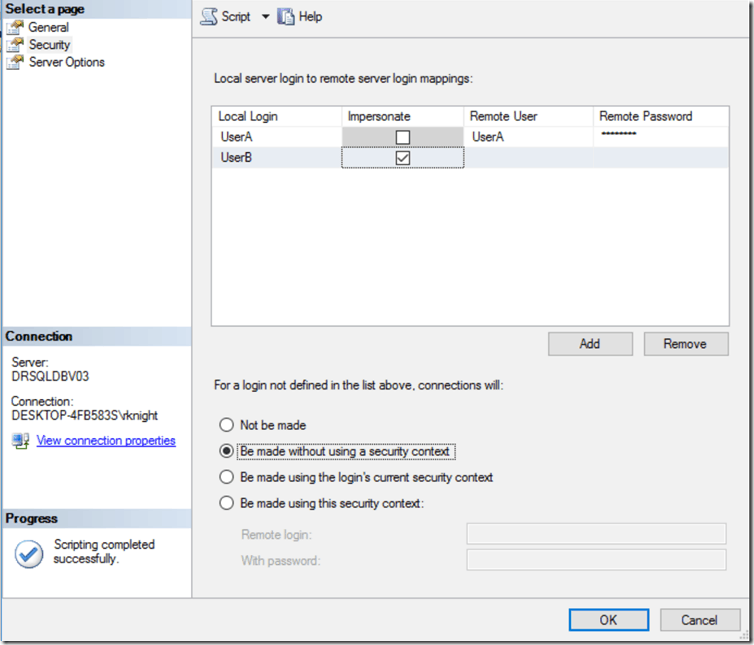
Remote Login Mapping
We didn’t spend a lot of time on mapped logins because that is fairly straightforward. We can map a local login to a remote login, providing the login name and password on the remote server. This is useful if we can’t control the login name and password on the remote server. It is also useful if we want to control exactly who on the local server can use the remote server. If you have logins mapped here and are using one of the first two options for the default behavior, only these users will have access to the remote server via the linked server.
The Impersonate option is just what it sounds like. This is effectively the same as the Be made using the login’s current security context but applies to a specific login, not all of them.
In this example, the only users who can access the remote server are UserA and UserB. For UserA, we have specified the login name and password on the remote server. UserB has the same login name and password on the remote server so impersonation can be used.
To totally unlock this section you need to Log-in
In SQL Server environments the linked server functionality is commonly used to connect to another (remote) database or file (Xls, CVX) using SQL Server Management Studio (SSMS) and access and use the remote data and objects. In this way you can write SQL queries or stored procedures from SSMS directly on a remote database on another machine. In Oracle environments this functionality is called DBLinks (Database Links).
As a quick example, we can consider a scenario where we need to create a view (saved query) on a database which receives data from a database that resides on a remote server. The other database can be SQL Server, Oracle or another supported database: we could use linked servers to establish connections to a set of source systems available on a datawarehouse/BI environment or multiple databases.
In this way if someone asks for a specific data of a set of data or complex data retrieve, we can always search and extract data from multiple and remote databases in couple of seconds (or minutes) by writing a query using linked servers.
More specifically, linked servers allow submitting a T-SQL statement on a specific SQL Server instance, and then it returns data from other SQL Server instances. A linked server allows joining data from several SQL Server instances using T-SQL statements when data exists on multiple databases on different SQL instances. The only configuration needed to retrieve data from different SQL instances using linked servers functionality is to establish a connection (using proper credentials) to the specific remote SQL server and instance.
In SQL Server are available two methods to configure linked server, using SSMS. The first one is by using sp_addlinkedserver system stored procedure and the second one is by using directly SQL Server Management Studio (SSMS) GUI interface.
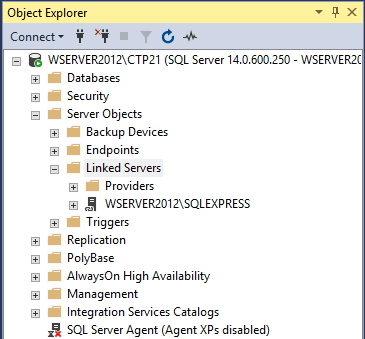
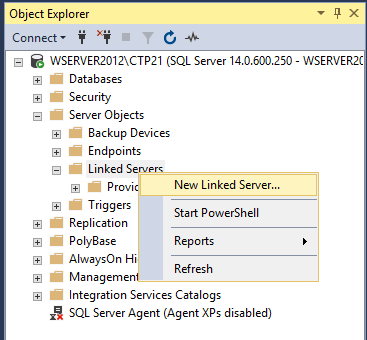
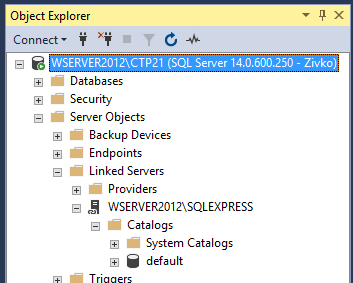
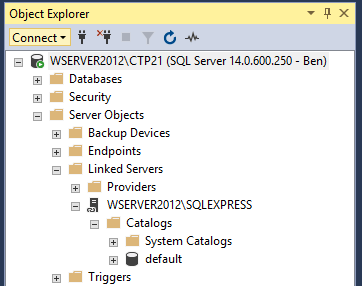
From now on you will see how to configure a linked server using a SQL Server data source. To check and see all available linked servers in SSMS you will need to go to Object Explorer, chose the Server Objects folder and expand the Linked Servers folder:
Now to create a linked server in SSMS make a right-click on the Linked Servers folder and from the context menu select the New Linked Server option:
The New Linked Server dialog will appear:
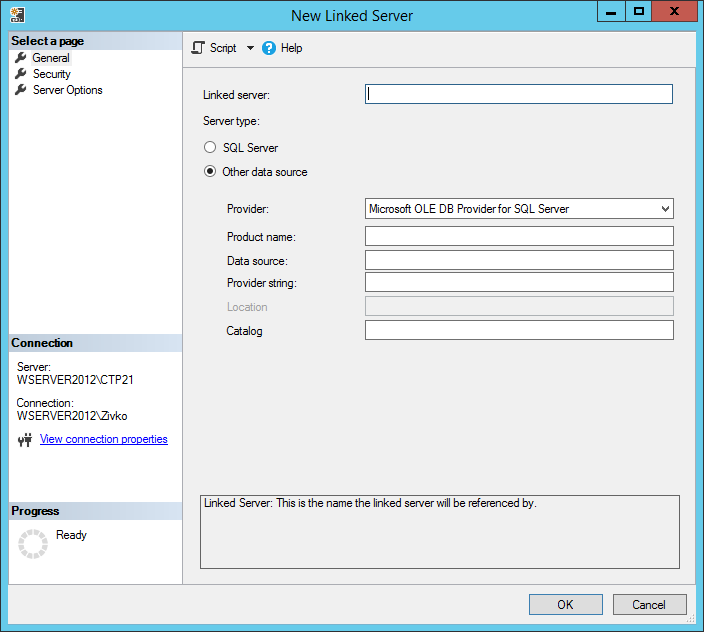
In this new window, you will have to specify the name of the linked server (in the field of Linked server) and the server type you will connect (usually it will be used the Other data source option). The Other data source radio button can give us the possibility to define different data source (not only databases): in this article we will use only the SQL Server radio button under the Server type section and in the Linked server text box, an example name of the server will be entered:
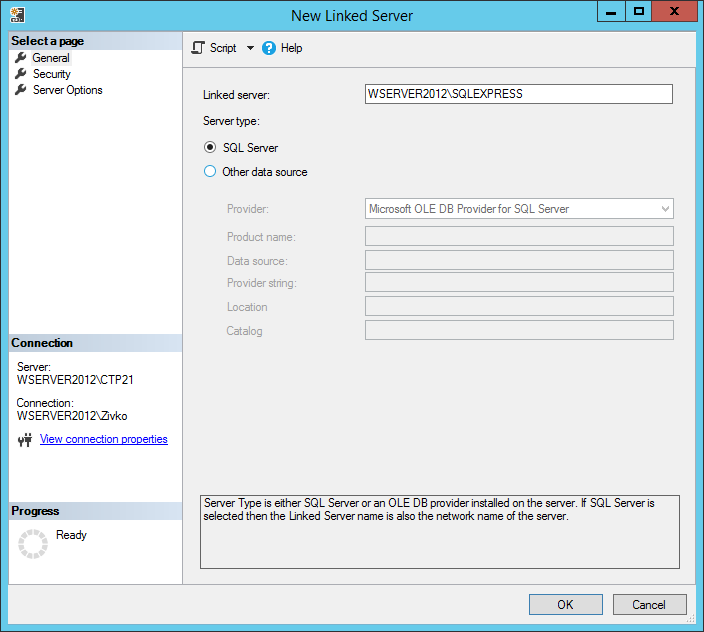
If the server type called SQL Server is chosen then the name specified in the Linked server text field must be the name of the remote SQL Server.
If a SQL Server instance is default instance, type the name of the computer that hosts the instance of SQL Server (e.g. WSERVER2012). If the SQL Server is a named instance, type the name of the computer and the name of the instance separated by slash (e.g. WSERVER2012SQLEXPRESS).
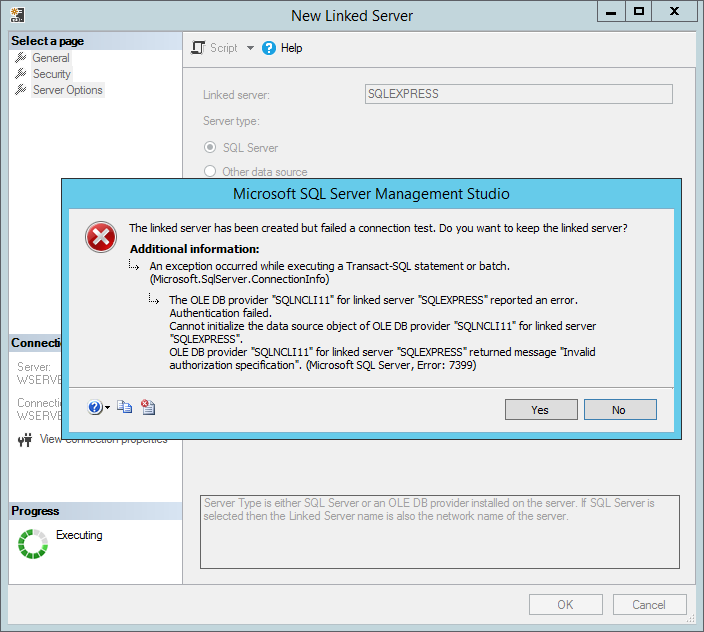
If you try to connect to a named instance without following the above instructions the following error could occur when the OK button is pressed:
No we have to specify how a user would authenticate to the SQL Server instance instance and we will do this by going under the Select a page section, on upper left corner of the New Linked Server dialog and finally select the Security item:
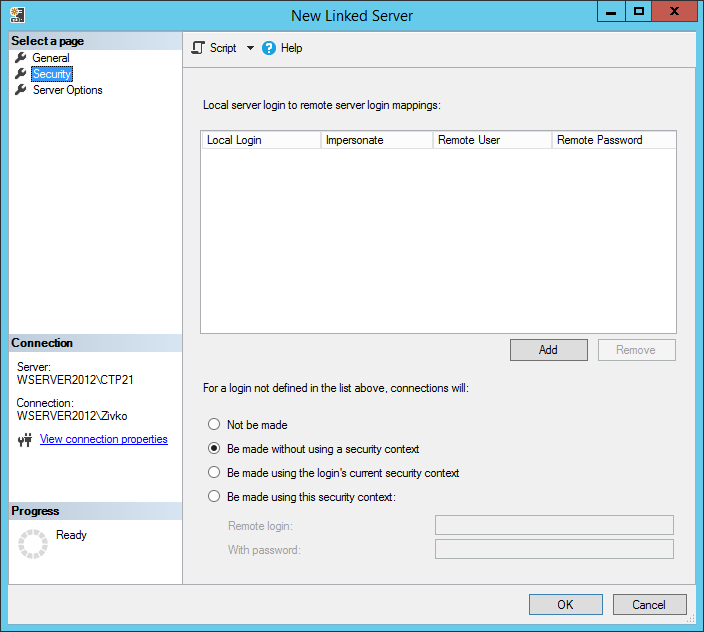
Under the Security section ther will be available different ways to authenticate the linked server and these parameters are really important to allow several operations over the remote SQL Server using T-SQL statements (simple queries, stored procedures, etc.).
Under the Local server login to remote server login mappings text, there are two ways of to map a local login to a remote login: the first one is to associate a local login with a remote login and the second one is to impersonate.
Local Login
In the Local Login field, will be listed all the local logins available on SQL Server (Domain or SQL Logins). The local login can be a SQL Server Authentication local login:
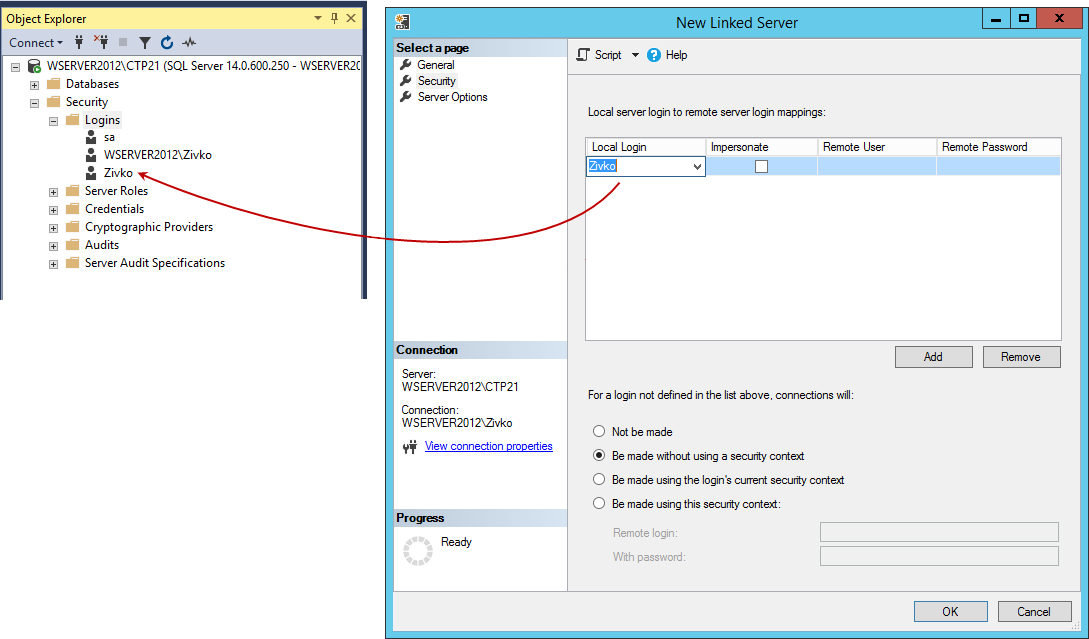
But it also can be a Windows (Active Directory) login:
Now, when you will click the OK button on the New Linked Server dialog, the following error message will appear:
The login mappings should either be impersonate or have a remote login name.
See the image below:
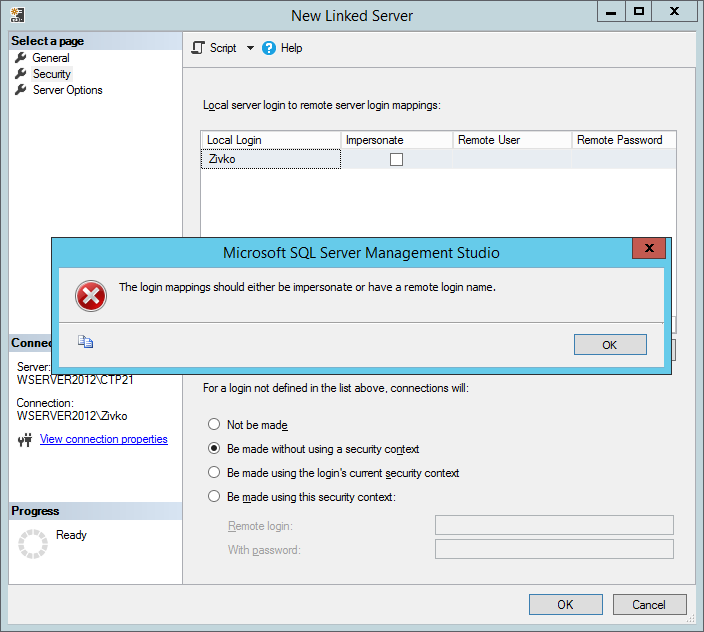
This basically happens because we don’t have specified any «mapping» between the Local login and another credential (remote or impersonated over the remote SQL Server).
Now we will see first the Impersonate option and what this option will imply for the connection, and then we will see the Remote login option (and probably this is the most used type of mapping used between different SQL Servers not joined on the same domain).
Impersonate
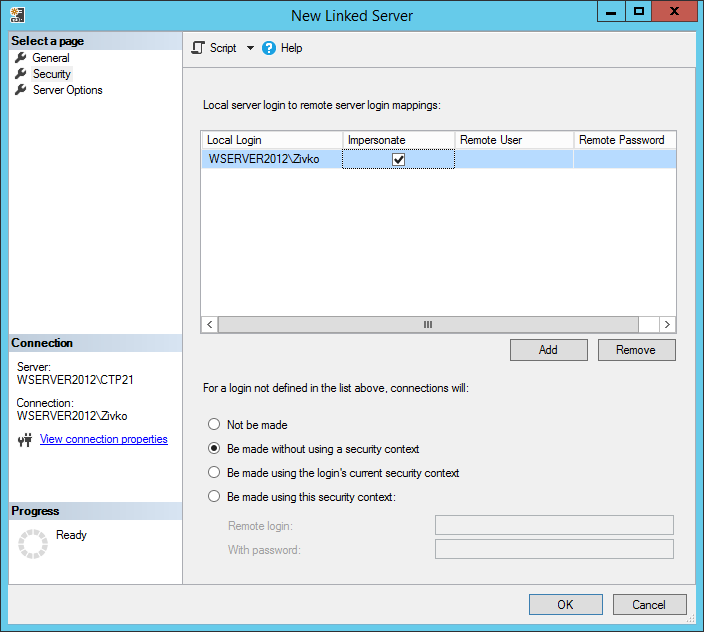
The Impersonate check box is usued to pass the local login credentials to the linked server. If Impersonate is used, for SQL Server Authentication, the same login with the exact credentials (username and password) have to exist on the linked server (remote SQL Server); if those credentials does not exist, SQL Server Management Studio will connect to the server but the list of the databases under the Catalogs folder may look like this (void):
Even for Windows logins, the login must exist and be a valid login on the remote SQL server. In order to use impersonation, the delegation between the local server and the linked server must be set.
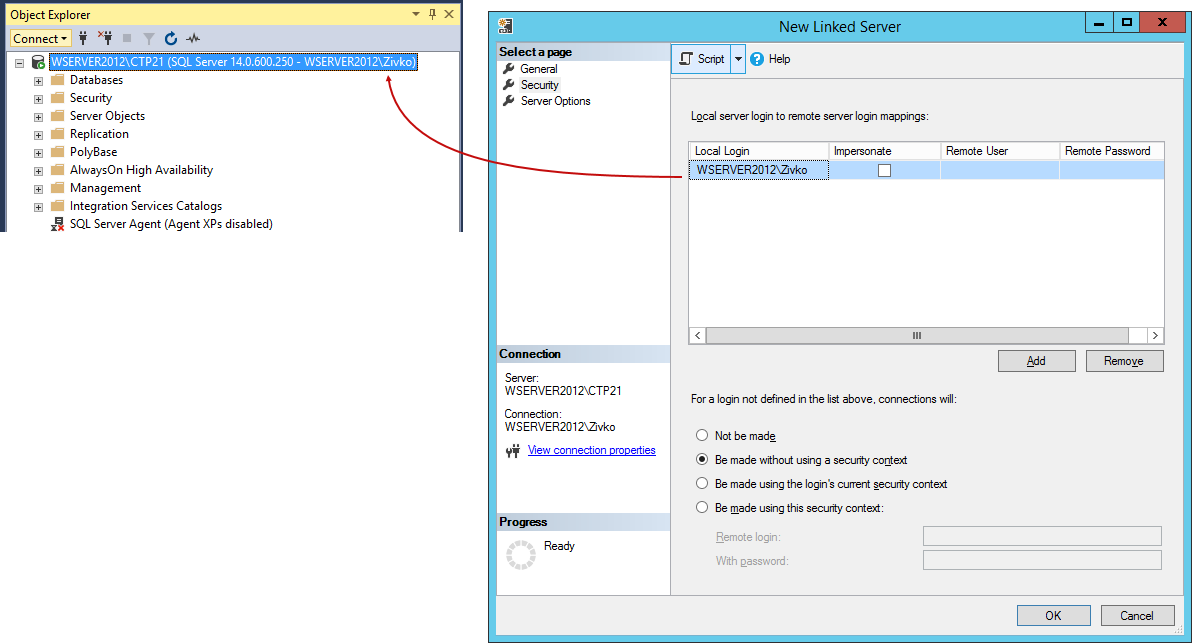
Creating a linked server using the local Windows login we will need to specify the local Windows login and check the Impersonate checkbox and press the OK button:
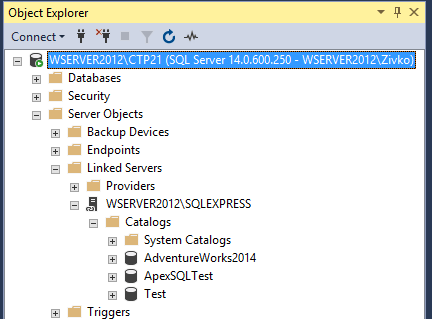
This time, under the Catalogs folder, all databases that are located on the linked server will be listed:
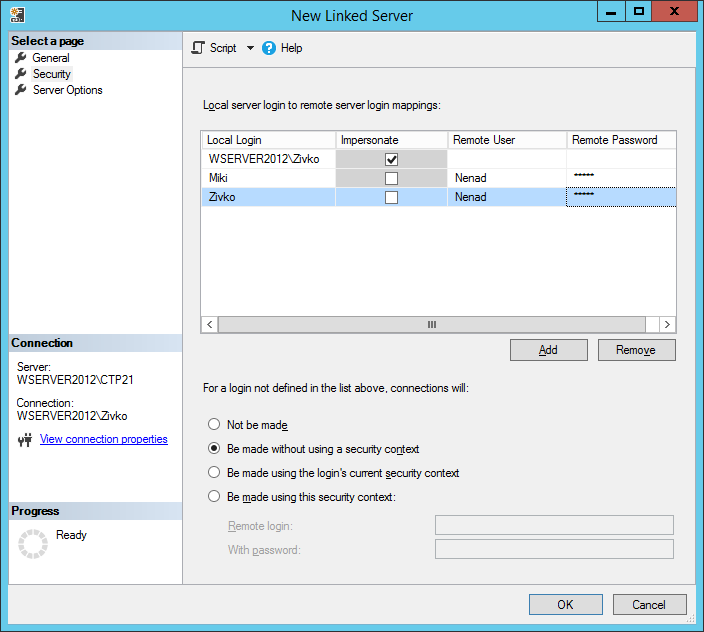
Remote User
The remote user option allows users from the local SQL server to connect to the linked SQL server even though their credentials aren’t present on the remote server by using the credentials from the user that exists on the remote server. Basically, it allows local logins to connect to a remote server as a different login that must exist on a remote server.
Remote Password
Specify the password of the remote user.
From the Local Login drop down list, choose a local login which should map to a remote login. On the Remote User field, enter the name of the remote user that exists on the remote server and in the Remote Password filed, enter a password of that remote user. Then, press the OK button:
Now, when connected to the local server using SQL Server Authentication, under the Catalogs folder, all databases that are available on a remote server for the remote login will be listed.
Additionally, on the Linked Server dialog, it can be identified how logins that are not set in the Local server login to remote server login mappings list will connect to the linked server, for that there are four options that can be used and they are located under the For a login not defined in the list above, connections will section:
Not be made
If this radio button is chosen, any users that aren’t identified in the Local server login to remote server login mappings list cannot establish connection to the linked server.
For example, if login with different account (e.g. Ben) that not set in the login mapping list the list of the databases under the Catalogs folder will look like this:
If you attempt to execute a linked server query:
SELECT * FROM [WSERVER2012SQLEXPRESS].AdventureWorks2014.HumanResources.Employee e
The following result will appear:
Msg 7416, Level 16, State 1, Line 1
Access to the remote server is denied because no login-mapping exists.
Be made without using a security context
The Be made without using a security context option is used for connecting to data sources that do not require any authentication, for example like a text file. When this option is selected for connect to a linked server, will have the same effect as selecting the “Not be made” option.
If you attempt to execute a linked server query:
SELECT * FROM [WSERVER2012SQLEXPRESS].AdventureWorks2014.HumanResources.Employee e
The following message e may appear:
OLE DB provider “SQLNCLI11” for linked server “WSERVER2012SQLEXPRESS” returned message “Invalid authorization specification”.
Msg 7399, Level 16, State 1, Line 1
The OLE DB provider “SQLNCLI11” for linked server “WSERVER2012SQLEXPRESS” reported an error. Authentication failed.
Msg 7303, Level 16, State 1, Line 1


Cannot initialize the data source object of OLE DB provider “SQLNCLI11” for linked server “WSERVER2012SQLEXPRESS”.
Be made using the login’s current security context
If this option is chosen, it will pass the current security context of the local login to the remote login. If Windows Authentication is used, the windows credentials will be used to connect to a remote SQL server. If SQL Server Authentication is used, then the local login credentials will be passed to remote SQL Server. Note, to establish connection to remote server successfully, then the user with the exact same credentials must exist on the remote server otherwise when execute a linked server query:
SELECT * FROM [WSERVER2012SQLEXPRESS].AdventureWorks2014.HumanResources.Employee e
The following message will appear:
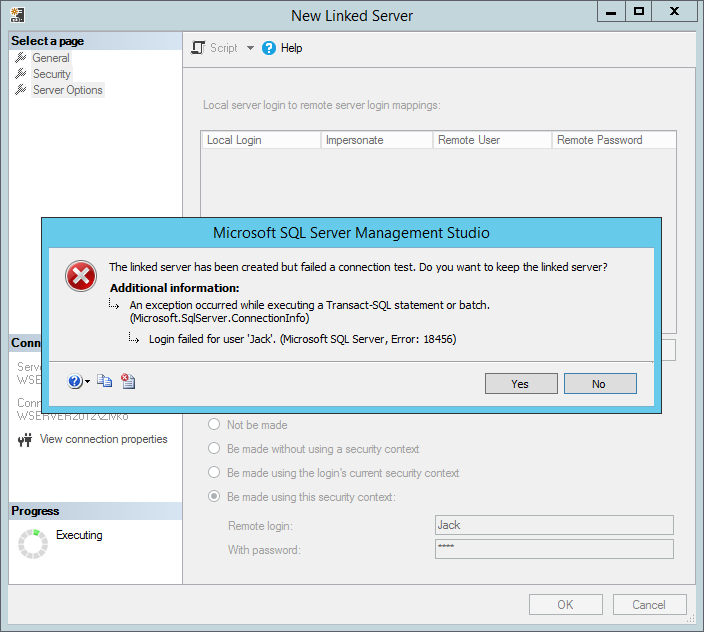
Msg 18456, Level 14, State 1, Line 1
Login failed for user ‘Ben’.
Be made using this security context
The fourth option under the For a login not defined in the list above, connections will section is Be made using this security context. In the Remote login and With password fields, enter the credentials of the SQL Server Authentication login that exist on a remote server, otherwise the following error may occur:
The last item under the Select a page menu is the Server Options item. When selecting this option, the following window will be shown:
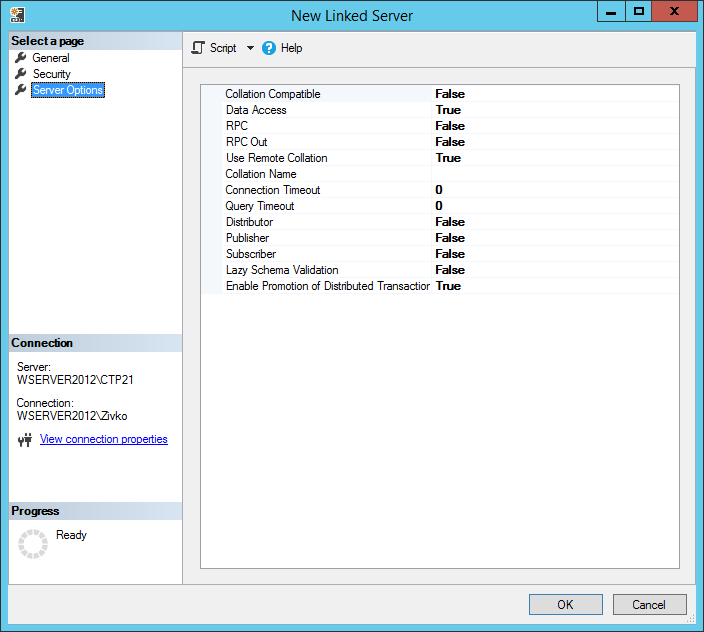
Collation Compatible
The first option is the Collation Compatible option. This option is used to identify if the linked server has the same collation as the local server. This option should set to True only if is known that the linked server has the same collation as the local, otherwise it should be set to False (default).
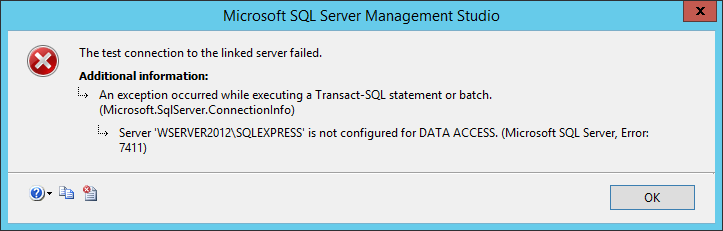
Data Access
This option is used to allow/deny access to the linked server data. If this option is set to False, the access to remote will be denied. This option is useful to disable access to a remote server temporally. The following message will appear when execute a linked server query and this option is set to False:
Msg 7411, Level 16, State 1, Line 1
Server ‘WSERVER2012SQLEXPRESS’ is not configured for DATA ACCESS.
By default, the option is set to True.
RPC and RCP Out
This RCP (Remote Procedure Call) is used to enable the access to remote procedures to be called from the linked server or to be called to the linked server.
If these options are set to False, the following error will appear when some procedures from the linked server are called:
Msg 7411, Level 16, State 1, Line 4
Server ‘WSERVER2012SQLEXPRESS’ is not configured for RPC.
By default, the False value are set for the RPC and RCP Out options.
Use Remote Collation
When this option is set to True, the collection of remote columns will be used and collection specified in the Collation Name filed will be used for data source that are not SQL Server data source, but if the option is set to False then the collation for the local server will be used. By default, is set to False.
Collation Name
If the Use Remote Collation filed set to True, this option is used to specify the collation name of the linked server for the data source that is not SQL Server data source. When chose a collation name, it must be a collation that SQL Server supports.
Connection Timeout
This option is used to set the maximum time the local server should wait for to get a connection to the linked server SQL Server instance. If 0 (zero) is set, then the server option remote login timeout is used. By default, 10 second is set for this option. Note, the default value for SQL Server 2008 is 20 seconds.
Query Timeout
This option is used to set how long, in seconds, a remote process can take before time is out. The default value is 600 second (10 minutes). To disable query timeout put 0 (zero) in this field and the query will wait until it is completed.
Distributor
In this option, it can be specified whether the linked server is participating in replication as a distribution Publisher.
The Distributor is a database instance, that acts as a store for replication specific data associated with one or more Publishers.
Publisher
In this option, it can be set whether the linked server to be a replication publisher or not. If True, the linked server is a publisher. Otherwise, is not.
The Publisher is a database instance, that makes data available to other locations through replication.
Subscriber
In this option, it can be specified whether the linked server is a replication subscriber or not.
A Subscriber is a database instance, that receives replicated data.
Lazy schema validation
This option checks schema changes that have occurred since compilation in the remote tables. If this option is set to False (default state), SQL Server checks changes before the execution of a query and if there are some changes, it recompiles the query. If the Lazy schema validation is set to True, a SQL Server delay schema checks the remote tables until query execution.
Enable Promotion of Distributed Transactions
This option is used to protect the actions of a server-to-server procedure through a Microsoft Distributed Transaction Coordinator (MS DTC) transaction. If this option is set to True calling a remote stored procedure starts a distributed transaction and enlists the transaction with MS DTC.
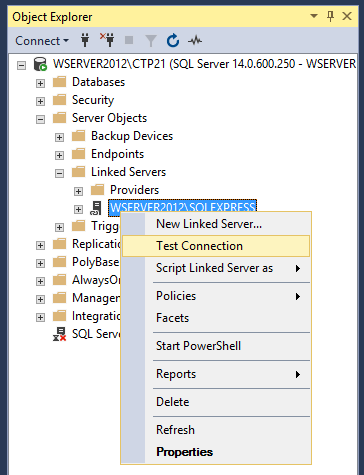
Now, when everything is set, click the OK button on the New Linked Server dialog. A newly created linked server will appear under the Linked Server folder.
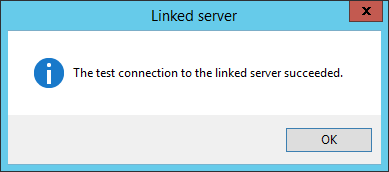
To test that linked server if it works properly, go right-clicking on that linked server and choose Test Connection:
If a connection with linked server is established successfully, the following info message box will appear:
Otherwise, an error message will be displayed that shows a problem that prevents connection to be successfully established:
Querying data using a linked server
Querying data using the linked server is a little bit different then querying data from the local SQL Server. In the normal queries, usually, two part notation is used [Schema].[ObjectName], for example db1.Employee:
SELECT * FROM db1.Employee e
When querying a table from a linked server, the fourth part notation is used LinkedServer.Database.Schema.ObjectName. To get data from the Employee table which is located in a database on the linked server, querying code will look like this:
SELECT * FROM [DBSERVERSQLEXPRESS2016].[AdventureWorks2014].[db1].[ Employee]
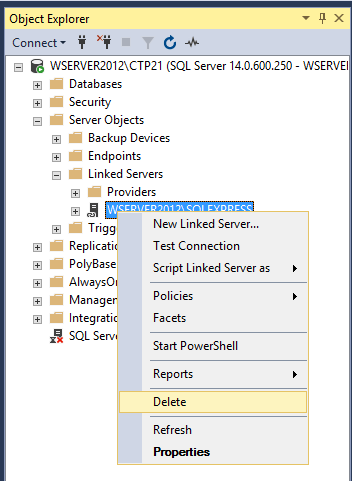
Deleting a linked server
To delete a linked server, under the Linked Servers folder, right click on the linked server and from the context menu choose the Delete command:
This will open the Delete Object window dialog:
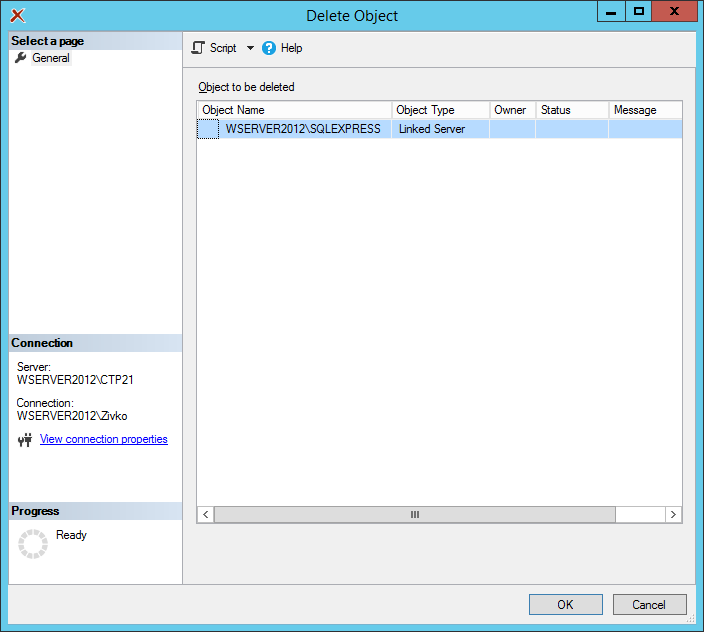
Click the OK button and from the message box, choose the Yes button:

If everything goes well the linked server will be removed from the Linked Servers folder.
Creating a Linked Server using Stored Procedures
As an alternative to using the options in the user interface, you can execute stored procedures in Management Studio to create your linked server.
To create a linked server using stored procedures:
- In Management Studio (SSMS), connect to your Database Engine instance.
- In the toolbar at the top of Management Studio, click New Query.
- In the editor window that appears, type the following statement for creating the linked server, where [LinkedServerName] is the name of the linked server, [DataStore] is the type of data store that you are linking to SQL Server, and [DSNName] (Connector Name) is the name of your DSN for the data store:
EXEC master.dbo.sp_addlinkedserver @server=N'[LinkedServerName]', @srvproduct=N'[DataStore]', @provider=N'MSDASQL', @datasrc=N'[DSNName]'
If your data store requires authentication, then type the following statement, where [LinkedServerName] is the name of the linked server and [UserName] and [Password] are your credentials:
EXEC master.dbo.sp_addlinkedsrvlogin @rmtsrvname=N'[LinkedServerName]', @useself=N'False', @locallogin=NULL, @rmtuser=N'[UserName]', @rmtpassword=N'[Password]'
- In the toolbar at the top, click Execute.
- The Messages pane opens and displays a message indicating whether the statements were executed successfully.
- In the Object Explorer, select Linked Servers and then click Refresh.
- The linked server appears as a node under the Linked Servers branch in the Object Explorer, and you can expand the node to browse the contents of the server down to the table level.
