Contrary to popular belief, Lorem Ipsum is not simply random text. It has roots in a piece of classical Latin literature from 45 BC, making it over 2000 years old. Richard McClintock, a Latin professor at Hampden-Sydney College in Virginia, looked up one of the more obscure Latin words, consectetur, from a Lorem Ipsum passage, and going through the cites of the word in classical literature, discovered the undoubtable source. Lorem Ipsum comes from sections 1.10.32 and 1.10.33 of «de Finibus Bonorum et Malorum» (The Extremes of Good and Evil) by Cicero, written in 45 BC. This book is a treatise on the theory of ethics, very popular during the Renaissance. The first line of Lorem Ipsum, «Lorem ipsum dolor sit amet..», comes from a line in section 1.10.32.
Contrary to popular belief, Lorem Ipsum is not simply random text. It has roots in a piece of classical Latin literature from 45 BC, making it over 2000 years old. Richard McClintock, a Latin professor at Hampden-Sydney College in Virginia, looked up one of the more obscure Latin words, consectetur, from a Lorem Ipsum passage, and going through the cites of the word in classical literature, discovered the undoubtable source. Lorem Ipsum comes from sections 1.10.32 and 1.10.33 of «de Finibus Bonorum et Malorum» (The Extremes of Good and Evil) by Cicero, written in 45 BC. This book is a treatise on the theory of ethics, very popular during the Renaissance. The first line of Lorem Ipsum, «Lorem ipsum dolor sit amet..», comes from a line in section 1.10.32.
Contrary to popular belief, Lorem Ipsum is not simply random text. It has roots in a piece of classical Latin literature from 45 BC, making it over 2000 years old. Richard McClintock, a Latin professor at Hampden-Sydney College in Virginia, looked up one of the more obscure Latin words, consectetur, from a Lorem Ipsum passage, and going through the cites of the word in classical literature, discovered the undoubtable source. Lorem Ipsum comes from sections 1.10.32 and 1.10.33 of «de Finibus Bonorum et Malorum» (The Extremes of Good and Evil) by Cicero, written in 45 BC. This book is a treatise on the theory of ethics, very popular during the Renaissance. The first line of Lorem Ipsum, «Lorem ipsum dolor sit amet..», comes from a line in section 1.10.32.
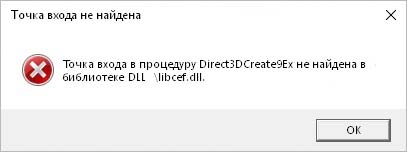
Файл libcef.dll – это библиотеки динамических ссылок Chromium Embedded Framework (CEF), который имеет цифровую подпись Valve и используется клиентом Steam и другими программами.
Но есть случаи, когда запуск приложения прерывается ошибкой «Точка входа в процедуру не найдена в библиотеке libcef.dll». Причина ошибки указывает на то, что этот файл отсутствует по месту расположения или перемещен на карантин антивирусным программным обеспечением.
Загрузка и регистрация
Во многих случаях ошибка возникает по причине того, что libcef.dll либо отсутствует, либо удален. Нужно скопировать его с другого компьютера или с проверенного источника в интернете, чтобы не подвергнуть систему заражению.
В проводнике перейдите по пути:
C:WindowsSystem32 или SysWOW64, если используете 64-разрядную версию ОС.
Посмотрите, присутствует ли здесь файл с помощью поискового запроса.
Если он не найден, скопируйте с другого компьютера или сайта dllme com и вставьте в указанную папку.
Откройте командую строку с помощью системного поиска.
Выполните команду:
cd C:WindowsSysWOW64 или System32
После изменения пути зарегистрируйте библиотеку командой:
regsvr32 libcef.dll
После успешного выполнения закройте консоль и перезагрузите ПК. Попробуйте установить приложение, которое не удавалось из-за отсутствия системного файла.
Для запуска игр в Стим скопируйте эту библиотеку в «C:Program FilesSteambin».
Добавление в список исключений антивируса
Ошибка может произойти из-за блокировки DLL в указанном каталоге. Чтобы ее устранить, добавьте следующие каталоги в исключение антивирусной программы.
После добавления вернитесь к первому решению. Проверьте, решена ли проблема. Если не удается запустить какую-то игру, в которой libcef.dll продолжает исчезать после копирования, исключите и этот каталог.
Если проблема остается, отмените указанные изменения удалением этих папок из списка исключений. Поскольку есть много вирусов, которые могут проникнуть в эти незащищенные папки.
by Milan Stanojevic
Milan has been enthusiastic about technology ever since his childhood days, and this led him to take interest in all PC-related technologies. He’s a PC enthusiast and he… read more
Updated on May 2, 2022
- The procedure error point error is a tricky one. It is usually related to a software bug or missing DLL files but there are many other different cases that users have reported.
- Check this extensive guide for what solution best fits your situation and apply the changes accordingly.
- You can try to reinstall the UPlay application and see if you resolve the entry point error on your computer.
- A practical idea would be to consider another gaming distribution service like Steam to launch your games.

XINSTALL BY CLICKING THE DOWNLOAD FILE
This software will keep your drivers up and running, thus keeping you safe from common computer errors and hardware failure. Check all your drivers now in 3 easy steps:
- Download DriverFix (verified download file).
- Click Start Scan to find all problematic drivers.
- Click Update Drivers to get new versions and avoid system malfunctionings.
- DriverFix has been downloaded by 0 readers this month.
The procedure entry point is Windows error, and it usually affects Uplay application. This error can also prevent other applications from running, so today we’re going to show you how to fix it on Windows 10.
The procedure entry point could not be located [FIXED]
1. Reinstall the Uplay application
As previously mentioned, The procedure entry point error message usually appears when trying to start Uplay. However, you can easily fix the problem simply by reinstalling Uplay. Users reported that removing Uplay and deleting all files from its directory fixed the problem for them, so be sure to try that.
On the other hand, several users reported that your antivirus can interfere with Uplay and cause this error. According to users, the problem is related to Bullguard Antivirus and Firewall, so you might want to disable it temporarily. Users reported that they fixed the problem by following these steps:
- Turn off Bullguard Antivirus and Firewall completely.
- Restart your PC. When your PC restarts, make sure that Bullguard Antivirus and Firewall are disabled.
- Delete Uplay.exe from game folders.
- Reinstall Uplay.
- After you reinstall it, turn the Bullguard antivirus back on.
Several users claim that you don’t even have to uninstall Uplay to fix it. Simply download the latest Uplay setup file and run it to update Uplay. After doing that, you should be able to use Uplay without any problems.
2. Rename the libcef.dll.old file
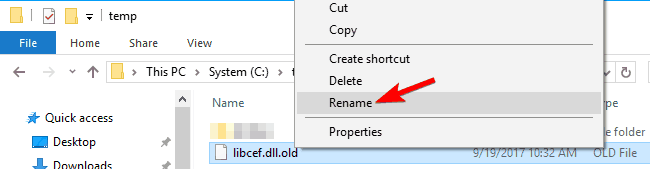
- Locate libcef.dll.old file. By default, it should be located in the Uplay installation directory.
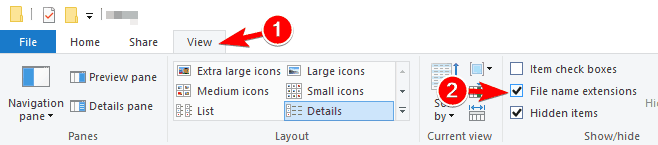
- Once you locate the file you need to rename it. To do that, first, you need to reveal file extensions. You can do that by clicking on View and checking File name extensions.

- Right-click libcef.dll.old and choose Rename. Change its name from libcef.dll.old to libcef.dll .

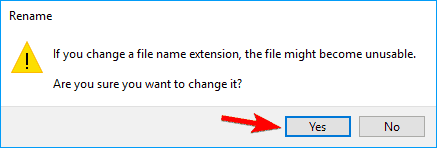
- A warning message will appear. Click on Yes to proceed.

According to users, the cause for The procedure entry point error can be your libcef.dll file. This file is related to Uplay, but for some reason, the name of the file can change. If the file name isn’t correct, Uplay won’t be able to start and you’ll encounter this error. To fix the problem, you just have to rename this file by doing the steps above.
After you rename the file, the issue should be resolved completely. Keep in mind that this solution works only if you don’t have libcef.dll available. If this file is present in the Uplay directory, this solution doesn’t apply to you, so you can just skip it.
3. Repair the Visual C++ packages
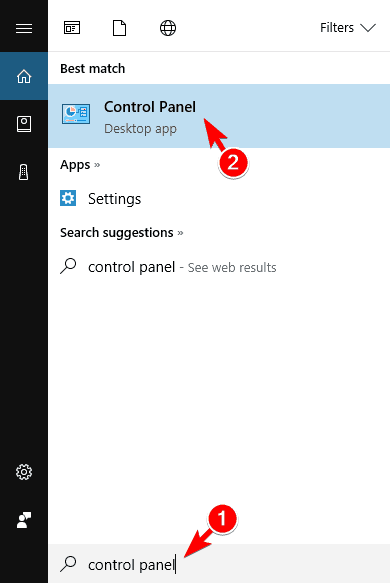
- Press Windows Key + S and enter control panel. Choose Control Panel from the list of results.

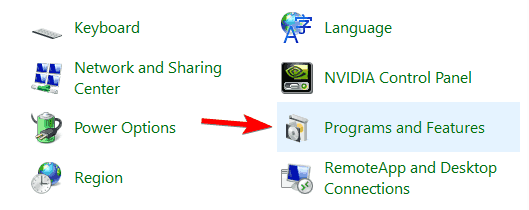
- When Control Panel opens, go to Programs and Features.

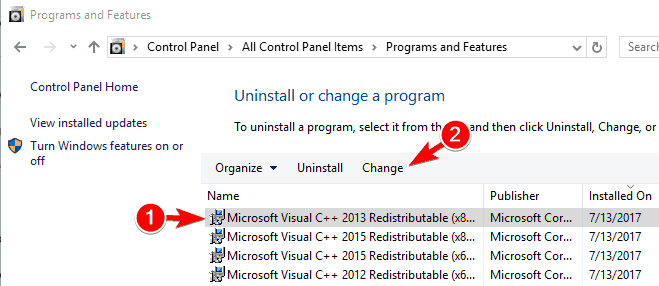
- A list of all installed applications will now appear. Select Microsoft Visual C++ Redistributable and click on Change.

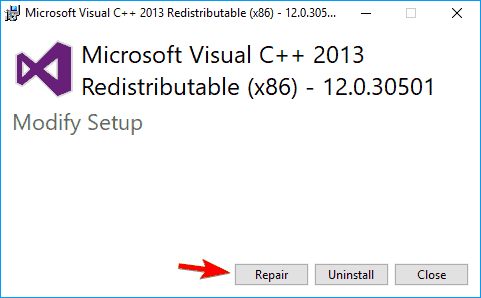
- Now choose Repair from the menu and follow the instructions on the screen.

Many applications rely on Visual C++ Redistributables in order to work. However, if there’s any problem with Visual C++ Redistributables you might encounter The procedure entry point error. Several users claim that you can fix the problem simply by repairing Visual C++ packages. To do that, follow the steps from above.
Keep in mind that you might have to repair all Visual C++ Redistributables that you have on your PC in order to fix this problem. If repairing the Redistributables doesn’t help, you might have to reinstall them. Keep in mind that you’ll have to install multiple versions of C++ Redistributables and not just the latest one. Different applications often require different versions of C++ Redistributables in order to run properly, so you’ll have to install multiple versions.
4. Use Steam to launch your game
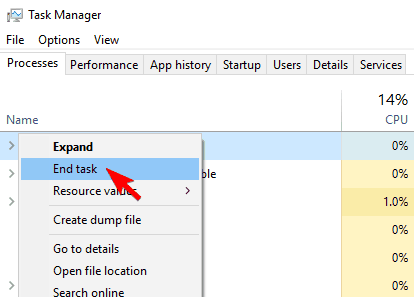
- Press Ctrl + Shift + Esc to open Task Manager.
- When Task Manager opens, go to Processes tab and look for Uplay process. If you find it, right-click it and choose End task. You can also go to the Details tab and check if the Uplay process is running. If so, right-click it and choose End task from the menu.

Now you need to download Uplay again and install it. To do that, follow these steps:
- Download the Uplay setup file and run it.
- Make sure not to run Uplay at the end of the installation.
- Now start Steam and launch your game.
According to users, you can fix The procedure entry point error simply by starting your game from Steam instead of Uplay. To fix the problem, first, you need to close Uplay entirely. Sometimes Uplay can run in the background, so you’ll need to use Task Manager to close it.
By starting your game from Steam, Uplay will automatically start and you won’t have any problems with it. Keep in mind that you might have to start games from Steam as a workaround until you find a permanent solution.
5. Remove your graphics card driver
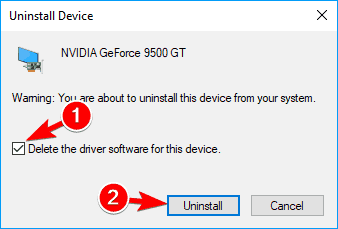
- Press Windows Key + X to open Win + X menu and choose Device Manager from the list.

- In the Display adapters section locate your graphics card driver, right-click it and choose Uninstall device.

- Now check Delete the driver software for this device and click on Uninstall.

- After you uninstall your driver, restart your PC.


Once your PC restarts, Windows will install the default driver. After the default driver is installed, check if the problem still persists. If not, you might want to update your driver, but be sure not to install the same version that caused you this problem.
According to users, The procedure entry point error can appear due to problems with your Nvidia graphics drivers. To fix the issue, users are suggesting removing your driver and checking if that solves the problem.
There’s also one more way to remove your driver. We showed you how to remove it from Device Manager, but this method can sometimes leave leftover files and registry entries that can still cause the problem. To completely remove your graphics card driver, we suggest that you use Display Driver Uninstaller. This is a freeware third-party tool that will automatically remove your graphics card driver and all files related to it. If you want to be sure that your graphics card driver is completely removed, we suggest that you use this tool.
Users reported this problem with Nvidia drivers, but even if you don’t use Nvidia graphics, you might want to try reinstalling your drivers and see if that helps.
6. Disable Windows Defender
- If you have a third-party antivirus tool installed, disable it.
- Disconnect your PC from the Internet.
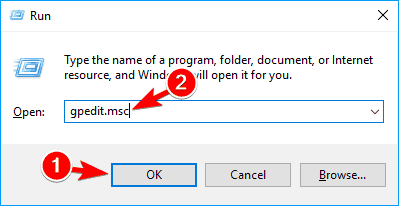
- Now you need to start Group Policy Editor. To do that, press Windows Key + R and enter gpedit.msc. Now press Enter or click OK to run it.

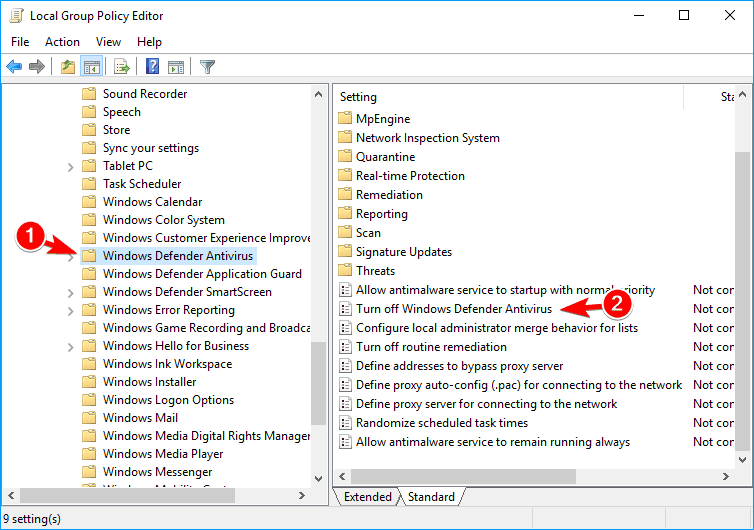
- In the left pane, navigate to Computer Configuration > Administrative Templates > Windows Components > Windows Defender. In the right pane, locate and double click Turn off Windows Defender Antivirus.

- Select Enabled and click on Apply and OK to save changes. Several users are recommending to select Disabled option instead, so you might want to try doing that as well.

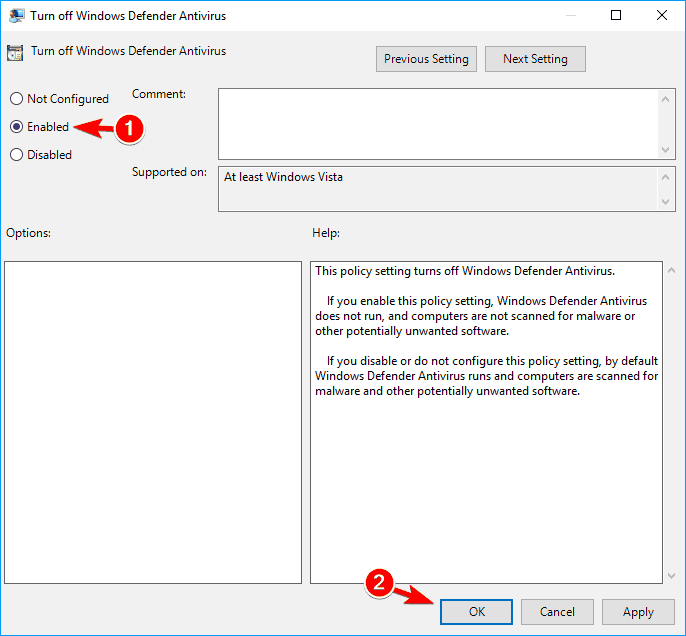
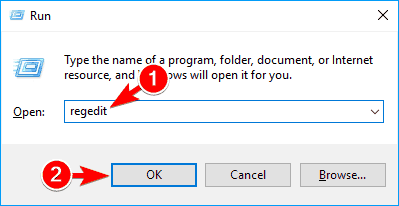
After you disable Windows Defender, reinstall your game and check if the problem still appears. We have to mention that Group Policy Editor is available only on Windows Pro or Enterprise Editions. If your Windows doesn’t have Group Policy Editor, you can disable Windows Defender by modifying your registry. To do that, follow these steps:
- Press Windows Key + R and enter regedit. Press Enter or click OK to open Registry Editor.
- In the left pane, navigate to
HKEY_LOCAL_MACHINESOFTWAREPoliciesMicrosoftWindows Defender.
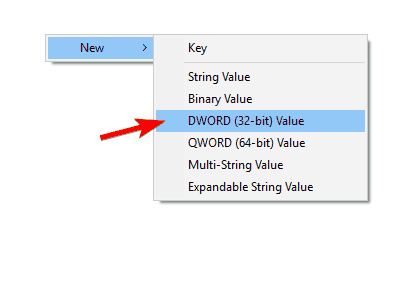
- In the right pane, double click the DisableAntiSpyware key. If this key isn’t available, you need to create it. To do that, right-click the empty space and choose New > DWORD (32-bit) Value. Enter DisableAntiSpyware as the name of the new DWORD. Now double click the DisableAntiSpyware DWORD to open its properties.

- Set the Value data to 1 and click OK to save changes.


Several users reported that they encountered The procedure entry point error while trying to run certain games. It seems that this problem can be caused by Windows Defender, so in order to fix it we need to disable Windows Defender. To do that, you just need to follow the steps described above.
Keep in mind that editing the registry can be potentially dangerous, so use extra caution. If you want to enable Windows Defender again, simply change the value data of DisableAntiSpyware DWORD to 0 or delete it.
7. Completely remove VLC player from your PC
The procedure entry point error usually affects Uplay, but it can also appear in other applications. Users reported this error in Tunngle, and it seems that it was caused by VLC Media Player.
To fix the problem, you need to uninstall VLC Media Player and remove all registry entries associated with it.
To completely remove VLC from your PC, you might consider a cleaning software that can help you remove any unwanted programs.
CCleaner can perform this job in a few clicks and also erase junk files or temporary files from your system.
Users reported that removing the VLC player fixed the problem for them, so be sure to try it. If you still want to use VLC as your media player, be sure to download and install the latest version and check if the issue still appears.
8. Replace the configuration and .dll files
Users reported The procedure entry point error while trying to run Assassin’s Creed 4. According to users, the issue is caused by corrupted configuration and .dll files. To fix the problem, you’ll need to replace the corrupted files with new ones. The list of files that you need to replace includes orbit_api, steam_api, steam_api.dll, uplay_r1.dll, and uplay_r1_loader.dll.
Keep in mind that downloading these files from third-party websites can be a security concern, therefore it’s always better to copy them from another user that has a working copy of the game. After you copy these files to the game’s directory, the problem should be fixed and everything will start working without issues.
If the problem still persists, users are suggesting disabling Windows Defender entirely and checking if that solves the problem. For more information on how to disable Windows Defender, be sure to check Solution 6 for detailed instructions.
9. Disable your antivirus
Your antivirus software is rather important, but it can sometimes cause The procedure entry point error to appear while trying to play certain games. To fix the issue, it’s advised to temporarily disable your antivirus and check if that solves the problem.
Some PC issues are hard to tackle, especially when it comes to corrupted repositories or missing Windows files. If you are having troubles fixing an error, your system may be partially broken.
We recommend installing Restoro, a tool that will scan your machine and identify what the fault is.
Click here to download and start repairing.
This is just a simple workaround, but if it works, be sure to use it in the future if this error appears again. Keep in mind that almost any third-party antivirus software can cause this problem to appear, so be sure to try this solution.
10. Install the latest updates
If you’re frequently getting The procedure entry point error message, you might be able to solve it by updating your Windows. By default, Windows 10 automatically installs the necessary updates in the background, but sometimes you might miss an important update.
However, you can always check for updates manually by doing the following:
- Open the Settings app. You can do that quickly simply by pressing Windows Key + I.
- When Settings app opens, navigate to Update & security section.

- Now click on Check for updates button. Windows will now check for updates and download them automatically in the background. If any updates are available, Windows will install them as soon as your PC restarts.


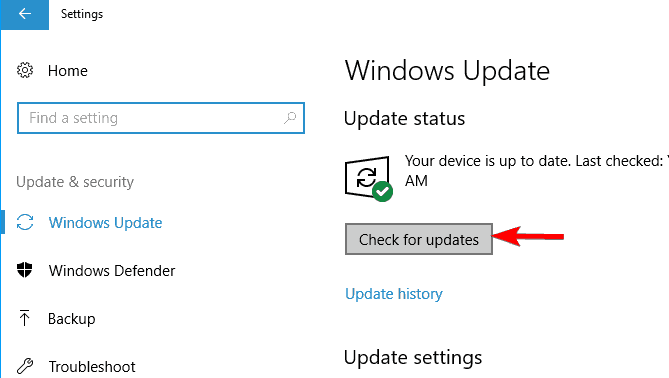
Keeping your Windows up to date is one of the best ways to ensure that errors such as this one don’t appear, so be sure to update Windows as often as you can.
11. Copy the steam_api.dll file
Users reported The procedure entry point error message while trying to start a Gmod server on their PC. Apparently the problem is occurring because steam_api.dll file is missing. To fix the issue, you just need to copy the missing file to the Gmod server directory. This is rather simple, and you can do it by following these steps:
- Go to the gmodserver directory on your PC.
- Now navigate to the bin folder.
- Once you open the bin directory, search for steam_api.dll file. Copy that file.
- Now go back to gmodserver directory and paste the steam_api.dll file in that directory.
After you copy the steam_api.dll file, the problem should disappear and you’ll be able to run Gmod server without any problems.
12. Copy libxml2.dll file
According to users, this error message can appear while using APPandora app. The problem occurs because a certain .dll file is missing, but you can fix the problem simply by copying that file. To do that, follow these steps:
- On a 64 -bit Windows, go to the
C:Program Files (x86)Common FilesAppleApple Application Supportdirectory. If you’re using 32 -bit version of Windows, navigate to the
C:Program FilesCommon FilesAppleApple Application Supportdirectory instead.
- Once you open Apple Application Support directory locate libxml2.dll file and copy it. The procedure entry point error message usually tells you which file is missing, so you need to find it in Apple Application Support directory and copy it.
- Now navigate to C:WindowsSysWOW64 directory and paste that file. If you’re using a 32-bit version of Windows, you need to navigate to C:WindowsSystem32 directory and paste your file there.
After copying the missing files, APPandora app will start working again without any problems.
- READ ALSO: Fix: SysMenu.dll error in Windows 10
Reinstall / update your browser
Google Chrome is a great browser, but it can also suffer from The procedure entry point error. Several users reported this error message in Chrome, and in order to fix it, you just have to reinstall Chrome on your PC. Keep in mind that you’ll need to install the latest version of Chrome in order to fix this issue.
In addition to Chrome, this issue also affects Firefox, so if you’re using Firefox as your default browser, reinstall it and update it to the latest version to fix this problem.
Solution 14 – Rename the dxgi.dll file
According to users, this error can appear while trying to use mods with certain games. The cause for this problem is dxgi.dll file, and in order to fix the issue, you need to find and rename that file. To do that, follow these steps:
- Go to your game’s installation directory and look for dxgi.dll file. If this .dll isn’t available, go to C:WindowsSystem32 directory. Locate the dxgi.dll and copy it to the game’s installation directory.
- In the game’s installation directory, right-click dxgi.dll and choose Rename from the menu. Rename the file from dxgi.dll to d3d11.dll .
After renaming the file, try to start the game again and check if the problem still appears.
Solution 15 – Change System Variables
According to users, The procedure entry point error message can appear while starting DWG Viewer or DWG TrueView software. If you’re using these tools, you might be able to fix the problem simply by changing your system variables. To do that, follow these steps:
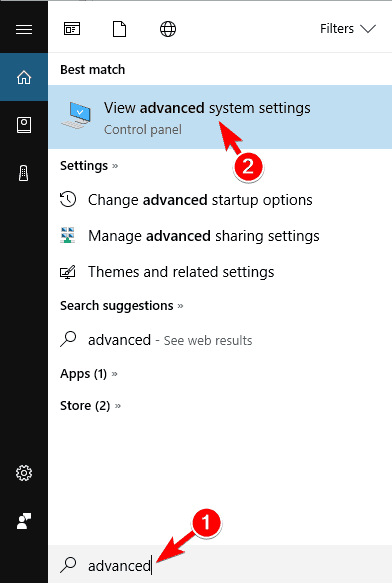
- Press Windows Key + S and enter advanced. Choose View advanced system settings from the menu.

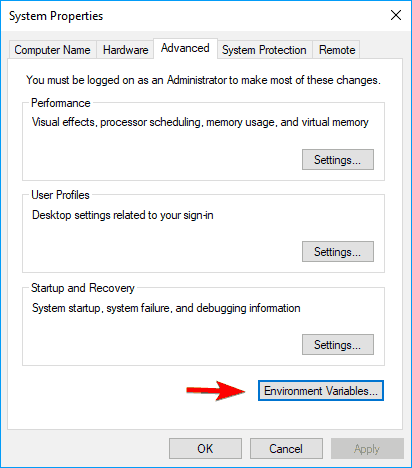
- System Properties window will now appear. Click on Environment Variables button.

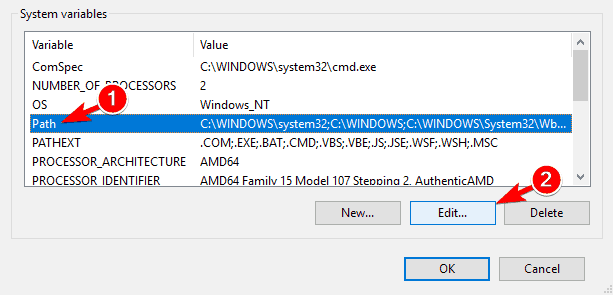
- Environment Variables window will open. In the System variables section, select Path and click on Edit button.

- A list of path variables will appear. If C:Program FilesCommon FilesAutodesk Shared isn’t available on the list, you need to add it. To do that, simply click an empty space on the list and enter C:Program FilesCommon FilesAutodesk Shared . Now click OK to save changes. If this path is available, be sure to check if it’s correct.


- READ ALSO: Fix: Autorun.dll errors in Windows 10
After doing that, you just need to save changes and the problem should be resolved. Keep in mind that this problem can also affect other applications. If you’re having this error with other applications, we strongly advise you to check their Path variables and edit them if necessary.
Solution 16 – Reinstall Jabber and remove MeetingService files
Several users reported this error message while using Jabber. To fix the issue, you need to uninstall Jabber and remove certain .dll and .xml files. To do that, follow these steps:
- Uninstall Jabber.
- Now navigate to Jabber’s installation directory. By default, it should be
C:Program Files (x86)Cisco SystemsCisco JabberservicesMeetingService. - Locate and remove MeetingService.dll and MeetingService.xml files.
- After removing these files, reinstall Jabber.
This is a simple solution, and users reported that reinstalling Jabber and removing MeetingService files fixed the issue for them, so be sure to try it out. Several users reported that removing the entire Cisco Jabber directory fixed the problem for them, so be sure to try that as well.
Solution 17 – Verify the integrity of game files
The procedure entry point error message usually appears when trying to run certain games using Uplay. According to users, the issue can occur if your game files are corrupted. To fix the problem, you’ll need to check the integrity of your game cache. To do that in Uplay, follow these steps:
- Open Uplay and click on Games.
- Select the game that is giving you this error message. Now click on Verify files button.
- The verification process will now start. This process can take a while, so you’ll have to be patient.
If you’re having this problem with Steam games, you can verify the game cache by doing the following:
- Open Steam and go to your game library. Locate the game that is giving you this error, right-click it and choose Properties from the menu.

- When Properties window opens, go to Local Files tab and click on Verify integrity of game cache button.

- The verification process will now start. The verification can take a while so be patient.


After the verification is finished, check if the problem still appears. Few users claim that verifying their games solved the issue for them, so be sure to try that.
Solution 18 – Reinstall Adobe Photoshop
According to users, the issue can appear after installing Adobe Photoshop. The issue is caused by a corrupted .dll file, and in order to fix this problem, you need to reinstall Photoshop. To do that, you need to follow these steps:
- Uninstall Adobe Photoshop from your PC.
- Download Adobe Creative Cloud Cleaner Tool.
- Once you download the tool, run it. The tool will remove any files associated with Adobe Photoshop from your PC.
- After you finish the process, download and install Adobe Photoshop again.
After you reinstall Photoshop, the problem should be resolved and you’ll be able to use it without any issues.
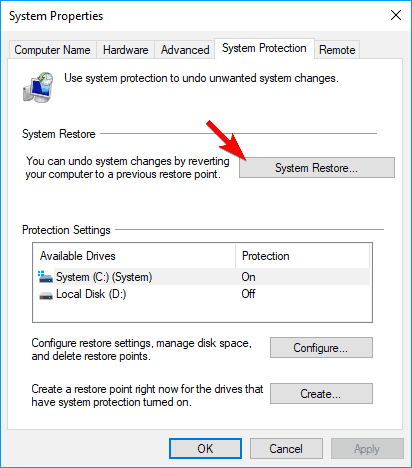
Solution 19 – Perform a System Restore
If The procedure entry point error message started appearing recently, you might be able to fix the problem by performing a System Restore. This is a useful feature that will restore your PC to the previous state and fix any recent problems. Keep in mind that this feature might remove any recently saved files, so you might want to back them up. To perform a System Restore, do the following:
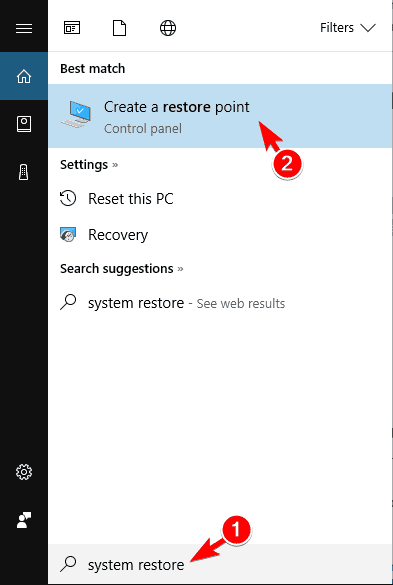
- Press Windows Key + S and enter system restore. Choose to Create a restore point from the menu.

- System Properties window will appear. Click on System Restore button.
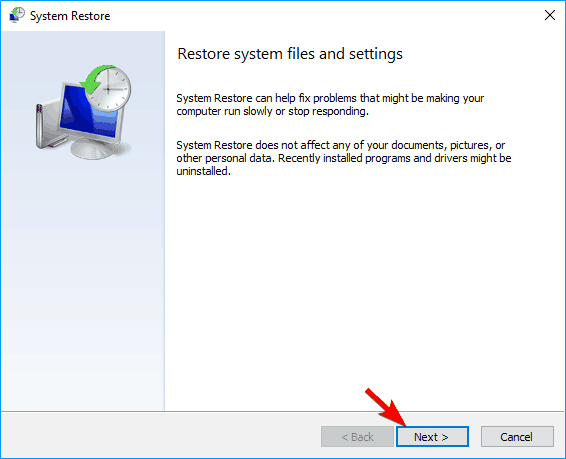
- When System Restore window opens, click on Next.

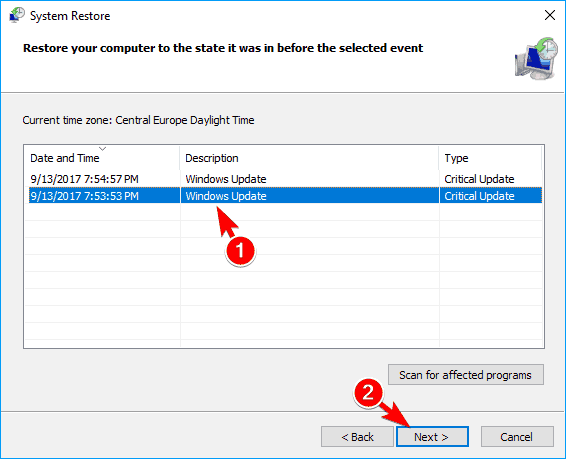
- List of available restore points will appear. If available, check the Show additional restore points option. Now select the desired restore point and click on Next.
- Follow the instructions on the screen to complete the restoration process.
Once you restore your PC, check if the problem still appears.
Solution 20 – Copy the missing .dll files to the Syncios directory
This error message can appear while using the Syncios software on your PC. Missing .dll files are causing this error to appear, and in order to fix it, you need to copy them to Syncios directory. To do that, follow these steps:
- Navigate to the
C:Program FilesCommon FilesAppleApple Application Supportdirectory. If you’re using a 32-bit version of Windows, you’ll need to navigate to C:Program Files (x86) directory instead.
- Once you open Apple Application Support folder, select libxml2.dll , WTF.dll , libxml3.dll , and WebKit.dll files. Now press Ctrl + C to copy these files.
- Navigate to C:Program FilesSyncios directory. If you’re using a 32-bit version of Windows, you’ll need to navigate to C:Program Files (x86)Syncios directory instead.
- Once you open Syncios directory, press Ctrl + V to paste the files.
After doing that, the problem should be fixed and you’ll be able to run Syncios app without any problems.
Have issues with specific .dll files? You can consider the DLL Errors Troubleshooting Hub on our website.
Also, you may visit the Windows 10 Errors section for guides on fixing common Windows problems with the computer.
The procedure entry point error message can prevent you from running your favorite applications or games. This error is usually caused by missing .dll files, but you should be able to solve it by using one of our solutions.
![]()
Newsletter
If you receive an error message that says, “Entry point not found, The procedure entry point could not be located in the dynamic link library” on your Windows 10 PC, then you will find this post useful for this will provide you some potential fixes to fix the error.
This kind of error can occur if a program fails to locate the DLL library that it needs in order to run. It can also occur if the library is not in the specified directory in the path or if the DLL file has gone missing or has become corrupted.
To fix the “The procedure entry point could not be located in the dynamic link library” error, check out the following options given below.
Option 1 – Try to reinstall the program
The first thing you can do to resolve the error is to uninstall the program that throws the error and download its latest version from its official site and then install it again.
Option 2 – Run System File Checker scan
If reinstalling the program didn’t work, you can also try running the System File Checker or SFC scan to fix the error. System File Checker is a command utility built into your computer that helps restore corrupted files and missing files. Refer to the following steps to run it:
- Hit the Win + R keys to launch Run.
- Type in cmd in the field and tap Enter.
- After opening Command Prompt, type in sfc /scannow
The command will start a system scan which will take a few whiles before it finishes. Once it’s done, you could get the following results:
- Windows Resource Protection did not find any integrity violations.
- Windows Resource Protection found corrupt files and successfully repaired them.
- Windows Resource Protection found corrupt files but was unable to fix some of them.
Reboot your computer.
Option 3 – Try checking the details in the Event Viewer
The Event Viewer can also help you resolve the error as it contains detailed information about the error that could help you pinpoint its root cause and resolve it.
Option 4 – Try to re-register the problematic DLL file
You may have to re-register the ntdll.dll file using the regsvr32.exe before you can successfully install the program and fix the error. The Regsvr32 tool is a command-line utility that can be used to register and unregister OLE controls like DLL and ActiveX (OCX) controls in the Windows operating system. Follow the steps below to use it.
- Open Command Prompt as admin from the WinX menu.
- Next, type the following commands in the elevated Command Prompt and hit Enter to execute the command. This will re-register the affected DLL file using the Windows operating system tool, regsvr32.exe.
- exe /[DLL file]
- exe [DLL file]
Note: Replace “[DLL file]” with the name of the DLL file that was pointed out in the error.
- After you execute the given commands, you should see a message saying, “DllRegisterServer in vbscript.dll succeeded” if the Regsvr32 tool was able to run successfully. After that, try to install the program again and see if it now works.
Option 5 – Try to replace the DLL file with a trusted source
- First, you need to get the new DLL file from another computer with preferably the same file version number.
- After that, you need to boot your PC into Safe Mode and navigate to the paths listed below and then replace the file using a USB drive or other external storage devices.
- x86: This PC > C:/Windows/System32
- x64: This PC > C:/Windows/SysWOW64
- Next, type “cmd” in the Cortana search box and right click on Command Prompt, and select “Run as administrator” to open it with administrator privileges.
- Now type the “regsvr32 ntdll.dll” command and hit Enter.
- Restart your PC and check if the error is now fixed.
Option 6– Try to scan your computer using Windows Defender
It is also possible that the DLL file might be infected with malware or virus which could explain why you’re getting the error. Thus, you have to scan your computer using security programs like Windows Defender.
- Tap the Win + I keys to open Update & Security.
- Then click on the Windows Security option and open Windows Defender Security Center.
- Next, click on Virus & threat protection > Run a new advanced scan.
- Now make sure that Full Scan is selected from the menu and then click the Scan Now button to get started.
Advanced System Repair Pro
One-click automated PC repair solution
![]()
With Advanced System Repair Pro you can easily
DOWNLOAD
Advanced System Repair Pro is compatible with all versions of Microsoft Windows including Windows 11
Share this article:
You might also like
 Razer had some strange dives into stuff not really aimed at gamers and the gaming community overall like its Zephir smart mask and now it is venturing into the area of smartwatches teaming up with Fossil. I am not clear if this initiative was set in motion by Razer or Fossil and I really do not know why limited production numbers. Officially named RAZER X FOSSIL GEN 6 SMARTWATCH, this watch comes with the official following text on Razer’s page:
Way more. Way faster. Way ahead of the game. Get time on your side with the limited-edition Razer X Fossil Gen 6 Smartwatch—only 1,337 pieces worldwide. Designed for the next generation of gamers, supercharge your style with customizable straps, dials, Razer Chroma™ RGB effects, and more.
Now, I am a fan of Razer and I like their products, mostly keyboards and mouse altho chair is also very good and in top of the product line in that field but I can not really stand behind this product and decision, and the only reason why I can not stand behind it is this 1337 (leet, or elite) a limited number of available pieces that is nothing more than a gimmick to sell watches at a higher price. Watch itself is not really bad, as a matter of fact, it has some solid hardware statistics.
Technical characteristics
Featuring a 1.28-inch AMOLED Display with 3 unique Razer watch faces (Analog, Text, Chroma*), 4 customizable Razer Chroma™ RGB effects, and 2 custom-designed, interchangeable straps, this Razer’s baby is packing 44mm, Stainless Steel case with 22mm, straps. It runs on Wear OS by Google as an operating system of a choice and under software, it is packing Qualcomm Snapdragon Wear 4100+ CPU paired with 1GB of RAM and 8GB Storage. The display is running at 416×416 resolution with 326ppi.
Watch input is with 2 configurable Push buttons, One rotating Home button, touchscreen, and voice. It has in it a loudspeaker, microphone, and vibration. Connection is via Bluetooth 5.0, GPS, NFC SE, and Wi-Fi. The battery can in their word work for 24 Hr + multi-day Extended Mode **Varies based on usage and after updates install**. USB data cable with magnetic dock snaps to split rings on the watch case back and spins 360 degrees for ease of use. Approximately half an hour to reach 80%. Sensors included in the watch itself are: Accelerometer, Altimeter, Ambient Light, Compass, Gyroscope, Off-body IR, PPG Heart Rate, SPO2.
Smartwatch is water-resistant up to 3 ATM & it comes with preloaded apps like: Agenda, Alarm, Battery-Optimized Activity Mode, Calendar, Cardio Level Tracking, Cardiogram, Contacts, Enhanced Phone Dialer App, Google Assistant, Google Fit (Workout, Heart Rate, Goals, Breathe), Google Maps, Google Pay™, Google Play Store, Nike Run Club, Noonlight, Smart Battery Modes, Spotify, Stopwatch, Timer, Translate, Wellness Apps with Sleep Tracking.
Conclusion
Watch is Dropping on 01.10.22, 8 AM PST which is 4 days from now and altho it is an interesting device with solid hardware I can not stand behind it due to its limited edition numbers and with $329 price tag. With the same amount of money, you can get yourself Samsung or Apple watch with more features packing. But of course, that is just my personal preference and if you want to own this limited edition Razer smartwatch, go for it.
Read More
One of the popular tools that allow a user to offer or obtain remote assistance on a computer is the TeamViewer. It is available on all the major computer and mobile platforms which makes it a lot useful to every kind of user, even on the go. If you are one of the users who frequently use TeamViewer, then you must be familiar with this one sentence that states, “Initializing display parameters”. In common cases, this sentence will appear for a second and load the other user’s screen. However, some users reported that TeamViewer gets stuck on that stage and did not move ahead even a bit. If you experience the same problem, read on as this post will guide you in fixing this issue with TeamViewer on your Windows 10 computer.
At the time of writing, the cause of this issue is still unclear. It could be due to the quality of internet connection, conflicts in process, misconfiguration of Remote Access, and many more. To fix this issue, you can try to update TeamViewer for both the users or have it reinstalled with Unattended Remote Access, or reconfigure the Remote Access. You can also try to kill any conflicting processes or optimize your internet connection. For more details, refer to the given options below.
Option 1 – Reboot your router
The first thing you can try to do to fix the error is to simply restart your router. All you need to do is reboot the router from its Admin panel or you can also turn it off manually and turn it back on after a couple of seconds so that it can completely reboot. Once you’re done, try accessing your server again and see if the error is now fixed.
Option 2 – Try to update TeamViewer on both users’ end
You might have to update the TeamViewer on both ends and to do that, you need to start the TeamViewer installer again. Once it is installed, run the program and click on the Help option in the Menu ribbon and then select the “Check for updates…” option. If an update is found, you will be notified within a couple of seconds through a pop-up mini window. From there, click on Update and then follow the next onscreen instructions that appear and choose your TeamViewer version to update.
Option 3 – Try reinstalling TeamViewer via the Unattended Remote Access
If the first two given options didn’t work, you might have to reinstall TeamViewer from the Windows 10 Settings app or Control Panel.
- Tap the Win + R keys to launch the Run utility and type “regedit” in the field and hit Enter to open the Registry Editor.
- Here, navigate to this registry key: Computer HKEY_LOCAL_MACHINE SOFTWARE Wow6432Node TeamViewer
- Next, look for the TeamViewer key and right-click on it, and select Delete.
- After that, restart your PC to apply the changes made and then start TeamViewer again, and then click on Connection > Open Management Console.
- Then sign in or sign up to get registered and select the Add new device radio button under Add > Add computer located on the top-right corner and then select the Download now option.
- Now follow the next onscreen instructions that appear to complete the installation and then check if it fixes the problem or not.
Option 4 – Try reconfiguring the Remote Access
You can also try to reconfigure Remote Access in case there is some misconfiguration that might have caused the problem with TeamViewer.
- On your Desktop, right-click on This PC and click on Properties.
- Next, go to the left side of the navigation panel and click on Remote Settings.
- From there, make sure that the “Allow Remote Assistance Connections to this computer” checkbox is checked under the Remote Assistance section.
- Once done, click on the Advanced button. This will open a new mini window where you’ll have to check the “Allow this computer to be controlled remotely” option under the Remote Control section.
- Then click on OK and see if it fixed the problem.
Option 5 – Try to kill any conflicting processes
- Tap the Ctrl + Shift + Esc key combination to open the Task Manager.
- Then navigate to the Processes tab and right-click on the BGInfo process.
- Now select the End Task option to kill its process and then start TeamViewer again and check if the problem is resolved.
Option 6 – Try to optimize the quality of connection
You need to take care of two things under this option – first, you have to disable the loading of the Wallpaper of the computer which is the one that you’re trying to access remotely. To do that, you have to select the Extras menu from the menu ribbon and then select Options. And under the Remote Control section, check the “Remove remote wallpaper” option. The next thing you have to do is to optimize the quality for the speed by selecting the “Optimize Speed” for the menu of Quality still under the Remote Control section.
Read More
A number of users reported lately that their Windows 10 PCs automatically boots into the BIOS whenever they start their computers. And when they tried to exit the BIOS and restart their computers, it still boots into the BIOS. If you are one of the users who experience the same problem, worry not for this post will walk you through what you can do to resolve the problem.
Each time a Windows 10 computer boots, it goes through a lot of processes and one of them is where it checks the computer for any hardware issue such as hard drives, peripherals, as well as external devices. So if it finds some issue, the computer will halt the boot process and will boot into the BIOS. To fix this, there are several suggestions you can try. You have to check if you’ve pressed any key, especially the F2 or F12, or Del keys. You also have to check the peripherals and external devices in your computer or update the BIOS or reset it. For more information, make sure to follow each one of the options laid out below.
Option 1 – Try to check for any pressed key
The first thing you can do is to check for any pressed key. This might not make any sense but a pressed key can actually cause this problem. So you have to check if you have the F2 or F12 or Del buttons pressed since these are hardware keys that are usually set by the OEM to boot into the BIOS.
Option 2 – Try checking the physical device connections
You might also want to try checking if there are other devices that are connected to your PC. This is because the configuration of the BIOS or UEFI might be configured in a way that any external device connected to the computer has a higher boot priority compared to the hard disk. And if it’s really the case, the externally attached disk might be the drive your computer is trying to boot into and not the hard disk. In such cases, Pen Drives, USB storage devices, CDs, DVDs, and so on, are included in this category of physical device connections.
Option 3 – Try to set a proper boot device
If the Boot Manager wasn’t able to locate a proper boot device, then it could be the reason why your computer boots into the BIOS when you turn it on. Thus, you have to check if there is an available proper boot device. You can usually find it under the Boot priority section. However, if you’re unable to locate your hard drive or SSD under the Boot device, then you have to change the hard drive but you have to check first if it is properly plugged in and that it works on other computers. If it works on other PCs, then the problem lies in the motherboard of your computer, and in that case, you have to consult its manufacturer.
Option 4 – Try to update the BIOS
Updating the BIOS can help you fix the issue but as you know, BIOS is a sensitive part of a computer. Even though it is a software component, the functioning of the hardware depends on it largely. Thus, you must be careful when modifying something in the BIOS. So if you don’t know much about it, it’s best if you skip on this option and try the other ones instead. However, if you are well-versed in navigating the BIOS, then follow the steps below.
- Tap the Win + R keys to open the Run dialog box.
- Next, type “msinfo32” in the field and press Enter to open System Information.
- From there, you should find a search field on the bottom where you have to search for the BIOS version and then press Enter.
- After that, you should see the developer and version of the BIOS installed on your PC.
- Go to your manufacturer’s website and then download the latest version of BIOS on your computer.
- If you are using a laptop, make sure that you keep it plugged in until you have updated the BIOS.
- Now double click on the downloaded file and install the new BIOS version on your computer.
- Now restart your computer to apply the changes made.
Note: If updating the BIOS didn’t help, you might want to consider resetting it instead.
Option 5 – Try resetting the BIOS/UEFI configuration
You might also want to reset the BIOS configuration which will lead to arranging the boot configuration since it is intended by the manufacturer. Note that this will get rid of any blockage in the boot process. All you have to do is take out the CMOS battery for a couple of seconds and then put it back again. After that restart, your computer and will be booted directly into Windows. Resetting the BIOS would also get rid of any password set for BIOS and you need to change your CMOS battery in case it didn’t work.
Read More
What is Error 2032?
Error 2032 is a Windows stream error. The error is generated when running applications like Flash. It shows that the application is unable to request ads from server.
Error Causes
The error 2032 is triggered due to multiple reasons including:
- The URL cannot be located or is blocked
- HTTP Service is not found
- Incorrect proxy settings
- Automatic cookies handling
- Corrupt Flash Player
- Viral infection
- Registry issues
Further Information and Manual Repair
Here are some easy and best do it yourself methods to resolve the error 2032 on your system:
Fix the Proxy Settings
To do this, first, go to the start menu and press RUN, type regedit in the RUN box and press enter. Now from the left-hand panel of the registry path open: HKEY_CURRENT_USERSoftwareMicrosoftWindowsCurrentVersionInternet Settings. Now double click the proxyenable string and replace its value with 0.
After that, right-click on proxy server and select delete option. Then exit Regedit and restart your PC to activate changes.
Verify the URL
Sometimes the error 2032 may be generated due to wrong or incorrect URL in the HTTP Service URL property. So, verify your URL and look for typos. Specifying the correct URL can fix the error right away.
Check Cookies Handling
Automatic cookies handling can also trigger this error code. Therefore, to resolve the error, it is advisable to disable automatic cookies handling. This can be done by launching your web browser.
Go to tools and then press the privacy tab. Now click on the advance tab from settings and un-check override automatic cookie handling. To confirm changes press OK.
Uninstall and then Reinstall the Flash Player
It is possible your Flash Player is corrupt. Therefore, another way to fix error 2032 is to uninstall the Flash Player and then reinstall it on your system.
Scan for Viruses
Programs usually get corrupted due to two reasons, viruses or registry issues. Therefore, to remove viruses on your PC, download and run an antivirus program.
Clean and Restore Registry
Also, clean the registry.
Read More
If you are experiencing a Low Wi-Fi signal strength on your Windows 10 PC after you’ve updated or reinstalled it, read on as this post will guide you on what you can do to fix the problem.
The way devices connect these days has evolved with our cognitive revolution. Various devices use some or other wireless technology to connect with other devices. However, all wireless technology has some kind of limitation when it comes to range and signal strength. From time to time, you might have faced several Wi-Fi issues. Low Wi-Fi signal strength usually happens after you update or reinstall your Windows 10 system. This issue can be identified easily by looking at the signal bars in the Wi-Fi icon or by measuring its strength. Since this problem is wide scope, there are tons of possibilities which is why this post covers the most generic situations that could help most users. Refer to the options given below to fix the low Wi-Fi signal strength of your Windows 10 PC.
Option 1 – Try running the Network Adapter Troubleshooter
If a few days ago the range and signal of the Wi-Fi was perfectly fine before you did an update or reinstall, it is possible that there were some changes made in the configuration as well. In most cases, the latest configuration that came with the update has not aligned the config in your computer or laptop. The easiest and simplest way to fix this is by using the Network Adapter Troubleshooter. How? Follow the steps below.
- Right-click on the Wi-Fi icon from the system tray to start troubleshooting.
- After that, select Troubleshoot problems. Note that it might take a while to run it but once it’s finished, it will show you all the problems with the network adapter.
Note: The Network Adapter Troubleshooter will also fix the issues in the background but there might be some issues that will require manual action. And if the troubleshooter wasn’t able to identify and fix the problem for you, proceed to the next given option below.
Option 2 – Try using the Device Manager
If the problem is related to hardware, you need to seek out the help of the Device Manager. To do so, follow the steps below.
- Pull up the Device Manager.
- Next, look for your Wi-Fi adapter under the Network Adapters.
- Once you found it, right-click on it and open Properties.
- After that, you will see all the actions related to drivers under the driver tab.
- You can either update or roll back the selected driver or you could also disable and re-enable it to see if the problem’s fixed.
Note: If updating the driver didn’t help, you might have to dig into the advanced settings. From this post on, it can get a bit complicated as there are terms that you might not understand as well as some configuration. To make it easier for you, you can search for your Wi-Fi adapter online and try following the instructions from there. And before you make any further changes to your computer’s settings, make sure that you create a system restore point first.
Option 3 – Try changing the Wi-Fi Roaming Sensitivity
If you want to enhance the Wi-Fi reception as well as the performance on your Windows 10 PC, you might want to change the Wi-Fi Roaming Sensitivity or Aggressiveness. Roaming Sensitivity is the rate at which your computer chooses and switches to the nearest available point of access which offers a better signal. It is based on the strength and quality of the Wi-Fi and not on the distance to the Wi-Fi point.
Option 4 – Try adjusting the Wi-Fi range
The issue could also be caused by the position of your computer with respect to the Wi-Fi router instead of your hardware or drivers. It could be that your physical location might be a factor for the low signal strength of your Wi-Fi so you might want to adjust the Wi-Fi range to fix the problem.
Read More
Runtime Error 713 is an error that occurs during the distribution of a Visual Basic application that includes a data report.
The error is displayed on the screen when you try to open the data report from your desired application.
Error Causes
The reason why computer users often experience the Runtime Error 713 is that the data report run-time file also referred to as Msdbrptr.dll is not included in your setup package.
Though this error does not pose any big threat to your computer, however, it is recommended to fix the error because the Runtime error 713 may hamper your ability to install and access new programs.
Further Information and Manual Repair
Don’t you panic if you see Runtime Error 713 message pop up on your PC? This error is rated easy to repair and can be fixed in a couple of minutes.
There are two ways to fix Runtime Error 713. You can choose whichever 2 alternatives suit you best.
- Method 1
First, open your project and include a reference to the data report file, the Msdbrptr.dll file. Locating this file is not difficult. It is listed as Microsoft Data Report Designer v6.0 in the reference dialog box. Sometimes you may see this file listed more than once.
Now when this happens be sure to select the file that is associated with Msdbrptr.dll. After you select it, the reference will be verified. Once verification is complete, you are good to go. Now you can try rebuilding your setup package again.
- Method 2
The second alternative is to add the Msdbrptr.dll file manually in PDW (the Package and Deployment Wizard). Simply add the file in the Included Files dialog box window and run the PDW. Now you are all set to rebuild your setup package.
Whether you follow method 1 or 2 after you rebuild the setup package and the installation is complete, you will see the following files in the indicated folders:
- <windows system>Msdbrptr.dll
- <program files>Common FilesDesignersMsderun.dll
- <windows system>Msstdfmt.dll
The presence of these files indicates successful installation and now you can easily try opening the data report.
If you’ve noticed, all you have to do to fix Runtime Error 713 was to include the Msdbrptr.dll file.
So, next time if you or your friends experience Runtime Error 713, you know exactly what to do and how to fix it.
Read More
The MP4 MIME-type is a video type that is mainly configured in IIS or Internet Information console. It is the one that instructs a web browser to use the default video application when running MP4 files from websites. MIME which stands for Multipurpose Internet Mail Extensions which offers a way to identify files on the Internet-based on their format and nature. For example, when a content-type header value like MP4 is defined in an HTTP response, the browser can be configured to open the file with the proper plugin. However, there are some servers that don’t have an associated MIME type to support MP4 files and so they fail to play these files. In such cases, you will encounter the “Unsupported video type or invalid file path” error, especially when you use the Internet Explorer browser in Windows 10. To fix this problem, you may have to configure the MP4 MIME type in IIS but you might find that IIS is not enabled in Windows 10 which is why you need to turn it on or enable it first. For more details, refer to the following instructions below.
Step 1 – Enable IIS:
- Open Control Panel and go to Programs > Programs and Features.
- From there, select “Turn Windows features on or off” to mark its checkbox.
- After that, select “Web Management Tools” and expand its menu and look for “IIS Management Console”.
- Click the OK button and then wait for a couple of seconds to allow Windows to successfully apply the changes made.
Step 2 – Configure the MP4 MIME type in IIS:
- Go to Control Panel and from there, access Administrative Tools.
- Next, click “Internet Information Services Manager” from the list of given options.
- Once confirmed, it will open the IIS console where you have to click the name of your IIS Server located on the left panel. This will enable several options in the central details section.
- Now double click on the icon with the label “MIME Types”.
- After that, you should see an “Add” link option on the right panel. Click on the link to open a configuration dialog box.
- Then type “.mp4” in the File Name Extension field and enter “video/mp4” in the textbox of the MIME Type.
- Click the OK button to save the changes made. This should fix the “Unsupported video type or invalid file path” error on your Windows 10 computer.
Step 3 – Reset your browsers:
Mozilla Firefox
- Open Firefox and click the icon that looks like three stacked lines located at the top-right section of the browser.
- Next, select the question mark icon from the drop-down menu.
- Then select “Troubleshooting information” from the slide-out menu.
- After that, click on the “Reset Firefox” button located at the top-right section of the newly opened web page.
- Now select “Reset Firefox” in the confirmation pop-up window that appears.
Google Chrome
- Open Google Chrome, then tap the Alt + F keys.
- After that, click on Settings.
- Next, scroll down until you see the Advanced option, once you see it, click on it.
- After clicking the Advanced option, go to the “Restore and clean up option and click on the “Restore settings to their original defaults” option to reset Google Chrome.
- Now restart Google Chrome.
Internet Explorer
- Launch Internet Explorer.
- Next, click the wrench icon for Settings.
- Then click Internet Options.
- After that, go to the Advanced tab.
- From there, click the Reset button. This will reset Internet Explorer’s settings to their default condition.
- Now click OK to save the changes made.
Read More
Windows Setup in Continuous Reboot Loop – What is it?
After upgrading to Windows 10 operating system from Windows 7 or Windows 8/8.1, a lot of Windows users are complaining about the Windows setup in a continuous reboot loop. The computer would just keep on rebooting every time the machine is booted and this incites frustration for a lot of Windows users.
Solution
 Error Causes
 Error Causes
When Windows launched the third update for Windows 10, users trying to upgrade to Windows 10 encountered an endless reboot loop problem. The computer will crash repeatedly. The KB3081424, which is a roll-up of bug fixes of Windows 10, continuously fails once you start the update process and then triggers a message showing: “We couldn’t complete the updates, undoing the changes.” The undoing process will then cause a system reboot mandatorily.
Once you log back on your computer again, the Windows 10 update will try to reinstall KB3081424. You will not be able to stop the update which will cause your Windows setup in a continuous reboot loop.
The KB3081424 will not be successfully installed since if it fails for the first time, that initial failure can be detected to create a bad entry in your Windows 10 registry. This will then prevent your subsequent attempts to reinstall KB3081424 to make it work correctly.
Further Information and Manual Repair
In order to fix the problem of Windows 10 setup in a continuous reboot loop, there are a few methods you can try. Try following these simple steps and you’ll be able to get rid of the problem.
Note: If you’re not highly confident to solve this issue on your own, it is highly recommended to consult an authorized computer technician who would be knowledgeable enough to fix the issue for you. In addition, you can also use a system optimizer to resolve the issue.
Method One: Check For Windows Update
Microsoft Windows released an updated fix for the Windows setup in continuous reboot loop problem. You can try fixing the issue through Windows Update.
- Open Settings
- Go to Update & Security
- Select Windows Update then choose Check for updates
At this point, an additional update will be installed and downloaded to your operating system to resolve the continuous reboot loop problem.
Method Two: Eliminate Bad Registry Entry
Before KB3081424 attempts to install again, you can try doing this solution:
- Click on the Start menu then type regedit
- Once the window opens, go to HKEY_LOCAL_MACHINESOFTWAREMicrosoftWindows NTCurrentVersionProfileList
- Create a backup for your registry key (since this process is a bit risky). Select ProfileList then click on File and Export then choose your backup name.
- From the ProfileList IDs, remove anything with ProfileImagePath in it.
- Close Regedit then reboot. By this time, the KB3081424 should properly install.
Method Three: Perform A Startup Repair
Another thing you can try to solve the Windows setup in continuous reboot loop problem is to perform a startup repair from a working computer.
- Ensure that all unnecessary devices are disconnected from your computer as your computer might detect them.
- If you are connected to a network, you need to disconnect from this as well.
- On a working computer, download the Windows 10 ISO then you can perform a startup repair.
- Boot your computer from the Windows 10 DVD.
To change your BIOS option to boot from the Windows 10 DVD, follow these steps:
- Boot your computer then press the F2 function key to enter setup.
NOTE: You must do this quickly since the BIOS loads rapidly.
- Once you’re inside the BIOS, navigate to the Boot Configuration screen. On this screen, you’ll be able to change the first device to be loaded.
- Go to Removable Devices then hit Enter. Removable devices could either be a thumb drive or DVD. Select DVD to put it at the top and be the first boot device.
- Save your changes by pressing on the F10 function key. A setup confirmation box will appear with a message Save configuration changes and exit now. Select Yes.
- Exit BIOS by pressing on the ESC key. You should be prompted to boot from the Windows 10 DVD at this point.
If you’re not able to execute the aforementioned processes on your own, get help or download and install a powerful system optimizer to assist with the windows continuous reboot loop process and other Windows 10 error messages.
Read More
This toolbar/web browser extension is ad/search-supported that is typically installed as an optional offer, users generally have this bundled with 3rd party software. During setup, this toolbar will modify the home page and new tab pages to the affiliate search portal MyWay.com using a primary search engine to collect shared search revenue. It will also modify the default search provider as well.
While this extension is installed users will experience a display of additional ads and sponsored content throughout their browsing sessions, as well as the possibility of pop-up ads.
Several anti-virus scanners have marked this extension as a Browser Hijacker and it is recommended to remove it from your computer.
About Browser Hijackers
Browser hijacking means that a malicious code has taken control over and altered the settings of your internet browser, without your consent. They are designed to interfere with browser programs for a variety of purposes. Usually, it’ll drive users to predetermined websites that are looking to increase their advertising campaign income. Though it may seem naive, all browser hijackers are damaging and thus always regarded as security risks. In a worst-case scenario, your internet browser can be hijacked to download malicious software that can do a great deal of damage to your laptop or computer.
How to know if your internet browser has been hijacked
The common symptoms that indicate having this malicious software on your PC are:
1. home page is modified
2. bookmark and the new tab are likewise modified
3. default online search engine is changed
4. you’re getting new toolbars you have never found before
5. your internet browser displays endless pop-up ads
6. your web browser has become unstable or starts running slowly
7. you can’t visit certain websites like homepages of anti-malware software.
Exactly how browser hijacker finds its way onto your computer system
Browser hijackers can enter a computer by some means or other, including via downloads, file sharing, and e-mail also. They may also come from any BHO, extension, add-on, toolbar, or plug-in with malicious intent. Browser hijackers sneak into your pc in addition to free software application downloads that you unintentionally install alongside the original. Some of the most popular hijackers are MyImageConverter, Conduit Search, Babylon Toolbar, Sweet Page, OneWebSearch, and CoolWebSearch.
Learn how to get rid of browser hijackers
Certain hijackers could be removed by just uninstalling the related freeware or add-ons through the Add or Remove Programs in the Windows control panel. In some cases, it could be a difficult job to find and remove the malicious piece because the associated file could be running as part of the operating system process. Besides, browser hijackers can modify the Windows registry so it can be quite tough to restore all the values manually, especially when you are not a very tech-savvy person.
You can choose automatic browser hijacker removal by just installing and running an efficient anti-malware program. SafeBytes Anti-Malware detects all types of hijackers – including MyImageConverter – and eliminates every trace quickly and efficiently. In addition to anti-virus software, a PC optimizer program, like Total System Care, can help you fix Windows registry errors, remove unwanted toolbars, secure your internet privacy, and boost overall computer performance.
What to Do if Virus Stops You From Downloading Or Installing Antivirus?
Practically all malware is bad, but certain types of malware do much more damage to your PC than others. Some malware variants alter web browser settings by adding a proxy server or change the PC’s DNS configuration settings. In such cases, you’ll be unable to visit some or all of the websites, and therefore not able to download or install the required security software to clear out the computer virus. If you are reading this now, you might have perhaps realized that virus infection is a reason behind your blocked net connectivity. So how to proceed if you need to install an anti-virus software like Safebytes? Follow the instructions below to remove malware by alternate methods.
Download the software in Safe Mode with Networking
The Windows operating system comes with a special mode referred to as “Safe Mode” in which only the minimum required programs and services are loaded. In the event the malware is blocking internet connection and affecting your computer, running it in Safe Mode enables you to download anti-virus and run a diagnostic scan whilst limiting potential damage. To get into Safe Mode or Safe Mode with Networking, press F8 while the system is booting up or run MSCONFIG and locate the “Safe Boot” options in the “Boot” tab. Once you are in safe mode, you can try to install your anti-malware application without the hindrance of the malware. Now, you can run the antivirus scan to get rid of viruses and malware without hindrance from another malicious application.
Download the security software using an alternate internet browser
Some malware only targets particular web browsers. If this sounds like your situation, utilize another web browser as it might circumvent the virus. If you seem to have a trojan attached to Internet Explorer, then switch to an alternate web browser with built-in safety features, such as Firefox or Chrome, to download your preferred anti-malware program – Safebytes.
Install anti-malware on a USB drive
Another option would be to make a portable antivirus program on your USB flash drive. To run anti-malware from a USB pen drive, follow these simple measures:
1) On a virus-free computer, download and install Safebytes Anti-Malware.
2) Plug the USB drive into the clean computer.
3) Double-click on the downloaded file to open the installation wizard.
4) Select the drive letter of the flash drive as the location when the wizard asks you exactly where you want to install the antivirus. Follow the on-screen instructions to finish the installation process.
5) Transfer the flash drive from the uninfected computer to the infected computer.
6) Double-click the Safebytes Anti-malware icon on the USB drive to run the software.
7) Hit the “Scan” button to run a full computer scan and remove viruses automatically.
Protect Your PC and Privacy With SafeBytes Anti-Malware
Are you looking to install the best anti-malware software program for your PC? You can find many applications on the market which come in free and paid versions for Windows systems. A few of them do a great job in eradicating malware threats while some will affect your PC themselves. You should look for a product that has obtained a good reputation and detects not only viruses but other types of malware as well. While considering the highly regarded applications, Safebytes AntiMalware is certainly the highly recommended one.
SafeBytes anti-malware is trustworthy software that not only secures your PC completely but is also quite user-friendly for people of all ability levels. Through its cutting-edge technology, this software will help you protect your computer against infections caused by various kinds of malware and similar internet threats, including adware, spyware, viruses, worms, trojans, keyloggers, ransomware, and potentially unwanted program (PUPs).
SafeBytes anti-malware offers an array of advanced features which sets it aside from all others. Let’s take a look at a few of them below:
Real-time Threat Response: SafeBytes provides real-time active supervision and protection from all known computer viruses and malware. It’ll inspect your personal computer for suspicious activity regularly and its unrivaled firewall protects your computer from illegal access by the outside world.
World-class AntiMalware Protection: Using a critically acclaimed anti-malware engine, SafeBytes offers multilayered protection which is designed to catch and get rid of viruses and malware that are hidden deep inside your computer’s operating system.
Web protection: SafeBytes inspects the hyperlinks present on a webpage for possible threats and notifies you if the site is safe to visit or not, through its unique safety ranking system.
Light-weight: This application is not “heavy” on the computer’s resources, so you’ll not see any performance troubles when SafeBytes is working in the background.
24/7 Customer Support: Support service is readily available 24 x 7 x 365 days through email and chats to answer your concerns.
SafeBytes has developed a great anti-malware solution to help you conquer the latest malware threats and virus attacks. You can be sure that your computer will be protected in real-time once you put this tool to use. So if you’re looking for the absolute best malware removal application out there, and if you don’t mind paying out a few bucks for it, opt for SafeBytes Anti-Malware.
Technical Details and Manual Removal (Advanced Users)
To get rid of MyImageConverter manually, navigate to the Add or Remove programs list in the Control Panel and choose the program you want to get rid of. For web browser extensions, go to your browser’s Addon/Extension manager and choose the plug-in you intend to disable or remove. You may also want to reset your home page and search engine providers, and also delete temporary files, browsing history, and cookies.
If you opt to manually delete the system files and Windows registry entries, utilize the following checklist to make sure you know precisely what files to remove before performing any actions. But bear in mind, editing the Windows registry is usually a difficult task that only advanced users and professionals should attempt to fix the problem. In addition, some malware is capable of replicating or preventing removal. It is highly recommended that you carry out the removal procedure in Windows Safe Mode.
Files:
%PROGRAMFILES(x86)%4zUninstall MyImageConverter.dll
%SystemDrive%UserswsierraAppDataRoamingMozillaFirefoxProfilespe3eufs0.default[email protected]_4z.comcontentMyImageConverter.exe
%LOCALAPPDATA%MyImageConverter_4z
%PROGRAMFILES%MyImageConverter_4z
%UserProfile%Local SettingsApplication Dataamailnkkmeeoijlkjdgloiclaiifpojf
%LOCALAPPDATA%amailnkkmeeoijlkjdgloiclaiifpojf
%ProgramFiles%MyImageConverter
%UserProfile%Local SettingsApplication DataGoogleChromeUser DataDefaultSync Extension Settingsoeabadoffdnkmmecmhpknaklgmabippp
%ProgramFiles(x86)%MyImageConverter
%UserProfile%Local SettingsApplication DataGoogleChromeUser DataDefaultExtensionsikgjglmlehllifdekcggaapkaplbdpje
%LOCALAPPDATA%GoogleChromeUser DataDefaultExtensionsikgjglmlehllifdekcggaapkaplbdpje
%LOCALAPPDATA%GoogleChromeUser DataDefaultSync Extension Settingsikgjglmlehllifdekcggaapkaplbdpje
%UserProfile%Local SettingsApplication DataGoogleChromeUser DataDefaultSync Extension Settingsikgjglmlehllifdekcggaapkaplbdpje
%UserProfile%Local SettingsApplication DataMyImageConverterTooltab
%LOCALAPPDATA%MyImageConverterTooltab
Registry:
HKEY_CURRENT_USERHKEY_CURRENT_USERSoftware
HKEY_CURRENT_USERSoftwareAppDataLowSoftwareMyImageConverter_4z
HKEY_CURRENT_USERSoftwareMyImageConverter_4z
HKEY_LOCAL_MACHINESOFTWAREClassesMyImageConverter_4z.DynamicBarButton
HKEY_LOCAL_MACHINESOFTWAREClassesMyImageConverter_4z.DynamicBarButton.1
HKEY_LOCAL_MACHINESOFTWAREClassesMyImageConverter_4z.FeedManager
HKEY_LOCAL_MACHINESOFTWAREClassesMyImageConverter_4z.HTMLPanel
HKEY_LOCAL_MACHINESOFTWAREClassesMyImageConverter_4z.HTMLPanel.1
HKEY_LOCAL_MACHINESOFTWAREClassesMyImageConverter_4z.MultipleButton
HKEY_LOCAL_MACHINESOFTWAREClassesMyImageConverter_4z.MultipleButton.1
HKEY_LOCAL_MACHINESOFTWAREClassesMyImageConverter_4z.PseudoTransparentPlugin
HKEY_LOCAL_MACHINESOFTWAREClassesMyImageConverter_4z.PseudoTransparentPlugin.1
HKEY_LOCAL_MACHINESOFTWAREClassesMyImageConverter_4z.Radio
HKEY_LOCAL_MACHINESOFTWAREClassesMyImageConverter_4z.ScriptButton
HKEY_LOCAL_MACHINESOFTWAREClassesMyImageConverter_4z.ScriptButton.1
HKEY_LOCAL_MACHINESOFTWAREClassesMyImageConverter_4z.SettingsPlugin
HKEY_LOCAL_MACHINESOFTWAREClassesMyImageConverter_4z.SettingsPlugin.1
HKEY_LOCAL_MACHINESOFTWAREClassesMyImageConverter_4z.SkinLauncher
HKEY_LOCAL_MACHINESOFTWAREClassesMyImageConverter_4z.SkinLauncher.1
HKEY_LOCAL_MACHINESOFTWAREClassesMyImageConverter_4z.SkinLauncherSettings
HKEY_LOCAL_MACHINESOFTWAREClassesMyImageConverter_4z.SkinLauncherSettings.1
HKEY_LOCAL_MACHINESOFTWAREClassesMyImageConverter_4z.ToolbarProtector
HKEY_LOCAL_MACHINESOFTWAREClassesMyImageConverter_4z.ToolbarProtector.1
HKEY_LOCAL_MACHINESOFTWAREClassesMyImageConverter_4z.UrlAlertButton
HKEY_LOCAL_MACHINESOFTWAREClassesMyImageConverter_4z.UrlAlertButton.1
HKEY_LOCAL_MACHINESOFTWAREClassesMyImageConverter_4z.XMLSessionPlugin
HKEY_LOCAL_MACHINESOFTWAREClassesMyImageConverter_4z.XMLSessionPlugin.1
HKEY_CURRENT_USERSoftwareMicrosoftInternet ExplorerApproved Extensions, value: 312F84FB-8970-4FD3-BDDB-7012EAC4AFC9
HKEY_CURRENT_USERSoftwareMicrosoftInternet ExplorerApproved Extensions, value: 48586425-6BB7-4F51-8DC6-38C88E3EBB58
HKEY_LOCAL_MACHINESOFTWAREWow6432NodeGoogleChromeExtensionsadldappccjhelkmbkpiibilgnnjakieg
HKEY_LOCAL_MACHINESOFTWAREWow6432NodeMicrosoftInternet ExplorerLow RightsElevationPolicy3d429207-4689-492d-a0e5-cdc5dfbb5005
HKEY_LOCAL_MACHINESOFTWAREWow6432NodeMicrosoftInternet ExplorerLow RightsElevationPolicy66d59105-fe06-43a4-b292-eb0097e9eb74
HKEY_LOCAL_MACHINESOFTWAREWow6432NodeMicrosoftInternet ExplorerLow RightsElevationPolicy9103c314-c4e2-4463-8934-b19bcb46236d
HKEY_LOCAL_MACHINESOFTWAREWow6432NodeMicrosoftInternet ExplorerLow RightsElevationPolicy97cef41c-5055-474a-855a-892d4fe3e596
HKEY_LOCAL_MACHINESOFTWAREWow6432NodeMicrosoftInternet ExplorerLow RightsElevationPolicyd375ee64-f893-498a-a0e9-0e9829c88c3d
HKEY_LOCAL_MACHINESOFTWAREWow6432NodeMicrosoftTracingMyImageConverterCrxSetup_RASAPI32
HKEY_LOCAL_MACHINESOFTWAREWow6432NodeMicrosoftTracingMyImageConverterCrxSetup_RASMANCS
HKEY_LOCAL_MACHINESOFTWAREWow6432NodeMicrosoftWindowsCurrentVersionExtPreApproved1f6f39c1-00a8-4752-a94c-d0ea92d978b6
HKEY_LOCAL_MACHINESOFTWAREWow6432NodeMicrosoftWindowsCurrentVersionExtPreApproved38122a36-83b2-46b8-b39a-ec72a4614a07
HKEY_LOCAL_MACHINESOFTWAREWow6432NodeMicrosoftWindowsCurrentVersionExtPreApproved5354d921-3f52-47c5-938d-77a2fb6defe7
HKEY_LOCAL_MACHINESOFTWAREWow6432NodeMicrosoftWindowsCurrentVersionExtPreApproved71144427-1368-4D18-8DC9-2AE3CC4C4F83
HKEY_LOCAL_MACHINESOFTWAREWow6432NodeMicrosoftWindowsCurrentVersionExtPreApproved99e1f6fd-2e94-4cf6-8344-1ba63cd3bd9b
HKEY_LOCAL_MACHINESOFTWAREWow6432NodeMicrosoftWindowsCurrentVersionExtPreApproveda86782d8-7b41-452f-a217-1854f72dba54
HKEY_LOCAL_MACHINESOFTWAREWow6432NodeMicrosoftWindowsCurrentVersionExtPreApproveded345812-2722-4dca-9976-d01832db44ee
HKEY_LOCAL_MACHINESOFTWAREWow6432NodeMozillaPlugins@MyImageConverter_4z.com/Plugin
HKEY_LOCAL_MACHINESOFTWAREMicrosoftInternet ExplorerLow RightsElevationPolicy9103c314-c4e2-4463-8934-b19bcb46236d
HKEY_LOCAL_MACHINESOFTWAREMicrosoftInternet ExplorerLow RightsElevationPolicy97cef41c-5055-474a-855a-892d4fe3e596
HKEY_LOCAL_MACHINESOFTWAREMicrosoftInternet ExplorerLow RightsElevationPolicyd375ee64-f893-498a-a0e9-0e9829c88c3d
HKEY_LOCAL_MACHINESOFTWAREMicrosoftTracingMyImageConverterCrxSetup_RASAPI32
HKEY_LOCAL_MACHINESOFTWAREMicrosoftTracingMyImageConverterCrxSetup_RASMANCS
HKEY_LOCAL_MACHINESOFTWAREMicrosoftWindowsCurrentVersionexplorerBrowser Helper Objects312f84fb-8970-4fd3-bddb-7012eac4afc9
HKEY_LOCAL_MACHINESOFTWAREMicrosoftWindowsCurrentVersionexplorerBrowser Helper Objectsc547c6c2-561b-4169-a2a5-20ba771ca93b
HKEY_LOCAL_MACHINESOFTWAREMicrosoftWindowsCurrentVersionExtPreApproved1f6f39c1-00a8-4752-a94c-d0ea92d978b6
HKEY_LOCAL_MACHINESOFTWAREMicrosoftWindowsCurrentVersionExtPreApproved71144427-1368-4D18-8DC9-2AE3CC4C4F83
HKEY_LOCAL_MACHINESOFTWAREMicrosoftWindowsCurrentVersionExtPreApproved99e1f6fd-2e94-4cf6-8344-1ba63cd3bd9b
HKEY_LOCAL_MACHINESOFTWAREMicrosoftWindowsCurrentVersionExtPreApproveda86782d8-7b41-452f-a217-1854f72dba54
HKEY_LOCAL_MACHINESOFTWAREMicrosoftWindowsCurrentVersionExtPreApproveded345812-2722-4dca-9976-d01832db44ee
HKEY_LOCAL_MACHINESOFTWAREMozillaPlugins@MyImageConverter_4z.com/Plugin
HKEY_LOCAL_MACHINESOFTWAREMicrosoftWindowsCurrentVersionRun, value: MyImageConverter Search Scope Monitor
HKEY_LOCAL_MACHINESOFTWAREWow6432NodeMicrosoftWindowsCurrentVersionUninstallVDC_is1
HKEY_LOCAL_MACHINESOFTWAREGoogleChromeExtensionsadldappccjhelkmbkpiibilgnnjakieg
HKEY_LOCAL_MACHINESOFTWAREMyImageConverter
HKEY_LOCAL_MACHINESOFTWAREWow6432NodeMyImageConverter_4z
HKEY_LOCAL_MACHINESOFTWAREClassesMyImageConverter.ScriptHelper
HKEY_LOCAL_MACHINESOFTWAREClassesMyImageConverter.ScriptHelper.1
HKEY_LOCAL_MACHINESOFTWAREWow6432NodeMicrosoftInternet ExplorerSearchScopescf6e4b1c-dbde-457e-9cef-ab8ecac8a5e8
HKEY_LOCAL_MACHINESOFTWAREWow6432NodeMicrosoftWindowsCurrentVersionUninstallMyImageConverter
HKEY_LOCAL_MACHINESOFTWAREMozillaPlugins@MyImageConverter_ScriptHelper.com/Plugin
HKEY_LOCAL_MACHINESOFTWAREMicrosoftWindowsCurrentVersionRun, value: MyImageConverter_4z Browser Plugin Loader
HKEY_LOCAL_MACHINESOFTWAREWow6432NodeMicrosoftWindowsCurrentVersionRun, value: MyImageConverter_4z Browser Plugin Loader
HKEY_LOCAL_MACHINESOFTWAREMicrosoftInternet ExplorerLowRegistryDOMStorageMyImageConverter.dl.tb.ask.com
HKEY_CURRENT_USERSoftwareMicrosoftInternet ExplorerDOMStorageMyImageConverter.dl.myway.com
HKEY_LOCAL_MACHINESOFTWAREMicrosoftInternet ExplorerDOMStorageMyImageConverter.com
HKEY_LOCAL_MACHINESOFTWAREMicrosoftInternet ExplorerLowRegistryDOMStoragewww.MyImageConverter.com
HKEY_CURRENT_USERSoftwareMicrosoftInternet ExplorerDOMStoragefree.MyImageConverter.com
HKEY_LOCAL_MACHINEHKEY_CURRENT_USERSoftware[APPLICATION]MicrosoftWindowsCurrentVersionUninstall..Uninstaller
Read More
![]()
Copyright © 2022, ErrorTools. All Rights Reserved
Trademarks: Microsoft Windows logos are registered trademarks of Microsoft. Disclaimer: ErrorTools.com is not affiliated with Microsoft, nor claim direct affiliation.
The information on this page is provided for information purposes only.
![]()
Repair your PC with one click
Please be aware that our software needs to be installed on a PC system with Windows on it, Open this website on a desktop PC and download the software for easy and quick elimination of your issues.
The “Procedure Entry Point Could Not Be Located” error is a Windows 10 error that can be caused by many different things. A few of the most common causes are outdated drivers, missing registry entries and system files, or hardware conflicts.
In this post, we’ll explore some ways you can resolve this pesky error and get back to your work!
It’s frustrating when your computer freezes and you’re unable to do anything. It’s even worse when the screen pops up with an error saying “The procedure entry point could not be located in the dynamic link library”. If you’re on Windows 10, this error may seem difficult to resolve. Fortunately, there are a few things you can do to get around the problem.
This article will provide some solutions to the Windows 10 error “The procedure entry point could not be located in the dynamic link library”.
What Causes “The Procedure Entry Point Could Not Be Located in the Dynamic Link Library” Error?
This error occurs when software is unable to locate the DLL library it requires to run. It could also happen if the library isn’t located in the path’s provided directory, or if the DLL file is missing or corrupted.
The DLL library is a treasure trove of the most important resources for your computer. It stores and maintains vital system data and drivers that help with compatibility issues between programs on different computers. A missing or corrupted DLL can leave you feeling helpless in cyberspace, as it may prevent everything from opening to crashing completely.
The file containing all these program instructions has gone AWOL at an inconvenient time? Your life might be totally ruined! The symptom could include any number of frustrating things: error messages appearing out of nowhere, files failing to load properly, crashes galore — you name it.
There are many different ways to fix the “The procedure entry point could not be located in the dynamic link library” error. See your options and troubleshooting guides below.
How To Fix “The Procedure Entry Point Could Not Be Located” in Windows 10
Use the following methods to resolve the error «the procedure entry point could not be located» in Windows 10:
Method 1. Reinstall the Problematic App
The first thing you should do when you start troubleshooting is to try reinstalling the application giving you the error. Windows might have removed or corrupted some of the files needed to successfully run it, and reinstalling will help Windows repair any damage that was done.
In Windows 10 you can reinstall programs from Windows Store apps by going to Settings → Apps. Let’s review the step-by-step instructions.
- Click on the Windows icon in the bottom left of your screen to bring up the Start menu. Choose Settings, or alternatively use the Windows + I shortcut.

- Select the Apps tile. This is the central space where you can check every application that is correctly installed on your PC.
- Find the application that is giving you the error, and then click on it once to select it. You should see the Uninstall option — click on it once to begin the removal process.
- Confirm that you want to uninstall the software, and then wait for Windows to complete the uninstallation. When it’s done, the program will disappear from your application list.
- Go to the official website and download the latest version. Don’t download from any other websites that are not trusted distributors of this software, because they might have malware.
- Install the problematic application again, and check if you still get the same error message.


Method 2. Use the System File Checker
The System File Checker (SFC) is a troubleshooting tool available in Windows 10 by default. It’s able to automatically detect corrupted system files, and repair them to working order.
You can use the SFC scan as another way of potentially fixing any problems that lead to “The procedure entry point could not be located in the dynamic link library” errors when you use your computer.
- Open the search bar in your taskbar by clicking on the magnifying glass icon. You can also bring it up with the Windows + S keyboard shortcut.
- Type Command Prompt in the search box. When you see it in the results, right-click on it and choose Run as Administrator.
Check out our
How to make a local user an administrator in Windows 10 guide. - When prompted by the User Account Control (UAC), click Yes to allow the app to launch with administrative permissions.
- Once the Command Prompt window is open, type in the following command and press Enter to execute it: sfc /scannow

- Wait for the System File Checker to finish scanning your computer. If it finds any errors, you’ll be able to fix them automatically through the SFC command itself, which may also fix related errors.


Method 3. Check the Event Viewer for Errors
You are seeing an error message. You probably don’t know what caused it. Use the Event Viewer to easily find out. It’s a built-in tool that shows the last thing that happened on your computer before an application crashed or ran into an error during or after launch.
When something goes wrong with the app or service, it will show up on the Event Viewer and it will help you determine how to fix the problem.
- Press the Windows + X keys on your keyboard at the same time, then choose “Event Viewer” from the context menu.
- Click on “Windows Logs” inside the left-side panel, then choose “System”. This should change the middle section to show all events with timestamps.
- Locate the last event recorded before “The procedure entry point could not be located in the dynamic link library” showed up on your screen. If you see a certain application or service, this is most likely the culprit.

Method 4. Re-Register the DLL File
If the error in question mentions a DLL file that your programs need, you should try to re-register it. The Regsvr32 command-line utility can be used for registering OLE controls like DLL and ActiveX (OCX) controls in Windows 10. If you can’t get past the error any other way, you might need to register your DLL files manually.
- Open the search bar in your taskbar, and then type Command Prompt in the search box. When you see it in the results, right-click on it and choose Run as Administrator.
- Click Yes if prompted.
- Type the following command in the new window, and hit the Enter key on your keyboard to execute it: regsvr32 DLL. Make sure to replace “DLL” with the name of the DLL file that was pointed out in the error. Example:

- After you execute the given commands, you should see a message saying, “DllRegisterServer in vbscript.dll succeeded” if the Regsvr32 tool was able to run successfully.

Method 5. Scan Your Computer With Windows Defender
We recommend scanning your computer to make sure that it does not have any viruses. There are some harmful programs that can cause the computer and apps to crash. To scan, we’ll use the Windows Defender built-in program, but a different third-party software may work better.
- Open the search bar in your taskbar by clicking on the magnifying glass icon. You can also bring it up with the Windows + S keyboard shortcut.
- Type in Windows Security and launch it from the search results.
- Switch to the Virus & Threat Protection tab using the home screen or the menu in the left-side pane. Click on the Scan Options link.

- Select the Full scan option. This is going to check every single file on all of your drives to ensure no threats can hide. Take note that this scan may last over 1-2 hours, depending on how many files you have on your system.
- Click on the Scan now button to begin the scan. If a threat is detected, Windows 10 will automatically quarantine or remove it entirely. You can review the scan results afterward.


Final Thoughts
We hope this article helped you troubleshoot the “The procedure entry point could not be located in the dynamic link library” Windows 10 error. You can now get back up and running as quickly as possible.
Now, it’s your turn.
If you have any questions about how we fixed this and other issues check out our site and contact us. You will get free technical support about any problem in Windows and Office.
Also, check out our Help Center for articles to help you troubleshoot many other Windows 10 errors.
Sign up for our newsletter to get promotions, deals, and discounts from us right in your inbox. Subscribe with your email address below and you’ll be the first one notified about our latest news and deals.
You May Also Like
» How to Fix the “Side by Side Configuration Is Incorrect” Error on Windows 10
» How to Fix the Desktop Icons Disappeared on Windows 10
» How To Fix the Audio Services Not Responding Error in Windows 10
Sometimes while trying to launch a program or application, you might have come across “The Procedure Entry Point Could Not Be Located ” error.
This error occurs due to the operating system’s inability to hand over control to the program that is being launched. This usually happens when a critical dynamic link library (dll) file is either missing, corrupt, or outdated.
Sometimes, the error message itself will let you know the exact file that is causing the problem and you can go about solving that particular problem. Other times, you will need to put in a little bit more effort.
The most likely cause for the Entry Point Not Found error is missing or corrupt dll files in windows system folder. Other likely causes can be:
- Missing or corrupted files in Microsoft Visual C++ Redistributables
- Missing or corrupt dll files for application specific installations.
- Outdated or corrupted drivers
How to fix Entry Point Not Found Error
We’ve listed all the possible fixes for the Entry Point Not Found error. Work your way down the bottom of the list until you have managed to successfully solve the problem.
Using DISM Command
Deploy Image Servicing and Management (DISM) tool allows users with administrative privilege to prepare, modify, and repair window images. Typically, you would use the SFC tool if a windows system file is missing or corrupt, but if the local windows image itself is damaged or corrupt, the SFC tool might not be able to solve the issue.
In such cases, you can use install.wim image with DISM tool to repair the image then use SFC tool to fix the underlying issue. We will use CheckHealth, ScanHealth, and RepairHealth options in the DISM tool to repair and restore the corrupted windows local image.
Follow the steps below to run the CheckHealth option with DISM –
- Press Win + R and type
cmd. Press Ctrl + Shift + Enter to launch elevated command prompt. - In the command prompt, type
DISM /online /cleanup-image /CheckHealth

If CheckHealth returns a healthy image status, you probably do not need to run ScanHealth. In such a case, you do not need to run the DISM tool any further. Please try a different fix in the list.
If Checkhealth returns a repairable image status, then you can proceed with ScanHealth option.
- Open command prompt as an administrator.
- In the command prompt, type
DISM /online /cleanup-image /ScanHealth

If ScanHealth detected problems with your windows local image, use DISM with RetoreHealth option to automatically scan and repair the image.
- Launch the elevated command prompt.
- In the command prompt, type
DISM /online /cleanup-image /RestoreHealth
Make sure you are connected to the internet as the tool will connect to Windows Update online to download and replace damaged files.
Tip: Sometimes it is worth a try to run ScanHealth option even if CheckHealth option returned a healthy image status.
Scan With System File Checker
Windows has a handy built-in utility called System File Checker that allows users to scan and restore corrupted Windows system files. To launch this utility, first launch a command prompt with administrative privileges.
To do this, follow the steps below:
- Launch the elevated command prompt.
- Once the command prompt is launched, type in
sfc /scannowand press enter.

The SFC tool will now proceed to scan all windows system files and repair any corrupted or missing files. Wait until verification is complete then restart your computer.
Reinstall the Problematic Application
You can reinstall the application that is causing the error and see if that fixed the problem. Follow the steps below to reinstall the problematic application.
- Launch Settings from the Start Menu
- Select Apps tab
- Click on Apps and Features.
- Find the program that is causing the problem and select Uninstall.

- Now install the program again
- Restart your computer when prompted.

Re-register the .dll File
If the error message includes the name of the dll file that is causing Entry Point Not Found error, then you can try re-registering the dll file.
- Open the elevated Command Prompt
- In the command prompt, type in
regsvr32 /u <pathXXX.dll>to unregister the dll file. - Now type
regsvr32 <pathXXX.dll>. This re-registers the dll file that you just unregistered.
Please note that <pathXXX.dll> means that you will have to type the name of the problematic dll file with its full path.
It would also be possible to replace the corrupted dll file with a copy. If you have a working copy in your local drive, you could perhaps do so.
Another try is to look for a dll on the internet. However, we do not recommend going down this path as you could potentially open yourself to virus and malware infections.
Install the Latest Visual C++ Redistributable Package
Visual C++ redistributables are software packages provided by Microsoft that other programs use. Many applications need Visual C++ redistributable runtime library packages to function correctly. These packages are often installed independently of applications, allowing multiple applications to make use of the package while only having to install it once.
Missing and/or corrupted files in the Visual C++ redistributable package can cause the computer to throw Entry Point Not Found error. In such a case, you can try installing latest Visual C+ Redistributable package.
- Visit the official Microsoft website for Visual C++ Redistributable.
- Download both x86 and x64 versions of the library.
- Launch both installers and follow the instructions.
- Restart your computer.
We also have an article in case of other Visual C++ related issues. Hope you will find it worth reading.
Scan Your Computer for Malware and Viruses.
It is possible that you are seeing Entry Point Not Found error because your computer has been infected with malware or a virus.
- Try scanning your computer with a reliable antivirus program for viruses. Windows defender with the latest virus definitions is a good option.
- Also, run a scan for malware. Using specialized malware tools that provide protection against adware, spyware, etc. could also be a good alternative.
- Run each of these and follow the instructions provided.
- Restart your computer once done.
If you are thinking or already running multiple antivirus programs, this article is definitely prepared for you. Leave your thoughts?
Update Windows
While commercially released professional-grade productivity software are usually stable, the same cannot be said for video games, especially with the latest release or patch. In some cases, the program might not run because you do not have the latest version of windows update installed.
- Launch Windows Update Settings from the search bar.
- Check to see if any updates are available.
- If any updates are available, click Install now.


Update Your Graphics Card Drivers
Graphics card drivers are another set of culprits when it comes to gaming that can throw Entry Point Not Found errors.
- Nvidia users can use Geforce Experience to update to the latest version of the driver.
- AMD users can use AMD Software: Adrenaline Experience to update your drivers.
Do so and check if the problem is resolved.
Restore Your PC to a Previous Restore Point
Windows has a feature called System Restore which allows the user to revert their computer’s state to that of a previous point in time. It can be used to recover from system malfunctions. To use this feature, you will have to know when your program last ran without problems. Follow the steps below to use System Restore and recover your last working state:
- Press Windows + R, which launches Run task window.
- Type
rstrui.exeand press enter.
- Select Next, then select Show more restore points.
- Select a date when the program worked fine and then select Next once again.
- Restart your system.

Frequently Asked Questions
How to fix the procedure entry point steam controller that could not be located in dynamic link library error in GTA5?
This usually happens with the modded version of GTA 5. This problem occurs when windows think that there is a virus infection and blocks the Steam_api64.dll file. To solve this, follow the steps given below:
- Run Windows Security from the Start Menu.
- Click on Virus and Threat Protection.
- Select Protection History and look for a GTA5-related entry.
- Press the action button at the bottom right corner.
- Click on Allow and Restore.
How to fix a procedure entry point error when I try to launch a game on Steam?
Corrupt or missing game files could cause your favorite Steam title from running. If this is the case, follow the steps below to fix this problem:
- In your steam library, right-click the game that you are trying to launch.
- Click on Properties in the context menu.
- Switch to Local Files Tab.
- Click on Verify integrity of game files.


How do you fix the procedure entry point CreateDXGIFactory2 could not be located?
This problem occurs due to a missing or corrupted dxgi.dll file. DXGI stands for DirectX Graphics Infrastructure. DirectX is an Application Programming Interface (API) that lets the graphics card communicate with the game you are trying to run. Many modern games require DirectX api to run. If a file in DirectX is missing or corrupted, you will not be able to run it.
Dxgi.dll error could be caused by some kind of malware infection in your system. In this case, run a security scan (see fix Scan Your Computer for Malware and Viruses) and then run an sfc scan (see fix Scan with System File Checker) above.
How do I fix the entry point not found error KERNEL32 DLL Windows 10
Kernel32.dll is a 32-bit dynamic link library file used by windows to handle memory management, input/output operations, and interrupts. A corrupt or missing kernel32.dll file can cause windows to throw up a blue screen of death (bsod), which is not fun for anybody involved.
To fix this problem, you can try one of the following solutions :
- Repair the corrupted file by running SFC command (see above)
- If SFC utility did not fix this problem, you should try to repair your installation of windows by using the windows installation media. For how to do this, check out our article on How To Repair Your Windows.