- Introduction
- ‘A RenderFlex overflowed…’
- ‘RenderBox was not laid out’
- ‘Vertical viewport was given unbounded height’
- ‘An InputDecorator…cannot have an unbounded width’
- ‘Incorrect use of ParentData widget’
- ‘setState called during build’
- References
Introduction
This page explains several frequently-encountered Flutter framework errors and
gives suggestions on how to resolve them. This is a living document with more
errors to be added in future revisions, and your contributions are welcomed.
Feel free to open an issue or submit a pull request to make this page more
useful to you and the Flutter community.
‘A RenderFlex overflowed…’
RenderFlex overflow is one of the most frequently encountered Flutter framework
errors, and you probably have run into it already.
What does the error look like?
When it happens, you’ll see yellow & black stripes indicating the area of
overflow in the app UI in addition to the error message in the debug console:
The following assertion was thrown during layout:
A RenderFlex overflowed by 1146 pixels on the right.

The relevant error-causing widget was
    Row 	    lib/errors/renderflex_overflow_column.dart:23
The overflowing RenderFlex has an orientation of Axis.horizontal.
The edge of the RenderFlex that is overflowing has been marked in the rendering
with a yellow and black striped pattern. This is usually caused by the contents
being too big for the RenderFlex.
(Additional lines of this message omitted)
How might you run into this error?
The error often occurs when a Column or Row has a child widget that is not
constrained in its size. For example, the code snippet below demonstrates a
common scenario:
Widget build(BuildContext context) {
  return Row(
    children: [
      const Icon(Icons.message),
      Column(
        mainAxisSize: MainAxisSize.min,
        crossAxisAlignment: CrossAxisAlignment.start,
        children: [
          Text('Title', style: Theme.of(context).textTheme.headlineMedium),
          const Text(
              'Lorem ipsum dolor sit amet, consectetur adipiscing elit, sed'
              ' do eiusmod tempor incididunt ut labore et dolore magna '
              'aliqua. Ut enim ad minim veniam, quis nostrud '
              'exercitation ullamco laboris nisi ut aliquip ex ea '
              'commodo consequat.'),
        ],
      ),
    ],
  );
}
In the above example, the Column tries to be wider than the space the Row
(its parent) can allocate to it, causing an overflow error. Why does the
Column try to do that? To understand this layout behavior, you need to know
how Flutter framework performs layout:
“To perform layout, Flutter walks the render tree in a depth-first traversal
and passes down size constraints from parent to child… Children respond by
passing up a size to their parent object within the constraints the parent
established.” – Flutter architectural overview
In this case, the Row widget doesn’t constrain the size of its children, nor
does the Column widget. Lacking constraints from its parent widget, the second
Text widget tries to be as wide as all the characters it needs to display. The
self-determined width of the Text widget then gets adopted by the Column which
clashes with the maximum amount of horizontal space its parent the Row widget
can provide.
How to fix it?
Well, you need to make sure the Column won’t attempt to be wider than it can
be. To achieve this, you need to constrain its width. One way to do it is to
wrap the Column in an Expanded widget:
return Row(
  children: [
    const Icon(Icons.message),
    Expanded(
      child: Column(
          // code omitted
          ),
    ),
  ],
);
Another way is to wrap the Column in a Flexible widget and specify a flex
factor. In fact, the Expanded widget is equivalent to the Flexible widget
with a flex factor of 1.0, as its source
code
shows. To further understand how to use the Flex widget in Flutter layouts,
please check out this Widget of the Week video
on the Flexible widget.
Further information:
The resources linked below provide further information about this error.
- Flexible (Flutter Widget of the Week)
- How to debug layout issues with the Flutter Inspector
- Understanding constraints
‘RenderBox was not laid out’
While this error is pretty common, it’s often a side effect of a primary error
occurring earlier in the rendering pipeline.
What does the error look like?
The message shown by the error looks like this:
RenderBox was not laid out:
RenderViewport#5a477 NEEDS-LAYOUT NEEDS-PAINT NEEDS-COMPOSITING-BITS-UPDATE
How might you run into this error?
Usually, the issue is related to violation of box constraints, and it needs to
be solved by providing more information to Flutter about how you’d like to
constrain the widgets in question. You can learn more about how constraints work
in Flutter on the page Understanding constraints.
The RenderBox was not laid out error is often caused by one of two other errors:
- ‘Vertical viewport was given unbounded height’
- ‘An InputDecorator…cannot have an unbounded width’
‘Vertical viewport was given unbounded height’
This is another common layout error you could run into
while creating a UI in your Flutter app.
What does the error look like?
The message shown by the error looks like this:
The following assertion was thrown during performResize():
Vertical viewport was given unbounded height.

Viewports expand in the scrolling direction to fill their container.
In this case, a vertical viewport was given an unlimited amount of
vertical space in which to expand. This situation typically happens when a
scrollable widget is nested inside another scrollable widget.
(Additional lines of this message omitted)
How might you run into this error?
The error is often caused when a ListView (or other kinds of scrollable
widgets such as GridView) is placed inside a Column. A ListView takes all
the vertical space available to it, unless it’s constrained by its parent
widget. However, a Column doesn’t impose any constraint on its children’s
height by default. The combination of the two behaviors leads to the failure of
determining the size of the ListView.
Widget build(BuildContext context) {
  return Center(
    child: Column(
      children: <Widget>[
        const Text('Header'),
        ListView(
          children: const <Widget>[
            ListTile(
              leading: Icon(Icons.map),
              title: Text('Map'),
            ),
            ListTile(
              leading: Icon(Icons.subway),
              title: Text('Subway'),
            ),
          ],
        ),
      ],
    ),
  );
}
How to fix it?
To fix this error, specify how tall the ListView should be. To make it as tall
as the remaining space in the Column, wrap it using an Expanded widget (see
the example below). Otherwise, specify an absolute height using a SizedBox
widget or a relative height using a Flexible widget.
Widget build(BuildContext context) {
  return Center(
    child: Column(
      children: <Widget>[
        const Text('Header'),
        Expanded(
          child: ListView(
            children: const <Widget>[
              ListTile(
                leading: Icon(Icons.map),
                title: Text('Map'),
              ),
              ListTile(
                leading: Icon(Icons.subway),
                title: Text('Subway'),
              ),
            ],
          ),
        ),
      ],
    ),
  );
}
Further information:
The resources linked below provide further information about this error.
- How to debug layout issues with the Flutter Inspector
- Understanding constraints
‘An InputDecorator…cannot have an unbounded width’
The error message suggests that it’s also related to box constraints,
which are important to understand to avoid many of the most common
Flutter framework errors.
What does the error look like?
The message shown by the error looks like this:
The following assertion was thrown during performLayout():
An InputDecorator, which is typically created by a TextField, cannot have an
unbounded width.
This happens when the parent widget does not provide a finite width constraint.
For example, if the InputDecorator is contained by a `Row`, then its width must
be constrained. An `Expanded` widget or a SizedBox can be used to constrain the
width of the InputDecorator or the TextField that contains it.
(Additional lines of this message omitted)
How might you run into the error?
This error occurs, for example, when a Row contains a TextFormField or a
TextField but the latter has no width constraint.
Widget build(BuildContext context) {
  return MaterialApp(
    home: Scaffold(
      appBar: AppBar(
        title: const Text('Unbounded Width of the TextField'),
      ),
      body: Row(
        children: const [
          TextField(),
        ],
      ),
    ),
  );
}
How to fix it?
As suggested by the error message, fix this error by constraining the text field
using either an Expanded or SizedBox widget. The following example
demonstrates using an Expanded widget:
Widget build(BuildContext context) {
  return MaterialApp(
    home: Scaffold(
      appBar: AppBar(
        title: const Text('Unbounded Width of the TextField'),
      ),
      body: Row(
        children: [
          Expanded(child: TextFormField()),
        ],
      ),
    ),
  );
}
This error is about missing an expected parent widget.
What does the error look like?
The message shown by the error looks like this:
The following assertion was thrown while looking for parent data:
Incorrect use of ParentDataWidget.
(Some lines of this message omitted)
Usually, this indicates that at least one of the offending ParentDataWidgets
listed above is not placed directly inside a compatible ancestor widget.
How might you run into the error?
While Flutter’s widgets are generally flexible in how they can be composed
together in a UI, a small subset of those widgets expect specific parent
widgets. When this expectation can’t be satisfied in your widget tree, you’re
likely to see this error.
Here is an incomplete list of widgets that expect specific parent widgets
within the Flutter framework. Feel free to submit a PR (using the doc icon in
the top right corner of the page) to expand this list.
| Widget | Expected parent widget(s) |
|---|---|
Flexible |
Row, Column, or Flex
|
Expanded (a specialized Flexible) |
Row, Column, or Flex
|
Positioned |
Stack |
TableCell |
Table |
How to fix it?
The fix should be obvious once you know which parent widget is missing.
‘setState called during build’
The build method in your Flutter code is not a good place to call setState
either directly or indirectly.
What does the error look like?
When the error occurs, the following message gets displayed in the console:
The following assertion was thrown building DialogPage(dirty, dependencies:
[_InheritedTheme, _LocalizationsScope-[GlobalKey#59a8e]],
state: _DialogPageState#f121e):
setState() or markNeedsBuild() called during build.

This Overlay widget cannot be marked as needing to build because the framework
is already in the process of building widgets.
(Additional lines of this message omitted)
How might you run into the error?
In general, this error occurs when the setState method is called within the
build method.
A common scenario where this error occurs is when attempting to trigger a Dialog
from within the build method. This is often motivated by the need to
immediately show information to the user, but setState should never be called
from a build method.
Below is a snippet that seems to be a common culprit of this error:
Widget build(BuildContext context) {
  // Don't do this.
  showDialog(
      context: context,
      builder: (context) {
        return const AlertDialog(
          title: Text('Alert Dialog'),
        );
      });

  return Center(
    child: Column(
      children: const <Widget>[
        Text('Show Material Dialog'),
      ],
    ),
  );
}
You don’t see the explicit call to setState, but it’s called by showDialog.
The build method is not the right place to call showDialog because build
can be called by the framework for every frame, for example, during an
animation.
How to fix it?
One way to avoid this error is to use the Navigator API to trigger the dialog
as a route. In the example below, there are two pages. The second page has a
dialog to be displayed upon entry. When the user requests the second page from
clicking on a button on the first page, the Navigator pushes two routes in a
row – one for the second page and another for the dialog.
class FirstScreen extends StatelessWidget {
  const FirstScreen({super.key});

  @override
  Widget build(BuildContext context) {
    return Scaffold(
      appBar: AppBar(
        title: const Text('First Screen'),
      ),
      body: Center(
        child: ElevatedButton(
          child: const Text('Launch screen'),
          onPressed: () {
            // Navigate to the second screen using a named route.
            Navigator.pushNamed(context, '/second');
            // Immediately show a dialog upon loading the second screen.
            Navigator.push(
              context,
              PageRouteBuilder(
                barrierDismissible: true,
                opaque: false,
                pageBuilder: (_, anim1, anim2) => const MyDialog(),
              ),
            );
          },
        ),
      ),
    );
  }
}
References
To learn more about how to debug errors, especially layout errors in Flutter,
check out the following resources:
- How to debug layout issues with the Flutter Inspector
- Understanding constraints
- Dealing with box constraints
- Flutter architectural overview
Содержание
- [Solved] A RenderFlex overflowed by pixels on the right/bottom
- Error Message:
- Cause of The Error:
- Solution of the Error:
- Common Flutter errors
- Introduction
- ‘A RenderFlex overflowed…’
- ‘RenderBox was not laid out’
- ‘Vertical viewport was given unbounded height’
- ‘An InputDecorator…cannot have an unbounded width’
- ‘Incorrect use of ParentData widget’
- ‘setState called during build’
- References
- Extended widget doesn’t solve a RenderFlex overflowed error
- Overflowed error happens only when keyboard appears
- ListView fixes the overflow error
[Solved] A RenderFlex overflowed by pixels on the right/bottom
In this example, we are going to show you how to solve two Errors: «A RenderFlex overflowed by pixels on the right» and «A RenderFlex overflowed by pixels on the bottom» in Flutter App.
Error Message:
OR:
Cause of The Error:
This error mostly happens on the Row and Column widget when its children have unbounded width or height. For example:
Case One: A RenderFlex overflowed by pixels on the right.
Here, the row has a Text child that has no constrained size. While rendering the widget, the Text() widget will overflow the width of Row and the error will occur.
Case Tow: A RenderFlex overflowed by pixels on the bottom
Here, the Column is rendered according to the height of its parent, and the child inside it will render more height than the column, and the error will occur.
Solution of the Error:
[Recommended Solution] In the case of Row, wrap the children widget of Row() with Expanded() widget, or you can wrap with SizedBox() and Container() and give the bounded width. For example:
Here, expanded applies the maximum 100% width of the screen, so that the text inside Text() widget will break the line instead of overflow:
Or, you can also use Flexible() widget instead of Expanded() widget:
The output of the above code is:
If you want to create Horizontally scrollable widgets if width is overflowed, then use your Row() widget like below:
OR, you can also wrap with SizedBox() or Container() and pass the width, for example:
In case of Column Error, such as «A RenderFlex overflowed by pixels on the bottom», you need to wrap Column() with SingleChildScrollView() widget.
Here, SingleChildScrollView() will create a scrollable widget if the child widgets inside it overflowed by the height:
Источник
Common Flutter errors
Introduction
This page explains several frequently-encountered Flutter framework errors and gives suggestions on how to resolve them. This is a living document with more errors to be added in future revisions, and your contributions are welcomed. Feel free to open an issue or submit a pull request to make this page more useful to you and the Flutter community.
‘A RenderFlex overflowed…’
RenderFlex overflow is one of the most frequently encountered Flutter framework errors, and you probably have run into it already.
What does the error look like?
When it happens, you’ll see yellow & black stripes indicating the area of overflow in the app UI in addition to the error message in the debug console:
How might you run into this error?
The error often occurs when a Column or Row has a child widget that is not constrained in its size. For example, the code snippet below demonstrates a common scenario:
In the above example, the Column tries to be wider than the space the Row (its parent) can allocate to it, causing an overflow error. Why does the Column try to do that? To understand this layout behavior, you need to know how Flutter framework performs layout:
“To perform layout, Flutter walks the render tree in a depth-first traversal and passes down size constraints from parent to child… Children respond by passing up a size to their parent object within the constraints the parent established.” – Flutter architectural overview
In this case, the Row widget doesn’t constrain the size of its children, nor does the Column widget. Lacking constraints from its parent widget, the second Text widget tries to be as wide as all the characters it needs to display. The self-determined width of the Text widget then gets adopted by the Column which clashes with the maximum amount of horizontal space its parent the Row widget can provide.
How to fix it?
Well, you need to make sure the Column won’t attempt to be wider than it can be. To achieve this, you need to constrain its width. One way to do it is to wrap the Column in an Expanded widget:
Another way is to wrap the Column in a Flexible widget and specify a flex factor. In fact, the Expanded widget is equivalent to the Flexible widget with a flex factor of 1.0, as its source code shows. To further understand how to use the Flex widget in Flutter layouts, please check out this Widget of the Week video on the Flexible widget.
Further information:
The resources linked below provide further information about this error.
‘RenderBox was not laid out’
While this error is pretty common, it’s often a side effect of a primary error occurring earlier in the rendering pipeline.
What does the error look like?
The message shown by the error looks like this:
How might you run into this error?
Usually, the issue is related to violation of box constraints, and it needs to be solved by providing more information to Flutter about how you’d like to constrain the widgets in question. You can learn more about how constraints work in Flutter on the page Understanding constraints.
The RenderBox was not laid out error is often caused by one of two other errors:
- ‘Vertical viewport was given unbounded height’
- ‘An InputDecorator…cannot have an unbounded width’
‘Vertical viewport was given unbounded height’
This is another common layout error you could run into while creating a UI in your Flutter app.
What does the error look like?
The message shown by the error looks like this:
How might you run into this error?
The error is often caused when a ListView (or other kinds of scrollable widgets such as GridView ) is placed inside a Column . A ListView takes all the vertical space available to it, unless it’s constrained by its parent widget. However, a Column doesn’t impose any constraint on its children’s height by default. The combination of the two behaviors leads to the failure of determining the size of the ListView .
How to fix it?
To fix this error, specify how tall the ListView should be. To make it as tall as the remaining space in the Column , wrap it using an Expanded widget (see the example below). Otherwise, specify an absolute height using a SizedBox widget or a relative height using a Flexible widget.
Further information:
The resources linked below provide further information about this error.
‘An InputDecorator…cannot have an unbounded width’
The error message suggests that it’s also related to box constraints, which are important to understand to avoid many of the most common Flutter framework errors.
What does the error look like?
The message shown by the error looks like this:
How might you run into the error?
This error occurs, for example, when a Row contains a TextFormField or a TextField but the latter has no width constraint.
How to fix it?
As suggested by the error message, fix this error by constraining the text field using either an Expanded or SizedBox widget. The following example demonstrates using an Expanded widget:
This error is about missing an expected parent widget.
What does the error look like?
The message shown by the error looks like this:
How might you run into the error?
While Flutter’s widgets are generally flexible in how they can be composed together in a UI, a small subset of those widgets expect specific parent widgets. When this expectation can’t be satisfied in your widget tree, you’re likely to see this error.
Here is an incomplete list of widgets that expect specific parent widgets within the Flutter framework. Feel free to submit a PR (using the doc icon in the top right corner of the page) to expand this list.
| Widget | Expected parent widget(s) |
|---|---|
| Flexible | Row , Column , or Flex |
| Expanded (a specialized Flexible ) | Row , Column , or Flex |
| Positioned | Stack |
| TableCell | Table |
How to fix it?
The fix should be obvious once you know which parent widget is missing.
‘setState called during build’
The build method in your Flutter code is not a good place to call setState either directly or indirectly.
What does the error look like?
When the error occurs, the following message gets displayed in the console:
How might you run into the error?
In general, this error occurs when the setState method is called within the build method.
A common scenario where this error occurs is when attempting to trigger a Dialog from within the build method. This is often motivated by the need to immediately show information to the user, but setState should never be called from a build method.
Below is a snippet that seems to be a common culprit of this error:
You don’t see the explicit call to setState , but it’s called by showDialog . The build method is not the right place to call showDialog because build can be called by the framework for every frame, for example, during an animation.
How to fix it?
One way to avoid this error is to use the Navigator API to trigger the dialog as a route. In the example below, there are two pages. The second page has a dialog to be displayed upon entry. When the user requests the second page from clicking on a button on the first page, the Navigator pushes two routes in a row – one for the second page and another for the dialog.
References
To learn more about how to debug errors, especially layout errors in Flutter, check out the following resources:
Except as otherwise noted, this work is licensed under a Creative Commons Attribution 4.0 International License, and code samples are licensed under the BSD License.
Источник
I faced RenderFlex overflowed error while I was implementing Flutter app. I could eventually solve the problem by using ListView but I will show my case and what I did before using ListView.
Overflowed error happens only when keyboard appears
I wrote the following code.
It looks like this.
When it starts up error doesn’t occur but it occurs when I focus on text field.
I didn’t understand at first why it happened only when the keyboard appeared. It’s because the keyboard occupies almost half of the screen and the size of the body for the Scaffold decreases. Therefore, it leads to an overflow error. The message I got was the following.
What I tried first was, as the message described, to use Expanded widget for Column. The official page describes the same thing.
Well, you need to make sure the Column won’t attempt to be wider than it can be. To achieve this, you need to constrain its width. One way to do it is to wrap the Column in an Expanded widget:
I added Expanded widget.
However, the result was the same.
ListView fixes the overflow error
When the keyboard appears the screen size for the app decreases. Therefore we need to make the view scrollable. Otherwise, some widgets can be hidden under the keyboard which leads RenderFlex overflowed error.
The final code that I could solve the problem is the following.
The error message also says that ListView is another solution.
I’m new to Flutter but I like it so far because UI can be written in code. The code will easily be messy because we need to wrap a widget by widget to set style for example. That’s an issue that I should take care of.
Источник
I faced RenderFlex overflowed error while I was implementing Flutter app. I could eventually solve the problem by using ListView but I will show my case and what I did before using ListView.
Overflowed error happens only when keyboard appears
I wrote the following code.
return Scaffold(
    appBar: AppBar(
        title: Text(widget.title),
    ),
    body:
        Padding(
        padding: EdgeInsets.all(10),
        child: Column(
        crossAxisAlignment: CrossAxisAlignment.start,
        children: [
            Padding(child: nameField, padding: EdgeInsets.only(bottom: 20)),
            Padding(child: typeRow, padding: EdgeInsets.only(bottom: 20)),
            Padding(child: unitRow, padding: EdgeInsets.only(bottom: 20)),
            Padding(child: categoryRow, padding: EdgeInsets.only(bottom: 20)),
        ],
        ),
    )
);
It looks like this.
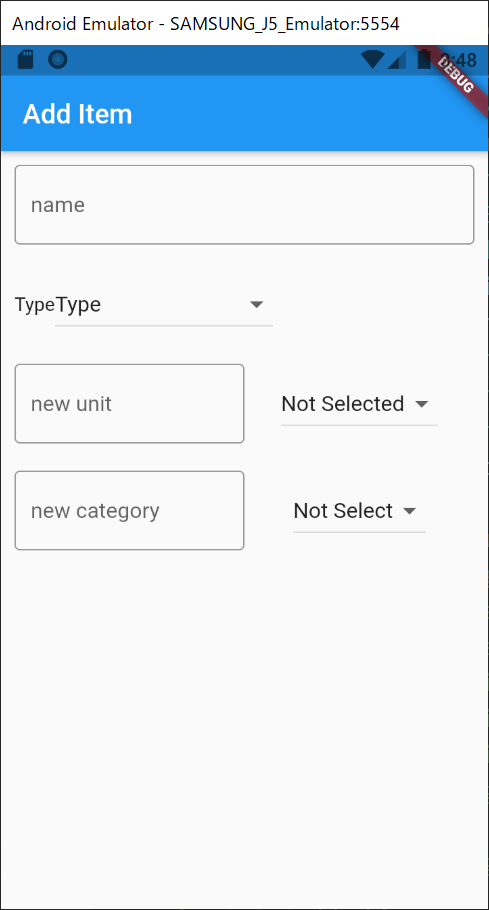
When it starts up error doesn’t occur but it occurs when I focus on text field.
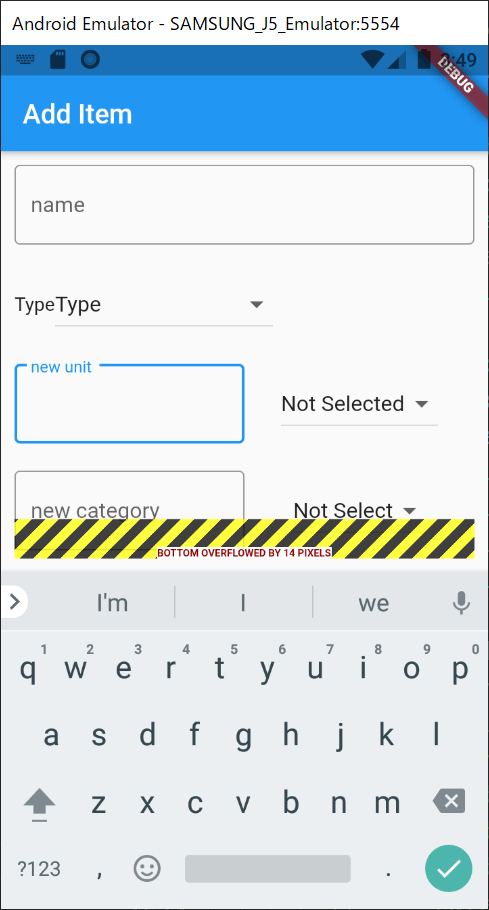
I didn’t understand at first why it happened only when the keyboard appeared. It’s because the keyboard occupies almost half of the screen and the size of the body for the Scaffold decreases. Therefore, it leads to an overflow error. The message I got was the following.
════════ Exception caught by rendering library ═════════════════════════════════
The following assertion was thrown during layout:
A RenderFlex overflowed by 14 pixels on the bottom.

The relevant error-causing widget was
Column
libAddItemView.dart:109
You can inspect this widget using the 'Inspect Widget' button in the VS Code notification.
The overflowing RenderFlex has an orientation of Axis.vertical.
The edge of the RenderFlex that is overflowing has been marked in the rendering with a yellow and black striped pattern. This is usually caused by the contents being too big for the RenderFlex.

Consider applying a flex factor (e.g. using an Expanded widget) to force the children of the RenderFlex to fit within the available space instead of being sized to their natural size.
This is considered an error condition because it indicates that there is content that cannot be seen. If the content is legitimately bigger than the available space, consider clipping it with a ClipRect widget before putting it in the flex, or using a scrollable container rather than a Flex, like a ListView.

The specific RenderFlex in question is: RenderFlex#54ac3 relayoutBoundary=up2 OVERFLOWING
What I tried first was, as the message described, to use Expanded widget for Column. The official page describes the same thing.
Well, you need to make sure the Column won’t attempt to be wider than it can be. To achieve this, you need to constrain its width. One way to do it is to wrap the Column in an Expanded widget:
https://flutter.dev/docs/testing/common-errors#a-renderflex-overflowed
I added Expanded widget.
return Scaffold(
    appBar: AppBar(
        title: Text(widget.title),
    ),
    body: Padding(
        padding: EdgeInsets.all(10),
        child: Expanded(    // Expanded is added
            child: Column(
                crossAxisAlignment: CrossAxisAlignment.start,
                children: [
                Padding(child: nameField, padding: EdgeInsets.only(bottom: 20)),
                Padding(child: typeRow, padding: EdgeInsets.only(bottom: 20)),
                Padding(child: unitRow, padding: EdgeInsets.only(bottom: 20)),
                Padding(
                    child: categoryRow, padding: EdgeInsets.only(bottom: 20)),
                ],
            ),
        ),
    ),
);
However, the result was the same.
ListView fixes the overflow error
When the keyboard appears the screen size for the app decreases. Therefore we need to make the view scrollable. Otherwise, some widgets can be hidden under the keyboard which leads RenderFlex overflowed error.
The final code that I could solve the problem is the following.
return Scaffold(
    appBar: AppBar(
    title: Text(widget.title),
    ),
    body: ListView(
    children: [
        Padding(child: nameField, padding: EdgeInsets.only(bottom: 20)),
        Padding(child: typeRow, padding: EdgeInsets.only(bottom: 20)),
        Padding(child: unitRow, padding: EdgeInsets.only(bottom: 20)),
        categoryRow,
    ],
    padding: EdgeInsets.all(10),
    ),
);
The error message also says that ListView is another solution.
consider clipping it with a ClipRect widget before putting it in the flex, or using a scrollable container rather than a Flex, like a ListView.
End
I’m new to Flutter but I like it so far because UI can be written in code. The code will easily be messy because we need to wrap a widget by widget to set style for example. That’s an issue that I should take care of.
In this example, we are going to show you how to solve two Errors: «A RenderFlex overflowed by pixels on the right» and «A RenderFlex overflowed by pixels on the bottom» in Flutter App.
Related: [Solved] ’Overflowed By Pixels’ Error on Keyboard Popup in Flutter
══╡ EXCEPTION CAUGHT BY RENDERING LIBRARY ╞══════════════════════════
The following assertion was thrown during layout:
A RenderFlex overflowed by 941 pixels on the right.

The relevant error-causing widget was:
  Row Row:file:///C:/flutter_apps/testapp/lib/main.dart:32:20

To inspect this widget in Flutter DevTools, visit:
http://127.0.0.1:9102/#/inspector?uri=http%3A%2F%2F127.0.0.1%3A54414%2FrGXl_NXKmP8%3D%2F&inspectorRef=inspector-88

The overflowing RenderFlex has an orientation of Axis.horizontal.
The edge of the RenderFlex that is overflowing has been marked in the rendering with a yellow and
black striped pattern. This is usually caused by the contents being too big for the RenderFlex.
Consider applying a flex factor (e.g. using an Expanded widget) to force the children of the
RenderFlex to fit within the available space instead of being sized to their natural size.
This is considered an error condition because it indicates that there is content that cannot be
seen. If the content is legitimately bigger than the available space, consider clipping it with a
ClipRect widget before putting it in the flex, or using a scrollable container rather than a Flex,
like a ListView.
The specific RenderFlex in question is: RenderFlex#a9df8 relayoutBoundary=up2 OVERFLOWING:
  creator: Row ← Padding ← Container ← _BodyBuilder ← MediaQuery ← LayoutId-[<_ScaffoldSlot.body>] ←
    CustomMultiChildLayout ← AnimatedBuilder ← DefaultTextStyle ← AnimatedDefaultTextStyle ←
    _InkFeatures-[GlobalKey#a0c92 ink renderer] ← NotificationListener<LayoutChangedNotification> ← ⋯
  parentData: offset=Offset(0.0, 100.0) (can use size)
  constraints: BoxConstraints(0.0<=w<=392.7, 0.0<=h<=611.3)
  size: Size(392.7, 15.0)
  direction: horizontal
  mainAxisAlignment: start
  mainAxisSize: max
  crossAxisAlignment: center
  textDirection: ltr
  verticalDirection: down
OR:
══╡ EXCEPTION CAUGHT BY RENDERING LIBRARY ╞══════════════════
The following assertion was thrown during layout:
A RenderFlex overflowed by 1449 pixels on the bottom.

The relevant error-causing widget was:
  Column Column:
This error mostly happens on the Row and Column widget when its children have unbounded width or height. For example:
Case One: A RenderFlex overflowed by pixels on the right.
Row(
  children: [
    Text(
      "Lorem ipsum dolor sit amet, consectetur adipiscing elit, sed"
      " do eiusmod tempor incididunt ut labore et dolore magna "
      "aliqua. Ut enim ad minim veniam, quis nostrud "
      "exercitation ullamco laboris nisi ut aliquip ex ea "
      "commodo consequat."),
  ],
)
Here, the row has a Text child that has no constrained size. While rendering the widget, the Text() widget will overflow the width of Row and the error will occur.
Error Output:

Case Tow: A RenderFlex overflowed by pixels on the bottom
Column(
  children: [
      Container(
          height:2000,
      )
  ],
)
Here, the Column is rendered according to the height of its parent, and the child inside it will render more height than the column, and the error will occur.
Error Output:

[Recommended Solution] In the case of Row, wrap the children widget of Row() with Expanded() widget, or you can wrap with SizedBox() and Container() and give the bounded width. For example:
Row(
  children: [
    Expanded(
      child:Text(
        "Lorem ipsum dolor sit amet, consectetur adipiscing elit, sed"
        " do eiusmod tempor incididunt ut labore et dolore magna "
        "aliqua. Ut enim ad minim veniam, quis nostrud "
        "exercitation ullamco laboris nisi ut aliquip ex ea "
        "commodo consequat."),
    )
  ],
)
Here, expanded applies the maximum 100% width of the screen, so that the text inside Text() widget will break the line instead of overflow:
Or, you can also use Flexible() widget instead of Expanded() widget:
Row(
  children: [
    Flexible(
      child:Text(
        "Lorem ipsum dolor sit amet, consectetur adipiscing elit, sed"
        " do eiusmod tempor incididunt ut labore et dolore magna "
        "aliqua. Ut enim ad minim veniam, quis nostrud "
        "exercitation ullamco laboris nisi ut aliquip ex ea "
        "commodo consequat."),
    )
  ],
)
The output of the above code is:

If you want to create Horizontally scrollable widgets if width is overflowed, then use your Row() widget like below:
SingleChildScrollView(
  scrollDirection: Axis.horizontal,
  child:Row(
  children: [
      Text(
        "Lorem ipsum dolor sit amet, consectetur adipiscing elit, sed"
        " do eiusmod tempor incididunt ut labore et dolore magna "
        "aliqua. Ut enim ad minim veniam, quis nostrud "
        "exercitation ullamco laboris nisi ut aliquip ex ea "
        "commodo consequat."),
    ],
  ),
)
OR, you can also wrap with SizedBox() or Container() and pass the width, for example:
Row(
  children: [
    SizedBox(
      width:300, //width must be less than the width of Row(),
      child:Text(
        "Lorem ipsum dolor sit amet, consectetur adipiscing elit, sed"
        " do eiusmod tempor incididunt ut labore et dolore magna "
        "aliqua. Ut enim ad minim veniam, quis nostrud "
        "exercitation ullamco laboris nisi ut aliquip ex ea "
        "commodo consequat."),
    )
  ],
)
Row(
children: [
Container(
width:300, //width must be less than the width of Row(),
child:Text(
"Lorem ipsum dolor sit amet, consectetur adipiscing elit, sed"
" do eiusmod tempor incididunt ut labore et dolore magna "
"aliqua. Ut enim ad minim veniam, quis nostrud "
"exercitation ullamco laboris nisi ut aliquip ex ea "
"commodo consequat."),
)
],
)In case of Column Error, such as «A RenderFlex overflowed by pixels on the bottom», you need to wrap Column() with SingleChildScrollView() widget.
SingleChildScrollView(
  child:Column(
    children: [
        Container(
          height: 2000,
        )
      ],
    ),
)
Here, SingleChildScrollView() will create a scrollable widget if the child widgets inside it overflowed by the height:
Issue
I am Getting An error (overflowed by 4.8 pixels on the bottom). I was creating an emailAuthSheet with showModalBottomSheet while debugging the app it shows the error of overflowed. Can u please guide me…And If Possible can you please also guide me on how to make it responsive for all devices as per their device screen size
The following code is below:
emailAuthSheet(BuildContext context) {
    return showModalBottomSheet(
        context: context,
        builder: (context) {
          return Container(
              child:
              Column(
                children: [
                Padding(
                  padding: const EdgeInsets.symmetric(horizontal: 150.0),
                  child: Divider(
                    thickness: 4.0,
                    color: constantColors.whiteColor,
                  ),
                ),
                Provider.of<LandingService>(context,listen: false).passwordLessSignIn(context),
                Row(
                  mainAxisAlignment: MainAxisAlignment.spaceEvenly,
                  children: [
                    MaterialButton(
                        color: constantColors.blueColor,
                        child: Text(
                          'Log in',
                          style: TextStyle(
                              color: constantColors.whiteColor,
                              fontSize: 18.0,
                              fontWeight: FontWeight.bold),
                        ),
                        onPressed: () {}),
                    MaterialButton(
                        color: constantColors.redColor,
                        child: Text(
                          'Sign in',
                          style: TextStyle(
                              color: constantColors.whiteColor,
                              fontSize: 18.0,
                              fontWeight: FontWeight.bold),
                        ),
                        onPressed: () {})
                  ],
                ),
              ]),
              height: MediaQuery.of(context).size.height * 0.5,
              width: MediaQuery.of(context).size.width,
              decoration: BoxDecoration(
                  color: constantColors.blueGreyColor,
                  borderRadius: BorderRadius.only(
                      topLeft: Radius.circular(15.0),
                      topRight: Radius.circular(15.0))));
        });
}
Below is the pic of the flutter app and error
Solution
Wrap your container with singleChildScrollView
emailAuthSheet(BuildContext context) {
  return showModalBottomSheet(
      context: context,
      builder: (context) {
        return SingleChildScrollView(
          child: Container(
              child:
              Column(
                  children: [
                    Padding(
                      padding: const EdgeInsets.symmetric(horizontal: 150.0),
                      child: Divider(
                        thickness: 4.0,
                        color: constantColors.whiteColor,
                      ),
                    ),
                    Provider.of<LandingService>(context,listen: false).passwordLessSignIn(context),
                    Row(
                      mainAxisAlignment: MainAxisAlignment.spaceEvenly,
                      children: [
                        MaterialButton(
                            color: constantColors.blueColor,
                            child: Text(
                              'Log in',
                              style: TextStyle(
                                  color: constantColors.whiteColor,
                                  fontSize: 18.0,
                                  fontWeight: FontWeight.bold),
                            ),
                            onPressed: () {}),
                        MaterialButton(
                            color: constantColors.redColor,
                            child: Text(
                              'Sign in',
                              style: TextStyle(
                                  color: constantColors.whiteColor,
                                  fontSize: 18.0,
                                  fontWeight: FontWeight.bold),
                            ),
                            onPressed: () {})
                      ],
                    ),
                  ]),
              height: MediaQuery.of(context).size.height * 0.5,
              width: MediaQuery.of(context).size.width,
              decoration: BoxDecoration(
                  color: constantColors.blueGreyColor,
                  borderRadius: BorderRadius.only(
                      topLeft: Radius.circular(15.0),
                      topRight: Radius.circular(15.0)))),
        );
      });
}
Answered By – Jahidul Islam
This Answer collected from stackoverflow, is licensed under cc by-sa 2.5 , cc by-sa 3.0 and cc by-sa 4.0
Introduction
This is the fifth article in the “Flutter for Beginners” series, where we are looking at how to get started on developing awesome mobile applications at ease using Flutter. So far we have seen how to set up the environment and looked at various basics of app development such as project structure, widgets, classes and different classes of UI widgets we use for building our applications. By the end of this series, we shall develop a simple blog application with a home list of blog articles with an individual view page.
Read How to setup Flutter Development Environment Here – How to Install and Configure Flutter
Know how a Flutter Project looks like Here – Understanding App Structure and Anatomy
Know What is the purpose of main.dart file Here – main.dart and First run
Know What are Stateless and Stateful widgets Here – Understanding Stateful and Stateless Widgets
In this article, let’s go ahead and build an article page for our blog application. I would like to have three components in my article page; a header section to show a banner image, a title section to show a heading and a content section with long content.
We have already seen in Flutter that everything is a Widget in making; hence we shall define three Widgets for these three areas.
Getting Started
First, let’s build our banner image section which consists of an Image be loaded from the Internet. For this, we use the library class Image, which contains various helpers to render the image. Of these helper methods, let’s choose the one which takes a URL as a parameter and returns an Image: Image.network() method.
The widget can look like below:
class BannerImageWidget extends StatelessWidget {
  @override
  Widget build(BuildContext context) {
    // TODO: implement build
    return Container(
        child: Image.network(
            "https://referbruv.com/wp-content/uploads/2022/05/bitmap.png"));
  }
}
Next, let’s develop the Title widget, which contains a Text with a bigger font and bold content. For this, we’ll use a Text() widget along with added TextFont properties to it. The code can look like below:
class TitleWidget extends StatelessWidget {
  @override
  Widget build(BuildContext context) {
    // TODO: implement build
    return Container(
        child: Text(
      "Flutter for Beginners - Setting up the Card Layout",
      style: TextStyle(fontSize: 24.0, fontWeight: FontWeight.bold),
    ));
  }
}
Third, let’s complete the Content widget, which contains a long text of the entire article content. This shall also be a Text() widget along with added TextFont properties to it, to give it a little smaller font when compared to the Title text. We also add a little Margin on all sides to give a little separation from the widgets above. The widget looks like below:
class DescriptionWidget extends StatelessWidget {
@override
Widget build(BuildContext context) {
// TODO: implement build
return Container(
margin: EdgeInsets.all(5.0),
child: Text(
"This is the fourth article in the 'Flutter for Beginners' series. So far we have seen what flutter is about and how to get started in the world of flutter. We have also seen the things to be done to setup the flutter development environment and the flutter command line using which we can created a no of articles on how to do the flutter thing. but nothing has been so explanatory as does a thing for all what is required and not required. This is what a scrolling does to do the effect on the parent.",
style: TextStyle(fontSize: 22.0, wordSpacing: 1.5)));
}
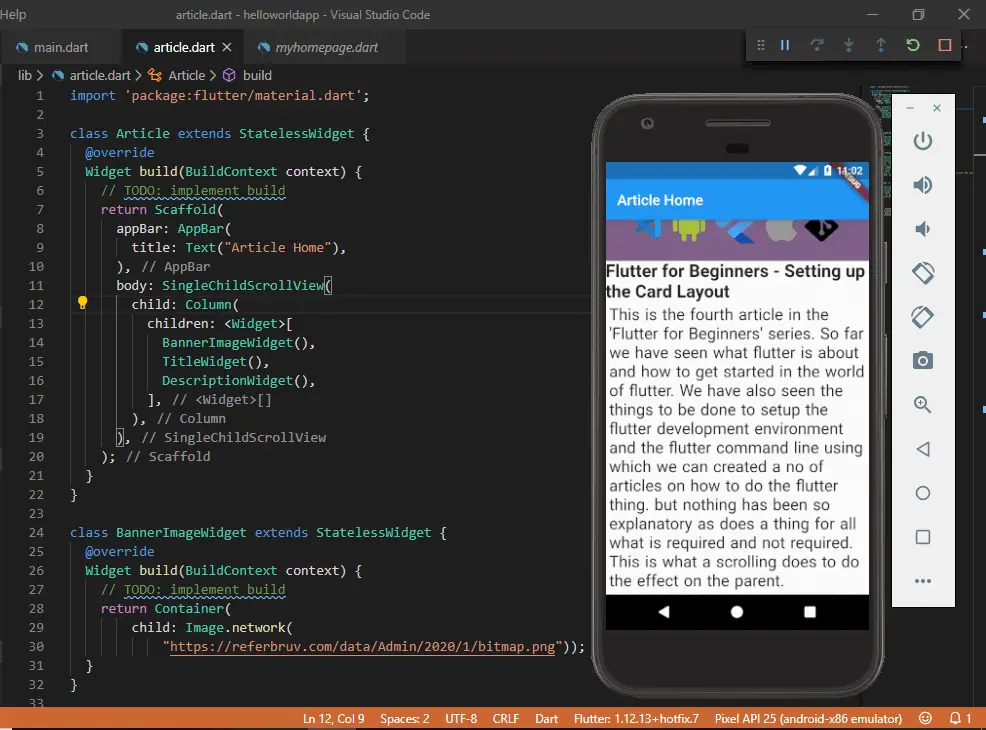
}Finally, let’s group all the Widgets together into a Column layout, which shall arrange all these in order of their appearances in a vertical fashion. All this goes under the Scaffolding widget which provides a basic AppBar-ContentView template to make things easy for us. The code looks like below:
class Article extends StatelessWidget {
  @override
  Widget build(BuildContext context) {
    // TODO: implement build
    return Scaffold(
      appBar: AppBar(
        title: Text("Article Home"),
      ),
      body: Column(
        children: <Widget>[
          BannerImageWidget(),
          TitleWidget(),
          DescriptionWidget(),
        ],
      ),
    );
  }
}
And when you run this setup and expect you’d have a fluid layout of banner, title and content in place. You see the screen looks like this:
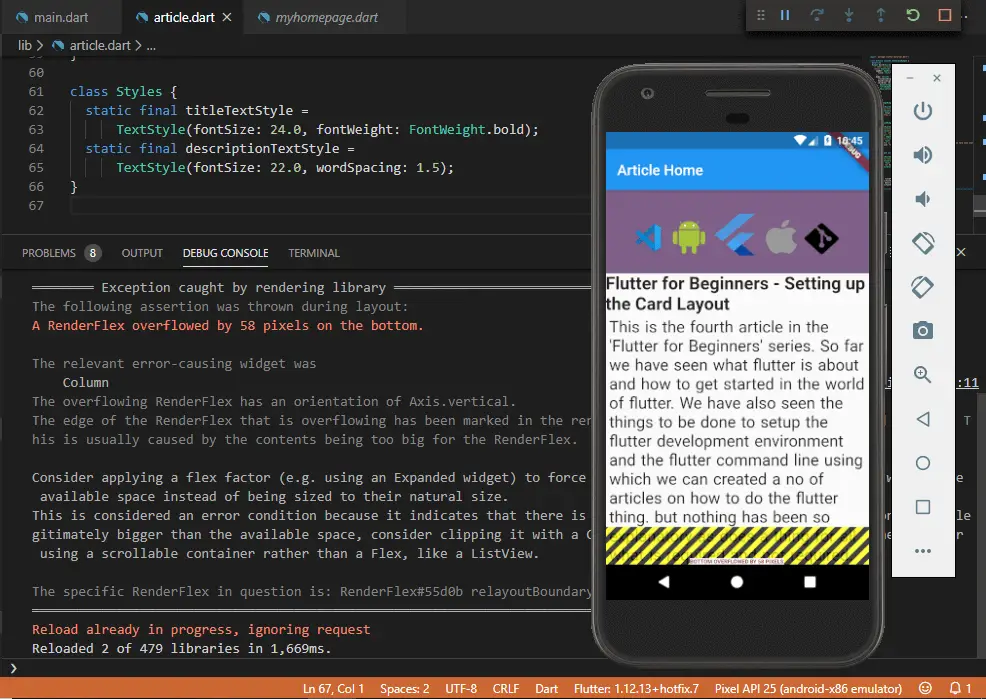
And you can find an error in the Debug window which says:
----- Exception caught by rendering library -----

The following assertion was thrown during layout:

A RenderFlex overflowed by 58 pixels on the bottom.

The relevant error-causing widget was
 Column
The overflowing RenderFlex has an orientation of Axis.vertical.
The edge of the RenderFlex that is overflowing has been marked in the rendering with a yellow and black striped pattern. This is usually caused by the contents being too big for the RenderFlex.

Consider applying a flex factor (e.g. using an Expanded widget) to force the children of the RenderFlex to fit within the available space instead of being sized to their natural size.
This is considered an error condition because it indicates that there is content that cannot be seen. If the content is legitimately bigger than the available space, consider clipping it with a ClipRect widget before putting it in the flex, or using a scrollable container rather than a Flex, like a ListView.

The specific RenderFlex in question is: RenderFlex#55d0b relayoutBoundary=up1 OVERFLOWING
Which simply means that the content has overflown the actual height of the mobile screen. Since the content we try to render in the Content widget goes beyond the total vertical viewport of the screen, Flutter fails to render it and instead throws an exception.
The same is reflected over the app screen with a yellow tint of the overflown text. Now how do we solve this?
One mistake we did while laying things inside the scaffold is that we haven’t describe how the app should behave if there’s excessive widget height being rendered onto the screen. The Column() widget can only hold and lay the widgets in the vertical fashion but it cannot decide on overflowing conditions.
For this we should wrap the column itself under another container (not the Container() widget we’re talking about) which can handle overflow conditions. Enter the SingleChildScrollView() widget.
The SingleChildScrollView() widget wraps overflowing content widgets under a scrollable view along with a scrollbar so as to push the overflown content below and still be able to render all the widgets continuously.
This avoids the excessive height issue and gives the screen the required fluid look. And in our application, we wrap our Column() widget (which itself wraps all the content widgets in the vertical layout fashion) under the SingleChildScrollView() widget which has a child property.
class Article extends StatelessWidget {
  @override
  Widget build(BuildContext context) {
    // TODO: implement build
    return Scaffold(
      appBar: AppBar(
        title: Text("Article Home"),
      ),
      body: SingleChildScrollView(
        child: Column(
          children: <Widget>[
            BannerImageWidget(),
            TitleWidget(),
            DescriptionWidget(),
          ],
        ),
      ),
    );
  }
}
And when we save and do a hot-reload (or F5) on the flutter codebase, we see that the error is now gone and also a part of our content is now missing on the viewport. And when we scroll it down, we see an otherwise invisible scrollbar scrolling things down to the rest of the content. Awesome right?
The SingleChildScrollView() widget has a property “scrollDirection” which defines in which direction the scrollbar shall occur. The values are Axis.vertical, or Axis.hortizontal which gives out a X-axis scrollbar or a Y-axis scrollbar. In our case we don’t provide any direction in specific and hence the scrollbar defaults to the vertical or Y-axis direction, which is also its default direction.
In this way we can create a fluid app screen with a series of widgets without having to get into overflow issues using the ScrollView().
For all the UI designers and developers who’re looking for a simple utility to create and test colors and combinations for their next awesome apps – here’s a simple app for you, which is completely ad-free and is free! check it out here
Когда я пытаюсь использовать Card внутри SingleScrollChildView, я получаю эту ошибку:
The following assertion was thrown during layout:
A RenderFlex overflowed by 178 pixels on the bottom.

The relevant error-causing widget was:
  Column file:///C:/Users/emirs/AndroidStudioProjects/view_met/lib/home.dart:197:16
The overflowing RenderFlex has an orientation of Axis.vertical.
The edge of the RenderFlex that is overflowing has been marked in the rendering with a yellow and black striped pattern. This is usually caused by the contents being too big for the RenderFlex.

Consider applying a flex factor (e.g. using an Expanded widget) to force the children of the RenderFlex to fit within the available space instead of being sized to their natural size.
This is considered an error condition because it indicates that there is content that cannot be seen. If the content is legitimately bigger than the available space, consider clipping it with a ClipRect widget before putting it in the flex, or using a scrollable container rather than a Flex, like a ListView.

The specific RenderFlex in question is: RenderFlex#d861f relayoutBoundary=up2 OVERFLOWING
...  needs compositing
...  parentData: offset=Offset(0.0, 0.0) (can use size)
...  constraints: BoxConstraints(0.0<=w<=411.4, 0.0<=h<=820.6)
...  size: Size(411.4, 820.6)
...  direction: vertical
...  mainAxisAlignment: start
...  mainAxisSize: max
...  crossAxisAlignment: center
...  verticalDirection: down
◢◤◢◤◢◤◢◤◢◤◢◤◢◤◢◤◢◤◢◤◢◤◢◤◢◤◢◤◢◤◢◤◢◤◢◤◢◤◢◤◢◤◢◤◢◤◢◤◢◤◢◤◢◤◢◤◢◤◢◤◢◤◢◤◢◤◢◤◢◤◢◤◢◤◢◤◢◤◢◤◢◤◢◤◢◤◢◤◢◤◢◤◢◤◢◤◢◤◢◤
Это мой код:
Padding(
                padding: EdgeInsets.fromLTRB(0, 20, 0, 0),
                child: Column(
                  children: <Widget>[
                    Text("Random Items You Could Like", style: GoogleFonts.merriweather(fontSize: 18, color: Colors.black)),
                    SingleChildScrollView(
                      scrollDirection: Axis.vertical,
                      child: Column(
                       children: <Widget>[
                         builder(randint1.toString()),
                         builder(randint2.toString()),
                         builder(randint3.toString()),
                         builder(randint4.toString()),
                         builder(randint5.toString()),
                       ],
                      )
                    ),
                  ],
                ),
              )
Это функция builder():
builder(String id) {
      return FutureBuilder(
        future: fetchData(id),
        builder: (BuildContext context, snapshot) {
          if (snapshot.connectionState == ConnectionState.waiting) {
            return Padding(
              padding: EdgeInsets.fromLTRB(0, 20, 0, 0),
              child: CircularProgressIndicator(),
            );
          }
          var data = jsonDecode(snapshot.data.toString());

          var leading;
          var artist;


          if (data["primaryImageSmall"] == "") {
            leading = Icon(Icons.dangerous);
          }
          else {
            leading = Image.network(data["primaryImageSmall"]);
          }

          if (data["artistDisplayName"]== "") {
            artist = "Unknown";
          }
          else {
            artist = data["artistDisplayName"];
          }

          return Card(
            clipBehavior: Clip.antiAlias,
            child: Column(
              children: [
                ListTile(
                  leading: leading,
                  title: Text(data["title"]),
                  subtitle: Text(
                    "by $artist",
                    style: TextStyle(color: Colors.black.withOpacity(0.6)),
                  ),
                ),
                ButtonBar(
                  alignment: MainAxisAlignment.start,
                  children: [
                    TextButton(
                      onPressed: () {
                        Navigator.push(
                          context,
                          MaterialPageRoute(builder: (context) => DetailsPage()),
                        );
                      },
                      child: Text("Details", style: TextStyle(color: Color(0xFF6200EE))),
                    ),
                    TextButton(
                      onPressed: () {
                        Navigator.push(
                          context,
                          MaterialPageRoute(builder: (context) => DetailsPage()),
                        );
                      },
                      child: Text("Add to Favorites", style: TextStyle(color: Color(0xFF6200EE))),
                    ),
                  ],
                ),
              ],
            ),
          );
        },
      );
    }
Вот результат:

Я посмотрел и на другие вопросы, но ни один из них не помог, и у них не было ответа, который я искал. Я действительно не знаю, что мне делать в данный момент. Буду признателен за любую помощь. Если потребуется, могу предоставить дополнительную информацию.
3 ответа
Лучший ответ
Оберните SingleChildScrollView в Expanded.
Column(
  children: [
    // ...
    Expanded(
      child: SingleChildScrollView(),
    ),
  ],
),
8
Tirth Patel
23 Май 2021 в 00:06
Я думаю, что вы неправильно используете SingleChildScrollView, удалите SingleChildScrollView и scrollDirection; используйте его, чтобы обернуть эту часть:
Column(
                          children: <Widget>[
                            builder(randint1.toString()),
                            builder(randint2.toString()),
                            builder(randint3.toString()),
                            builder(randint4.toString()),
                            builder(randint5.toString()),
                          ],
И это будет выглядеть так:
SingleChildScrollView(
                    scrollDirection: Axis.vertical,
Column(
                          children: <Widget>[
                            builder(randint1.toString()),
                            builder(randint2.toString()),
                            builder(randint3.toString()),
                            builder(randint4.toString()),
                            builder(randint5.toString()),
                          ],
),
1
Trần Trung Hiếu
23 Май 2021 в 00:23
Попробовать ниже Код
 Padding(
              padding: EdgeInsets.fromLTRB(0, 20, 0, 0),
              child: Stack(
                children: [
                  Align(
                    alignment:Alignment.topCenter,
                      child: Text("Random Items You Could Like", style: GoogleFonts.merriweather(fontSize: 18, color: Colors.black))),
                  SingleChildScrollView(
                    scrollDirection: Axis.vertical,
                    child: Column(
                      children: <Widget>[
                        Column(
                          children: <Widget>[
                            builder(randint1.toString()),
                            builder(randint2.toString()),
                            builder(randint3.toString()),
                            builder(randint4.toString()),
                            builder(randint5.toString()),
                          ],
                        ),
                      ],
                    ),
                  ),
                ],
              ),
            )
0
Aamil Silawat
23 Май 2021 в 00:05