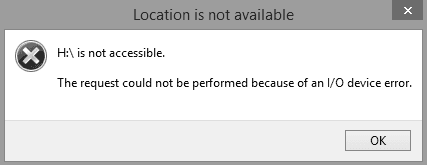
A lot of users have been getting the “The Request could not be performed because of an I/O Device Error” message either while using Diskpart or on Virtual Disk Manager and this prevents them from accessing the disk or sometimes from being able to view its properties and format it.

In this article, we have listed some common reasons due to which the error message is seen such as conflicting partition letters, faulty Storage Device connection, etc. In addition to that, we have listed some comprehensive solutions that should get rid of this error completely and help you access the storage device normally.
After sifting through user recommendations and troubleshooting guides regarding this error message, we came to the conclusion that the following are the primary reasons due to which it is triggered.
- Ports: Some ports on your computer might not be able to work properly due to which the Storage device connected to them isn’t being properly recognized by Windows. Therefore, it is recommended to switch SATA ports if you are getting the “The Request could not be performed because of an I/O Device Error” error with a storage device and switch the USB ports if you are getting this with a USB.
- Outdated Drivers: Sometimes, outdated drivers can cause the “Diskpart has encountered an error The Request could not be performed because of an I/O Device Error” message and prevent the command from being carried out. Therefore, we recommend that you check for any outdated storage device drivers and update them ASAP.
- Bad Sectors: In your storage device, due to prolonged usage, several bad sectors might be created due to storage failures and wearing out of the device. Therefore, it is recommended to perform a scan and amend any bad sectors that might be present on your storage device.
- Incorrect Configuration: It is possible that your computer isn’t using the proper storage configuration mode to be able to run the Storage device due to which you are running into this error message. Basically, some Windows versions have the ability to determine the transfer modes for the device and if the incorrect one is selected, you will run into the “The Request could not be performed because of an I/O Device Error” message.
- Partition Letter: The Partition letter assigned to the storage device if already occupied by another partition or unpartitioned sector, will create complications and incompatibility. Therefore, assigning the partition a new letter can sometimes get rid of the error message.
- General Misconfiguration: Sometimes, Windows might run into conflicts or internal misconfiguration due to which it is unable to launch into the local disk drive and throws this error. Therefore, we recommend that you check to see if troubleshooting the issue using the default troubleshooter fixes the error message.
- USB Controllers: Some USB Controller drivers on your computer might be malfunctioning or they might be simply outdated. Therefore, checking for any misconfiguration, fixing them, and checking if there are any updates available for the drivers might be the way to go.
Now that you have been familiarized with most of the reasons behind this error, we can finally begin the fixing process.
Before You Start:
The simplest troubleshooting technique in the case of this error message is to look for any loose connections and fix them back properly. Initially make sure that the cable is fully plugged into the hard drive or the USB port and also look that there does not exist any breaks in the cable. Moreover, also try to check the device on another computer to see if it’s not your computer causing the issue. These are some of the simple and potential fixes in getting you through the error successfully but if you still aren’t able to resolve the issue then proceed with some of the advanced solutions listed below.
Fixing the request could not be performed because of an i/o device error USB:
Solution 1: Switch Ports
It so happens that quite a lot of times the fault may exist in the USB port so try plugging in your hard drive or USB into an alternate port. Also, plug in your hard drive into the USB ports on the motherboard instead of the ports on the case front. Moreover, try to switch from USB 2.0 to 3.0 or vice versa to see which connection your drive supports better. You may also plug your SD card into another card reader or try to connect the device directly via a cable. Check to see if switching the port gets rid of the The Request could not be Performed because of an I/O Device Error message.
Solution 2: Update USB Driver
Sometimes the old or defective device drivers can also take a toll on your device and can give rise to such errors. In order to fix this update your device drivers instantly by following the below-mentioned steps:
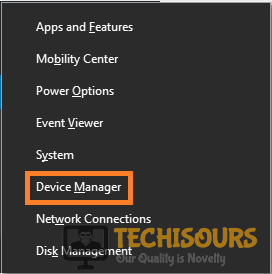
- Open your PC and type in “Device Manager” in the search bar located near the Start menu. Then click to open it.

Open Device Manager - In here look for the option of “Universal Serial Bus controllers” and afterward click to expand it.
- From the pop-up list search for the specific device causing the issue and right-click on it to select the option of “Update Driver”.

Update Device Drivers - Windows will start looking up for the latest driver available for your device and will take you through downloading and installing the updated driver automatically.
- Finally, check to see if the error got resolved now.

Solution 3: Repair Bad sectors
Chkdsk is used to check and repair a device for any sort of error so in order to check your disk for any sort of errors and repairing it proceed with these steps:
- Open your PC and search for “Command Prompt” from the search bar located near the Start menu, right-click on it and select “Run as Administrator”.

Run Command Prompt Note: You specifically need to check for your drive name e.g. if your drive is shown as “Local Disk E” your drive letter entered with the chkdsk command would be E.
- Now type the following command in the command prompt window and press Enter:

chkdsk E:/f/r/x
- Windows will start checking for your device errors and will repair them automatically.
- Lastly, check to see if you have been able to resolve the Request could not be performed because of an I/O Device Error now.
Solution 4: Change the Transfer Mode
Your windows cannot transfer files if the transfer mode is different and not compatible with the OS. To change the transfer mode proceed with these steps:
- Open your PC and type in “Device Manager” in the search bar located near the Start menu. Then click to open it.
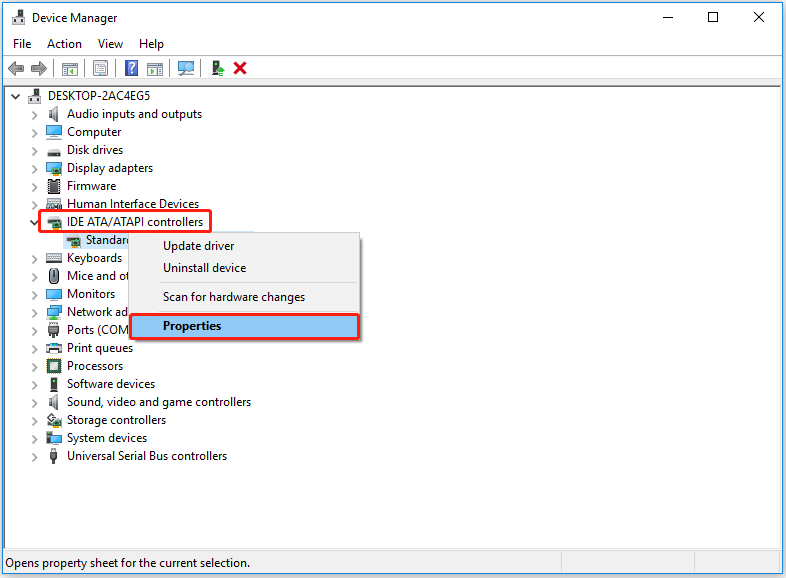
Open Device Manager - In here look for “IDE ATA/ATAPI Controllers” and click to expand this option.
- Now right-click on the “Primary IDE Channel” and then click to select the “Advanced” settings tab at the top of the window.
- In the “Transfer Mode” box select “PIO only” for the device causing errors and then click “OK”.

Select PIO Only Option - Exit from all the windows and now observe if the issue got resolved.

Solution 5: Disconnect All External Devices
Sometimes the other devices connected to your computer can also be troublesome so disconnect all sorts of extra devices and restart your computer again. Now only connect those devices which are necessary and see if the problem is removed.
Solution 6: Changing the Drive Letter
Some users were also able to resolve their I/O device error by simply changing their drive letter. So in order to change the drive letter follow these steps:
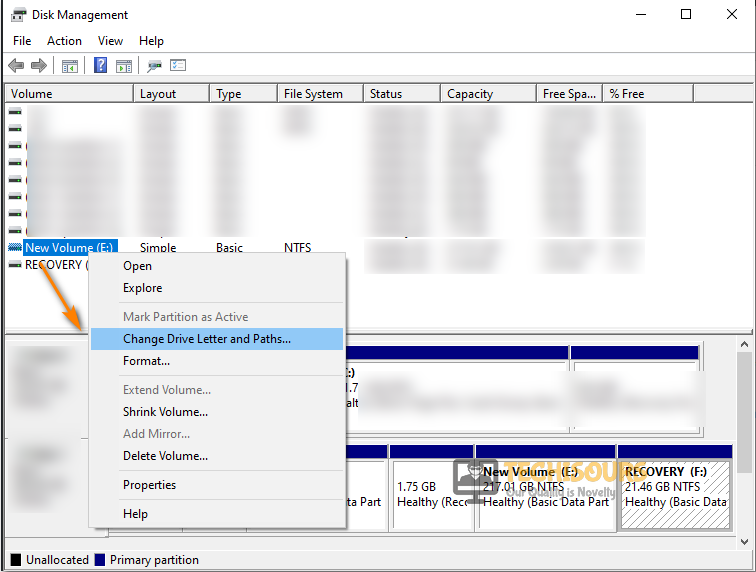
- On the search bar near the Start menu type in “Disk Management” and click to open it up.

Disk Management - When the disk management window opens up it will show you all of the connected storage devices. From here right-click on the particular device causing errors.
- Then click to select “Change Drive Letter and Paths” and a new window will open up and from here click to select the “Change” option.

Change Drive letter and paths - Now assign a new drive letter to the drive from the drop-down menu and click to select “OK”.
- Close all windows and now check whether the problem still persists or not.

Solution 7: Use Windows Troubleshooter
Windows has a built-in troubleshooting feature that searches for all possible errors and provides possible solutions. To run the troubleshooter on your computer implement the following steps:
- Open your PC and search for “Troubleshoot” in the search bar located near the Start menu.
- When in the troubleshoot settings window here look for “Hardware and Devices” in the right pane and click on “Run the Troubleshooter” to select it.

Run the troubleshooter - The Windows will start troubleshooting for any errors and will provide you with the best possible solutions sidewise.
- Carry out those fixes in order to get through the error instantly.

Solution 8: Scan with Windows Drive Check Facility
In order to check a drive for error with windows default drive check you need to carry out these steps:
- Open your PC and go to “This PC” on the main window and right-click on the drive causing issues.

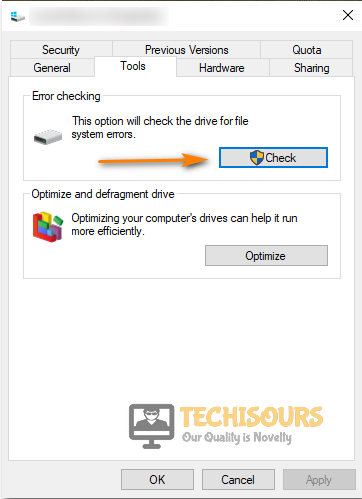
Click on This PC - Then click to select “Properties” from the pop-up list and in the Properties tab navigate to select the “Tools” tab located at the top of the window.
- Proceed to the “Error Checking” section and click on the “Check” option.

Check Drive - A new window will open up asking you if you want to proceed to scan the drive. Press the option of “Scan Drive”.

Scan Drive


Solution 9: Clean Boot Your PC
Sometimes the other third-party apps installed on your computer can be in a clash with your device causing it not to work properly. To check if any other program is at a clash with your drive proceed with these steps:
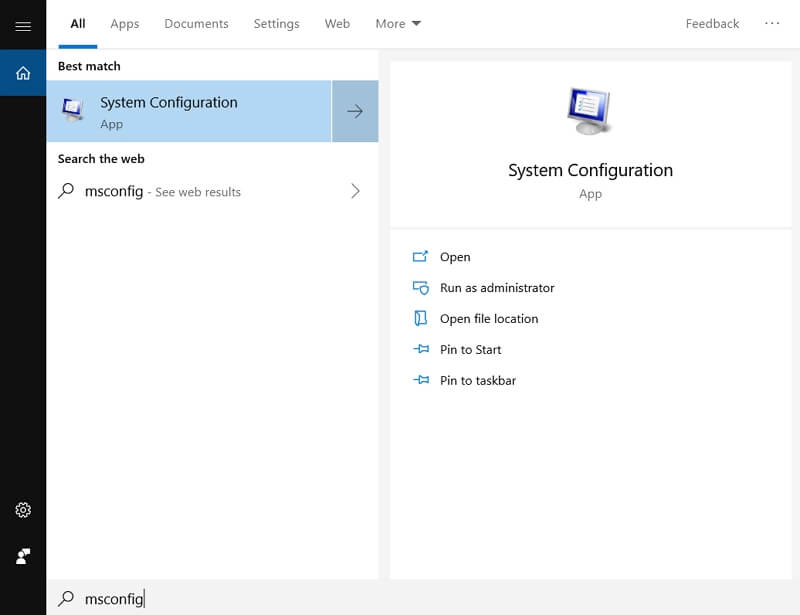
- Search for “msconfig” in the search bar located near the Start menu to open up the “System Configuration” window.

Typing in “Msconfig” - When the window opens click on the “Services” tab placed at the top.
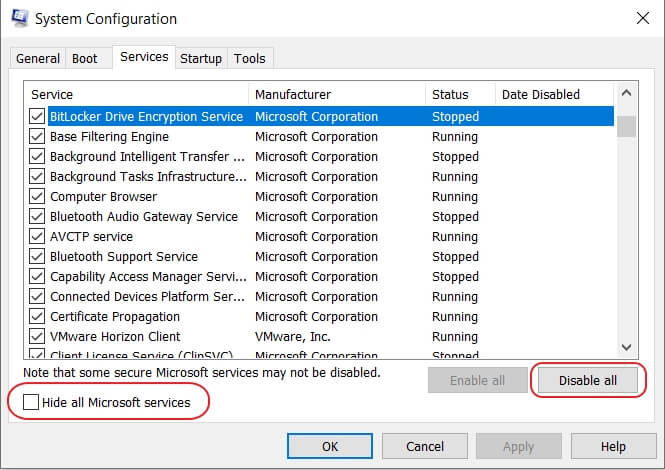
- Scroll down to the bottom of the window to checkmark the option of ‘’Hide all Microsoft Services’’. Then click on “Disable All” at the bottom of the window.

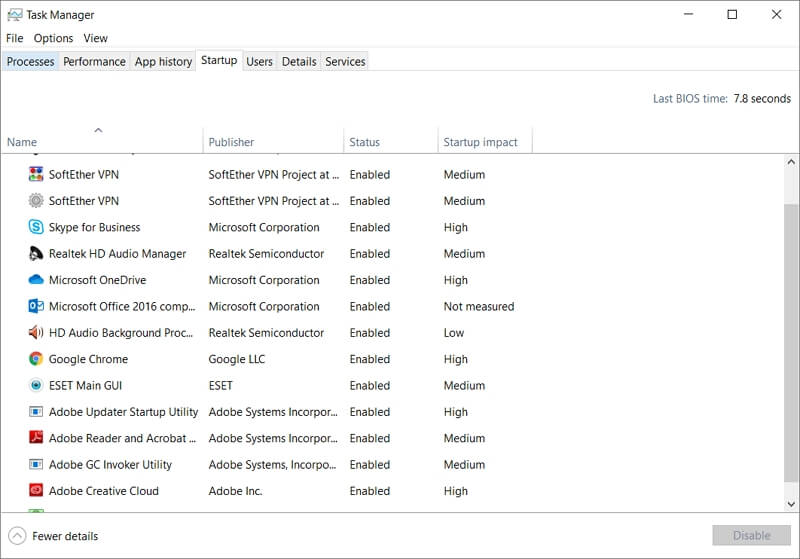
Hide all Microsoft services - Now proceed to open up the “Startup” tab and click to open “Task Manager”.
- When the task manager window opens up in the Startup tab click to select “Disable” at the bottom of the screen.
- Close the task manager window and go back to the “Services” tab and click OK.
- Close all windows and restart your computer now to check if the error still persists or not.


Solution 10: Boot Your PC into Safe-Mode
To check if any third-party install isn’t causing you issues you can boot into Safe-Mode. Safe-Mode enables you to use your computer with very minimal tasks and apps running in your background. To get into Safe-Mode follow these steps:
- Press the “Windows + R” keys on your keyboard to open up the RUN dialog box.
- When the RUN window appears up type in “msconfig” in the dialog box and press Enter.
Typing in “Msconfig” - In the System configuration window navigate to select the “Boot” tab beside the General tab.
- Below the “Advanced” options tick mark the “Safe-Mode” check box and make sure “Minimal” is selected.

Enter Safe Mode - Press OK and select “Restart”.
- Once you are booted into Safe-Mode, try transferring files now and check to see if The Request could not be Performed because of an I/O Device Error has been fixed.

Solution 11: Reinstall USB Controllers
Sometimes errors are caused by defective USB controllers so try to reinstall them by carrying on the below-listed steps:
- Search for “Device Manager” in the search bar located near the Start menu.
Open Device Manager - In here look for “Universal Serial Bus Controllers” on the new window and click to expand this option.
- Now right-click on the “USB Controller” of your drive and click to select “Uninstall”.

Uninstall Device Driver - Close the window and restart your computer. Your computer will automatically reinstall the missing USB controller.
- Finally, proceed to check if the virtual disk manager the request could not be performed because of an i/o device error got fixed now.

Solution 12: Fixing I/O Device Error in CMD
- On the search bar near the Start menu search for “Command Prompt”, right-click on it to select “Run as Administrator”.
Run Command Prompt - When the command prompt window opens up type in the below-listed commands respectively:
list disk (press Enter)
The command prompt window will show you a list of drives connected so here you need to look for the drive causing the issue. If in case its Disk 1, type:
select disk 1 (Press Enter)

attributes disk clear readonly (Press Enter)

clean (Press Enter)

create partition primary (Press Enter)

format fs=fat32 (Press Enter)
Note: This will format the drive, thus, erasing all data on it.
Check to see if implementing this has fixed the “The Request could not be Performed because of an I/O Device Error” message.
Solution 13: Contact Manufacturer
If none of the above-listed fixes worked for you then there must be certain hardware issues and in such a scenario you would need to backup all of your data from the affected drive. To backup your data, you will be needing an expert’s help so contact the drive’s manufacturer for assistance in this case.
Hopefully, the aforementioned fixes will lead you towards eradicating the problem completely but if the issue still exists you may Contact Us here.
What Is An I/O Device Error? When the I/O device error shows up, you are not allowed to read or write from a disk,
hard drive or portable device and so on, following with «The request could not be performed because of an I/O device
error» message. In general, it occurs on external & internal hard drives, DVD or CD drives, SD cards, USB drives while
you are trying to read or copy data in Windows 10/8/7. To fix this error, you’d better know the possible causes of it.

People Also Read:
Stuck in Windows 10 Automatic Repair Loop? Fix It Right
Away (opens new window)
5 Proven Ways to Recover Permanently Deleted Files in Windows
10 (opens new window)
Common Causes of I/O Device Error:
- Outdated hardware drivers.
- Loose connection between hardware and computer.
- Incompatible transfer mode is used by Windows.
- The hard drive is damaged.
After learning the causes of this error, let’s see how to fix the I/O device error on internal/external hard drives,
DVD or CD drives, SD cards, USB drives.
Method 1. Recover Data from Hard Drive, SD Cards, USB Drives with I/O Device Error
When you experience I/O device error on the internal/external device, you might need to recover data from an
inaccessible device. FonePaw Data Recovery (opens new window) will be helpful, specializing in data recovery
from corrupt or formatted devices. With it, you are able to recover the data to a safe location and fix the error
without worrying data loss.
Free Download Buy with 20% off
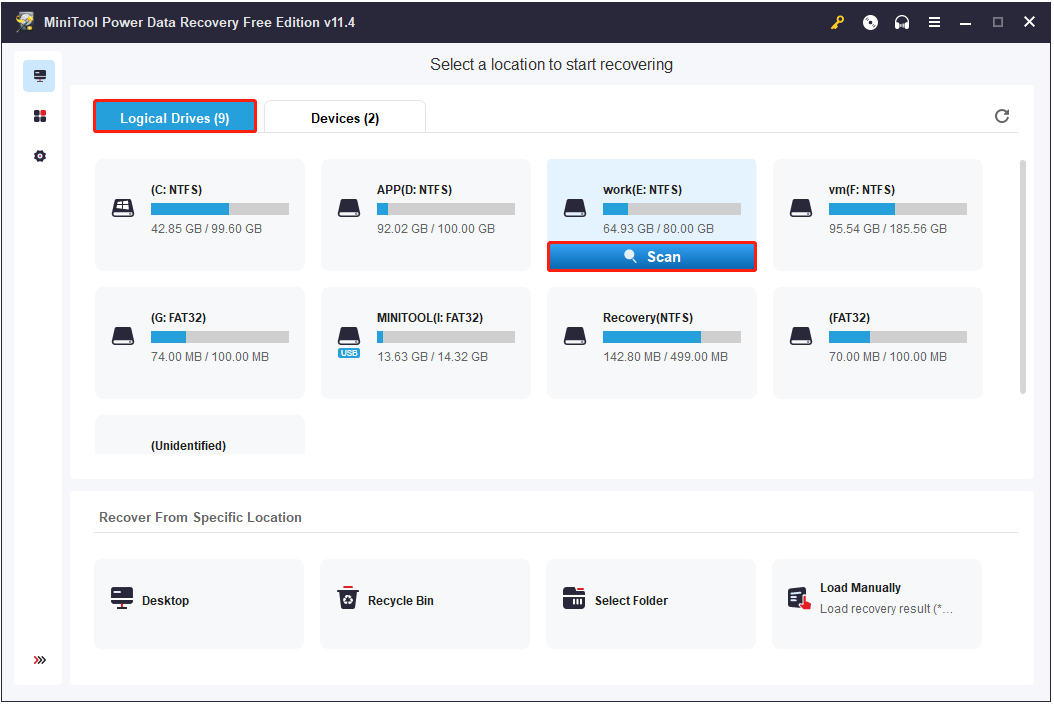
STEP 1. Select the file types and scanning drive after launching the software. And then, click «Scan».
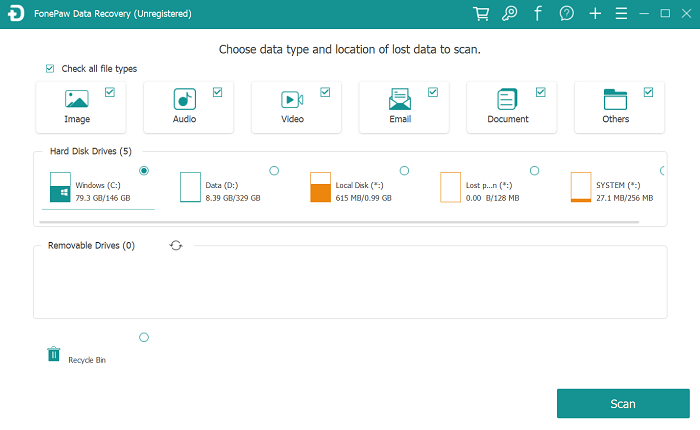
STEP 2. When the scan is completing, you can choose the target files. Moreover, «Deep Scan» is offered to have
a further scanning.
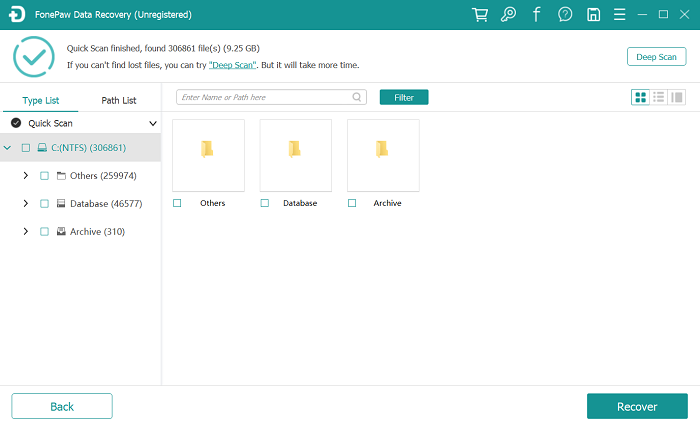
STEP 3. After that, click «Recover» button to finish data recovery when the request could not be performed
because of an i/o device error.
Method 2. Update the Hardware Drivers
If you are noted that your device driver is outdated or not compatible, it is in need to download and install the latest driver (opens new window). After that, your device will go back to normal
functioning so the issue of I/O is fixed well.
Method 3. Check Hardware Connections
Usually, loose connection between hardware and computer will lead to I/O device error.
- If the error is caused by the external hard drive, reinsert the USB or file wire to connect the computer.
- If it is still there, plug the drive into other USB port on the computer. Directly using computer’s USB port is
recommended. - Use alternative cable for the drive to reconnect to the computer.
- Try to access the drive again.
NOTE:
If I/O device error is caused by the internal hard drive, reconnecting drive is not suggested for casual users in
case of causing damage to the drive.
Method 4. Run Windows Default Tool for Error Checking
Actually, to fix I/O device error, running windows default tool for error checking must be one of the most effective
methods. Here are the simple tutorials.
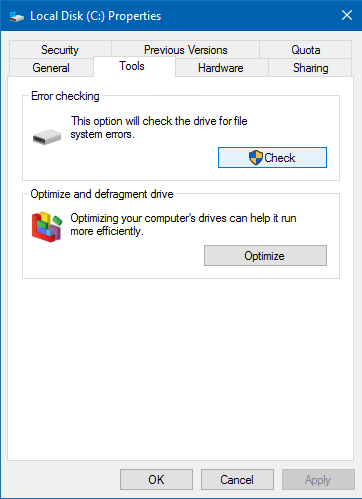
STEP 1. Right-click the inaccessible hard drive to choose «Properties».
STEP 2. In the «Tool» tab, click on the «Check» button for error checking.
STEP 3. Click «Scan drive» on the pop-up window.
And then, windows will automatically to fix the error.
Method 5. Change the IDE Channel Transfer Properties
Sometimes, Windows can’t transfer data from the computer and cause I/O device error because of incorrect transfer
mode for the drive. In this case, follow the steps below to fix this issue.
STEP 1. Right-click «My Computer».
STEP 2. Select «Manage» > «Device Manager» > «IDE ATA/ATAPI controllers».
STEP 3. Locate the Secondary IDE Channel where the external drive is connected. Right-click on it and choose
«Properties».
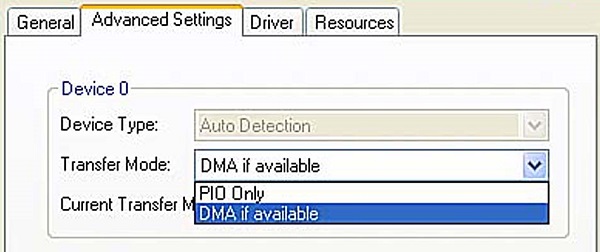
STEP 4. On «Advanced Settings» tab, enable «PIO Only» option in «Transfer Mode» box under Device 0 section.
And then, click «OK» to close the windows.
STEP 5. Restart your PC.
Method 6. Repair Device with Command Prompt
Likewise, you can try to run «CHKDSK» command to repair device so as to isolate I/O device error.
STEP 1. Press down «Windows» + «X» keys to open Command Prompt (Admin).
STEP 2. Click «Yes» on the pop-up window.
STEP 3. Type «chkdsk [your drive letter]: /f /r /x», and then press «Enter».
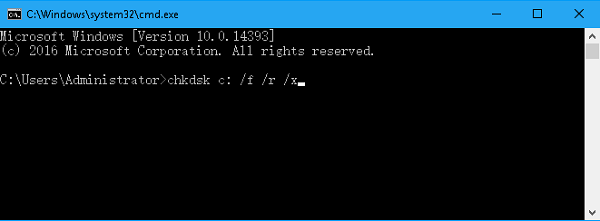
After that, Windows will automatically check and repair I/O device error.
You may receive the error message “the request could not be performed because of an i/o device error USB” due to the connection issue between the storage device and PC. Sometimes, this error is also triggered due to corrupted or outdated hardware drivers. Regardless the causes, this error can be easily fixed by checking the hardware connection, running chkdsk utility, updating the device drivers and many others solutions mentioned in this blog.
When the USB i/o device error occurs, you won’t be allowed to read/write a disk. Additionally, you will not be able to edit or transfer the any file of USB. In other words, you can say that, the data or files stored in your USB drive are at great risk of being lost permanently.
But since you have visited this webpage then I must say that you don’t have to worry at all. Because this post contains 9 working fixes to troubleshoot device i/o error USB drive and recover data from USB drive easily.
Rated Excellent on Trustpilot
Free USB Drive Recovery Tool.
Recover data from USB drives, Pendrives, SSDs, HDDs, and other devices on Windows. Try now!
Quick Navigation:
- What Is I/O Device Error?
- How To Fix USB Flash Drive I/O Device Error
- Recover Deleted Data From USB Flash Drive
- How Do I Initialize A Disk With An I/O Error?
- What Causes USB Flash Drive I/O Device?
Before fixing this issue, let us know more about the pendrive i/o device error.
What Is I/O Device Error On USB Flash Drive Error?
I/O stands for Input/Output and I/O device error is actually an issue with the device that stops Windows from reading or writing the data on it.
This error appears not only on USB flash drives but also on SSD or HDD, SD card, external hard drive, CD/DVD, etc. When you get this error, you will be unable to read or write any new data to that device on your Windows PC.
Generally, when you get I/O device error, you may get these below two error messages:
- The request could not be performed because of an I/O device error USB
- Only part of a read process memory or write process memory request was completed
Also, you may get error code errors such as error 6, error 21, error 103, error 105, and error 131.
Quick Solutions |
Step-By-Step Solutions Guide |
|
Fix 1: Check The Hardware Connection |
If there is a loose connection or faulty cable or USB port, it can cause this error to take place…Complete Steps |
|
Fix 2: Fix I/O Error USB Flash Drive In Command Prompt |
Using a command prompt will help you run chkdsk function that will check…Complete Steps |
|
Fix 3: Start Computer In Clean Boot State |
Starting the computer in a clean boot state can make you clean…Complete Steps |
|
Fix 4: Change The Drive Letter |
You can change the drive letter and fix this issue…Complete Steps |
|
Fix 5: Update The Device Driver |
Due to the outdated device drivers, it is possible that you may get this issue…Complete Steps |
|
Fix 6: Reinstall USB Controllers |
Try to solve this error by reinstalling the USB controllers…Complete Steps |
|
Fix 7: Change The Transfer Mode In IDE Channel Properties |
If Windows is trying to use a transfer mode that your device does not support…Complete Steps |
|
Fix 8: Repair USB IO Device Error With ‘Error Checking |
Error Checking scans internal & external hard drives for several file system errors…Complete Steps |
|
Fix 9: Seek Help From Hardware Manufacturer |
It is suggested to contact the technical support of the hardware manufacturer for help…Complete Steps |
Fix #1: Check The Hardware Connection
The very first fix you can try to fix USB flash drive I/O device error is to check the connection. If there is a loose connection or faulty cable or USB port, then it can cause this error to take place. You can try these fixes below to overcome this issue:
- Try to connect USB flash drive to another computer
- Connect the USB flash drive to another USB port
- Replace the USB cable
However, after trying these, even if you get I/O device error then you can try other solutions mentioned below.
You May Also Read: Fix Please Insert A Disk Into USB Drive Without Losing Data
Fix #2: Fix I/O Device Error USB Flash Drive In Command Prompt
Using a command prompt will help you run chkdsk function that will check and fix usb flash drive i/o device error in command prompt. So, to do so, follow the below steps:
- First of all, press Windows keys and then type there cmd to open the menu. Next, right-click on the option ‘Command Prompt’ and then choose ‘Run as administrator’.

- Now, you have to click ‘Yes’ to simply launch the Command Prompt as Administrator.
- Next, in the new Command Prompt window, you have to type there chkdsk E: /f /r /x where you can replace E with the drive letter you are using.
This fix will also help you fix USB flash drive using cmd command and further recover data from it using the data recovery tool mentioned below.
Fix #3: Start Computer In Clean Boot State
Starting the computer in a clean boot state can make you clean whether i/o device error USB external hard drive is caused due to a driver or application conflict. If it is, then it will help you know which application or software is causing this error.
So, in this case, it is easy to start the computer in a clean boot. To start the computer in the clean boot state, follow the below steps:
- First of all, you have to log in Windows as Administrator account and then press Windows + R keys together and it will open Run dialog box.
- You can then type msconfig in Run box and then press Enter key and it will open System Configuration window.
- Next, you have to click ‘General’ tab on System Configuration window and then select Selective startup and then simply uncheck the ‘Load startup items’ box.
- Now, click the ‘Services’ tab on the pop-up window and then check the box ‘Hide all Microsoft services’ and then tap ‘Disable all’.
- Next, you have to go to the Startup option and then click there ‘Open Task Manager’ and this will open Task Manager

- After this, you have to select all startup items and then click ‘Disable’ and then again click ‘x’ to close the Task Manager.
- Next, you have to go back to ‘System Configuration’ and then Startup and then click ‘OK’ and then reboot the Windows PC.
You Might Also Read: Complete Steps To Fix ‘USB Drive Detected But Not Accessible’ Issue
Fix #4: Change The Drive Letter
Sometimes you may also get USB flash drive I/O device error because the system doesn’t show its drive letter when connected to the PC.
In this case, you can change the drive letter and fix this issue and get the request could not be performed because of an i/o device error disk management. So, follow the below steps to do so:
- First of all, you have to go to ‘This PC’ and then right-click and then choose the option ‘Manage’ and then go to ‘Disk Management’.
- Next, you have to right-click the USB flash drive and then go to USB flash drive and then select ‘Change Drive Letter and Paths’.
- Now, click ‘Change’ in the new window and then assign a new drive letter to the USB flash drive and then click ‘OK’.

Fix #5: Update The Device Driver To Fix ‘The Request Could Not Be Performed Because Of An I/O Device Error USB’
Due to the outdated device drivers, it is possible that you may get a USB flash drive I/O device error. As for example, ‘there is no media in USB flash drive’ or USB not showing up in Windows and the ‘the request could not be performed because of an IO device error USB’.
So, to update the driver drive, you have to follow the below steps:
- Firstly, you have to connect the USB flash drive to the PC and then right-click on the option ‘This PC’ and then choose ‘Manage’.
- Next, you have to click ‘Device Manager’ and then go to ‘Disk drives’. Next, search and right-click the problematic USB flash drive and then simply select the option there ‘Update driver’.
- Now, you have to click the option ‘Search automatically search for driver software online’.
- After doing so, wait for the driver to be updated and then reboot the computer. You can further open the device to check whether the USB flash drive I/O error still persists.

Fix #6: Reinstall USB Controllers
When you get any I/O device error, you also try to solve this error by reinstalling USB controllers. Yes, doing so can somehow fix the i/o device error flashdisk. Follow the below steps to do so:
- At first, click the Windows + X keys together to open the power users’ menu.
- Next, you have to click on Computer Management and then go to Device Manager.

- Now, you have to expand Universal Serial Bus controllers and then make a right-click on a device and click Uninstall.
- Next, you have to repeat for each device and then after you complete this task, restart your PC. After your PC gets restarted, the USB controllers will install automatically.
Fix #7: Change The Transfer Mode In IDE Channel Properties
If Windows is trying to use a transfer mode that your device does not support then you will encounter this error message. So, to remove or fix USB flash drive I/O device error, you have to switch the transfer mode:
- Firstly, press the Windows + X keys to open the menu and then select the option ‘Device Manager’.

- Next, you have to expand ‘IDE ATA/ATAPI controllers’. A subset will then get opened and listing the different IDE ATA/ATAPI channels for the PC.
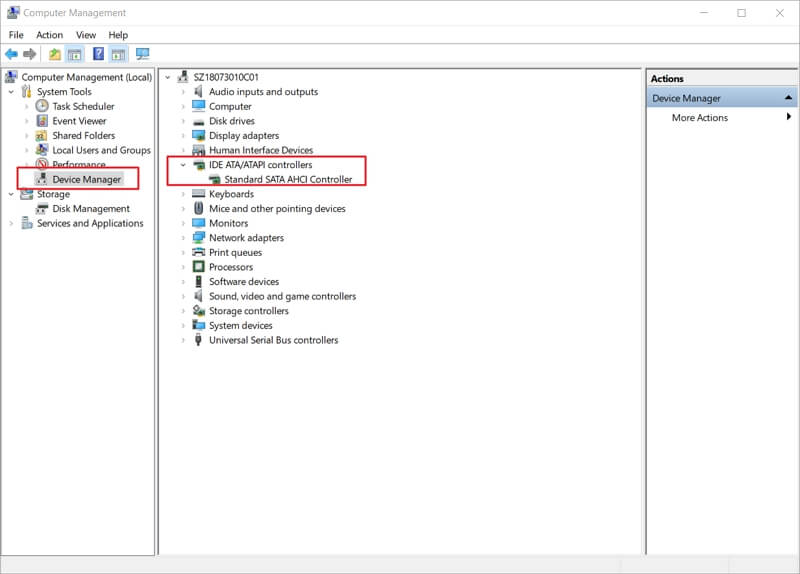
- Now, you have to make a right-click the channel where the appropriate disk drive is connected. Next, you have to click there ‘Properties’ and this channel will then become ‘Secondary IDE Channel’.

- After this, select ‘PIO Only’ in the ‘Transfer Mode’ in the ‘Advanced Settings’ tab for the device that represents the appropriate drive. Generally, this is Device 0, and then click OK option and exit all the windows.
You can then test the USB flash drive and then check if the message ‘USB flash drive I/O device error’ has been removed.
Also Read: Fix Error Checking USB Drive Scanning and Repairing Stuck
Fix #8: Repair USB IO Device Error With ‘Error Checking’ Utility
Windows has the feature which is known as ‘Error Checking’. It helps to scan internal & external hard drives for several file system errors and resolves them.
In order to repair bad sectors for SD card/USB drive, try the below instructions:
1: First of all, connect the USB drive to a PC.
2: In the second step, you have to press on Win + E keys together in order to launch Windows Explorer.
3: Make right-click on a drive that has the bad sectors >> open the Properties.
4: At this time, tap on Tools >> Check.
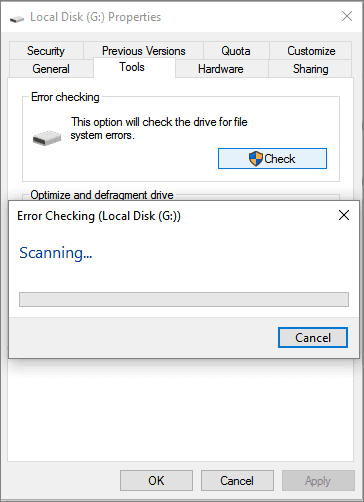
Now, the scanning process starts. Once the scan process completes, if the usb i/o error is found then, try the next way.
Fix #9: Seek Help From Hardware Manufacturer
If you have already tried all the above ways to fix the request could not be performed because of an i/o device error when initializing disk and you still fail then you can seek expert help. It is suggested to contact the technical support of the hardware manufacturer for further help.
To do so, you have to follow the below steps:
- You have to first visit the hardware manufacturer’s website and then download the latest driver or firmware for the device which reposts I/O device error.
- Next, you have to double-click the drive or firmware installer and get it installed on the PC. You can then restart the PC and check if the error persists.
- After this, email the technical support team of the hardware in question and then ask for fixes. However, if the solution still persists, then replace the USB flash drive with the new one.
Recover Deleted Data From USB Flash Drive Using USB Flash Drive Data Recovery Tool
If you ever notice that the data from USB flash drive has been deleted due to any reason then you can easily perform USB flash drive data recovery.
Yes, I am saying so because, with the help of the USB Flash Drive Data Recovery Tool, you can easily recover deleted media files from USB flash drives.
This data recovery tool is very easy to use and is 100% safe and secure to use. This tool recover data of all types like photos, video and audio files from external hard drives. Also, it recovers all file formats of photos, videos and audio files which include the following:
- Image file formats: PNG, JPEG/JPG, TIFF, GIF, BMP, RAW image file formats
- Video file formats: MP4, MPEG, FLV, VOB, WMV, M4V, MOV, F4V, AVI, MKV, etc
- Audio file formats: MP3, FLAC, WMA, M4A, AIFF, RPS, OGG, MIDI, AMR, etc
Well, to use this tool, you have to just download and install USB Flash Drive Data Recovery Tool and follow the further steps as directed in the tool


* Free version of the program only scans and previews recoverable objects.
Here is the step-by-step guide to recover deleted data from a USB flash drive in no time using this fully-featured data recovery tool.
How Do I Initialize A Disk With An I/O Error?
Well to initialize a disk with I/O device error, you have to follow the below steps:
- First of all, connect the uninitialized USB flash drive, external hard drive, or other storage devices to your computer.
- Next, you have to press Windows + R keys to open Run command and then type there diskmgmt.MSC and then hit Enter key.
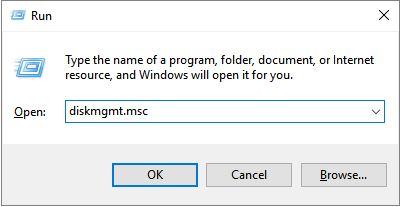
- You have to then find the uninitialized or unknown USB flash drive with I/O device error and then right-click on it and then select the option ‘Initialize Disk’.
- After this, you have to set the disk to initialize and then set the drive as MBR or GPT.

What Causes USB Flash Drive I/O Device Error To Take Place?
There are several reasons why the request could not be performed because of an i/o device error in USB takes place. Some of them are mentioned below:
- Hardware drivers are incompatible or corrupt
- The hardware device is damaged
- USB controllers have become corrupt or unstable
- Connection issues like faulty cable
Also Read: Fix Unknown USB Device (Device Descriptor Request Failed)
FAQs [Frequently Asked Questions]
How Do You Fix The Request Could Not Be Performed Because Of An I/O Device Error Using CMD?
If you want to fix the request could not be performed because of an i/o device error using CMD then you need to follow the below process:
All you need to do is, go to the Start menu & type CMD. Then, right-click on ‘Command Prompt’ > ‘Run as administrator’ > ‘Yes’ to open a Command Prompt as Administrator. Once the new Command Prompt window opens, simply type: chkdsk E: /f /r /x command to replace E with a drive letter.
Is USB an IO device?
Yes, USB is an IO device.
Since an USB receives data from your computer as input & also sends data to your PC or another device as output, thus you can say it an IO device. Here’s the examples of some I/O storage devices: USB flash drives, hard disk drives & CD/DVD-ROM drive. Examples of some communication I/O devices: dongles and modems, network adapters & Bluetooth adapters.
What are the 3 types of IO?
Generally, the IO is categorized into three groups — Control Output, Sensory Input & Data Transfer.
Time To Conclude
If you ever get USB flash drive I/O device error then you can try these above-mentioned ways to fix this error. All these fixes are very effective and one can easily try the fixes even without having any technical knowledge.
Also, if the data saved in the USB flash drive gets deleted due to any reason then you can easily recover it using USB Flash Drive Data Recovery Tool. This tool will help you restore lost media files from USB flash drives or other external hard drives in no time.

Taposhi is an expert technical writer with 5+ years of experience. Her in-depth knowledge about data recovery and fascination to explore new DIY tools & technologies have helped many. She has a great interest in photography and loves to share photography tips and tricks with others.
В этой статье рассматривается ошибка 0x8007045d, также известная как Ошибка 0x8007045d и означающая запрос не может быть выполнен из-за ошибки устройства ввода-вывода.
Об ошибке Windows
Операционная система Windows сегодня используется миллионами пользователей персональных компьютеров и ноутбуков. И вполне вероятно, что большинство из них в свое время сталкивались с тем или иным типом ошибки Windows. Отчеты об ошибках были представлены компанией Microsoft для обеспечения средств сбора и отправки отладочной информации после ошибки или для применения шагов по устранению неполадок в зависимости от того, получил ли пользователь синтаксическую, логическую ошибку или ошибку времени выполнения.
Если пользователь получает код остановки, то вместе с сообщением об ошибке предоставляется краткая информация по устранению неполадок. Затем пользователь может найти конкретное сообщение об ошибке и применить исправление, предоставленное на сайтах поддержки Microsoft, а также в других доступных в Интернете статьях и журналах по данной теме.
В других случаях пользователь получает только уведомление о сбое компьютера, после чего ему предлагается отправить отчет о сбое в Microsoft. Это делается для сбора данных для анализа, чтобы компания Microsoft могла отправить пользователю решение проблемы.
Каким бы ни был случай, вот некоторые общие сведения об устранении неполадок, которые можно использовать для устранения ошибок Windows.
Определения (Бета)
Здесь мы приводим некоторые определения слов, содержащихся в вашей ошибке, в попытке помочь вам понять вашу проблему. Эта работа продолжается, поэтому иногда мы можем неправильно определить слово, так что не стесняйтесь пропустить этот раздел!
- Устройство — электронные устройства: компьютеры, смартфоны, планшеты, электронное оборудование и платформы.
- Запрос — запрос представляет собой сообщение отправлено источником другому объекту.
Симптомы 0x8007045d — Ошибка 0x8007045d
Ошибки Windows можно классифицировать как синтаксические ошибки, логические ошибки или ошибки времени выполнения.
Когда пользователь получает синтаксическую ошибку, компьютер просто внезапно выдает сообщение об ошибке, что в фоновом режиме произошел сбой. Программы, к которым обращается пользователь, могут застопориться или полностью завершиться. Пользователь может продолжать использовать другие приложения, но время от времени появляется непонятное сообщение о том, что запущенная программа не может запуститься, потому что какой-то процесс не работает.
Ошибки времени выполнения происходят во время работы приложения. Поэтому, когда ошибка возникает, она просто происходит без предупреждения, и компьютер выдает уведомление о том, что произошла ошибка.
Логические ошибки связаны с программированием. Ошибка вызывает непреднамеренный вывод или поведение. Если говорить о компьютерных системах, которые прошли все испытания и поступили в продажу, то логические ошибки случаются только тогда, когда произошли значительные изменения в физическом состоянии логической платы. Возможно, часть шин расплавилась или возникла подобная ситуация. Это может привести к тому, что компьютер внезапно издаст громкий звуковой сигнал или скрежещущий звук, и даже может перейти к внезапной нестабильной работе, замерзнуть или резко изменить температуру перед фактическим сбоем.
 Repair Tool")
(Только для примера)
Причины ошибок Ошибка 0x8007045d — 0x8007045d
Ошибки Windows могут быть вызваны неисправностью аппаратных компонентов или повреждением ОС. Некоторые из них могут быть даже связаны с проблемами программирования, которые не были решены, поскольку ошибки не были устранены на этапе проектирования. Иногда ошибки Windows могут возникать из-за изменений, внесенных в компьютер.
Методы исправления
Для разных категорий ошибок Windows существуют разные шаги по устранению неполадок. Однако существуют общие шаги, которые можно применить, столкнувшись с этими ошибками. Вот они.
Если метод ремонта вам подошел, пожалуйста, нажмите кнопку upvote слева от ответа, это позволит другим пользователям узнать, какой метод ремонта на данный момент работает лучше всего.
Обратите внимание: ни ErrorVault.com, ни его авторы не несут ответственности за результаты действий, предпринятых при использовании любого из методов ремонта, перечисленных на этой странице — вы выполняете эти шаги на свой страх и риск.
Метод 1 — Восстановить базу данных Центра обновления Windows
Когда хороший компьютер внезапно начинает работать странным образом, причиной могут быть обновления Windows. Чтобы исправить это, пользователи могут запустить Восстановление системы, если есть дата восстановления, сохраненная до ошибки. Вот как это делается.
Восстановление в Windows 7:
- Нажмите Пуск и введите Восстановление системы в поле поиска, затем нажмите клавишу ввода.
- Когда появится окно восстановления системы, нажимайте Далее , пока не дойдете до окна, в котором вы можете выбрать точку восстановления. Вы увидите список дат восстановления с описанием.
- Затем снова нажмите Далее и подтвердите процесс восстановления. Подождите, пока он прекратит обработку, и появится окно, в котором вы можете нажать кнопку Готово . Закройте окно и дайте компьютеру перезагрузиться.
Вы также можете восстановить свой компьютер с помощью установочного диска ОС .
- Для этого загрузитесь с компакт-диска с ОС или с носителя для восстановления.
- Следуйте инструкциям, пока не дойдете до экрана, на котором будет предложена опция Восстановить мой компьютер , нажмите и выберите Восстановление системы из списка инструментов восстановления.
- Вы можете выбрать любую точку восстановления в окне «Восстановление системы», но убедитесь, что вы восстановили дату, при которой ваш компьютер работает нормально.
- Дождитесь завершения процесса и позвольте вашему компьютеру перезагрузиться на рабочий стол.
Вы также можете загрузиться в безопасном режиме .
- Загрузите компьютер и нажмите F8. Выберите Безопасный режим с командной строкой , нажимая стрелки на клавиатуре, чтобы переместить выделение вниз к этому элементу.
- В безопасном режиме введите rstrui.exe и нажмите Enter в командной строке. Следуйте указаниям мастера восстановления и перезагрузите компьютер в обычном режиме.
Восстановление в Windows 8:
Восстановление в среде Windows
- В Windows 8 щелкните значок поиска и введите Восстановление системы.
- Продолжайте нажимать кнопку «Далее», пока не дойдете до окна, в котором можно выбрать дату восстановления.
- Подтвердите восстановление, выполнив оставшиеся шаги. После этого перезагрузите компьютер в обычном режиме.
Восстановить при загрузке
- Перезагрузите компьютер и нажмите F11, чтобы начать восстановление системы.
- Вы увидите экран «Дополнительные параметры», на котором вы найдете пункт «Восстановление системы».
- Вам будет предложено выбрать учетную запись администратора, просто выберите и войдите в свою учетную запись администратора.
- Нажимайте кнопку «Далее», пока не дойдете до экрана, на котором можно выбрать даты восстановления.
- Нажимайте кнопку «Далее», пока не дойдете до конца процесса восстановления и не увидите кнопку «Готово».
- Перезагрузите компьютер в обычном режиме.
Восстановление в Windows 10:
Внутри окна
- Запустите восстановление системы, введя его в поле поиска. Щелкните элемент, который появится в результатах поиска.
- Когда откроется окно «Восстановление системы», нажимайте «Далее», пока не получите список для выбора даты восстановления, выберите ту, которая, как вы знаете, лучше всего подходит для вас.
- Подтвердите процесс, нажав «Далее», затем «Да» и, наконец, «Готово». После закрытия окна перезагрузите компьютер.
Использование установочного носителя
- Если вы не можете загрузиться в Windows, вам лучше загрузить файл Media Creator из Microsoft. Создайте загрузочный диск с помощью DVD или флэш-диска.
- После этого перезагрузите компьютер и войдите в BIOS, чтобы изменить загрузочное устройство на DVD или флэш-диск.
- Когда вы перейдете к экрану установки, выберите «Устранение неполадок»> «Дополнительные параметры»> «Восстановление системы» и выполните процесс таким же образом.
Метод 2 — Исправить неправильную системную дату и время
Иногда Windows может работать неправильно из-за неправильной настройки времени. Чтобы установить время и дату:
В Windows 7
- Нажмите «Пуск», затем «Панель управления».
- Нажмите «Дата и время».
- В окне «Дата и время» нажмите «Изменить часовой пояс», чтобы выбрать правильный часовой пояс.
- Нажмите «Применить» и «ОК».
В Windows 8
- Откройте «Настройки», переместив указатель мыши вправо, при открытии вкладки щелкните значок шестеренки.
- Откроется новая всплывающая вкладка «Настройки», нажмите «Панель управления».
- На панели управления нажмите «Часы, язык и регион». Затем нажмите «Установить время и дату» в разделе «Дата и время».
- Когда откроется окно «Дата и время», нажмите «Изменить дату и время» и перейдите к нужной дате и времени в следующем окне. Чтобы подать заявку, просто нажмите «ОК».
В Windows 10
- Просто щелкните правой кнопкой мыши дату и время на панели задач, расположенной в правой нижней части экрана.
- Нажмите «Настроить дату и время». Откроются настройки даты и времени.
- Вы можете выбрать часовой пояс, а затем закрыть окно. Это автоматически обновит время и дату на панели задач.
Метод 3 — Проверьте отсутствие или повреждение файлов
- Запустить проверку системных файлов
- Чтобы запустить команду, откройте командную строку с повышенными привилегиями, набрав ее в окне поиска, затем щелкните правой кнопкой мыши командную строку и выберите «Запуск от имени администратора».
- Введите в командной строке sfc / scannow и дождитесь успешного завершения процесса проверки.
- Запустите Checkdisk — Chkdsk исправляет многие несоответствия с ОС. Системные ошибки также можно исправить с помощью этой утилиты. Чтобы запустить это,
- Откройте командную строку, введя ее в поле поиска, а затем, когда вы увидите результат в верхней части списка, щелкните его правой кнопкой мыши и выберите «Запуск от имени администратора».
- Ваша система может сказать, что вы не можете запустить ее в данный момент, потому что вы все еще обрабатываете данные, и спросит вас, хотите ли вы запустить ее перед следующим запуском, просто нажмите y для подтверждения, а затем выйдите с экрана и перезагрузите компьютер.
- После перезагрузки компьютера вы увидите, что checkdisk работает вне Windows, просто дайте ему закончить, пока он не даст вам отчет о том, что было найдено, исправлено или отмечено.
- Закройте окно и дайте компьютеру нормально перезагрузиться.
Другие языки:
How to fix 0x8007045d (Error 0x8007045d) — the request could not be performed because of an I/O device error.
Wie beheben 0x8007045d (Fehler 0x8007045d) — die Anforderung konnte aufgrund eines E/A-Gerätefehlers nicht ausgeführt werden.
Come fissare 0x8007045d (Errore 0x8007045d) — non è stato possibile eseguire la richiesta a causa di un errore del dispositivo I/O.
Hoe maak je 0x8007045d (Fout 0x8007045d) — het verzoek kon niet worden uitgevoerd vanwege een I/O-apparaatfout.
Comment réparer 0x8007045d (Erreur 0x8007045d) — la requête n’a pas pu être exécutée en raison d’une erreur de périphérique d’E/S.
어떻게 고치는 지 0x8007045d (오류 0x8007045d) — I/O 장치 오류로 인해 요청을 수행할 수 없습니다.
Como corrigir o 0x8007045d (Erro 0x8007045d) — a solicitação não pôde ser realizada devido a um erro do dispositivo de E / S.
Hur man åtgärdar 0x8007045d (Fel 0x8007045d) — begäran kunde inte utföras på grund av ett I/O -enhetsfel.
Jak naprawić 0x8007045d (Błąd 0x8007045d) — żądanie nie mogło zostać wykonane z powodu błędu urządzenia we/wy.
Cómo arreglar 0x8007045d (Error 0x8007045d) — la solicitud no se pudo realizar debido a un error del dispositivo de E / S.
![]() Об авторе: Фил Харт является участником сообщества Microsoft с 2010 года. С текущим количеством баллов более 100 000 он внес более 3000 ответов на форумах Microsoft Support и создал почти 200 новых справочных статей в Technet Wiki.
Об авторе: Фил Харт является участником сообщества Microsoft с 2010 года. С текущим количеством баллов более 100 000 он внес более 3000 ответов на форумах Microsoft Support и создал почти 200 новых справочных статей в Technet Wiki.
Следуйте за нами: ![]()
![]()
![]()

Этот инструмент восстановления может устранить такие распространенные проблемы компьютера, как синие экраны, сбои и замораживание, отсутствующие DLL-файлы, а также устранить повреждения от вредоносных программ/вирусов и многое другое путем замены поврежденных и отсутствующих системных файлов.
ШАГ 1:
Нажмите здесь, чтобы скачать и установите средство восстановления Windows.
ШАГ 2:
Нажмите на Start Scan и позвольте ему проанализировать ваше устройство.
ШАГ 3:
Нажмите на Repair All, чтобы устранить все обнаруженные проблемы.
СКАЧАТЬ СЕЙЧАС
Совместимость
![]()
Требования
1 Ghz CPU, 512 MB RAM, 40 GB HDD
Эта загрузка предлагает неограниченное бесплатное сканирование ПК с Windows. Полное восстановление системы начинается от $19,95.
ID статьи: ACX014406RU
Применяется к: Windows 10, Windows 8.1, Windows 7, Windows Vista, Windows XP, Windows 2000
Совет по увеличению скорости #41
Использование TeraCopy для быстрого копирования больших файлов:
Использование стандартного инструмента копирования Windows иногда может вызывать разочарование, особенно если вы хотите передавать большие файлы по сети. Используйте TeraCopy, чтобы легко ускорить копирование больших файлов. Он предлагает такие функции, как пауза и возобновление, восстановление после ошибок, проверка точности целевого файла, сокращение времени копирования и множество других функций, которые трудно игнорировать.
Нажмите здесь, чтобы узнать о другом способе ускорения работы ПК под управлением Windows
What is I/O device error and how to fix it without affecting the original data? This article will help you understand the origin and solution of the I/O device error. Try MiniTool software to recover lost data.
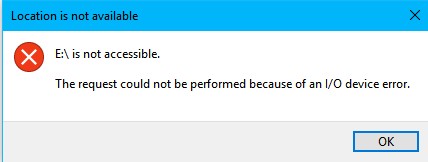
I cannot access my external hard drive due to the following error message: «Drive is not accessible. The request could not be performed because of an I/O device error.» (Picture below)
Read this post to find reliable solutions to fix this I/O device error external hard drive as well as removable media without the loss of any data.
Part 1: What Is An I/O Device Error?
An I/O device error (short for Input/Output device error) happens when Windows is not able to perform an input/output action (such as reading or copying data) when it is trying to access a drive or disk.
It can occur to many different types of hardware devices or media.
Note: Sometimes, an I/O device error may occur when you try to access the floppy disk drive in Windows XP Service Pack.
Reasons for I/O Device Error
- This plugged storage device is incorrectly connected. PC cannot detect your connected device normally.
- The computer USB port or USB card reader is damaged or broken.
- The computer storage device driver is outdated, damaged or incompatible with your attached device.
- The external hard drive, memory card or USB drive is recognized with a wrong drive letter.
- The external hard drive, memory card or USB drive that you are trying to access is dirty or damaged.
- Windows is trying to use a transfer mode that the hardware device cannot use.
Common Symptoms of «I/O Device Error»
In general, you will get the following messages if your storage device unexpectedly gets the I/O device error issue:
- «The request could not be performed because of an I/O device error».
- «I/O error 32», «I/O error 21» or the similar «I/O error + codes».
- «Only part of a read process memory request was completed» or «Only part of a write process memory request was completed».
Click to Tweet
So, how to solve this issue? Click the Play button to learn how to fix i/o device error Windows 10/7
Actually, regardless of why and how the I/O device error message is triggered, it is strongly recommended for data of the affected drive to be transferred or backed up before any attempts to fix the issue. All of the files and data stored on the affected drive are at the risk of being lost completely in the occurrence of the I/O error.
However, how to get lost data back from this damaged drive effectively?
Part 2: Recover Data from Drive with I/O Device Error
How to recover data from drive with I/O device error without affecting the original data?
We recommend MiniTool Power Data Recovery!
- All-in-one and read-only data recovery software.
- Excellent data recovery effect and great reliability.
- Detailed instructions guide users to complete data recovery successfully.
- Over 2,000,000 users download this tool from CNET.
- Supported OS: Windows XP, Vista, Windows 7, Windows 8, Windows 8.1, Windows 10, Windows Server 2003, Windows Server 2008 (R2), and Windows Server 2012.
In short, using MiniTool Power Data Recovery, you can easily and quickly recover lost data without damaging the original data. It is a tool with high security, excellent performance, and simple operations.
Free Download
Warning: Do not install Power Data Recovery on the drive containing lost data. The original data could be overwritten and there is no way to recover them.
Step-by-step Guide to Recovering Data from Drive with I/O Device Error
Step 1. Launch MiniTool Power Data Recovery. Select the target drive and click Scan to scan for desired data in the disk sector by sector. For the best recovery result, please wait until the full scan is complete.
Note: You can click Scan Settings icon in the left panel to configure the scan to scan for specific file systems and file types. For example, to recover only pictures or photos.
Step 2. Verify the files recovered are there, and then click Save to store them on a safe place.

- Preview: before recovering files, you can preview the attributes such as file name and file size of the selected file on the right side. You can also preview photos before saving.
- Find: find a specific file using the file name
- Filter: filter files by file name, file size, creation time, etc. For instance, if you only want to recover photos, you can choose «*.jpg,*.gif,*.png,*.psd,*.tif” to filter out other types of files.
- Export Scan Result: after scanning for recoverable files, we can export the results to a specific location so we can load previous results in the future without rescanning.
To recover data, use MiniTool Power Data Recovery Pro by purchasing and registering a MiniTool license key.
With MiniTool Power Data Recovery, I quickly and effectively recovered lost data from hard drive with I/O device error without bringing any damage to the original data.Click to Tweet
After recovering lost data, let’s see how to fix the external hard drive I/O error.
Part 3: How to Fix The «I/O Device Error» Problem
Here are 6 solutions fix the i/o device error Windows 7, Windows 8 and Windows 10.
Solution 1: Ensure the storage device connection is working correctly
The affected storage device might not have been connected properly. To check the connection, disconnect the storage medium and connect it with another USB port, USB cable, USB adaptor, or USB card reader. Data on the device should be able to be read as usual if this is caused by a faulty connection.
Solution 2: Download, install or update your device driver
If the computer storage device driver is outdated, damaged or incompatible with your attached device, it might affect its input/output functionality.
Download, install or update your device driver, and then disconnect and reconnect this device to see whether if I/O is fixed.
Solution 3: Change drive letter
If the external drive is detected with a wrong drive letter, its I/O functionality will be affected because the computer would be reading from the wrong or non-existent drive.
You can change the drive letter to fix this issue. To do so without affecting the original data, you should use MiniTool Partition Wizard, a free, simple and professional partition magic.
Step 1. Download and install MiniTool Partition Wizard, and then launch it.
Free Download
Step 2. Select the drive and choose «Change Drive Letter» feature from the action panel.
Step 3: Choose a drive letter from the list. Click «OK» to go back to the main interface.
Step 4: Click «Apply» button to perform this operation.
Solution 4: Check and repair disk errors on drive
You can Run Check Disk from a Command Line to Check for and fix Disk Errors.
Step 1: Open the command prompt. Note: you have to run CHKDSK commands as an administrator to have the necessary privileges to execute the scan.
Step 2: Type «chkdsk /f x:» into the command prompt and press Enter. The letter «x» should be replaced with the letter name of the drive you’d like to run the scan on.
Step 3: Finally, type «exit» and press Enter.
Solution 5: Change the transfer mode for the drive in IDE channel properties
Windows cannot transfer data from the drive to the computer if the transfer mode for the drive was changed or was incorrect. Follow these steps to change the transfer mode to fix this problem.
Step 1: Press Start button.
Step 2: Right click This Computer or My Computer.
Step 3: Select Manage.
Step 4: Select Device Manager.
Step 5: Expand IDE ATA/ATAPI controllers. You will see a list containing various IDE ATA/ATAPI channels for your PC.
Step 6: Right-click the channel where the external drive is connected, and then click Properties. Typically, the channel that is usually used for external hard drives is Secondary IDE Channel.
Step 7: Select PIO Only option in the box labeled Transfer Mode for the device representing your external hard drive on the tab labeled Advanced Settings. Usually, this is Device 0. Close all windows after clicking OK button.
Step 8: Restart computer and check the drive.
Solution 6: Format the hard drive
If all above solutions cannot help you, you can try formatting your hard drive. If you don’t know how to format hard drive with ease, you can try formatting your drive easily and quickly with MiniTool Partition Wizard using its concise interface and guidance.
Note: If formatting does not work either, your drive must be seriously damaged. In this case, you have no choice but to replace it with a new one.
Click to Tweet
Bottom Line
Have you ever encountered this message: «The request could not be performed because of an I/O device error»?
Now, you can try the above 6 solutions to fix this I/O device error external hard drive and internal hard drive. Remember to recover your lost data in this drive before trying the solutions.
Like this post? Share it to help more users get rid of the I/O device error.
If you have any question about data recovery with MiniTool Power Data Recovery, please feel free to contact us via[email protected].
Привет, друзья. На нашем сайте представлено множество статей по восстановлению жёсткого диска, в частности, цикл публикаций по работе с известной программой Victoria. Эта статья пополнит цикл публикаций по работе с программой, и в ней мы рассмотрим решение ошибки, делающей невозможным процесс ремаппинга – переназначения бэд-блоков блоками резервных дорожек HDD и ячеек SSD. Что необходимо предпринять, если при запуске этой операции Виктория выдаёт ошибку «try Remap… Error»?
Как устранить ошибку ремаппинга «try Remap… Error» в программе Victoria
Итак, мы в среде Windows хотим с помощью Victoria избавиться от бэд-блоков путём запуска теста «Remap», но программа выдаёт ошибку «try Remap… Error».
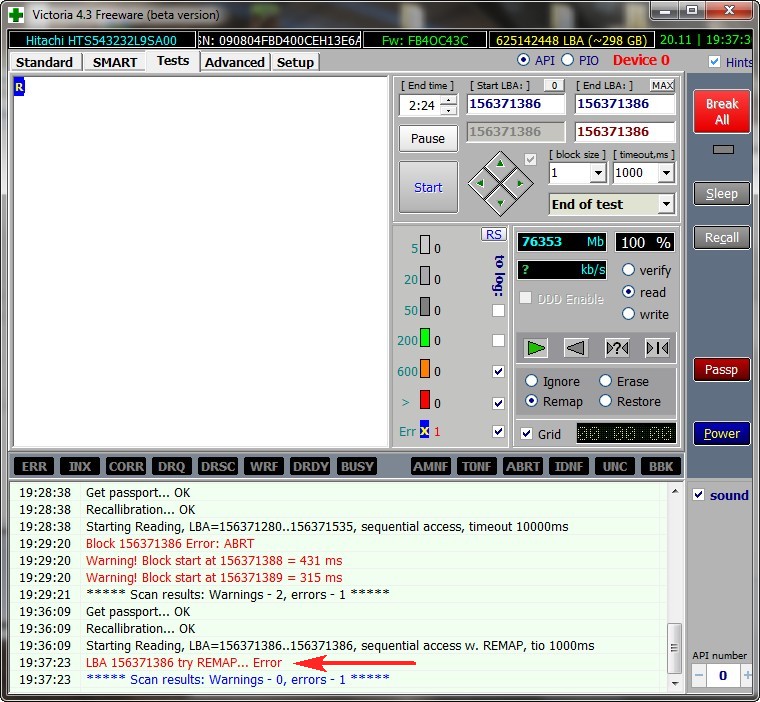
Дело в том, что в среде Windows не рекомендуется запускать тесты жёсткого диска по той причине, что операционная система может препятствовать произведению записи на диск со структурированным пространством, т.е., имеющим разделы. При этом не будет иметь значение, что сама программа запущена на другом, отличном от оперируемого жёстком диске. Выход из этой ситуации – запуск Victoria с LiveDisk.
LiveDisk с программой Victoria на борту
Где взять LiveDisk с программой Victoria на борту? Необходимо записать на флешку или оптический диск ISO-образ одного из трёх представленных ниже LiveDisk’ов на базе WinPE.
LiveDisk с программой Victoria на борту
Вариант №1: можете скачать мою сборку LiveCD, созданную с помощью AOMEI PE Builder, в которой я собрал 6 полезных программ для работы с жёсткими дисками – CrystalDiskInfo, CrystalDiskMark, DMDE, HDDScan, HDTune и, собственно, Victoria. Подробнее о сборке вы можете прочитать в этой статье, в ней же приводится и ссылка на скачивание ISO-образа LiveDisk’а.
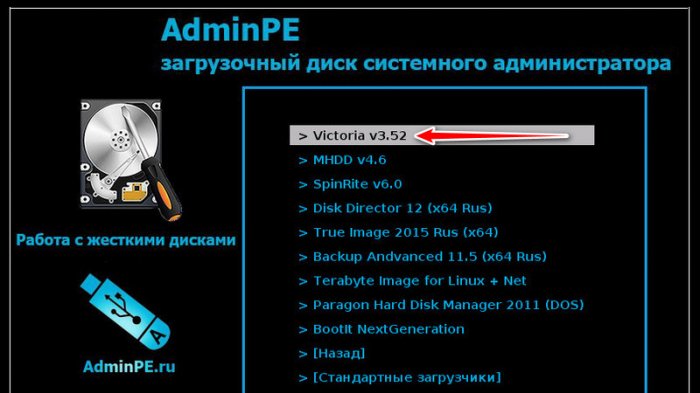
Вариант №2: можете скачать образ LiveDisk’а AdminPE. Это большой сборник профильного софта для системщиков, среди которого есть программа Victoria. Полный перечень софта, друзья, смотрите здесь: http://adminpe.ru/modules/
Ярлык запуска Виктории в среде AdminPE увидим прямо на рабочем столе.

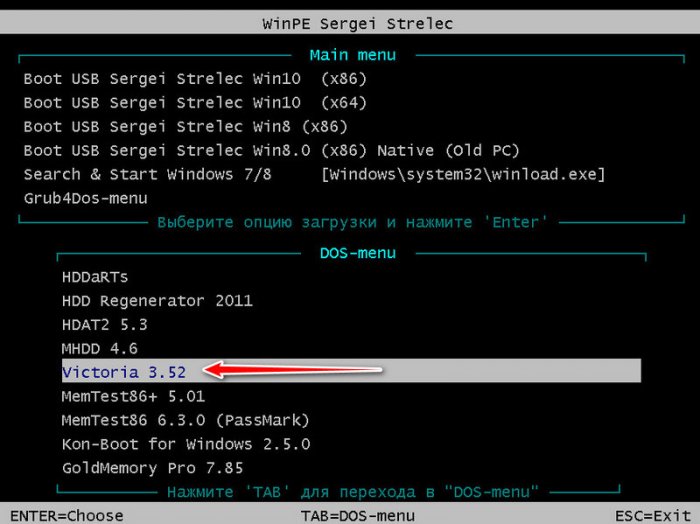
Вариант №3: можете скачать образ известного уже нашим постоянным читателям LiveDisk’а от Сергея Стрельца. Программу Victoria на диске Стрельца ищем в меню «Пуск», в разделе «Диагностика».
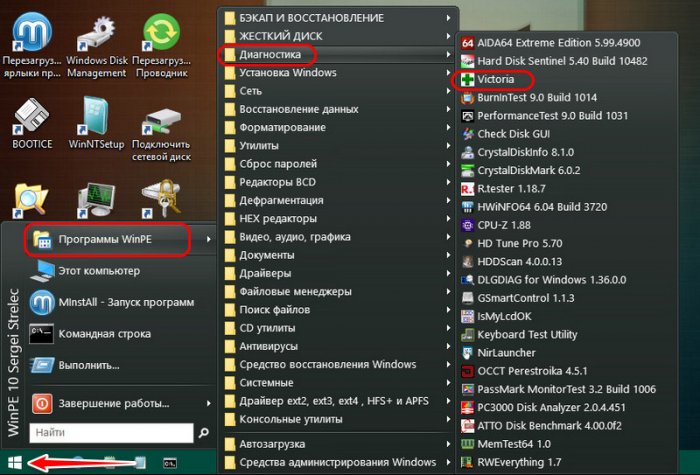
Скачать LiveDisk Сергея Стрельца можно на сайте Sergeistrelec.Ru. Сборки постоянно обновляются, потому указывать страницу конкретной сборки нет смысла. Прямо на главной странице сайта кликаете категорию WinPE с русскоязычной локализацией и выбираете первую в списке сборку, она же будет самой свежей.
Какой LiveDisk из тройки предложенных лучше? Ну если, друзья, у вас мелкая флешка, куда более 3 Гб не поместится, или, например, у вас завалялась раритетная CD-болванка на 700 Мб, то выбирайте, конечно же, мою сборку с шестёркой указанных программ, её ISO-образ весит всего-навсего 400 Мб. Если у вас есть нормальная флешка или DVD-болванка, то записывайте либо AdminPE, либо LiveDisk Стрельца, это комплексные инструменты с большим выбором софта по реанимации жёстких дисков. Какой из них двух лучше, смотрите по составу программ.
2. Обнуление нулевого сектора на жёстком диске
Если даже при запуске Виктории с LiveDisk’а в процессе ремаппинга возникает ошибка «try Remap… Error», необходимо обнулить нулевой сектор HDD – деактивировать на время проведения теста загрузочную запись. Для этого идём во вкладку программы «Advanced» и кликаем кнопку «MBR OFF». Кликаем и подтверждаем деактивацию.
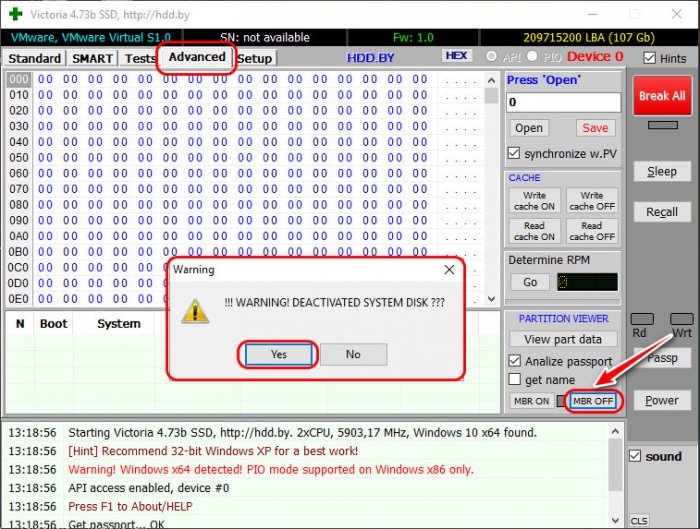
Делаем это и на MBR-, и на GPT-дисках. После этого отключаем жёсткий диск в диспетчере устройств среды WinPE. А потом снова включаем. По завершении ремаппинга включаем загрузочную запись рядом расположенной кнопкой «MBR ON». Не забываем это сделать, иначе Windows не загрузится.
3. Запуск Victoria из-под DOS
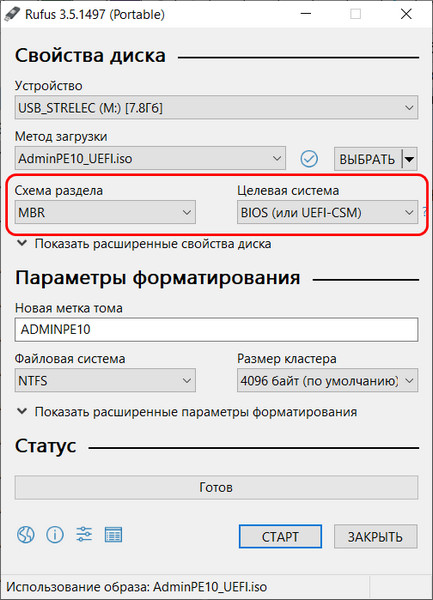
Альтернативное решение устранения в процессе ремаппинга ошибки «try Remap… Error» — запуск программы Victoria из-под DOS. Но, друзья, такое решение возможно только на компьютерах из числа современных, которые позволяют переключать режим работы BIOS на Legacy или совместимости с оным (CSM). С активным режимом UEFI в BIOS’е DOS-программы на LiveDisk’е обычно не работают. Флешка с DOS-версией Виктории должна быть записана в режиме Legacy. Напомню, таковую можно создать программами WinSetupFromUSB или Rufus. В последней при записи ISO-образа на флешку необходимо указать схему раздела «MBR».
Как запустить Викторию из-под DOS? И опять даю на выбор три варианта.
Вариант №1: можете создать флешку или CD/DVD-диск только с одной Викторией в DOS-режиме по этой статье.
Вариант №2: можете создать Legacy-флешку с вышеупомянутым LiveDisk’ом AdminPE. Запустившись с AdminPE, в меню загрузчика выбираем пункт «Hard Disk Tools».
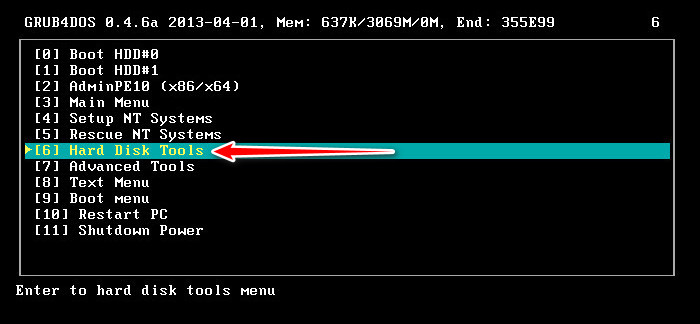
И далее первым пунктом видим Викторию в её DOS-версии 3.52.
Вариант №3: можете создать Legacy-флешку с LiveDisk’ом Сергея Стрельца. Запустившись с него, клавишей Tab переключаетесь на DOS-меню и в нём выбираете пункт «Victoria 3.52».
4. Что делать, если ничего не помогает
Если ни одно из предложенных решений ошибки Виктории «try Remap… Error» не помогает, то здесь, друзья, придётся только проводить тест с полным стиранием данных «Write». Он детально рассмотрен в этой статье сайта. Тест со стиранием данных в целях исправления логических бэд-блоков вы также можете осуществить в другой программе, альтернативе Виктории — HDDScan. Она присутствует на всех предложенных выше LiveDisk’ах. Как с помощью HDDScan исправить бэды, можете почитать здесь.
И насчёт прощания с информацией. Понимаю, что у многих из вас её хранится тоннами, собственно, что и побуждает вас первично прибегать к ремаппингу, поскольку в этом случае данные, если они не записаны как раз таки в бэд-блоки, остаются целыми. Однако, друзья, тесты с полным стиранием информации на диске, проводимые Викторией или HDDScan, производят принудительную запись нулей во все сектора диска. Следовательно, на нём всё обнуляется. Часто тест с полным стиранием эффективнее ремаппинга: он вылечивает бэд-блоки (если они имеют логическую, не физическую природу) даже тогда, когда в результате ремаппинга они не переназначаются или не обнуляются. Так что если мы говорим хотя бы о том объёме информации, который можно на время распихать по другим носителям и облачным хранилищам, не ленитесь решить этот вопрос.
Для справки привожу объёмы, которые в облачных хранилищах можно использовать со старта бесплатно:
- Mega – 50 Гб;
- Google Диск – 15 Гб;
- Яндекс.Диск – 10 Гб;
- Box – 10 Гб;
- MediaFire – 10 Гб;
- pCloud – 10 Гб;
- Облако Mail.Ru – 8 Гб;
- OneDrive – 5 Гб;
- iCloud – 5 Гб;
- IDrive – 5 Гб.