HTTPS cloning errors
There are a few common errors when using HTTPS with Git. These errors usually indicate you have an old version of Git, or you don’t have access to the repository.
Here’s an example of an HTTPS error you might receive:
> error: The requested URL returned error: 401 while accessing
> https://github.com/USER/REPO.git/info/refs?service=git-receive-pack
> fatal: HTTP request failed
> Error: The requested URL returned error: 403 while accessing
> https://github.com/USER/REPO.git/info/refs
> fatal: HTTP request failed> Error: https://github.com/USER/REPO.git/info/refs not found: did you run git
> update-server-info on the server?Check your Git version
There’s no minimum Git version necessary to interact with GitHub, but we’ve found version 1.7.10 to be a comfortable stable version that’s available on many platforms. You can always download the latest version on the Git website.
Ensure the remote is correct
The repository you’re trying to fetch must exist on GitHub.com, and the URL is case-sensitive.
You can find the URL of the local repository by opening the command line and
typing git remote -v:
$ git remote -v
# View existing remotes
> origin  https://github.com/ghost/reactivecocoa.git (fetch)
> origin  https://github.com/ghost/reactivecocoa.git (push)

$ git remote set-url origin https://github.com/ghost/ReactiveCocoa.git
# Change the 'origin' remote's URL

$ git remote -v
# Verify new remote URL
> origin  https://github.com/ghost/ReactiveCocoa.git (fetch)
> origin  https://github.com/ghost/ReactiveCocoa.git (push)
Alternatively, you can change the URL through our
GitHub Desktop application.
Provide an access token
To access GitHub, you must authenticate with a personal access token instead of your password. For more information, see «Creating a personal access token.»
If you are accessing an organization that uses SAML SSO and you are using a personal access token (classic), you must also authorize your personal access token to access the organization before you authenticate. For more information, see «About authentication with SAML single sign-on» and «Authorizing a personal access token for use with SAML single sign-on.»
Check your permissions
When prompted for a username and password, make sure you use an account that has access to the repository.
Tip: If you don’t want to enter your credentials every time you interact with the remote repository, you can turn on credential caching. If you are already using credential caching, please make sure that your computer has the correct credentials cached. Incorrect or out of date credentials will cause authentication to fail.
Use SSH instead
If you’ve previously set up SSH keys, you can use the SSH clone URL instead of HTTPS. For more information, see «About remote repositories.»
Error: Repository not found
If you see this error when cloning a repository, it means that the repository does not exist or you do not have permission to access it. There are a few solutions to this error, depending on the cause.
Check your spelling
Typos happen, and repository names are case-sensitive. If you try to clone git@github.com:user/repo.git, but the repository is really named User/Repo you will receive this error.
To avoid this error, when cloning, always copy and paste the clone URL from the repository’s page. For more information, see «Cloning a repository.»
To update the remote on an existing repository, see «Managing remote repositories».
Checking your permissions
If you are trying to clone a private repository but do not have permission to view the repository, you will receive this error.
Make sure that you have access to the repository in one of these ways:
- The owner of the repository
- A collaborator on the repository
- A member of a team that has access to the repository (if the repository belongs to an organization)
Check your SSH access
In rare circumstances, you may not have the proper SSH access to a repository.
You should ensure that the SSH key you are using is attached to your personal account on GitHub. You can check this by typing
the following into the command line:
$ ssh -T git@github.com
> Hi USERNAME! You've successfully authenticated, but GitHub does not
> provide shell access.
If the repository belongs to an organization and you’re using an SSH key generated by an OAuth App, OAuth App access may have been restricted by an organization owner. For more information, see «About OAuth App access restrictions.»
For more information, see Adding a new SSH key to your GitHub account.
Check that the repository really exists
If all else fails, make sure that the repository really exists on GitHub.com!
If you’re trying to push to a repository that doesn’t exist, you’ll get this error.
Error: Remote HEAD refers to nonexistent ref, unable to checkout
This error occurs if the default branch of a repository has been deleted on GitHub.com.
Detecting this error is simple; Git will warn you when you try to clone the repository:
$ git clone https://github.com/USER/REPO.git
# Clone a repo
> Cloning into 'repo'...
> remote: Counting objects: 66179, done.
> remote: Compressing objects: 100% (15587/15587), done.
> remote: Total 66179 (delta 46985), reused 65596 (delta 46402)
> Receiving objects: 100% (66179/66179), 51.66 MiB | 667 KiB/s, done.
> Resolving deltas: 100% (46985/46985), done.
> warning: remote HEAD refers to nonexistent ref, unable to checkout.
To fix the error, you’ll need to be an administrator of the repository on GitHub.com.
You’ll want to change the default branch of the repository.
After that, you can get a list of all the available branches from the command line:
$ git branch -a
# Lists ALL the branches
>   remotes/origin/awesome
>   remotes/origin/more-work
>   remotes/origin/new-main
Then, you can just switch to your new branch:
$ git checkout new-main
# Create and checkout a tracking branch
> Branch new-main set up to track remote branch new-main from origin.
> Switched to a new branch 'new-main'Решение ошибки remote: Permission to user/repo denied to user/other-repo. fatal: unable to access user/repo: The requested URL returned error: 403
Дата: 27.03.2017
В данном уроке рассмотрим варианты решения данной оишбки:
remote: Permission to user/repo denied to user/other-repo.
fatal: unable to access user/repo: The requested URL returned error: 403
Возникает она чаще всего у новичков при попытке выполнить команду:
$ git push
Пример ошибки на скриншоте ниже.
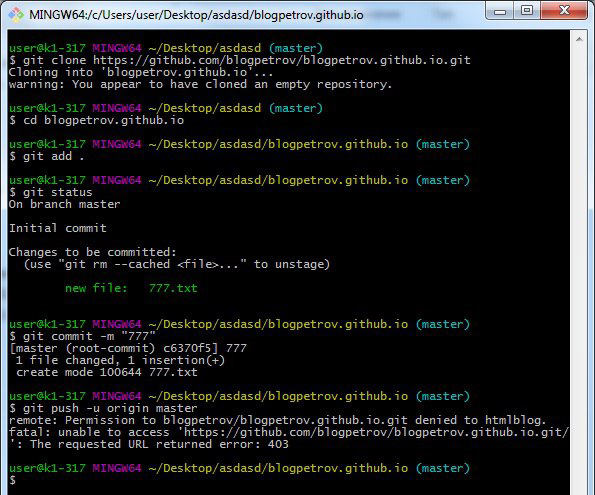
Данная ошибка возникает довольно часто при работе с Git в терминале Windows. Суть ошибка довольно таки простая, но почему-то в интернете постоянно создаются темы с вопросом на данную тему и нет внятного ответа на русском языке.
Ошибка говорит нам о том, что мы пытаемся отправить данные в чужой репозиторий. И о том, что текущий пользователь Git не имеет прав для отправки данных в указанный в команде репозиторий.
Существует два способа решить данную ошибку:
Вариант 1. Дать текущему пользователю права для работы с репозиторием
Данный способ подойдет, если вы являетесь владельцем обеих учетных записей указанных в ошибке. Необходимо зайти на GitHub под именем того пользователя, в чей репозиторий вы не можете отправить данные. В настройках репозитория указать необходимого соавтора. Ему на почту отправится приглашение, которое необходимо подтвердить, перейдя по ссылке в письме.
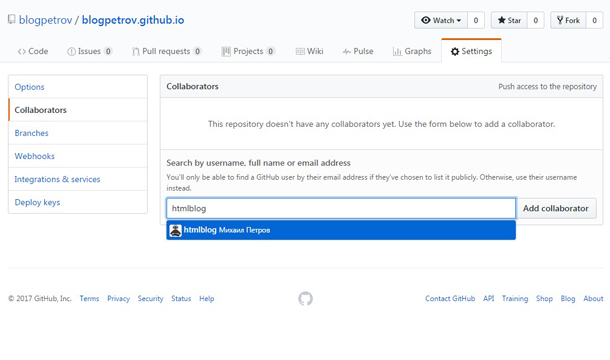
После этого вы сможете работать с репозиторием как со своим и ошибка больше не появится.
Вариант 2. Назначить в системе текущим пользователем Git ту учетную запись, в которую не можете отправить данные
Для этого необходимо перейти в Панель управления Windows. Выбрать отображение в виде категорий.
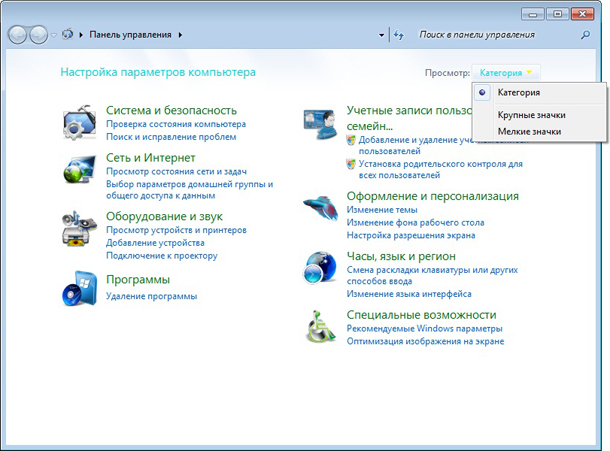
Перейти в раздел “Учетные записи пользователей и семейная безопасность”. Далее в раздел “Диспетчер учетных данных”. В самом низу будет блок “Общие учетные данные”. Нажмите в нем ссылку “Удаление из хранилища”.
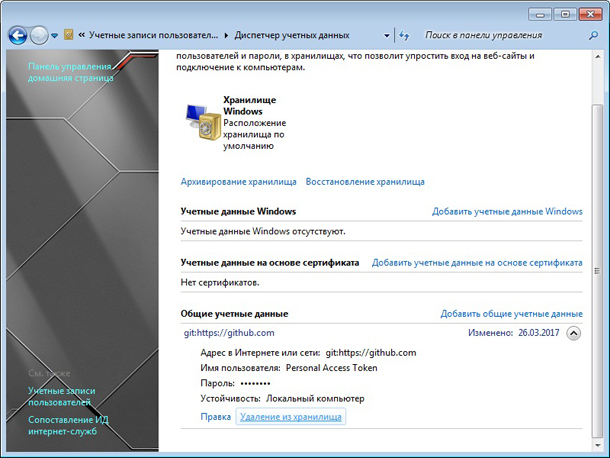
После этого при попытке выполнить команду:
$ git push -u origin master
Терминал запросит у вас пароль от учетной записи на Github в чей репозиторий вы пытаетесь отправить данные.
После ввода пароля система установит данного пользователя как основного и будет использовать его в дальнейшем при работе с Git.
Надеюсь данный пост поможет вам решить ошибку, с которой я разбирался почти сутки.
git
github
Не забудьте сказать спасибо. Поставьте лайк!
This article discusses a problem that may occur when you try to push to a remote GitHub repository using HTTPS from an A2 Hosting server.
- Problem
- Cause
- Resolution
- Method #1: Use SSH
- Method #2: Modify the HTTPS URL
Problem
When you try to push changes to a GitHub repository from an A2 Hosting server using an HTTPS URL, you receive the following error message:
error: The requested URL returned error: 403 Forbidden while accessing https://github.com/github-username/github-repository-name.git/info/refs
Cause
There are a few possible causes for this problem:
- You typed an incorrect password. Make sure you are using the correct GitHub password for the account.
- The Git client on the A2 Hosting server requires a modified HTTPS URL to work correctly. If this is the cause, the password prompt does not even appear when you try to do a push operation.
Resolution
If you are sure you are using the correct GitHub password, there are two ways to resolve the “403 Forbidden” problem:
Method #1: Use SSH
Instead of using HTTPS URLs to push changes to GitHub, you can use SSH instead. For information about how to do this, please visit https://help.github.com/articles/changing-a-remote-s-url.
Method #2: Modify the HTTPS URL
Some A2 Hosting managed servers have an old version of the Git client installed. To push changes to GitHub using this older client version, you must include your GitHub username in the HTTPS URL.
To do this, follow these steps:
- Log in to your A2 Hosting account using SSH.
- At the command prompt, change to the directory where the Git repository is located.
- Type the following command:
git config -l | grep url
You should see output that resembles the following:
remote.origin.url=https://github.com/github-username/github-repository-name.git
-
You need to add your GitHub username to the github.com portion of the URL. To do this, type the following command, replacing the values in red with your own account information:
git remote set-url origin "https://github-username@github.com/github-username/github-repository-name.git"
-
To verify the new remote URL setting, type the following command:
git config -l | grep url
Now when you try to push changes to the GitHub repository, you are prompted for a password, and the push operation should succeed.
Все мы, путешествуя по просторам интернета, натыкаемся на различные ошибки при загрузке сайтов. Одна из них, кстати, достаточно часто встречается – я говорю об ошибке сервера 403 Forbidden Error. Сегодня я рассмотрю причины ее возникновения и способы устранения со стороны владельца сайта и его пользователя.
Что означает ошибка 403 и почему она появляется
Ошибка сервера 403 Forbidden означает ограничение или отсутствие доступа к материалу на странице, которую вы пытаетесь загрузить. Причин ее появления может быть несколько, и вот некоторые из них:
- Формат индексного файла неверен.
- Некорректно выставленные права на папку/файл.
- Файлы были загружены в неправильную папку.
Комьюнити теперь в Телеграм
Подпишитесь и будьте в курсе последних IT-новостей
Подписаться
Исправление ошибки сервера 403 Forbidden
Чтобы исправить ошибку сервера 403 Forbidden, обязательно нужен доступ к панели управления вашего хостинга. Все описанные ниже шаги применимы к любой CMS, но примеры будут показаны на основе WordPress.
Проверка индексного файла
Сначала я проверю, правильно ли назван индексный файл. Все символы в его имени должны быть в нижнем регистре. Если хотя бы один символ набран заглавной буквой, возникнет ошибка 403 Forbidden. Но это больше относится к ОС Linux, которой небезразличен регистр.
Еще не стоит забывать, что индексный файл может быть нескольких форматов, в зависимости от конфигураций сайта: index.html, index.htm, или index.php. Кроме того, он должен храниться в папке public_html вашего сайта. Файл может затеряться в другой директории только в том случае, если вы переносили свой сайт.

Любое изменение в папке или файле фиксируется. Чтобы узнать, не стала ли ошибка итогом деятельности злоумышленников, просто проверьте графу «Дата изменения».
Настройка прав доступа
Ошибка 403 Forbidden появляется еще тогда, когда для папки, в которой расположен искомый файл, неправильно установлены права доступа. На все директории должны быть установлены права на владельца. Но есть другие две категории:
- группы пользователей, в числе которых есть и владелец;
- остальные, которые заходят на ваш сайт.
На директории можно устанавливать право на чтение, запись и исполнение.
Так, по умолчанию на все папки должно быть право исполнения для владельца. Изменить их можно через панель управления TimeWeb. Для начала я зайду в раздел «Файловый менеджер», перейду к нужной папке и выделю ее. Далее жму на пункт меню «Файл», «Права доступа».

Откроется новое окно, где я могу отрегулировать права как для владельца, так и для всех остальных.

Отключение плагинов WordPress
Если даже после всех вышеперечисленных действий ошибка не исчезла, вполне допустимо, что влияние на работу сайта оказано со стороны некоторых плагинов WordPress. Быть может они повреждены или несовместимы с конфигурациями вашего сайта.
Для решения подобной проблемы необходимо просто отключить их. Но сначала надо найти папку с плагинами. Открываю папку своего сайта, перехожу в раздел «wp-content» и нахожу в нем директорию «plugins». Переименовываю папку – выделяю ее, жму на меню «Файл» и выбираю соответствующий пункт. Название можно дать вот такое: «plugins-disable». Данное действие отключит все установленные плагины.

Теперь нужно попробовать вновь загрузить страницу. Если проблема исчезла, значит, какой-то конкретный плагин отвечает за появление ошибки с кодом 403.
Но что делать, если у вас плагин не один, а какой из них влияет на работу сайта – неизвестно? Тогда можно вернуть все как было и провести подобные действия с папками для определенных плагинов. Таким образом, они будут отключаться по отдельности. И при этом каждый раз надо перезагружать страницу и смотреть, как работает сайт. Как только «виновник торжества» найден, следует переустановить его, удалить или найти альтернативу.
Читайте также


Как решить проблему, если вы – пользователь
Выше я рассмотрела способы устранения ошибки 403 Forbidden для владельцев сайта. Теперь же разберу методы исправления в случаях с пользователем.
- Сначала надо убедиться, что проблема заключается именно в вашем устройстве. Внимательно проверьте, правильно ли вы ввели URL сайта. Может, в нем есть лишние символы. Или, наоборот, какие-то символы отсутствуют.
- Попробуйте загрузить страницу с другого устройства. Если на нем все будет нормально, значит, проблема кроется именно в используемом вами девайсе. Если нет – надо перейти к последнему шагу.
- Еще хороший вариант – немного подождать и обновить страницу. Делается это либо кликом по иконке возле адресной строки браузера, либо нажатием на комбинацию Ctrl + F5. Можно и без Ctrl, на ваше усмотрение.
- Если ничего из вышеперечисленного не помогло, надо очистить кэш и cookies. Провести такую процедуру можно через настройки браузера. Для этого необходимо открыть историю просмотров, чтобы через нее перейти к инструменту очистки. Эту же утилиту часто можно найти в настройках, в разделе «Конфиденциальность и безопасность». В новом окне нужно отметить пункты с кэшем и cookies и нажать на кнопку для старта очистки.


- Ошибка 403 Forbidden возникает и тогда, когда пользователь пытается открыть страницу, для доступа к которой сначала надо осуществить вход в систему. Если у вас есть профиль, просто войдите в него и попробуйте вновь загрузить нужную страницу.
- Если вы заходите со смартфона, попробуйте отключить функцию экономии трафика в браузере. Она находится в настройках, в мобильном Google Chrome под нее отведен отдельный раздел.
- Последний шаг – подождать. Когда ни один способ не помогает, значит, неполадки возникли именно на сайте. Возможно, его владелец уже ищет способы решения проблемы и приступает к их исполнению, но это может занять какое-то время. Пользователям остается только дождаться, когда все работы будут завершены.
Еще одна допустимая причина появления ошибки сервера 403 – доступ к сайту запрещен для определенного региона или страны, в которой вы находитесь. Бывает и такое, что сайт доступен для использования только в одной стране. Если вы используете VPN, попробуйте отключить его и перезагрузите страницу. Вдруг получится все исправить.
Если ничего из вышеперечисленного не сработало, рекомендуется обратиться к владельцу сайта. Есть вероятность, что никто не знает о возникшей проблеме, и только ваше сообщение может изменить ситуацию.
Здравствуйте.
—
1) Вы пытаетесь загрузить с другого аккаунта, выйти из него я не знаю как, но зато, при установке git на ваш компьютер, создаётся файл .githistory, обычно пихается в пользовательскую папку, как и данные по composer. (for Windows) — для других систем не узнавал.
2) Если вы нашли .githistory — и используете другой аккаунт, удалите его. Возможно другие файлы со словом git так же стоит удалить.
3) Убедитесь, что вы после удаления истории сделали новую регистрацию:
$ git config --global user.name 'login'
$ git config --global user.email 'mail@yourmail.ru'
4) Когда создаёте репозиторий на GitHub , клонируйте его на свой компьютер.
Чтобы убедится, что вы открыли консоль [Git Bash] в нужном месте, просто сделайте команду$ git status
Если репозиторий и директория верны, он красным подсветит файлы, которые нужно добавить.
Если он пишет, что такой директории не существует, значит перейдите в вашу папку.$ cd your_folder — ещё раз проверьте статус.
Если git увидел ваш склонированный репозиторий, значит делайте запрос:$ git add .
или$ git add --all
Почему я не начал с $ git init ?
Если вы склонировали, то папка .git там уже есть.
Закидывайте к этой папке и файлу README.md ваши файлы, и делайте $ git add .
Только теперь можно делать коммиты$ git commit -m "your commit"
высветились все файлы? Тогда пропускаете $ git remote add origin.... — потому что ветка уже создана, при создании репозитория на сайте.
Теперь мы загружаем:$ git push -u origin master
Если не ошибаюсь, дописать записанное можно через команду:$ git pull
—-
Самое главное, это сменить пользователя на того, у которого есть права, иначе вам не поможет удаление программы и установка новой. Есть команда, которая чистит кеш истории$ git credential-cache exit
Но она почему-то в последнее время бесполезная и нерабочая, так что ищите способ очистить кеш.
Что касается ключей и ssh — их можно и не создавать, но как показывает практика, не только git , но и composer не дадут вам работать.
Успехов вам, надеюсь помог.
—
P.S. данный метод мне помог, если вы видите содержимое файла README.md смотрите в settings что у вас за ошибка, устраните её, и обновите браузер. Возможно, ещё придётся выбрать тему, или указать описание, так же смотрите, где у вас галочки стоят, они тоже могут вызвать головную боль.
While working with Github you may face that, Git is saying 403 when trying to perform the git push origin master command. This fatal error occurs because password authentication for accessing Github’s private repository has been disabled. The error looks like,
fatal: unable to access 'https://github.com/username/location.git/': The requested URL returned error: 403
If you are struggling with the error here is a quick solution for you.
Step 1: Create Personal Access Token on Github
- Log in to your GitHub account
- Click on the Profile logo on the top right corner
- Click on Settings
- Then, Click on Developer settings for the left sidebar
- Next, Click on Personal access tokens for the left sidebar
- After that, Click on Generate new token
- Give your token a descriptive name on the Note field
- Select Expiration time and preferred scopes
- Click on Generate token
- Finally, you can copy that token and use it to authenticate. You can use the token instead of a password for Git over HTTPS or can use it to authenticate to the API over Basic Authentication.
Step 2: Use Personal Access Token for Authentication
Using HTTPS URL
Personal access tokens can only be used for HTTPS Git operations. Once you have a token, you can enter it instead of your password when performing Git operations over HTTPS. For the existing remote repository, you need to update the remote URL by using,
$ git remote set-url origin https://[githubtoken]@github.com/[username]/[repositoryname].git
$ git push origin master
Or, while cloning any repository,
$ git clone https://github.com/username/repo.git
Username: Enter your username
Password: Enter your access token
Using SSH
For performing Git operation you just need to change the URL. First, make sure your SSH keys are correctly set up. Then, To update the URL you have to run
$ git remote set-url origin git@github.com:[username]/[repositoryname].git
$ git push origin master
Thank you for reading the article. Hope following the steps properly will solve your problem.
But if still, you are facing a problem to generate or use your Personal Access Token and perform Git Operations you can read this article with details step by step process.
Error Description:
- We can clone a copy of this repo over HTTPS authenticated.
- We have made some commits and want to come back to the GitHub server. Using Cygwin on Windows 7 x64.
C:cygwinhomeXPheriorCodelunch_call>git push
Password:
error: The requested URL returned error: 403 while accessing https://MichaelDrog
[email protected]/derekerdmann/lunch_call.git/info/refs

fatal: HTTP request failed
Solution 1:
Github give the idea it supports ssh way to read & write the repo, whereas https way also displayed ‘Read & Write’.
- Now you need to change your repo config on your PC to ssh way:
1. Edit .git/config file under your repo directory
2. Find url=entry under section [remote "origin"]
3. Change it from url=https://[email protected]/derekerdmann/lunch_call.git to url=ssh://[email protected]/derekerdmann/lunch_call.git. ie, change all the texts before @ symbol to ssh://git
4. Save config file and quit. You can use git push origin master to sync your repo on GitHub
Solution 2:
- To login using
https protocol,you should first set your authentication credential to the git Remote URI:
- Now you’ll be asked for a password when try to
git push. - In fact, this is on the http authentication format. Now you have to set a password :
- You should be aware that your github password will be stored in plaintext in your .git directory, which is undesirable.
Solution 3:
- On behalf of editing
.git/configfile manually, you can usegit remote set-urlcommand. - In your case it should be:
Solution 4:
- Edit
.git/configfile under your repo directory - Find
url=entry under section[remote "origin"] - Change it from
url=https://github.com/rootux/ms-Dropdown.gittohttps://[email protected]/rootux/ms-Dropdown.git - Where
USERNAMEis your github user name
Solution 5:
- When permission denied 403 error while using ssh(according to Xiao) or http urls you can also try these commands
git config --global --unset-all credential.helper

git config --unset-all credential.helper
With administrator rights
git config --system --unset-all credential.helper
UP NEXT IN GIT
- Git Tutorial
- Git Interview Questions and Answers
- Git HR Interview Questions and Answers
- Git Sample Resume
- Git Interview Dress Code
- Git Job Apply Letters
- Git Forums
Remote: Permission to UserName/repo.git denied to OtherUserName fatal: unable to access ‘https://github.com/UserName/repo.git/’: The requested URL returned error: 403
February 6, 2020 08:47PM
I was working on the one of the clients project hosted on github.com, I cloned the repo locally added few files to local repo and staged/committed project locally all was good.
git add .
git commit -m 'test'
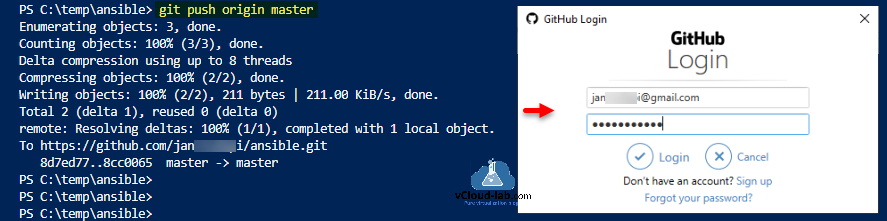
But when tried to push the changes on remote repo on github.com. I was receiving below error.
git push origin master
remote: Permission to UserName/repo.git denied to AnotherUserName.
fatal: unable to access 'https://github.com/UserName/repo.git/': The requested URL returned error: 403

This error says that you are using wrong credential or wrong repo: the fact is when you are pushing its not asking for credentials, below are the possible reasons.
- Username needs to be the user, not the email
- Ensure you provide the proper password. If you have 2FA enabled on GitHub, you need to make sure you create an Access Token with proper access permissions and use the token as password instead.
- Repo format is: https://github.com/<user>/<repo>.git
- You have 2 different github (version control) accounts
403 means GitHub is not granting you access so one or more of the 4 above cause are the problem. In my case this issue happened due to I have one personal github account and second received from client. Until now I was using my github account and in the past when I did push for the first time it asked my github credentials which got saved/ cached in windows credential manager, and today for the first time when I am using second account it is using username and password cached earlier for previous github account, causing access denied error.
You can solve this problem by using few methods. But below simple method helps you to solve the issue.
step 1: Go to Control Panel.
step 2: In the control panel find and go to user accounts
step 3: After that go to credential manager
step 4: Then Windows credentials
step 5: Go to Generic credentials, and search github.com, expand it
step 6: Finally delete the Github keys.
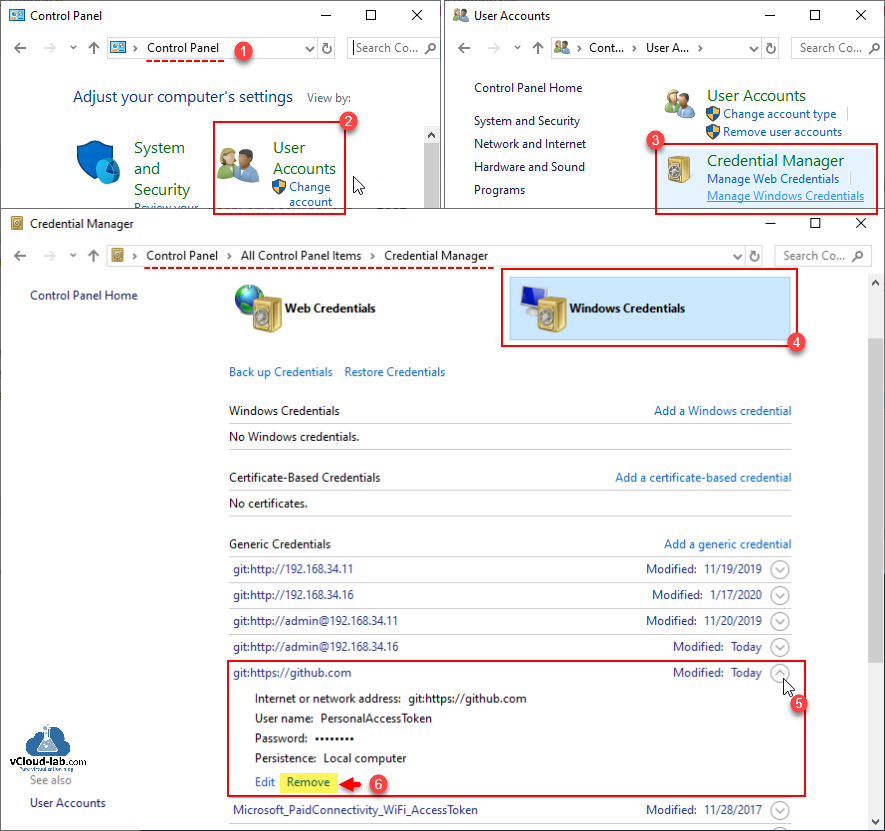
Once cached credentials are removed, try pushing project on remote by running command git push origin master, This will prompt for GitHub login prompt, once the authentication is successful with correct username and password, command will succeed and files/folders are pushed successfully on remote github repo.
If you don’t want to remove previous users credentials from windows credentials manager another way to resolve this issue is give previous user access over new github.com repo.
Useful Article
Solved Visual studio Code make sure you configure your user.name and user.email in git
Part 1 Git version control integration in Visual Studio Code
Part 2 Git master branch source control integration in Visual Studio Code
Part 3 Git clone version control integration in Visual Studio Code
Go Back