Объяснение сообщений об ошибках
PHP возвращает код ошибки наряду с другими
атрибутами принятого файла. Он расположен в массиве, создаваемом PHP
при загрузке файла, и может быть получен при обращении по ключу
error. Другими словами, код ошибки можно
найти в $_FILES[‘userfile’][‘error’].
-
UPLOAD_ERR_OK -
Значение: 0; Ошибок не возникло, файл был успешно загружен на сервер.
-
UPLOAD_ERR_INI_SIZE -
Значение: 1; Размер принятого файла превысил максимально допустимый
размер, который задан директивой upload_max_filesize
конфигурационного файла php.ini. -
UPLOAD_ERR_FORM_SIZE -
Значение: 2; Размер загружаемого файла превысил значение MAX_FILE_SIZE,
указанное в HTML-форме. -
UPLOAD_ERR_PARTIAL -
Значение: 3; Загружаемый файл был получен только частично.
-
UPLOAD_ERR_NO_FILE -
Значение: 4; Файл не был загружен.
-
UPLOAD_ERR_NO_TMP_DIR -
Значение: 6; Отсутствует временная папка.
-
UPLOAD_ERR_CANT_WRITE -
Значение: 7; Не удалось записать файл на диск.
-
UPLOAD_ERR_EXTENSION -
Значение: 8; Модуль PHP остановил загрузку файла. PHP не
предоставляет способа определить, какой модуль остановил
загрузку файла; в этом может помочь просмотр списка загруженных
модулей с помощью phpinfo().
Viktor 
8 years ago
Update to Adams old comment.
This is probably useful to someone.
<?php
$phpFileUploadErrors
= array(
0 => 'There is no error, the file uploaded with success',
1 => 'The uploaded file exceeds the upload_max_filesize directive in php.ini',
2 => 'The uploaded file exceeds the MAX_FILE_SIZE directive that was specified in the HTML form',
3 => 'The uploaded file was only partially uploaded',
4 => 'No file was uploaded',
6 => 'Missing a temporary folder',
7 => 'Failed to write file to disk.',
8 => 'A PHP extension stopped the file upload.',
);
Anonymous 
13 years ago
[EDIT BY danbrown AT php DOT net: This code is a fixed version of a note originally submitted by (Thalent, Michiel Thalen) on 04-Mar-2009.]
This is a handy exception to use when handling upload errors:
<?php
class UploadException extends Exception
{
public function __construct($code) {
$message = $this->codeToMessage($code);
parent::__construct($message, $code);
}
private function
codeToMessage($code)
{
switch ($code) {
case UPLOAD_ERR_INI_SIZE:
$message = "The uploaded file exceeds the upload_max_filesize directive in php.ini";
break;
case UPLOAD_ERR_FORM_SIZE:
$message = "The uploaded file exceeds the MAX_FILE_SIZE directive that was specified in the HTML form";
break;
case UPLOAD_ERR_PARTIAL:
$message = "The uploaded file was only partially uploaded";
break;
case UPLOAD_ERR_NO_FILE:
$message = "No file was uploaded";
break;
case UPLOAD_ERR_NO_TMP_DIR:
$message = "Missing a temporary folder";
break;
case UPLOAD_ERR_CANT_WRITE:
$message = "Failed to write file to disk";
break;
case UPLOAD_ERR_EXTENSION:
$message = "File upload stopped by extension";
break;
default:
$message = "Unknown upload error";
break;
}
return $message;
}
}
// Use
if ($_FILES['file']['error'] === UPLOAD_ERR_OK) {
//uploading successfully done
} else {
throw new UploadException($_FILES['file']['error']);
}
?>
adam at gotlinux dot us 
17 years ago
This is probably useful to someone.
<?php
array(
0=>"There is no error, the file uploaded with success",
1=>"The uploaded file exceeds the upload_max_filesize directive in php.ini",
2=>"The uploaded file exceeds the MAX_FILE_SIZE directive that was specified in the HTML form"
3=>"The uploaded file was only partially uploaded",
4=>"No file was uploaded",
6=>"Missing a temporary folder"
);
?>
stephen at poppymedia dot co dot uk 
17 years ago
if post is greater than post_max_size set in php.ini
$_FILES and $_POST will return empty
svenr at selfhtml dot org 
15 years ago
Clarification on the MAX_FILE_SIZE hidden form field and the UPLOAD_ERR_FORM_SIZE error code:
PHP has the somewhat strange feature of checking multiple "maximum file sizes".
The two widely known limits are the php.ini settings "post_max_size" and "upload_max_size", which in combination impose a hard limit on the maximum amount of data that can be received.
In addition to this PHP somehow got implemented a soft limit feature. It checks the existance of a form field names "max_file_size" (upper case is also OK), which should contain an integer with the maximum number of bytes allowed. If the uploaded file is bigger than the integer in this field, PHP disallows this upload and presents an error code in the $_FILES-Array.
The PHP documentation also makes (or made - see bug #40387 - http://bugs.php.net/bug.php?id=40387) vague references to "allows browsers to check the file size before uploading". This, however, is not true and has never been. Up til today there has never been a RFC proposing the usage of such named form field, nor has there been a browser actually checking its existance or content, or preventing anything. The PHP documentation implies that a browser may alert the user that his upload is too big - this is simply wrong.
Please note that using this PHP feature is not a good idea. A form field can easily be changed by the client. If you have to check the size of a file, do it conventionally within your script, using a script-defined integer, not an arbitrary number you got from the HTTP client (which always must be mistrusted from a security standpoint).
jalcort at att dot net 
3 years ago
When uploading a file, it is common to visit the php.ini and set up upload_tmp_dir = /temp but in the case of some web hostess as fatcow you need to direct not only /tmp but upload_tmp_dir = /hermes/walnaweb13a/b345/moo.youruser/tmp
If not the $_FILES show you an error #6 "Missing a temporary folder
roland at REMOVE_ME dot mxchange dot org 
4 years ago
I have expanded @adam at gotlinux dot us's example a bit with proper UPLOAD_FOO constants and gettext support. Also UPLOAD_ERR_EXTENSION is added (was missing in his version). Hope this helps someone.
<?php
class Some {
/**
* Upload error codes
* @var array
*/
private static $upload_errors = [];
public function
__construct() {
// Init upload errors
self::$upload_errors = [
UPLOAD_ERR_OK => _('There is no error, the file uploaded with success.'),
UPLOAD_ERR_INI_SIZE => _('The uploaded file exceeds the upload_max_filesize directive in php.ini.'),
UPLOAD_ERR_FORM_SIZE => _('The uploaded file exceeds the MAX_FILE_SIZE directive that was specified in the HTML form.'),
UPLOAD_ERR_PARTIAL => _('The uploaded file was only partially uploaded.'),
UPLOAD_ERR_NO_FILE => _('No file was uploaded.'),
UPLOAD_ERR_NO_TMP_DIR => _('Missing a temporary folder.'),
UPLOAD_ERR_CANT_WRITE => _('Cannot write to target directory. Please fix CHMOD.'),
UPLOAD_ERR_EXTENSION => _('A PHP extension stopped the file upload.'),
];
}
}
?>
Jeff Miner mrjminer AT gmail DOT com 
12 years ago
One thing that is annoying is that the way these constant values are handled requires processing no error with the equality, which wastes a little bit of space. Even though "no error" is 0, which typically evaluates to "false" in an if statement, it will always evaluate to true in this context.
So, instead of this:
-----
<?php
if($_FILES['userfile']['error']) {
// handle the error
} else {
// process
}
?>
-----
You have to do this:
-----
<?php
if($_FILES['userfile']['error']==0) {
// process
} else {
// handle the error
}
?>
-----
Also, ctype_digit fails, but is_int works. If you're wondering... no, it doesn't make any sense.
To Schoschie:
You ask the question: Why make stuff complicated when you can make it easy? I ask the same question since the version of the code you / Anonymous / Thalent (per danbrown) have posted is unnecessary overhead and would result in a function call, as well as a potentially lengthy switch statement. In a loop, that would be deadly... try this instead:
-----
<?php
$error_types = array(
1=>'The uploaded file exceeds the upload_max_filesize directive in php.ini.',
'The uploaded file exceeds the MAX_FILE_SIZE directive that was specified in the HTML form.',
'The uploaded file was only partially uploaded.',
'No file was uploaded.',
6=>'Missing a temporary folder.',
'Failed to write file to disk.',
'A PHP extension stopped the file upload.'
);
// Outside a loop...
if($_FILES['userfile']['error']==0) {
// process
} else {
$error_message = $error_types[$_FILES['userfile']['error']];
// do whatever with the error message
}
// In a loop...
for($x=0,$y=count($_FILES['userfile']['error']);$x<$y;++$x) {
if($_FILES['userfile']['error'][$x]==0) {
// process
} else {
$error_message = $error_types[$_FILES['userfile']['error'][$x]];
// Do whatever with the error message
}
}
// When you're done... if you aren't doing all of this in a function that's about to end / complete all the processing and want to reclaim the memory
unset($error_types);
?>
jille at quis dot cx 
13 years ago
UPLOAD_ERR_PARTIAL is given when the mime boundary is not found after the file data. A possibly cause for this is that the upload was cancelled by the user (pressed ESC, etc).
sysadmin at cs dot fit dot edu 
17 years ago
I noticed that on PHP-4.3.2 that $_FILES can also not be set if the file uploaded exceeds the limits set by upload-max-filesize in the php.ini, rather than setting error $_FILES["file"]["error"]
tyler at fishmas dot org 
18 years ago
In regards to the dud filename being sent, a very simple way to check for this is to check the file size as well as the file name. For example, to check the file size simple use the size attribute in your file info array:
<?php
if($_FILES["file_id"]["size"] == 0)
{
// ...PROCESS ERROR
}
?>
Tom 
12 years ago
Note: something that might surprise you, PHP also provides a value in the $_FILES array, if the input element has no value at all, stating an error UPLOAD_ERR_NO_FILE.
So UPLOAD_ERR_NO_FILE is not an error, but a note that the input element just had no value. Thus you can't rely on the $_FILES array to see if a file was provided. Instead you have to walk the array and check every single damn entry - which can be quite difficult since the values may be nested if you use input elements named like "foo[bar][bla]".
Seems like PHP just introduced you to yet another common pitfall.
admin at compumatter dot com 
3 years ago
We use this function to handle file uploads.
Since $_FILES allows for more than a single file, this loops through each file and if there's an error, it is displayed in human readable language to the error log and then returned / exited. You can adjust that to echo's if preferred:
function file_upload_test($messageBefore="CM FILE UPLOAD MESSAGE"){
global $_FILES;
# a single file limit
$upload_max_size = ini_get('upload_max_filesize');
# the combination of a batch o multiple files
$post_max_size = ini_get('post_max_size');
# array of possible fails which are retuned below in if $key=error section
$phpFileUploadErrors = array(
0 => 'There is no error, the file uploaded with success',
1 => 'Exceeds php.ini upload_max_filesize of '.$upload_max_size.'MB',
2 => 'The uploaded file exceeds the MAX_FILE_SIZE directive that was specified in the HTML form',
3 => 'The uploaded file was only partially uploaded',
4 => 'No file was uploaded',
6 => 'Missing a temporary folder',
7 => 'Failed to write file to disk.',
8 => 'A PHP extension stopped the file upload.',
);
error_log("========================================");
error_log("$messageBefore");
error_log("========================================");
foreach ($_FILES['cmmediabrowsedfor'] as $key => $value) {
${$key}=$value;
error_log('$_FILES ['.$key.'] = ['.$value.']');
if(is_array($value)){
foreach ($value as $key2 => $value2) {
error_log(' > $_FILES ['.$key.']['.$key2.'] = '.$value2);
if($key=='error'){
error_log(' ******* CM Failed Upload: '.$phpFileUploadErrors[$value2]);
error_log(' Exit / Return in plugins/cm-alpha/php/images/img-create-tmp.php');
error_log(' ');
exit;
}
}
}
}
if(!file_exists($_FILES["cmmediabrowsedfor"]["tmp_name"][0]) || !is_uploaded_file($_FILES["cmmediabrowsedfor"]["tmp_name"][0])) {
error_log("NO FILE GOT UPLOADED ");
} else {
error_log("SUCCESS FILE GOT UPLOADED ");
}
}
rlerne at gmail dot com 
8 years ago
This updates "adam at gotlinux dot us" above and makes it version aware, and also adds newer constants to the array.
The reason we want to check the version is that the constants are not defined in earlier versions, and they appear later in the array. They would effectively overwrite the "0" index (no error) with an error message when the file actually uploaded fine.
It also drops the constant's value (0,1,2, etc) for the errors, in the likely event that they are changed later (the code should still work fine).
<?php
$upload_errors
= array(
0 => "There is no error, the file uploaded with success"
,UPLOAD_ERR_INI_SIZE => "The uploaded file exceeds the upload_max_filesize directive in php.ini"
,UPLOAD_ERR_FORM_SIZE => "The uploaded file exceeds the MAX_FILE_SIZE directive that was specified in the HTML form"
,UPLOAD_ERR_PARTIAL => "The uploaded file was only partially uploaded"
,UPLOAD_ERR_NO_FILE => "No file was uploaded"
);
if (
version_compare(PHP_VERSION, '5.0.3') >= 0)
$upload_errors[UPLOAD_ERR_NO_TMP_DIR] = "Missing a temporary folder";
if (
version_compare(PHP_VERSION, '5.1.0') >= 0)
$upload_errors[UPLOAD_ERR_CANT_WRITE] = "Failed to write to disk";
if (
version_compare(PHP_VERSION, '5.2.0') >= 0)
$upload_errors[UPLOAD_ERR_EXTENSION] = "File upload stopped by extension";
?>
belowtherim2000 at yahoo dot com 
15 years ago
I've been playing around with the file size limits and with respect to the post_max_size setting, there appears to be a hard limit of 2047M. Any number that you specify above that results in a failed upload without any informative error describing what went wrong. This happens regardless of how small the file you're uploading may be. On error, my page attempts to output the name of the original file. But what I discovered is that this original file name, which I maintained in a local variable, actually gets corrupted. Even my attempt to output the error code in $_FILES['uploadedfiles']['error'] returns an empty string/value.
Hopefully, this tidbit will save someone else some grief.
viseth10 at gmail dot com 
5 years ago
[Well just a little note. ]
That UploadException class example posted on top by anonymous is great. It works good. But there is a certain problem. You know there are two sides to generating errors.
First -> for the client side.
Second -> for the developers who will use your script
But i see only one side to generating Exceptions. ie For the developers.
Why ? Because when you generate an Exception, your script will come to an halt and do whatever you have defined in catch clause.
Now you dont want any client to see the Exception, do you ? I will not. The client will want to know what error occured in simple words they can understand instead of wanting their web app crashed if upload fails. So, dont generate exceptions. These errors should be collected and shown to client in an elegant way. That's a little advice.
Keep developing smarter.
krissv at ifi.uio.no 
18 years ago
When $_FILES etc is empty like Dub spencer says in the note at the top and the error is not set, that might be because the form enctype isnt sat correctly. then nothing more than maybe a http server error happens.
enctype="multipart/form-data" works fine
roger dot vermeir at nokia dot com 
4 years ago
Just found out that it is very important to define the
input type="hidden" name="MAX_FILE_SIZE" value=...
AFTER defining the input type="FILE" name=...
in your html/php.
If you swap them around, you will keep getting the filesize exceeded (error 2)!
Hope this helps.
Roger
Dub Spencer 
18 years ago
Upload doesnt work, and no error?
actually, both $_FILES and $_REQUEST in the posted to script are empty?
just see, if "post_max_size" is lower than the data you want to load.
in the apache error log, there will be an entry like "Invalid method in request". and in the access log, there will be two requests: one for the POST, and another that starts with all "----" and produces a 501.
web att lapas dott id dott lv 
15 years ago
1. And what about multiple file upload ? - If there is an UPLOAD_ERR_INI_SIZE error with multiple files - we can`t detect it normaly ? ...because that we have an array, but this error returns null and can`t use foreach. So, by having a multiple upload, we can`t normaly inform user about that.. we can just detect, that sizeof($_FILES["file"]["error"]) == 0 , but we can`t actualy return an error code. The max_file_size also is not an exit, becouse it refers on each file seperatly, but upload_max_filesize directive in php.ini refers to all files together. So, for example, if upload_max_filesize=8Mb , max_file_size = 7Mb and one of my files is 6.5Mb and other is 5Mb, it exeeds the upload_max_filesize - cant return an error, becouse we don`t know where to get that error.
Unfortunately we cannot get the file sizes on client side, even AJAX normaly can`t do that.
2. If in file field we paste something, like, D:whatever , then there also isn`t an error to return in spite of that no such file at all.
info at foto50 dot com 
15 years ago
For those reading this manual in german (and/or probably some other languages) and you miss error numbers listed here, have a look to the english version of this page ;)
Tom 
8 years ago
As it is common to use move_uploaded_file with file uploads, how to get it's error messages should be noted here (especially since it's not noted anywhere else in the manual).
Common code is to do something like:
 if (move_uploaded_file($_FILES["file1"]["tmp_name"], $target_file)) {
      echo "<P>FILE UPLOADED TO: $target_file</P>";
   } else {
      echo "<P>MOVE UPLOADED FILE FAILED!!</P>";
      print_r(error_get_last());
   }
Trying to upload something to your WordPress site only to be met with a message saying “the uploaded file exceeds the upload_max_filesize directive in php.ini”?
This error message can appear when you’re uploading large images, videos, plugins, themes, any type of file that you upload to your WordPress site.
In this article, we’re going to help you fix the problem and make it so that you can upload those large files. In total, we’ll cover:
- What causes the uploaded file exceeds the upload_max_filesize directive in php.ini
- How to fix the uploaded file exceeds the upload_max_filesize directive in php.ini
What Causes the uploaded file exceeds the upload_max_filesize directive in php.ini

Let’s start at the beginning. In order to preserve your server’s resources, hosts set a limit on the maximum size of a file that can be uploaded.
This maximum, in megabytes, is defined in the upload_max_filesize directive.
The upload_max_filesize directive itself is located in the php.ini file, which is the default server configuration file for applications that require PHP.
Those two things – upload_max_filesize and php.ini – are what the error message you see is referencing.
It’s important to remember that this upload limit is not a WordPress setting. However, you can see this limit in your WordPress site if you go to Media → Add New:
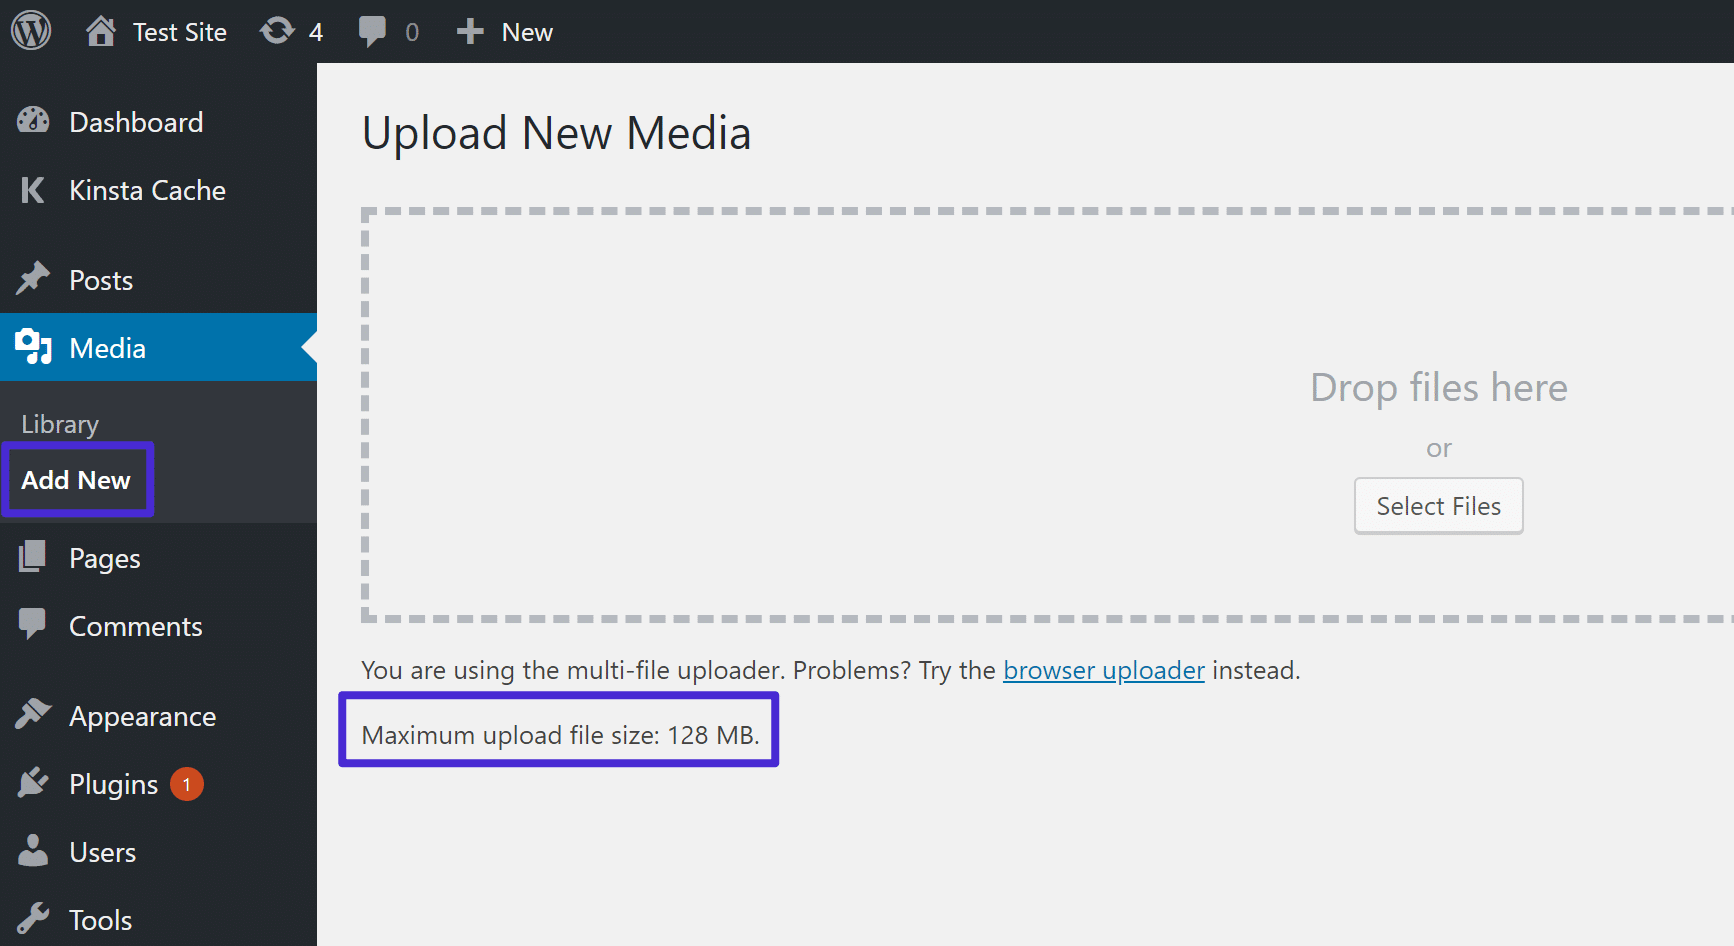
As you can see above, Kinsta sets the default limit at 128 MB, which is quite large and unlikely to ever cause issues. However, a lot of other hosts set the default as small as just 2 MB or 4 MB.
That means if you try to upload a file larger than that limit, you’re going to see the “the uploaded file exceeds the upload_max_filesize directive in php.ini”, or a similar message like “file_name exceeds the maximum upload size for this site.”
How to Fix the uploaded file exceeds the upload_max_filesize directive in php.ini
In order to fix this error, you need to increase the file size upload limit. That is, you need to increase the value of the upload_max_filesize directive in your php.ini file.
There are several different ways you can do this – the exact method that you choose will depend on your preference and your host’s configuration.
1. Talk to your host’s support
While we’ll cover some methods that you can try by yourself, the simplest solution is usually to just reach out to your host’s support and ask them to increase the limit for you.
This is a common request, your host’s support should know exactly what you want, and it should only take a couple of minutes of your time. That’s what your host’s support is there for!
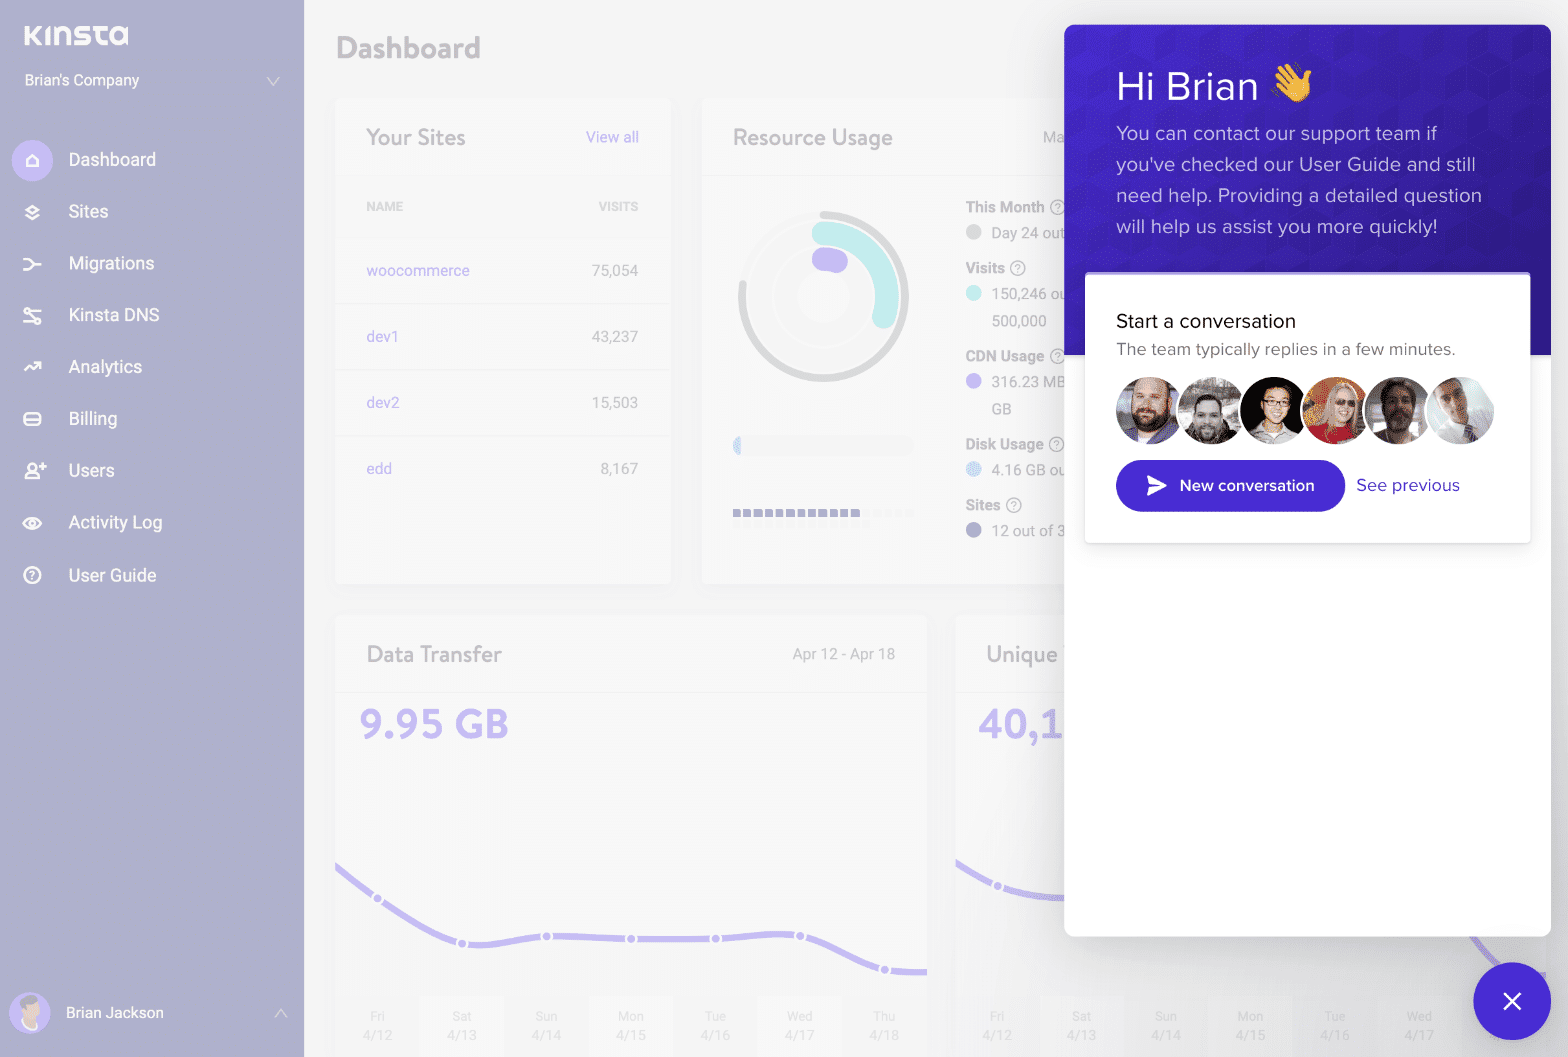
If you host at Kinsta and need to increase your limit beyond the default 128 MB limit, you can reach out to support on Intercom from anywhere in your Kinsta dashboard:
2. Edit php.ini via cPanel
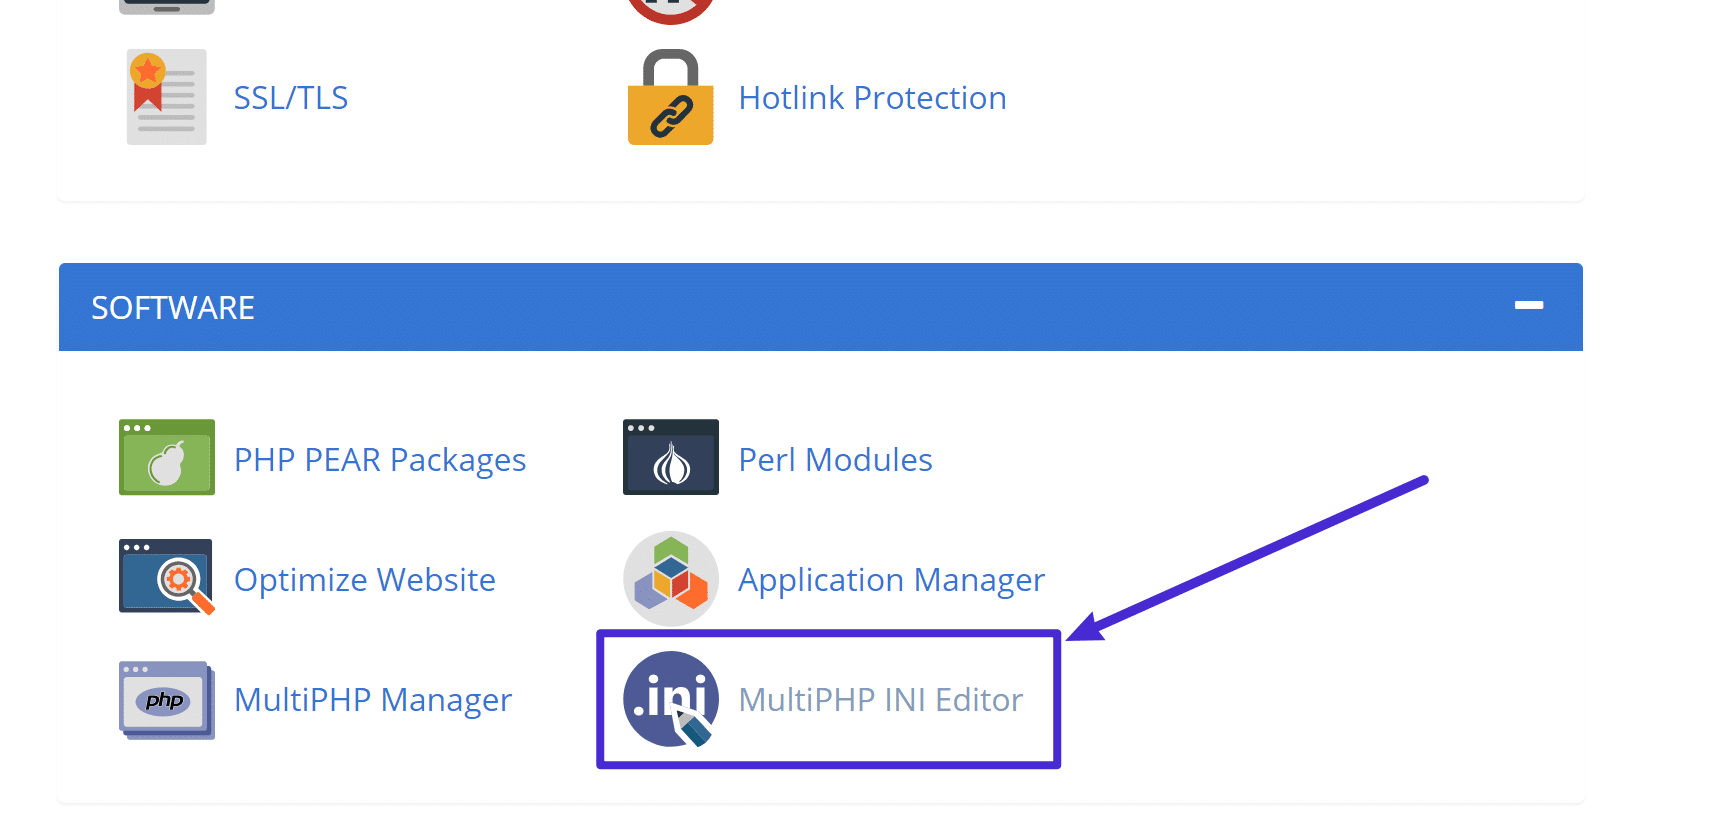
If your host uses cPanel, you should be able to edit your php.ini file and upload_max_filesize directive via the cPanel dashboard.
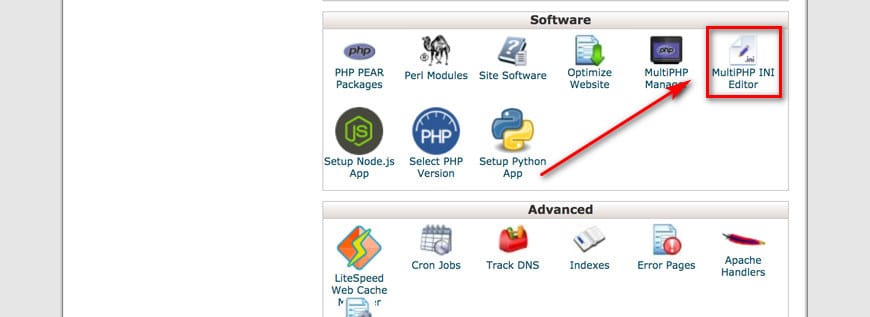
First, look for the MultiPHP INI Editor:
Then choose your WordPress site from the drop-down. After that, you’ll be able to edit the upload_max_filesize directive for that site:
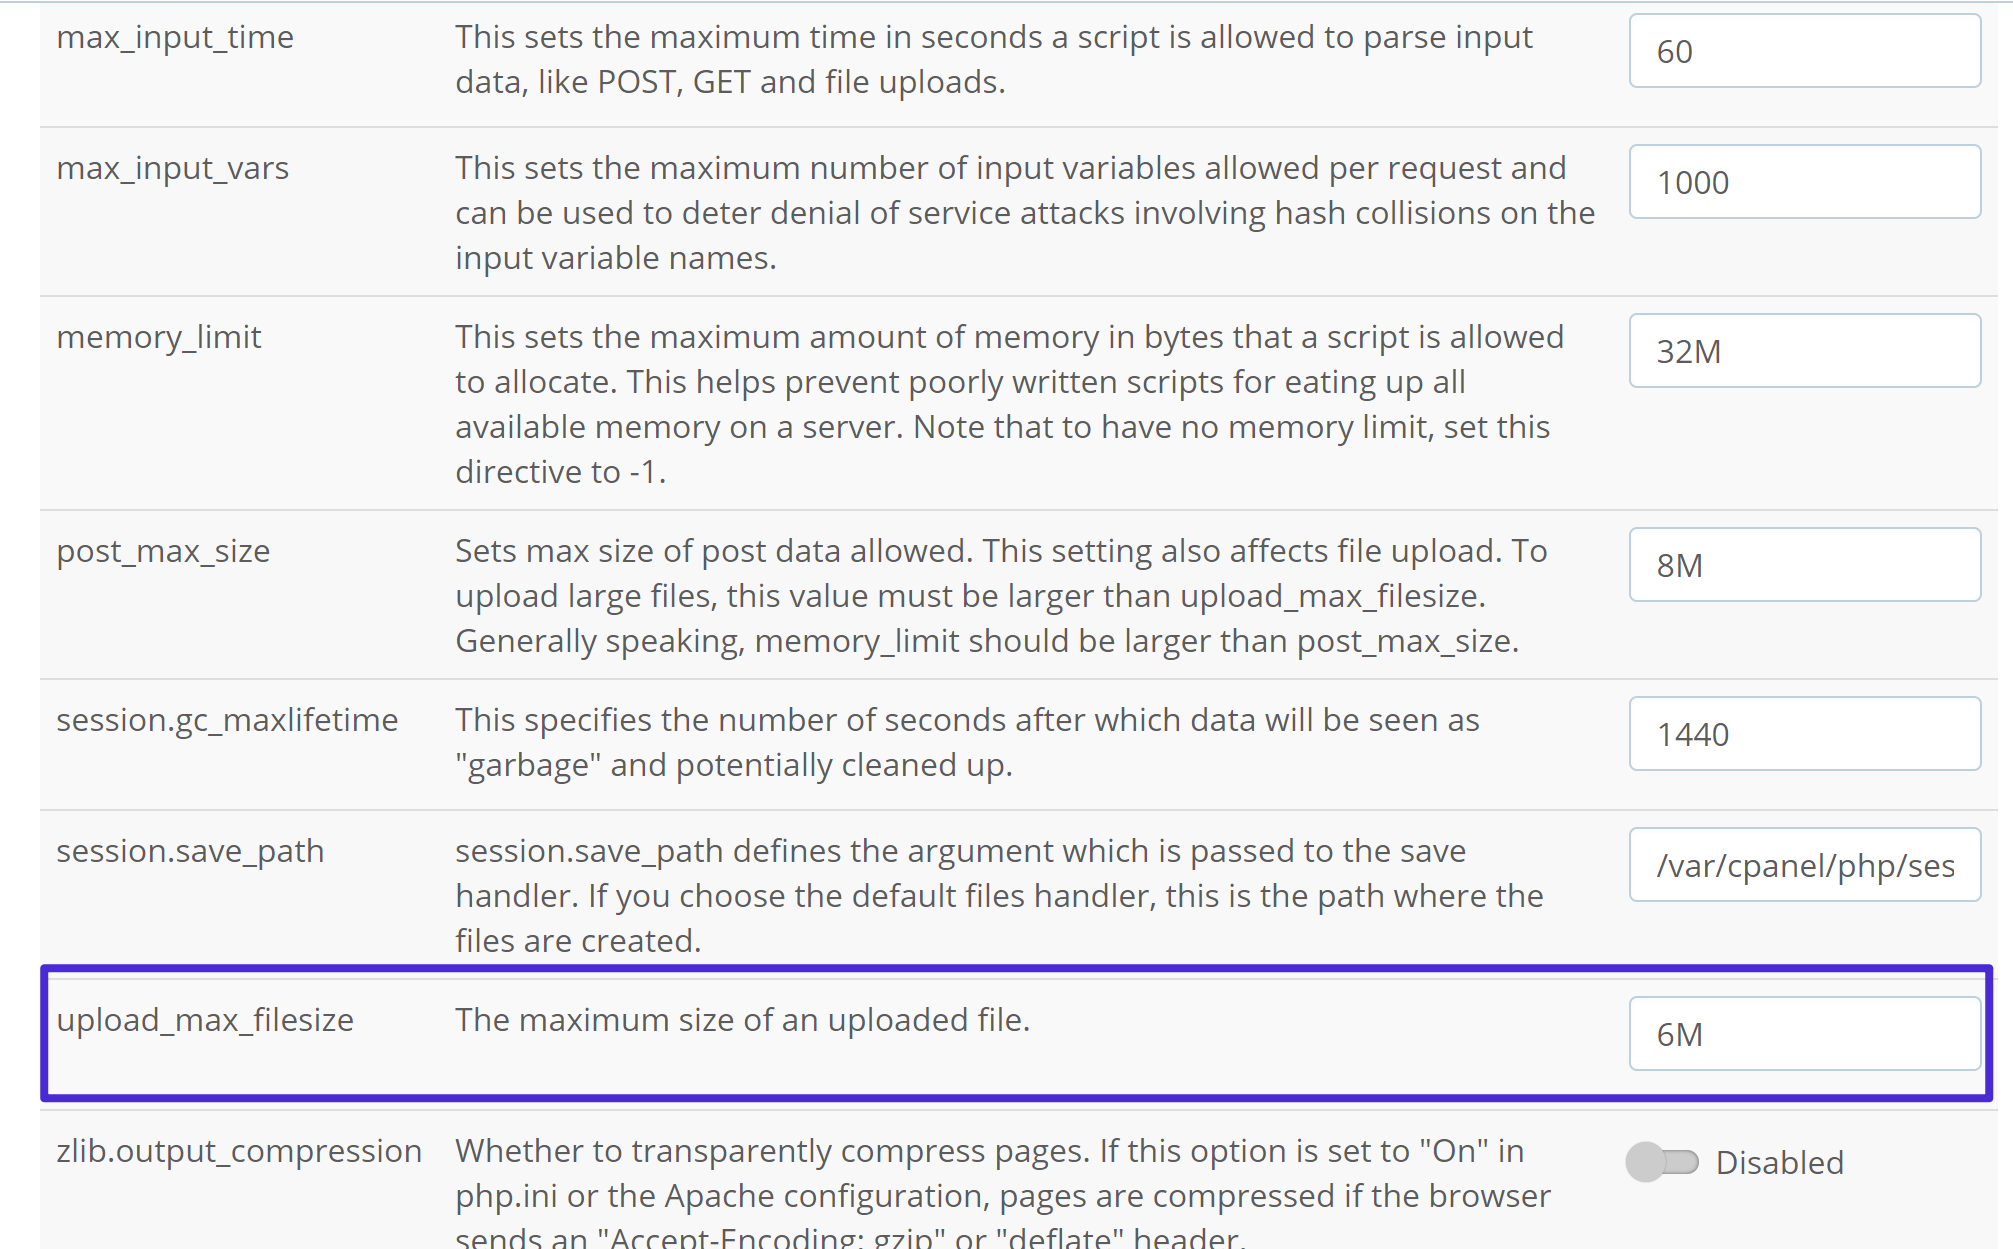
Increase the value based on your needs.
3. Create or edit php.ini via FTP
As you learned above, the php.ini file controls how your server works for PHP applications.
Unfortunately, based on your host’s restrictions, you may or may not be able to use php.ini files. For that reason, a more reliable approach can sometimes be to use .htaccess (which we’ll cover in the next section).
However, you can give this a try first to see if you are allowed to use php.ini at your host.
To get started, connect to your server via FTP and go to your site’s root folder.
If you already see a php.ini file in the root folder, you can edit that file. Otherwise, create a new file and name it php.ini:
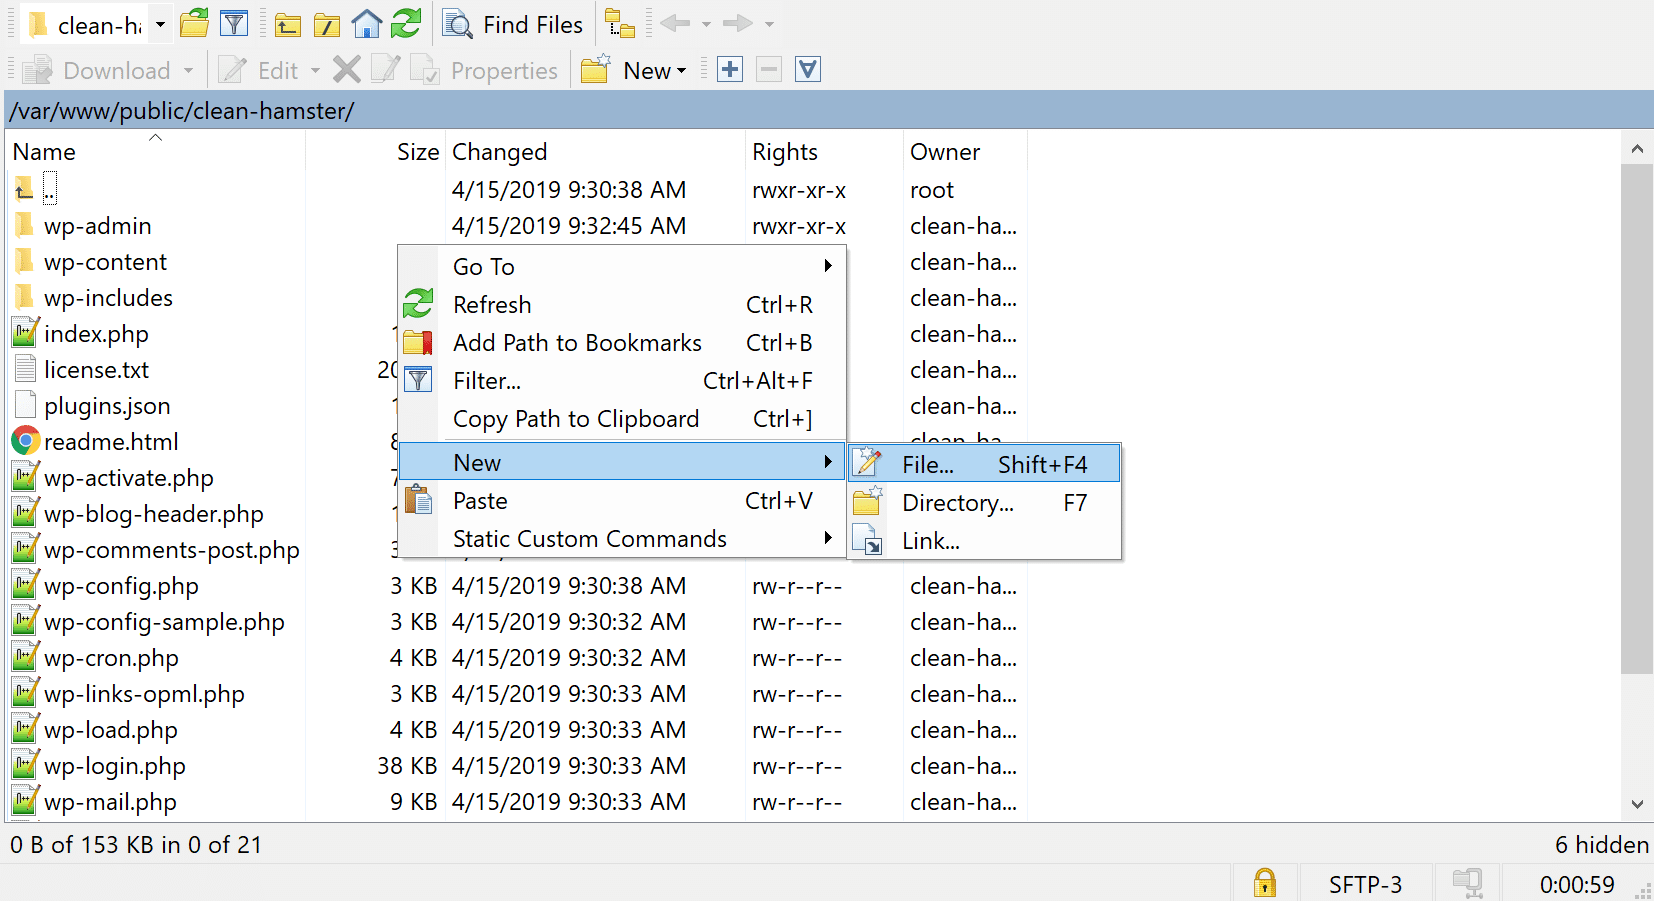
Then add or modify the code snippet below:
- If you created a new file, paste in the code snippet and modify the numbers to suit your needs.
- If you’re editing an existing file, find the same directives in the existing file and modify the numbers to suit your needs.
upload_max_filesize = 12M

post_max_size = 13M

memory_limit = 15M
Some hosts might further require you to add the suPHP directive in your site’s .htaccess file in order for the changes above to actually work.
To do this, you can also edit your .htaccess file via PHP and add the following code near the top of the file:
<IfModule mod_suphp.c>

suPHP_ConfigPath /home/yourusername/public_html

</IfModule>
Make sure to replace yourusername with the actual file path of your site.
4. Increase upload_max_filesize value by editing .htaccess
If directly creating or editing the php.ini file via the methods above didn’t work, you can also try to modify the upload_max_filesize directive by editing your site’s .htaccess file.
To get started, connect to your site via FTP and edit the .htaccess file that’s located in your site’s root folder.
Then, add the following code snippet, making sure to adjust the values based on your needs:
php_value upload_max_filesize 12M

php_value post_max_size 13M

php_value memory_limit 15M
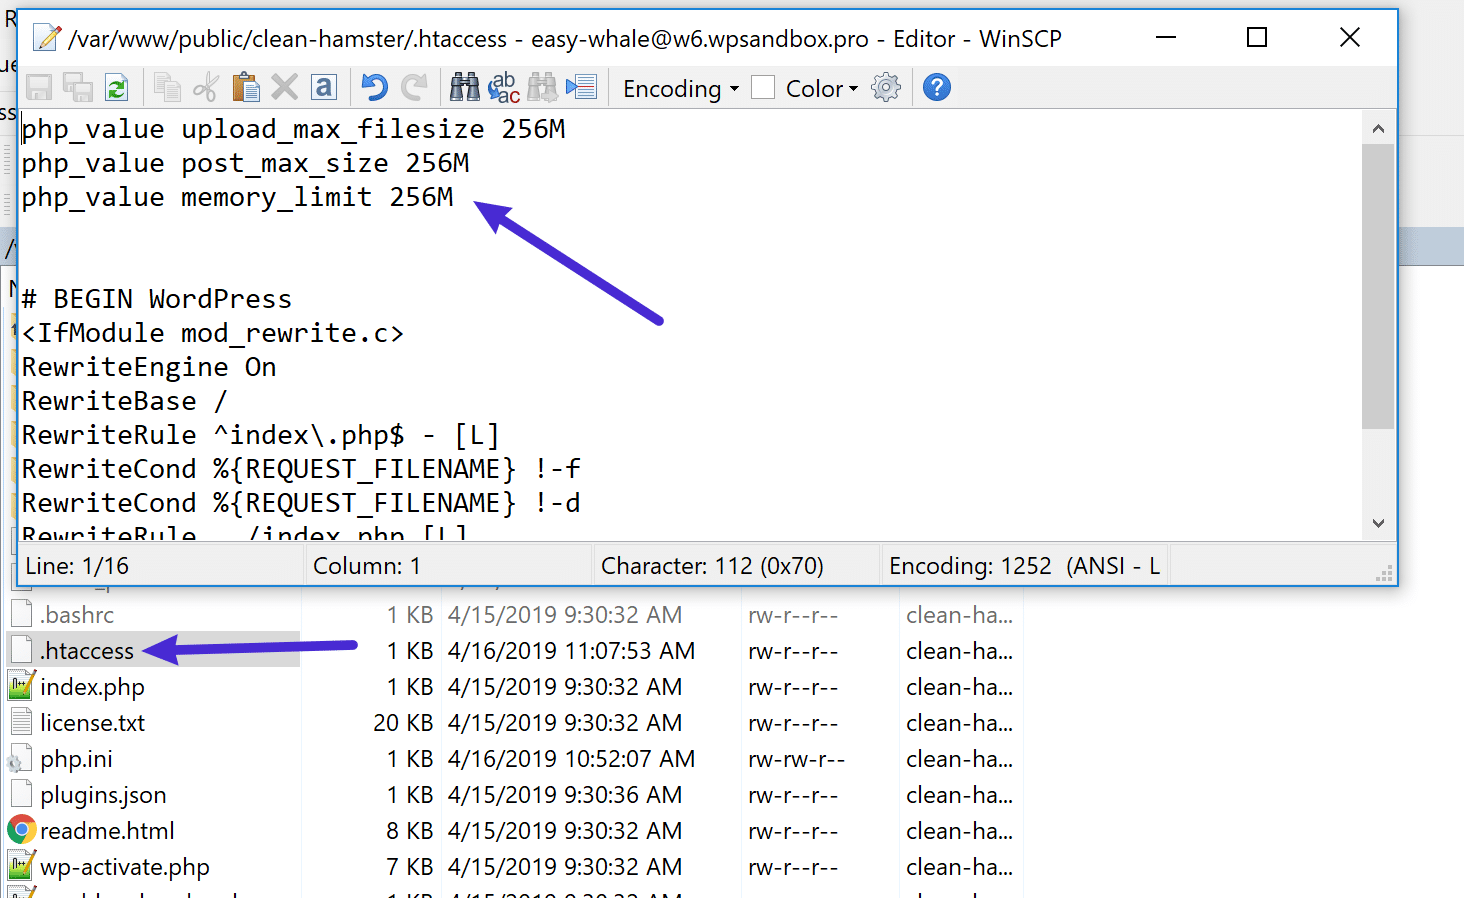
If you get an internal server error message after adding this code snippet, your server is likely running PHP in CGI mode, which means you cannot use these commands in your .htaccess file. Remove the snippets you just added and your site should start functioning again.
Note – if you’re a Kinsta customer, Kinsta uses NGINX, which means your site does not have an .htaccess file. If you need help at Kinsta, we recommend just reaching out to our support team and they’ll be able to quickly get things working for you.
Summary
To check if your changes are working, you can go back to Media → Add New in your WordPress dashboard to see if the new maximum upload limit matches the number you set in your php.ini file. If all goes well, you should see your new value and you’ll be able to upload the file that was giving you problems.
Finally, if nothing you’ve tried is working and your host’s support can’t help for some reason, you can always upload the file via FTP as a workaround. FTP has no limits and will let you upload everything from images to plugins and themes. You can even bulk upload files if needed.
Get all your applications, databases and WordPress sites online and under one roof. Our feature-packed, high-performance cloud platform includes:
- Easy setup and management in the MyKinsta dashboard
- 24/7 expert support
- The best Google Cloud Platform hardware and network, powered by Kubernetes for maximum scalability
- An enterprise-level Cloudflare integration for speed and security
- Global audience reach with up to 35 data centers and 275 PoPs worldwide
Test it yourself with $20 off your first month of Application Hosting or Database Hosting. Explore our plans or talk to sales to find your best fit.
Introduction
The Uploaded file exceeds the upload_max_filesize directive in php.ini error in WordPress, occurs when uploading large files, themes, or images. The issue is the result of a server-side setting that limits file sizes.
This guide provides six (6) solutions on how to adjust the appropriate parameters and resolve the file size error.
Prerequisites
- A working WordPress installation
- Access to the server that hosts the WordPress installation (local or SSH)
- If you are working from a client system, a file manager (or cPanel)
- A user account with sudo privileges
- Access to a command-line/terminal window (optional)
Use the WordPress dashboard to check your current maximum upload file size. Select the Media > Add New option, as shown in the image below.
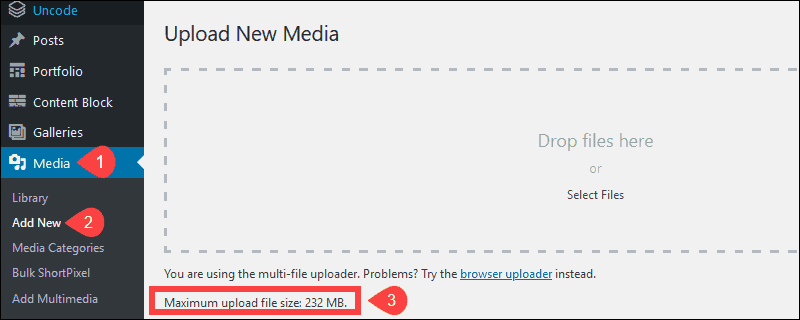
In this example, the maximum file size is limited to 232 MB. It is not possible to change this setting using WordPress. We provided 6 simple solutions on how to configure maximum file size on your server.
Option 1: Edit the .htaccess File (cPanel)
1. Open cPanel and launch the file manager.
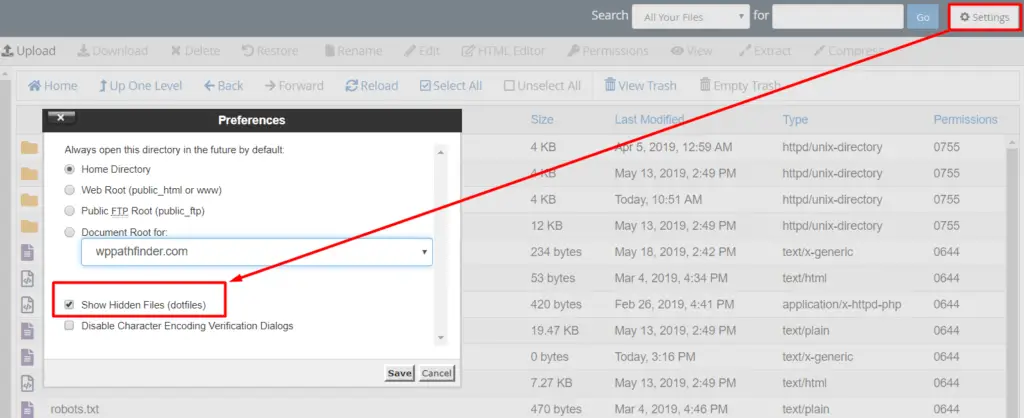
2. Right-click the .htaccess file, then click edit.
Note: If you are not able to locate the .htaccess file, you may need to click Settings in the upper-right corner and check the box to show hidden files.
3. Explore the file and find the line php_value upload_max_filesize. Edit the line to look as follows:
php_value_upload_max_filesize 256MThis instruction changes the server-side limit on the size of the file you’re allowed to upload to 256 MB.
4. Save the changes and exit the file.
Option 2: Edit the .htaccess File using Command Line Interface
1. Access the server that hosts your WordPress site.
2. Enter the following command in your Command Line Interface to access the WordPress directory:
cd /path/to/wordpressNote: The /path/to/wordpress is an example. You need to enter the correct path to your WordPress directory.
3. Open the .htaccess file with a text editor of your choice. In this example, we used the nano text editor:
sudo nano .htaccess4. Explore the file and find the line php_value upload_max_filesize. Edit the line and define the size you need:
php_value_upload_max_filesize 256MThis instruction changes the server-side limit on the size of the file you are allowed to upload to 256 MB.
5. Save the changes and exit the file.
Option 3: Editing wp-config.php File
This method changes the limits on the PHP file size by editing the wp-config.php file directly:
1. Access the public_html folder using cPanel.
2. Find the wp-config.php file. Right-click the file and select the edit option.
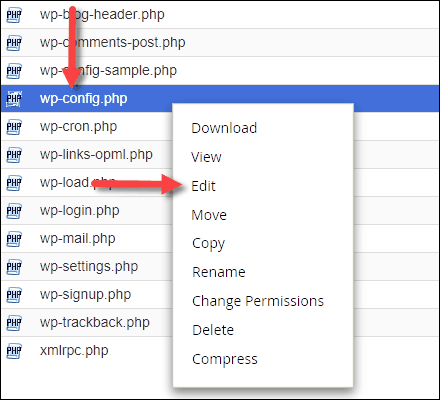
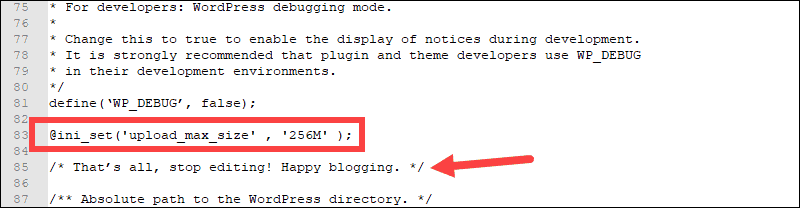
Scroll nearly to the end of the file and find for the following comment line:
/* That’s all, stop editing! Happy blogging. */
3. Add the following code just above that line:
@ini_set('upload_max_size' , '256M' );4. Save the file and exit. Try to upload your file again.
Option 4: Edit the wp-config.php File from Command Line Interface
1. Access the server that hosts your WordPress site.
2. Enter the following command and access the WordPress directory:
cd /path/to/wordpress3. Open the wp-config.php file with a text editor of your choice.
sudo nano wp-config.php4. Find for the following comment line:
/* That’s all, stop editing! Happy blogging. */
5. Add the following line just above:
@ini_set('upload_max_size' , '256M' );6. Save the file and exit.
Option 5: Edit php.ini File
The php.ini file is a configuration file for PHP variables. The following steps show you how to edit the php.ini file:
1. Log into your server hosting the WordPress site.
2. Access the Command Line Interface, and enter the following:
cd /etc/php/7.0/cliNote: If you’re running a different version of PHP, make sure to replace 7.0 with the version you are currently using.
3. Use a text editor to open the php.ini file:
sudo nano php.ini4. Locate the following line:
upload_max_filesize = 100M5. Replace 100M with a higher value in megabytes. (256 MB for example)

This file allows you to configure other settings as well:
- memory_limit 256M – Sets the max amount of memory a script can use.
- post_max_size 32M – Sets the max size for the total of the POST body data.
- max_execution_time 600 – Max time, in seconds, that a script is allowed to run.
- max_input_time 900 – Max time, in seconds, that a script is allowed to parse input data.
6. Save the file and exit.
Test your file upload in WordPress – the issue with file size is now resolved.
Option 6: Contact Host’s Support
It is not uncommon for hosting companies to set limitations on the settings clients can edit themselves. Depending on your particular hosting company, you might not be able to perform some of the actions described in the previous steps.
In those cases, it might be necessary to contact your host’s support services. Most hosts perform this type of configuration as part of their standard service.
Conclusion
Now you know how to fix the error “The uploaded file exceeds the upload_max_filesize directive in php.ini.” in WordPress. This tutorial covered 6 different methods to increase the maximum file upload size.
Regardless of the chosen method, by following these simple instructions, you are now able to define the maximum file size when uploading files to your website.
WordPress is the best content management system for building websites of almost any type and complexity. It does not require a deep knowledge of coding, so, it is the best choice for everyone. You can install WordPress manually or, depending on your web host, can also install it in one click. While uploading the files into WordPress, you may face the “the uploaded file exceeds the upload_max_filesize directive in php.ini” error.
At WPOven you can install a WordPress site to your server in a matter of seconds and easily manage it from our dashboard. Moreover, it is very customizable: you can easily change the interface or add new functionality just by installing new themes or plugins.
You can also read our most popular posts on WordPress common errors such as DNS_PROBE_FINISHED_NXDOMAIN, 404 error, 504 gateway timeout, 403 Forbidden.
What does this error mean? Why does WordPress display it? What are the ways to fix this error? Let’s look closer.
-
What is the uploaded file exceeds the upload_max_filesize directive in php.ini error?
- How to fix the uploaded file that exceeds the upload_max_filesize directive in php.ini?
What is “the uploaded file exceeds the upload_max_filesize directive in PHP.ini” Error?
Depending on the platform you hosted your website on, your WordPress may have different maximum file size limits. In most cases, it is 64 MB, but sometimes it can be higher or significantly lower.
For example, in the WordPress configuration or php.ini file, you have a limit of 64 MB. And you are going to install the theme, and plugin, or just upload the media file which is bigger. In this case, the server will throw the “the uploaded file exceeds the upload_max_filesize directive in php.ini” error, and you will not be able to upload the file.
What are the ways to fix the issue? We’ll review four of them in detail in the below section. But first
What Causes “the uploaded file exceeds the upload_max_filesize directive in php.ini” Error to Happen?
In order to prevent abusing server resources and preserve them, many web hosts impose certain limitations on the maximum upload file size. This maximum file size (MB or MegaByte) is mentioned or defined in the max_file_size directive.
This max_file_size directive is itself present in the default server configuration (for certain applications that require PHP) file i.e. php.ini.
Therefore, you might have noticed the terms, upload_max_filesize as well as php.ini present in the error message “the uploaded file exceeds the upload_max_filesize directive in php.ini“.
Note: You must keep in mind that this upload file limit is not imposed or set by WordPress but by your web hosting provider. However, you can easily check out this upload limit in your WordPress dashboard > media > Add new.

From the above picture, you can see, WPOven sets the default maximum upload file size limit up to 256 MB, which is quite large compared to what other web hosts provide by default i.e. 4MB, 64MB,128MB and it is very unlikely you face any issue in future.

How to Fix “the uploaded file exceeds the upload_max_filesize directive in php.ini” Error?

- Editing the .htaccess file
- Edit the wp-config.php file
- Edit php.ini file
- Contact the support
Editing the .htaccess file –
.htaccess is an Apache Web server configuration file. It allows you to configure the settings for individual folders and users. The .htaccess file provides a wide range of website customization. The maximum file size is one of the parameters you can set up in this file.
You can find the .htaccess file in the root folder of your website. To access it, you will require either an FTP manager or a web interface given by the hosting provider. In the case of an FTP manager, you will need the IP address, login, and password to connect remotely. Usually, this information is provided by the hosting service provider. If you are a WPOven user you can check out our post on, How do I use Secure FTP (SFTP) to access my site’s files and folders ?

- Open the file in any text or code editor, like Sublime Text, Visual Studio Code, Notepad++, etc. Then find the upload_max_filesize line. It will look like that:
php_value upload_max_filesize 64M
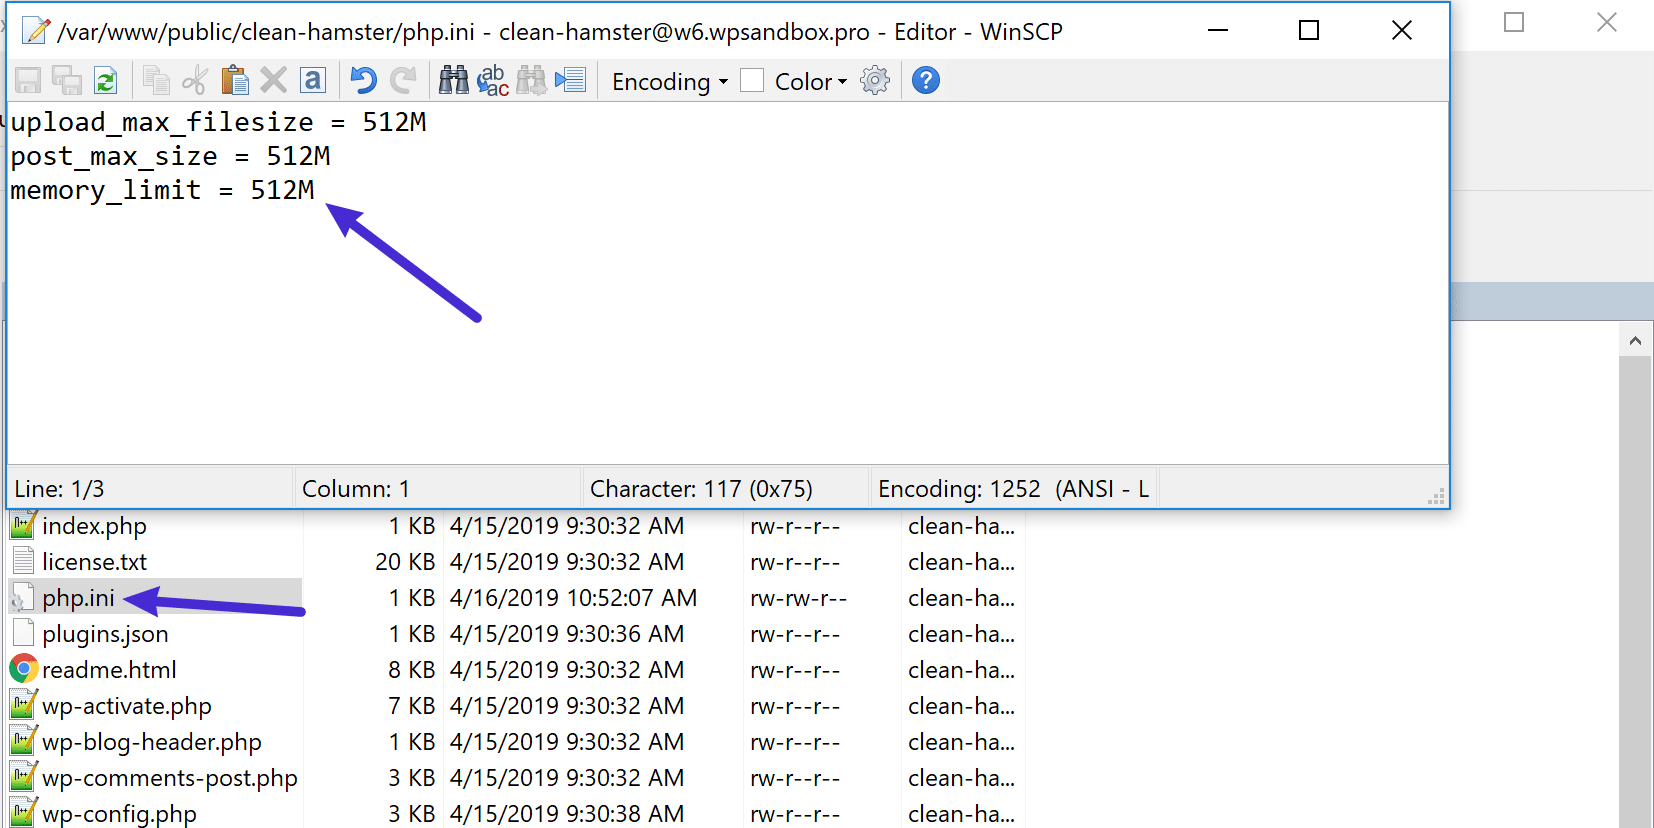
- In some cases, the .htaccess file may not contain this line. Then, add it at the end of the document. Change the value to the one you really need. For example:
php_value upload_max_filesize 512M
If you did everything correctly, WordPress would not display this error anymore.
Edit the wp-config.php file-
wp-config.php is the main configuration file of your WordPress website. It contains all the important parameters and tools to make the website work correctly. It is also located in the website root folder. Like a .htaccess file, you will need an FTP manager or web browser if you access it online.

- Open the file in any text or code editor and find the following line:
define('WP_DEBUG', false);
- Right after that, add the line with the maximum file size parameter:
@ini_set('upload_max_size' , '512M' );
You can use any appropriate value instead of 512M.
- Apply the changes, upload the file back to the server if you edited it offline, refresh the page, and try to upload the file again.
- The uploaded file exceeds the upload_max_filesize directive in PHP.ini error must be now solved.
Edit php.ini file-
The uploaded file exceeds the upload_max_filesize directive in the PHP.ini error means that something wrong is going on with the php.ini file. First, let’s find out what this file is for.
The php.ini file is the main PHP configuration file. WordPress uses the PHP programming language, and this file controls everything. Some hosting providers set up their configuration to the maximum parameters and do not allow it to change globally. However, in most cases it is possible.
If you do not know where the php.ini file is located on the server, do the following steps:
- Start a text editor and type the following line of code in it:
<?php phpinfo(); ?>
- Save the created file and name it info.php.
- Via the FTP manager, connect to the hosting server where your site is located and copy the info.php file to the website root directory.
- Now, in the address bar of your browser type http://example.com/info.php, where instead of example.com type in your website address.
As a result, the browser displays all the information about the PHP version used on the hosting, and information about its configuration. In the Loaded Configuration File column, it will display the path to the php.ini file on the host server.

Among other settings, check the value of the following three parameters:
- memory_limit — the maximum memory size allowed by the host to run scripts on the website;
- post_max_size — allowed size of a one-time file import request;
- upload_max_filesize — the maximum amount of data that can be uploaded to the site per time.

To increase the allowed maximum file size, you need to adjust the values specified in the upload_max_filesize and post_max_size parameters. If you use virtual hosting, most likely you will not have full access to the global server settings. As a rule, full access to this file is available on the local server or on a VPS hosting.
If you have access, open the php.ini file in edit mode and set the new upload_max_filesize and post_max_size values. The upload_max_filesize value should be less than post_max_size, and the post_max_size value should not be higher than the memory_limit. Do not forget to back up the site and save a backup copy of the php.ini file before you make any changes.
It must look like the following:
; Maximum allowed size for uploaded files.
; http://php.net/upload-max-filesize
upload_max_filesize = 100M
If you do not have access to the php.ini file, adjust the necessary values in the user.ini file. The path to it is indicated in the “Additional .ini files parsed” section when opening the info.php file. This method works for PHP version 5 or higher.
- Run a text or code editor and name the file user.ini.
- Add the necessary parameters to memory_limit, post_max_size, and upload_max_filesize.
- Using the file manager, copy the user.ini file to the root directory of the site, upload the page and try to upload the file again.
Contact the support-
In many cases, it will be much easier to contact the technical support of your hosting provider and ask them to solve the issue. Remember that they may possibly not be able to change the parameters if your plan does not allow you to do that. In that case, you may require to change it.
The uploaded file exceeds the upload_max_filesize directive in php.ini error is very easy to fix. All you need is several minutes of your time and some simple steps.
Summary
Finally, you can check or verify the changes you have made in the maximum upload file size and see if it’s working or not. To do so, go to your WordPress dashboard > Media > Add new and see if the file size limit you have applied is reflected in your php.ini file or not.
If you find everything works great and all the settings are exactly like you have made, then you should not face any “uploaded file exceeds the upload_max_filesize directive in php.ini” error while uploading a file in near future.
However, if things won’t work as, you expected and even your web host support is unable to help you for some reason, the last thing you can do is upload files through an FTP client. Since FTP has no limitations or restrictions you can upload any file size without any issue.
But the best solution we would suggest you do is migrate your website to a more reliable and trusted Managed Web host, which provides you with a larger file upload limit with more server space, i.e. WPOven.
If you have any queries or would like to share your valuable points, please do let us know in the comment section below.
No more “the uploaded file exceeds the upload_max_filesize directive in php.ini” error displaying on your screen. Host your website on WPOven and get a maximum upload file size limit than any other web host can provide. Save your time, money, and resources, and give your website mammoth growth with WPOven’s Fastest, and Fully managed Dedicated Servers.
- Get higher SSD storage
- Higher upload file size limit
- Fastest private servers
- Website Management
- 24X7 WordPress Expert support
- High-end Security
- Datacentres around the world, etc.
You can have all these features and much more in a single plan with unlimited Free migrations, unlimited staging, and a 14-day risk-free guarantee. Check out our plans or Contact our support team that assists you to choose the right plan.
Frequently Asked Questions
How do I change the maximum upload size in PHP.INI?
To increase file upload size in PHP, you need to modify the upload_max_filesize and post_max_size variables in your php.ini file. In addition, you can also set the maximum number of files allowed to be uploaded simultaneously, in a single request, using the max_file_uploads
Where do I upload PHP.INI file?
For a list of ini directives, please visit http://www.php.net/manual/en/ini.list.php. For more information about the upload_max_filesize directive, please visit http://www.php.net/manual/en/ini.core.php#ini.upload-max-filesize
Where is my PHP.INI file?
ini file is the default configuration file for running applications that require PHP. It is used to control variables such as upload sizes, file timeouts, and resource limits. This file is located on your server in the /public_html folder.
‘Uploaded file exceeds the upload_max_filesize directive in php.ini’ is an error meaning the file you are uploading is larger than WordPress’s upload limit. To fix ‘Uploaded file exceeds…’ error you need to increase upload_max_filesize using config.php or php.ini file. You can find the instructions below.
This error can also be shown as a HTTP error in WordPress.
What is uploaded file exceeds the upload_max_filesize directive in php.ini error?
Hosting providers limit your upload file size to protect the server. Upload_max_filesize code can be found in your php.ini file. Php.ini file is your server’s default PHP structure.
These limitations are mostly set by the hosting provider and you can see them by going to your WordPress dashboard, Media and clicking on Add New.
How to fix Uploaded file exceeds the upload_max_filesize directive in php.ini error?
To fix this error, you need to increase the upload size in your php.ini file. There are many ways to increase the upload size, which we will discuss below:
1. Increase upload_max_filesize in WordPress

With an FTP client, connect to your server’s root directory, and paste the code below at the bottom of your wp-config.php file:
define('WP_MEMORY_LIMIT', '256M');Now you have changed your upload size limit to 256
megabytes.
2. Increase upload_max_filesize in cPanel
If your host uses cPanel, by entering your cPanel you can simply make your changes to php.ini.
First, locate MultiPHP INI Editor. Then select your website, on the opened page. You can see several settings that can be edited. Scroll down to upload_max_filesize and change its value to your desired number.
3. Increase upload_max_filesize with FTP
As mentioned above, php.ini manages your server’s PHP structure. If your hosting provider allows you to access the php.ini file, you can make the required changes to it.

With an FTP client, connect to your server and head over to your directory. If you can’t locate php.ini (or php5.ini) to edit it, then you can simply create a file with the same name and add the code below to it.
upload_max_filesize = 2M
post_max_size = 3M
memory_limit = 5M
file_uploads = On
max_execution_time = 300
If you are using XAMPP, Wamp or MAMP, you can locate the php.ini in:
Windows: C:/xampp/php/php.ini
macOS: /private/etc/php.ini
Linux: /etc/php.ini
Keep in mind, some hosting providers require a suPHP in .htaccess file to run the code that we mentioned. Make sure you add the code below to your .htaccess file:
<IfModule mod_suphp.c>
suPHP_ConfigPath /home/yourusername/public_html
</IfModule>
Make sure you change yourusername, with your actual path.
Configurations mentioned above may be different for
different hosting providers. Therefore, to make sure they are indeed the right
configurations for your server, you can simply contact your hosting provider or
look at their forums.
4. Increase upload_max_filesize with .htaccess file
If your hosting provider doesn’t allow you to edit or create a php.ini file, you can make some changes to your .htaccess file to change upload_max_filesize. To do so, connect to your server with an FTP client and open your main directory. Locate .htaccess file and add the codes below:
php_value upload_max_filesize 2M
php_value post_max_size 3M
php_value memory_limit 5M
php_value max_execution_time 300
php_value max_input_time 300
If by adding the code above to your .htaccess file you
receive an error from your server, it means that your server is running PHP on
CGI and you are not allowed to edit .htaccess file. Delete the added codes to
restore your website back to its original state.
5. Increase upload_max_filesize in function.php file
To fix upload_max_filesize error in WordPress, you can also add the code below to your functions.php file in your child theme:
@ini_set( 'upload_max_size' , '40M' );
@ini_set( 'post_max_size', '70M');
@ini_set( 'max_execution_time', '250M');
You can change the numbers above to the limitations that suit you.
Conclusion
If none of the methods above worked for you, you need to contact your hosting provider’s support team and notify them of the situation.
To make sure the methods above have worked, you can head over to your WordPress dashboard, media and click on add new and look for upload size limit. If the limit has changed from what it was to the number you have entered in your codes, then it means it has worked. If not, then you need to contact your hosting provider.
Keep in mind, if you are still having issues uploading your file to the website, you can use an FTP client to upload your files to the server. Because FTP doesn’t have any upload size limitations.
If you are a regular WordPress user like me, then you must know how annoying you feel when you get the error message – ” uploaded file exceeds the upload_max_filesize directive in php.ini. wordpress ” when you are trying upload something really serious!
Recently, I encountered new error message that actually tells you to increase the upload memory limit!
I’m adding the error message in a style box below.
This File is empty. Please upload something more substantial. This error could also be caused by uploads being disabled in your php.ini or by post_max_size being defined as smaller than upload_max_filesize in php.ini.
How to Increase Max File Upload Size in WordPress?
Basically, this happen for WordPress security. By default WordPress does not allow you to upload large file size to prevent hacking problem & unwanted site damage.
This also can cause earlier bandwidth exceeds problem as well. So, WordPress engineers decreased the file upload limit. Sometimes, your hosting company also prevent uploading large file sizes.
This has both advantages & disadvantages as well. Though, disadvantages are nearly negligible & you can easily overcome this issue, but using alternative ways.
Pros
- Ensure Security of Your Website
- Prevent Harm Code Injecting
- Prevent Unwanted Bandwidth Exceeds
- Stop Showing Error – “Taking Too Much Time to Upload”
- Check the File Properly Before Upload It.
Cons
- Prevent to Upload Large File Upload That is Annoying
- Memory Limit is Too Short!
- Needs Technical Knowledge to Increase Memory Limit
- Bibendum ispum dolor elit
How to Solve The uploaded file exceeds the upload_max_filesize directive in php.ini?
You can follow either way or test multiple method to solve this issue. Sometimes one method does not work, but another works!
Depending on various hosting provider & WordPress version, you need to test below mentioned methods.
- Using a WordPress Plugins
- Updating php.ini File
- Updating wp-config.php File
- Edit .htaccess File
- Edit functions.php File
- Contact Your Hosting Provider
If you are getting below errors while uploading files on your WordPress Website, you can follow this video tutorial.
- upload max file size wordpress plugin
- wordpress maximum upload file size 2mb
- maximum upload file size 2 mb wordpress
- exceeds the maximum upload size for this site. wordpress
- increase max upload size wordpress wp-config
- how to increase maximum upload file size in cpanel
- increase maximum upload file size in wordpress localhost
- increase upload size wordpress godaddy
Some other CMS ( Content Management System ) users also experience this issue on their websites. Basically, this happens for php.ini problem on hosting accounts.
- the uploaded file exceeds the upload_max_filesize directive in php.ini. localhost
- the uploaded file exceeds the upload_max_filesize directive in php.ini. cpanel
- the uploaded file exceeds the upload_max_filesize directive in php.ini. ubuntu
- the uploaded file exceeds the upload_max_filesize directive in php.ini. mamp
- the uploaded file exceeds the upload_max_filesize directive in php.ini. moodle
- the uploaded file exceeds the upload_max_filesize directive in php.ini. plesk
- warning: the uploaded file exceeds the upload_max_filesize directive in php.ini! opencart
- the file you uploaded exceeds 1m
Here are My Listed Solutions For You!
#1 Using WordPress Plugins
If you are a non-coder & afraid of editing hosting files like me!
I suggest you to use WordPress Plugins to solve “The uploaded file exceeds the upload_max_filesize” problem efforlessly.
This is also a clever way to solve your problem & avoid all sensitive WordPress Files.
Because editing sensitive files can damage your website sometimes and you can add wrong codes that could be harmful as well.
As a huge WordPress fan, I am using WordPress for last 6 years and Working as Pro WordPress Developer that enhanced my knowledge about WordPress features & add-ons.
In my cases, I use “Increase Maximum Upload File Size” or “Upload Larger Plugins” WordPress plugins to solve upload file size exceeds error.
So, I suggest you to try both of this plugins on your website first, before you jump to edit sensitive files.
Plugins to Solve The uploaded file exceeds the upload_max_filesize
- Increase Maximum Upload File Size
- Upload Larger Plugins
#2 Updating php.ini File
Most of the cPanel hosting use PHP coding to develop the management system. You will find a file called php.ini that will help you bindings of uploading larger files on your website.
You need to add below lines by editing your php.ini file.
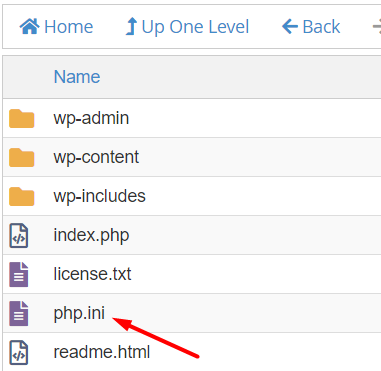
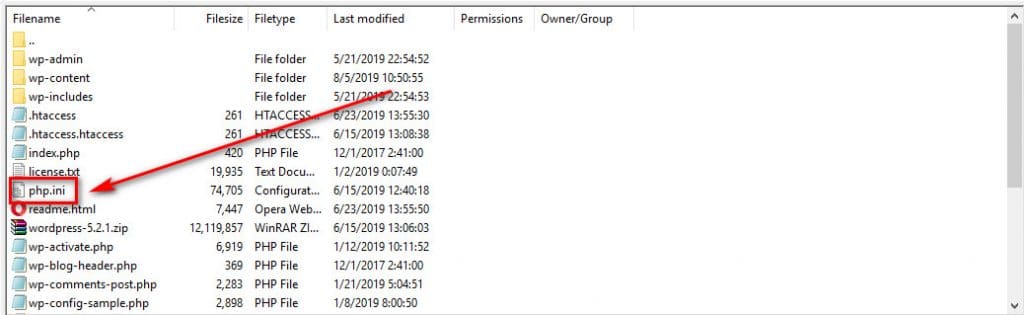
Figure 1
upload_max_filesize = 25M
post_max_size = 13M
memory_limit = 15M
You will find the php.ini file on your hosting under the WordPress installation directory ( Check Figure 1 ). Open the file in the Text Editor & add the lines from the above box.
In case you don’t find the ini.php file on your WordPress Directory, you can create one, add the codes & upload it to WP Installation Directory.
Create New php.ini File
Once you update the file, try to reupload your file on WordPress. If you still get the error notice, move forwar & try the method.
#3 Updating wp-config.php File
Wp-config.php is a core file of WordPress that cotains some important information & instruction of your website. Here you can easily define the upload limit on your website. You will find the wp-config.php file on the same directory where the php.ini located.
Open the file on Text Editor & add below lines at the bottom of your wp-config.php file.
@ini_set( 'upload_max_size' , '24M' );
@ini_set( 'post_max_size', '13M');
@ini_set( 'memory_limit', '15M' );
or you can add below line instead of above one.
define('WP_MEMORY_LIMIT', '256M');
Save the file & try to upload files on your WordPress site again. Hope this will solve the issue. Or you can try next method.
#4 Edit .htaccess File
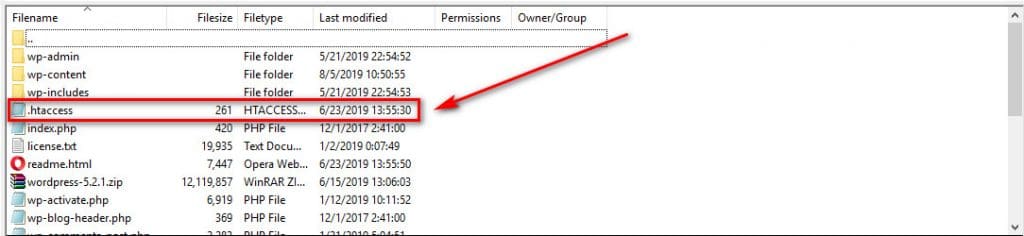
To edit .htaccess file you need to navigate the WordPress installation directory again and make sure all of your server hidden files are visible. You can do this just clicking setting icon on the top right corner and check “Show Hidden Files” option.
Once you save the option, you will find all the hidden files visible including the .htaccess file. So, you need to edit the file using Text Editor & add following lines from below box.
php_value upload_max_filesize 64M
php_value post_max_size 128M
php_value memory_limit 256M
php_value max_execution_time 300
php_value max_input_time 300
You can modify the sizes in Megabytes. Suppose you can change 64M to 128M depending on your requirement. Also, you can increase the execution time & input time to avoid errors for time delay on large file uploads.
#5 Edit functions.php File
If you are not too much Tech Expert, I suggest you not to edit WordPress core files like wp-config.php & .htaccess file.
Rather, it will be clever way to update your WordPress theme files. Because, you can easily change your theme & restore any damage using the theme backup.
Because, you always have theme backup & it’s less harmful for your website. You can easily recover your website if anything bad happen!
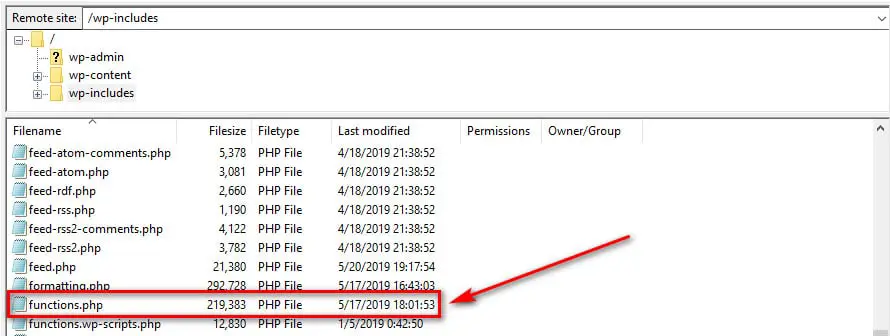
So, I suggest you to navigate the WordPress Theme installation folder & edit the theme function file.
you will find it inside the theme folder. Just select the right theme that is currently active & you will notice the file “functions.php”.
Your next step is open the file in a Text Editor & add below lines on function file on your theme.
The actual path is “wp-content>themes>ActiveTheme>functions.php“.
Once you find the file, edit it & add below lines on it.
@ini_set( 'upload_max_size' , '64M' );
@ini_set( 'post_max_size', '64M');
@ini_set( 'max_execution_time', '300' );
Your problem should be solved at this stage. But if you don’t get the solution, you should try the next way.
#6 Contact Your Hosting Provider
If you are not that much expert to solve the issue by implementing above ways, you have then two options available!
- Contact Hosting Support Center
- Hire an Expert
«Загруженный файл превышает директиву upload_max_filesize в php.ini» – это ошибка, означающая, что загружаемый вами файл превышает лимит загрузки WordPress. Чтобы исправить ошибку «Загруженный файл превышает …», вам необходимо увеличить upload_max_filesize с помощью файла config.php или php.ini. Вы можете найти инструкции ниже.
Эта ошибка также может отображаться как ошибка HTTP в WordPress.
Исправить Загруженный файл превышает директиву upload_max_filesize:
Какой загруженный файл превышает директиву upload_max_filesize в ошибке php.ini?
Хостинг-провайдеры ограничивают размер загружаемого файла для защиты сервера. Код Upload_max_filesize можно найти в вашем файле php.ini. Файл php.ini – это структура PHP по умолчанию на вашем сервере.
Эти ограничения в основном устанавливаются хостинг-провайдером, и вы можете увидеть их, перейдя в панель управления WordPress, Медиа и нажав Добавить.
Как исправить загруженный файл превышает директиву upload_max_filesize в ошибке php.ini?
Чтобы исправить эту ошибку, вам необходимо увеличить размер загрузки в файле php.ini. Есть много способов увеличить размер загрузки, которые мы обсудим ниже:
1. Увеличьте upload_max_filesize в WordPress

С помощью FTP-клиента подключитесь к корневому каталогу вашего сервера и вставьте приведенный ниже код в конец файла wp-config.php:
define('WP_MEMORY_LIMIT', '256M');Теперь вы изменили ограничение на размер загрузки до 256 мегабайт.
2. Увеличьте upload_max_filesize в cPanel
Если ваш хост использует cPanel, войдя в свою cPanel, вы можете просто внести изменения в php.ini.

Сначала найдите MultiPHP INI Editor. Затем выберите свой сайт на открывшейся странице. Вы можете увидеть несколько настроек, которые можно редактировать. Прокрутите вниз до upload_max_filesize и измените его значение на желаемое.
3. Увеличьте upload_max_filesize с помощью FTP.
Как упоминалось выше, php.ini управляет структурой PHP вашего сервера. Если ваш хостинг-провайдер разрешает вам доступ к файлу php.ini, вы можете внести в него необходимые изменения.
С помощью FTP-клиента подключитесь к своему серверу и перейдите в свой каталог. Если вы не можете найти php.ini (или php5.ini) для его редактирования, вы можете просто создать файл с тем же именем и добавить в него код, указанный ниже.
upload_max_filesize = 2M
post_max_size = 3M
memory_limit = 5M
file_uploads = On
max_execution_time = 300
Если вы используете XAMPP, Wamp или MAMP, вы можете найти php.ini в:
Windows: C:/xampp/php/php.ini
macOS: /private/etc/php.ini
Linux: /etc/php.ini
Имейте в виду, что некоторым хостинг-провайдерам требуется suPHP в файле .htaccess для запуска упомянутого кода. Убедитесь, что вы добавили приведенный ниже код в свой файл .htaccess:
<IfModule mod_suphp.c>
suPHP_ConfigPath /home/yourusername/public_html
</IfModule>
Убедитесь, что вы изменили имя пользователя на свой фактический путь.
Вышеупомянутые конфигурации могут отличаться для разных хостинг-провайдеров. Поэтому, чтобы убедиться, что они действительно подходят для вашего сервера, вы можете просто связаться с вашим хостинг-провайдером или просмотреть их форумы.
4. Увеличьте upload_max_filesize с помощью файла .htaccess.
Если ваш хостинг-провайдер не позволяет вам редактировать или создавать файл php.ini, вы можете внести некоторые изменения в файл .htaccess, чтобы изменить upload_max_filesize. Для этого подключитесь к серверу с помощью FTP-клиента и откройте свой основной каталог. Найдите файл .htaccess и добавьте следующие коды:

php_value upload_max_filesize 2M
php_value post_max_size 3M
php_value memory_limit 5M
php_value max_execution_time 300
php_value max_input_time 300
Если, добавляя приведенный выше код в файл .htaccess, вы получаете сообщение об ошибке с вашего сервера, это означает, что на вашем сервере работает PHP на CGI, и вам не разрешено редактировать файл .htaccess. Удалите добавленные коды, чтобы восстановить ваш сайт в исходное состояние.
5. Увеличьте upload_max_filesize в файле function.php.
Чтобы исправить ошибку upload_max_filesize в WordPress, вы также можете добавить приведенный ниже код в файл functions.php дочерней темы:

@ini_set( 'upload_max_size', '40M' );
@ini_set( 'post_max_size', '70M');
@ini_set( 'max_execution_time', '250M');
Вы можете изменить числа, указанные выше, на те ограничения, которые вам подходят.
Вывод
Если ни один из вышеперечисленных методов не помог вам, вам необходимо связаться со службой поддержки вашего хостинг-провайдера и сообщить им о ситуации.
Чтобы убедиться, что описанные выше методы сработали, вы можете перейти на панель управления WordPress, медиа и нажать «Добавить новый» и найти ограничение на размер загрузки. Если лимит изменился с прежнего на число, которое вы ввели в свои коды, значит, оно сработало. Если нет, то вам необходимо связаться с вашим хостинг-провайдером.
Имейте в виду, что если у вас по-прежнему возникают проблемы с загрузкой файла на веб-сайт, вы можете использовать FTP-клиент для загрузки файлов на сервер. Потому что FTP не имеет ограничений на размер загрузки.
Источник записи: https://betterstudio.com