Если при подключении к VPN вы видите, что соединение VPN не удалось из-за неудачного сообщения о разрешении доменного имени, вы можете следовать этому руководству, чтобы решить эту проблему. Это происходит из-за неправильных настроек общедоступного DNS или когда общедоступный DNS перестает правильно отвечать.
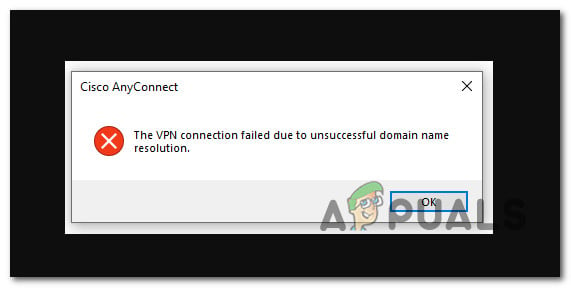
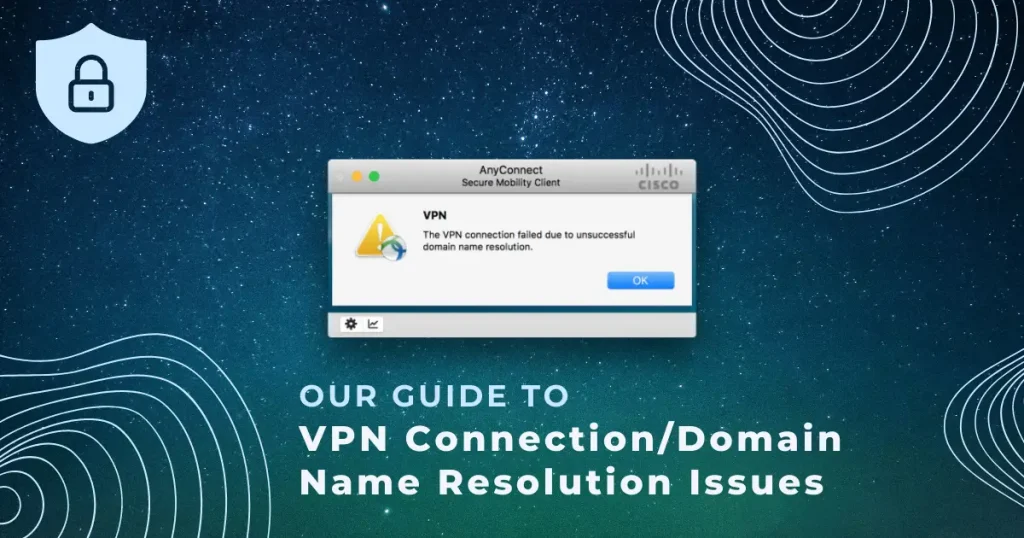
VPN-соединение не удалось из-за неудачного разрешения доменного имени.

Программное обеспечение VPN помогает вам подключаться и анонимно исследовать Интернет. С другой стороны, общедоступные службы DNS, такие как Google Public DNS, Comodo Secure DNS, OpenDNS и т. Д., Могут помочь вам преодолеть некоторые ограничения при работе в Интернете. Вышеупомянутая проблема возникает, когда приложение VPN не соответствует дополнительному общедоступному DNS, который вы настроили ранее. Поэтому вам необходимо переключиться на исходный DNS, чтобы избавиться от этого сообщения об ошибке и продолжить использование службы VPN.
Что такое VPN-соединение из-за неудачного домена?
Когда установленное приложение VPN не может подключиться к серверу из-за некоторых неправильных настроек, пользователи получают эту ошибку на своем компьютере с Windows 11/10. Это сообщение об ошибке указывает на проблему, возникшую из-за неправильного общедоступного DNS или неправильных настроек.
Как мне исправить неудачное разрешение доменного имени VPN?
Вы можете решить проблему с неудачным разрешением доменного имени VPN, вернувшись к исходному DNS, предоставленному вашим интернет-провайдером. Если ваш интернет-провайдер не предоставил отдельную настройку DNS, вы можете выбрать Получить адрес DNS-сервера автоматически вариант.
Чтобы исправить эту ошибку — VPN-соединение не удалось из-за неудачного разрешения доменного имени., Следуй этим шагам:
- Нажмите Win + R, чтобы открыть диалоговое окно «Выполнить».
- Тип ncpa.cpl и нажмите Войти кнопка.
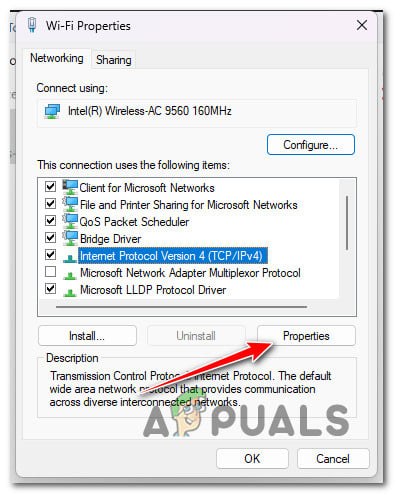
- Щелкните правой кнопкой мыши сетевой адаптер и выберите Характеристики вариант.
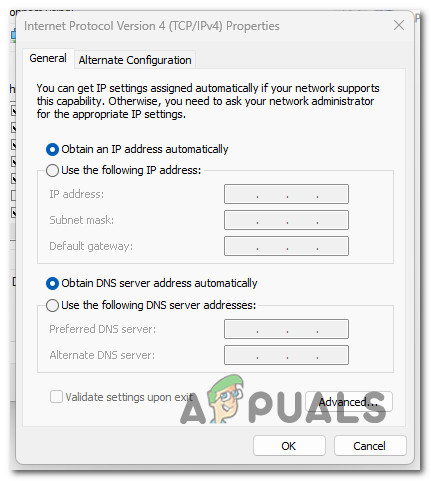
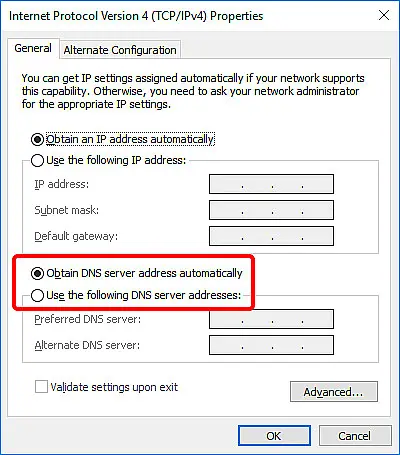
- Дважды щелкните значок Интернет-протокол версии 4 (TCP / IPv4).
- Выбрать Получить адрес DNS-сервера автоматически вариант.
- Щелкните значок хорошо кнопка.
Давайте подробно рассмотрим эти шаги.
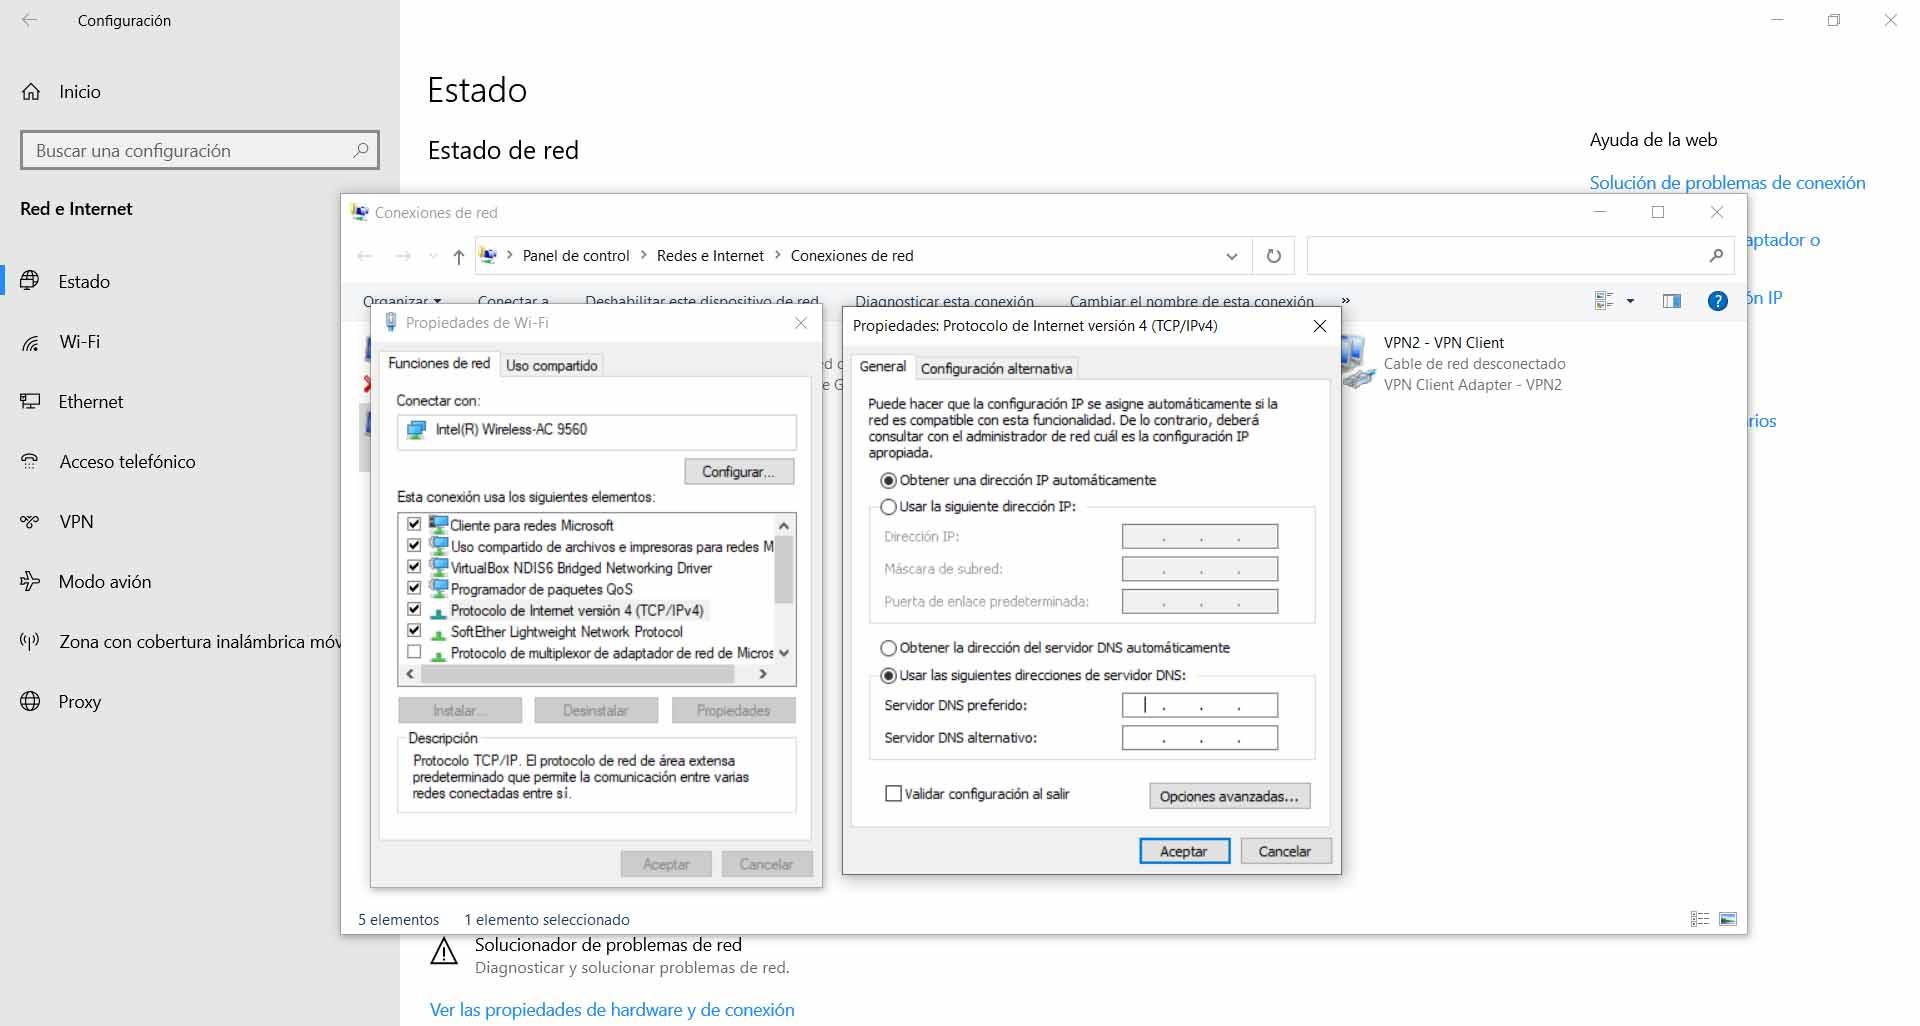
Сначала вам нужно открыть Сетевые соединения панель. Для этого нажмите Win + R, чтобы открыть командную строку «Выполнить», введите ncpa.cpl и нажмите кнопку «Ввод».
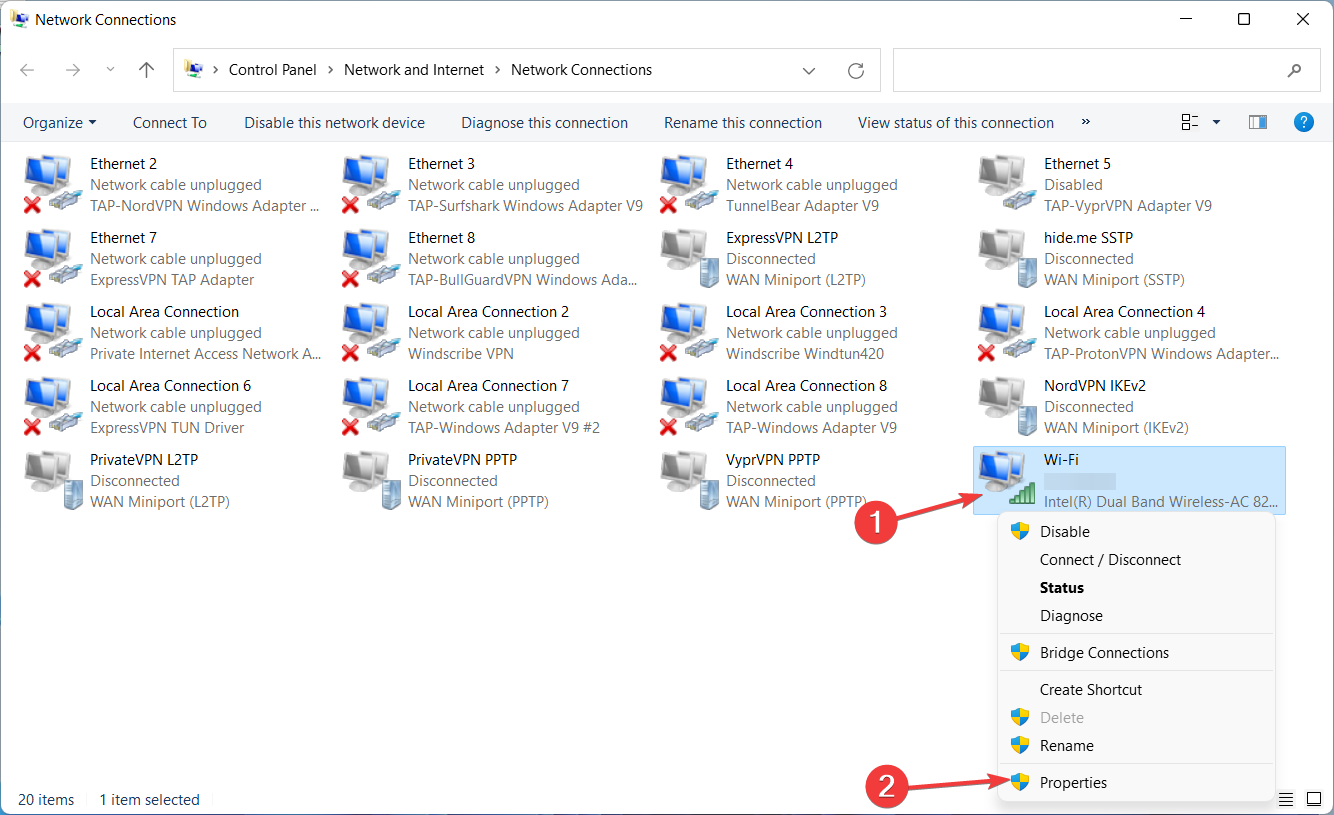
Здесь вы можете найти все сети, к которым вы были подключены. Вам нужно щелкнуть правой кнопкой мыши сетевой адаптер или соединение, которое создает проблему, и выбрать параметр «Свойства».
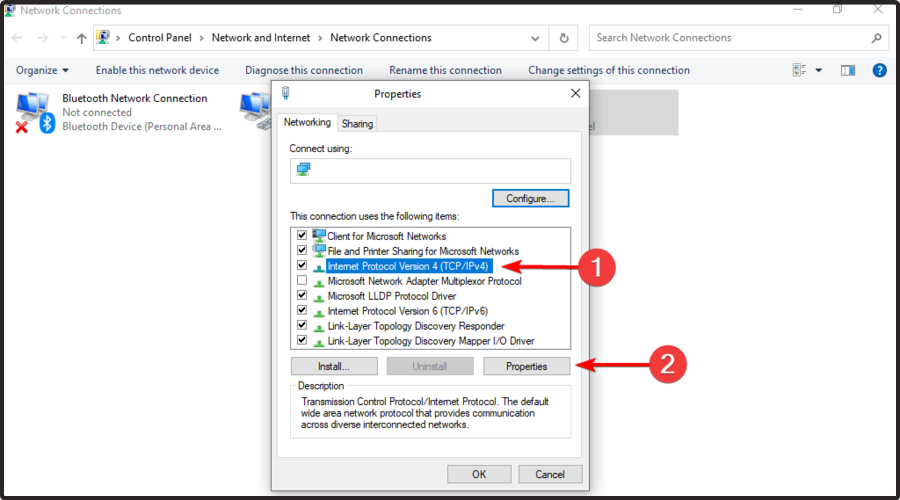
Теперь открывается всплывающее окно. Найдите протокол Интернета версии 4 (TCP / IPv4) и дважды щелкните его. Кроме того, вы можете выбрать его и нажать кнопку «Свойства».
Затем выберите опцию Получить адрес DNS-сервера автоматически и нажмите кнопку ОК.
После этого закройте все окна и попробуйте подключиться к VPN-серверу. Надеюсь, сейчас у вас не возникнет никаких проблем.
Почему мой VPN не работает?
Это сообщение об ошибке может появиться по двум причинам: 1]приложение VPN не соответствует общедоступному DNS, который вы используете на своем компьютере. 2]публичный DNS не работает из-за некоторых проблем. Если вторая причина вам не подходит, вы можете вернуть пользовательские настройки DNS из Сетевые соединения панель. Независимо от того, используете ли вы Wi-Fi, Ethernet или мобильную точку доступа, вы можете изменить настройки, используя указанное выше руководство.
Связанные чтения:
.
Содержание
- Почему я получаю ошибку разрешения доменного имени при использовании VPN
- Шаги по исправлению этой ошибки
- Изменить DNS-серверы
- Убедитесь, что VPN установлен правильно
- Используйте другой VPN

В чем проблема с этой ошибкой при попытке установить VPN-соединение в Windows? Это появляется, когда есть проблемы с DNS . Например, мы неправильно настроили общедоступные DNS-серверы или те, которые мы используем, по какой-то причине работают некорректно.
Что за VPN делает это для шифрования интернет-соединения и позволяет нам анонимно просматривать сеть, но для этого необходимо, чтобы оно правильно подключалось к DNS. Проблема обычно присутствует в последнем, на DNS-серверах, которые мы используем, поскольку VPN может быть правильно установлен, но выдает этот код ошибки.
Однако может случиться так, что используемый нами VPN не соответствует требованиям требования публичного DNS мы используем на компьютере. Это также вызовет ошибку разрешения доменного имени.
Какой бы ни была причина, мы можем легко исправить это, изменив DNS-серверы. Обычно это уже сработает, если мы не вернемся к использованию других, которые не работают для этой VPN или также генерируют ошибки.
Шаги по исправлению этой ошибки
После объяснения основных причин появления ошибки разрешения доменного имени при использовании VPN, мы собираемся упомянуть, что мы можем сделать, чтобы решить эту проблему и заставить ее работать нормально. Главное будет изменить DNS-серверы, которые мы используем, но мы также увидим, что это может быть ошибка в установленной нами VPN.
Изменить DNS-серверы
Первое, что мы сделаем, это изменить DNS-серверы что мы используем в Windows. Они служат переводчиками, поскольку отвечают за получение доменного имени, которое мы помещаем, например, в этой статье, на соответствующий IP-адрес. Это избавляет нас от необходимости запоминать бессмысленные числа и просто знать их имена.
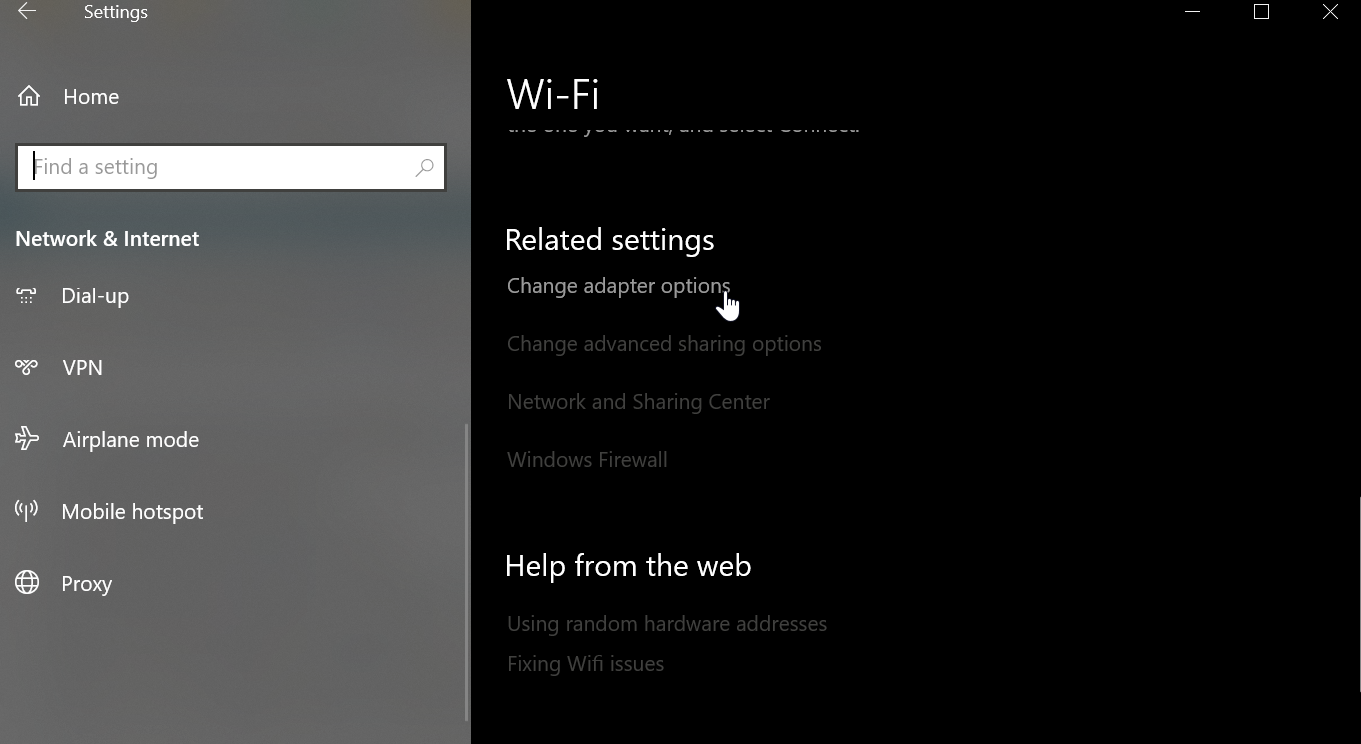
Чтобы изменить DNS-серверы в Windows, мы должны перейти в Пуск, мы заходим в Настройки, мы идем в Cеть и Интернет и там, чтобы изменить параметры адаптера. Теперь откроется новое окно, в котором появятся все сетевые карты, которые мы настроили. Например, может появиться карта Wi-Fi и карта Ethernet. Мы должны выбрать тот, который нас интересует, который мы будем использовать для навигации.
Вы должны щелкнуть второй кнопкой мыши, а затем щелкнуть «Свойства». Как только это будет сделано, откроется новое окно, и мы должны найти Интернет-протокол версии 4 (TCP / IPv4) и снова щелкнуть «Свойства».
Появится новое окно, как мы видим на изображении выше. Если мы вручную настроили и IP-адрес, и DNS-серверы, они появятся там. Если это происходит автоматически, он просто будет казаться пустым. Нас интересует изменение DNS-серверов, которые указаны ниже.
Мы должны дать Использовать следующие адреса DNS-серверов и заполните его. Возможно, мы удалили их у оператора, и при использовании других проблема разрешения доменного имени возникает при использовании VPN. Но может даже случиться так, что проблемы вызывают именно операторы.
Какие DNS-серверы мы можем использовать? Их много, и некоторые из самых популярных и наиболее эффективных — это продукты от Google и Cloudflare. Нам нужно было бы поставить следующее:
- Google DNS : 8.8.8.8 и 8.8.4.4
- Cloudflare DNS : 1.1.1.1 и 1.0.0.1
С этого момента наше оборудование будет подключаться к Интернету через DNS-серверы, которые мы изменили. Это то, что мы можем изменить в любое время, и это может даже помочь улучшить как скорость, так и безопасность.
Убедитесь, что VPN установлен правильно
Правильно ли мы установили VPN? Нам удалось кое-что изменить конфигурация и вот почему возникает эта проблема? Мы должны это проверить. VPN — это приложение, которое необходимо правильно установить и, конечно же, чтобы конфигурация была правильной и не было проблем.
Если мы установили программу недавно или обновили ее, нам, возможно, придется изменить какой-либо параметр конфигурации, чтобы она была включена правильно. Придется просмотреть его и посмотреть, не что-то не так, поэтому оно не работает должным образом.
Используйте другой VPN
Тип VPN, который мы используем, будет иметь важное значение для того, чтобы он работал лучше или хуже. Доступно множество вариантов, как бесплатных, так и платных. Однако бесплатные — не лучший вариант. Они могут стать серьезной проблемой как для безопасности, так и для правильной работы.
Наш совет заключается в используйте надежный VPN , платный, стабильный, с хорошей производительностью. Избегайте как бесплатных, так и пробных версий. Например, мы можем использовать ExpressVPN, NordVPN или ProtonVPN, которые являются одними из самых надежных и используемых вариантов.
Если мы видим, что при смене DNS-серверов и проверке того, что все правильно установлено и настроено, ошибка разрешения доменного имени продолжает появляться при использовании VPN, скорее всего, сбой вызван программой, которую мы используем. В этом случае не было бы выбора, кроме как попробовать другой и посмотреть, решится ли это, и мы сможем нормально перемещаться.
Короче говоря, если при использовании VPN мы обнаруживаем проблему разрешения доменного имени, возможно, это происходит из-за сбоя в DNS-серверах, хотя это также может быть связано с некоторой плохой конфигурацией самой программы или ее использованием. это не работает. Мы увидели, что мы можем сделать, чтобы решить эту проблему, и главное — использовать другие DNS-серверы, которые мы можем легко изменить.
Download PC Repair Tool to quickly find & fix Windows errors automatically
While connecting to a VPN, if you see The VPN connection failed due to unsuccessful domain name resolution message, you can follow this tutorial to fix this problem. It happens due to wrong public DNS settings or when the public DNS stops responding correctly.
The VPN connection failed due to unsuccessful domain name resolution

VPN software helps you connect and explore the internet anonymously. On the other hand, public DNS services such as Google Public DNS, Comodo Secure DNS, OpenDNS, etc., can help you go through some limitations while browsing the internet. The above-mentioned problem occurs when the VPN app doesn’t comply with the additional public DNS that you set up earlier. Therefore, you have to switch to the original DNS to get rid of this error message and continue using the VPN service.
What is VPN connection failed due to unsuccessful domain?
When the installed VPN app cannot connect to the server due to some incorrect settings, users get this error on their Windows 11/10 computer. This error message is a representation of a problem occurring due to the wrong public DNS or settings.
How do I fix VPN unsuccessful domain name resolution?
You can fix the VPN unsuccessful domain name resolution issue by switch back to the original DNS given by your ISP. In case your ISP has not provided a separate DNS setting, you can choose the Obtain DNS server address automatically option.
To fix this error – The VPN connection failed due to unsuccessful domain name resolution, follow these steps:
- Press Win+R to open the Run dialog.
- Type ncpa.cpl and press the Enter button.
- Right-click on the network adapter and select the Properties option.
- Double-click on the Internet Protocol Version 4 (TCP/IPv4).
- Choose the Obtain DNS server address automatically option.
- Click the OK button.
Let’s check out these steps in detail.
At first, you have to open the Network Connections panel. For that, press Win+R to open the Run prompt, type ncpa.cpl, and press the Enter button.
Here you can find all the networks that you were connected to. You have to right-click on the network adapter or connection, which is creating the issue and select the Properties option.
Now, it opens up a popup window. Find out the Internet Protocol Version 4 (TCP/IPv4) and double-click on it. Alternatively, you can select it and click on the Properties button.
Next, select the Obtain DNS server address automatically option and click on the OK button.
After that, close all the windows and try to connect to the VPN server. Hopefully, you won’t get any issues now.
Why does my VPN say unsuccessful?
This error message can appear due to two reasons – 1] the VPN app is not complying with the public DNS you are using on your computer. 2] the public DNS is down due to some problems. If the second reason is not valid for you, you can revert the custom DNS settings from Network Connections panel. Whether you are using a Wi-Fi, Ethernet, or mobile hotspot, you can change the settings using the guide mentioned above.
Related reads:
- Common VPN error codes troubleshooting & solutions
- VPN not working? Fix VPN problems & issues

Sudip loves to engage with the latest technology & gadgets. Apart from writing about all things technology, he is a Photoshop junkie and a football enthusiast.
Download PC Repair Tool to quickly find & fix Windows errors automatically
While connecting to a VPN, if you see The VPN connection failed due to unsuccessful domain name resolution message, you can follow this tutorial to fix this problem. It happens due to wrong public DNS settings or when the public DNS stops responding correctly.
The VPN connection failed due to unsuccessful domain name resolution
VPN software helps you connect and explore the internet anonymously. On the other hand, public DNS services such as Google Public DNS, Comodo Secure DNS, OpenDNS, etc., can help you go through some limitations while browsing the internet. The above-mentioned problem occurs when the VPN app doesn’t comply with the additional public DNS that you set up earlier. Therefore, you have to switch to the original DNS to get rid of this error message and continue using the VPN service.
What is VPN connection failed due to unsuccessful domain?
When the installed VPN app cannot connect to the server due to some incorrect settings, users get this error on their Windows 11/10 computer. This error message is a representation of a problem occurring due to the wrong public DNS or settings.
How do I fix VPN unsuccessful domain name resolution?
You can fix the VPN unsuccessful domain name resolution issue by switch back to the original DNS given by your ISP. In case your ISP has not provided a separate DNS setting, you can choose the Obtain DNS server address automatically option.
To fix this error – The VPN connection failed due to unsuccessful domain name resolution, follow these steps:
- Press Win+R to open the Run dialog.
- Type ncpa.cpl and press the Enter button.
- Right-click on the network adapter and select the Properties option.
- Double-click on the Internet Protocol Version 4 (TCP/IPv4).
- Choose the Obtain DNS server address automatically option.
- Click the OK button.
Let’s check out these steps in detail.
At first, you have to open the Network Connections panel. For that, press Win+R to open the Run prompt, type ncpa.cpl, and press the Enter button.
Here you can find all the networks that you were connected to. You have to right-click on the network adapter or connection, which is creating the issue and select the Properties option.
Now, it opens up a popup window. Find out the Internet Protocol Version 4 (TCP/IPv4) and double-click on it. Alternatively, you can select it and click on the Properties button.
Next, select the Obtain DNS server address automatically option and click on the OK button.
After that, close all the windows and try to connect to the VPN server. Hopefully, you won’t get any issues now.
Why does my VPN say unsuccessful?
This error message can appear due to two reasons – 1] the VPN app is not complying with the public DNS you are using on your computer. 2] the public DNS is down due to some problems. If the second reason is not valid for you, you can revert the custom DNS settings from Network Connections panel. Whether you are using a Wi-Fi, Ethernet, or mobile hotspot, you can change the settings using the guide mentioned above.
Related reads:
- Common VPN error codes troubleshooting & solutions
- VPN not working? Fix VPN problems & issues
Sudip loves to engage with the latest technology & gadgets. Apart from writing about all things technology, he is a Photoshop junkie and a football enthusiast.
The VPN connection failed due to unsuccessful domain name resolution is a common error that may occur when using the Cisco AnyConnect Secure Mobility Client to remotely connect to the workplace.
The description is self-explanatory: you can’t establish a successful VPN connection using Cisco due to DNS issues.
BEST VPN RECOMMENDATIONS — VETTED BY OUR EXPERTS
Normally, if you stumble upon problems with your company’s VPN, such as AnyConnect installation failure, you should contact your system admin and request assistance.
However, since this error is usually caused by improper settings on the client side, you can try the following solutions to fix it.
What does it mean when it says the VPN connection failed due to unsuccessful domain name resolution?
The VPN connection failed due to unsuccessful domain name resolution error usually means the VPN service is unable to establish a connection to the server through the DNS.
If you wonder why is VPN connection unsuccessful, you should know that this type of error generally hints to underlying problems in your network or applications, most notably:
➡️ Faulty DNS configuration: it’s possible that your native DNS setup is not compatible with your VPN client
➡️ Bad Internet connection: if your connection is fluctuating or down, you will have problems with your VPN too
➡️ Corrupt/outdated VPN app: if you don’t run the best version, some functionalities may not work as desired
➡️ Problems with the operating system: it’s possible that certain parts of your OS are corrupt which interferes with establishing a secure VPN connection
How can I fix the VPN connection failed due to DNS error?
- Change your DNS settings
- Try another VPN service
- Repair the anyconnect.xml file
- Reinstall your operating system
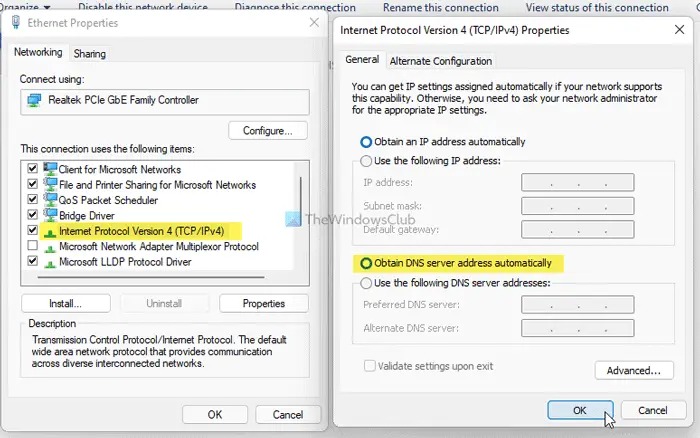
1. Change your DNS settings
Time needed: 2 minutes.
If you want to get rid of this Cisco VPN connection error and repair any DNS malfunctions, the logical solution is to change your settings as exemplified below.
- On Windows 10, right-click the Start button.
- Go to Network Connections > Change adapter options.

- Right-click your network adapter and select Properties.

- Double-click Internet Protocol Version 4 (TCP/IPv4).

- Select Obtain DNS server address automatically and Click OK.

The DNS error might occur when using custom DNS settings, such as Google Public DNS, OpenDNS, or Cloudflare. In certain cases, static DNS servers are not compatible with VPN clients like Cisco VPN.
However, you can easily fix this issue by resetting your computer’s DNS settings to default, which means using the DNS servers provided by your ISP. If the problem persists, you should contact your ISP.
But if your ISP’s DNS servers are slow by default and that’s actually the reason why you used custom DNS in the first place, then you should try using other static DNS servers.
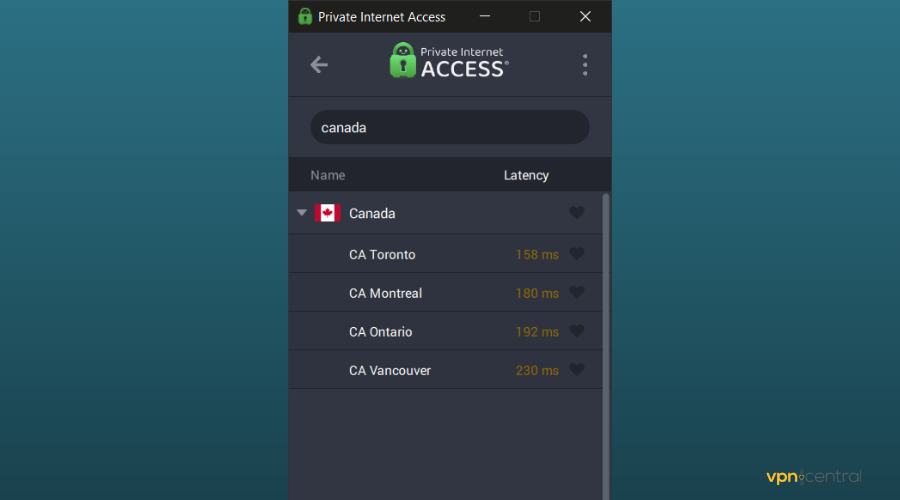
2. Try another VPN service
If you get DNS-related issues on a regular basis, we suggest you try a different VPN. Look for a trusted provider that’s secure and up-to-date.
In this regard, we recommend Private Internet Access (PIA) because it is acknowledged to have great DNS security.
This tool has very secure DNS configurations and also lets you make your own custom DNS setup, configure port forwarding, and more.
Along with that, you should also know that PIA has a global server coverage of over 35,000 servers. This ensures private and high-speed connections regardless of location.
Private Internet Access is a full-package VPN service with unlimited bandwidth, powerful encryption, a dedicated ad and malware blocker, and more. Plus, it is open source which makes it more stable and secure than other types of apps.
With this VPN you should be able to bypass issues like unsuccessful domain name resolution errors.

Private Internet Access
Get access to secure VPN and DNS servers for a private and error-free experience.
3. Repair the anyconnect.xml file

In some cases, AnyConnect’s XML profiles become corrupt, which causes the VPN connection failed due to an unsuccessful domain name resolution error. But you should be able to fix this problem by reinstalling AnyConnect.
You can also try connecting to another region, specifying an alternative VPN gateway, or checking the DNS name and port address in the XML file to see if it’s correct.
4. Reinstall your operating system
If you can’t fix the VPN connection failed due to an unsuccessful domain name resolution error using the solutions above, back up all your important data and applications in order to reinstall Windows 10.
This way, all system settings will be restored to default. Alternatively, you can use the Refresh Tool for a clean install.
In conclusion, the solutions we provided above should be enough to fix the VPN failed due to unsuccessful domain name resolution error with Cisco AnyConnect on your Windows PC.
However, if the error is recurring, you should consider dropping Cisco VPN and replacing it with other corporate VPN solutions.
The error ‘VPN connection failed due to unsuccessful domain name resolution‘ occurs when using the Cisco AnyConnect Secure Mobility Client to connect remotely to a different machine.
A DNS issue is a potential cause of this issue, an issue with the anyconnect.xml file, or some system file corruption.
Here’s a list of troubleshooting steps that you can try to fix the issue.
1. Change DNS Settings
This error occurs more frequently when a custom public DNS is in use (such as Cloudflare, Google Public DNS, or Open DNS). The built-in VPN component used by Cisco AnyConnect is very specific and is known to trigger incompatibility errors with the majority of public DNS addresses.
To ensure that a DNS-based conflict is not causing the following error. For step-by-step instructions on how to do this, follow the instructions below:
- Press the Win + R keys together to open up a Run dialog box.
- Type ‘ncpa.cpl’ and press Ctrl + Shift + Enter to open Network Connections window.

Open the Network Connection menu - At the User Account Control (UAC), click Yes to grant admin access.
- Once you’re inside the Network Connections menu, right-click on your active network, then click on Properties from the context menu that just appeared.

Access the Properties screen of your Network connection - Inside the Properties menu of your active network, click on the Networking tab, then scroll down to the ‘This connection uses the following items:’, select Internet Protocol Version 4 (TCP/IPv4) and click on Properties.

Access the Properties screen of IPV4 - From the Internet Protocol Version 4 (TCP/IPv4) Properties screen, access the General tab and make sure the Obtain DNS server address automatically toggle is enabled and click on Ok to save the changes.

Reconfigure IPV4 to obtain DNS server automatically - Reboot your PC to allow the changes to take effect.


2. Repair the anyconnect.xml file
The following error will also occur if the AnyConnect XML profiles have become corrupted.
You can access the XML file and look for inconsistencies in the showcased paths if you know networking.
You can effectively reset AnyConnect’s XML profiles by reinstalling the AnyConnect application.
Follow the steps to repair anyconnect.xml:
- Press Windows key + R to open up a Run dialog box.
- Now type ‘appwiz.cpl’ inside the text box, then press Ctrl + Shift + Enter to open up a Run dialog box.
Open up the Programs and features menu - At the User Account Control (UAC), click Yes to grant admin access.
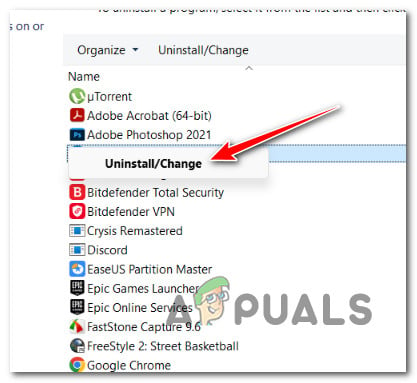
- Once you’re inside the Programs and Features menu, scroll down through the list of programs and locate the AnyConnect installation.
- Right-click the AnyConnect installation and click on Uninstall from the context menu that just appeared.

Uninstall the AnyConnect application - Once you see the uninstallation screen, follow the on-screen prompts to complete the uninstallation, then reboot your PC to remove any remnant files left behind by the installation.
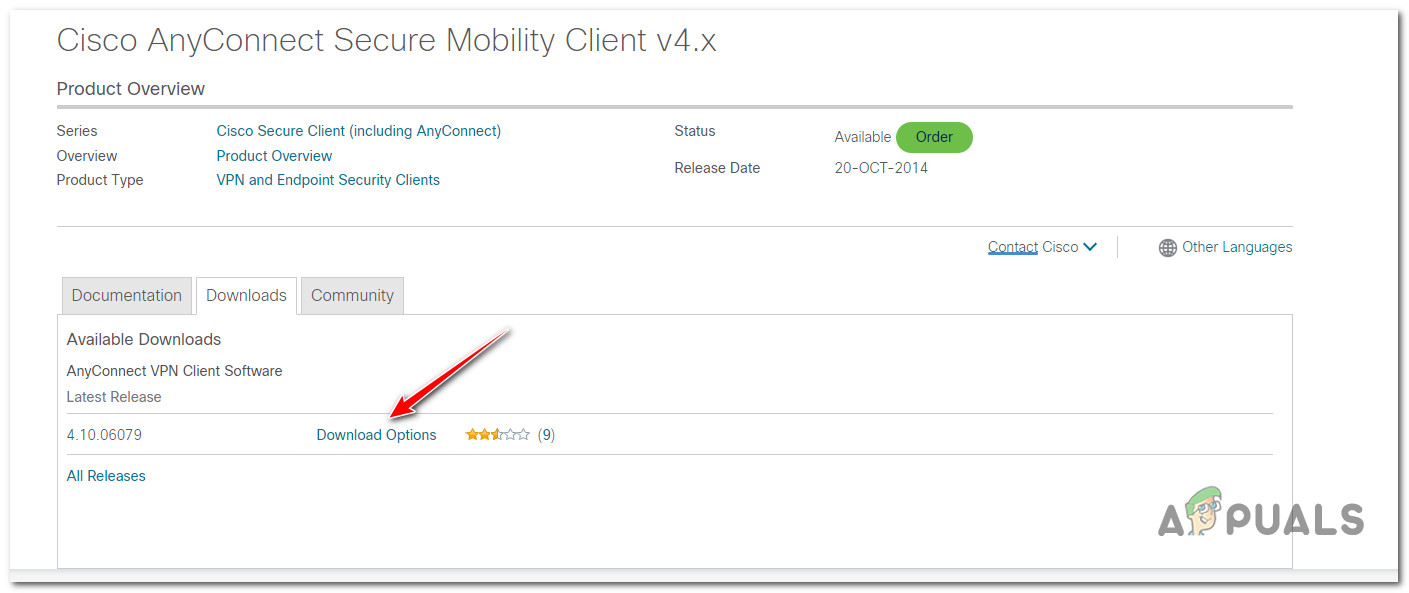
- At the next startup, navigate to the official download page of AnyConnect Security Mobility Client and download the latest executable from Downloads > Download Options.

Downloading the latest version of AnyConnect Note: To download the software, you need to be logged in with your Cisco account.
- From the next link, make sure you download the file package compatible with your OS.
- Once the download is complete, open the executable with admin access and follow the on-screen instructions until AnyConnect Secure Mobility Client is reinstalled.
- Attempt to connect to a machine remotely using the recently installed software and see if the problem is now fixed.

If the same problem is still occurring, move to the next method below.
3. Connect to another region (with different VPN HEs)
If you’ve come this far without a viable resolution, another thing that you can do to avoid the following error is to connect to another region with a different set of VPN HEs.
Note: This method will fix the issue if the anyconnect.xml file becomes corrupted and the method above doesn’t work in your case.
This action will cause a new file to be downloaded, allowing you to connect to the original HEs.
If you are an AnyConnect admin and you can connect with a different set of HEs, do so the new file is generated.
Next, connect to the original HEs and see if the problem is now fixed. If you still see the ‘VPN connection failed due to unsuccessful domain name resolution’ or you don’t have the necessary permissions to complete the operation, try the next method below.
4. Disable or Uninstall 3rd party firewall
If you’ve gotten this far without a solution and you’re using a third-party antivirus, you should look into it to see if it’s the cause of the Cisco AnyConnect software cutting off the connection.
The “VPN connection failed due to unsuccessful domain name resolution” error could be caused by a series of overprotective suites that cut off the connection to the VPN server because they thought it was a threat.
Note: Norton and Comodo Antivirus, both AV suites often cause this problem.
Start by trying to turn off the 3rd party suite to see if that is the problem. Most 3rd party security suites will let you do this right from the tray bar icon.
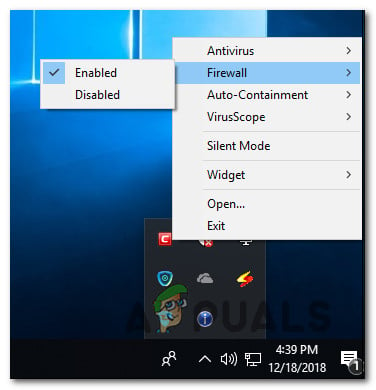
After turning off the firewall, restart your computer and open Cisco AnyConnect again to see if the problem is fixed.
Important: Even if you turn off real-time protection on some firewalls, rules that are specific to a network will still be in place. So, if you set up your firewall to stop certain kinds of communication with external servers in the past, this role is likely to stay the same after you turn off the firewall protection.
If this is the case, follow the steps below to remove the third-party firewall and see if the error goes away.
What you have to do is:
- Press the Windows key + R to open the Run box, type “appwiz.cpl,” and then press Enter. This will bring up the menu for Programs and Files.
Open up the Programs and features menu - Use the Programs and Files menu to look through the list of installed programs until you find the third-party firewall tool you want to get rid of.
- To finish uninstalling, right-click on the third-party antivirus program you found and choose “Uninstall” from the new menu that pops up.

4. Now, you need to finish following the instructions for removing the program and restarting your computer to see if the problem is still there.
If you’re still getting the error “VPN connection failed because the domain name could not be resolved,” move on to the last solution below.
5. Disable Proxy server or 3rd party VPN
Another third-party component that might prevent communication between your Windows end-user version and Cisco AnyConnect’s VPN server is a proxy or VPN client. Most of the time, this issue was brought on by a VPN client or proxy server configured on Windows.
Try uninstalling your VPN client or disabling your proxy server if your circumstance is similar to the one described above.
Select the guide that best fits your needs from the two we created to address these scenarios.
5.1. Disable VPN client
Whether a VPN service was set up by Windows itself or by an external program determines how to disable it on a Windows computer.
You must go to the VPN interface if you are using a standalone app to disconnect from a VPN.
However, you can disable it by carrying out the following steps if you configured your VPN using the built-in feature:
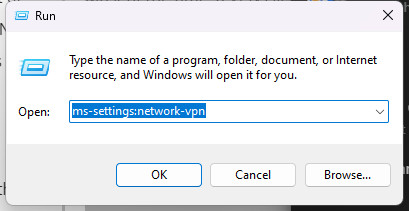
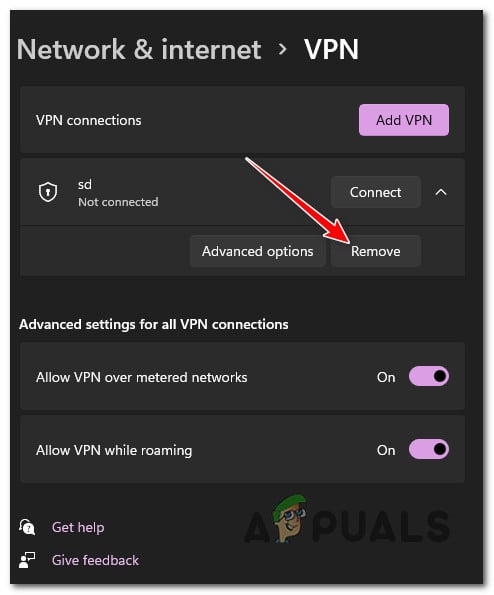
- Press the Windows key + R to bring up the Run box.
- Then, press Enter after typing “ms-settings:network-vpn” to open the VPN tab in the Windows Settings app.

- Click on your VPN connection on the right side.
- Click Remove on the new context menu to stop it from messing up connections to the outside world.

- Open Cisco AnyConnect again and connect to the same machine that was giving you the “VPN connection failed because domain name resolution failed” error before.
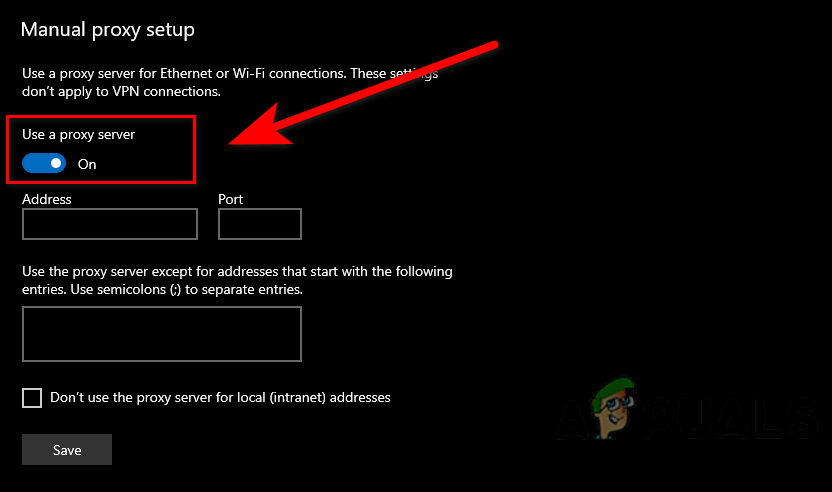
5.2 Turn off the proxy server
If you’ve already configured a local proxy server, you may quickly disable it by selecting the Proxy tab from the Settings menu.
Here’s how:
- Press the Windows key + R to bring up the Run box.
- In the next menu, type “ms-settings:network-proxy” and press Enter to open the Proxy tab in the Settings app.
Open the Proxy server - Go to the Proxy tab in the Settings menu and click on Manual Proxy Setup.
- On the right side of the screen, uncheck the box that says “Use a proxy server.”

Disable Proxy Server - After turning off the proxy server, restart your computer and try to connect remotely with Cisco AnyConnect again to see if the problem has been fixed.

6. Disable DNS Error Assist (if applicable)
The DNS Error Assist function may be the cause of your issue if you encounter this error when attempting to connect from an AT&T network.
If you can enter your AT&T account and change the Privacy Settings to keep the DNS Error Assist feature disabled, you should be able to resolve the problem.
Note: If you try to use AnyConnect to connect outside from an AT&T network, this is probably where the issue is coming from.
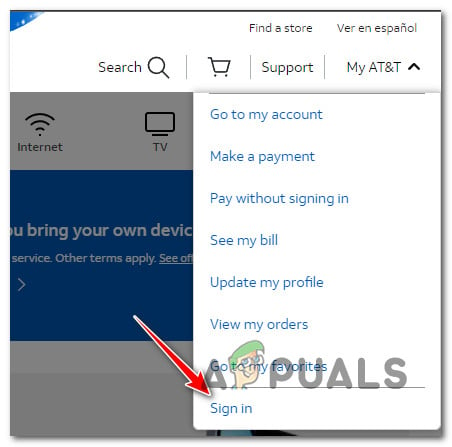
To opt out of the DNS Error assistance, adhere to the directions below:
- Open any browser and visit the home page of AT&T.
- Click on My AT&T (From the right-hand top corner), then click on Sign In.

Sign in with your Account - Use your account credentials to sign in with your account.
- Once you have successfully signed in with your account, click on View Profile.
- Go to Communication Preferences, then click on Privacy Settings.
- Select DNS Error Assist and use the opt out option to disable it.

Disable the DNS error assist - Reboot your PC, then attempt to connect with AnyConnect once again and see if the problem is now fixed.
7. Clean install or repair install
If none of the above solutions worked, it’s likely that the problem is caused by corrupted system files that affect the local network and prevent AnyConnect from connecting to the VPN server.
In this case, the only way to fix the problem is to follow a set of steps that will reset every part of the OS.
You have two options for how to do this: a repair install or a clean install.
- A clean install is a simple process that takes only a few clicks and doesn’t need any installation media. But the biggest problem is that if you don’t back up your apps, games, user settings, and other personal data first, you might lose most of it.
- A repair install will require Windows 11 installation media that is compatible, but you will be able to keep all of your personal apps, games, user preferences, and media. The operation will only change the parts of the OS. Everything else will stay the same.
Fix Vpn Failed Due Unsuccessful Domain Name Resolution
- Если вы получилиVPN-соединение не удалось из-за неудачного разрешения доменного имениошибка, это означает, что Cisco VPN не работает должным образом из-за проблем с DNS, что не позволяет вам удаленно подключиться к вашему рабочему месту.
- Откройте для себя 3 надежных решения для исправления этой ошибки VPN в Cisco AnyConnect Secure Mobility Client на стороне клиента без необходимости связываться с системным администратором вашей компании.
- Посетите наш Раздел Cisco для получения дополнительных полезных статей и руководств.
- Присоединяйтесь к нашему Центр устранения неполадок VPN если у вас возникли другие ошибки, связанные с VPN.

VPN-соединение не удалось из-за неудачного разрешения доменного имениэто распространенная ошибка, которая может возникнуть при использовании Клиент безопасной мобильности Cisco AnyConnect для удаленного подключения к рабочему месту. Описание говорит само за себя: вы не можете установить успешное VPN-соединение с помощью Cisco из-за Проблемы с DNS .
Обычно, если вы сталкиваетесь с проблемами с VPN вашей компании, например Ошибка установки AnyConnect , вам следует обратиться к системному администратору и запросить помощь. Однако, поскольку эта ошибка обычно вызвана неправильными настройками на стороне клиента, вы можете попробовать следующие решения, чтобы исправить ее.
Как исправить «сбой подключения к VPN из-за неудачного разрешения доменного имени»?
Наша команда тестирует различные бренды VPN, и мы рекомендуем их нашим пользователям:
- Серверный парк: более 20000 серверов по всему миру, высокие скорости и ключевые местоположения
- Забота о конфиденциальности: многие VPN хранят много пользовательских журналов, поэтому мы ищем те, которые не
- Справедливые цены: мы выбираем лучшие доступные предложения и регулярно меняем их за вас.
ТОП РЕКОМЕНДУЕМЫЕ VPN

ЛУЧШИЙ ТРАХ ДЛЯ БАКА

Раскрытие: WindowsReport.com поддерживается читателем.
Прочтите наше партнерское раскрытие.
Измените настройки DNS

- В Windows 10 щелкните правой кнопкой мыши значок Начало кнопка.
- Идти к Сетевые соединения > Изменить параметры адаптера .
- Щелкните правой кнопкой мыши сетевой адаптер и выберите Свойства .
- Двойной щелчок Интернет-протокол версии 4 (TCP / IPv4) .
- Выбрать Получить адрес DNS-сервера автоматически .
- Нажмите Хорошо .
Ошибка DNS может возникнуть при использовании пользовательских настроек DNS, таких как Google Public DNS , OpenDNS или же Cloudflare . В некоторых случаях статические DNS-серверы несовместимы с VPN-клиентами, такими как Cisco VPN.
ИБП доставлены, но нет пакета
Однако вы можете легко решить эту проблему, сбросив настройки DNS вашего компьютера на значения по умолчанию, что означает использование DNS-серверов, предоставленных вашим интернет-провайдером. Если проблема не исчезнет, обратитесь к своему интернет-провайдеру.
Но если DNS-серверы вашего интернет-провайдера по умолчанию работают медленно и именно поэтому вы изначально использовали собственный DNS, то вам следует попробовать использовать другие статические DNS-серверы.
Восстановите файл anyconnect.xml

В некоторых случаях профили XML AnyConnect становятся поврежденными, что приводит кVPN-соединение не удалось из-за неудачного разрешения доменного имениошибка. Но вы сможете решить эту проблему, переустановка AnyConnect .
Вы также можете попробовать подключиться к другому региону, указав альтернативный шлюз VPN или проверив DNS-имя и адрес порта в XML-файле, чтобы убедиться, что они верны.
Переустановите вашу операционную систему

Если вы не можете исправитьVPN-соединение не удалось из-за неудачного разрешения доменного имениошибка, используя приведенные выше решения, сделайте резервную копию всех ваших важных данных и приложений, чтобы переустановить Windows 10 .
Таким образом, все системные настройки будут восстановлены по умолчанию. В качестве альтернативы вы можете используйте Refresh Tool для чистой установки .
Cisco AnyConnect VPN не работает на вашем ПК? В нашей статье показано, как это исправить.
В заключение, приведенных выше решений должно быть достаточно, чтобы исправитьОшибка VPN из-за неудачного разрешения доменного имениошибка с Cisco AnyConnect на вашем ПК с Windows.
Однако, если ошибка повторяется, вам следует рассмотреть возможность отказа от Cisco VPN и замены его другим корпоративные решения VPN .

Chris Lawrence is a journalist and chief editor at Wlan Labs. He has been writing about technology for more than ten years. He writes about everything ranging from privacy to open source software. His goal is to educate readers about important topics to help make their lives easier.
What is domain name resolution in VPN?
Before we get into the intricacies of the vpn connection failed due to unsuccessful domain name resolution error we need to answer the above question.
Domain name resolution in VPN is the process of translating a domain name into an IP address. When you type a domain name into your web browser, your computer sends a request to a DNS server (usually operated by your ISP) to translate the domain into an IP address.
The advantage of using a VPN is that it provides a secure way to route all of your traffic through the VPN server. This means that all of your DNS requests will be routed through the VPN server, which can provide security and privacy benefits. For example, if you’re using a public WiFi network, you can use a VPN to encrypt all of your traffic and protect yourself from snooping eyes.
So what’s the deal with this error message?
“An unsuccessful domain name resolution error caused the VPN connection to fail”. This means that Cisco VPN isn’t functioning properly because of DNS issues. This can be bypassed by changing your DNS settings. This issue can also be solved by changing the content of key files.
Often, that is easier said than done, so hopefully, this guide will help you fix this annoying issue and get you back on track.
A complete system reset may be necessary if all else fails. However, this is not something you would take delight in doing.
A “vpn failed due to unsuccessful domain name resolution” warning is a common error when the Cisco AnyConnect Secure Mobility Client is used to remote connect to the workplace.
This description is clear. Cisco DNS issues can prevent you from establishing a successful VPN connection. In most cases, if you find any problems with your VPN service, such as AnyConnect failures, you would contact your system administrator and ask for assistance.
This error is often caused by incorrect settings on the client’s side.
So how can I fix the VPN connection failed due to unsuccessful domain name resolution error?
Here are some solutions that will hopefully help you:
1) Change your computer’s existing DNS Settings
Please do the following:
- In Windows 10, right-click on the very familiar the Start button
- Jump over to Network Connections > Change adapter options
- Right-click your network adapter and then select Properties
- Double-click on Internet Protocol Version 4 (TCP/IPv4)
- Select Obtain DNS server address automatically
- Finally, Click OK
You might experience a DNS error warning if you are using custom DNS settings like Google Public DNS, OpenDNS or Cloudflare. Sometimes, static DNS servers might not work with VPN clients such Cisco VPN.
You can fix the problem by setting your computer’s DNS to default. This means that you use the DNS servers provided through your ISP. If the problem persists please contact your ISP.
However, if the DNS servers of your ISP are slow by default (which is why you used custom DNS) then you might want to try other static DNS servers.
2) Maybe you should think about trying out a different VPN?
As you most likely realise a VPN is a service that creates an encrypted tunnel between your device and a VPN server. This creates two benefits: first, it ensures that your data is encrypted and thus cannot be intercepted by anyone else; and second, it allows you to access websites and content that are otherwise blocked in your location.
So what makes a VPN service reliable? Simply put, it provides two essential security features: encryption and location masking. Because these features are so essential, they make up the core of any good VPN service. So if you’re looking for a reliable VPN provider, make sure that these two features are included in their offering.
Tired of getting the “the VPN connection failed due to unsuccessful domain name resolution” error? We recommend that you switch VPNs if you experience DNS issues frequently. You should choose a reliable provider that is trustworthy and up-to-date.
3) Be brave and try repairing the the anyconnect.xml file

Sometimes, AnyConnect’s XML profiles can become corrupted, which can cause the VPN connection to stop working due to an error in domain name resolution. However, you can fix the problem by reinstalling AnyConnect.
To verify that it is correct, you can also connect to another region by specifying a different VPN gateway or checking the XML file for the DNS name, port address, and port number.
4) As a last resort you could reinstall your operating system
You can restore Windows 10 by backing up all your data if you are unable to fix the VPN connection that was lost due to an error in the domain name resolution.
All system settings will then be restored to their default state. You can also use the Refresh Tool to perform a clean installation.
The solutions provided here should suffice to resolve the VPN failure due to an error in domain name resolution with Cisco AnyConnect on Windows.
If the vpn connection failed due to unsuccessful domain name resolution problem is persistent, Cisco VPN should be discontinued and replaced with a more robust and reliable VPN solution.
How do I fix VPN unsuccessful domain name resolution on a Mac?
There are a few potential causes for this error message when trying to connect to a VPN on a Mac:
- First, make sure that you are entering the VPN address correctly. If you are unsure, contact your VPN provider for the correct address.
- Next, check your network settings. If you are using a proxy server or firewall, make sure that it is configured to allow access to the VPN address.
- Finally, if you are still having trouble connecting, try restarting your computer and then trying again.
If none of these solutions work, then you may need to contact your VPN provider for further assistance.
I recently noticed VPN connection failing after upgrading to Mac OS X 10.7.3 (Lion) because VPN would fail with the message “VPN disconnected due to domain name resolution error”.
I rolled back Mac OS X to 10.6.8, VPN connects successfully again and I was able to log into the VPN without any problems.
The VPN connection failed due to unsuccessful domain name resolution Conclusion
We hope you found the VPN connection failed due to unsuccessful domain name resolution article useful. If you have any questions or need help with anything else, please don’t hesitate to reach out to us. Our team of experts is always happy to assist in any way possible. Thanks for reading:)