Hi Guys, Today I am Going to tell you How to Fix “Setup was unable to create the directory. Error 5: Access is Denied” Error in Windows 7,8,8.1,10 & 11?
Check Out This: How to Fix “Some of these settings are hidden or managed by your organization” in Windows 10 & 11?
Are you Looking for “How to Fix An Error occurred while attempting to create an directory? (or) “How to Fix An Error occurred while preparing the installation When Installing any Softwares?
You are at the Right Place to Get Your Answers & Solve the Issue/Error.
Let’s See About it.
Steps For How to Fix “Setup was unable to create the directory. Error 5: Access is Denied” Error in Windows 7,8,8.1,10 & 11?
Method 1: Disabling Controlled Folder Access.
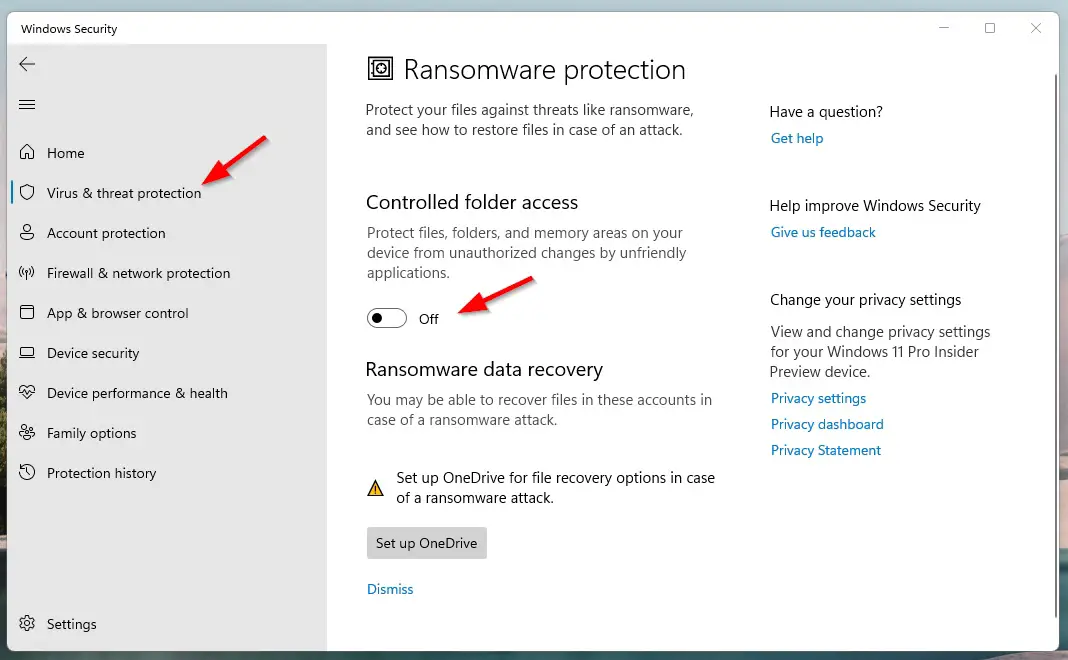
Step 1: First of all, Goto Search and Search for Virus & Threat Protection and Click on it.
Step 2: Navigate to the Controlled Folder Access Option and Click on the Manage Controlled Folder Access Option.
Step 3: Now Turn off the Controlled Folder Access Option and Navigate Back to Virus & Threat Protection.
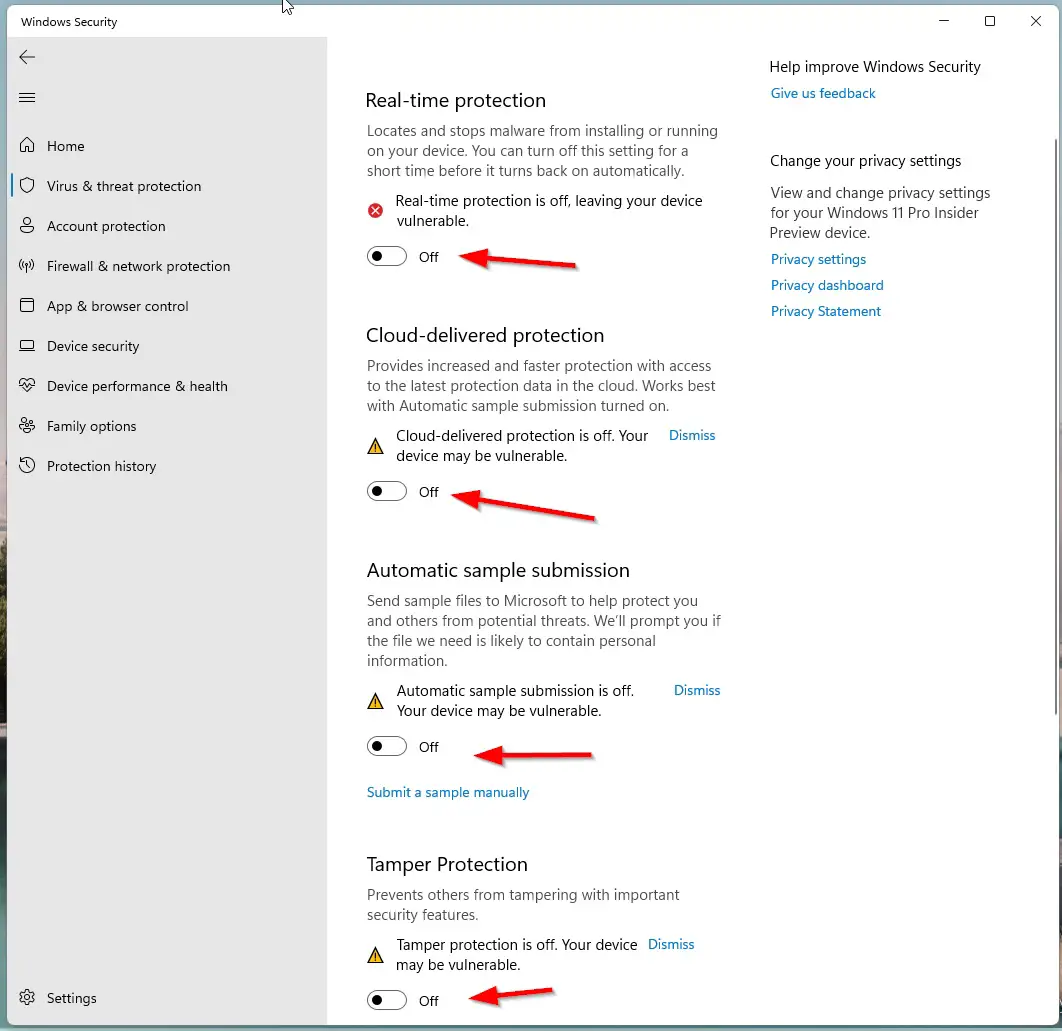
Step 4: Now Temporarily Disable the Third-party antivirus (or) Windows Defender Services (Real-Time Protection, Cloud-Delivered Protection, Automatic Sample Submission, Tamper Protection)
Step 3: Restart Your PC and Now You can Install any Softwares Without Any Errors.
Note – After Installation You Can Enable the Third-party antivirus (or) Windows Defender Services.
Method 2: Giving Full Permission to Temp Folder
Step 1: Open the Run Program and Type %localappdata% and Navigate to Temp Folder.
For Example
C:UsersUsernameAppDataLocal
Step 2: Now Right Click on the Temp Folder and Navigate to Security Tab and Click the Edit Button.
Step 3: Now Click Add and type Everyone then click on Check Names. Press Ok.
Step 4: Make sure that the Full Control, Modify, and Write box is checked, and click OK to save the new settings.
(or)
Step 3: Navigate to Security Tab and Click the Advanced Button and Click on the Change Permissions Option and Mark the Include inheritable permissions from the object’s parent.
Step 4: Now Click the Apply button to save your changes and click on Continue and delete the inherited permissions.
Step 5: Restart Your PC and Now You can Install any Softwares Without Any Errors.
Method 3: Run it as Administrator
Go to the File Directory and Right Click on the File and Run the File as an Administrator.
Method 4: Create a new Temp folder
Step 1: Go to your Local Disk C Drive (Where You Installed Windows OS) and Create a New Folder and Name it as Temp.
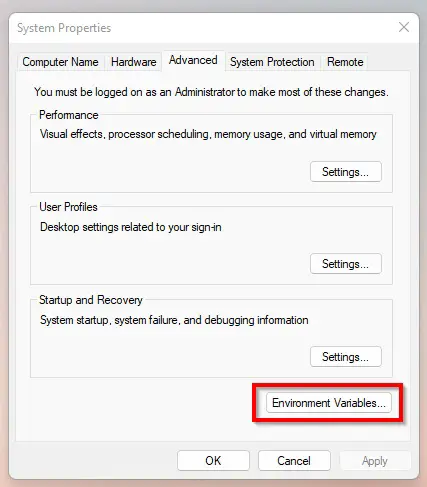
Step 2: Go to Control Panel and select the System Settings and Open the Advanced System Settings.
Step 3: Navigate to the Advanced tab and Click the Environment Variables.
Step 4: Under User variables, double-click on the TMP variable, not TEMP.
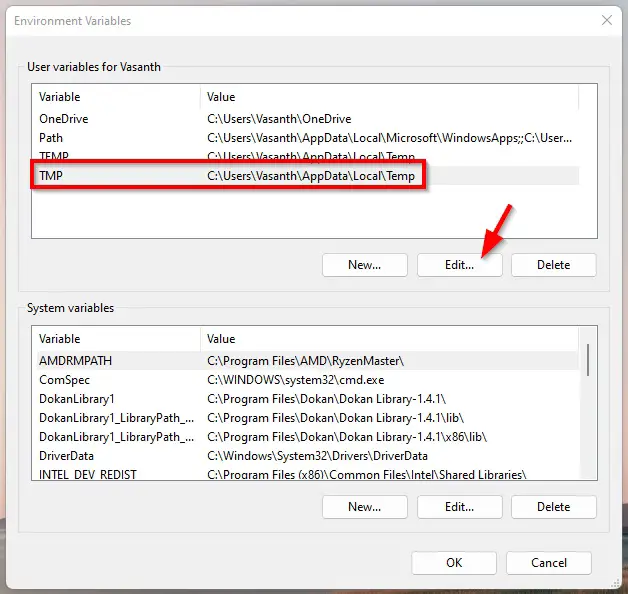
Step 5: Replace the Value to C:Temp and Click OK.
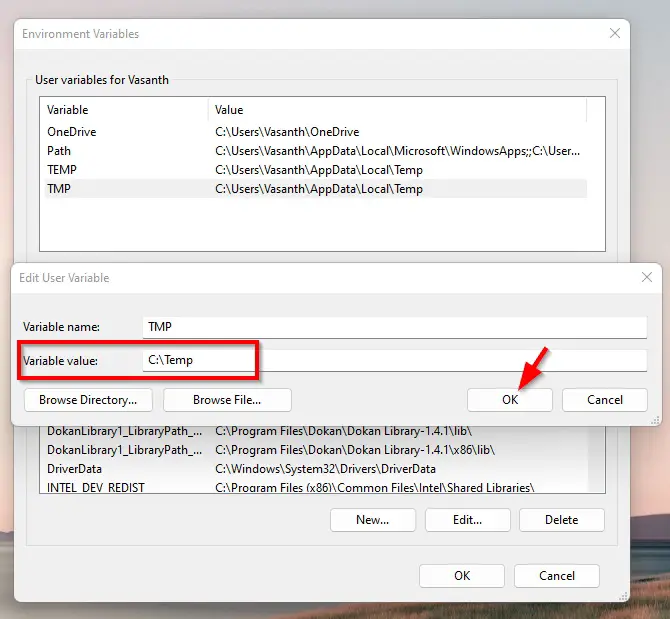
Step 6: Restart Your PC.
That’s It. You’re Done. Have a Nice Day.
@@@ Leave Comments @@@
##Stay Safe Guys And Live Happily ##
My Microsoft Visual Studio Code automatically checks for updates every time it opens, but every time it opens, it will run the update and get an error. I know that the «check for updates» is causing it because it gives me an error if I click it. I know that others mentioned to run the program as an admin. The problem is it creates a new user folder instead of updating the software in my current directory. More explanations are below.

Below is the error. If you look carefully, this tells us that it is trying to create a new user directory, «Ronel Priela». The only user directory I use contains a name with an underscore which is «Ronel_Priela». This problem never occurred to me before.

A few months ago. I made a lot of changes to my user folder name. It was «Ronel Priela» before. Since it was a folder with spacing on its name, it caused problems for my coding. So I changed my user folder and account name to «Ronel_Priela» which was successful. Do you think messing with my user folder before caused all this?

I don’t see anything wrong with my environment variables as well.


asked Feb 4, 2022 at 8:42
![]()
There is a simple solution:
- Go to ‘C:UsersAppDataRoaming’ and delete folder ‘Code’.
- Go to ‘C:UsersAppDataLocalProgramsMicrosoft VS Code’ and run ‘unins000.exe’.
- Download and install ‘Visual Studio Code’.
- Go to ‘Recycle Bin’ and restore folder ‘Code’.
answered Jun 16, 2022 at 11:56
![]()
I just had the same problem and could not uninstall through the Control Panel or Programs and Features because it kept linking back to the old user name and saying that it had already been uninstalled. I navigated to the location of Visual Studio code and used the uninstall script there. Also to note, which may be the piece that actually fixed it (maybe try this first): I deleted the folder «Code» in «C:Users<UserName>AppDataRoaming» and then uninstalled.
In the Start Menu, search for Visual Studio Code, In the right side of the menu where it displays the app, click «Open File Location» (you may have to click the arrow to see all options). For me that opened another VS Code shortcut, so right click and select «Open File Location» again. Mine opened in «C:Users<UserName>AppDataLocalProgramsMicrosoft VS Code». I then opened the «unins000.exe» and that successfully uninstalled. From there, I reinstalled and it hasn’t had any problems since.
During the install, it prompted for the correct user directory (I think this is what you’re referring to in your comment) and when I clicked next, it warned me that the folder exists, but I can proceed anyway.
answered Feb 16, 2022 at 20:20
![]()
kaylakayla
211 bronze badge
It actually happens because you changed the Users folder name I have the same issue, I’m trying to find the solution but one solution that will work is reinstalling the VS code, I still have to find if anything else will work here.
Edit: So the solution is just to update the VS Code or download the new (or same) version from the web and install it and click on the Path (or create path probably) checkbox while installing, it’ll solve the issue.
answered Feb 4, 2022 at 15:53
![]()
2
You are here: Home / WordPress / How to Fix the Unable to create directory Error in WordPress
Last updated: January 12, 2017
If you are seeing any of the following errors when you try to upload/import media into WordPress’s media library then this tutorial is for you. It will show you how to fix this annoying error.
- Unable to create directory wp-content/uploads
- Unable to create directory /wp-content/uploads/ Is its parent directory writable by the server?
- Unable to create directory wp-content/uploads/2013/02
I personally faced this issue a while back and wrote a quick fix tutorial on this subject. However, a lot has changed since then so it is time to publish an updated version of the tutorial.
There are a few different possibilities for this error to show up. I will try to cover all the possibilities so hopefully one of them will help you fix the issue.
Fix #1: Update/Change the Uploads Directory Settings
This is the easiest option to try and solve this error so you should try this one first.
- Log into your WordPress admin dashboard
- Go to Media Settings menu (Settings -> Media)
- Enter wp-content/uploads in the “Store uploads in this folder” text box
- Save the changes by hitting the “Save Changes” button and you are done

The important thing here is to make sure you only enter the following in the “Store uploads in this folder” field:
wp-content/uploads
Fix #2: Manually Change the Folder Permission
If the above fix doesn’t work then try this option. This method requires you to change the file/folder permissions on your server. If you don’t know how to do this then read the tutorial on how to change permissions.
- Change folder permissions on the wp-content directory to 775 and try the upload again
- If it fails, change the permissions to 777 and try again
- if it still fails then do step 1 and 2 for the “wp-content/uploads” directory too
Once you can successfully create the folder and upload the media, be sure to return the permissions on wp-content directory to 755 (your folders should have a permission of 755 for security reasons).

Fix #3: Use This If Your Server is Using Ubutu
The webserver (Apache) runs as user www-data and group www-data by default on a Ubuntu system. If the files/folders are not owned by this user (www-data) then the webserver will be unable to write changes to them.
Change the filesystem permission on the folder (where the web application wants to write to) to the “parent directory” as mentioned in the error message.
For example, do (prepend with sudo if you’re not the current owner and need to elevate your own permissions in order to do it):
chown www-data /path/to/directory
to make www-data the owner which makes it writeable usually, or another approach via groups:
chgrp www-data /path/to/directory

chmod g+w /path/to/directory
Fix #4: Try This If Running PHP in Safe Mode
If your server is running PHP in safe mode then know that it won’t allow you to create files or directories if your PHP scripts and upload directories belong to different users. So try one of the following solutions:
- Change the owner of scripts and upload directories (your hosting provider can do this for you)
- Disable PHP safe mode (your hosting provider can do this for you)
Fix #5: Use This for XAMPP (LocalHost Installs)
If you have installed XAMPP to run WordPress on your local PC for testing and you are seeing this error then try the following.
Reset the ownership of the WordPress instillation to nobody. You can do this by running the a command in the command line/terminal.
- Windows System: Start -> Programs -> Accessories -> Command Prompt
- Mac: Applications ->Utilities -> Terminal
The command you need to run is the following (change “wp” to the actual directory name in your installation):
sudo chown -R nobody:staff /applications/xampp/xamppfiles/htdocs/wp
Hopefully one of the above solutions should help you fix the unable to create directory error in WordPress.
If none of the above solution works then maybe it is time to look for another hosting provider for your WordPress site.
Please feel free to share any other techniques/fixes for this error in the comment section below.