Содержание
- Ripples in Harmony
- To send or not to send..
- Installing ISE 2.3 on ESXi 6.x
- The OVA can’t be deployed as.. an OVA
- Download VMware OVF Tool
- Convert OVA -> VMX
- Convert VMX -> OVF
- Import to ESXi
- Share this:
- Like this:
- Related
- Share this:
- Like this:
- 22 thoughts on “ Installing ISE 2.3 on ESXi 6.x ”
- Licensing
- ISE 3.0 New Licensing Model
- Step 1 – Open a TAC Case
- Step 2 – Register ISE 3.0 to Smart Account
- What’s Next?
- Почему происходит ошибка с импортом модуля Django?
- How to Install Cisco ISE 2.4 Eval Virtual Appliance on VMware ESXi 6.5
- How to Download the Cisco ISE Eval Virtual Appliance Template Software
- Creating the Cisco ISE Eval Virtual Appliance
- Initial Configuration of Your Cisco ISE Eval Virtual Appliance
- How to Install Cisco ISE Hotfix
- Recommended for You: Solarwinds Virtualization Manager
- Chase Smith, CCNP
Ripples in Harmony
To send or not to send..
Installing ISE 2.3 on ESXi 6.x
We’ve just had quite the head scratcher trying to install the ISE 2.3 OVA on ESXi 6.5 and figured we won’t be the only ones.
Tl;dr – Convert the OVA to VMX then convert that VMX to OVF. Do not go directly from OVA to OVF.
*Edit* 26/11/2018 – Can confirm this works for ISE 2.4 on ESXi 6.7 which I tested in my home lab. Make sure you use separate folders to convert each step below or your VMDK file will get overwritten on the last step and ruin it. Thanks to crystal for pointing that out.
The OVA can’t be deployed as.. an OVA
Yep. The install file provided by Cisco needs to be converted to a different format in order to work with VMware i.e. OVF.
The error message when attempting this:
3.5: ATTRIBUTE_REQUIRED: Attribute “id” is required.
3.5: ATTRIBUTE_REQUIRED: Attribute “href” is required.
15.3: ATTRIBUTE_REQUIRED: Attribute “id” is required.

To be fair this is partly documented by Cisco but it doesn’t clear much up on what to do next.
The ISE 2.3 OVA templates are not compatible with VMware web client for vCenter 6.5. As a workaround, use the VMware OVF tool to import the OVA templates.
For ISE 2.3 on to ESXi 6.5 I used OVF Tool version 4.2
You can convert directly from OVA to OVF but we encountered the error below after doing this and importing to ESXi. A senior colleague saved my bacon by saying they’d had luck going from OVA to VMX then to OVF.
4:5: PARSE_ERROR: Parse error: Unexpected character ‘.’ (code 58) (missing namespace prefix?) at [row,col,system-id]: [4,11,”descriptor.ovf”].

Convert OVA -> VMX
- Install the OVF Tool
- Place your OVA somewhere easily accessible (C:) and open up elevated command prompt.
- Navigate to cd C:Program FilesVmwareVmware OVF Tool
- Initiate the executable in the format ovftool.exe “source file” “destination file” e.g. ovftool.exe “C:ISE-2.3.0.298-virtual-SNS3415-600.ova” “C:ISE-2.3.0.298-virtual-SNS3415-600.vmx”
- The above will convert from the OVA to the VMX in the same directory of C:

Once complete you will see both the original OVA and the two new VMX/VMDK files

Convert VMX -> OVF
Now that VMX can be converted to OVF. Note you can choose not to use the quotations like in this example as long as there’s a space between source and destination. I created an OVF directory so that it didn’t overwrite any files during this process.
ovftool.exe C:ISE-2.3.0.298-virtual-SNS3415-600.vmx C:OVFISE-2.3.0.298-virtual-SNS3415-600.ovf

You will end up with three files in your OVF directory and the OVF can be used for the import to ESXi.

Import to ESXi
This time there is no error on the import and the resources are automatically filled out via the OVF template.

Additional Note Feb 2018 from Frank (comments below):
“When deploying in VMware, I needed to select both the converted OVF-file and the VMDK-file. When selecting only OVF-file, VMware said that files where missing.”
Like this:
Like this:
22 thoughts on “ Installing ISE 2.3 on ESXi 6.x ”
When deploying in VMware, I needed to select both the converted OVF-file and the VMDK-file. When selecting only OVF-file, VMware said that files where missing.
Thanks, Frank! I actually just bounced this to my server guys (lazy me) so guessing they worked that out as well haha!
Sure, no problem. Maybe this could be included in the blog, for other readers attention 🙂
This is awesome…thanks…worked with 2.3 eval and VSphere 6.5
I had the issue with version 2.1 as well and this resolved it for me. I just wanted to add that if a separate directory is not specified for the ovf files and it does try to overwrite the files it may error out with something like this:
ovftool.exe C:ISE-2.1.0.474-mini.vmx C:ISE-2.1.0.474-mini.ovf
Opening VMX source: C:ISE-2.1.0.474-mini.vmx
Opening OVF target: C:ISE-2.1.0.474-mini.ovf
Writing OVF package: C:ISE-2.1.0.474-mini.ovf
Transfer Failed
Error: Output file C:ISE-2.1.0.474-mini-disk1.vmdk already exists. Use overwrite flag to delete it.
Completed with errors
Using a separate directory as mentioned in the steps above for the ovf resolves the error. so the syntax I used should have used is:
ovftool.exe C:ISE-2.1.0.474-mini.vmx C:ovfISE-2.1.0.474-mini.ovf
Thanks that’s awesome info!
Many Thanks for sharing this, i wonder how did you worked it out.
Im getting 1 error while converting from ova to vmx
C:Program FilesVMwareVMware OVF Tool>ovftool.exe “H:VMXISE-2.3.0.298-virtual-eval.ova” “H:VMXISE-2.3.0.298-virtual-eval.vmx”
Opening OVA source: H:VMXISE-2.3.0.298-virtual-eval.ova
The manifest validates
Opening VMX target: H:VMXISE-2.3.0.298-virtual-eval.vmx
Warning:
– Line 79: Unable to parse ‘enableMPTSupport’ for attribute ‘key’ on element ‘Config’.
Writing VMX file: H:VMXISE-2.3.0.298-virtual-eval.vmx
Disk progress: 100%
I actually cannot claim credit for this. A colleague suggested it originally last year and I just made sure it was blogged because there’s so little info regarding it! As to your error I cannot assist a whole lot as I am not great with vmware. I would run it in elevated privileges if not already (cmd prompt) and try different versions of the conversion tool.
Also double check the hash on your ISE file matches the one Cisco have and it isn’t corrupt.
I got the same error, even with the actual SNS3515 OVA. Did you find a solution for that issue?
Regards
I also met this error when using ovftool ver.4.4.1 and 4.3, then I found that if you use ovftool 4.2, the error was gone. So maybe reinstall ovftool 4.2 is the solution.
BTW, did you write any blog on how to Install ISE 2.3 ovf on VMware esxi 6.5
I could find any good blog like you did on this page, step by step, please let me know.
Many thanks!
Nope our servers team ended up running through this sorry!
Ok Thanks for letting me know.
This saved me many headaches. Thank you for the write up.
Thanks so much for this article.. Who would have thought about translating ova to vmx before ovf?
Awesome! Thanks for sharing this. We had the same issue, and resolved it using your post.
Источник
Licensing
My favorite, your favorite, I mean who doesn’t like licensing? It’s always so simple to understand, persistent, and fluid. Except NOT! Yes, indeed another licensing curve ball thrown at us by the overlords in a never ending attempt to make this stuff easy (cough…monetizable).
ISE 3.0 New Licensing Model
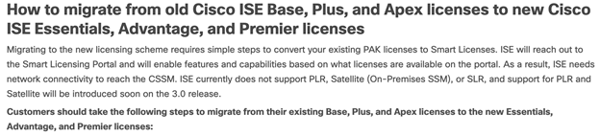
In ISE 3.0, a new licensing model is introduced for Base, Plus, and Apex license tiers. The new replacements are Essentials (Base), Advanced (Plus), and Premier (Apex). You will recall that Base, Plus, and Apex licenses were mutually exclusive, meaning that Apex didn’t give me functionality provided for in Plus or Base. The new model is nested, so Premier gives you all Advanced and Essentials functionality. I am not a fan of constant licensing changes, but this is a good one IMHO. The below images are taken from this Cisco Documentation on these license changes.
How the licenses migrate from old to new!

Example with counts and expirations!

You’ll note now that even the Essentials level is a subscription. Anything that migrates from your old Base level into the new Essentials level will be given the arbitrary expiration date of October 31 st , 2023.
Step 1 – Open a TAC Case
Per the steps outlined in this document (beginning where pictured below), open a TAC case to get your ISE 2.X licenses upgraded to ISE 3.X in your Smart Account.
Step 2 – Register ISE 3.0 to Smart Account
We aren’t walking through the Smart Account administration in this step, rather we are assuming you already have your registration token handy.
Open Registration Details!
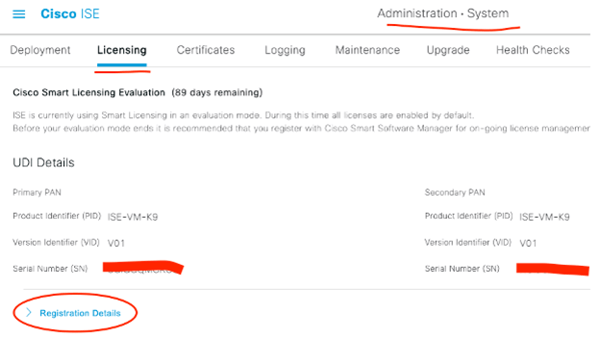
Plug in your token, connection method, license tiers, and click Register!

What’s Next?
We took a detour today off of our scheduled programming to cover this major upgrade. Mainly because I had to get it done and thought, why not document it? Next, we’ll look to continue on our TrustSec track, covering enforcement. Hope you enjoy your new ISE 3.X GUI!!
As always if you have any questions on getting Cisco’s ISE set up for you and your business and would like to schedule a free consultation with us, please reach out to us at sales@lookingpoint.com and we’ll be happy to help!

Want the answers to the most asked questions about ISE? Check out our video below!
Dominic Zeni, LookingPoint Consulting Services SME — CCIE #26686
Источник
Почему происходит ошибка с импортом модуля Django?
Установил виртуальное окружение, установил django, при написании команды django-admin —version показывается нужная версия 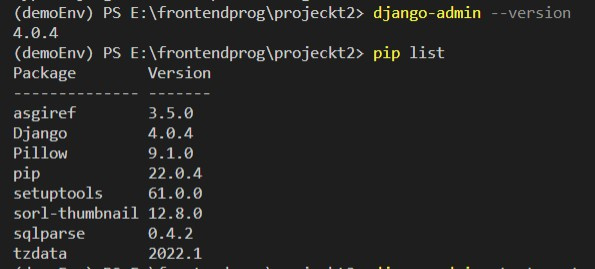
При попытке запуска локального сервера выдаёт 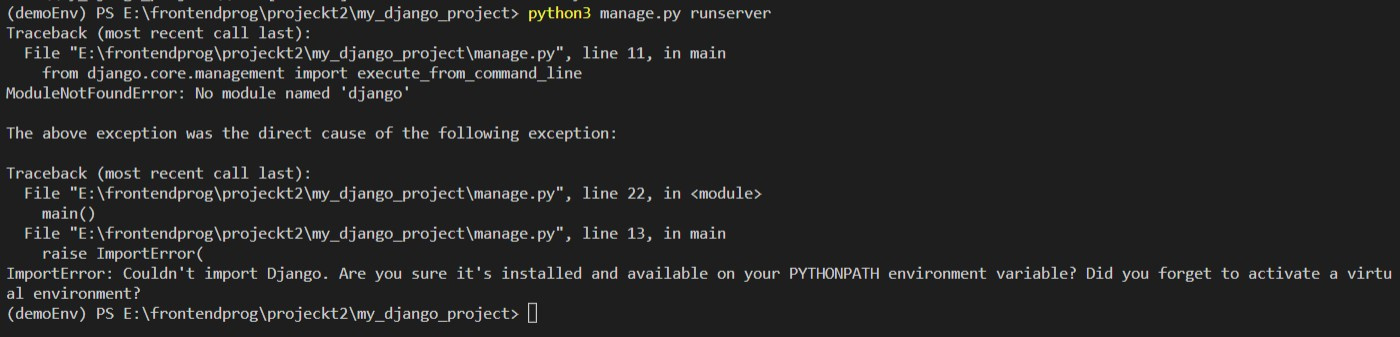
Пробовал:
1) Удаление виртуального окружения и повторный запуск с последующей установкой django
2) Пытался делать 2 типа виртуального окружения :
Таким образом
(demoEnv) PS E:frontendprogprojeckt2my_django_project> python3 manage.py runserver
Traceback (most recent call last):
File «E:frontendprogprojeckt2my_django_projectmanage.py», line 11, in main
from django.core.management import execute_from_command_line
ModuleNotFoundError: No module named ‘django’
The above exception was the direct cause of the following exception:
Traceback (most recent call last):
File «E:frontendprogprojeckt2my_django_projectmanage.py», line 22, in
main()
File «E:frontendprogprojeckt2my_django_projectmanage.py», line 13, in main
raise ImportError(
ImportError: Couldn’t import Django. Are you sure it’s installed and available on your PYTHONPATH environment variable? Did you forget to activate a virtual environment?
Хотя оно видит Django, но именно на этой команде выдает ошибку.
при создании файла с зависимостями командой
Источник
How to Install Cisco ISE 2.4 Eval Virtual Appliance on VMware ESXi 6.5
Installing the Cisco ISE 2.4 Eval virtual appliance on ESXi 6.5 is a little tricky. This guide makes that install super simple.
Before we can install Cisco ISE (Identity Services Engine) we need to download a few components and tools. The first thing we need to download are the necessary Cisco ISE virtual appliance files and any updates.
How to Download the Cisco ISE Eval Virtual Appliance Template Software
- Download the .ova file from https://cisco.app.box.com/v/ISE-Eval.
- Download the latest patch bundle .tar.gz listed.

- Move the downloaded files to a temporary directory such as C:Temp.


Unfortunately, starting in ESXi 6.5 you’ll receive errors when trying to create a VM from the OVA template. More specifically, you’ll get the following error:
Issues detected with selected template.
To solve this, we need to convert the OVA file to an OVF file.
The easiest tool to use to do this is the VMware Open Virtualization Format Tool. To get this:
Now that we have our files and our tool we can finally get to work.
- Install the OVFTool msi file. In my case it is VMware-ovftool-4.3.0-7948156-win.x86_64.msi.
This is a command line tool so you won’t find it in your start menu anywhere.
- Open up a CMD prompt window as an Administrator.
- Change the directory to where you installed OVFtool:
CD “C:Program FilesVMwareVMware OVF Tool”
Now one might think we could just convert from OVA to OVF but that’s not the case. If you do that you might find that you still run into the following errors when creating a vm from the OFV file:
Issues detected with selected template. Details:
-3.5:ATTRIBUTE_REQUIRED: Attribute “id” is required.
-3:5:ATTRIBUTE_REQUIRED: Attribute “href” is required.
-15:3:ATTRIBUTE_REQUIRED: Attribute “id” is required.
To get around that we need to convert the original OVA file to a VMX and then to an OVF file. Crazy, I know, but it was the only way to get around the errors and it’s pretty simple to do (albeit time consuming) with the OVFTool from VMware.
- Enter the following command in CMD prompt (while in the OVFTool install directory) to unpack the OVA into its’ VMX parts:
Ovftool.exe “C:TempISE-2.4.0.357-virtual-Eval.ova” “C:TempISE-2.4.0.357-virtual-Eval.vmx”
Running the above command will result in the creation of two new files:
ISE-2.4.0.357-virtual-Eval.vmx
ISE-2.4.0.357-virtual-Eval-disk1.vmdk

We now need to convert from VMX to OVF.
- Create a new directory to store the new OVF files such as C:TempOVF.
- Enter the following command in CMD prompt:
Ovftool.exe “C:TempISE-2.4.0.357-virtual-Eval.vmx” “C:TempOVFISE-2.4.0.357-virtual-Eval.vmf”
Finally, we have the OVF file that we can use to create a VM in vCenter without error along with its associated .mf and .vmdk files.
ISE-2.4.0.357-virtual-Eval.mf
ISE-2.4.0.357-virtual-Eval.ovf
ISE-2.4.0.357-virtual-Eval-disk1.vmdk

Creating the Cisco ISE Eval Virtual Appliance
- In your VMware environment (vCenter in my case) select to Deploy OVF Template.
- In the box that opens, click the Browse… button.
- Select all three of the files that were created in your new OFV directory from earlier (.mf, .ovf, and .vmdk) and click Open.
- Give your new VM a name and select the datacenter or folder that you want it created in then click next.
- Select the Host, Cluster, or Resource Pool that you want your VM created in and click Next.
- At the Review details screen click Next.
- Select your preferred virtual disk format and Datastore or Datastore Cluster and click Next.
- Select the Destination Network that your ISE server will be connected to and be addressed on and click Next.
- Review all your settings and click Finish.


VMware will now begin building your VM using a combination of your selections and the settings stored within the ovf file.
Initial Configuration of Your Cisco ISE Eval Virtual Appliance
Now that the appliance has been deployed to your ESX environment, we can fire it up and configure some basic settings.
- Power on the VM.
- Open a console window into the VM.
- At the prompt that says “localhost login:” type setup and press enter.

Your screen will clear and you’ll be returned to a prompt asking you to Enter hostname[ ]:. At this point the steps are pretty self-explanatory and will be specific to your network.
- Answer each prompt with your specific network settings and preferences.

The automated configuration process will kick off after the last prompt (Enter password again for SSH user) and will take a long time. It was almost 20 minutes before I was returned to a prompt to login and all process had started and the web interface was brought up.
- Log in to your ISE install by typing your username and password at the console prompt (or through SSH which should be working at this point).
- Enter command:

show application status ise

We want to make sure the Application Server process is in the STATE running. When I first installed Cisco ISE the Application Server process was stuck in STATE initializing. It took another coffee break before the process was running.
If the Application Server process isn’t running you won’t be able to open your ISE web page. You’ll just receive a 404 error.
Now that our Application Server process is in the STATE running, we can proceed with testing the GUI login.
- Open a web browser and enter the url of your ise server. It should be in format of: https://yourservername.domain.com/admin/login.jsp.

If your webpage does not resolve, make sure you have a Host (A) record in DNS pointing your hostname to the IP of your ISE server.
At this point you can type in your username and password and login to the ISE server’s web interface.
How to Install Cisco ISE Hotfix
Before you go nuts playing with your new ISE install you’ll want install the hotfix we downloaded in the beginning. This will ensure you have the most up to date platform to begin building from.
- Navigate to Administration -> System -> Maintenance -> Patch Management and click Choose File.
- Select the ise-patchbundle we downloaded in the beginning.
- Click Install.


At this point you’ll see an upload progress indicator appear in the lower left hand corner of the window.
It’s quick and easy to miss, leaving you to believe that ISE hasn’t done anything after you clicked Install.
Once it finishes uploading you’ll be kicked out of Cisco ISE back to the login screen. It’s advisable to wait at this screen for a few minutes before signing back in or you may get kicked back out as proceeds through the patch install. It took around 10 minutes for the install to complete and allow me to sign back in.
You can verify that the patch installed successfully by navigating back to Administration -> System -> Maintenance -> Patch Management and looking to see if the Patch is listed under Installed Patches. In my case I had a radio button with a 1 next to it indicating that Patch 1 had been installed.

So there you have it. You now have a fully up to date Cisco ISE Eval Virtual Appliance deployed and ready to take for a test drive.
Hopefully this saved you some time and heartache!
Recommended for You: Solarwinds Virtualization Manager

Chase Smith, CCNP
Chase Smith, CCNP is a Network Engineer III who has spent the last decade elbow deep in enterprise system administration and networking. He can usually be found trying to warm up behind the storage in the datacenter.
Источник

Yogurt-Filled Chocolate Cauldrons
Cute chocolate «cauldrons» hold a cool, creamy orange-flavored yogurt in this recipe. The unfilled cups…
Provided by Taste of Home

Demi-Glace
This is my technique for veal demi-glace, and there’s not much to it. I’m going for a pure veal stock…
Provided by Chef John

Easy Butterfinger Cake
OMG!!! I had to make this cake this past Sunday for my Mary Kay party.. It was a huge hit. It was also…
Provided by vicky hunt
Pork Neck Slow Cooker Stew
Good food doesn’t always have to cost a fortune! Your family will love this. Full of flavor and easy…
Provided by Melissa Baldan

Steamed Parsley Red Potatoes
This is a very good potato dish , I stem baby red potatoes and smother them in real butter and parsley…
Provided by Karla Everett
![]()

Homemade Chicken Pot Pie
Sure you can make a quick Chicken Pot Pie using already made pie crust, canned soups, vegetables and…
Provided by Julia Ferguson

Red Velvet Pound Cake
This delicious red velvet pound cake is the perfect combination of flavors. Make sure the cake has cooled…
Provided by Taste of Home
Boudreaux’s Zydeco Stomp Gumbo
Dis is da toe curlin Texicajun hybrid of a classic dish. This will put a smile on everyone’s face that’s…
Provided by Lupe Boudreaux

Pesto Baked Pork Chops
This is a tender and delicious baked pork chop recipe, with an Italian flair.
Provided by larvia57
Previous
Next
MANAGING ORACLE VM VIRTUALBOX FROM THE COMMAND LINE
2023-01-28If the command outputs nothing, you either currently have no VMs registered with Oracle VM VirtualBox or you’re running VBoxManage as a user different from the user who created those VMs. If the latter is the case, you need to log …
From oracle.com
See details »
IS NOT RECOGNIZED AS AN INTERNAL OR EXTERNAL COMMAND, …
Oct 1, 2015 Why is it not possible to specify a path of a program and have it executed like that from the command prompt (assuming it’s not in path variable). This used to work under DOS …
From stackoverflow.com
Reviews 3
See details »
SOLVED: VBOXMANAGE IS NOT RECOGNIZED — ROEL PETERS
May 29, 2019 ‘VBoxManage’ is not recognized as an internal or external command, operable program or batch file. If you type VBoxManage in the command prompt, you expect a list of …
From roelpeters.be
Reviews 8
Estimated Reading Time 2 mins
See details »
ISE INSTALL ERROR VBOXMANAGE — XILINX
2023-01-28March 10, 2021 at 3:25 PM ISE Install error vboxmanage I get the the following message: There was an unexpected error executing Import ISE Virtual Appliance. The error message was: …
From support.xilinx.com
See details »
70239 — ISE S6 VM — VBOXMANAGE.EXE: ERROR: DETAILS: CODE E … — XILINX
Sep 23, 2021 2) Open Task Manager (Win+X Task Manager) and make sure no VirtualBox processes are running, and kill them if they are. 3) Double click on the downloaded VirtualBox …
From support.xilinx.com
See details »
‘VBOXMANAGE.EXE’ IS NOT RECOGNIZED : R/VIRTUALBOX — REDDIT
2023-01-28Version: 4.3.12 (Not sure how to tell if I’ve installed Host Extensions or Guest Additions) VM OS: Windows 7. Got the error: ‘VBoxManage.exe’ is not recognized as an internal or external …
From reddit.com
See details »
VBOXMANAGE IS NOT RECOGNIZED AS AN INTERNAL OR EXTERNAL COMMAND …
2023-01-28vboxmanage is not recognized as an internal or external command windows 10 I’m trying to install ISE 14.7 on Windows 10 and I got the following message: vboxmanage is not …
From support.xilinx.com
See details »
SOLVED: ‘VBOXMANAGE’ IS NOT RECOGNIZED AS AN INTERNAL OR EXTERNAL …
Jan 12, 2023 We just need to edit the Path environment variable by clicking on Edit as shown below. Then to add a new value, click on New and then add VirtualBox path as shown below. …
From cyberithub.com
See details »
VBOXMANAGE IS NOT RECOGNIZED AS AN INTERNAL OR EXTERNAL …
2023-01-28At the beginning i encountered » vboxmanage is not recognized as an internal or external command windows 10″ error message. I try to look for the installation log in C://Xilinx/ folder, …
From support.xilinx.com
See details »
VIRTUALBOX — HOW TO RUN VBOXMANAGE.EXE? — SERVER FAULT
2023-01-28You need to either use the whole path for the command: «C:Program FilesOracleVirtualBoxVBoxManage.exe» list hdds. Or cd to the C:Program …
From serverfault.com
See details »
6 USEFUL VIRTUALBOX COMMANDS YOU CAN USE TO MANAGE YOUR VMS
Dec 1, 2021 To get information about the state of a VM, run a long listing using the command vboxmanage list runningvms -l. In the output, the state parameter should be equal to paused. …
From makeuseof.com
See details »
VIRTUALBOX.ORG • VIEW TOPIC — VBOXMANAGE NOT WORKING
May 22, 2008 VBoxManage modifyhd «Ubuntu 16 64-bit.vdi» —resize 61920 command with VirtualBox Vm’s Path and it’s still won’t recognize VBoxManage command. Here’s my …
From forums.virtualbox.org
See details »
XILINX ISE 14.7 INSTALLATION ISSUE
2023-01-28‘» C:Xilinx14.7_VMvboxmanage «‘ is not recognized as an internal or external command, operable program or batch file. Do you want to retry? Help would be much appreciated.
From support.xilinx.com
See details »
7.38. VBOXMANAGE UNATTENDED — ORACLE
2023-01-287.38.2.1. unattended detect. VBoxManage unattended detect {—iso= install-iso } [—machine-readable] Detects the guest operating system (OS) on the specified installation ISO and …
From docs.oracle.com
See details »
Related Search
We’ve just had quite the head scratcher trying to install the ISE 2.3 OVA on ESXi 6.5 and figured we won’t be the only ones.
Tl;dr – Convert the OVA to VMX then convert that VMX to OVF. Do not go directly from OVA to OVF.
*Edit* 26/11/2018 – Can confirm this works for ISE 2.4 on ESXi 6.7 which I tested in my home lab. Make sure you use separate folders to convert each step below or your VMDK file will get overwritten on the last step and ruin it. Thanks to crystal for pointing that out.
The OVA can’t be deployed as.. an OVA
Yep. The install file provided by Cisco needs to be converted to a different format in order to work with VMware i.e. OVF.
The error message when attempting this:
3.5: ATTRIBUTE_REQUIRED: Attribute “id” is required.
3.5: ATTRIBUTE_REQUIRED: Attribute “href” is required.
15.3: ATTRIBUTE_REQUIRED: Attribute “id” is required.

To be fair this is partly documented by Cisco but it doesn’t clear much up on what to do next.
https://www.cisco.com/c/en/us/td/docs/security/ise/2-3/install_guide/b_ise_InstallationGuide23/b_ise_InstallationGuide23_chapter_011.html?bookSearch=true
The ISE 2.3 OVA templates are not compatible with VMware web client for vCenter 6.5. As a workaround, use the VMware OVF tool to import the OVA templates.
Download VMware OVF Tool
https://www.vmware.com/support/developer/ovf/
For ISE 2.3 on to ESXi 6.5 I used OVF Tool version 4.2
You can convert directly from OVA to OVF but we encountered the error below after doing this and importing to ESXi. A senior colleague saved my bacon by saying they’d had luck going from OVA to VMX then to OVF.
4:5: PARSE_ERROR: Parse error: Unexpected character ‘.’ (code 58) (missing namespace prefix?) at [row,col,system-id]: [4,11,”descriptor.ovf”].

Convert OVA -> VMX
- Install the OVF Tool
- Place your OVA somewhere easily accessible (C:) and open up elevated command prompt.
- Navigate to cd C:Program FilesVmwareVmware OVF Tool
- Initiate the executable in the format ovftool.exe “source file” “destination file” e.g. ovftool.exe “C:ISE-2.3.0.298-virtual-SNS3415-600.ova” “C:ISE-2.3.0.298-virtual-SNS3415-600.vmx”
- The above will convert from the OVA to the VMX in the same directory of C:

Once complete you will see both the original OVA and the two new VMX/VMDK files

Convert VMX -> OVF
Now that VMX can be converted to OVF. Note you can choose not to use the quotations like in this example as long as there’s a space between source and destination. I created an OVF directory so that it didn’t overwrite any files during this process.
ovftool.exe C:ISE-2.3.0.298-virtual-SNS3415-600.vmx C:OVFISE-2.3.0.298-virtual-SNS3415-600.ovf

You will end up with three files in your OVF directory and the OVF can be used for the import to ESXi.

Import to ESXi
This time there is no error on the import and the resources are automatically filled out via the OVF template.

Additional Note Feb 2018 from Frank (comments below):
“When deploying in VMware, I needed to select both the converted OVF-file and the VMDK-file. When selecting only OVF-file, VMware said that files where missing.”