There was an unexpected error (type=Forbidden, status=403). Access Denied.
When I was trying to access URL from postman or from browser I am getting an error of There was an unexpected error (type=Forbidden, status=403). Access Denied.
1)Web Security Class:-
import javax.servlet.Filter;

import org.springframework.beans.factory.annotation.Autowired;
import org.springframework.context.annotation.Configuration;
import org.springframework.core.env.Environment;
import org.springframework.security.config.annotation.authentication.builders.AuthenticationManagerBuilder;
import org.springframework.security.config.annotation.web.builders.HttpSecurity;
import org.springframework.security.config.annotation.web.configuration.EnableWebSecurity;
import org.springframework.security.config.annotation.web.configuration.WebSecurityConfigurerAdapter;
import org.springframework.security.crypto.bcrypt.BCryptPasswordEncoder;

import com.photoapp.users.service.ApiUserService;

@Configuration
@EnableWebSecurity
public class WebSecurity extends WebSecurityConfigurerAdapter {

    private Environment environment;
    private ApiUserService apiUserService;
    private BCryptPasswordEncoder bCryptPasswordEncoder;

    @Autowired
    public WebSecurity(Environment environment , ApiUserService apiUserService , BCryptPasswordEncoder bCryptPasswordEncoder) {
        this.environment = environment;
        this.apiUserService = apiUserService;
        this.bCryptPasswordEncoder = bCryptPasswordEncoder;
    }

    @Override
    protected void configure(HttpSecurity http) throws Exception {
        http.csrf().disable();
        http.authorizeRequests().antMatchers("/**").hasIpAddress(environment.getProperty("gateway.ip"))
        .and()
        .addFilter(getAuthenticationFilter());
        http.headers().frameOptions().disable();
    }

    private AuthenticationFilter getAuthenticationFilter() throws Exception {
        // TODO Auto-generated method stub
        AuthenticationFilter authenticationFilter = new AuthenticationFilter();
        authenticationFilter.setAuthenticationManager(authenticationManager());
        return authenticationFilter;
    }

    protected void configure(AuthenticationManagerBuilder auth) throws Exception {
        auth.userDetailsService(apiUserService).passwordEncoder(bCryptPasswordEncoder);
    }
}
2)Authentication Filter Class:-
import java.io.IOException;
import java.util.ArrayList;

import javax.servlet.FilterChain;
import javax.servlet.ServletException;
import javax.servlet.http.HttpServletRequest;
import javax.servlet.http.HttpServletResponse;

import org.springframework.security.authentication.UsernamePasswordAuthenticationToken;
import org.springframework.security.core.Authentication;
import org.springframework.security.core.AuthenticationException;
import org.springframework.security.web.authentication.UsernamePasswordAuthenticationFilter;

import com.fasterxml.jackson.databind.ObjectMapper;
import com.photoapp.users.model.LoginRequestModel;

public class AuthenticationFilter extends UsernamePasswordAuthenticationFilter {

    public Authentication attemptAuthentiation(HttpServletRequest req, HttpServletResponse res) throws AuthenticationException {

        try {
            LoginRequestModel creds = new ObjectMapper()
                    .readValue(req.getInputStream() , LoginRequestModel.class);

            return getAuthenticationManager().authenticate(new UsernamePasswordAuthenticationToken (
                    creds.getEmail(),
                    creds.getPassword(),
                    new ArrayList<>()));
        }
        catch(IOException e) {
            throw new RuntimeException(e);
        }
    }

    protected void succeddfulAuthentication(HttpServletRequest req, HttpServletResponse res , FilterChain chain , Authentication auth) throws IOException , ServletException {

    }
}
3)Controller Class:-
import org.modelmapper.ModelMapper;
import org.modelmapper.convention.MatchingStrategies;
import org.springframework.beans.factory.annotation.Autowired;
import org.springframework.http.HttpStatus;
import org.springframework.http.MediaType;
import org.springframework.http.ResponseEntity;
import org.springframework.web.bind.annotation.GetMapping;
import org.springframework.web.bind.annotation.PostMapping;
import org.springframework.web.bind.annotation.RequestBody;
import org.springframework.web.bind.annotation.RequestMapping;
import org.springframework.web.bind.annotation.RestController;

import com.photoapp.users.dto.UserDto;
import com.photoapp.users.model.CreateUserRequestModel;
import com.photoapp.users.model.CreateUserResponseModel;
import com.photoapp.users.service.ApiUserService;

@RestController
@RequestMapping("/users")
public class UsersController {

    @Autowired
    private ApiUserService apiUserService;

    @GetMapping("/status/check")
    public String status() {
        return "Working";
    }

    @PostMapping( consumes = {MediaType.APPLICATION_XML_VALUE , MediaType.APPLICATION_JSON_VALUE } ,
                  produces = {MediaType.APPLICATION_XML_VALUE , MediaType.APPLICATION_JSON_VALUE })
    public ResponseEntity<CreateUserResponseModel> createUser(@RequestBody CreateUserRequestModel userDetails) {
        ModelMapper modelMapper = new ModelMapper();
        modelMapper.getConfiguration().setMatchingStrategy(MatchingStrategies.STRICT);
        UserDto userDto = modelMapper.map(userDetails, UserDto.class);
        UserDto createdUser = apiUserService.createUser(userDto);
        CreateUserResponseModel responseModel = modelMapper.map(createdUser , CreateUserResponseModel.class);
        return ResponseEntity.status(HttpStatus.CREATED).body(responseModel);
    }
}
4)Service Implementation Class:-
import java.util.ArrayList;
import java.util.UUID;

import org.modelmapper.ModelMapper;
import org.modelmapper.convention.MatchingStrategies;
import org.springframework.beans.factory.annotation.Autowired;
import org.springframework.security.core.userdetails.User;
import org.springframework.security.core.userdetails.UserDetails;
import org.springframework.security.core.userdetails.UsernameNotFoundException;
import org.springframework.security.crypto.bcrypt.BCryptPasswordEncoder;
import org.springframework.stereotype.Service;

import com.photoapp.users.dao.UserRepository;
import com.photoapp.users.dto.UserDto;
import com.photoapp.users.entity.UserEntity;

@Service
public class ApiUserServiceImpl implements ApiUserService{

    UserRepository userRepository;

    BCryptPasswordEncoder bCryptPasswordEncoder;

    @Autowired
    public ApiUserServiceImpl(UserRepository userRepository, BCryptPasswordEncoder bCryptPasswordEncoder) {
        this.userRepository = userRepository;
        this.bCryptPasswordEncoder = bCryptPasswordEncoder;
    }

    @Override
    public UserDto createUser(UserDto userDetails) {

        userDetails.setUserId(UUID.randomUUID().toString());
        userDetails.setEncryptedPassword(bCryptPasswordEncoder.encode(userDetails.getPassword()));
        ModelMapper modelMapper = new ModelMapper();
        modelMapper.getConfiguration().setMatchingStrategy(MatchingStrategies.STRICT);
        UserEntity userEntity = modelMapper.map(userDetails, UserEntity.class);
        userRepository.save(userEntity);
        return userDetails;
    }

    @Override
    public UserDetails loadUserByUsername(String username) throws UsernameNotFoundException {
        // TODO Auto-generated method stub
        UserEntity userEntity = userRepository.findByEmail(username);

        if(userEntity == null) throw new  UsernameNotFoundException(username);
        return new User(userEntity.getEmail() , userEntity.getEncryptedPassword() , true ,true ,true ,true , new ArrayList<>());
    }
}
The Access denied exception There was an unexpected error (type=Forbidden, status=403). Access Denied is a common exception seen in the browser when you access the url of the spring boot application. As stated, due to the restriction of access to the url, it refuses to serve you because you do not have enough access to the server.
You do not have enough permission to access the page, or you have limited permission to access this page. If access permission is set in the spring boot security configuration, this error will be fixed.
Whitelabel Error Page

This application has no explicit mapping for /error, so you are seeing this as a fallback.

Sat Feb 01 17:14:58 IST 2020
There was an unexpected error (type=Forbidden, status=403).
Access Denied
Root Cause
If the security module is configured in your spring boot application, the web url must be allowed to access it. If the web url is accessed without sufficient permission, the forbidden error with the http error code 403 will be shown in the browser. The Spring Boot Security Module secures page level access to the respective roles configured for the spring boot application.
If a web url is called without sufficient permission, the above error message will be shown as a response from the spring boot application server.
How to reproduce this issue
The spring boot application is configured with security module in pom.xml file. The page level security is not configured in the security configuration java class. The security configuration class is created by the extension of the WebSecurityConfigurerAdapter class.
This issue will be reproduced in the example below. Configure the spring boot application as below and invoke any page url from the browser to display this error message.
pom.xml
		<dependency>
			<groupId>org.springframework.boot</groupId>
			<artifactId>spring-boot-starter-security</artifactId>
		</dependency>
package com.yawintutor;
import org.springframework.context.annotation.Configuration;
import org.springframework.security.config.annotation.authentication.builders.AuthenticationManagerBuilder;
import org.springframework.security.config.annotation.web.builders.HttpSecurity;
import org.springframework.security.config.annotation.web.configuration.WebSecurityConfigurerAdapter;
@Configuration
public class SpringBootSecurityConfiguration extends WebSecurityConfigurerAdapter {
@Override
public void configure(AuthenticationManagerBuilder auth) throws Exception {
auth.inMemoryAuthentication()
.withUser("user").password("{noop}password").roles("USER") .and()
.withUser("admin").password("{noop}password").roles("ADMIN");
}
@Override
public void configure(HttpSecurity http) throws Exception {
http
.csrf()
.disable()
.authorizeRequests()
.anyRequest().authenticated();
}
}Solution 1
In the spring boot security configuration file, add the appropriate page level access permission, and restart the application will resolve this issue. If you are not sure about permission, please add the code below.
	@Override
	public void configure(HttpSecurity http) throws Exception {
		http
			.csrf()
			.disable()
			.authorizeRequests()
			.antMatchers("/**").permitAll()
			.anyRequest().authenticated();
	}
The complete java code is as shown below with page level permission.
package com.yawintutor;

import org.springframework.context.annotation.Configuration;
import org.springframework.security.config.annotation.authentication.builders.AuthenticationManagerBuilder;
import org.springframework.security.config.annotation.web.builders.HttpSecurity;
import org.springframework.security.config.annotation.web.configuration.WebSecurityConfigurerAdapter;

@Configuration
public class SpringBootSecurityConfiguration extends WebSecurityConfigurerAdapter {

	@Override
	public void configure(AuthenticationManagerBuilder auth) throws Exception {
		  auth.inMemoryAuthentication()
		  .withUser("user").password("{noop}password").roles("USER") .and()
		  .withUser("admin").password("{noop}password").roles("ADMIN");
	}

	@Override
	public void configure(HttpSecurity http) throws Exception {
		http
			.csrf()
			.disable()
			.authorizeRequests()
			.antMatchers("/", "/home","/guest").permitAll()
			.antMatchers("/admin/**").hasAnyRole("ADMIN")
			.antMatchers("/user/**").hasAnyRole("USER")
			.anyRequest().authenticated();
	}
}
Solution 2
If the user access a web page that is unauthorized to access, then this error occurs. This could be a valid scenario. You can customize the error message as shown in this link Spring Boot Security Step by Step 6.
The customized unauthorized access denied error message will show the user with a informative error message.
Solution 3
If you still have issue in spring boot security, please follow the below step by step procedure to fix the issue
Все мы, путешествуя по просторам интернета, натыкаемся на различные ошибки при загрузке сайтов. Одна из них, кстати, достаточно часто встречается – я говорю об ошибке сервера 403 Forbidden Error. Сегодня я рассмотрю причины ее возникновения и способы устранения со стороны владельца сайта и его пользователя.
Что означает ошибка 403 и почему она появляется
Ошибка сервера 403 Forbidden означает ограничение или отсутствие доступа к материалу на странице, которую вы пытаетесь загрузить. Причин ее появления может быть несколько, и вот некоторые из них:
- Формат индексного файла неверен.
- Некорректно выставленные права на папку/файл.
- Файлы были загружены в неправильную папку.
Комьюнити теперь в Телеграм
Подпишитесь и будьте в курсе последних IT-новостей
Подписаться
Исправление ошибки сервера 403 Forbidden
Чтобы исправить ошибку сервера 403 Forbidden, обязательно нужен доступ к панели управления вашего хостинга. Все описанные ниже шаги применимы к любой CMS, но примеры будут показаны на основе WordPress.
Проверка индексного файла
Сначала я проверю, правильно ли назван индексный файл. Все символы в его имени должны быть в нижнем регистре. Если хотя бы один символ набран заглавной буквой, возникнет ошибка 403 Forbidden. Но это больше относится к ОС Linux, которой небезразличен регистр.
Еще не стоит забывать, что индексный файл может быть нескольких форматов, в зависимости от конфигураций сайта: index.html, index.htm, или index.php. Кроме того, он должен храниться в папке public_html вашего сайта. Файл может затеряться в другой директории только в том случае, если вы переносили свой сайт.

Любое изменение в папке или файле фиксируется. Чтобы узнать, не стала ли ошибка итогом деятельности злоумышленников, просто проверьте графу «Дата изменения».
Настройка прав доступа
Ошибка 403 Forbidden появляется еще тогда, когда для папки, в которой расположен искомый файл, неправильно установлены права доступа. На все директории должны быть установлены права на владельца. Но есть другие две категории:
- группы пользователей, в числе которых есть и владелец;
- остальные, которые заходят на ваш сайт.
На директории можно устанавливать право на чтение, запись и исполнение.
Так, по умолчанию на все папки должно быть право исполнения для владельца. Изменить их можно через панель управления TimeWeb. Для начала я зайду в раздел «Файловый менеджер», перейду к нужной папке и выделю ее. Далее жму на пункт меню «Файл», «Права доступа».

Откроется новое окно, где я могу отрегулировать права как для владельца, так и для всех остальных.

Отключение плагинов WordPress
Если даже после всех вышеперечисленных действий ошибка не исчезла, вполне допустимо, что влияние на работу сайта оказано со стороны некоторых плагинов WordPress. Быть может они повреждены или несовместимы с конфигурациями вашего сайта.
Для решения подобной проблемы необходимо просто отключить их. Но сначала надо найти папку с плагинами. Открываю папку своего сайта, перехожу в раздел «wp-content» и нахожу в нем директорию «plugins». Переименовываю папку – выделяю ее, жму на меню «Файл» и выбираю соответствующий пункт. Название можно дать вот такое: «plugins-disable». Данное действие отключит все установленные плагины.

Теперь нужно попробовать вновь загрузить страницу. Если проблема исчезла, значит, какой-то конкретный плагин отвечает за появление ошибки с кодом 403.
Но что делать, если у вас плагин не один, а какой из них влияет на работу сайта – неизвестно? Тогда можно вернуть все как было и провести подобные действия с папками для определенных плагинов. Таким образом, они будут отключаться по отдельности. И при этом каждый раз надо перезагружать страницу и смотреть, как работает сайт. Как только «виновник торжества» найден, следует переустановить его, удалить или найти альтернативу.
Читайте также

Как решить проблему, если вы – пользователь
Выше я рассмотрела способы устранения ошибки 403 Forbidden для владельцев сайта. Теперь же разберу методы исправления в случаях с пользователем.
- Сначала надо убедиться, что проблема заключается именно в вашем устройстве. Внимательно проверьте, правильно ли вы ввели URL сайта. Может, в нем есть лишние символы. Или, наоборот, какие-то символы отсутствуют.
- Попробуйте загрузить страницу с другого устройства. Если на нем все будет нормально, значит, проблема кроется именно в используемом вами девайсе. Если нет – надо перейти к последнему шагу.
- Еще хороший вариант – немного подождать и обновить страницу. Делается это либо кликом по иконке возле адресной строки браузера, либо нажатием на комбинацию Ctrl + F5. Можно и без Ctrl, на ваше усмотрение.
- Если ничего из вышеперечисленного не помогло, надо очистить кэш и cookies. Провести такую процедуру можно через настройки браузера. Для этого необходимо открыть историю просмотров, чтобы через нее перейти к инструменту очистки. Эту же утилиту часто можно найти в настройках, в разделе «Конфиденциальность и безопасность». В новом окне нужно отметить пункты с кэшем и cookies и нажать на кнопку для старта очистки.


- Ошибка 403 Forbidden возникает и тогда, когда пользователь пытается открыть страницу, для доступа к которой сначала надо осуществить вход в систему. Если у вас есть профиль, просто войдите в него и попробуйте вновь загрузить нужную страницу.
- Если вы заходите со смартфона, попробуйте отключить функцию экономии трафика в браузере. Она находится в настройках, в мобильном Google Chrome под нее отведен отдельный раздел.
- Последний шаг – подождать. Когда ни один способ не помогает, значит, неполадки возникли именно на сайте. Возможно, его владелец уже ищет способы решения проблемы и приступает к их исполнению, но это может занять какое-то время. Пользователям остается только дождаться, когда все работы будут завершены.
Еще одна допустимая причина появления ошибки сервера 403 – доступ к сайту запрещен для определенного региона или страны, в которой вы находитесь. Бывает и такое, что сайт доступен для использования только в одной стране. Если вы используете VPN, попробуйте отключить его и перезагрузите страницу. Вдруг получится все исправить.
Если ничего из вышеперечисленного не сработало, рекомендуется обратиться к владельцу сайта. Есть вероятность, что никто не знает о возникшей проблеме, и только ваше сообщение может изменить ситуацию.
Does the term ‘403 forbidden’ seem familiar? This is a client-side error that denies you access to specific areas of a website. You might have seen it when you landed on a webpage with a permission error or an empty website directory.
Why? Because the majority of websites are configured to disallow directory browsing, with an aim to stop unauthorized users from getting into files containing sensitive data.
But if you or users run into a 403 forbidden error on your website, you need to fix it — or you could lose traffic. And that would cost you invaluable new customers over time.
However, as there are various causes for a 403 forbidden error, you have more than one solution to consider.
In this guide, we’ll explore everything you need to know about 403 forbidden errors, including likely causes and several solutions to try.
What Does the 403 Forbidden Error Mean?
The HTTP status code ‘403 forbidden — you don’t have permission to access this resource’ is displayed when a web server recognizes a user’s request but is unable to allow additional access.
What Causes the 403 Forbidden Error?
HTTP 403 forbidden errors are typically triggered by a client-side setup issue, so you should be able to fix it independently. One of the most common reasons for a 403 forbidden error is the settings for a specific folder or file. These determine which users can read, write, or execute that folder or file.
In this case, the site owner may have:
- Changed the settings and denied you from accessing the relevant resources.
- Failed to put the proper permissions in place.
Another common cause is the htaccess file settings, which may simply be wrong or (less simply) corrupt. This could occur after a file has been changed. Fortunately, you can fix this problem in an easy way — just create a new server configuration file.
Other possible causes of a 403 forbidden error include:
- Incorrect IP address: A domain name directs to an incorrect or outdated IP address hosting a site that prevents you from gaining access.
- Issues with a WordPress plugin: WordPress plugins that are incompatible with other plugins or set up incorrectly.
- New link to page: A site owner updates a page’s link, which differs from the version that has been cached.
- Malware: Malware infections can lead a .htaccess file to be in a state of ongoing corruption, so you would need to get rid of the infection before completing a file restoration.
- No index page: Your site’s homepage isn’t named ‘index.php’ or ‘index.html’.
Any of these causes may be responsible for your site’s 403 forbidden error.
Try These Techniques to Solve Your 403 Forbidden Error
The techniques we’ll explore below focus primarily on 403 forbidden errors associated with file access permissions. But alternative options, including malware scans and emptying your browser’s cache, could also fix the problem.
And while we focus on WordPress websites, you can apply our solutions to different types of sites too.
Assess the .htaccess File for Signs of Corruption
The .htaccess file usually remains inside the site’s document root..
Are you using cPanel or Plesk? First, find the File Manager, open the site’s document root directory, then search for the .htaccess file. Not there? In case of cPanel tap ‘Settings’ in the top-right area of the screen, then turn on the ‘Show Hidden Files (dotfiles)’ setting.
The .htaccess file primarily works by adjusting the settings for Apache Web Server, as it’s a server configuration file. But while you’ll find this file on the majority of sites by default, you have to manually make a new file if your site lacks one or it has been accidentally deleted.
In any case, when you find the file, take the following steps to find out whether the 403 forbidden error has been caused by an incorrect configuration:
- Right-click on the file then tap ‘Download’ to make a backup.
- Delete the file.
- Try to access your site — if you can get into it, it’s safe to say that the file was corrupted.
- If you want to make a new .htaccess file, sign in to your WordPress dashboard then click on the ‘Settings’ option followed by ‘Permalinks’.
- Tap the ‘Save Changes’ button without making changes.
Completing these steps will create a new .htaccess file for your site. But if this process fails to fix the problem, move on to our next technique.
Resetting Permissions for the File and Directory
Incorrect file or folder permissions could be causing your HTTP 403 issue.
New files carry certain default permissions that determine how you read, write, and execute them. But you can edit permissions for files and folders with FTP. To get started:
- Set up an FTP client and connect it to your site.
- Right-click ‘publichtml’ after connecting the FTP client, then select ‘File Attributes’.
- Input permission ‘755’ in the ‘Numeric value’ field, choose ‘Apply to directories only’, then press ‘ok’.
Generally, with regards to file permission numeric values, ‘755’ relates to folders, ‘644’ relates to static content, while ‘700’ relates to dynamic content.
Next, once you have adjusted your folder permissions, repeat the second and third steps above — but use ‘644’ in the ‘Numeric value’ field instead. Then, click on ‘Apply to files only’.
After you complete these steps, try to access your site to find out if you have fixed the problem.
Deactivating Plugins for WordPress
It’s likely that your 403 forbidden error is caused by a plugin which is faulty or simply incompatible if neither of the previous techniques have worked for you. So, we’ll explore how to disable plugins to discover if they’re behind the error.
Before we begin, though, we want to recommend that you disable all of the plugins at the same time rather than disabling them one by one.
Follow these steps:
- Use FTP to get into your hosting account, or use the file manager in your hosting account, and navigate to the public_html -> wp-content folder.
- Find the ‘plugins’ folder.
- Change the folder’s name to something simple and relevant, such as ‘plugins-disabled’, to disable all of the plugins.
Next, try to access your site — if you don’t see the error again, the problem will have been caused by a plugin which is no longer active.
Change the folder name back to ‘plugins’, then disable one plugin at a time and see if the site continues to run properly. This will make it easy to identify the plugin causing the problem.
Either update or delete the plugin when you find it. But if the 403 forbidden error continues to appear, get in touch with your hosting provider for further help.
Index Page Uploading
Take a look at the name of your site’s homepage: it should be &lsquoindexphp’ or index.html’. Otherwise, you have two options to consider.
One possibility is to name your homepage either ‘index.php’ or ‘index.html’ instead. Alternatively, if you would prefer to retain the current name, just upload an index page to your public_html directory then set up a redirect to your present homepage.
Sounds good? Follow these steps:
- Use FTP or the file manager in your hosting account to upload an index.php or index.html file to your public_html directory.
- Find the .htaccess file and open it.
- Enter this snippet of code to start redirecting the index.php or index.html file to your present homepage:
Redirect index.html /myhomepagehtml
And make sure you swap ‘nyhomepage.html’ with the actual page name.
Reconfigure Ownership of the File
Do you use VPS or Linux web hosting? Improper file ownership could be causing your 403 forbidden error problem.
Folders and files may be assigned to a specific Group, Owner, or even both. However, you’ll require SSH access to change ownership within these environments, as well as an SSH terminal for connecting to the VPS.
Use the following SSH command to assess ownership after you connect SSH to your site’s server:
ls -1 [file name]
You should see this (or something similar):
-rwxrw-rw- 1 [owner][group] 20 Jul 22 12:00 filename.txt
Focus on the owner and group elements: the username for your hosting account will be the proper ownership. If the ownership is different, enter the following chown Linux command to change that:
chown [owner][:group] [file name]
Check Your A Record
Another potential reason for your 403 forbidden error is that your domain name is pointing to the incorrect IP address, where you lack permission to view the site’s content. To get around that, verify that your domain name is pointing to the right IP address.
Your domain could still point to your previous web host if you have migrated to a new one and forgot about updating your nameservers. A 403 error status code will be triggered when your previous host terminates your account.
Run a Malware Scan
Your 403 error may be due to malware: your WordPress website may continually add unwanted code to the .htaccess file after becoming infected. The 403 error will continue even if you fix the file using our first suggested method.
So, run a scan of your site to find malware using a WordPress plugin like Wordfence or Sucuri. Most security plugins for WordPress can get rid of malware: you’ll be presented with various options when the plugin locates the infection, such as restoring or deleting the affected files.
Another way to restore your site is to use backup files or, if you’re missing a full backup of the necessary files, a database backup.
Empty Your Cache
Our final recommended technique for fixing your 403 forbidden error involves the cache and cookies in your browser. The cache retains data to help websites load more quickly next time you go back to it. But the real page link could be different from the cached one if a site has been updated.
Additionally, cookies may trigger an error too. That could be the case if you see the error when trying to sign in to a site that you log into frequently.
Fortunately, clearing out both the cache and cookies in your chosen browser could solve the problem. But be prepared: emptying the cache could cause a site to run more slowly the next time you visit it, as the browser will request the site’s files again. Also, emptying your cookies will log you out of any sites that you’re currently signed in to.
If you use Google Chrome like countless other people, take the following steps to clear out your cache and cookies:
- Tap the ellipsis icon in the top-right area of the screen, then click on ‘Settings’.
- Locate the ‘Privacy and security’ section, then tap the ‘Clear browsing data’ button.
- Choose the data-deletion time period via the drop-down menu, then select both ‘Cookies and other site data’ and ‘Cached images and files’.
- Tap the ‘Clear data’ button to proceed.
After finishing all four steps, go back to your site and sign in if necessary. Hopefully, the 403 forbidden error will be solved!
Conclusion
If you have run into 403 forbidden errors before, you’ll know just how annoying they can be, especially when they prevent you from accessing a website you depend on daily. They’re typically caused by file permission issues, though glitchy plugins and malware infections could be responsible too.
It’s not always easy to identify the reason for 403 errors, but the eight techniques explored in this guide should help you get your site running properly again.
However, there are plenty of HTTP error codes, and the 403 forbidden is just one of them. Website owners may face client- and server-side errors, including 404 and 504 gateway timeouts.
The more you know about these and other errors, the faster you will be able to fix them if they disrupt activity on your site.
В статье мы расскажем, что такое ошибка 403 (403 forbidden) и как ее исправить.
- Ошибка 403: что она значит
- Хостинг заблокирован
- Некорректное название главной страницы
- Файлы загружены вне корневой директории
- Некорректные настройки в файле .htaccess
- Некорректная работа плагинов
- Как устранить ошибку 403 forbidden, если описанные способы не помогли
- Что делать, если ошибка 403 forbidden запрещает доступ к стороннему ресурсу
Ошибка 403: что она значит
Ошибки вида 4хх относятся к категории ошибок клиента (браузера) — когда сервер отправил ответ на запрос, но браузер не может его обработать.
Код 403 (forbidden) значит, что доступ к этому ресурсу запрещен. Текст ошибки может отличаться, например:
- error 403,
- 403 запрещено,
- HTTP 403,
- Forbidden 403,
- Access denied (перевод на русский: доступ запрещен),
- Error: access denied и др.
Ниже мы опишем наиболее распространенные причины возникновения этой ошибки.
Хостинг заблокирован
Хостинг может быть заблокирован по следующим причинам:
- Нехватка средств на балансе услуги. Пополните баланс хостинга, чтобы сайт продолжал работать.
- Нарушение правил договора. В этом случае перед блокировкой отправляется уведомление на контактный email услуги: если вы получили это письмо, необходимо устранить нарушение в течение 24 часов.
Некорректное название главной страницы
Главная страница (или индексный файл) — это страница, которая открывается первой при переходе по домену. По умолчанию индексный файл в панели управления SpaceWeb называется index.html или index.php. Ошибка 403 (forbidden) означает, что файл отсутствует или его название отличается.
Чтобы исправить название файла:
- Перейдите в панель управления.
- Разверните блок Хостинг и выберите Сайты:
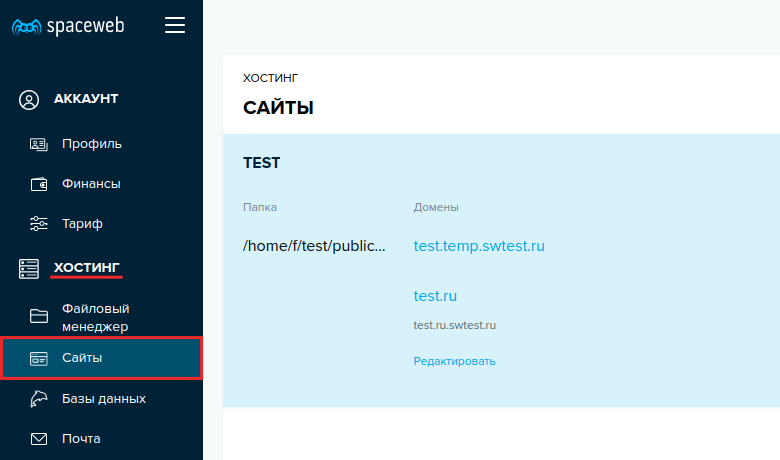
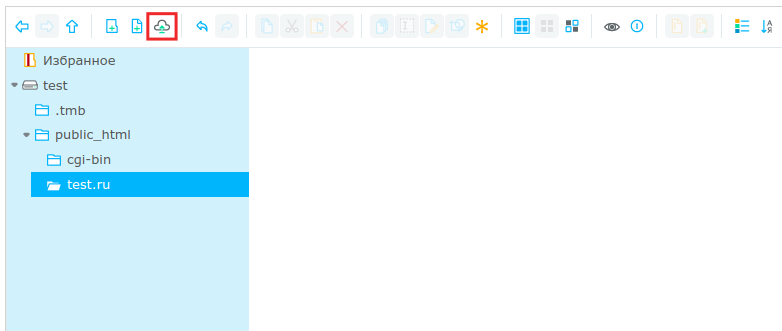
- Затем справа от имени пользователя кликните Открыть папку:
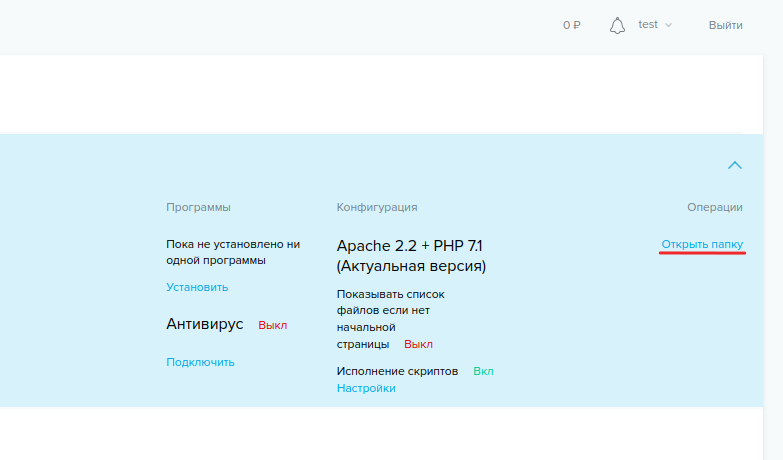
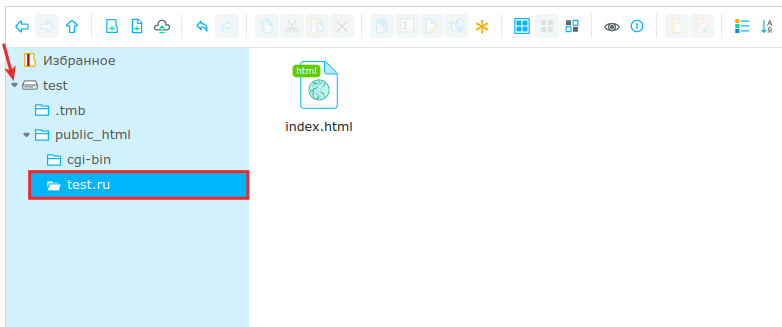
- Перейдите в корневую директорию сайта. Нажмите на иконку индексного файла и выберите Переименовать:
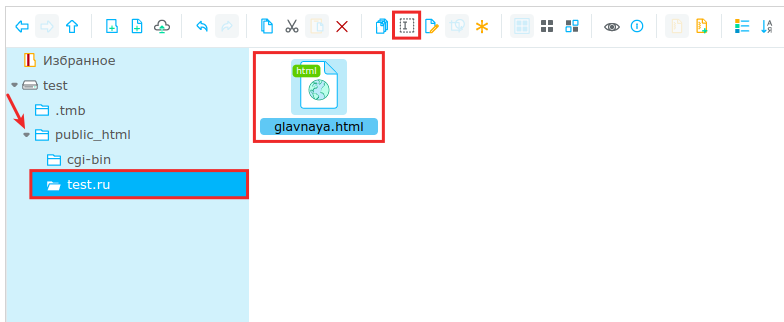
- Укажите название файла.
Если файл стартовой страницы отсутствует, выполните шаги 1, 2 и 3. Затем перейдите в корневую папку сайта и кликните Загрузить файлы:
Файлы загружены вне корневой директории
Ошибка 403 на сайте может возникать, если файлы не загружены в корневую директорию: например, файлы находятся в подпапке или выше на один уровень.
Чтобы это проверить:
- Перейдите в панель управления.
- Разверните блок Хостинг и выберите Сайты:
- Затем справа от имени пользователя кликните Открыть папку:
- Перейдите в корневую директорию сайта и проверьте наличие файлов:
Некорректные настройки в файле .htaccess
Иногда причина ошибки с кодом 403 — некорректные правила в файле .htaccess. Чтобы убедиться в том, что проблема в директивах .htaccess, измените название файла. После этого проверьте, осталась ли ошибка на сайте.
Для решения проблемы обратитесь к разработчику сайта. Зачастую она связана с правилами «RewriteRule» или путаницей с действиями «deny» и «allow».
Некорректная работа плагинов
Эта проблема может возникнуть, если ваш сайт создан на CMS WordPress. Чтобы исправить ошибку 403, необходимо перейти в админку сайта и обновить все плагины.
Если разработчики перестали поддерживать один из них, рекомендуем установить актуальный плагин с аналогичным функционалом.
Как устранить ошибку 403 forbidden, если описанные способы не помогли
Если вышеперечисленные способы не помогли и сайт по-прежнему недоступен — обратитесь в службу поддержки. Наши технические специалисты готовы помочь в любое время.
Что делать, если ошибка 403 forbidden запрещает доступ к стороннему ресурсу
Как исправить ошибку 403 (доступ запрещен), если вы перешли на сторонний ресурс:
Проверьте корректность URL. Иногда ошибка может возникнуть, когда вы обращаетесь к подразделу: например, при вводе в адресной строке test.ru/contacts возникает ошибка. Но если указать test.ru/contacts/ (со знаком / в конце), страница открывается корректно.
- Проверьте, не закрыт ли доступ намеренно. Например, руководство предприятия может закрыть доступ с рабочих компьютеров ко всем ресурсам, кроме корпоративных.
- Обновите страницу или зайдите позже. Высока вероятность, что владелец сайта знает о проблеме и занимается ее решением.
- Возможно, сайт закрыт в определенном регионе. При подключении к интернету вашему устройству присваивается IP-адрес. IP содержит информацию о регионе, и на ее основе администратор может ограничить доступ к определенной странице или сайту целиком. Для решения проблемы можно использовать VPN или прокси-сервер.
- Очистите кеш и cookies браузера. Это может быть полезно, если ранее не было проблем с доступом к сайтам.
- Обратитесь к интернет-провайдеру. Если перечисленные способы не помогли исправить ошибку, обратитесь в поддержку поставщика интернет-услуг: возможно, провайдер попал в черный список — из-за этого могут быть проблемы с доступом к сайтам.
Jan 04, 2023
Domantas G.
9min Read
You might encounter the 403 forbidden error when you visit an empty website directory or a specific page that has a permission error. This is because most websites are set up to disallow directory browsing to prevent attackers from accessing sensitive files.
However, if you or your visitors encounter this error on your site, it’s necessary to fix the issue or you may risk losing valuable traffic. Since its causes vary, there are many methods to resolve the 403 errors.
We will explain the different types of 403 forbidden errors, their possible causes, and also provide eight methods to fix the 403 forbidden error.
| Error code | 403 Forbidden Error |
| Error type | Client-side error |
| Error variations | Forbidden: You don’t have permission to access [directory] on this server HTTP Error 403 – Forbidden Error 403 – Forbidden 403 forbidden request forbidden by administrative rules 403 Forbidden Access Denied – You don’t have permission to access Error 403 HTTP 403 Forbidden |
| Error causes | Missing index page Broken WordPress plugin Wrong IP address Malware infection New web page link |
What Is a 403 Forbidden Error?
403 Forbidden – you don’t have permission to access this resource is an HTTP status code that occurs when the web server understands the request but can’t provide additional access.
Video Tutorial
Learn the most common causes and how to fix the 403 forbidden error.

Subscribe For more educational videos!
Hostinger Academy
Causes of 403 Forbidden
Often, HTTP 403 forbidden errors are caused by an access misconfiguration on the client-side, which means you can usually resolve the issue yourself.
A common cause of these errors is the file or folder permission settings, which control who can read, write, and execute the file or folder.
There are two possibilities in this case: either the website owner edited the settings so that you couldn’t access the resources, or they didn’t set the correct permissions.
The second common cause is corrupt or incorrect settings in the .htaccess file. This might happen after you’ve made changes to the file. Luckily, it’s easy to solve the issue by simply creating a new server configuration file.
Other than those two common causes, here are some other possible triggers for the error:
- Missing index page – the website’s homepage name is not index.html or index.php.
- Faulty WordPress plugin – if a WordPress plugin is not configured correctly or is incompatible with another plugin, it may trigger the 403 errors.
- Wrong IP address – the domain name points to a wrong or old IP address which now hosts a website that blocks your access.
- Malware infection – a malware infection may cause the .htaccess file to be constantly corrupted. You’ll need to remove the malware before restoring the file.
- New web page link – the site owner may have updated the page’s link, which is now different from the cached version.
How to Fix the 403 Forbidden Error
Since the HTTP 403 forbidden error is closely related to file access permissions, this will be the main focus of the following methods to solve it. That said, there are other ways of resolving this issue, such as clearing the browser cache or scanning for malware.

Let’s take a better look at each of the eight available methods to solve the HTTP error 403.
Please note that while the steps mentioned here mainly focus on WordPress, they can be applied to other websites as well.
1. Check the .htaccess File
You may not be familiar with the .htaccess file, as it often remains hidden in the site directory. However, if you use Hostinger File Manager, the file is available in your public_html directory by default.
Follow these steps to locate it:
- Find the File Manager on the hPanel dashboard.

- Open the public_html directory to find the .htaccess file.

If you use cPanel, follow these steps:
- Locate File Manager on cPanel.

- In the public_html directory, look for the .htaccess file.

- If you can’t find the file, click on Settings on the top-right corner of the screen and enable the Show Hidden Files (dotfiles) option.

The .htaccess file is a server configuration file and mainly works by altering the Apache Web Server settings.
Although the file is present on most websites by default, you need to create a new .htaccess file manually if your website doesn’t have it or if it was deleted unintentionally.
Now that you have found the file, follow these steps to check whether a wrong configuration is causing the error:
- Right-click on the file and select Download to create a backup.

- Once you have the backup, delete the file.

- Try accessing your website. If it works fine, this indicates that the file was corrupted.
- To generate a fresh .htaccess file, log in to your WordPress dashboard and click on Settings -> Permalinks.
- Without making any changes, click the Save Changes button at the bottom of the page.

This will generate a fresh .htaccess file for your website. If this didn’t solve the issue, try the next method.
2. Reset File and Directory Permissions
Another possible cause triggering HTTP 403 errors is incorrect permissions for files or folders. In general, when files are created, they come with specific default file permissions, which control how you can read, write, and execute them.
Pro Tip
If you’re using Hostinger, there’s a special tool that will take care of all your permission problems in just a single click. Enter Fix File Ownership in the search bar or scroll to the bottom of your control panel to Other and locate it there.

This tool will save you loads of time and will restore all file and directory permissions to default values.
.
Using FTP will let you edit file and folder permissions. To begin, you should:
- Configure an FTP client and connect it to your website.
- Once connected, right-click public_html and select File Attributes.

- Enter permission 755 in the Numeric value field, select Apply to directories only, and press OK.
The general practice for file permission numeric values is using 755 for folders, 644 for static content, and 700 for dynamic content.

- After changing folder permissions, repeat step 2 and step 3, but now enter 644 in the Numeric value field and select the Apply to files only option.

Once done, try accessing your website and see if the error is resolved.
3. Disable WordPress Plugins
If you have come this far and none of the previous methods work, chances are that the error is caused by an incompatible or faulty plugin. In this step, we will try disabling plugins to check whether doing so fixes the 403 forbidden error.
We recommend disabling all the plugins at once instead of going through the process one by one. Following this method, you should be able to detect the problem and work towards a solution. Here is what you’ll have to do:
- Access your hosting account via FTP or use the hosting account’s file manager and go to the public_html -> wp-content folder.
- Locate the plugins folder.

- Rename the folder with a different name like “disabled-plugins” to disable all plugins.

Try reaccessing the website. If the error is no longer there, a problematic plugin is the actual source of the error.
Rename the folder back to plugins. Now you have to disable the plugins one by one from your WordPress dashboard and check if the site is still working. This way, you will be able to detect the faulty plugin.
Once you find it, update the plugin if necessary or delete it. However, if the error still appears, you may need to contact your hosting provider for assistance.
4. Upload an Index Page
Check your website’s homepage name – it should be called index.html or index.php. If it’s not, then there are two alternatives. The first and simplest one is to rename the homepage as index.html or index.php.
However, if you want to keep the current homepage name, upload an index page to your public_html directory and create a redirect to your existing homepage.
Here are the steps to follow:
- Upload an index.html or index.php file to your public_html directory. Use your hosting account’s file manager or FTP to do so.
- Open the .htaccess file.
- Insert this code snippet to redirect the index.php or index.html file to your existing homepage. Don’t forget to replace
homepage.htmlwith the page’s actual name.
Redirect /index.html /homepage.html
5. Edit File Ownership
Incorrect file ownership can trigger the 403 forbidden error if you use Linux or VPS web hosting.
Typically, files and folders can be assigned to an Owner, a Group, or both. Keep in mind that you need SSH access to modify ownership in these environments. You’ll also need an SSH terminal to connect to the VPS.
Once you’ve connected SSH to your website server, check the ownership by using this SSH command:
ls -1 [file name]
The result will look something like this:
-rwxrw-rw- 1 [owner][group] 20 Jul 20 12:00 filename.txt
Look at the owner and group part. The correct ownership should be your hosting account’s username. If you see different ownership, use the chown Linux command to modify file ownership. Here’s the basic syntax for chown:
chown [owner][:group] [file name]
For example, if your username is Hostinger, use syntax like this:
chown Hostinger filename.txt
If you don’t feel comfortable using SSH yourself, contact our support team for help.
6. Verify the A Record
The 403 forbidden error can also happen if your domain name points to the wrong IP address, where you don’t have a permission to view the content. Therefore, double-check that your domain name points to the correct IP address.
To check if the domain A record is pointed correctly, access the DNS Zone Editor on your hPanel:
- Log in to your hPanel.
- Go to the Advanced section and click on DNS Zone Editor.

- You will see a list of DNS records. Find a record with the label A in the type column.

- Check the IP address on the Content column.
- If it’s pointing to the wrong IP address, click Edit to change it. Once you’ve finished, click Update.
If you don’t find the correct record, create a new one from the Manage DNS records section. Make sure you select A as the Type and insert the correct IP address into the Points to field. Then, click Add Record.

If you have recently migrated from one web host to another and forgot to change your nameservers, your domain may still be pointing to your old web host. Once the old host cancels your account, it will cause a 403 error status code.
7. Scan for Malware
Malware can be another cause of the 403 error. If your WordPress site becomes infected by malicious software, it may constantly keep injecting unwanted code into the .htaccess file. That way, even if you keep fixing the file using the first method we presented, the error will persist.
Scan your website to identify any malware. There are plenty of security plugins for WordPress such as Sucuri or Wordfence to do so.

Most WordPress security plugins like WordFence can remove malware. Once the plugin identifies all infected files, you’ll get actionable options for these files, such as deleting or restoring them.
Another method is restoring the website using backup files. It’s also possible to restore it using the database backup if you don’t have a complete backup of the site files.
8. Clear Your Web History/Cache
Your browser’s cache and cookies may also cause a 403 error. Cache stores data to make a website load faster the next time you visit it. However, it’s possible that the website’s link has been updated, and the actual web page link is now different from the cached version.
Another possibility is that the error comes from the cookies. It may be the case on a website that you usually log in normally, but the latest login attempt showed you this error message.
Clearing browser cache and cookies should resolve this issue. Note that clearing the cache may cause the next visit to the website to take a long time as your browser will ask for all the site files again. Clearing the cookies also signs you out from all logged-in websites.
Follow these steps to clear the cache and cookies on Google Chrome:
- Click on the three-dot icon on the top right corner and select Settings.
- Find the Privacy and security section and click Clear browsing data.

- Use the drop-down menu to select the time frame for data deletion. Then, check the Cookies and other site data and Cached images and files options.

- Click Clear data.
Once you’ve completed all the steps, try revisiting the website and logging in if it requires you to do so. If this or any other solutions don’t work, we recommend contacting our support team via live chat to resolve this issue.
Conclusion
403 forbidden errors can cause a great deal of frustration as they will prohibit you from accessing a resource. They mainly occur due to incorrect file permissions, but there are several other possible causes, like a missing index file, faulty plugins, or even a malware infection.
Finding the real cause of the 403 errors can be tricky. However, by following the methods listed in this article, we’re sure you can get your website working again.
To recap, here are the actions you should take to get rid of the 403 error message on your WordPress site:
- Check the .htaccess file.
- Reset file and directory permissions.
- Disable WordPress plugins.
- Upload an index page.
- Edit file ownership.
- Verify the A record.
- Remove any malware.
- Clear the web browser history and cache.
The 403 forbidden error is just one of many HTTP error codes. As a website owner, you may have encountered other client-side errors such as the 404 error or server-side errors like the 504 gateway timeout.
We encourage you to keep learning about these errors so that you know how to handle them if they ever appear on your website.
403 Forbidden Error FAQ
What Does 403 Forbidden Mean?
403 Forbidden error message means that the server is unable to authorize a particular request made by a user.
What Causes 403 Forbidden?
403 Forbidden error could be caused by a malfunctioning security plugin, incorrect file permissions or a corrupt .htaccess file.
Is 403 Forbidden Bad?
The 403 Forbidden error message isn’t a sign of something inherently bad happening to your website. It simply means that there is an issue with autorizing your request to access files or a particular page on your website.

Domantas leads the content and SEO teams forward with fresh ideas and out of the box approaches. Armed with extensive SEO and marketing knowledge, he aims to spread the word of Hostinger to every corner of the world. During his free time, Domantas likes to hone his web development skills and travel to exotic places.