![]()
Загрузить PDF
![]()
Загрузить PDF
В этой статье мы расскажем вам, как на Xbox изменить тип NAT (Network Address Translation — преобразование сетевых адресов). Большинство пользователей предпочитают «открытый» (open) NAT, который позволяет подключаться к другим консолям, но иногда сеть устанавливает тип NAT как «умеренный» (moderate) или «строгий» (strict), что может привести к проблемам с подключением.
-

1
Включите телевизор, Xbox One и контроллер. Нажмите и удерживайте кнопку «Guide» на подключенном контроллере.
- Также можно нажать кнопку питания на передней панели Xbox One, чтобы включить консоль, хотя вам все равно придется включить контроллер.
-
2
Нажмите кнопку «Guide» на контроллере. Она помечена логотипом Xbox и находится в центре контроллера. В левой части экрана телевизора откроется боковая панель.
-
3
Прокрутите вниз, выберите «Настройки»
, а затем нажмите A. Откроется дополнительная боковая панель.
-
4
Выберите Все настройки, а затем нажмите A. Эта опция находится вверху боковой панели. Откроется страница настроек.
-
5
Перейдите на вкладку Сеть, выберите Параметры сети, а затем нажмите A. Откроется страница «Параметры сети».
-
6
Выясните тип NAT. Найдите строку «Тип NAT» (NAT Type) — если в ней есть слово «строгий» (strict) или «умеренный» (moderate), перейдите к следующему разделу этой статьи.
- Если вы видите слово «открытый» (open), проблемы с Xbox LIVE не связаны с типом NAT. Попробуйте связаться со своим интернет-провайдером или устранить неполадки в сети самостоятельно.
Реклама


-
1
Отключите Ethernet-кабель, который соединяет маршрутизатор с модемом. Просто вытащите Ethernet-кабель из разъема на задней панели маршрутизатора.
- Если маршрутизатор и модем представляют собой одно устройство, пропустите этот шаг.
-
2
Найдите кнопку «Reset» (Сброс) на маршрутизаторе. Обычно эта кнопка находится на задней или нижней панели маршрутизатора.
- Кнопка «Сброс» очень маленькая.
-
3
Перезагрузите маршрутизатор. С помощью разогнутой скрепки (или аналогичного предмета) нажмите и удерживайте кнопку «Сброс» в течение тридцати секунд.
-
4
Отпустите кнопку через тридцать секунд. Маршрутизатор уйдет на перезагрузку, а его светодиоды будут мигать.
-
5
Подождите, пока маршрутизатор перезагрузится. Когда маршрутизатор включится, его светодиоды будут гореть (не мигая).
-
6
Подключите маршрутизатор к модему. Просто вставьте Ethernet-кабель в разъем на задней панели маршрутизатора.
- Если маршрутизатор и модем представляют собой одно устройство, пропустите этот шаг.
-
7
Найдите основной пароль маршрутизатора. Он указан на нижней или задней панели маршрутизатора в строке «password» (пароль) или «network/security key» (сетевой ключ). Пароль необходим, чтобы подключить Xbox к интернету.
-
8
Нажмите кнопку «Guide» на контроллере Xbox.
-
9
Подключитесь к сети. Для этого:
- выберите «Настройки» > «Сеть» > «Параметры сети» > «Параметры беспроводной сети», выберите активную сеть и введите пароль.
-
10
Выясните тип NAT. Если тип NAT «открытый», перезапуск сети устранил неполадки. Если нет, перейдите к следующему разделу.
Реклама


-
1
Определите IP-адрес маршрутизатора. Чтобы изменить тип NAT на «открытый», перейдите на страницу конфигурации маршрутизатора. Ваши действия будут зависеть от операционной системы:
- в Windows откройте меню «Пуск», нажмите «Параметры» > «Сеть и интернет» > «Параметры сети» и найдите IP-адрес в строке «Основной шлюз».
- в Mac OS X откройте меню Apple, нажмите «Системные настройки» > «Сеть» > «Дополнительно» > «TCP/IP» и найдите IP-адрес в строке «Маршрутизатор».
-
2
Откройте веб-браузер. В нем можно открыть страницу конфигурации подключенного маршрутизатора.
-
3
Введите IP-адрес маршрутизатора. Сделайте это в адресной строке браузера, а затем нажмите клавишу ↵ Enter.
-
4
Введите имя пользователя и пароль, чтобы открыть страницу конфигурации маршрутизатора. Страницы конфигурации многих маршрутизаторов защищены основными именем пользователя и паролем (например, «admin» и «password»), которые можно найти в инструкции к маршрутизатору.
- Если вы изменили основные учетные данные и не помните их, перезапустите сеть.
- Если вам не было предложено ввести имя пользователя и пароль, вы сразу перейдете на страницу конфигурации маршрутизатора.
-
5
Найдите настройки UPnP. Имейте в виду, что интерфейс страницы конфигурации зависит от модели маршрутизатора.
- «UPnP» означает «Universal Plug and Play», поэтому ищите одноименный раздел.
- Настройки UPnP чаще всего находятся в разделе «Advanced» (Дополнительно).
-
6
Найдите опцию «UPnP». Она позволяет подключенным устройствам автоматически открывать порты, необходимые для подключения к интернету.
-
7
Активируйте UPnP. Для этого установите флажок или нажмите на ползунок, а затем щелкните по «Save» (Сохранить) или «Apply» (Применить).
-
8
Перезагрузите Xbox. Просто нажмите на кнопку питания Xbox, подождите, пока консоль выключится, а затем снова включите ее.
-
9
Выясните тип NAT. Если тип NAT «открытый», у вас не будет проблем с подключением к Xbox LIVE.
- Если тип NAT все еще «строгий» или «умеренный», перейдите к следующему разделу.
Реклама


-
1
Откройте страницу конфигурации маршрутизатора. Для этого выполните действия, описанные в начале предыдущего раздела.
-
2
Добавьте IP-адрес Xbox One в список «Reserved» (Зарезервировано). Как и в случае включения UPnP, этот процесс зависит от модели маршрутизатора. Как правило, нужно открыть список подключенных устройств, выбрать имя своей Xbox One и нажать «Reserve» (Зарезервировать).
- Список может называться «Static IP» (Статический IP-адрес).
-
3
Перезагрузите консоль. Когда она снова появится в сети, назначьте ей статический IP-адрес.
-
4
Нажмите кнопку «Guide». Она помечена логотипом Xbox и находится в центре контроллера. В левой части экрана телевизора откроется боковая панель.
-
5
Прокрутите вниз, выберите «Настройки»
, а затем нажмите A. Откроется меню.
-
6
Выберите Все настройки, а затем нажмите A. Эта опция находится в меню. Откроется меню «Настройки».
-
7
Перейдите на вкладку Сеть и выберите Параметры сети, а затем нажмите A. Откроются сетевые настройки Xbox One.
-
8
Выберите Дополнительные настройки и нажмите A. Эта опция находится в левой части страницы.
-
9
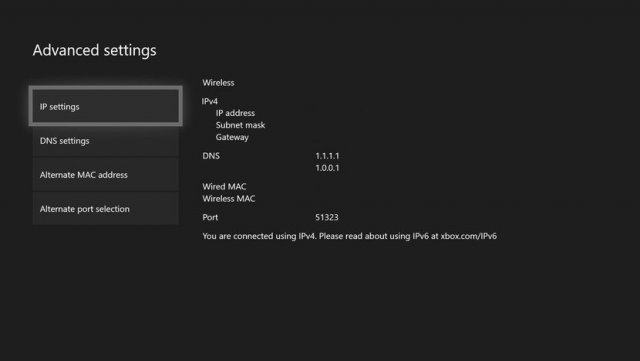
Обратите внимание на информацию об IP-адресе. Запишите цифры, которые найдете в следующих строках:
- «IP-адрес»;
- «Маска подсети»;
- «Шлюз»;
- «DNS».
-
10
Выберите Параметры IP и нажмите A. Эта опция находится в левой части страницы. Откроются настройки IP-адреса.
-
11
Введите IP-адрес, а затем нажмите ☰. Отобразится текущий IP-адрес.
-
12
Введите адрес маски подсети, а затем нажмите ☰. Обычно, это 255.255.255.0 или что-то подобное. [1]
-
13
Введите адрес шлюза, а затем нажмите ☰. Как правило, адрес шлюза похож на IP-адрес.
-
14
Дважды введите IP-адрес. Введите IP-адрес и нажмите ☰, а затем еще раз введите IP-адрес и нажмите ☰. Вы перейдете на страницу дополнительных настроек.
-
15
Выберите Параметры DNS, а затем нажмите A. Вы найдете эту опцию в левой части страницы.
-
16
Дважды введите DNS-адрес. Введите DNS-адрес и нажмите ☰, а затем еще раз введите DNS-адрес и нажмите ☰.
-
17
Нажмите B. Изменения будут сохранены, а интернет-соединение протестировано. Если вы правильно ввели все цифры, Xbox One останется подключенной к интернету.
-
18
Выясните тип NAT. Если тип NAT «открытый», назначение статического IP-адреса устранило неполадки.
- Если тип NAT все еще «строгий» или «умеренный», перейдите к следующему разделу.
Реклама


-
1
Откройте страницу конфигурации маршрутизатора. Это необходимо, чтобы вручную настроить переадресацию портов. Чтобы открыть указанную страницу, выполните действия, описанные в начале раздела Как включить UPnP.
-
2
Найдите раздел «Advanced» (Дополнительно). В этом разделе находятся настройки переадресации портов. Он может называться «Advanced Setup» (Дополнительные настройки) или аналогичным образом.
- Чтобы получить дополнительную информацию о переадресации портов, прочитайте эту статью.
-
3
Перейдите в раздел «Port Forwarding» (Переадресация портов). Если вам не удается найти его, введите в поисковую систему модель своего маршрутизатора, чтобы получить точные инструкции.
-
4
Откройте необходимые порты. Откройте следующие порты, чтобы Xbox One подключилась к Xbox LIVE:
- 53 (TCP/UDP)
- 80 (TCP)
- 88 (UDP)
- 500 (UDP)
- 1863 (TCP/UDP)
- 3074 (TCP/UDP)
- 3075 (TCP/UDP)
- 3544 (UDP)
- 4500 (UDP)
- 16000 (TCP/UDP)
- Используйте тот же статический IP-адрес, который вы назначили консоли в предыдущем разделе.
-
5
Перезагрузите Xbox. Когда вы настроите переадресацию портов, перезапустите Xbox, чтобы консоль подчинялась новому правилу переадресации портов.
-
6
Выясните тип NAT. Если тип NAT «открытый», вы подключитесь к Xbox LIVE.
-
7
Свяжитесь со своим интернет-провайдером, если все еще испытываете проблемы с подключением. Настройки интернет-соединения, выполненные провайдером, могут вызвать проблемы с NAT. Если вышеописанные методы не работают, позвоните в службу технической поддержки своего провайдера.
Реклама


Советы
- Рекомендуем назначить консоли статический IP-адрес, чтобы уменьшить помехи от других устройств и, таким образом, улучшить игровой процесс.
Реклама
Предупреждения
- Ввод неправильного IP-адреса (или любого другого значения, например, маски подсети) приведет к сетевой ошибке.
Реклама
Об этой статье
Эту страницу просматривали 65 138 раз.
Была ли эта статья полезной?
![]()
Download Article
![]()
Download Article
This wikiHow teaches you how to reset the Network Address Translation (NAT) type for your Xbox One. While you usually want your NAT type—which dictates your console’s connection to other consoles—to be set to «Open», certain aspects of your network can cause your console’s NAT type to be set to «Moderate» or «Strict», which can lead to connection problems.
-
1
Turn on your TV, Xbox One, and controller. Press and hold the «Guide» button on your connected controller.
- You can also press the power button on the front of your Xbox One to turn on the console, though you’ll still have to turn on your controller.
-
2
Press your controller’s «Guide» button. It resembles an Xbox logo in the middle of your controller. Doing so opens a sidebar on the left side of your TV’s screen.
Advertisement
-
3
Scroll down to select Settings
, then press A. This will open an additional sidebar.
-
4
Select All settings, then press A. It’s at the top of the sidebar. Doing this opens the Settings page.
-
5
Scroll down to the Network tab and select Network settings, then press A. The Network Settings page will open.
-
6
Check the NAT type. Look at the word to the right of the «NAT Type» field. If this word is «Strict» or «Moderate», you can continue to the next part of this article.
- If the word here is «Open», your Xbox LIVE issues are unrelated to the NAT type. Consider calling your Internet service provider or troubleshooting your network yourself.


Advertisement
-
1
Unplug the Ethernet cable connecting your router to your modem. Simply remove the Ethernet cable from the back of the router.
- If your router and modem are combined, skip this step.
-
2
Locate the router’s «Reset» button. You’ll typically find this button on the back or the bottom of the router.
- The «Reset» button is very small.
-
3
Restart your router. Press and hold the «Reset» button with a paperclip (or a similar object) for thirty seconds.
-
4
Release the button after thirty seconds. Your router will begin rebooting; you may see flashing lights appear on the router during this process.
-
5
Wait for the router to finish turning back on. Once the router is on, there should be a consistent light (no flashing) on the router.
-
6
Plug the router back into the modem. Just reconnect the Ethernet cable to the back of the router.
- Again, skip this step if your router is combined with the modem.
-
7
Look for the router’s stock password. It will be located on the bottom or back of the router, typically next to a «password» or «network/security key» line of text. You’ll need this to reconnect your Xbox to the Internet.
-
8
Open the Xbox Guide. Press the «Guide» button on your Xbox’s controller.
-
9
Connect to your network. To do so:
- Open Settings, select Network, select Network settings, select Set up wireless network, select your current network, and enter the password when prompted.
-
10
Check your Xbox’s NAT type. If it now reads «Open», resetting the network solved your problem. If not, continue to the next part.


Advertisement
-
1
Determine your router’s IP address. In order to make the changes necessary to open the NAT on your Xbox, you’ll need to open the router’s configuration page. The steps to do so will vary based on your operating system:
- Windows — Open Start, click the Settings gear, click Network & Internet, click View your network properties, and look for the «Default gateway» number.
- Mac — Open the Apple menu, click System Preferences, click Network, click Advanced, click TCP/IP, and look for the «Router:» number.
-
2
Open a web browser. Nearly all routers can be configured through the web browser of a connected computer.
-
3
Go to your router’s IP address. Type the router’s IP address into the browser’s address bar, then press the ↵ Enter key.
-
4
Enter your router’s username and password if prompted. Many routers have a default username and password (e.g., «admin» and «password») that you can find in the router’s manual.
- If you set a custom password and no longer remember it, you’ll have to reset the network.
- If you aren’t prompted for a username and password, you should be on the router’s configuration page.
-
5
Locate the UPnP settings. Each router has a different configuration page than other router models, so your steps will vary.
- «UPnP» stands for «Universal Plug and Play» which may be the name of the pertinent section.
- The UPnP settings are most often found in the «Advanced» section of the router’s page.
-
6
Open the UPnP section. This section allows connected devices to automatically open the ports necessary to connect to the internet.
-
7
Enable UPnP. You may do this by checking a box or clicking a button, then clicking Save or Apply.
-
8
Restart your Xbox. Simply press the Xbox’s power button, wait for the console to stop running, and then turn it back on.
-
9
Check your Xbox’s NAT type. If the NAT type reads «Open», you shouldn’t experience issues connecting to LIVE anymore.
- If you still see «Strict» or «Moderate» listed here, proceed to the next part.


Advertisement
-
1
Open your router’s configuration page. Reference the steps at the beginning of the last section to do so.
-
2
Add your Xbox One’s IP address to the «Reserved» list. As with enabling UPnP, this process will vary from router to router. Typically, you’ll click a list of currently-connected devices, select your Xbox One’s name, and click Reserve.
- The list might also be called the «Static IP» list.
-
3
Restart your console. Once it comes back online, you’ll need to assign the static IP address to it.
-
4
Press the «Guide» button. It’s the Xbox logo in the center of your controller. A sidebar will pop out on the left side of your TV’s screen.
-
5
Scroll down to select Settings
, then press A. This will open a pop-out menu.
-
6
Select All settings, then press A. It’s in the pop-out menu. The Settings menu will open.
-
7
Scroll down to the Network tab and select Network settings, then press A. This will open your Xbox One’s network settings.
-
8
Select Advanced settings and press A. It’s on the left side of the page.
-
9
Note the IP address information. Write down the numbers next to the following options:
- IP address
- Subnet mask
- Gateway
- DNS
-
10
Select IP settings and press A. It’s on the left side of the page. This will open your IP address settings.
-
11
Enter the «IP address» number, then press ☰. Doing so submits your current IP address.
-
12
Enter the «Subnet mask» number, then press ☰. This is usually 255.255.255.0 or something similar.[1]
-
13
Enter the «Gateway» number, then press ☰. The «Gateway» number is usually similar to your IP address.
-
14
Enter the «IP address» number twice. Type in the «IP address» number, press ☰, type the number in again, and press ☰ again. Doing so takes you back to the Advanced Settings page.
-
15
Select DNS settings, then press A. You’ll find this option on the left side of the page.
-
16
Enter the «DNS» number twice. Type in the «DNS» number, press ☰, then type the number in again and press ☰ again.
-
17
Press B. Doing so saves your changes and checks the network for connectivity. As long as you entered all of the numbers correctly, your Xbox One should remain connected to the Internet.
-
18
Review your NAT type. If you see «Open» here, setting a static IP for your Xbox One solved the problem.
- If you still see «Strict» or «Moderate», proceed to the next section.


Advertisement
-
1
Open your router’s configuration page. In order to manually forward ports, you’ll need to log into the administration tool for your router. See the «Enabling UPnP» section for details.
-
2
Open the «Advanced» section. The Port Forwarding page is located in the «Advanced» section of most routers. It may also be called Advanced Setup or a variety of other names.
- You may want to take some time to review port forwarding basics before continuing if you aren’t familiar with port forwarding.
-
3
Open the Port Forwarding section. If you are still having difficulty finding the Port Forwarding section of your router’s configuration tool, search for your router’s model online for exact instructions.
-
4
Open the necessary ports. Open the following ports to help your Xbox One connect to Xbox LIVE:
- 53 (TCP/UDP)
- 80 (TCP)
- 88 (UDP)
- 500 (UDP)
- 1863 (TCP/UDP)
- 3074 (TCP/UDP)
- 3075 (TCP/UDP)
- 3544 (UDP)
- 4500 (UDP)
- 16000 (TCP/UDP)
- You’ll need to use the same static IP address that you assigned to your console in the previous section.
-
5
Restart your Xbox. Once you’ve created the port forwarding rules, restart your Xbox so that it connects with the new port forwarding rules.
-
6
Check your Xbox’s NAT type. If it reads «Open», you’re good to go.
-
7
Contact your ISP if you are still having connection problems. Settings on your Internet service provider’s end may be causing your NAT problems. If the above methods don’t work, you can try calling your ISP’s technical support line.


Advertisement
Add New Question
-
Question
What if I’m in a dorm and can’t access the router/modem?

Try speaking with the IT Department, they may be able to adjust the settings for you.
-
Question
What if I do not have a computer, and just have an Xbox One? I already tried restarting everything and the NAT type is still moderate.
Use a phone. Phones can get on the router login page. You need to look up your router model and get the IP address and login info though.
-
Question
I can’t find the advanced settings, where are they?
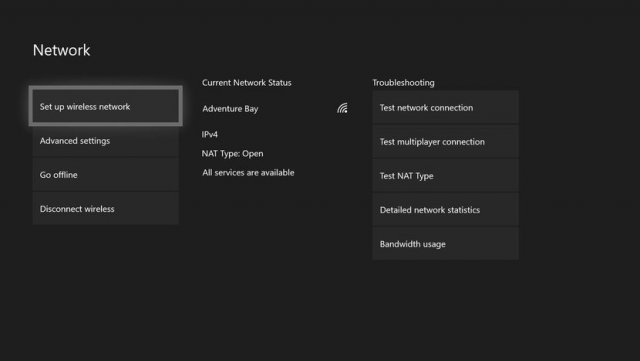
Once you go to «Network,» the first option will be «Set up wireless network.» Below you will find «Advanced settings.»
Ask a Question
200 characters left
Include your email address to get a message when this question is answered.
Submit
Advertisement
-
Setting a static IP address for your console is a generally good idea, since doing so will reduce interference from other devices and thus generally improve your online experience.
Thanks for submitting a tip for review!
Advertisement
-
Entering the wrong IP address (or any other value, such as the Subnet Mask) will result in a network error.
Advertisement
About This Article
Article SummaryX
1. Turn on your TV, Xbox One, and controller.
2. Press the Guide button.
3. Select the Settings gear.
4. Select All Settings.
5. Go to Network > Network Settings.
6. Select a NAT type.
Did this summary help you?
Thanks to all authors for creating a page that has been read 879,981 times.
Did this article help you?
![]()
Download Article
![]()
Download Article
This wikiHow teaches you how to reset the Network Address Translation (NAT) type for your Xbox One. While you usually want your NAT type—which dictates your console’s connection to other consoles—to be set to «Open», certain aspects of your network can cause your console’s NAT type to be set to «Moderate» or «Strict», which can lead to connection problems.
-
1
Turn on your TV, Xbox One, and controller. Press and hold the «Guide» button on your connected controller.
- You can also press the power button on the front of your Xbox One to turn on the console, though you’ll still have to turn on your controller.
-
2
Press your controller’s «Guide» button. It resembles an Xbox logo in the middle of your controller. Doing so opens a sidebar on the left side of your TV’s screen.
Advertisement
-
3
Scroll down to select Settings
, then press A. This will open an additional sidebar.
-
4
Select All settings, then press A. It’s at the top of the sidebar. Doing this opens the Settings page.
-
5
Scroll down to the Network tab and select Network settings, then press A. The Network Settings page will open.
-
6
Check the NAT type. Look at the word to the right of the «NAT Type» field. If this word is «Strict» or «Moderate», you can continue to the next part of this article.
- If the word here is «Open», your Xbox LIVE issues are unrelated to the NAT type. Consider calling your Internet service provider or troubleshooting your network yourself.
Advertisement
-
1
Unplug the Ethernet cable connecting your router to your modem. Simply remove the Ethernet cable from the back of the router.
- If your router and modem are combined, skip this step.
-
2
Locate the router’s «Reset» button. You’ll typically find this button on the back or the bottom of the router.
- The «Reset» button is very small.
-
3
Restart your router. Press and hold the «Reset» button with a paperclip (or a similar object) for thirty seconds.
-
4
Release the button after thirty seconds. Your router will begin rebooting; you may see flashing lights appear on the router during this process.
-
5
Wait for the router to finish turning back on. Once the router is on, there should be a consistent light (no flashing) on the router.
-
6
Plug the router back into the modem. Just reconnect the Ethernet cable to the back of the router.
- Again, skip this step if your router is combined with the modem.
-
7
Look for the router’s stock password. It will be located on the bottom or back of the router, typically next to a «password» or «network/security key» line of text. You’ll need this to reconnect your Xbox to the Internet.
-
8
Open the Xbox Guide. Press the «Guide» button on your Xbox’s controller.
-
9
Connect to your network. To do so:
- Open Settings, select Network, select Network settings, select Set up wireless network, select your current network, and enter the password when prompted.
-
10
Check your Xbox’s NAT type. If it now reads «Open», resetting the network solved your problem. If not, continue to the next part.
Advertisement
-
1
Determine your router’s IP address. In order to make the changes necessary to open the NAT on your Xbox, you’ll need to open the router’s configuration page. The steps to do so will vary based on your operating system:
- Windows — Open Start, click the Settings gear, click Network & Internet, click View your network properties, and look for the «Default gateway» number.
- Mac — Open the Apple menu, click System Preferences, click Network, click Advanced, click TCP/IP, and look for the «Router:» number.
-
2
Open a web browser. Nearly all routers can be configured through the web browser of a connected computer.
-
3
Go to your router’s IP address. Type the router’s IP address into the browser’s address bar, then press the ↵ Enter key.
-
4
Enter your router’s username and password if prompted. Many routers have a default username and password (e.g., «admin» and «password») that you can find in the router’s manual.
- If you set a custom password and no longer remember it, you’ll have to reset the network.
- If you aren’t prompted for a username and password, you should be on the router’s configuration page.
-
5
Locate the UPnP settings. Each router has a different configuration page than other router models, so your steps will vary.
- «UPnP» stands for «Universal Plug and Play» which may be the name of the pertinent section.
- The UPnP settings are most often found in the «Advanced» section of the router’s page.
-
6
Open the UPnP section. This section allows connected devices to automatically open the ports necessary to connect to the internet.
-
7
Enable UPnP. You may do this by checking a box or clicking a button, then clicking Save or Apply.
-
8
Restart your Xbox. Simply press the Xbox’s power button, wait for the console to stop running, and then turn it back on.
-
9
Check your Xbox’s NAT type. If the NAT type reads «Open», you shouldn’t experience issues connecting to LIVE anymore.
- If you still see «Strict» or «Moderate» listed here, proceed to the next part.
Advertisement
-
1
Open your router’s configuration page. Reference the steps at the beginning of the last section to do so.
-
2
Add your Xbox One’s IP address to the «Reserved» list. As with enabling UPnP, this process will vary from router to router. Typically, you’ll click a list of currently-connected devices, select your Xbox One’s name, and click Reserve.
- The list might also be called the «Static IP» list.
-
3
Restart your console. Once it comes back online, you’ll need to assign the static IP address to it.
-
4
Press the «Guide» button. It’s the Xbox logo in the center of your controller. A sidebar will pop out on the left side of your TV’s screen.
-
5
Scroll down to select Settings
, then press A. This will open a pop-out menu.
-
6
Select All settings, then press A. It’s in the pop-out menu. The Settings menu will open.
-
7
Scroll down to the Network tab and select Network settings, then press A. This will open your Xbox One’s network settings.
-
8
Select Advanced settings and press A. It’s on the left side of the page.
-
9
Note the IP address information. Write down the numbers next to the following options:
- IP address
- Subnet mask
- Gateway
- DNS
-
10
Select IP settings and press A. It’s on the left side of the page. This will open your IP address settings.
-
11
Enter the «IP address» number, then press ☰. Doing so submits your current IP address.
-
12
Enter the «Subnet mask» number, then press ☰. This is usually 255.255.255.0 or something similar.[1]
-
13
Enter the «Gateway» number, then press ☰. The «Gateway» number is usually similar to your IP address.
-
14
Enter the «IP address» number twice. Type in the «IP address» number, press ☰, type the number in again, and press ☰ again. Doing so takes you back to the Advanced Settings page.
-
15
Select DNS settings, then press A. You’ll find this option on the left side of the page.
-
16
Enter the «DNS» number twice. Type in the «DNS» number, press ☰, then type the number in again and press ☰ again.
-
17
Press B. Doing so saves your changes and checks the network for connectivity. As long as you entered all of the numbers correctly, your Xbox One should remain connected to the Internet.
-
18
Review your NAT type. If you see «Open» here, setting a static IP for your Xbox One solved the problem.
- If you still see «Strict» or «Moderate», proceed to the next section.
Advertisement
-
1
Open your router’s configuration page. In order to manually forward ports, you’ll need to log into the administration tool for your router. See the «Enabling UPnP» section for details.
-
2
Open the «Advanced» section. The Port Forwarding page is located in the «Advanced» section of most routers. It may also be called Advanced Setup or a variety of other names.
- You may want to take some time to review port forwarding basics before continuing if you aren’t familiar with port forwarding.
-
3
Open the Port Forwarding section. If you are still having difficulty finding the Port Forwarding section of your router’s configuration tool, search for your router’s model online for exact instructions.
-
4
Open the necessary ports. Open the following ports to help your Xbox One connect to Xbox LIVE:
- 53 (TCP/UDP)
- 80 (TCP)
- 88 (UDP)
- 500 (UDP)
- 1863 (TCP/UDP)
- 3074 (TCP/UDP)
- 3075 (TCP/UDP)
- 3544 (UDP)
- 4500 (UDP)
- 16000 (TCP/UDP)
- You’ll need to use the same static IP address that you assigned to your console in the previous section.
-
5
Restart your Xbox. Once you’ve created the port forwarding rules, restart your Xbox so that it connects with the new port forwarding rules.
-
6
Check your Xbox’s NAT type. If it reads «Open», you’re good to go.
-
7
Contact your ISP if you are still having connection problems. Settings on your Internet service provider’s end may be causing your NAT problems. If the above methods don’t work, you can try calling your ISP’s technical support line.
Advertisement
Add New Question
-
Question
What if I’m in a dorm and can’t access the router/modem?
Try speaking with the IT Department, they may be able to adjust the settings for you.
-
Question
What if I do not have a computer, and just have an Xbox One? I already tried restarting everything and the NAT type is still moderate.
Use a phone. Phones can get on the router login page. You need to look up your router model and get the IP address and login info though.
-
Question
I can’t find the advanced settings, where are they?
Once you go to «Network,» the first option will be «Set up wireless network.» Below you will find «Advanced settings.»
Ask a Question
200 characters left
Include your email address to get a message when this question is answered.
Submit
Advertisement
-
Setting a static IP address for your console is a generally good idea, since doing so will reduce interference from other devices and thus generally improve your online experience.
Thanks for submitting a tip for review!
Advertisement
-
Entering the wrong IP address (or any other value, such as the Subnet Mask) will result in a network error.
Advertisement
About This Article
Article SummaryX
1. Turn on your TV, Xbox One, and controller.
2. Press the Guide button.
3. Select the Settings gear.
4. Select All Settings.
5. Go to Network > Network Settings.
6. Select a NAT type.
Did this summary help you?
Thanks to all authors for creating a page that has been read 879,981 times.
Did this article help you?
Сетевая трансляция адресов (NAT) играет огромную роль в процессе подключения к многопользовательским играм на Xbox One. Здесь принимается решение, как обрабатывается входящий трафик. Для геймеров NAT может играть огромную роль при выборе, с кем они могут играть, устанавливая барьер между игроками. С помощью проброса портов можно быстро изменить тип NAT.
Зачем нужен Open NAT на Xbox One

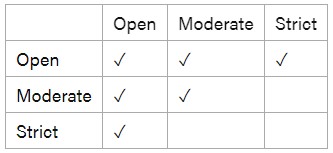
При подключении к Xbox Live для доступа к сетевым играм вы можете увидеть типы NAT. Это отображает вашу совместимость с другими игроками. Ограничительные типы NAT могут привести к проблемам с подключением к многопользовательским играм. Увидеть влияние NAT на связь можно благодаря Xbox Support. Здесь показывается совместимость между разными типами NAT и почему Open NAT является лучшим выбором.
Пользователи с Open NAT обычно имеют лучшее подключение к Xbox Live. Однако, многие пользователи испытывают затруднения с открытием NAT. Обычным решением являются проброс портов, чтобы игровой трафик попадал непосредственно на вашу консоль.
Что такое проброс портов
Порты представляет собой цифровые каналы маршрутизатора, которые сортируют входящий и исходящий интернет-трафик. Проброс портов делает консоль более доступной из интернета, позволяет трафику попадать на неё. Используя созданные пользователем правила для проброса определённых портов, можно значительно улучшить связь. Что ещё важнее, проброс портов можно настраивать для каждого сервиса или игры, улучшая связь для разных ситуаций.
В общем, проброс портов зачастую может решить многие связанные с задержками в играх проблемы.
Как сделать проброс портов на Xbox One
Чтобы выжать максимум из сервиса их Xbox Live, нужно выполнить проброс определённых рекомендуемых Microsoft портов. Эти порты используются Xbox One и обеспечивают попадание на консоль входящего трафика Xbox Live. Указанные ниже шаги позволят выполнить проброс портов, хотя могут быть отличия в зависимости от модели маршрутизатора.
- Откройте приложение Параметры на Xbox One.
- Выберите вкладку Сеть.
- Выберите Расширенные настройки.
- Обратите внимание на IP-адрес консоли. Он потребуется позднее при пробросе портов.
- Также обратите внимание на MAC-адрес.
- Откройте страницу для ввода логина маршрутизатор. Чтобы узнать как, выполните поиск в интернете для вашей модели маршрутизатора.
- Войдите в настройки маршрутизатора при помощи логина и пароля.
- Вручную присвойте адреса Xbox One, которые вы увидели выше. Конкретный процесс присвоения адреса может зависеть от модели маршрутизатора.
- Откройте приложение Параметры на Xbox One.
- Откройте вкладку Сеть.
- Нажмите плитку Проверить сетевое соединение.
- Следующее за указаниями на экране и убедитесь в подключении Xbox One к вашей сети.
- Открыть инструменты проброса портов на маршрутизаторе.
- Откройте следующие порты:
UDP: 88, 500, 3544, 4500
TCP & UDP: 3074 - Откройте приложение Параметры на Xbox One.
- Откройте вкладку Сеть.
- Нажмите на плитку Проверить тип NAT. Теперь здесь должен быть Open NAT.
Если будут проблемы, убедитесь в правильности IP и MAC-адресов и правильном выборе портов и протоколов.