При загрузке торрента появляется ошибка «Не смонтирован предшествующий том (former volume not mounted)»
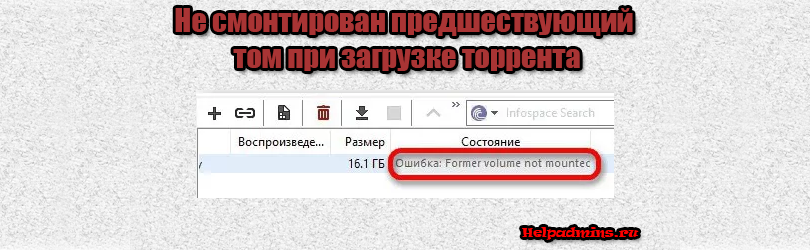
Ошибка в торренте “Не смонтирован предшествующий том”
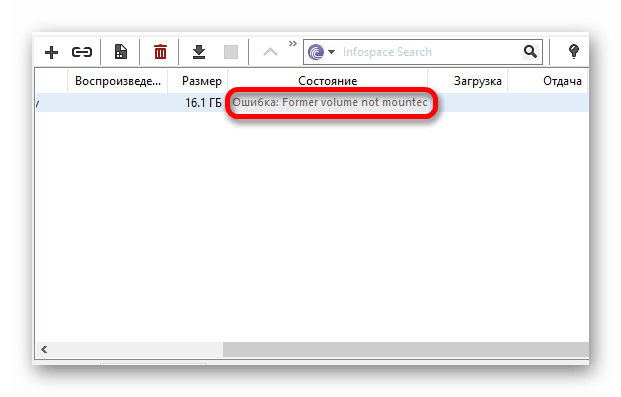
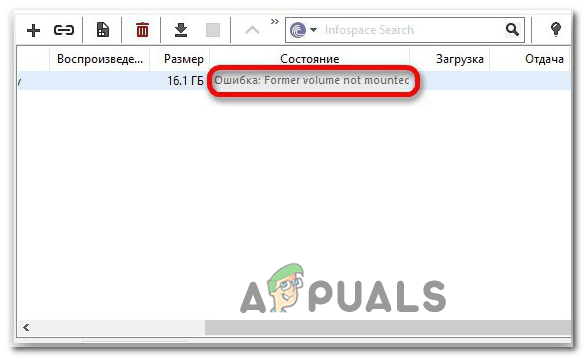
Иногда пользователи программы Utorrent сталкиваются с проблемой закачки того или иного торрента. Вместо привычного отображения шкалы загрузки отображается ошибка “Не смонтирован предшествующий том” (в английской версии программы “former volume not mounted”) и загрузка естественно не идет.
В данной статье мы разберемся о причинах появления данной ошибки, а также о методе ее устранения.
Почему появляется ошибка?
Наиболее частой причиной является недоступность того места, в которое вы назначили загрузку проблемного торрента. Если в пути сохранения вы указали съемный диск или флешку, и затем доступ к ним пропал по причине отключения или изменения буквы этого диска, то в торренте появится известная ошибка “Не смонтирован предшествующий том”.
Переименование или удаление каталога, в который осуществляется загрузка также приведет к данной ошибке.
Как устранить?
Решается данная проблема довольно просто. Для начала нужно поставить на паузу проблемный торрент.
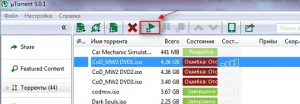
Остановка проблемного торрента
Затем, в случае использования сменного носителя нужно проверить надежность его подключения. После этого пробуйте возобновлять загрузку.
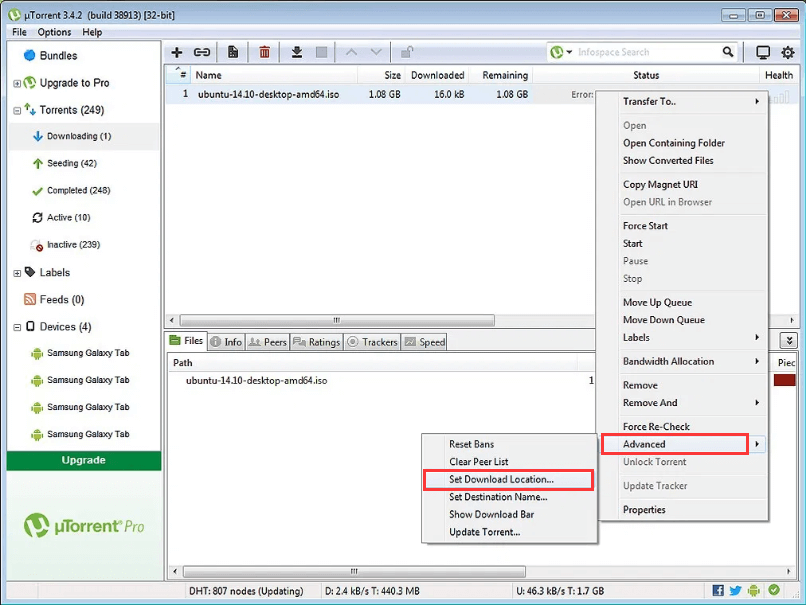
Если таким образом проблема не решилась, то снова ставим на паузу торрент с ошибкой “Не смонтирован предшествующий том”, жмем по нему правой кнопкой мыши и выбираем “Дополнительно” -> “Загружать в”.
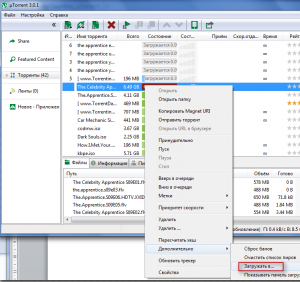
Задаем новый путь торренту
В открывшемся окне выберите любую доступную на вашем компьютере папку, например на диске D или E и жмите “Выбор папки” (“Сохранить”).
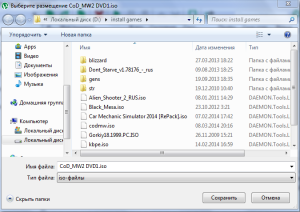
Выбор нового места размещения загружаемого торрента
После этого снова запускаете загрузку и ошибка “Не смонтирован предшествующий том” (former volume not mounted) должна исчезнуть.
Лучшая благодарность автору — репост к себе на страничку:
Plenty of users has reported the former volume not mounted error and are seeking for feasible solutions on the forum. If you are one of them, don’t worry. In this article, MiniTool Partition Wizard lists 6 possible solutions from users and you can feel free to have a try.
About uTorrent Error Former Volume Not Mounted
The former volume not mounted is an error that may occur in uTorrent. The volume refers to a storage device like a disk drive or USB flash drive. A volume is mounted when it is assigned a place in the file system of the computer so that it can be referred to at that path.
The problem has been reported by a number of users, and it might also occur on other popular torrent clients like BitTorrent and Vuze. You may learn about the details of the uTorrent error former volume not mounted from the following post:
Normally I keep all my uTorrent downloads stored in an external hard drive. I plug the drive into my PC after my PC has booted up. Today I went through the usual procedure but also added a USB stick with a view to copying some files from the external disk to the stick. Before doing this, I opened uTorrent with a view to rename one or two files, but every file had turned from green to brown with the message “Error former volume not mounted”.
I’m convinced that the introduction of the USB stick had something to do with this, but the question is, is there a way to get the files seeding and downloading again? — From uTorrent forum
Commonly, the frustrating problem occurs when users are using an external storage device and it prevents them from reading or downloading torrents normally. There are several potential factors that may lead to the former volume not mounted error in your torrent client. Some of them are listed below:
- There are some issues with the drive letter. One of your torrents or download paths probably uses a drive letter that no longer exists, or the external drive is assigned with another drive letter different from that your torrent client expects.
- The torrent is partially corrupted. If the downloading process of the torrent is interrupted unexpectedly, the data might be corrupted and your torrent client may refuse to resume download, giving the former volume not mounted error message.
- The resume.dat file contains certain conflicting data. It is possible that the resume.dat file of uTorrent contains certain incorrect instance, and this may also trigger the problem under our discussion.
After learning about the error in detail, it’s time to fix it. In the following contents, you will learn about 6 possible methods to fix uTorrent former volume not mounted error. Let’s check them out one by one.
6 Methods to Fix Former Volume Not Mounted Error
- Reconnect the problematic drive
- Set another download location for the problematic torrent
- Match the drive letter to the one allocated by the computer
- Change drive letter
- Re-check your torrents
- Modify the resume.dat file
Fix 1: Reconnect the Problematic Drive
As mentioned before, the problem is typically caused by the external drive like a USB drive being used as the storage directory of your downloaded torrents.
If you are using such a drive and frequently disconnect it from your computer, it is possible that its drive letter allocated by the computer changes and thus your uTorrent cannot recognize the drive. Besides, if the drive is not properly connected, you could also encounter the former volume not mounted error.
Therefore, you had better disconnect the problematic drive and then properly reconnect it to your computer. This will force your operating system to reassign a drive letter to the external drive and may fix the problem automatically.
Fix 2: Set Another Download Location for the Problematic Torrent
In some cases, this problem just happens to one specific torrent which is referencing a download path that no longer exists. According to the reports, this commonly occurs when you perform downloads on a removable drive but then decide to remove it while the file is downloading or seeding.
If you are in the same situation, perhaps you can try setting another download location for the problematic torrent to fix the issue. Here’s a simple guide for you.
Step 1: If the torrent is still under download, the first thing you need to do is stopping the current download to prevent your uTorrent from accessing or updating the file. Just right-click the torrent and choose Stop.
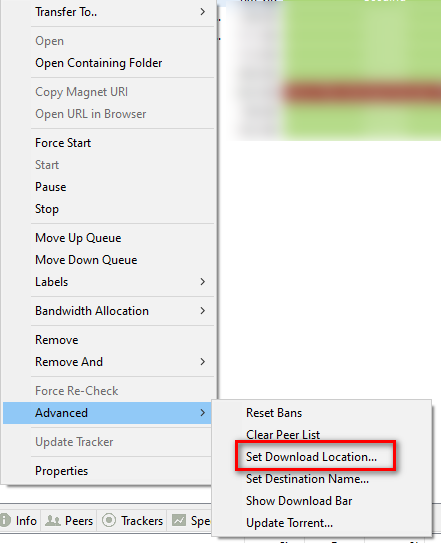
Step 2: Right-click the problematic torrent again and choose Advanced > Set Download Location.
Step 3: In the pop-up dialog, choose a new valid location you want to store the torrent file and click the Select Folder button.
After that, restart your torrent client and check if you can download the torrent without the former volume not mounted error.
Fix 3: Match the Drive Letter to the One Allocated by the Computer
When you reconnect the external hard drive to your computer, the operating system can still recognize it by allotting a drive letter which might be different from the one previously allotted. However, the uTorrent might remember the previous drive letter (or the path) and it gets confused once the drive letter or mount point alters, which might lead to former volume not mounted error message.
In this case, you can change the directories for your torrents to match the drive letter to the one allocated by your computer. To do that, you should:
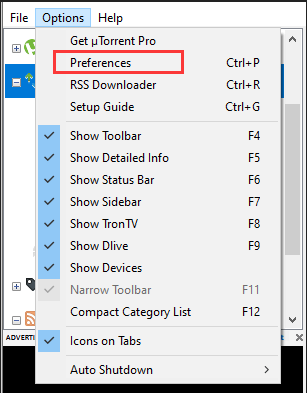
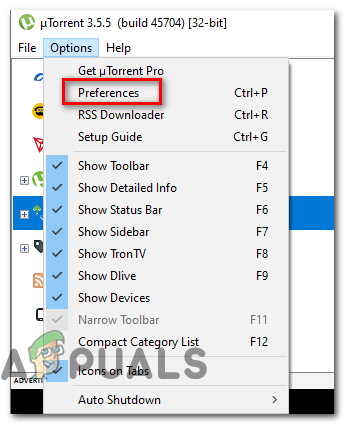
Step 1: Keep your uTorrent open and click Options from the upper ribbon bar.
Step 2: Click Preferences from the drop-down menu. You can also press Ctrl + P keys in the main interface to directly open the desired window.
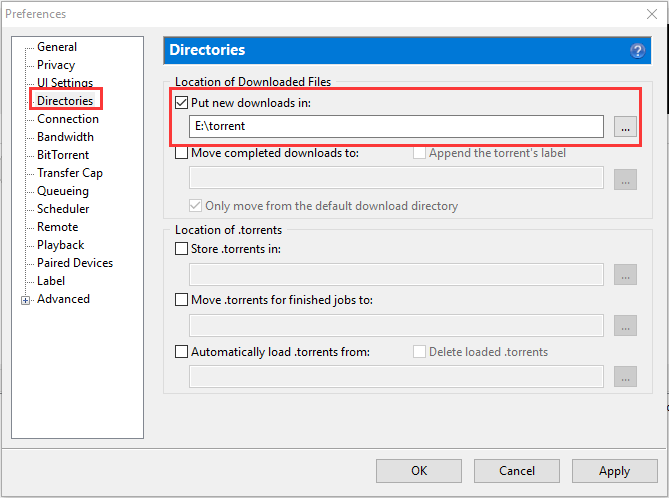
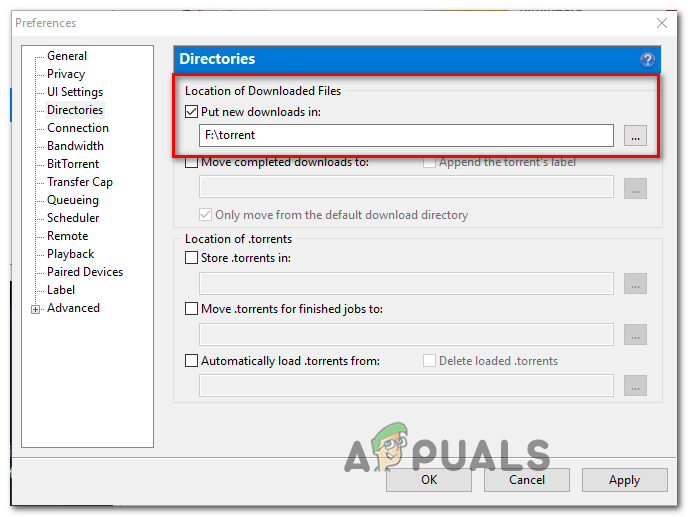
Step 3: In the left side of the Preferences window, click Directories, and then check Put new downloads in from the right pane. Here, check if the drive letter matches the current configuration. You should also make sure the drive letters of other involved locations are matched correctly.
Step 4: Click Apply and OK to save the changes you have made.
Now, you can restart your uTorrent and check if the problem is resolved. If you are still stuck with the former volume not mounted error, just move on to the next solution.
Fix 4: Change Drive Letter
If you find it troublesome to change the download location for each of affected torrents or you don’t want to make any changes for your torrent client, you can directly change the drive letter of the external drive to the one your uTorrent expects.
Here are 3 ways for you to change drive letter, and you can choose any one to complete the operation. But before that, you need to check the error message and hover your mouse over the error to see the drive letter that your uTorrent expects.
#1. Via Disk Management
Disk Management is a built-in utility in Windows computer which can help users to manage the connected disks and partitions with ease. To change the drive letter for your external storage device, just follow the steps below.
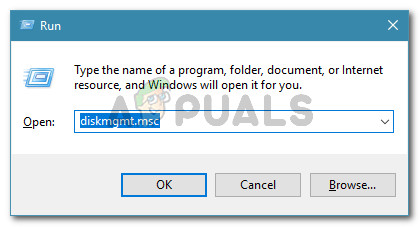
Step 1: Press Windows + R to bring up the Run window.
Step 2: Input diskmgmt.msc in the empty box and click OK to open Disk Management.
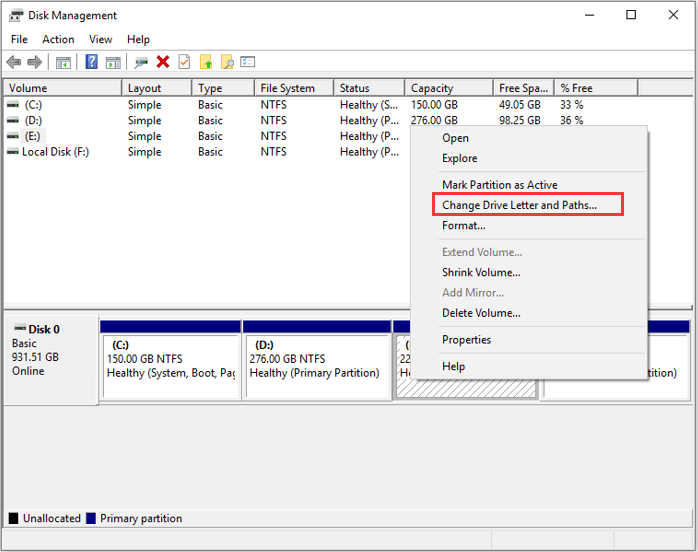
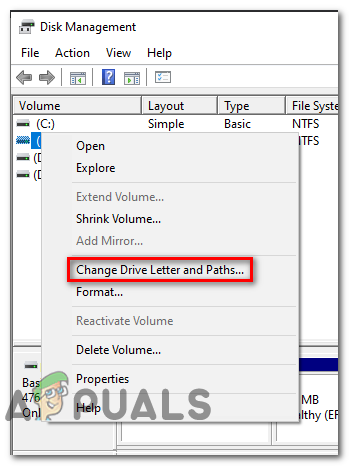
Step 3: Right-click the target drive and choose Change Drive Letter and Paths from the context menu.
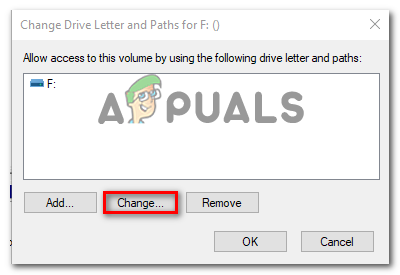
Step 4: In the pop-up window, click Change button. Then, check Assign the following drive letter options, choose the drive letter that your torrent client expects from the drop-down menu, and click OK button to save changes.
#2. Via Diskpart
If Disk Management is not loading or runs into certain problems on your computer, you can use the diskpart tool alternatively. Diskpart is a separate suite of commands that runs in the Command Prompt and helps you manage your computer’s drives. Here’s how to change drive letter via diskpart.
Step 1: Invoke Run window, input cmd, and click OK to open Command Prompt.
Step 2: Type diskpart in the command console and press Enter.
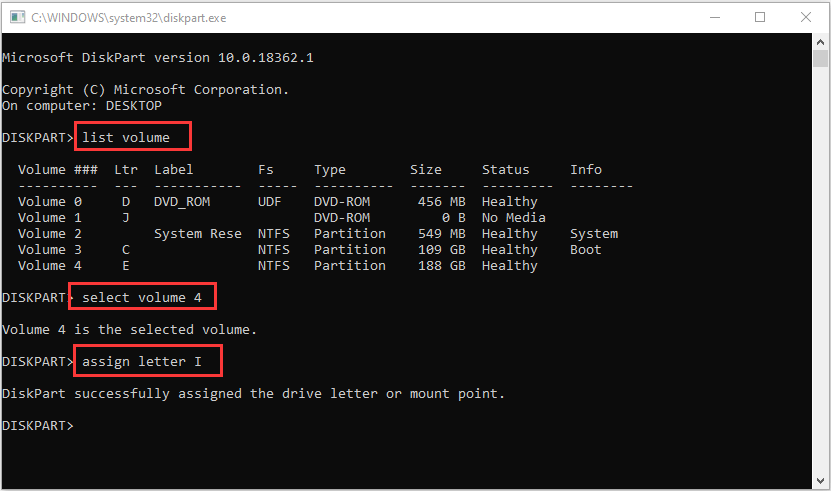
Step 3: Input the following commands one by one and press Enter key after each.
- list volume
- select volume * (* refers to the volume number of the target partition which can be figured out by the drive letter)
- assign letter I (replace I with the desired drive letter of your torrent client)
#3. Via Third-party Software
For users who are not so familiar with Windows built-in tools, using a professional third-party program is always a great choice. Here, MiniTool Partition Wizard is recommended for you. It can help you manage partitions and disks, restore lost data, and back up your computer easily. Here’s a simple guide on how to change drive letter using this assistant.
Step 1: Click the following button to download MiniTool Partition Wizard and install it on your computer.
Free Download
Step 2: When you get the main interface, right-click the target drive and choose Change Letter from the pop-up menu. You can also choose Change Drive Letter from the left pane after selecting the drive.
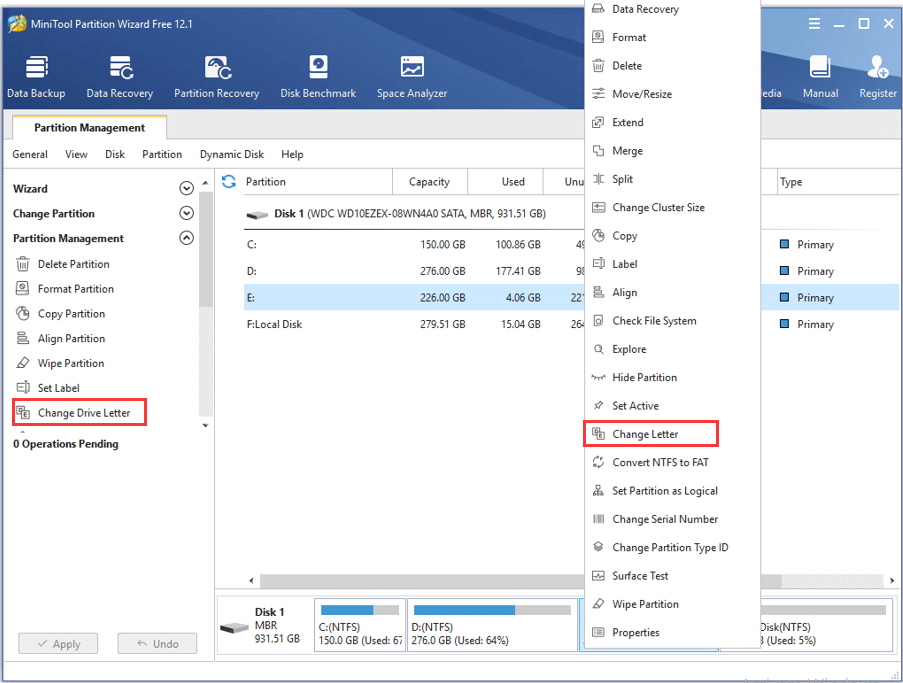
Step 3: Choose the desired drive letter from the list of New Drive Letter and click OK button.
Step 4: Click Apply button to execute the pending operation.
Fix 5: Re-Check Your Torrents
Almost all the torrent clients provide a force re-check feature that helps to troubleshoot the potential problems with the torrents. If the above methods fail to fix the problem for you, you can try this feature.
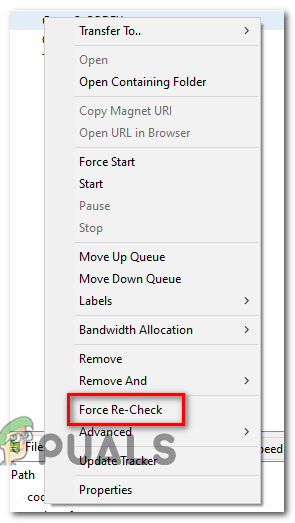
Just right-click the problematic torrent and choose Force Re-Check from the drop-down menu. After the re-check process is completed, restart your computer and see if the uTorrent former volume not mounted error is resolved.
Fix 6: Modify the Resume.dat File
Finally, you can choose to modify the resume.dat file of your uTorrent to replace the previous path that has changed due to the reconnection of the external drive. This is more complicated than the above solutions, but you can make use of a powerful text editor like Notepad++. Here’s what you need to do.
Step 1: Invoke Run window, input %AppData%uTorrent and click OK to open the uTorrent folder in File Explorer.
Step 2: Find the resume.dat file and make a backup for it in another location. Open your downloaded Notepad++ and drag the resume.dat file into the console to open it.
Step 3: Click Search tab in the ribbon bar and choose Replace. Input the incorrect path in the Find what box, input the correct one in the Replace with box, and click Replace All button.
Note: You have to keep the exact length of the path, which means that you can only change the drive letter in the path.
Once it’s done, save that file and then restart your computer. Now, the uTorrent error former volume not mounted should be removed.
How to resolve uTorrent former volume not mounted error? Here are 6 solutions for you.Click to Tweet
Bottom Line
This article has introduced 6 possible solutions to the former volume not mounted error in torrent client. If you have any better workarounds, you can share them with us by posting them in the following comment zone. We will keep improving this article.
As for any problems while using MiniTool software, you can contact us via [email protected].
Plenty of users has reported the former volume not mounted error and are seeking for feasible solutions on the forum. If you are one of them, don’t worry. In this article, MiniTool Partition Wizard lists 6 possible solutions from users and you can feel free to have a try.
About uTorrent Error Former Volume Not Mounted
The former volume not mounted is an error that may occur in uTorrent. The volume refers to a storage device like a disk drive or USB flash drive. A volume is mounted when it is assigned a place in the file system of the computer so that it can be referred to at that path.
The problem has been reported by a number of users, and it might also occur on other popular torrent clients like BitTorrent and Vuze. You may learn about the details of the uTorrent error former volume not mounted from the following post:
Normally I keep all my uTorrent downloads stored in an external hard drive. I plug the drive into my PC after my PC has booted up. Today I went through the usual procedure but also added a USB stick with a view to copying some files from the external disk to the stick. Before doing this, I opened uTorrent with a view to rename one or two files, but every file had turned from green to brown with the message “Error former volume not mounted”.
I’m convinced that the introduction of the USB stick had something to do with this, but the question is, is there a way to get the files seeding and downloading again? — From uTorrent forum
Commonly, the frustrating problem occurs when users are using an external storage device and it prevents them from reading or downloading torrents normally. There are several potential factors that may lead to the former volume not mounted error in your torrent client. Some of them are listed below:
- There are some issues with the drive letter. One of your torrents or download paths probably uses a drive letter that no longer exists, or the external drive is assigned with another drive letter different from that your torrent client expects.
- The torrent is partially corrupted. If the downloading process of the torrent is interrupted unexpectedly, the data might be corrupted and your torrent client may refuse to resume download, giving the former volume not mounted error message.
- The resume.dat file contains certain conflicting data. It is possible that the resume.dat file of uTorrent contains certain incorrect instance, and this may also trigger the problem under our discussion.
After learning about the error in detail, it’s time to fix it. In the following contents, you will learn about 6 possible methods to fix uTorrent former volume not mounted error. Let’s check them out one by one.
6 Methods to Fix Former Volume Not Mounted Error
- Reconnect the problematic drive
- Set another download location for the problematic torrent
- Match the drive letter to the one allocated by the computer
- Change drive letter
- Re-check your torrents
- Modify the resume.dat file
Fix 1: Reconnect the Problematic Drive
As mentioned before, the problem is typically caused by the external drive like a USB drive being used as the storage directory of your downloaded torrents.
If you are using such a drive and frequently disconnect it from your computer, it is possible that its drive letter allocated by the computer changes and thus your uTorrent cannot recognize the drive. Besides, if the drive is not properly connected, you could also encounter the former volume not mounted error.
Therefore, you had better disconnect the problematic drive and then properly reconnect it to your computer. This will force your operating system to reassign a drive letter to the external drive and may fix the problem automatically.
Fix 2: Set Another Download Location for the Problematic Torrent
In some cases, this problem just happens to one specific torrent which is referencing a download path that no longer exists. According to the reports, this commonly occurs when you perform downloads on a removable drive but then decide to remove it while the file is downloading or seeding.
If you are in the same situation, perhaps you can try setting another download location for the problematic torrent to fix the issue. Here’s a simple guide for you.
Step 1: If the torrent is still under download, the first thing you need to do is stopping the current download to prevent your uTorrent from accessing or updating the file. Just right-click the torrent and choose Stop.
Step 2: Right-click the problematic torrent again and choose Advanced > Set Download Location.
Step 3: In the pop-up dialog, choose a new valid location you want to store the torrent file and click the Select Folder button.
After that, restart your torrent client and check if you can download the torrent without the former volume not mounted error.
Fix 3: Match the Drive Letter to the One Allocated by the Computer
When you reconnect the external hard drive to your computer, the operating system can still recognize it by allotting a drive letter which might be different from the one previously allotted. However, the uTorrent might remember the previous drive letter (or the path) and it gets confused once the drive letter or mount point alters, which might lead to former volume not mounted error message.
In this case, you can change the directories for your torrents to match the drive letter to the one allocated by your computer. To do that, you should:
Step 1: Keep your uTorrent open and click Options from the upper ribbon bar.
Step 2: Click Preferences from the drop-down menu. You can also press Ctrl + P keys in the main interface to directly open the desired window.
Step 3: In the left side of the Preferences window, click Directories, and then check Put new downloads in from the right pane. Here, check if the drive letter matches the current configuration. You should also make sure the drive letters of other involved locations are matched correctly.
Step 4: Click Apply and OK to save the changes you have made.
Now, you can restart your uTorrent and check if the problem is resolved. If you are still stuck with the former volume not mounted error, just move on to the next solution.
Fix 4: Change Drive Letter
If you find it troublesome to change the download location for each of affected torrents or you don’t want to make any changes for your torrent client, you can directly change the drive letter of the external drive to the one your uTorrent expects.
Here are 3 ways for you to change drive letter, and you can choose any one to complete the operation. But before that, you need to check the error message and hover your mouse over the error to see the drive letter that your uTorrent expects.
#1. Via Disk Management
Disk Management is a built-in utility in Windows computer which can help users to manage the connected disks and partitions with ease. To change the drive letter for your external storage device, just follow the steps below.
Step 1: Press Windows + R to bring up the Run window.
Step 2: Input diskmgmt.msc in the empty box and click OK to open Disk Management.
Step 3: Right-click the target drive and choose Change Drive Letter and Paths from the context menu.
Step 4: In the pop-up window, click Change button. Then, check Assign the following drive letter options, choose the drive letter that your torrent client expects from the drop-down menu, and click OK button to save changes.
#2. Via Diskpart
If Disk Management is not loading or runs into certain problems on your computer, you can use the diskpart tool alternatively. Diskpart is a separate suite of commands that runs in the Command Prompt and helps you manage your computer’s drives. Here’s how to change drive letter via diskpart.
Step 1: Invoke Run window, input cmd, and click OK to open Command Prompt.
Step 2: Type diskpart in the command console and press Enter.
Step 3: Input the following commands one by one and press Enter key after each.
- list volume
- select volume * (* refers to the volume number of the target partition which can be figured out by the drive letter)
- assign letter I (replace I with the desired drive letter of your torrent client)
#3. Via Third-party Software
For users who are not so familiar with Windows built-in tools, using a professional third-party program is always a great choice. Here, MiniTool Partition Wizard is recommended for you. It can help you manage partitions and disks, restore lost data, and back up your computer easily. Here’s a simple guide on how to change drive letter using this assistant.
Step 1: Click the following button to download MiniTool Partition Wizard and install it on your computer.
Free Download
Step 2: When you get the main interface, right-click the target drive and choose Change Letter from the pop-up menu. You can also choose Change Drive Letter from the left pane after selecting the drive.
Step 3: Choose the desired drive letter from the list of New Drive Letter and click OK button.
Step 4: Click Apply button to execute the pending operation.
Fix 5: Re-Check Your Torrents
Almost all the torrent clients provide a force re-check feature that helps to troubleshoot the potential problems with the torrents. If the above methods fail to fix the problem for you, you can try this feature.
Just right-click the problematic torrent and choose Force Re-Check from the drop-down menu. After the re-check process is completed, restart your computer and see if the uTorrent former volume not mounted error is resolved.
Fix 6: Modify the Resume.dat File
Finally, you can choose to modify the resume.dat file of your uTorrent to replace the previous path that has changed due to the reconnection of the external drive. This is more complicated than the above solutions, but you can make use of a powerful text editor like Notepad++. Here’s what you need to do.
Step 1: Invoke Run window, input %AppData%uTorrent and click OK to open the uTorrent folder in File Explorer.
Step 2: Find the resume.dat file and make a backup for it in another location. Open your downloaded Notepad++ and drag the resume.dat file into the console to open it.
Step 3: Click Search tab in the ribbon bar and choose Replace. Input the incorrect path in the Find what box, input the correct one in the Replace with box, and click Replace All button.
Note: You have to keep the exact length of the path, which means that you can only change the drive letter in the path.
Once it’s done, save that file and then restart your computer. Now, the uTorrent error former volume not mounted should be removed.
How to resolve uTorrent former volume not mounted error? Here are 6 solutions for you.Click to Tweet
Bottom Line
This article has introduced 6 possible solutions to the former volume not mounted error in torrent client. If you have any better workarounds, you can share them with us by posting them in the following comment zone. We will keep improving this article.
As for any problems while using MiniTool software, you can contact us via [email protected].
Торрент (BitTorrent) — это протокол передачи данных в интернете. В отличие от привычных FTP и HTTP приём данных идёт по кускам с разных компьютеров, включённых в сеть torrent. Благодаря этому достигается гораздо более высокая скорость загрузки.

В программе uTorrent могут возникать ошибки при скачивании файлов.
Для организации процесса существует сервер (торрент-трекер) и специальная программа (клиент). Они осуществляют поиск частей скачиваемого файла и сбор его воедино на компьютере пользователя. На трекере хранятся файлы torrent, небольшие по размеру, которые содержат данные для торрент-клиента. Скачав его и открыв в программе, вы начинаете закачивать данные себе на диск, но и одновременно раздаёте скачанное другим пользователям.
uTorrent
uTorrent — это наиболее популярная в России программа по скачиванию файлов torrent. Приложение бесплатное, но есть версии с ежегодной оплатой. Это Ad-free и Pro. В первом случае вы платите просто за отсутствие рекламы в приложении. Во втором — за наличие дополнительных функций, таких как потоковое воспроизведение видео, конвертация, проверка на вирусы, премиум-поддержка.
uTorrent разработан для Windows, Mac, Linux и Android. Существует заблуждение, что, используя торрент-сеть, вы нарушаете закон. На самом деле и сами torrent-приложения, и трекеры абсолютно легальны. Но вот контент, передающийся через них, может быть защищён авторскими правами. Скачивая и передавая его через интернет, вы нарушаете закон.

Ошибка загрузки и её исправление
Бывает так, что вы запустили скачанный torrent-файл, началась успешная загрузка, но вдруг клиент выделяет строку закачки красным и выдаёт ошибку «Не смонтирован предыдущий том». В английской версии приложений torrent она выглядит как Volume not Mounted error. Остановка и перезапуск торрента ни к чему не приводят.
ВНИМАНИЕ. Том — это, другими словами, логический диск. Существует физический носитель, винчестер, либо внешний жёсткий диск. А он уже может быть разделён на несколько разделов. Такой раздел и называют том. То есть Torrent не может найти место, в которое начал сохранять контент.
Ошибка «Не смонтирован предыдущий том» может возникнуть по следующим причинам:
- В качестве места загрузки вы выбрали съёмный диск. А потом его вытащили. И даже если вы опять подключили, но уже в другой USB-порт, то система назначила ему другую букву, что и вызвало ошибку торрента.
- Вы поменяли букву раздела винчестера, то есть сменили название места назначения, и torrent-клиент больше не видит пути, по которому нужно сохранять содержимое.
В соответствии с описанными причинами, исправить ошибку «Не смонтирован предшествующий том» в uTorrent можно следующим образом:
Если вы начали загрузку на флешку или съёмный диск и потом их вытащили из компьютера, поставьте на место в тот же USB-порт. Затем в uTorrent запустите загрузку заново (нажмите «плей»). Если вы не помните, в какой порт вставляли съёмный носитель, и предыдущий пункт не дал результата, то:
Определите новое место назначения. Лучше выберите папку на винчестере и сохраните файлы туда. А после уже перенесёте на съёмный носитель. Так вы гарантируете себе, что ошибка «Не смонтирован предшествующий том» больше не повторится.
СОВЕТ. Если вы скачивали не на съёмный носитель, но поменяли том на жёстком диске, то либо верните ему прежнее название через специальную программу, либо, что проще и не приведёт к потере данных, воспользуйтесь вторым пунктом этой инструкции.
Помните, что если вы меняете место загрузки (второй пункт инструкции), то всё содержимое файла torrent будет закачиваться заново. Если же у вас получится продолжить (то есть первый пункт), то просто будут докачаны недостающие части.
Таким образом, можно исправить ошибку в uTorrent «Не смонтирован предшествующий том» двумя способами в зависимости от вызвавшей её причины. Рекомендуется в настройках uTorrent прописать путь сохранения по умолчанию на жёсткий диск либо запрос места сохранения при открытии нового торрента. Выбирайте папки на внутреннем диске, чтобы избежать ошибок.
Содержание
- Устранение ошибки «Не смонтирован предшествующий том»
- Способ 1: BEncode Editor
- Способ 2: Выбор другого места для сохранения файлов
- Способ 3: Докачка файла на съемный накопитель
- Вопросы и ответы

Торрент стал очень популярен благодаря своей практичности. Но с позитивными сторонами приходят и негативные. Например, ошибка «Предшествующий том не смонтирован», может поставить неопытного пользователя в тупик, ведь до этого всё прекрасно работало. Данная проблема не возникает просто так на пустом месте. Но её всегда можно исправить.
Устранение ошибки «Не смонтирован предшествующий том»
Обычно данная ошибка возникает тогда, когда папка в которую скачивались файлы была переименована или перемещена. Ещё проблема не смонтированного тома может появиться, когда вы скачивали фрагменты на флешку или съемный диск и слишком рано вынули устройство. Как это исправить, будет рассмотрено далее.
Способ 1: BEncode Editor
Программа для продвинутых пользователей. Новичок может запутаться в настройках. Данный софт будет полезен тем людям, которые хотят переместить все задействованные torrent-файлы в другую папку, раздел или диск. Её плюс заключается в том, что один раз настроив нужные параметры одним кликом, можно изменить всё и сразу, сэкономив кучу времени. Процесс изменения пути будет показан на примере BitTorrent, поэтому, если у вас другой клиент, проделывайте действия на нём.
Скачать BEncode Editor
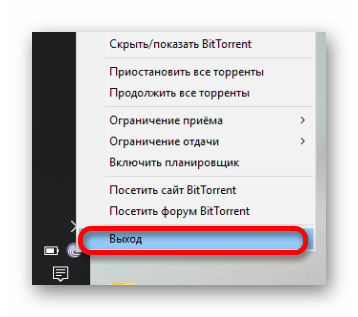
- Закройте torrent-клиент, кликнув на значок в трее правой кнопкой мыши и выбрав «Выход».
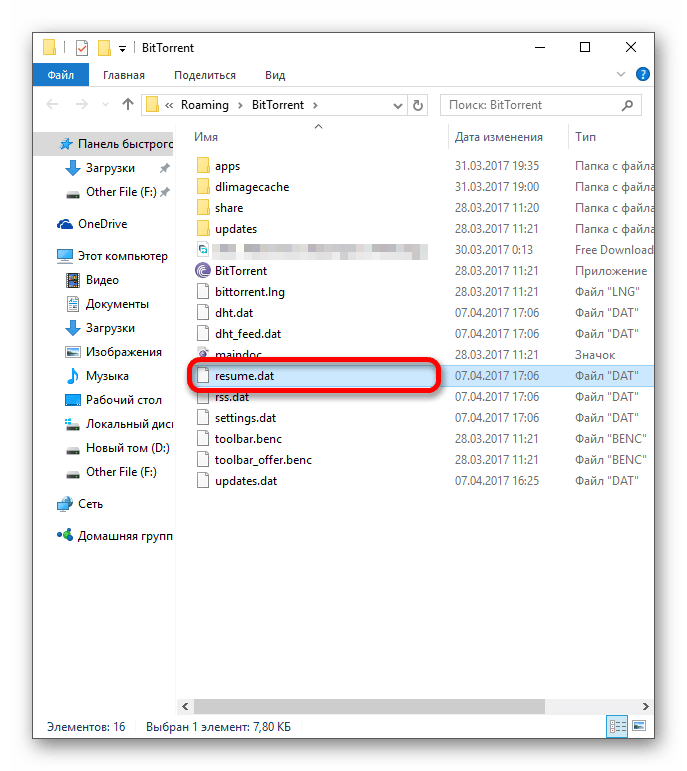
- Теперь нажмите комбинацию клавиш Win+R, впишите в открывшееся окно
%APPDATA%BitTorrent, после чего нажмите «ОК». - В высветившимся окне найдите объект resume.dat.
- Скопируйте resume.dat в другое безопасное место. Тем самым вы сделаете резервную копию и, если что-то пойдёт не так, у вас будут старые настройки.
- Вот теперь можно открыть объект в BEncode Editor. Для этого просто перетащите его в окно программы.
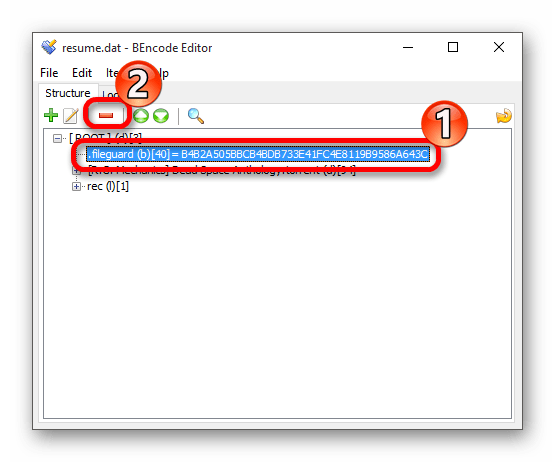
- Выделите строку с именем .fileguard и удалите её с помощью кнопки «Remove».
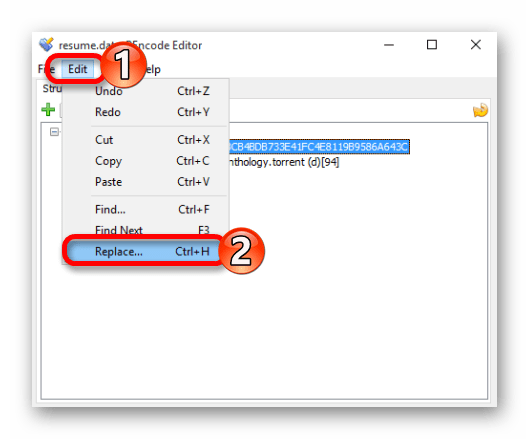
- Перейдите по пути «Edit» – «Replace» или примените сочетание Ctrl+H.
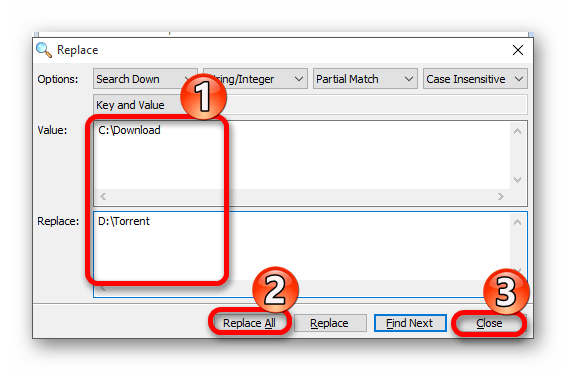
- В строке «Value» впишите старый путь размещения файлов, а в строке «Replace» — новый.
- Теперь нажмите на «Replace All», а потом «Close».
- Сохраните изменения сочетанием Ctrl+S.
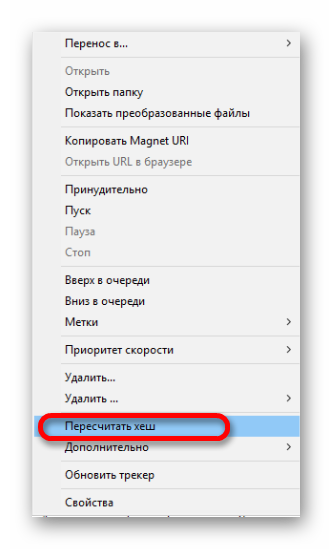
- В torrent-программе нажмите на загружаемый файл правой кнопкой мыши и в контекстном меню выберите «Пересчитать хэш» (в некоторых клиентах «Перепроверить»). Так вы проверите хэш файла, если физически он был перемещён на другой раздел.

Если вы не можете найти данный файл, поищите его по пути C:Program FilesBitTorrent (в названии папки ориентируйтесь на свой клиент).
Читайте также: Исправляем ошибку uTorrent «не смонтирован предшествующий том»
Способ 2: Выбор другого места для сохранения файлов
Можно поступить иначе и не использовать различные программы, особенно если у вас не так много загрузок. В настройках торрента есть функция выбора другого места для отдельного файла.

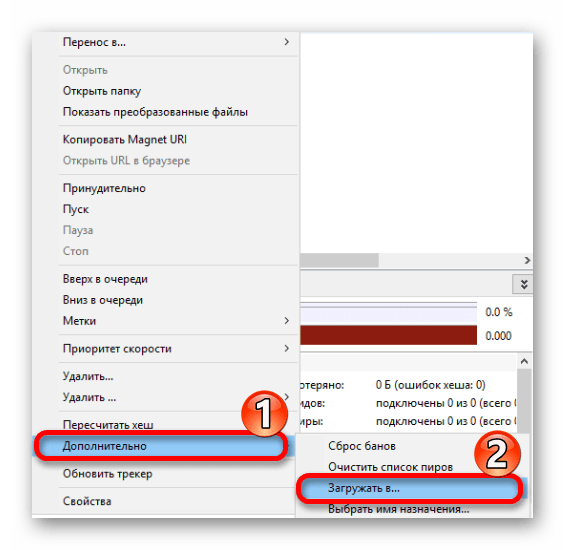
- В торрент-программе нажмите на загрузку с ошибкой правой кнопкой мыши. В меню наведите на «Дополнительно» и выберите пункт «Загружать в…».
- Укажите другое место сохранения, желательно на несъемный накопитель, а именно – на внутренний жёсткий диск.
- Сохраните всё и подождите несколько секунд.
Способ 3: Докачка файла на съемный накопитель
В том случае, если съемное устройство было извлечено до того, как файл был полностью загружен, можно попытаться догрузить его.
- Поставьте проблемный файл на паузу.
- Подсоедините к компьютеру тот накопитель, на который происходила загрузка.
- После удачного подсоединения продолжите закачку.
Теперь вы знаете, как исправить ошибку «Не смонтирован предшествующий том». Не так это сложно проделать, как могло бы показаться, ведь скорее всего вам пригодятся два последних способа, которые довольно просты.
Еще статьи по данной теме:
Помогла ли Вам статья?
Some Windows users are reporting that they randomly see the ‘Former volume not mounted‘ error in their torrent client. Upon expanding the error, the message says that access to the disc where the files are stored is not available. This problem is reported to occur on the majority of popular torrent clients including BitTorrent, Utorrent, and Vuse.
After investigating this particular issue, it turns out that this problem can occur due to a few potential causes. Here’s a shortlist of potential culprits:
- Bad external drive letter – If you’re using an external drive, the first thing you should do is disconnect it from your computer and connecting again. This operation will hopefully force your OS to assign the a different drive letter (the same one that your torrent client expects)
- Incorrect download location – According to some affected users, this problem can also occur in instances where there’s an incorrect download location currently stored by your torrent client. In this case, using the Setting menu to change it will allow you to fix the issue entirely.
- Letter in torrent client doesn’t match – If you get this error code with an external drive and you keep disconnecting it, it’s possible that your computer has assigned a different letter which is throwing the error in your torrent client. In this case, you can modify the Preferences menu to match the drive letter.
- The wrong letter in Disk management – It’s also possible that you started to see this error after you modified the letter of the drive via the Disk Management utility. If this scenario is applicable, you should be able to fix this problem by using the same utility to make the change to the letter expected by your torrent client.
- Partially corrupted torrent – If there’s an unexpected interruption while the torrent is downloading, your client might refuse to resume download due to conflicting data. In this case, you can resolve the error message by forcing your torrent client to force re-check that particular torrent.
- The Resume.dat file contains conflicting data – If you’re not afraid to edit config files, you should be able to fix the problem by editing the resume.dat file using an advanced text editor utility like Notepad++.
Method 1: Reconnect the problematic drive
If you’re using an external drive and you have the habit of disconnecting it frequently, you should start by disconnecting and reconnecting the problematic external drive.
This operation will force your OS to reassign a letter to the external drive which might resolve the problem automatically.
After you reconnect the external drive via the correct cable, reboot your torrent client and see if the problem is now resolved.
If the same ‘former volume not mounted‘ error is still occurring, move down to the next method below.
Method 2: Setting the correct download location
As it turns out, one of the most common instances that will trigger this error is when one (or more) of your torrents is referencing a download path that no longer exists.
This typically occurs when users initiate downloads on removable drives and then decide to remove them (while the file is downloading or seeding).
If this scenario is applicable, you can easily fix this problem by identifying the problematic torrent and setting the correct download location from the torrent settings.
To make things easier for you, we’ve put together a step-by-step guide on setting up the correct download location:
- Open the torrent client that triggers the error for you, right-click on the torrent that’s causing the problem and click on Advanced > Set Download Location.

Selecting the correct download location - From the next menu, go ahead and navigate to the location where you store the torrent files and click on Select Folder once the correct location is selected.
- Restart your torrent client and see if the problem is now resolved.
In case the same problem is still occurring, move down to the next potential fix below.
Method 3: Match the drive letter to the computer allocated drive (uTorrent Only)
If you’re using an external drive and you regularly disconnect it from your computer, it’s possible that when you connect it back, the drive letter allotted by your PC will change.
On Utorrent, this is will most likely occur due to a setting in the Preferences tab.
This is way more common than you might think. Fortunately, this is very easy to fix – You just need to modify the directories in the Preferences screen so they match the drive letter to computer allocated drive.
Here’s a quick step-by-step guide that will walk you through the steps of doing so:
- Open Utorrent and use the ribbon bar at the top to click on Options, then click on Preferences from the newly appeared context menu.

Accessing the Preferences menu in uTorrent - Once you’re inside the Preferences window, click on Directories from the left-hand side, then move over the right-hand section and check if the drive letters match your current configuration.

Adjusting the allocated Drive letters in uTorrent - Hit Apply to save the changes, then restart your uTorrent client and see if the problem is now resolved.
In case you still see the same ‘former volume not mounted‘ error, move down to the next potential fix below.
Method 4: Change drive letter from Disk Management
If you have a lot of different torrents affected by this error or you don’t want to change anything from your torrent client, you can go the other way around fixing this problem.
A different way of fixing the ‘former volume not mounted‘ error is to find out which drive letter your torrent client is expected and change the drive letter containing the torrent file to match using Disk Management.
If you’re looking for step by step clarifications, follow the instructions below to change the drive letter via Disk Management:
- Start by opening your torrent client and check the error message. If you hover your mouse over the error, you should see the drive letter that your torrent client expects.
- Once you know which letter your torrent client expects close it, then press Windows key + R to open up a Run command. Inside the text box of the Run window, type ‘diskmgmt.msc’ and press Enter to open up the Disk Management utility.

Run dialog: diskmgmt.msc - Once you’re inside the Disk Management utility, right-click on the drive letter that doesn’t match the torrent client equivalent and choose Change Drive Letters and Paths from the newly appeared context menu.

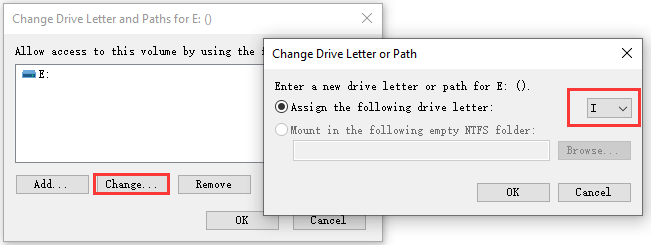
Change Drive Letter and Paths - From the Change Drive Letter and Paths screen, click on the Change button.

Change button - From the Change Drive Letter or Path, select Assign the following drive letter, then use the drop-down menu to select the same drive letter that your torrent client expects.
- Click Ok to save the changes, then restart your computer to allow these changes to take effect.
- Once the next startup is complete, open your torrent client and see if the problem is now resolved.
If you’re still encountering the same ‘former volume not mounted‘ error, move down to the next potential fix below.
Method 5: Re-checking the problematic torrents
If none of the potential fixes above have worked for you, one thing you can try is to force your torrent client to re-check the problematic torrent. This operation was confirmed to be successful by both uTorrent and BitTorrent users.
But it’s not just on these 2 torrent clients – Every similar client of this kind has a Force Re-Check feature that can be initiated by right-clicking on the problematic torrent and choosing the option from the context menu.
Once the re-check procedure has been completed, restart your computer and see if the error goes away the next time you start your torrent client.
If the same problem is still occurring, move down to the next potential fix below.
Method 6: Modifying the resume.dat file (uTorrent Only)
If you don’t mind modifying config files, one additional way of resolving this particular error code is to use an enhanced text editor like Notepad++ to replace all instances of the incorrect drive letter from the resume.dat file of uTorrent.
Important: The resume.dat file is sensible in the sense that after you modify it, you need to keep the exact length (only the path letter can be modified)
Several affected users that were also encountering the ‘former volume not mounted‘ error have confirmed that they managed to fix the error by using Notepad++ to replace every incorrect instance from the resume.dat files.
Here are some step-by-step instructions on how to do this:
- Start by ensuring that every instance of uTorrent is closed and no process is running in the background.
- Next, visit the official download page of Notepad++ and download the installer for the most recent version of the text editor.

Downloading the Notepad++text editor Note: You can potentially do the modifications below to the default text editor (Notepad), but this is not recommended as you run the risk of editing the wrong information.
- Once the download is complete, open the Notepad++ installer and follow the on-screen prompts to install the software on your computer.

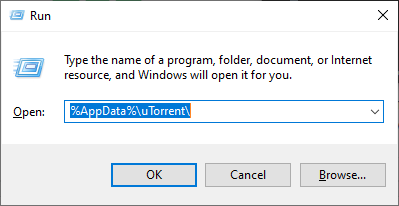
Installing Notepad++ - Once the installation is complete, press Windows key + R to open up a Run dialog box. Inside the text box, type ‘%AppData%uTorrent’ and press Enter to navigate directly to the location where resume.dat is stored.

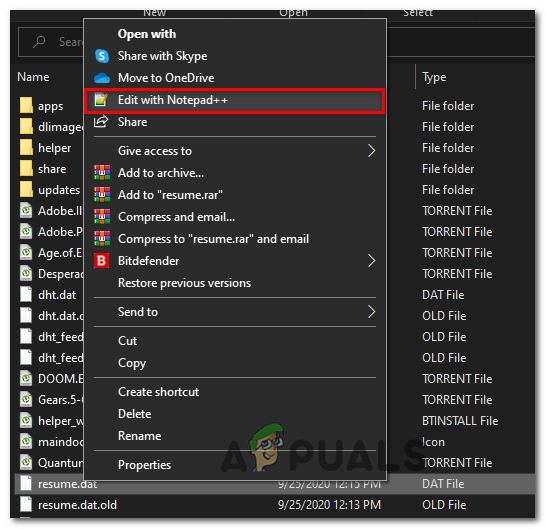
Accessing the Appdata folder of uTorrent - Inside the uTorrent folder from Appdata, right-click on resume.dat and choose Edit with Notepad++ from the newly appeared context menu.

Editing the resume.dat file using Notepad++ Note: At this point, it might be a good idea to copy the resume.dat file in case you end up making a modification that breaks it. You can back this file up simply by copying the file and pasting it onto a different drive or folder.
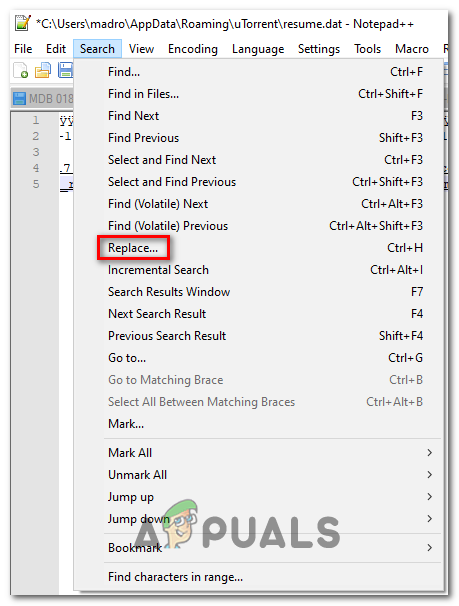
- Once the file is opened in Notepad++, use the ribbon at the top to access Search, then click on Replace.

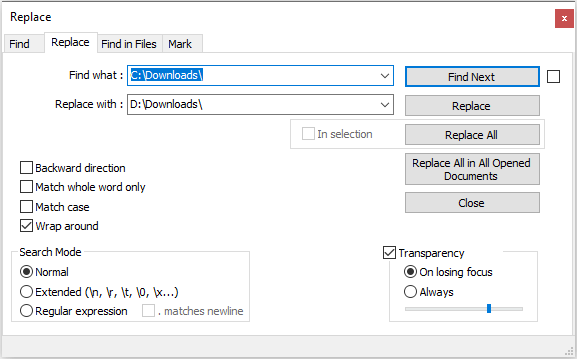
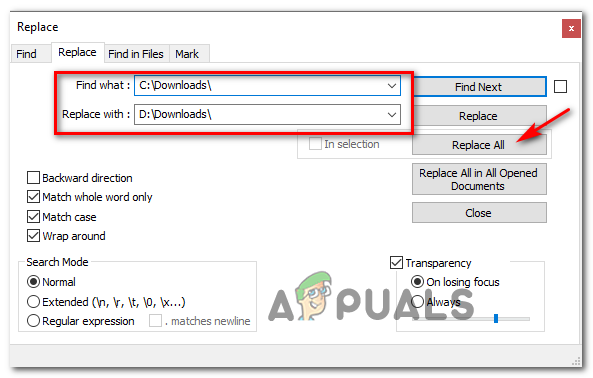
Using the Replace function in Notepad++ - Once you’re inside the Replace window, set the Find what box to the incorrect path (e.g. C:Downloads), then set the Replace with a box with the correct path (e.g. D:Downloads).
- Next, kickstart the replace operation by clicking on the Replace All button.

Replacing every bad instance with the correct equivalent using Notepad++ - Next, save the modifications you operated on the file and make sure you keep the name exactly the same.
- Finally, restart your computer and see if the issue is now resolved by opening uTorrent once the next startup is complete.

Kevin Arrows
Kevin is a dynamic and self-motivated information technology professional, with a Thorough knowledge of all facets pertaining to network infrastructure design, implementation and administration. Superior record of delivering simultaneous large-scale mission critical projects on time and under budget.
uTorrent представляет собой одну из популярнейших программ для скачивания torrent файлов. Приложение бесплатное и для простого использования не требует никаких дополнительных действий.
Из особенностей стоит выделить не столько приложение, сколько сам файл, который имеет отличие от стандартных HTTP и FTP. Дело в том, что torrent приходит на компьютер небольшими частями с нескольких носителей, которые подключены к общей сети и производят раздачу. От количества раздающих носителей зависит скорость передачи. Но во время загрузки файла в uTorrent, Mediaget или другом приложении могут возникать ошибки, например, «не смонтирован предшествующий том».
Что за ошибка, почему возникает
Ошибка «не смонтирован предшествующий том» появляется во время запуска файла в клиенте. Выдается уведомление о наличие ошибки, а строка закачки становится полностью красной. В таком случае в уведомление будет написано, что «не смонтирован предыдущий том» или «volume not mounted error» (если используется англоязычное приложение).
Обычно перезапуск компьютера и тем более клиента ни к чему не приводит.
В первую очередь необходимо определить причину, а их может быть несколько:
- скачивание производилось на съемный носитель, который был извлечен из компьютера;
- во время загрузки был изменен путь или имя конечной папки;
- конечная папка была перенесена в другое место.
Причина может быть, как одна, так и несколько сразу, все зависит от совершенных действий во время загрузочного процесса.
Как исправить ошибку
Исходя из вышеописанных причин следует и подбирать решение, которых в данном случае несколько.
Временное исправление
 Если причиной возникновения ошибки «не смонтирован предшествующий том» является извлечение носителя во время загрузки, то решать это можно дозагрузкой недостающих компонентов. Но важно соблюдать порядок действий, чтобы операция действительно сработала. Делать нужно следующее:
- Открыть клиент и навести курсор на файл, с которым возникла проблема. Чтобы не происходило сбоев, и приложение работало исправно следует поставить процесс скачивания на паузу. Для этого следует нажать на правую кнопку мыши и выбрать ячейку «Пауза».
- Когда процесс будет приостановлен, необходимо подключить тот же самый носитель в порт, в котором он стоял изначально. Если поменять порт, то операция не сработает, и клиент выдаст туже ошибку.
- Когда носитель будет установлен в соответствующий порт можно открывать клиент и возобновлять процесс.
Если шаги сделаны верно, то процесс запустится и файл корректно скачается. Если не помогло, то рассматриваем другие варианты.
Изменение папки загрузки в uTorrent
В случае, если предыдущие действия не дали результат, то скорее всего было изменено имя или конечная папка перемещена. Можно попробовать проделать обратные манипуляции (вернуть папку назад или вернуть первоначальное имя), и попробовать возобновить загрузку. Если это не дало результат или нет возможности сделать точные обратные действия, тогда нужно полностью менять путь загрузки. Для этого надо сделать следующее:
- Зайти в приложение и найти проблемный файл. После чего поставить на паузу, чтобы процесс не мешал, а клиент исправно работал.
- Закрывать клиент не обязательно, а надо еще раз нажать правой кнопкой мыши на файл. После этого появится список задач, где надо выбрать вкладку «Дополнительно», а после «Загрузить в».

- Затем откроется окно, где будет предложено указать новое место загрузки. Важно заполнять поле корректно, чтобы не возникло повторной ошибки. Лучше всего, скопировать нужный путь через проводник.

- Как только путь будет записан верно, можно возобновлять загрузку.


После этого проблема будет решена, независимо от причины ее возникновения.
Изменение пути в Media Get
Если используется другой клиент, то заменить каталог назначения в нем также не составит особого труда, все процедуры обычно идентичны. Рассмотрим исправление ошибки «не смонтирован предшествующий том» на примере Media Get,:
- Зайти в приложение.
- Найти вкладку «Настройки», нажать на нее и выбрать там «Настройки приложения».
- Появится окно, где нужен пункт «Папки», а там надо вписать корректный каталог загрузки.
После этого все скачиваемые файлы будут загружаться по этому пути.
Если нужно изменить директорию одного файла, то нужно зайти в настройки пути именно этого процесса. Для этого нужно нажать правой кнопкой мыши на нужный элемент и выбрать там настройки пути, где уже изменить его на необходимый.