The «TLB Bug» Explained
Phenom is a monolithic quad core design, each of the four cores has its own internal L2 cache and the die has a single L3 cache that all of the cores share. As programs are run, instructions and data are taken into the L2 cache, but page table entries are also cached.
Virtual memory translation is commonplace in all modern OSes, the premise is simple: each application thinks it has contiguous access to all memory locations so they don’t have to worry about complex memory management. When an application attempts to load or store something in memory, the address it thinks it’s accessing is simply a virtual address — the actual location in memory can be something very different.
The OS stores a table of all of these mappings from virtual to physical addresses, the CPU can cache frequently used mappings so memory accesses take place much quicker.
If the CPU didn’t cache page table entries, each memory access would proceed as follows:
1) Read from a pagetable directory
2) Read a pagetable entry
3) Then read the translated address and access memory
Then there’s something called a Translation Lookaside Buffer (TLB) which takes the addresses and maps them one to one, so you don’t even need to perform a cache lookup — there’s just a direct translation stored in the TLB. The TLB is much smaller than the cache so you can’t store too many items in the TLB, but the benefit is that with a good TLB algorithm you can get good hit rates within your TLB. If the mapping isn’t contained in the TLB then you have to do a lookup in cache, and if it’s not there then you have to go out to main memory to figure out the actual memory address you want to access.
Page table entries eventually have to be updated, for example there are situations when the OS decides to move a set of data to another physical location so all of the virtual addresses need to be updated to reflect the new address.
When page table entries are updated the cached entries stored in a core’s L2 cache also need to be updated. Page table entries are a special case in the L2, not only does the cache controller have to modify the data in the entries to reflect their new values, but it also needs to set a couple of status bits in the page table entries in order to mark that the data has been modified.
Page table entries in cache are very different than normal data. With normal data you simply modify it and your cache coherency algorithms take care of making sure everything knows that the data is modified. With page table entries the cache controller must manually mark it by setting access and dirty bits because page tables and TLBs are actually managed by the OS. The cache line has to be modified, have a couple of bits set and then put back into the cache — an exception to the standard operating procedure. And herein lies the infamous TLB erratum.
When a page table entry is modified, the core’s cache controller is supposed to take the cached entry, place it in a register, modify it and then put it back in the cache. However there is a corner case whereby if the core is in the middle of making this modification and about to set the access/dirty bits and some other activity goes into the cache, hits the same index that the page table entry is stored in and if the page table entry is marked as the next thing to be evicted, then the data will be evicted from the L2 cache and put into the L3 cache in the middle of this modification process. The line that’s evicted from L2 is without its access and dirty bits set and now in L3, and technically incorrect.
Now the update operation is still taking place and when it finishes setting the appropriate bits, the same page table data will be placed into the core’s L2 cache again. Now the L2 and L3 cache have the same data, which shouldn’t happen given AMD’s exclusive cache hierarchy.
If the line in L2 gets evicted once more, it’ll be sent off to the L3 and there will be a conflict creating a L3 protocol error. But the more dangerous situation is what happens if another core requests the data.
If another core requests the data it will first check for it in L3, and of course find it there, not knowing that an adjacent core also has the data in its L2. The second core will now pull the data from L3 and place it in its L2 cache but keep in mind that the data is marked as unmodified, while the first core has it marked as modified in its L2.
At this point everything is ok since the data in both L2 caches is identical, but if the second core modifies the page table data that could create a dangerous problem as you end up in a situation where two cores have different data that is expected to be the same. This could either result in a hard lock of the system or even worse, silent data corruption.
The BIOS fix
The workaround in B2 stepping Phenoms is a BIOS fix that tells the TLB it can’t look in the cache for page table entries upon lookup. Obviously this drives memory latencies up significantly as it adds additional memory requests to all page table accesses.
The hardware fix implemented in B3 Phenoms is that whenever a page table entry is modified, it’s evicted out of L2 and placed in L3. There’s a very minor performance penalty because of this but no where near as bad as the software/BIOS TLB fix mentioned above.
AMD gave us two confirmed situations where the TLB erratum would rear its ugly head in real world usage:
1) Windows Vista 64-bit running SPEC CPU 2006
2) Xen Hypervisor running Windows XP and an unknown configuration of applications
AMD insisted that the TLB erratum was a highly random event that would not occur during normal desktop usage and we’ve never encountered it during our testing of Phenom. Regardless, the two scenarios listed above aren’t that rare and there could be more that trigger the problem, which makes a great case for fixing the problem
Thanks to Asus and the wizard Shamino for allowing me to test drive their Maximus 13 Extreme and RKL 11900k sample for this user guide.
Welcome to a strange time in PC land. Where scalpers, miners, scammers and the pandemic have changed a landscape that was once standard fare and far too familiar. Intel throwing on Moar Corez while AMD’s Lisa Su just laughs and goes «IPC, baby», while giving us even moar corez! But Intel knew things needed a change and with excellent cooperation with Asus, have finally moved on past an aging architecture that was already past its breaking point, something gamers are now beginning to see with gems like Minecraft! And Asus, with its Z590 Maximus lineup, has once again set the tone for everyone else to follow, with a massively improved VRM (International Rectifier has finally been switched out for Intersil, improving vdroop and transient response), more phases, world record memory overclocking with DJR and a new emphasis on something called stability.
But first let’s discuss what was happening with Skylake.
While original Skylake had a rough start (microcode and firmware bugs galore and rather poor overclocking), Intel improved things with Kaby Lake, finally bringing 5 ghz overclocks back to realism, similar to what we got during the Sandy Bridge era. And soon after, making more than 4 cores mainstream, as before the only way to get more than 4 cores were in their HEDT lineup, and the «Enthusiast» platform previously, the X58, with the 6 core Nehalem processors. The 8700k was well welcomed, but there was a dark horse looming that no one seemed to notice or care about at the time—the ringbus/interconnect problem.
Not long after the release of the moar corez 9900k, the first 8 core consumer chip which led to an arms race of cores, came the release of a game called Apex Legends, just a few months later. And unknown to almost everyone at the time, this game showed that the ringbus extension to more and more threads was completely broken. The result: An error called the «Internal Parity Error», which related to the cache/core subsystem and its internal buffers. This problem was massive, generating a gigantic megathread «crash thread» over on the EA forums with people’s prime / ycruncher stable systems just randomly going back to the desktop, and a few people who noticed that WHEA Errors were being generated. The WHEA was the crash actually being prevented (corrected hardware error).
To get more of a clue about this error, we have to dig deeper. While many people were just pumping more vcore into their systems to try to bypass the Parity Error and the random crashes, I actually tried *lowering* the voltage even more, just to see what would happen in Apex. Sure enough, this was enough to occasionally BSOD the game, but more importantly, I was able to generate a new error alongside the parity errors:
«Translation Lookaside Buffer Error» (TLB).
«What is a TLB? In a very basic definition, a Translation lookaside-buffer (TLB) is a cache that memory management hardware uses to improve virtual address translation speed. All current desktop, laptop, and server processors include one or more TLBs in the memory management hardware, and it is nearly always present in any hardware that utilizes paged or segmented virtual memory.By default, a TLB miss whether caused by hardware and/or software complications is not fatal (if the virtual address is not stored in the TLB, it’s simply computed and found manually from other source data), but we’re crashing on a TLB failure, this implies that the CPU determined there was corruption or a hardware error in date, therefore notified Windows that an unrecoverable hardware error has occurred.»
What this shows is that Apex Legends is causing the CPU’s to function in a very unstable way, and since some users with completely stock systems were getting Parity Errors and crashing in Apex, this was a MAJOR problem.
Respawn tried to look into this, and thanks to the programmer Oriostorm’s efforts, he determined that these errors were a *flaw* in the Skylake processors. Specifically, he noticed that, due to some combination of code on the King’s Canyon map, under certain rare (considering just how many instructions are processed every second!) conditions, the processor will attempt to read or write to memory it has «no permission to access». This causes an exception error (read, write or execute) and the game to naturally crash. The parity error was simply this error being caught and corrected in time. The fact that reducing vcore even more would lead to a TLB error showed that there was a very low level issue with multithreading and the ringbus happening here.
Oriostorm decided to change the code path to attempt to prevent the circumstances which would cause this error (I believe the old system was «old_gather_props») or something. The new code path massively improved stability and bought Apex in line with other normal games of the time, and no longer ruining people’s daily overclocks.
Notes in the May 2019 patch gave me and some other users credit for helping Respawn improve stability of their game.
https://www.ea.com/games/apex-legend…pdate-may-2019
«[PC ONLY] CRASHES SPECIFIC TO INTEL CPUs
We investigated the crash reports from many people who were crashing frequently and found that Intel CPUs sometimes were not executing the instructions properly in one particular function. A common example was an instruction that only reads a register crashed on writing to invalid memory. With the help of many forum users, we found that lowering the clock speed always fixed the crashes, even if the CPU wasn’t overclocked or overheating. Thanks everyone, with a big shout out to Falkentyne, TEZZ0FIN0, JorPorCorTTV, and MrDakk!
This has been by far the most commonly reported PC crash over the last month or so and we’ve notified Intel about the issue. In the meantime, we’ve put a workaround in this patch to avoid the crashing at your original clock speeds just by changing the instructions used by that one function.»
But this was only the beginning. But until Apex Legends, no game had brought out the multi-score «Skylake threading» problem like this, and even though no one knew anything about this at the time, this «Internal parity error» crash and Apex needing a new code path to bypass the threading conditions was the result of the Skylake interconnect system being stretched to more cores, and helps explain the even bigger latency penalty on CML cores (relative to core position on die).
Minecraft was a java game that had been out for many years now, and at the time, Minecraft crashing was usually just people’s windows being corrupted or drivers out of date. Minecraft generating «Internal» errors was completely unheard of at the time. Parity Errors simply didn’t occur unnaturally on 4C/8T processors since the architecture hadn’t been extended to its breaking point. If you actually got a parity error on 4C/8T, you were truly unstable and were probably waiting for a L0 or a BSOD. Even the 6C/12T gen was mostly overlooked since it was so brief. When the 9900k hit, however, this is when more users started noticing Parity Errors being generated by MC, although no one had a clue what was going on.
What broke the camel’s back was the 10C/20T CML.
First, OC’ers noticed that cache/RAM latency went up (as mentioned above). This was obviously forced to happen, but users were rewarded with yeet RAM overclocks from a stronger IMC, and 5.3-5.4 all core overclocks on good chips, which kept CML competitive with AMD’s offerings, as AMD simply couldn’t touch Intel on memory overclocking. But as thread count went up, the problems causing Parity Errors became more obvious, as players started encountering Minecraft errors in droves, some people even on stock clocks, and some AAA Games (like RDR2) were also generating Internal WHEA errors. The L0 error was already well known; errors on virtualized instruction registers in the L0 register store, which only happened on hyperthreading enabled processors, which was already the major issue with skylake stability. You could push high overclocks and get random L0’s which were very difficult to stabilize, depending on the instruction set used, but enough vcore would fix it. But the parity error showing up on systems that passed stress tests was the sign that Skylake, never meant to go up to so many cores, needed to die. And with newer RTX/DLSS games now starting to generate Parity Errors on daily stable systems, something needed to be done.
Enter Rocket Lake.
While Rocket Lake is prep for Intel’s true next gen platform, Alder Lake and DDR5, Intel needed to prepare this platform for maturity, while moving on from Skylake and all its bugs. While ADL is rumored to have two IMC’s, the backport of Cypress Cove to 14nm, with only one IMC and the Gear changes, hurt RKL considerably. But this is a necessary evil because Skylake HAD to die. And the IPC increases (~19%) are real and will only keep getting better on future gens. But with people breaking NDA, and releasing benchmarks with pre-beta Bioses and broken memory overclocking, showing off terrible bandwidth results (NDA’s exist for a REASON, people!), every single person overlooked something.
Stability.
The Death of Skylake also meant the death of Skylake bugs.
1) CPU Cache L0 errors are now a thing of the past. No more random L0’s thinking you’re stable and only partially stable with BSOD’s that look like RAM errors (System Service Exception, IRQL_NOT_LESS OR_EQUAL, etc). You just BSOD now, with the well known «Clock Watchdog Timeout», or in other words «I’m not stable, chump, try again». There’s no more «middle road». You’re either stable or you BSOD. (I’m referring to the CPU core itself, NOT to the IMC or RAM errors—those still will happily make your life interesting).
2) Parity Errors are byebye. No longer will Minecraft generate parity errors due to garbage collection in the caches. Now it just runs. Or you BSOD.
3) The rules have changed for stress testing.
Prime95 «AVX stable» is no longer a valid test for gamers. You can push your 5.2 ghz 11900k overclocks, run small FFT AVX DISABLED Prime95 and get a quick ClocK Watchdog Timeout, because your CPU hates you for you letting it get too hot. You run Cinebench R20 and get a clock watchdog timeout.
Boot up Battlefield 5 (One of the gold standards for stability testing) and it just runs like nothing ever happened. No BSOD, no nothing.
If you want to test if you’re stable in games, now you just game. If you’re unstable you’ll know very fast. The skylake rules are deader than a dead horse.
4) Average overclocks will be a bit lower than what most people expect. 5 ghz all cores will be about the average. Expect about 200 mhz lower than CML chips. However due to stability changes, you may be able to play video games significantly higher than you can run any stress test without random L0 errors. Most 11900k’s should be able to game at 5.1-5.2 ghz with HT enabled and 5.3 ghz HT disabled.
I think most gamers will find this a very welcome change to CML «almost stable, but I crashed in COD: Cold War / Minecraft / RDR2» thus not stable overclocks.Some changes to this new platform:
1) New VRM controller and VRM’s. Allows lower v-latch deltas (transients) and lower set vcore when a CML processor is installed vs the previous Z490 motherboards of the same tier. Because Intersil.
Some of the LLC levels are slightly different. But LLC6 is 0.495 mOhm/0.49 mOhm on Maximus 12 Extreme and Maximus 13 Extreme, but M13E needed 20 less mv on my 10900k @ 5 ghz for same stable load voltage (1.146v), and amps draw was also lower!2) Each core now has its own PLL. This allows independent core clocks to be set on each core. This also greatly improves TVB and Adaptive Clocking, as now all cores can clock up to the TVB frequency on light loads. The favored cores still exist and TVB still exists, with the all core turbo dropping down to 4.8 ghz under heavy loads.
There are now configurable limits for max auto voltages, due to users being afraid of too high voltages. You can configure them in «Auto Voltage Caps.»
3) AVX 512 support.
4) AVX guardbands can now be configured independenty in the BIOS, and AVX512, AVX2 and AVX can also be manually disabled. Not that I would recommend disabling it but the option is there if you so choose. AVX guardbands allow voltage scaling during AVX loads (basically how much voltage is increased. 1.00=no increase, 1.25x=1.25 scale factor). Most users won’t need to adjust this, but if you’re experiencing stability issues and your cooling permits, you may want to look at this.
AVX offsets are different due to each core having its own PLL (see #2). The AVX offset references each core’s ratio rather than the all core ratio, depending on how many active cores are referenced. So if Core #0 has a multiplier of x52 and encounters an AVX workload with a negative AVX offset of -2, that core will drop to x50, while the other cores will not be affected! However if an all core AVX load happens, the all core ratio will kick in and limit all the cores to the «All core» ratio limit, with the negative per core offset only referencing the original value. If you want the ratio to go below the all core limit, then you need to lower the offset even more. So in other words, AVX offset is referenced against each individual core’s ratio limit, unless the all core offset is greater (lower) than the all core ratio limit value.
5) BCLK overclocking is changed slightly due to the PLL. People pushing very high BCLK will be able to adjust a PVD threshold (a divider) when pushing extremely high BCLK. I don’t do BCLK overclocking, but LN2 and world record seekers, especially some of the guys who love RAM bandwidth, will be happy this function exists. This divider is /15 by default, based on 100 mhz reference clock, and the threshold to switch to a x2 post divider is going to be 15. The x4 and x8 dividers come from the PLL, from the x2 threshold, and this can cause problems when pushing the BCLK extremely high. I’m talking about 200 mhz BCLK and higher here. If you encounter failures, please reduce the PVD thresheold. People wanting to push their RAM past normal limits or bypass normal multiplier limitations will enjoy this.
I expect some interesting results with DJR memory and this feature as more users start looking into BCLK + DJR Magic with Gear 2.
6) New Gearing mode (Prep for Alder Lake).
Memory can run 1:1 (synch) mode up to 3733 mhz. This will usually require a hefty increase in VCCIO and VCCSA. 3866 mhz requires work and silicon lottery and sometimes a large increase in IO/SA. 4000 1:1 is possible on SOME chips with maybe 1.65v IO/SA but do not bother. Listen to cstkl1. Just use 1:2. There is no bandwidth penalty from using 1:2 versus 1:1. Ignore the old pre-beta bios leaks. They mean nothing. NDA exists for a reason and people breaking NDA to sell chips early with beta Bioses doesn’t help anyone. Shamino did his magic for us and fixed the memory bandwidth issues quickly. If people are still having issues e.g. with single rank, certain RAM kits, etc, please post your specs, RAM kits etc in the Maximus 13 Megathread and details of the issues.
At Gear 1 (1:1) you can use 100:133 only. At gear 2, you can use both 100:100 and 100:133, but 100:100 is significantly worse than 100:133 and is not recommended.
There are now two VCCIO rails on this platform. CPU VCCIO and MemOC VCCIO. MemOC VCCIO is the one that will be most familar to those from Z490.
There is also System Agent voltage, as before.RTL/IOL tweaking does not seem to work, or no one has figured it out yet.
You can set «Round trip latency» tuning in presets to enabled for now.
Skews are different. Do not expect your old WR, Park, Nom values to work.
Most normal RAM timings and rules will function similar to before.Unstable memory can cause «00» after failed training sometimes.
There are three memory presets for speed features. Known as «SAGV», you can think of them as «Memory power states, or P-states» Low, Medium and High. They are NOT the same as the «Gear» settings for the controller. It does not make sense to use «Low» frequency if not at XMP (e.g. Jedec) since switching from Low to «Low» ‘doesn’t make much sense.
Overclocked memory can try the «High» setting (this is full speed gear), but certain memory configurations may fail to boot. This is because certain variables like the Controller/Ram Ratio modes will affect this setting. This setting is disabled by default. It’s suggested to simply «enable» this setting and leave the «Gear» configurations at auto and test it there. Overall, there wasn’t much benefit to enabling this setting. Try it if you are trying to get the most out of an overclock.
Prime95 30.5 build 2 all AVX disabled, Large FFT is a valid test for memory/IMC stability. If you can run 30 minutes minimum without errors, you should be stable enough for other use.
Setting Command rate 1T may train two additional settings: CMD SLew Rate and CMD Drive Strength. You may see POST CODES 6C and 6A.
There is an integrated Memtest86 stress test in the BIOS. You can test your memory overclock to be able to load windows without a BSOD, without having corrupt memory cells touching a system file.
Important: High cache ratios require a much higher Vcore to switch to that ratio while in windows to avoid crashing, than you need to run stress tests. This is different than CML behavior.
High cache ratios now require MUCH more vcore to run closer to core than CML. VID for cache is higher to much higher than its Core counterpart link. On CML, you could run cache up to its max (fused) ratio. On RKL, you will often need to stay with more down binning because cache VID cannot exceed core VID. If you try to run x51 all core OC and x48 cache and get «Check CPU», well, that’s why.
7) V-LATCH!!!!
Not RKL specific, but Asus and Z590 unique. New to Z590 and only Asus has this as far as I know.
Asus’ new proprietary hardware circuit is able to record transient min/max values below what the regular controller can read as Vcore, and allows reporting transient voltage true min and max spikes and dips to OS, and the OLED display, just like an oscilloscope. No longer do you need to buy a $300+ 2-4 channel scope to get true vmins! Board can log V-latch max (max spike), V-min (lowest dip) and V-delta (true min to max delta) with a dip switch, enabled for logging, disabled for logging cancel, and can be activated just by running Hwinfo64. Hwinfo EC reporting also has v-latch measurements. Now you can determine your ideal LLC for your workload and save it to a profile.
This is something that users wanted to know for a very long time, just how much the voltage spikes and dips were when they were running different LLC’s and vcore levels.
V-latch monitoring is available on the OLED display (no performance penalty) and in HWinfo EC monitoring (some polling penalty as on previous gens, as already known). Requires newest HWinfo version (7.00+).
On my 11900k, I determined LLC5 to have the best overall V-latch delta for min-max with full core non AVX Testing (thanks to Shamino).
LLC5 is 45% reduced vdroop (approx 0.73 mOhm). LLC3 is still the baseline of 1.1 mOhm (Intel spec).A lot of people will like this and you must choose Asus to use this type of feature. I’m excited about this and it saved me a lot of money over trying to buy a Siglent scope I might only use once, and I put that cost into a nice Fluke DMM instead. Thank you Shamino! (This feature was purely from Shamino’s efforts and is a first among any motherboard design).
- Remove From My Forums
-
Question
-
i update the bios since then i am getting this error….system crashes randomly
please help me with this
Problem signature:
Problem Event Name: BlueScreen
OS Version: 6.1.7600.2.0.0.256.4
Locale ID: 16393Additional information about the problem:
BCCode: 124
BCP1: 0000000000000000
BCP2: FFFFFA800A056028
BCP3: 00000000B2000000
BCP4: 0000000000010014
OS Version: 6_1_7600
Service Pack: 0_0
Product: 256_1Files that help describe the problem:
C:WindowsMinidump120813-24897-01.dmp
C:UsersServerAppDataLocalTempWER-44335-0.sysdata.xmlRead our privacy statement online:
http://go.microsoft.com/fwlink/?linkid=104288&clcid=0x0409If the online privacy statement is not available, please read our privacy statement offline:
C:Windowssystem32en-USerofflps.txtProblem signature:
Problem Event Name: BlueScreen
OS Version: 6.1.7600.2.0.0.256.4
Locale ID: 16393Additional information about the problem:
BCCode: 124
BCP1: 0000000000000000
BCP2: FFFFFA800A057028
BCP3: 00000000B2000000
BCP4: 0000000000000014
OS Version: 6_1_7600
Service Pack: 0_0
Product: 256_1Files that help describe the problem:
C:WindowsMinidump120813-24382-01.dmp
C:UsersServerAppDataLocalTempWER-42510-0.sysdata.xmlRead our privacy statement online:
http://go.microsoft.com/fwlink/?linkid=104288&clcid=0x0409If the online privacy statement is not available, please read our privacy statement offline:
C:Windowssystem32en-USerofflps.txtBCCode: 124
BCP1: 0000000000000000
BCP2: FFFFFA8007CB5028
BCP3: 00000000B2000000
BCP4: 0000000000010014
OS Version: 6_1_7600
Service Pack: 0_0
Product: 256_1Files that help describe the problem:
C:WindowsMinidump120913-24460-01.dmp
C:UsersServerAppDataLocalTempWER-42869-0.sysdata.xmlRead our privacy statement online:
http://go.microsoft.com/fwlink/?linkid=104288&clcid=0x0409If the online privacy statement is not available, please read our privacy statement offline:
C:Windowssystem32en-USerofflps.txtProblem signature:
Problem Event Name: BlueScreen
OS Version: 6.1.7600.2.0.0.256.4
Locale ID: 1033Additional information about the problem:
BCCode: 124
BCP1: 0000000000000000
BCP2: FFFFFA8007CB4028
BCP3: 00000000B2000000
BCP4: 0000000000000014
OS Version: 6_1_7600
Service Pack: 0_0
Product: 256_1Files that help describe the problem:
C:WindowsMinidump120913-21216-01.dmp
C:WindowsTempWER-34850-0.sysdata.xmlRead our privacy statement online:
http://go.microsoft.com/fwlink/?linkid=104288&clcid=0x0409If the online privacy statement is not available, please read our privacy statement offline:
C:Windowssystem32en-USerofflps.txt
Answers
-
Hi,
*******************************************************************************
*                                                                             *
*                        Bugcheck Analysis                                    *
*                                                                             *
*******************************************************************************

Use !analyze -v to get detailed debugging information.

BugCheck 124, {0, fffffa8007fde028, b2000000, 10014}

Probably caused by : GenuineIntel

Followup: MachineOwner
---------

1: kd> !errrec fffffa8007fde028
===============================================================================
Common Platform Error Record @ fffffa8007fde028
-------------------------------------------------------------------------------
Record Id     : 01cef8907404e523
Severity      : Fatal (1)
Length        : 928
Creator       : Microsoft
Notify Type   : Machine Check Exception
Timestamp     : 12/14/2013 5:51:26 (UTC)
Flags         : 0x00000000

===============================================================================
Section 0     : Processor Generic
-------------------------------------------------------------------------------
Descriptor    @ fffffa8007fde0a8
Section       @ fffffa8007fde180
Offset        : 344
Length        : 192
Flags         : 0x00000001 Primary
Severity      : Fatal

Proc. Type    : x86/x64
Instr. Set    : x64
Error Type    : TLB error
Flags         : 0x00
Level         : 0
CPU Version   : 0x00000000000306c3
Processor ID  : 0x0000000000000002

===============================================================================
Section 1     : x86/x64 Processor Specific
-------------------------------------------------------------------------------
Descriptor    @ fffffa8007fde0f0
Section       @ fffffa8007fde240
Offset        : 536
Length        : 128
Flags         : 0x00000000
Severity      : Fatal

Local APIC Id : 0x0000000000000002
CPU Id        : c3 06 03 00 00 08 10 02 - bf fb fa 7f ff fb eb bf
                00 00 00 00 00 00 00 00 - 00 00 00 00 00 00 00 00
                00 00 00 00 00 00 00 00 - 00 00 00 00 00 00 00 00

Proc. Info 0  @ fffffa8007fde240

===============================================================================
Section 2     : x86/x64 MCA
-------------------------------------------------------------------------------
Descriptor    @ fffffa8007fde138
Section       @ fffffa8007fde2c0
Offset        : 664
Length        : 264
Flags         : 0x00000000
Severity      : Fatal

Error         : DTLBL0_ERR (Proc 1 Bank 2)
  Status      : 0xb200000000010014
From this result, it’s translation lookaside buffer error casued by cpu. Typically i recommend you to update the latest intel chipset or cpu driver. If it doesn’t work, please change another cpu for your computer.
Thanks!
Andy Altmann
TechNet Community Support-
Marked as answer by
Thursday, January 16, 2014 1:30 AM
-
Marked as answer by
-
Stop 0x124 is a hardware error
If you are overclocking try resetting
your processor to standard settings and see if that helps.If you continue to get BSODs here are some more things you may want to consider.
This
is usually heat related, defective hardware, memory or even processor though it is»possible» that it is driver related (rare).
Stop 0x124 — what it means and what to try
Synopsis:
A «stop 0x124» is fundamentally different to many other types of bluescreens because it stems from a hardware complaint.
Stop 0x124 minidumps contain very little practical information, and it is therefore necessary to approach the problem as a case of hardware in an unknown state of distress.
Generic «Stop 0x124» Troubleshooting Strategy:
1) Ensure that none of the hardware components are overclocked. Hardware that is driven beyond
its design specifications — by overclocking — can malfunction in unpredictable ways.
2) Ensure that the machine is adequately cooled.
If there is any doubt, open up the side of the PC case (be mindful of any relevant warranty conditions!) and point a mains fan squarely at the motherboard. That will rule out most (lack of) cooling issues.
3) Update all hardware-related drivers: video, sound, RAID (if any), NIC… anything that interacts with a piece
of hardware.
It is good practice to run the latest drivers anyway.
4) Update the motherboard BIOS according to the manufacturer’s instructions and clear the CMOS.
Their website should provide detailed instructions as to the brand and model-specific procedure.
5) Rarely, bugs in the OS may cause «false positive» 0x124 events where the hardware wasn’t complaining but Windows thought
otherwise (because of the bug).
At the time of writing, Windows 7 is not known to suffer from any such defects, but it is nevertheless important to always keep Windows itself updated.
6) Attempt to (stress) test those hardware components which can be put through their paces artificially.
The most obvious examples are the RAM and HDD(s).
For the RAM, use the 3rd-party memtest86 utility to run many hours worth of testing. (6-8 passes to stress the ram out)
For hard drives, check whether CHKDSK /R finds any problems on the drive(s), notably «bad sectors».
Unreliable RAM, in particular, is deadly as far as software is concerned, and anything other than a 100% clear memory test result is cause for concern. Unfortunately, even a 100% clear result from the diagnostics utilities does not guarantee that the RAM is
free from defects — only that none were encountered during the test passes.
7) As the last of the non-invasive troubleshooting steps, perform a «vanilla» reinstallation of Windows: just the
OS itself without any additional applications, games, utilities, updates, or new drivers — NOTHING AT ALL that is not sourced from the Windows 7 disc.
Should that fail to mitigate the 0x124 problem, jump to the next steps.
If you run the «vanilla» installation long enough to convince yourself that not a single 0x124 crash has occurred, start installing updates and applications slowly, always pausing between successive additions long enough to get a feel for whether the machine
is still free from 0x124 crashes.
Should the crashing resume, obviously the very last software addition(s) may be somehow linked to the root cause.
If stop 0x124 errors persist despite the steps above, and the hardware is under warranty, consider returning it and requesting a replacement which does not suffer periodic MCE events.
Be aware that attempting the subsequent hardware troubleshooting steps may, in some cases, void your warranty:
Clean and carefully remove any dust from the inside of the machine.
Reseat all connectors and memory modules.
Use a can of compressed air to clean out the RAM DIMM sockets as much as possible.
9) If all else fails, start removing items of hardware one-by-one in the hope that the culprit is something non-essential
which can be removed.
Obviously, this type of testing is a lot easier if you’ve got access to equivalent components in order to perform swaps.Should
you find yourself in the situation of having performed all of the steps above without a resolution of the symptom, unfortunately the most likely reason is because the error message is literally correct — something is fundamentally wrong with the machine’s
hardware.More
advanced reading can be found here from a MS MVP IT PRO
Wanikiya and Dyami—Team Zigzag
-
Marked as answer by
ZigZag3143x
Thursday, January 16, 2014 1:30 AM
-
Marked as answer by
Введение
Вряд ли есть основания называть оптимистичными наши предыдущие обзоры четырёхъядерных процессоров AMD Phenom: к сожалению, AMD не смогла добиться паритета между своими и конкурирующими продуктами, идя по пути микроархитектурных усовершенствований, поэтому имевшиеся до настоящего времени на рынке CPU семейства Phenom проигрывали процессорам Core 2 Quad по быстродействию и уровню тепловыделения. Кроме того, AMD не смогла обеспечить и работоспособность Phenom на приемлемых тактовых частотах. Однако самым обидным недостатком новых четырёхъядерных CPU от AMD стало наличие в них серьёзной ошибки, так называемой «ошибки TLB», программное исправление которой значительно снижало производительность систем. И хотя проявлялась эта проблема в обычных настольных системах чрезвычайно редко, не повредить имиджу Phenom она не могла. Тем более что на серверном рынке эта проблема проявила себя, что называется «в полный рост», заставив AMD даже приостановить на время поставки четырёхъядерных процессоров Opteron с кодовым именем Barcelona.
Именно поэтому на скорейшее исправление пресловутой ошибки TLB «в железе» были брошены все инженерные силы – и это исправление не заставило себя долго ждать. Сегодня AMD официально объявляет о выпуске процессоров семейства Phenom, основанных на новом степпинге B3, который лишен пресловутой проблемы. Других усовершенствований новое ядро пока что не несёт, но, тем не менее, с его выпуском AMD несколько корректирует потребительские качества своих процессоров: немного подрастают тактовые частоты, немного снижается цена. И, в результате, обновлённые Phenom начинают выглядеть по-новому, привлекательнее, чем раньше.
Анонсируемая линейка процессоров Phenom степпинга B3 включает в себя четыре модели – 9550, 9650, 9750 и 9850 Black Edition. Младшие модели заменяют собой Phenom 9500 и Phenom 9600, две же старшие – поднимают планку тактовой частоты до 2,4 и 2,5 ГГц соответственно. Заметим, что последние две цифры «50» в процессорном номере указывают именно на принадлежность процессоров к новому степпингу, свободному от ошибки TLB. Тем не менее, новые Phenom при работе на одинаковых тактовых частотах со старыми моделями (с отключенным программным исправлением ошибки TLB) не должны демонстрировать никаких отличий с практической точки зрения. Преимущества нового степпинга заключаются исключительно в отсутствии необходимости использования патча, снижающего производительность, тем более, что его включение или отключение может требовать достаточных усилий и квалификации. В то время как большинство производителей материнских плат реализовало возможность активации или деактивации патча через BIOS Setup; Windows Vista SP1, который также содержит исправление ошибки, такого выбора уже не предоставляет, задействуя исправление вне зависимости от желания пользователя. И в этом случае избавиться от нежелательного эффекта снижения производительности в ущерб некоторой надёжности системы обладатели процессоров старого степпинга B2 могут лишь путём использования специализированных утилит, например, AMD Overdrive.
Кроме того, сегодня же компания AMD официально объявляет о выпуске своих трёхъядерных процессоров, известных ранее под кодовым именем Toliman. Пока что эти процессоры будут распространяться среди OEM партнёров компании и не будут доступны в рознице, поэтому их рассмотрение мы отложим на некоторое время – к тому же, пока они будут основываться на старом степпинге B2. Упомянуть же о трёхъядерных Phenom нас заставил тот факт, что AMD в очередной раз решила слегка изменить схему обозначения собственных CPU: четырёхъядерные Phenom теперь будут наименоваться «Phenom X4», трёхъядерные – «Phenom X3», а двухъядерным процессорам останется старое название «Athlon X2».
AMD Phenom X4 9850 Black Edition
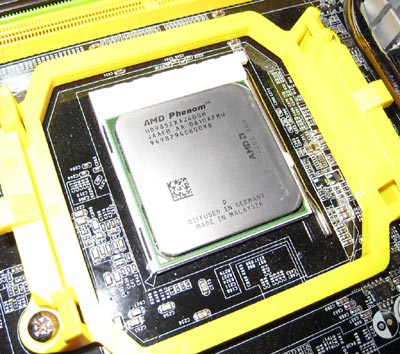
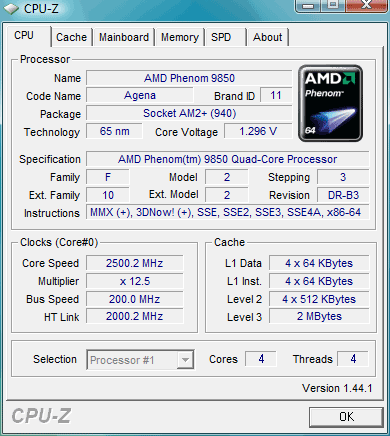
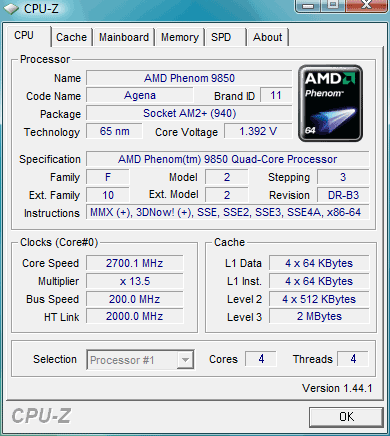
Для тестирования возможностей нового степпинга B3 компания AMD прислала нам свой процессор Phenom X4 9850 Black Edition. Это – новый старший представитель в линейке четырёхъядерных процессоров AMD, ориентированный на работу при частоте 2,5 ГГц, на 200 МГц превышающей частоту старшего процессора степпинга B2. Таким образом, компания AMD сумела, наконец, достигнуть своими четырёхъядерными CPU тактовой частоты, на которой работают младшие процессоры семейства Intel Core 2 Quad. Впрочем, этот рост частоты – экстенсивный, он обусловлен простым совершенствованием технологического процесса, так что новые процессоры с тактовыми частотами 2,4-2,5 ГГц имеют и более высокий уровень типичного тепловыделения, достигающий 125 Вт.
Помимо возросшей тактовой частоты и нового степпинга, Phenom X4 9850 выделяется и ещё одной особенностью: увеличенной до 2,0 ГГц частотой встроенного в процессор северного моста. Эта частота является определяющей для кэша третьего уровня и контроллера DDR2 SDRAM, поэтому можно ожидать, что Phenom X4 9850 работает с памятью несколько эффективнее предшественников. Впрочем, на формальных характеристиках поддерживаемой памяти это не сказалось: Phenom X4 9850 совместим с двухканальной DDR2-533/667/800/1066 SDRAM и поддерживает уже знакомые нам Ganged и Unganged режимы.
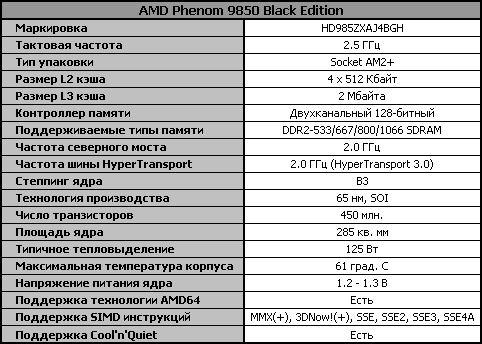
Полный список спецификаций Phenom X4 9850 Black Edition представлен ниже.
Необходимо упомянуть, что работа встроенного в процессор северного моста на частоте 2,0 ГГц – прерогатива исключительно Phenom X4 9850. Все остальные процессоры Phenom, включая и основанные на степпинге B3, оборудованы северным мостом, функционирующим на частоте 1,8 ГГц. Это же относится и шине HyperTransport 3.0: у Phenom X4 9850 она работает на 2,0 ГГц, в то время как остальные модели четырёхъядерных процессоров AMD используют 1,8-гигагерцовую шину.
Чтобы внести большую ясность в полную номенклатуру имеющихся на сегодняшний день моделей Phenom X4, приведём ещё одну небольшую таблицу.
Отметим, что поскольку Phenom X4 9850 относится к серии Black Edition, его ещё одной отличительной чертой является незафиксированный множитель, открывающий простор для разгона. Кстати, не-Black Edition модификацию этого процессора AMD пока выпускать не собирается.
Поскольку новый степпинг B3 не имеет никаких принципиальных отличий от B2, помимо исправления «ошибки TLB», все материнские платы, совместимые со старыми Phenom X4, могут работать и с новыми модификациями этого процессора.
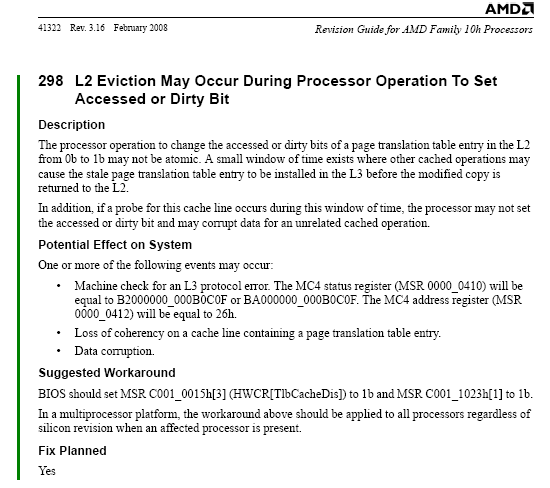
Описание пресловутой «ошибки TLB» нетрудно обнаружить в технической документации AMD, где она выступает в качестве ERRATA 298.
Суть проблемы сводится к тому, что при определённом трагическом стечении обстоятельств находящиеся в L2 кэше элементы таблицы трансляции адресов страниц, используемой операционной системой для преобразования виртуального адресного пространства в физические адреса, могут дублироваться в L3 кэше с неправильными установками флагов. А это как минимум противоречит эксклюзивной архитектуре кэш-памяти, а как максимум – может приводить к повреждению данных, если неправильная запись из общего разделяемого L3 кэша начнёт использоваться другим процессорным ядром. Согласно официальным документам, происходит такое дублирование лишь в одном достаточно редком случае: если во время изменения в L2 кэше состояния битовых флагов записи, относящейся к таблице трансляции адресов страниц, другой процесс вытесняет эту же запись в кэш третьего уровня.
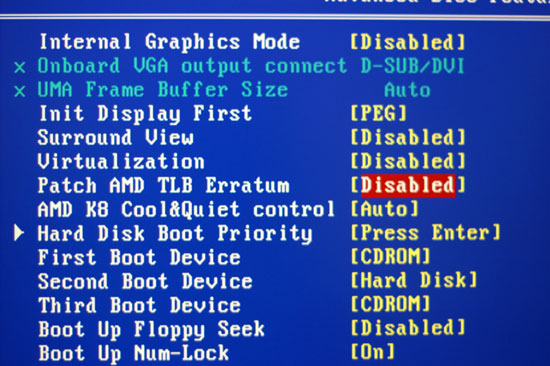
Реализованный по горячим следам патч, включающийся в BIOS Setup, решает указанную проблему кардинально: он просто запрещает кэширование таблицы адресов страниц. В результате, при каждом неуспешном поиске в TLB (Translation Lookaside Buffer), где хранится небольшое количество данных о прямых отображениях из виртуальной памяти в физическую, процессор вынужден обращаться к хранящейся в основной памяти и некэшируемой таблице страниц. Это, естественно, сильно увеличивает латентность подсистемы памяти, поэтому отказ от кэширования таблицы страниц нельзя назвать хорошим решением.
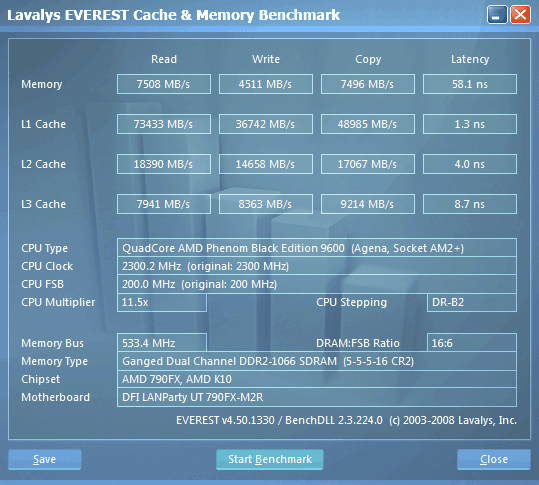
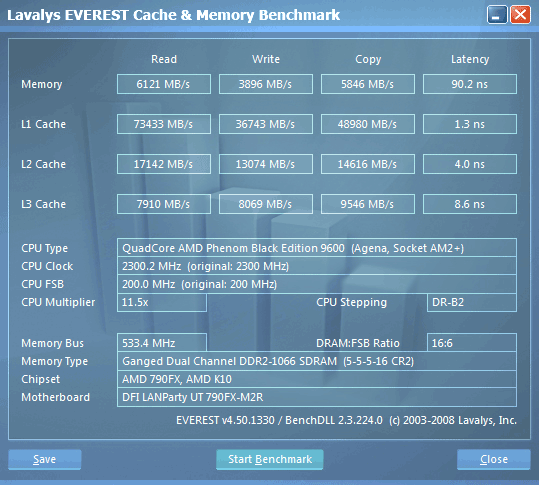
Даже самые простые синтетические тесты, измеряющие скорость подсистемы памяти, способны выявить драматически снижающееся быстродействие при активизации описанного топорного TLB-патча. Например, ниже мы приводим результаты измерения скорости работы подсистемы памяти, сделанные нами в системе с процессором Phenom X4 9600 степпинга B2 с включённым и выключенным патчем.
TLB-патч выключен
TLB-патч включён
Как видно по скриншотам, включение патча приводит к более чем 50-процентному росту латентности. Ухудшаются и результаты измерения практической пропускной способности. Как было нами показано в статье «Комплект для фанатов AMD: Phenom 9600 Black Edition + DFI LANParty UT 790FX-M2R», это находит отражение и в реальных приложениях, где производительность падает в среднем на 10 %, но в отдельных случаях может снижаться и более чем на 30 %.
Хотя число примеров, когда «ошибка TLB» приводит к серьёзным последствиям, весьма ограничено, и имеют шансы встретиться с ней лишь фатально невезучие пользователи настольных компьютеров, использующие специфическое программное обеспечение, аппаратное исправление ERRATA 298 стало для AMD одной из самых насущных задач.
Новый степпинг B3 решает проблему аппаратно, не снижая производительности и не принося в жертву кэширование таблицы страниц. По утверждениям представителей AMD, быстродействие обновлённых процессоров должно соответствовать производительности представителей степпинга B2 с выключенным патчем. Это можно подтвердить и результатами синтетических тестов: Phenom X4 9850 с пониженной до 2,3 ГГц тактовой частотой и встроенным северным мостом, работающим на 1,8 ГГц, выдаёт примерно те же показатели, что и Phenom 9600 с отключенным патчем.
Тем не менее, небольшие различия в показателях всё-таки можно отметить. Так, новый степпинг обеспечивает слегка худшую латентность при работе с памятью. Очевидно, что это несоответствие объясняется изменившимися алгоритмами работы с записями таблицы адресов страниц в кэш-памяти, которые не содержат теперь никаких потенциальных опасностей для данных. Впрочем, при сравнении производительности процессоров степпингов B2 и B3 в реальных приложениях это практически незаметно.
К сожалению, представители AMD не смогли объяснить нам, как же конкретно была решена проблема с «ошибкой TLB» в степпинге B3. Однако имеющаяся косвенная информация позволяет с некоторой доли вероятности говорить о том, что теперь при изменении ядром процессора флагов состояния элементов таблицы страниц, хранящихся в L2 кэше, они, по завершении этой операции, принудительно отправляются в кэш третьего уровня. Именно этим может и объясняться наблюдаемое незначительное увеличение латентности.
Что даёт ускорение контроллера памяти
Как мы указывали в предыдущих статьях, процессоры семейства Phenom обладают встроенным северным мостом, включающим контроллер памяти и L3 кэш, работающем на собственной частоте и напряжении, не зависящих от частоты и напряжения основной части процессорного ядра. Это сильно отличает Phenom от процессоров предыдущего поколения Athlon 64, в которых контроллер памяти работал на той же частоте, что и само ядро. Использование отдельной частоты для встроенного северного моста даёт возможность тактовать память независимо от процессорного ядра, что позволяет избавиться от «плавающих» от модели к модели частот DDR2 SDRAM. Контроллер памяти Phenom, вне зависимости от штатной частоты процессора, всегда правильно выставляет частоты для стандартных типов DDR2.
Во всех существующих процессорах Phenom, кроме старшей модели 9850, контроллер памяти и L3 кэш работали на частоте 1,8 ГГц. Phenom X4 9850 Black Edition отодвинул эту величину на 200 МГц, в нём частота встроенного северного моста выросла до 2,0 ГГц.
Соответственно, можно ожидать, что подсистема памяти этого CPU получила дополнительный прирост быстродействия. Мы решили отдельно обратить внимание на этот вопрос и сравнить скорость работы подсистемы памяти системы на базе Phenom X4 9850 Black Edition при работе северного моста CPU на штатной частоте 2,0 ГГц и при понижении этой частоты до используемых в младших моделях 1,8 ГГц.
Частота северного моста = 2,0 ГГц
Частота северного моста = 1,8 ГГц
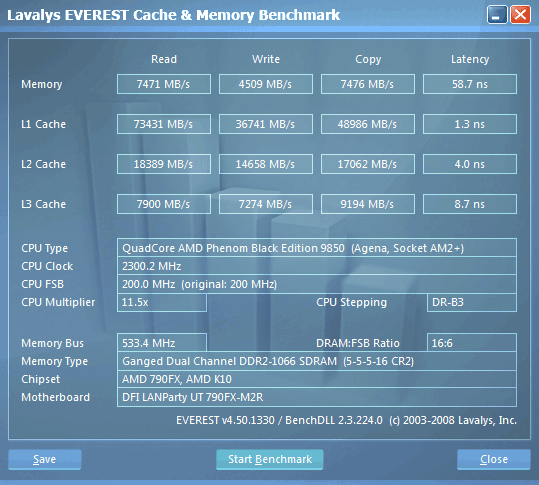
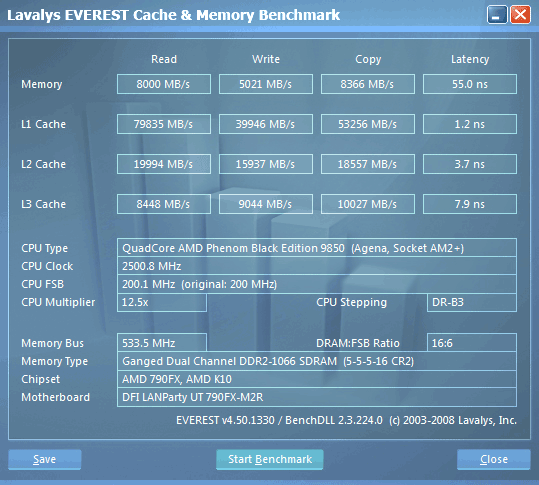
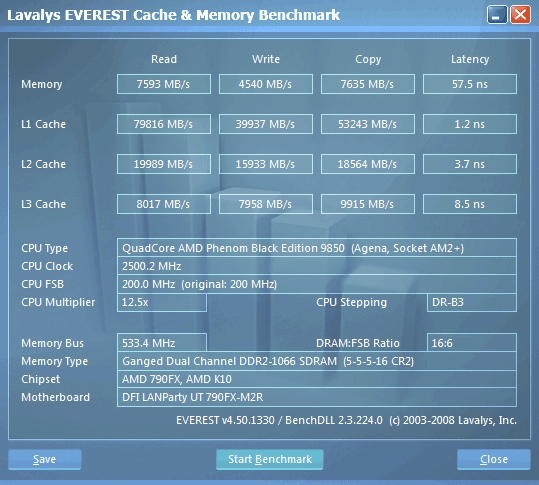
Результаты измерения практических характеристик подсистемы памяти говорят сами за себя. Увеличение частоты встроенного в процессор северного моста действительно положительно сказывается как на производительности L3 кэша, так и на скорости работы памяти.
Это, естественно, находит отражение и на быстродействии в реальных задачах, об этом говорит проведённое нами экспресс-тестирование.
В то же время надеяться на то, что частота северного моста ощутимо влияет на производительность, не следует. Уровень прироста быстродействия составляет не более 3 % в самом благоприятном случае. В среднем же, за счёт 200-мегагерцовой прибавки к скорости контроллера памяти и L3 кэша, удаётся выиграть не более 1 % в результатах тестов.
Разгон
Ещё один вопрос, который интересует энтузиастов в свете появления нового степпинга процессоров Phenom, это, безусловно, его частотный потенциал, который можно раскрыть через разгон. И хотя AMD всячески подчёркивает, что в новых процессорах его увеличению внимание не уделялось, надежда всё-таки оставалась.
Тем не менее, как показало практическое испытание Phenom X4 9850 Black Edition, чуда не произошло. Четырёхъядерные процессоры нового степпинга B3 разгоняются примерно так же, как и их предшественники степпинга B2. Так, увеличив напряжение питания нашего тестового экземпляра со штатных 1,3 В до 1,4 В, мы смогли достичь лишь частоты 2,7 ГГц. В таком состоянии при использовании для отвода тепла от CPU воздушного кулера Zalman CNPS9700 LED система демонстрировала абсолютную стабильность.
Разгон, как видно из скриншота, проводился увеличением множителя, так как в процессорах серии Black Edition, к которой относится и Phenom X4 9850, он не зафиксирован. Впрочем, возможность его изменения вряд ли может поднять интерес к этому процессору со стороны оверклокеров, так как полученный 8-процентный прирост частоты выглядит, мягко говоря, несерьёзно. Особенно, если вспомнить, как способны разгоняться конкурирующие процессоры Core 2 Quad.
К сожалению, улучшить достигнутый результат мы не смогли даже с дополнительным увеличением напряжения питания процессорного ядра и встроенного северного моста. Таким образом, какие-то значительные подвижки в части роста частотного потенциала четырёхъядерных процессоров AMD можно ожидать лишь только после перевода их производства на 45-нм технологический процесс.
Как мы тестировали
Честно говоря, целесообразность тестирования Phenom X4 9850 Black Edition в рамках этой статьи можно поставить под сомнение. Наши предыдущие обзоры уже рассеяли всякие иллюзии по части уровня производительности Phenom, а кроме того, мы уже выяснили, что для полноценного соперничества с младшими моделями четырёхъядерных процессоров Intel Core 2 Quad частоты Phenom должны быть повышены как минимум до 2,7-2,8 ГГц. Ничем таким Phenom X4 9850 похвастать не может.
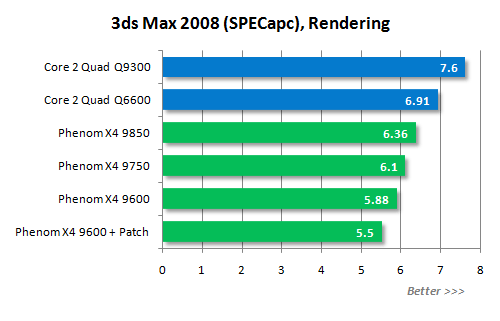
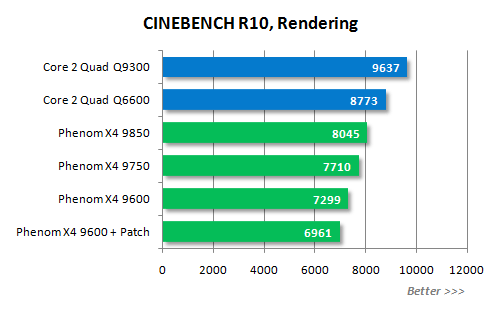
Тем не менее, тесты – одна из традиционных частей обзоров процессоров, поэтому пренебрегать ей мы всё же не решились. Phenom X4 9850 Black Edition мы решили сравнить с четырёхъядерными процессорами Intel, предлагаемыми в той же ценовой категории. Сегодня Intel готов предложить два таких процессора – Core 2 Quad Q6600 и более новый Core 2 Quad Q9300, входящий в семейство Penryn. Обратите внимание, Phenom X4 9850 и Core 2 Quad Q9300 работают на одинаковой тактовой частоте 2,5 ГГц, что может рассматриваться в качестве хоть какой-то интриги в тестировании.
Кроме того, среди результатов тестов вы найдёте показатели быстродействия более дешёвого Phenom X4 9750 и старшего процессора степпинга B2, Phenom X4 9600, для которого на графиках будет указано по два результата – без патча и с ним.
Ниже следует подробное описание тестовых систем.
Платформа AMD:
Процессоры:
AMD Phenom X4 9850 (Socket AM2+, 2,5 ГГц, 4 x 512 Кбайт L2, 2 Мбайта L3, Agena).
AMD Phenom X4 9750 (Socket AM2+, 2,4 ГГц, 4 x 512 Кбайт L2, 2 Мбайта L3, Agena).
AMD Phenom X4 9600 (Socket AM2+, 2,3 ГГц, 4 x 512 Кбайт L2, 2 Мбайта L3, Agena).
Материнская плата: DFI LANParty UT 790FX-M2R (Socket AM2+, AMD 790FX).
Память: 2 Гбайта DDR2-1066 с таймингами 5-5-5-15-2T (Corsair Dominator TWIN2X2048-10000C5DF).
Графическая карта: OCZ GeForce 8800GTX (PCI-E x16).
Дисковая подсистема: Western Digital WD1500AHFD (SATA150).
Операционная система: Microsoft Windows Vista x86.
Платформа Intel:
Процессоры:
Intel Core 2 Duo Q9300 (LGA775, 2,5 ГГц, 1333 МГц FSB, 2 x 3 Мбайт L2, Yorkfield);
Intel Core 2 Duo Q6600 (LGA775, 2,4 ГГц, 1066 МГц FSB, 2 x 4 Мбайт L2, Kentsfield).
Материнская плата: ASUS P5E (LGA775, Intel X38, DDR2 SDRAM).
Память: 2 Гбайта DDR2-1066 с таймингами 5-5-5-15 (Corsair Dominator TWIN2X2048-10000C5DF).
Графическая карта: OCZ GeForce 8800GTX (PCI-E x16).
Дисковая подсистема: Western Digital WD1500AHFD (SATA150).
Операционная система: Microsoft Windows Vista x86.
Производительность
3D игры
Кодирование медиаконтента
Финальный рендеринг
Другие приложения
Все использовавшиеся нами тестовые приложения солидарны в одном: новый Phenom X4 9850 Black Edition работает все ещё медленнее, чем самые младшие четырёхъядерные процессоры Intel. Так что о прямой конкуренции между четырёхъядерниками производства AMD и Intel речь вести пока ещё рано.
Выводы
Нельзя сказать, что четырёхъядерные процессоры AMD, основанные на новом степпинге B3, смогли нас приятно удивить. По сравнению с четырёхъядерными процессорами Intel, они продолжают выглядеть совершенно неубедительно, отставая от них по производительности, энергопотреблению и разгонным характеристикам.
Тем не менее, нельзя не подчеркнуть тот факт, что AMD встала на правильный путь и попыталась улучшить линейку Phenom X4 всеми доступными на данный момент средствами. Так, оперативно исправлена проблема TLB, сильно вредившая имиджу всех CPU с микроархитектурой K10. Кроме того, по возможности, увеличены тактовые частоты предлагаемых процессоров – старшие модели Phenom X4 даже смогли догнать по своей частоте младших представителей линейки Core 2 Quad. К сожалению, о паритете с точки зрения производительности речь пока не идёт, но отставание предложений AMD, несомненно, сократилось.
Но самое важное – это то, что AMD обоснованно скорректировала свою ценовую политику. В частности, официальная цена на AMD Phenom X4 9850 Black Edition установлена на уровне 235 долларов, что ниже стоимости самого дешёвого четырёхъядерного процессора, предлагаемого Intel. AMD Phenom X4 9750 при этом будет стоить 215 долларов, а младший процессор, Phenom X4 9550, оценён в 195 долларов. Таким образом, AMD наконец-то избавилась от необоснованных иллюзий и намерена предлагать свои Phenom X4 по справедливым, соответствующим уровню их производительности ценам.
Разумеется, на первых порах московские розничные цены на новые процессоры Phenom окажутся выше официальных цен AMD, однако то же самое можно сказать и про цены на процессоры Intel – а значит, разрыв в стоимости в пользу AMD, скорее всего, сохранится.
А это значит, что четырёхъядерные процессоры AMD приобретают некоторую актуальность в качестве основы для недорогих многопоточных систем, которые могут быть интересны определённой категории пользователей, например, как недорогие компьютеры для рендеринга или для обработки и кодирования медиаконтента.
В заключение заметим, что начинающие сегодня распространяться среди OEM-партнёров AMD трёхъядерные процессоры могут иметь лучший маркетинговый потенциал, чем Phenom X4 в его сегодняшнем виде. Ведь их цены, несмотря на значительную вычислительную мощность (в многопоточных задачах), ещё более демократичны: Phenom X3 8600, работающий на частоте 2,3 ГГц, по официальному прайс-листу AMD будет стоить 175 долларов, а Phenom X3 8400 с частотой 2,1 ГГц – порядка 150 долларов. Однако наше знакомство с трёхъядерными Phenom X3 состоится несколько позднее, когда эти процессоры будут переведены на степпинг B3 и начнут распространяться в розницу.
Уточнить наличие и стоимость процессоров AMD Phenom
Другие материалы по данной теме
Младший из Yorkfield: обзор Core 2 Quad Q9300
Современные двухъядерные процессоры: сравнительное тестирование
Celeron E1200: двухъядерный процессор за смешные деньги

