![]()
Download Article
![]()
Download Article
Have you ever cracked your favorite ceramic mug or piece of pottery? You might be wondering what you can do to fix it. The good news is it’s actually pretty easy to repair cracked or chipped ceramic. You just need to use the right adhesive. To make it easier, we’ve answered some of the most common question that people have about repairing cracked ceramic.[1]
-

Yes, you can repair ceramic household items with glue. A cracked ceramic mug, plate, or even tile can be repaired and look almost as good as new if you have all of the pieces. A strong adhesive will dry and cure to form a strong bond that will allow you to continue using the item. So don’t throw out that mug because the handle broke off or there’s a crack in the lip![2]

Advertisement
-
Super glue is the best glue to use for simple repairs. While you can use epoxy to repair ceramic, the simplest and best overall choice is super glue. It’s fast, it’s easy, and it’s effective. Choose a quality brand such as Gorilla Super Glue or Krazy Glue.[3]
- If you do choose to go with epoxy, choose a quality and dependable brand like JB Weld, which is simple to apply and sets quickly.
- If you’re repairing ceramic that’s exposed to a lot of water or the outside elements, choose a waterproof version of super glue.

-
1
Apply super glue to the crack and hold it in place for 1-2 minutes. If there’s a small gap in the crack, press both sides together. Use the applicator tip of the super glue to apply the glue directly into the crack. Wait for about 1-2 minutes to allow the glue to soak into the crack and form a bond.[4]
-
2
Wipe away the excess glue before it fully dries. Because the hairline crack is so small, it’s likely that you’ll have some excess glue on the surface of the mug. No worries. As soon as you allow the glue to seep into the crack for a minute or so, take a clean cloth and wipe away any excess glue from the surface so it doesn’t have a chance to fully set.[5]


Advertisement
-
1
Apply adhesive to the sides of the crack and press the pieces together. You can use either super glue or a 2-part epoxy. If you choose to use epoxy, make sure you mix both parts together according to the instruction on the packaging. Apply the glue to the edges of the crack and then hold the broken pieces together for a few seconds so the form a bond.[6]
- The adhesive is not fully dry yet, so don’t immediately use the bowl!
-
2
Allow the adhesive to dry and then scrape off the excess. Wait about 10 minutes for the adhesive to dry and harden. Then, use a metal scraper or a kitchen knife to scrape off any adhesive that was pushed out of the crack so the surface is nice and smooth.[7]


Advertisement
-
1
Clean off the pieces with rubbing alcohol. Use rubbing alcohol and a clean cloth to wipe down the pottery. Remove any dust or dirt from the surface and scrub off any old adhesive that may be on the surface so the new adhesive can bond more effectively.[8]
-
2
Apply 2-part epoxy to 1 side and hold the pieces together. Mix together 2-part epoxy according to the directions on the packaging and then spread a thin layer on 1 side of the chipped pottery. Then, press the broken piece back into place and hold it for about a minute so it bonds.[9]
- Epoxy is a better choice for chipped pottery because it will fill in the space more effectively than super glue.
-
3
Allow the epoxy to cure for an hour and then scrape off the excess. When you press the chipped piece back into place, some of the epoxy may squeeze out between the crack. That’s okay. Allow the epoxy to fully cure and harden and then take a razor blade and scrape off the excess.[10]


Advertisement
Add New Question
-
Question
How can I repair cracked pottery?

Natasha Dikareva is a San Francisco, California based sculptor, and installation artist. With over 25 years of ceramics, sculpting, and installation experience, Natasha also teaches a ceramic sculpture workshop titled «Adventures in Clay» covering concept development, hand-building techniques, texture, and glazing techniques. Her work has been featured in solo and group exhibitions at the Beatrice Wood Center for the Arts, Abrams Claghorn Gallery, Bloomington Center for the Arts, Maria Kravetz Gallery, and the American Museum of Ceramic Art. She has taught at the University of Minnesota and the American Indian OIC School. She has been awarded the Excellence Award at the 1st World Teapot Competition, Best in Show at the 4th Clay & Glass Biennial Competition, and a Grand Prize at the American Museum of Ceramic Art. Natasha holds an MFA from the University of Minnesota and a BFA from Kiev Fine Arts College.
Ceramics & Sculpting Instructor
Expert Answer
You can fix a crack in pottery in several ways. Use vinegar or buy magic water to repair cracks in a sculpture. Otherwise, make the crack bigger and fill a mixture of the same clay and some particles of fire clay.
-
Question
What can I use to paint ceramic?
Natasha Dikareva is a San Francisco, California based sculptor, and installation artist. With over 25 years of ceramics, sculpting, and installation experience, Natasha also teaches a ceramic sculpture workshop titled «Adventures in Clay» covering concept development, hand-building techniques, texture, and glazing techniques. Her work has been featured in solo and group exhibitions at the Beatrice Wood Center for the Arts, Abrams Claghorn Gallery, Bloomington Center for the Arts, Maria Kravetz Gallery, and the American Museum of Ceramic Art. She has taught at the University of Minnesota and the American Indian OIC School. She has been awarded the Excellence Award at the 1st World Teapot Competition, Best in Show at the 4th Clay & Glass Biennial Competition, and a Grand Prize at the American Museum of Ceramic Art. Natasha holds an MFA from the University of Minnesota and a BFA from Kiev Fine Arts College.
Ceramics & Sculpting Instructor
Expert Answer
You can use acrylics or oil paint. If you use oil paint, the drying process may be slower.
-
Question
How can I transfer images onto ceramic?
Natasha Dikareva is a San Francisco, California based sculptor, and installation artist. With over 25 years of ceramics, sculpting, and installation experience, Natasha also teaches a ceramic sculpture workshop titled «Adventures in Clay» covering concept development, hand-building techniques, texture, and glazing techniques. Her work has been featured in solo and group exhibitions at the Beatrice Wood Center for the Arts, Abrams Claghorn Gallery, Bloomington Center for the Arts, Maria Kravetz Gallery, and the American Museum of Ceramic Art. She has taught at the University of Minnesota and the American Indian OIC School. She has been awarded the Excellence Award at the 1st World Teapot Competition, Best in Show at the 4th Clay & Glass Biennial Competition, and a Grand Prize at the American Museum of Ceramic Art. Natasha holds an MFA from the University of Minnesota and a BFA from Kiev Fine Arts College.
Ceramics & Sculpting Instructor
Expert Answer
You can do screen printing. For this, you need a printer that has iron oxide. You have to fire the piece after using this method. Or you can buy prints known as decals. They do not require firing. You have to put them in water and wait for the printed image to separate from the paper. Then you apply it to the piece. You should do this carefully and remove all the air bubbles from underneath.

Ask a Question
200 characters left
Include your email address to get a message when this question is answered.
Submit
Advertisement
-
Don’t try to use craft glue or other types of glue to fix ceramic because it may not be strong enough to repair it and it may contain toxic chemicals.
Advertisement
References
About This Article
Thanks to all authors for creating a page that has been read 31,044 times.
Did this article help you?
![]()
Download Article
![]()
Download Article
Have you ever cracked your favorite ceramic mug or piece of pottery? You might be wondering what you can do to fix it. The good news is it’s actually pretty easy to repair cracked or chipped ceramic. You just need to use the right adhesive. To make it easier, we’ve answered some of the most common question that people have about repairing cracked ceramic.[1]
-
Yes, you can repair ceramic household items with glue. A cracked ceramic mug, plate, or even tile can be repaired and look almost as good as new if you have all of the pieces. A strong adhesive will dry and cure to form a strong bond that will allow you to continue using the item. So don’t throw out that mug because the handle broke off or there’s a crack in the lip![2]
Advertisement
-
Super glue is the best glue to use for simple repairs. While you can use epoxy to repair ceramic, the simplest and best overall choice is super glue. It’s fast, it’s easy, and it’s effective. Choose a quality brand such as Gorilla Super Glue or Krazy Glue.[3]
- If you do choose to go with epoxy, choose a quality and dependable brand like JB Weld, which is simple to apply and sets quickly.
- If you’re repairing ceramic that’s exposed to a lot of water or the outside elements, choose a waterproof version of super glue.
-
1
Apply super glue to the crack and hold it in place for 1-2 minutes. If there’s a small gap in the crack, press both sides together. Use the applicator tip of the super glue to apply the glue directly into the crack. Wait for about 1-2 minutes to allow the glue to soak into the crack and form a bond.[4]
-
2
Wipe away the excess glue before it fully dries. Because the hairline crack is so small, it’s likely that you’ll have some excess glue on the surface of the mug. No worries. As soon as you allow the glue to seep into the crack for a minute or so, take a clean cloth and wipe away any excess glue from the surface so it doesn’t have a chance to fully set.[5]
Advertisement
-
1
Apply adhesive to the sides of the crack and press the pieces together. You can use either super glue or a 2-part epoxy. If you choose to use epoxy, make sure you mix both parts together according to the instruction on the packaging. Apply the glue to the edges of the crack and then hold the broken pieces together for a few seconds so the form a bond.[6]
- The adhesive is not fully dry yet, so don’t immediately use the bowl!
-
2
Allow the adhesive to dry and then scrape off the excess. Wait about 10 minutes for the adhesive to dry and harden. Then, use a metal scraper or a kitchen knife to scrape off any adhesive that was pushed out of the crack so the surface is nice and smooth.[7]
Advertisement
-
1
Clean off the pieces with rubbing alcohol. Use rubbing alcohol and a clean cloth to wipe down the pottery. Remove any dust or dirt from the surface and scrub off any old adhesive that may be on the surface so the new adhesive can bond more effectively.[8]
-
2
Apply 2-part epoxy to 1 side and hold the pieces together. Mix together 2-part epoxy according to the directions on the packaging and then spread a thin layer on 1 side of the chipped pottery. Then, press the broken piece back into place and hold it for about a minute so it bonds.[9]
- Epoxy is a better choice for chipped pottery because it will fill in the space more effectively than super glue.
-
3
Allow the epoxy to cure for an hour and then scrape off the excess. When you press the chipped piece back into place, some of the epoxy may squeeze out between the crack. That’s okay. Allow the epoxy to fully cure and harden and then take a razor blade and scrape off the excess.[10]
Advertisement
Add New Question
-
Question
How can I repair cracked pottery?
Natasha Dikareva is a San Francisco, California based sculptor, and installation artist. With over 25 years of ceramics, sculpting, and installation experience, Natasha also teaches a ceramic sculpture workshop titled «Adventures in Clay» covering concept development, hand-building techniques, texture, and glazing techniques. Her work has been featured in solo and group exhibitions at the Beatrice Wood Center for the Arts, Abrams Claghorn Gallery, Bloomington Center for the Arts, Maria Kravetz Gallery, and the American Museum of Ceramic Art. She has taught at the University of Minnesota and the American Indian OIC School. She has been awarded the Excellence Award at the 1st World Teapot Competition, Best in Show at the 4th Clay & Glass Biennial Competition, and a Grand Prize at the American Museum of Ceramic Art. Natasha holds an MFA from the University of Minnesota and a BFA from Kiev Fine Arts College.
Ceramics & Sculpting Instructor
Expert Answer
You can fix a crack in pottery in several ways. Use vinegar or buy magic water to repair cracks in a sculpture. Otherwise, make the crack bigger and fill a mixture of the same clay and some particles of fire clay.
-
Question
What can I use to paint ceramic?
Natasha Dikareva is a San Francisco, California based sculptor, and installation artist. With over 25 years of ceramics, sculpting, and installation experience, Natasha also teaches a ceramic sculpture workshop titled «Adventures in Clay» covering concept development, hand-building techniques, texture, and glazing techniques. Her work has been featured in solo and group exhibitions at the Beatrice Wood Center for the Arts, Abrams Claghorn Gallery, Bloomington Center for the Arts, Maria Kravetz Gallery, and the American Museum of Ceramic Art. She has taught at the University of Minnesota and the American Indian OIC School. She has been awarded the Excellence Award at the 1st World Teapot Competition, Best in Show at the 4th Clay & Glass Biennial Competition, and a Grand Prize at the American Museum of Ceramic Art. Natasha holds an MFA from the University of Minnesota and a BFA from Kiev Fine Arts College.
Ceramics & Sculpting Instructor
Expert Answer
You can use acrylics or oil paint. If you use oil paint, the drying process may be slower.
-
Question
How can I transfer images onto ceramic?
Natasha Dikareva is a San Francisco, California based sculptor, and installation artist. With over 25 years of ceramics, sculpting, and installation experience, Natasha also teaches a ceramic sculpture workshop titled «Adventures in Clay» covering concept development, hand-building techniques, texture, and glazing techniques. Her work has been featured in solo and group exhibitions at the Beatrice Wood Center for the Arts, Abrams Claghorn Gallery, Bloomington Center for the Arts, Maria Kravetz Gallery, and the American Museum of Ceramic Art. She has taught at the University of Minnesota and the American Indian OIC School. She has been awarded the Excellence Award at the 1st World Teapot Competition, Best in Show at the 4th Clay & Glass Biennial Competition, and a Grand Prize at the American Museum of Ceramic Art. Natasha holds an MFA from the University of Minnesota and a BFA from Kiev Fine Arts College.
Ceramics & Sculpting Instructor
Expert Answer
You can do screen printing. For this, you need a printer that has iron oxide. You have to fire the piece after using this method. Or you can buy prints known as decals. They do not require firing. You have to put them in water and wait for the printed image to separate from the paper. Then you apply it to the piece. You should do this carefully and remove all the air bubbles from underneath.
Ask a Question
200 characters left
Include your email address to get a message when this question is answered.
Submit
Advertisement
-
Don’t try to use craft glue or other types of glue to fix ceramic because it may not be strong enough to repair it and it may contain toxic chemicals.
Advertisement
References
About This Article
Thanks to all authors for creating a page that has been read 31,044 times.
Did this article help you?
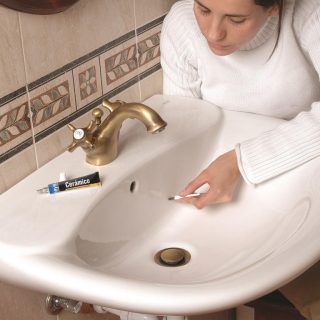
Не всегда есть возможность приобрести новую раковину из керамики для ванной или кухни, когда случилась неприятность с существующей.
Если процесс необратим и поломка серьезная, то остается только вариант замены. Но бывают случаи, когда возникают незначительные дефекты, от которых можно избавиться путем ремонта.
Рассмотрим информацию о том, как заделать скол на керамической раковине, чтобы не осталось видимых следов.
Что стоит учитывать
Чтобы не приходилось задаваться вопросом: что делать, постарайтесь заранее побеспокоиться о профилактике. Не лейте в раковину кипяток, например, не сливайте воду от только что сваренной картошки. И уж, конечно же, не включайте следом холодную. Таких температурных перепадов даже сильный материал не выдержит.
Естественно, будьте осторожны, когда держите тяжелые банки, сковородки или кастрюли. Не уроните их, иначе трещины вам почти со 100%-ной вероятностью обеспечены.
Люди часто относятся к раковинам как к незначительному дополняющему предмету в доме. Но если уделить ей хоть немного внимания и постараться обращаться с ней бережнее, она будет служить вам долго и никакого ремонта не потребует.
Смотрите также
Вам понадобится:
- щетка;
- средства для обезжиривания и очищения;
- шпатель;
- шпаклевочная смесь;
- специальный спрей с краской, чтобы закрасить шов, он должен подходить для эмалированных поверхностей;
- наждачная бумага.
Реставрация раковины, маскировка трещин
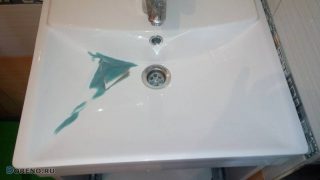
Керамика имеет свойство трескаться, особенно опасны для нее удары или такой процесс происходит со временем. Вот тогда и возникает вопрос, как заделать трещину в керамической раковине и придать ей опрятный вид.
Часто используются для таких работ специально разработанные герметики, которые являются водостойкими. Следует приобрести в магазине подходящий для керамической раковины состав хорошего качества и просто замазать им трещины.
Естественно следует предварительно очистить место ремонта от ржавчины, плесени и жира, просушить. Теперь вы точно знаете, как заделать трещину и можете смело идти в магазин за материалами.
Устранение скола
Игнорирование проблемы может привести к увеличению повреждения, поэтому надбитую раковину нужно реставрировать самостоятельно или доверить это дело профессионалу. Перед тем как убрать скол на раковине из керамики, подготовьте необходимые инструменты и материалы: щетку, обезжириватель, шпатель, шпаклёвку, краску для эмали, наждачку.

Очерёдность действий:
- Очистите скол от пыли, грязи и влаги при помощи кисти и наждачной бумаги.
- Высушите место повреждения феном. Не стоит пользоваться тканью, салфеткой или тряпкой, чтобы на покрытии не осталось ворсинок.
- Нанесите на скол шпаклёвочную смесь, разровняйте шпателем и дайте поверхности полностью высохнуть.
- Ошкурьте раковину наждачной бумагой, пока стык между эмалью и трещиной станет незаметным на ощупь.
- Обезжирьте поверхность изделия ацетоном.
- Покройте проблемное место краской из аэрозольного баллончика. Используйте высокотемпературное и влагостойкое средство под цвет эмали. Наносить краску следует в несколько слоёв.
- Оставьте раковину сохнуть на 3–4 дня.
- Отполируйте поверхность изделия наждачкой-нулёвкой.
В случае сильного повреждения раковину лучше заменить, чтобы в будущем избежать новых трещин.
Способы реставрации керамических раковин и моек из искусственного камня
Керамические раковины и сантехника из искусственного камня имеют много достоинств: они эстетично выглядят, долго служат, доступны по цене.
Но даже самой качественной модели может потребоваться обновление. Работа выполняется несколькими способами:
- Восстановление эпоксидной эмалью – оптимальное решение, если хочется покрасить раковину быстро и недорого.
- Реставрация наливным акрилом. Такой способ обработки позволяет устранить более серьезные повреждения (например, сколы). Этот вариант выбирают, когда нужно вернуть к жизни треснувшую ванну.
- Локальный ремонт повреждений. Материал для точечного ремонта мастер подбирает индивидуально.
Чтобы обновленная мойка служила долго, ее нужно беречь. От привычки ставить в раковину тарелки с остатками еды лучше избавиться. Место пищевых отходов – в мусорном ведре. После мытья посуды мойку нужно ополоснуть и протереть. В процессе уборки не стоит пользоваться жесткими металлическими щетками – они оставляют царапины.
Смотрите также
Предотвращение образования трещин и сколов
Основная причина появления сколов на раковинах (мойках) — это ударение тяжёлыми твердыми предметами, например, падение кастрюли или сковородки на кухне или падение флакона с туалетной водой в ванной. Такие повреждения — это следствие собственной неосторожности, их предотвратить сложно.
Более распространённый случай — резкий перепад температур, например, при сливе горячей воды в холодную мойку. Образования трещин в таких ситуациях, практически, не избежать. От резкого перепада температуры раковина может даже расколоться и поранить находящихся рядом людей. Будьте осторожны!
Даже если у вас мойка из нержавейки (естественно, она не расколется), не следует сливать в неё очень горячую воду — кипяток негативно влияет на резиновые прокладки сифона и канализационной подводки.
Предотвращающие действие самые простые — если вам нужно слить кипяток в раковину, предварительно откройте холодную воду на смесителе. Горячую воду стоит сливать постепенно, чтобы её температура уменьшалась, смешиваясь с потоком воды из смесителя.
Источники:
- https://stroybud.com/remont-keramicheskoy-rakovinyi-kak-zadelat-skol-ili-treshhinu/
- https://mostech-group.ru/nelzya/pochemu-na-rakovine-poyavilis-treschiny/
- https://pristor.ru/kak-i-chem-zadelat-skol-rakoviny-v-domashnix-usloviyax-luchshie-sposoby/
- https://santatrade.ru/skol-rakoviny-chem-zamazat/
- https://interquartz.ru/stati/skol-na-keramicheskoy-rakovine
- https://restavracia-vann.ru/restavraciya-rakovin/
- https://NiceDeck.ru/uborka/remont-rakoviny-iz-iskusstvennogo-kamnya-svoimi-rukami.html
![]()
Download Article
![]()
Download Article
Pottery is a subset under the broader category of ceramics, and it’s commonly used for everyday life, like eating and drinking. Pottery and ceramics in general can often be repaired using the same methods. So, the next time your favorite piece of pottery gets cracked or chipped, don’t even consider throwing it out! Instead, try fixing it first. A 2-part epoxy adhesive can work wonders and repair broken pieces of pottery so that they look almost-new once again, and you can fill chips with an epoxy filler.[1]
-
1
Fill a 1 gallon (3.8 L) bucket with sand to use as a holder. This won’t be necessary for all repairs, but it can be really helpful for items that need to be fixed while held at an angle. Nestle the broken pottery piece into the sand so that the cracked section is facing up. This enables you to use both hands to make the repairs.[2]
- If you don’t have sand, you can also use rice to the same effect.
- You could also use a large pot, a shallow serving dish, or something similar to hold the sand as long as it’s deep enough to fully support the pottery.
-
2
Sand the edges of the chipped area to smooth ragged edges. Use fine sandpaper on both the edges of the broken-off piece and the main piece of pottery. Use a back and forth motion with light pressure until the edges are smooth.[3]
- If you’re fixing a crack rather than a full break, you don’t need to worry about sanding the piece at this point.
Advertisement
-
3
Clean the broken pieces with denatured or 91% alcohol and cotton balls. Wipe down the edges both from the main piece of pottery and from the broken-off piece. Let them air dry completely afterwards before moving on to the next step.[4]
- This will ultimately help the adhesive do its job better as there won’t be any dirt in the way.
-
4
Mix a 2-part epoxy adhesive to fill cracks and reattach broken pieces.[5]
Squeeze the epoxy onto a non-porous disposable surface, like a thin sheet of plastic, and use a wooden or plastic stick to mix together the 2 components as quickly as possible. It’ll start to harden after 3 to 4 minutes, so you need to work fast.- Some 2-part epoxies come in a container with a syringe that will distribute both parts equally for you. If yours doesn’t come with that, disperse each part of the epoxy in lines so that you can gauge by eye that the 2 components are equal.
- Avoid using superglue for repairs. Superglue is very thin, and while it’s strong, it won’t protect your pottery from future breakages along the same cracks as well as epoxy will.
Warning: If your piece of pottery is used with food, like a mug or a soup bowl, look for a food-safe adhesive or one that is silicone based.[6]
There are both epoxies and other types of adhesives that are FDA-approved for food safety. -
5
Apply the epoxy to each edge of the broken sections. Use the wooden or plastic stick to line the edges of the piece of pottery as well as the cracked piece with epoxy. Don’t worry about using too much or if it is going over the edges—you’ll be able to remove that excess epoxy later on.
- If you’re working with a crack rather than a break, use a toothpick to apply the epoxy to the crack. Push the epoxy into the crack as far as you can, then squeeze the piece together so the crack adheres back together.
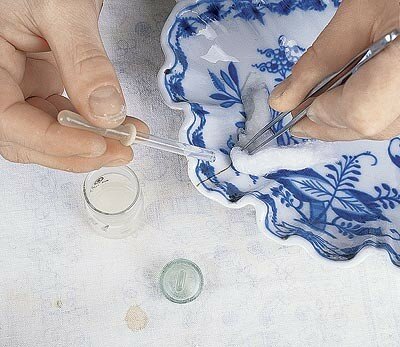
Tip: Hold small pieces of broken pottery with tweezers while you apply the epoxy to keep your fingers clean.
-
6
Press the broken section back into place as firmly as you can. It’s totally okay if epoxy squeezes out around the edges. Get it in line as perfectly as you can and hold it in place for about 30 seconds or as long as the epoxy directions instruct.
- If you’re worried about getting the adhesive onto your hands, wear a pair of rubber gloves while you work.
- If there is more than one piece to reattach, do one at a time rather than trying to do them all at once.
- If the pieces aren’t staying together well because of the position of the pottery, use a small piece of modeling clay to pinch the edges together. It’ll come right off once the piece has fully dried.
-
7
Scrape away the excess epoxy with a razor after 20 minutes. You can use a razor blade or a sharp, flat-edged knife. Simply run the blade along the surface of the piece of pottery and slice off any sections of raised dried epoxy.
- Most fast-acting epoxies take about 20 minutes to fully set, but always follow the instructions for whatever brand you’re using.
-
8
Sand over the edges of the cracks to make the surface perfectly smooth. Take 220-grit sandpaper and rub it very lightly over the sealed cracks on your piece of pottery. This will just finish the process so that there are absolutely no bumps or imperfections on your piece.[7]
- To double-check the surface run your thumb over the sealed cracks. The sensitivity in your finger should allow you to easily feel if there are more sections that need to be sanded.
-
9
Paint over the repaired cracked lines if desired. You may not want to or need to do this since the epoxy dries clear, but if you think the cracks are too visible, use acrylic paint to cover those lines.[8]
Mix your colors carefully to get as close a match to the original color as possible.[9]
- You can also spray an acrylic gloss over the repaired area if the rest of the piece is shiny and you want the crack lines to be less noticeable.


Advertisement
-
1
Wipe off dust and grime from the pottery with a swab of alcohol. Use denatured alcohol or 91% alcohol and a cotton ball. Let the item air dry completely before moving on to the next step.[10]
- Don’t skip this part even if you can’t see any visible grime in the chip. There could be built up oils or residue that you can’t see but that could get in the way of the epoxy adhering to the pottery.
-
2
Use 2-part epoxy filler to fill in chips in your pottery.[11]
You can buy epoxy filler online or at a home improvement store. Most brands come with 2 components: the filler and a hardener that has to be mixed with the filler once it’s ready to be used.[12]
- You could also use a polyester filler to the same effect. Polyester filler tends to be a little less expensive than epoxy filler, but the epoxy filler is usually a little easier to handle and takes less time to dry.
-
3
Follow the instructions and mix the filler and the hardener. Squeeze out enough filler to completely fill the chip you’re repairing. Read the directions to determine how much hardener you need to mix in with the filler so that it’ll work properly.[13]
- Work quickly—the hardener will only allow you 4 to 5 minutes to work with the filler before it gets too stiff to be pliable still.
- For the best results, work in a room that is 75 °F (24 °C) or warmer.
-
4
Fill the chipped section completely with the prepared filler. Use a wooden or plastic stick to fill the entire chipped area with the filler. If needed, use a toothpick to poke it into small, hard to reach areas. It’s okay if the filler isn’t even with the rest of the pottery—you’ll deal with that part later.
- Even though the filler might resemble putty, don’t use your hands to put it in place. Continue using your wooden or plastic stick.
-
5
Shave off the excess filler with a razor once it has hardened. Epoxy filler can take anywhere from 2 hours to 2 days to harden, so make sure to check the manufacturer’s instructions for that information. Use a razor or a straight-edged knife to shave off larger chunks of filler that is raised up over the surface of the piece of pottery.
- Don’t worry about getting the edges to look perfect with the razor. You’ll use sandpaper later on to smooth things out.
-
6
Sandpaper the filler-filled area to smooth it down. Take a piece of 220-grit sandpaper and gently rub it back and forth over the repaired area. Keep working at it until the surface is once again completely smooth.
- Once you’re done sanding, give the piece another wipe down with alcohol to get rid of any sandpaper and filler residue.
Tip: For sections that have corners or edges, wrap sandpaper around a dowel to give yourself a little more control over the sanding process.
-
7
Paint the repaired area with acrylic paint to match the original color. Because the filler is most likely brown or white, you’ll probably want to paint it so it doesn’t stick out as much from the rest of the piece. Take your time matching the color of the paint to the color of the piece of pottery.[14]
- Try thinning the acrylic paint with a little bit of water so that it can be applied more evenly over the surface.
-
8
Finish the piece with a coat of clear spray acrylic to give it a shine. This spray will add a layer of gloss to the repaired area, which will make it stand out from the rest of the piece less. If possible, use the spray outside or in a well-ventilated area so that you aren’t bothered by the fumes. Let the gloss completely dry before you use or display the pottery piece again.
- It generally takes acrylic spray about 12 to 24 hours to completely dry. Test it by patting it with your thumb—if it still feels tacky it needs more time.


Advertisement
Add New Question
-
Question
What is the best glue for pottery repair?
Deanna Ranlett is a Pottery and Ceramics Professional and the Owner of Mudfire Inc. in Decatur, Georgia. With more than 22 years of experience in the ceramics industry and eight years of experience owning a studio, they specialize in glaze formulation, firing ceramic and pottery pieces, general clay projects, and screen printing for ceramics. Deanna holds a BFA in Ceramic Arts and Ceramics from Georgia State University.
Pottery & Ceramics Professional
Expert Answer
Two-part epoxies are one of the best options out there! If the item is a decorative ceramic piece, you could also use a super glue to repair it.
-
Question
How can I fix a crack in pottery?
Natasha Dikareva is a San Francisco, California based sculptor, and installation artist. With over 25 years of ceramics, sculpting, and installation experience, Natasha also teaches a ceramic sculpture workshop titled «Adventures in Clay» covering concept development, hand-building techniques, texture, and glazing techniques. Her work has been featured in solo and group exhibitions at the Beatrice Wood Center for the Arts, Abrams Claghorn Gallery, Bloomington Center for the Arts, Maria Kravetz Gallery, and the American Museum of Ceramic Art. She has taught at the University of Minnesota and the American Indian OIC School. She has been awarded the Excellence Award at the 1st World Teapot Competition, Best in Show at the 4th Clay & Glass Biennial Competition, and a Grand Prize at the American Museum of Ceramic Art. Natasha holds an MFA from the University of Minnesota and a BFA from Kiev Fine Arts College.
Ceramics & Sculpting Instructor
Expert Answer
There are different ways to fix a crack in pottery. You can make the crack bigger and then fill it with a mixture of the same clay and some particles of fire clay. Buy magic water to fix cracks in sculptures or use vinegar to repair them.
-
Question
What are the different types of clay?
Natasha Dikareva is a San Francisco, California based sculptor, and installation artist. With over 25 years of ceramics, sculpting, and installation experience, Natasha also teaches a ceramic sculpture workshop titled «Adventures in Clay» covering concept development, hand-building techniques, texture, and glazing techniques. Her work has been featured in solo and group exhibitions at the Beatrice Wood Center for the Arts, Abrams Claghorn Gallery, Bloomington Center for the Arts, Maria Kravetz Gallery, and the American Museum of Ceramic Art. She has taught at the University of Minnesota and the American Indian OIC School. She has been awarded the Excellence Award at the 1st World Teapot Competition, Best in Show at the 4th Clay & Glass Biennial Competition, and a Grand Prize at the American Museum of Ceramic Art. Natasha holds an MFA from the University of Minnesota and a BFA from Kiev Fine Arts College.
Ceramics & Sculpting Instructor
Expert Answer
There are different types of clay depending on their firing temperature. Earthenware is a low-temperature clay, and mid-range clays are known as stoneware. Porcelain is a high fire range clay.

See more answers
Ask a Question
200 characters left
Include your email address to get a message when this question is answered.
Submit
Advertisement
-
If your broken pottery is beyond repair, consider repurposing it into a piece of art. You could embed the pieces in wet concrete to make stepping stones for a garden, or you could even sand the pieces down and make jewelry out of them.
-
Many types of ceramics can be fixed using these same methods for pottery, but items made of terra cotta, stone, or plaster will require a different method altogether.
Advertisement
Things You’ll Need
- Large bucket
- Sand
- 2-part epoxy adhesive
- Plastic or wooden stirrer for epoxy
- Non-porous surface to mix epoxy
- Tweezers (optional)
- Razor or flat-edged knife
- Toothpick
- 220-grit sandpaper
- Acrylic paint
- Paintbrushes
- Denatured or 91% alcohol
- Cotton balls
- 2-part epoxy filler
- Denatured or 91% alcohol
- Cotton balls
- Razor or flat-edged knife
- 220-grit sandpaper
- Acrylic paint
- Paintbrushes
- Clear spray acrylic
References
About This Article
Thanks to all authors for creating a page that has been read 140,527 times.
Did this article help you?
Get all the best how-tos!
Sign up for wikiHow’s weekly email newsletter
Subscribe
You’re all set!
![]()
Download Article
![]()
Download Article
Pottery is a subset under the broader category of ceramics, and it’s commonly used for everyday life, like eating and drinking. Pottery and ceramics in general can often be repaired using the same methods. So, the next time your favorite piece of pottery gets cracked or chipped, don’t even consider throwing it out! Instead, try fixing it first. A 2-part epoxy adhesive can work wonders and repair broken pieces of pottery so that they look almost-new once again, and you can fill chips with an epoxy filler.[1]
-
1
Fill a 1 gallon (3.8 L) bucket with sand to use as a holder. This won’t be necessary for all repairs, but it can be really helpful for items that need to be fixed while held at an angle. Nestle the broken pottery piece into the sand so that the cracked section is facing up. This enables you to use both hands to make the repairs.[2]
- If you don’t have sand, you can also use rice to the same effect.
- You could also use a large pot, a shallow serving dish, or something similar to hold the sand as long as it’s deep enough to fully support the pottery.
-
2
Sand the edges of the chipped area to smooth ragged edges. Use fine sandpaper on both the edges of the broken-off piece and the main piece of pottery. Use a back and forth motion with light pressure until the edges are smooth.[3]
- If you’re fixing a crack rather than a full break, you don’t need to worry about sanding the piece at this point.
Advertisement
-
3
Clean the broken pieces with denatured or 91% alcohol and cotton balls. Wipe down the edges both from the main piece of pottery and from the broken-off piece. Let them air dry completely afterwards before moving on to the next step.[4]
- This will ultimately help the adhesive do its job better as there won’t be any dirt in the way.
-
4
Mix a 2-part epoxy adhesive to fill cracks and reattach broken pieces.[5]
Squeeze the epoxy onto a non-porous disposable surface, like a thin sheet of plastic, and use a wooden or plastic stick to mix together the 2 components as quickly as possible. It’ll start to harden after 3 to 4 minutes, so you need to work fast.- Some 2-part epoxies come in a container with a syringe that will distribute both parts equally for you. If yours doesn’t come with that, disperse each part of the epoxy in lines so that you can gauge by eye that the 2 components are equal.
- Avoid using superglue for repairs. Superglue is very thin, and while it’s strong, it won’t protect your pottery from future breakages along the same cracks as well as epoxy will.
Warning: If your piece of pottery is used with food, like a mug or a soup bowl, look for a food-safe adhesive or one that is silicone based.[6]
There are both epoxies and other types of adhesives that are FDA-approved for food safety. -
5
Apply the epoxy to each edge of the broken sections. Use the wooden or plastic stick to line the edges of the piece of pottery as well as the cracked piece with epoxy. Don’t worry about using too much or if it is going over the edges—you’ll be able to remove that excess epoxy later on.
- If you’re working with a crack rather than a break, use a toothpick to apply the epoxy to the crack. Push the epoxy into the crack as far as you can, then squeeze the piece together so the crack adheres back together.
Tip: Hold small pieces of broken pottery with tweezers while you apply the epoxy to keep your fingers clean.
-
6
Press the broken section back into place as firmly as you can. It’s totally okay if epoxy squeezes out around the edges. Get it in line as perfectly as you can and hold it in place for about 30 seconds or as long as the epoxy directions instruct.
- If you’re worried about getting the adhesive onto your hands, wear a pair of rubber gloves while you work.
- If there is more than one piece to reattach, do one at a time rather than trying to do them all at once.
- If the pieces aren’t staying together well because of the position of the pottery, use a small piece of modeling clay to pinch the edges together. It’ll come right off once the piece has fully dried.
-
7
Scrape away the excess epoxy with a razor after 20 minutes. You can use a razor blade or a sharp, flat-edged knife. Simply run the blade along the surface of the piece of pottery and slice off any sections of raised dried epoxy.
- Most fast-acting epoxies take about 20 minutes to fully set, but always follow the instructions for whatever brand you’re using.
-
8
Sand over the edges of the cracks to make the surface perfectly smooth. Take 220-grit sandpaper and rub it very lightly over the sealed cracks on your piece of pottery. This will just finish the process so that there are absolutely no bumps or imperfections on your piece.[7]
- To double-check the surface run your thumb over the sealed cracks. The sensitivity in your finger should allow you to easily feel if there are more sections that need to be sanded.
-
9
Paint over the repaired cracked lines if desired. You may not want to or need to do this since the epoxy dries clear, but if you think the cracks are too visible, use acrylic paint to cover those lines.[8]
Mix your colors carefully to get as close a match to the original color as possible.[9]
- You can also spray an acrylic gloss over the repaired area if the rest of the piece is shiny and you want the crack lines to be less noticeable.
Advertisement
-
1
Wipe off dust and grime from the pottery with a swab of alcohol. Use denatured alcohol or 91% alcohol and a cotton ball. Let the item air dry completely before moving on to the next step.[10]
- Don’t skip this part even if you can’t see any visible grime in the chip. There could be built up oils or residue that you can’t see but that could get in the way of the epoxy adhering to the pottery.
-
2
Use 2-part epoxy filler to fill in chips in your pottery.[11]
You can buy epoxy filler online or at a home improvement store. Most brands come with 2 components: the filler and a hardener that has to be mixed with the filler once it’s ready to be used.[12]
- You could also use a polyester filler to the same effect. Polyester filler tends to be a little less expensive than epoxy filler, but the epoxy filler is usually a little easier to handle and takes less time to dry.
-
3
Follow the instructions and mix the filler and the hardener. Squeeze out enough filler to completely fill the chip you’re repairing. Read the directions to determine how much hardener you need to mix in with the filler so that it’ll work properly.[13]
- Work quickly—the hardener will only allow you 4 to 5 minutes to work with the filler before it gets too stiff to be pliable still.
- For the best results, work in a room that is 75 °F (24 °C) or warmer.
-
4
Fill the chipped section completely with the prepared filler. Use a wooden or plastic stick to fill the entire chipped area with the filler. If needed, use a toothpick to poke it into small, hard to reach areas. It’s okay if the filler isn’t even with the rest of the pottery—you’ll deal with that part later.
- Even though the filler might resemble putty, don’t use your hands to put it in place. Continue using your wooden or plastic stick.
-
5
Shave off the excess filler with a razor once it has hardened. Epoxy filler can take anywhere from 2 hours to 2 days to harden, so make sure to check the manufacturer’s instructions for that information. Use a razor or a straight-edged knife to shave off larger chunks of filler that is raised up over the surface of the piece of pottery.
- Don’t worry about getting the edges to look perfect with the razor. You’ll use sandpaper later on to smooth things out.
-
6
Sandpaper the filler-filled area to smooth it down. Take a piece of 220-grit sandpaper and gently rub it back and forth over the repaired area. Keep working at it until the surface is once again completely smooth.
- Once you’re done sanding, give the piece another wipe down with alcohol to get rid of any sandpaper and filler residue.
Tip: For sections that have corners or edges, wrap sandpaper around a dowel to give yourself a little more control over the sanding process.
-
7
Paint the repaired area with acrylic paint to match the original color. Because the filler is most likely brown or white, you’ll probably want to paint it so it doesn’t stick out as much from the rest of the piece. Take your time matching the color of the paint to the color of the piece of pottery.[14]
- Try thinning the acrylic paint with a little bit of water so that it can be applied more evenly over the surface.
-
8
Finish the piece with a coat of clear spray acrylic to give it a shine. This spray will add a layer of gloss to the repaired area, which will make it stand out from the rest of the piece less. If possible, use the spray outside or in a well-ventilated area so that you aren’t bothered by the fumes. Let the gloss completely dry before you use or display the pottery piece again.
- It generally takes acrylic spray about 12 to 24 hours to completely dry. Test it by patting it with your thumb—if it still feels tacky it needs more time.
Advertisement
Add New Question
-
Question
What is the best glue for pottery repair?
Deanna Ranlett is a Pottery and Ceramics Professional and the Owner of Mudfire Inc. in Decatur, Georgia. With more than 22 years of experience in the ceramics industry and eight years of experience owning a studio, they specialize in glaze formulation, firing ceramic and pottery pieces, general clay projects, and screen printing for ceramics. Deanna holds a BFA in Ceramic Arts and Ceramics from Georgia State University.
Pottery & Ceramics Professional
Expert Answer
Two-part epoxies are one of the best options out there! If the item is a decorative ceramic piece, you could also use a super glue to repair it.
-
Question
How can I fix a crack in pottery?
Natasha Dikareva is a San Francisco, California based sculptor, and installation artist. With over 25 years of ceramics, sculpting, and installation experience, Natasha also teaches a ceramic sculpture workshop titled «Adventures in Clay» covering concept development, hand-building techniques, texture, and glazing techniques. Her work has been featured in solo and group exhibitions at the Beatrice Wood Center for the Arts, Abrams Claghorn Gallery, Bloomington Center for the Arts, Maria Kravetz Gallery, and the American Museum of Ceramic Art. She has taught at the University of Minnesota and the American Indian OIC School. She has been awarded the Excellence Award at the 1st World Teapot Competition, Best in Show at the 4th Clay & Glass Biennial Competition, and a Grand Prize at the American Museum of Ceramic Art. Natasha holds an MFA from the University of Minnesota and a BFA from Kiev Fine Arts College.
Ceramics & Sculpting Instructor
Expert Answer
There are different ways to fix a crack in pottery. You can make the crack bigger and then fill it with a mixture of the same clay and some particles of fire clay. Buy magic water to fix cracks in sculptures or use vinegar to repair them.
-
Question
What are the different types of clay?
Natasha Dikareva is a San Francisco, California based sculptor, and installation artist. With over 25 years of ceramics, sculpting, and installation experience, Natasha also teaches a ceramic sculpture workshop titled «Adventures in Clay» covering concept development, hand-building techniques, texture, and glazing techniques. Her work has been featured in solo and group exhibitions at the Beatrice Wood Center for the Arts, Abrams Claghorn Gallery, Bloomington Center for the Arts, Maria Kravetz Gallery, and the American Museum of Ceramic Art. She has taught at the University of Minnesota and the American Indian OIC School. She has been awarded the Excellence Award at the 1st World Teapot Competition, Best in Show at the 4th Clay & Glass Biennial Competition, and a Grand Prize at the American Museum of Ceramic Art. Natasha holds an MFA from the University of Minnesota and a BFA from Kiev Fine Arts College.
Ceramics & Sculpting Instructor
Expert Answer
There are different types of clay depending on their firing temperature. Earthenware is a low-temperature clay, and mid-range clays are known as stoneware. Porcelain is a high fire range clay.
See more answers
Ask a Question
200 characters left
Include your email address to get a message when this question is answered.
Submit
Advertisement
-
If your broken pottery is beyond repair, consider repurposing it into a piece of art. You could embed the pieces in wet concrete to make stepping stones for a garden, or you could even sand the pieces down and make jewelry out of them.
-
Many types of ceramics can be fixed using these same methods for pottery, but items made of terra cotta, stone, or plaster will require a different method altogether.
Advertisement
Things You’ll Need
- Large bucket
- Sand
- 2-part epoxy adhesive
- Plastic or wooden stirrer for epoxy
- Non-porous surface to mix epoxy
- Tweezers (optional)
- Razor or flat-edged knife
- Toothpick
- 220-grit sandpaper
- Acrylic paint
- Paintbrushes
- Denatured or 91% alcohol
- Cotton balls
- 2-part epoxy filler
- Denatured or 91% alcohol
- Cotton balls
- Razor or flat-edged knife
- 220-grit sandpaper
- Acrylic paint
- Paintbrushes
- Clear spray acrylic
References
About This Article
Thanks to all authors for creating a page that has been read 140,527 times.
Did this article help you?
Get all the best how-tos!
Sign up for wikiHow’s weekly email newsletter
Subscribe
You’re all set!
Трещины могут подстерегать вас как в том случае, если вы изготавливаете керамику, так и в том, если вы просто пользуетесь керамической посудой.
При изготовлении керамической посуды трещины могу появляться в нескольких случаях:
-
Неподходящее сырье или неправильная технология. Причиной трещин может быть слишком «жирная» или слишком «тощая» глина, а также добавление большого количества воды при лепке.
-
Слишком быстрая или неправильная сушка. Для каждого вида керамических изделий существуют свои правила сушки. Чтобы не было трещин, необходимо их придерживаться.
-
Неравномерная толщина стенок. При сушке одна часть изделия высыхает быстрее другой и изделие деформируется. Поэтому необходимо проверять, чтобы дно изделия не было слишком тяжелым.
-
Плохо примазанные детали и ручки. Для того, чтобы детали не отваливались при сушке, следует прокладывать места соединения валиком глины и хорошо примазывать.
Существует несколько проверенных способов заделать трещину. Чего не надо делать ни в коем случае, так это замазывать треснувшее место водой. Глина разбухнет и скроет трещину, но после сушки и усадки все вернется на место или даже станет еще хуже.
 Промачивать место трещин и разломов следует уксусом. Глина смягчается благодаря уксусу, но не впитывает много влаги. Уксус может помочь и в том случае, когда отломалась небольшая деталь. Края разлома следует промокнуть уксусом и аккуратно соединить детали.
Можно затереть проблемное место сухой измельченной глиной или составом из ½ части сухой глины и ½ части каолина. До этого следует промочить трещину уксусом, потом затереть смесью и аккуратно загладить. После того, как вы покроете изделие глазурью, трещина станет невидимой.
Другой способ – это смешать сухую глину с сахарной пудрой в пропорции 1:1. Получается так называемая «сахарная глина». Сахар придаст глине пластичность, поэтому после заполнения трещины и сушки изделия усадка будет гораздо меньше, чем если бы это была просто влажная глина.
Случается так, что образовавшаяся трещина достаточно велика, чтобы просто затереть ее глиной. В этом случае готовят состав «бумажной глины» для заполнения зазоров и швов. Для этого небольшое количество туалетной бумаги кладут в банку, заливают горячей водой и перемешивают блендером до однородности. Лишнюю воду сливают и добавляют 1/3 сухой глины к 2/3 бумажной глины. После очистки трещины и увлажнения краев уксусом, смесью заполняют необходимое пространство. Для трещин больше подходит подсушенная бумажная глина, а вот жидкой удобно соединять швы на изделии.
В домашних условиях треснувшую посуду реставрируют при помощи казеинового клея, который можно приготовить из молока и уксуса. Для этого обезжиренное молоко нужно подогреть примерно до 37 градусов, добавить половину чайной ложки уксуса и нагреть до 70 градусов. Молоко под действием уксуса свернется. Его нужно процедить через плотную ткань и подсушить. Таким образом можно получить качественный казеиновый клей.
Для уже готовой посуды можно использовать покупной двусоставный клей. Треснувшее место нужно очистить и обезжирить. Подготовленную посуду нагревают в духовке до горячего состояния, чтобы трещина разошлась сильнее. Сразу после этого трещину плотно заполняют клеем и затирают пальцами. Остатки аккуратно удаляют и дают посуде остыть.
Каким бы способом вы не реставрировали посуду, после ремонтных работ обращаться с ней нужно бережно. Мыть ее следует мягкими средствами и не слишком горячей водой, а использовать лучше реже, чем до поломки.
Долговечность кафеля – понятие условное, подразумевающее его целостность в отсутствие разрушающих воздействий. Но в реальных условиях керамика подвержена им сразу после укладки, в результате чего даже самые твёрдые её разновидности получают повреждения различной степени. При этом необходимость полной замены отделки возникает не скоро, чаще это точечные дефекты, портящие общее впечатление от интерьера – трещины, царапины, сколы.
Рассмотрим, как устранить или замаскировать такие повреждения с учётом причин их образования.
Содержание
- Замена повреждённых элементов
- Заделка на керамике сколов и царапин
- Заключение
Замена повреждённых элементов
Данный способ точечного восстановления отделки наиболее трудоёмкий из всех применяющихся, но позволяет отремонтировать покрытие практически без следов. Это как раз тот случай, когда пригодятся несколько плиток, оставшихся после основного ремонта.
Прежде всего с основания необходимо удалить повреждённый лист (или несколько), не испортив при этом соседние элементы отделки. Для этого одним из способов удаляют из швов затирку. Для облегчения процесса можно предварительно нанести на стыки средство для размягчения цементных составов («Лугато», ЕК-100 Super, «Лепта ХимФрез»), но с соблюдением мер осторожности, так как они на основе кислот.
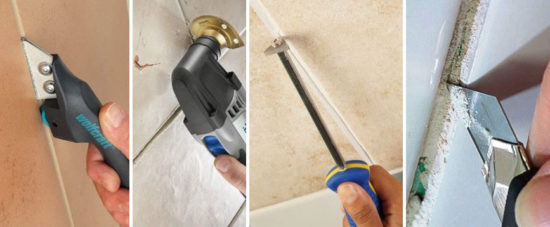
Способы удаления старой затирки
Освободив от затирки стыки дефектного листа, его для безопасного удаления лучше дополнительно ослабить – выполнить на плитке крест-накрест 1-2 надреза болгаркой, или просверлить дрелью несколько отверстий. После этого кафель осторожными ударами молотка по зубилу легко раскалывается на мелкие куски и удаляется из гнезда.
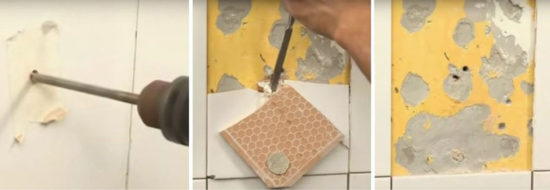
Удаление дефектного листа из кафельного покрытия
Площадку под удалённой плиткой нужно очистить от старого плиточного клея, чтобы образовалось место для нового слоя. Если кафель был наклеен на стену, окрашенную масляной краской, это покрытие нужно соскоблить – предварительно по нему можно выполнить частое засверливание. После очистки основание грунтуют.
Иногда под треснувшей плиткой обнаруживается трещина и на основании — чаще всего это вызвано осадкой конструкций или их температурными деформациями.
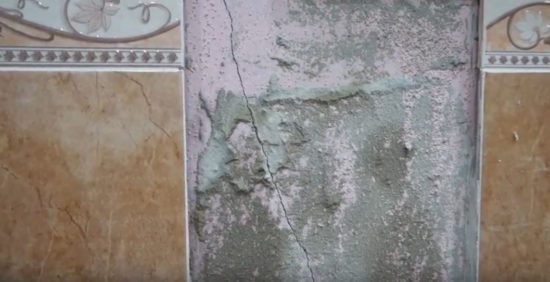
Трещина на плитке оказалась сквозной
Если эти процессы, кроме порчи одной плитки, больше никак не проявились, принимать меры по их пресечению нецелесообразно. Но новый кафельный лист нужно уложить так, чтобы его связь со стеной была эластичной – нужен клей, слой которого под плиткой примет на себя деформации основания без разрушения связи с ним. Для этого подойдут следующие составы:
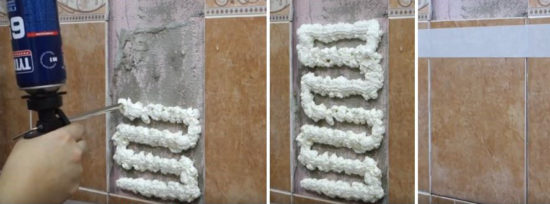
- специальные мастики – акриловые клей-мастики «Радуга 18», «Акрилакс», «Гумилакс», «Синтолакс»;
- монтажные пена-цементы с низким коэффициентом расширения — «Макрофлекс», «Титан», но во флаконах под пистолет-аппликатор;
- качественные силиконовые герметики – с маркировкой «для аквариумов».

Составы для ремонта керамики
Наклейка кафеля – это одна из штатных функций акриловых мастик, поэтому при их использовании руководствуются инструкцией на упаковке, и вопросов по применению не возникает.
Применять пену-цемент для отделки кафелем большой площади неудобно, так как после выхода каждой порции пены сопло дозатора нужно очищать специальной смывкой, но при монтаже нескольких плиток это не составляет труда. Пену накладывают на основание «змейкой» — важно укладывать её «колбасками» небольшого диаметра (1,5-2 см) с шагом «дорожек» в 5-6 см, а после установки плитки по месту зафиксировать её в плоскости отделки скотчем или наложением планки.
Наклейка плитки на цемент
У использования для наклейки плитки силикона есть противники, утверждающие, что этой области применения нет в инструкции герметика. Но практика показывает, что этот способ вполне надёжен и долговечен, просто функционал любого материала часто не до конца изучен и потому не описан в инструкции в полном объёме. Эластичность силиконовых герметиков особенно востребована при отделке керамикой оснований из древесины – очень нестатичного материала. Для успешной укладки кафеля на силикон нужно лишь выполнить два условия:
- плитку на основе терракоты (глины) необходимо грунтовать – для снижения её пористости и повышения адгезии;
- силикон не должен попасть на торцы кафеля – это повредит адгезии затирки с керамикой.
Если после съёма дефектного листа керамики трещин на площадке нет, кроме перечисленных средств можно использовать раствор готовой сухой клеевой смеси, но – с необходимыми для данных условий характеристиками. Для применения цементных составов основание только грунтуется, под тонкослойные компаунды (дисперсные, полиуретановые) – выравнивается.
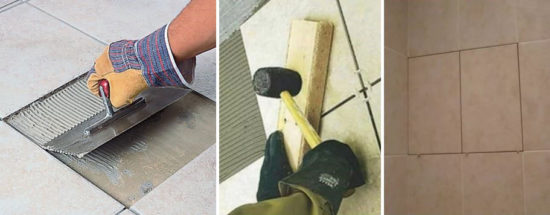
Установка ремонтных фрагментов
После нанесения клеящей смеси плитка устанавливается по месту, утапливается до уровня отделки и центруется в нише шовными крестиками. Когда клей схватится, из стыков удаляют его излишки – можно тонким гвоздём. На следующий день крестики извлекают, и заполняют стыки затиркой, которую через час-два заглаживают влажным поролоном.
На заметку. Чтобы швы ремонтного участка не выделялись на общем фоне, их можно освежить по всей площади отделки – предварительно снять слой затирки толщиной 1-2 мм и заполнить стыки раствором одного общего замеса. Как вариант, можно окрасить все швы специальным карандашом.
Заделка на керамике сколов и царапин
К средствам, специально предназначенным для ремонта настенной и напольной кафельной отделки, относится керамический воск, который продаётся в виде набора брусков различных цветов.
Для применения этого реставрационного материала понадобится также следующий комплект:
- газовый плавитель;
- шпатель для работы с таким воском;
- акриловый лак для защитного покрытия – глянцевый или матовый.
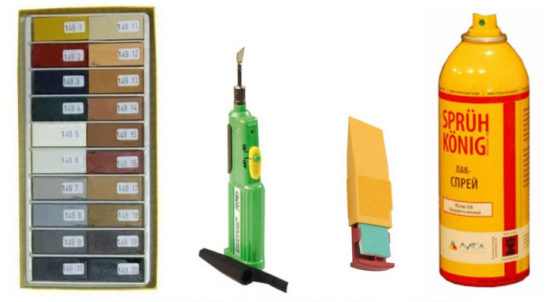
Ремкомплект для заполнения скола на плитке
Как избавиться от скола или замаскировать трещину на плитке с помощью керамического воска, наглядно показано в видеоролике:
Кроме этого средства, скол можно заполнить и другими составами, например, двухкомпонентной автомобильной шпаклёвкой – обычной или на эпоксидной основе. Материалы эти достаточно прочны как для настенного, так и напольного использования, но для маскировки на керамике требуют колеровки.
Важно! Подогнать цвет шпаклёвки под плитку можно с помощью синтетической краски, несколько капель которой добавляют в основной состав до смешивания с отвердителем.
Место скола оклеивают малярным скотчем, очищают выскабливанием и обезжиривают. Подкрашенную шпаклёвку смешивают с отвердителем, вносят в углубление на плитке и разравнивают шпателем. После отверждения смеси её обрабатывают мелкой наждачной бумагой на бруске, снимают скотч и покрывают ремонтный участок двумя слоями лака.
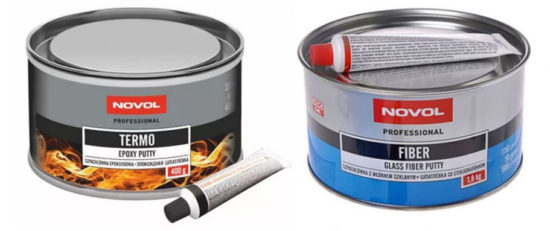
Автошпаклевки на эпоксидной основе
Идентично можно поступить и с трещиной, если отколотый кусок плитки не отслоился – чуть расшить её строительным ножом и затереть шпаклёвкой, после чего шов зашлифовать мелкой наждачкой и покрыть лаком. Но ремонт трещины, как правило, сложнее замаскировать. Если трещина волосяная, после ремонта она не станет менее заметна. А при раскрывшейся трещине фрагменты плитки по её сторонам чаще всего находятся с перепадом по высоте, который тоже не скрыть. Поэтому в большинстве случаев от трещин избавляются заменой плитки, наклейкой поверх дефекта декоративного стикера или размещением какого-нибудь аксессуара.
В отсутствие шпаклёвок скол на плитке можно высверлить корончатым сверлом, а затем им же вырезать круг-заглушку из такой же плитки. Заглушку сажают на клей в гнездо, после чего затирают и маскируют кольцо её стыка.
Заключение
Точечный ремонт плитки – с технической точки зрения процедура не всегда необходимая, но позволяющая восстановить эстетичность отделки комнаты без выполнения объёмного ремонта. Операция не требует значительных физических усилий, вполне под силу домашнему мастеру, но не терпит небрежности – исполнение примитивным инструментом или на скорую руку может не реставрировать покрытие, а добавить отделке дефектов.
—>
В этой статье пойдёт речь не о реставрации керамических изделий, а о ремонте трещин, которые появляются на глиняной посуде и глиняных изделиях в процессе их сушки. Понятно, что с трещиной обжигать изделие нельзя. Но обычно ничего страшного в трещинах нет. Как правило, от них можно легко избавиться.

Здесь мы рассмотрим три способа убрать трещины на необожженной керамике так, что после обжига трещина станет совсем незаметной.
Почему появляются трещины на необожжённой глине в процессе сушки?
Начинающий керамист должен всегда помнить о том, что в процессе сушки глина дает усадку. Если не придерживаться технологии (например, смешать мягкую глину с твердой – они дают разную усадку) то изделие может «порвать».
Как не нужно ремонтировать трещины на глиняной посуде. Главная ошибка.
Главная ошибка – смачивать трещину водой или затирать мокрой глиной.
Когда вы добавляете воду или более мокрую глину уже к подсохшей, она, естественно, намокает и разбухает, увеличиваясь в объеме и заполняя собой трещину. Но это на самом деле не решает проблему. А только замаскирует её.
После сушки глина всё равно даст усадку, и трещина проявится снова. Только станет еще хуже.
Как и чем делать ремонт трещины на керамике? Есть три простых способа устранить трещины на высохшем керамическом изделии.
Затереть трещину сухой глиной
Этот способ используют когда нужно убрать мелкие трещины на сухом изделии. Подходит для глазурованной керамики.
Чтобы избавиться от небольшой трещинки на глиняной посуде (или другом изделии из глины) достаточно аккуратно втереть в трещину немного сухой измельченной до порошка глины перед тем как поместить изделие в печь для обжига.
После обжига это место не станет монолитным. Но если покрыть керамику глазурью, то трещина будет не видна.
Использовать сахарную глину для ремонта керамики
Способ подходит для заполнения широких трещин (несколько миллиметров) в практически высохшем изделии.

Сахарная глина – это глиняная крошка, глина, которая высохла и раскрошилась на небольшие крупинки смешанная с сахарной пудрой. Можно купить сахарную глину в интернет-магазине DIYтоваров или рукоделия. Либо получить самостоятельно.
Ремонт керамики с помощью сахарной глины в три шага:
- Тщательно смешать немного глиняной крошки с равным количеством сахарной пудры.
- Трещину очистить и выровнять края, чтобы затирка заполнила её всю, не оставив пустот.
- Увлажнить края трещины небольшим количеством уксуса и поместить в неё сахарную глину.
Преимущества способа:
- Первое. По сравнению с водой, сахарная пудра лучше смягчает глину и придаёт ей большую пластичность.
- Второе. При сушке сахарная глина даёт намного меньшую усадку по сравнению с обычной влажной глиной. А значит, риск появления трещины – минимален.
Бумажная глина для ремонта трещин в глиняной посуде

- Бумажная глина используется для ремонта больших трещин в почти сухом изделии.
- Ремонт керамики бумажной глиной подходит для изделий из глины, которые не будут покрываться глазурью.
Как отремонтировать керамику и заделать трещину с помощью бумажной глины:
- Вычистить трещину и убрать неровности, чтобы затирка свободно проникла на всю глубину и заполнила трещину.
- Уксусом немного увлажнить края трещины.
- Плотно заполнить трещину бумажной глиной.
Вязкая бумажная глина в подсушенном состоянии используется для заделывания трещин. Жидкой бумажной глиной можно соединять швы изделия.
Купить бумажную глину можно в магазине для творчества. Но лучше делать её самостоятельно, потому как в магазинах обычно продаётся бумажная глина по другой рецептуре – с клеем ПВА, глицериновым маслом и мукой (или другим связующим веществом). В нашей глине в качестве связующего вещества используется сухая глина и больше нет никаких добавок.
Как сделать бумажную глину своими руками?
Бумажную глину можно легко сделать в домашних условиях. Для этого понадобится мягкая туалетная бумага или бумажные полотенца, сухая глина и блендер.
- Положить мягкую (раскисающую в воде) туалетную бумагу в миску или банку.
- Измельчить её (порвать руками на мелкие кусочки) и залить кипятком.
- Подождать несколько минут пока она хорошо пропитается и раскиснет.
- Затем измельчить блендером или миксером до однородной массы. Если после измельчения отходит лишняя вода, её можно слить.
- В отдельной миске перемешать блендером сухую глину.
- Пропорции: 2/3 сухой порошковой глины + 1/3 бумажной массы.
- Компоненты тщательно перемешать миксером или блендером.
При необходимости (если масса слишком «текучая») смесь нужно немного подсушить на гипсовой доске.
Не обязательно использовать сразу весь рулон бумаги и делать много бумажной глины. Для заделывания трещин её нужно совсем чуть-чуть. Так что около 100 гр будет вполне достаточно.
Хранить бумажную глину можно в вакуумном пакете в холодильнике.
На чтение 7 мин Просмотров 16.8к. Опубликовано 21.12.2021 Обновлено 15.05.2022
Эмалированный, керамический акриловый умывальник во время эксплуатации может повреждаться. Дефекты обычно невелики, однако исправить их нужно как можно быстрее.
Содержание
- Причины образования трещин керамической раковины
- Инструменты и материалы для ремонта
- Устранение трещин
- Незначительные царапины
- Удаление потертостей
- Ремонт глубоких царапин
- Как отремонтировать скол на раковине
Причины образования трещин керамической раковины
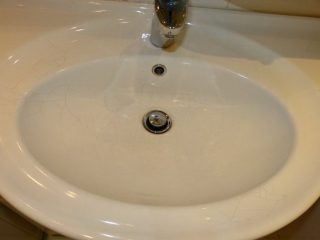
Материал раковины – санфаянс, фарфор, камень – довольно прочен и тяжел. Для нормальной эксплуатации прибора важна функциональная целостность и гладкость верхнего покрытия.
В раковине моют руки, посуду, овощи, фрукты, сюда попадает масса разнообразной грязи вместе с жиром, очистками и кусками пищи. Все это взаимодействует с поверхностью. Пока она гладкая и беспористая, грязь не задерживается на стенках мойки. Но стоит появиться царапинам, сколам и даже потертостям, и мелкие частицы грязи, жира, ржавчины будут впитываться и накапливаться.
Расколоть раковину сложно, но трещина появляется довольно легко.
- Повреждение металлическими предметами – даже не слишком тяжелыми. На акриловом умывальнике достаточно оставить бритву, чтобы сделать царапину. Более твердый материал – натуральный камень или сталь – поцарапать сложнее.
- Падение тяжелых предметов – некоторая утварь, бытовые кухонные приборы, кастрюля, полная готовой еды. Могут появиться трещины и сколы верхнего слоя. Последние хуже, так как при небольшой глубине имеют большую площадь и неровную поверхность. На сколах грязь и ржавчина накапливается намного быстрее.
- Потертости – обычно возникают при неаккуратном использовании абразивных порошков во время чистки. На таком участке материал теряет блеск и гладкость, грязь здесь накапливается быстрее, а бытовая химия и соли, растворенные в воде, быстрее разъедают материал.
- Перепады температуры – встречаются реже. Если сковороду, кастрюлю с плиты ставят сразу в мойку и пытаются как можно быстрее остудить холодной водой, перепад температуры приводит к появлению трещин, сначала микроскопических, затем видимых.
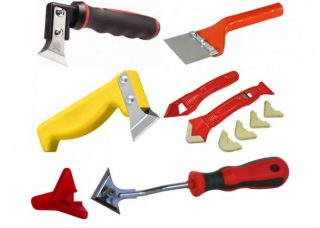
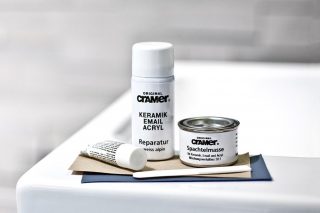
Инструменты и материалы для ремонта
 Трещины и сколы заделывают, когда это возможно: при небольшой глубине и длине не более 1/3 поверхности. Если откололся кусок раковины, ее нужно заменить новой.
Для реставрации умывальника из любого материала потребуется:
- дрель с набором сверл или нож для расширения трещин;
- наждачная бумага разной зернистости или шлифовальная машинка;
- фрезер;
- молоток;
- обезжириватель – ацетон, уайт-спирит;
- клей – выбирается по типу материала мойки, или же берут специальные составы на базе смолы;
- малярная лента.
Может понадобиться краска для восстановления внешнего вида.
Устранение трещин
 Чтобы замазать трещину в керамической раковине изготавливают вязкие смеси. Составы применяют разные. Для глубокой трещины или скола берут смесь на базе эпоксидной смолы. Внешние царапины можно заделать влагостойкой шпатлевкой, так как здесь важно лишь предотвратить попадание воды в глубину материала.
Незначительные царапины
Санфаянс или фарфор сверху покрыт тонким прозрачным очень твердым слоем. Он обеспечивает водонепроницаемость, блеск и гладкость керамической раковины. От соприкосновения с твердыми острыми предметами, иногда от перепада температуры на поверхности появляются тонкие паутинные трещинки. Глубина их минимальна. До базового слоя материала они не доходят. Однако выглядят некрасиво, быстро впитывают грязь и со временем увеличиваются.
Царапинки проще всего зашлифовать. Для керамики берут специальные полировочные пасты для шлифовки мягких камней, например, пасту Гои. Состав накладывают на поверхность и специальной ветошью натирают участок, пока он не приобретает блеск, а царапинки не исчезнут.
Можно применять состав на основе строительного клея и очень мелкого песка. Клей набирают на ветошь, песком посыпают поврежденный участок, а затем натирают тканью до блеска.

Валера
Голос строительного гуру
Задать вопрос
Домашние мастера используют для удаления царапин и потертостей крем для полировки царапин на автомобиле. Составом натирают раковину, оставляют на 1-5 минут и снова натирают до блеска.
Удаление потертостей
Потертость – участок, где поверхность утратила гладкость. Это не сильно сказывается на функциональности, но приводит к образованию желтых и серых неустранимых пятен. На таком шероховатом участке откладывается ржавчина, грязь. Так как керамическую раковину не рекомендуется чистить абразивными средствами, удалить загрязнения оказывается сложно.
Нельзя использовать для вытравливания пятен едкие кислоты и металлические щетки. Такое воздействие избавит от пятна, но повредит фаянс еще сильнее. В итоге появится темное пятно с микротрещинами.
 Избавляются от потертостей таким же образом, как и от мелких трещинок – полировкой. Применяют только пасты. Шлифуют поверхность до тех пор, пока пятно не сойдет, а блеск не восстановится. Работа длительная, сеансов шлифовки потребуется несколько, так как натирать нужно с усилием и не менее часа.
Если площадь потертости велика, такой метод не годится. Для ремонта берут восстановитель эмали. Поврежденный участок обрабатывают наждачной бумагой, чтобы сделать его максимально шероховатым, обезжиривают, а затем наносят восстановитель и эмаль нужного оттенка.
Слой после застывания шлифуют до тех пор, пока уровень участка не сравняется с уровнем поверхности мойки. Мелкие царапины на большой площади тоже можно так удалить.
Ремонт глубоких царапин
 Применяемые методы зависят от глубины и величины царапины, ее расположения.
Если это глубокая сквозная трещина с внутренней стороны раковины, действуют по следующей инструкции.
- Заклеивают трещины с наружной стороны скотчем.
- Покупают и готовят двухкомпонентный эпоксидный клей. Состав подогревают на водяной бане, чтобы его консистенция стала жидкой.
- В горячем виде клей наносят на трещину несколькими порциями до тех пор, пока он не наполнит собой углубление. Допускается перемешивать его спичкой или щепкой.
- Когда клей начинает «вытекать» из трещины, излишки вытирают поверхности мокрой тряпкой и оставляют состав на сутки.
- При необходимости поверхность полируют.
Валера
Голос строительного гуру
Задать вопрос
Если трещины не сквозные и находятся с внешней стороны, можно для ремонта брать водостойкую керамическую шпатлевку. Участок очищают, обезжиривают, а затем шпателем накладывают смесь. После схватывания и отверждения участок зачищают наждачной бумагой. Можно дополнительно отполировать автомобильной шкуркой.
Как отремонтировать скол на раковине
 Восстановить сколотый участок сложнее, так как площадь повреждения здесь больше. Заделать дырку в керамической раковине можно с помощью керамической шпаклевки.
- Отверстие скола расширяют фрезером. При этом поверхности повреждения выравниваются, а сам скол становится более единообразным.
- Очищают участок от пыли, обезжиривают и высушивают строительным феном.
- Готовят шпаклевочную смесь. Наносят ее на скол и разравнивают шпателем.
- После высыхания место скола обрабатывают наждачной бумагой, пока стык между эмалью и шпаклевкой перестанет быть заметным.
- Вновь обрабатывают ацетоном или уайт-спиритом. Затем участок окрашивают влагостойкой краской под цвет эмали. Краску наносят в несколько слоев.
- После полного высыхания – 3–4 дня – поверхность полируют наждачкой-нулевкой.
На каждой стадии шлифовки обязательно убирают пыль.