Uplay is a digital distribution, digital rights management, multiplayer and communications service developed by Massive Entertainment to try and use a single app to manage your achievements which can be taken over to other games. The service is provided across various platforms and it’s used primarily by Ubisoft games.
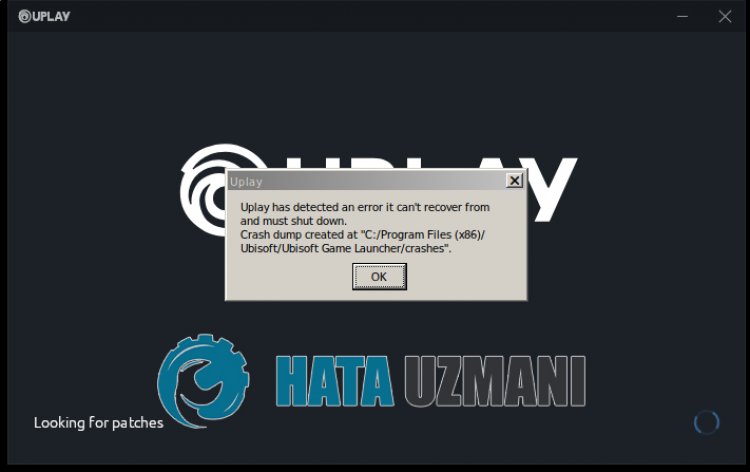
After users have tried and run one of the games they have downloaded and installed on their computer, they received the “Uplay has detected an unrecoverable error and must shut down” error message which can be caused by various different causes but all of them can be solved using the solutions we have prepared below.
The most common cause for this problem is a new update being released for the Uplay service, leaving the old versions without support. The real problem occurs because of the fact that the Uplay client is unable to update automatically.
Other causes include too strict security settings such as the firewall you have installed on your computer. One of the most popular causes was definitely a corrupt hosts file which may have been altered by the user or by a Windows update.
Solution 1: Update Uplay
This is usually a clean sign that the Uplay client is outdated and the Ubisoft company has probably released a new version. However, a different problem occurs as the client can’t be updates (as it can’t be opened) and you will have to perform the updating process manually; by uninstalling the current version of the client and installing the new one.
- First of all, make sure you have logged in with an admin account since you won’t be able to uninstall programs using any other account privileges.
- Don’t worry about losing your achievements or any other data related to Uplay as this data is tied exclusively to your Uplay account and not the installation on your computer.
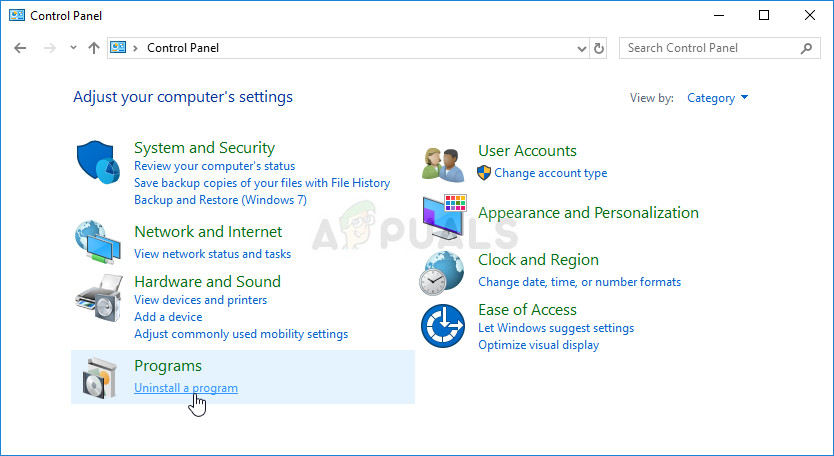
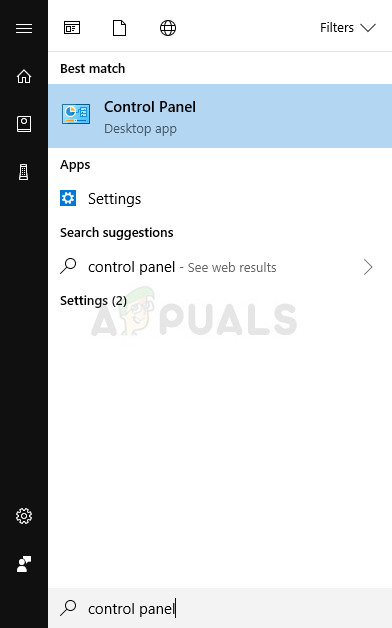
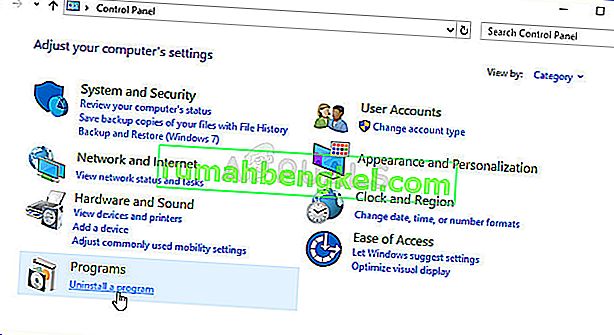
- Click on the Start menu and open Control Panel by searching for it. If you are using Windows 10 as your operating system of choice, you can click on the gear icon in order to open the Settings app.
- In Control Panel, switch the View as option to Category at the top right corner and click on Uninstall a Program under the Programs section.
- If you are using the Settings app, clicking on Apps should immediately open a list of all installed programs on your PC.
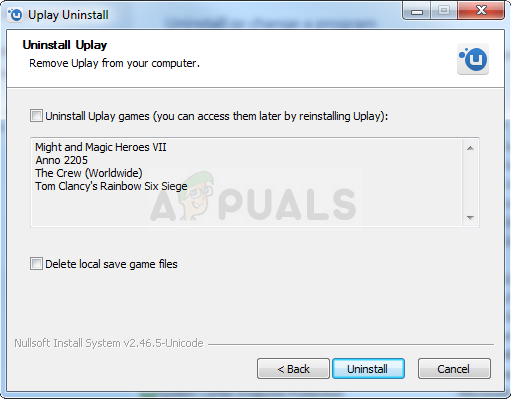
- Locate the Uplay entry on the list and click on it once. Click on the Uninstall button above the list and confirm any dialog boxes which may appear. Follow the instructions on-screen in order to uninstall Uplay and restart your computer afterwards.
- Navigate to the folder where you have installed Uplay in the first place. By default, it should be either C >> Program Files or C >> Program Files (x86). Locate the Uplay folder located in these folders and delete any files you may encounter by right-clicking on them and choosing Delete from the context menu.
Visit this link and click the Download Uplay for PC button in order to download the latest version of the Uplay client. Double-click the downloaded file in the Downloads folder in order to initiate the downloading and installing process and follow the instructions on screen in order to install this tool properly.
Relaunch the game and check to see if the “Uplay has detected an unrecoverable error and must shut down” still appears when running the problematic Ubisoft game.
Solution 2: Change the Way Your Connect to the Internet
Sometimes you will need to connect to a more reliable source of Internet connection to launch the Uplay updating service. Sometimes when your wireless connection is not that strong on your computer, it will display the “Uplay has detected an unrecoverable error and must shut down” error so try switching to Ethernet just to launch Uplay properly the first time.
If you want to get rid of this problem, make sure you do the following:
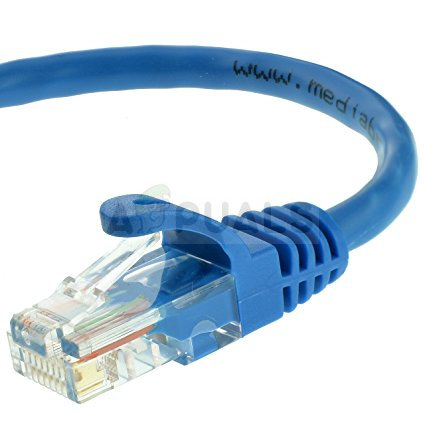
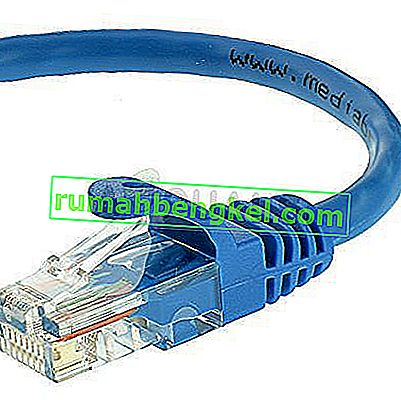
- If you are using a wireless connection via a router, make sure you locate or purchase an Ethernet cable. If you are not sure how it looks, check the image below or just ask a vendor if you don’t own one in your home.
- Plug one end of the cable into your PC or laptop and plug the other end into the modem you used for the Internet connection if you are able to locate one. The other method would be to plug the Ethernet cable directly into the router if you fail to find a modem or if you are simply not using one.
- Try running the problematic Ubisoft game to see if Uplay will now launch properly.
Solution 3: Reset Your Hosts File
If you have tried to solve other issues on your computer besides this problem, you may have edited the hosts file located deep into the System32 folder in various subfolders. The Hosts file, is used to map host names to IP addresses. If for some reason, you find that your Hosts file has been compromised or if you start experiencing this problem with Uplay, you can reset Hosts file back to default by following the steps below.
- Navigate to the location C >> Windows >> System32 >> Drivers >> Etc by navigating to it after opening the File Explorer. Firstly click This PC or My Computer from the left side pane in order to locate and open your Local Disk C.
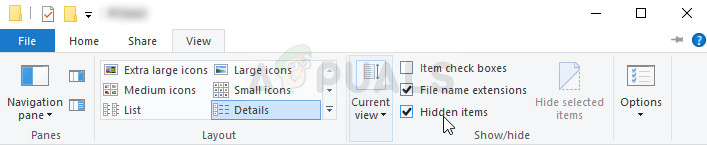
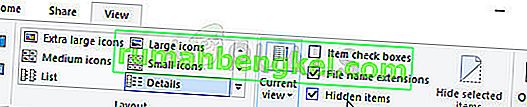
- If you are unable to see the Windows folder, you may need to turn on the option which enables you to see hidden files and folders. Click the “View” tab in File Explorer’s top menu and click on the “Hidden items” checkbox in the Show/hide section. File Explorer will show the hidden files and will remember this settings until you change it again.
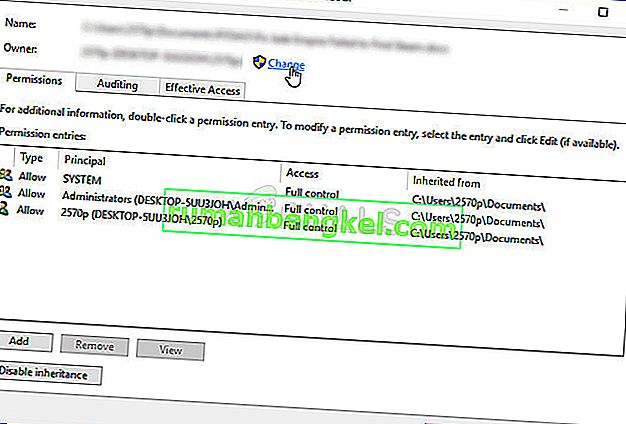
- Locate the hosts file in the Etc folder, right-click on it, click Properties, and then click the Security tab. Click the Advanced button. The “Advanced Security Settings” window will appear. Here you need to change the Owner of the key.
- Click the Change link next to the “Owner:” label The Select User or Group window will appear.
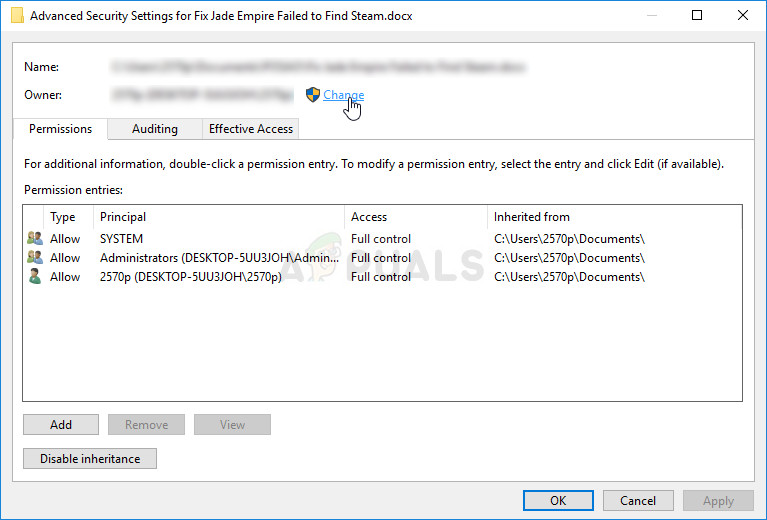
- Select the user account via the Advanced button or just type your user account in the area which says ‘Enter the object name to select’ and click OK. Add your user account and the TrustedInstaller account just in case.
- Optionally, to change the owner of all subfolders and files inside the folder, select the check box “Replace owner on subcontainers and objects” in the “Advanced Security Settings” window. Click OK to change the ownership.
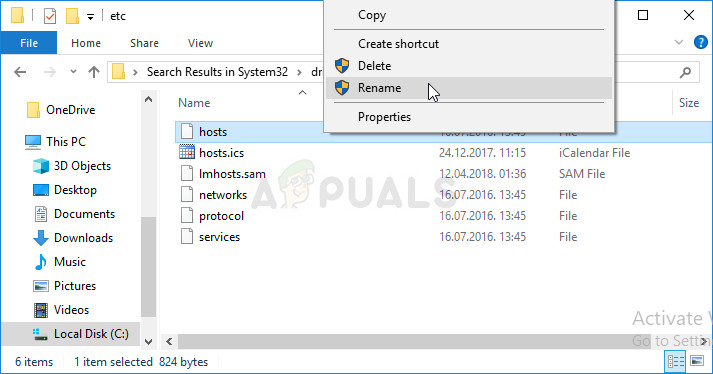
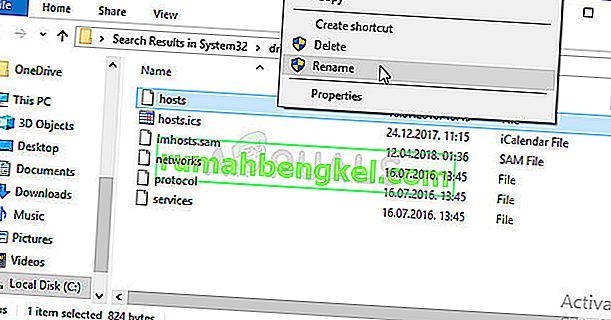
- After taking ownership of the hosts file, right-click on It and choose the Rename option from the context menu. Change its name to hosts.old and apply the changes.
Now it’s time to create a new hosts file in the same folder but using the template we will provide for you. This is the easier part of this solution and the problem is now almost solved as creating the file is quite easy.
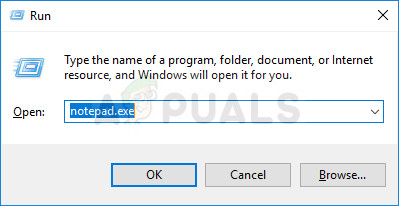
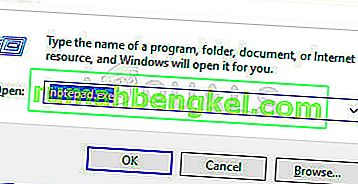
- Open Notepad by searching for it after clicking the Start menu button or the search bar right next to it. You can also use the Windows Key + R key combination and type “notepad.exe” in the Run box in order to open Notepad.
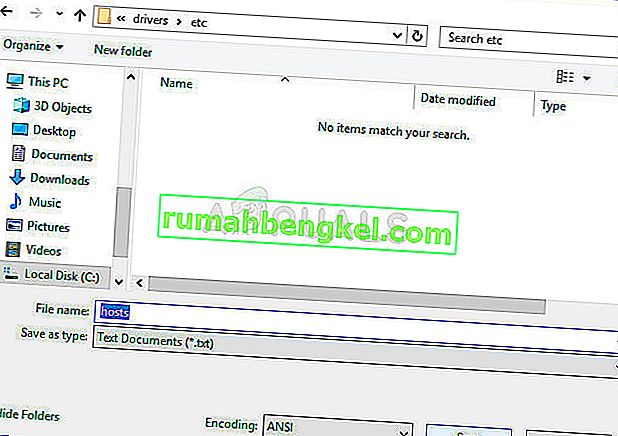
- Leave the file blank and click the File option from the top menu at the top left part of the Notepad window. Choose Save as from the dropdown list and navigate to C >> Windows >> System32 >> Drivers >> Etc folder using the File Explorer.
- Under the Save as type option, keep it as a Text Document and set the File name option to “hosts ” without the quotation marks.
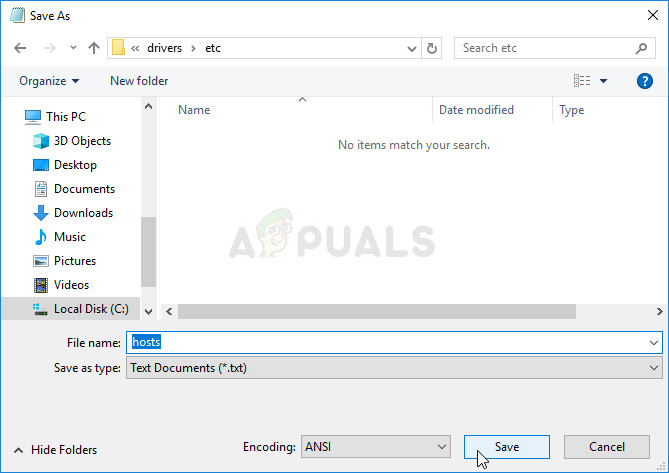
- Click OK in order to save the file in the same folder where the old hosts file was located and restart your computer in order to save the changes and check to see if the same problem still appears on your computer.
Solution 4: Disable Your Firewalls Completely
Firewall tools are one of the most important parts of your whole security since they prevent programs from connecting to the Internet freely as each program needs to be allowed through before it can simply connect online and do as it pleases.
However, it appears that disabling your firewalls for a while actually solved the problem as Uplay then proceeded to open and the error stopped appearing even after the firewall has been turned back on. In order to ensure this, you should also make an exception for Uplay in your firewall. The steps below are related to the Windows Firewall which comes built into each Windows PC.
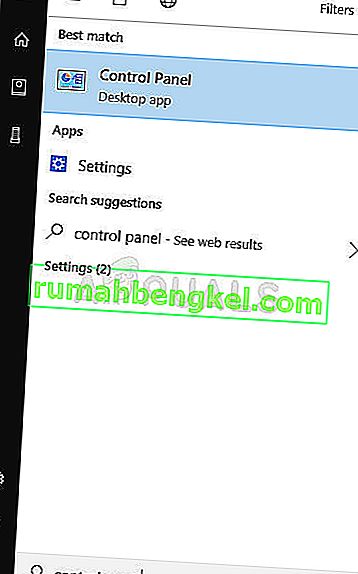
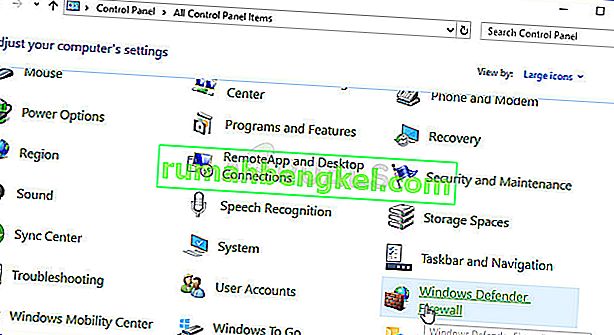
- Open Control Panel by searching for its entry in the Start button or by clicking the Search magnifying glass or the circular Cortana button at the left part of your taskbar.
- After Control Panel opens, change the view to Large or Small icons and navigate to the bottom of it in order to locate Windows Firewall option.
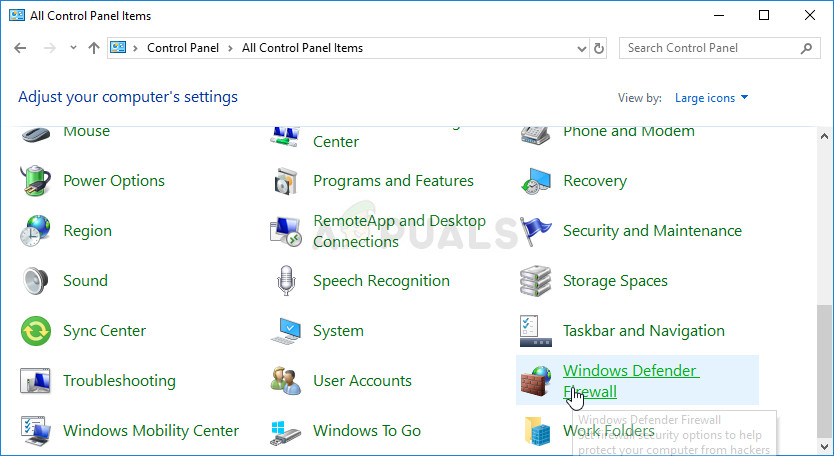
- Click on Windows Firewall and click on the Allow and app or feature through Windows Firewall option from the left side list of options. A list of apps should open. Locate the Uplay entry on the list and check the boxes next to both Private and Public networks.
- Click OK and restart your computer before relaunching the problematic game and checking if it will now run without displaying the “Uplay has detected an unrecoverable error and must shut down” error message.

Kevin Arrows
Kevin is a dynamic and self-motivated information technology professional, with a Thorough knowledge of all facets pertaining to network infrastructure design, implementation and administration. Superior record of delivering simultaneous large-scale mission critical projects on time and under budget.
«Ubisoft Connect has detected an unrecoverable error and must shutdown.» We will try to resolve the error in this article.
Ubisoft Connect users encounter the error «Ubisoft Connect has detectedan unrecoverable errorand must shutdown.» while opening theprogram,and theiraccess to theprogram is restricted. If youare facing suchaproblem, you can findasolutionby following the suggestionsbelow.
What is Ubisoft Connect Has Detected An Unrecoverable Error?
This error occurs whenany folder in the Ubisoft Connect Launcher folder isblocked or crashed, restricting ouraccess to theprogram. For this, we will try to solve theproblemby telling youafew suggestions.
How To Fix Ubisoft Connect Has Detected An Unrecoverable Error
We can solve theproblemby following the suggestionsbelow to fix this error.
1-) Turn off Antivirus Program
Disableanyantivirusprogram you use, or delete it completely from your computer. If youare using Windows Defender, disable it. First ofall, let’s close the Ubisoft Connectprogram completelyand start ourprocess.
- Type «virusand threatprotection» into the start search screenand open it.
- Then click on «Manage settings«.
- Real-timeprotection to «Off«.
After this, let’s turn off other ransomwareprotection.
- Open the start search screen.
- Open the search screenby typing Windows security settings.
- Click on the Virusand Threat Protection option on the screen that opens.
- Click on the Ransomware Protection option in the menu.
- Turn off Controlled Folder Access on the screen that opens.
Afterperforming this operation, we will need toadd the Ubisoft Connectprogram filesasan exception.
- Type «virusand threatprotection» into the start search screenand open it.
- Virusand threatprotection settings, click Manage settingsand then Exclusions Underb>, select Add or remove exclusions.Addan exclusionand then select the Ubisoft Connectprogram folder saved to your disk.
After thisprocess, let’s move on to our other suggestion.
2-) Clear Ubisoft Connect Launcher Cache Files
We can eliminate theproblemby clearing the cache files hostedby the Ubisoft Connect Launcherprogram.
- Type «Run» into the start search screenand open it.
- Type «%UserProfile%AppDataLocal» into the searchboxandpress enter.
- Then empty the recyclebinby deleting the «Ubisoft Game Launcher» folder.
After thisprocess, you can run the Ubisoftprogramand check if theproblempersists.
3-) Turn Off Unnecessary Services
Unnecessary services running in thebackground may notallow theapplication to run. For this, we can eliminate theproblemby disabling the services.
- Type «msconfig» into the start search screenand open it.
- Select «Services» on the screen that opens.
- Check «Hide All Microsoft Services«below.
- Then uncheck the serviceslistedand click the «Apply«button.
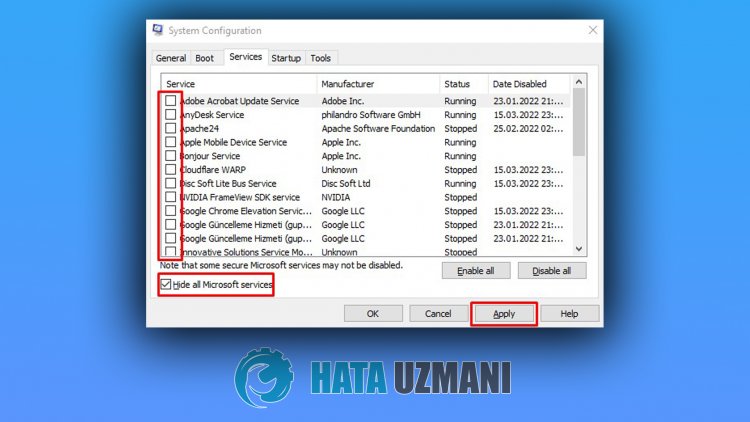
After thisprocess, restart the computerand check if theproblempersists. If theproblem is solved, you canactivate the services oneby oneand get informationabout which service is causing thisproblem.
Uplay — это служба цифрового распространения, управления цифровыми правами, многопользовательской игры и связи, разработанная Massive Entertainment, чтобы попытаться использовать одно приложение для управления своими достижениями, которые можно перенести в другие игры. Услуга предоставляется на различных платформах и используется в основном играми Ubisoft.
После того, как пользователи попытались запустить одну из игр, которые они загрузили и установили на свой компьютер, они получили сообщение об ошибке «Uplay обнаружил неисправимую ошибку и должен выключиться», которое может быть вызвано различными причинами, но все они могут быть решается с использованием решений, которые мы подготовили ниже.
Что вызывает Ошибка «Uplay обнаружил неисправимую ошибку и должен выключиться»?
Наиболее частой причиной этой проблемы является выпуск нового обновления для службы Uplay, в результате чего старые версии остаются без поддержки. Настоящая проблема возникает из-за того, что клиент Uplay не может обновляться автоматически.
Другие причины включают слишком строгие настройки безопасности, такие как брандмауэр, установленный на вашем компьютере. Одной из самых популярных причин, безусловно, был поврежденный файл hosts, который мог быть изменен пользователем или обновлением Windows.
Решение 1. Обновите Uplay
Обычно это явный признак того, что клиент Uplay устарел и компания Ubisoft, вероятно, выпустила новую версию. Однако возникает другая проблема, поскольку клиент не может обновляться (поскольку его нельзя открыть), и вам придется выполнить процесс обновления вручную; удалив текущую версию клиента и установив новую.
- Прежде всего, убедитесь, что вы вошли в систему с учетной записью администратора, поскольку вы не сможете удалять программы, используя какие-либо другие привилегии учетной записи.
- Не беспокойтесь о потере ваших достижений или любых других данных, связанных с Uplay, поскольку эти данные привязаны исключительно к вашей учетной записи Uplay, а не к установке на вашем компьютере.
- Щелкните меню «Пуск» и откройте панель управления, выполнив поиск. Если в качестве операционной системы вы используете Windows 10, вы можете щелкнуть значок шестеренки, чтобы открыть приложение «Настройки».
- В панели управления переключите параметр «Просмотр как» на «Категория» в правом верхнем углу и нажмите «Удалить программу» в разделе «Программы».
- Если вы используете приложение «Настройки», при нажатии на «Приложения» немедленно откроется список всех установленных программ на вашем компьютере.
- Найдите запись Uplay в списке и щелкните по ней один раз. Нажмите кнопку «Удалить» над списком и подтвердите все диалоговые окна, которые могут появиться. Следуйте инструкциям на экране, чтобы удалить Uplay и после этого перезагрузить компьютер.

- Перейдите в папку, в которую вы изначально установили Uplay. По умолчанию это должно быть C >> Program Files или C >> Program Files (x86). Найдите папку Uplay, расположенную в этих папках, и удалите все файлы, с которыми вы можете столкнуться, щелкнув их правой кнопкой мыши и выбрав Удалить в контекстном меню.
Перейдите по этой ссылке и нажмите кнопку «Загрузить Uplay для ПК», чтобы загрузить последнюю версию клиента Uplay. Дважды щелкните загруженный файл в папке «Загрузки», чтобы начать процесс загрузки и установки, и следуйте инструкциям на экране, чтобы правильно установить этот инструмент.
Перезапустите игру и проверьте, появляется ли сообщение «Uplay обнаружил неисправимую ошибку и должен завершиться» при запуске проблемной игры Ubisoft.
Решение 2. Измените способ подключения к Интернету
Иногда вам нужно будет подключиться к более надежному источнику интернет-соединения, чтобы запустить службу обновления Uplay. Иногда, когда ваше беспроводное соединение на вашем компьютере не такое сильное, он отображает ошибку «Uplay обнаружил неисправимую ошибку и должен выключиться», поэтому попробуйте переключиться на Ethernet, чтобы правильно запустить Uplay в первый раз.
Если вы хотите избавиться от этой проблемы, обязательно сделайте следующее:
- Если вы используете беспроводное соединение через маршрутизатор, обязательно найдите или приобретите кабель Ethernet. Если вы не знаете, как он выглядит, посмотрите изображение ниже или просто спросите продавца, нет ли у вас дома.
- Подключите один конец кабеля к компьютеру или ноутбуку, а другой конец — к модему, который вы использовали для подключения к Интернету, если вы можете его найти. Другой способ — подключить кабель Ethernet непосредственно к маршрутизатору, если вы не можете найти модем или просто не используете его.
- Попробуйте запустить проблемную игру Ubisoft, чтобы проверить, правильно ли запускается Uplay.
Решение 3. Сбросьте файл Hosts
Если вы пытались решить другие проблемы на вашем компьютере помимо этой, возможно, вы отредактировали файл hosts, расположенный глубоко в папке System32 в различных подпапках. Файл Hosts используется для сопоставления имен хостов с IP-адресами. Если по какой-то причине вы обнаружите, что ваш файл Hosts был скомпрометирован или если у вас возникла эта проблема с Uplay, вы можете сбросить файл Hosts до значений по умолчанию, выполнив следующие действия.
- Перейдите в папку C >> Windows >> System32 >> Drivers >> Etc, перейдя к ней после открытия проводника. Сначала щелкните Этот компьютер или Мой компьютер на левой панели, чтобы найти и открыть локальный диск C.
- Если вы не видите папку Windows, вам может потребоваться включить опцию, которая позволяет вам видеть скрытые файлы и папки. Щелкните вкладку «Просмотр» в верхнем меню проводника и установите флажок «Скрытые элементы» в разделе «Показать / скрыть». Проводник покажет скрытые файлы и запомнит эти настройки, пока вы не измените их снова.
- Найдите файл hosts в папке Etc, щелкните его правой кнопкой мыши, выберите пункт «Свойства» и перейдите на вкладку «Безопасность». Щелкните кнопку Advanced. Откроется окно «Дополнительные параметры безопасности». Здесь нужно сменить Владельца ключа.
- Щелкните ссылку «Изменить» рядом с меткой «Владелец:». Появится окно «Выбрать пользователя или группу».
- Выберите учетную запись пользователя с помощью кнопки «Дополнительно» или просто введите свою учетную запись в области с надписью «Введите имя объекта для выбора» и нажмите «ОК». На всякий случай добавьте свою учетную запись пользователя и учетную запись TrustedInstaller.
- При желании, чтобы изменить владельца всех вложенных папок и файлов внутри папки, установите флажок «Заменить владельца подконтейнеров и объектов» в окне «Дополнительные параметры безопасности». Нажмите ОК, чтобы сменить владельца.
- После того, как вы станете владельцем файла hosts, щелкните его правой кнопкой мыши и выберите параметр «Переименовать» в контекстном меню. Измените его имя на hosts.old и примените изменения.
Теперь пора создать новый файл hosts в той же папке, но с использованием шаблона, который мы вам предоставим. Это наиболее легкая часть этого решения, и теперь проблема почти решена, поскольку создать файл довольно просто.
- Откройте Блокнот, выполнив поиск после нажатия кнопки меню «Пуск» или строки поиска рядом с ним. Вы также можете использовать комбинацию клавиш Windows Key + R и ввести «notepad.exe» в поле «Выполнить», чтобы открыть Блокнот.
- Оставьте файл пустым и выберите пункт «Файл» в верхнем меню в верхней левой части окна Блокнота. Выберите «Сохранить как» в раскрывающемся списке и перейдите в папку C >> Windows >> System32 >> Drivers >> Etc с помощью проводника.
- В разделе «Тип файла» сохраните его как текстовый документ и установите для параметра «Имя файла» значение «хосты» без кавычек.
- Нажмите OK, чтобы сохранить файл в той же папке, где находился старый файл hosts, и перезагрузите компьютер, чтобы сохранить изменения и проверить, появляется ли та же проблема на вашем компьютере.
Решение 4. Полностью отключите брандмауэры
Инструменты брандмауэра — одна из наиболее важных частей вашей безопасности, поскольку они не позволяют программам свободно подключаться к Интернету, поскольку каждая программа должна быть разрешена, прежде чем она сможет просто подключиться к сети и делать то, что ей заблагорассудится.
Однако, похоже, что отключение ваших брандмауэров на некоторое время фактически решило проблему, поскольку затем Uplay продолжил открываться, и ошибка перестала появляться даже после того, как брандмауэр был снова включен. Чтобы гарантировать это, вы также должны сделать исключение для Uplay в вашем брандмауэре. Приведенные ниже шаги относятся к брандмауэру Windows, который встроен в каждый ПК с Windows.
- Откройте панель управления, выполнив поиск соответствующей записи на кнопке «Пуск» или щелкнув увеличительное стекло «Поиск» или круглую кнопку Cortana в левой части панели задач.
- После открытия панели управления измените вид на большие или мелкие значки и перейдите в нижнюю часть панели, чтобы найти параметр брандмауэра Windows.
- Щелкните брандмауэр Windows и выберите параметр Разрешить и приложение или функцию через брандмауэр Windows в списке параметров слева. Должен открыться список приложений. Найдите в списке запись Uplay и установите флажки рядом с частными и общедоступными сетями.
- Нажмите «ОК» и перезагрузите компьютер перед перезапуском проблемной игры и проверьте, будет ли она теперь работать без отображения сообщения об ошибке «Uplay обнаружил неисправимую ошибку и должен выключиться».