Domain Name Service (DNS) is an Internet service that maps IP addresses and fully qualified domain names (FQDN) to one another. In this way, DNS alleviates the need to remember IP addresses. Computers that run DNS are called name servers. Ubuntu ships with BIND (Berkley Internet Naming Daemon), the most common program used for maintaining a name server on Linux.
Installation
At a terminal prompt, enter the following command to install dns:
sudo apt install bind9
A very useful package for testing and troubleshooting DNS issues is the dnsutils package. Very often these tools will be installed already, but to check and/or install dnsutils enter the following:
sudo apt install dnsutils
Configuration
There are many ways to configure BIND9. Some of the most common configurations are a caching nameserver, primary server, and secondary server.
-
When configured as a caching nameserver BIND9 will find the answer to name queries and remember the answer when the domain is queried again.
-
As a primary server, BIND9 reads the data for a zone from a file on its host and is authoritative for that zone.
-
As a secondary server, BIND9 gets the zone data from another nameserver that is authoritative for the zone.
Overview
The DNS configuration files are stored in the /etc/bind directory. The primary configuration file is /etc/bind/named.conf, which in the layout provided by the package just includes these files.
-
/etc/bind/named.conf.options: global DNS options -
/etc/bind/named.conf.local: for your zones -
/etc/bind/named.conf.default-zones: default zones such as localhost, its reverse, and the root hints
The root nameservers used to be described in the file /etc/bind/db.root. This is now provided instead by the /usr/share/dns/root.hints file shipped with the dns-root-data package, and is referenced in the named.conf.default-zones configuration file above.
It is possible to configure the same server to be a caching name server, primary, and secondary: it all depends on the zones it is serving. A server can be the Start of Authority (SOA) for one zone, while providing secondary service for another zone. All the while providing caching services for hosts on the local LAN.
Caching Nameserver
The default configuration acts as a caching server. Simply uncomment and edit /etc/bind/named.conf.options to set the IP addresses of your ISP’s DNS servers:
forwarders {
    1.2.3.4;
    5.6.7.8;
};
Note
Replace
1.2.3.4and5.6.7.8with the IP Addresses of actual nameservers.
To enable the new configuration, restart the DNS server. From a terminal prompt:
sudo systemctl restart bind9.service
See dig for information on testing a caching DNS server.
Primary Server
In this section BIND9 will be configured as the Primary server for the domain example.com. Simply replace example.com with your FQDN (Fully Qualified Domain Name).
Forward Zone File
To add a DNS zone to BIND9, turning BIND9 into a Primary server, first edit /etc/bind/named.conf.local:
zone "example.com" {
    type master;
    file "/etc/bind/db.example.com";
};
Note
If bind will be receiving automatic updates to the file as with DDNS, then use
/var/lib/bind/db.example.comrather than/etc/bind/db.example.comboth here and in the copy command below.
Now use an existing zone file as a template to create the /etc/bind/db.example.com file:
sudo cp /etc/bind/db.local /etc/bind/db.example.com
Edit the new zone file /etc/bind/db.example.com and change localhost. to the FQDN of your server, leaving the additional . at the end. Change 127.0.0.1 to the nameserver’s IP Address and root.localhost to a valid email address, but with a . instead of the usual @ symbol, again leaving the . at the end. Change the comment to indicate the domain that this file is for.
Create an A record for the base domain, example.com. Also, create an A record for ns.example.com, the name server in this example:
;
; BIND data file for example.com
;
$TTL    604800
@       IN      SOA     example.com. root.example.com. (
                              2         ; Serial
                         604800         ; Refresh
                          86400         ; Retry
                        2419200         ; Expire
                         604800 )       ; Negative Cache TTL

@       IN      NS      ns.example.com.
@       IN      A       192.168.1.10
@       IN      AAAA    ::1
ns      IN      A       192.168.1.10
You must increment the Serial Number every time you make changes to the zone file. If you make multiple changes before restarting BIND9, simply increment the Serial once.
Now, you can add DNS records to the bottom of the zone file. See Common Record Types for details.
Note
Many admins like to use the last date edited as the serial of a zone, such as 2020012100 which is yyyymmddss (where ss is the Serial Number)
Once you have made changes to the zone file BIND9 needs to be restarted for the changes to take effect:
sudo systemctl restart bind9.service
Reverse Zone File
Now that the zone is setup and resolving names to IP Addresses, a Reverse zone needs to be added to allows DNS to resolve an address to a name.
Edit /etc/bind/named.conf.local and add the following:
zone "1.168.192.in-addr.arpa" {
    type master;
    file "/etc/bind/db.192";
};
Note
Replace
1.168.192with the first three octets of whatever network you are using. Also, name the zone file/etc/bind/db.192appropriately. It should match the first octet of your network.
Now create the /etc/bind/db.192 file:
sudo cp /etc/bind/db.127 /etc/bind/db.192
Next edit /etc/bind/db.192 changing the same options as /etc/bind/db.example.com:
;
; BIND reverse data file for local 192.168.1.XXX net
;
$TTL    604800
@       IN      SOA     ns.example.com. root.example.com. (
                              2         ; Serial
                         604800         ; Refresh
                          86400         ; Retry
                        2419200         ; Expire
                         604800 )       ; Negative Cache TTL
;
@       IN      NS      ns.
10      IN      PTR     ns.example.com.
The Serial Number in the Reverse zone needs to be incremented on each change as well. For each A record you configure in /etc/bind/db.example.com, that is for a different address, you need to create a PTR record in /etc/bind/db.192.
After creating the reverse zone file restart BIND9:
sudo systemctl restart bind9.service
Secondary Server
Once a Primary Server has been configured a Secondary Server is highly recommended in order to maintain the availability of the domain should the Primary become unavailable.
First, on the Primary server, the zone transfer needs to be allowed. Add the allow-transfer option to the example Forward and Reverse zone definitions in /etc/bind/named.conf.local:
zone "example.com" {
    type master;
    file "/etc/bind/db.example.com";
    allow-transfer { 192.168.1.11; };
};

zone "1.168.192.in-addr.arpa" {
    type master;
    file "/etc/bind/db.192";
    allow-transfer { 192.168.1.11; };
};
Note
Replace
192.168.1.11with the IP Address of your Secondary nameserver.
Restart BIND9 on the Primary server:
sudo systemctl restart bind9.service
Next, on the Secondary server, install the bind9 package the same way as on the Primary. Then edit the /etc/bind/named.conf.local and add the following declarations for the Forward and Reverse zones:
zone "example.com" {
    type secondary;
    file "db.example.com";
    masters { 192.168.1.10; };
};

zone "1.168.192.in-addr.arpa" {
    type secondary;
    file "db.192";
    masters { 192.168.1.10; };
};
Note
Replace
192.168.1.10with the IP Address of your Primary nameserver.
Restart BIND9 on the Secondary server:
sudo systemctl restart bind9.service
In /var/log/syslog you should see something similar to the following (some lines have been split to fit the format of this document):
client 192.168.1.10#39448: received notify for zone '1.168.192.in-addr.arpa'
zone 1.168.192.in-addr.arpa/IN: Transfer started.
transfer of '100.18.172.in-addr.arpa/IN' from 192.168.1.10#53:
 connected using 192.168.1.11#37531
zone 1.168.192.in-addr.arpa/IN: transferred serial 5
transfer of '100.18.172.in-addr.arpa/IN' from 192.168.1.10#53:
 Transfer completed: 1 messages,
6 records, 212 bytes, 0.002 secs (106000 bytes/sec)
zone 1.168.192.in-addr.arpa/IN: sending notifies (serial 5)

client 192.168.1.10#20329: received notify for zone 'example.com'
zone example.com/IN: Transfer started.
transfer of 'example.com/IN' from 192.168.1.10#53: connected using 192.168.1.11#38577
zone example.com/IN: transferred serial 5
transfer of 'example.com/IN' from 192.168.1.10#53: Transfer completed: 1 messages,
8 records, 225 bytes, 0.002 secs (112500 bytes/sec)
Note
Note: A zone is only transferred if the Serial Number on the Primary is larger than the one on the Secondary. If you want to have your Primary DNS notifying other Secondary DNS Servers of zone changes, you can add
also-notify { ipaddress; };to/etc/bind/named.conf.localas shown in the example below:
zone "example.com" {
    type master;
    file "/etc/bind/db.example.com";
    allow-transfer { 192.168.1.11; };
    also-notify { 192.168.1.11; };
};

zone "1.168.192.in-addr.arpa" {
    type master;
    file "/etc/bind/db.192";
    allow-transfer { 192.168.1.11; };
    also-notify { 192.168.1.11; };
};
Note
The default directory for non-authoritative zone files is
/var/cache/bind/. This directory is also configured in AppArmor to allow the named daemon to write to it. For more information on AppArmor see Security — AppArmor.
Troubleshooting
This section covers diagnosing problems with DNS and BIND9 configurations.
Testing
resolv.conf
The first step in testing BIND9 is to add the nameserver’s IP Address to a hosts resolver. The Primary nameserver should be configured as well as another host to double check things. Refer to DNS client configuration for details on adding nameserver addresses to your network clients. In the end your nameserver line in /etc/resolv.conf should be pointing at 127.0.0.53 and you should have a search parameter for your domain. Something like this:
nameserver  127.0.0.53
search example.com
To check which DNS server your local resolver is using, run:
systemd-resolve --status
Note
You should also add the IP Address of the Secondary nameserver to your client configuration in case the Primary becomes unavailable.
dig
If you installed the dnsutils package you can test your setup using the DNS lookup utility dig:
-
After installing BIND9 use dig against the loopback interface to make sure it is listening on port 53. From a terminal prompt:
dig -x 127.0.0.1You should see lines similar to the following in the command output:
;; Query time: 1 msec ;; SERVER: 192.168.1.10#53(192.168.1.10) -
If you have configured BIND9 as a Caching nameserver “dig” an outside domain to check the query time:
dig ubuntu.comNote the query time toward the end of the command output:
;; Query time: 49 msecAfter a second dig there should be improvement:
;; Query time: 1 msec
ping
Now to demonstrate how applications make use of DNS to resolve a host name use the ping utility to send an ICMP echo request:
ping example.com
This tests if the nameserver can resolve the name ns.example.com to an IP Address. The command output should resemble:
PING ns.example.com (192.168.1.10) 56(84) bytes of data.
64 bytes from 192.168.1.10: icmp_seq=1 ttl=64 time=0.800 ms
64 bytes from 192.168.1.10: icmp_seq=2 ttl=64 time=0.813 ms
named-checkzone
A great way to test your zone files is by using the named-checkzone utility installed with the bind9 package. This utility allows you to make sure the configuration is correct before restarting BIND9 and making the changes live.
-
To test our example Forward zone file enter the following from a command prompt:
named-checkzone example.com /etc/bind/db.example.comIf everything is configured correctly you should see output similar to:
zone example.com/IN: loaded serial 6 OK -
Similarly, to test the Reverse zone file enter the following:
named-checkzone 1.168.192.in-addr.arpa /etc/bind/db.192The output should be similar to:
zone 1.168.192.in-addr.arpa/IN: loaded serial 3
OK
Note
The Serial Number of your zone file will probably be different.
Quick temporary query logging
With the rndc tool, you can quickly turn query logging on and off, without restarting the service or changing the configuration file.
To turn query logging on, run:
sudo rndc querylog on
Likewise, to turn it off, run:
sudo rndc querylog off
The logs will be sent to syslog and will show up in /var/log/syslog by default:
Jan 20 19:40:50 new-n1 named[816]: received control channel command 'querylog on'
Jan 20 19:40:50 new-n1 named[816]: query logging is now on
Jan 20 19:40:57 new-n1 named[816]: client @0x7f48ec101480 192.168.1.10#36139 (ubuntu.com): query: ubuntu.com IN A +E(0)K (192.168.1.10)
Note
The amount of logs generated by enabling
querylogcould be huge!
Logging
BIND9 has a wide variety of logging configuration options available, but the two main ones are channel and category, which configure where logs go, and what information gets logged, respectively.
If no logging options are configured the default configuration is:
logging {
     category default { default_syslog; default_debug; };
     category unmatched { null; };
};
Let’s instead configure BIND9 to send debug messages related to DNS queries to a separate file.
We need to configure a channel to specify which file to send the messages to, and a category. In this example, the category will log all queries. Edit /etc/bind/named.conf.local and add the following:
logging {
    channel query.log {
        file "/var/log/named/query.log";
        severity debug 3;
    };
    category queries { query.log; };
};
Note
The debug option can be set from 1 to 3. If a level isn’t specified, level 1 is the default.
-
Since the named daemon runs as the bind user the
/var/log/nameddirectory must be created and the ownership changed:sudo mkdir /var/log/named sudo chown bind:bind /var/log/named -
Now restart BIND9 for the changes to take effect:
sudo systemctl restart bind9.service
You should see the file /var/log/named/query.log fill with query information. This is a simple example of the BIND9 logging options. For coverage of advanced options see More Information.
References
Common Record Types
This section covers some of the most common DNS record types.
-
Arecord: This record maps an IP Address to a hostname.www IN A 192.168.1.12 -
CNAMErecord: Used to create an alias to an existing A record. You cannot create aCNAMErecord pointing to anotherCNAMErecord.web IN CNAME www -
MXrecord: Used to define where email should be sent to. Must point to anArecord, not aCNAME.@ IN MX 1 mail.example.com. mail IN A 192.168.1.13 -
NSrecord: Used to define which servers serve copies of a zone. It must point to anArecord, not aCNAME. This is where Primary and Secondary servers are defined.@ IN NS ns.example.com. @ IN NS ns2.example.com. ns IN A 192.168.1.10 ns2 IN A 192.168.1.11
More Information
-
Upstream BIND9 Documentation
-
DNS and BIND is a popular book now in it’s fifth edition. There is now also a DNS and BIND on IPv6 book.
-
A great place to ask for BIND9 assistance, and get involved with the Ubuntu Server community, is the #ubuntu-server IRC channel on freenode.
Ubuntu ships with a number of graphical utilities to configure your network devices. This document is geared toward server administrators and will focus on managing your network on the command line.
Ethernet interfaces
Ethernet interfaces are identified by the system using predictable network interface names. These names can appear as eno1 or enp0s25. However, in some cases an interface may still use the kernel eth# style of naming.
Identify Ethernet interfaces
To quickly identify all available Ethernet interfaces, you can use the ip command as shown below.
ip a
1: lo: <LOOPBACK,UP,LOWER_UP> mtu 65536 qdisc noqueue state UNKNOWN group default qlen 1000
    link/loopback 00:00:00:00:00:00 brd 00:00:00:00:00:00
    inet 127.0.0.1/8 scope host lo
       valid_lft forever preferred_lft forever
    inet6 ::1/128 scope host
       valid_lft forever preferred_lft forever
2: enp0s25: <BROADCAST,MULTICAST,UP,LOWER_UP> mtu 1500 qdisc noqueue state UP group default qlen 1000
    link/ether 00:16:3e:e2:52:42 brd ff:ff:ff:ff:ff:ff link-netnsid 0
    inet 10.102.66.200/24 brd 10.102.66.255 scope global dynamic eth0
       valid_lft 3257sec preferred_lft 3257sec
    inet6 fe80::216:3eff:fee2:5242/64 scope link
       valid_lft forever preferred_lft forever
Another application that can help identify all network interfaces available to your system is the lshw command. This command provides greater details around the hardware capabilities of specific adapters. In the example below, lshw shows a single Ethernet interface with the logical name of eth4 along with bus information, driver details and all supported capabilities.
sudo lshw -class network
  *-network
       description: Ethernet interface
       product: MT26448 [ConnectX EN 10GigE, PCIe 2.0 5GT/s]
       vendor: Mellanox Technologies
       physical id: 0
       bus info: pci@0004:01:00.0
       logical name: eth4
       version: b0
       serial: e4:1d:2d:67:83:56
       slot: U78CB.001.WZS09KB-P1-C6-T1
       size: 10Gbit/s
       capacity: 10Gbit/s
       width: 64 bits
       clock: 33MHz
       capabilities: pm vpd msix pciexpress bus_master cap_list ethernet physical fibre 10000bt-fd
       configuration: autonegotiation=off broadcast=yes driver=mlx4_en driverversion=4.0-0 duplex=full firmware=2.9.1326 ip=192.168.1.1 latency=0 link=yes multicast=yes port=fibre speed=10Gbit/s
       resources: iomemory:24000-23fff irq:481 memory:3fe200000000-3fe2000fffff memory:240000000000-240007ffffff
Ethernet Interface logical names
Interface logical names can also be configured via a Netplan configuration. If you would like control which interface receives a particular logical name use the match and set-name keys. The match key is used to find an adapter based on some criteria like MAC address, driver, etc. The set-name key can be used to change the device to the desired logical name.
network:
  version: 2
  renderer: networkd
  ethernets:
    eth_lan0:
      dhcp4: true
      match:
        macaddress: 00:11:22:33:44:55
      set-name: eth_lan0
Ethernet Interface settings
ethtool is a program that displays and changes Ethernet card settings such as auto-negotiation, port speed, duplex mode, and Wake-on-LAN. The following is an example of how to view the supported features and configured settings of an Ethernet interface.
sudo ethtool eth4
Settings for eth4:
    Supported ports: [ FIBRE ]
    Supported link modes:   10000baseT/Full
    Supported pause frame use: No
    Supports auto-negotiation: No
    Supported FEC modes: Not reported
    Advertised link modes:  10000baseT/Full
    Advertised pause frame use: No
    Advertised auto-negotiation: No
    Advertised FEC modes: Not reported
    Speed: 10000Mb/s
    Duplex: Full
    Port: FIBRE
    PHYAD: 0
    Transceiver: internal
    Auto-negotiation: off
    Supports Wake-on: d
    Wake-on: d
    Current message level: 0x00000014 (20)
                   link ifdown
    Link detected: yes
IP addressing
The following section describes the process of configuring your system’s IP address and default gateway needed for communicating on a local area network and the Internet.
Temporary IP address assignment
For temporary network configurations, you can use the ip command which is also found on most other GNU/Linux operating systems. The ip command allows you to configure settings which take effect immediately – however they are not persistent and will be lost after a reboot.
To temporarily configure an IP address, you can use the ip command in the following manner. Modify the IP address and subnet mask to match your network requirements.
sudo ip addr add 10.102.66.200/24 dev enp0s25
The ip can then be used to set the link up or down.
ip link set dev enp0s25 up
ip link set dev enp0s25 down
To verify the IP address configuration of enp0s25, you can use the ip command in the following manner:
ip address show dev enp0s25
10: enp0s25: <BROADCAST,MULTICAST,UP,LOWER_UP> mtu 1500 qdisc noqueue state UP group default qlen 1000
    link/ether 00:16:3e:e2:52:42 brd ff:ff:ff:ff:ff:ff link-netnsid 0
    inet 10.102.66.200/24 brd 10.102.66.255 scope global dynamic eth0
       valid_lft 2857sec preferred_lft 2857sec
    inet6 fe80::216:3eff:fee2:5242/64 scope link
       valid_lft forever preferred_lft forever6
To configure a default gateway, you can use the ip command in the following manner. Modify the default gateway address to match your network requirements.
sudo ip route add default via 10.102.66.1
You can also use the ip command to verify your default gateway configuration, as follows:
ip route show
default via 10.102.66.1 dev eth0 proto dhcp src 10.102.66.200 metric 100
10.102.66.0/24 dev eth0 proto kernel scope link src 10.102.66.200
10.102.66.1 dev eth0 proto dhcp scope link src 10.102.66.200 metric 100
If you require DNS for your temporary network configuration, you can add DNS server IP addresses in the file /etc/resolv.conf. In general, editing /etc/resolv.conf directly is not recommended, but this is a temporary and non-persistent configuration. The example below shows how to enter two DNS servers to /etc/resolv.conf, which should be changed to servers appropriate for your network. A more lengthy description of the proper (persistent) way to do DNS client configuration is in a following section.
nameserver 8.8.8.8
nameserver 8.8.4.4
If you no longer need this configuration and wish to purge all IP configuration from an interface, you can use the ip command with the flush option:
ip addr flush eth0
Note
Flushing the IP configuration using theipcommand does not clear the contents of/etc/resolv.conf. You must remove or modify those entries manually (or re-boot), which should also cause/etc/resolv.conf, which is a symlink to/run/systemd/resolve/stub-resolv.conf, to be re-written.
Dynamic IP address assignment (DHCP client)
To configure your server to use DHCP for dynamic address assignment, create a Netplan configuration in the file /etc/netplan/99_config.yaml. The following example assumes you are configuring your first Ethernet interface identified as enp3s0.
network:
  version: 2
  renderer: networkd
  ethernets:
    enp3s0:
      dhcp4: true
The configuration can then be applied using the netplan command:
sudo netplan apply
Static IP address assignment
To configure your system to use static address assignment, create a netplan configuration in the file /etc/netplan/99_config.yaml. The example below assumes you are configuring your first Ethernet interface identified as eth0. Change the addresses, routes, and nameservers values to meet the requirements of your network.
network:
  version: 2
  renderer: networkd
  ethernets:
    eth0:
      addresses:
        - 10.10.10.2/24
      routes:
        - to: default
          via: 10.10.10.1
      nameservers:
          search: [mydomain, otherdomain]
          addresses: [10.10.10.1, 1.1.1.1]
The configuration can then be applied using the netplan command.
sudo netplan apply
NOTE
netplanin Ubuntu Bionic 18.04 LTS doesn’t understand the “to: default” syntax to specify a default route, and should use the oldergateway4: 10.10.10.1key instead of the wholeroutes:block.
The loopback interface is identified by the system as lo and has a default IP address of 127.0.0.1. It can be viewed using the ip command.
ip address show lo
1: lo: <LOOPBACK,UP,LOWER_UP> mtu 65536 qdisc noqueue state UNKNOWN group default qlen 1000
    link/loopback 00:00:00:00:00:00 brd 00:00:00:00:00:00
    inet 127.0.0.1/8 scope host lo
       valid_lft forever preferred_lft forever
    inet6 ::1/128 scope host
       valid_lft forever preferred_lft forever
Name resolution
Name resolution (as it relates to IP networking) is the process of mapping hostnames to IP addresses, and vice-versa, making it easier to identify resources on a network. The following section will explain how to properly configure your system for name resolution using DNS and static hostname records.
DNS client configuration
Traditionally, the file /etc/resolv.conf was a static configuration file that rarely needed to be changed, or it automatically changed via DCHP client hooks. systemd-resolved handles nameserver configuration, and it should be interacted with through the systemd-resolve command. Netplan configures systemd-resolved to generate a list of nameservers and domains to put in /etc/resolv.conf, which is a symlink:
/etc/resolv.conf -> ../run/systemd/resolve/stub-resolv.conf
To configure the resolver, add the IP addresses of the appropriate nameservers for your network to the netplan configuration file. You can also add optional DNS suffix search-lists to match your network domain names. The resulting file might look like the following:
network:
  version: 2
  renderer: networkd
  ethernets:
    enp0s25:
      addresses:
        - 192.168.0.100/24
      routes:
        - to: default
          via: 192.168.0.1
      nameservers:
          search: [mydomain, otherdomain]
          addresses: [1.1.1.1, 8.8.8.8, 4.4.4.4]
The search option can also be used with multiple domain names so that DNS queries will be appended in the order in which they are entered. For example, your network may have multiple sub-domains to search; a parent domain of example.com, and two sub-domains, sales.example.com and dev.example.com.
If you have multiple domains you wish to search, your configuration might look like the following:
network:
  version: 2
  renderer: networkd
  ethernets:
    enp0s25:
      addresses:
        - 192.168.0.100/24
      routes:
        - to: default
          via: 192.168.0.1
      nameservers:
          search: [example.com, sales.example.com, dev.example.com]
          addresses: [1.1.1.1, 8.8.8.8, 4.4.4.4]
If you try to ping a host with the name server1, your system will automatically query DNS for its Fully Qualified Domain Name (FQDN) in the following order:
-
server1.example.com -
server1.sales.example.com -
server1.dev.example.com
If no matches are found, the DNS server will provide a result of notfound and the DNS query will fail.
Static hostnames
Static hostnames are locally defined hostname-to-IP mappings located in the file /etc/hosts. Entries in the hosts file will have precedence over DNS by default. This means that if your system tries to resolve a hostname and it matches an entry in /etc/hosts, it will not attempt to look up the record in DNS. In some configurations, especially when Internet access is not required, servers that communicate with a limited number of resources can be conveniently set to use static hostnames instead of DNS.
The following is an example of a hosts file where a number of local servers have been identified by simple hostnames, aliases and their equivalent Fully Qualified Domain Names (FQDN’s):
127.0.0.1   localhost
127.0.1.1   ubuntu-server
10.0.0.11   server1 server1.example.com vpn
10.0.0.12   server2 server2.example.com mail
10.0.0.13   server3 server3.example.com www
10.0.0.14   server4 server4.example.com file
Note
In this example, notice that each of the servers were given aliases in addition to their proper names and FQDN’s. Server1 has been mapped to the name vpn, server2 is referred to as mail, server3 as www, and server4 as file.
Name Service Switch (NSS) configuration
The order in which your system selects a method of resolving hostnames to IP addresses is controlled by the Name Service Switch (NSS) configuration file /etc/nsswitch.conf. As mentioned in the previous section, typically static hostnames defined in the systems /etc/hosts file have precedence over names resolved from DNS. The following is an example of the line responsible for this order of hostname lookups in the file /etc/nsswitch.conf.
hosts: files mdns4_minimal [NOTFOUND=return] dns mdns4
-
filesfirst tries to resolve static hostnames located in/etc/hosts. -
mdns4_minimalattempts to resolve the name using Multicast DNS. -
[NOTFOUND=return]means that any response ofnotfoundby the precedingmdns4_minimalprocess should be treated as authoritative and that the system should not try to continue hunting for an answer. -
dnsrepresents a legacy unicast DNS query. -
mdns4 represents a multicast DNS query.
To modify the order of these name resolution methods, you can simply change the hosts: string to the value of your choosing. For example, if you prefer to use legacy unicast DNS versus multicast DNS, you can change the string in /etc/nsswitch.conf as shown below:
hosts: files dns [NOTFOUND=return] mdns4_minimal mdns4
Bridging multiple interfaces
Bridging is a more advanced configuration, but is very useful in multiple scenarios. One scenario is setting up a bridge with multiple network interfaces, then using a firewall to filter traffic between two network segments. Another scenario is using bridge on a system with one interface to allow virtual machines direct access to the outside network. The following example covers the latter scenario:
Configure the bridge by editing your netplan configuration found in /etc/netplan/, entering the appropriate values for your physical interface and network:
network:
  version: 2
  renderer: networkd
  ethernets:
    enp3s0:
      dhcp4: no
  bridges:
    br0:
      dhcp4: yes
      interfaces:
        - enp3s0
Now apply the configuration to enable the bridge:
sudo netplan apply
The new bridge interface should now be up and running. The brctl provides useful information about the state of the bridge, controls which interfaces are part of the bridge, etc. See man brctl for more information.
networkd-dispatcher for hook scripts
Users of the former ifupdown may be familiar with using hook scripts (e.g., pre-up, post-up) in their interfaces file. Netplan configuration does not currently support hook scripts in its configuration definition.
Instead, to achieve this functionality with the networkd renderer, users can use networkd-dispatcher. The package provides both users and packages with hook points when specific network states are reached, to aid in reacting to network state.
Note:
If you are on Desktop (not Ubuntu Server) the network is driven by Network Manager — in that case you need NM Dispatcher scripts instead.
The Netplan FAQ has a great table that compares event timings between ifupdown/systemd-networkd/network-manager.
It is important to be aware that these hooks run asynchronously; i.e. they will not block transition into another state.
The Netplan FAQ also has an example on converting an old ifupdown hook to networkd-dispatcher.
Resources
-
The Ubuntu Wiki Network page has links to articles covering more advanced network configuration.
-
The Netplan website has additional examples and documentation.
-
The Netplan man page has more information on Netplan.
-
The systemd-resolved man page has more information on systemd-resolved service.
-
For more information on bridging see the netplan.io examples page
В статье мы расскажем, как изменить настройки DNS-серверов на популярных ОС: Ubuntu, Debian, Centos и Windows Server.
Самые распространённые причины смены DNS-серверов:
- увеличение скорости загрузки сайта в браузере,
- настройка родительского контроля (чтобы дети не просматривали нежелательный контент),
- защита от фишинга и другие.
Ubuntu 18.04
Изменить DNS-серверы поможет служба netplan. С её помощью нужно отредактировать её конфигурационный файл 01-netcfg.yaml.
Чтобы внести изменения:
-
1.
Подключитесь к серверу по SSH.
-
2.
Откройте файл 01-netcfg.yaml:
sudo nano /etc/netplan/01-netcfg.yamlПримерное содержимое файла:
network: ethernets: eth0: addresses: - 123.123.123.123/24 - 2002:7b7b:7b7b:0:0:0:0:0/64 gateway4: 123.123.123.123 gateway6: 2002:7b7b:7b7b:0:0:0:0:0 nameservers: addresses: - 1.1.1.1 - 1.0.0.1 renderer: networkd version: 2 -
3.
В блоке «nameservers» измените адреса DNS:
nameservers:
            addresses:
            - 8.8.8.8
            - 8.8.4.4
Вместо 8.8.8.8 и 8.8.4.4 укажите свои IP-адреса.
-
4.
Нажмите Ctrl + O, чтобы сохранить изменения. Закройте файл с помощью комбинации Ctrl + X.
-
5.
Примените изменения командой:
-
6.
Проверьте, работают ли DNS-серверы:
systemd-resolve --status | grep 'DNS Servers' -A2Если настройка прошла корректно, команда покажет следующий вывод:
DNS Servers: 8.8.8.8
             8.8.4.4
Вместо 8.8.8.8 и 8.8.4.4 будут указаны ваши IP-адреса.
Ubuntu 20.04/Debian
Чтобы сменить DNS-серверы:
-
1.
Подключитесь к серверу по SSH.
-
2.
Откройте файл resolv.conf:
sudo nano /etc/systemd/resolved.conf -
3.
В строке «DNS» добавьте IP-адреса DNS-серверов:
Вместо 8.8.8.8 и 8.8.4.4 укажите свои IP-адреса.
-
4.
Нажмите Ctrl + O, чтобы сохранить изменения. Закройте файл с помощью комбинации Ctrl + X.
-
5.
Примените изменения командой:
sudo systemctl restart systemd-resolved -
6.
Проверьте, работают ли преобразователи:
systemd-resolve --status | grep 'DNS Servers' -A2Если настройка прошла корректно, команда покажет следующий вывод:
DNS Servers: 8.8.8.8
             8.8.4.4
Вместо 8.8.8.8 и 8.8.4.4 будут указаны ваши IP-адреса.
CentOS
Чтобы сменить DNS-серверы:
-
1.
Подключитесь к серверу по SSH.
-
2.
Выполните команду:
В консоли отобразится вывод:
1: lo: <LOOPBACK,UP,LOWER_UP> mtu 65536 qdisc noqueue state
        UNKNOWN group default qlen 1000
            link/loopback 00:00:00:00:00:00 brd 00:00:00:00:00:00
             inet 127.0.0.1/8 scope host lo
                valid_lft forever preferred_lft
        forever
            inet6 ::1/128 scope host
               valid_lft forever preferred_lft
        forever
2: eth0: <BROADCAST,MULTICAST,UP,LOWER_UP> mtu 1500 qdisc pfifo_fast
        state UP group default qlen 1000
            link/ether 2002:7b7b:7b7b:0:0:0:0:0
            inet 123.123.123.123/24 brd 123.123.123.255
        scope global eth0
               valid_lft forever preferred_lft
        forever
            inet6 2002:7b7b:7b7b:0:0:0:0:0/64 scope global
               valid_lft forever preferred_lft
        forever
            inet6 2002:7b7b:7b7b:0:0:0:0:0/64 scope link
               valid_lft forever preferred_lft
        forever
3: eth1: <BROADCAST,MULTICAST> mtu 1500 qdisc noop state DOWN
        group default qlen 1000
            link/ether 52:54:00:e4:b4:cc brd ff:ff:ff:ff:ff:ff
Слева от значения <BROADCAST,MULTICAST,UP,LOWER_UP> отображается параметр, который отвечает за название конфигурационного файла (в нашем примере это eth0). Его название будет отличаться в зависимости от настроек.
-
3.
Откройте файл конфигурации:
sudo nano /etc/sysconfig/network-scripts/ifcfg-eth0Вместо eth0 укажите название вашего конфигурационного файла.
На экране отобразится содержимое файла:
NAME="eno1" ONBOOT=yes BOOTPROTO=static HWADDR="2002:7b7b:7b7b:0:0:0:0:0" IPADDR="123.123.123.123" NETMASK="255.255.255.0" GATEWAY="123.123.123.123" TYPE=Ethernet DEVICE=eth0 BOOTPROTO=none ONBOOT=yes IPADDR=123.123.123.123 PREFIX=24 GATEWAY=123.123.123.123 DNS1=1.1.1.1 DNS2=1.0.0.1 IPV6INIT=yes IPV6ADDR=2002:7b7b:7b7b:0:0:0:0:0::3f9d/64 IPV6_DEFAULTGW=2002:7b7b:7b7b:0:0:0:0:0 -
4.
Измените IP-адреса в строках:
DNS1="8.8.8.8"
DNS2="8.8.4.4"
Вместо 8.8.8.8 и 8.8.4.4 будут указаны ваши IP-адреса. Если вам нужно добавить дополнительные DNS-серверы, добавьте их на следующих строках как DNS3 и DNS4.
-
5.
Нажмите Ctrl + O, чтобы сохранить изменения. Закройте файл с помощью комбинации Ctrl + X.
-
6.
Примените изменения командой:
systemctl restart network -
7.
Проверьте, работают ли преобразователи:
Если настройка прошла корректно, команда покажет следующий вывод:
; generated by /usr/sbin/dhclient-script
      search localdomain
      nameserver 8.8.8.8
      nameserver 8.8.4.4
Вместо 8.8.8.8 и 8.8.4.4 будут указаны ваши IP-адреса.
Windows
Чтобы сменить DNS-серверы:
-
1.
Подключитесь к серверу по RDP.
-
2.
Откройте окно Выполнить. Для этого нажмите сочетание клавиш Win + R.
-
3.
Введите ncpa.cpl и нажмите OK:
-
4.
Правой кнопкой мыши кликните по названию соединения и выберите Свойства:
-
5.
Кликните по строке IP версии 4 (TCP/IPv4) и нажмите Свойства:
-
6.
Отметьте пункт Использовать следующие адреса DNS-серверов. Укажите IP-адреса и кликните OK:
-
7.
Откройте приложение PowerShell и выполните команду:
В последней строке вывода отобразятся новые адреса DNS-серверов:
DNS-серверы. . . . . . . . . . . : 8.8.8.8
                                   8.8.4.4
Сервера DNS используются системой для преобразования сложных для запоминания IP адресов в простые доменные имена. Это делается потому что людям сложно запоминать несколько никак не связанных цифр, но очень просто запомнить слово.
Когда компьютеру нужно узнать IP адрес какого-либо домена, он отправляет запрос известному ему DNS серверу. Эти сервера могут быть получены автоматически от роутера по DHCP или же заданы в ручную. В этой статье мы рассмотрим как выполняется настройка DNS Ubuntu 16.04 и более старых версиях.
Раньше, для настройки DNS серверов, которые будут использоваться системой было достаточно внести адреса нужных серверов в файл /etc/resolv.conf. Но сейчас всей конфигурацией сети в Ubuntu управляет NetworkManager, а этот файл теперь представляет собой только ссылку на файл NetworkManager.
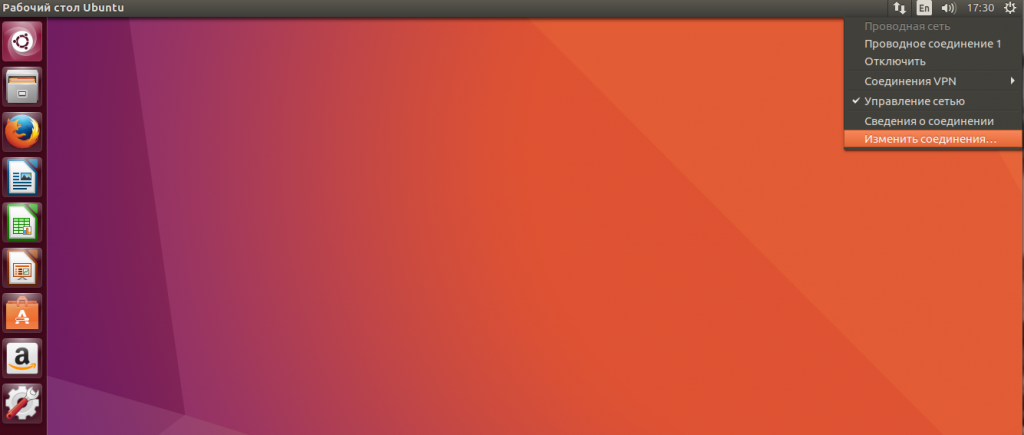
Этот способ до сих пор работает, но в нем вы можете настроить DNS на LiveCD, или до перезагрузки. После перезагрузки все настройки собьются и придется все делать заново. Поэтому, чтобы все сохранилось нужно выполнять все действия через интерфейс NetworkManager. Сначала откройте контекстное меню для значка сети на панели и выберите «Изменить подключения»:
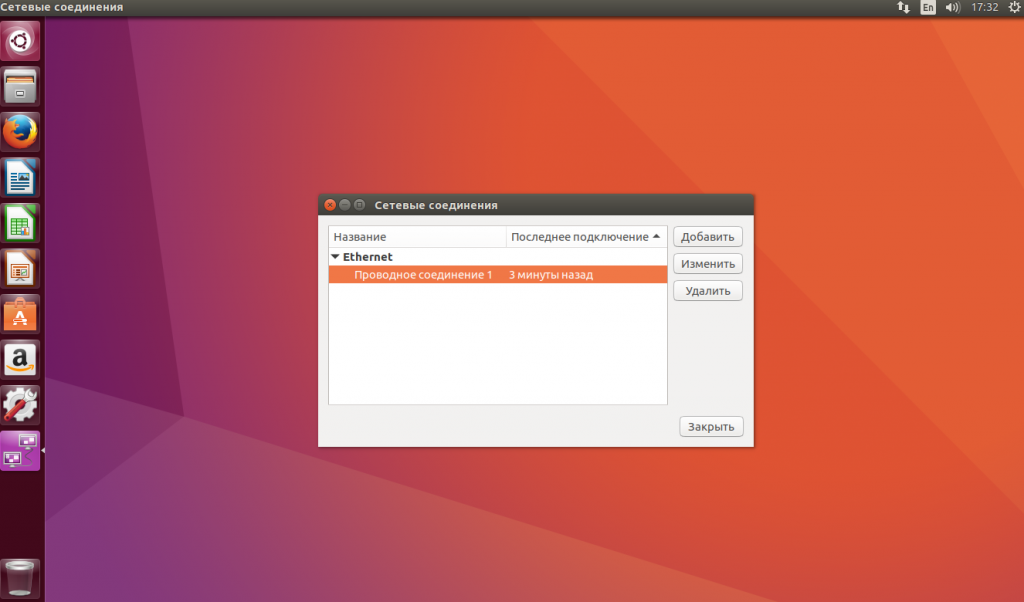
Выберите ваше подключение и нажмите «Изменить»:
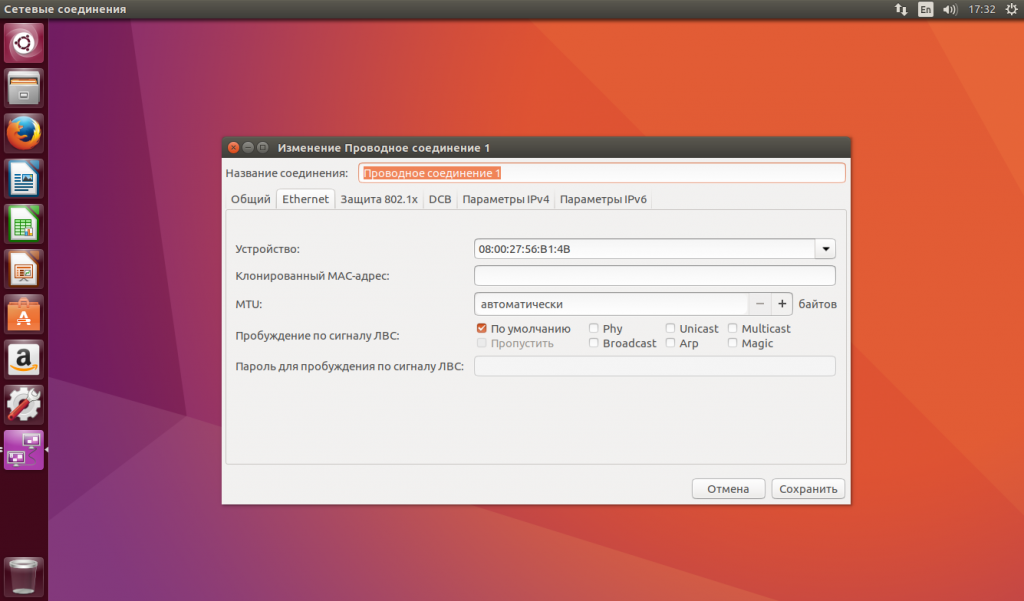
В открывшемся окне перейдите на вкладку «Параметры IPv4»:
Затем, в поле «Способ настройки» выберите «Автоматически (DHCP, только адрес)»:
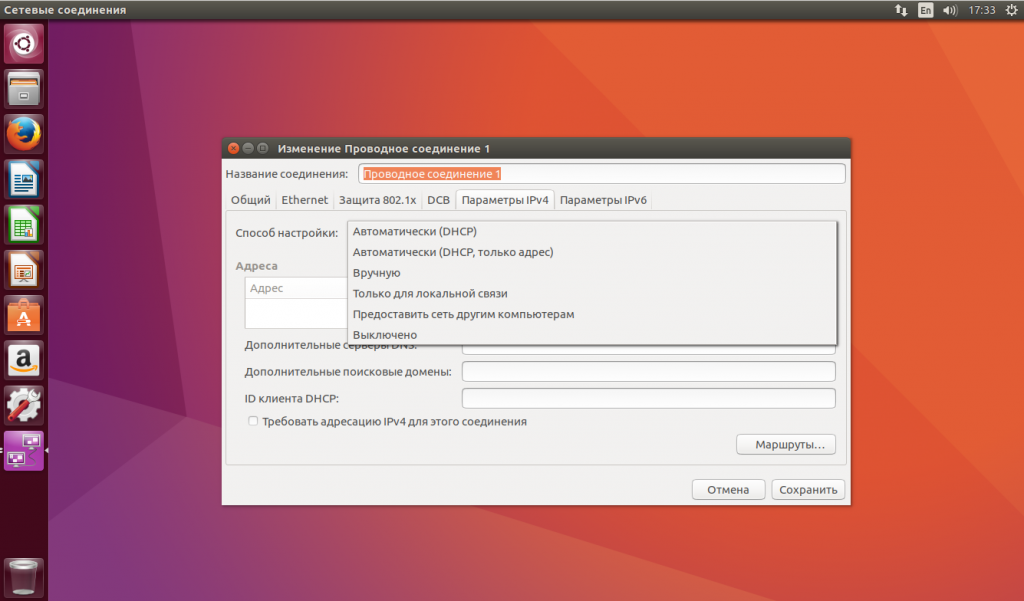
Теперь немного ниже появиться поле «Серверы DNS», где вам нужно прописать нужные серверы, можно несколько адресов через запятую. Например, можно указать сервера от Google:
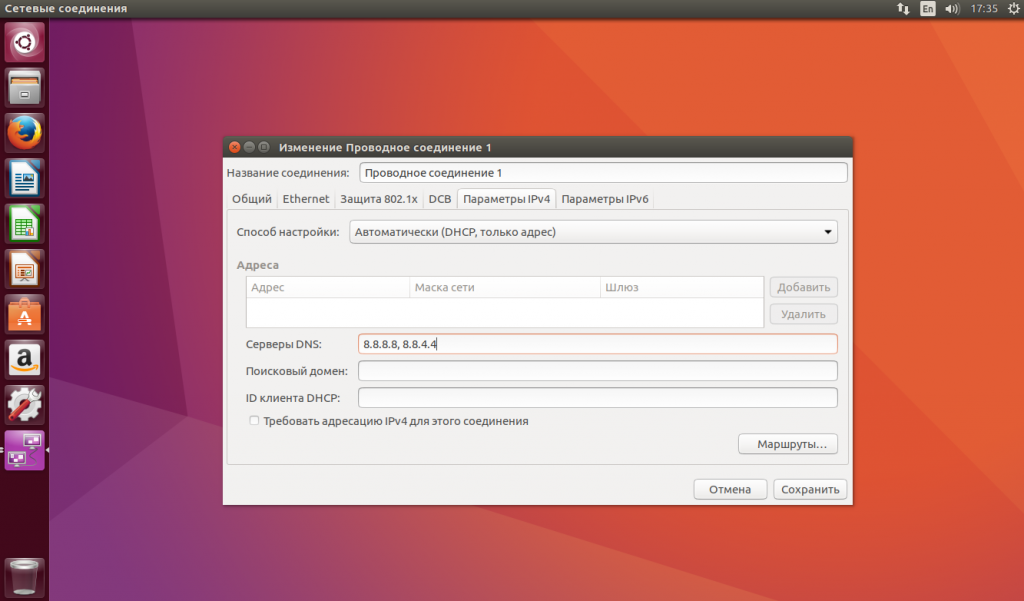
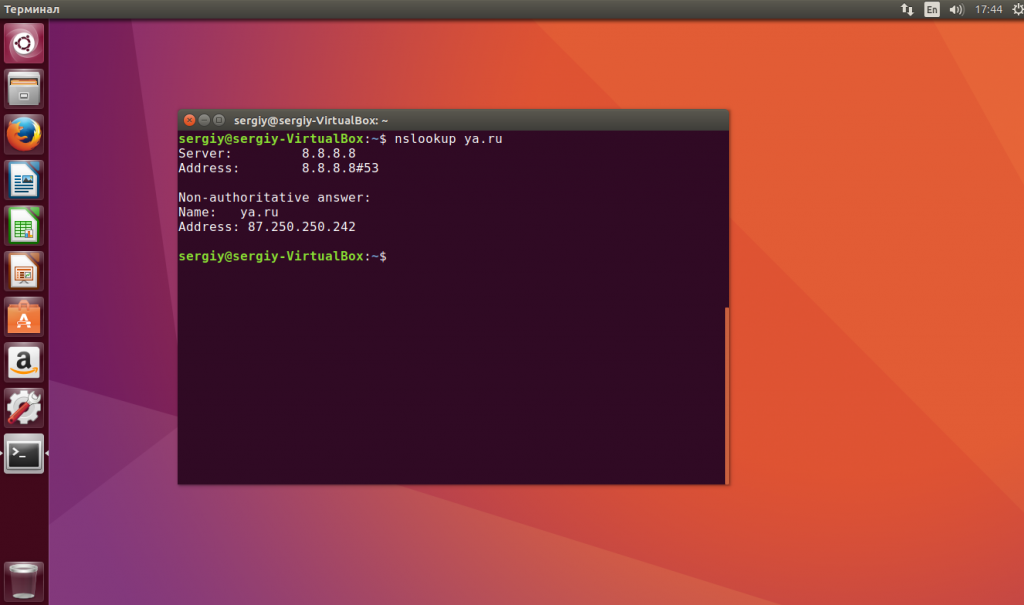
Поле этого нажмите «Сохранить» и «Закрыть». Теперь можете переподключитесь к этому соединению и можете проверять текущий DNS сервер:
nslookup ya.ru
Собственно, это все, но есть еще один способ настройки через консоль, если этот не сработал или вы предпочитаете работать из консоли.
Настройка DNS через терминал Ubuntu
В Ubuntu есть унифицированный интерфейс настройки сети, который настраивается через конфигурационный файл /etc/network/interfaces. Сначала смотрим список сетевых интерфейсов:
ls /sys/class/net/
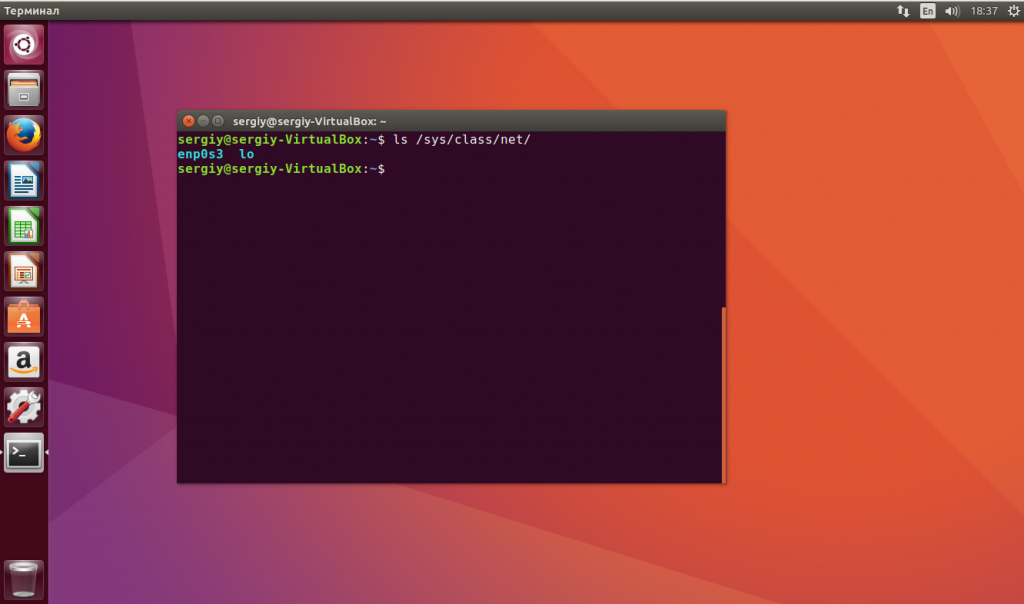
Откройте файл для редактирования и найдите в нем имя своего сетевого интерфейса, например, auto enp0s3, если такой секции нет, ее нужно добавить:
sudo vi /etc/network/interfaces
auto enp0s3

iface enp0s3 inet dhcp
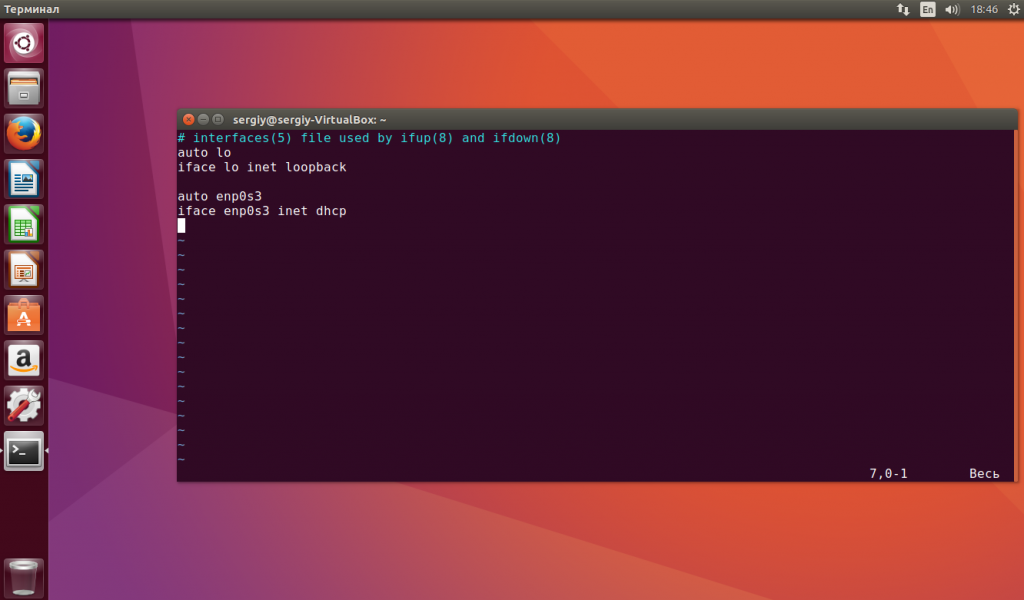
Затем, добавьте в эту секцию строчку:
dns-nameserver 8.8.8.8
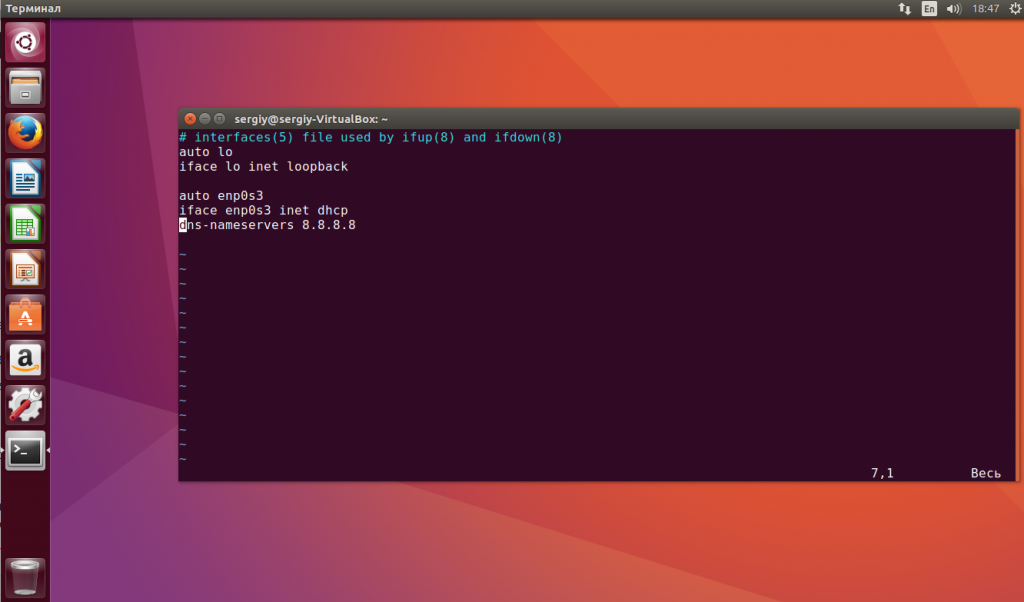
Здесь адрес 8.8.8.8 — это адрес вашего DNS сервера. Но эта настройка сработает, только если ваш DHCP клиент не пытается назначить адрес самостоятельно. Чтобы указать DNS адрес на уровне DHCP сервера нужно добавить такую строчку в конфигурационный файл /etc/dhcp/dhclient.conf:
sudo vi /etc/dhcp/dhclient.conf
supersede domain-name-servers 8.8.8.8

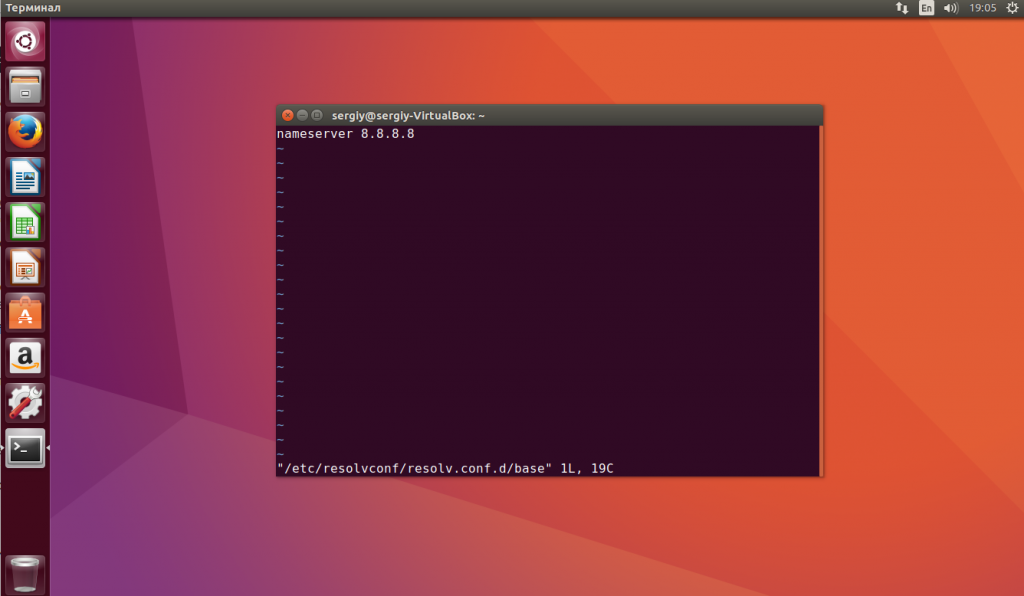
Здесь тоже адрес 8.8.8.8 означает адрес DNS сервера. Для верности, вы можете добавить свои адреса DNS серверов в файл /etc/resolvconf/resolv.conf.d/base:
sudo vi /etc/resolvconf/resolv.conf.d/base
nameserver 8.8.8.8
Чтобы настройки вступили в силу необходимо перезапустить сеть:
sudo systemctl restart networking
Возможно, даже лучше будет если вы полностью перезагрузите компьютер. Теперь вы можете открыть /etc/resolv.conf и посмотреть применялся ли новый адрес DNS:
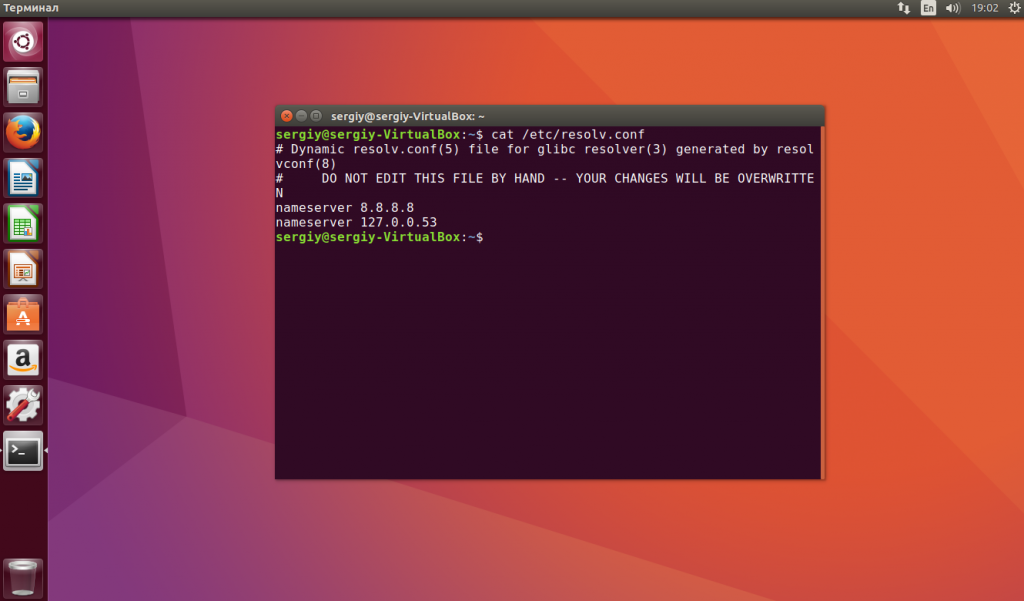
Как видите, в моем примере все заработало. Подобно этому выполняется настройка dns linux для любого дистрибутива.
Выводы
В этой небольшой статье мы рассмотрели как выполняется настройка DNS Ubuntu 16.04 через графический интерфейс или терминал. В Ubuntu автоматической настройкой DNS могут заниматься множество утилит и это создает некоторые проблемы при настройке, но со всем можно разобраться. Надеюсь, эта информация была полезной для вас.

Статья распространяется под лицензией Creative Commons ShareAlike 4.0 при копировании материала ссылка на источник обязательна .
Об авторе
![]()
Основатель и администратор сайта losst.ru, увлекаюсь открытым программным обеспечением и операционной системой Linux. В качестве основной ОС сейчас использую Ubuntu. Кроме Linux, интересуюсь всем, что связано с информационными технологиями и современной наукой.
Introduction
The Domain Name System (DNS) translates text-based domain names to numeric IP addresses. By default, most networks are configured to work with DNS servers supplied by the internet service provider. However, users are free to change the DNS nameservers.
This tutorial will show you how to change DNS nameservers on your Ubuntu machine using GUI or the command line.
Prerequisites
- Ubuntu 20.04 (both methods also work on Ubuntu 18.04 and later)
- Access to the terminal
- Sudo privileges
Change DNS Nameserver via GUI
Use Ubuntu Settings to complete all the steps to change DNS addresses via the graphical user interface.
1. Launch Settings and click the Network tab in the menu on the left.
2. Click the cogwheel next to the connection you wish to set up.
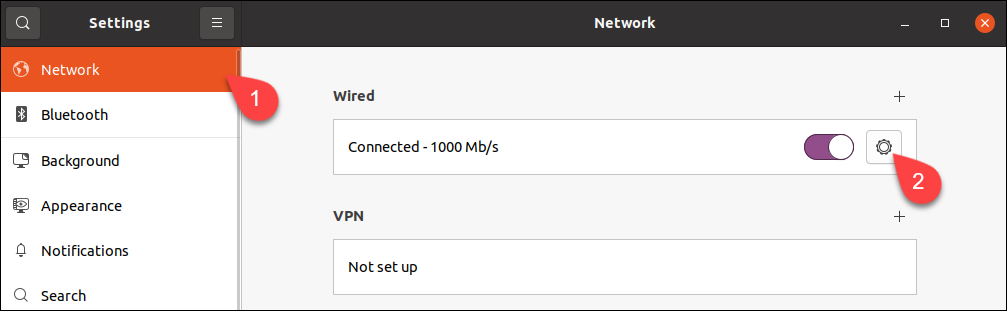
Note: To change the settings for a wireless connection, select the Wi-Fi tab, choose a wireless network and proceed with the steps below.
3. Go to the IPv4 tab.
4. Disable automatic DNS configuration by turning off the switch next to the DNS field.
5. Type new DNS addresses in the field. The example shows Google’s public DNS nameservers.
6. Click Apply.
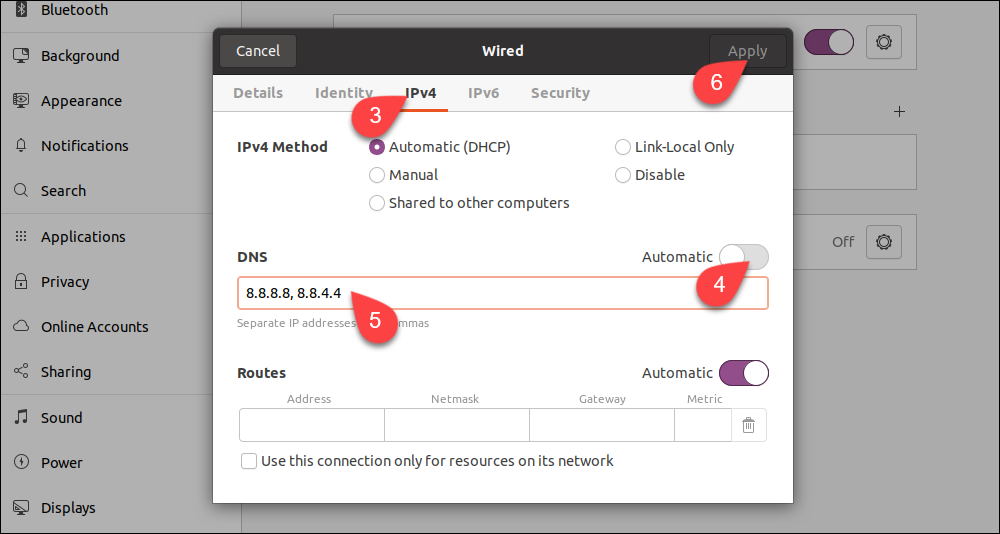
The system is now configured to work with the new DNS servers.
Note: If you wish to set up IPv6 nameservers, go to the IPv6 tab and enter them there. The IPv6 address format is different from IPv4. For example, Google’s IPv6 DNS servers are: 2001:4860:4860::8888 and 2001:4860:4860::8844.
Change DNS Nameserver via Config File
If you do not use a GUI, change DNS settings with the command line Netplan tool.
1. Go to the Netplan directory:
cd /etc/netplan2. List the directory contents with ls to see the name of the yaml file containing network configuration.

Open the file in a text editor. Your file may have a different name.
sudo nano 01-network-manager.yamlEthernet connections are listed in the ethernets section of the file. If there are any wireless connections, you can find them in the wifis section. Netplan stores the current DNS configuration parameters in nameservers subsections of each section.
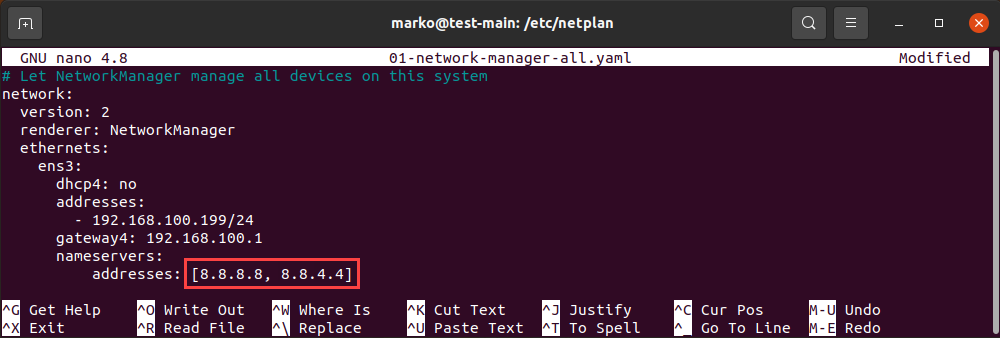
Replace the addresses located in the file with the DNS addresses you want to use. You can enter more than two addresses. Save the changes and exit.
Note: The file on your system may lack the entire ethernets or wifis section. In that case, add the lines that are missing, making sure you respect the indentation provided in the example.
3. Apply the changes you made in the config file:
sudo netplan applyIf the operation is successful, there is no output. To check if the system successfully applied the changes, type:
systemd-resolve --status | grep 'DNS Servers' -A2The output lists your current DNS servers:

Why Change DNS Nameserver on Ubuntu?
In most cases, your default DNS settings offer optimal performance. However, there are scenarios in which you should consider switching to a third-party DNS provider:
- Large companies with better infrastructure are usually more capable of providing uninterrupted DNS service. If your ISP is unreliable and you experience frequent downtimes, switching the DNS provider may be the solution.
- Third-party DNS servers can be faster than those provided to you by your ISP.
Note: Since latency is the primary consideration for DNS, a fast third-party server located far away may provide inferior service to a slower one that is closer to you.
- Some DNS providers offer filters that prevent phishing sites from reaching your computer. The same mechanism is also used to block sensitive content on the internet. Businesses often employ this DNS feature.
- Internet Service Providers sometimes block content on the DNS level, so switching to another DNS nameserver may help you access some geo-restricted websites.
Conclusion
This tutorial showed you how to set your DNS nameservers on Ubuntu, either using a graphical user interface or the command line.
To learn more about DNS, read What Is a Domain Name System & How Does it Work?
Содержание
Краткое описание руководства
В данном руководстве объясняется, как подключить компьютер к сети при помощи конфигурационных файлов и консольных утилит. Основная цель — рассказать о различных способах подключения к интернету без использования GUI (графического интерфейса). Руководство не затрагивает таких тем, как настройка сетевых фильтров или, например, собственных точек доступа Wi-Fi. Подразумевается, что существует некий, предоставленный провайдером, способ подключения к интернету, для использования которого и необходимо выполнить приведенные ниже действия.
В руководстве приведены примеры редактирования конфигурационных файлов с помощью текстовых редакторов «nano» и «gedit». Обратите внимание на то, что первый редактор запускается в терминале и может быть использован как при запуске Ubuntu с графическим интерфейсом, так и без него, а «gedit» можно использовать только при включенной графической среде.
Требования к системе
Для воспроизведения описанных в руководстве действий подходит любой вариант установки системы. Наличие графического пользовательского интерфейса не обязательно. Все действия необходимо выполнять в консоли. Подразумевается, что команды, начинающиеся с символа $ — необходимо выполнять от пользователя, а начинающиеся с # — от суперпользователя (root).
Прежде чем Вы начнете, убедитесь, что:
-
Различные сетевые утилиты, предназначенные для автоматического конфигурирования сети выключены. Например, тут Вы можете прочитать, как отключить установленный по умолчанию в Ubuntu сетевой помощник Network Manager.
-
Различные сетевые фильтры (например iptables), и утилиты их конфигурирования (например, Firestarter) отключены/правильно настроены и не вмешиваются в работу сети.
-
У Вас есть все необходимые параметры для подключения в Вашей сети (например, IP-адрес, маска подсети и шлюз по умолчанию для соединения с использованием статического IP).
-
Устройства сети осуществляющие фильтрацию по MAC-адресу правильно настроены и «знают» Ваш сетевой интерфейс.
-
Драйвер Вашего сетевого устройства корректно установлен, кабель (при проводном соединении) исправен и подсоединен.
Для настроек вам обязательно потребуется имя вашего сетевого адаптера. Его можно узнать из вывода команды:
$ sudo lshw -C network
Она позволяет посмотреть подключенные сетевые устройства.
Пример вывода команды:
ubuntu@ubuntu:~$ sudo lshw -C network
  *-network
       description: Ethernet interface                             # Тип устройства
       product: L2 100 Mbit Ethernet Adapter                       # Название адаптера
       vendor: Attansic Technology Corp.                           # Производитель устройства
       physical id: 0
       bus info: pci@0000:03:00.0
       logical name: eth0                                          # Имя сетевого интерфейса
       version: a0
       serial: 00:00:00:00:00:00                                   # Физический адрес устройства (mac-адрес)
       size: 100MB/s
       capacity: 100MB/s
       width: 64 bits
       clock: 33MHz
       capabilities: pm msi pciexpress vpd bus_master cap_list
ethernet physical tp 10bt 10bt-fd 100bt 100bt-fd autonegotiation
       configuration: autonegotiation=on broadcast=yes
                      driver=atl2                                  # Используемый драйвер
                      driverversion=2.2.3                          # Версия драйвера
                      duplex=full firmware=L2 ip=192.168.0.5 latency=0
                      link=yes                                     # Наличие линка
                      module=atl2 multicast=yes port=twisted pair
                      speed=100MB/s                                # Текущая скорость подключения.
Обратите внимание на строку:
logical name: eth0
eth0 — это и есть искомое имя сетевого интерфейса.
Имя eth0 будет далее применяться для настройки именно данной сетевой карты. Где eth обозначает что используется Ethernet интерфейс, а 0 — номер устройства. Если у вас установлено несколько сетевых устройств, то, соответственно, им будут присвоены имена: eth0, eth1, eth2 и т.д.
После внедрения SystemD (начиная с Ubuntu 15.04) сетевые интерфейсы могут иметь другие имена (не ethX).
Сделано это для того, что бы имена сетевых устройств не менялись при подключении к машине новых адаптеров (в последнее время, некоторые USB модемы выступают в роли сетевого адаптера). В результате eth0 может называться например enp0s4 или eno1, или даже enx78e7d1ea46da. Именно это имя сетевого адаптера и нужно использовать в настройке сети.
Более подробно о наименовании сетевых интерфейсов в SystemD можно почитать тут (англ.).
Такое переименование можно отключить добавив в /etc/default/grub, в строку с переменной GRUB_CMDLINE_LINUX_DEFAULT строку net.ifnames=0. После этого нужно выполнить sudo update-grub
Настройка проводной сети
Настройка IP-адреса, шлюза по умолчанию, маски подсети
Отредактируйте файл конфигурации /etc/network/interfaces, например так:
$ sudo nano /etc/network/interfaces
И допишите в него:
Для статического IP:
iface eth0 inet static
address 192.168.0.1
netmask 255.255.255.0
gateway 192.168.0.254
dns-nameservers 192.168.0.254 8.8.8.8
auto eth0
Где:
-
iface eth0 inet static— указывает, что интерфейс (iface eth0) находится в диапазоне адресов IPv4 (inet) со статическим ip (static); -
address 192.168.0.1— указывает что IP адрес (address) нашей сетевой карты 192.168.0.1; -
netmask 255.255.255.0— указывает что наша маска подсети (netmask) имеет значение 255.255.255.0; -
gateway 192.168.0.254— адрес шлюза (gateway) по умолчанию 192.168.0.254; -
dns-nameservers 192.168.0.254 8.8.8.8— адреса DNS серверов (о ниж мы расскажем позже) -
auto eth0— указывет системе что интерфейсeth0необходимо включать автоматически при загрузке системы с вышеуказанными параметрами.
eth0 — имя подключаемого своего интерфейса. Список интерфейсов можно посмотреть набрав:
$ ip addr
В итоге файл /etc/network/interfaces должен выглядеть примерно так:
(для одного проводного соединения со статическим IP)
# This file describes the network interfaces available on your system
# and how to activate them. For more information, see interfaces(5).

# The loopback network interface
auto lo
iface lo inet loopback

# Моя проводная сеть.
iface eth0 inet static
address 192.168.0.1
netmask 255.255.255.0
gateway 192.168.0.254
dns-nameservers 192.168.0.254 8.8.8.8
auto eth0
Сохраните файл и закройте редактор. В данном примере (редактор nano) — нажмите Ctrl+X, затем Y, убедитесь, что «Имя файла для записи» — /etc/network/interfaces и нажмите Enter.
Более подробно про синтаксис файла /etc/network/interfaces можно прочитать в документации.
Пример конфигурации для динамического IP:
iface eth0 inet dhcp
auto eth0
Временная настройка IP-адреса и маски подсети
При необходимости задать пробные настройки, выполните:
$ sudo ip addr add 192.168.0.1/24 dev eth0
Где 192.168.0.1 — наш IP-адрес, /24 — число бит в префиксной части адреса (соответствует маске подсети 255.255.255.0).
eth0 — подключаемый сетевой интерфейс.
Данные настройки пропадут после перезагрузки системы и не повлияют на файл /etc/network/interfaces
Настройка DNS
За конфигурацию DNS отвечает утилита resolvconf, которая работает в паре с небольшим кеширующим DNS сервером dnsmasq. resolvconf позволяет осуществить настройку DNS на основе данных от разных подсистем.
Одним из следствий этого полезного нововведения (переход на эту схему произошел в Ubuntu начиная с версии 12.04) является то, что теперь файл /etc/resolv.conf генерируется автоматически, а не индивидуально каждой программой, которая хочет его изменить (порой перезаписывая правки сделанные ранее). Автоматическая генерация /etc/resolv.conf означает, что внесенные «руками» изменения в него будут потеряны.
Автоматически формируемый /etc/resolv.conf содержит ссылку на DNS сервер на локальном интерфейсе (127.0.1.1), а там (на 53 порту) и сидит сервис dnsmasq, который отвечает за разрешение символьных имен в IP адреса. Нужно отметить, что этот порт (53) открыт в режиме LISTEN, но т.к. это локальный интерфейс, то из внешней сети этот порт не доступен.
Информацию о DNS для статических интерфейсов теперь надо вносить в /etc/network/interfaces1) в параметры dns-nameservers, dns-search и dns-domain (которые соответствуют параметрам nameserver, search и domain в /etc/resolv.conf)
Обратите внимание — в /etc/resolv.conf, при записи нескольких серверов используется несколько ключей nameserver, а в /etc/network/interfaces все адреса DNS серверов записывались в одну строчку после ключа dns-nameservers, разделенные пробелами.
В итоге описание статического интерфейса в /etc/network/interfaces должно выглядеть примерно так:
iface eth0 inet static
address 192.168.0.1
netmask 255.255.255.0
gateway 192.168.0.254
dns-nameservers 8.8.8.8 192.168.0.254
auto eth0
Ubuntu до версии 12.04
В более старых версиях ubuntu, когда есть необходимость указать статические адреса DNS серверов (если они не выдаются автоматически) выполните:
$ sudo gedit /etc/resolv.conf
и впишите туда адреса DNS серверов (отдельные записи для каждого сервера):
nameserver 192.168.0.100
nameserver 192.168.0.200
Где 192.168.0.100 и 192.168.0.200 — адреса DNS серверов. Если нужно добавить больше адресов — каждый адрес нужно начинать с новой строки и с фразы nameserver
Настройка соединений ppp
За создание соединений типа «точка-точка» в Ubuntu отвечает демон pppd, более подробная информация о котором доступна в документации. В рамках данного руководства будут рассмотрены примеры создания PPPoE подключения через DSL модем, подключения PPTP (VPN-подключения) и DIAL-UP подключения через обычный модем.
Соединение PPPoE
В стандартную установку Ubuntu входит утилита для настройки PPPoE соединений – pppoeconf, для ее запуска наберите:
$ sudo pppoeconf
Появится «псевдографическое» 2) окно в терминале. Утилита произведет поиск сетевых устройств и выведет их на экран, далее она произведет поиск модема 3) на этих устройствах. Если на этом этапе pppoeconf выдаст отрицательный результат — проверьте правильность подключения, питание модема. Следующий шаг — выбор «популярных параметров» — в большинстве случаев стоит согласиться. Далее утилита запросит Ваш логин, а затем — пароль. Теперь — выбор способа указания DNS серверов. Опять же, в большинстве случаев следует согласиться на получение адресов DNS серверов автоматически. Далее Вам предложат ограничить размер MSS до 1452-х байт — как правило, стоит согласиться. Следующий вопрос — устанавливать ли подключение автоматически при загрузке компьютера. Последний вопрос утилиты — установить ли соединение сейчас. pppoeconf по умолчанию создает для подключения имя dsl-provider. Управлять подключением Вы можете при помощи команд:
$ sudo pon dsl-provider # Для подключения
или
$ sudo poff dsl-provider # Для отключения
Если в Вашем случае опций, предоставляемых утилитой pppoeconf недостаточно — обратитесь к документации по pppd или pppoeconf.
Замечание: при настройке соединения с помощью pppoeconf часть настроек записывается в /etc/network/interfaces, в результате чего Network Manager больше не может управлять сетью. Выход: либо использовать только NM, либо только консоль+конфиги.
Вернуть управление Network Manager можно следующим образом. Приведите /etc/network/interfaces к следующему виду (лишнее не обязательно удалять, достаточно закомментировать):
# This file describes the network interfaces available on your system
# and how to activate them. For more information, see interfaces(5).

# The loopback network interface
auto lo
iface lo inet loopback
Перезапустите сеть:
$ sudo /etc/init.d/networking restart
Перезагрузитесь или перезапустите Network Manager:
$ sudo /etc/init.d/NetworkManager restart
Соединение PPTP
Для осуществления VPN-соединения при помощи pppd Вам потребуется установить пакет pptp-linux, который может быть найден на установочном диске Ubuntu. Далее создайте (от root’а) в папке /etc/ppp/peers файл с названием Вашего провайдера и отредактируйте его, например так:
$ sudo nano /etc/ppp/peers/my-provider
И добавьте туда опции подключения, например такие:
persist # При разрыве соединения - переподключаться снова.
maxfail 0 # Максимальное количество неудачных попыток подключения. 0 - бесконечно.
mtu 1476 # Значение MTU
name {логин} # Ваш логин.
#nodefaultroute # Не быть шлюзом по умолчанию
defaultroute # Быть шлюзом по умолчанию
replacedefaultroute # Заменить шлюз по умолчанию если он был
remotename {vpn} # Имя удаленного сервера (для нас), может быть любым.
pty "pptp {адрес_сервера} --nolaunchpppd" # Команда запуска pptp.
# Адрес сервера - может быть как IP адресом, так и доменным именем, например vpn.foo.bar
Далее — отредактируйте файл /etc/chap-secrets 4) и добавьте туда:
{логин} {vpn} {пароль}
После перезагрузки системы Вы сможете управлять соединением при помощи команд:
$ sudo pon my-provider # Для подключения
или
$ sudo poff my-provider # Для отключения
Процесс настройки VPN-соединения может сильно облегчить скрипт-помощник.
Настройка DIAL-UP подключения
Для настройки модемного соединения можно использовать встроенный конфигуратор pppd — pppconfig или специальную утилиту wvdial .
При помощи pppconfig
Процесс настройки при помощи pppconfig во многом похож на утилиту pppoeconfig, Вам по очереди будут заданы вопросы о параметрах подключения, и будет предложено ввести номер телефона, логин и пароль, а также имя соединения. Запускать pppconfig следует с правами суперпользователя. Например так:
$ sudo pppconfig
Управлять соединением можно так:
$ sudo pon my-provider # Для подключения
или
$ sudo poff my-provider # Для отключения
Где my-provider — имя, присвоенное Вами соединению при настройке.
При помощи wvdial
В некоторых случаях (например при подключении с использованием мобильного телефона), удобнее использовать wvdial . Для этого нужно его сначала установить. Например так:
$ sudo apt-get install wvdial
В состав пакета wvdial входит утилита автоматического конфигурирования — wvdialconf .
$ sudo wvdialconf
Вывод будет примерно следующим:
ubuntu@ubuntu:~$ sudo wvdialconf
[sudo] password for ubuntu:
Editing `/etc/wvdial.conf'.

Scanning your serial ports for a modem.

Modem Port Scan<*1>: S0   S1   S2   S3
WvModem<*1>: Cannot get information for serial port.
ttyACM0<*1>: ATQ0 V1 E1 -- OK
ttyACM0<*1>: ATQ0 V1 E1 Z -- OK
ttyACM0<*1>: ATQ0 V1 E1 S0=0 -- OK
ttyACM0<*1>: ATQ0 V1 E1 S0=0 &C1 -- OK
ttyACM0<*1>: ATQ0 V1 E1 S0=0 &C1 &D2 -- OK
ttyACM0<*1>: ATQ0 V1 E1 S0=0 &C1 &D2 +FCLASS=0 -- OK
ttyACM0<*1>: Modem Identifier: ATI -- Manufacturer: QUALCOMM INCORPORATED
ttyACM0<*1>: Speed 4800: AT -- OK
ttyACM0<*1>: Speed 9600: AT -- OK
ttyACM0<*1>: Speed 19200: AT -- OK
ttyACM0<*1>: Speed 38400: AT -- OK
ttyACM0<*1>: Speed 57600: AT -- OK
ttyACM0<*1>: Speed 115200: AT -- OK
ttyACM0<*1>: Speed 230400: AT -- OK
ttyACM0<*1>: Speed 460800: AT -- OK
ttyACM0<*1>: Max speed is 460800; that should be safe.
ttyACM0<*1>: ATQ0 V1 E1 S0=0 &C1 &D2 +FCLASS=0 -- OK

Found an USB modem on /dev/ttyACM0.
Modem configuration written to /etc/wvdial.conf.
ttyACM0<Info>: Speed 460800; init "ATQ0 V1 E1 S0=0 &C1 &D2 +FCLASS=0"
Теперь остается только отредактировать файл /etc/wvdial.conf и добавить в него номер телефона, логин и пароль.
$ sudo nano /etc/wvdial.conf
В данном примере я дополнительно добавил несколько опций. См. комментарии.
[Dialer Defaults]
Init1 = ATZ
Init2 = ATQ0 V1 E1 S0=0 &C1 &D2 +FCLASS=0
Modem Type = USB Modem
ISDN = 0
Idle Seconds = 0
New PPPD = yes
Dial Attempts = 0
Phone = #777
Modem = /dev/ttyACM0
Username = mobile
Password = internet
Baud = 460800
Idle Seconds = 0 # Время простоя соединения,
# после которого нужно будет его разорвать. Значение 0 - никогда.
Dial Attempts = 0 # Количество попыток дозвона. 0 - бесконечно.
[Dialer pulse]
Dial Command = ATDP # Команда набора номера (P - импульсный, T - тональный). Имеет смысл для набора номера в импульсном режиме на старых АТС.
Файл /etc/wvdial.conf разбит на секции, в качестве разделителей которых выступают сами названия секций, предварённые словом Dialer, в квадратных скобках. Если исполнять команду без параметров, то в дело пойдут установки, перечисленные в секции Defaults. В противном случае дополнительно будут исполнены указанные в добавочных секциях команды.
Теперь, когда все настроено, соединение можно установить набрав:
$ sudo wvdial
Если потребуется запустить wvdial с набором номера в импульсном режиме, то это можно сделать командой
$ sudo wvdial pulse
Прервать соединение можно прервав выполнение команды wvdial, т.е. в том же терминале нужно нажать Ctrl+C.
Автоматическое подключение
Отредактируйте файл конфигурации /etc/network/interfaces, например так:
$ sudo nano /etc/network/interfaces
И допишите в него:
Для pppoe , pptp , и модемного подключения без использования wvdial :
iface ppp0 inet ppp
provider my-provider
auto ppp0
Где my-provider — название вашего соединения.
При использовании wvdial:
iface ppp0 inet wvdial
provider wvdial
auto ppp0
Теперь при перезапуске сетевых служб соединение будет автоматически установлено.
Ручная настройка роутинга
Если Вы не получаете адрес шлюза по-умолчанию от сервера, к которому подключаетесь, или по какой-либо иной причине Вам необходимо указать маршруты вручную — Вы можете создать свой скрипт в /etc/ppp/ip-up.d/, либо по рекомендации официальной документации создать /etc/ppp/ip-up.local например так:
$ sudo nano /etc/ppp/ip-up.local
или
$ sudo nano /etc/ppp/ip-up.d/routing
со следующим кодом:
#! /bin/sh
#
route del default
route add default ppp0 # Имя ppp-подключения.
# тут - необходимые маршруты, например:
route add -net 192.168.0.0 netmask 255.255.255.0 gw 192.168.0.1 dev eth0
Далее — сделайте этот скрипт исполняемым, например так:
$ sudo chmod ug+x /etc/ppp/ip-up.local
или
$ sudo chmod ug+x /etc/ppp/ip-up.d/routing
Теперь маршруты будут автоматически подключаться при установлении ppp-соединения.
Установка MTU и TTL
MTU (Maximum Transfer Unit) — параметр определяет величину максимальной единицы передачи.
Это максимальное количество октетов (байт), которое интерфейс способен поддерживать
за одну операцию приема/передачи. Для Ethernet это значение по умолчанию составляет
1500 (максимальный размер пакета Ethernet).
TTL (Time To Live) — время жизни ip-пакета в секундах. Нужен чтобы избежать перегрузки сети пакетами.
Обычно каждый роутер, через которого прошел пакет, уменьшает TTL на еденицу.
Если TTL=0, пакет из системы удаляется. Изначально TTL=128 (для Windows) и TTL=64 (для Ubuntu).
Для DNS-записей TTL определяет время актуальности данных при кешировании запросов.
Для изменения величины MTU, отредактируем файл конфигурации /etc/network/interfaces, например так:
auto eth0
iface eth0 inet static
address 192.168.1.5
netmask 255.255.255.0
mtu 600
Для изменения величины TTL наберите:
$ sudo su
затем
# echo "128" > /proc/sys/net/ipv4/ip_default_ttl
Значение TTL меняется только с правами администратора, для выхода из аккаунта администратора введите exit
Настройка WiFi
Настройка Wi-Fi при помощи wpa-supplicant и /etc/network/interfaces
В этой главе пойдет речь о настройке подключения к существующей Wi-Fi сети с использованием наиболее безопасного на сегодняшний день стандарта шифрования и аутентификации WPA2. Дополнительно приведены примеры настроек для менее безопасных соединений.
Если Вы можете повлиять на настройку точки доступа, например, в случае, если это Ваш домашний Wi-Fi роутер — постарайтесь настроить авторизацию с использованием WPA2, т.к. это наиболее безопасный протокол аутентификации в беспроводных сетях на настоящий момент.
Замечания
Дополнительно к требованиям, указанным выше Вам следует учесть, что:
-
После установки всех необходимых пакетов, кабель проводной сети лучше отсоединить.
-
Некоторые устройства (или их драйвера, например Madwifi) не поддерживают WPA2 (AES). Если соединение WPA2 установить не удается, можно попробовать WPA1 (TKIP).
-
Если у Вас RTxxx (Ralink) с драйверами Serialmonkey — этот способ Вам не поможет. Вам следует либо установить пакет
ndiswrapper, заменяющий Serialmonkey, либо попробовать другой способ.
Подготовка
Установите пакеты wpa-supplicant и wireless-tools
Например так:
$ sudo apt-get install wpasupplicant wireless-tools
Теперь убедитесь в том, что Ваше беспроводное устройство (в данном примере это «wlan0») работает и «видит» беспроводные сети. Команда
$ iwconfig
должна выдать примерно такой результат:
ubuntu@ubuntu:~$ iwconfig
lo        no wireless extensions.

eth0      no wireless extensions.

wmaster0  no wireless extensions.

wlan0     IEEE 802.11bg  ESSID:""
          Mode:Managed  Frequency:2.412 GHz  Access Point: Not-Associated
          Tx-Power=27 dBm
          Retry min limit:7   RTS thr:off   Fragment thr=2352 B
          Power Management:off
          Link Quality:0  Signal level:0  Noise level:0
          Rx invalid nwid:0  Rx invalid crypt:0  Rx invalid frag:0
          Tx excessive retries:0  Invalid misc:0   Missed beacon:0
а доступные сети можно посмотреть командой
$ iwlist <имя интерфейса> scan
которая должна выдать примерно такой результат:
ubuntu@ubuntu:~$ iwlist wlan0 scan

wlan0     Scan completed :
          Cell 01 - Address: 00:00:00:00:00:00
                    ESSID:"ubuntuessid"
                    Mode:Master
                    Channel:8
                    Frequency:2.447 GHz (Channel 8)
                    Quality=7/100  Signal level:-99 dBm  Noise level=-104 dBm
                    Encryption key:on
                    Bit Rates:1 Mb/s; 2 Mb/s; 5.5 Mb/s; 11 Mb/s; 18 Mb/s
                              24 Mb/s; 36 Mb/s; 54 Mb/s; 6 Mb/s; 9 Mb/s
                              12 Mb/s; 48 Mb/s
                    Extra:tsf=0000001d57e98bf6
                    Extra: Last beacon: 388ms ago
Бывает, что Ваше устройство Wi-Fi не включено по умолчанию, тогда команда вместо рапорта, приведенного выше выдаст
такое сообщение:
wlan0 Failed to read scan data : Network is down
Ничего страшного, просто введите команду
sudo ip link set dev wlan0 up
соответственно выключить устройство можно командой
sudo ip link set dev wlan0 down
Настройка
Редактируем /etc/network/interfaces, например так:
$ sudo gedit /etc/network/interfaces
Удаляем (или комментируем) все упоминания нашего беспроводного интерфейса и добавляем свои:
iface wlan0 inet dhcp
wpa-driver wext
wpa-ssid <имя_точки_доступа>
wpa-ap-scan 1
wpa-proto RSN
wpa-pairwise CCMP
wpa-group CCMP
wpa-key-mgmt WPA-PSK
wpa-psk <hex_ключ> [ВАЖНО - см. Генерация ключей]
auto wlan0
Где:
| Параметр | Описание |
|---|---|
| iface wlan0 inet dhcp | конфигурация для DHCP (для статического IP см. пример ниже) «iface wlan0» — Имя нашего интерфейса (wlan0, eth1, rausb0, ra0, итд.) |
| wpa-driver | Это wpa-driver для нашей карты (‘wext’ — общий драйвер для linux, работающий с «ndiswrapper»). Рекомендуется оставить как есть. Другие варианты: hostap = Host AP driver (Intersil Prism2/2.5/3) atmel = ATMEL AT76C5XXx (USB, PCMCIA) wext = Linux wireless extensions (generic) madwifi = Atheros wired = wpa_supplicant wired Ethernet driver |
| wpa-ssid | Имя нашей точки доступа (ESSID). Без кавычек. |
| wpa-ap-scan | Параметр вещания точкой доступа ее имени. «1» = ESSID вещается всем. «2» = ESSID скрыт. |
| wpa-proto | Протокол «RSN» = WPA(2) «WPA» = WPA(1) |
| wpa-pairwise & wpa-group | «CCMP» = AES-шифрователь (как часть стандарта WPA(2)) «TKIP» = TKIP-шифрователь (как часть стандарта WPA(1)) |
| wpa-key-mgmt | «WPA-PSK» = Аутентификация через ключевую фразу (см. ‘Cоздание ключей’) «WPA-EAP» = Аутентификация при помощи сервера аутентификаций. |
| auto wlan0 | Автоматическое включение wlan0 при загрузке/перезагрузке сети. |
Генерация ключей
Теперь нам нужно сконвертировать нашу ключевую фразу (WPA ASCII) в hex-ключ:
$ wpa_passphrase <имя_точки_доступа> <ascii_ключ>
Результат будет примерно таким:
network={
ssid="test"
#psk="12345678"
psk=fe727aa8b64ac9b3f54c72432da14faed933ea511ecab1 5bbc6c52e7522f709a
}
hex-ключ это все символы после «psk=».
Нужно его скопировать в буфер обмена и вставить в файл /etc/network/interfaces в поле wpa-psk.
Теперь можно сохранить файл и перезагрузить сеть. Должно установиться соединение. Однако иногда этого сразу не происходит. Если это так — перезагружаем машину.
Дополнительно
Отключаем чтение файла /etc/network/interfaces для others во избежания попадания пароля от сети к третьим лицам.
$ sudo chmod o=-r /etc/network/interfaces
Примеры конфигураций
WPA2 + статический IP, скрытый ESSID.
iface wlan0 inet static
address 192.168.168.40
gateway 192.168.168.230
dns-nameservers 192.168.168.230
netmask 255.255.255.0
wpa-driver wext
wpa-ssid <имя_точки_доступа>
wpa-ap-scan 2
wpa-proto RSN
wpa-pairwise CCMP
wpa-group CCMP
wpa-key-mgmt WPA-PSK
wpa-psk <hex_ключ> [ВАЖНО - см. Генерация ключа]
auto wlan0
WPA1 + DHCP, ESSID виден всем.
iface wlan0 inet dhcp
wpa-driver wext
wpa-ssid <имя_точки_доступа>
wpa-ap-scan 1
wpa-proto WPA
wpa-pairwise TKIP
wpa-group TKIP
wpa-key-mgmt WPA-PSK
wpa-psk <hex_ключ> [ВАЖНО - см. Генерация ключа]
auto wlan0
Смешанный режим (WPA1, WPA2) + DHCP, ESSID виден всем.
iface wlan0 inet dhcp
wpa-driver wext
wpa-ssid <имя_точки_доступа>
wpa-ap-scan 1
wpa-proto WPA RSN
wpa-pairwise TKIP CCMP
wpa-group TKIP CCMP
wpa-key-mgmt WPA-PSK
wpa-psk <hex_ключ> [ВАЖНО - см. Генерация ключа]
auto wlan0
LEAP, WEP, DHCP, ESSID виден всем.
iface wlan0 inet dhcp
wpa-driver wext
wpa-ssid <имя_точки_доступа>
wpa-ap-scan 1
wpa-eap LEAP
wpa-key-mgmt IEEE8021X
wpa-identity <имя_пользователя>
wpa-password <пароль>
auto wlan0
PEAP, AES, DHCP, ESSID виден всем.
iface wlan0 inet dhcp
wpa-driver wext
wpa-ssid <имя_точки_доступа>
wpa-ap-scan 1
wpa-proto RSN
wpa-pairwise CCMP
wpa-group CCMP
wpa-eap PEAP
wpa-key-mgmt WPA-EAP
wpa-identity <наш_identity>
wpa-password <пароль>
auto wlan0
TTLS, WEP, DHCP, ESSID виден всем.
iface wlan0 inet dhcp
wpa-driver wext
wpa-ssid <имя_точки_доступа>
wpa-ap-scan 1
wpa-eap TTLS
wpa-key-mgmt IEEE8021X
wpa-anonymous-identity <anonymous_identity>
wpa-identity <наш_identity>
wpa-password <наш_password>
wpa-phase2 auth=PAP [Также: CHAP, MSCHAP, MSCHAPV2]
auto wlan0
Другие способы работы Wi-Fi оборудования
При помощи Wi-Fi адаптера также возможно установить децентрализованную сеть ad-hoc или сделать из компьютера под управлением Ubuntu точку доступа. Поскольку описание данных способов Wi-Fi подключения выходит за рамки этого руководства — обратитесь к соответствующим разделам. Ссылки на эти разделы см. в разделе Cсылки.
Решение проблем
Не устанавливается соединение по Wi-Fi/Ethernet с точкой доступа/маршрутизатором
Симптомы: сеть обычно изначально работает нормально, долго или недолго, а затем неожиданно пропадает и не появляется после перезагрузки. Эта проблема может быть непостоянной. Сеть «сама собой» начинает работать, а затем пропадает вновь.
При перезапуске адаптера сети таким образом:
sudo ifdown wlan0
sudo ifup wlan0
будет выводиться в консоль похожий текст
Listening on LPF/wlan0/00-02-2A-E1-E0-6C
Sending on   LPF/wlan0/00-02-2A-E1-E0-6C
Sending on   Socket/fallback
DHCPDISCOVER on wlan0 to 255.255.255.255 port 67 interval 8
DHCPDISCOVER on wlan0 to 255.255.255.255 port 67 interval 8
DHCPDISCOVER on wlan0 to 255.255.255.255 port 67 interval 15
No DHCPOFFERS received.
No working leases in persistent database - sleeping.
Причиной проблемы может быть то, что материнская плата полностью не обесточивается при выключении компьютера. При этом вероятно не обесточивается и некоторое периферийное оборудование, в т.ч. могут не обесточиваться usb порты. Если вы используете, например, Wi-Fi usb-адаптер, то в таком случае можно заметить горящий на адаптере светодиод (если он им оборудован). Вероятно проблема возникает из-за того, что сетевое оборудование в этом режиме работает не совсем корректно.
Простое решение проблемы состоит в выключении компьютера и выдергивании кабеля питания из розетки с последующим подключением шнура питания и включением компьютера.
Сложное решение проблемы состоит в настройке параметров BIOS-а на полное обесточиваение сетевого оборудования при выключении компьютера.
Иногда наглухо пропадает соединение по Wi-Fi с точкой доступа/маршрутизатором
Симптомы: сеть изначально работает, а затем после перезагрузки точки доступа/маршрутизатора неожиданно пропадает, и не появляется ни после перезагрузки, ни после танцев с бубном. При этом беспроводной адаптер в упор не видит точку доступа (хотя она может стоять рядом с компьютером), но прекрасно видит все соседские сети. Затем после ~дцатой~ перезагрузки маршрутизатора сеть сама собой появляется вновь.
Причиной проблемы может быть то, что некоторые маршрутизаторы произвольно выбирают номер рабочего канала, игнорируя номер канала выбранный в настройках маршрутизатора. Если в файле /etc/network/interfaces номер канала для беспроводного интерфейса указан, то вероятно проблема состоит именно в этом. Номер 6 канала указывается в файле примерно так:
auto wlan0
...
wireless-channel 6
Простое решение проблемы состоит в комментировании этого параметра, чтобы адаптер не был ограничен только этим каналом, и перезапуске сети
auto wlan0
...
#wireless-channel 6
Сложное решение проблемы состоит в регистрации бага на сайте производителя маршрутизатора (прошивки для него) и обновление прошивки маршрутизатора после (в случае) его исправления.
Перезапуск сети
Теперь, когда все необходимые действия выполнены, можно перезапустить сеть и проверить соединение. Для этого:
$ sudo /etc/init.d/networking restart
Теперь, при запуске команды ip addr должно отобразиться подключение eth0 с выставленными параметрами.
Если подключение отображается, но параметры не такие, какие были указаны в файле /etc/network/interfaces, либо возникают любые другие ошибки, перепроверьте этот файл на наличие неточностей и опечаток и попробуйте ещё раз перезапустить сеть.
FAQ по сетям
Как зайти на мой компьютер извне (через интернет)?
Для начала надо узнать, какой IP-адрес даёт провайдер — серый или белый (не путать со статическим/динамическим). Если серый, то ничего не получится. Если белый, то возможны два варианта:
-
Роутера нет или он работает в режиме бриджа (моста). В этом случае белый IP-адрес присваивается самому компьютеру. Вводим адрес — попадаем на комп, всё просто.
-
Белый адрес присваивается роутеру. Соответственно, по этому адресу мы попадаем на роутер, а не на компьютер. Чтобы попасть на компьютер, на роутере нужно пробросить порты (см. ниже).
Мне кажется, у меня слишком медленно работает сеть!
Измерьте скорость сети между двумя компьютера с помощью iperf. Можно воспользоваться этой инструкцией. В ней предлагают скомпиллировать программу из исходников, но можно просто установить её из репозитория. Если iperf покажет значение немного меньшее, чем ожидаемое, то с сетью всё в порядке, проблема может быть в железе (жёсткий диск/процессор не могут обеспечить большую скорость), в способе передачи (например, scp и ftp весьма неторопливы), в настройках (скорость может быть ограничена, например, настройками FTP-сервера) или в чём-то ещё. Если iperf показал величину, которая в разы меньше желаемой, то да — с сетью проблемы. Стоит посмотреть, в нужном ли режиме работает карта (например, с помощью ethtool), проверить наличие «errors» в выводе ifconfig и протестировать скорость подключения к какому-нибудь третьему компьютеру.
Как узнать, какие программы слушают порты на моём компьютере?
Чтобы посмотреть список открытых портов и названия слушающих их программ, используйте команду:
sudo netstat -nlpA inet,inet6
Для вывода информации о конкретном порте можно использовать grep. Например, для 80 порта:
sudo netstat -nlpA inet,inet6 | grep :80
Из вывода netstat не всегда понятно, о какой программе идёт речь (например, 2671/python), подробнее о процессе расскажет ps:
ps aux | grep 2671
Как присвоить два IP-адреса одной сетевой карте?
Например, интерфейсу eth0 нужно добавить адрес 192.168.1.1.
Кратковременно, до перезапуска сети:
sudo ip addr add 192.168.1.1/24 dev eth0
Навсегда — добавить в /etc/network/interfaces следующее:
#исправить строку auto
auto eth0 eth0:1

# добавить алиас
iface eth0:1 inet static
  address 192.168.1.1
  netmask 255.255.255.0
Как пробросить порт?
Например, нужно пробросить порт 8081. Адрес, на который обращается клиент, назовём внешний_ip, а адрес, на который он должен попасть — внутренний_ip.
iptables -t nat -A PREROUTING -p tcp -d внешний_ір --dport 8081 -j DNAT --to-destination внутренний_ір:8081
iptables -t nat -A POSTROUTING -p tcp --dst внутренний_ір --dport 8081 -j SNAT --to-source внешний_ір
И обязательно нужно что-то вроде
iptables -t filter -A FORWARD -m conntrack --ctstate DNAT -j ACCEPT
Ссылки
In this tutorial, we will be showing you how to change the DNS settings on Ubuntu.

Changing your DNS settings within Ubuntu is a reasonably straightforward process and can be done within either the desktop interface or terminal.
The steps that we will be showing you should work on almost all recent releases of Ubuntu.
Suppose you are running a desktop version of Ubuntu. In that case, we do recommend sticking with that interface as it does make the process incredibly straightforward and is significantly harder to make mistakes.
There are many reasons why you might want to change the DNS settings. One of the reasons you might want to change this is to utilize a more privacy-orientated DNS service such as Cloudflare’s 1.1.1.1.
Table of Contents
- Setting the DNS using Ubuntu’s Desktop Interface
- Changing Ubuntu’s DNS Settings Using the Terminal
- Set DNS Settings within the Netplan Config File
- Changing DNS Settings using the Network Manager
- Conclusion
Setting the DNS using Ubuntu’s Desktop Interface
This section will show you how to change the DNS settings utilizing Ubuntu’s desktop interface. These steps were written while using Ubuntu 22.04 but are still relevant for older releases of Ubuntu, such as 20.04.
Of course, to complete these steps, you will need to use a desktop variant of Ubuntu and have access to a mouse and keyboard.
1. On your desktop, start by clicking in the top-right corner of the screen. This is typically where you will see the network, volume, and power icons in the toolbar.
Clicking this will bring up a menu that we can use to access the settings page quickly.

2. You should now have a menu open in the top-right corner of your screen.
Within this menu, find and click the option labeled “Settings“.

3. Now the settings menu is open, use the left-hand sidebar to find the “Network” settings tab (1.).
Once you have changed to the Network settings, identify your active connection and click the cog next to it (2.). In our example, we only have a single ethernet connection.

4. Next, we need to change to the IPv4 or IPv6 tabs (1.) to be able to change the DNS servers Ubuntu is utilizing. Most people will likely by utilizing an IPv4 connection.
Before setting the DNS servers, we need to click the “Automatic” toggle (2.), switching it off.
Finally, within the DNS textbox (3.), we can set the IP addresses for the DNS server we want Ubuntu to use. For our example, we will use Cloudflare’s 1.1.1.1 service.
To add multiple IP addresses, you must separate them with a comma (,). For our example we are using “1.1.1.1,1.0.0.1“.
Once you have set your new DNS servers for Ubuntu, you can apply them by clicking the “Apply” button (4.).

5. Your Ubuntu device should now utilize the DNS servers you just set.
If you utilize an ISP that supports both IPv4 and IPv6, you may want to set DNS servers in both tabs.
Changing Ubuntu’s DNS Settings Using the Terminal
In this section, you will learn how to change the DNS settings on Ubuntu from the terminal. This is more complicated than using the GUI but is still relatively straightforward.
The following steps will work on all versions of Ubuntu that utilize Netplan for their network configuration.
That means you can change your DNS settings on any version of Ubuntu newer than 18.04, including the LTS releases Ubuntu 20.04 and 22.04.
1. Start by opening up the terminal on your Ubuntu device or connecting over SSH.
If you use Ubuntu Desktop, you can open the terminal by pressing CTRL + ALT + T on your keyboard.
2. With the terminal open, we need first to work out what config files are available for you to edit. Depending on your Ubuntu distribution, the file present in the Netplan directory might differ.
Using the ls command as shown below we can see the file available within this directory.
3. We should now check the contents of your chosen configuration file. If your system uses “NetworkManager” as the renderer, we will need to use different steps.
For our example, our file is called “01-netcfg.yaml” and we will open it using the nano text editor.
4. Before we proceed, we need to decide whether we can modify this file or not.
If your file contains “renderer: NetworkManager“, you must follow the “Changing Ubuntu’s DNS Settings using the Network Manager in the Terminal” section.
Alternatively, if your file contains “renderer: networkd“, you can continue to our “Set DNS Settings within Netplan” section.
Set DNS Settings within the Netplan Config File
If you see “renderer: networkd” within your Netplan configuration file, we can configure Ubuntu’s DNS servers within this file.
1. First, check if your file already has a network interface configured. You should see something like the following.
If you don’t see either “ethernets” or any devices underneath that header, you will need to get the network interfaces device name. You can get these device names by quitting out of the file and following step a.
If you see a network device, and it’s the one you want to set the DNS servers for, continue to step 2.
a. To get the network device names, you can run the following command in the terminal.
An example of a device name from this is “eth0“. In our example, this is the interface belonging to our ethernet internet connection.
Ignore the “lo” device. This device is the loopback interface.
2. With a network device name handy, we can now modify the configuration file so Ubuntu will use our DNS servers.
You will need to change the file to look something like we have shown below. In addition, you will need to make sure you change two things.
- Make sure “
<INTERFACENAME>” is the interface’s name you are setting the DNS servers for.For example, our file contains “
eth0” as the interface name. - Secondly, you will need to set the addresses field (
<NAMESERVERS...>). As this is an array of IP addresses, these must sit within the square brackets ([ ]).You need to separate each additional DNS server with a comma (
,). For example, using Cloudflare’s DNS service, you would use “[1.1.1.1,1.0.0.1]“.
Below is an example of how this was configured within our Netplan configuration file.
3. Once you have modified this file to point to your chosen DNS servers, you can save and quit by pressing CTRL + X, then Y, followed by the ENTER key.
4. For your Ubuntu device to start using these DNS servers, you must apply the changes.
You can apply the changes you made to the configuration file by utilizing the command below.
Changing Ubuntu’s DNS Settings using the Network Manager
This section is for users whose Ubuntu system uses “NetworkManager” to manage their connection, including its DNS settings.
1. For this, you will need to quit out of the configuration file you opened previously. Instead, will need to use a different tool to set the DNS server.
If you are using the nano text editor, you can quit out of this file by pressing CTRL + X.
2. Since the system uses NetworkManager, we can utilize a tool called “nmcli” to set the DNS servers on Ubuntu.
The first command that we want to run will retrieve the current connection. Make a note of the “name” returned by this command
Below is the result we got when running the above command on our system. This means we will need to use the name “Wired connection 1“.
3. Now that we have a connection name, we can use this to change the DNS server Ubuntu is using for that connection.
You need to decide whether you want to set the DNS server for an IPv4 or IPv6 connection. These commands differ slightly.
When using either one of the following commands, replace “[NETWORKNAME]” with the name you got from the previous command.
Additionally, make sure you replace “[DNSSERVERS]” with the IP addresses belonging to your DNS server, separating multiple addresses with a comma (,).
a. Use the following command when you want to set the DNS servers for the IPv4 connection. The DNS servers specified here must be in IPv4 format (E.G 1.1.1.1).
b. if you want to change your Ubuntu DNS servers for an IPv6 connection, you will use the command below. Remember the DNS servers specified here must be in IPv6 format (E.G. 2606:4700:4700::1111).
4. For example, if we wanted to change the IPv4 DNS servers on our Ubuntu device to Cloudflare’s, we would use the following command.
Using “Wired connection 1” as our network name and “1.1.1.1,1.0.0.1” for our DNS servers.
5. You can verify that the changes have been applied using the command below. Make sure to replace “[NETWORKNAME]” with the interface you got earlier.
This command will show you a wealth of information about your connection. You should eventually see “ipv4.dns” with the value set to your provided servers.
Conclusion
Throughout this tutorial, we have shown you how to change the DNS server on Ubuntu. These steps work for almost every recent iteration of Ubuntu. These versions include Ubuntu 18.04, 20.04, and 22.04.
The desktop interface is the easiest way to set the DNS servers but is only helpful if running a desktop variant of Ubuntu.
If you have any questions about setting the DNS servers on your version of Ubuntu, please comment below.
Be sure to check out our many other Ubuntu guides or explore a wealth of Linux command tutorials.
Weekly Updates Straight To Your Inbox
Receive our Raspberry Pi projects, coding tutorials, Linux guides and more!
Changing the DNS server on Ubuntu is an easy task, but needs to be done carefully.
This article shows you how to do it easily.
Step 1: Check your current DNS Server
The first step is to always check, and note down the currently used DNS Servers – in case the change in DNS Server does not result in intended changes.
To show the current DNS servers that are being used per interface, use the ‘resolvectl’ command:
resolvectl statusFor systems running Ubuntu 20.04 or newer, please use the following command:
systemd-resolve --statusRunning either of these commands will show you the DNS server(s) being used by each network interface.
Let us see the output of the ‘resolvectl’ command on my computer:
$ resolvectl status
Global
       Protocols: -LLMNR -mDNS -DNSOverTLS DNSSEC=no/unsupported
resolv.conf mode: stub

Link 2 (enp1s0)
    Current Scopes: DNS
         Protocols: +DefaultRoute +LLMNR -mDNS -DNSOverTLS DNSSEC=no/unsupported
Current DNS Server: 8.8.8.8
       DNS Servers: 8.8.8.8 8.4.4.8
As evident from the output, my current DNS provider is Google.
I’d like to change that to something else, maybe Cloudflare.
Step 2: Temporarily change DNS (to test it out)
Before you change the DNS settings permanently, it is best to change it temporarily and see the results.
If there is regression, no need to revert as this is only a temporary change. If the results are as expected, we will make it permanent.
To temporarily change the DNS server, edit the /etc/resolv.conf file.
In /etc/resolv.conf, the line which starts with the keyword nameserver deals with DNS Servers.
💡
NEVER remove the line that says nameserver 127.0.0.53. Comment it out by putting a pound/hash symbol at the beginning of that line.
Add one or two lines that begin with nameserver and specify the IP address next to it. Below is what it should look like (if I want Cloudflare as my DNS provider):
nameserver 1.1.1.2
nameserver 1.0.0.2
The first line is your primary DNS server and second line is the fall-back DNS server. The fall-back DNS server is used when [for some reason] the primary DNS server is unavailable.
Once these two lines are added to your /etc/resolv.conf file, you should immediately see the results.
You can verify if the DNS server changed with the help of dig command.
$ dig google.com | grep SERVER
;; SERVER: 1.1.1.2#53(1.1.1.2) (UDP)
Grep-ing the output, we see that Cloudflare’s DNS servers are being used. That confirms that the temporary change in DNS server was in effect immediately.
After temporarily switching DNS, if you do not like the change, remove the lines that you had added and uncomment the nameserver 127.0.0.53 line.
Available DNS Providers
In case you are not aware of IP addresses for DNS servers, below is the table of a few popular DNS providers, and their primary and fall-back addresses:
| Provider | Primary IP Address | Fall-back IP Address |
|---|---|---|
| Cloudflare | 1.1.1.1 | 1.0.0.1 |
| Cloudflare (malware blocking) | 1.1.1.2 | 1.0.0.2 |
| 8.8.8.8 | 8.4.4.8 | |
| Quad9 | 9.9.9.9 | 149.112.112.112 |
| OpenDNS | 208.67.222.222 | 208.67.220.220 |
To use Cloudflare (with malware blocking) as my DNS provider, I will use the 1.1.1.2 and 1.0.0.2 IP addresses.
Step 3: Permanently change DNS
After temporarily changing your DNS provider, if you are satisfied with the results, it is time to make this change permanent.
Method 1: The easy way 
To permanently change your DNS server, install the resolvconf package using the following command:
sudo apt-get install resolvconfOnce that is installed, edit the /etc/resolvconf/resolv.conf.d/head file and add the same nameserver lines to it like so (assuming Cloudflare as DNS provider):
nameserver 1.1.1.2
nameserver 1.0.0.2
Once that is done, start the resolvconf.service with the following command:
sudo systemctl enable --now resolvconf.serviceThat is all!
Method 2: The not-so-easy way
One way to permanently change your DNS server is to edit the YAML file that resides in the /etc/netplan/ directory.
Before that, note down the name of your network interface beforehand. You can do so using the ip command:
ip addrThat will list various network interfaces. Locate the interface and note it down.
Usually, there is only one file in /etc/netplan/ directory, but the name is mostly different. If there are multiple files, grep all files for your interface name. That should narrow down the candidate file to one.
grep -H INTERFACE_NAME *.*Once you know the filename, open it for editing. You should see something similar to my output:
network:
  ethernets:
    enp1s0:
      dhcp4: true
  version: 2
My network interface is called ‘enp1s0’, yours might be different.
Under my interface, I will add the nameservers field (below, not under dhcp), and another filed called addresses under it as well. I will specify the address in a bracket, separated by commas, like so:
network:
  ethernets:
    enp1s0:
      dhcp4: true
      nameservers:
        addresses: [1.1.1.2, 1.0.0.2]
  version: 2
Once that is done, save changes and exit.
Then, run the following command to make changes effective:
sudo netplan applyDone! You have now permanently changed your DNS server 
Let’s learn the GUI and a command-line way to set the DNS server address in your Ubuntu 22.04 LTS Jammy JellyFish.
Well, whenever we visit some website such as how2shout.com in a browser, to find the website the browser needs the Ip-address of it. Here, the DNS comes into the picture. The Domain Name System, or DNS for short, is a system that converts Internet addresses or computer names into IP addresses and vice versa.
A browser request for the IP address will be sent to the DNS server. For private individuals, this is usually the case with the associated Internet provider. The DNS server then returns the IP address.
There are numerous DNS servers connected and always inform each other about changes. If a DNS server does not find a name or an IP address, it asks the other DNS server.
The DNS is therefore responsible and necessary for us to be able to access websites via Internet addresses or IP addresses.
Steps to change the DNS Nameserver on Ubuntu 22.04 LTS Linux
Although the DNS server address supplied by your internet service provider automatically gets configured, however, if you want to change it manually then follow this guide.
#1st Method Using GUI
1. Open Ubuntu Settings
On your Ubuntu 22.04, click on the Power icon given on the right top side of the Taskbar. A pop-up will appear there select the “Settings” option to open it.

2. Go to Network Settings
Once you are on the Settings page, go to the Network menu given on the left sidebar and then click on the Gear icon given for Wired or Wireless connection.

3. Set DNS Server on Ubuntu 22.04
Now, you will have a window to configure IP addresses and other settings related to the network. However, to configure DNS Server Ip-address, select IPV4 Tab and then click on the Toggle button given in front of DNS. This will disable the automatic fetching of DNS Server addresses from your Internet provider. After that enter the IP address of the DNS server you want to set on your Ubuntu 22.04. Here we are using the address of the Google DNS server to perform this tutorial, you can set whatever you want to. After that click on the “Apply” button to save the configuration.

From now onwards to resolve some domain names, the system will check it with the Google DNS server or the one you have set.
Note: Don’t forget to Turn the Network Off and On to get the immediate effect or else the same will reflect on your next system boot-up.
#2nd method using CLI
4. Open Command terminal
Those who are not using the GUI Desktop of Ubuntu 22.04 or prefer to use the command line, can go for the Netplan configuration file. First, open the command terminal, those who are on the server version already have terminal access, whereas the Desktop user can use the keyboard shortcut – Ctrl+Alt+T.
5. Edit Netplan Confgiuration file
Ubuntu has a command-line Netplan tool that uses a YAML configuration file; we can use it to set our network configuration.
Switch to Netplan directory:
cd /etc/netplan
List the available file:
ls
Edit it:
Before editing the file, find out your ethernet adapter name and also the IP address of the PC in your network range. To find it, you can use the command ip a
sudo nano 01-network-manager.yaml
Add the following lines, however, make sure the space should be as given in the block of code because YAML is an indent-sensitive language. And don’t forget to replace ens160 with your adapter and Ip-address + Gateway as well. After that move to the nameservers section and set whatever DNS server address you want on your system to use for resolving domain names.
network:
  version: 2
  renderer: NetworkManager
  ethernets:
    ens160:
      dhcp4: no
      addresses:
        - 192.168.17.100/24
      gateway4: 192.168.17.2
      nameservers:
          addresses: [1.1.1.1, 8.8.8.8, 4.4.4.4]
Save the file by pressing Ctlr+O, hitting the Enter key, and then exiting using Ctrl+X.
Before applying your Netplan configuration file, let’s test it by issuing the following command:
sudo netplan try
Hit the Enter key, if the Configuration you have done in the Netplan file is valid, you will have an output saying- Configuration accepted.

Now, Apply the configuration:
sudo netplan apply
If you want also want to see what is happening while applying the new Netplan configuration, use:
sudo netplan --debug apply

With the help of the Domain Name System, the assignments between IP addresses and domain names can be resolved in the outward and backward directions. Since DNS is very important for the functioning of an IP network, there are numerous security extensions such as DNSSEC, DNS over TLS, or DNS over HTTPS.
Other Articles:
• How to get IP Address in Linux using Command terminal
• Steps to Install MySQL on Ubuntu 22.04 LTS Jammy…
• How to install Webmin on Ubuntu 22.04 LTS…