Contents
- Understanding and Using File Permissions
- Folder/Directory Permissions
- Permissions in Action
-
Changing Permissions
- chmod with Letters
- chmod with Numbers
- chmod with sudo
-
Recursive Permission Changes
- Recursive chmod with -R and sudo
- Recursive chmod using find, pipemill, and sudo
- Warning with Recursive chmod
- Changing the File Owner and Group
- Volume Permissions with umask
-
ACL (Access Control List)
- Setting up ACL
- Example Usage
- GUI ACL Editor
- Useful ACL Resources
- File removal
- Sticky Bit
- See also
- ToDo
Understanding and Using File Permissions
In Linux and Unix, everything is a file. Directories are files, files are files and devices are files. Devices are usually referred to as a node; however, they are still files. All of the files on a system have permissions that allow or prevent others from viewing, modifying or executing. If the file is of type Directory then it restricts different actions than files and device nodes. The super user «root» has the ability to access any file on the system. Each file has access restrictions with permissions, user restrictions with owner/group association. Permissions are referred to as bits.
To change or edit files that are owned by root, sudo must be used — please see RootSudo for details.
If the owner read & execute bit are on, then the permissions are:
-r-x------
There are three types of access restrictions:
|
Permission |
Action |
chmod option |
|
read |
(view) |
r or 4 |
|
write |
(edit) |
w or 2 |
|
execute |
(execute) |
x or 1 |
There are also three types of user restrictions:
|
User |
ls output |
|
owner |
-rwx—— |
|
group |
—-rwx— |
|
other |
——-rwx |
Note: The restriction type scope is not inheritable: the file owner will be unaffected by restrictions set for his group or everybody else.
Folder/Directory Permissions
Directories have directory permissions. The directory permissions restrict different actions than with files or device nodes.
|
Permission |
Action |
chmod option |
|
read |
(view contents, i.e. ls command) |
r or 4 |
|
write |
(create or remove files from dir) |
w or 2 |
|
execute |
(cd into directory) |
x or 1 |
-
read restricts or allows viewing the directories contents, i.e. ls command
-
write restricts or allows creating new files or deleting files in the directory. (Caution: write access for a directory allows deleting of files in the directory even if the user does not have write permissions for the file!)
-
execute restricts or allows changing into the directory, i.e. cd command
![]() Folders (directories) must have ‘execute’ permissions set (x or 1), or folders (directories) will NOT FUNCTION as folders (directories) and WILL DISAPPEAR from view in the file browser (Nautilus).
Folders (directories) must have ‘execute’ permissions set (x or 1), or folders (directories) will NOT FUNCTION as folders (directories) and WILL DISAPPEAR from view in the file browser (Nautilus).
Permissions in Action
user@host:/home/user$ ls -l /etc/hosts
-rw-r--r--  1 root root 288 2005-11-13 19:24 /etc/hosts
user@host:/home/user$
Using the example above we have the file «/etc/hosts» which is owned by the user root and belongs to the root group.
What are the permissions from the above /etc/hosts ls output?
-rw-r--r--

owner = Read & Write (rw-)
group = Read (r--)
other = Read (r--)
Changing Permissions
The command to use when modifying permissions is chmod. There are two ways to modify permissions, with numbers or with letters. Using letters is easier to understand for most people. When modifying permissions be careful not to create security problems. Some files are configured to have very restrictive permissions to prevent unauthorized access. For example, the /etc/shadow file (file that stores all local user passwords) does not have permissions for regular users to read or otherwise access.
user@host:/home/user# ls -l /etc/shadow
-rw-r-----  1 root shadow 869 2005-11-08 13:16 /etc/shadow
user@host:/home/user#

Permissions:
owner = Read & Write (rw-)
group = Read (r--)
other = None (---)

Ownership:
owner = root
group = shadow
chmod with Letters
Usage: chmod {options} filename
|
Options |
Definition |
|
u |
owner |
|
g |
group |
|
o |
other |
|
a |
all (same as ugo) |
|
x |
execute |
|
w |
write |
|
r |
read |
|
+ |
add permission |
|
— |
remove permission |
|
= |
set permission |
Here are a few examples of chmod usage with letters (try these out on your system).
First create some empty files:
user@host:/home/user$ touch file1 file2 file3 file4
user@host:/home/user$ ls -l
total 0
-rw-r--r--  1 user user 0 Nov 19 20:13 file1
-rw-r--r--  1 user user 0 Nov 19 20:13 file2
-rw-r--r--  1 user user 0 Nov 19 20:13 file3
-rw-r--r--  1 user user 0 Nov 19 20:13 file4
Add owner execute bit:
user@host:/home/user$ chmod u+x file1
user@host:/home/user$ ls -l file1
-rwxr--r--  1 user user 0 Nov 19 20:13 file1
Add other write & execute bit:
user@host:/home/user$ chmod o+wx file2
user@host:/home/user$ ls -l file2
-rw-r--rwx  1 user user 0 Nov 19 20:13 file2
Remove group read bit:
user@host:/home/user$ chmod g-r file3
user@host:/home/user$ ls -l file3
-rw----r--  1 user user 0 Nov 19 20:13 file3
Add read, write and execute to everyone:
user@host:/home/user$ chmod ugo+rwx file4
user@host:/home/user$ ls -l file4
-rwxrwxrwx  1 user user 0 Nov 19 20:13 file4
user@host:/home/user$
chmod with Numbers
Usage: chmod {options} filename
|
Options |
Definition |
|
#— |
owner |
|
-#- |
group |
|
—# |
other |
|
1 |
execute |
|
2 |
write |
|
4 |
read |
Owner, Group and Other is represented by three numbers. To get the value for the options determine the type of access needed for the file then add.
For example if you want a file that has -rw-rw-rwx permissions you will use the following:
|
Owner |
Group |
Other |
|
read & write |
read & write |
read, write & execute |
|
4+2=6 |
4+2=6 |
4+2+1=7 |
user@host:/home/user$ chmod 667 filename
Another example if you want a file that has —w-r-x—x permissions you will use the following:
|
Owner |
Group |
Other |
|
write |
read & execute |
execute |
|
2 |
4+1=5 |
1 |
user@host:/home/user$ chmod 251 filename
Here are a few examples of chmod usage with numbers (try these out on your system).
First create some empty files:
user@host:/home/user$ touch file1 file2 file3 file4
user@host:/home/user$ ls -l
total 0
-rw-r--r--  1 user user 0 Nov 19 20:13 file1
-rw-r--r--  1 user user 0 Nov 19 20:13 file2
-rw-r--r--  1 user user 0 Nov 19 20:13 file3
-rw-r--r--  1 user user 0 Nov 19 20:13 file4
Add owner execute bit:
user@host:/home/user$ chmod 744 file1
user@host:/home/user$ ls -l file1
-rwxr--r--  1 user user 0 Nov 19 20:13 file1
Add other write & execute bit:
user@host:/home/user$ chmod 647 file2
user@host:/home/user$ ls -l file2
-rw-r--rwx  1 user user 0 Nov 19 20:13 file2
Remove group read bit:
user@host:/home/user$ chmod 604 file3
user@host:/home/user$ ls -l file3
-rw----r--  1 user user 0 Nov 19 20:13 file3
Add read, write and execute to everyone:
user@host:/home/user$ chmod 777 file4
user@host:/home/user$ ls -l file4
-rwxrwxrwx  1 user user 0 Nov 19 20:13 file4
user@host:/home/user$
chmod with sudo
Changing permissions on files that you do not have ownership of: (Note that changing permissions the wrong way on the wrong files can quickly mess up your system a great deal! Please be careful when using sudo!)
user@host:/home/user$ ls -l /usr/local/bin/somefile
-rw-r--r--  1 root root 550 2005-11-13 19:45 /usr/local/bin/somefile
user@host:/home/user$

user@host:/home/user$ sudo chmod o+x /usr/local/bin/somefile

user@host:/home/user$ ls -l /usr/local/bin/somefile
-rw-r--r-x  1 root root 550 2005-11-13 19:45 /usr/local/bin/somefile
user@host:/home/user$
Recursive Permission Changes
To change the permissions of multiple files and directories with one command. Please note the warning in the chmod with sudo section and the Warning with Recursive chmod section.
Recursive chmod with -R and sudo
To change all the permissions of each file and folder under a specified directory at once, use sudo chmod with -R
user@host:/home/user$ sudo chmod 777 -R /path/to/someDirectory
user@host:/home/user$ ls -l
total 3
-rwxrwxrwx  1 user user 0 Nov 19 20:13 file1
drwxrwxrwx  2 user user 4096 Nov 19 20:13 folder
-rwxrwxrwx  1 user user 0 Nov 19 20:13 file2
Recursive chmod using find, pipemill, and sudo
To assign reasonably secure permissions to files and folders/directories, it’s common to give files a permission of 644, and directories a 755 permission, since chmod -R assigns to both. Use sudo, the find command, and a pipemill to chmod as in the following examples.
To change permission of only files under a specified directory.
user@host:/home/user$ sudo find /path/to/someDirectory -type f -print0 | xargs -0 sudo chmod 644
user@host:/home/user$ ls -l
total 3
-rw-r--r--  1 user user 0 Nov 19 20:13 file1
drwxrwxrwx  2 user user 4096 Nov 19 20:13 folder
-rw-r--r--  1 user user 0 Nov 19 20:13 file2
To change permission of only directories under a specified directory (including that directory):
user@host:/home/user$ sudo find /path/to/someDirectory -type d -print0 | xargs -0 sudo chmod 755
user@host:/home/user$ ls -l
total 3
-rw-r--r--  1 user user 0 Nov 19 20:13 file1
drwxr-xr-x  2 user user 4096 Nov 19 20:13 folder
-rw-r--r--  1 user user 0 Nov 19 20:13 file2
Warning with Recursive chmod
WARNING: Although it’s been said, it’s worth mentioning in context of a gotcha typo. Please note, Recursively deleting or chown-ing files are extremely dangerous. You will not be the first, nor the last, person to add one too many spaces into the command. This example will hose your system:
user@host:/home/user$ sudo chmod -R / home/john/Desktop/tempfiles
Note the space between the first / and home.
You have been warned.
Changing the File Owner and Group
A file’s owner can be changed using the chown command. For example, to change the foobar file’s owner to tux:
user@host:/home/user$ sudo chown tux foobar
To change the foobar file’s group to penguins, you could use either chgrp or chown with special syntax:
user@host:/home/user$ sudo chgrp penguins foobar
user@host:/home/user$ sudo chown :penguins foobar
Finally, to change the foobar file’s owner to tux and the group to penguins with a single command, the syntax would be:
user@host:/home/user$ sudo chown tux:penguins foobar
![]() Note that, by default, you must use sudo to change a file’s owner or group.
Note that, by default, you must use sudo to change a file’s owner or group.
Volume Permissions with umask
This section has been moved to: Fstab#Options
ACL (Access Control List)
Posix ACLs are a way of achieving a finer granularity of permissions than is possible with the standard Unix file permissions. See the full page on ACLs FilePermissionsACLs
Setting up ACL
- Install the acl package:
sudo apt-get install acl
-
Edit /etc/fstab and add option acl to partition(s) on which you want to enable ACL. For example:
...
UUID=d027a8eb-e234-1c9f-aef1-43a7dd9a2345 /home    ext4   defaults,acl   0   2
...
- Remount partition(s) on which you want to enable ACL. For example:
sudo mount -o remount /home
-
Verify acl is enabled on the partition(s):
mount | grep acl
The commands, setfacl and getfacl, set and read ACLs on files and directories.
Example Usage
This is a simple example for use with a Samba share to ensure that any files or sub-directories created could also be modified by any Samba user.
- Create a directory with full permission:
mkdir shared_dir
chmod 777 shared_dir
-
Set the default ACL with ‘-d’ and modify with ‘-m’ the permissions for samba nobody user nogroup group which will apply to all newly created file/directories.
setfacl -d -m u:nobody:rwx,g:nogroup:rwx,o::r-x shared_dir
GUI ACL Editor
The Eiciel package allows GUI access to ACLs through the Nautilus file manager.
Useful ACL Resources
-
http://brunogirin.blogspot.com/2010/03/shared-folders-in-ubuntu-with-setgid.html
-
http://wiki.kaspersandberg.com/doku.php?id=howtos:acl
-
man acl
-
man setfacl
-
man getfacl
File removal
To remove a file you cannot delete use
sudo rm -rf filename
where filename is the name and path of the file to delete.
Nota bene: Be very careful when using the command rm with the -rf option since -r makes the file removal recursive (meaning it will remove files inside of folders) and -f will force the removal even for files which aren’t writable. To play it safe, please consider typing in the absolute path to the file
sudo rm -rf /path/to/file/filename
to prevent any mishaps that can/will occur. It takes longer to type but you can’t put a price on peace of mind. See the rm man page for details.
Sticky Bit
The sticky bit applies only to directories, and is typically used on publicly-writeable directories. Within a directory upon which the sticky bit is applied, users are prevented from deleting or renaming any files that they do not personally own.
To add or remove the sticky bit, use chmod with the «t» flag:
chmod +t <directory>
chmod -t <directory>
The status of the sticky bit is shown in the other execute field, when viewing the long output of ls. «t» or «T» in the other execute field indicates the sticky bit is set, anything else indicates it is not.
Making a public directory:
user@host:/home/user$ mkdir folder
user@host:/home/user$ chmod 777 folder
user@host:/home/user$ ls -l
total 3
drwxrwxrwx  2 user user 4096 Nov 19 20:13 folder
Adding the sticky bit (note the «t» in the other execute field):
user@host:/home/user$ chmod +t folder
user@host:/home/user$ ls -l
total 3
drwxrwxrwt  2 user user 4096 Nov 19 20:13 folder
See also
-
man chmod
-
man chown
-
man chgrp
-
FindingFiles
-
User Private Groups
ToDo
- umask (add file and directory umask section, with specific focus on security)
-
The User Private Group scheme. In other words, this page does the nuts and bolts ok, but we need to describe what the permissions should be. The default Ubuntu set up is not agnostic: Every user has their default private group. Directories for collaboration need to have special group and permission set for correct functioning.
-
* Suggestion: I often use find instead of chmod -R, because it’s easier to differentiate between files and directories that way. Yes, I know about the ‘X’ permission, but I don’t trust it.
- The sticky bit. It’s needed for «other» in shared directories like /tmp. It’s needed for «group» in shared directories where write permission is given to a group, like /var/www
|
|
Candidate for Deletion |

Содержание
Contents
- Права доступа в системе Linux
-
Команда chmod
- Символьная форма прав доступа
- Числовая форма прав доступа
- Примеры
- Команда chown
- Команда chgroup
Права доступа в системе Linux
Поскольку Linux (да и UNIX вообще) — многопользовательская OS, в ней существует система прав доступа к файлам, служащая для защиты файлов каждого пользователя от влияния других пользователей системы.
Права доступа подразделяются на три типа:
-
чтение (read)
-
запись (write)
-
выполнение (execute)
Разрешение на чтение позволяет пользователю читать содержимое файлов, а в случае каталогов — просматривать перечень имен файлов в каталоге (используя, например, команду ls). Разрешение на запись позволяет пользователю писать в файл, изменять его или удалять. Для каталогов это дает право cоздавать в каталоге новые файлы и каталоги, или удалять файлы в этом каталоге. Наконец, разрешение на выполнение позволяет пользователю выполнять файлы (как бинарные программы, так и командные файлы). Если на файле стоит атрибут Execute, то независимо от его расширения он считается программой, которую можно запустить. (Вот почему в *nix не принято ставить исполняемым файлам расширения по типу DOS’овских *.com, *.exe, *.bat. Вообще в Unix/Linux нет такого жесткого понятия расширение файла, как в Dos/Windows, и система сама определяет тип файлов независимо от их расширения, но это — уже другая история…). Так же атрибут выполнения может стоять у shell-скриптов, CGI-скриптов, и у всего, что можно хоть как-то запустить. Разрешение на выполнение применительно к каталогам означает возможность выполнять команды вроде cd.
Эти типы прав доступа могут быть предоставлены для трех классов пользователей:
-
владельцы — у каждого файла в Linux’e есть один владелец.
-
группы — с каждым файлом связана группа пользователей этого файла.
-
остальные пользователи.
Владельцем файла становится юзер, который создал этот файл. Короче говоря, для файла все юзеры делятся на 3 типа: хозяин, или владелец, юзеры, состоящие в одной группе с владельцем, и все остальные юзеры. Для каждого типа — свои права. Учтите, что директории и все системные устройства в UNIX являются обычными файлами. Тот же самый /dev/fd0 — это не сам Floppy disk, а всего лишь файл, связанный с флопповодом. Поэтому, если root запретил юзеру доступ к этому файлу, тот не сможет использовать флопповод (так же обстоят дела с модемами, хардами и т.п.). Владельцем всех системных файлов является root. Он же имеет право забирать файлы у одного юзера и передавать их другому (менять владельца).
Команда chmod
Изменить права доступа к файлу может либо его владелец, либо сам root. Делается это командой chmod. Существует две формы представления прав доступа: символьная и цифровая.
Символьная форма прав доступа
Если войти в любой каталог, где есть файлы, и набрать ls -l, то появится список всех файлов в этом каталоге и права доступа в символьной форме. Строка прав доступа состоит из 10 символов. Первый символ указывает на тип файла: d — директория, — — обычный файл. Три последующих — права доступа владельца к этому файлу. Если первый символ из этих трех — r, владелец имеет право читать этот файл, а если —, то не имеет. Следующие 2 символа — w — писать и x — запускать. Если вместо них стоит —, значит, владелец этого права не имеет. Еще 3 символа — права доступа группы, еще три — права всех остальных пользователей.
Примеры:
drwxrwxrwx — директория, к которой все имеют любые права доступа.
-rwxr—r— — обычный файл, владелец может делать все, а остальные — только читать.
-r——— — обычный файл, который владелец может только читать, а остальные пользователи не видят.
Важно заметить, что права доступа, которые имеет файл, зависят также от прав доступа к каталогу, в котором этот файл находится. Например, даже если файл имеет -rwxrwxrwx, другие пользователи не смогут до него добраться, если у них не будет прав на чтение и выполнение каталога, в котором находится файл. Например, если юзер захочет ограничить доступ ко всем своим файлам, он может просто изменить права доступа своего домашнего каталога /home/user на drwx——. Таким образом, никто другой не будет иметь доступ в его каталог, а следовательно посторонним будут недоступны и все файлы. Так что, пользователь может не заботиться об индивидуальной защите своих файлов. Другими словами, чтобы иметь доступ к файлу, вы должны иметь доступ ко всем каталогам, лежащим на пути от корня к этому файлу, а также разрешение на доступ собственно к этому файлу. Обычно пользователи UNIX весьма открыты всеми своими файлами. По умолчанию файлам устанавливается защита -rw-r—r—, которая позволяет другим пользователям читать файлы, но ни коим образом их не менять. Каталогам обычно устанавливаются права доступа drwxr-xr-x, что позволяет другим пользователям ходить с правами экскурсантов по вашим каталогам, но ничего в них не трогать и не записывать.
Но многие пользователи хотят держать других подальше от своих файлов. Установив права доступа файла -rw——-, вы никому не покажете этот файл и не дадите записать в него. Также хорошо закрывает файлы защита соответствующего каталога drwx——.
С правами доступа в символьной форме chmod работает так:
chmod {a,u,g,o}{+,-}{r,w,x} <filenames>
Кратко, вы выбираете из all (все), user (пользователь), group (группа) или other (другие). Далее указываете, либо вы добавляете права (+), либо лишаете прав (—). И наконец, вы указываете один или несколько режимов: read, write или execute.
Числовая форма прав доступа
Теперь права доступа в числовой форме. Для некоторых эта форма может показаться более простой. Надо запомнить только следующее:
- 400 — владелец имеет право на чтение
- 200 — владелец имеет право на запись
- 100 — владелец имеет право на выполнение
- 40 — группа имеет право на чтение
- 20 — группа имеет право на запись
- 10 — группа имеет право на выполнение
- 4 — остальные имеют право на чтение
- 2 — остальные имеют право на запись
- 1 — остальные имеют право на выполнение
Теперь осталось только просуммировать числа, соответствующие тем правам доступа, которые мы хотим поставить файлу.
Примеры
Символьная форма
chmod a+r stuff
Дает всем пользователям право читать файл stuff.
chmod +r stuff
То же самое, что и ранее (a — по умолчанию).
chmod og-x stuff
Лишает права на выполнение всех, кроме владельца.
chmod u+rwx stuff
Разрешает владельцу все (read, write и execute).
chmod o-rwx stuff
Запрещает все (read, write и execute) пользователям категории другие (other).
=== Числовая форма===
400+200+100+40+4=744
chmod 744 stuff
владелец может делать все, а остальные — только читать.
400+40+4=444
chmod 444 stuff
все имеют право только на чтение.
400+100+10+1=611
chmod 611 stuff
владелец может читать и выполнять, остальные — только выполнять.
400+200+100+40+10+4+1=755
chmod 755 script
Классическая команда. Скрипт — это исполняемый файл, и все должны иметь к нему доступ на чтение и выполнение. Только владелец этого файла может его изменять или удалять.
Команда chown
Изменение владельца файла осуществляется командой chown, например:
sudo chown <имя нового владельца> <имя файла>
Для передачи каталога надо вводить:
sudo chown -R <имя нового владельца> <имя каталога>
Команда chgroup
Изменение группы, которой принадлежит файл.
sudo chown <название новой группы> <имя файла>
Для передачи каталога надо вводить:
sudo chown -R <название новой группы> <имя каталога>
Valery V. Kachurov
How do I change the permissions of a folder and all its subfolders and files?
This only applies to the /opt/lampp/htdocs folder, not its contents:
chmod 775 /opt/lampp/htdocs
How do I set chmod 755 for all of the /opt/lampp/htdocs folder’s current contents, as well as automatically in the future for new folders/files created under it?
![]()
Henry Ecker♦
33.5k18 gold badges35 silver badges54 bronze badges
asked Sep 18, 2010 at 2:31
![]()
Adam HalaszAdam Halasz
56.9k63 gold badges148 silver badges213 bronze badges
12
The other answers are correct, in that chmod -R 755 will set these permissions to all files and subfolders in the tree. But why on earth would you want to? It might make sense for the directories, but why set the execute bit on all the files?
I suspect what you really want to do is set the directories to 755 and either leave the files alone or set them to 644. For this, you can use the find command. For example:
To change all the directories to 755 (drwxr-xr-x):
find /opt/lampp/htdocs -type d -exec chmod 755 {} ;
To change all the files to 644 (-rw-r--r--):
find /opt/lampp/htdocs -type f -exec chmod 644 {} ;
Some splainin’: (thanks @tobbez)
chmod 755 {}specifies the command that will be executed byfindfor each directorychmod 644 {}specifies the command that will be executed byfindfor each file{}is replaced by the path;the semicolon tellsfindthat this is the end of the command it’s supposed to execute;the semicolon is escaped, otherwise it would be interpreted by the shell instead offind
![]()
Bob Stein
15.5k10 gold badges82 silver badges98 bronze badges
answered Jul 16, 2012 at 20:42
![]()
WombleGoneBadWombleGoneBad
34.3k1 gold badge13 silver badges2 bronze badges
18
Check the -R option
chmod -R <permissionsettings> <dirname>
In the future, you can save a lot of time by checking the man page first:
man <command name>
So in this case:
man chmod
![]()
answered Sep 18, 2010 at 2:36
![]()
Steve RobillardSteve Robillard
13.4k3 gold badges35 silver badges32 bronze badges
3
If you want to set permissions on all files to a+r, and all directories to a+x, and do that recursively through the complete subdirectory tree, use:
chmod -R a+rX *
The X (that is capital X, not small x!) is ignored for files (unless they are executable for someone already) but is used for directories.
![]()
danronmoon
3,7545 gold badges33 silver badges56 bronze badges
answered Jan 31, 2013 at 20:39
![]()
8
You can use -R with chmod for recursive traversal of all files and subfolders.
You might need sudo as it depends on LAMP being installed by the current user or another one:
sudo chmod -R 755 /opt/lampp/htdocs
![]()
Hashim Aziz
3,4704 gold badges35 silver badges62 bronze badges
answered Apr 19, 2014 at 15:43
![]()
ravi ranjanravi ranjan
5,6342 gold badges18 silver badges18 bronze badges
5
The correct recursive command is:
sudo chmod -R 755 /opt/lampp/htdocs
-R: change every sub folder including the current folder
![]()
PencilBow
1,01211 silver badges16 bronze badges
answered Sep 18, 2010 at 2:40
![]()
Pramendra GuptaPramendra Gupta
14.5k4 gold badges32 silver badges34 bronze badges
1
To set to all subfolders (recursively) use -R
chmod 755 /folder -R
![]()
Henry Ecker♦
33.5k18 gold badges35 silver badges54 bronze badges
answered Sep 18, 2010 at 2:35
![]()
ToperaTopera
12.1k15 gold badges66 silver badges103 bronze badges
1
chmod 755 -R /opt/lampp/htdocs will recursively set the permissions. There’s no way to set the permissions for files automatically in only this directory that are created after you set the permissions, but you could change your system-wide default file permissions with by setting umask 022.
answered Sep 18, 2010 at 2:38
![]()
sleepynatesleepynate
7,7763 gold badges26 silver badges38 bronze badges
3
You might want to consider this answer given by nik on Super User and use «one chmod» for all files/folders like this:
chmod 755 $(find /path/to/base/dir -type d)
chmod 644 $(find /path/to/base/dir -type f)
![]()
Ethan
8498 gold badges12 silver badges25 bronze badges
answered Feb 27, 2013 at 6:42
![]()
Iam ZeshIam Zesh
1,7772 gold badges19 silver badges40 bronze badges
5
Here’s another way to set directories to 775 and files to 664.
find /opt/lampp/htdocs
( -type f -exec chmod ug+rw,o+r {} ; ) ,
( -type d -exec chmod ug+rwxs,o+rx {} ; )
It may look long, but it’s pretty cool for three reasons:
- Scans through the file system only once rather than twice.
- Provides better control over how files are handled vs. how directories are handled. This is useful when working with special modes such as the sticky bit, which you probably want to apply to directories but not files.
- Uses a technique straight out of the
manpages (see below).
Note that I have not confirmed the performance difference (if any) between this solution and that of simply using two find commands (as in Peter Mortensen’s solution). However, seeing a similar example in the manual is encouraging.
Example from man find page:
find /
( -perm -4000 -fprintf /root/suid.txt %#m %u %pn ) ,
( -size +100M -fprintf /root/big.txt %-10s %pn )

Traverse the filesystem just once, listing setuid files and direct‐
tories into /root/suid.txt and large files into /root/big.txt.
![]()
Ethan
8498 gold badges12 silver badges25 bronze badges
answered Nov 17, 2013 at 5:47
![]()
chrisfargenchrisfargen
1,5171 gold badge13 silver badges11 bronze badges
2
Use:
sudo chmod 755 -R /whatever/your/directory/is
However, be careful with that. It can really hurt you if you change the permissions of the wrong files/folders.
![]()
answered Sep 18, 2010 at 2:37
![]()
chmod -R 755 directory_name works, but how would you keep new files to 755 also? The file’s permissions becomes the default permission.
![]()
Rick
1,1661 gold badge20 silver badges27 bronze badges
answered Apr 30, 2014 at 0:22
![]()
Sanchit GuptaSanchit Gupta
1,2732 gold badges11 silver badges8 bronze badges
0
For Mac OS X 10.7 (Lion), it is:
chmod -R 755 /directory
And yes, as all other say, be careful when doing this.
![]()
answered Jul 10, 2012 at 9:33
![]()
wmartinwmartin
1751 silver badge6 bronze badges
For anyone still struggling with permission issues, navigate up one directory level cd .. from the root directory of your project, add yourself (user) to the directory and give permission to edit everything inside (tested on macOS).
To do that you would run this command (preferred):
sudo chown -R username: foldername .*
Note: for currently unsaved changes, one might need to restart the code editor first to be able to save without being asked for a password.
Also, please remember you can press Tab to see the options while typing the username and folder to make it easier for yourself.
Or simply:
sudo chmod -R 755 foldername
but as mentioned above, you need to be careful with the second method.
![]()
answered Nov 19, 2020 at 3:44
![]()
Jakub A SuplickiJakub A Suplicki
4,4661 gold badge21 silver badges30 bronze badges
0
There are two answers to finding files and applying chmod to them.
The first one is find the file and apply chmod as it finds (as suggested by @WombleGoneBad).
find /opt/lampp/htdocs -type d -exec chmod 755 {} ;
The second solution is to generate a list of all files with the find command and supply this list to the chmod command (as suggested by @lamgesh).
chmod 755 $(find /path/to/base/dir -type d)
Both of these versions work nicely as long as the number of files returned by the find command is small. The second solution looks great to the eye and is more readable than the first one. If there are a large number of files, the second solution returns an error: Argument list too long.
So my suggestion is
- Use
chmod -R 755 /opt/lampp/htdocsif you want to change the permissions of all files and directories at once. - Use
find /opt/lampp/htdocs -type d -exec chmod 755 {} ;if the number of files you are using is very large. The-type xoption searches for a specific type of file only, where d is used for finding the directory, f for file and l for link. - Use
chmod 755 $(find /path/to/base/dir -type d)otherwise - Better to use the first one in any situation
![]()
Ethan
8498 gold badges12 silver badges25 bronze badges
answered Jul 29, 2013 at 10:47
![]()
PrabhuPrabhu
5,2274 gold badges36 silver badges45 bronze badges
You want to make sure that appropriate files and directories are chmod-ed/permissions for those are appropriate. For all directories you want
find /opt/lampp/htdocs -type d -exec chmod 711 {} ;
And for all the images, JavaScript, CSS, HTML…well, you shouldn’t execute them. So use
chmod 644 img/* js/* html/*
But for all the logic code (for instance PHP code), you should set permissions such that the user can’t see that code:
chmod 600 file
![]()
answered Jan 12, 2014 at 4:03
![]()
I think Adam was asking how to change the umask value for all processes that are trying to operate on the /opt/lampp/htdocs directory.
The user file-creation mode mask (umask) is used to determine the file permissions for newly created files. It can be used to control the default file permissions for new files.
so if you will use some kind of FTP program to upload files into /opt/lampp/htdocs you need to configure your FTP server to use the umask you want.
If files / directories need be created, for example, by PHP, you need to modify the PHP code:
<?php
    umask(0022);
    // Other code
?>
If you will create new files / folders from your Bash session, you can set umask value in your shell profile ~/.bashrc file.
Or you can set up a umask in /etc/bashrc or /etc/profile file for all users.
Add the following to the file:
umask 022

Sample umask Values and File Creation Permissions
If umask value set to    User permission     Group permission     Others permission
000                            all                 all                   all
007                            all                 all                   none
027                            all             read / execute               none
And to change permissions for already created files, you can use find.
![]()
answered Jan 7, 2014 at 11:39
![]()
ViktorViktor
3513 silver badges5 bronze badges
You can change permissions by using the following command:
sudo chmod go+rwx /opt/lampp/htdocs
![]()
answered Oct 12, 2020 at 15:34
![]()
Use:
sudo chmod -R a=-x,u=rwX,g=,o= folder
Owner rw, others no access, and directory with rwx. This will clear the existing ‘x’ on files.
The symbolic chmod calculation is explained in Chmod 744.
![]()
answered Jan 31, 2021 at 6:23
![]()
Pawel CiochPawel Cioch
2,7511 gold badge28 silver badges29 bronze badges
It’s very simple.
In Terminal, go to the file manager. Example: sudo nemo. Go to /opt/, and then click Properties → Permission. And then Other. Finally, change to create and delete and file access to read and write and click on button Apply… And it works.
![]()
answered Jun 16, 2014 at 9:34
![]()
4

Linux is a multi user OS which means that it supports multiple users at a time.
As many people can access the system simultaneously and some resources are shared, Linux controls access through ownership and permissions.
In Linux, there are three types of owners: user, group, and others .
Linux User
A user is the default owner and creator of the file. So this user is called owner as well.
Linux Group
A user-group is a collection of users. Users that belonging to a group will have the same Linux group permissions to access a file/ folder.
You can use groups to assign permissions in a bulk instead of assigning them individually. A user can belong to more than one group as well.
Other
Any users that are not part of the user or group classes belong to this class.
Linux File Permissions
File permissions fall in three categories: read, write, and execute.
Read permission
For regular files, read permissions allow users to open and read the file only. Users can’t modify the file.
Similarly for directories, read permissions allow the listing of directory content without any modification in the directory.
Write permission
When files have write permissions, the user can modify (edit, delete) the file and save it.
For folders, write permissions enable a user to modify its contents (create, delete, and rename the files inside it), and modify the contents of files that the user has write permissions to.
Execute permission
For files, execute permissions allows the user to run an executable script. For directories, the user can access them, and access details about files in the directory.
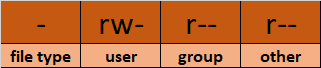
Below is the symbolic representation of permissions to user, group, and others.

Note that we can find permissions of files and folders using long listing (ls -l) on a Linux terminal.
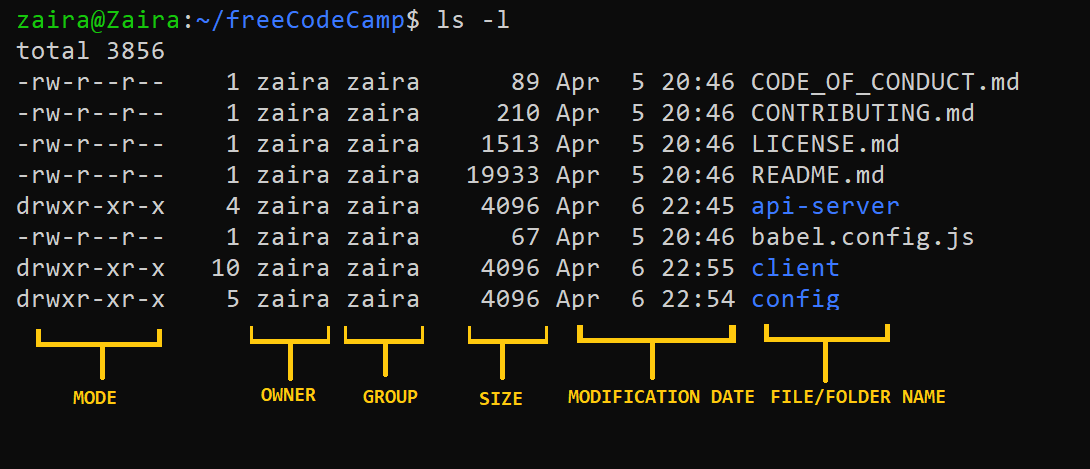
In the output above, d represents a directory and- represents a regular file.

How to Change Permissions in Linux Using the chmod Command
Now that we know the basics of ownerships and permissions, let’s see how we can modify permissions using the chmod command.
Syntax of chmod:
chmod permissions filenameWhere,
permissionscan be read, write, execute or a combination of them.filenameis the name of the file for which the permissions need to change. This parameter can also be a list if files to change permissions in bulk.
We can change permissions using two modes:
- Symbolic mode: this method uses symbols like
u,g,oto represent users, groups, and others. Permissions are represented asr, w, xfor read write and execute, respectively. You can modify permissions using +, — and =. - Absolute mode: this method represents permissions as 3-digit octal numbers ranging from 0-7.
Now, let’s see them in detail.
How to Change Permissions using Symbolic Mode
The table below summarize the user representation:
| User representation | Description |
|---|---|
| u | user/owner |
| g | group |
| o | other |
We can use mathematical operators to add, remove, and assign permissions. The table below shows the summary:
| Operator | Description |
|---|---|
| + | Adds a permission to a file or directory |
| – | Removes the permission |
| = | Sets the permission if not present before. Also overrides the permissions if set earlier. |
Example:
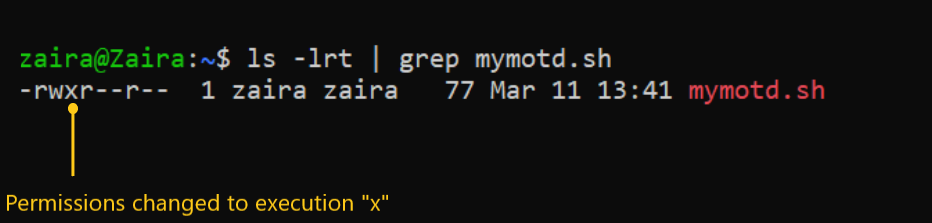
Suppose, I have a script and I want to make it executable for owner of the file zaira.
Current file permissions are as follows:

Let’s split the permissions like this:
To add execution rights (x) to owner (u) using symbolic mode, we can use the command below:
chmod u+x mymotd.shOutput:
Now, we can see that the execution permissions have been added for owner zaira.
Additional examples for changing permissions via symbolic method:
- Removing
readandwritepermission forgroupandothers:chmod go-rw. - Removing
readpermissions forothers:chmod o-r. - Assigning
writepermission togroupand overriding existing permission:chmod g=w.
How to Change Permissions using Absolute Mode
Absolute mode uses numbers to represent permissions and mathematical operators to modify them.
The below table shows how we can assign relevant permissions:
| Permission | Provide permission |
|---|---|
| read | add 4 |
| write | add 2 |
| execute | add 1 |
Permissions can be revoked using subtraction. The below table shows how you can remove relevant permissions.
| Permission | Revoke permission |
|---|---|
| read | subtract 4 |
| write | subtract 2 |
| execute | subtract 1 |
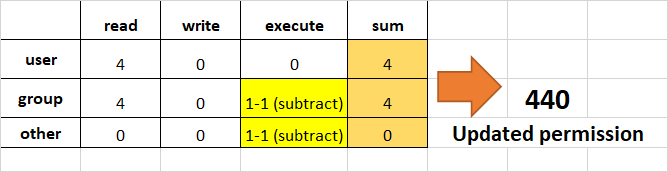
Example:
- Set
read(add 4) foruser,read(add 4) andexecute(add 1) for group, and onlyexecute(add 1) for others.
chmod 451 file-name
This is how we performed the calculation:
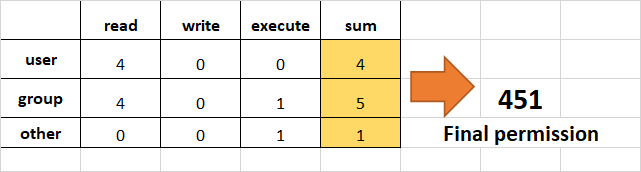
Note that this is the same as r--r-x--x.
- Remove
executionrights fromotherandgroup.
To remove execution from other and group, subtract 1 from the execute part of last 2 octets.
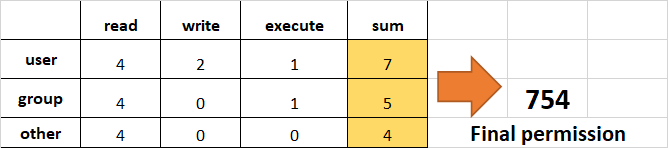
- Assign
read,writeandexecutetouser,readandexecutetogroupand onlyreadto others.
This would be the same as rwxr-xr--.
How to Change Ownership using the chown Command
Next, we will learn how to change the ownership of a file. You can change the ownership of a file or folder using the chown command. In some cases, changing ownership requires sudo permissions.
Syntax of chown:
chown user filename
How to change user ownership with chown
Let’s transfer the ownership from user zaira to user news.
chown news mymotd.sh

Command to change ownership: sudo chown news mymotd.sh
Output:

How to change user and group ownership simultaneously
We can also use chown to change user and group simultaneously.
chown user:group filenameHow to change directory ownership
You can change ownership recursively for contents in a directory. The example below changes the ownership of the /opt/script folder to allow user admin.
chown -R admin /opt/scriptHow to change group ownership
In case we only need to change the group owner, we can use chown by preceding the group name by a colon :
chown :admins /opt/scriptLinux Permissions Guided Exercise
Up until now we have explored permissions, ownerships, and the methods to change them. Now we will reinforce our learning with a guided exercise.
Goal: To create groups and assign relevant permissions to its members. Verify access by accessing it from unauthorized users.
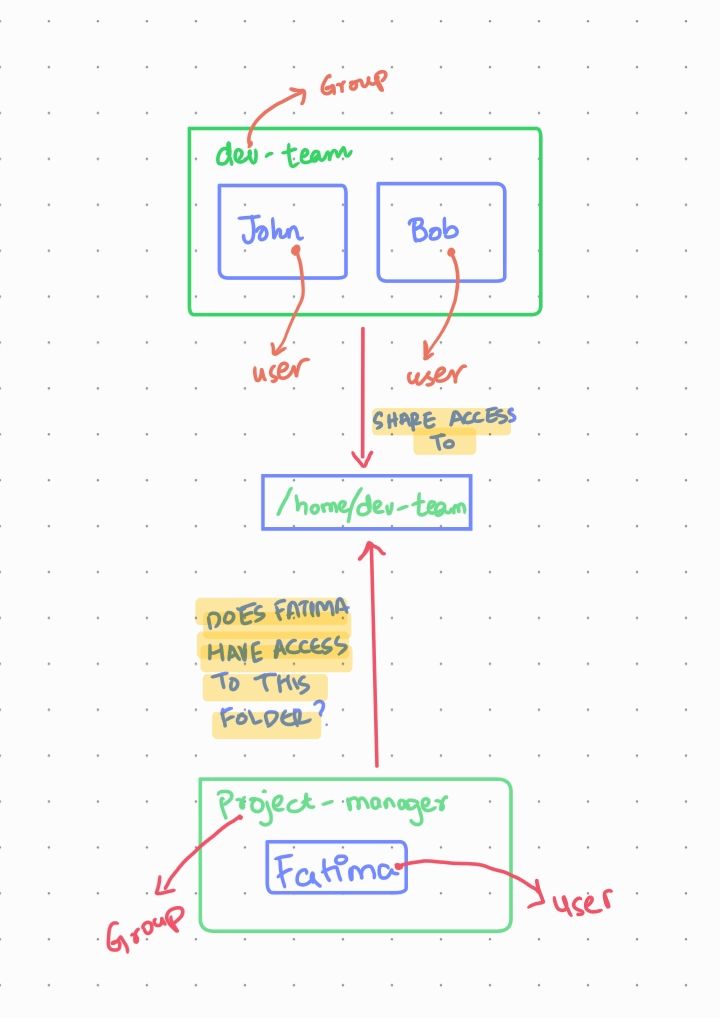
Task: Create a group called dev-team and add two members (John and Bob) to it. Create a folder /home/dev-team and change ownership to group dev-team. Verify that both users in the dev-team group have read and write access to the folder.
Create another group project-manager and add a user Fatima to it. Verify if the folder /home/dev-team is accessible by Fatima.
Visualization of the problem
We can visualize the problem like this:
Step 1: Switch to root user.
Switch to root user so that we have the rights to create new users and groups.
Show hint
Use the sudo command with flag i.
If you have the root password, you can login using that as well.
Show solution
Enter sudo -i to switch to the root user.
Enter whoami to find out if you are the root user:

If you do not have root access, use the commands with appending sudo.
Step 2: Create a group dev-team
Show hint
Use the groupadd command.
Syntax: groupadd group-name
Show solution
Enter groupadd dev-team to create the dev-team group
Verify: cat /etc/group | grep dev-team
Step 3: Create two new users John and Bob and add them to the dev-team group
Show hint
Use command useradd.
useradd creates a new user and adds to the specified group.
Syntax: useradd -G groupname username
Where -G specifies the group.
Show solution
useradd -G dev-team John
useradd -G dev-team Bob
Verify: cat /etc/group | grep dev-team

Step 4: Provide passwords for users John and Bob
Show hint
Use command passwd
passwd creates a password for users.
Syntax: passwd username
Show solution
passwd John
passwd Bob
Step 5: Create a directory in /home and name it dev-team
Show hint
Use command mkdir
mkdir creates a directory.
Syntax: mkdir directory-name
Show solution
mkdir /home/dev-team
Verify:

Step 6: Change the group ownership of the folder dev-team to group dev-team
Show hint
Use command chown
Syntax: chown :group-name folder
Show solution
chown :dev-team /home/dev-team/
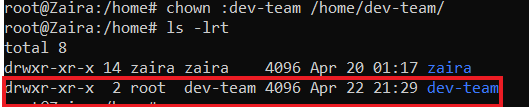
Step 7: Make sure the permissions of folder dev-team allow group members to create and delete files.
Show hint
Use command chmod
Write permissions allow users and groups to create and delete files.
Syntax: chmod permissions folder
Show solution
chmod g+w /home/dev-team/

Step 8: Ensure that ‘others’ don’t have any access to the files of dev-team folder.
Show hint
Use command chmod
Remove read, write, execute permissions from ‘others’ if they exist.
Syntax: chmod permissions folder
Show solution
chmod o-rx dev-team

Step 9: Exit the root session and switch to John
Show hint
Use command exit to logout of the root user.
Use su to switch users.
Syntax: su - user
To confirm current user, use command whoami.
Show solution
exit
su - John
Verify with command whoami.
Step 10: Navigate to folder: /home/dev-team
Show hint
Use command cd to switch folders.
Syntax: cd /path/to/folder
Confirm current path with pwd.
Show solution
cd /home/dev-team
Step 11: Create an empty file in the folder: /home/dev-team
Show hint
Use command touch to create an empty file.
Syntax: touch filename
Show solution
touch john-file.txt
Verify: ls -lrt

Step 12: Change the group ownership of the created file to dev-team and verify.
Show hint
Use command chown to change ownership.
Syntax: chown :group file-name
Show solution
chown :dev-team john-file.txt
Once group ownership is modified, all members of the group can access this file.
Verify ls -lrt

Step 13: Exit the shell and switch to user Bob
Show hint
Use command exit to exit the terminal.
Use su to switch users.
Syntax: su - user
To confirm current user, use command whoami.
Show solution
exit
su - Bob
Verify the current user with command whoami.
Step 14: Navigate to the path /home/dev-team
Show hint
Use command cd to switch folders.
Syntax: cd /path/to/folder
Confirm current path with pwd.
Show solution
cd /home/dev-team
Step 15: Find out Bob's privileges to access john-file.txt
Show hint
Use command ls -l for long listing.
Syntax: ls -l | grep file-name
Does group have rw- permissions?
Show solution
ls -l | grep john-file.txt

Step 16: Modify the file john-file.txt while logged in as Bob
Show hint
Use command echo to add some text to the file.
Syntax: echo "Some text" >>file-name
This would redirect the quoted text to end of the file.
Show solution
echo "This is Bob's comment" > john-file.txt
If all the permissions are correctly set, Bob would be allowed to edit and save this file. Otherwise you would get an error like this: Permission denied.
Verify cat john-file.txt
Step 17: Create another group project-manager and assign a member Fatima to it
Show hint
Use command groupadd to add a new group.
Syntax: groupadd group-name
Create a new user with command useradd.
Use flag -G to assign a user to it.
Show solution
groupadd project-manager
useradd -G project-manager Fatima
passwd Fatima
Step 18: Navigate to folder /home/dev-team and verify if Fatima can access it
Show hint
Use cd to navigate to /home/dev-team.
Show solution
cd /home/dev-team.
We get this error:

This is because, others don’t have any access to the folder dev-team.
If we recall, below are the rights of the dev-team folder.

Wrapping up
Permissions and ownerships are useful concepts for enforcing security across multi-user operating systems. I hope you were able to learn about changing permissions and ownerships in depth.
What’s your favorite thing you learned from this tutorial? Let me know on Twitter!
You can also read my other posts here.
Thanks to Tom Mondloch for his help with the guided exercise.
Learn to code for free. freeCodeCamp’s open source curriculum has helped more than 40,000 people get jobs as developers. Get started
Linux is a multi user OS which means that it supports multiple users at a time.
As many people can access the system simultaneously and some resources are shared, Linux controls access through ownership and permissions.
In Linux, there are three types of owners: user, group, and others .
Linux User
A user is the default owner and creator of the file. So this user is called owner as well.
Linux Group
A user-group is a collection of users. Users that belonging to a group will have the same Linux group permissions to access a file/ folder.
You can use groups to assign permissions in a bulk instead of assigning them individually. A user can belong to more than one group as well.
Other
Any users that are not part of the user or group classes belong to this class.
Linux File Permissions
File permissions fall in three categories: read, write, and execute.
Read permission
For regular files, read permissions allow users to open and read the file only. Users can’t modify the file.
Similarly for directories, read permissions allow the listing of directory content without any modification in the directory.
Write permission
When files have write permissions, the user can modify (edit, delete) the file and save it.
For folders, write permissions enable a user to modify its contents (create, delete, and rename the files inside it), and modify the contents of files that the user has write permissions to.
Execute permission
For files, execute permissions allows the user to run an executable script. For directories, the user can access them, and access details about files in the directory.
Below is the symbolic representation of permissions to user, group, and others.
Note that we can find permissions of files and folders using long listing (ls -l) on a Linux terminal.
In the output above, d represents a directory and- represents a regular file.
How to Change Permissions in Linux Using the chmod Command
Now that we know the basics of ownerships and permissions, let’s see how we can modify permissions using the chmod command.
Syntax of chmod:
chmod permissions filenameWhere,
permissionscan be read, write, execute or a combination of them.filenameis the name of the file for which the permissions need to change. This parameter can also be a list if files to change permissions in bulk.
We can change permissions using two modes:
- Symbolic mode: this method uses symbols like
u,g,oto represent users, groups, and others. Permissions are represented asr, w, xfor read write and execute, respectively. You can modify permissions using +, — and =. - Absolute mode: this method represents permissions as 3-digit octal numbers ranging from 0-7.
Now, let’s see them in detail.
How to Change Permissions using Symbolic Mode
The table below summarize the user representation:
| User representation | Description |
|---|---|
| u | user/owner |
| g | group |
| o | other |
We can use mathematical operators to add, remove, and assign permissions. The table below shows the summary:
| Operator | Description |
|---|---|
| + | Adds a permission to a file or directory |
| – | Removes the permission |
| = | Sets the permission if not present before. Also overrides the permissions if set earlier. |
Example:
Suppose, I have a script and I want to make it executable for owner of the file zaira.
Current file permissions are as follows:
Let’s split the permissions like this:
To add execution rights (x) to owner (u) using symbolic mode, we can use the command below:
chmod u+x mymotd.shOutput:
Now, we can see that the execution permissions have been added for owner zaira.
Additional examples for changing permissions via symbolic method:
- Removing
readandwritepermission forgroupandothers:chmod go-rw. - Removing
readpermissions forothers:chmod o-r. - Assigning
writepermission togroupand overriding existing permission:chmod g=w.
How to Change Permissions using Absolute Mode
Absolute mode uses numbers to represent permissions and mathematical operators to modify them.
The below table shows how we can assign relevant permissions:
| Permission | Provide permission |
|---|---|
| read | add 4 |
| write | add 2 |
| execute | add 1 |
Permissions can be revoked using subtraction. The below table shows how you can remove relevant permissions.
| Permission | Revoke permission |
|---|---|
| read | subtract 4 |
| write | subtract 2 |
| execute | subtract 1 |
Example:
- Set
read(add 4) foruser,read(add 4) andexecute(add 1) for group, and onlyexecute(add 1) for others.
chmod 451 file-name
This is how we performed the calculation:
Note that this is the same as r--r-x--x.
- Remove
executionrights fromotherandgroup.
To remove execution from other and group, subtract 1 from the execute part of last 2 octets.
- Assign
read,writeandexecutetouser,readandexecutetogroupand onlyreadto others.
This would be the same as rwxr-xr--.
How to Change Ownership using the chown Command
Next, we will learn how to change the ownership of a file. You can change the ownership of a file or folder using the chown command. In some cases, changing ownership requires sudo permissions.
Syntax of chown:
chown user filename
How to change user ownership with chown
Let’s transfer the ownership from user zaira to user news.
chown news mymotd.sh
Command to change ownership: sudo chown news mymotd.sh
Output:
How to change user and group ownership simultaneously
We can also use chown to change user and group simultaneously.
chown user:group filenameHow to change directory ownership
You can change ownership recursively for contents in a directory. The example below changes the ownership of the /opt/script folder to allow user admin.
chown -R admin /opt/scriptHow to change group ownership
In case we only need to change the group owner, we can use chown by preceding the group name by a colon :
chown :admins /opt/scriptLinux Permissions Guided Exercise
Up until now we have explored permissions, ownerships, and the methods to change them. Now we will reinforce our learning with a guided exercise.
Goal: To create groups and assign relevant permissions to its members. Verify access by accessing it from unauthorized users.
Task: Create a group called dev-team and add two members (John and Bob) to it. Create a folder /home/dev-team and change ownership to group dev-team. Verify that both users in the dev-team group have read and write access to the folder.
Create another group project-manager and add a user Fatima to it. Verify if the folder /home/dev-team is accessible by Fatima.
Visualization of the problem
We can visualize the problem like this:
Step 1: Switch to root user.
Switch to root user so that we have the rights to create new users and groups.
Show hint
Use the sudo command with flag i.
If you have the root password, you can login using that as well.
Show solution
Enter sudo -i to switch to the root user.
Enter whoami to find out if you are the root user:
If you do not have root access, use the commands with appending sudo.
Step 2: Create a group dev-team
Show hint
Use the groupadd command.
Syntax: groupadd group-name
Show solution
Enter groupadd dev-team to create the dev-team group
Verify: cat /etc/group | grep dev-team
Step 3: Create two new users John and Bob and add them to the dev-team group
Show hint
Use command useradd.
useradd creates a new user and adds to the specified group.
Syntax: useradd -G groupname username
Where -G specifies the group.
Show solution
useradd -G dev-team John
useradd -G dev-team Bob
Verify: cat /etc/group | grep dev-team
Step 4: Provide passwords for users John and Bob
Show hint
Use command passwd
passwd creates a password for users.
Syntax: passwd username
Show solution
passwd John
passwd Bob
Step 5: Create a directory in /home and name it dev-team
Show hint
Use command mkdir
mkdir creates a directory.
Syntax: mkdir directory-name
Show solution
mkdir /home/dev-team
Verify:
Step 6: Change the group ownership of the folder dev-team to group dev-team
Show hint
Use command chown
Syntax: chown :group-name folder
Show solution
chown :dev-team /home/dev-team/
Step 7: Make sure the permissions of folder dev-team allow group members to create and delete files.
Show hint
Use command chmod
Write permissions allow users and groups to create and delete files.
Syntax: chmod permissions folder
Show solution
chmod g+w /home/dev-team/
Step 8: Ensure that ‘others’ don’t have any access to the files of dev-team folder.
Show hint
Use command chmod
Remove read, write, execute permissions from ‘others’ if they exist.
Syntax: chmod permissions folder
Show solution
chmod o-rx dev-team
Step 9: Exit the root session and switch to John
Show hint
Use command exit to logout of the root user.
Use su to switch users.
Syntax: su - user
To confirm current user, use command whoami.
Show solution
exit
su - John
Verify with command whoami.
Step 10: Navigate to folder: /home/dev-team
Show hint
Use command cd to switch folders.
Syntax: cd /path/to/folder
Confirm current path with pwd.
Show solution
cd /home/dev-team
Step 11: Create an empty file in the folder: /home/dev-team
Show hint
Use command touch to create an empty file.
Syntax: touch filename
Show solution
touch john-file.txt
Verify: ls -lrt
Step 12: Change the group ownership of the created file to dev-team and verify.
Show hint
Use command chown to change ownership.
Syntax: chown :group file-name
Show solution
chown :dev-team john-file.txt
Once group ownership is modified, all members of the group can access this file.
Verify ls -lrt
Step 13: Exit the shell and switch to user Bob
Show hint
Use command exit to exit the terminal.
Use su to switch users.
Syntax: su - user
To confirm current user, use command whoami.
Show solution
exit
su - Bob
Verify the current user with command whoami.
Step 14: Navigate to the path /home/dev-team
Show hint
Use command cd to switch folders.
Syntax: cd /path/to/folder
Confirm current path with pwd.
Show solution
cd /home/dev-team
Step 15: Find out Bob's privileges to access john-file.txt
Show hint
Use command ls -l for long listing.
Syntax: ls -l | grep file-name
Does group have rw- permissions?
Show solution
ls -l | grep john-file.txt
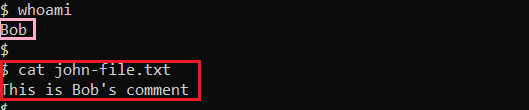
Step 16: Modify the file john-file.txt while logged in as Bob
Show hint
Use command echo to add some text to the file.
Syntax: echo "Some text" >>file-name
This would redirect the quoted text to end of the file.
Show solution
echo "This is Bob's comment" > john-file.txt
If all the permissions are correctly set, Bob would be allowed to edit and save this file. Otherwise you would get an error like this: Permission denied.
Verify cat john-file.txt
Step 17: Create another group project-manager and assign a member Fatima to it
Show hint
Use command groupadd to add a new group.
Syntax: groupadd group-name
Create a new user with command useradd.
Use flag -G to assign a user to it.
Show solution
groupadd project-manager
useradd -G project-manager Fatima
passwd Fatima
Step 18: Navigate to folder /home/dev-team and verify if Fatima can access it
Show hint
Use cd to navigate to /home/dev-team.
Show solution
cd /home/dev-team.
We get this error:
This is because, others don’t have any access to the folder dev-team.
If we recall, below are the rights of the dev-team folder.
Wrapping up
Permissions and ownerships are useful concepts for enforcing security across multi-user operating systems. I hope you were able to learn about changing permissions and ownerships in depth.
What’s your favorite thing you learned from this tutorial? Let me know on Twitter!
You can also read my other posts here.
Thanks to Tom Mondloch for his help with the guided exercise.
Learn to code for free. freeCodeCamp’s open source curriculum has helped more than 40,000 people get jobs as developers. Get started
Содержание
| Поддерживаемые версии Ubuntu |
|---|
| Все (теоретически) |
Вступление
В Unix каждому файлу соответствует набор прав доступа, представленный в виде 9-ти битов режима. Он определяет, какие пользователи имеют право читать файл, записывать в него данные или выполнять его. Вместе с другими тремя битами, влияющими на запуск исполняемых файлов, этот набор образует код режима доступа к файлу. Двенадцать битов режима хранятся в 16-битовом поле индексного дескриптора вместе с 4-мя дополнительными битами, определяющими тип файла. Последние 4 бита устанавливаются при создании файлов и не подлежат изменению.
Биты режима (далее права) могут изменяться либо владельцем файла, либо суперпользователем с помощью команды chmod.
Существует три пути управления доступом к файлу или каталогу. Было определено, что каждый файл должен иметь владельца (owner), группового владельца (group owner), а также может потребоваться доступ для всех остальных пользователей (everyone). Эти названия обычно приводятся как пользователь/группа/остальные (user/group/others) или коротко ugo. Реализация управления доступом к файлам и каталогам в Unix позволяет или запрещает доступ по трем флагам: флаг чтения (Read), флаг записи (Write), флаг выполнения (eXecute). Они представляются следующим образом:
| flag | user | group | other |
|---|---|---|---|
| # | rwx | rwx | rwx |
Флаг типа (flag) может быть одним из следующих:
| Флаг | Описание |
|---|---|
| — | Отсутствие флага |
| l — лат. «л» | Символическая ссылка (symbolic link) |
| d | Директория (directory) |
| b | Блочное устройство (block device) |
| c | Символьное устройство (character device) |
| p | Канал, устройство fifo (fifo device) |
| s | Unix сокет (unix domain socket) |
Права доступа
Посмотреть права доступа на объекты можно командой ls c ключем -l («л»). Также можно добавить ключ -a, для того,чтобы были отображены скрытые объекты:
/media/Work/applicat > ls -l
итого 1308
-rwx------  1 allexserv nogroup 638116 2009-06-25 20:42 autumnscolor.zip
drwxr-xr-x 13 allexserv nogroup   4096 2009-05-31 14:58 phpBB3
drwx------ 10 allexserv nogroup   4096 2009-06-25 14:29 phpMyAdmin-3.2.0-all-languages
-rwx------  1 allexserv nogroup 677334 2009-06-25 20:42 pro_ubuntu.zip
drwxr-xr-x  2 allexserv nogroup   4096 2009-06-25 14:29 безымянная папка
Для назначения прав используются три группы флагов, первая определяет права для владельца, вторая — права для основной группы пользователя, третья — для всех остальных пользователей в системе.
Для файлов: r — право на чтение из файла; w — разрешает запись в файл (в частности перезапись или изменение); x — позволяет исполнить файл.
Для каталогов, флаги r w x имеют несколько отличный смысл: r — позволяет читать только имена файлов в каталоге; x — позволяет иметь доступ к самим файлам и их атрибутам (но не именам); w имеет смысл только в сочетании с x, и позволяет (в дополнение к x) манипулировать с файлами в каталоге (создавать, удалять и переименовывать). w без x — не имеет никакого эффекта.
Рассмотрим таблицу, чтобы было понятнее:
| OCT | BIN | Mask | Права на файл | Права на каталог |
|---|---|---|---|---|
| 0 | 000 | — — — | отсутствие прав | отсутствие прав |
| 1 | 001 | — — x | права на выполнение | доступ к файлам и их атрибутам1) |
| 2 | 010 | — w — | права на запись | отсутствие прав |
| 3 | 011 | — w x | права на запись и выполнение | все, кроме доступа к именам файлов2) |
| 4 | 100 | r — — | права на чтение | только чтение имен файлов |
| 5 | 101 | r — x | права на чтение и выполнение | чтение имен файлов и доступ файлам и их атрибутам3) |
| 6 | 110 | r w — | права на чтение и запись | только чтение имен файлов |
| 7 | 111 | r w x | полные права | все права |
Для администрирования часто удобнее использовать не буквенное представление прав, а цифровое, в восьмеричном представлении (оно короче). Так, например, права на файл всем и вся, соответствуют записи 777 (что аналогично символьному представлению rwxrwxrwx).
Существуют также специальные биты, такие как SUID, SGID и Sticky-бит. SUID, SGID влияют на запуск файла, а Sticky влияет на определение владельца объектов в каталоге. При их применении необходимо использовать не три восьмеричных цифры, а 4. Зачастую, в различной технической литературе права обозначаются именно 4-мя цифрами, например 0744. Многие стараются не использовать специальные биты, сетуя на безопасность (и не без основательно), но, в некоторых ситуациях без них не обойтись. Поговорим о них несколько позже.
Давайте рассмотрим пример, итак:
-rwx------  1 allexserv nogroup 677334 2009-06-25 20:42 pro_ubuntu.zip
drwxr-xr-x  2 allexserv nogroup   4096 2009-06-25 14:29 безымянная папка
Для первой строки:
-
Первый символ (флаг) пустой: « — » — для файлов.
-
Следующие три символа (rwx) обозначают права для владельца файла, в данном случае полные права для пользователя allexserv.4)
-
Следующие три (- — -) — определяют права для группы nogroup, в нашем примере для всех пользователей группы nogroup доступ запрещен.
-
Ну и последние три символа (- — -) определяют права для всех остальных пользователей, в нашем случае доступ запрещен.
Восьмеричное обозначение прав для файла pro_ubuntu.zip: 0700.
Для второй строки (это каталог, о чем свидетельствует флаг «d»), по аналогии:
-
Для владельца каталога allexserv — полные права (rwx).
-
Для группы nogroup — права на листинг каталога и доступ к файлам (r-x).
-
Для пользователя «все остальные» — права на листинг каталога и доступ к файлам (r-x).
Восьмеричное обозначение в этом примере: 0755.
Для полноценного просмотра каталога, необходимы права на чтение каталога и доступ к файлам, а главное к их атрибутам, т.е. минимальные разумные права на каталог — 5 (r-x). Прав 4 (r–) хватит только на просмотр имен файлов, без атрибутов, т.е. не будут известны размер файла, права доступа, владелец.
На практике для каталогов используется только три режима: 7 (rwx), 5 (r-x) и 0 (—).
Очень любопытный режим доступа к каталогу — 3 (-wx): он позволяет делать в директории все, что угодно, но не позволяет прочитать имена объектов в директории. Т.е. если вам не известны названия объектов в этом каталоге, то вы сделать с ними ничего не сможете (даже удалить по маске * т.к. маску не к чему применять — имена то недоступны).
В каталоге с режимом доступа 3 (-wx) можно создавать новые, переименовывать и удалять файлы и каталоги (если вы знаете их имя); читать, изменять, запускать файл (если достаточно на него прав, и опять же — вы знаете его имя). Можно даже менять права доступа на файлы и каталоги (если вы знаете имя). Но самое интересное, что если вы сможете перейти (по cd5)) в подкаталог такого каталога (а для этого вам опять нужно знать его имя), то там у вас будет «все в ожуре» (если конечно у этого подкаталога будет нормальный режим доступа).
Никакой рекурсивный поиск/удаление тоже не сможет залезть внутрь такого каталога — ему ведь нужны названия — а их из такого каталога — никак не получить.
Но не надо думать, что такой каталог полноценно заменяет крипто-контейнер (т.е. может использоваться для хранения очень секретных данных). Да, имен объектов из такого каталога никак не получить, однако если попытаться создать объект с именем, которое уже существует, то такая операция закончится неудачей (т.е. мы получим подтверждение, что такое имя уже есть). Так же можно пытаться открыть (как файл или как каталог) объект с произвольным именем, если такого имени нет, то мы получим ошибку. Безусловно имя может быть очень длинным и шансы угадать его могут быть не велики, но не надо забывать, что права доступа могут сменить как владелец каталога так root. Да и пути доступа могут сохраниться в различных логах и файлах истории.
Команда chmod
Права устанавливаются командой chmod. Команда chmod поддерживает установку прав как в восьмеричном представлении, так и в символьном (маска режима доступа).
Синтаксис команды прост:
chmod <опции> <права> <объект или регулярное выражение>
Опции
Из самых полезных и часто используемых опций можно выделить одну:
-
-R — рекурсивное назначение прав. Т.е. назначить права всем объектам, руководствуясь регулярным выражением.
Например:
-
chmod -R 755 * — Назначение прав всем объектам текущего каталога, включая подкаталоги.
-
chmod -R 700 z* — Назначить полные права для владельца и исключить права для группы и всех остальных для всех объектов, которые начинаются именоваться на z, находящиеся в текущем каталоге и его подкаталогах.6)
Права
Права можно записывать как в восьмеричном представлении так и в символьном. В восьмеричном представлении, для стандартных прав, указываются 3 восьмеричные цифры (1-я для владельца, 2-я для группы, 3-я для всех остальных. См. таблицу выше).
Например:
-
chmod 744 koshka.txt — установит права для файла koshka.txt — (r w x r — — r — -);
-
chmod -R 775 sobaki — установит права на каталог sobaki и на все объекты, что внутри этого каталога, включая содержимое подкаталогов (r w x r w x r — x);
-
chmod 700 * — установит права только для владельца на все файлы и каталоги в текущем каталоге, включая подкаталоги и их объекты (rwx — — — — — -).
Другой способ назначения прав — это использование маски режима доступа (символьное представление). Помимо прав задается еще кому мы собираемся эти права выставлять:
-
u — владельцу объекта;
-
g — группе объекта;
-
o — пользователю «все остальные»;
-
a — все вышеперечисленное.
Для назначения прав используются три знака: минус, плюс или равно:
-
— — убрать указанные права с объекта;
-
+ — добавить указанные права к существующим правам объекта;
-
= — заменить права объекта на указанные.
Пример:
-
chmod g+w koshki.txt — Добавить пользователям группы файла koshki.txt права на запись в этот файл;
-
chmod a=rwx sobaki.doc — Заменит существующие права на файле sobaki.doc на полные права всем;
-
chmod o-w test.cgi — Уберет права на запись для пользователя «Все остальные».
-
chmod ug=rw spisok.doc — Выставить права на чтение и запись файлу spisok.doc для владельца и группы. Обратите внимание, что если у пользователя «все остальные» были какие-либо права, они сохранятся в неизменном виде.
Использование символьного представления позволяет редактировать права файлов более гибко:
-
chmod u+x,g+w-x koshki.txt — Добавить владельцу файла koshki.txt права на его выполнение, пользователям группы разрешить запись и запретить выполнение и оставить права остальных пользователей без изменений;
-
chmod u=rwx,g+w,go-x sobaki.doc — Установить полные права для владельца файла, разрешить пользователям группы запись и запретить выполнение всем пользователям, кроме владельца файла.
Символьное назначение окажет неоценимую услугу, если требуется добавить права на объект к уже существующим правам.
Массовое назначение прав
Иногда, бывает, нужно массово установить права на определенный тип объектов, например, только на каталоги или только на файлы. Простое использование опции -R (рекурсия) здесь не поможет т.к. chmod будет проходить по всем объектам удовлетворяющим маске, что иногда вовсе не то, что нужно.
Итак, чтобы массово установить права на определенный тип объектов можно использовать один из вариантов (вообще, их очень много):
-
chmod -R 770 $(find . -type d)
где -type d — каталоги, -type f — файлы. В данном примере chmod установит, начиная от текущего каталога7), права на все каталоги (включая подкаталоги) разрешения 770 (rwx rwx- — -) при этом не трогая права на другие объекты.
Более длинный вариант аналогичной операции:
-
find ./ -type f -exec sudo chmod 775 {} ;
где -type d — каталоги, -type f — файлы. В данном варианте chmod установит разрешения 775 на все файлы включая файлы в подкаталогах начиная от текущего.
Биты SUID, SGID и Sticky
Unix отслеживает не символьные имена владельцев и групп, а их идентификаторы (UID — для пользователей и GID для групп). Эти идентификаторы хранятся в файлах /etc/passwd и /etc/group соответственно. Символьные эквиваленты идентификаторов используются только для удобства, например, при использовании команды ls, идентификаторы заменяются соответствующими символьными обозначениями.
vipw
allexserv:x:1000:0:allexserv,,,:/home/allexserv:/bin/bash
-
1000 — идентификатор (UID) пользователя allexserv
-
0 — идентификатор (GID) основной группы (root) для пользователя allexserv
/etc/group
allexserv:x:1000:
1000 — идентификатор (GID) дополнительной группы allexserv пользователя allexserv 
Если при создании пользователя основная группа не указана явно, то основной группой пользователя будет группа с тем же именем, что и имя пользователя. Например:
vipw
backup:x:34:34:backup:/var/backups:/bin/sh

/etc/group
backup:x:34:
Что касается процессов, то с ними связано не два идентификатора, а 4-е: реальный и эффективный пользовательский (UID), а также реальный и эффективный групповой (GID). Реальные номера применяются для учета использования системных ресурсов, а эффективные для определения прав доступа к процессам. Как правило, реальные и эффективные идентификаторы совпадают. Владелец процесса может посылать ему сигналы, а также изменять приоритет.
Процесс не может явно изменить ни одного из своих четырех идентификаторов, но есть ситуации когда происходит косвенная установка новых эффективных идентификаторов процесса. Дело в том, что существуют два специальных бита: SUID (Set User ID — бит смены идентификатора пользователя) и SGID (Set Group ID — бит смены идентификатора группы). Когда пользователь или процесс запускает исполняемый файл с установленным одним из этих битов, файлу временно назначаются права его (файла) владельца или группы (в зависимости от того, какой бит задан). Таким образом, пользователь может даже запускать файлы от имени суперпользователя.
-
Восьмеричные значения для SUID и SGID — 4000 и 2000.
-
Символьные: u+s и g+s.
Вобщем, одним словом установка битов SUID или SGID позволит пользователям запускать исполняемые файлы от имени владельца (или группы) запускаемого файла. Например, как говорилось выше, команду chmod по умолчанию может запускать только root. Если мы установим SUID на исполняемый файл /bin/chmod, то обычный пользователь сможет использовать эту команду без использования sudo, так, что она будет выполнятся от имени пользователя root. В некоторых случаях очень удобное решение. Кстати по такому принципу работает команда passwd, c помощью которой пользователь может изменить свой пароль.
Возьмите на заметку!
Если установить SGID для каталога, то все файлы созданные в нем при запуске будут принимать идентификатор группы каталога, а не группы владельца, который создал файл в этом каталоге. Аналогично SUID. Одним словом, если пользователь поместил исполняемый файл в такой каталог, запустив его, процесс запустится от имени владельца (группы) каталога, в котором лежит этот файл.
Однако, в системе FreeBSD, если скомпилировать ядро с поддержкой suiddir, а так же смонтировать раздел с этой опцией, то, все объекты создаваемые в каталоге где установлен SUID будут иметь владельца этого каталога (наследование). Реализация подобного в Linux возможна (?) на файловой системе GFS2. Данная функция считается уязвимостью.
Установить SUID и SGID можно командой chmod:
-
chmod 4755 koshka.pl — устанавливает на файл koshka.pl бит SUID и заменяет обычные права на 755 (rwxr-xr-x).
-
chmod u+s koshka.pl — тоже самое, только обычные права не перезаписываются.
-
chmod 2755 koshka.pl — устанавливает на файл koshka.pl бит SGID и заменяет обычные права на 755 (rwxr-xr-x).
-
chmod g+s koshka.pl — тоже самое, только обычные права не перезаписываются.
Догадайтесь, что произойдет если выполнить такую команду:
-
chmod 6755 koshka.pl
Снять установленные биты можно различными способами:
-
chmod u-s koshka.pl — убираем SUID
-
chmod g-s koshka.pl — убираем SGID
-
chmod 0644 koska.pl — Убираем все дополнительные биты и меняем права на 644.
Отображение SGID и SUID:
/media/Work/test > ls -l
итого 20
drwxr-xr-x 2 root root 4096 2009-06-15 16:18 allex
drwx------ 2 root root 4096 2009-06-15 14:20 qqq
-rwxrwsrwx 1 root root    0 2009-07-24 19:42 qwert
Видно, что для файла qwert установлен SGID, о чем свидетельствует символ «s» (-rwxrwsrwx). Символ «s» может быть как строчная буква (s), так и прописная (S). Регистр символа только лишь дает дополнительную информацию об исходных установках, т.е. был ли до установки SGID установлен бит, в данном случае на выполнение (rwxrwsrwx). Если s строчная, то права на выполнение у группы этого файла были до установки SGID. Если S прописная, то группа для этого файла ранее не имела прав на выполнение до установки SGID.9)
Еще одно важное усовершенствование касается использования sticky-бита в каталогах.10) Каталог с установленным sticky-битом означает, что удалить файл из этого каталога может только владелец файла или суперпользователь. Другие пользователи лишаются права удалять файлы.11) Установить sticky-бит в каталоге может только суперпользователь. Sticky-бит каталога, в отличие от sticky-бита файла, остается в каталоге до тех пор, пока владелец каталога или суперпользователь не удалит каталог явно или не применит к нему chmod. Заметьте, что владелец может удалить sticky-бит, но не может его установить.
-
Восьмеричное значение stiky-бита: 1000
-
Символьное: +t
Установить sticky-бит на каталог можно используя команду chmod:
-
chmod 1755 allex — с заменой прав;
-
chmod +t allex — добавление к текущим правам.
Убрать sticky-бит на каталог можно:
-
chmod -t allex
Отображение sticky-бит:
/media/Work/test > ls -l
итого 20
drwxr-xr-t 2 root root 4096 2009-06-15 16:18 allex
drwx------ 2 root root 4096 2009-06-15 14:20 qqq
-rwxr--r-T 1 root root    0 2009-07-24 19:42 qwert
-rw-r--r-- 1 root root 4099 2009-06-11 14:14 sources.list
Видно, что sticky-бит установлен на каталоге allex, а также на файле qwert, о чем свидетельствует символ (t).
Символ «t» может быть как строчная буква (t), так и прописная (T). Строчная буква отображается в том случае, если перед установкой sticky bit произвольный пользователь уже имел право на выполнение (х), а прописная (Т) — если такого права у него не было. Конечный результат один и тот же, но регистр символа дает дополнительную информацию об исходных установках.
Итак, использование sticky позволяет реализовать, например, т.н. каталоги-помойки. Пользователи смогут писать файлы в такие каталоги, но не смогут удалять чужие файлы.
Пример с каталогом на котором установлен sticky:
/media/Work/test > ls -l
итого 20
drwxrwxrwx 2 root root 4096 2009-07-24 20:54 allex
drwx------ 2 root root 4096 2009-06-15 14:20 qqq

# Устанавливаю sticky-бит:

/media/Work/test > chmod +t allex
/media/Work/test > ls -l
итого 20
drwxrwxrwt 2 root root 4096 2009-07-24 20:54 allex
drwx------ 2 root root 4096 2009-06-15 14:20 qqq

/media/Work/test > cd allex
/media/Work/test/allex > ls -l
итого 4
-rw-r----- 1 root fuse 215 2009-06-10 19:54 fuse.conf

# Создаю файл с разрешением 777 (полные права для всех):

/media/Work/test/allex > touch proverka
root@sytserver:/media/Work/test/allex# ls -l
итого 4
-rw-r----- 1 root fuse 215 2009-06-10 19:54 fuse.conf
-rw-r--r-- 1 root root   0 2009-07-24 21:20 proverka

root@sytserver:/media/Work/test/allex# chmod 777 *
root@sytserver:/media/Work/test/allex# ls -l
итого 4
-rwxrwxrwx 1 root fuse 215 2009-06-10 19:54 fuse.conf
-rwxrwxrwx 1 root root   0 2009-07-24 21:20 proverka

# Захожу под обычным пользователем child и пытаюсь удалить файл proverka:

root@sytserver:/media/Work/test/allex# su child
child@sytserver:/media/Work/test/allex$ cd /media/Work/test/allex
child@sytserver:/media/Work/test/allex$ ls -l
итого 4
-rwxrwxrwx 1 root fuse 215 2009-06-10 19:54 fuse.conf
-rwxrwxrwx 1 root root   0 2009-07-24 21:20 proverka

child@sytserver:/media/Work/test/allex$ rm proverka
rm: невозможно удалить `proverka': Operation not permitted
child@sytserver:/media/Work/test/allex$
Расширенные права
Очевидно, что использование стандартных прав Unix недостаточно при реализации сложных схем доступа. Они не так гибки как хотелось бы. Даже используя различные биты доступа в сочетании со стандартными правами, желаемого эффекта в большинстве случаев не добиться.
В больших сетях, с многоуровневыми схемами доступа применяется более гибкая реализация назначения прав, именуемая как ACL — Списки контроля доступа.
Поговорив о пользователях и группах, самое время вспомнить про права доступа, которые для них настраиваются. Общая схема прав одинакова и для файлов, и для папок. Вы уже видели, как система отображает права доступа, в выводе команды ls -l, которая показывает содержимое директории:
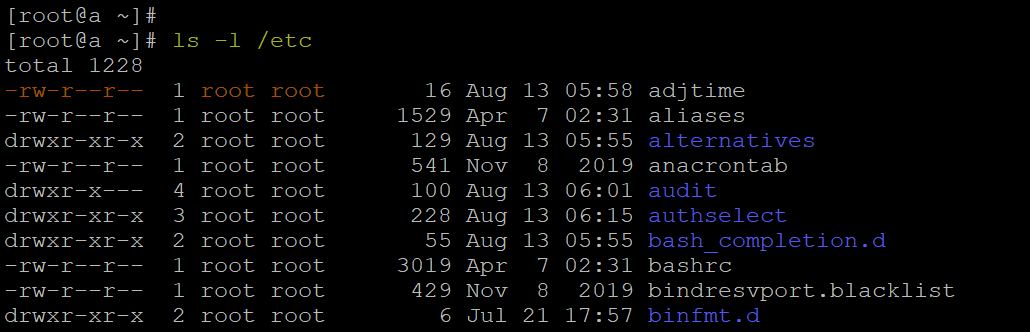
Первые 10 символов содержат информацию о правах к файлу или каталогу.
rw-
права пользователя-владельца
r--
права пользователей группы-владельца
r--
права всех остальных пользователей
Далее идёт имя пользователя-владельца и группы -владельца.
root
файл принадлежит пользователю root
root
файл принадлежит группе root
Исходя из этого, иерархия доступа на уровне пользователей разбивается следующим образом: права пользователя-владельца, права участников группы-владельца и права всех остальных.
Соответственно, для каждой категории указывается, какие операции с файлом ей доступны: чтение (r), запись (w) или выполнение (x) — для исполняемых файлов. Для директорий параметры те же, но обозначают немного другое: просмотр директории (r), создание папок / файлов (w) внутри директории, переход в директорию (x).
Каждый из этих уровней доступа можно выразить в восьмеричной системе с помощью числового значения: 4 (r), 2 (w), 1 (x). Вот так мы и получаем общую схему прав:
a — любые пользователи |
||||||||
u — права пользователя |
g — права группы |
o — права всех остальных |
||||||
r |
w |
x |
r |
w |
x |
r |
w |
x |
4 |
2 |
1 |
4 |
2 |
1 |
4 |
2 |
1 |
Для отображения уровня прав помимо формата rwxrwxrwx используется упомянутый восьмеричный формат. Для этого достаточно сложить все уровни прав по категориям:
rwxrwxrwx = (4+2+1), (4+2+1), (4+2+1) = 777
Теперь можно перейти к инструментам, которые позволяют управлять правами на файлы и директории.
Смена владельца файла или директории
Для смены владельца доступны два инструмента. Первый — chown, позволяет изменить пользователя и группу файла или папки:
chown [новый пользователь]:[новая группа] [файл или папка]
Если не указывать группу, изменится только пользователь-владелец. Если не указывать пользователя (:[новая группа]), изменится только группа-владелец.
При изменении прав на директории можно использовать параметр -R. Он рекурсивно изменит владельца всех вложенных директорий и файлов. Представим, что нам нужно предоставить права на папку new-user для одноимённого пользователя и его группы. Команда для этого будет выглядеть так:
chown -R new-user:new-group /home/users/new-user
Второй инструмент — chgrp. В отличие от первого, меняет только группу-владельца:
chgrp [группа] [файл или папка]
Как и chown, может работать рекурсивно с помощью ключа -R.
Смена прав доступа к файлу или директории
Для работы непосредственно с правами используется команда chmod:
chmod [настройки прав] [файл или папка]
При работе с директориями опция -R позволит изменить права на все вложенные файлы и папки.
Настройки прав в chmod можно определять двумя способами:
-
Указав категорию (
u— пользователь-владелец,g— группа-владелец,o— другие пользователи,a— все пользователи), модификатор (+,-,=) и, соответственно, нужные права (r,w,x).Например, представим, что у нас есть файл
example.txtс максимальным уровнем прав для всех категорий пользователей:
Допустим, мы не хотим, чтобы кто-то в принципе мог запускать этот файл на выполнение. В таком случае нам нужно убрать параметр
«x»из прав всех категорий пользователей сразу. Это можно сделать так:chmod a-x example.txt
Представим, что потом мы решили вернуть владельцу права на запуск файла. То есть нам нужно добавить параметр
«x»в категорию пользователя-владельца:chmod u+x example.txt
Если вдруг мы захотим изменить весь набор параметров для отдельной категории разом, это будет выглядеть следующим образом:
chmod u=rwx example.txt
-
Указав права в виде числового значения. Возможно, это не так прозрачно, но зато быстрее. В качестве параметра нам нужно передать это самое цифровое выражение уровня прав:
chmod 777 example.txt
В примере мы назначили максимальный уровень доступа всем категориям пользователей.
Соответственно, для изменения уровня прав отдельной категории пользователей нужно изменить только это числовое значение. Например, запретим исполнение файла для всех пользователей:
chmod 666 example.txt
А потом вернём, но только пользователю-владельцу:
chmod 766 example.txt
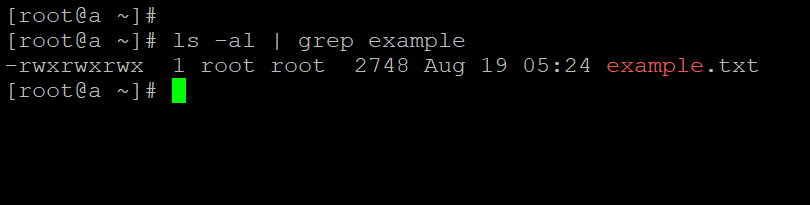
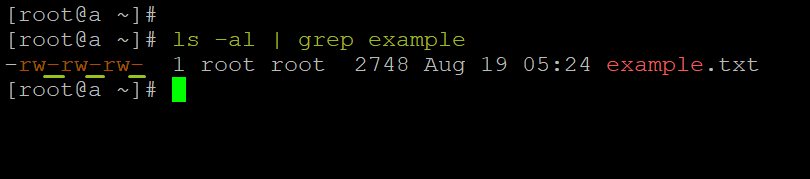
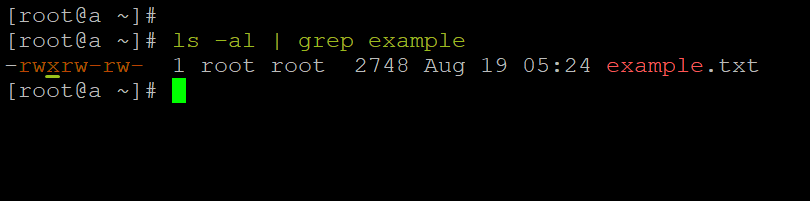
Бывает, что нам нужно изменить права только на все папки или только на все файлы в определённой директории. Часто с этим можно столкнуться при настройке прав на файлы сайтов. Вот вам пара однострочников на этот случай:
-
Смена прав на
755для всех папок внутри/var/www/sites/example.com:find /var/www/sites/example.com/ -type d -exec chmod 755 {} ;
-
Смена прав на
644для всех файлов внутри/var/www/sites/example.com:find /var/www/sites/example.com/ -type f -exec chmod 644 {} ;
Изменение атрибутов файлов
Помимо прав доступа и владельца каждый файл может иметь ряд атрибутов, определяемых на уровне файловой системы. Атрибуты показывают, какие операции могут или не могут проводиться с файлом в принципе, независимо от того, кто им владеет.
Посмотреть атрибуты файлов в текущей директории можно с помощью команды lsattr. Если запустить её без аргументов, она выведет атрибуты всех файлов в текущей директории. Если указать путь к файлу или папке, она перечислит свойства указанного файла или списка файлов в указанной папке соответственно:
lsattr example.txt

Первые 20 символов в строке предназначены для отображения атрибутов файла.
Список атрибутов может отличаться в зависимости от файловой системы. Вот список основных:
|
|
«godmode» — файл становится неуязвим для любых изменений. Его нельзя удалить, переименовать, изменить содержимое, создать символьную ссылку на него. |
|
|
в файл с таким атрибутом можно только добавлять новые данные. Старое содержимое изменить или удалить не получится. Это пригодится для защиты от вредоносных вставок или замен в файлах, куда постоянно записываются данные — например, в логах. Доступ к изменению старого содержимого по умолчанию есть только у суперпользователя |
|
|
активирует безвозвратное удаление файла. В том смысле, что после удаления файл нельзя будет восстановить с носителя — при удалении все использовавшиеся для хранения файла блоки на диске перезаписываются нулями. |
|
|
активирует «обратимое» удаление файлов. Это значит, что при удалении файла с этим атрибутом его содержимое можно восстановить. |
|
|
сжатый файл. Все данные, записываемые в файл, автоматически сжимаются, а данные, извлекаемые из файла — возвращаются в исходное состояние. |
|
|
настраивает для файла исключение при использовании утилиты |
|
|
показывает, что файл в качестве указателей использует экстенты. |
|
|
в журналируемых файловых системах ( |
|
|
указывает, что при работе с файлом система не будет обновлять информацию о времени доступа к нему. |
|
|
атрибут для директорий. Указывает, что все изменения в папке синхронно записываются на диск, минуя кэш. |
|
|
указывает, что все изменения в файле с этим атрибутом записываются синхронно на диск, минуя кэш. |
Изменить атрибуты файла позволяет команда chattr:
chattr [модификатор][изменяемые атрибуты] [целевой файл или папка]
То есть, если нам нужно защитить какой-то важный файл от посягательств, можно использовать такую команду:
chattr +i example.txt
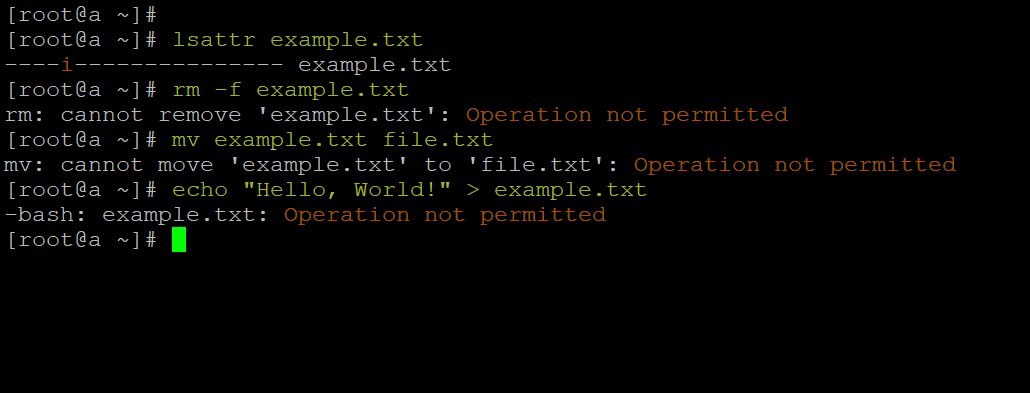
Проверяем — посягательства не работают.
Если же нам нужно вернуть файл в нормальное состояние, нужно выполнить обратную операцию:
chattr -i example.txt
Для просмотра более подробной информации о файловых атрибутах, их ограничениях и правилах применения используйте команду:
man chattr