When working with Linux, one often run into a Permission denied error. This is probably the most common error one runs into when starting on Linux. In this module we would learn how to fix this error in multiple ways.
Steps to fix the permission denied error on Ubuntu/Debian Linux
Let’s go over the steps to fix the permission denied error on our Ubuntu or Debian based systems here.
Method 1: Use the Sudo Command
There are some files that are owned by root and can be accessed only by the root user or can be accessed with the sudo command. It is not advisable to change the permissions or the ownership of these files. However, if needed, they can be modified with superuser permissions. Examples of such files are :
- /etc/shadow
- sudoers file
- systemwide config files
To access such files, we need to use sudo or be a root user as such :
$ whoami
root
$ cat /etc/shadow
< Contents >
Or ,
$ whoami
user
$ id
uid=1000(user) gid=1000(user) groups=1000(user),27(sudo)
$ sudo cat /etc/shadow
< Contents >
Method 2: Setting the Right System Permissions
This is the most common way of fixing this operation. Often, we lack the necessary permissions to access a file. To check our available permissions, we can use the ls command:
Let’s assume that this results in the following output :
$ ls -l
total 4
-rw------- 1 user user 20 Feb 12 11:36 Test
Here we can see that only the owner user has read and write permissions. Thus if another user tries to read this file, they will get an error as such:
$ whoami
user1
$ cat /home/user/Test
cat: /home/user/Test: Permission denied
Hence, to fix this, we would use the chmod command. We can provide read access to everyone (the owner, the group members and others) with the following command :
Checking the permissions on the file now should yield something like the following :
$ ls -l
total 4
-rw-r--r-- 1 user user 20 Feb 12 11:36 Test
The same can be done with write and execute permissions. If we want to limit the access to the users of the same group, we can use the following command :
This would allow the users in the same group as that of the owner to access the file and the permissions would look something like this :
$ ls -l
total 4
-rw-r----- 1 user user 20 Feb 12 11:36 Test
Now, we can finally read the file as the other user.
$ whoami
user1
$ cat /home/user/Test
This Is A Test File
NOTE : If the file is owned by the root user and our current user is in the sudoer’s group then we can ourselves change the permissions of the file by prefixing our commands with sudo. To know more about the usage of the chmod command check out this module !
Method 3: Change Ownership Of The File
The last method on our list, albeit less conventional, can help fix the Permission denied error. Instead of changing the permissions of the file, here we will change its ownership. For this, we would need the chown command. First let us check the ownership of the file using:
$ ls -l
total 4
-rw------- 1 user user 20 Feb 12 13:27 Test
As we can see, the file belongs to the user labeled as ‘user‘ and also the group by the same name. Also, notice how only the owner has read and write permissions (these can be changed as discussed previously). However, at present, we cannot access the file. But we’ll change the ownership (and group) of the file with :
$ sudo chown user1:mygroup /home/user/Test
If we check the details on our file now, we would find it to be changed to :
-rw------- 1 user1 my-group 20 Feb 12 13:27 Test
As we can see, the permissions on the files are preserved, but the groups that can access the file are changed. Since the owner has read permissions (if that’s not the case, we can always use chmod), we can now read the file’s contents:
$ cat /home/user/Test
This Is A Test File
Conclusion
Here, we saw how to solve issues with permissions. The methods described here each have their own applicability depending on the scenarios and each must be used carefully as required.
Все операционные системы семейства Linux имеют четко разграниченные права доступа. В своей домашней директории пользователь может делать все, что ему угодно, до тех пор, пока укладывается в отведенные рамки. Попытка выйти за них приводит к появлению ошибки «Permission Denied».
Изменение прав в терминале
Рассмотрим вариант, в котором необходимо прочесть текстовый документ, созданный другим пользователем. Файлы TXT в Linux можно просматривать непосредственно в терминале с помощью команды «cat».
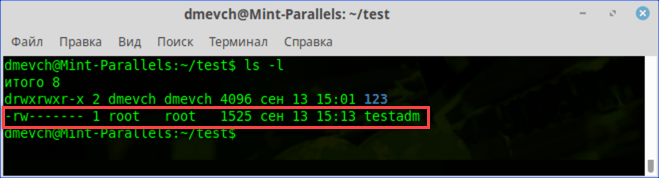
- Заходим в каталог с интересующим нас документом. Набираем команду «cat filename», подставляя вместо «filename» имя нужного файла. На скриншоте показана ошибка «Permission Denied», выглядящая в русской локализации как «Отказано в доступе».

Получаем ошибку «Permission Denied» при попытке просмотреть содержимое файла
- Проверяем права доступа к содержимому каталога, набрав «ls -l». Результат, полученный для текстового документа, выделен рамкой. Разрешение на чтение и запись имеет только его владелец.

Проверяем права доступа к документу используя команду «ls -l»
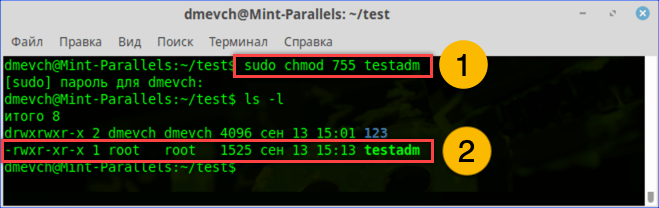
- Набираем команду «sudo chmod 755 filename». С ее помощью мы от имени администратора системы даем разрешение на чтение документа себе и любому другому пользователю. Проверяем результат выполнения и убеждаемся, что права доступа изменились нужным образом.

Используем команду «chmod» и административные права для получения доступа
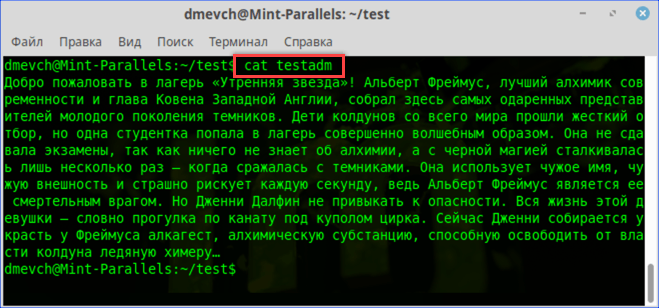
- Повторно используем «cat» и читаем ранее недоступное содержимое.

Просматриваем содержимое текстового документа командой «cat»

![]() Загрузка …
Загрузка …
Изменение прав в файловом менеджере
Разберемся, как выполнить рассмотренную выше операцию в графическом интерфейсе, используя файловый менеджер из дистрибутива.
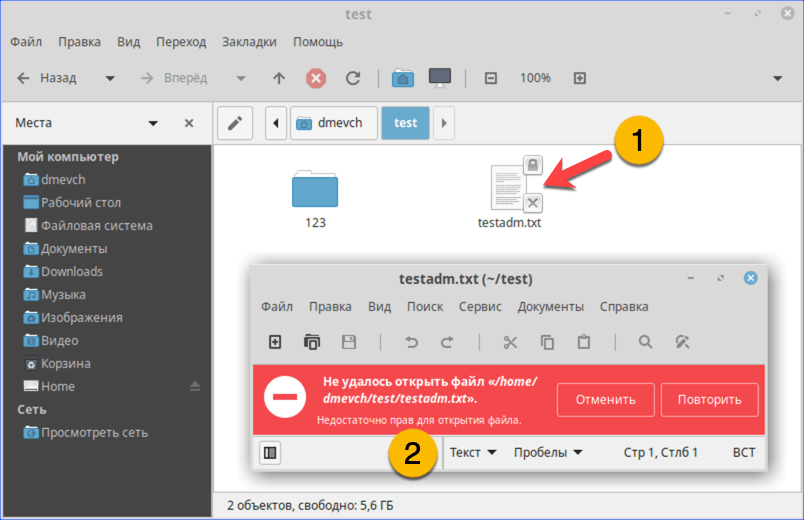
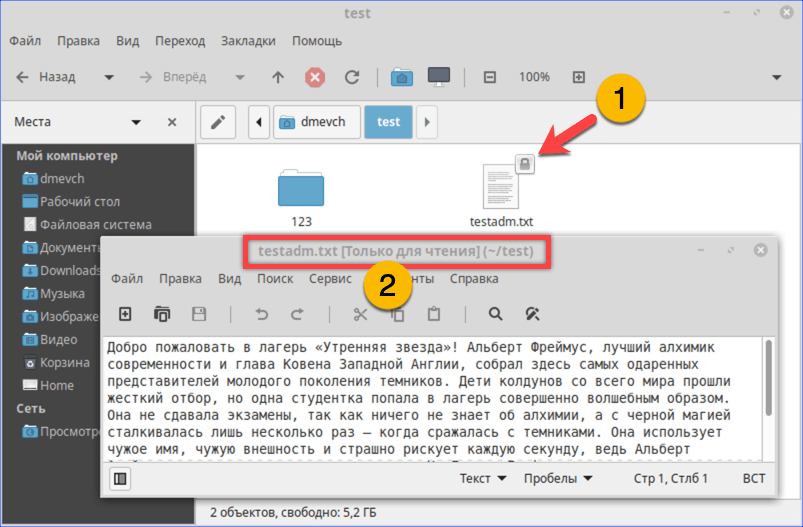
- Как видно на скриншоте, значок файла изначально имеет дополнительные символы, указывающие на то, что доступ у нему ограничен. При попытке посмотреть содержимое получаем графический вариант ошибки «Permission Denied».

При попытке открыть текстовый документ получаем ошибку «Permission Denied»
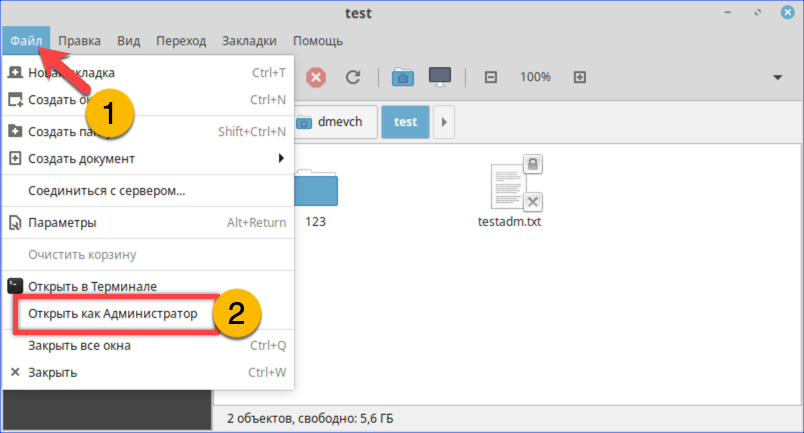
- Разворачиваем меню «Файл». Выбираем в списке действий «Открыть как Администратор».

Открываем меню «Файл» и перезапускаем файловый менеджер от имени root
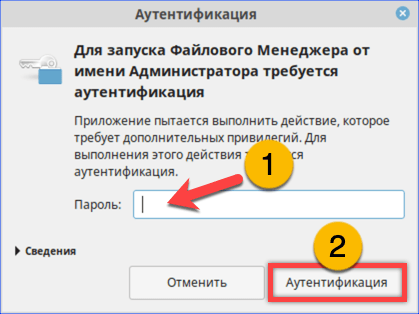
- Вводим в отмеченное стрелкой поле пароль root. Нажимаем кнопку «Аутентификация» или клавишу Enter.

Набираем пароль root в окне аутентификации
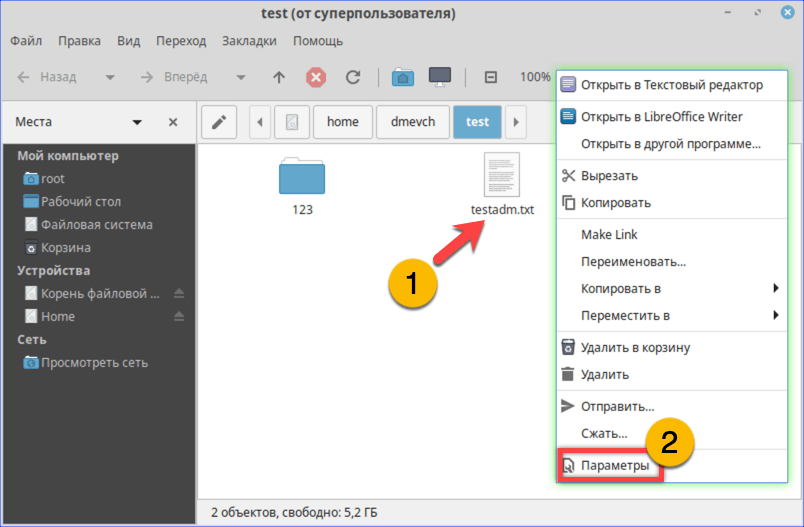
- В новом окне файлового менеджера вызываем контекстное меню для нужного файла. Выбираем в нем пункт «Параметры».

Открываем параметры файла с помощью контекстного меню
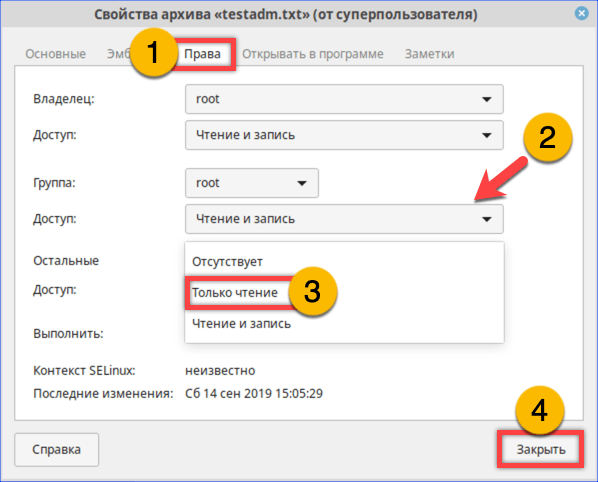
- Переключаемся на вкладку «Права». Меняем разрешения для группы и остальных пользователей. Для последних выберем в качестве примера «Только чтение». Внеся изменения, закрываем окно параметров.

На вкладке «Права» разрешаем доступ для группы root и остальных пользователей
- Теперь текстовый документ будет открываться в выбранном нами режиме «Только чтение», без возможности редактировать содержимое.

Открываем ранее недоступный файл в режиме чтения и изучаем содержимое
![]() Загрузка …
Загрузка …
В заключение
Как видим, избавиться от ошибки Permission Denied достаточно просто. Решив изменить правда доступа к системным файлам, лишний раз убедитесь, что полностью уверены в своих действиях и понимаете последствия вносимых изменений.
![]() Загрузка …
Загрузка …
Post Views: 26 831
Linux is a community of open-source Unix-like operating systems that are based on the Linux Kernel. Linux distributions are constructed in such a secured way that a user cannot make changes unless he/she has administration access. Users who are first time exploring Linux encounter the problem of Permission being Denied. In this article, we will learn how to fix them with the following methods.
- Sudo command missing
- Insufficient permissions to access the files
- Change ownership of the file
Let’s explore all the methods one by one.
Method 1: Sudo command missing
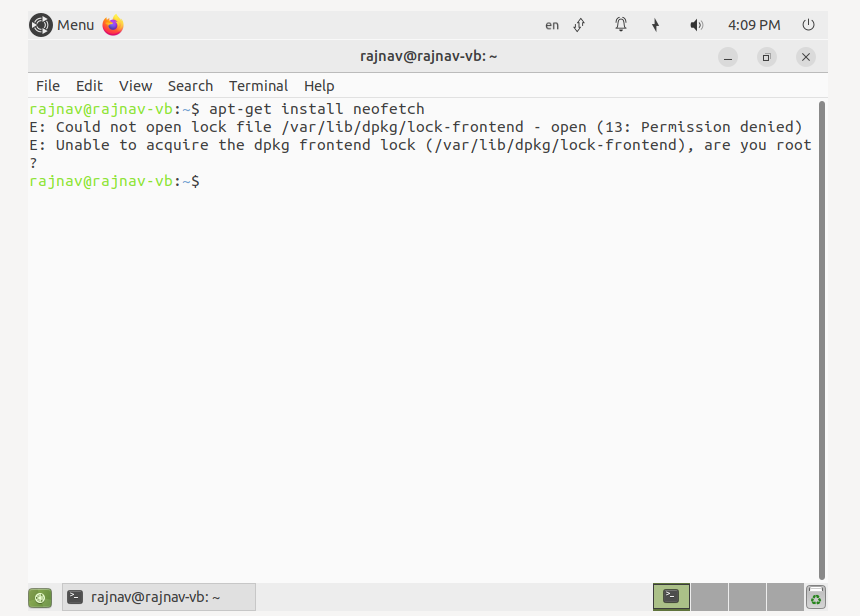
Step 1: This is one of the very common mistakes that experienced Linux users also make and has nothing wrong with your system or files. The sudo command allows you to access the files, and folders, and change settings that are accessible to only a root user. For example, here we are installing a new application and the user who is installing should be a root user.
First, we enter the command
apt-get install neofetch
And we get the following error.
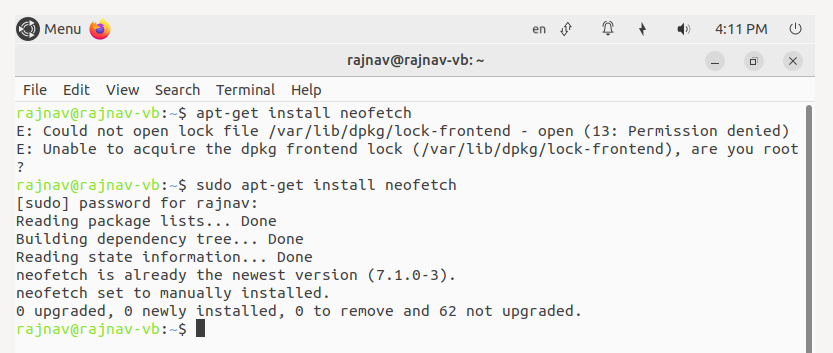
Step 2: Now add the sudo command, after entering the following command, you are required to enter the password.
sudo apt-get install neofetch
The output is as follows:
Method 2: Insufficient permissions to access the files
Step 1: Some files don’t have the required permission for accessing. In the following example, we want to read a file but we don’t have sufficient permissions.
$ cat geeks.txt
The output is

Step 2: Now we will change the access permission using the chmod command. The +rwx adds the read-write access.
$ chmod +rwx geeks.txt
$ cat geeks.txt
The output is as follows

The chmod has the following commands:
- r: It means the read permission.
- w: It means write permissions
- x: It means execution permissions.
- +: It provides permission.
- –: It removes the permission.
Method 3: Change ownership of the file
This also gives a Permission Denied error to a user in a mixed system when the user doesn’t have the access to a particular file. We can add users using the chown command.
Step 1: First, check the users who have access using the following command.
ls -l
Only a single user and a single group have access to read, write and execute as can be seen in the output.

Step 2; Now add the user geeks using the following command.
sudo chown geeks geeks.txt
Now check the owners of the file. The output is as follows:

So the user geeks now has the access to the text file.
30 Nov, 22
by Susith Nonis
5 min Read
![How to fix 'permission denied' error in Linux? [Solutions]](https://monovm.com/wp-content/uploads/2022/02/permission-denied-linux804-847xAuto.webp)
List of content you will read in this article:
- 1. What is Linux Permission Denied Error?
- 2. How To Fix Permission Denied Error in Linux?
- 3. Representation of permissions
- 4. How to Solve Bash Permission Denied?
- 5. Conclusion
In Linux operating system, you cannot execute any command without proper permission. Every file and directory has some permission or privilege (read, write, or execute) associated with them. If you are not authorized to access the file or directory, executing any command on that will result as a “permission denied” error in Linux. This prevalent common can only be resolved by getting the proper access to that file and directory. In this article, we will help you with how to fix the permission denied errors in Linux and what type of error is this with the help of various Linux commands.
What is Linux Permission Denied Error?
This type of error will occur whenever you run a command for which you do not have the execute permission. Similarly, you cannot perform read or write action if you do not have read or write permission for any file or directory. These Linux permissions are the primary reason behind the security of Linux, as they will help in protecting the data from unauthorized access.
Linux system has three types of permissions
1. read permission
2. write permission
3. execute permission
So, if you want to solve a Linux permission denied error, you can check your privileges for the specific file or folder using the following command.
ls -la
This command will display the long listing of all files and folders along with the permission, as shown below.
As shown below, we have created a shell script “hello.sh” without the execute permission. On executing “hello.sh”, you will get a “permission denied” error.

How To Fix Permission Denied Error in Linux?
For solving this error, you need to add the correct permissions to the file to execute. However, you need to be a “root” user or have sudo access for changing the permission. For changing the permission, Linux offers a chmod command. The chmod stands for change mod. This command has a simple syntax, as shown below.
chmod flags permissions filename
- Flags are the additional options that users can set.
- Permissions can either be read, write or execute in the file. You can represent them in symbolic form (r, w, and x) or octal numbers.
- The Filename specifies the file’s name for changing the permissions.
Representation of permissions
Below is the symbolic and octal representation of the user’s permissions while executing the “chmod” command. First, we will understand the representation before using it.
-
Symbolic representation
chmod u=rwx,g=r,o=r file
where-
- r specifies the read permissions
- w specifies the write permissions
- x specifies the execute permissions
- Octal representation-
chmod 744 file
where-
- 4 specifies the read permissions
- 2 specifies the write permissions
- 1 specifies the execute permissions
- 0 means no permissions issued.
How to Solve Bash Permission Denied?
Now, we are aware of the error, as shown below.

Giving the appropriate permission to the user will solve the problem. Thus, we are giving the execute permission to the user to run the “hello.sh” shell script. Execute the below command to provide execute permission.
chmod +x hello.sh

Now, we can see the change in the permission of the “hello.sh” script file. The above command provides the execute permission to the file. As you can see, the root user can make the required changes. If we execute the shell script, we should not get the error. Let’s try by running the below command.
./hello.sh

After executing the “hello.sh”, we get the output that displays the “hello.” Changing permission has solved the problem of bash permission denied.
Conclusion
If you are a regular Linux user, you might have faced the “permission denied” error while executing various commands. This might be due to the incorrect privileges to run that command. Only a root user or user with sudo access can change the permissions for the file or directory you want to access or execute. If you are the correct user to make the required permission changes, you can run the “chmod” command and add the desired permission.
This is all about how you can solve/fix permission denied errors in Linux with the help of the above-listed commands/methods. If you think there are other alternatives to achieve the goal, you can put them down via the comment box. Also, you can buy a Linux VPS server to run and test the above listed commands.
People also read:
- How to fix the sudo command not found error
- How to fix DNS server not responding error
- What is 403 forbidden error
- 500 internal server error: fixed
- How to fix npm command not found error
Многие новички пытаются выполнить запись определенных значений в системные файлы с помощью операторов перенаправления ввода и вывода и получают ошибку bash permission denied. Эта ошибка выводится, даже если вы использовали sudo.
Казалось бы, sudo есть, значит права суперпользователя получены и все должно работать но тут все не так просто. В этой статье мы рассмотрим почему возникает ошибка bash permission denied и как ее обойти.
Допустим, вы выполняете команду:
sudo echo "nameserver 8.8.8.8" >> /etc/resolv.conf

А в результате вместо записи строчки в /etc/resolv.conf получаете ошибку:
bash: /etc/resolv.conf permission denied
В русской локализации это будет отказано в доступе bash linux. Так происходит потому что вы запускаете с правами суперпользователя утилиту echo и она честно выводит вашу строку в стандартный вывод bash с правами суперпользователя. Но bash запущен от обычного пользователя, и когда интерпретатор bash пытается записать полученную строчку в системный файл, естественно, что вы получите ошибку.
Но существует несколько способов обойти это ограничение, вы можете, например, использовать команду tee, которая записывает стандартный вывод в файл или запустить саму оболочку от имени суперпользователя. Рассмотрим сначала вариант с tee:
echo ‘текст’ | sudo tee -a /путь/к/файлу
echo 'nameserver 8.8.8.8' | sudo tee -a /etc/resolv.conf

Это очень простое решение, но, кроме того, вы можете запустить оболочку bash с правами суперпользователя, чтобы дать ей доступ на запись:
sudo sh -c ‘echo текст >> /путь/к/файлу’
sudo bash -c ‘echo текст >> /путь/к/файлу’
Например:
sudo bash -c 'echo nameserver 8.8.8.8 >> /etc/resolv.conf

Еще одно решение, призванное, упростить эту команду, добавить такой код в ~/.bashrc:
sudoe() {

[[ "$#" -ne 2 ]] && echo "Usage: sudoe <text> <file>" && return 1

echo "$1" | sudo tee --append "$2" > /dev/null

}
Дальше для вывода строки в файл выполняйте:
sudoe ‘текст’ >> /путь/к/файлу
Например:
sudoe "nameserver 8.8.8.8" > /etc/resolv.conf
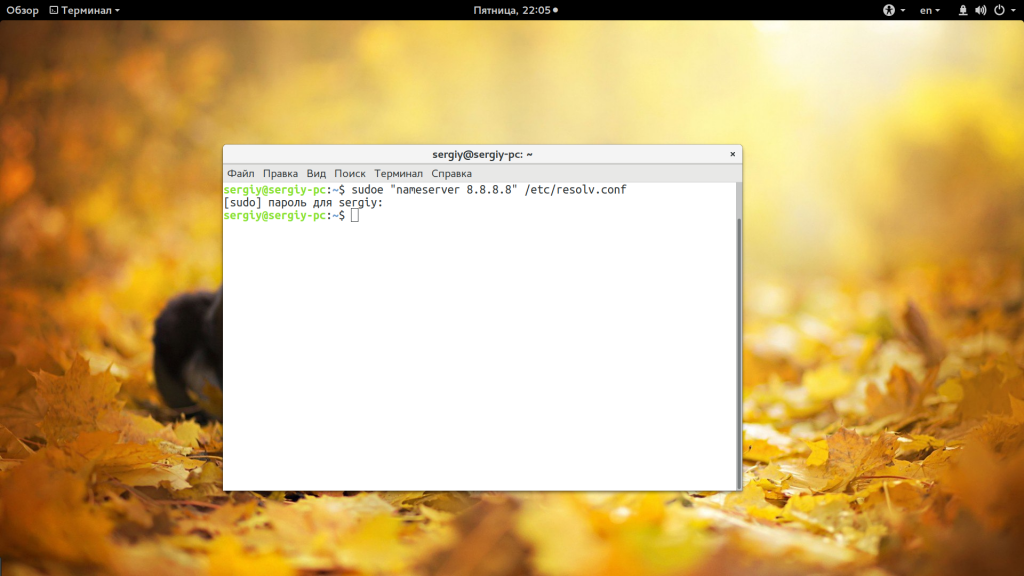
Теперь все будет работать, как и ожидалось, и ошибка bash отказано в доступе не появится. Еще можно поменять права на файл, а потом уже выводить в него строку. Но это очень неправильное решение. И даже не потому, что это небезопасно, а больше потому что там намного больше действий.
Выводы
В этой небольшой статье мы разобрали почему возникает ошибка bash permission denied при использовании команды echo для системных файлов, а также несколько путей ее решения. Как видите, все достаточно просто. Надеюсь, эта информация была полезной для вас.

Статья распространяется под лицензией Creative Commons ShareAlike 4.0 при копировании материала ссылка на источник обязательна .
Об авторе
![]()
Основатель и администратор сайта losst.ru, увлекаюсь открытым программным обеспечением и операционной системой Linux. В качестве основной ОС сейчас использую Ubuntu. Кроме Linux, интересуюсь всем, что связано с информационными технологиями и современной наукой.
I have a weird problem, I cant execute bash script even as basic as:
#!/bin/bash
echo "me"
I am saving it as a test.sh and then do chmod 755 test.sh and once run ./test.sh getting:
bash: ./test.sh: Permission denied
Any ideas what could be causing this?
![]()
tripleee
170k31 gold badges261 silver badges306 bronze badges
asked Nov 11, 2011 at 14:19
![]()
1
That can happen if you have mounted the file system with the «noexec» option. You should remove it.
![]()
apaderno
27.9k16 gold badges76 silver badges87 bronze badges
answered Nov 11, 2011 at 14:21
![]()
themelthemel
8,7732 gold badges30 silver badges31 bronze badges
3
Script needs be executable. Use this:
chmod +x <script-name>
answered Apr 20, 2017 at 21:30
![]()
AbhinavAbhinav
3093 silver badges8 bronze badges
2
Although not directly pertinent to this particular thread; if a file has come form a Windows system there may be a CR/LF at the end of the line. This would affect all lines in the file, including the initial execution line, and would not be visible if you are viewing the file.
$ ./test.sh
-bash: ./test.sh: /bin/bash^M: bad interpreter: No such file or directory
To see this, you could cat -A the file:
$ cat -A ./test.sh
#!/bin/bash^M$
echo «me»^M$
To remove, use dos2unix.
answered Apr 19, 2012 at 11:33
![]()
Try
ls -la
to see the actual rights and ownership of the file. To see if the chmod command actually worked. You might want to change the ownership along with the mod of the file check : http://www.tuxfiles.org/linuxhelp/fileowner.html
answered Nov 11, 2011 at 14:25
![]()
StainedartStainedart
1,9294 gold badges31 silver badges53 bronze badges
Use chmod +x ./test.sh
this should allow you to run it.
answered Jul 19, 2014 at 15:35
![]()
SeremSerem
211 bronze badge
1
Also, check to see if the directory/filesystem containing the script is nfs-mounted. root won’t run scripts from nfs-mounted locations.
answered Mar 22, 2016 at 20:13
![]()
1
In macOS this can occur if a com.apple.quarantine flag exists. If you see a @ suffix on the permissions after running a ls -l on the script’s path, execute ls -l@ *script_path* to confirm. Then run a xattred -d com.apple.quarantine *script_path* to remove the quarantine flag.
answered Oct 23, 2020 at 18:10
![]()
you need use ./test.sh when you in the directory of that file,if you don’t,try PATH TO THE SCRIPT.or you can copy it to some directory of /data and chmod it for shell,then do the above steeps.if you still fail,it’s ok because i have a same problem,i just did it success for once time.
answered Jul 20, 2016 at 15:57
![]()
Lan…Lan…
1051 silver badge6 bronze badges
3
For filesystems which are mounted with the noexec by default, for example NFS, explicitly adding exec at the end helps, even when options provided earlier in the list default imply noexec as well, e.g. the user option.
So if you have one of those options:
noexecuser
Change them to:
execoruser,exec
It is important to place exec at the end. Just removing noexec may help in certain cases, but not in all, if you are using other options like user before.
answered Dec 23, 2020 at 21:03
![]()
sebixsebix
2,9042 gold badges28 silver badges43 bronze badges
Should the sudo command or elevated privileges be used with Git?
You should not be using the sudo command or elevated privileges, such as administrator permissions, with Git. If you have a very good reason you must use sudo, then ensure you are using it with every command (it’s probably just better to use su to get a shell as root at that point). If you generate SSH keys without sudo and then try to use a command like sudo git push, you won’t be using the same keys that you generated.
Check that you are connecting to the correct server
Typing is hard, we all know it. Pay attention to what you type; you won’t be able to connect to «githib.com» or «guthub.com». In some cases, a corporate network may cause issues resolving the DNS record as well.
To make sure you are connecting to the right domain, you can enter the following command:
$ ssh -vT git@github.com
> OpenSSH_8.1p1, LibreSSL 2.7.3
> debug1: Reading configuration data /Users/YOU/.ssh/config
> debug1: Reading configuration data /etc/ssh/ssh_config
> debug1: /etc/ssh/ssh_config line 47: Applying options for *
> debug1: Connecting to github.com port 22.
The connection should be made on port 22, unless you’re overriding settings to use SSH over HTTPS.
Always use the «git» user
All connections, including those for remote URLs, must be made as the «git» user. If you try to connect with your GitHub username, it will fail:
$ ssh -T GITHUB-USERNAME@github.com
> Permission denied (publickey).
If your connection failed and you’re using a remote URL with your GitHub username, you can change the remote URL to use the «git» user.
You should verify your connection by typing:
$ ssh -T git@github.com
> Hi USERNAME! You've successfully authenticated...
Make sure you have a key that is being used
- Open TerminalTerminalGit Bash.
- Verify that you have a private key generated and loaded into SSH.
# start the ssh-agent in the background
$ eval "$(ssh-agent -s)"
> Agent pid 59566
$ ssh-add -l -E sha256
> 2048 SHA256:274ffWxgaxq/tSINAykStUL7XWyRNcRTlcST1Ei7gBQ /Users/USERNAME/.ssh/id_rsa (RSA)
If you have GitHub Desktop installed, you can use it to clone repositories and not deal with SSH keys.
-
If you are using Git Bash, turn on ssh-agent:
# start the ssh-agent in the background
$ eval "$(ssh-agent -s)"
> Agent pid 59566
If you are using another terminal prompt, such as Git for Windows, turn on ssh-agent:
# start the ssh-agent in the background $ eval $(ssh-agent -s) > Agent pid 59566 -
Verify that you have a private key generated and loaded into SSH.
$ ssh-add -l -E sha256
> 2048 SHA256:274ffWxgaxq/tSINAykStUL7XWyRNcRTlcST1Ei7gBQ /Users/USERNAME/.ssh/id_rsa (RSA)
- Open TerminalTerminalGit Bash.
- Verify that you have a private key generated and loaded into SSH.
$ ssh-add -l -E sha256
> 2048 SHA256:274ffWxgaxq/tSINAykStUL7XWyRNcRTlcST1Ei7gBQ /Users/USERNAME/.ssh/id_rsa (RSA)
The ssh-add command should print out a long string of numbers and letters. If it does not print anything, you will need to generate a new SSH key and associate it with GitHub.
Tip: On most systems the default private keys (~/.ssh/id_rsa and ~/.ssh/identity) are automatically added to the SSH authentication agent. You shouldn’t need to run ssh-add path/to/key unless you override the file name when you generate a key.
Getting more details
You can also check that the key is being used by trying to connect to git@github.com:
$ ssh -vT git@github.com
> ...
> debug1: identity file /Users/YOU/.ssh/id_rsa type -1
> debug1: identity file /Users/YOU/.ssh/id_rsa-cert type -1
> debug1: identity file /Users/YOU/.ssh/id_dsa type -1
> debug1: identity file /Users/YOU/.ssh/id_dsa-cert type -1
> ...
> debug1: Authentications that can continue: publickey
> debug1: Next authentication method: publickey
> debug1: Trying private key: /Users/YOU/.ssh/id_rsa
> debug1: Trying private key: /Users/YOU/.ssh/id_dsa
> debug1: No more authentication methods to try.
> Permission denied (publickey).
In that example, we did not have any keys for SSH to use. The «-1» at the end of the «identity file» lines means SSH couldn’t find a file to use. Later on, the «Trying private key» lines also indicate that no file was found. If a file existed, those lines would be «1» and «Offering public key», respectively:
$ ssh -vT git@github.com
> ...
> debug1: identity file /Users/YOU/.ssh/id_rsa type 1
> ...
> debug1: Authentications that can continue: publickey
> debug1: Next authentication method: publickey
> debug1: Offering RSA public key: /Users/YOU/.ssh/id_rsa
Verify the public key is attached to your account
You must provide your public key to GitHub to establish a secure connection.
-
Open Terminal.
-
Start SSH agent in the background.
$ eval "$(ssh-agent -s)" > Agent pid 59566 -
Find and take a note of your public key fingerprint.
$ ssh-add -l -E sha256 > 2048 SHA256:274ffWxgaxq/tSINAykStUL7XWyRNcRTlcST1Ei7gBQ /Users/USERNAME/.ssh/id_rsa (RSA) -
In the upper-right corner of any page, click your profile photo, then click Settings.

-
In the «Access» section of the sidebar, click SSH and GPG keys.
-
Compare the list of SSH keys with the output from the
ssh-addcommand.


-
Open the command line.
-
Start SSH agent in the background.
$ ssh-agent -s > Agent pid 59566 -
Find and take a note of your public key fingerprint.
$ ssh-add -l -E sha256 > 2048 SHA256:274ffWxgaxq/tSINAykStUL7XWyRNcRTlcST1Ei7gBQ /Users/USERNAME/.ssh/id_rsa (RSA) -
In the upper-right corner of any page, click your profile photo, then click Settings.
-
In the «Access» section of the sidebar, click SSH and GPG keys.
-
Compare the list of SSH keys with the output from the
ssh-addcommand.
-
Open Terminal.
-
Start SSH agent in the background.
$ eval "$(ssh-agent -s)" > Agent pid 59566 -
Find and take a note of your public key fingerprint. If you’re using OpenSSH 6.7 or older:
$ ssh-add -l
> 2048 a0:dd:42:3c:5a:9d:e4:2a:21:52:4e:78:07:6e:c8:4d /Users/USERNAME/.ssh/id_rsa (RSA)
If you’re using OpenSSH 6.8 or newer:
$ ssh-add -l -E md5 > 2048 MD5:a0:dd:42:3c:5a:9d:e4:2a:21:52:4e:78:07:6e:c8:4d /Users/USERNAME/.ssh/id_rsa (RSA) -
In the upper-right corner of any page, click your profile photo, then click Settings.
-
In the «Access» section of the sidebar, click SSH and GPG keys.
-
Compare the list of SSH keys with the output from the
ssh-addcommand.
If you don’t see your public key in GitHub, you’ll need to add your SSH key to GitHub to associate it with your computer.
Warning: If you see an SSH key you’re not familiar with on GitHub, delete it immediately and contact GitHub Support, for further help. An unidentified public key may indicate a possible security concern. For more information, see «Reviewing your SSH keys.»
This article will teach you quickly what is permission denied Linux error. And also what ways you can avoid permission denied error in Linux.
This error comes when you try to list files or try execute the file inside the directory where you don’t have sufficient permission. Since Linux operating system is very particular about its security aspect.
Example of Permission denied Linux error
Let’s say you are a normal user who is trying to list or trying change the directory inside the /root file-system. Since you do not have sufficient permissions system will respond with permission denied error message as below:
[root@rhel ~]# su - manmohan
Last login: Wed Jan 24 14:34:36 UTC 2018 on pts/0
[manmohan@rhel ~]$ ls -l /root
ls: cannot open directory /root: Permission denied
[manmohan@rhel ~]$ cd /root
-bash: cd: /root: Permission denied
[manmohan@rhel ~]$ id
uid=501(manmohan) gid=501(manmohan) groups=501(manmohan)
[manmohan@rhel ~]$
One way to avoid such error is to switch to root user using su – command. However this solution is not recommended since it will gain unnecessary access to all the root file system.
How to resolve Permission denied Error
-
Resolving Permission denied error related to script execution:
Let’s say you have created a shell script for performing any task. but when you try to execute the script you may end with below error due absence of permission denied error.
[root@rhel tmp]# ./myshell.sh
-bash: ./myshell.sh: Permission denied
[root@rhel tmp]#
Now to avoid such case you need to add execute permission “x” to the file myshell.sh using chmod command as below:
[root@rhel tmp]# ls -l myshell.sh
-rw-r--r-- 1 root root 27 Jan 25 00:31 myshell.sh
[root@rhel tmp]# chmod u+x myshell.sh
[root@rhel tmp]# ls -l myshell.sh
-rwxr--r-- 1 root root 27 Jan 25 00:31 myshell.sh
[root@rhel tmp]#
In the last output you can see that there is “x” (execution) permission added after chmod command. So next time when you try to execute the shell script , it will execute without any error.
[root@rhel tmp]# cat myshell.sh
echo "My name is Manmohan"
[root@rhel tmp]# ./myshell.sh
My name is Manmohan
[root@rhel tmp]#
Resolving permission denied Linux error while listing or writing to a file
In this type of permission denied error you try to list or write the file in which you do not have sufficient permission to do so as below:
[manmohan@rhel tmp]$ cd myfolder/
-bash: cd: myfolder/: Permission denied
[manmohan@rhel tmp]$
If you look at the permissions of the “myfolder” directory using ls -l command you will come to know about the permissions.
[root@rhel tmp]# ls -ltr
total 4
drwx------ 2 root root 4096 Jan 25 00:48 myfolder
[root@rhel tmp]# pwd
/tmp
[root@rhel tmp]#
As per the permission given in above output only owner of the directory who is root can have all permission that is read, write and execute. So in such case you need to change the permission of the directory to read using below chmod command:
[root@rhel tmp]# chmod o+rx myfolder/
[root@rhel tmp]# ls -lt
total 4
drwx---r-x 2 root root 4096 Jan 25 00:48 myfolder
[root@rhel tmp]#
Now this time when normal user manmohan try to list directory he will not get the permission denied error.
[manmohan@rhel tmp]$ ls -lt myfolder/
total 0
[manmohan@rhel tmp]$ cd myfolder/
[manmohan@rhel myfolder]$
In case you want to have write permission on this directory you need to specify w flag as well in chmod command as below:
[root@rhel tmp]# chmod o+rwx myfolder/
[root@rhel tmp]# ls -lt
total 4
drwx---rwx 2 root root 4096 Jan 25 00:48 myfolder
[root@rhel tmp]#
Same is applicable to file level permission as well.
One more way is to changing the ownership of the directory using chown command. Since in our example we are getting error for user manmohan we will change ownership of the directory “myfolder” using below command.
[root@rhel tmp]# chown manmohan:manmohan myfolder/
[root@rhel tmp]# ls -l
total 4
drwx---rwx 2 manmohan manmohan 4096 Jan 25 00:48 myfolder
[root@rhel tmp]#
Since manmohan user is now the owner of the directory he can able to do any operation on the directory. In case you want to recursive permission do not forget to add -r while chown command as below:
[root@rhel tmp]# chown -R manmohan:manmohan myfolder/
-
Resolving permission denied Linux error for specific user
In above method of changing the permission using chmod is not suitable as per my opinion. Because when you give permission to others, it will be open for all the users within the system. Which is wrong in terms of security perspective. To resolve this error specific to user you can implement it using access control list or ACL. Follow my article on Access control list ACL for the same.
Download Free book
Get your free copy of Linux command line Cheat Sheet!!!!