Вам пришлось столкнуться с ошибкой 403 Forbidden на своем сайте на WordPress? Это одна из самых страшных ошибок, с которой может столкнуться новичок. В этой статье м покажем вам как легко исправить ошибку 403 Forbidden в WordPress.
![403forbiddenerror[1]](https://wpincode.com/wp-content/uploads/2016/12/403forbiddenerror1.jpg)
Что за ошибка 403 Forbidden – Access Denied Error в WordPress?
WordPress отображает коды и сообщения, когда ошибка возникает на сайте.
![403screenshot[1]](https://wpincode.com/wp-content/uploads/2016/12/403screenshot1.png)
Код ошибки 403 Forbidden показывается тогда, когда права, установленные на сервере, не позволяют получить доступ к определенной странице.
Именно поэтому ошибку часто можно видеть с текстом:
403 Forbidden – You don’t have permission to access ‘/’ on this server.

Additionally, a 403 Forbidden error was encountered while trying to use an ErrorDocument to handle the request.
Ошибку можно увидеть в различных ситуациях. Например:
- 403 Forbidden – Запрещен доступ к wp-admin или странице входа в WordPress.
- 403 Forbidden – во время установки WordPress.
- 403 Forbidden при попытке открыть любую страницу на сайте.
- Возможно, что вы получаете только сообщение ‘Access Denied’ вместо полного статуса 403 Forbidden.
- Также можно увидеть ‘Access to yourdomain.com was denied. You don’t have authorization to view this page.’
Теперь, когда мы определили различные типы ошибок 403, давайте поговорим о том, что приводит к этим ошибкам.
Что вызывает ошибку 403 Forbidden в WordPress?
Наиболее вероятной причиной возникновения ошибки 403 Forbidden в WordPress являются плохо настроенные плагины безопасности. Многие из них блокируют IP адреса (или даже всю подсеть), если считают, что они вредоносны.
Второй возможной причиной может быть поврежденный файл .htaccess или некорректные права доступа к файлу на вашем сервере.
Ваш хостер также может внести какие-то изменения в настройки сервера, что может привести к рассматриваемой ошибке.
Давайте же посмотрим как можно исправить ошибку 403 forbidden в WordPress.
Исправляем ошибку 403 Forbidden в WordPress
Прежде чем что-либо сделать, мы рекомендуем вам создать полный бекап сайта.
1. Исправляем ошибку 403 Forbidden, вызванную плагином WordPress
Для начала вам потребуется временно отключить все плагины WordPress, включая все плагины безопасности, которые вы устанавливали.
Если это решит проблему, тогда станет понятно, что один из плагинов вызывает ошибку.
Выяснить, какой именно, можно будет, если отключить все плагины, а затем включать по одному, пока не появится ошибка 403.
2. Исправляем ошибку 403 Forbidden, вызванную поврежденным файлом .htaccess
Часто ошибка 403 возникает из-за поврежденного .htaccess файла вашего сайта. Починить его очень просто.
Подключаемся к сайту по FTP или через Менеджер файлов хостинга.
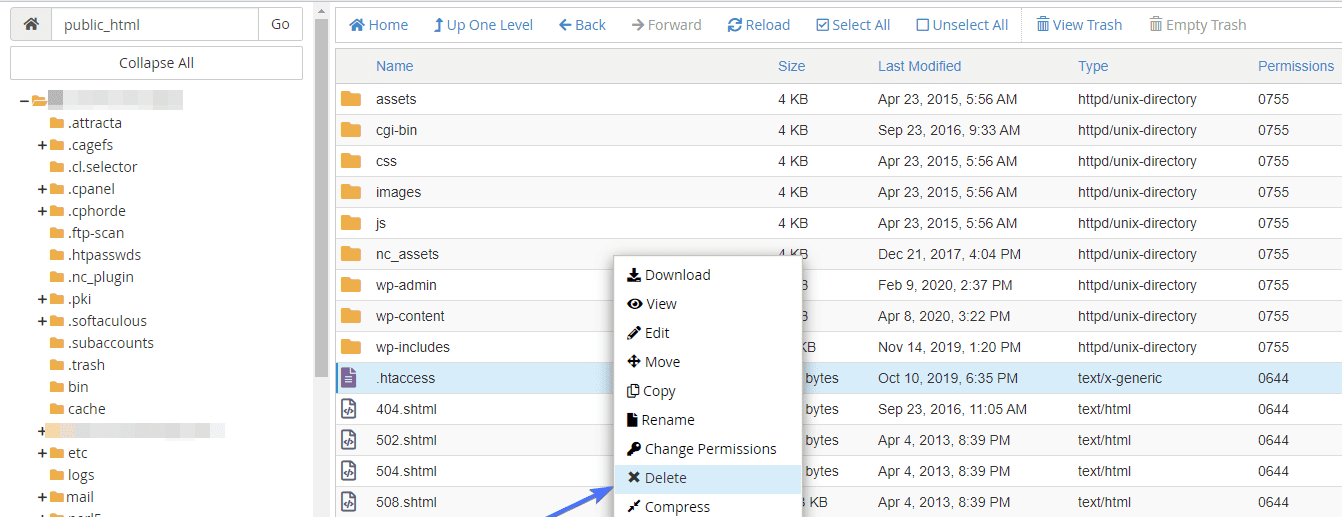
Находим файл .htaccess в корневой папке своего сайта.
Скачиваем файл на свой компьютер, чтобы у нас была свежая его копия. Далее, удаляем файл с сервера.
![delete-htaccess[1]](https://wpincode.com/wp-content/uploads/2016/12/delete-htaccess1.png)
Пытаемся открыть свой сайт. Если ошибка 403 пропала, значит ваш .htaccess файл был поврежден.
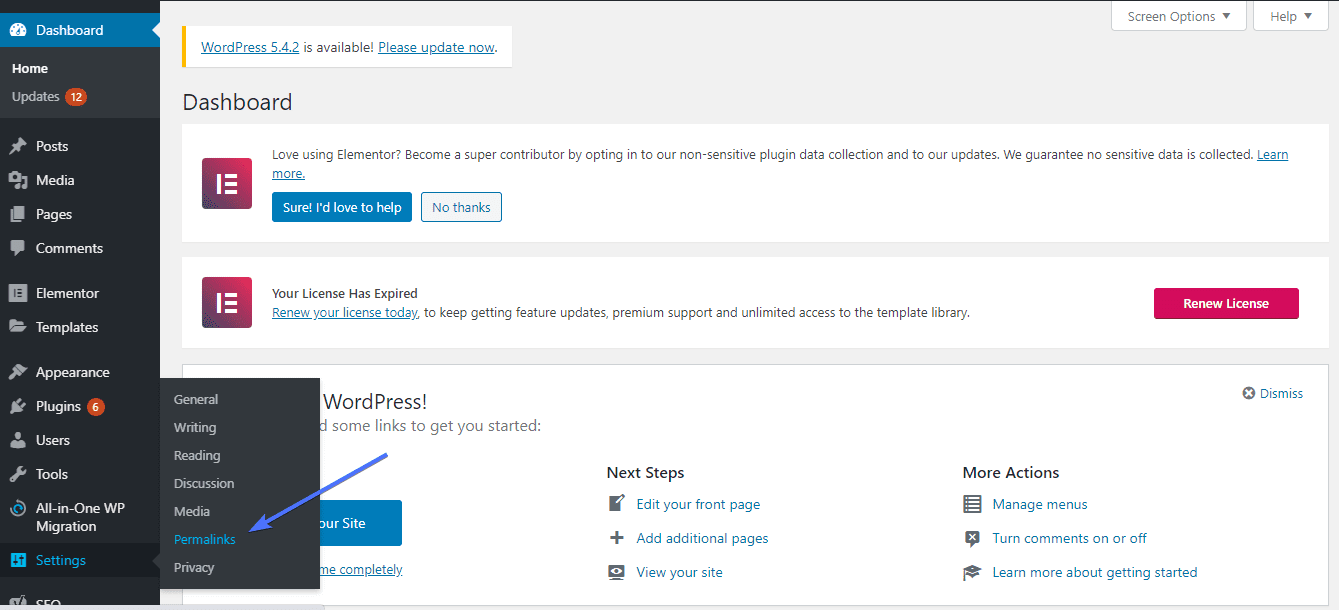
Сгенерировать новый можно в админке сайта, если перейти на страницу Настройки » Постоянные ссылки.
![regenerate-htaccess[1]](https://wpincode.com/wp-content/uploads/2016/12/regenerate-htaccess1.png)
Просто нажимаем на кнопку Сохранить изменения внизу страницы и WP сгенерирует свеженький файл .htaccess.
3. Исправляем ошибку 403 Forbidden, вызванную правами доступа к файлам в WordPress
Все файлы, хранимые на вашем сайте, имею права доступа. Эти права контролирует тот, у кого есть доступ к файлам и папкам сайта.
Некорректные права доступа могут вызывать ошибку 403, потому как ваш веб сервер начинает считать, что у вас нет прав на доступ к тем файлам.
Если два вышеуказанных решения не помогли с проблемой, тогда скорее всего дело в правах доступа.
Вы можете обратиться к своему хостеру для того, чтобы тот проверил сайт на предмет корректных прав доступа.
Изменение же прав самостоятельно может иметь негативные последствия. Если вы не слишком уверены в правильности своих действий, то лучше обратиться к знакомому или нанять профессионала.
Однако, если вы все-таки решите исправить проблему лично, то вот как можно проверить права доступа.
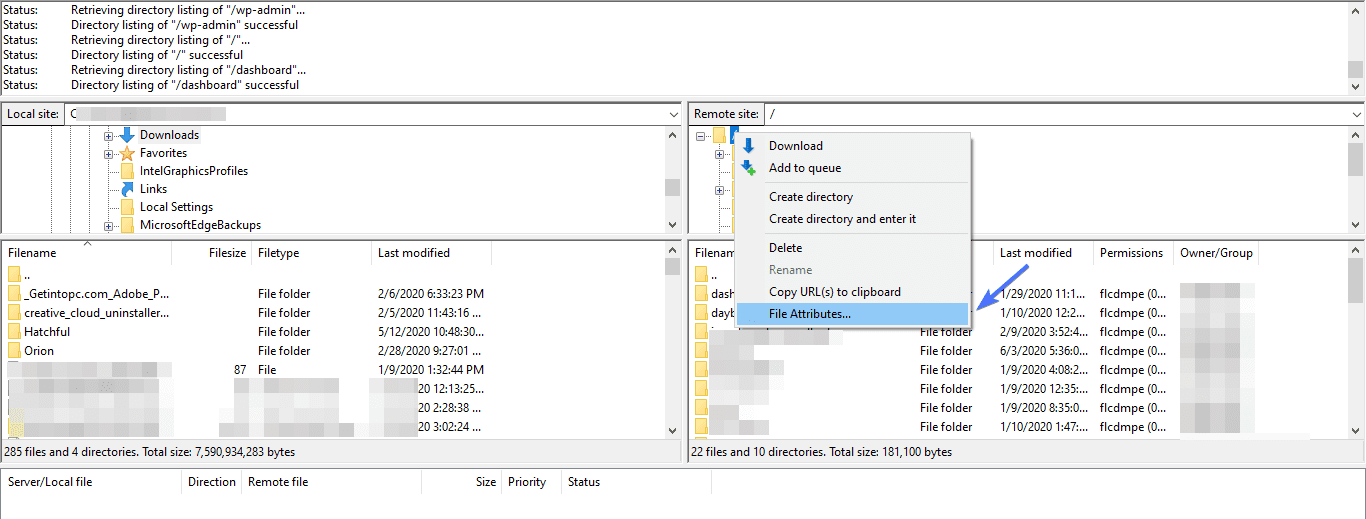
Просто подключаемся к своему сайту по FTP, а затем переходим в корневую директорию сайта, содержащую все файлы WordPress.
![check-file-permissions[1]](https://wpincode.com/wp-content/uploads/2016/12/check-file-permissions1.png)
Кликните на директорию для выбора, затем нажмите правой кнопкой мыши, после чего выберите File Permissions из меню.
Ваш FTP клиент отобразит вам диалог изменения прав доступа вроде такого:
![changefilepermissions[1]](https://wpincode.com/wp-content/uploads/2016/12/changefilepermissions1.png)
Все директории вашего сайта изменят права доступа с 744 на 755.
Все директории вашего сайта получат права доступа, изменив их с 644 на 644.
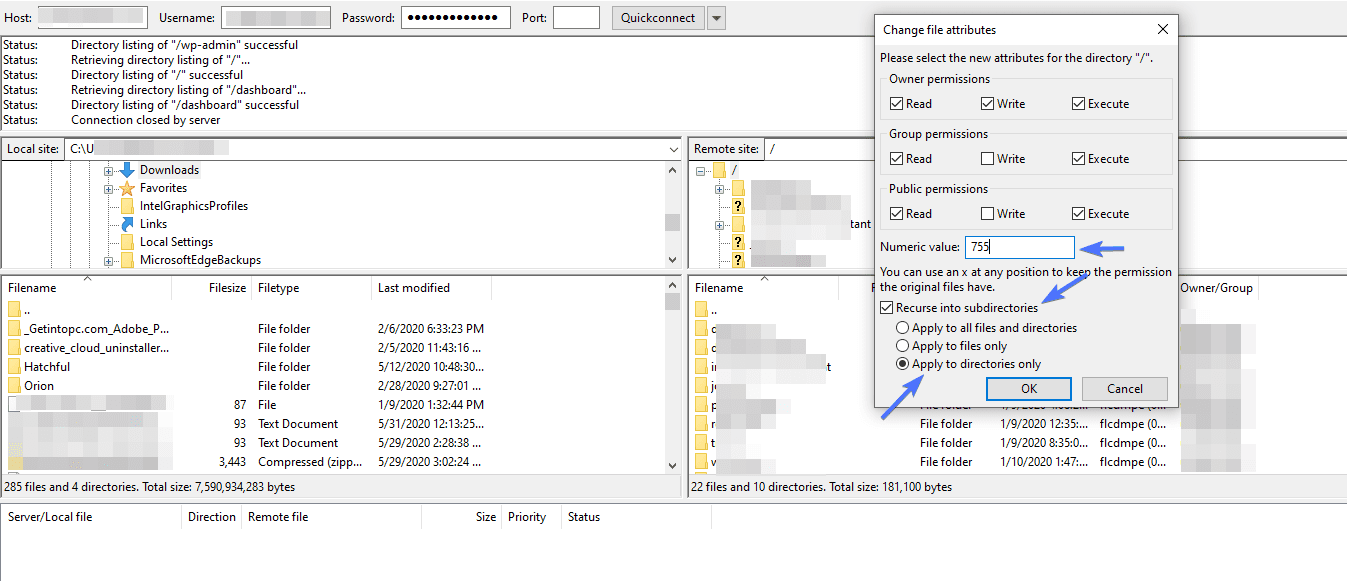
Можно изменить права доступа корневой директории с 744 на 755. Поставьте галочку рядом с ‘Recurse into subdirectories’, а затем отметьте опцию ‘apply to directories only’.
Нажимаем на кнопку ОК. Ваш FTP клиент начнет простановку прав доступа ко всем вложенным папкам в этой директории.
По окончанию процесса необходимо будет повторить проделанное для всех файлов. В этот раз вам нужно будет использовать права доступа 644 или 640 и не забыть выбрать опции ‘Recurse into subdirectories’ и ‘apply to files only’.
Нажимаем на кнопку ОК. Ваш FTP клиент обработает права доступа ко всем вложенным папкам в этой директории.
Попробуйте зайти на свой сайт, и ошибка 403 forbidden должна исчезнуть.
Мы надеемся, что эта статья помогла вам исправить ошибку 403 forbidden в WordPress.
По всем вопросам и отзывам просьба писать в комментарии ниже.
Не забывайте, по возможности, оценивать понравившиеся записи количеством звездочек на ваше усмотрение.
Rating: 3.3/5 (24 votes cast)
A web server may return a 403 Forbidden HTTP status code in response to a request from a web browser for a web page. It indicates that the server can be reached and understood the request, but refuses to take any further action. Status code 403 responses are the result of the web server being configured to deny access, for some reason, to the requested URL by the web browser.
The following are some possible cause and it’s solutions.
Window server
There could be problems with Directory Indexes if your blog is hosted on a Windows server. Please contact your web hosting company to assist in resolving this issue, you will need help in adding index.php to your web.config file.
Firewalls or Security Plugin
HTTP 403 errors can also result from website firewalls or other security plugins. If the URL is correct and the 403 error persists, check to see if the firewall is preventing access to any web pages. Check if your IP is being blacklisted by your firewall or security plugin. Turn off your firewall and security plugin, clear your browser cache and see if you are able to access your website. You should reconfigure them to prevent them from blocking visitors.
File and Folder Permissions
Your file and folder permissions if set wrongly, it can also cause a HTTP 403 error. Try setting folders to 755 and files to 644.
- Login to your web server using FTP.
- Go to the file and right click. Choose Permissions or Attributes or Properties (depends on your program).
- You should be able to see it’s permission.
.htaccess
Check your .htaccess file for any codes that are not added by WordPress. Your plugin could have added them and it could have been incompatible with your setup and blocked your access. A basic WordPress .htaccess looks something as follows.
# BEGIN WordPress
<IfModule mod_rewrite.c>
RewriteEngine On
RewriteBase /
RewriteRule ^index.php$ - [L]
RewriteCond %{REQUEST_FILENAME} !-f
RewriteCond %{REQUEST_FILENAME} !-d
RewriteRule . /index.php [L]
</IfModule>
# END WordPress
Contact Web Hosting Company
If the above suggestions does not work, you should contact your web hosting company for help. This is a server error, therefore only your web hosting company is able to help you. Not the Theme or Plugin developer.
External Resources
- HTTP 403
- Changing File Permissions
- WordPress .htaccess
Did this answer your question?
Thanks for the feedback
There was a problem submitting your feedback. Please try again later.
Last updated on July 13, 2018
Are you dealing with the 403 Forbidden error on your WordPress site? It is one of the most dreadful errors that a WordPress beginner can come across. In this article, we will show you how to easily fix the 403 forbidden error in WordPress.

What is a 403 Forbidden – Access Denied Error in WordPress?
WordPress shows codes and messages when an error occurs on your website. See our list of most common WordPress errors and how to fix them.

403 Forbidden error code is shown when your server permissions don’t allow access to a specific page.
This is why the error is usually accompanied by the text:
403 Forbidden – You don’t have permission to access ‘/’ on this server.
Additionally, a 403 Forbidden error was encountered while trying to use an ErrorDocument to handle the request.
There are different scenarios when you can see this error. For example:
- 403 Forbidden – Access denied on wp-admin or WordPress login page.
- 403 Forbidden – during WordPress install.
- 403 Forbidden error when visiting any page on your WordPress site.
- It is also possible that you only get to see ‘Access Denied’ instead of full 403 Forbidden status.
- You may also see ‘Access to yourdomain.com was denied. You don’t have authorization to view this page.’
Now that you know about the different types of 403 errors, let’s talk about what causes this error.
What Causes 403 Forbidden Error in WordPress?
The most common cause for the 403 Forbidden error in WordPress is due to poorly configured security plugins. Many WordPress security plugins can block an IP address (or a whole range of IP addresses) if they believe them to be malicious.
This is why we use Sucuri to improve security of all our WordPress sites.
Another possible cause could be a corrupt .htaccess file or incorrect file permissions on your server.
Your WordPress hosting company can sometimes make accidental changes to their server settings. This may result in 403 Forbidden error on your site.
Having said that, let’s take a look at how to solve 403 forbidden error in WordPress.
Video Tutorial
Subscribe to WPBeginner
If you don’t like the video or need more instructions, then continue reading.
Fixing 403 Forbidden Error in WordPress
Before you do anything, we recommend that you create a complete WordPress backup of your website. Here is our guide on how to manually create a WordPress backup.
If you were already using an automatic WordPress backup plugin, then make sure that you have access to a latest backup before moving forward.
1. Fixing 403 Forbidden Error Caused by a WordPress Plugin
First thing you need to do is to temporarily deactivate all WordPress plugins. This includes any security plugins that you may have installed on your site.
If this resolves your problem, then this means one of the plugins on your website was causing this error.
You can figure out which plugin was causing the error by activating all your plugins one at a time until you are able to reproduce the 403 forbidden error.
2. Fix 403 Forbidden Error Caused by Corrupt .htaccess File
Often the 403 error is caused by a corrupt .htaccess file in your WordPress site. Repairing this file is quite easy.
First you need to connect to your website using a FTP client or file manager in cPanel.
Next, locate the .htaccess file in the root folder of your WordPress site. See this guide if you can’t find .htaccess file in Your WordPress folder.
You need to download the .htaccess file to your computer so that you have a fresh backup of it. After that, you need to delete the file from your server.

Try accessing your website. If 403 forbidden error is resolved, then this means that your .htaccess file was corrupt.
You can generate a fresh .htaccess file by logging into your WordPress admin area and going to Settings » Permalinks page.

Simply click on the Save Changes button at the bottom of the page and WordPress will generate a fresh .htaccess file.
3. Fix 403 Forbidden Error Caused by File Permissions in WordPress
All files stored on your website have file permissions. These file permissions control who can access files and folders on your website.
Incorrect file permissions can cause 403 forbidden error. It makes your web server thinks that you do not have permission to access those files.
If the above two solutions do not solve the 403 forbidden error on your site, then incorrect file permissions can be the most likely cause.
You can ask your WordPress hosting provider to check your website for correct file permissions. Some hosts are very supportive, they wouldn’t mind and will probably fix that for you.
Changing file permissions yourself can have serious consequences. If you do not feel confident doing it yourself, then ask a friend for help or hire a professional.
However, if you want to do it yourself, then here is how you would check your file permissions.
Simply connect to your WordPress site using an FTP client. Navigate to the root folder containing all your WordPress files.

Click to select a folder, right click and then select File Permissions from the menu.
Your FTP client will show you a file permissions dialog box like this:

All folders on your WordPress site should have a file permission of 744 or 755.
All files on your WordPress site should have a file permission of 644 or 640.
You can set the file permission to the root folder to 744 or 755. Check the box next to ‘Recurse into subdirectories’ and then check the option that says ‘apply to directories only’.
Click on the OK button. Your FTP client will now start setting permissions to all subdirectories in that folder.
Once it is done, you need to repeat the process for all the files. This time you will use file permission of 644 or 640 and don’t forget to select ‘Recurse into subdirectories’ and ‘apply to files only’. options.
Click on the OK button and your FTP client will start setting file permissions for all the selected files.
Try accessing your website now, and 403 forbidden error should be gone now.
We hope this article helped you fix the 403 forbidden error in WordPress. You may also want to see our expert tips and hacks to protect your WordPress admin area.
If you liked this article, then please subscribe to our YouTube Channel for WordPress video tutorials. You can also find us on Twitter and Facebook.
Disclosure: Our content is reader-supported. This means if you click on some of our links, then we may earn a commission. See how WPBeginner is funded, why it matters, and how you can support us.
Editorial Staff at WPBeginner is a team of WordPress experts led by Syed Balkhi. We have been creating WordPress tutorials since 2009, and WPBeginner has become the largest free WordPress resource site in the industry.
Все мы, путешествуя по просторам интернета, натыкаемся на различные ошибки при загрузке сайтов. Одна из них, кстати, достаточно часто встречается – я говорю об ошибке сервера 403 Forbidden Error. Сегодня я рассмотрю причины ее возникновения и способы устранения со стороны владельца сайта и его пользователя.
Что означает ошибка 403 и почему она появляется
Ошибка сервера 403 Forbidden означает ограничение или отсутствие доступа к материалу на странице, которую вы пытаетесь загрузить. Причин ее появления может быть несколько, и вот некоторые из них:
- Формат индексного файла неверен.
- Некорректно выставленные права на папку/файл.
- Файлы были загружены в неправильную папку.
Комьюнити теперь в Телеграм
Подпишитесь и будьте в курсе последних IT-новостей
Подписаться
Исправление ошибки сервера 403 Forbidden
Чтобы исправить ошибку сервера 403 Forbidden, обязательно нужен доступ к панели управления вашего хостинга. Все описанные ниже шаги применимы к любой CMS, но примеры будут показаны на основе WordPress.
Проверка индексного файла
Сначала я проверю, правильно ли назван индексный файл. Все символы в его имени должны быть в нижнем регистре. Если хотя бы один символ набран заглавной буквой, возникнет ошибка 403 Forbidden. Но это больше относится к ОС Linux, которой небезразличен регистр.
Еще не стоит забывать, что индексный файл может быть нескольких форматов, в зависимости от конфигураций сайта: index.html, index.htm, или index.php. Кроме того, он должен храниться в папке public_html вашего сайта. Файл может затеряться в другой директории только в том случае, если вы переносили свой сайт.

Любое изменение в папке или файле фиксируется. Чтобы узнать, не стала ли ошибка итогом деятельности злоумышленников, просто проверьте графу «Дата изменения».
Настройка прав доступа
Ошибка 403 Forbidden появляется еще тогда, когда для папки, в которой расположен искомый файл, неправильно установлены права доступа. На все директории должны быть установлены права на владельца. Но есть другие две категории:
- группы пользователей, в числе которых есть и владелец;
- остальные, которые заходят на ваш сайт.
На директории можно устанавливать право на чтение, запись и исполнение.
Так, по умолчанию на все папки должно быть право исполнения для владельца. Изменить их можно через панель управления TimeWeb. Для начала я зайду в раздел «Файловый менеджер», перейду к нужной папке и выделю ее. Далее жму на пункт меню «Файл», «Права доступа».

Откроется новое окно, где я могу отрегулировать права как для владельца, так и для всех остальных.

Отключение плагинов WordPress
Если даже после всех вышеперечисленных действий ошибка не исчезла, вполне допустимо, что влияние на работу сайта оказано со стороны некоторых плагинов WordPress. Быть может они повреждены или несовместимы с конфигурациями вашего сайта.
Для решения подобной проблемы необходимо просто отключить их. Но сначала надо найти папку с плагинами. Открываю папку своего сайта, перехожу в раздел «wp-content» и нахожу в нем директорию «plugins». Переименовываю папку – выделяю ее, жму на меню «Файл» и выбираю соответствующий пункт. Название можно дать вот такое: «plugins-disable». Данное действие отключит все установленные плагины.

Теперь нужно попробовать вновь загрузить страницу. Если проблема исчезла, значит, какой-то конкретный плагин отвечает за появление ошибки с кодом 403.
Но что делать, если у вас плагин не один, а какой из них влияет на работу сайта – неизвестно? Тогда можно вернуть все как было и провести подобные действия с папками для определенных плагинов. Таким образом, они будут отключаться по отдельности. И при этом каждый раз надо перезагружать страницу и смотреть, как работает сайт. Как только «виновник торжества» найден, следует переустановить его, удалить или найти альтернативу.
Читайте также

Как решить проблему, если вы – пользователь
Выше я рассмотрела способы устранения ошибки 403 Forbidden для владельцев сайта. Теперь же разберу методы исправления в случаях с пользователем.
- Сначала надо убедиться, что проблема заключается именно в вашем устройстве. Внимательно проверьте, правильно ли вы ввели URL сайта. Может, в нем есть лишние символы. Или, наоборот, какие-то символы отсутствуют.
- Попробуйте загрузить страницу с другого устройства. Если на нем все будет нормально, значит, проблема кроется именно в используемом вами девайсе. Если нет – надо перейти к последнему шагу.
- Еще хороший вариант – немного подождать и обновить страницу. Делается это либо кликом по иконке возле адресной строки браузера, либо нажатием на комбинацию Ctrl + F5. Можно и без Ctrl, на ваше усмотрение.
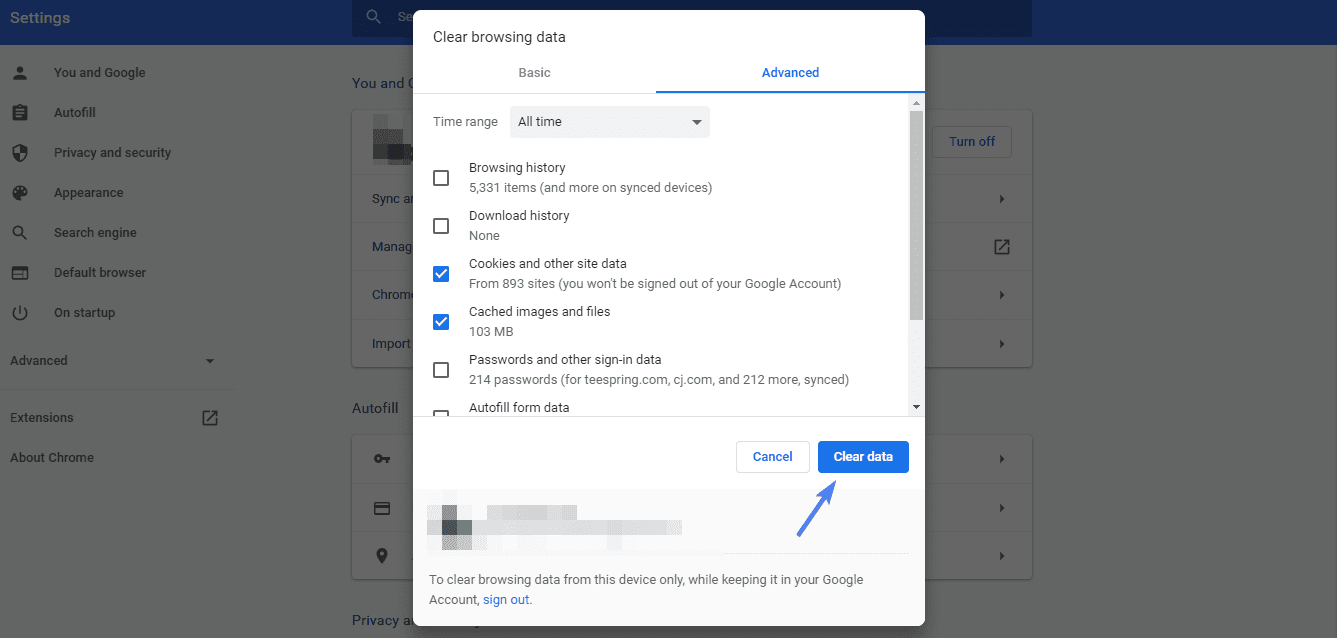
- Если ничего из вышеперечисленного не помогло, надо очистить кэш и cookies. Провести такую процедуру можно через настройки браузера. Для этого необходимо открыть историю просмотров, чтобы через нее перейти к инструменту очистки. Эту же утилиту часто можно найти в настройках, в разделе «Конфиденциальность и безопасность». В новом окне нужно отметить пункты с кэшем и cookies и нажать на кнопку для старта очистки.


- Ошибка 403 Forbidden возникает и тогда, когда пользователь пытается открыть страницу, для доступа к которой сначала надо осуществить вход в систему. Если у вас есть профиль, просто войдите в него и попробуйте вновь загрузить нужную страницу.
- Если вы заходите со смартфона, попробуйте отключить функцию экономии трафика в браузере. Она находится в настройках, в мобильном Google Chrome под нее отведен отдельный раздел.
- Последний шаг – подождать. Когда ни один способ не помогает, значит, неполадки возникли именно на сайте. Возможно, его владелец уже ищет способы решения проблемы и приступает к их исполнению, но это может занять какое-то время. Пользователям остается только дождаться, когда все работы будут завершены.
Еще одна допустимая причина появления ошибки сервера 403 – доступ к сайту запрещен для определенного региона или страны, в которой вы находитесь. Бывает и такое, что сайт доступен для использования только в одной стране. Если вы используете VPN, попробуйте отключить его и перезагрузите страницу. Вдруг получится все исправить.
Если ничего из вышеперечисленного не сработало, рекомендуется обратиться к владельцу сайта. Есть вероятность, что никто не знает о возникшей проблеме, и только ваше сообщение может изменить ситуацию.
You must have encountered some common errors while trying to access your WordPress site that shows a forbidden message. You likely came across a 403 forbidden error. In this guide, we will take you through how to fix the 403 error code. We will cover detailed information on how to resolve the issue so without any further delay let’s get started.
What does 403 Forbidden mean?
403 forbidden error or 403 forbidden access to this resource on the server is denied! is one of the HTTP errors that you face while working on WordPress. There are some HTTP status codes defined by Microsoft’s Internet Information Services which are considered standard internet codes.
These codes are used by web servers to communicate with your web browsers (like Chrome, Firefox, Opera, etc.). These codes are defined within the HTTP header. In normal circumstances when the website is working fine, the server sends Status Code as 200.

In case there is something wrong with the requested resource, it returns an error code. There are lots of error codes used by HTTP, for example, a 404 error is returned for a resource not found and a 500 error code signifies an internal server error. Another such HTTP response code is 403 which signifies that the user is prohibited or forbidden to access the requested web resource, which exists on the web server. We have tried to resolve all the common errors like 404 error, 504 gateway timeout error, 502 bad gateway error, etc faced while working on WordPress.
These types of errors are classified into two categories, they are either “client-side” errors or they are “server-side” errors.
Example of Client-Side Errors:
- 400 Bad Request
- 401 Unauthorized
- 403 Forbidden
- 404 Not Found, and
- 408 Request Timeout Error
Example of Server Side Errors:
- 500 Internal Server Error
- 502 Bad Gateway
- 503 Service Unavailable and
- 504 Gateway Timeout
To make the identification of these HTML errors easier 4xx are client-side errors, while 5xx are server-side errors.
In this article, we will learn about the reasons for 403 errors, and possible ways to troubleshoot them for your visitors to easily access your website or web application without any errors.
Different browsers show different messages for the 403 error :
- Forbidden: You don’t have permission to access / on this server.
- HTTP Error 403 – Forbidden
- 403 forbidden requests forbidden by administrative rules
- 403 Forbidden
- Access Denied You don’t have permission to access
- 403 – Forbidden: Access is denied
- Error 403 – Forbidden
- 403 forbidden nginx– You are not allowed to access this address 403 Forbidden – Nginx HTTP Error 403 – Forbidden – You do not have permission to access the document or program you requested
- 403 Forbidden – Access to this resource on the server is denied
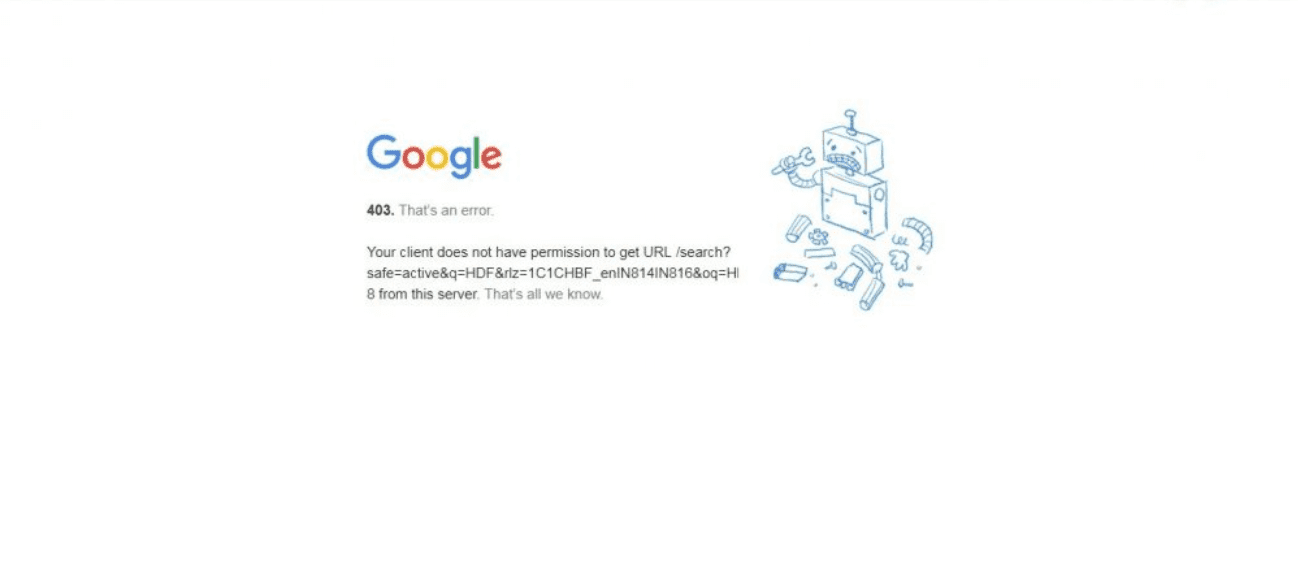
- 403. That’s an error. Your client does not have permission to get URL / from this server
- You are not authorized to view this page
What are the Causes of 403 Forbidden Error?
- Incorrect File Permissions
- No Index file or Empty Folder
1. Incorrect File Permissions:
The most common reason behind this error is files and folder permissions on the webserver. This can be easily fixed by going into your File Manager under cPanel and checking the permission settings. We will discuss the issue in detail in the subsequent sections.
The ideal folder permissions on a web server should look like this:
- Permission Status for Folders: 755
- Static Content: 644
- Dynamic Content: 700
Understanding File Permissions
- 7 : Stands for full access (Read, Write, Execute)
- 6 : for the Only Read and Write Access
- 5 : Stands for Reading and Execute
- 4 : Only Read Access
- 0 : Stands for No Access Rights
The 3 digits in the permission codes specify Owner | Group | Public in that order
So, if a folder permission codes look like 7|5|4 it means the owner has full access (7), while Group can Read and Execute (5) while Public/Everyone else can only Read (4) the resource.
These codes can be changed under File Manager if you are using a Cpanel. File permissions can also be changed using an FTP tool like Filezilla.
What does the Read/Write/Execute means?
- Read – view the files and subfolders within the folder.
- Write – add, edit or delete the files and subfolders inside the folder
- Execute – process/execute the resources using a script or commands to change their value.
Setting File Permission using FTP Tool like Filezilla


Setting File Permission using File Manager in Cpanel


Folder permissions can also be changed using SSH under chmod commands.
2. No Index file or Empty Folder:
One of the other reasons for this error is the empty Http directory, or in other words, no website or web application files are uploaded to the server directory.
The default landing page for a website or web application is index.html or index.php. The server will return a 403 error status if none of the 2 exists on the server. Or you have defined some other file in Nginx config or .htaccess as the home page, and that file is not uploaded in the directory.
These are some of the common reasons behind the 403 Forbidden errors.
The other specific reasons and level of resource access forbidding can be determined by identifying the sub-status code, which is as follows (though they are not standard codes):
- 403.1 – Execute access forbidden.
- 403.2 – Read access is forbidden.
- 403.3 – Write access forbidden.
- 403.4 – SSL required
- 403.5 – SSL 128 required.
- 403.6 – IP address rejected.
- 403.7 – Client certificate required.
- 403.8 – Site access denied.
- 403.9 – Too many users.
- 403.10 – Invalid configuration.
- 403.11 – Password change.
- 403.12 – Mapper denied access.
- 403.13 – Client certificate revoked.
- 403.14 – Directory listing denied.
- 403.15 – Client Access Licenses exceeded.
- 403.16 – Client certificate is untrusted or invalid.
- 403.17 – Client certificate has expired or is not yet valid.
- 403.18 – Cannot execute request from that application pool.
- 403.19 – Cannot execute CGIs for the client in this application pool.
- 403.20 – Passport logon failed.
- 403.21 – Source access denied.
- 403.22 – Infinite depth is denied.
- 403.502 – Too many requests from the same client IP; Dynamic IP Restriction limit reached.
- 403.503 – Rejected due to IP address restriction
Based on one of the identified above sub-status error codes you can easily troubleshoot the error.
On WordPress, there can be additional events that can cause a temporary 403 Forbidden error in cases like:
- Access denied to WordPress Dashboard. In that case, you have to check the settings for the wp-admin directory.
- Access may be denied during WordPress installation
- Access may be denied during theme or plugin updates
How to Fix 403 Forbidden Error on Your WordPress Website?

Irrespective of the platform, most of the troubleshooting methods apply to all the websites. You can use these methods to resolve the “403 forbidden access to this resource on the server is denied!” Error –
- Check Missing Core Files and Theme Files
- Check .htaccess file configuration
- Directory Browsing and 403 Error
- Check file and folder permissions
- Check Plugins
- Clear Browser Cache and Cookies
- Try to fix issues from your Chrome Browser
- Deactivate Browser Extensions
- Check Firewall Settings
First things first, before making any changes we recommend you take a backup of your files and database. In case you are using WordPress and can access the WordPress Dashboard you can take the help of a backup plugin. We recommend using a backup plugin that creates automatic backups at regular intervals.
Check Missing Core Files and Theme Files:
Please check that all WordPress Core Files are in place, you can upload the core files manually using a File Transfer tool.
Also, check that all these files are properly uploaded. Specially check the index.php files at root, inside wp-admin, theme folder, and individual plugin folders.

Check .htaccess file configuration:
.htaccess is a hidden file in the public_html directory of your Apache-based web server. The function of the .htaccess file is to define the web response to various queries, especially to set up the redirects, restrict access to various bots, etc. In some cases, there are differences .htaccess files for the root directory and subdirectories in WordPress like wp-admin and wp-includes.
To access this hidden file you can go to File Manager, and select the hidden checkbox in the options provided in the pop up as shown in the image below:

If a pop-up doesn’t appear you can go to Settings under File Manager at Top Right as shown below:

Once you have selected to show the hidden files you will be able to see the .htaccess file

You can download it to your local machine and edit using an editor, a Notepad, Dreamweaver, or any other similar editing tool.
You can also right-click on it and Edit it as shown below:

This will open up an editable file like this:

If a .htaccess file is not yet created on your system, you can create it as well. To create it go into your public_html folder, or the website-specific default folder if you have hosted multiple websites on your Cpanel, and click on Add New File:


So, if your WordPress website is facing a 403 forbidden error issue, and a .htaccess file exists, delete it and try to access the website or the specific page with the issue. If it works fine it means that your .htaccess file was not configured correctly. If you don’t want to delete the .htaccess file, you can just remove all the code and save the empty file instead.
You can regenerate the fresh .htaccess file now from your WordPress Dashboard. You will have to go to Permalinks under Settings, as shown below:

And Click on the Save Changes button. Please note, you don’t have to change the settings here unless you want to change the permalink settings or URL structure.
Directory Browsing and 403 Error:
Directory browsing simply means in absence of a default home page file (index.php or index.html) the server will display the directory content to the visitor. A visitor will be able to see files and subfolders of the main folder and certainly, you don’t want to display it, as shown below:

Most of the servers by default disallow directory browsing to hide the content of the folder. In such cases, if the default root file (index.html or index.php) is missing the server will return a 403 Forbidden error.
How to Disable Directory Browsing using the .htaccess file?
Open the editable .htaccess file, as described in the previous section. (Note: remember to back up the existing .htaccess file)
By default the WordPress .htaccess file looks like this:
#BEGIN WordPress
RewriteEngine On
RewriteBase /
RewriteRule ^index.php$ - [L]
RewriteCond %{REQUEST_FILENAME} ! - f
RewriteCond %{REQUEST_FILENAME} ! - d
RewriteRule . /index.php [L]
#END WordPress
Just add this line of the code after the last line:
Options -Indexes
Update or Upload the edited .htaccess file, and refresh the page to see if the problem is resolved.
Check file and folder permissions:
The default file permission settings are applied to the core file and folders when WordPress is installed or a new file or folder is created in your Cpanel.
You can go to each folder and change the permission settings. You can do it for specific files as well. Some hosting providers also provide tools to reset the permission settings.
You can also edit permission settings using the FTP tool (Filezilla for example). It will give you additional options as follows:

- Permission settings to be only applied to selected directories or files
- It is to be applied in all subdirectories and files within the selected directory
- Also, it is to be applied only in all subdirectories within the selected directory
- Permissions settings are to be applied only in all files within the selected directory
Following are the default permission settings for WordPress Files:
- First of all change permission settings to 755 or 750 for all the directories
- Change permissions settings to 644 or 640 for all the files (select the “Apply to files only” option)
Note: There is an exception to the above rule for the wp-config.php file. The Wp Config file is used to connect WP files to the Database. It includes the necessary database name, DB username, and password. The file permission for wp-config should either be 440 or 400.
Changing the permission settings accordingly should resolve the 403 forbidden error issues.
Caution: Perform this step when you are sure about what you are doing. It is an expert job. Playing around with file permissions can lead to compromising your website or server’s security. Incorrectly configured file permissions can leave a gate open for hackers or malware.
Check Plugins:
If the issue is still not resolved you need to check if there is a plugin that is causing the issue.
To do this first deactivate and uninstall any of the recently installed plugins. If it resolves the issue you can identify the incompatible plugin.
If still, the problem persists, deactivate the other plugins one by one and check the website. You will be able to identify the problematic plugin, and you can replace it with another plugin that provides similar functionality.
- Deactivate all the plugins from your WordPress Dashboard
- Check the website if it works now.
- If it works Re-activate the plugins one by one to identify the problematic ones.
- Repeat steps two and three until the 403 error is shown.
- Congratulations, you have identified the plugin that is causing the problem.
- You may need to delete it entirely and replace it with another plugin with similar functionality.
One of the other lesser recommended methods of deactivating plugins is changing the name of the Plugins folder to something else. You can also change the name of individual plugin folders one by one If you follow this process of changing folder names, you will see several errors in your WordPress dashboard stating that “Plugin file doesn’t exist”. Don’t panic seeing this error message as it will be fine once the folder name is changed back to what it was originally. You will have to activate them again from WP Dashboard after changing them back to their original name.
Note: Most of the time the issue is found with either one of the caching plugins or the security plugins. So keep an eye on these plugins.
“403 forbidden access to this resource on the server is denied!” Error in WordPress Multisite
If you have WordPress Multisite installation and getting a 403 error the chances are you have created a wildcard subdomain.
Just change it to remove the wildcard setting for a subdomain, and it should resolve the issue.
You also need to check the subdomain redirects.

How to Fix 403 Forbidden Error on Google Chrome?

Sometimes your chrome browser can also be the culprit to trigger 403 forbidden errors. So, you resolve this issue from the chrome browser, there are certain methods you need to follow:
Some Quick and easy Solutions you must try at first:
- Refresh or Reload: Sometimes, the 403 forbidden error can trigger due to temporary glitches that can be eliminated by simply refreshing or reloading the webpage on Google chrome. Just click on the refresh button on the chrome browser and you are done.
- Try accessing the page after some time: sometimes, the server issue or the glitch can extend and might take a longer time than usual to resolve. If accessing the website is not on your priority list, you can wait for a few hours or even a day and try accessing it again. However, if you can’t wait and accessing the website is the utmost priority you can move on to other methods mentioned below:
- Incorrect Typed URL: It truly said, ” hurry-hurry spoils the curry”. Generally, users in a hurry type incorrect or misspelled URLs in the browser address bar, and the outcome result in these type of errors. So you must review your typed URL before pressing the enter key, and make sure the URL is 100% correct.
- Check on multiple devices or connections: You must also try to access the same website on multiple devices using the same network. If the error persists, move on to another internet connection and check if the error is due to the device or the internet connection.
- Reset to default settings: If none of the above methods work, try to reset everything from the browser to your wifi router to their default settings.
Clear Chrome Browser Cache and Cookies
If you are still seeing a 403 Forbidden error try deleting the specific cookies of your web browser. This is how website-specific cookies are deleted in Google Chrome:
- Open Chrome.
- Click on More Settings
- Next, click on Advanced.
- In this menu, find ‘Content settings’ Under “Privacy and security”
- Click on ‘Cookies’.
- Under “All cookies and site data,” search for the website’s name.
- To the right of the site, click Remove
To clear all the cookies you can just go to Google Chrome History, and delete the Cache completely. A similar process can be followed in other leading web browsers.
Go to History, and click on Clear Browsing Data as shown below:


You can select the time range, select the option of Cookies and other site data, select Cached Images and files, and then click on the “Clear data” button.
Deactivate Chrome Browser Extensions
All the browsers have some extensions installed on them by the user. While troubleshooting the 403 Forbidden error it is recommended to deactivate browser extensions.
Check Firewall Settings
There is a possibility that due to one of your Firewall settings the server is not displaying the requested page. You can momentarily disable the firewall while troubleshooting the 403 Forbidden error issue.
Effects of 403 Forbidden Error on Search Engine Rankings
If your website has started showing a 403 error page which is already ranked, then it is for sure that it will end up losing search engine rankings on prominent websites like Google, Bing, etc. As per the algorithm of search engines, they first downgrade the rankings and then eventually remove the pages from their index which are no more accessible to users or bots.
To avoid such a situation it is recommended that you keep a close watch on your website’s analytics, search console, and webmaster data, and see if there are no such errors.
You can simply log in to Google Search Console (previously known as Google Webmasters), Select your website, and click on Coverage under Index, as shown below:

It will display the number of errors as well as the type of errors faced by your visitors.
You can just keep an eye on it to keep your website Indexing healthy and avoid getting lower ranks on search engines.
In case if you have recently changed the URL of a page make sure to use a redirection plugin, and redirect the old URL to the new one. Also, update the XML sitemap in the search console.

We also recommend following the above-described troubleshooting methods under the guidance of a WordPress expert if you are a beginner.
Conclusion
Understanding it, in a nutshell, a 403 forbidden error means the resource or requested file exists on the server but is not accessible to the visitor due to one of the above-specified reasons.
Following the above-described method will most probably solve the issue quickly if you are still not able to troubleshoot using any of the above methods we suggest you contact the tech support of your hosting provider immediately and see what the problem is.
During maintenance or other phases, the server technical team possibly makes configuration changes accidentally. Also, there is a possibility that your IP has been blocked by the server. Ask the technical team to check and unblock your IP Address.
Hope you are enjoying our article. if you find anything missed or would like to add some value to it, please do let us know in the comment section below.
Poor web server performance and lack of proper maintenance can increase the risk of server errors such as 403 Forbidden Error. Host or migrate your website to a more reliable, sturdy, fastest, and reputed server instead. WPOven provides Linode’s powerful private servers with industry-leading features such as:
- Fastest Private Servers
- Fully WordPress optimized Servers
- Upto 100% server uptime guarantee
- Server stack
- FREE SSL Certificate
- FREE Daily malware Scanning & Offsite Backups
- Hardened Servers with high-end security
- 24X7 WordPress Expert support
- Datacentres around the world, etc.
You can have all these features and much more in a single plan with unlimited Free migrations, unlimited staging, and a 14-day risk-free guarantee. Check out our plans or Contact our support team that assists you to choose the right plan.
How do I fix 403 Forbidden error?
Here are some things you can try.
1. Refresh the Page.
2. Double Check the Address.
3. Clear Your Browser Cookies and Cache.
4. Check if You Have Permission to Access the URL.
5. Try Again Later.
6. Contact the Website.
7. Contact your ISP.
What causes a 403 Forbidden error?
The simple reason why we are seeing this error is that you are trying to access something you don’t have permission for. Throwing a 403 forbidden error is your website’s way of stating that you don’t have enough permissions to proceed further. This error is basically due to Incorrect file or folder permissions.
What does 403 Forbidden mean?
401 Unauthorized: If the request already included Authorization credentials, then the 401 response indicates that authorization has been refused for those credentials. 403 Forbidden: The server understood the request, but is refusing to fulfill it.
One of the most common errors you will likely come across while surfing the internet is the 403 forbidden error.
This is an HTTP (Hypertext Transfer Protocol) error often displayed in many different forms on the browser. However, it usually looks something like this:
Whenever you see this error message, it simply means you have been denied permission to access a certain web page. No doubt, this error can be upsetting!
But what if you are seeing this forbidden message on your WordPress website, and not on a random website? In this case, you must be eager to get this fixed as it is possible your readers are seeing the same error message.
Thankfully, the 403 HTTP response error can be fixed! In this tutorial, we will show you how to do so. But first, we will dive a bit deeper to understand what this error message is all about.
Content:
-
- What is 403 error?
- What causes 403 error?
- How to fix 403 forbidden error
- Conclusion
What is 403 Error?
From the technical point of view, 403 is an HTTP status error code. That is to say, it is one of the responses a web server throws up when there’s something wrong somewhere.
Whenever you see this error on a website, it indicates that the webserver is denying access to that site. This denial of access can be intentional or a mistake.
Sometimes, due to geographical location, you can be denied access to a website via 403 forbidden error. In such a case, it’s intentional. However, in other cases, this error can result from a faulty server configuration.
What Causes 403 Error?
Before troubleshooting any technical issue, it’s important to understand the root cause of it. Whenever you see 403 error on a website, it’s simply an indication that something is denying you access to that site.
That something could be:
- Absence of an index page
- Corrupted/absent htaccess file
- Wrongly configured file and folder permission
- Empty website directory
- Blocked IP address.
Now you’ve seen the possible causes of 403, let’s show you methods for fixing the error.
How to Fix 403 Forbidden Error
If you are currently seeing this error on your WordPress website, here are a couple of things you can do to fix it:
Check if The URL is Typed Properly
Let’s say you are trying to access a website, but you mistakenly typed the domain name wrongly. You will very likely get a 403 error message.
For example, instead of https://example.com, you typed https:://example.com, you will run into accessibility problems.
So, check to see there are no errors in the URL you typed.
Clear Your Browser’s Cache
Clearing your browser’s cache can also help fix this problem, especially if it’s temporary. To do so, hold down Shift + Ctrl + Delete keys simultaneously on the PC.
Then, select All time from Time range (or a time range since you started seeing this error). Finally, click Clear Data.
Uninstall Any Recently Installed Plugin
At times, a poorly coded plugin can cause you to see ‘access denied’ error message on your website. If you started noticing this error shortly after installing a certain plugin, the best thing you can do is to uninstall it right away.
If you cannot access your WordPress admin dashboard, you would need to manually disable plugins. Read this guide to learn more: How to disable WordPress plugins using FTP.
Side note about the guide linked above: If you want to disable a particular plugin, open the plugins folder, locate that plugin, and rename the folder.
However, if nothing improves after uninstalling the plugin, then disable all active plugins. Again, follow the guide above if you cannot access wp-admin.
Next, refresh your site to see if the error has cleared. If you no longer see the error, it’s indicative there is a problematic plugin on your website.
To find the bad plugin, reactivate your plugins one at a time. Each time you do, refresh your site to see if the error returned. The problematic plugin will cause the error to resurface after reactivation.
If up to this point your website is still displaying a forbidden 403 error message, proceed to the next step.
Check Your Site’s htaccess File
Just so you know, htaccess file is where the configuration settings of a web server are stored. If it is missing or corrupted, a website can throw up an HTTP status error message. In such a situation, there are two things you can do to fix the problem:
- Delete the corrupted file
- Upload a fresh one
To begin with, you first need to access your site’s file directory via the cPanel or using FTP. Once you have gained access to your cPanel, locate File Manager.
Next, scroll down until you find the public_html folder.
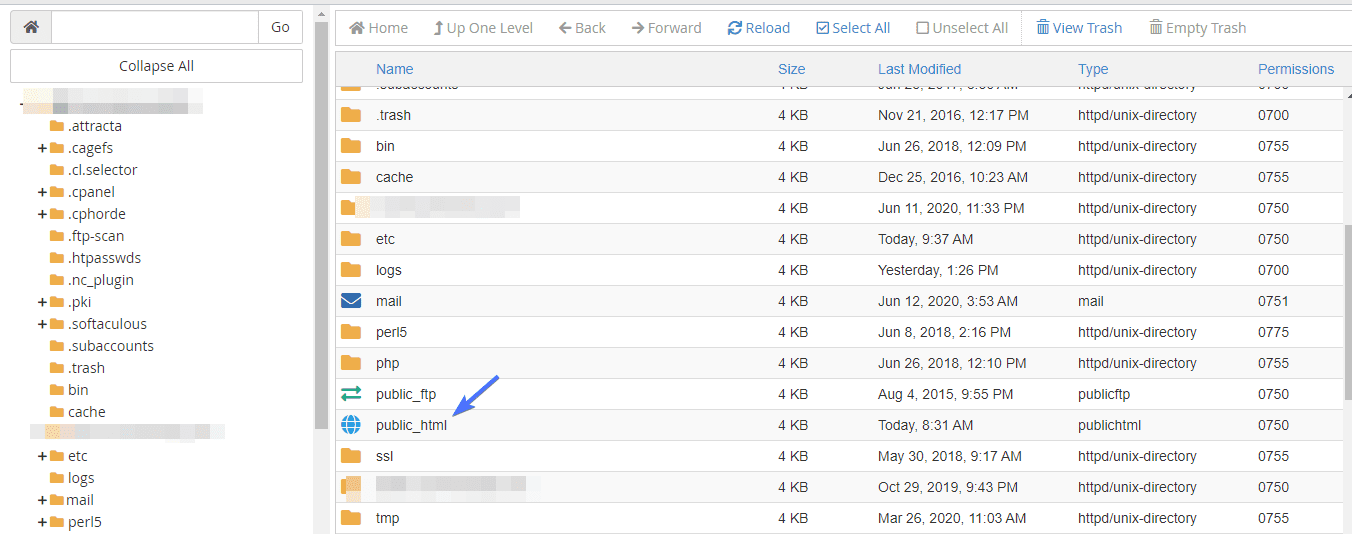
By default, you should see the .htaccess file like so:
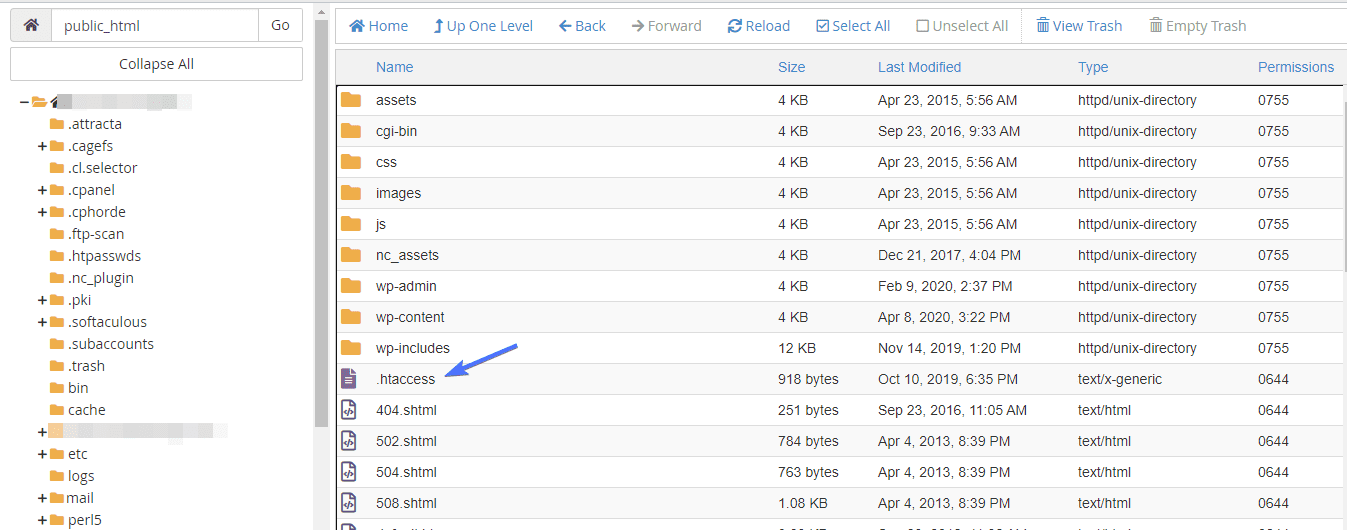
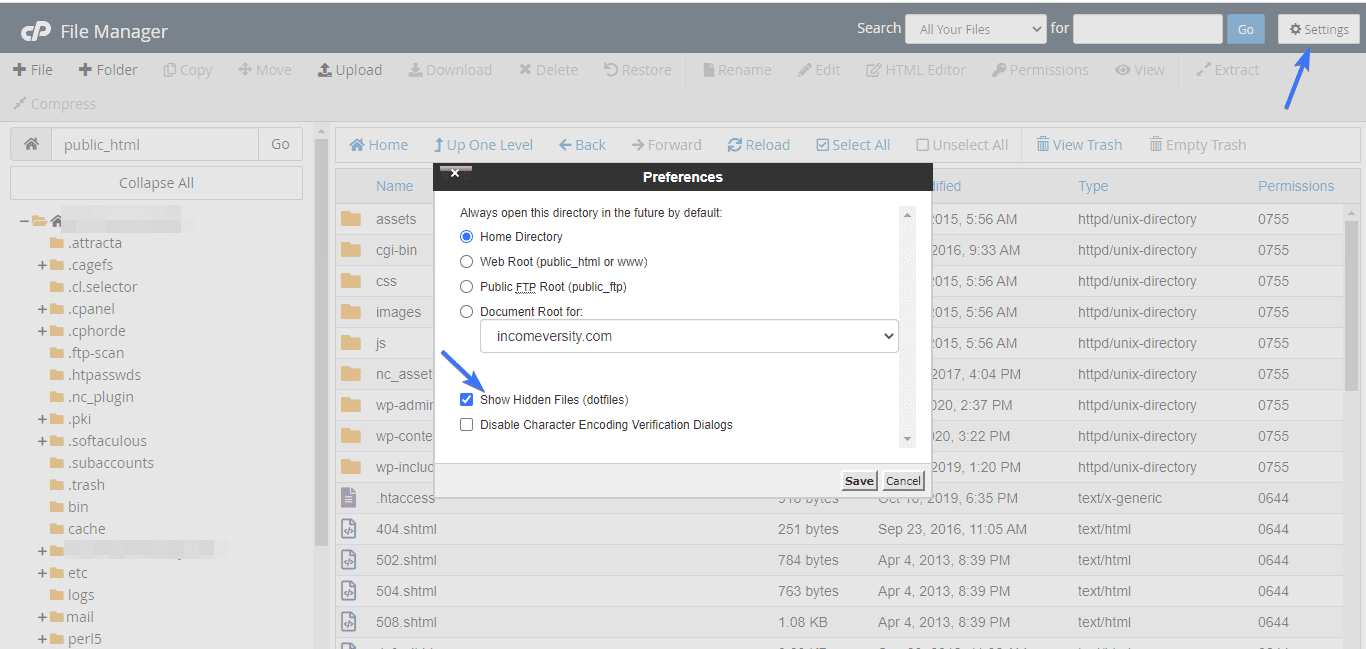
However, if it happens you couldn’t find this file, chances are it’s hidden. To unhide it, click Settings, and then check Show Hidden Files.
Once you’ve located the htaccess file, the next thing you would want to do is to find out if it’s been corrupted. How do you go about this? Well, it’s pretty simple. First, download a copy of this file as backup. Then right-click on the file and then select Delete.
With the file deleted, head back to your website, refresh it, and see if the error has cleared away. If it has, then it’s obvious the htaccess file has been corrupted.
To generate a fresh copy of the deleted file, log into your WordPress dashboard. Then navigate to Settings >> Permalink.
Without making any changes to the default settings, scroll down and click the Save changes button. Upon click, WordPress will automatically generate a fresh htaccess file for you.
Change Permissions Setting for Folders
Like we had earlier mentioned, if permission settings aren’t configured properly on your site’s folders and files, you will most likely encounter 403 forbidden error.
As such, if up to this point you are still experiencing this error, it’s about time you made alterations to your permission settings.
To do so, you will need an FTP client program like FileZilla to access your website folder, remotely.
Once you’ve gained access to your site’s backend via FTP, locate the public_html folder. Right-click on it and click File Attributes.
Next, check the Recurse into subdirectories and Apply to directories only buttons. Finally, in the Numeric value box, type in 755.
Now hit the OK button.
At this point, you are halfway through configuring your permission settings. To complete the process, repeat what you did to the public_html folder in the step above. But this time, check Recurse into subdirectories and Apply to files only, and in the Numeric value box, type in 644. Hit the OK button, and you are all set.
When this completes, your issue should be fixed.
Contact Your WordPress Hosting Provider
If nothing has worked up to this point, you might have to reach out to your hosting provider. Who knows, it might be an expired SSL certificate that has been the problem all along. They would be able to identify the source of the error from their end and help you with it.
But if the error isn’t coming from your site but someone else’s, you can always contact the website owner.
Conclusion
403 Forbidden error message can be frustrating. But thankfully, it can be fixed with a few troubleshooting steps.
In this post, we showed you methods you can use to fix this error. Some are pretty simple, while others will need some time investment from you.
We hope you found this article helpful! If you did, feel free to share it with others.
Business vector created by freepik – www.freepik.com
Read More Useful Articles:

The 403 Forbidden Error is one of the well-known errors on WordPress Website. To understand why this always appears, you need to know that how it works.
On this article, we will tell you the possible solutions to fix the 403 Forbidden Error for WordPress website.
The very first thing you should know about this error is that it is a Client-Side Error, and most commonly the error code starting with series digit 4( 4xx ) are Client-Side Errors.
What do these client-side errors mean?
The 4xx HTTP Status Code indicates that something is wrong on the client side. There is a problem with the authentication, and the client needs to fix it.
How do the Client-Server Model Works?
The client-server model is the most popular model of communication over the internet. There is a request-response cycle that is responsible for the communication between the client and the server.
Firstly, the client makes a request to the server and in return, the server response back to the client with the requested resources. Every time, the server response has an HTTP status code that indicates the success or failure of the request.
What is 403 Forbidden?
The 403 Forbidden error is a Client Side HTTP status code that occurs when you try to access a URL. It means that you do not have permission to view the requested page or resource.

You can face this error under different circumstance.
1. A 403 Forbidden error occurs when you don’t have permission to access.
2. Additionally, it occurs While trying to use an ErrorDocument to handle the request.
What Causes the 403 Forbidden Error in WordPress?
There are several reasons why 403 Forbidden error triggered. Going through the step by step guide is the best way to get rid of the error. The following are the common causes of 403 Forbidden error:
1. File Permission Issues.
2. Corrupt .htaccess file.
3. Incompatible or Faulty Plugins.
Different Scenarios of 403 Forbidden Error
1. You can face the 403 Forbidden error on wp-admin or WordPress login page.
2. 403 Forbidden – during WordPress install.
3. 403 Forbidden error – while visiting any URL.
4. It is also possible that you only see Access Denied instead of 404 Forbidden Error.
5. You may also see Access to yourdomain.com was denied. You don’t have the authorization to view this page.
Methods to fix the 403 Forbidden Error in WordPress
Note: Before moving on, it is recommended to take the backup of the entire website. You can use Backup Bank to backup your site. It is freely available on wordpress.org plugins directory.
Method 1) Change File Permissions
All files have file permissions, and these permissions are used to control who can access files and folders on your website. Inadequate file permissions can cause 403 forbidden error. Due to this, the web server believes that you do not have permission to access those files.
All Folders on your WordPress site must have the file permission of 744 or 755. All Files on your WordPress site must have the file permission of 644 or 640. Overall, all the Images, Media, and Text Files like HTML should be 755 or 644.
How to Change Permissions of a File?
File permissions play a vital role when it comes to hosting your website. They allow server computer to write, edit or view your file. Along with that, this also protects files from editing by changing the permissions. You can change your file permissions in many ways.
1. Using File Manager in cPanel
One of the easiest ways to change the permissions is by File Manager in cPanel. Please follow the following steps if you want to change the file permissions for folders or files in cPanel.
1. The first thing you need to do is Log In to your cPanel.
2. Choose the File Manager.

3. Now, select the file for which you would like to change the permissions. Click on the Change Permissions link at the top right of the page.

4. Set the permission for your file and click on Change Permissions.

2. Using FTP
It is pretty easy to change the file permissions with FTP.
1. Firstly, connect to your WordPress site using an FTP. Navigate to the root folder containing all your WordPress files.
2. Select the particular file or folder, right click and then select File Permissions from the menu.
3. A dialog box will appear in front of you asking to set the file permissions. Set the file permission to the root folder as 744 or 755.
4. Select the checkbox next to Recurse into subdirectories and then check the option saying apply to directories only.
5. Click on the OK button. Your FTP client will now start setting permissions to all subdirectories in that folder.
Once done, you need to repeat the process for all the files. This time you need to set 644 or 640. Again, select the checkbox next to Recurse into subdirectories and then check the option saying apply to files only. Click on the OK button and your FTP client will start setting file permissions for all the selected files.
Try to access your website now and check for 403 forbidden error.
3. Using Command Prompt
Type     Explanation
Owner:   It’s the user who created and owns a file/directory.
Group:   All users who are members of the same group.
Others:  All other users, on the system who are neither the owners
         nor members of the group.
Syntax: chmod options permissions file name
There are two ways to represent these permissions:
1. With Symbols( Alphanumeric Characters )
2. With Octal Number ( From Digits 0 to 7 )
Let’s have a look at the example given below that will show you how you can write the syntax of chmod command in two different ways.
a) Symbolic Permissions Notation
Let’s assume that you are the owner of the file named new-document, and you want to set its permissions such as:
The user can read, write and execute it.
Group can read and execute it.
Other only may read.
Example: chmod u=rwx,g=rx,o=r new-document
The above example shows the symbolic permission notation. Here, the letter u means the user, letter g means the group, and the letter o means other.
The equal sign (=) is to set permissions properly, whereas letters, r, w, and x are read, write, and execute respectively.
The comma separator is used to differentiate the file permissions, and there are no spaces in between them.
b) Octal Permissions Notation
Example: chmod 754 new-document
Digits 7, 5, and 4 represent permissions for users, groups, and others.
The numbers are the combination of permissions. The first of the three digits represents the permissions for the Owner. The second digit represents the Group. The third digit represents the World.
Read is equal to 4.
Write is equal to 2.
Execute is equal to 1.
No permissions for a user is equal to 0.
Write and Execute without Reading is equal to 3.
Read and Execute without Write is equal to 5.
Read and Write without Execute is equal to 6.
Read and Write and Execute is equal to 7
At this point, all you need to know is that your files should always have permissions of 644 or 755. Read, write, and execute permissions allow you to view, edit, and run a file.
It is necessary for groups and others to be able to view files. However, there are some files which you may not want anyone to see.
For this, you need to uncheck the checkbox from the reading option. Then no one will be able to see the file. Instead, the user will see a 403 Forbidden error.
Method 2) Corrupt .htaccess file. / Hidden Files (Dot Files)
When the visitor tries to browse file like the .htaccess file, results in 403 Forbidden error. You cannot look at any file that starts with a dot, in your browser.
Example: http://domain.com/.htaccess will always result in a 403 Forbidden error.
The .htaccess file is responsible for determining how the Apache servers process the client request. Whenever the user modifies the file to achieve some functionalities could result in situations that could cause 403 Forbidden error.
Solution
If your 403 Forbidden error is due to the .htaccess file, then it is quite easy to fix this issue.
1. Access the root directory of the website by FTP or by File Manager WordPress plugin.
2. Click on the .htaccess File and Delete the file.

3. Once you remove the file, login to your WordPress Admin and navigate to the Settings menu.
4. Select the Permalink menu under the Settings menu. Click on Save Changes, and this will create a new .htaccess file.

Visit your website and ensure that everything is working correctly.
Method 3) Deactivate/Reactivate your Plugins
If the reason behind the 403 Forbidden error is a faulty plugin, then you have to deactivate all the plugins to check which one is the culprit.
There are two ways you can deactivate plugins.
1. Using the Plugins Menu in your WP dashboard: Need to navigate to WordPress Admin and click on plugins menu. Now, select all the plugins and choose to deactivate from the drop-down and click on apply.
2. By FTP : While FTP is quite faster, so we recommend deactivating the plugins through FTP. All you have to do is to rename your plugins folder.
Once done, proceed to check whether the error is gone or not. If yes, restore the folder’s name and find the culprit responsible for your 403.
The 403 Forbidden error is very annoying. There are chances that if you ever run across this issue, you will be able to fix it within a fraction of time. We hope this article helps you.
WordPress Plugins
-
Backup Bank -
Captcha Bank -
Captcha Booster -
Clean Up Booster -
Clean Up Optimizer -
Coming Soon Booster -
Contact Bank -
Facebook Like Box -
Gallery Bank -
Gallery Master -
Google Maps Bank -
Limit Attempts Booster -
WP Mail Bank -
WP Mail Booster

Что это такое? Ошибка 403, возникшая на экране смартфона, ПК или планшета, говорит вам: «Сюда вход запрещен». Считается серверной ошибкой, однако это не технический сбой. Спровоцировать ее могут проделки провайдеров или мошенников.
Как устранить? Если ошибка 403 – дело рук хакеров, то придется пофиксить в настройках сайта. Если же сайт не открывается у пользователей всей страны (заблокировали по первым цифрам IP), то и здесь решить проблему можно. Для обхода запрета есть специальные сервисы.
В статье рассказывается:
- Что означает ошибка 403
- Причины появления ошибки 403
- Как решить проблему, если вы – пользователь
- Способ обхода ошибки 403
- Топ-7 прокси-серверов для обхода ошибки 403
- Как устранить ошибку 403 в Play Market
- Как исправить ошибку 403 в Крыму
- Как обойти ошибку 403 в Netflix
Многие пользователи впадают в недоумение, увидев сообщение «403 forbidden», и задаются вопросом, что это за ошибка. Если браузер отправил ее, это значит, что доступ к запрашиваемому ресурсу ограничен. Эта ошибка может быть отображена и по-другому:
-
403 Forbidden.
-
Access denied.
-
«В доступе отказано».
-
Forbidden.
-
You don’t have permission to access.
-
Запрещено 403.

Когда в сообщении об ошибке будет указан код 403, то практически во всех случаях потребуется использование стороннего программного обеспечения либо выход в Интернет через удаленный сервер.
Такое сообщение не связано с техническими неполадками, оно дает понять, что доступ к ресурсу ограничен самим провайдером.
Ошибка 403 может появиться при попытке открыть любой сайт, страницу, файл, сценарий, к которым по тем или иным причинам решено ограничить доступ пользователя.
Причины появления ошибки 403
Существует целый ряд причин, по которым пользователь может увидеть ошибку запроса 403. Таковыми могут быть как случайные или ошибочные действия провайдера, так и намеренное ограничение доступа, обусловленное политическими мотивами, соображениями безопасности данных, неготовностью материалов к публикации. Подробнее о разных вариантах.
Доступ к ресурсу может быть ограничен для пользователя из какой-либо страны
Сразу, как только пользователь выходит в Интернет, он получает IP-адрес. По нему происходит обмен данными между его устройством и любым интернет-ресурсом. IP представляет собой набор цифр, разделенных точками на четыре части по два или три знака. Первые цифры в этом коде указывают на страну, из которой осуществляется доступ к серверу.

В частности, один из самых посещаемых в мире поисковик Google в ряде стран невозможно открыть из-за ограничения доступа, поэтому пользователи из этих стран видят ошибку 403 при попытке зайти на него. Характерным примером подобной ситуации являются непростые отношения России с целым рядом зарубежных государств, из-за чего вне закона оказалось множество популярных иностранных ресурсов. Заходя на них, пользователи из России видят ошибку http 403. Кроме того, на устаревшем оборудовании провайдера при присвоении пользователю IP-адреса может указываться недостоверный код страны.
Крайне низка вероятность того, что ошибка 403 связана с тем, что сервер запретил доступ именно конкретному пользователю. Это возможно при наличии выделенной линии, при которой IP-адрес не изменяется при каждом подключении. В большинстве же случаев он присваивается заново при каждом доступе в Интернет, поэтому блокировка одного адреса не будет действовать при новом подключении. Если ошибка 403 появилась на сайте Гугл или на другом свободном в России ресурсе, следует попробовать переподключиться и зайти под другими логином и паролем. Иногда проблема решается автоматически по прошествии непродолжительного времени – не более нескольких дней.
В работе сайта возникли сбои в связи с изменениями, внесёнными в код
Если у вас в Сети создан свой сайт, то и здесь можно столкнуться с ошибкой авторизации 403. Причины могут быть следующие:
-
Сайт был взломан, в результате действий злоумышленников файл с индексными данными оказался поврежден;
-
при переносе ресурса его данные были размещены в месте хранения с неправильным адресом;
-
в вашем IP содержатся данные, при наличии которых доступ к сайту ограничен.
Индексные файлы – это записи сайта, к которым сервер при поступлении запроса от пользователя обращается в первую очередь, на основании данных, содержащихся в нем, уже обрабатываются остальные его данные. Если сервер управляется операционной системой Linux, то нужно быть внимательным к регистру при указании имени файла.
Собрали все фишки маркетинга в одном месте, чтобы вы смогли показать, что ваш продукт – лучший.
Для ресурсов, которые написаны на языке HTML и являются статичными, индексный файл будет иметь название Index и расширение html. Динамические сайты имеют index files с расширением php. У ресурса Joomla, например, два таких – Index1 и Index2. Индексный файл можно использовать из готового дистрибутива, распаковав его на локальном компьютере.
Может выясниться, что дистрибутив сайта помещен не в папку верхнего уровня, а в одну из подчиненных директорий, например, со сценариями, после чего появляется ошибка страницы 403. Не нужно тратить время на перенос данных, проще переименовать папки.

Для удаленных действий на сервере можно пользоваться протоколом FTP. Однако эффективнее будет выполнить вход непосредственно на server, поскольку так можно будет увидеть следы несанкционированных действий и обнаружить признаки вирусной атаки. Все действия на сайте фиксируются сервером с указанием их даты и времени. Вирусный код можно легко идентифицировать по записям типа ?php eval или iframe.
Если все указанные действия не помогают, остается только связаться с провайдером через службу техподдержки.
Браузер пишет «Ошибка 403», когда пользователь пытается загрузить конкретную страницу
Такие проблемы возникают гораздо чаще. В частности, если сайт был перемещен с локального сервера веб-разработчика на хостинг, как это произошло с площадкой Virtue Mart. На ней систематически возникают проблемы при нажатии кнопки «Купить».

Однако вместо страницы с данными о заказе пользователь видит ошибку 403. Вряд ли он станет думать, что делать, он просто сделает покупку в другом магазине. Поэтому в сфере интернет-торговли такие неполадки – просто непозволительная роскошь.
Отказы доступа к отдельным страницам сайта вызываются неверными настройками, которые указаны в корне сайта. Для управления нужными для открытия ресурса правами используется программа CHMOD, отличающаяся удобным интерфейсом. К каждой директории и любому файлу на сайте есть три уровня доступа:
-
хозяин сайта или суперпользователь;
-
группа доверенных лиц (администраторы);
-
посетители сайта.
С помощью программы CHMOD можно задать для страниц и папок действия, которые допускается совершать с ними тем или иным пользователям:
-
читать – обозначается цифрой 7 или буквой «r»;
-
редактировать (изменять) – цифра 7 или буква «w»;
-
исполнять – цифра 7 или буква «х».
Если файлу назначили права доступа 777 (в буквенном коде: rwx–rwx–rwx), то это означает, что любой пользователь Сети может совершать с ним действия наравне с хозяином сайта – изменять, удалять, редактировать данные.
Как создать продающий прайс-лист, чтобы клиенты отдали предпочтение вам, а не конкурентам.
Чаще всего встречается режим доступа 755 (в буквенном обозначении: rwx–r-x–r-x). Это значит, что редактировать файл может только суперпользователь, а администраторы и посетители сайта – только читать и исполнять. Буква «w» для суперпользователя позволяет получить ему неограниченный доступ к сайту. Знак «r», если он отсутствует в наборе прав хозяина, лишит доступа к сайту даже его. Ну а без режима «x» ни один посетитель не сможет оформить заказ и увидит ошибку браузера 403, как в случае с вышеупомянутым Virtue Mart.
В программе CHMOD все папки и файлы представляются в виде таблицы. Для изменения режима доступа достаточно кликнуть по соответствующей ячейке рядом с названием. Не зная, какой режим выбрать, указывайте 755, он подходит для большинства случаев.
Провоцируем 403 сами
Мы выяснили, что означает ошибка 403. Теперь разберемся, как воспроизвести ее самостоятельно. Например, вы хотите ограничить доступ какому-то пользователю или их группе по тому или иному признаку. В этом поможет файл .htaccess. В стандартном дистрибутиве CMS Joomla он называется htaccess.txt. Присвойте ему новое имя, поставив в начале заголовка точку. Также можно использовать программу Notepad ++, в ней нужно прописать следующее:

Этой командой вы ограничите возможность доступа к файлу всем пользователям, IP которых будет отличаться от указанного. Как вы помните, интернет-протокол большинства пользователей динамический, поэтому ограничения нужно указывать в директиве Deny. Третью и четвертую группу цифр в IP-адресе заполните нулями. Можно заблокировать пользователей из определённой страны. Так, например, если указать 81.4.0.0/14, то доступ к ресурсу не смогут получить все пользователи, интернет-протокол которых начинается с 81.4; на блокировку указывает число 14 после косой черты.
Чтобы установить IP-адрес злоумышленника, нужно воспользоваться одним из следующих вариантов:
-
компоненты CMS (форум) указывают этот адрес, и администратор узнает о новом посте;
-
изучите log-файл, который хранится на хосте.
Log-файл достаточно объемный, однако, потратив время на его изучение, вы безошибочно вычислите злодея, соотнеся момент его появления на сайте со временем вредоносных изменений, а затем сможете легко его заблокировать.
Также можно ограничить доступ к критически важным директориям. В Joomla к таковым относится папка Libraries.
Сформируйте файл .htaccess и укажите в нем следующие параметры:
Order allow deny
Deny from all
Файл нужно разместить в папке, доступ к которой будет ограничен. После этого по запросу, в котором указано имя сайта и за ним – /Libraries, пользователю будет направлено сообщение «Ошибка 403 disallowed useragent».
Кейс: VT-metall
Узнай как мы снизили стоимость привлечения заявки в 13 раз для металлообрабатывающей компании в Москве
Узнать как
Хостинг недоступен
Нередко ошибка сервера 403 может возникать, если нет доступа к хостингу, который может оказаться заблокирован самим провайдером для конкретного пользователя. Это чаще всего связано с нарушением технических требований или условий hosting-договора. Как правило, перед блокировкой направляется электронное письмо с предупреждением и указанием ее причин, дается время на устранение недостатков. По истечении срока, если нарушения не устранены, происходит блокировка.

Таким образом, в первую очередь нужно проверить свою электронную почту и найти там письмо соответствующего содержания, а затем выполнить указанные в нем требования провайдера. Если такого послания не обнаружилось, то скорее всего причина проблемы кроется в другом.
Отключение плагинов WordPress
Если так и не удалось установить, почему появляется ошибка 403, то существует вероятность проблемы в плагинах WordPress. Они могут быть неработоспособны или несовместимы с теми настройками сайта, которые вы указали.
В этом случае сначала нужно попытаться отключить плагины. Для этого переходим в раздел «Wp-content» и находим в нем папку «Plugins». Переименуйте ее, после этого сайт не сможет обнаружить и подгрузить ранее указанный плагин. Теперь вновь откройте страницу. Если она загрузилась, то проблема крылась именно в plugins. Осталось лишь выяснить, какой именно из них вызвал неполадки. Для этого можно вернуть прежние имена папкам, а затем аналогичным способом отключать каждую отдельно. Когда проблемный плагин будет обнаружен, его нужно переустановить или заменить на другой.
Защита Hotlink
Хотлинкинг предполагает использование одним порталом ресурсов другого посредством ссылок. Выглядит этот так. Например, на сайте 1 размещены какие-то объемные видеоматериалы, которые понравились владельцу ресурса 2. Владелец веб 2 решил разместить их у себя, указав на них ссылки. Пользователь, заходя на сайт 2, видит эти материалы так же, как если бы они были размещены непосредственно на нем. Однако нагрузка на веб 1 и сервер, на котором он размещен, возрастает, сказываясь негативно на его пропускной способности.
Для предотвращения такого положения хозяин ресурса 1 может указать зону рефереров. В этом случае пользователь, пытающийся ретранслировать материалы с портала 1 на сторонние вебы, будет видеть сообщение «Ошибка 403 доступ запрещен» вплоть до того момента, как хозяин сайта 1 отменит ограничения. Исправить ее самостоятельно владелец ресурса 2 не сможет.

Как решить проблему, если вы – пользователь
Часто с ошибкой скачивания 403 сталкиваются не только администраторы сайтов, но и рядовые пользователи. Что делать:
-
Прежде всего удостоверьтесь, что данные нужного ресурса в Интернете указаны в адресной строке без ошибок.
-
Если ошибка 403 проявляется на андроиде, попробуйте загрузить страницу с другого устройства. Возможно, причина проблемы непосредственно в вашем гаджете.
-
Могут быть временные неполадки у провайдера, поэтому, если сообщение об ошибке 403 направлено удаленным сервером, обновите страницу и проверьте, не исчезла ли она.
-
Выполните очистку кэша и cookies. Для этого нужно зайти в соответствующие настройки браузера, которые могут отличаться и находиться в разных разделах в каждом из них. В нужном меню отметьте файлы кэша и cookies, после чего нажмите «Очистить».
-
Пользователь может видеть сообщение «403 ошибка на сайте», если для доступа к нему нужно выполнить вход с логином и паролем. Зарегистрируйтесь или войдите под своей учетной записью, и проблема должна исчезнуть.
-
При выходе в Интернет с телефона ошибка 403 может появляться, если включён режим экономии трафика. Для ее отключения найдите соответствующий раздел в Google Chrome.
-
Если ничего не помогло, то остается только ждать. Вполне вероятно, что владелец сайта уже знает об ошибке и пытается ее устранить, но для этого требуется определенное время. Выждав пару дней, попробуйте зайти на ресурс снова.
Способ обхода ошибки 403
Ошибку приложения 403 можно преодолеть достаточно легко. Для этого лишь нужно воспользоваться прокси-сервером. В этом случае запрос пользователя будет оправляться не напрямую на целевой сервер, а сначала проходить через промежуточный компьютер, для которого ограничения не установлены. Тот от своего имени получит требуемые данные и передаст их исходному пользователю. Это очень эффективный способ обхода ограничений в Сети, а также надёжный инструмент для того, чтобы сохранить анонимность.
Прокси-серверы работают как в России, так и за границей. Как правило, подобная услуга предоставляется на возмездной основе.

Прокси может использоваться для расширения возможностей связи, на нем основан, в частности, GPRS, который изменяет IP сотового телефона несколько раз за один выход в Интернет. Связано это с тем, что голосовые сообщения обладают приоритетом при передаче по линиям сотовой связи, а остальные данные передаются по свободным каналам. Провайдеры при использовании несимметричного выхода в Интернет также используют прокси, когда запрос направляется по каналу GPRS, а ответный сигнал принимается по спутниковой связи.
Топ-7 прокси-серверов для обхода ошибки 403
Рассмотрим наиболее популярные прокси-серверы. Ниже представлены как резидентные и мобильные решения, так и серверные прокси с доступными тарифами.
AstroProxy
Предоставляет пользователю как серверные, так и резидентные и мобильные прокси. IP у всех изменяется.

Преимущества:
-
Наглядное управление через веб-интерфейс и сбор статистики.
-
Изменяемые IP, сводящие к минимуму возможность обнаружения подключения через удалённый сервер.
-
Огромный выбор прокси, привязанных более чем к 100 странам по всему миру.
-
Широкий ассортимент тарифных планов, включая безлимитные варианты.
-
Моментальный доступ ко всему перечню доступных прокси-серверов.
-
Возможность платежей как традиционными валютами – рублями, долларами, евро, так и многими видами криптовалюты.
-
Поддержка русского языка.
-
Тестовый период, в течение которого возможности сервиса можно опробовать бесплатно.
Недостатки:
-
Имеется перекос в сторону прокси, привязанных к определенным регионам.
-
Невысокий дисконт при использовании значительных объёмов переданных данных.
Особенности AstroProxy:
-
Пользователю предоставляется порт, с которым связаны однотипные прокси. Для каждого из них в полном объеме поддерживается HTTP(S) и SOCKS, которые можно использовать параллельно друг с другом. Данные с каждого порта могут быть моментально активированы через VPN.
-
Оплачивается трафик только в одном направлении – либо входящий, либо исходящий, в зависимости от того, на какой из них приходится наибольшая часть данных.
-
Если вы приводите новых пользователей, то вам предоставляется на счет до 10 % от каждого сделанного ими платежа, в то время как у большинства иных провайдеров бонус зачисляется только с первой такой суммы.
Oxylabs
На данном сервисе можно воспользоваться всеми тремя видами proxy – мобильными, динамическими и приватными. Доступны и shared, и частные прокси.

Преимущества:
-
Самое большое количество прокси в мире – более 100 млн.
-
Поддержка HTTP(S) и SOCKS5;
-
Высокая скорость передачи данных.
-
К пользователю прикрепляется персональный менеджер.
-
Изменение прокси как вручную, так и в автоматическом режиме.
-
Семь дней бесплатного использования для оценки возможностей, рефанд в течение трех дней.
Недостатки:
-
Дороговизна (от $ 100 для shared, от $ 300 для резидентных прокси и от $ 500 — для мобильных proxy);
-
Нет поддержки русского языка.
Особенности Oxylabs:
-
Целевая аудитория – крупные бизнес-компании. Сервис относит себя к премиальному сегменту, предоставляя пользователям широкий набор FPI инструментов из поисковых сайтов, (в частности – SERP Scraper), с онлайн-магазинов (E-Commerce Scraper API), обычных сайтов (Web Scraper API).
-
Официальный плагин для Chrome, который дает возможность использовать весь спектр прокси.
-
Имеются резидентные и мобильные proxy в широком перечне государств.
Storm Proxies
К услугам пользователей – резидентные прокси с изменяемым IP, а также серверные, как приватные, так и shared.

Преимущества:
-
Тарифы, предоставляющие неограниченный трафик.
-
Доступность тарифов (от $ 39/месяц за выделенные динамические прокси).
-
Не требуется логин и пароль.
-
Отдельные прокси для сбора данных с сайтов по продаже билетов и со сникер-ботами.
Недостатки:
-
Ограничение по частоте изменения IP (не чаще одного раза в три минуты в ручном режиме и не чаще одного раза в 15 минут в автоматическом).
-
Ограниченный перечень IP (чуть более 200 000).
-
Не поддерживается протокол SOCKS.
-
Доступ без логина и пароля снижает безопасность.
Особенности Storm Proxies:
-
Целевая аудитория – частные пользователи и низкобюджетные стартапы. Может использоваться как основа для запуска сникер- и тикет-ботов. Для трафик-ботов могут использоваться также изменяемые IP. Хорошо подходит для SEO-парсинга и операций с использованием скрейперов.
-
Удобство для начинающих пользователей прокси, выражающееся в простом интерфейсе и ограниченных возможностях настройки.
SOAX
Доступны мобильные proxy и резидентные прокси с изменяемым IP-адресом.

Преимущества:
-
Надежность соединения.
-
Доступна функция таргетинга не только по государству, но и по городам и ASN (более 100 стран).
-
Оперативная поддержка пользователей.
-
Пробный период с минимальной оплатой – за 1,99 долларов можно получить 100 МБ данных.
-
Широкие опции для изменения IP (sticky-сессия продолжительностью 90–600 секунд, длительность может быть увеличена).
-
Поддержка протоколов HTTP(S) и SOCKS5.
-
Доступная цена, не превышающая предложения конкурентов (99 долларов за мобильные и резидентные прокси).
Недостатки:
-
Количество портов для доступа HTTP(S) и SOCKS5 ограничено.
-
Частое падение скорости передачи данных.
Особенности SOAX:
-
Принцип работы: После входа в панель управления пользователю предоставляется перечень всех доступных прокси, нужные вносятся им в отдельный белый список. Также настраиваются частота и режим изменения IP, геолокация, после чего к порту привязывается перечень этих адресов.
-
Пользователю в его аккаунте предоставляется список всех действующих прокси и активных ASN.
Smartproxy
Наряду с резидентными прокси, Smartproxy предоставляет пользователю серверные варианты, которые могут быть как с изменяемым IP, так и предоставляться по выделенной линии.

Преимущества:
-
Быстрота передачи данных, минимальное время отклика на запрос пользователя на любом виде прокси.
-
Развернутая информация о пользовании сервисом прямо на сайте.
-
Пользователю предоставляется полный перечень имеющихся резидентных прокси.
-
Вспомогательное программное обеспечение, предоставляемое безвозмездно.
-
У резидентных прокси по выделенной линии IP-адрес меняется каждый месяц.
-
Возможность совершения платежей криптовалютой (используется биткойн).
Недостатки:
-
Протокол SOCKS5 не работает.
-
Нет мобильных и ISP прокси;
-
Все серверные proxy размещены на территории Соединенных Штатов Америки.
-
Для резидентных прокси не работает ASN-таргетинг.
-
Пользователи из России и Белоруссии могут совершать платежи только криптовалютой, для использования традиционных валют требуется наличие PayPal или банковской карты, которая зарегистрирована за пределами этих стран.
Особенности Smartproxy:
-
Имеется собственный безопасный браузер X-Browser, а также плагины для сторонних программ для серфинга в Сети. Предоставляется скрейпер как отдельное приложение (SERP), так и в виде плагина для браузера (Smart Scraper).
Bright Data (ex. Iluminati)
Пользователю предоставляются ISP-прокси, резидентные и мобильные, частные и shared серверные proxy.
")
Преимущества:
-
Огромный опыт в предоставлении прокси-услуг. Компания, созданная в Израиле, находится на рынке с 2014 года.
-
Наряду с прокси, пользователю предоставляется полноценный сервис по сбору сведений.
-
Имеются все популярные предложения proxy.
-
Искусственный интеллект подбирает прокси, который наиболее отвечает нуждам пользователя (технология Proxy Waterfall).
-
Бесперебойная работа сервиса и предоставляемого им proxy-канала.
-
Наличие русскоязычного интерфейса.
Недостатки:
-
Дороговизна (за резидентные или мобильные прокси придется выложить не менее $ 500);
-
Плохо подходит новичкам, так как предполагает наличие навыков программирования и сетевого администрирования.
Особенности Bright Data:
-
Является полноценным решением для профессионалов, которые, помимо прокси, предлагает также и эффективные решения для скрейпинга, парсинга, настройки изменения IP, возможность расширенного сбора данных. Также отличается безопасностью, которой способствует как собственная технология Data Unblocker, отслеживающая cookies и активность браузера, так и наличие плагина для популярных браузеров.
-
Предлагается не менее 72 млн прокси всех видов.
NetNut
Предоставляются как shred-прокси для серверов, так и ISP, и резидентные proxy с постоянным и с изменяемым IP-адресом.

Преимущества:
-
Колоссальное количество доступных ISP-прокси – свыше 1 млн.
-
Предоставляется семь дней бесплатного использования для ознакомления с возможностями сервиса.
-
Не ограничивается число запросов, которые могут быть направлены в один момент времени.
-
Резидентные прокси имеют широкий выбор по их географическому размещению.
-
Бесперебойное соединение и передача данных по резидентным каналам.
Недостатки:
-
Русскоязычный интерфейс выполнен машинным способом, что значительно искажает значение многих опций для не владеющего английским языком;
-
Дороговизна с учетом отсутствия поддержки в рамках пакетов некоторых опций, которые в тех же тарифах на других сервисах дополнительно предоставляются пользователю (не менее $ 20 за 20 ГБ трафика, при этом нет поддержки белого списка, Skype и некоторых других возможностей).
-
Небольшой выбор ISP-прокси, привязанных к странам Азии и Африки.
-
Геолокация поддерживается только для прокси, IP которых приписаны к Соединённым Штатам Америки.
-
Неудобные интерфейс, который новичка собьет с толку, и справочник по часто возникающим проблемам.
Особенности NetNut:
-
Входит в число лидеров по выбору ISP-прокси, привязанных в основном к Европе и Соединенным Штатам Америки.
-
Имеется API приложение, которое обрабатывает запросы, заменяя proxy, что позволяет повысить продуктивность скрейпинга информации (данная возможность входит в цену наиболее дорогостоящих пакетов).
Скачайте полезный документ по теме:
Чек-лист: Как добиваться своих целей в переговорах с клиентами
Как устранить ошибку 403 в Play Market
Очень часто с ошибкой 403 сталкиваются пользователи Play Market при попытке установки приложения на гаджет. Как правило, проблема устраняется очисткой временных файлов и cookies в меню опций. Также код 403 указывается в ошибке Плей Маркета для пользователей в тех странах, в которых Google заблокирован. В этом случае придется воспользоваться VPN.
Столкнувшись с ошибкой Плей Маркета 403, попробуйте сперва протестировать стабильность соединения или канала Wi-Fi. Затем выключите и снова включите гаджет, проверьте, что свободный объем памяти достаточен для скачивания и установки данных.

Ошибку 403 в Плей Маркете исправить не так сложно. Для этого нужно войти в меню настроек и выполнить следующую последовательность действий:
-
откройте меню «Приложения» (может также называться «Приложения и уведомления»), найдите пункт «Сведения о приложении»;
-
кликните по заголовку «Play Маркет», если Android ниже 7 версии, также зайдите в хранилище;
-
кликните по опции «Стереть данные», на запрос системы о подтверждении действия ответьте утвердительно;
-
Повторно войдите в Play Market, попытайтесь скачать ранее недоступные данные вновь. Ошибка 403 может появиться и в этот раз, что значит недоступность сервера. В этом случае те же действия нужно вновь выполнить из меню настроек в приложении «Сервисы Google Play».
Как исправить ошибку 403 в Крыму
Спор из-за территориальной принадлежности Крыма повлек отказ многих западных компаний работать на данной территории, включая Google, отключившей для жителей полуострова Play Market, и Apple, заблокировавшей сервис AppStore.
Выручит в этой неприятной ситуации изменение IP-адреса, который эти сервисы будут видеть при обращении к ним пользователя. Для этого используйте VPN. Возможно, для полноценной работы потребуется скачать и установить на свой гаджет файл apk.

Для теста опробуем браузер Opera VPN:
-
Включите Opera VPN на вашем устройстве и кликните по надписи «Начать работу»
-
Увидев на дисплее вопрос о разрешении на подключение, отвечаем утвердительно.
-
После нажатия кнопки «Подключиться» весь исходящий трафик будет обрабатываться серверами Opera, которые размещены в Германии, Канаде, Нидерландах, Сингапуре и США. Приложение автоматически подключается к тому из них, который размещен ближе всего к устройству пользователя. Можно выбрать любой другой, но чем дальше находится сервер, тем сильнее падает скорость передачи данных.
-
В верхней части телефона должна появиться иконка ключа, что означает активность VPN. Попытайтесь зайти на сайт, который ранее выдавал ошибку 403. Если удалось выполнить вход, то виртуалка работает нормально.
Как обойти ошибку 403 в Netflix
Сервис Netflix официально приостановил работу на территории РФ, но пока не сообщал о полной блокировке. В результате пользователи при попытке войти на сервис видят сообщение nw 6 403. Netflix выдает такую ошибку, поскольку при обращении к сервису в запросе отображается российский IP-адрес. Рассмотрим, как ее исправить.
-
Устранение ошибки «Нетфликс» nw 6 403 на персональных компьютерах и смартфонах
Неплохим способом решения проблемы будет использование VPN-сервисов. Они позволяют скрыть местонахождение пользователя, предоставляя Netflix данные прокси сервера, через который подключается пользователь. Во многих случаях есть возможность выбрать конкретную локацию IP. Дело в том, что содержание контента, который предоставляется данной стриминговой платформой, даже без учета ограничений различно в зависимости от нахождения устройства, направившего запрос. Поэтому выбор VPN по локации позволит получить полный доступ к содержимому Netflix.

Нужно помнить о ряде факторов, с которыми будет сопряжено устранение на «Нетфликс» ошибки 403 с помощью VPN. Прежде всего это ограниченная скорость данных, которые будут передаваться пользователю, что повлечёт нестабильное воспроизведение видео. Также платформа запрещает использовать средства обхода региональных ограничений, за нарушение этого правила пользователя могут заблокировать. И, наконец, Netflix способен отслеживать подключение пользователя через VPN, после чего сразу происходит обрыв соединения. Таким образом, подобный способ обхода ошибки с кодом nw 6 403 не может гарантировать безотказную работу.
Если вы согласны мириться с этими неудобствами, то вопрос только в выборе подходящего VPN-сервиса. Платные платформы предлагают более широкие возможности и широкий перечень серверов и их типов. Стоит обратить внимание на такие из них, как ExpressVPN, Zenmate, Surfshark и CyberGhost. Зарегистрировавшись на сайте соответствующей площадки, нужно скачать приложение и установить его на телефон или ПК, после чего выполнить подключение к Интернету через VPN.
Проблемы могут возникнуть также с оплатой подписки в Netflix. Для этого в идеале нужен человек, который находится вне территории России и имеет карту зарубежного банка. В противном случае попробуйте воспользоваться VPN, который работает бесплатно. Эффективность невысока, но за неимением лучшего можно использовать и им. Попробуйте сервисы Proton VPN, плагин Windscribe, Browsec и Lantern.
-
Устранение ошибки 403 на телевизоре
В данном случае ситуация сложнее, чем в случае с ПК или смартфоном. На телевизор не получится установить какое-то стороннее программное обеспечение. Поэтому если ошибка nw 6 403 Netflix появилась на телевизоре, нужно изменить настройки роутера.
Они различны для разных производителей. В Сети можно найти для каждого роутера алгоритм действий, который позволит обойти ошибку eos in ff 403. Также для большинства моделей имеется возможность настроить VPN, в этом вам поможет Интернет.

Статья опубликована: 08.09.2022
Облако тегов
Понравилась статья? Поделитесь: