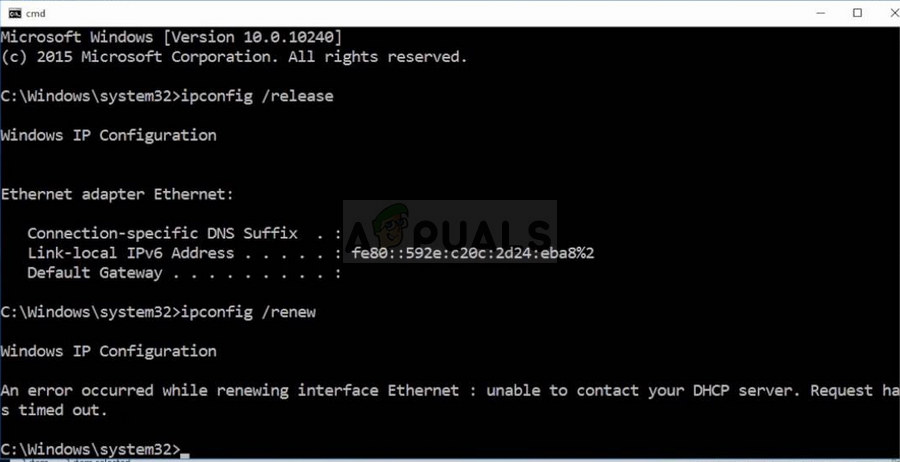
Unable to Contact DHCP Server appears when you try to lease, release or renew an IP Address. This error means that your NIC cannot speak with the DHCP Server in order to obtain a new lease to retrieve a new IP Address that it can use.
What is a DHCP Server
DHCP or Dynamic Host Configuration Protocol is a network protocol used for assigning IP Addresses automatically.
Why am I getting ‘Unable to Contact DHCP Server’
The error will often occur after you try to run the “ipconfig /renew” command in Command Prompt and it can become difficult to solve Windows problems that rely on this method. Below you will be able to find several methods that were confirmed to work for other users so make sure you try them out and hopefully solve your problem!
Solution 1: Update or Roll Back Your Network Drivers
To be honest, updating and rolling back the driver are two opposite actions but it all depends on which driver brought the error to your computer. If you are running old, no-longer-supported drivers on your computer, then an update is almost certain to solve the problem.
However, if the problem started to occur after you have updated your driver one way or another; a rollback might be good enough until a new, more secure driver is released. You should also update or rollback the network device you are using to connect to the Internet (Wireless, Ethernet, etc) but performing the same process all of them should do no harm.
- First of all, you will need to uninstall the driver you currently have installed on your machine.
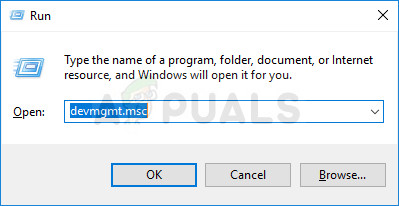
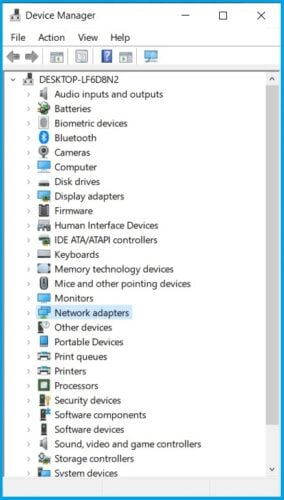
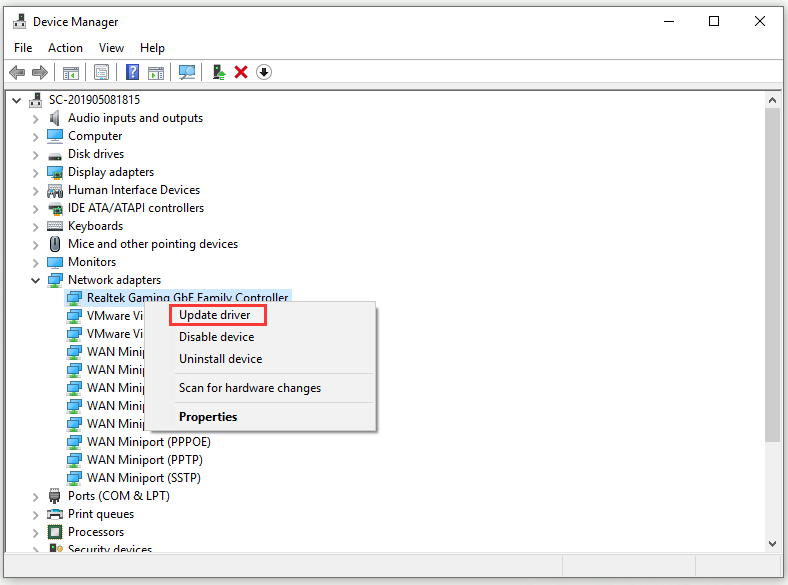
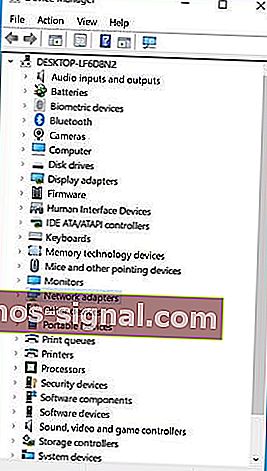
- Type “Device Manager” into the search field next to the Start menu button to open the device manager window. You can also use the Windows Key + R key combination in order to open the Run dialog box. Type devmgmt.msc in the box and click OK or Enter key.
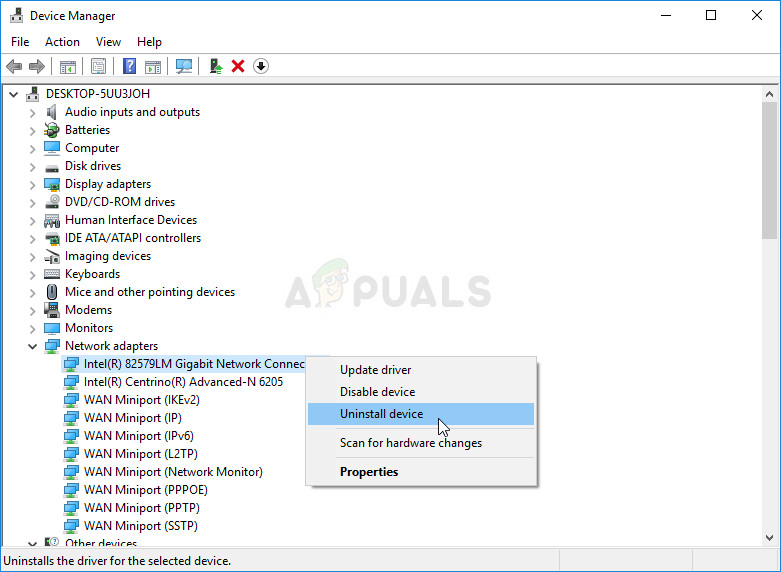
- Expand the “Network Adapters” section. This will display all network adapters that the machine has installed at the moment.
Update the Driver:
- Right-click on the network adapter you want to uninstall and select “Uninstall device“. This will remove the adapter from the list and uninstall the networking device.
- Click “OK” when prompted to uninstall the device.
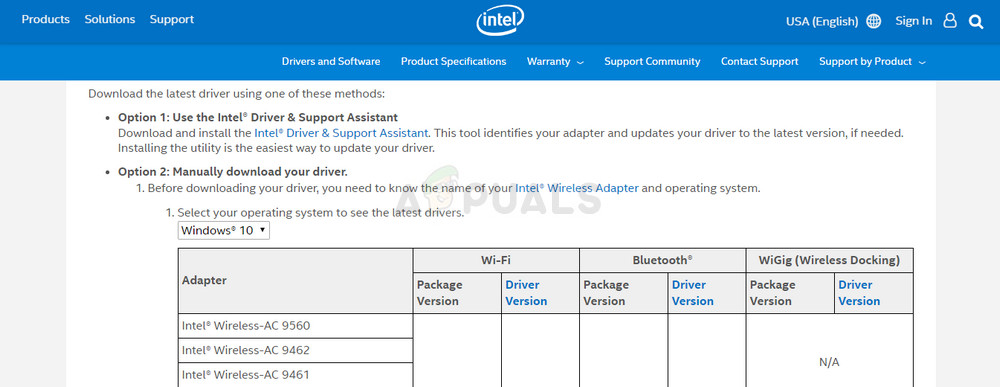
- Remove the adapter you are using from your computer and navigate to your manufacturer’s page in order to see the list of available drivers for your operating system. Choose the latest one, download it, and run it from the Downloads folder.
- Follow the instructions on-screen in order to install the driver. If the adapter is external such as a Wi-Fi dongle, make sure it stays disconnected until the wizard prompts you to reconnect it to your computer. Restart the computer and check to see if the problem has disappeared.
Rolling Back the Driver:
- Right-click on the network adapter you want to uninstall and select Properties. After the Properties window opens, navigate to the Driver tab and locate the Roll Back Driver option.
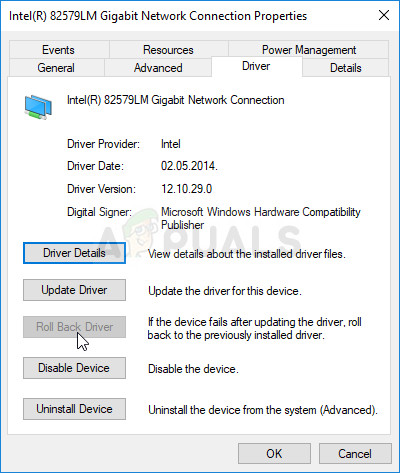
- If the option is grayed out, it means that the device wasn’t updated recently as it has no backup files remembering the old driver. This also means that the recent driver update is probably not the cause of your problem.
- If the option is available to click on, do so, and follow the instructions on-screen to proceed with the process. Restart the computer and check to see if the problem still occurs in Command Prompt.
Solution 2: Disable the VirtualBox Related Driver
VirtualBox is a program developed and published by Oracle and it’s used to run and visualize various operating systems on various platforms. It can be downloaded and installed from their website and you might have used it in the past or you might be using it now.
However, their driver may mess things up a bit on your computer, and disabling it from the Internet connection you are using won’t affect the program significantly but it may just help you solve your problem.
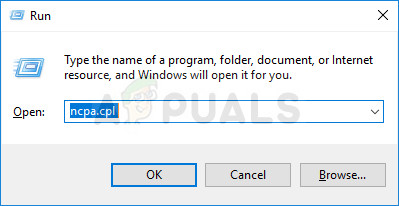
- Open the Run dialog box by pressing the Windows logo key + R key together. Then type “ncpa.cpl” in it and click OK. It can also be achieved by opening the Control Panel. Change the view to Category and click on Network and Internet. Click on the Network and Sharing center section in order to open it and locate the Change adapter settings option at the left side of the window and click on it.
- Now that the Internet Connection window is open, double-click on your active Network Adapter.
- Then click Properties and locate the VirtualBox Bridged Networking Driver entry on the list. Disable the check box next to this entry and click OK. Restart your computer in order to confirm the changes and check to see if the error appears again.
Solution 3: Register DNS using CMD
This simple command did the trick for a lucky user who complained about a problem on an online forum and it appears what this answer helped other users as well. That being said, plenty of Microsoft officials were stunned by the fact that this worked but it’s a viable solution so you might as well try it out!
It won’t do any harm to your computer as it initiates manual dynamic registration for the DNS names and IP addresses that are configured at a computer and it’s actually used to solve network-related problems..
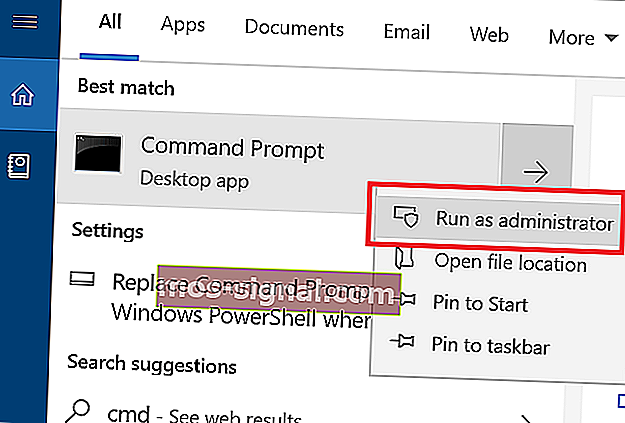
- If you are a Windows 10 user, you can easily locate Command Prompt simply by clicking the Start menu button or the Search button next to it and type in “cmd” or “Command Prompt”. Right-click on the first result and choose the Run as administrator option.
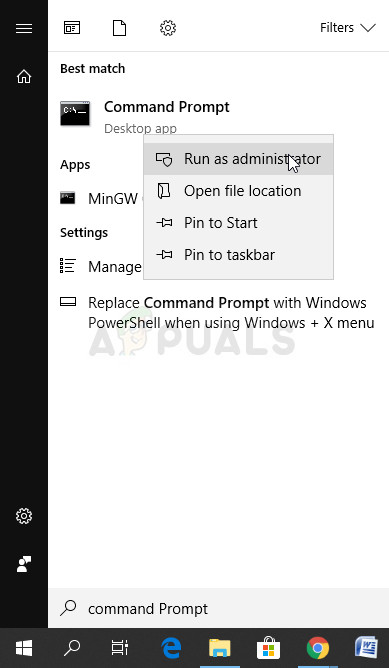
- If you are running a version of Windows older than Windows 10, the Start menu search might or might not work properly but you can still navigate to C >> Windows >> System32, right-click on the “cmd.exe” entry and choose Run as administrator.
- Type in the command below and make sure you click Enter afterwards:
ipconfig /registerdns
- After you see the “operation completed successfully” message in Command Prompt, click the close button or type in “exit” in Command Prompt, restart your computer and check to see if the problem is gone.
Solution 4: Disable IPv6 on Your Active Connection
This “ipconfig” error sometimes occurs if IPv6 is enabled for your active connection and you don’t have a local gateway which is needed to connect. There are several users who were able to solve the problem this way and it won’t affect your consumer experience.
- Open the Run dialog box by pressing the Windows logo key + R key together. Then type “ncpa.cpl” in it and click OK.
- When the Internet Connection window opens, double-click on your active Network Adapter.
- Then click Properties and locate the Internet Protocol Version 6 entry on the list. Disable the checkbox next to this entry and click OK. Restart your computer in order to confirm the changes and check to see if the problem occurs in “ipconfig” again.

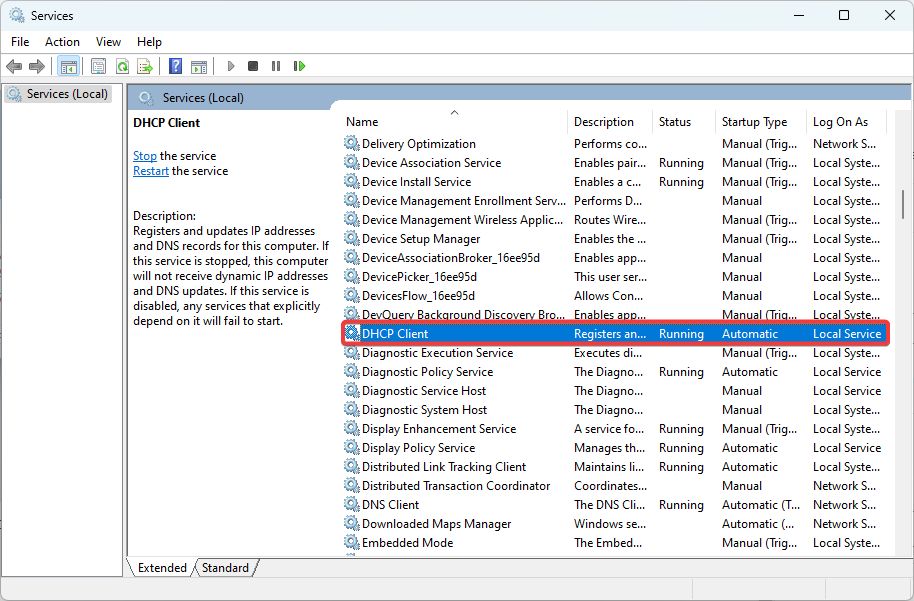
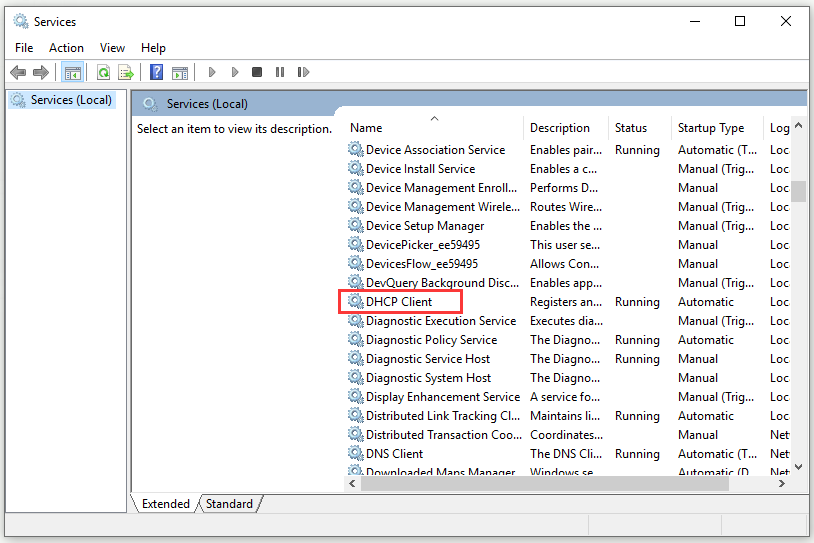
Solution 5: Restart Your DHCP Client Service
DHCP Client Service managed these problems and if the service has stopped or malfunctioned, the best thing you can do is to simply (re)start it and hope for the best. It has helped several users as this service absolutely needs to be running on your computer in order for commands like “ipconfig /renew” to work.
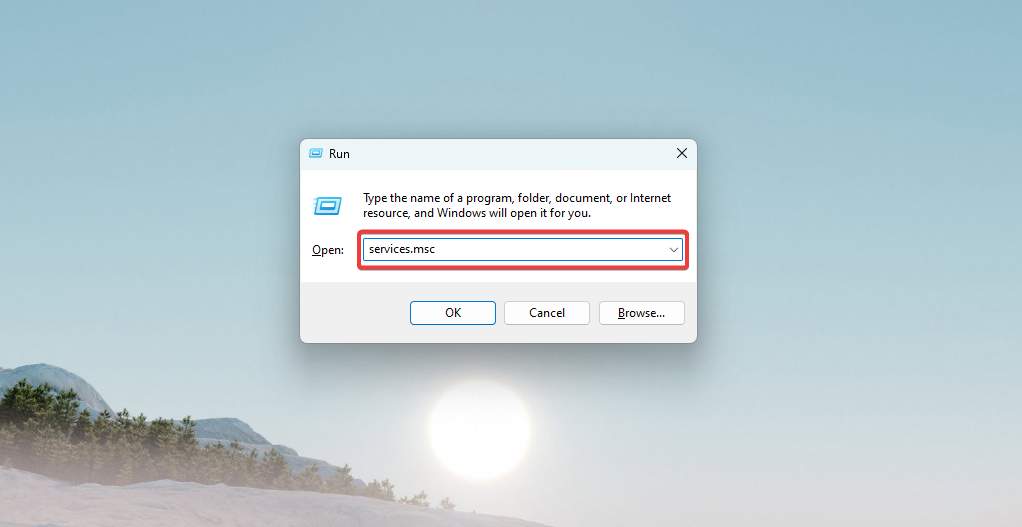
- Open the Run dialog box by using the Windows Key + R key combination on your keyboard. Type “services.msc” in the box without the quotation marks and click OK in order to open Services.

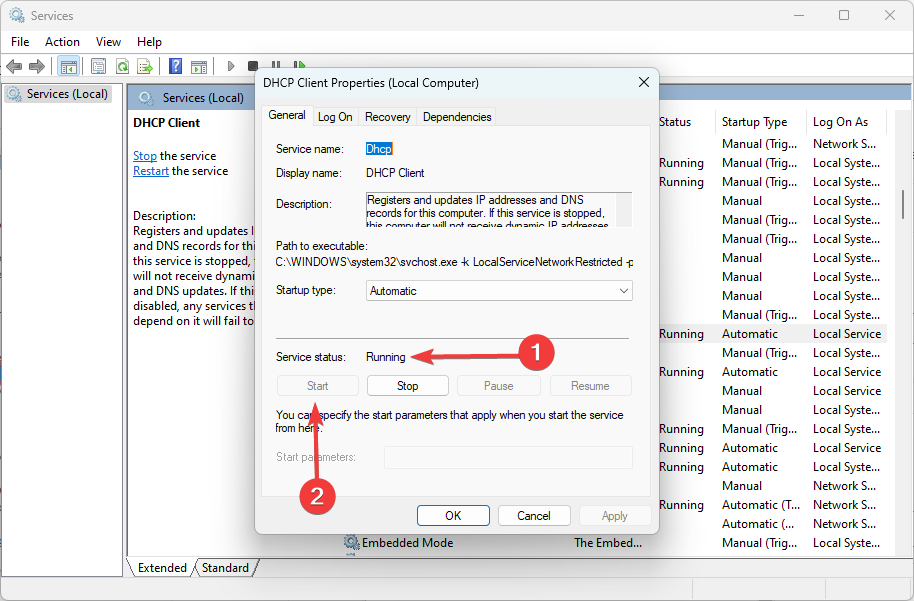
- Locate DHCP Client Service in the services list, right-click on it, and select Properties from the context menu which appears.
- If the service is started (you can check that just next to the Service status message), you should spot it immediately by clicking the Stop button in the middle of the window. If it is stopped, leave it as it is (for now, of course).
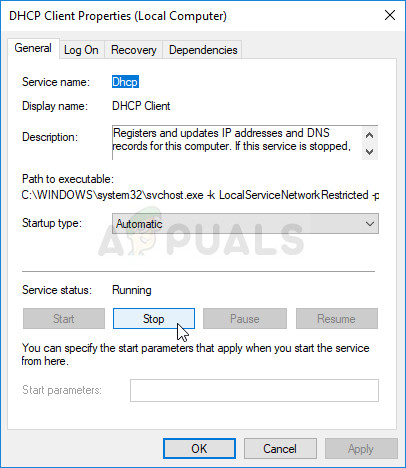
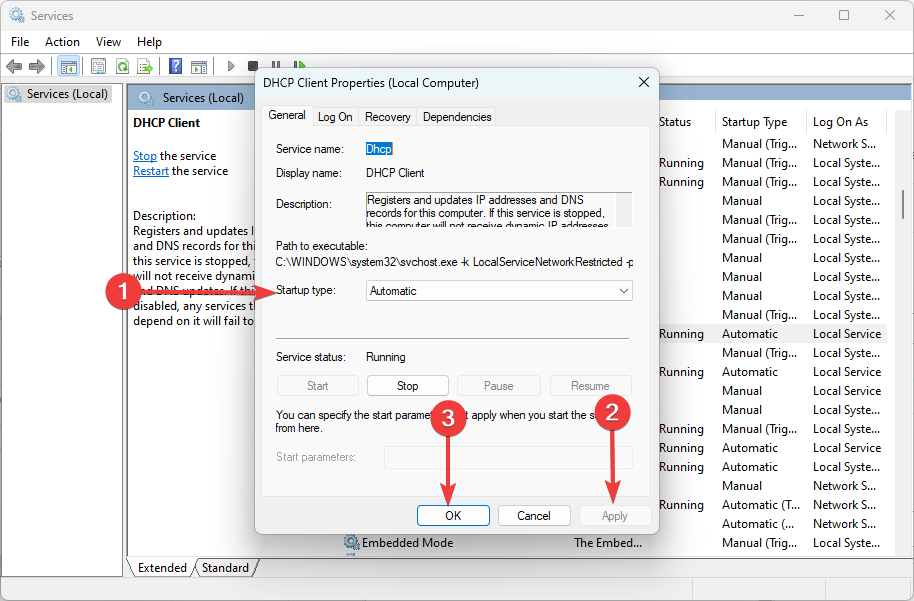
- Make sure that the option under the Startup type menu in the DHCP Client Service’s properties is set to Automatic before you proceed with the instructions. Confirm any dialogue boxes which may appear when you set the startup type. Click on the Start button in the middle of the window before exiting.
You may receive the following error message when you click on Start:
“Windows could not start the DHCP Client Service on Local Computer. Error 1079: The account specified for this service differs from the account specified for other services running in the same process.”
If this occurs, follow the instructions below to fix it.
- Follow steps 1-3 from the instructions above in order to open DHCP Client Service’s properties. Navigate to the Log On tab and click on the Browse… button.
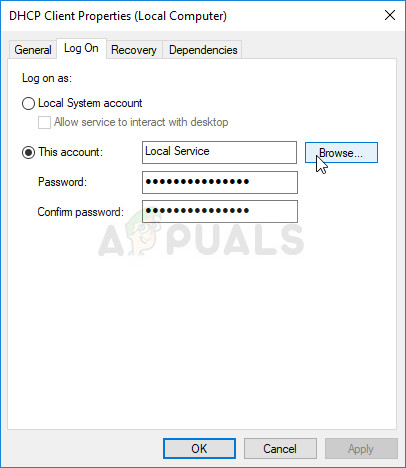
- Under the “Enter the object name to select” box, type in your account’s name, click on Check Names and wait for the name to become recognized.
- Click OK when you are finished and type in the password in the Password box when you are prompted with it, if you have set up a password. It should now start without issues!
Solution 6: Replace the Antivirus Program You are Using
Even though this final method may sound like too much, it was reported by several users that certain free antivirus tools actually caused this problem and removing them managed to solve the problem after all of the methods above have failed.
If you have tried out the solutions above with no success, consider using a different virus, especially if you are not paying for it. The major culprits for this issue include Avast and McAfee. However, the uninstall process can sometimes be avoided if you are using BitDefender Total Security which will be discussed at the bottom
- Click on the Start menu and open Control Panel by searching for it. Alternatively, you can click on the gear icon in order to open settings if you are using Windows 10.
- In Control Panel, select to View as: Category at the top right corner and click on Uninstall a Program under the Programs section.
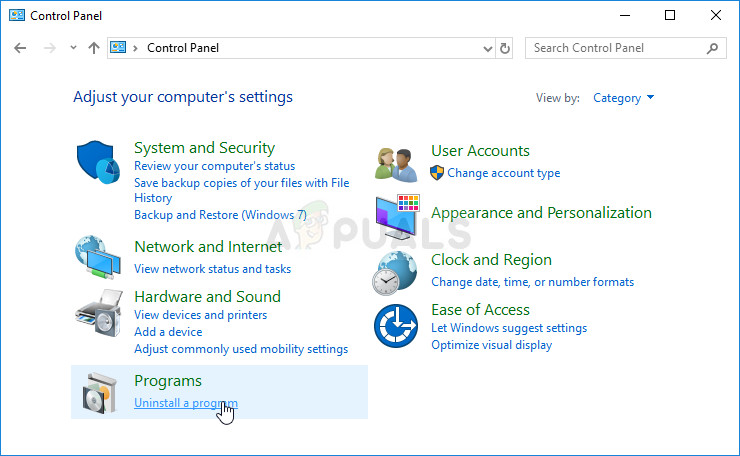
- If you are using the Settings app, clicking on Apps should immediately open a list of all installed programs on your PC.
- Locate McAfee or Avast in Control Panel or Settings and click on Uninstall.
- Its uninstall wizard should open either prompting you to confirm your choice to uninstall or to offer to Uninstall or Repair. Choose Uninstall and follow the instructions on the screen.
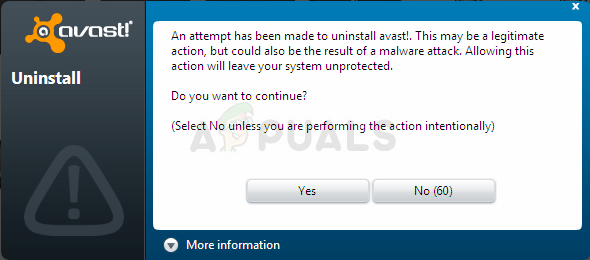
- Click Finish when the uninstalled completes the process and restart your computer to see whether errors will still appear.
BitDefender Total Security Users:
The problem can sometimes be solved if you are using this antivirus program by disabling a certain option in Firewall settings. It appears that its firewall is preventing this process from going through via this option so you will have to disable it in order to proceed.
- Open the BitDefender user interface by double-clicking its icon on the desktop, searching for it in the Start menu, or by double-clicking its icon in the system tray.
- Click on the Protection icon on the left sidebar of the Bitdefender user interface and click on View Features.
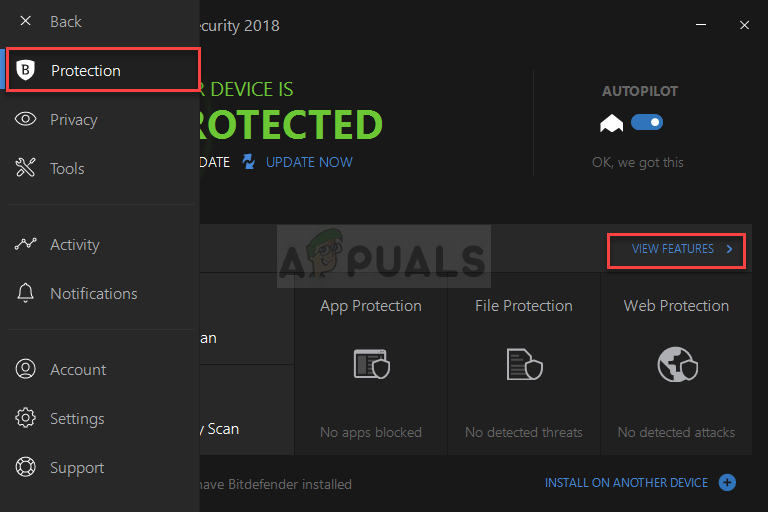
- Click the Settings icon in the upper-right corner of the FIREWALL module and navigate to the Settings tab. Here you should be able to see the Block port scans in the network option so make sure you disable it before checking if the problem is still active.

Kevin Arrows
Kevin is a dynamic and self-motivated information technology professional, with a Thorough knowledge of all facets pertaining to network infrastructure design, implementation and administration. Superior record of delivering simultaneous large-scale mission critical projects on time and under budget.
Learn to get rid of this Ethernet issue once and for all
by Madalina Dinita
Madalina has been a Windows fan ever since she got her hands on her first Windows XP computer. She is interested in all things technology, especially emerging technologies… read more
Updated on January 5, 2023
Reviewed by
Vlad Turiceanu

Passionate about technology, Windows, and everything that has a power button, he spent most of his time developing new skills and learning more about the tech world. Coming… read more
- Some users encounter the You cannot contact your DHCP server error message after renewing the IP address of their Windows 10 PCs.
- This type of error indicates that the network card cannot communicate with the DHCP server, so it cannot share a new IP addresses.
- Find out how to fix this issue and resume your PC activity within minutes.
Say you’ve tried refreshing your IP address or releasing it using the ipconfig /renew command, but you’re still getting Unable to contact DHCP server.
To get to the bottom of your troubles, you first have to understand which element means what in this equation.
What is DHCP?
DHCP stands for Dynamic Host Configuration Protocol, and it essentially is responsible for creating new IP addresses.
And the type of error that accompanies it is always related to the ipconfig /renew command that you execute in Command Prompt.
The ipconfig /renew command will disable communication from your Network Interface Controller to the DHCP server. Therefore, in case something goes wrong, you get the ipconfig /renew DHCP request failed error message.
Now that we’ve cleared out the basics, let’s get busy with the fixes.
- What is DHCP?
- How can I fix the Unable to contact your DHCP server error?
- 1. Update or reinstall your network drivers
- 2. Register your DNS via cmd
- 3. Enable or disable DHCP
- 4. Restart your DHCP client service
1. Update or reinstall your network drivers
In order to update the network drivers, follow these steps:
- Press Windows Key + X, and select Device Manager.
- Select a category to see names of devices, then right-click on the one you’d like to update.

- Select Update Driver.
- Click on Search automatically for updated driver software.
- Once it’s done updating you’re all set.
To reinstall your network drivers, follow these steps:
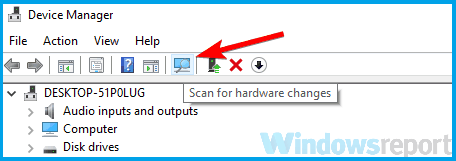
- Press Windows Key + X, and select Device Manager.
- Locate your network device, right-click it and choose Uninstall device.
- Check the Remove driver software for this device option.
- Select Uninstall.
- Click the Scan for hardware changes icon.
- Windows will now try to install the default driver.
If Windows is unable to find a new driver, you can try looking for one on the device manufacturer’s website.
Downloading drivers manually is a process that carries the risk of getting the wrong driver installed, which may lead to serious malfunctions.
Some PC issues are hard to tackle, especially when it comes to corrupted repositories or missing Windows files. If you are having troubles fixing an error, your system may be partially broken.
We recommend installing Restoro, a tool that will scan your machine and identify what the fault is.
Click here to download and start repairing.
The safer and easier way to update drivers on a Windows 10 PC is by using automatic software.
We strongly recommend the DriverFix tool to update your drivers in order to avoid damage to your PC by manually downloading the wrong driver versions.
This great tool was developed so that you do not have to worry about manually downloading and installing your drivers yourself.
It scans your system and lists all existing and possibly missing drivers. The tool also detects if there is already a new version for current records. If necessary, these can be updated directly by this program.
2. Register your DNS via cmd

- Type cmd in your Start Menu.
- Open Command Prompt.
- Enter ipconfig /registerdns.
- Type exit in Command Prompt.
- Restart your PC.
Our second fix for the ipconfig DHCP request failed issue is to run the command to register DNS. This should fix things, but if it doesn’t jump to the next solution.
3. Enable or disable DHCP
In order to disable your DHCP, follow these steps:
- Press Windows key + X, and select Network Connections.
- Double-click the active network connection.
- Select Properties.
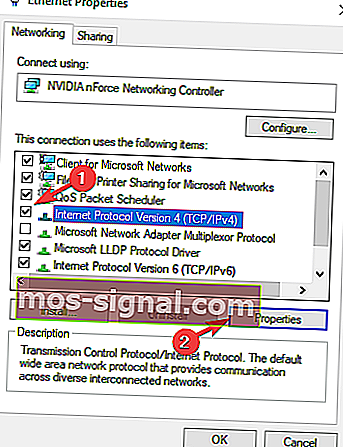
- Click on Internet Protocol Version 4 or Internet Protocol Version 6..
- Choose Properties.

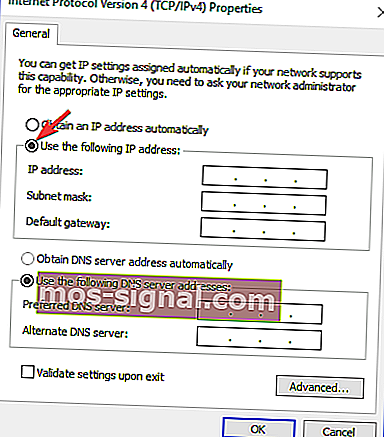
- Click on Use the following IP address.
- Enter the values for your IP Address, Subnet Mask, etc.


Be careful when you disable DHCP and move to a static IP configuration. If you enter the wrong settings, this can result in your Internet connection not working.
To enable your DHCP, follow these steps:
- Press Windows key + X, and select Network Connections.
- Double-click the active network connection.
- Select Properties.
- Click on Internet Protocol Version 4 or Internet Protocol Version 6..
- Choose Properties.
- Click on both Obtain an IP Address automatically and Obtain DNS Server Address Automatically.
- Click OK.
If you’ve re-enabled your DHCP, reboot your PC to apply the changes, then check whether ipconfig /renew works properly now.
4. Restart your DHCP client service
- Press Windows + R, type services.msc, and hit Enter.

- Scroll down to the DHCP Client service and double-click on it to get to its properties.

- Make sure Service status is set to Running; if not, click on Start.
- Makes sure the Startup type is set to Automatic, then click Apply and OK.
- Fix: The Local Device Name is Already in Use in Windows 10
- 8 Best Bandwidth Limiter Tools for Windows 10
- How to Fix The Network Security Key Isn’t Correct on Windows
- Can’t Map A Network Driver in Windows 10: 5 Ways to Fix It
- WiFi Shows No Internet But Internet Works: 11 Easy Solutions
We hope that these solutions worked for you in solving the unable to contact your DHCP server error message and that your Ethernet works fine now. Let us know what other network issues you have faced, in the comments section down below.
![]()
Newsletter
Download PC Repair Tool to quickly find & fix Windows errors automatically
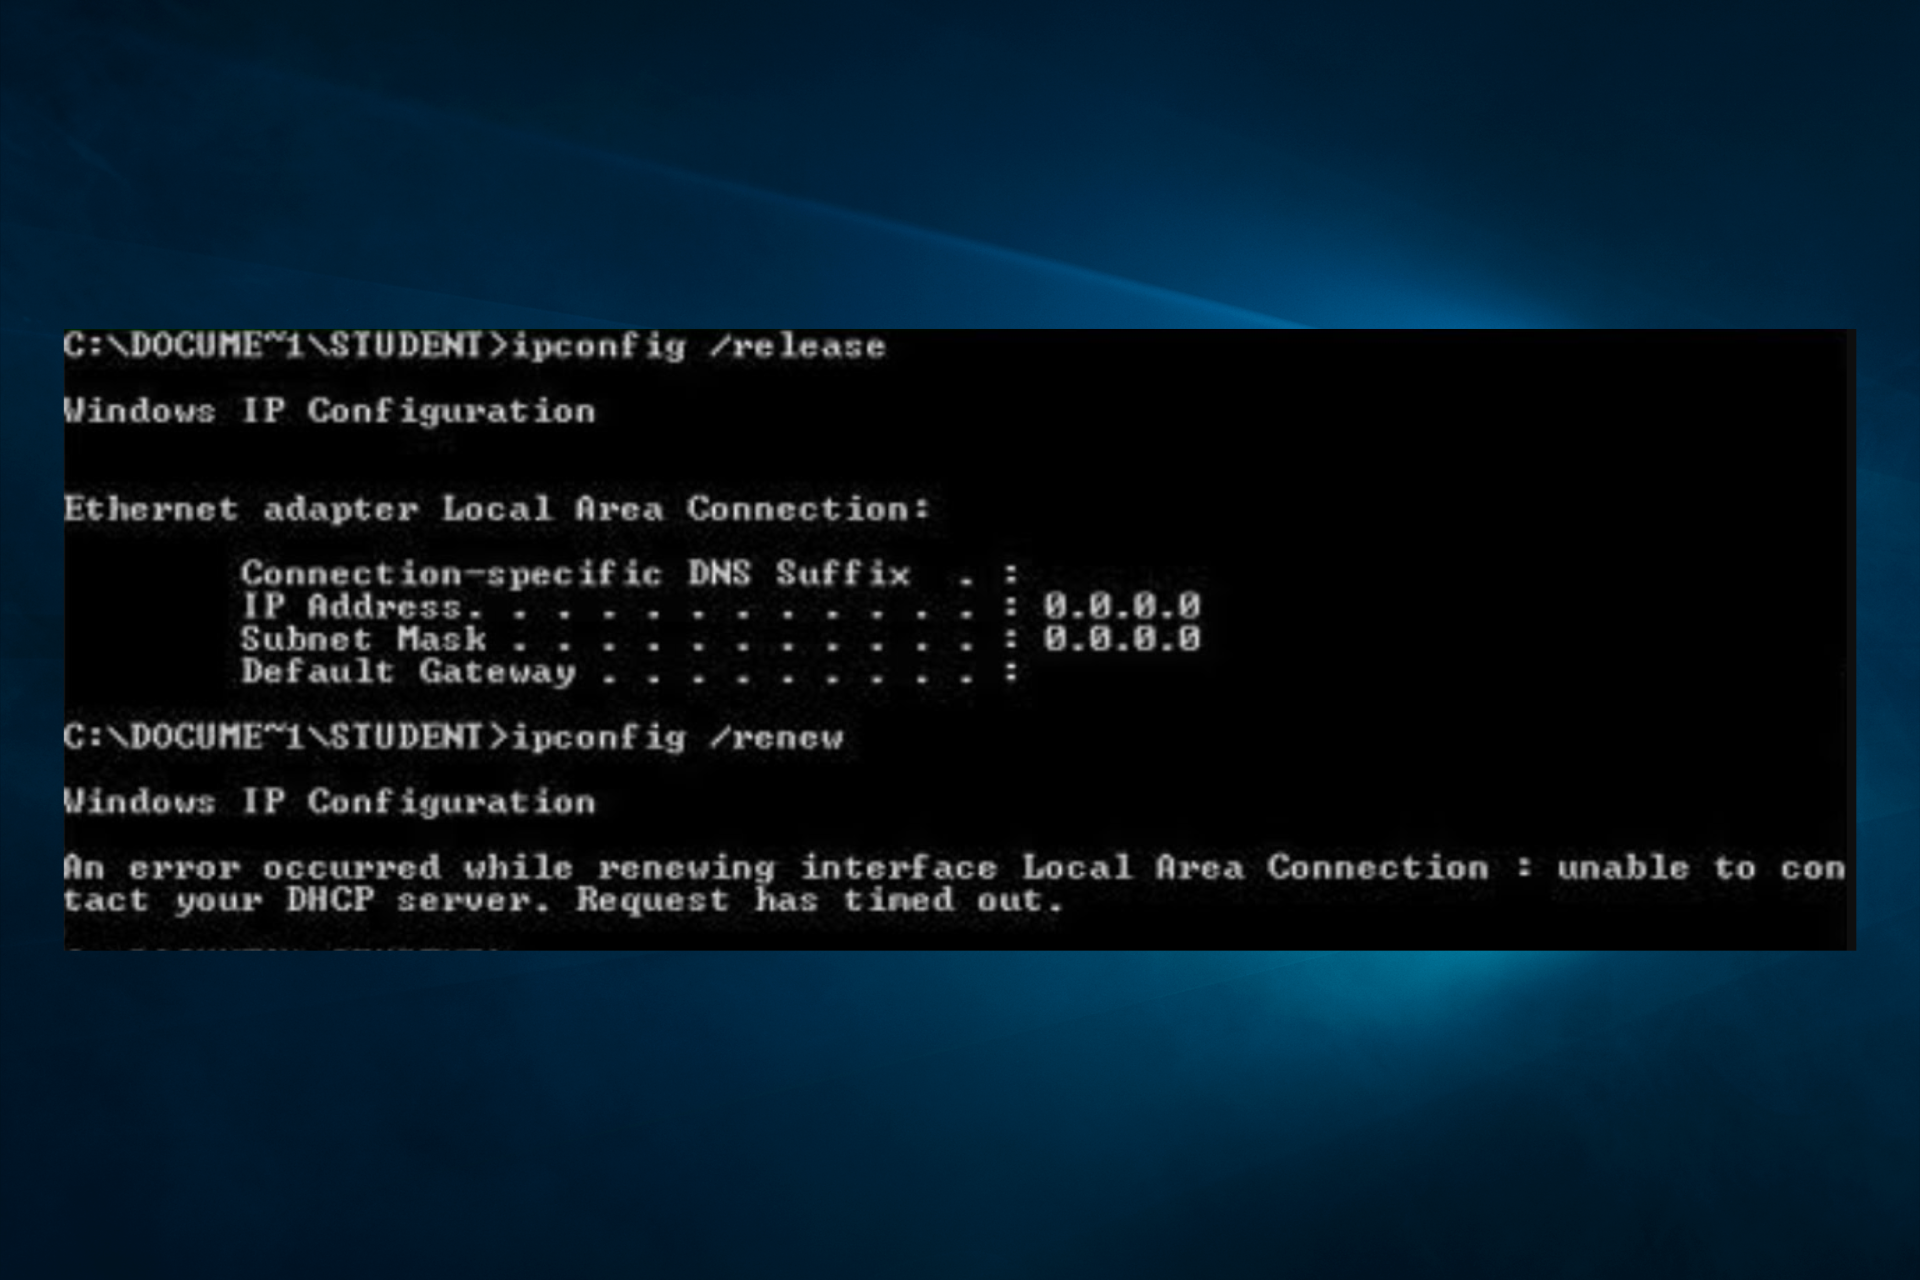
While trying to renew the IP address, if you receive Unable to contact your DHCP Server error message on your Windows computer, then this post may be able to help you. Expired IP addresses might interrupt your Internet connection. Thus, in such a situation, it is advised to release and renew the IP address.

The way to do this is to open an elevated Command Prompt window and type the following commands, press Enter after each:
ipconfig /release

ipconfig /renew
Now if this does not work for you and upon trying to release or renew an IP address, you may see the following error:
The error means that the NIC cannot communicate with the DHCP Server and is thus unable to release new IP addresses. The causes for this issue could be many, and we will discuss them one by one with the solutions:
- Update the Network drivers
- Run the Network Adapter troubleshooter
- Start/Restart the DHCP client service.
1] Update the Network drivers

One of the main causes behind this issue is obsolete Network drivers. Thus, you could update the Network drivers before anything else.
Press Win + R to open the Run window and type the command devmgmt.msc. Press Enter to open the Device Manager.
In the Device Manager, expand the list of Network adapters. Right-click on the Broadcom Network Adapter option and select Update driver.
Once the driver has updated, restart the system.
2] Run the Network Adapter troubleshooter

The Network Adapter troubleshooter checks for issues with the Network adapter and resolves them if possible. The procedure to run the Network Adapter troubleshooter is as follows:
Click on the Start button and then the gear-like symbol to open the Settings menu.
Go to Updates & Security > Troubleshoot. Select the Network Adapter troubleshooter and run it.
Restart the system once done.
Read: How to fix DHCP Lookup Failed.
3] Disable IPv6 on the connection which is active
At times, if IPv6 is enabled for active connections and that causes the problem. Thus, you could disable IPv6 as follows:
Press Win + R to open the Run window and type the command ncpa.cpl. Press Enter to open the Network Connections window. Right-click on the active Internet connection and select Properties.
In the list on the window, uncheck the box corresponding to Internet Protocol Version 6.
Hit OK to save the settings and restart the system.
4] Start/Restart the DHCP client service

In case the DHCP client service is stopped or inactive, you could start/restart it from the Services Manager.
Press Win + R to open the Run window and type the command services.msc. Press Enter to open the Services Manager window.
In the list of services (which is arranged in alphabetical order), right-click on the service DHCP client and select Start/Restart.
Restart your system and check if it resolves the problem.

Anand Khanse is the Admin of TheWindowsClub.com, a 10-year Microsoft MVP (2006-16) & a Windows Insider MVP (2016-2022). Please read the entire post & the comments first, create a System Restore Point before making any changes to your system & be careful about any 3rd-party offers while installing freeware.
When you try to lease, release or renew an IP address, an error message saying “unable to contact your DHCP server” may pop up. What should you do? Refer to this post offered by MiniTool. You will get some workable methods to fix this issue.
An error occurred while renewing interface ethernet — unable to contact your DHCP server. When you try to run the command: ipconfig /renew, the unable to contact your DHCP server error may also happen. It means that your NIC cannot speak with the DHCP Server to obtain a new lease that is used to retrieve a new IP address.
Keep reading and get several methods given below to solve your problem.
Solution 1: Update or Roll Back Your Network Driver
Depending on which driver brought the error to your computer, you can try updating and rolling back your network driver.
Update the Network Driver
If you are running an old driver on your computer, then you need to update it to solve the problem.
Step 1: Right-click the Start menu and select Device Manager to open it.
Step 2: Click to expand Network adapters. All network adapters that the machine has installed will display.
Step 3: Right-click the network adapter you want to update and select Update driver.
Step 4: Select Search automatically for updated driver software.
Step 5: Follow the instructions to finish updating the driver.
Restart your computer and check to see if the “unable to contact your DHCP server” problem has disappeared.
Roll Back the Network Driver
If the problem happens after you have updated your driver, you need to roll back it until a new and more secure driver is released.
Step 1: Find all network adapters following the instructions above. Right-click the network adapter you want to roll back and select Properties.
Step 2: Navigate to the Driver tab and click the Roll Back Driver button.

Tip: If the Roll Back Driver option is grayed out, this means the device wasn’t updated recently because it has no backup files remembering the old driver. It also means that the recent driver update may not be the cause of the problem.
Step 3: Click OK and follow the instructions to proceed with the process.
Restart your computer and check if the “unable to contact your DHCP server” problem still occurs in Command Prompt.
Solution 2: Run a Command in Command Prompt
You can try to run a simple command in Command Prompt to fix your issue. This fix won’t harm your computer as it initiates manual dynamic registration for the DNS names and IP addresses configured at a computer and it’s actually used to fix network-related issues.
Step 1: Type cmd in the Search bar, navigate to Command Prompt and choose Run as administrator.
Step 2: Type this command: ipconfig /registerdns and press Enter to execute it.
Step 3: After the operation is completed successfully, close Command Prompt and restart your computer.
Now, check to see if the “unable to contact your DHCP server” error message is gone.
Solution 3: Restart/Start Your DHCP Client Service
DHCP Client Service handles these issues. Thus, if this service has stopped or malfunctioned, the best method you can try is to simply restart/start it.
Step 1: Type the Win key + R key to open the Run box. Next, type services.msc and click OK to open Services.
Step 2: Locate the DHCP Client service in the services list, right-click it and select Properties.
Step 3: If Service status: is set to Running which means the service is started, click the Stop button. If it shows Stopped, leave it as it is for now.
Step 4: Set the Startup type menu to Automatic. Confirm any dialogue boxes which may appear.
Step 5: Click the Start button now.
Step 6: Click Apply > OK to save changes.
Bottom Line
After reading this post, you should clearly know how to fix unable to contact your DHCP server error. If you encounter the same error when you try to lease, release or renew an IP address next time, try these methods.
Major corporates, organizations and home networks use DHCP servers to automatically assign IP addresses to all the connected devices. A DHCP (Dynamic Host Configuration Protocol) server provides clients with IP addresses that fall within the same IP network ID as the scope it is servicing.
But what if DHCP servers can’t be contacted?
Well, if your Network Internet Controller (NIC) is unable to communicate with the DHCP server, it means you can’t access the internet or resources on your network. Our experts investigated this problem, and here are the best solutions to resolve the ‘Unable to contact DHCP server’ error.
But before we go any further, you need to understand what a DHCP server error means and what causes it.
What Is a DHCP Server Error?
When you try to access the internet on your home or work computer and you get the ‘Unable to contact DHCP server’ error, it means the DHCP server failed to create a new IP address.
This error usually appears when you try to execute the “ipconfig /renew” command in Command Prompt.
How to Fix ‘Unable to Contact Your DHCP Server’ Error On Windows 10
Solution 1: Run Windows Network Diagnostics or Network Troubleshooter
This is the first simple solution that you can employ when the ‘Unable to contact your DHCP server’ error appears.
- Right-click the network icon in the Windows Notification area.
- Select “Troubleshoot problems”. This opens the “Windows Network Diagnostics” window.
- Follow the instructions to allow Windows to diagnose and repair the network issues that you’re having.
After completing the process, the communication between your NIC and DHCP server should now be restored.
Solution 2: Register Your DNS
With this method, you can execute a simple command that could provide the solution to your DHCP errors.
- Open Command Prompt with administrator privileges.
- Carefully type in this command followed by “Enter”: ipconfig /registerdns.
- Check for the “Operation completed successfully” message before you exit Command Prompt.
Your internet connection problems should now be gone. If not, move on to the next solution.
Is your computer running slow or suffering system glitches? If so, it may need maintenance. Try running a dedicated PC optimization tool to check the health of your PC and apply the necessary fixes.
Solution 3: Update or Reinstall Network Drivers
Problems with your network drivers could cause DHCP server errors. If they are broken or missing, you can uninstall and reinstall them. If they are outdated, the only solution is to update them.
To reinstall your network drivers:
- Launch Device Manager by right-clicking the “Start” menu.
- Expand “Network adapters”.
- Right-click the network adapter that you want to reinstall and click “Uninstall”.
- Exit “Device Manager” and restart your PC.
- Windows will automatically reinstall the driver for you.
To update your network drivers:
- Repeat Steps 1 and 2 above.
- Right-click the device whose driver you want to update and click “Update driver”.
- Choose “Search automatically for updated driver software”. Windows will attempt to search for and install the latest driver from the internet.
However, Windows doesn’t always find the latest driver versions and you could try a third-party tool like Auslogics Driver Updater to automatically install new official network drivers from the manufacturer’s website.
This is an intuitive tool that will first analyze your system to detect the device drivers that need your attention. After the scan, you can view the details of your device drivers by clicking “Overview”.
Now you can choose if you want to update only the network drivers or all the outdated device drivers.
Here’s the most important part. Auslogics Driver Updater creates a backup so that you can always go back to the previous driver version if the latest one develops issues or you simply don’t like it.
This application ensures that you don’t encounter compatibility problems or device conflicts.
Solution 4: Roll-Back Network Drivers
If the ‘Unable to contact your DHCP server’ error started after updating your network drivers, a rollback might help to get things back to normal. To do so:
- Right-click “Start” and run “Device Manager”.
- Expand “Network adapters”, and select the device whose driver you want to roll back.
- Open “Properties”, and then go to the “Driver” tab.
- You should see an option titled “Roll Back Driver”. If the option is grayed out, it means the device was not updated recently, and therefore, there isn’t an older version of the driver.
- If the option is clickable, then select it and follow the instructions provided.
- Restart your device and check if the error still occurs in the Command Prompt window after executing the ipconfig /renew command.
Solution 5: Disable and Re-Enable DHCP
- Press the Windows Key+R simultaneously on your keyboard and type in ncpa.cpl.
- Hit “Enter”, and you’ll be taken to “Network Connections” in Control Panel.
- Right-click your active network adapter and open “Properties”.
- Find “Internet Protocol Version 6 (TCP/IPv6)” and highlight it.
- Next, click “Properties”.
- Select “Use the following IPv6 address:”. For this option to work, you need to enter the correct network settings.
- Now select “Use the following DNS server addresses:”, and enter the correct values.
- Click “OK” when you’re done.
Repeat the same process for the “Internet Protocol Version 4 (TCP/IPv4)” option.
To enable DHCP:
- Repeat Steps 1 through to 5 above.
- Select the “Obtain an IP address automatically” and “Obtain DNS server address automatically” options.
Restart your computer and check if this method resolves the ‘Unable to contact your DHCP server’ error.
Solution 6: Restart Your DHCP Client Service
Sometimes, the DHCP Client Service may malfunction and stop unexpectedly. If that’s the case, then you can restart the service by following the steps below:
- Press the Windows Key+R, and type in services.msc.
- Hit “Enter” or click “OK”.
- Navigate to “DHCP Client” and right-click it.
- Click on “Properties” and be sure “Startup type” is set to “Automatic”.
- Click “Stop” to stop the service.
- Now click “Start” to restart the service.
You should now be able to access the internet without issues.
Lastly, we like to encourage our community to keep their device drivers updated to improve system stability and efficiency. This also ensures that your device works seamlessly.
Do you have any other solutions that helped to fix the ‘Unable to contact your DHCP server’ error on Windows 10? Please share with us via the comments section below.
If your IP address expires, you will most likely experience interruptions when browsing the web. In such cases, you have to release and renew the IP address by executing the following commands:
- ipconfig /release
- ipconfig /renew
So if you are trying to renew the IP address of your Windows 10 computer using the commands given above but you encounter an error message instead that says, “Unable to contact your DHCP Server”, then you’ve come to the right place as this post will guide you in fixing this error.
This kind of error indicates that the NIC can’t communicate with the DHCP server which is why it’s not able to release new IP addresses. It could be due to many reasons. To fix this error, you can try to roll back, update or reinstall the Network Adapter drivers. You could also run the built-in Network Adapter troubleshooter, as well as start or restart the DHCP client service.
Option 1 – Try to rollback your Network driver
If you have updated the driver software as of late and you suddenly got this error, you might have to roll back the device driver – in other words, switch back to the previous working version. To do that, follow these steps:
- Tap the Win + R keys to launch the Run window and then type in the “devmgmt.msc” command and hit Enter to open the Device Manager window.
- Under the Device Manager, you will see a list of drivers. From there, look for the Network Adapters and expand it.
- Next, select the driver entries that are labeled appropriately other than anything in the context of the WAN Miniport.
- Then select each one of them and double click to open a new mini window.
- After that, make sure that you’re on the Driver tab and if you are not, just navigate to it then click the Roll Back Driver button to switch back to the previous version of your Network adapters.
- Now restart your computer to successfully apply the changes made.
Option 2 – Try to update the Network drivers
If rolling back to the previous version of the Network adapter drivers didn’t help, then you need to update them instead. To do so, here’s what you have to do:
- Tap the Win + R keys to launch the Run window and then type in the “devmgmt.msc” command and hit Enter to open the Device Manager window.
- Under the Device Manager, you will see a list of drivers. From there, look for the Network Adapters and expand them.
- Then right-click on each one of the Network drivers and update them all.
- Restart your PC and see if it helped in fixing the BSOD error.
Note: If updating the network drivers didn’t help in fixing the problem, you can also try to uninstall the very same drivers and restart your Windows 10 PC. After that, the system itself will reinstall the drivers you just uninstalled. Alternatively, you can also download and install the drivers from the manufacturer’s website directly.
Option 3 – Run the Network Adapter troubleshooter
Running the built-in Network Adapter troubleshooter can also help in fixing the “Unable to contact your DHCP Server” error. To run the Network Adapter Troubleshooter, refer to these steps:
- Open the Search bar on your computer and type in “troubleshoot” to open the Troubleshoot settings.
- Next, scroll down and select the “Network Adapter” option from the right pane.
- Then click on the Run Troubleshooter” button.
- After that, your computer will check for any possible errors and will pinpoint the root cause of the problem if possible.
- Restart your computer.
Option 4 – Try disabling the IPv6 in the Network Center
- Tap the Win + X key combination and click on Network Connections.
- This will open the Settings app on a specific page. Now on the right-side panel, click on the Network and Sharing Center link.
- After that, it will open the Control Panel and from there, click on the network that your computer is connected to and then click on Properties.
- Next, uncheck the entry that says, “Internet Protocol Version 6 (TCP/IPv6)” in the list that populates.
- Now click on OK and close all other windows.
- Restart your computer and see if the error is now fixed.
Option 5 – Start or restart the DHCP client service
If the DHCP client service is either inactive or stopped, you can try to start or restart it to resolve the error. You can do this via the Services Manager.
- Tap the Win + R keys to open the Run utility.
- Then type “services.msc” in the field and tap Enter or click OK to open the Services Manager.
- After that, look for the DHCP client service from the list of services displayed.
- Once you found it, right-click on it and select the Start or Restart option.
Advanced System Repair Pro
One-click automated PC repair solution
![]()
With Advanced System Repair Pro you can easily
DOWNLOAD
Advanced System Repair Pro is compatible with all versions of Microsoft Windows including Windows 11
Share this article:
You might also like
Since its release, Hearthstone has changed and innovated how digital card games are played. From its cross-platform matchmaking to interesting random mechanics and making the game free to play from day 1 have paved the road to Hearthstone’s success. If you by any chance get lost connection to game server error and find yourself unable to play please stay awhile and listen
Keep reading and try provided solutions as they are presented to fix this issue and continue gaming.
Read More
What’s the 0x80040116?
Ms-Outlook is the widely used and most favored program to get and to send e-mails within workplaces.
In addition, it eases customers’ business execution through additional features like producing schedule records to retaining track of important dates and sessions, preserving details on addresses, producing several files for handling significant e-mails and accessories, and additionally preserving drafts of emails individuals intend to send in future.
Ms-Outlook helps individuals handle functions and organize with each other effectively and economically.
Nevertheless, everything may suddenly halt when the problem code information screen is experienced by the Outlook user, you.
This is time-consuming and annoying as it prevents you from getting into your account and could lock you away from your view e-mail account.
Error code 0x80040116 is a familiar Outlook error that jumps up with no caution on the display.
Besides restricting your capacity to utilize your Outlook account, it presents a critical risk to the private data you’ve stored inside. Additionally, there is the chance of losing parts and information preserved in your e-mail account.
Error Causes
Finding and determining error code 0x80040116 cause isn’t fairly easy. The truth is that there are several distinct causes that could activate this error
A few of the major causes of this error include:-
- Broken PST list document. Ms-outlook uses this file to handle the users’ requests. You can encounter this problem signal when it gets ruined.
- 2 gigabytes limit is exceeded by the PST record. You have been incorporating data to Outlook accounts for years frequently without any erasures. When the 2GB limit is reached this error may surface.
- PST file gets damaged. This generally occurs thanks to virus contamination to the System or sudden system shutdown.
- Problems with account settings.
Further Information and Manual Repair
The error 0x80040116 is displayed in just one of these types:
- «Outlook.pst cannot be accessed — 0x80040116(where «Outlook.pst» is PST file name)»
- «Sending and receiving reported error (0x80040116): Unknown error 0x80040116»
- «Outlook.pst cannot be accessed – 0x80040116»
When you have this error, it is advisable to correct it promptly to ensure it doesn’t interfere with your productivity and work.
You do not require to contact an IT expert, to solve this issue. It’s graded as an error signal that’s easy to repair. So you do not want need deep IT knowledge to fix it.
There are two methods to remove this problem signal. Erase some memory if the error is created by excessive data.
This technique functions in the event the error’s cause is PST size. However, that is not likely the best method to repair it if dropping the data that is outdated is no alternative.
Maybe the one that is greatest and the 2nd alternative is to install and to obtain Stellar Phoenix Outlook PST Repair.
Why is this the solution that is most effective to repair and solve the problem code 0x80040116 out there is that the software can fix the malfunction no matter the trigger?
What this means is you do not have to understand the nitty-gritty of determining a problem signal and then locate a unique option to fix its cause.
Wait there is a lot more! Stellar Phoenix Outlook PST fix tool is compatible with all versions of Windows.
Therefore, whether you’ve got 2007, the 2000 version, or 2010 Outlook editions, you do not have to be concerned about the compatibility like with several other repair resources out there.
Also, it solves the issue in a short while as well as re-establishes each of the e-mails, contact records, and diary info. That means that if you had lost the info as a result of error code 0x80040116, it is possible to heave a sigh of relief as everything is going to be regained right back.
What you need to do is click here, Download, and run Stellar Phoenix Outlook PST on your computer to recover your ms-outlook accounts now and fix error code 0x80040116.
Read More
Any modifications in a computer, either big ones or small ones can definitely trigger some errors which is why you have to be careful when you modify the system setting. One of the errors you might encounter when you’ve modified your computer is the WHEA_UNCORRECTABLE_ERROR 0x00000124 Blue Screen Error. According to the error data provided by the Windows Hardware Error Architecture or WHEA, aside from system modifications, you could also encounter this error if your computer has a hardware failure which could be due to a hard drive, RAM, or any other hardware component. In most cases, it is related to physical hardware failures which might have something to do with defective hardware, heat-related, memory as well as a processor that is starting to fail or has already failed.
To fix the WHEA_UNCORRECTABLE_ERROR 0x00000124 Blue Screen error, here are some suggestions you have to check out.
Option 1 – Try to perform System Restore
Before you further troubleshoot the problem, you might want to perform System Restore first as the BSOD error might be caused by system modifications. Thus, to undo them, you can use System Restore. Run it using these steps:
- First, tap the Win + R keys to open the Run dialog box.
- After that, type in “sysdm.cpl” in the field and tap Enter.
- Next, go to the System Protection tab then click the System Restore button. This will open a new window where you have to select your preferred System Restore point.
- After that, follow the on-screen instructions to finish the process and then restart your computer and check if the problem is fixed or not.
Option 2 – Try disabling Overclocking
If overclocking is enabled, you might have to disable it as some users reported that the WHEA_UNCORRECTABLE_ERROR 0x00000124 error started to appear right after overclocking. To disable it, follow the steps below.
- Go to the Start Menu and open Settings.
- Next, select Update and Security and go to the Recover tab.
- From there, click on Restart now in Advanced startup. This will restart your computer.
- Once you’re in the Advanced startup, go to Troubleshoot and then select the Advanced Options.
- From there, select the UEFU Firmware Settings.
- Now click on Restart. Once your computer has restarted, it will automatically open BIOS.
- From the BIOS, go to the Advanced tab and navigate to Performance and then look for Overclocking.
- Once you’ve found Overclocking, make sure that it is disabled. If it’s not, then disable it and then save the changes made by tapping the F10 key.
- Start your computer normally and check if the WHEA_UNCORRECTABLE_ERROR 0x00000124 error is now fixed.
Option 3 – Check your computer’s cooling components and make sure that they are working
It is a known fact that an overheated PC causes system slowdowns and even Blue Screen errors like WHEA_UNCORRECTABLE_ERROR 0x00000124. To fix it, you need to check your computer’s cooling components to see whether they’re properly working or not. Then make sure that you clean them up including the fan and other hardware from dust and other debris.
Option 4 – Use the Windows Memory Diagnostics
Since the problem has something to do with the physical RAM, you need to use Windows Memory Diagnostics. To run it, refer to these steps:
- Tap the Win + R keys to open Run and type exe and hit Enter to open the Windows Memory Diagnostic Tool.
- After that, it will give two options such as:
- Restart now and check for problems (Recommended)
- Check for problems the next time I start my computer
- Once your computer has restarted, perform a basic scan or you could also go for the “Advanced” options such as “Test mix” or “Pass count”. Simply tap the F10 key to start the test.
Note: After you select the option, your PC will restart and check for memory-based issues. If it finds any issues, it will automatically fix them.
Option 5 – Update or rollback or disable concerned device drivers
To fix the WHEA_UNCORRECTABLE_ERROR 0x00000124 error, you can also try to roll back, or update, or disable the concerned device drivers.
- Open the Devices Manager from the Win X Menu.
- Then locate the device drivers particularly the ones that are under the sections of Keyboard, Mouse, USB, and HID Drivers.
- Next, right-click on them to open the Properties.
- After that, switch to the Driver tab and click on the Uninstall Device button.
- Follow the screen option to completely uninstall it.
- Finally, restart your computer. It will just reinstall the device drivers automatically.
Note: You can install a dedicated driver on your computer in case you have it or you could also look for it directly from the website of the manufacturer. On the other hand, if you have just updated your device drivers then you need to roll back the drivers to their previous versions or disable them.
Option 6 – Try running System File Checker or SFC scan
You could also run System File Checker or SFC scan to fix the BSOD error. It is a built-in command utility that helps in restoring corrupted files as well as missing files. It replaces bad and corrupted system files with good system files. To run the SFC command, follow the steps given below.
- Tap Win + R to launch Run.
- Type in cmd in the field and tap Enter.
- After opening Command Prompt, type in sfc /scannow
The command will start a system scan which will take a few whiles before it finishes. Once it’s done, you could get the following results:
- Windows Resource Protection did not find any integrity violations.
- Windows Resource Protection found corrupt files and successfully repaired them.
- Windows Resource Protection found corrupt files but was unable to fix some of them.
- Reboot your PC.
Option 7 – Try to disable the Digital Driver Signature Enforcement
- Reboot your computer from the Start menu.
- Then select the option while pressing the Shift key. This will open the Advanced Boot menu.
- From there, click on Troubleshoot and select Startup Settings.
- Now select the “Disable driver signature enforcement” option using the arrow keys on your keyboard and then restart your computer normally.
Read More
Diablo has changed how action RPG games are made and has placed homework for many developers. Diablo 3 is 3rd continuation in the series and to the joy of many players worldwide it has brought some interesting things in the genre like teaming up with other friends to slay demon hordes together introducing much needed multiplayer element. Sadly sometimes we get the error that Diablo 3 can not connect or that the connection to the game server has been lost.
Keep reading and try provided solutions as they are presented to fix this issue and continue gaming.
Read More
In case you don’t know, there is a built-in tool in Windows 10, known as Reliability Monitor that provides a day-to-day snapshot of the health of your system. It warns users of any looming issues or disasters before your computer breaks down finally. So obviously, Reliability Monitor is useful, however, there are times when it could behave incorrectly. For instance, it might fail to show you any updates even when they are installed. Thus, if you experience any malfunctions with the Reliability Monitor tool in Windows 10, read on as this post will guide you in updating or working in Windows 10.
To fix the problem with the Reliability Monitor, there are several fixes you can check out. You can try to enable the data collection for Reliability Monitor or reset it, as well as put your computer in a Clean Boot State. For more information, refer to each one of the options given below.
Option 1 – Try to enable the Data Collection for Reliability Monitor
The Reliability Monitor tool uses data provided by the RAC Agent scheduled task and it will start to display a Stability Index rating and specific event information 24 hours after the system installation. The RACAgent scheduled task, by default, runs after the operating system is installed. And if it is disabled, it must be manually enabled from the Task Scheduler snap-in for MMC or Microsoft Management Console. Thus, you need to enable the Data Collection for Reliability Monitor to fix the problem.
Option 2 – Try to reset the Reliability Monitor
The next thing you can do to fix the issue with the Reliability Monitor might want to reset it to resolve the problem. If the Reliability Monitor is already open, you have to close it and open it again. After the reset is done, it may take up to 24 hours for the Reliability Monitor to display results again. This should fix the problem.
Option 3 – Troubleshot the problem in a Clean Boot State
There are some instances that some conflicting programs installed in your computer might be the one that’s causing the Black border issue. To identify which program is causing the problem, you need to put your computer in a Clean Boot State. To do so, follow the steps below.
- Log onto your PC as an administrator.
- Type in MSConfig in the Start Search to open the System Configuration utility.
- From there, go to the General tab and click “Selective startup”.
- Clear the “Load Startup items” check box and make sure that the “Load System Services” and “Use Original boot configuration” options are checked.
- Next, click the Services tab and select the “Hide All Microsoft Services” check box.
- Click Disable all.
- Click on Apply/OK and restart your PC. (This will put your PC into a Clean Boot State. And configure Windows to use the usual startup, just simply undo the changes.)
- From there, start to isolate the problem by checking which one of the programs you installed recently is the root cause of the problem.
Read More
Error Code 0x8024001b- What is it?
At its most basic level, Error Code 0x8024001b is an error that can cause problems with the installation and updates of software and operating system updates. The most common version of this error appears in Windows 10, but a similar error with a matching code number has been present in previous versions of the operating system, back through Windows 7.
Common symptoms include:
- Programs freezing or locking up during use
- The appearance of an error message regarding installation difficulties
- Computer shutting down or freezing during operation
- Difficulty in running multiple programs at the same time
Solution
 Error Causes
 Error Causes
There are two main causes for Error Code 0x8024001b, both of which are fairly simple: Updates needed for the Windows Update tool itself and software that causes Windows Update to fail during installations through conflicts in system files. While these may seem like technical issues, these problems are actually easily resolved with a few simple steps. The average user can use the methods listed below to fix the problems on their own.
Further Information and Manual Repair
For users who want to address Error Code 0x8024001b for themselves, the steps below can be followed to address the two primary causes for the error. If you have difficulty in completing these steps or are not confident in your computing skills and ability to follow the listed steps, contact a Windows repair technician.
Here are the top methods to resolve Error Code 0x8024001b on your own:
Method One: Check for Updates to Windows Update
In some cases, the Windows Update tool may need an update for itself. When you attempt to run updates or install wizards for other software, it can cause conflicts with the Windows Update process, slowing down your computer or causing it to freeze.
If you are attempting to run multiple installations or updates at the same time, it may also cause Error Code 0x8024001b to arise on your computer.
To resolve this issue, close out all programs, with the exception of the Windows Update tool. Within the tool, select “Check for Updates” and install any updates that are needed. When finished, you should restart your computer to ensure that all updates have been fully applied before attempting any other installations or updates.
Method Two: Uninstall Conflicting Software
Another problem that can cause Error Code 0x8024001b is the presence of conflicting software. If Error Code 0x8024001b has only recently appeared on your computer, consider removing any software that has been added to your computer, running the Windows Update process, and restarting your computer before attempting to reinstall the problem software.
With any method that you use, it is important to remember to keep your Windows Updates current at all times. This is the best way to avoid the appearance of Error Code 0x8024001b and similar errors in the future, as stacked up updates are more likely to cause issues and conflicts with your other installed software and operating system.
While there are some tools out there that claim to be able to fix Error Code 0x8024001b for you, it is important to always thoroughly investigate the publisher and distributor of such software, as some of the tools available on the Internet will actually introduce malware and adware on your computer in the name of “protecting” your computer or resolving an error.
If you have tried to use both methods above and have not fully resolved Error Code 0x8024001b, get in touch with someone who is a qualified computer repair professional and is familiar with your particular version of the Windows operating system to assist you in finalizing your resolution.
Method Three: Use An Automated Tool
If you wish to always have at your disposal a utility tool to fix these Windows 10 and other related issues when they do arise, download and install a powerful automated tool.
Read More
Msvcr71.dll Error — What is it?
Msvcr71.dll is a dynamic library link that belongs to the Microsoft Visual C Runtime library. This file is a core Windows component used by numerous Windows applications like Microsoft Office version 2002 and 2003, Windows XP Media Center, and Windows XP Tablet PC Edition.
The Msvcr71.dll error commonly occurs when two applications share the same DLL file. When an application is deleted sometimes the Msvcr71.dll file is also deleted which is associated with two applications on your PC.
So, when you try to run the other application you come across the Msvcr71.dll error on your system.
The error also occurs when you try to install new programs or update the old program versions. This also misconfigures the DLL files and results in the Msvcr71.dll error.
Msvcr71.dll error messages are often displayed as the following:
- “This application has failed to start because Msvcr71.dll was not found.”
- “Mscvr71.dll is a bad windows image. Please check against your installation diskette.”
- “Cannot find [PATH]msvcr71.dll»
- «The file msvcr71.dll is missing.»
Solution
Error Causes
Deletion of the Msvcr71.dll file is one cause for the Msvcr71.dll file error. However, this error can also be generated due to other causes such as:
- Corrupt, missing, or misconfigured msvcr71.dll file
- Damaged and missing .dll files
- Corrupt runtime code library
- Registry issues
- Malware attack and viral infection
- Msvcr71.dll error codes usually occur on Windows versions XP and Vista.
Further Information and Manual Repair
Here are different ways to resolve the Msvcr71.dll error code on your system:
1. Reinstall the program/application that is causing the Error to Pop up on the Screen
When this error code occurs due to misconfigured or missing the Msvcr71.dll file, try reinstalling the program/application that is causing the error to pop up on your screen.
When doing this, make sure there is no problem with the setup files from the disk you are performing the installation on your PC.
2. Check the Recycle Bin and Restore the Deleted File
If the Msvcr.dll file was deleted accidentally when you uninstalled a program on your PC, then the deleted file is most likely to be in the recycle bin. Check it and if you find it, restore it. Once the file is restored try running the application again.
3. Scan for Malware and Viruses
Install an antivirus and scan for malware and viruses. This software can also corrupt DLL files and runtime code libraries.
However, this is not the best solution especially if you already have too many programs installed on your PC. New program installations cause more complications and besides antivirus are infamous for slowing down PC speed.
4. Repair the Corrupt Registry
If the three methods discussed above don’t help you resolve the Msvcr71.dll error code on your system, then this means the cause of the error is more critical than you think.
The error is triggered by a corrupt and damaged registry. If this issue is not addressed timely, it can result in system failure and a fatal crash.
To resolve the error code Msvcr71.dll, you need to repair the corrupt registry. And the best way to go about it is to download Restoro
Restoro is a user-friendly, highly functional, and multi-functional repair tool integrated with high speed and powerful utilities such as a registry cleaner, system stability scanner, Active X and class error module, and an antivirus.
It also functions as a system optimizer. It is the answer to your entire PC-related errors and issues.
The automated and intuitive algorithm deployed inside this tool enables it to detect all registry errors and issues generating Msvcr71.dll error. DLL files often get damaged due to data overload, disk fragmentation, and malicious files saved in the registry.
The registry cleaner removes all the unnecessary and obsolete files from the registry, clears up disk space, and repairs defragmented, damaged, and misconfigured disks. DLL files including Msvcr71.dll and also fixes the registry.
It’s an in-built antivirus scan and removes viruses and the system optimizer feature ensures that your PC runs at its optimum speed. It is safe, bug-free, efficient, and easy to use. It runs smoothly on all Windows versions.
Click here to download Restoro and resolve the Msvcr71.dll error on your PC.
Read More
Spying via some malicious app on the target phone is not a new thing but it can be very uncomfortable and even against the law in some countries.
Infecting the target phone can be done in various ways, another person can intentionally download and install applications on it, and you can install them via some phishing attacks or by an online scam. Once installed this piece of software presents a very serious invasion of privacy since it can track text messages, track phone location in real-time, record calls in real-time, eavesdrop on calls, take control of the camera and microphone, and many other applications.

Here are some common symptoms of mobile phones infected with spyware.
Symptoms of spyware
Random reboots
Slow performance
Strange text messages
Overheating
Unusual high data usage
Non-familiar apps in the app list
The fast drain of the battery
Long shutdown time
Strange interference and sounds during calls
Signs of activity during standby mode
If your phone exhibits any of these symptoms you might have a spyware app installed and running on it.
Common spy apps
There are many apps that have been designed to spy on people that can be downloaded in the app store or on Google Play today. Most of these spyware apps are aimed at parents wanting to keep an eye on and protect their children. However, these can be used by anyone in order to spy on a target person via their phone.
Below is a list of common apps that can be used to spy on you. Many spyware apps require a phone to be ‘jailbroken’ or ‘rooted’ before being installed, this is when the phone’s operating system is changed to allow the phone to become unlocked and customizable.
mSpy : An undetectable spying app for iOS devices. It can be used to read your chats, see your location, view your email, check your call history, record your keystrokes, and more.
Spyera : This app requires rooted and jail-broken iPhones to work. It can go undetected and monitors phone calls and your call history. It even allows call recording and eavesdropping on live calls.
Flexispy : Flexispy prides itself as the #1 phone monitor for parents and can monitor everything from calls to social texts.
Umobix : This powerful spyware app has a dashboard that allows users to easily monitor someone’s location, calls, texts, keystrokes, all major social media, and more. You can detect Umobix because it heats up the infected phone and greatly affects the battery life of the infected device.
Ikey Monitor : Although it requires the device to be rooted for Android or jailbroken for iPhones, this spy app captures keystrokes, passwords, and screenshots, allows for call recording and supports multiple languages.
Clevguard : Available for both iOS and Android, Clevguard allows users to track GPS and Wi-Fi locations, capture screenshots remotely, and more. Due to a recent update, the spy app drains the target phone’s battery significantly.
Remove spyware from your phone
If any of the beforementioned apps are present on your phone you need to remove them right away.
Go to your phone settings and remove the malicious applications, then download some protection suite and scan the whole phone for any other trace of software remains or other malware apps.
Read More
What is Error 2200?
Error 2200 is an error code that you are likely to experience if you have Dell Photo All in One Printer 926. Dell Photo Printer 926 is an inkjet multifunction device. It offers features like print, copy, scan, and fax.
Error 2200 may stop you from scanning and printing documents on your Dell Photo All in One Printer 926.
Solution
Error Causes
Error 2200 may occur due to several reasons. However, the most common causes include:
- Registry issues
- Broken or missing system files
- Corrupted driver
- Malware
Further Information and Manual Repair
To resolve error 2200 on your system try the methods listed below. These DIY methods are easy and effective and can repair this error in no time. These solutions require zero technical expertise and knowledge.
This means if you are not technically sound or you are not a computer programmer, you can try these solutions and repair error 2200 on your system easily.
Method 1
When the underlying cause of error 2200 is related to a corrupted driver then follow these steps to resolve the issue. Go to the Start menu, click Control Panel, Performance and Maintenance tab, System and Device Manager.
Navigate the device, click properties, driver, and then uninstall. Now reboot your PC to activate changes. Now download the latest version of the Dell Photo All in One Printer 926 drivers from a reliable website and save install it on your PC.
Method 2
Malware can also damage and corrupt drivers and system files. If the reason for error 2200 on your PC is malware then download a powerful antivirus and scan your entire PC. Remove all malware and viruses infecting your system to resolve the error.
Method 3
The Windows registry is that part of the computer that stores much of the information and settings for software programs, operating system configurations, and hardware devices.
It also saves unnecessary and obsolete files like junk files, cookies, internet history, bad registry entries, and invalid files. If these files are not removed from the registry frequently, they accumulate in the registry and corrupt it thereby triggering different error codes.
These files damage the registry and other important system files.
To repair the registry and error codes triggered due to registry issues, it is suggested you download Restoro. This is a cutting-edge and user-friendly PC Fixer deployed with a powerful and intuitive registry cleaner.
The registry cleaner scans your entire PC, removes all the bad entries and obsolete files. It cleans the registry, repairs the damaged and corrupt system files thereby resolving registry issues instantly.
Click here to download Restoro and repair error 2200.
Method 4: Locate and Install the Driver
As was pointed out, you might need to reinstall the printer driver again. Using DriverFIX, you’ll be able to automatically update your computer system and install the drivers your computer needs to operate smoothly.
Read More
Error code 0x803f7000 -What is it?
Error code 0x803f7000 refers to an issue in Windows 10 with downloading apps through Windows Store. When you choose the app or game to download, it heads to Downloads in the Store app. Then it says it is acquiring a license but then fails. When you click the “See details” link, you see the error code 0x803F7000. It could mean that the date and time or region settings in your Windows 10 are incorrect or there are some problems with the Windows Store Cache.
Symptoms
- This error appears when you are running Windows 10 and trying to download an app through the Microsoft store. The error code may appear with this message: “Something went wrong. The error code is 0x803f7000, in case you need it”
- You might also see this message along with the error code: «It looks like you’ve reached your device limit for installing apps and games from the Store on your Windows 10 device. If you want to install apps and games from the Store on another Windows 10 device, remove a device from the device list.»
Solution
Error Causes
There may be several reasons for this error:
- This problem may arise if the date and time in Windows 10 are incorrect.
- If the region has been set incorrectly.
- Problems with Windows store cache.
- Windows store server overloaded.
- The Windows version you are using is pirated.
Further Information and Manual Repair
Method 1:
Correcting date and time:
- Open up Control Panel > Clock, Language, and Region.
- Then click on Date & Time.
- Now click on Change date & time to correct your time.
Method 2:
Correcting region:
- Navigate to Control Panel > Clock, Language, and Region.
- Then click on Region.
- Then click on the Location tab.
- Now set your actual region from Home location section.
- Click Apply & OK.
Method 3:
Resetting Windows Store:
- Press Windows Flag Key + X from your keyboard. Then select Command Prompt (Admin). It will launch Command prompt as administrator.
- Then type wsreset and hit Enter.
- Wait for a few seconds. It will automatically open Windows Store.
- Then try to download any apps.
Method 4:
- Open Command prompt in local machine and type in the Windows Store reset tool exe
- Activate Windows by going to Settings>Updates and Security
- Run the Modern UI/metro app troubleshooter from Microsoft
- Keep trying it several times.
- Try changing locale and time zone to the United States as shown below
- Go to control panel, Language settings
- Select location to the United States
- This will reset the language to US English. After this try downloading the apps again.
- Try restarting the Windows Updater service or restart the machine once.
You must make sure that you have a good internet connection. You need that for the updates and downloads complete without disruption.
Method 5:
Make sure the app isn’t blocked by the Windows firewall:
To make your PC more secure, some apps are blocked by Windows Firewall by default. For proper functioning, you might need to enable an app to receive info through the firewall. For more info, see the «Allow an app to receive info through the firewall,» and follow the procedure from start to finish.
Method 6:
Check with your system admin:
If your PC is part of a network in an organization, like a business, school, or government agency, your system administrator might have turned off the use of certain apps using the Group Policy. Contact your system admin if you believe that Group Policy is preventing you from using an app.
Method 7:
Make sure your apps are up-to-date:
To make the apps working properly, you must keep your apps up-to-date. This could be done by turning on automatic updates in the Windows Store.
Method 8:
Contact the app publisher
To view the publisher’s app support info, follow these steps:
- On the Start screen, tap or click Store to open the Windows Store.
- Search or browse for the app, and then tap or click it.
- Scroll to the Details section of the app’s description page, and then tap or click the support link for the app under Learn more. The link will open an email message for you to contact support or will take you to a support website.
If you do not possess the technical expertise required to accomplish this yourself or do not feel comfortable doing so, download and install a powerful automated tool to get the job done.
Read More
![]()
Copyright © 2022, ErrorTools. All Rights Reserved
Trademarks: Microsoft Windows logos are registered trademarks of Microsoft. Disclaimer: ErrorTools.com is not affiliated with Microsoft, nor claim direct affiliation.
The information on this page is provided for information purposes only.
![]()
Repair your PC with one click
Please be aware that our software needs to be installed on a PC system with Windows on it, Open this website on a desktop PC and download the software for easy and quick elimination of your issues.
- Некоторые пользователи сталкиваются с сообщением об ошибке DHCP-сервера после обновления IP-адреса своих компьютеров с Windows 10.
- Этот тип ошибки указывает на то, что сетевая карта не может взаимодействовать с DHCP-сервером, поэтому она не может использовать новые IP-адреса.
- Посетите наш сетевой и интернет-центр для получения дополнительной информации о том, как решать проблемы с сетью.
- Загляните в наш раздел Windows 10, чтобы узнать о свежих новостях, обновлениях и всем, что вам нужно знать о Windows 10.
Допустим, вы попытались обновить свой IP-адрес или освободить его, но по-прежнему не можете связаться с DHCP-сервером .
Чтобы разобраться в своих проблемах, вы сначала должны понять, какой элемент что означает в этом уравнении.
DHCP означает протокол динамической конфигурации хоста и, по сути, отвечает за создание новых IP-адресов.
И тип ошибки, который сопровождает это, всегда связан с командой ipconfig / refresh, которую вы выполняете в командной строке.
Эта команда отключит связь вашего контроллера сетевого интерфейса с DHCP-сервером. Теперь, когда мы разобрались с основами, давайте займемся исправлениями.
1. Обновите или переустановите сетевые драйверы.
Чтобы обновить сетевые драйверы, выполните следующие действия:
- Нажмите Windows Key + X и выберите Диспетчер устройств .
- Выберите категорию, чтобы увидеть названия устройств, затем щелкните правой кнопкой мыши по тому, которое хотите обновить.

- Выберите Обновить драйвер .
- Щелкните Автоматический поиск обновленного программного обеспечения драйвера .
- После завершения обновления все готово.
Чтобы переустановить сетевые драйверы, выполните следующие действия:

- Нажмите Windows Key + X и выберите Диспетчер устройств .
- Найдите свое сетевое устройство, щелкните его правой кнопкой мыши и выберите « Удалить устройство».
- Установите флажок Удалить программное обеспечение драйвера для этого устройства .
- Выберите Удалить.
- Щелкните значок Сканировать на предмет изменений оборудования .
- Windows попытается установить драйвер по умолчанию.
Если Windows не может найти новый драйвер, вы можете попробовать найти его на веб-сайте производителя устройства.
Загрузка драйверов вручную — это процесс, сопряженный с риском установки неправильного драйвера, что может привести к серьезным сбоям в работе.
Более безопасный и простой способ обновления драйверов на ПК с Windows 10 — использование автоматического программного обеспечения.
Мы настоятельно рекомендуем инструмент DriverFix для обновления драйверов, чтобы избежать повреждения вашего ПК путем загрузки неправильных версий драйверов вручную.
Этот отличный инструмент был разработан, чтобы вам не приходилось беспокоиться о ручной загрузке и установке драйверов самостоятельно.
Он сканирует вашу систему и перечисляет все существующие и, возможно, отсутствующие драйверы. Инструмент также определяет, есть ли уже новая версия для текущих записей. При необходимости их можно обновить непосредственно с помощью этой программы.

DriverFix
Загрузите DriverFix, чтобы с легкостью автоматически обновлять сетевые драйверы! Бесплатная пробная версия Посетить сайт
2. Зарегистрируйте свой DNS.
- Введите cmd в меню «Пуск» .
- Откройте командную строку .
- Введите ipconfig / registerdns.
- Введите exit в командной строке.
- Перезагрузите компьютер.
Возникли проблемы с доступом к командной строке от имени администратора? Взгляните на это удобное руководство.
3. Включение или отключение DHCP.
Чтобы отключить DHCP, выполните следующие действия:
- Нажмите клавиши Windows + X и выберите Сетевые подключения .
- Дважды щелкните активное сетевое соединение.
- Выберите Свойства .
- Щелкните Internet Protocol Version 4 или Internet Protocol Version 6 ..
- Выберите Свойства.
- Щелкните Использовать следующий IP-адрес .
- Введите значения своего IP-адреса, маски подсети и т. Д.
Будьте осторожны при отключении DHCP и переходе к статической конфигурации IP. Если вы введете неправильные настройки, это может привести к тому, что ваше интернет-соединение не будет работать.
Чтобы включить DHCP, выполните следующие действия:
- Нажмите клавиши Windows + X и выберите Сетевые подключения .
- Дважды щелкните активное сетевое соединение.
- Выберите Свойства .
- Щелкните Internet Protocol Version 4 или Internet Protocol Version 6 ..
- Выберите Свойства.
- Щелкните одновременно Получить IP-адрес автоматически и Получить адрес DNS-сервера автоматически .
- Щелкните ОК .
Если вы повторно включили DHCP, не забудьте перезагрузить компьютер, чтобы изменения вступили в силу.
Мы надеемся, что эти решения сработали для вас. Сообщите нам о том, с какими другими проблемами сети вы столкнулись, в разделе комментариев ниже.
Примечание редактора: этот пост был первоначально опубликован в апреле 2019 года и с тех пор был переработан и обновлен в сентябре 2020 года для обеспечения свежести, точности и полноты.