Содержание
- How to fix the Runtime Code 2 Java Error Code 2
- How to Fix «Java Runtime Environment not found» error In this post, we will solve the «Java Runtime Environment not found error». This java error is one of the common errors faced by developers or end-users. Whenever you try to install any software which requires java like eclipse or Minecraft. Also, if you are new to java development, JDK or Java Development Kit is necessary for you. Following this tutorial will help you to resolve all Java runtime errors. Additionally, you will learn to install, remove and set java variables in Windows10 and Ubuntu. These are the very common errors you will find related to Java. java runtime environment not found java runtime environment not found windows 10 eclipse java runtime environment not found eclipse java runtime environment not found path java SE runtime environment not found java runtime environment not found at bin javaw.exe unable to load java runtime environment cannot determine a valid java home java runtime environment not found mac Let’s understand some basic concepts of Java runtime first. Check out this post, if you are getting a java command not found error. What is a runtime environment? Runtime basically means everything you require to run a program. Which includes environment variables, directory structure, common libraries etc. This can also be a virtual machine like JRE (Java Runtime Environment) CLR (Common Language Runtime) for .net framework The target would be JRE or CLR for your program, need to decide by you. As soon as you execute any program, it’s in run time. JRE vs JDK JRE JDK Stands for Java Runtime Environment Stands for Java development kit To run Java programs, you need JRE Helps to build Java programs and applets Platform dependent contains libraries and supporting tool Platform dependent contains tools development and debugging JRE does not contain a development kit. JDK includes JRE also to execute the program Simple JRE VS JDK What are the causes of the «Java Runtime environment not found» error Java is not installed in your system Java installation not completed (due to errors) Environment variables of Java are not set Java conflict due to more than one Java Runtime installation Because JRE is platform-dependent, I have covered java installation, variable setup and un-installation for Windows and Ubuntu both. Choose Windows 10 or Ubuntu 20.04 from the post and follow step by step to get java issues resolved. Java download Before installation, first, we need to download java — Step1 Visit oracle.com and download JDK 15 or the latest available for your system. I am downloading it for Windows 10 (64-bit). The latest available versions of java are listed in the screenshot. How to install Java runtime environment step by step Let’s solve 1 st reason for «Java runtime environment not found», Because java is not installed. Step2 First, check for any pre-installed java version — Open the command prompt with «Run as administrator» and run java command. How to install java runtime environment in Windows 10 Step3 Once Download completes. Browse to the «jdk-15.0.1_windows-x64_bin.exe» file and double-click on it, to run the installer. Click Next. Step4 I recommend keeping «C:Program filesjavajdk-15.0.1 (64-bit)» as the default installation folder. Select Next. You may select different installation folders also. For example, if you are installing a second instance of java software. Click on change and browse for the target folder. Step5 Let installation complete, it may take a few minutes. Step6 Click close. Now you are done with java installation on windows 10. How to set the environment variable for java in windows10 Set the Environment variable for java in windows 10 by these steps — Step7 Type «environment» in the search window. Click «open» on «Edit the system environment variables« Step8 Click on Environment variables. Step9 Select «Path» > Then click Edit. Step10 Select New > Give path of java installation directory > For example, «C:Program filesjavajdk-15.0.1bin» in my case. If you have selected a different folder for java installation in step4. You can enter your path to the bin folder. Click OK. Step11 Set «classpath» for java. Click «New» in the environment variable window. It allows to set up the new environment variables. Step12 In «Variable name», enter «classpath«. Also in «variable value» provide path to your java installation till «lib» folder. In my case it is «C:program filesjavajdk-15.0lib > Select OK Close all open environment variables windows by selecting OK. How to check what version of java I have? Installation and java variables have been set up. Now, Let’s validate the java installation and version. Step13 Open the command prompt with «run as administrator» rights in windows 10. Step14 Run the «java» command to check your Java and JRE (Java Runtime Environment) version. Check java SDK version with javac command Video tutorial-JRE error solved for Windows «Java Runtime Environment not found» error fixed for windows 10 How to uninstall java from Windows 10 In case, you are not happy with your old java or JRE version and want to install a new. For that, you need to remove the old Java version. Cleanup of Java from Windows 10 is pretty easy. Follow these steps to remove java from your system. Step15 Search add or remove programs and click open Step16 Select the java program and click Uninstall. Java software will go from the window. You can clean up java variables also, set up in step10 and 11 earlier. How to install java runtime environment in Ubuntu 20.04 There are two ways to download and install java or JDK in Ubuntu 20.04 A.) Using the apt command B.) Download the Oracle JDK package and install it manually Let’s see both options one by one- A.) How to install java or JRE in Ubuntu 20.04 using the apt command To install Java in Ubuntu using the repository, Follow these commands Step17 Update package index using apt command Step18 Check if you have any old java versions installed in the system. In my case, java is not installed. output Command ‘java’ not found, but can be installed with: sudo apt install openjdk-11-jre-headless # version 11.0.9.1+1-0ubuntu1 Step19 Run the «apt» command to install java or JRE. I will install default-jre version 2:1.11-72 in my Ubuntu system from the list. Select «Y» and press Enter. Let installation complete. it will take a few minutes. Step20 Check the java version output How to Remove java from Ubuntu 20.04 Step21 Run apt command to remove JRE package installed. Press Y and then enter. B.) How to install the latest java or JDK in Ubuntu 20.04 from oracle (manually) Step22 Java JRE download steps — Visit oracle.com and download JDK 15 or the latest available .deb and transfer to your system. I am downloading Debian package jdk-15.0.1_linux-x64_bin.deb. Alternatively, you can download java using wget command. Reference output Step23 Rename the .deb file using mv command, if required. Then install the Debian package using the dpkg command. output Default installation directory path of java would be «/usr/lib/jvm/jdk-15.0.1/«. So, make a note of it, as it will be required to set up a Java_HOME variable. How to set the «JAVA_HOME» variable in Ubuntu 20.04 Set the JAVA_HOME variable for all users in Ubuntu by editing the environment file. Step24 Edit /system/environment file Add path «/usr/lib/jvm/jdk-15.0.1/bin» to the last of the environment file. Then, save and exit. Run source command to execute changes made in the environment file. Step25 Check your java version Remove java runtime environment package using dpkg command Step26 Run the dpkg command with the —purge option to completely clean java from Ubuntu 20.04 Video Tutorial — JRE error solved for Ubuntu Video on «How to fix java runtime environment error in Ubuntu 20.04» Источник
- What is a runtime environment?
- JRE vs JDK
- What are the causes of the «Java Runtime environment not found» error
- Java download
- How to install Java runtime environment step by step
- How to install java runtime environment in Windows 10
- How to set the environment variable for java in windows10
- How to check what version of java I have?
- Video tutorial-JRE error solved for Windows
- How to uninstall java from Windows 10
- How to install java runtime environment in Ubuntu 20.04
- A.) How to install java or JRE in Ubuntu 20.04 using the apt command
- How to Remove java from Ubuntu 20.04
- B.) How to install the latest java or JDK in Ubuntu 20.04 from oracle (manually)
- Java JRE download steps —
- How to set the «JAVA_HOME» variable in Ubuntu 20.04
- Remove java runtime environment package using dpkg command
- Video Tutorial — JRE error solved for Ubuntu
How to fix the Runtime Code 2 Java Error Code 2
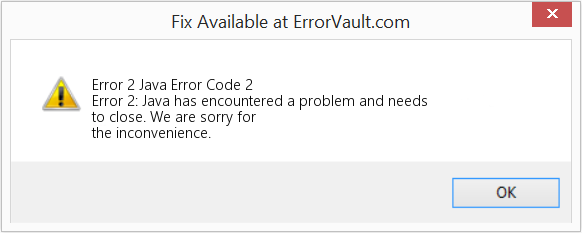
This article features error number Code 2, commonly known as Java Error Code 2 described as Error 2: Java has encountered a problem and needs to close. We are sorry for the inconvenience.
Error Information
Error name: Java Error Code 2
Error number: Code 2
Description: Error 2: Java has encountered a problem and needs to close. We are sorry for the inconvenience.
Software: Java
Developer: Oracle Corporation
This repair tool can fix common computer errors like BSODs, system freezes and crashes. It can replace missing operating system files and DLLs, remove malware and fix the damage caused by it, as well as optimize your PC for maximum performance.
About Runtime Code 2
Runtime Code 2 happens when Java fails or crashes whilst it’s running, hence its name. It doesn’t necessarily mean that the code was corrupt in some way, but just that it did not work during its run-time. This kind of error will appear as an annoying notification on your screen unless handled and corrected. Here are symptoms, causes and ways to troubleshoot the problem.
Definitions (Beta)
Here we list some definitions for the words contained in your error, in an attempt to help you understand your problem. This is a work in progress, so sometimes we might define the word incorrectly, so feel free to skip this section!
- Error code — An error code is a value returned to provide context on why an error occurred
- Java — Java not to be confused with JavaScript or JScript is a general-purpose object-oriented programming language designed to be used in conjunction with the Java Virtual Machine JVM
Symptoms of Code 2 — Java Error Code 2
Runtime errors happen without warning. The error message can come up the screen anytime Java is run. In fact, the error message or some other dialogue box can come up again and again if not addressed early on.
There may be instances of files deletion or new files appearing. Though this symptom is largely due to virus infection, it can be attributed as a symptom for runtime error, as virus infection is one of the causes for runtime error. User may also experience a sudden drop in internet connection speed, yet again, this is not always the case.
 (Java Error Code 2) Repair Tool»/>
(For illustrative purposes only)
Causes of Java Error Code 2 — Code 2
During software design, programmers code anticipating the occurrence of errors. However, there are no perfect designs, as errors can be expected even with the best program design. Glitches can happen during runtime if a certain error is not experienced and addressed during design and testing.
Runtime errors are generally caused by incompatible programs running at the same time. It may also occur because of memory problem, a bad graphics driver or virus infection. Whatever the case may be, the problem must be resolved immediately to avoid further problems. Here are ways to remedy the error.
Repair Methods
Runtime errors may be annoying and persistent, but it is not totally hopeless, repairs are available. Here are ways to do it.
If a repair method works for you, please click the upvote button to the left of the answer, this will let other users know which repair method is currently working the best.
Источник
How to Fix «Java Runtime Environment not found» error
In this post, we will solve the «Java Runtime Environment not found error». This java error is one of the common errors faced by developers or end-users. Whenever you try to install any software which requires java like eclipse or Minecraft. Also, if you are new to java development, JDK or Java Development Kit is necessary for you.
Following this tutorial will help you to resolve all Java runtime errors. Additionally, you will learn to install, remove and set java variables in Windows10 and Ubuntu.
These are the very common errors you will find related to Java.
- java runtime environment not found
- java runtime environment not found windows 10
- eclipse java runtime environment not found
- eclipse java runtime environment not found path
- java SE runtime environment not found
- java runtime environment not found at bin javaw.exe
- unable to load java runtime environment
- cannot determine a valid java home
- java runtime environment not found mac
Let’s understand some basic concepts of Java runtime first. Check out this post, if you are getting a java command not found error.
What is a runtime environment?
Runtime basically means everything you require to run a program. Which includes environment variables, directory structure, common libraries etc. This can also be a virtual machine like
- JRE (Java Runtime Environment)
- CLR (Common Language Runtime) for .net framework
The target would be JRE or CLR for your program, need to decide by you. As soon as you execute any program, it’s in run time.
JRE vs JDK
| JRE | JDK |
|---|---|
| Stands for Java Runtime Environment | Stands for Java development kit |
| To run Java programs, you need JRE | Helps to build Java programs and applets |
| Platform dependent contains libraries and supporting tool | Platform dependent contains tools development and debugging |
| JRE does not contain a development kit. | JDK includes JRE also to execute the program |
Simple JRE VS JDK
What are the causes of the «Java Runtime environment not found» error
- Java is not installed in your system
- Java installation not completed (due to errors)
- Environment variables of Java are not set
- Java conflict due to more than one Java Runtime installation
Because JRE is platform-dependent, I have covered java installation, variable setup and un-installation for Windows and Ubuntu both.
Choose Windows 10 or Ubuntu 20.04 from the post and follow step by step to get java issues resolved.
Java download
Before installation, first, we need to download java —
Step1
Visit oracle.com and download JDK 15 or the latest available for your system. I am downloading it for Windows 10 (64-bit). The latest available versions of java are listed in the screenshot.
How to install Java runtime environment step by step
Let’s solve 1 st reason for «Java runtime environment not found», Because java is not installed.
Step2
First, check for any pre-installed java version —
Open the command prompt with «Run as administrator» and run java command.
How to install java runtime environment in Windows 10
Step3
Once Download completes. Browse to the «jdk-15.0.1_windows-x64_bin.exe» file and double-click on it, to run the installer. Click Next.
Step4
I recommend keeping «C:Program filesjavajdk-15.0.1 (64-bit)» as the default installation folder. Select Next.
You may select different installation folders also. For example, if you are installing a second instance of java software. Click on change and browse for the target folder.
Step5
Let installation complete, it may take a few minutes.
Step6
Click close. Now you are done with java installation on windows 10.
How to set the environment variable for java in windows10
Set the Environment variable for java in windows 10 by these steps —
Step7
Type «environment» in the search window. Click «open» on «Edit the system environment variables«
Step8
Click on Environment variables.
Step9
Select «Path» > Then click Edit.
Step10
Select New > Give path of java installation directory > For example, «C:Program filesjavajdk-15.0.1bin» in my case. If you have selected a different folder for java installation in step4. You can enter your path to the bin folder.
Click OK.
Step11
Set «classpath» for java. Click «New» in the environment variable window. It allows to set up the new environment variables.
Step12
In «Variable name», enter «classpath«. Also in «variable value» provide path to your java installation till «lib» folder. In my case it is «C:program filesjavajdk-15.0lib > Select OK
Close all open environment variables windows by selecting OK.
How to check what version of java I have?
Installation and java variables have been set up. Now, Let’s validate the java installation and version.
Step13
Open the command prompt with «run as administrator» rights in windows 10.
Step14
Run the «java» command to check your Java and JRE (Java Runtime Environment) version.
Check java SDK version with javac command
Video tutorial-JRE error solved for Windows
«Java Runtime Environment not found» error fixed for windows 10
How to uninstall java from Windows 10
In case, you are not happy with your old java or JRE version and want to install a new. For that, you need to remove the old Java version.
Cleanup of Java from Windows 10 is pretty easy. Follow these steps to remove java from your system.
Step15
Search add or remove programs and click open
Step16
Select the java program and click Uninstall.
Java software will go from the window. You can clean up java variables also, set up in step10 and 11 earlier.
How to install java runtime environment in Ubuntu 20.04
There are two ways to download and install java or JDK in Ubuntu 20.04
A.) Using the apt command
B.) Download the Oracle JDK package and install it manually
Let’s see both options one by one-
A.) How to install java or JRE in Ubuntu 20.04 using the apt command
To install Java in Ubuntu using the repository, Follow these commands
Step17
Update package index using apt command
Step18
Check if you have any old java versions installed in the system. In my case, java is not installed.
output
Command ‘java’ not found, but can be installed with:
sudo apt install openjdk-11-jre-headless # version 11.0.9.1+1-0ubuntu1
Step19
Run the «apt» command to install java or JRE. I will install default-jre version 2:1.11-72 in my Ubuntu system from the list.
Select «Y» and press Enter. Let installation complete. it will take a few minutes.
Step20
Check the java version
output
How to Remove java from Ubuntu 20.04
Step21
Run apt command to remove JRE package installed. Press Y and then enter.
B.) How to install the latest java or JDK in Ubuntu 20.04 from oracle (manually)
Step22
Java JRE download steps —
Visit oracle.com and download JDK 15 or the latest available .deb and transfer to your system. I am downloading Debian package jdk-15.0.1_linux-x64_bin.deb.
Alternatively, you can download java using wget command.
Reference output
Step23
Rename the .deb file using mv command, if required. Then install the Debian package using the dpkg command.
output
Default installation directory path of java would be «/usr/lib/jvm/jdk-15.0.1/«. So, make a note of it, as it will be required to set up a Java_HOME variable.
How to set the «JAVA_HOME» variable in Ubuntu 20.04
Set the JAVA_HOME variable for all users in Ubuntu by editing the environment file.
Step24
Edit /system/environment file
Add path «/usr/lib/jvm/jdk-15.0.1/bin» to the last of the environment file. Then, save and exit.
Run source command to execute changes made in the environment file.
Step25
Check your java version
Remove java runtime environment package using dpkg command
Step26
Run the dpkg command with the —purge option to completely clean java from Ubuntu 20.04
Video Tutorial — JRE error solved for Ubuntu
Video on «How to fix java runtime environment error in Ubuntu 20.04»
Источник
This article features error number Code 2, commonly known as Java Error Code 2 described as Error 2: Java has encountered a problem and needs to close. We are sorry for the inconvenience.
About Runtime Code 2
Runtime Code 2 happens when Java fails or crashes whilst it’s running, hence its name. It doesn’t necessarily mean that the code was corrupt in some way, but just that it did not work during its run-time. This kind of error will appear as an annoying notification on your screen unless handled and corrected. Here are symptoms, causes and ways to troubleshoot the problem.
Definitions (Beta)
Here we list some definitions for the words contained in your error, in an attempt to help you understand your problem. This is a work in progress, so sometimes we might define the word incorrectly, so feel free to skip this section!
- Error code — An error code is a value returned to provide context on why an error occurred
- Java — Java not to be confused with JavaScript or JScript is a general-purpose object-oriented programming language designed to be used in conjunction with the Java Virtual Machine JVM
Symptoms of Code 2 — Java Error Code 2
Runtime errors happen without warning. The error message can come up the screen anytime Java is run. In fact, the error message or some other dialogue box can come up again and again if not addressed early on.
There may be instances of files deletion or new files appearing. Though this symptom is largely due to virus infection, it can be attributed as a symptom for runtime error, as virus infection is one of the causes for runtime error. User may also experience a sudden drop in internet connection speed, yet again, this is not always the case.
(For illustrative purposes only)
Causes of Java Error Code 2 — Code 2
During software design, programmers code anticipating the occurrence of errors. However, there are no perfect designs, as errors can be expected even with the best program design. Glitches can happen during runtime if a certain error is not experienced and addressed during design and testing.
Runtime errors are generally caused by incompatible programs running at the same time. It may also occur because of memory problem, a bad graphics driver or virus infection. Whatever the case may be, the problem must be resolved immediately to avoid further problems. Here are ways to remedy the error.
Repair Methods
Runtime errors may be annoying and persistent, but it is not totally hopeless, repairs are available. Here are ways to do it.
If a repair method works for you, please click the upvote button to the left of the answer, this will let other users know which repair method is currently working the best.
Please note: Neither ErrorVault.com nor it’s writers claim responsibility for the results of the actions taken from employing any of the repair methods listed on this page — you complete these steps at your own risk.
Method 1 — Close Conflicting Programs
When you get a runtime error, keep in mind that it is happening due to programs that are conflicting with each other. The first thing you can do to resolve the problem is to stop these conflicting programs.
- Open Task Manager by clicking Ctrl-Alt-Del at the same time. This will let you see the list of programs currently running.
- Go to the Processes tab and stop the programs one by one by highlighting each program and clicking the End Process buttom.
- You will need to observe if the error message will reoccur each time you stop a process.
- Once you get to identify which program is causing the error, you may go ahead with the next troubleshooting step, reinstalling the application.
Method 2 — Update / Reinstall Conflicting Programs
Using Control Panel
- For Windows 7, click the Start Button, then click Control panel, then Uninstall a program
- For Windows 8, click the Start Button, then scroll down and click More Settings, then click Control panel > Uninstall a program.
- For Windows 10, just type Control Panel on the search box and click the result, then click Uninstall a program
- Once inside Programs and Features, click the problem program and click Update or Uninstall.
- If you chose to update, then you will just need to follow the prompt to complete the process, however if you chose to Uninstall, you will follow the prompt to uninstall and then re-download or use the application’s installation disk to reinstall the program.
Using Other Methods
- For Windows 7, you may find the list of all installed programs when you click Start and scroll your mouse over the list that appear on the tab. You may see on that list utility for uninstalling the program. You may go ahead and uninstall using utilities available in this tab.
- For Windows 10, you may click Start, then Settings, then choose Apps.
- Scroll down to see the list of Apps and features installed in your computer.
- Click the Program which is causing the runtime error, then you may choose to uninstall or click Advanced options to reset the application.
Method 3 — Update your Virus protection program or download and install the latest Windows Update
Virus infection causing runtime error on your computer must immediately be prevented, quarantined or deleted. Make sure you update your virus program and run a thorough scan of the computer or, run Windows update so you can get the latest virus definition and fix.
Method 4 — Re-install Runtime Libraries
You might be getting the error because of an update, like the MS Visual C++ package which might not be installed properly or completely. What you can do then is to uninstall the current package and install a fresh copy.
- Uninstall the package by going to Programs and Features, find and highlight the Microsoft Visual C++ Redistributable Package.
- Click Uninstall on top of the list, and when it is done, reboot your computer.
- Download the latest redistributable package from Microsoft then install it.
Method 5 — Run Disk Cleanup
You might also be experiencing runtime error because of a very low free space on your computer.
- You should consider backing up your files and freeing up space on your hard drive
- You can also clear your cache and reboot your computer
- You can also run Disk Cleanup, open your explorer window and right click your main directory (this is usually C: )
- Click Properties and then click Disk Cleanup
Method 6 — Reinstall Your Graphics Driver
If the error is related to a bad graphics driver, then you may do the following:
- Open your Device Manager, locate the graphics driver
- Right click the video card driver then click uninstall, then restart your computer
Method 7 — IE related Runtime Error
If the error you are getting is related to the Internet Explorer, you may do the following:
- Reset your browser.
- For Windows 7, you may click Start, go to Control Panel, then click Internet Options on the left side. Then you can click Advanced tab then click the Reset button.
- For Windows 8 and 10, you may click search and type Internet Options, then go to Advanced tab and click Reset.
- Disable script debugging and error notifications.
- On the same Internet Options window, you may go to Advanced tab and look for Disable script debugging
- Put a check mark on the radio button
- At the same time, uncheck the «Display a Notification about every Script Error» item and then click Apply and OK, then reboot your computer.
If these quick fixes do not work, you can always backup files and run repair reinstall on your computer. However, you can do that later when the solutions listed here did not do the job.
Other languages:
Wie beheben Fehler 2 (Java-Fehlercode 2) — Fehler 2: Java hat ein Problem festgestellt und muss geschlossen werden. Wir entschuldigen uns für die Unannehmlichkeiten.
Come fissare Errore 2 (Codice errore Java 2) — Errore 2: Java ha riscontrato un problema e deve essere chiuso. Ci scusiamo per l’inconveniente.
Hoe maak je Fout 2 (Java-foutcode 2) — Fout 2: Java heeft een probleem ondervonden en moet worden afgesloten. Excuses voor het ongemak.
Comment réparer Erreur 2 (Code d’erreur Java 2) — Erreur 2 : Java a rencontré un problème et doit se fermer. Nous sommes désolés du dérangement.
어떻게 고치는 지 오류 2 (자바 오류 코드 2) — 오류 2: Java에 문제가 발생해 닫아야 합니다. 불편을 드려 죄송합니다.
Como corrigir o Erro 2 (Código de erro 2 do Java) — Erro 2: O Java encontrou um problema e precisa fechar. Lamentamos o inconveniente.
Hur man åtgärdar Fel 2 (Java-felkod 2) — Fel 2: Java har stött på ett problem och måste avslutas. Vi är ledsna för besväret.
Как исправить Ошибка 2 (Код ошибки Java 2) — Ошибка 2: Возникла ошибка в приложении Java. Приложение будет закрыто. Приносим свои извинения за неудобства.
Jak naprawić Błąd 2 (Kod błędu Java 2) — Błąd 2: Java napotkała problem i musi zostać zamknięta. Przepraszamy za niedogodności.
Cómo arreglar Error 2 (Código de error de Java 2) — Error 2: Java ha detectado un problema y debe cerrarse. Lamentamos las molestias.
![]() About The Author: Phil Hart has been a Microsoft Community Contributor since 2010. With a current point score over 100,000, they’ve contributed more than 3000 answers in the Microsoft Support forums and have created almost 200 new help articles in the Technet Wiki.
About The Author: Phil Hart has been a Microsoft Community Contributor since 2010. With a current point score over 100,000, they’ve contributed more than 3000 answers in the Microsoft Support forums and have created almost 200 new help articles in the Technet Wiki.
Follow Us: ![]()
![]()
![]()

This repair tool can fix common computer problems such as blue screens, crashes and freezes, missing DLL files, as well as repair malware/virus damage and more by replacing damaged and missing system files.
STEP 1:
Click Here to Download and install the Windows repair tool.
STEP 2:
Click on Start Scan and let it analyze your device.
STEP 3:
Click on Repair All to fix all of the issues it detected.
DOWNLOAD NOW
Compatibility
![]()
Requirements
1 Ghz CPU, 512 MB RAM, 40 GB HDD
This download offers unlimited scans of your Windows PC for free. Full system repairs start at $19.95.
Article ID: ACX05504EN
Applies To: Windows 10, Windows 8.1, Windows 7, Windows Vista, Windows XP, Windows 2000
Speed Up Tip #49
Troubleshooting 100% Disk Usage:
A very common issue among Windows users is the disk usage in the Task Manager always shows 100%. Troubleshoot the cause of this spike in disk usage by going through the Processes tab in the Task Manager.
Click Here for another way to speed up your Windows PC
Адаптер куплен, ноутбук готов, пора приступить к настройке софта.
Решил собрать все, что узнал для и себя и других.
Я решил настроить все на виртуальной машине, так удобнее и пока делаешь эксперименты удобнее, нет надобности чистить хвосты от установленного софта, достаточно вернутся на сделанный снимок перед установкой.
В роли гипервизора выбрал VirtualBox (в процессе экспериментов выяснил, что если у вас установлена роль Hyper-V в системе, загружаться ВМ не будут, это стоило мне еще одного часа). Он бесплатный и мульти-платформенный.
Версии выше Odis 3.0.3 установить на windows 10 не получится*. В комплекте с кабелем шли диски с версией 4.3.3, я решил поставить самую свежую из доступных на текущий момент ODIS Service 5.0.5 + ODIS Engineering 9.0.4.
— Первым делом устанавливаем Windows 7 64 bit и все обновления — самый долгий этап.
— Для установки нужны следующие обновления:
KB3033929
KB2992611
Они есть в дистрибутивах ODIS, я скачивал по ссылкам выше.
— После всех приготовлений ставим ODIS в соответствии с инструкцией, если кратко то:
1) Ставим OffboardDiagSetup-Servict_…, процессе установки указываем ему файл лицензии.
2) После перезагрузки заменяем файлы из папки 03. Launcer+license+plugins в каталоге с программой.
3) Монтируем образ PostSetup если нет эмулятора, можно просто распаковать папку архиватором.
От имени администратор запускаем ярлык Offboard Diagnostic Information System с рабочего стола, указываем ему диск или папку с PostSetup.
Выбираем нужный нам язык, жмем стрелочку вправо, ждем окончания установки.
4) ODIS Engineering ставим аналогичным образом.
Можно попробовать запустить и проверить работу, как и ожидалось, не все сразу, ODIS не видит машину и зажигание.

— Тут и начинается самое интересное, нужно найти правильный драйвер для нашего китайского модуля. У меня на это ушло много времени, не буду рассказывать все перепробованные мною варианты, сразу перейду к решению. Отправной точкой стала запись Dimap-77 о правильной установке драйверов.
В комплекте с ODIS ставится последняя версия драйвера (1.20.042), китайские клоны с ними не работают (мой так точно). Судя по записям на форумах и драйве многим помогла 23 версия, мне нет. Значит надо подбирать к своему экземпляру самостоятельно, что же приступим.
Вспоминаем про заботливых китайцев, на диске с кабелем идет 42 версия, как мы уже убедились она не рабочая, предчувствие меня не обмануло, передаем привет китайцам, едем дальше.
Для проверки работы шнурка, с ODIS устанавливается программа для тестирования соединения, запускаем и проверяем работу, Пуск —> Все программы —> Softing D-PDU API for VCIs V1.20.042 (тут могут быть другие цифры если вы ставите другой дистрибутив) —> Softing D-PDUAPI Test Application
1. Выбираем версию прошивки EDIC_D_PDU_API
2. Нажимаем Parse MDF File
3. В этом поле должен появится ваш диагностический модуль
4. Нажимаем кнопку PDUModuleConnect
5. Если все хорошо то в этом поле в конце будет написано
—————————————————-
Return of PDUGetResourceIds:
PDU_STATUS_NOERROR: PDU function call successful
—————————————————-
Number of matching resource IDs: 1
—————————————————-
Selected resource ID: 81
В моем случае была ошибка
—————————————————-
Return of PDUModuleConnect:
PDU_ERR_FCT_FAILED: PDU Function call failed
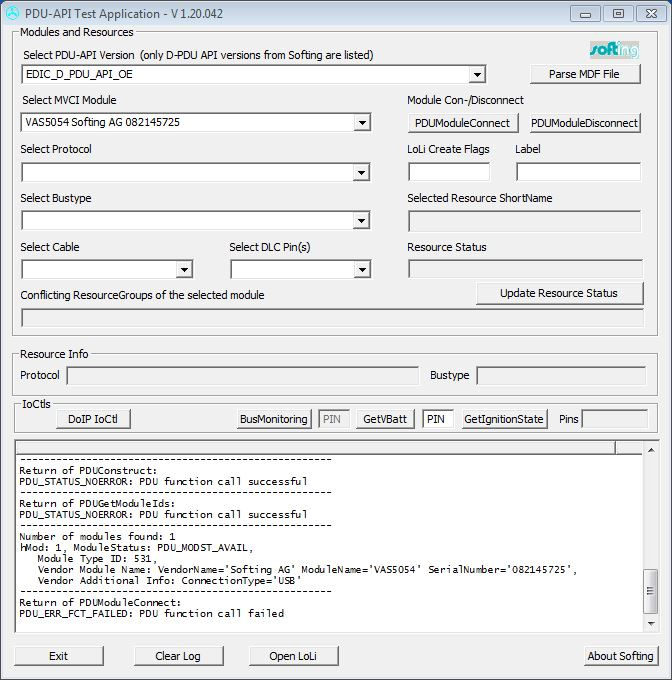
В дистрибутиве последнего ODIS Engineering был архив с файлами разных версий библиотек. Я начал методично заменять файлы в папке c:Program Files (x86)SoftingD-PDU API1.20.042VeComVAS5054
После каждой замены делаем тест, мне повезло на 3 раз, версия 1.20.037 мне подошла. Теперь надо найти установщик этой версии, где то на форуме видел, что данная версия шла с ODIS 3.0.3, скачиваем PostSetup данного дистрибутива, извлекаем архив драйверов из каталога образ дискаpostsetupupdateOdisTrade-Retailsoftwareupdatefeaturesodis.data.D-PDU_API_Softing_1.20.37odis.data.D-PDU_API_Softing_1.20.37.jar извлекаем и устанавливаем, советуют удалять старые версии, у меня после удаления не заработало, так что ставим рядом.
Теперь идем в файл настроек по пути C:ProgramDataD-PDU APIpdu_api_root.xml и меняем значения используемого драйвера (42) на только что установленные (37)
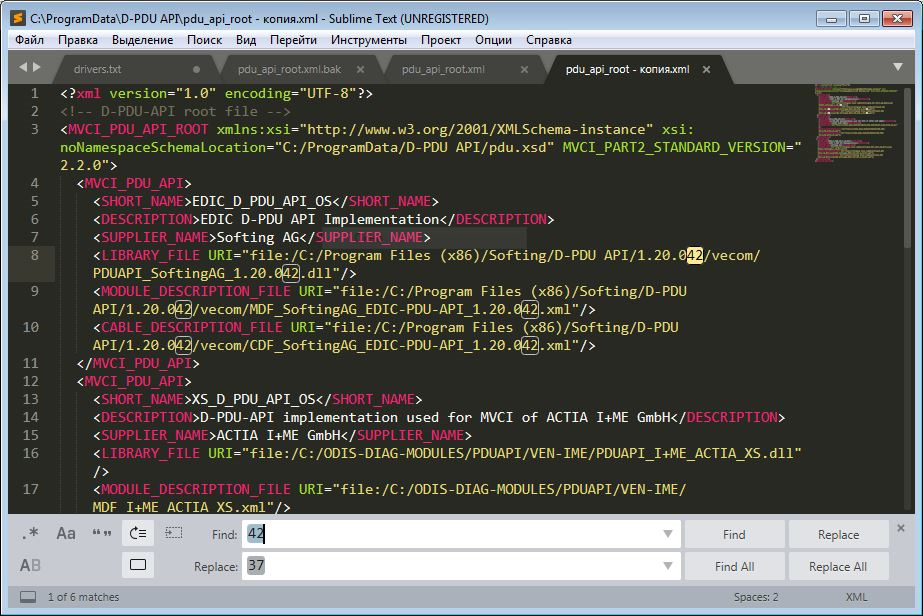
Копируем содержимое папки c:Program Files (x86)SoftingD-PDU API1.20.037VeComVAS5054 в папку c:Program Files (x86)SoftingD-PDU API1.20.042VeComVAS5054 — если делали чистую установку без подбора, как было описано выше.
Возвращаемся в Softing D-PDUAPI Test Application проверяем, Бинго!

Теперь ODIS видит машину и зажигание.

*Поддержка кабеля 5054(5054а) отсутствует, встречал записи, что можно обойти изменив скрипт установки в дистрибутиве Odis.
| Номер ошибки: | Ошибка 2 | |
| Название ошибки: | Java Error Code 2 | |
| Описание ошибки: | Ошибка 2: Возникла ошибка в приложении Java. Приложение будет закрыто. Приносим извинения за неудобства. | |
| Разработчик: | Oracle Corporation | |
| Программное обеспечение: | Java | |
| Относится к: | Windows XP, Vista, 7, 8, 10, 11 |
Объяснение «Java Error Code 2»
Как правило, специалисты по ПК называют «Java Error Code 2» как тип «ошибки времени выполнения». Когда дело доходит до программного обеспечения, как Java, инженеры могут использовать различные инструменты, чтобы попытаться сорвать эти ошибки как можно скорее. Тем не менее, возможно, что иногда ошибки, такие как ошибка 2, не устранены, даже на этом этапе.
«Java Error Code 2» может возникнуть у пользователей Java даже при нормальном использовании приложения. После того, как об ошибке будет сообщено, Oracle Corporation отреагирует и быстро исследует ошибки 2 проблемы. Затем Oracle Corporation будет иметь знания, чтобы исследовать, как и где устранить проблему. В результате разработчик может использовать пакеты обновлений для Java, доступные с их веб-сайта (или автоматическую загрузку), чтобы устранить эти ошибки 2 проблемы и другие ошибки.
Что генерирует ошибку времени выполнения 2?
Ошибки выполнения при запуске Java — это когда вы, скорее всего, столкнетесь с «Java Error Code 2». Вот три наиболее заметные причины ошибки ошибки 2 во время выполнения происходят:
Ошибка 2 Crash — это распространенная ошибка 2 во время выполнения ошибки, которая приводит к полному завершению работы программы. Обычно это происходит, когда Java не может обрабатывать предоставленный ввод или когда он не знает, что выводить.
Утечка памяти «Java Error Code 2» — ошибка 2 утечка памяти приводит к тому, что Java постоянно использует все больше и больше памяти, увяская систему. Критическими проблемами, связанными с этим, могут быть отсутствие девыделения памяти или подключение к плохому коду, такому как бесконечные циклы.
Ошибка 2 Logic Error — логическая ошибка возникает, когда компьютер производит неправильный вывод, даже если вход правильный. Это видно, когда исходный код Oracle Corporation содержит недостаток в обработке данных.
Основные причины Oracle Corporation ошибок, связанных с файлом Java Error Code 2, включают отсутствие или повреждение файла, или, в некоторых случаях, заражение связанного Java вредоносным ПО в прошлом или настоящем. Для устранения неполадок, связанных с файлом Oracle Corporation, большинство профессионалов ПК заменят файл на соответствующую версию. Кроме того, регулярная очистка и оптимизация реестра Windows предотвратит создание неправильных ссылок на пути к файлам Oracle Corporation, поэтому мы настоятельно рекомендуем регулярно выполнять сканирование реестра.
Распространенные сообщения об ошибках в Java Error Code 2
Наиболее распространенные ошибки Java Error Code 2, которые могут возникнуть на компьютере под управлением Windows, перечислены ниже:
- «Ошибка приложения Java Error Code 2.»
- «Ошибка программного обеспечения Win32: Java Error Code 2»
- «Извините за неудобства — Java Error Code 2 имеет проблему. «
- «К сожалению, мы не можем найти Java Error Code 2. «
- «Java Error Code 2 не найден.»
- «Ошибка запуска программы: Java Error Code 2.»
- «Не удается запустить Java Error Code 2. «
- «Ошибка Java Error Code 2. «
- «Java Error Code 2: путь приложения является ошибкой. «
Эти сообщения об ошибках Oracle Corporation могут появляться во время установки программы, в то время как программа, связанная с Java Error Code 2 (например, Java) работает, во время запуска или завершения работы Windows, или даже во время установки операционной системы Windows. Выделение при возникновении ошибок Java Error Code 2 имеет первостепенное значение для поиска причины проблем Java и сообщения о них вOracle Corporation за помощью.
Эпицентры Java Error Code 2 Головные боли
Проблемы Java и Java Error Code 2 возникают из отсутствующих или поврежденных файлов, недействительных записей реестра Windows и вредоносных инфекций.
Более конкретно, данные ошибки Java Error Code 2 могут быть вызваны следующими причинами:
- Недопустимые разделы реестра Java Error Code 2/повреждены.
- Вирус или вредоносное ПО, которые повредили файл Java Error Code 2 или связанные с Java программные файлы.
- Вредоносное удаление (или ошибка) Java Error Code 2 другим приложением (не Java).
- Другое приложение, конфликтующее с Java Error Code 2 или другими общими ссылками.
- Java (Java Error Code 2) поврежден во время загрузки или установки.
Продукт Solvusoft
Загрузка
WinThruster 2022 — Проверьте свой компьютер на наличие ошибок.
Совместима с Windows 2000, XP, Vista, 7, 8, 10 и 11
Установить необязательные продукты — WinThruster (Solvusoft) | Лицензия | Политика защиты личных сведений | Условия | Удаление