Иногда случаются проблемы с VPN подключением или VPN не работает. На данной странице вы можете найти описание возникающей ошибки впн и самостоятельно исправить ее.
Вы везунчик!
Поздравляем! Вы нашли скрытый промо-код со скидкой 75% на покупку анонимного VPN без логов.
Промо-код действует только 1 час.
Ошибки OpenVPN
Если вы не знаете как узнать ошибку, возникшую в ходе подключения, нажмите на следующую ссылку:
Ниже представлен список возможных ошибок и методы их устранения. Нажмите на ошибку, чтобы узнать как ее устранить. Названия ошибок соответствуют записям в окне лога.
Как узнать какая OpenVPN ошибка возникла?
Программа OpenVPN имеет лог подключения. При подключении к OpenVPN серверу программа записывает данные подключения. Эта информация никуда не передается и остается на вашем компьютере, чтобы вы могли понять из-за чего возникла ошибка впн. Чтобы вызвать окно лога, нажмите дважды левой кнопкой мыши на иконку OpenVPN в системном трее.
Когда соединение прошло успешно, и вы подключены к VPN серверу, то окно лога должно выглядеть так:
Не могу выбрать «Connect» при нажатии на иконку в системном трее
В списке есть только «Proxy Settings», «About» и «Exit», но нет пункта «Connect».
Это означает, что вы не скачали и/или не скопировали конфигурационный файл «client.ovpn» в «C:/Program Files/OpenVPN/config». Откройте еще раз Инструкцию по настройке OpenVPN соединения для вашей ОС и проверьте все шаги установки и настройки.
Connect to IP:Port failed, will try again in 5 seconds; No Route to Host
Данная ошибка означает, что у вас нет подключения к Интернету, либо его блокирует ваш Firewall или Антивирус.
Проверьте активно ли ваше Интернет подключение, отключите Firewall, Антивирус и подключитесь еще раз.
Cannot load certificate file client.crt
Данная ошибка связана с отсутствием сертификационных файлов в папке «C:Program FilesOpenVPNconfig».
В процессе установки было необходимо скачать архив с сертификатами и распаковать его в папку с программой. Откройте еще раз Инструкцию по настройке OpenVPN соединения для вашей ОС и проверьте все шаги установки и настройки.
All TAP-Win32 adapters on this system are currently in use
Эта впн ошибка связана с некорректной работой Windows и программы OpenVPN. Также эта OpenVPN ошибка может возникнуть вследствие отключения Интернета без отключения сначала OpenVPN соединения. Всегда отключайте сначала OpenVPN соединение и только затем Интернет.
Для устранения ошибки, зайдите в «Пуск -> Сетевые подключения». Найдите «Подключение по локальной сети. TAP-Win32 Adapter» и правой кнопкой мышки щелкните на ярлыке. Выберите «Отключить».
Затем, таким же образом, «Включите» данное подключение. После выполнения данных действий проблемы с VPN подключением должны исчезнуть.
ERROR: Windows route add command failed: returned error code 1
Данная ошибка связана с ограничением прав в Windows Vista, Seven.
Для устранения ошибки, необходимо выйти из OpenVPN GUI. Правой кнопкой мышки нажать на иконку OpenVPN GUI на рабочем столе и выбрать пункт меню «Свойства»
На вкладке «Совместимость» поставьте галочку «Выполнять эту программу от имени администратора».
Теперь запустите OpenVPN GUI еще раз и подключитесь к VPN серверу.
Initialization Sequence Completed With Errors
Данная ошибка связана с неправильной работой службы DHCP из-за антивирусов или фаерволов.
Ошибка наблюдалась постоянно у фаервола Outpost Firewall версии 2009 и ранее, наблюдается также у антивируса Касперского. Ниже представлено решение для антивируса Касперского. Сам алгоритм ничем не отличается от решения проблемы для других антивирусов и фаерволов.
Для устранения ошибки, необходимо зайти в «Пуск -> Панель Управления -> Сетевые подключения» и зайти в «Свойства» виртуального адаптера «TAP-Win 32 Adapter». На вкладке «Общие» в списке отключить Kaspersky Anti-Virus NDIS Filter и затем нажать «ОК».
Теперь подключитесь к VPN и подключение должно пройти успешно.
VPN и прокси сервис защищает своих клиентов с 2006 года, используя надежные технологии в области анонимности передачи данных в Интернете.
FortiClient SSL-VPL Failed
Using FortiClient to establish an SSL-VPN connection to the FortiGate can output a warning message.
Symptom

Cause

The now outdated cryptographic protocol TLS 1.0 is no longer enabled by default as of FortiOS 6.0. It is recommended to use at least TLS 1.1 (Cipher Suites) for authentication and data encryption. We are currently on TLS 1.3 which has been approved by the IETF (Internet Engineering Task Force).
Solution
If you want to continue to use older clients that are only ready for use later with TLS 1.2 or higher may if planned client migration via update rollout, TLS 1.0 can be activated on the FortiGate.
Check the current TLS setting from the FortiGate Console with CLI Command:
Activate in the CLI the Cipher Suite TLS 1.0.
How to enable TLS 1.0 on Windows
The TLS version 1.0 in the Microsoft Windows snap-in (inetcpl) Internet Options can also be activate.

Hit the key Win + R and enter inetcpl.cpl
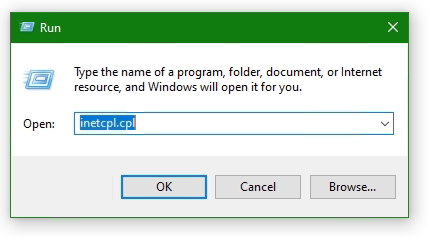
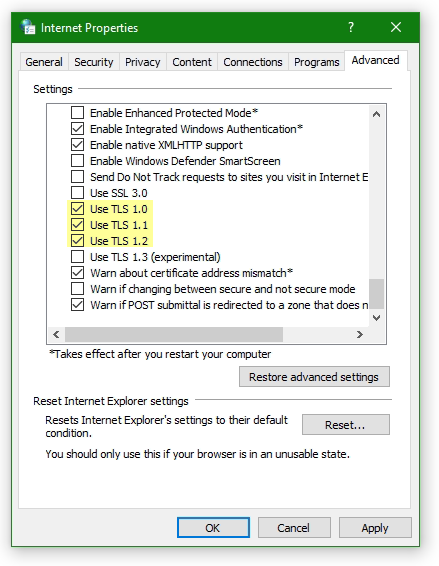
In the opened Internet Options window Internet Properties click to Advanced tab and click Use TLS Version 1.0 to enable it.
More Solution
With older Windows versions, or with routers with PPPoE Internet connection, errors when establishing SSL-VPN connections can be eliminated as follows.
It appears the FortiClient error message:
Unable to establish the VPN connection. The VPN server may be unreachable (-5)
To do this, check the MTU size of the network interfaces with the following command from an open command prompt
The output might look something like this:
Check the MTU size and adjust to 1400 if necessary. In a command prompt opened as an administrator, with running netsh.
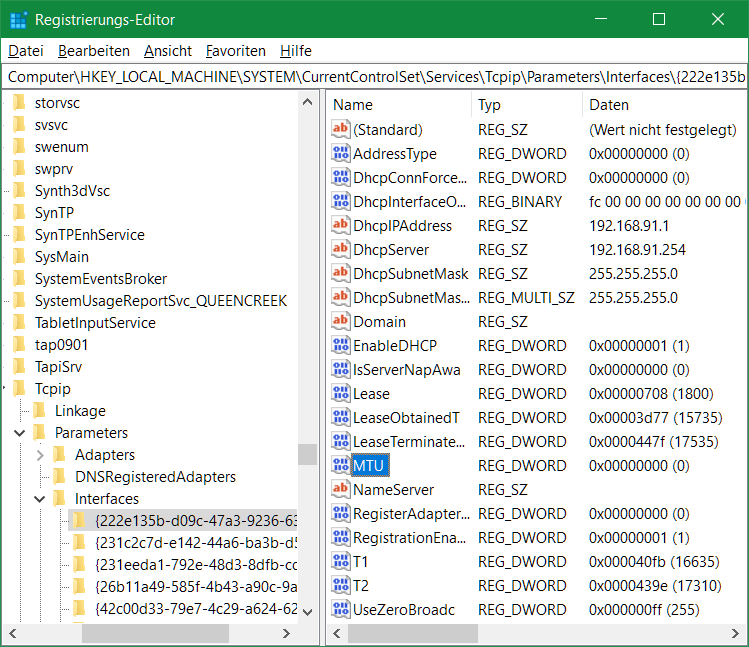
Alternatively, call Regedit and navigate to the following key.
under the appropriate interface with the appropriate IP address, here change the key MTU with the value 578 hexadecimal.
After restarting the computer, the SSL-VPN connection can be established.
How to fix: FortiClient VPN – Unable to establish the VPN connection. The VPN server may be unreachable (-14)
The past couple of months I could connect with the FortiClient VPN just fine and today it did not work.
I got the error:

First I tried updating to the latest version (6.4.0.1464), but that did not fix the problem.
Then some people suggested to change the TLS options in internet options on Windows 10.
I tried several combinations, but that did not fix the problem.
Then some suggested that it could have something to do with your Active Directory account and that was the problem.
My password was expired, after changing the password in Active Directory the problem was fixed.
Leave a Reply
This site uses Akismet to reduce spam. Learn how your comment data is processed.
«Ошибка: аутентификация не удалась» – ExpressVPN
«VPN-соединение: аутентификация пользователя не удалась» – NordVPN
Вы не одиноки, когда сталкиваетесь с ошибкой «VPN Authentication Failed» – это одна из наиболее часто сообщаемых проблем VPN. Как пользователь VPN, я знаю, как важно оставаться защищенным в сети, а не идти на компромисс в отношении безопасности. Так что не волнуйтесь – я придумала 11 методов, которые вы можете использовать, чтобы исправить эту ошибку и быстро восстановить и запустить VPN .

Сообщения об ошибках проверки подлинности на NordVPN и ExpressVPN
1. Перезагрузите компьютер
Иногда самые простые решения являются лучшими. Как и многие технические проблемы, ошибку «VPN Authentication Failed» иногда можно решить, перезагрузив устройство . Это очищает кэш памяти и останавливает любой код, который не работает должным образом, чтобы VPN мог начать заново.
2. Отключите ваш брандмауэр
Если вы используете брандмауэр, он может блокировать ваш VPN-клиент. Чтобы выяснить, является ли это проблемой, вам нужно временно отключить брандмауэр, чтобы убедиться, что он что-то исправляет . Убедитесь, что вы отключили как сторонние, так и встроенные брандмауэры (например, брандмауэр Защитника Windows). Это необходимо сделать для публичных и частных сетей – эта опция должна быть в настройках вашего брандмауэра.
Это не постоянное решение, и отключение брандмауэра может сделать ваш компьютер уязвимым для угроз безопасности. Если проблема связана с вашим брандмауэром, вам нужно изменить настройки или переключиться на другой брандмауэр .
3. Попробуйте проводное соединение
Иногда проблемы с вашим маршрутизатором могут помешать правильному подключению VPN . Это не часто, но это случается, особенно если вы используете два связанных маршрутизатора. Попробуйте подключиться к маршрутизатору с помощью кабеля Ethernet вместо беспроводного подключения и посмотрите, решит ли это проблему.
Если использование двух маршрутизаторов вызывает проблемы, вы можете исправить это, включив режим моста . Метод для этого варьируется в зависимости от модели, поэтому проверьте руководство вашего маршрутизатора.
4. Используйте другой протокол VPN
В большинстве VPN вы можете выбрать, какой протокол IP использовать . Наиболее распространенными являются TCP (протокол управления передачей) и UDP (протокол пользовательских дейтаграмм). Основное отличие состоит в том, что TCP включает исправление ошибок , то есть он отправляет все, что повреждено или не получено из-за проблем с соединением. Поскольку UDP этого не делает, он быстрее, но может быть менее надежным.
Переключение между протоколами может устранить ошибку «VPN Authentication Failed» , ускоряя ваше соединение, особенно если вы переходите с TCP на UDP . Вы найдете эту опцию в настройках вашего VPN-приложения. Обратите внимание, что качество вашего соединения может ухудшиться, если вы переключите протоколы.
5. Попробуйте альтернативный DNS-сервер
По умолчанию ваш VPN-клиент, вероятно, будет использовать DNS-серверы вашего VPN-провайдера. Это снижает риск утечек DNS, но иногда вызывает проблемы с подключением . Чтобы проверить, является ли это проблемой, попробуйте использовать другие DNS-серверы . В настройках вашего VPN-приложения вам нужно отключить опцию «Использовать только DNS-серверы VPN». Имейте в виду, что это может немного увеличить риск утечки DNS.
6. Попробуйте другую сеть WiFi
Если ни одно из предыдущих решений не помогло вам, возможно, проблема в вашей сети Wi-Fi. Чтобы узнать, так ли это, попробуйте использовать VPN в общедоступной точке доступа WiFi или в доме друга . Если VPN работает в этих других сетях, ваша проблема может быть в этом. Взгляните на настройки Интернета и WiFi и попытайтесь определить причины проблем с VPN.
7. Подключитесь к другому серверу VPN
Если вы пытаетесь подключиться, возможно, сервер VPN, который вы используете, слишком медленный или имеет слишком много пользователей . Большинство приложений VPN позволяют выбирать между несколькими серверами в каждом доступном месте. Попробуйте перейти на другой и посмотреть, поможет ли это.
Помните, что чем ближе вы находитесь к серверу, тем быстрее он будет . Например, если вы находитесь в Европе и вам необходимо подключиться к американскому серверу, серверы на восточном побережье должны быть быстрее, чем на западе.
Если вы используете VPN на своем маршрутизаторе, а не через клиент на вашем устройстве, переключение между серверами более сложное . Способ зависит от вашего роутера и провайдера VPN. Если вы не уверены, как это сделать, проверьте документацию для вашего маршрутизатора и VPN .
8. Переустановите свой VPN
Поврежденная установка вашей VPN может привести к ошибке «VPN Authentication Failed» . Если вы подозреваете, что это может быть проблемой, попробуйте удалить и переустановить VPN-клиент . Избегайте других ошибок, используя программное обеспечение для удаления, чтобы удалить все записи реестра и файлы из первой установки.
9. Убедитесь, что ваша VPN-подписка активна
Если вы используете платный VPN-сервис, срок действия вашей подписки истек . Кроме того, вы, возможно, создали учетную запись, но еще не купили подписку.
Чтобы решить эту проблему, войдите в свою учетную запись на веб-сайте вашего провайдера VPN и убедитесь, что ваша подписка была оплачена .
10. Убедитесь, что не слишком много одновременных подключений
Большинство VPN-сервисов ограничивают количество устройств, которые могут быть подключены к VPN одновременно . Если вы подключили несколько устройств, возможно, вы превысили лимит. Посетите веб-сайт вашего поставщика услуг VPN, чтобы подтвердить количество одновременных подключений. Если вы превысили лимит, отключите все устройства, которые вы не используете .
11. Попробуйте лучше VPN
Если вы перепробовали все вышеперечисленные решения и у вас все еще есть проблемы, вы можете подумать о более качественном VPN-сервисе . Бесплатные VPN более низкого уровня могут быть медленными и подвержены другим проблемам с подключением. Напротив, услуги премиум-класса очень быстрые и гораздо реже вызывают проблемы . Например, ExpressVPN предлагает неограниченную пропускную способность и имеет встроенную функцию проверки скорости, которая поможет вам выбрать самый быстрый сервер.
Для тех, кто ограничен в бюджете, NordVPN имеет много тех же функций, что и ExpressVPN, по более доступной цене . Сервис не такой быстрый, но он известен своей надежностью. Или, если вы смотрите много онлайн-контента, вы можете попробовать CyberGhost . Компания гарантирует, что вы всегда будете подключены к самому быстрому доступному серверу, а также имеет серверы, оптимизированные для различных потоковых сервисов .
Все эти VPN предоставляют гарантии возврата денег, так что вы можете попробовать их некоторое время и получить полный возврат средств, если вы не удовлетворены .
Получите лучший VPN сейчас!
Вывод
Ошибка «VPN Authentication Failed» может быть распространена, но исправить ее просто. С этими решениями вы скоро снова будете в безопасности.
Испытываете другие проблемы с подключением? Ознакомьтесь с этим руководством по исправлению наиболее распространенных кодов ошибок VPN .
Статья была переведена для сайта https://vpn.inform.click
Источник: www.wizcase.com

If you are unable to make the connection as VPN Client when you trying to connect to VPN (Virtual Private Network) Network using FortiClient, and connection getting stuck at Status: 98% result in, disconnected, then you are in right place for the solution. This problem occurs usually due to some problems with your Windows Operating System WAN Miniport Driver, and “Forticlient Error” appears on Forticlient version 5.3.xxx as well as 5.4.1.0840 running on Windows 10/8 operating System.
“Forticlient”: It is an integrated endpoint protection platform offers automated next-gen threat protection, control and visibility of your software and hardware inventory across entire security fabric. “Forticlient” offers simplified Endpoint management, endpoint visibility & compliance throughout security fabric, helps to prevent known bugs or errors from being exploited by Attackers and automated behaviors based protection against unknown threats. Fortinet’s FortiClient tested a 100% block rate of exploits effectiveness in detecting malware across multiple vectors including email, web, and USB for offline threats.
“Forticlient” – VPN application offers two options including SSL and IPSec to use this VPN application. SSL is recommended option and it is more reliable, and likely to work in all scenarios compared with IPSec, which may not work from some networks including hotels and cafes. Note that configuring SSL VPN connection is required to connect to VPN network using Forticlient.
In case if are facing any problem while connecting once you have setup your new VPN connection using Forticlient – VPN application, then check Forticlient VPN connection issues and troubleshooting. When you encountered “Forticlient Error” after when the computer comes out of hibernation, then you can fix this issue by “Restarting your network device”. While in some case, it will automatically attempt to reboot the network device after when computer comes out of hibernation.
“Forticlient Error” or “Forticlient VPN Connection Error” can also occur when you try to connect multiple devices from one “Home Network/Broadband Connection” and then you try to connect the second derive, the first device will automatically be disconnected. So, you are recommended to install FortiClient VPN application and create a SSL VPN Connection to fix.
Some users reported that Forticlient Error appears as “Unable to logon to the server. Your user name or password may not be configured properly for this connection. (-12)” on their Windows Server 19 Datacenter VM on Azure, after correctly logged into their FortiClient-VPN software with all other settings properly configured. After that they have tried to connect to VPN network with other user accounts with valid passwords, but they still faced the same issue.
Some common Forticlient Error reported by FortiClient users based Windows 10:
- Applies to both SSL and IPSec: “Warning: unable to establish the VPN connection. The VPN server may be unreachable (-14)”
- Applies to “SSL”: “Warning : unable to establish the VPN connection. The VPN server may be unreachable”
- Applies to SSL: “Failed to establish the VPN connection. This may be caused by a mismatch in the TLS version. Please check the TLS version settings in the Advanced of the Internet options. (-5029)”
- Applies to IPSec: “Error: Wrong Credentials”
- Applies to IPSec: The connection fails with no message
- Applies to IPSec: “Error: Unable to reach tunnel gateway/policy server”
Some common Forticlient Errors with description:
The VPN server may be unreachable (-20199): This error is appeared usually when you try to connect to SSL-VPN. If you are facing this error, then you can try to fix the issue by downloading WAN Miniport repair tool according to your Windows versions by opening https://www.vpnhosting.cz/wan-miniport-repair-x64.exe Or https://www.vpnhosting.cz/wan-miniport-repair-v2-x64.exe page in browser. Once downloaded, run the WAN Miniport Repair Tool and then restart your computer and test VPN access again.
VPN server may be unreachable (-8): It is also known errors among Forticlient users where they faced this error whenever they tried to access VPN service. If you are facing the same and looking for ways to fix, then you can follow our instructions given here in the post and check if it works for you.
Fortinet client on MacBook drops out with -113 error: No only Windows users, MacOS users also reported about Forticlient issue and explained they experienced -113 error while using VPN service on their MacBook. One possible reason the issue can be the outdated VPN Client and MacOS. You can fix the issue by updating MacOS and Forticlient VPN to latest & compatible version and then check if it works for you.
Error in FortiClient SSL VPN using FortiAuthenticator ‘unable to logon to server username or password might not be configured properly (-12)’: This error is another error belongs to Forticlient VPN service. This error is usually appeared when you try to login into FortiClient SSL VPN. In order to fix the issue, you should make sure the group name defined in FortiGate matches Radius Attribute Value in the FortiAuthenticator user group. Note down the group name and in Radius Attributes Fortinet group name, the value is ‘sslvpn’ and similarly, define group name as ‘sslvpn’ in Fortigate as well under ‘User & Authentication > User Groups’.
How to Fix Forticlient Error “Failed to establish the VPN Connection”?

This issue can occur due to TLS mismatch.
Step 1: Open “Internet Explorer” browser in your Windows 10 device
Step 2: In the opened “IE” browser, go to “Settings > Internet Options > Advanced” and scroll down to check “TLS Version”
Step 3: If “TLS 1.2” version is selected on client end, then you need to change to TLS 1.1 and/or TLS 1.0 on FortGate end.
How to Fix WAN Miniport, VPN, Dial-up Error Code 720 and similar errors?
Step 1: At first, you need to install “WAN Miniport Repair Tool”
Step 2: Reboot your computer
Step 3: Now, run “WAN Miniport Repair Tool” and then restart your computer to save the changes
Step 4: After restart, test VPN access.
Reinstall Miniport Driver to fix Forticlient Error
Step 1: Press “Windows + X” keys together from keyboard and select “Device Manager”
Step 2: In the opened “Device Manager” window, click on “View > Show hidden Devices”
Step 3: Under “Network Adapters” category, there should be series of WAN Miniport: IP, IPv6, PPTP, IKEv2, etc. In case if the Miniports are not visible, then you will have to reinstalled.
Step 4: To download Miniport driver, visit Microsoft official site, search for “devcon.exe” and download and then install this file in your computer.
Step 5: Once done, you can find the different miniport driver names associated with your OS in “C:Windowsinfnetrasa.inf”. Depending on Windows OS version, this path will be different.
Step 6: Perform reinstall Miniports operation using “Command Prompt”. To do so, press “Windows + X” keys together from keyboard and select “Command Prompt as admin”
Step 7: Now, type the following commands in command line and hit “Enter” keys after each to execute.

Step 8: After that, restart your computer.
Step 9: Similarly, you will need to reinstall your VPN Client software or hardware driver to fix Forticlient Error
To make VPN Client work with Windows 8.x/Windows 10, execute following commands
Step 1: Open “Command Prompt as admin”
Step 2: Type the follow command one-by-one and hit “Enter” key after each to execute
“netcfg –v ms_ndiswanip”
“netcfg –v ms_ndiswanipv6”
Step 3: After that, restart your computer. Windows will detect the devices are missing and reinstall it automatically
Check if “Telephony”, “Remote Access Connection Manager”, “Secure Socket Tunneling Protocol Service” services are running:
Step 1: Press “Windows + R” keys together from keyboard to open “Run Dialog Box”
Step 2: In the opened “Run Dialog Box”, type “services.msc” and hit “Enter” key to open “Services” window.
Step 3: Now, locate “Telephony”, “Remote Access Connection Manager”, “Secure Socket Tunneling Protocol Service” services in opened “Services” window one-by-one, double-click on them and check under “status” section, is started.
Step 4: If not, then click on “Start” button under “Service Status” section to start the service
Update Forticlient – VPN application to version 5.6 to fix Forticlient Error
Forticlient Error occurs due to problem with WAN Miniport driver, causing 98% error message and VPN connection getting stuck at status 98% for some reasons. However, the latest version of Forticlient i.e., Forticlient 5.6 has released with this bug fixes. So, you can’t download/install this new version from Forticlient official site. Before install, make sure the previous/current version of Forticlient has uninstall.
Download or reinstall Miniport Driver update in Windows 10/11 [Automatically]
You can also try to update all Windows drivers including Miniport Driver driver update using Automatic Driver Update Tool. You can get this tool through button/link below.
⇓ Get Automatic Driver Update Tool
Conclusion
I am sure this article helped you to fix Forticlient Error with several easy methods/steps. You can read & flow our instructions to do so. If this article really helped you, then you can share this article with others to help them. That’s all. For any suggestions or queries, please write on comment box below.
People also asked for:
Q: What is error in Forticlient VPN?
A: This Forticlient error happens when there is either: an incorrect configuration setting in the FortiClient desktop app. a network device (home router or ISP) blocking the configuration.
Q: How do I set up Forticlient VPN on Windows 10?
A: Forticlient Error “Failed to Establish the VPN Connection” error can be occurred if Forticlient VPN is not configured properly in Windows 10. You can set up Forticlient VPN on Windows 10 properly in order to fix.
To set up & configure Forticlient SSL VPN Connection on Windows 10:
Step 1: On the Remote Access tab, click Configure VPN.
Step 2: Select SSL-VPN, then configure the following settings: Connection Name. Enter a name for the connection. Description. (Optional) Enter a description for the connection. Remote Gateway. …
Step 3: Click Save to save the VPN connection.
Q: How do I reset my Forticlient VPN?
A: One possible way to fix the issue with Forticlient VPN in your device is to perform Forticlient VPN reset/restart and then check if it works for you. To do so, follow steps below.
Step 1: Go to System Settings > Dashboard.
Step 2: In the Unit Operation widget, click the Restart button.
Step 3: Enter a message for the event log, then click OK to restart the system.
Q: How do I fix Forticlient VPN?
A: If you are facing Forticlient VPN issues like Forticlient Error “Failed to Establish the VPN Connection” or others in your Windows computer, then you can try below solutions to fix and check if it works.
Step 1: Launch Internet Explorer 11, or run inetcpl. cpl .
Step 2: In the Internet Options dialog, select the Security tab.
Step 3: Select Trusted sites.
Step 4: Click the Sites button.
Step 5: Now add the VPN IP address to the list of Trusted sites.
Step 6: Close the Trusted sites dialog.
Step 7: Click OK to apply the changes to Internet Options.
In this article, we have discussed how to fix “Failed to establish the VPN connection” Forticlient error. This error usually appears on screen while attempting to connect to VPN. If you are facing off such issues too, this article will help you fixing the issue easily.
About “Failed to establish the VPN connection” Forticlient error
We all know that Forticlient is one of the reliable VPN tool that offers to connect to internet anonymously by offering a VPN network. Although this application is very powerful, many a times the users have reported about the issue that the connection got stuck at status 98%, and never goes beyond that leads to disconnection.
The problem mostly dictates the issues with Windows OS WAN Miniport Driver, and the issue may occur with any app versions on Windows 10 (Other variants as well). If you are facing hurdles or problems while connecting to Fortificlient application after the system comes out of hibernation, then you can try out to fix the issue automatically by just restarting your system and network device.
In some cases, the eruption of “Forticlient Error” or “Forticlient VPN Connection Error” may also occur when you attempt to connect multiple devices from a single internet connection. In this case, whenever you actually try to connect your second device, the first one will get disconnected. In order to overcome this problem, it’s suggested to install Forticlient VPN application and create a SSL VPN connection.
Many users have reported that Forticlient Error also appears as “Unable to logon to the server. Your user name or password may not be configured properly for this connection. 9-120”, mostly on Windows Server 19 Data Center VM. They even confirmed that they have properly logged into and configured their Forticlient VPN software. Based on such details, here are some commonly reported errors by Forticlient on Windows 10:
- Applies to both SSL and IPSec: “Warning: unable to establish the VPN connection. The VPN server may be unreachable (-14)”
- Applies to “SSL”: “Warning : unable to establish the VPN connection. The VPN server may be unreachable”
- Applies to SSL: “Failed to establish the VPN connection. This may be caused by a mismatch in the TLS version. Please check the TLS version settings in the Advanced of the Internet options. (-5029)”
- Applies to IPSec: “Error: Wrong Credentials”
- Applies to IPSec: The connection fails with no message
- Applies to IPSec: “Error: Unable to reach tunnel gateway/policy server”
So, let’s check out how to fix Forticlient “Failed to establish the VPN connection” error along with other issues in further sections.
Fix “Failed to establish the VPN connection” error in Forticlient
Since this error indicates TLS mismatch, here are the steps to sort out the issue:
- Open “Internet Explorer” browser in your Windows 10 device
- Go to “Settings > Internet Options > Advanced” and scroll down to check “TLS Version”
- If “TLS 1.2” version is selected on client end, then you need to change to TLS 1.1 and/or TLS 1.0 on FortGate end.
Fix WAN Miniport, VPN, Dial-up Error Code 720, and more
- At first, install “WAN Miniport Repair Tool”
- Restart your computer
- Now, run “WAN Miniport Repair Tool” and restart your computer to save the changes
- Test VPN access now.
Fix Forticlient Error by reinstalling Miniport Driver
- Press “Windows + X” key combination and select “Device Manager”
- In “Device Manager” window, click on “View > Show hidden Devices”
- Under “Network Adapters”, there should be series of WAN Miniport: IP, IPv6, PPTP, IKEv2, etc. In case if these are not visible, then you will have to reinstall Miniport driver.
- To download it, visit Microsoft official site, search for “devcon.exe” to download and install it.
- Once done, you can find the different miniport driver names associated with your OS in “C:Windowsinfnetrasa.inf”. This path may vary based on OS versions.
- Now, press “Windows + X” keys together from keyboard and select “Command Prompt as administrator”
- Once CMD is open, type the following commands and hit “Enter” keys after each command.

- Reboot your computer to take changes in effect.
- Reinstall VPN Client software or hardware drivers similarly to resolve Forticlient errors

Alternatively, If you wish to check, download, and install all required drivers automatically without manual hassles, you can take help of here suggested automatic driver installer and updater.
Download Automatic Driver Updater App
How to make VPN Client work with Windows 8, 8.1 and Windows 10?
In order accomplish this task, just follow the instructions here mentioned:
- Open “Command Prompt as admin”
- Type the commands below and hit “Enter” key after each:
“netcfg –v ms_ndiswanip” “netcfg –v ms_ndiswanipv6”
- Once done, restart your computer and Windows will automatically detect missing devices and reinstall it.
Verify if required services are properly running in Windows
- Press “Windows + R” keys to open “Run Dialog Box”
- Type “services.msc” and hit “Enter” to open “Services” window.
- Locate “Telephony”, “Remote Access Connection Manager”, “Secure Socket Tunneling Protocol Service” services. Double-click on each of them and check if the “status” section is set to started.
- If not, click on “Start” button under “Service Status” section to start these services
Still stuck with Forticlient Errors? Update app to latest version
If you are facing Forticlient Errors on your Windows due to WAN Miniport driver, and if the app version is outdated, then this might be a possible reason why you are facing the issue. To sort this out, just update Forticlient VPN app to latest version (5.6), as the new version has fixed many bugs. Before you seek to install the latest version, it’s recommended to uninstall the previous version completely from your machine.
In case if your PC ran into some problems after doing these processes, you might need to fix internal problems, for which you can try out here suggested automatic tool that can identify and resolve all internal issues in minutes.
Download Automatic Scanner To Fix Windows Issues
Final Words
Forticlient VPN app offers flexible features and functions to allow users connecting to internet safely to prevent various attacks and keep their data and information secured against hackers. However, this app may sometimes end up to show “Failed to establish the VPN connection” and more other issues too. In this article, we have discussed various approaches to fix those issues and we hope it helped you. Do share this tutorial with your friends. If you have any question, you can click to Visit Our Discussion Board.
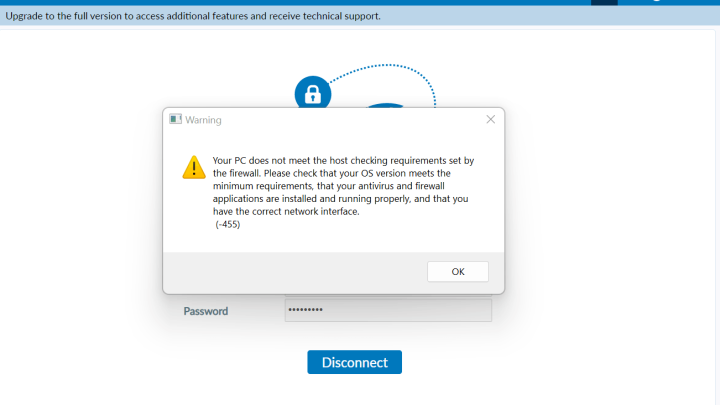
Failed to establish the VPN connection. This may be caused by a mismatch in the TLS version. Please check the TLS version settings in the Advanced of the Internet options. (-5029)
Using FortiClient to establish an SSL-VPN connection to the FortiGate can output a warning message.
Symptom
Cause
The now outdated cryptographic protocol TLS 1.0 is no longer enabled by default as of FortiOS 6.0. It is recommended to use at least TLS 1.1 (Cipher Suites) for authentication and data encryption. We are currently on TLS 1.3 which has been approved by the IETF (Internet Engineering Task Force).
Solution
If you want to continue to use older clients that are only ready for use later with TLS 1.2 or higher may if planned client migration via update rollout, TLS 1.0 can be activated on the FortiGate.
Check the current TLS setting from the FortiGate Console with CLI Command:
FG60E # get vpn ssl settings | grep tls
tlsv1-0             : disable
tlsv1-1             : enable
tlsv1-2             : enable
dtls-hello-timeout  : 10
dtls-tunnel         : enable
Activate in the CLI the Cipher Suite TLS 1.0.
config vpn ssl settings
set tlsv1-0 enable
How to enable TLS 1.0 on Windows
The TLS version 1.0 in the Microsoft Windows snap-in (inetcpl) Internet Options can also be activate.
Hit the key Win+R and enter inetcpl.cpl
In the opened Internet Options window Internet Properties click to Advanced tab and click Use TLS Version 1.0 to enable it.
More Solution
With older Windows versions, or with routers with PPPoE Internet connection, errors when establishing SSL-VPN connections can be eliminated as follows.
It appears the FortiClient error message:
Unable to establish the VPN connection. The VPN server may be unreachable (-5)
To do this, check the MTU size of the network interfaces with the following command from an open command prompt
netsh interface ipv4 show subinterfaceThe output might look something like this:
C:> netsh interface ipv4 show subinterface

   MTU  Medienerkennungsstatus   Bytes eingehend  Bytes ausgehend  Schnittstelle
------  ---------------  ---------  ---------  -------------
  1500                5          0          0  Ethernet
  1500                1  598892209   19487894  WiFi
  1500                5          0          0  Mobilfunk
  1500                1       5248     144442  VMware Network Adapter VMnet1
  1500                5          0          0  LAN-Verbindung* 1
  1500                1          0     134436  VMware Network Adapter VMnet8
  1500                5          0          0  LAN-Verbindung* 5
4294967295                1          0      67869  Loopback Pseudo-Interface 1
  1500                5          0          0  Bluetooth-Netzwerkverbindung
  1500                5          0          0  Ethernet 3
Check the MTU size and adjust to 1400 if necessary. In a command prompt opened as an administrator, with running netsh.
netsh interface ip4 set subinterface Ethernet mtu=1400 store=persistentAlternatively, call Regedit and navigate to the following key.
ComputerHKEY_LOCAL_MACHINESYSTEMCurrentControlSetServicesTcpipParametersInterfacesunder the appropriate interface with the appropriate IP address, here {222e135b-d09c-47a3-9236-63a041a02ea6} change the key MTU with the value 578 hexadecimal.
After restarting the computer, the SSL-VPN connection can be established.