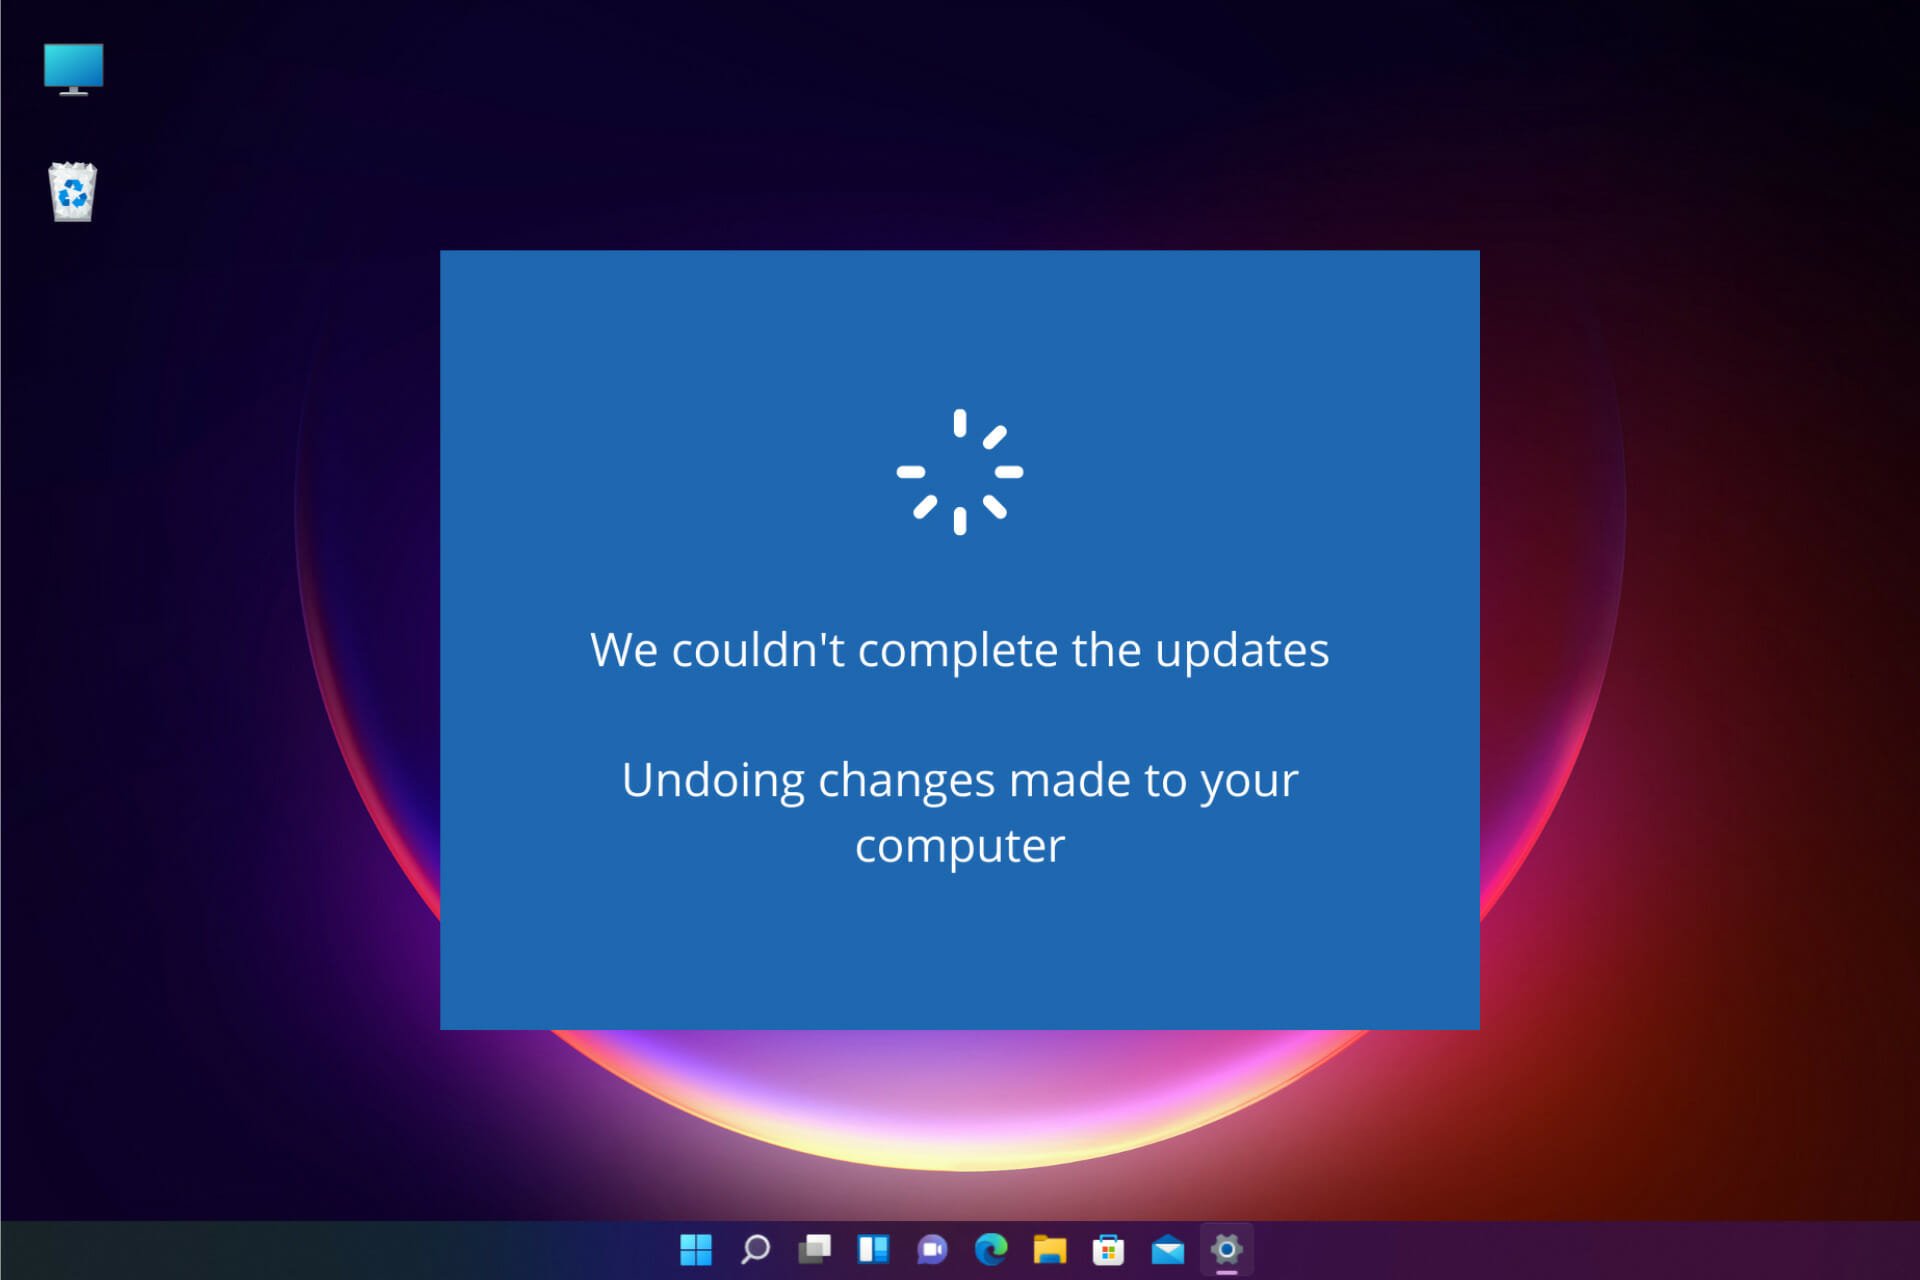
Часто при обновлении Windows 10 вы можете столкнуться с ошибкой «Мы не смогли завершить обновление», за которой следует «Отмена изменений». Существует несколько причин, почему это происходит, и список проблем, с которыми вы можете столкнуться, включает зацикливание загрузки, зависание, потерю данных и многое другое.
Как правило, эта проблема возникает, когда Windows сталкивается с непредвиденной ошибкой во время установки новых обновлений. Windows всегда рекомендует не выключать компьютер во время установки обновлений и вообще не вмешиваться в процесс.
Если вы столкнулись с одной из вышеупомянутых ошибок в процессе обновления, эта статья развеет все ваши сомнения, а также перечислит лучшие способы их устранения, которые вы можете попробовать.
Содержание
- Как исправить ошибку «Undoing Changes Made to Your Computer» в Windows 10
- Как загрузиться в безопасный режим в Windows 10?
- Как удалить последние обновления в Windows 10?
- Как использовать DISM для устранения ошибки «Undoing Changes Made to Your Computer» в Windows 10
- YouTube video: Исправление отмены изменений, внесенных в компьютер в windows 10.
- Использование сканирования SFC Windows 10 для исправления поврежденных системных файлов
- Заключение
Как исправить ошибку «Undoing Changes Made to Your Computer» в Windows 10

Прежде чем предпринимать какие-либо попытки исправить эту проблему, сначала необходимо загрузиться в Windows. Но это может оказаться невозможным традиционным способом, поскольку Windows не может загрузиться , когда критические части процесса обновления не работают. Поэтому один из лучших сценариев — загрузиться в безопасном режиме и попробовать удалить последние обновления с помощью встроенных инструментов, предоставляемых Microsoft. Давайте рассмотрим, как это сделать.
Как загрузиться в безопасный режим в Windows 10?
Загрузка в безопасный режим — это одно из первых действий, которые можно предпринять, столкнувшись с подобными ошибками. Давайте рассмотрим, как легко загрузиться в безопасный режим, даже если вы не можете загрузиться в нормальное состояние ОС.
- Во время загрузки компьютера используйте клавиши «Shift» и «F8» на клавиатуре и удерживайте их вместе во время загрузки.

- Это вызовет меню дополнительных опций, откуда вы сможете перейти в безопасный режим.

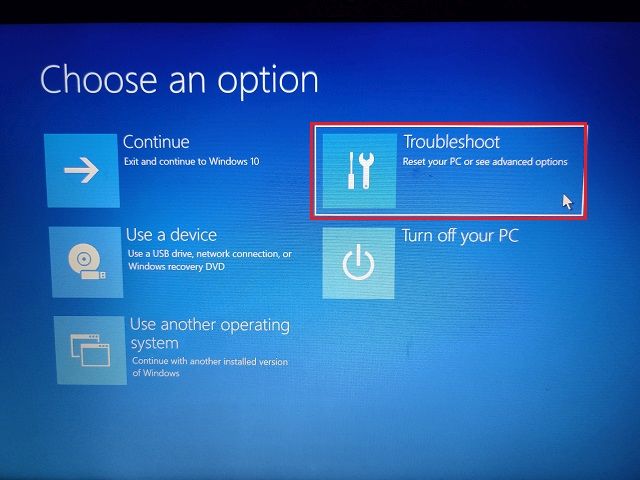
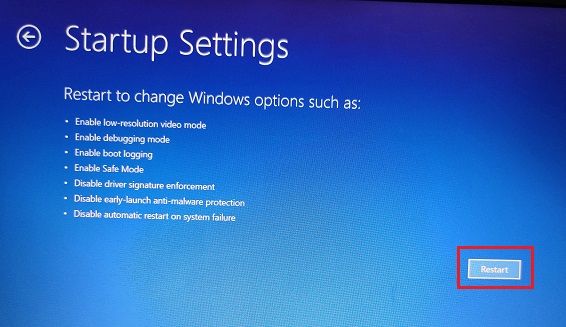
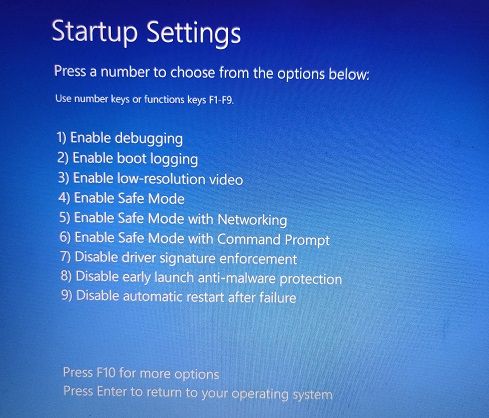
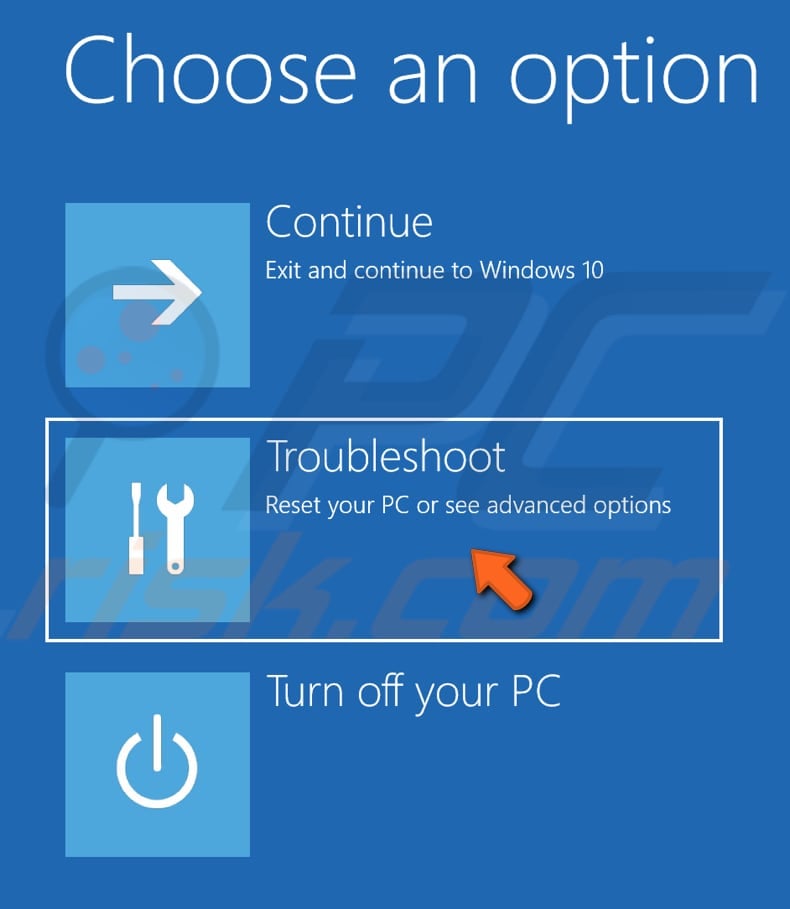
- Перейдите в «Параметры», затем «Устранение неполадок» > «Дополнительные параметры» > «Параметры запуска» > «Включить безопасный режим»

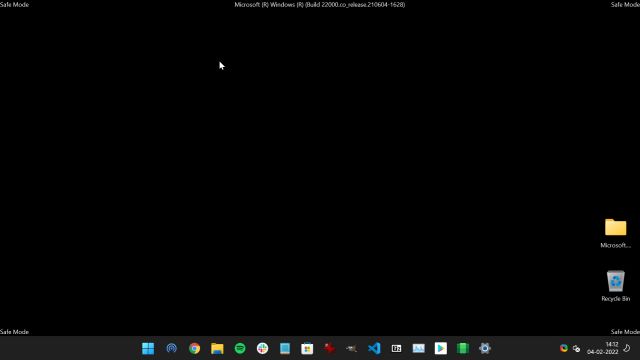
- Далее Windows автоматически перезагрузится в безопасный режим.
Это позволит вам получить доступ к большинству функций Windows и выполнить ремонт в случае возникновения ошибок во время обновления.
Как удалить последние обновления в Windows 10?
Следующий шаг, который вы можете предпринять для решения проблем с зависанием и зацикливанием загрузки после обновления, — использовать встроенные инструменты Windows для удаления последних обновлений. Давайте рассмотрим, как получить доступ к этой функции в безопасном режиме и как ее использовать для устранения проблемы.
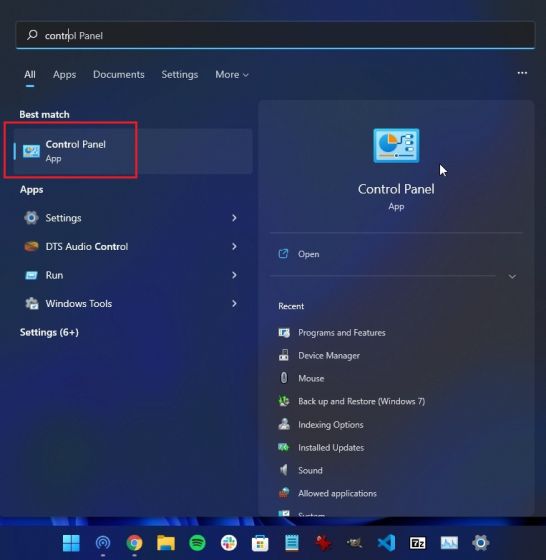
- После загрузки в безопасный режим нажмите на значок поиска на панели задач, чтобы вызвать меню поиска.
- Введите «Панель управления» в строке поиска и нажмите на наиболее подходящий результат.

- Если вы открыли Панель управления, в левой части окна нажмите на «Программы».

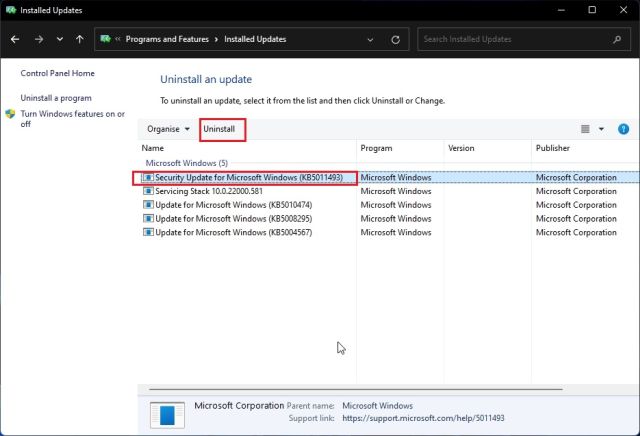
- В разделе «Программы и функции» вы найдете опцию «Просмотр установленных обновлений». Нажмите на нее, чтобы продолжить.

- Перед вами появится окно со списком всех последних обновлений, которые были установлены на вашем компьютере.

- Выберите последнее обновление и нажмите на него правой кнопкой мыши.
- Нажмите на опцию «Удалить», чтобы удалить поврежденное обновление.
Этот процесс должен устранить любые конфликты с файлами обновлений, и после перезагрузки компьютер должен начать работать как обычно.
Как использовать DISM для устранения ошибки «Undoing Changes Made to Your Computer» в Windows 10
Другое средство, которое можно попробовать для устранения зависаний и ошибок «could not complete updates», — это отмена изменений, внесенных с помощью инструмента «Windows Deployment Image Servicing and Management» (DISM). Выполните следующие шаги, чтобы легко устранить любые проблемы, с которыми вы можете столкнуться при повреждении обновлений.
- Загрузите Windows в безопасном режиме.
- Найдите «CMD» в опции поиска на панели задач.
- В правой части меню «Пуск» нажмите «Запуск от имени администратора»
- Скопируйте и вставьте или введите эту команду в CMD (без кавычек): «DISM.exe/Online /Cleanup-image /Restorehealth
- Если вам предлагается подключить установочный носитель Windows (USB или DVD ), сделайте это, чтобы продолжить процесс.
- Затем введите следующую команду и замените путь к диску в команде на путь к диску установочного носителя — «DISM.exe /Online /Cleanup-Image /RestoreHealth /Source:{Enter recovery drive path here} /LimitAccess»
- Дождитесь завершения процедуры.
- После завершения вы можете перезагрузить windows вне безопасного режима, чтобы получить доступ.
Обратите внимание, что для этого процесса необходим установочный носитель. Вы можете либо создать его самостоятельно, либо получить у производителя вашего ПК.
YouTube video: Исправление отмены изменений, внесенных в компьютер в windows 10.
Использование сканирования SFC Windows 10 для исправления поврежденных системных файлов
В Windows есть еще одна встроенная команда для исправления повреждений в важных системных файлах. Вы можете получить доступ к ней, загрузившись в безопасном режиме и запустив командную строку с правами администратора. Давайте рассмотрим, как это сделать.
- Загрузитесь в безопасный режим, выполнив вышеуказанные действия.
- Найдите «CMD» в строке поиска Windows.
- Нажмите на «Запуск от имени администратора», чтобы получить доступ к системным файлам.
- Введите «SFC/scannow» без кавычек в CMD, чтобы начать процесс исправления.
- Дождитесь окончания процесса, а затем перезагрузите компьютер, как обычно.
Это должно устранить любые конфликты между системными файлами и файлами обновлений и вернуть ваш компьютер в нормальное рабочее состояние.
Заключение
Обновления, которые прерываются во время установки, являются одним из основных факторов, которые могут вызвать проблемы с Windows при загрузке. Если вы столкнулись с такими проблемами, как зависание и зацикливание загрузки, то перечисленные выше исправления помогут вам легко устранить эти проблемы. Кроме того, эти исправления могут быть применены к широкому набору проблем, с которыми вы можете столкнуться при загрузке.
A driver update is a good first call
by Claudiu Andone
Oldtimer in the tech and science press, Claudiu is focused on whatever comes new from Microsoft. His abrupt interest in computers started when he saw the first Home… read more
Updated on February 5, 2023
Reviewed by
Alex Serban

After moving away from the corporate work-style, Alex has found rewards in a lifestyle of constant analysis, team coordination and pestering his colleagues. Holding an MCSA Windows Server… read more
- The update fails if the system is undoing changes made to your computer in Windows 11.
- This problem may be caused by an error that halted the process; now, the OS is recovering.
- One of the most probable causes for this issue is a faulty or corrupted driver, but many other reasons exist.
XINSTALL BY CLICKING THE DOWNLOAD FILE
- Download Restoro PC Repair Tool that comes with Patented Technologies (patent available here).
- Click Start Scan to find Windows 11 issues that could be causing PC problems.
- Click Repair All to fix issues affecting your computer’s security and performance
- Restoro has been downloaded by 0 readers this month.
You probably have just encountered the message undoing changes made to your computer. We will take you through all you should know.
Windows Update issues are not yesterday’s news, and they are probably here to stay longer than we would like.
One of our readers reported that when he tries to update Windows 11, the process gets stuck, getting the 0xc1900101 error.
Then, the PC restarts only to see the Undoing changes made to this PC message on the screen. It’s incredibly frustrating because the update gets interrupted at a high completion percentage.
We have been confronted with error 0xc1900101 on Windows 10 too, and it’s usually related to corrupt or faulty drivers, so it’s most likely that Windows 11 inherited this bug.
Why does my computer keep saying undoing changes?
From user experience, we can tell that a few things may trigger this message. At the top of the list, we have the following:
- Update errors – The Undoing changes made to this PC message result from an error during the Windows Update process.
- Uncompleted processes – This mainly comes with the error 0xc1900101, but any such Windows Update fault can trigger the same problem and stop the process.
- Bad or corrupted drivers – Problematic drivers usually produce this particular error.
- Corrupted system files – Generally, when vital system files are corrupted, you will expect various errors to be thrown by the computer, which may trigger the computer to undo changes.
- Overprotective antivirus programs – For some users, this is the case. The antivirus is doing more than required and may not allow some legitimate systems to run correctly.
There’s a whole family of error codes related to this problem, and the solutions we recommend will also work if you experience error codes 0xC1900101 – 0x2000c, 0x20004, 0x20017, 0x40017, 0x30018, 0x3000D, or 0x4000D.
How can I fix Undoing changes made to your computer message?
Before trying any of the solutions recommended below, we suggest you detach every connected peripheral. There is the off chance that they may be interacting with a process and triggering this error.
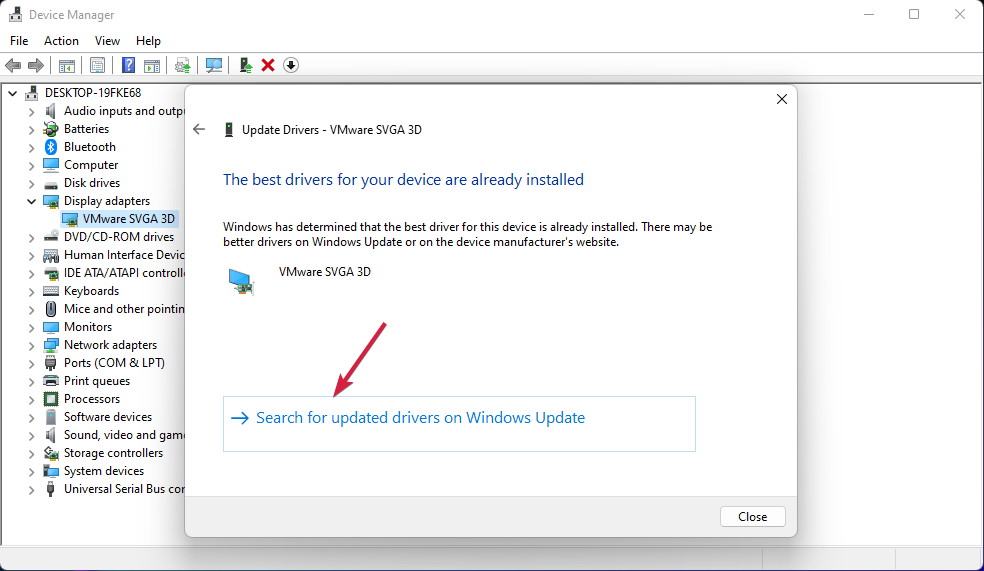
1. Update the drivers
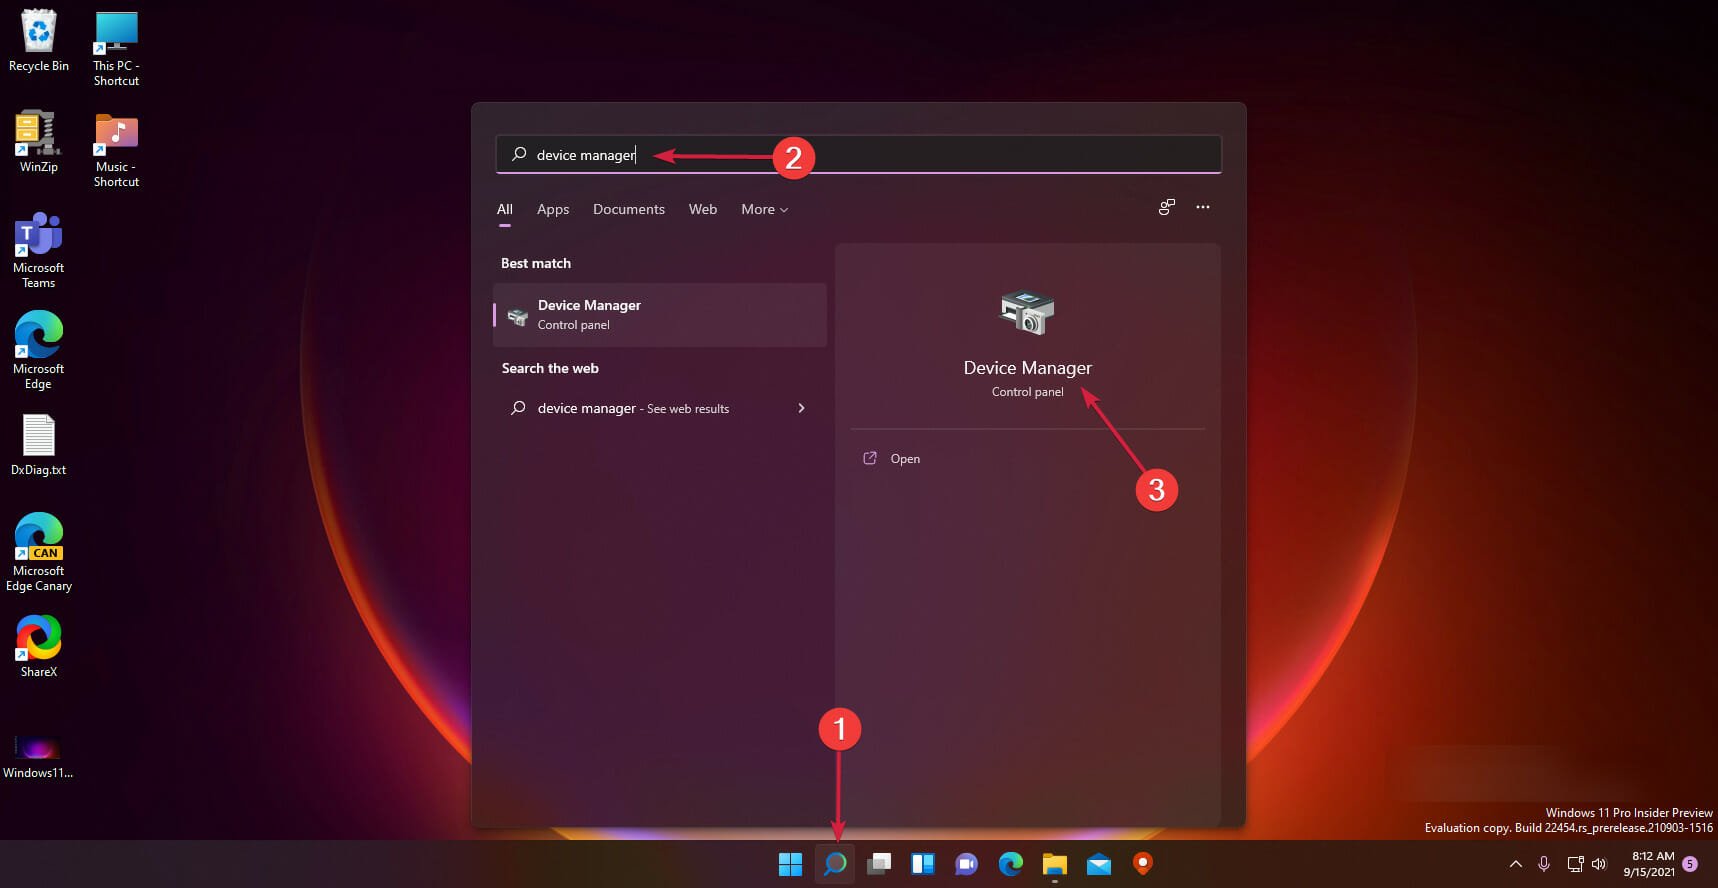
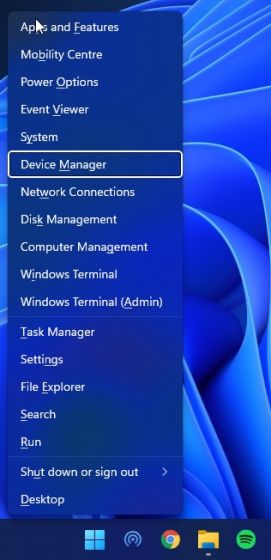
- Click the Search button from the Taskbar, type device manager, and click the app from the results.

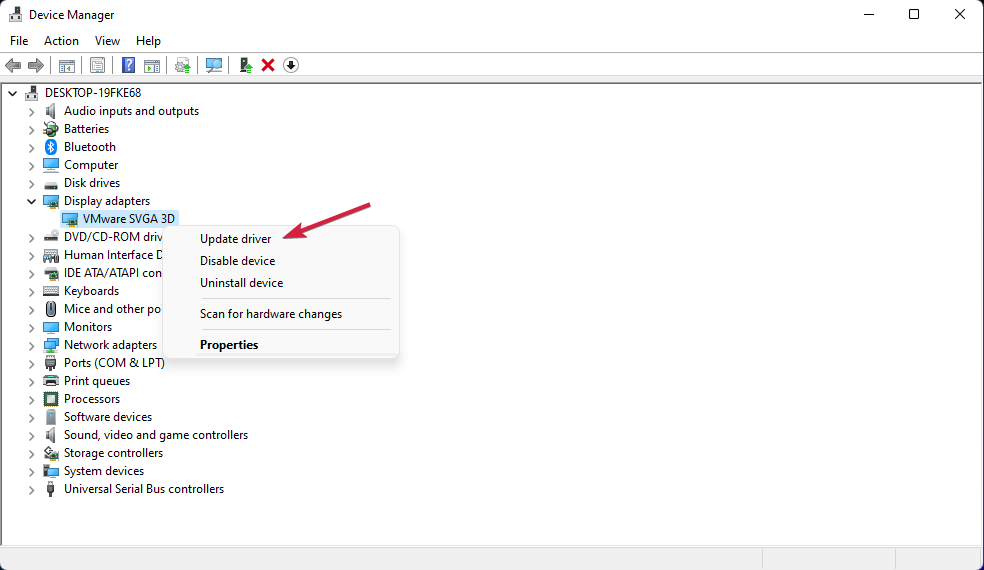
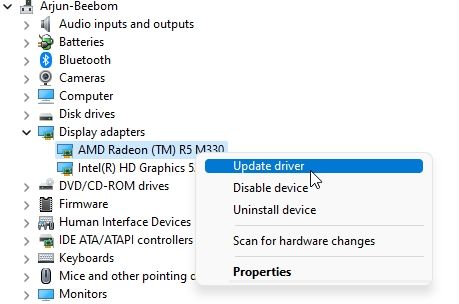
- Click any outdated driver section; in this case, we use the Display adapters section, right-click on the driver, and select Update driver.

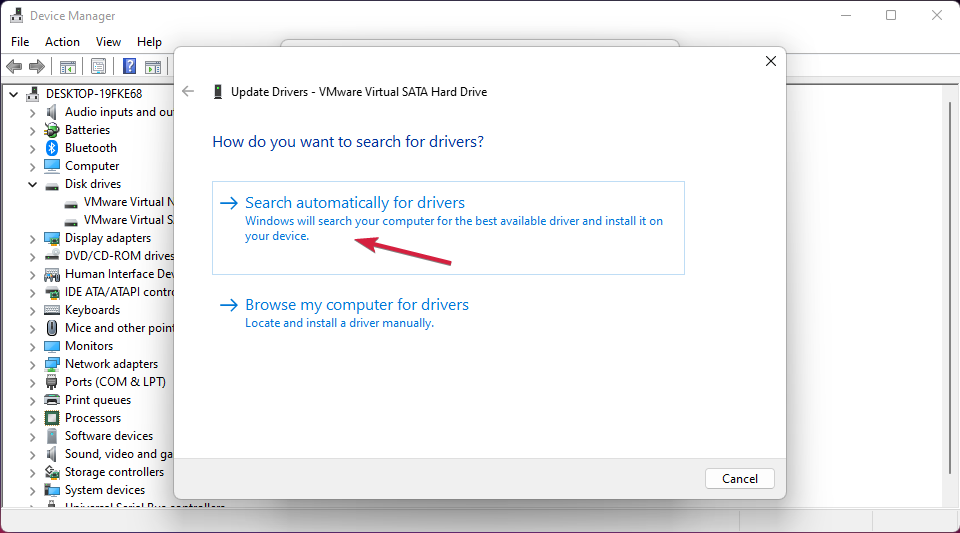
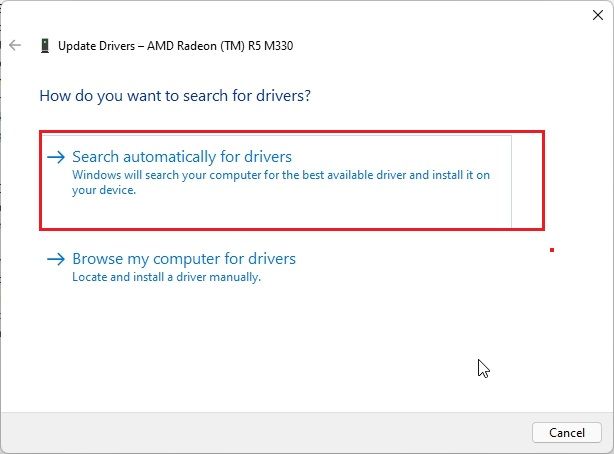
- Select the first option, Search automatically for drivers.

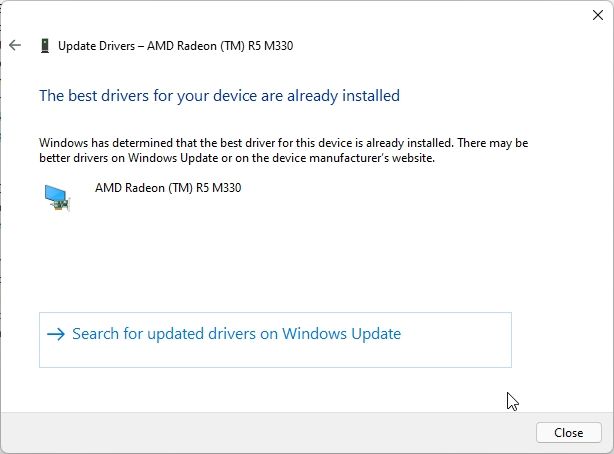
- If the system finds a new one, it will install it. If not, you can click on Search for updated drivers on Windows Update.

- You will be redirected to the Windows Update. Click on Advanced options.

- Now, look at the Optional updates option. If you see that you have any new updates related to drivers there, click it and install them right away.


The method showcased above is manual and often tiring, so we recommend downloading DriverFix, a reliable tool that will keep the installed drivers up-to-date.
⇒ Get DriverFix
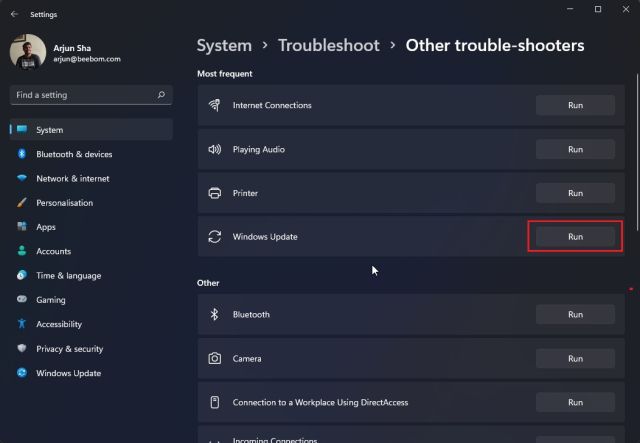
2. Run the Windows Update troubleshooter
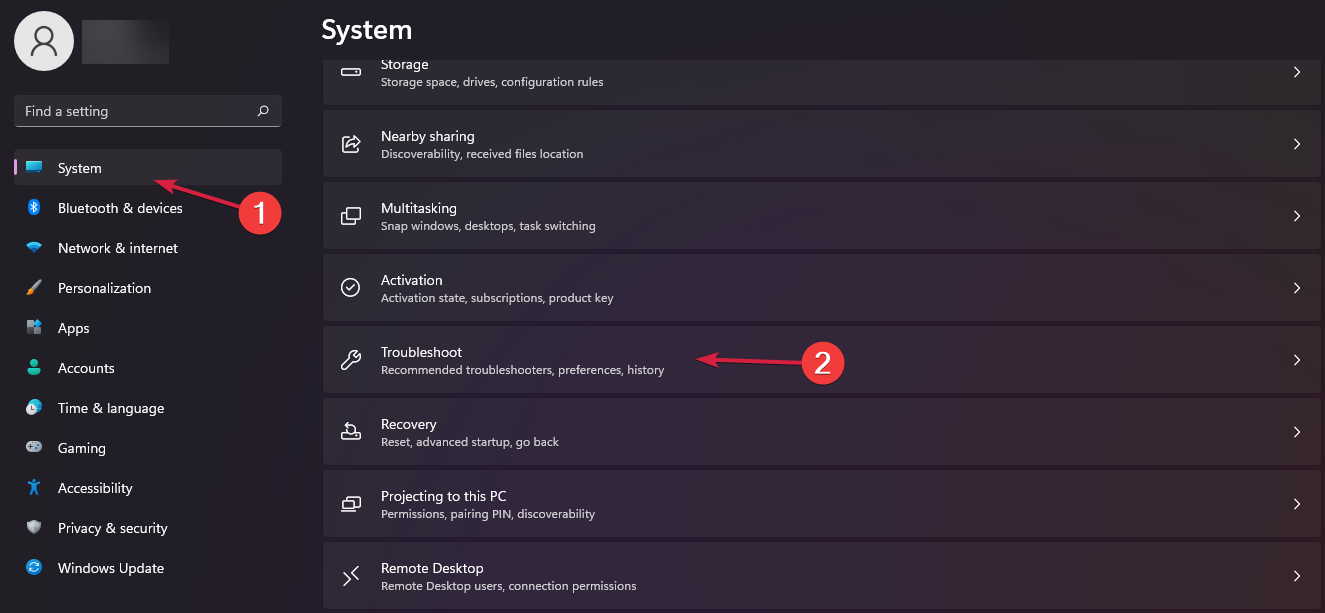
- Click the Windows button and select Settings.
- Select System from the left pane, scroll down on the right pane, and click on Troubleshoot.

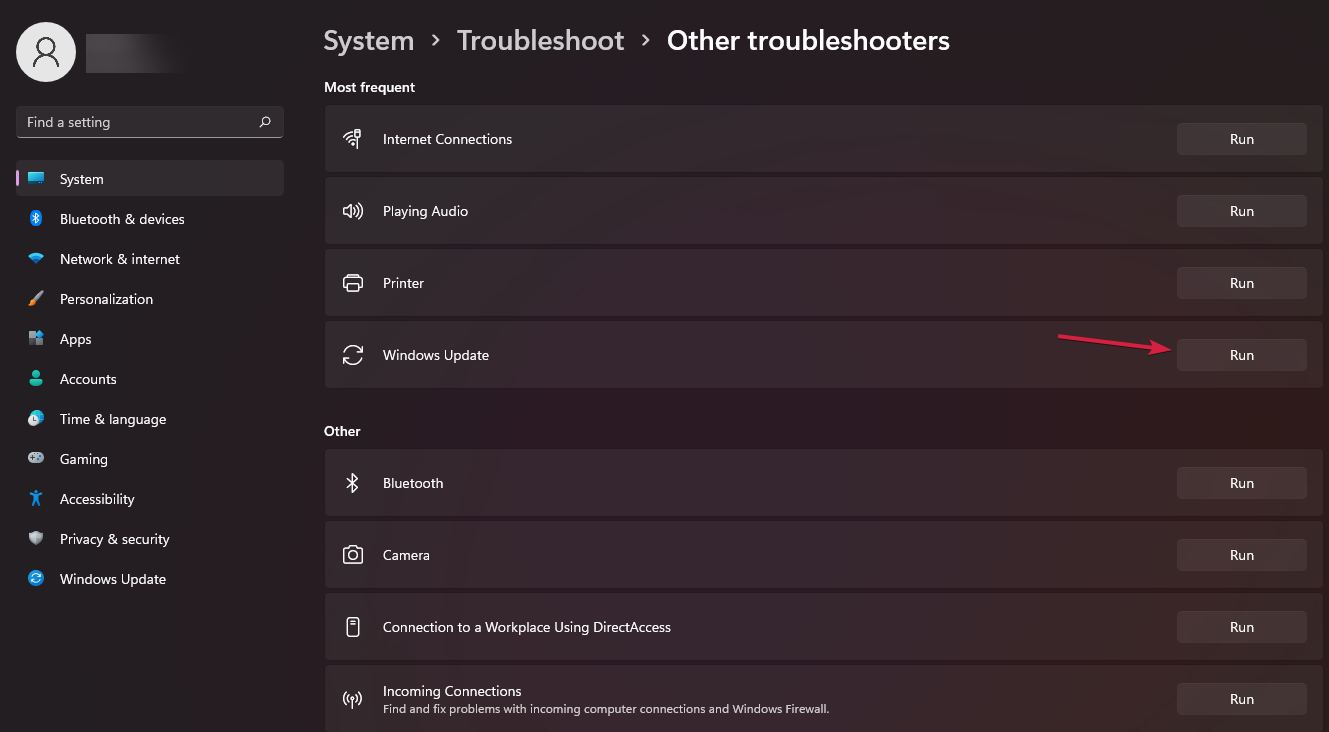
- Now click on Other troubleshooters.

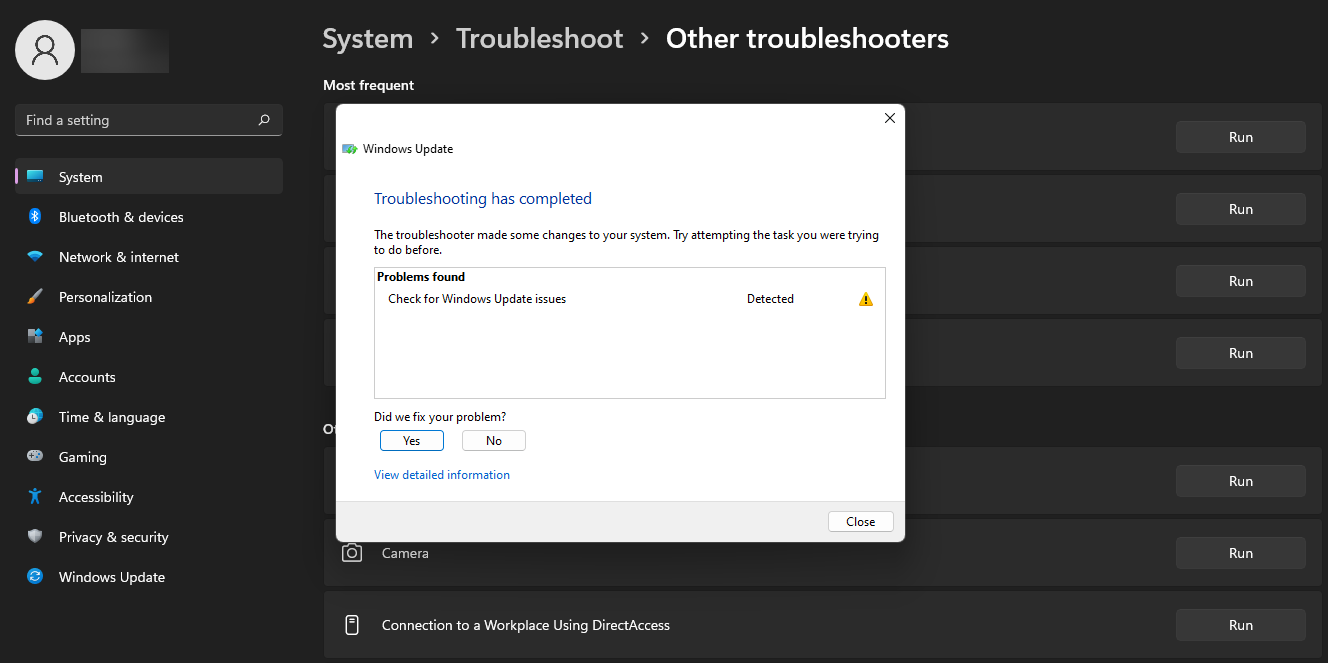
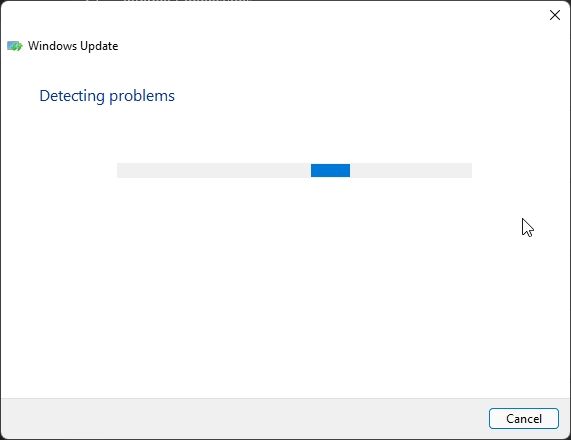
- Locate the Windows Update troubleshooter and hit the Run button from its right.

- The system will detect any problems with the update and attempt to fix them. Next, try performing the update again and see if this time works.


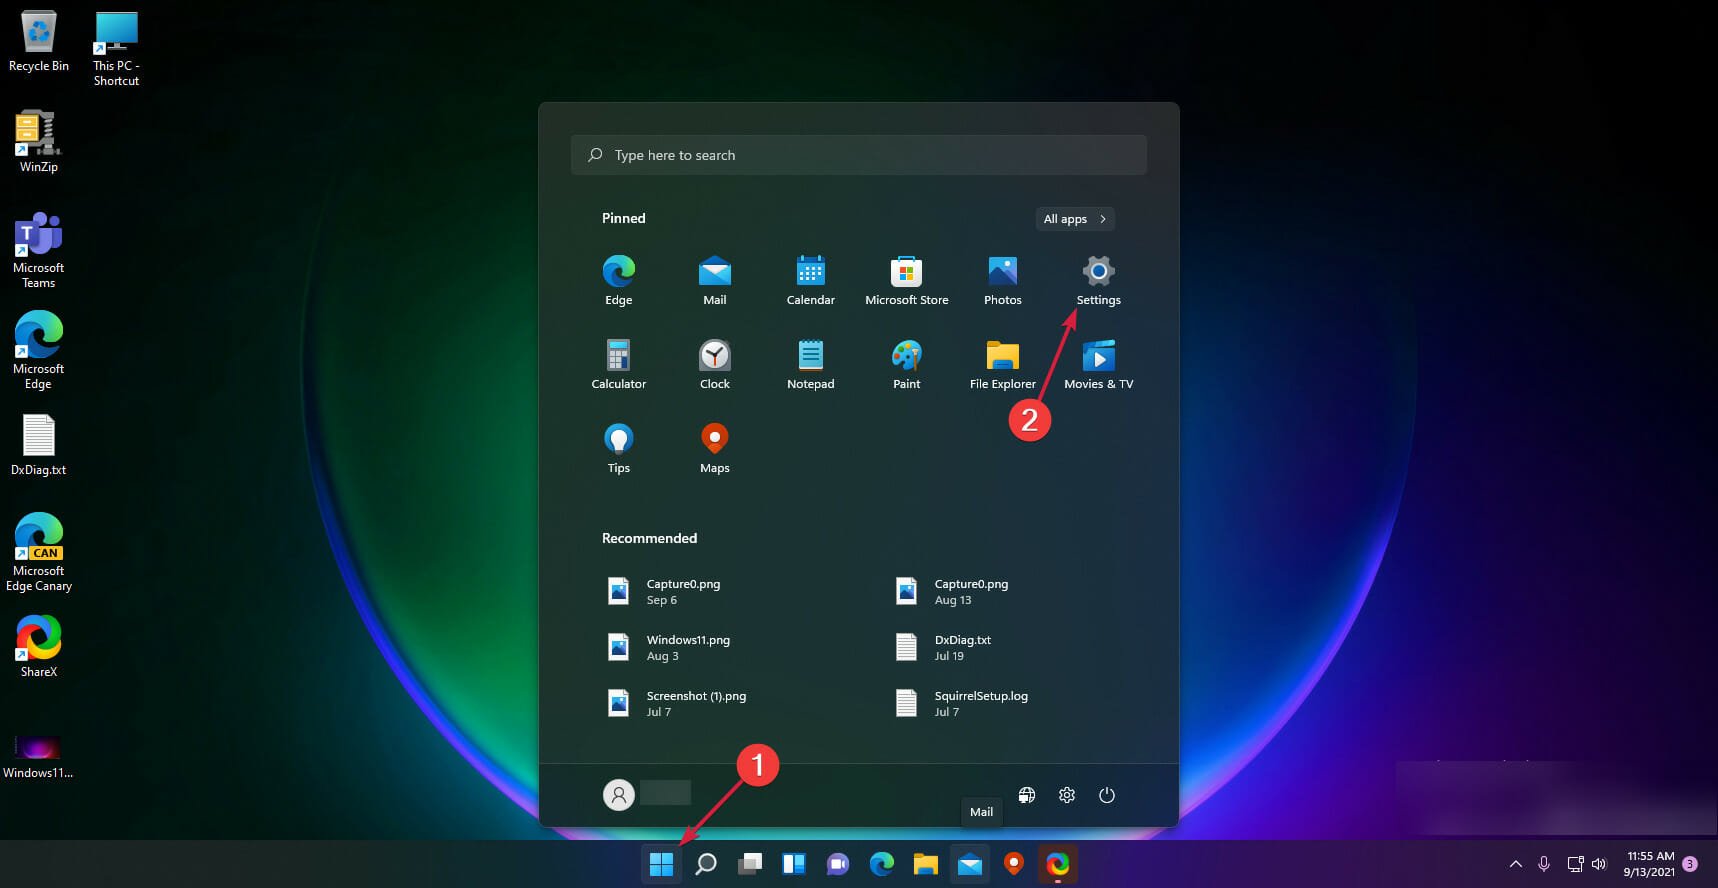
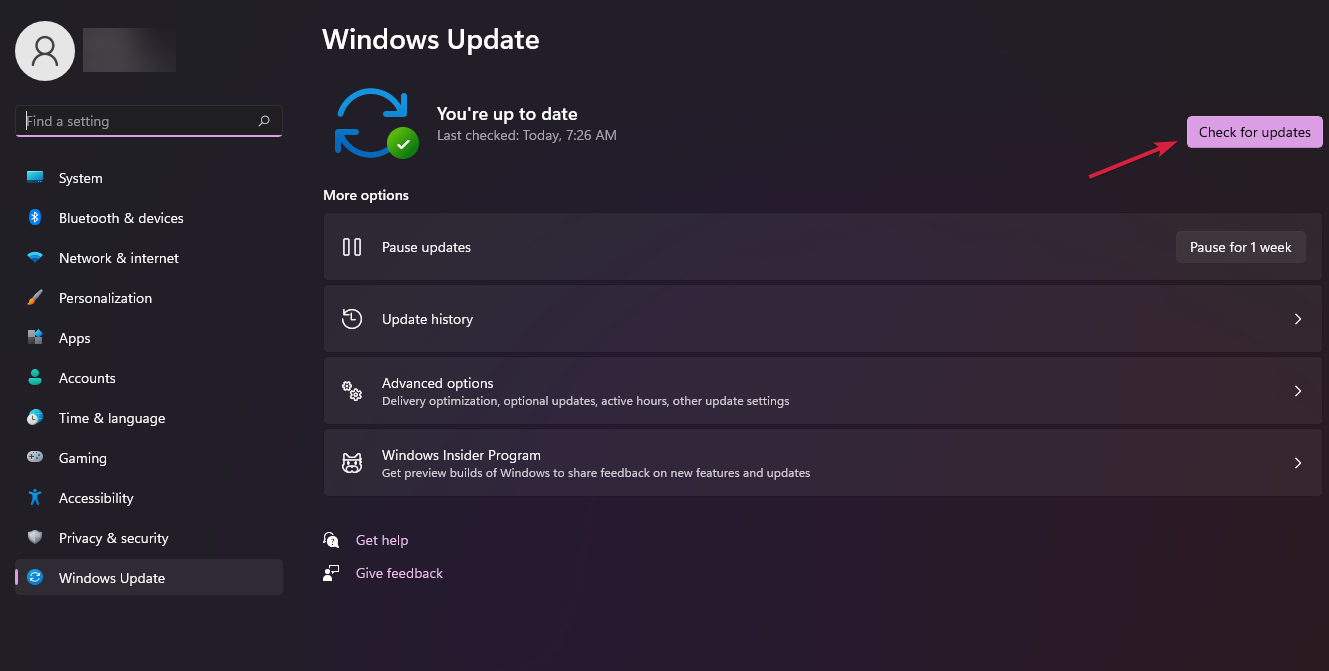
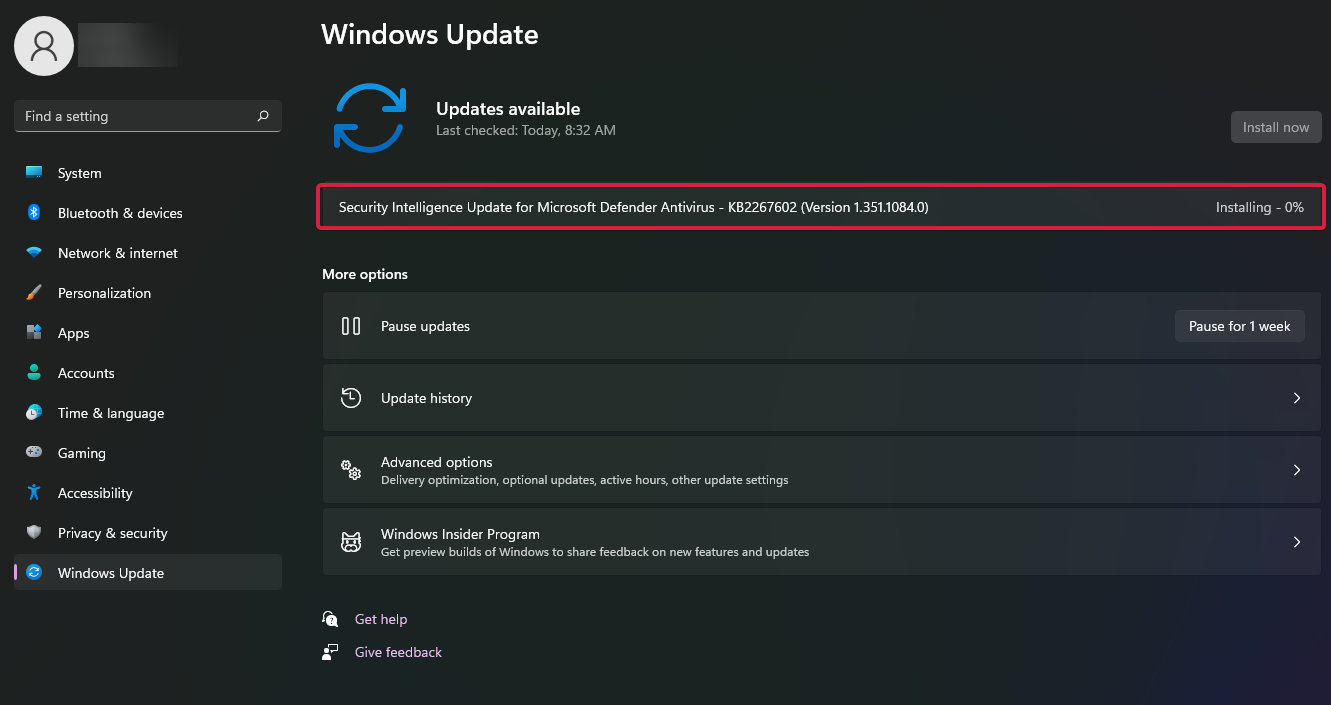
3. Check for Windows updates
- Click the Start button and select Settings.
- Then click on Windows Update from the left pane and hit the Check for updates button from the right.

- If there are any new updates, the system will start downloading and installing them.

Some PC issues are hard to tackle, especially when it comes to corrupted repositories or missing Windows files. If you are having troubles fixing an error, your system may be partially broken.
We recommend installing Restoro, a tool that will scan your machine and identify what the fault is.
Click here to download and start repairing.
Even though the update is exactly the procedure you cannot perform, there might also be other system updates that you have missed, and installing them before the problematic one may solve this issue.
4. Disable or remove your antivirus
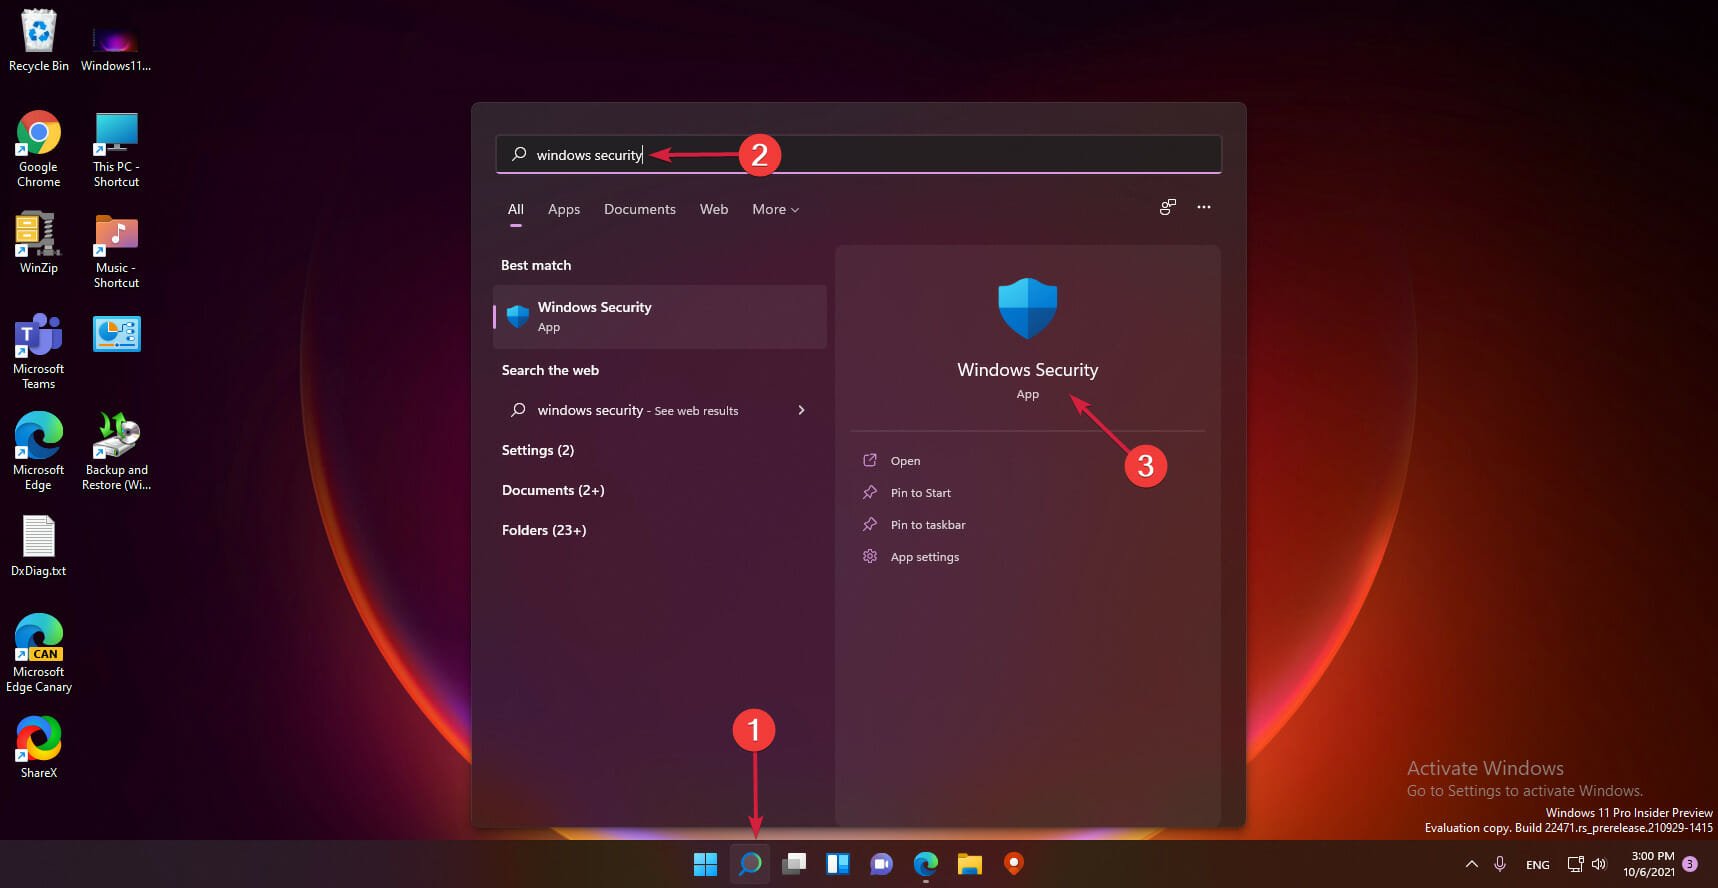
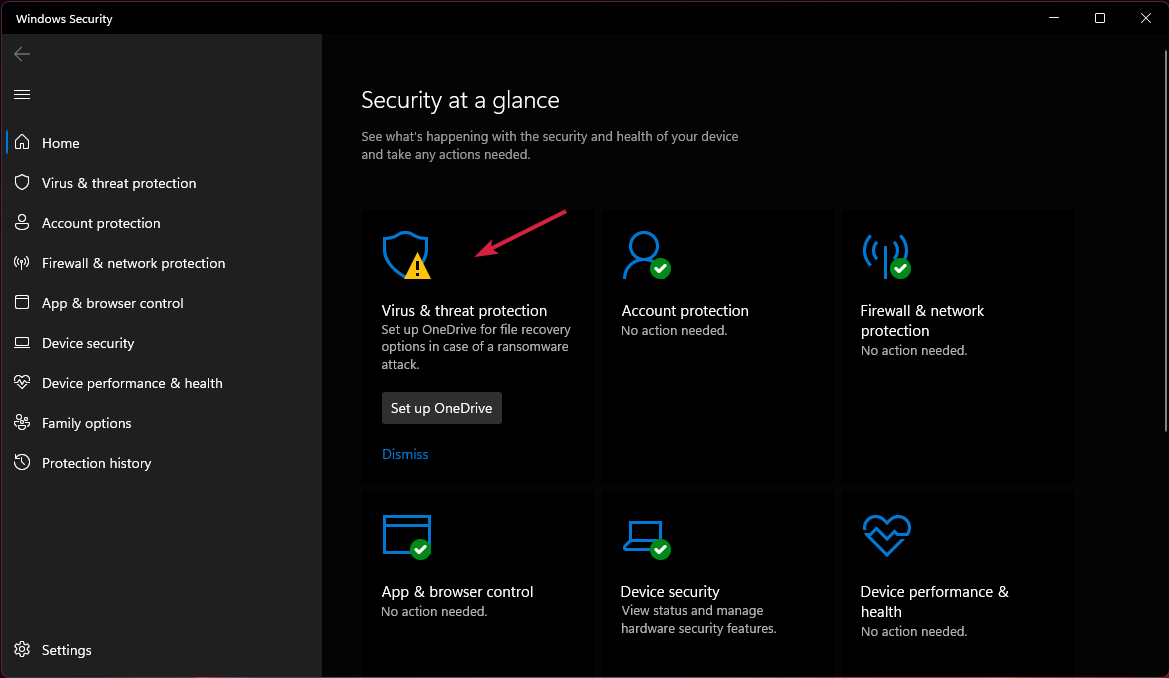
- Click the Search button from the Taskbar, type security, and select Windows Security from the results.
- Choose Virus & threat protection.

- In the next window, click on Manage settings.

- Now turn off the real-time protection.


We have shown you how to turn off the Windows Defender Antivirus, but if you have a third-party antivirus installed, you need to turn it off from its settings.
If that doesn’t work, uninstall your antivirus temporarily because it may block your updates. Of course, you can always reinstall it afterward.
If you discover that that software was causing the problem, think about getting a better antivirus for Windows 11.
5. Run an SFC scan
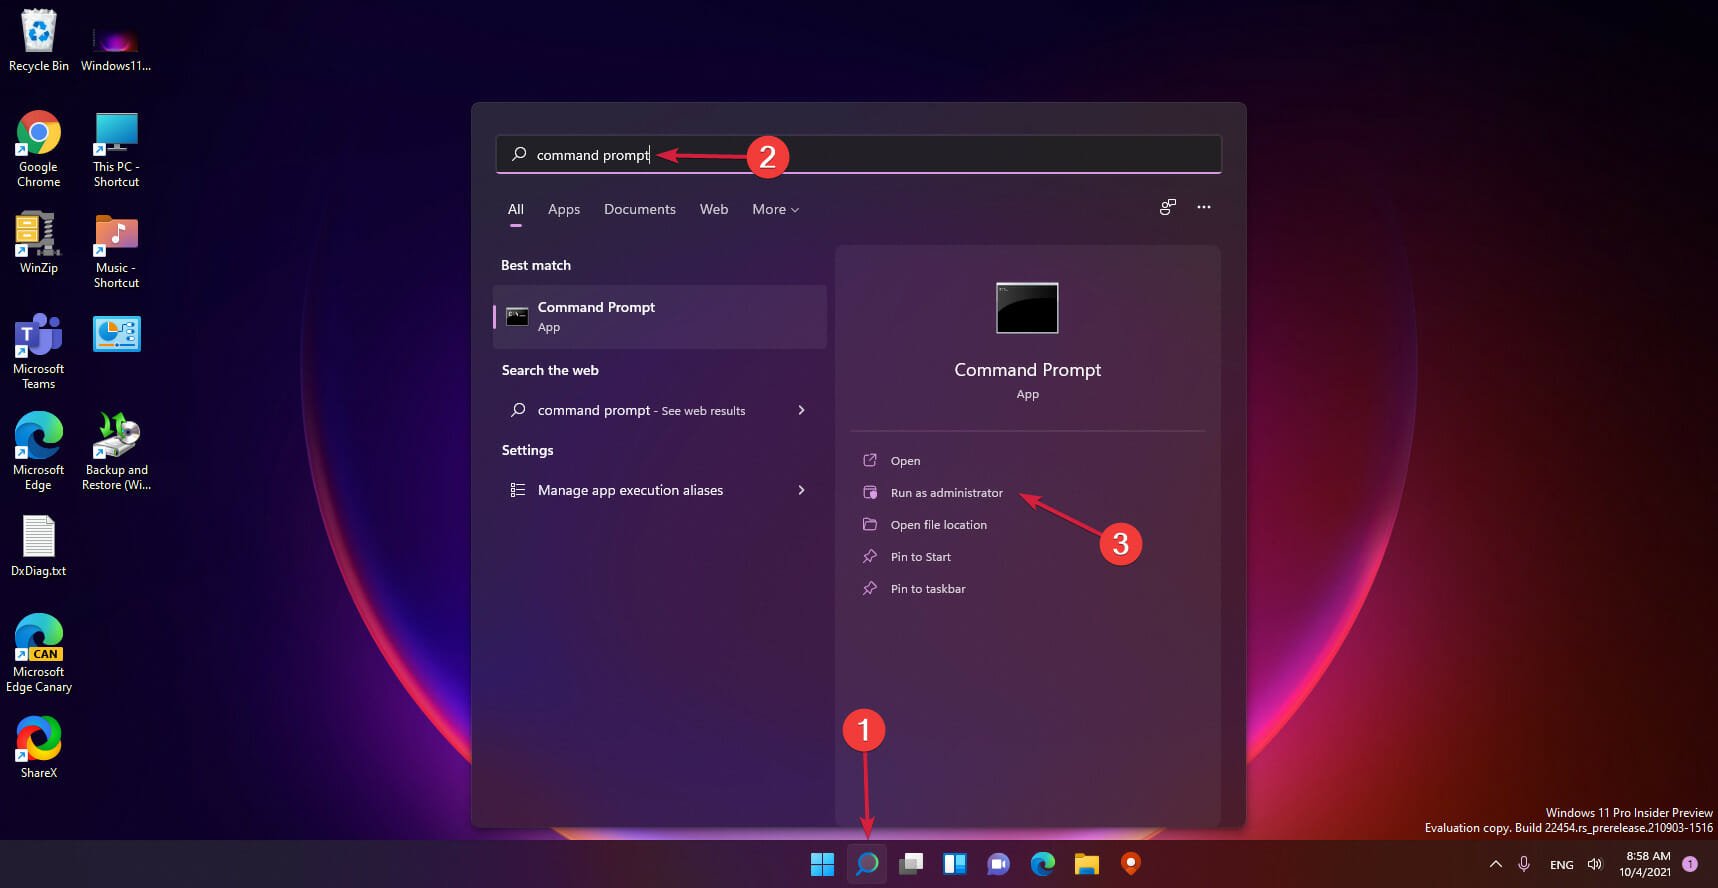
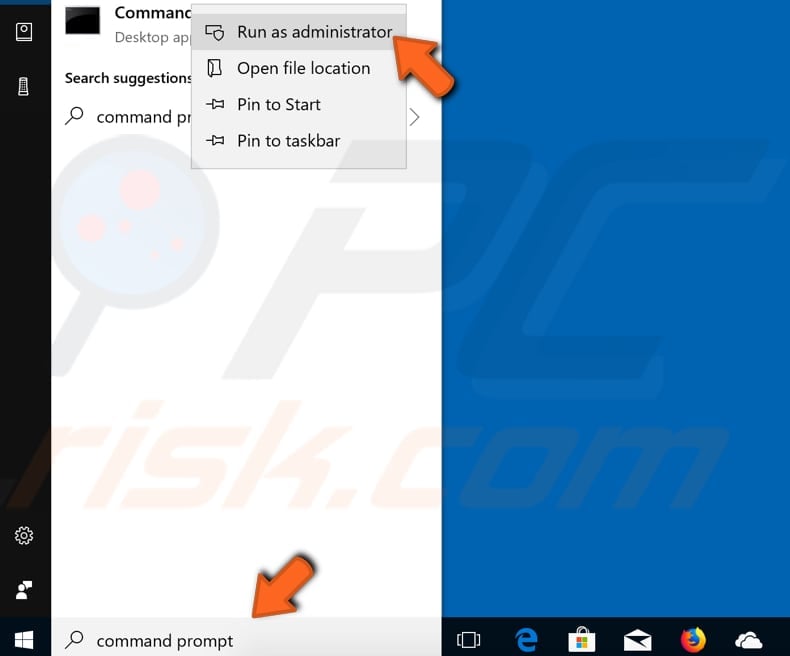
- Click the Search icon on the Taskbar, type cmd, then click on Run as administrator to start Command Prompt with full privileges.
- Type or paste the following command and press Enter to run it:
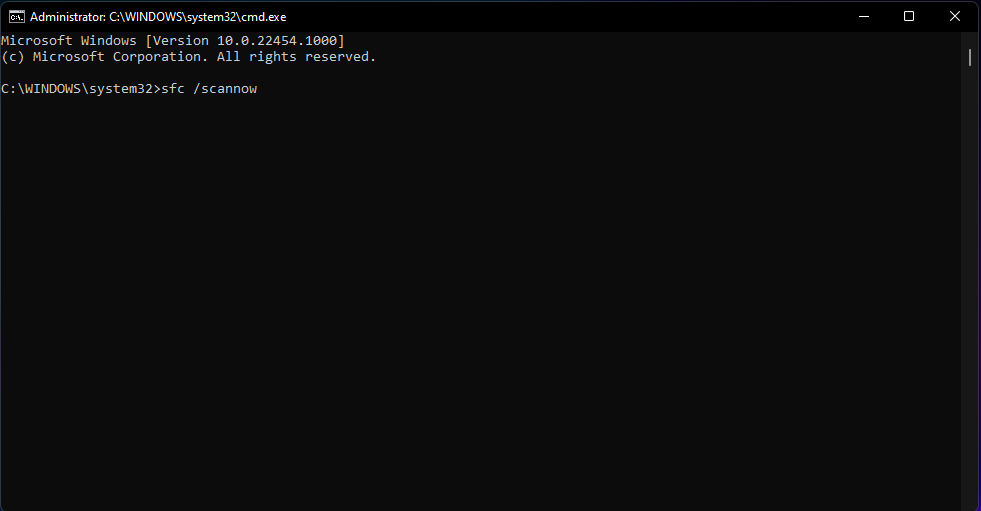
sfc /scannow
- System File Checker will look for corrupt system files and attempt to fix them. Wait for the process to finish, then restart your PC.
6. Scan your hard drive for errors
- Select the Search button from the Taskbar, type command prompt, and click on Run as administrator to start Command Prompt with administrative rights.
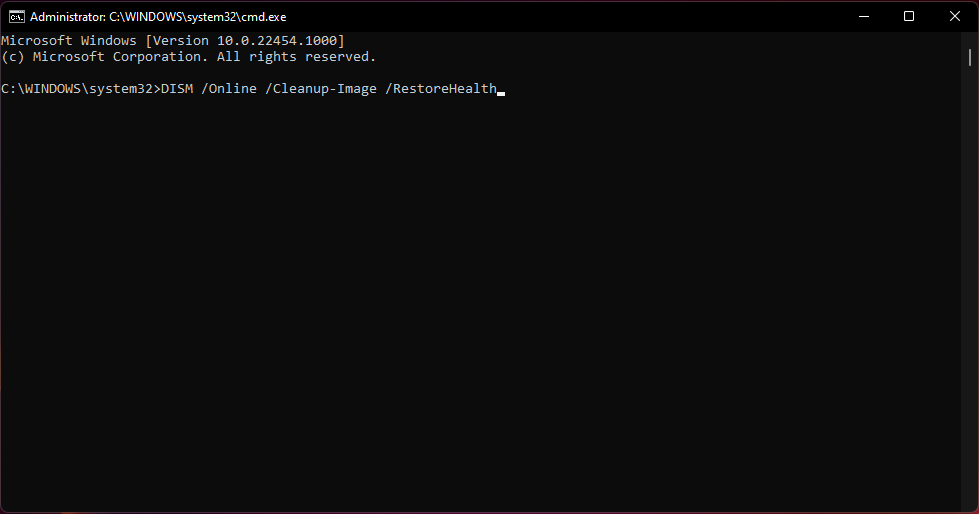
- Type or paste the following command and press Enter to run it:
Dism /Online /Cleanup-Image /RestoreHealth
- Wait until the process has finished, then restart your system.
- Fix: We couldn’t complete the Updates/Undoing changes
- Windows 11 Hidden Icon Menu: How to Turn It On Or Off
- Windows XP Sounds for Windows 11: How to Download & Set Up
- Is your screen stretched on Windows 11? Here’s the solution
- Google Indic Keyboard for Windows 11 [Download & Install]
7. Reset your PC

NOTE
Unfortunately, if none of the solutions above helped, it’s time to reset your PC to factory settings. However, the reset process allows you to keep your files, but you will lose all installed programs, so make sure you still have the software to restore them.
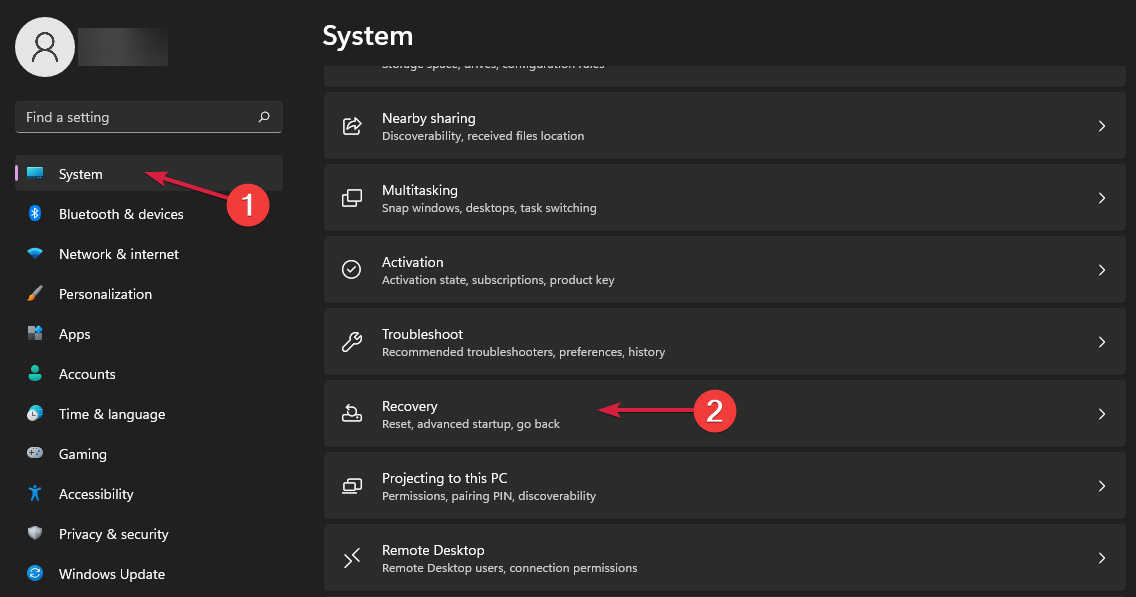
- Choose the Start button located on the Taskbar and click on Settings.
- Now select System and click on Recovery from the right pane.

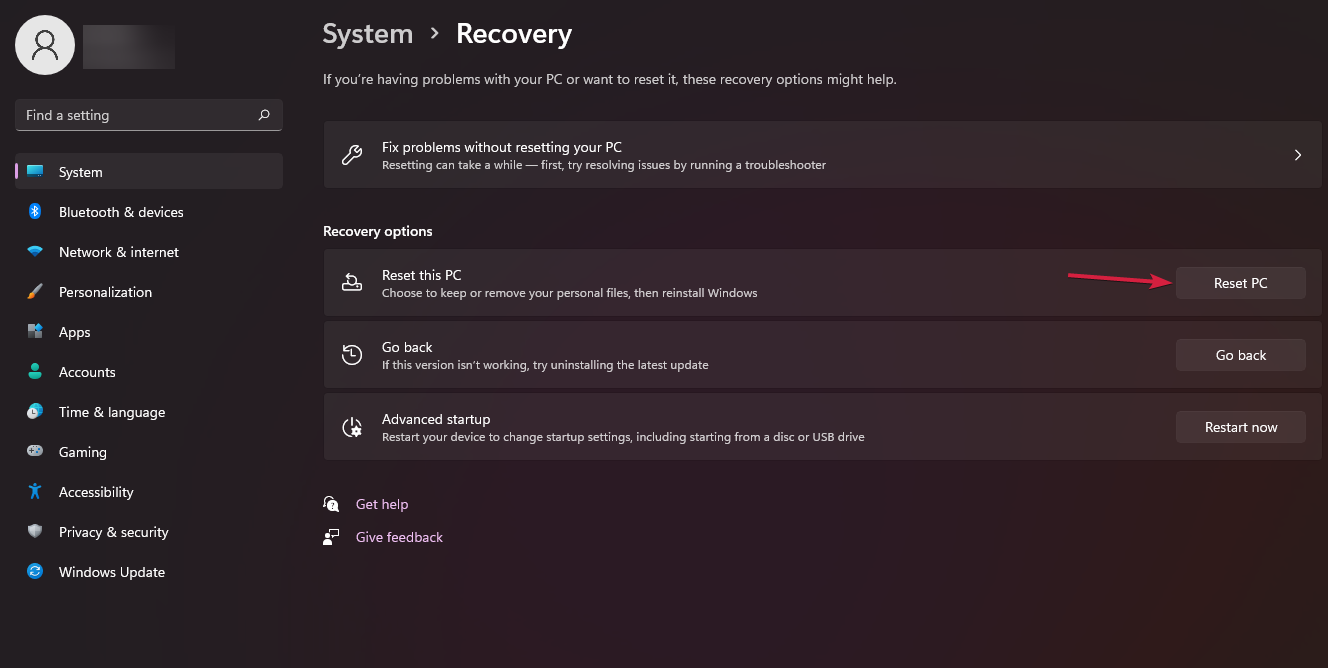
- Next, hit the Reset PC button.

- Click on Keep my files if you don’t want to lose them, or select the second option if you want a fresh start. We also recommend performing a backup before going through with this step.

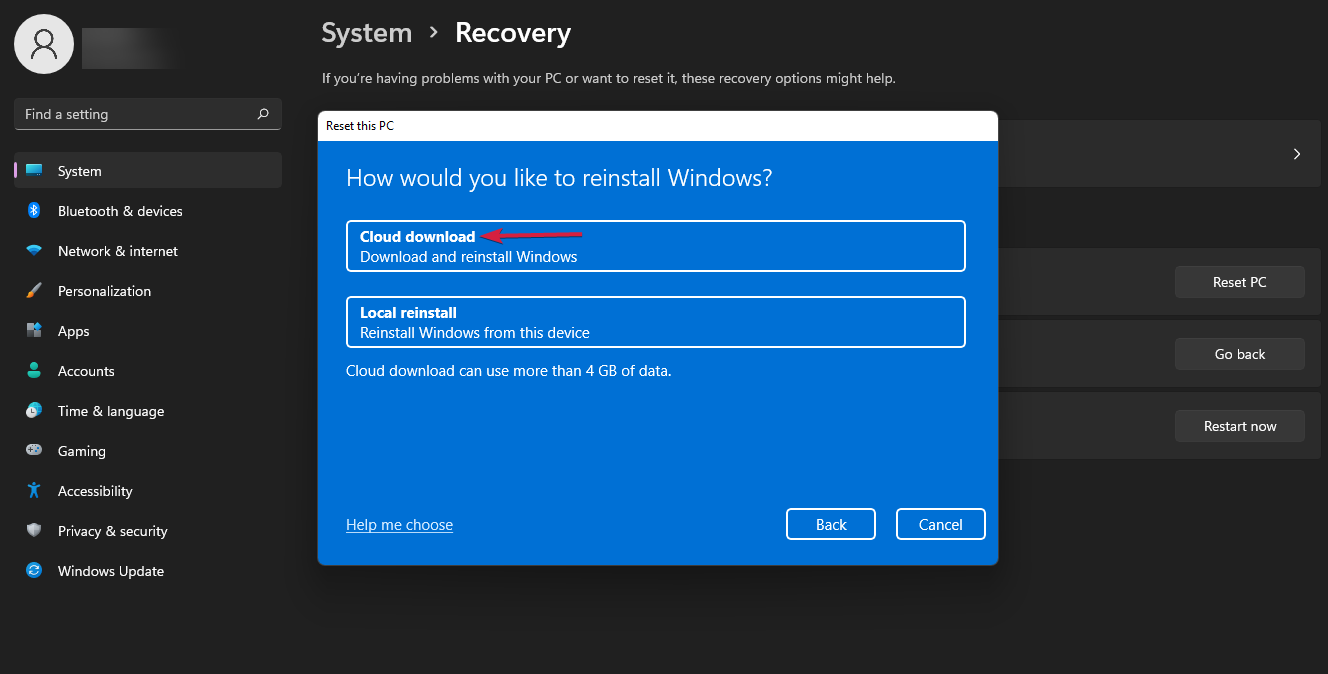
- Select the first option, Cloud download, to get Windows 11 online (you need at least 4 GB of free space on your drive). You can go for the second option if you have a local kit.

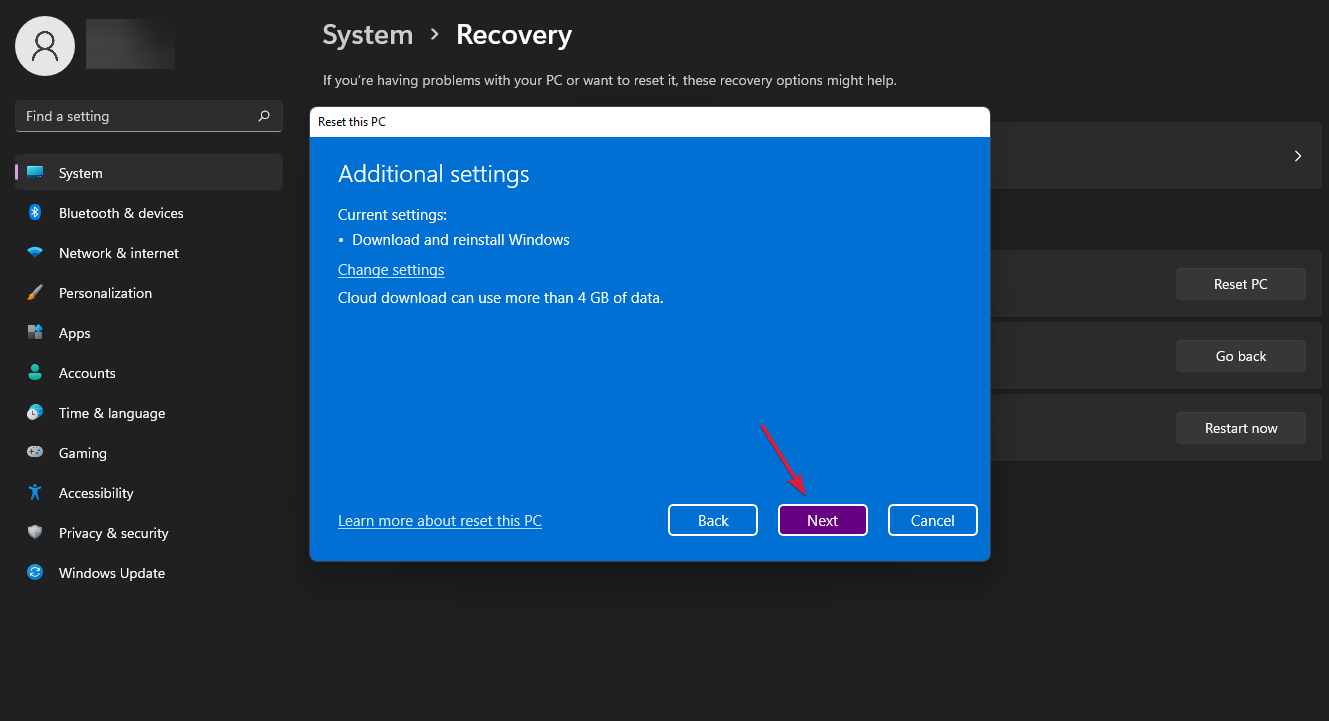
- Click Next, then Reset, and Windows 11 will start the reinstallation process.


If the procedure is unsuccessful, read our guide on what to do if the Reset PC is not working in Windows 11 and solve it immediately.
We hope our solutions helped you fix this update problem and that you removed the Undoing changes made to this PC message on the screen.
You should also check if your PC has enough space on your drive for the update because this update error might also be caused by insufficient disk space.
It would be helpful to check our article on how to make Windows 11 faster and more responsive, and you will also learn how to free some space on your drive.
Lastly, note that the solutions above will work for many cases, including undoing changes made to your HP or Dell computer and the black screen problem.
Let us know the method you opted for in the comments section below.
Still having issues? Fix them with this tool:
SPONSORED
If the advices above haven’t solved your issue, your PC may experience deeper Windows problems. We recommend downloading this PC Repair tool (rated Great on TrustPilot.com) to easily address them. After installation, simply click the Start Scan button and then press on Repair All.
![]()
Newsletter
A driver update is a good first call
by Claudiu Andone
Oldtimer in the tech and science press, Claudiu is focused on whatever comes new from Microsoft. His abrupt interest in computers started when he saw the first Home… read more
Updated on February 5, 2023
Reviewed by
Alex Serban
After moving away from the corporate work-style, Alex has found rewards in a lifestyle of constant analysis, team coordination and pestering his colleagues. Holding an MCSA Windows Server… read more
- The update fails if the system is undoing changes made to your computer in Windows 11.
- This problem may be caused by an error that halted the process; now, the OS is recovering.
- One of the most probable causes for this issue is a faulty or corrupted driver, but many other reasons exist.
XINSTALL BY CLICKING THE DOWNLOAD FILE
- Download Restoro PC Repair Tool that comes with Patented Technologies (patent available here).
- Click Start Scan to find Windows 11 issues that could be causing PC problems.
- Click Repair All to fix issues affecting your computer’s security and performance
- Restoro has been downloaded by 0 readers this month.
You probably have just encountered the message undoing changes made to your computer. We will take you through all you should know.
Windows Update issues are not yesterday’s news, and they are probably here to stay longer than we would like.
One of our readers reported that when he tries to update Windows 11, the process gets stuck, getting the 0xc1900101 error.
Then, the PC restarts only to see the Undoing changes made to this PC message on the screen. It’s incredibly frustrating because the update gets interrupted at a high completion percentage.
We have been confronted with error 0xc1900101 on Windows 10 too, and it’s usually related to corrupt or faulty drivers, so it’s most likely that Windows 11 inherited this bug.
Why does my computer keep saying undoing changes?
From user experience, we can tell that a few things may trigger this message. At the top of the list, we have the following:
- Update errors – The Undoing changes made to this PC message result from an error during the Windows Update process.
- Uncompleted processes – This mainly comes with the error 0xc1900101, but any such Windows Update fault can trigger the same problem and stop the process.
- Bad or corrupted drivers – Problematic drivers usually produce this particular error.
- Corrupted system files – Generally, when vital system files are corrupted, you will expect various errors to be thrown by the computer, which may trigger the computer to undo changes.
- Overprotective antivirus programs – For some users, this is the case. The antivirus is doing more than required and may not allow some legitimate systems to run correctly.
There’s a whole family of error codes related to this problem, and the solutions we recommend will also work if you experience error codes 0xC1900101 – 0x2000c, 0x20004, 0x20017, 0x40017, 0x30018, 0x3000D, or 0x4000D.
How can I fix Undoing changes made to your computer message?
Before trying any of the solutions recommended below, we suggest you detach every connected peripheral. There is the off chance that they may be interacting with a process and triggering this error.
1. Update the drivers
- Click the Search button from the Taskbar, type device manager, and click the app from the results.
- Click any outdated driver section; in this case, we use the Display adapters section, right-click on the driver, and select Update driver.
- Select the first option, Search automatically for drivers.
- If the system finds a new one, it will install it. If not, you can click on Search for updated drivers on Windows Update.
- You will be redirected to the Windows Update. Click on Advanced options.
- Now, look at the Optional updates option. If you see that you have any new updates related to drivers there, click it and install them right away.
The method showcased above is manual and often tiring, so we recommend downloading DriverFix, a reliable tool that will keep the installed drivers up-to-date.
⇒ Get DriverFix
2. Run the Windows Update troubleshooter
- Click the Windows button and select Settings.
- Select System from the left pane, scroll down on the right pane, and click on Troubleshoot.
- Now click on Other troubleshooters.
- Locate the Windows Update troubleshooter and hit the Run button from its right.
- The system will detect any problems with the update and attempt to fix them. Next, try performing the update again and see if this time works.
3. Check for Windows updates
- Click the Start button and select Settings.
- Then click on Windows Update from the left pane and hit the Check for updates button from the right.
- If there are any new updates, the system will start downloading and installing them.
Some PC issues are hard to tackle, especially when it comes to corrupted repositories or missing Windows files. If you are having troubles fixing an error, your system may be partially broken.
We recommend installing Restoro, a tool that will scan your machine and identify what the fault is.
Click here to download and start repairing.
Even though the update is exactly the procedure you cannot perform, there might also be other system updates that you have missed, and installing them before the problematic one may solve this issue.
4. Disable or remove your antivirus
- Click the Search button from the Taskbar, type security, and select Windows Security from the results.
- Choose Virus & threat protection.
- In the next window, click on Manage settings.
- Now turn off the real-time protection.
We have shown you how to turn off the Windows Defender Antivirus, but if you have a third-party antivirus installed, you need to turn it off from its settings.
If that doesn’t work, uninstall your antivirus temporarily because it may block your updates. Of course, you can always reinstall it afterward.
If you discover that that software was causing the problem, think about getting a better antivirus for Windows 11.
5. Run an SFC scan
- Click the Search icon on the Taskbar, type cmd, then click on Run as administrator to start Command Prompt with full privileges.
- Type or paste the following command and press Enter to run it:
sfc /scannow - System File Checker will look for corrupt system files and attempt to fix them. Wait for the process to finish, then restart your PC.
6. Scan your hard drive for errors
- Select the Search button from the Taskbar, type command prompt, and click on Run as administrator to start Command Prompt with administrative rights.
- Type or paste the following command and press Enter to run it:
Dism /Online /Cleanup-Image /RestoreHealth - Wait until the process has finished, then restart your system.
- Fix: We couldn’t complete the Updates/Undoing changes
- Windows 11 Hidden Icon Menu: How to Turn It On Or Off
- Windows XP Sounds for Windows 11: How to Download & Set Up
- Is your screen stretched on Windows 11? Here’s the solution
- Google Indic Keyboard for Windows 11 [Download & Install]
7. Reset your PC
NOTE
Unfortunately, if none of the solutions above helped, it’s time to reset your PC to factory settings. However, the reset process allows you to keep your files, but you will lose all installed programs, so make sure you still have the software to restore them.
- Choose the Start button located on the Taskbar and click on Settings.
- Now select System and click on Recovery from the right pane.
- Next, hit the Reset PC button.
- Click on Keep my files if you don’t want to lose them, or select the second option if you want a fresh start. We also recommend performing a backup before going through with this step.
- Select the first option, Cloud download, to get Windows 11 online (you need at least 4 GB of free space on your drive). You can go for the second option if you have a local kit.
- Click Next, then Reset, and Windows 11 will start the reinstallation process.
If the procedure is unsuccessful, read our guide on what to do if the Reset PC is not working in Windows 11 and solve it immediately.
We hope our solutions helped you fix this update problem and that you removed the Undoing changes made to this PC message on the screen.
You should also check if your PC has enough space on your drive for the update because this update error might also be caused by insufficient disk space.
It would be helpful to check our article on how to make Windows 11 faster and more responsive, and you will also learn how to free some space on your drive.
Lastly, note that the solutions above will work for many cases, including undoing changes made to your HP or Dell computer and the black screen problem.
Let us know the method you opted for in the comments section below.
Still having issues? Fix them with this tool:
SPONSORED
If the advices above haven’t solved your issue, your PC may experience deeper Windows problems. We recommend downloading this PC Repair tool (rated Great on TrustPilot.com) to easily address them. After installation, simply click the Start Scan button and then press on Repair All.
![]()
Newsletter
Some users have posted on Microsoft’s support forum about an Windows 10 Undoing changes error. That’s a Windows 10 update error that arises for some users. Instead of installing an update, Windows 10 displays this error message: “Error – We couldn’t complete the updates. Undoing changes.” Thereafter, Windows 10 gets stuck in an update loop as it tries to install the update again and again to no avail. Here we will show you 9 potential fixes for Windows 10 Undoing changes made to your computer.
Part 1. What Causes the Windows 10 Undoing Changes Made to Your Computer Error
The Undoing changes made to your computer Windows 10 error can be due to a few things. It might arise because your PC has some corrupt system files. The SoftwareDistribution folder for Windows Update could be corrupted. There might be insufficient space for an update on your system volume. Or something might have interrupted the update’s installation process.
So, there are a few potential factors behind the Undoing changes to your computer error. Therefore, there are also quite a few potential fixes for the issue. This is how you can fix Undoing changes made to your computer error within Windows 10.
Firstly, a quick fixing solution for you: Windows Boot Genius– All-in-one Windows Rescue Software.
- It will help you out of all booting issues and boot your crashed/dead/non-bootable Windows computer from various cases, such as Update Loop. You can try to use this tool to fix Windows 10 undoing changes made to your computer within 5 simple steps.
- It also helps to recover data from the crashed computer in all Windows OS before factory reset. And recover all your Product Key and Windows login password.
Moreover, 9 methods without using any software to resolve undoing changes error are also ready for you. Check the details below:
1. Enter Safe Mode
Step 1: First, you’ll need to enter safe mode to get into Windows 10. Turn on your Windows 10 PC.
Step 2: Press the F11 key during system startup, before Windows 10 displays the Undoing changes error message, to open the Advanced options menu.
Step 3: Select the “Startup Settings” option.
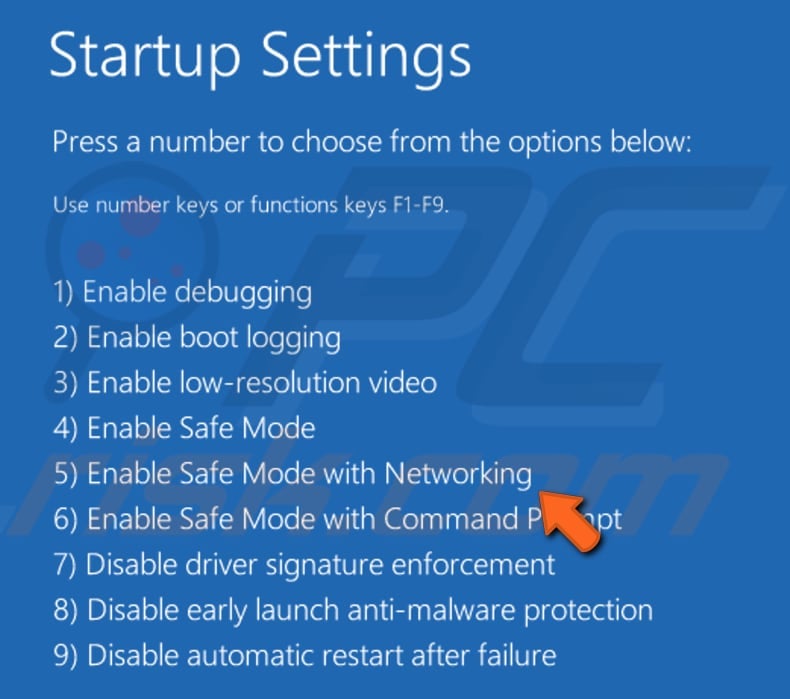
Step 4: Then press the 4 key to select the “Enable Safe Mode” option. Thereafter, Windows 10 will boot into safe mode from which you can apply the fixes directly below.
2. Delete Recently Installed Updates
Step 1: First, try deleting recently installed Windows 10 cumulative updates. To do so, press the Windows key + R hotkey, which will open Run.
Step 2: Type appwiz.cpl in the Open box within Run.
Step 3: Select the “OK” option.
Step 4: Next, click “View installed updates” to open a list of installed updates.
Step 5: Select your most recently dated Windows 10 updates.
Step 6: Click the “Uninstall” button to remove selected updates.
Step 7: Restart Windows 10 after uninstalling recent updates.
3. Run Windows Update Troubleshooter
Step 1: The Windows Update troubleshooter can often fix Windows 10 update issues. Click the “Type here to search” taskbar button, which will open Windows 10’s search utility.
Step 2: Next, enter “troubleshoot” in the search box to find Troubleshoot settings.
Step 3: Click Troubleshoot settings to open the Settings app.
Step 4: Select the Windows Update troubleshooter.
Step 5: Click the “Run the troubleshooter” button. Go through the troubleshooter’s suggested fixes.
4. Run A Startup Repair
Step 1: Startup Repair is a utility that can resolve Windows 10 startup issues, such as the undoing changes to your computer error. First, press and hold down the Shift key and click Restart on Windows 10’s Start menu.
Step 2: Thereafter, the blue menu shown directly below should open. Select “Troubleshoot” on that menu.
Step 3: Select the “Advanced options” button to open further tools.
Step 4: Next, choose the “Startup Repair” utility.
Step 5: Select an account to fix with the Startup Repair tool.
Step 6: Input the user password for an account, and select “Continue” to proceed.
5. Run DISM Tool
Step 1: The Deployment Image Servicing Management command-line utility can repair the Windows 10 image, which some users might need to do before running a system file scan to fix Undoing changes made to your computer error. First, open Windows 10’s search utility.
Step 2: Then type cmd into the search box to find the Command Prompt.
Step 3: Right-click your Command Prompt to open a context menu for it.
Step 4: Select the “Run as administrator” option to open an elevated Command Prompt window.
Step 5: Then input DISM /Online /Cleanup-Image /RestoreHealth into the Command Prompt’s window. Press the Return key after entering that command.
6. Delete the SoftwareDistribution Folder
Step 1: Deleting a corrupted SoftwareDistribution folder, which contains Windows update files, might resolve the Undoing changes to your computer error. To do that, open Run first by pressing the Windows key + R keyboard shortcut.
Step 2: Type in cmd into Run’s Open box.
Step 3: Then press the Ctrl + Shift + Enter key combination to open an elevated Command Prompt.
Step 4: Input these separate commands into the Command Prompt (press Enter after each one):
net stop wuauserv
net stop bits
net stop cryptSvc
net stop msiserver
Step 5: Next, click the File Explorer button on your Windows 10 taskbar.
Step 6: Open this folder in File Explorer: C:WindowsSoftwareDistribution.
Step 7: Press the Ctrl + A keyboard shortcut to select all content within the SoftwareDistribution folder.
Step 8: Click the “Delete” button.
Step 9: Open the Command Prompt as an administrator again.
Step 10: Enter these separate commands into the Prompt’s window to restart services:
- net start wuauserv
- net start bits
- net start cryptSvc
- net start msiserver
Step 11: Then restart Windows 10.
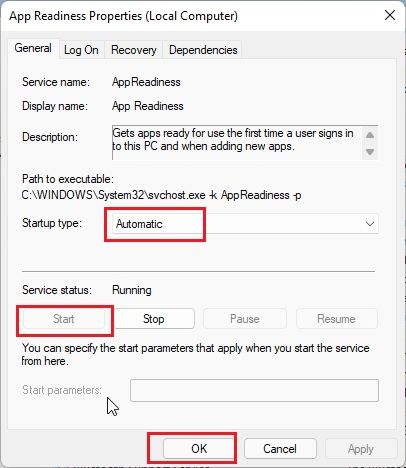
7. Enable the App Readiness Service
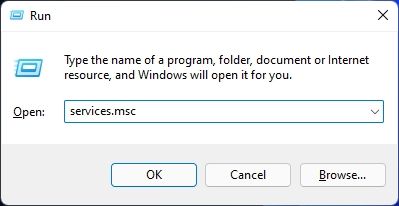
Step 1: Some users have reputedly fixed the Windows 10 Undoing changes made to your computer error by turning on the App Readiness service. To enable that service, open the Run accessory.
Step 2: Next, type services.msc in Run; and select the “OK” option.
Step 3: Double-click the App Readiness service to open the properties window in the snapshot directly below.
Step 4: Click the Startup type drop-down menu to select the “Automatic” option.
Step 5: Press the “Apply” button.
Step 6: Click “OK” to exit the App Readiness Properties window.
Step 7: Restart your desktop or laptop after turning on the App Readiness service.
8. Run a System File Checker Scan
Step 1: The System File Checker is a potential fix for Undoing changes made to your computer Windows 10 error as that repairs corrupted system files. To run an SFC scan, you’ll need to open Windows 10’s search box first.
Step 2: Type Command Prompt into the search box.
Step 3: Right-click Command Prompt and select the “Run as administrator” option to open the Prompt’s window.
Step 4: Input sfc /scannow in the Command Prompt, and press the Enter key.
Step 5: Wait for the SFC scan to finish.
Step 6: If the scan does fix files, restart your desktop or laptop.
9. Block Windows Automatic Updates
Although not an ideal fix, blocking automatic updates can stop the Windows 10 Undoing changes made to your computer issue arising. However, note that Windows 10 won’t install any updates if you disable the automatic update service. You can disable the Windows Update service as follows.
Step 1: Open the Run accessory.
Step 2: Enter services.msc in Run’s text box, and click the “OK” option.
Step 3: Double-click the Windows Update service to open the window shown directly below.
Step 4: Select the “Disabled” option on the Startup type drop-down menu.
Step 5: Don’t forget to click the “Apply” button.
Step 6: Click “OK” to close the window, and restart your desktop or laptop.
Conclusion
There’s a good chance the resolutions above will fix Undoing changes made to your computer Windows 10 error for many users. However, they aren’t necessarily guaranteed fixes for all users. If the above resolutions aren’t enough, try resetting Windows 10 with the Reset this PC utility. Doing so will restore Windows 10 to its default factory settings, but you’ll also need to reinstall third-party software. Before factory reset the computer, don’t forget that you can use Windows Boot Genius to recover your data/files from a crashed system in Windows boot failure.
In this article, you will learn about the windows 10 error of undoing changes made to your computer on your screen and 7 ways to fix it.
OK JUST CALM DOWN we will fix this problem and there is no need to worry as there are many methods to fix this issue of Windows update.
This error can be because of 3 reasons.
- You have an old device where you are updating Windows 10 features and security programs, so compatibility issues can also be a cause of Undoing changes made to your computer.
- Windows update gets installed on your C: drive where OS is installed, so probably your C: drive doesn’t have enough space and due to this Windows update gets stuck.
- Your PC took a long time to update so you shut down or restarted the computer which can also brick the PC.

Though there can be many more other reasons but the 3 reasons I listed above are the ones which I got to know while troubleshooting recently.
You may get a blue screen on the device with a few of these messages
Errors
undoing changes made to your computer we couldn’t complete the updates undoing changes couldn’t install some updates because the pc was turned off
we couldn’t complete the updates
NOTE:- [Perform all the methods one by one starting from the method 1]
Method #1:- Wait for the update to fix Undoing changes made to your computer
Yes, If you have time then please go with this method, why I pushed this method on the top because recently I fixed one of my user’s computer by leaving it as it was for around 3 hours and when I came back I saw the regular screen of Desktop with all the desktop icons.
This method can only be tried if you have time; let’s suppose you got this issue in the evening then you can leave it for the whole night and check in the morning.
If this doesn’t work then follow the method 2
How to Enter the Windows 10 recovery environment from Boot
Before proceeding towards the other methods we must know how to bring the advanced options like SAFE MODE, RESTORE, RESET, or REPAIR options.
We have trouble starting our Windows so we might not be able to bring these options through the normal Windows settings.
So let’s see how you can bring these options while starting the computer.
NOTE:-Perform these steps carefully by reading the instructions as you may need to follow few steps multiple times
- Press and hold the power button for 10 seconds to turn off the device (1)

- Now press the power button to turn on the device
- Once Windows come up with a logo sign, press and hold the power button again for 10 seconds until the device shuts down. (2)
- Turn on the device again
- Repeat step no 3 which is as soon as Windows gets to start to press and hold power button for 10 seconds(3)
- Start the computer again and wait till you see WinRE screen which is Windows Recovery Environment
Also read: – What is IDP.GENERIC Virus
Method #2:- Restore the Computer
Why I am recommending you to go with this method as number 2 because through this way you can easily switch the computer to an earlier date when it was working fine.
As at this period of time we need our computer back so that we can proceed with our work.
So this issue of we couldn’t complete the updates undoing changes can be easily fixed by restoring the device to an earlier date
Please follow the steps to restore your computer and fix Undoing changes made to your computer
- Once you are inside the Windows Recovery Environment please look for TROUBLESHOOT and click on it.
- Look for Advanced options and click on it.
- In the Advanced section, you will System Restore and once you click on it, it may ask you for Windows password in order to proceed

- After putting your password you will be getting a new window of System Restore, click on Next

- In the next window, you will see a few restore points created. Check on the box of “Show more restore points” which will display more restore points.

- Highlight the one you want to go with and hit next.
- Confirm the restore point and click Finish.

- Wait till the Windows restore your computer.
If this fixes your issue of “undoing changes made to your computer” then you are all set no need to proceed ahead, if not follow the Method no 3
Recommended Laptops for you on AMAZON
![]() Method #3:- Go with Start-up Repair
Method #3:- Go with Start-up Repair
Instead of finding and spending a long time for the solution, we can run start-up repair which will automatically fix all issues which are preventing Windows to update.
Start-up repair is a Windows default feature that we simply need to run.
I am starting with the easiest way and this will be a good way as a start-up repair look and fix the missing and damaged files.
Let’s see the steps to run Start-up repair and fix we couldn’t install some updates because the pc was turned off error message in Windows 10.
- Enter the Windows Recovery Environment by restarting the computer 3 times as instructed above.
- Go with Advanced start-up/Automatic repair and select troubleshoot
- Now select Advanced option and click ok

- Select Start-up repair and click Ok.
Now this will start looking for the problem and try to fix it, if not proceed with the Method no 4
Method #4:- Clear Software Distribution Folder
The software distribution folder is an important component for Windows update and managed by WUAgent (Windows update agent).
This folder temporarily store files needed for the new updates which help our device to fix bugs and improve security.
But in some cases, the Datastore and download folders stop synchronization which can result to update failure.
So at this situation problem of we couldn’t complete the updates undoing changes can be fixed by deleting the software distribution folder.
To delete the folder we need to enter inside the Windows through Safe mode with Networking Follow the instruction to clear the folder.
- Enter the Windows Recovery Environment and choose advanced start-up/Automatic repair.
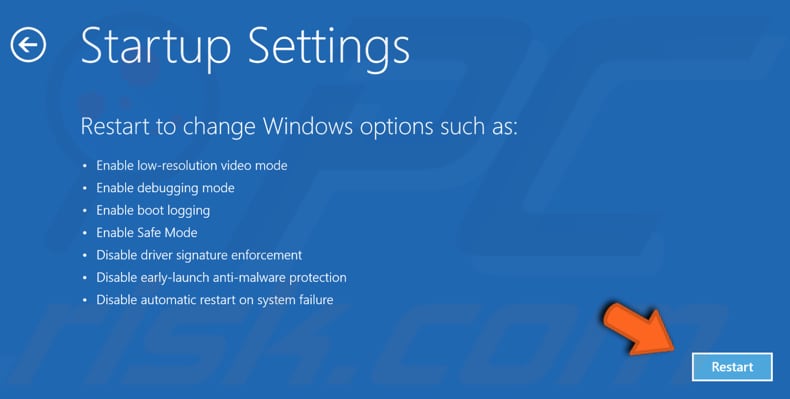
- Go to Advanced options from the Troubleshoot and select start-up settings

- The Start-up window will now come up, look for Restart at the right-hand bottom of the window and click on it.

- Now once windows start you will see multiple choices to start the windows, where you can use function keys F1 to F9 to make a choice.
- As we have to go with Safe mode with networking, press F5.

- Now the Windows will start in safe mode, so before clearing the folder we have to stop a few services
- Type CMD in the search box and choose Run as administrator

- Type the following command
“net stop wuauserv” and Enter
“net stop bits” and Enter


- Let’s go to the location and delete the folder now by typing C:WindowsSoftware Distribution in the search box

- The software distribution folder will now come up, press CTRL + A key to select all, and then right-click on to delete the files

Restart the computer now and I hope now this might have fixed your problem of undoing changes made to your computer.
Also Read: – Pornographic Virus Alert from Microsoft
MacBook Latest model on AMAZON

![]()
Method #5:- Use the DISM Tool to fix Undoing changes made to your computer
Windows will not be able to run updates if any system file is damaged, so in order to fix the issue, we can use the Deployment Image servicing and management (DISM) tool to fix the system files.
How to run the DISM tool
- Enter into the Windows recovery environment.
- Look for Advanced options in Troubleshoot and then Command Prompt

- Now the black window of Command prompt will appear on which you need to type
“DISM /Online /Cleanup-Image / RestoreHealth” and Enter

- Once the command is completed, restart the computer
Hopefully, this fixed the problem if not
COOL DOWN PLEASE AND HAVE PATIENCE
We have a few more methods to fix “undoing changes made to your computer”
Method #6:- Reset the PC to FIX Undoing changes made to your computer
You might be thinking why I am recommending this method in the last because I started from the easiest and safest way of keeping in mind to save your data and time.
Don’t worry by resetting your PC you won’t be losing your personal files and data, what you will lose is all the installed apps.
Follow these steps
- Enter the Windows Recovery Environment and choose to troubleshoot.
- Click on Reset this PC

- Now you will be displayed with two options
“Keep my Files”
“Remove Everything”
- Click on Keep my Files as this option will keep all your data and files safe except installed apps. Remove everything option will delete all the files and data.

Method#7:- Fully Formatting the PC
If nothing works, we can’t leave our computer as it is, the final way to get rid of this problem would be to go with the full format which will delete everything from the PC.
Then we can install fresh Windows again and use the computer.
To do so you need to choose the option of Delete Everything by following the steps of Reset this PC

Keep Optimizing your Device
Computer Optimization is very important and all Windows devices should be updated every week.
When we browse on the Internet many unwanted junks and files get saved on our computer. These files can harmful and damage system files.
→ Keep Deleting Temp, %Temp% files.
→Reduce Start-ups
→Uninstall unwanted data, software, and applications
→Optimize your browser to prevent from an error like dns_probe_finished_nxdomain
Frequently Asked Questions
Question: – What do undoing changes made to your computer means?
Answer:- This is a blue screen error that will be stuck to the same screen every time you restart. This mostly occurs because of the Windows update.
Question: – How long does undoing changes made to your computer take?
Answer:- If you got this error and did not restart your computer, then Kindly wait for few hours. If still nothing happens and takes ever then you can follow the above methods to fix.
Question: – What happens if you turn off your PC while updating?
Answer: – Restarting or shutting down a computer in the middle of updates may cause severe damages to the device.
If it was shut down because of power failure, then try updating again. In such cases, the computer can be bricked as well.
Question: – What is a bricked Computer?
Answer: – A device that gets bricked won’t turn on and function properly. A bricked computer can’t be fixed through a normal process or software.
FINAL WORDS
Windows operating system is one of the most used operating systems and we face many issues as well.
But it becomes easy when we easily get troubleshooting steps on the internet to fix our problem.
Windows 10 update issue of undoing changes made to your computer can easily be fixed by the above-mentioned methods.
Finally, I would request you all to leave your comments in the comment box if the above methods did not work for you. Do let me know if you have a similar problem on your Windows.
I will definitely bring easy troubleshooting steps for that. We couldn’t install some updates because the pc was turned off issue can also come by different error message as well; let me know for that as well.
Thanks for reading! Be safe and positive in your life
To run Windows operating systems without any errors updating it to the latest version is recommended. But when getting these updates installed becomes a task then?
We understand it is frustrating; hence, in the guide below, we will discuss how to fix we couldn’t complete the updates/undoing changes made to your computer.
Usually, after downloading the updates and restarting the PC Windows 10 users complain about screen freeze and we couldn’t complete the updates undoing changes error message.
To resolve this, many users force, restart the system and end up getting stuck in the restart loop. Therefore, to fix this problem, we need precise solutions, and this is what we will discuss here.
Must Read: Best System Cleaner
But before that we will like to discuss some common Windows update error messages:
1. We couldn’t complete the updates undoing changes won’t turn off your computer – this occurs when Windows updates fail to install.
2. We couldn’t finish installing updates Windows 10 – occurs when Windows cannot finish installing updates
3. Failure configuring Windows updates undoing changes don’t turn off your computer – this makes Windows run in a loop as updates are not configured.
4. Windows 10 undoing changes stuck – when the installation of a certain update fails this stop code error occurs.
Now that the reason for different Windows updates is apparent let’s move further and learn the solution to fix Windows 10 undoing changes made to your computer.
Short on Time? Looking for a Quick Fix?
Well, here it is. You can try using Advanced System Optimizer – the best Free PC Optimizer.
To download it click here.

This popular PC cleaner helps fix the common reasons responsible for the error message “Undoing changes made to your computer”.
You can use it to clean junk files, check the disk for errors, optimize hard disk to fix bad sector, update outdated drivers, invalid registry entries, and more. This top PC optimizer offers a 25+ system tweaking tool that no other PC cleaner offers. Also, it is very simple to use. To automate the process you can set Schedule and run it automatically. To know more about the tool click here.
How to fix Undoing Changes Made to Your Computer – Windows 10
There are different solutions to fix this problem, so, try them one by one and see which one works for you.
1. Booting Windows into Safe Mode
- Altogether press and hold Shift + F8 or F8 key when the system restarts.
- This will load the advanced startup screen with different options
- Click Options > Troubleshoot > Advanced options > Startup Settings > Enable Safe Mode.
To learn in detail about Safe Mode, read our article on How to boot in Safe Mode.
2. Delete Latest Updates
Now that you are running Windows into Safe Mode, you need to delete freshly installed updates as it might be creating problems. To do so, follow the steps below:
1. Type Control Panel in Windows search and press Enter key.
2. Click Programs/ Programs & Features > View installed updates.

3. This will open a new window with the list of all Windows updates. Select the most recent one to uninstall > hit the Uninstall button.

4. Now restart Windows 10 in normal mode.
You should no longer face problems if we couldn’t complete the updates error message.
3. Run DISM
DISM (Windows Deployment Image Servicing and Management) is a built-in Windows tool. It helps resolve various Windows issues. Hence to fix undoing changes made to your computer we will use it.
To run the DISM command, follow the steps below:
1. Type Command Prompt in Windows search.
2. Select the search result then click Run as administrator from the right pane.

3. Here type following command: DISM.exe/Online /Cleanup-image /Restorehealth
4. In case you face any problem, try using an installation DVD or USB. Once connected type following command in Command Prompt running as admin:
DISM.exe /Online /Cleanup-Image /RestoreHealth /Source:C:RepairSourceWindows /LimitAccess
Note: C: RepairSourceWindows should be replaced with the USB or DVD path.
- Wait for the operation to complete.
- Exit Command Prompt.
This should fix we Couldn’t Complete the Updates/Undoing Changes PC error message.
4. Run the SFC scan
When dealing with Windows update error messages running sfcscannow helps. To use this command, follow the steps below:
- Command Prompt > Run as administrator.
- Type SFC/scannow and press Enter key.
- Let the process finish. This will fix all corrupt system files.
- Now, restart your system and check if computer error with stop code Windows 10 undoing changes is resolved or not.
5. Use Windows Update Troubleshooter
Windows 10 offers a fantastic feature to troubleshoot most Windows error messages. Placed under Settings, the troubleshooter helps fix issues.
To use it, follow the steps below:
1. Windows Settings > Update & Security > Troubleshoot > Windows Update > Run the troubleshooter.

2. Follow on-screen instructions and wait for the process to finish.
3. Restart the computer. This should fix undoing changes made to your computer on Windows 10
6. Block Windows Automatic Updates
Indeed, there’s no way to block Windows updates as you will have to update Windows sooner or later.
Therefore, instead of trying to block Windows updates, we will use a trick that will help block updates temporarily. To do so, follow the steps below:
1. Head to Windows Settings.
2. Look for Network & Internet and double click it.

3. Click Status in the right pane > Change connection properties in the left.

4. Look for the Metered connection option and toggle it to the right to enable a Metered connection.

This will block updates from being downloaded temporarily as a data limit will be set.
After a while when Microsoft releases bug-free updates, disable it and get the latest Windows update
7. Rename the SoftwareDistribution folder
To store temporary Windows installation files, the SoftwareDistribution folder is used. If any file gets corrupt during installation, you might end up facing Windows 10 undoing changes error messages. Therefore, to fix it, let’s try renaming the folder in question. To do so, follow the steps below:
1. Windows search > Command Prompt > Run as administrator
2. Here, type the following command. Make sure you press enter after every command.
net stop wuauserv
net stop bits
rename C:WindowsSoftwareDistribution to SoftwareDistribution.bak
net start wuauserv
net start bits
3. Now try updating Windows you should not face any problem.
8. Enable the App Readiness service
Amongst all the methods listed above, this one is the most recent once. To enable App Readiness service, follow the steps below:
1. Press Windows + R keys.
2. Here enter services.msc
3. Under Services windows look for App Readiness service > right-click Start.

4. Restart your system and check if the PC error message is resolved or not.
This is all for now. Using any of the fixes above you can get rid of the dreaded Windows 10 undoing changes made to your computer error message. In addition to this, we suggest using Advanced System Optimizer – the free system optimizer tool that helps clean PC and keep it free from junk files. Moreover, this tool fixes most of the issues like outdated drivers, invalid registry, and more all of which are responsible for the Blue Screen of Death.
Click the Download button to get this amazing tool and share your experience with us in the comments section below.
Windows 11 is frankly a great operating system, and Rectify 11 (Redesigned Windows 11) is even better with its consistent UI and upgraded features. However, much like Windows 10, the update issues in Windows 11 are quite annoying. Once in a while, Windows 11 will show an “Undoing changes made to your computer” error while applying an update. And no matter how many times you attempt a fresh download, it just can’t install the update. To help you out of this situation, we have listed 10 ways to fix the “Undoing changes made to your computer” error in Windows 11 in this guide. If you are stuck on this screen or facing errors like 0x800f0922 or 0x800f0988 on your Windows 11 PC, we have the perfect solution. So without any wait, let’s dive in.
In this tutorial, we have mentioned 10 different ways to fix the “Undoing changes made to your computer” error on Windows 11. If you are stuck on the update screen or unable to apply a new update, the below methods will help you resolve the problem. You can expand the table below and move to any section.
Table of Contents
1. Stuck at “Undoing Changes Made to Your Computer”? Fix Here
Don’t worry if your Windows 11 PC is stuck at the “Undoing changes made to your computer” error for hours. You can fix the issue from the recovery menu. Here is what you need to do:
1. If your computer is stuck at the “Undoing changes made to your computer” error, I first suggest you wait for a few hours. If there is no progress even after 2-3 hours, press and hold the power key and shut down your PC.
2. Now, press the power key once and press the “F8” key. It will open the Recovery screen. If that does not happen, try pressing “Shift + F8” simultaneously. On other computers, pressing the “Esc” or “F11” key may trigger the Recovery menu.
3. Once you are on the Recovery screen, click on “Troubleshoot“.
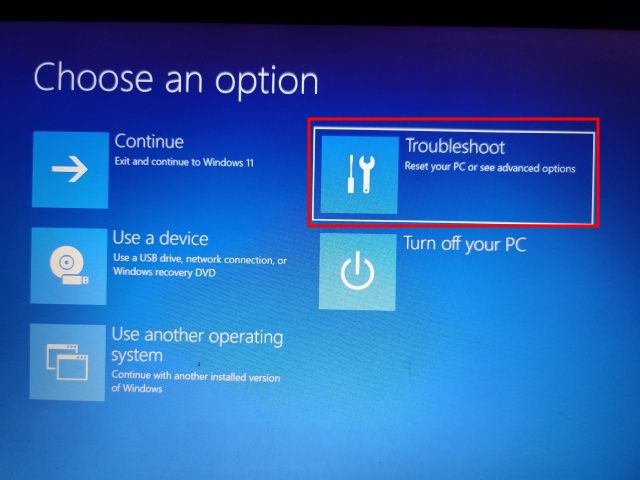
4. Next, click on Advanced Options and choose “Startup Repair“. Now, your Windows 11 PC will restart and diagnose your PC. After that, your PC should boot fine.
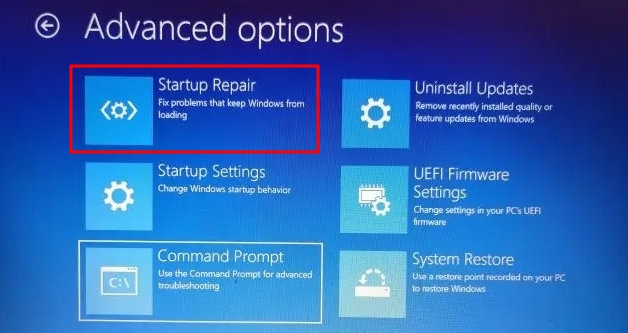
5. If the above step didn’t work, click on “Uninstall Updates” under “Advanced options” on the Recovery screen.
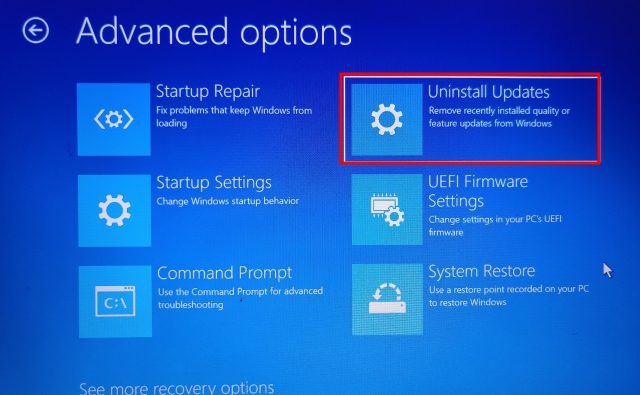
7. After that, click on “Uninstall latest quality update“. That’s it. Now, restart your Windows 11 PC, and the “Undoing changes made to your computer” error should be eliminated.

2. Getting Error 0x800f0922 or 0x800f0988 While Updating Windows 11
If you are getting the “Undoing Changes Made to Your Computer” error, followed by either the 0x800f0922 or 0x800f0988 error, you can fix it with a simple service change. Here are the steps to follow.
1. Once you log in to your PC, press the Windows 11 keyboard shortcut “Windows + R” and open services.msc. Then, press Enter to open the Windows Services window.
2. Here, look for “App Readiness” and open it. Now, change the Startup type to “Automatic” and start the service. Finally, click on “OK”.
3. Now, go ahead and update your Windows 11 PC. You should not see “Undoing changes made to your computer” or “0x800f0922” errors anymore.
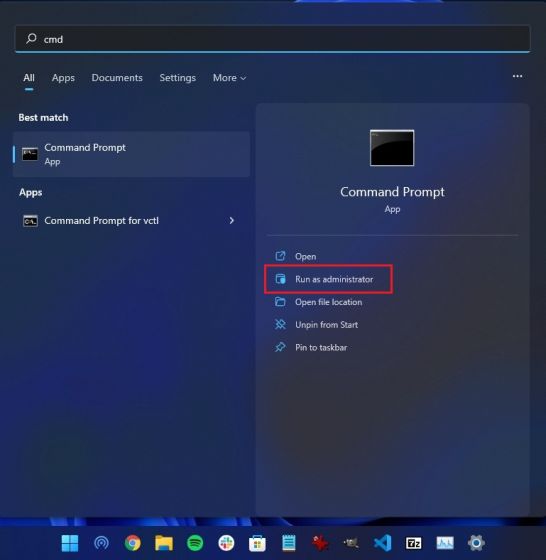
4. In case you are specifically getting the “0x800f0988” error, you should try running the command in the next step. Press the Windows key once and search for “cmd“. Now, click on “Run as Administrator” in the right pane.
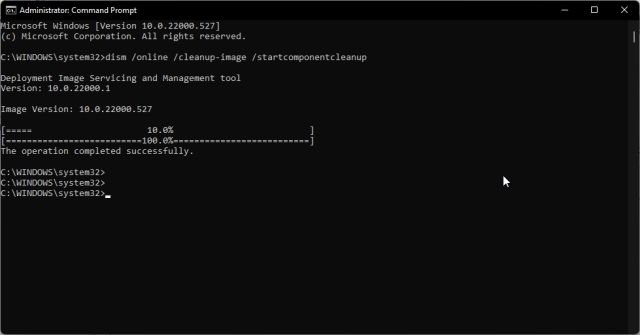
5. After that, execute the below command. It will clean up the WinSxS folder. Once it’s done, update your Windows 11 PC, and it should work fine this time around.
dism /online /cleanup-image /startcomponentcleanup
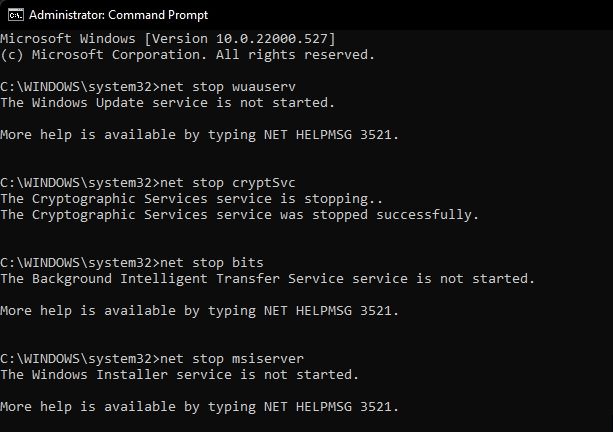
3. Fix the “Undoing Changes Made to Your Computer” Error with Command Prompt
In case your Windows 11 PC is still not updating to the latest build and showing the “Undoing changes made to your computer” error, try these nifty Command Prompt commands.
1. Press the Windows key once and search for “cmd”. Now, click on “Run as Administrator“.
2. Here, run the below commands one by one. This will stop all the essential Windows Update services.
net stop wuauserv
net stop cryptSvc
net stop bits
net stop msiserver
3. After that, execute the below commands to rename the update folders.
Ren C:WindowsSoftwareDistribution SoftwareDistribution.old
Ren C:WindowsSystem32catroot2 Catroot2.old
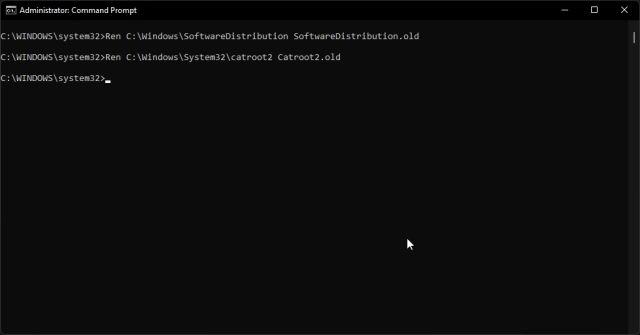
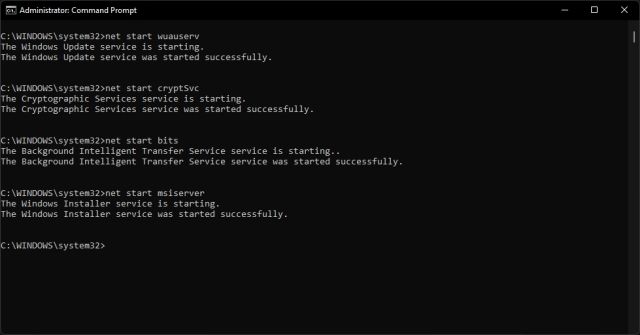
4. Finally, run these commands to restart the services. After that, go ahead and update Windows 11. Chances are that you will not get any errors this time.
net start wuauserv
net start cryptSvc
net start bits
net start msiserver
4. Run Windows Update Troubleshooter
So far, if none of the above methods have worked for you, then try running the official Windows Update troubleshooter. It has seemingly fixed many update-related bugs in the past for me. Here are the steps you need to follow.
1. Press the Windows key once and search for “Troubleshoot“. Now, open it.

2. After that, click on “Other trouble-shooters“.
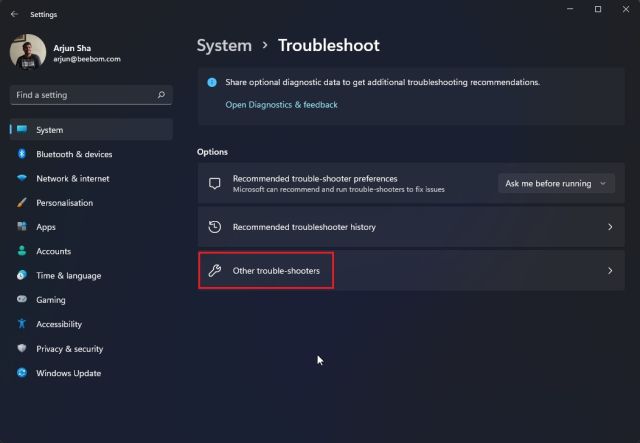
3. Here, click on “Run” next to Windows Update.
4. Now, follow the on-screen instructions and let it complete the process. Following that, restart your PC and try to update your Windows 11 PC. This time, you should not encounter any errors.
5. Upgrade from Windows 10 to Windows 11 with Installation Assistant
If you are on Windows 10 and always getting the “Undoing changes made to your computer” error while upgrading to Windows 11, you can follow the steps below to avoid this error. With Windows 11 Installation Assistant, you can seamlessly upgrade your PC from Windows 10 to Windows 11 without any error.
1. Go ahead and download the Windows 11 Installation Assistant from here.
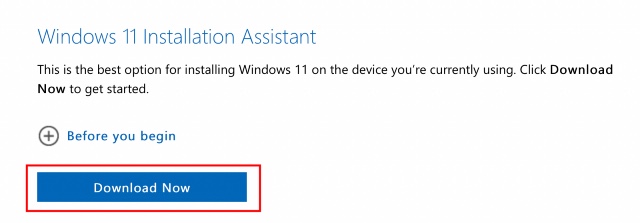
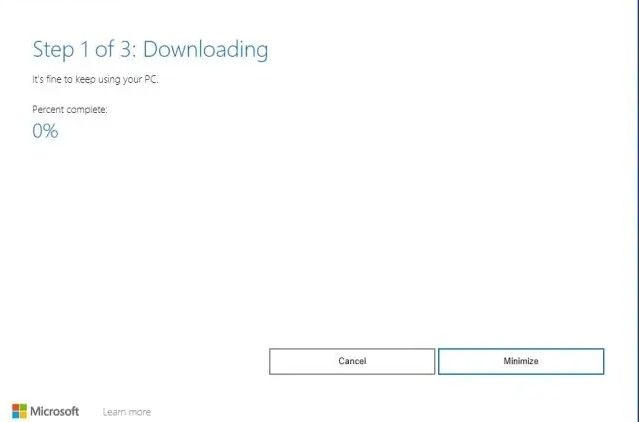
2. After that, run it and follow the on-screen instructions.

3. Now, let it download the latest build of Windows 11. After that, restart your computer, and you will be upgraded to the latest version of Windows 11. You can read about all the cool new Windows 11 features you will be able to use right here.
6. Apply Windows 11 Update Manually
For smaller cumulative updates, you can bypass the “Undoing changes made to your computer” error on Windows 11 by downloading and applying the update manually. Here is how to do it.
1. First, press “Windows + I” to open the Settings app. Now, move to “Windows Update” from the left sidebar. Here, note down the update pack that starts with “KB”.
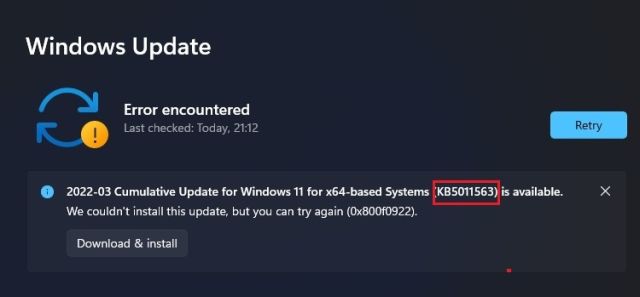
2. Now, open catalog.update.microsoft.com and enter the update pack that you just noted above into the search field. Then, hit Enter.

3. It will show you all the updates available for the particular update pack. Now, based on your system, whether it’s x64 or ARM-based, download the required update. For a majority of users, it will be x64.
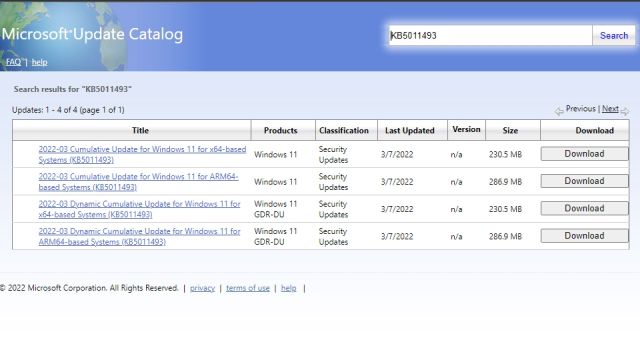
4. After downloading the update, double-click on it and install the update. Once it’s done, restart your computer, and you will have your Windows 11 PC updated to the latest patch. That’s easy, right?

7. Investigate the Windows 11 Update Error with Event Viewer
Sometimes, Windows 11 does not show any error code and simply throws the “Undoing changes made to your computer” error. It prevents us from knowing the exact reason behind the error and hinders us from solving the issue. To combat this, we are going to use the built-in Event Viewer that keeps a log of all the operations that go in the background. From there, we can find the root cause behind the error on your Windows 11 PC. Here is how to do it.
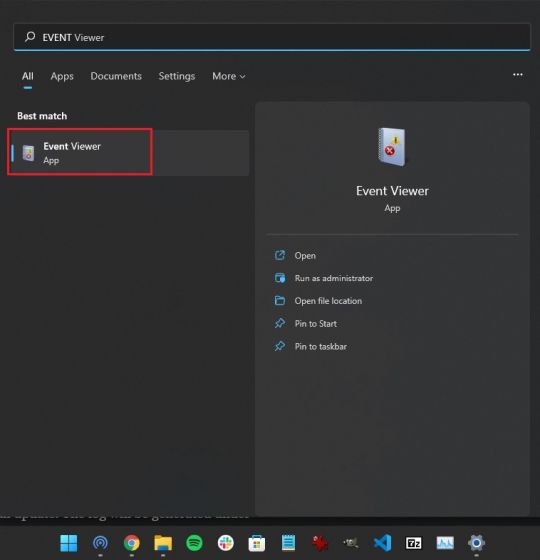
1. Press the Windows key once and search for “Event Viewer“. Now, open it.
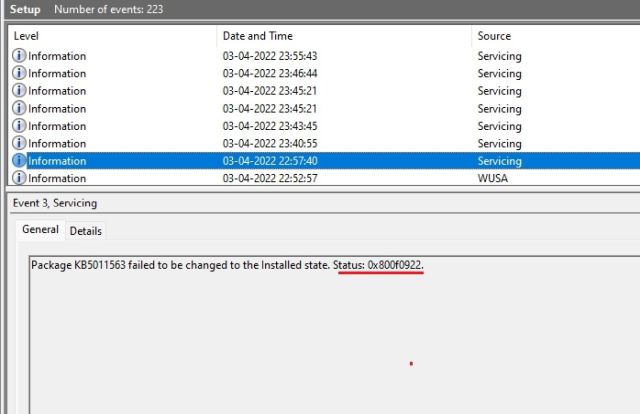
2. Here, navigate to Windows Logs -> Setup.

3. Under “Setup”, you will find all the update logs. Keep going through all the logs and try to find the error code at the bottom pane. For example, here is mine — 0x800f0922.
4. This will help you in pinning down the issue. Now, go ahead and search for the error code on the internet and find a suitable solution.
5. By the way, you can also download SetupDiag (click here) to find out the reason behind the unsuccessful update. Just run the EXE file, and the log (logs.zip) will be generated under the same folder.
8. Run DISM, SFC, and CHKDSK Commands
In case you are still facing the “Undoing changes made to your computer” error, you can run the DISM and SFC commands to fix update woes on your Windows 11 computer. Simply follow the steps below.
1. Press the Windows key once and search for “cmd“. Now, click on “Run as Administrator”.
2. In the CMD window, run the below DISM command to fix any image corruption issues.
DISM /Online /Cleanup-Image /RestoreHealth
3. After that, run the SFC command to check file integrity.
SFC /scannow
4. Finally, run the CHKDSK command to fix any bad sectors in the hard disk. Type “Y” when prompted and hit Enter. Now, restart your computer, and your hard disk will be checked for possible errors during boot.
chkdsk /f
9. Update Windows 11 Drivers
Many have reported that due to outdated drivers, Windows 11 sometimes is unable to apply the update. If such is the case, go ahead and update all your drivers to the latest version of Windows 11. We already have a guide on how to update drivers on Windows 11. However, we will briefly demonstrate the steps here.
1. First, use the “Windows + X” keyboard shortcut to open the Quick Links menu. Here, select “Device Manager”.
2. In the Device Manager window, choose the driver you want to update. For example, to update the graphics driver, expand the Display adapters menu, and right-click on one of the entries. Here, one of the entries is the integrated GPU, while the other is a discrete GPU from AMD (if your computer includes one). Then, click on “Update driver”.
3. On the pop-up window that appears now, click “Search automatically for drivers,” and Windows 11 will look for the specific driver from Microsoft’s vast catalog of online drivers.
4. If there is an update available, it will install the latest driver and ask you to restart the PC. If not, it will let you know that the best driver is already installed on your Windows 11 PC. Repeat this process for all the hardware devices connected to your PC. After that, try to update your Windows 11 computer.
10. Boot Into Safe Mode
Finally, if nothing works and you are stuck in a boot loop with the “Undoing changes made to your computer” error on the screen, boot into safe mode and roll back the updates. Simply follow our guide on how to start Windows 11 in safe mode and make changes from the isolated environment. Here are the steps to follow.
1. If you are stuck on the “Undoing changes made to your computer” screen, turn off your PC. Now, turn on the PC and turn it off again. Do this 3-4 times, and your PC will be triggered to open the Recovery menu.
2. Once you are here, navigate to Troubleshoot -> Advanced options.
3. Then, move to the “Startup Settings” page and click the “Restart” button.
4. Now, press “4” or “F4” on the keyboard, and you will be taken to Safe mode straight away.
5. Within a few seconds, you will boot to Windows 11 Safe mode.
6. Now, press the Windows key once and search for “Control Panel“. Open it.
7. Here, go to Programs -> View installed updates.

8. Finally, click on the latest Windows 11 update and “Uninstall” it right away. Once it’s done, restart your computer, and you should boot back into Windows 11 without any errors.
Resolve Windows 11 Update Issues Right Away
So these are the 10 ways you can resolve Windows 11 update issues. If none of the methods worked for you, I would highly recommend you to check the log with the built-in Event Viewer. It can shine some light on the underlying issue that may be causing the update problem on your Windows 11 computer. Anyway, that is all from us. In case, you have forgotten your Windows 11 password and want to reset it, follow our tutorial linked here. And to fix Microsoft Store issues on Windows 11, head over to the linked guide. Finally, if you have any questions, let us know in the comments section below.
Without a doubt, Windows 11 is a great operating system. Of course, a lot of people love and hate the new features as well as the design language. While we do get new features through updates, the same updates can be a nightmare for some users. Why? These updates are known for causing many problems and in particular the blue screen of death BSOD cause. With these updates, another screen appears with a message about undo changes made to your computer… If so, then you must be looking for a fix for it. Here’s how to fix undo changes made to your computer.
Everyone loves Windows, but bugs and flaws can be frustrating if they go beyond the limit. Especially when you see errors such as blue screens or messages that the update is not installing. Everything has its own set of problems, and luckily there are fixes for that. We have several troubleshooting methods that you can follow when you see messages such as “canceling changes made to your computer”. So go ahead and follow this guide to find out what to do when these messages appear.
Fix undo changes made to your computer
what does this message mean? Well, it just indicates that an update that was just downloaded or force-installed by the user ran into some errors, and it could also be that the update files might have been corrupted, causing the OS to display messages like this on your screen. The good news is that if you receive such a message, it is not the end of the world. The following steps below might help you fix this problem.
Step 1: force shutdown the system
The first thing you need to do is force your system to shutdown. Why? Well, because there is no other way or button to communicate with your system. Just press and hold the power button on your system until it turns off.
Step 2. Start your computer in safe mode.
Now that your system has been forcefully shut down, it’s time to turn it back on. However, you will want to enable it and boot into Safe Mode.
Step 3. Repair Windows 11
It is possible that there were a lot of problems with the installed update. The good part is that you can simply restore your system to the state where the update was downloaded and installed on your Windows 11 PC. You can follow this guide to learn how to use a restore point on your Windows 11 PC. If a restore point was not created before installing the update, you can follow the next step.
Step 4: uninstall updates
Since your system is still in Safe Mode, you have the option to uninstall the recently installed update from your Windows 11 PC. Here’s how you do it.
Step 5. Start scanning and managing images
- Open the start menu and find command line.
- Be sure to open it with administrator rights.

- Now just enter the following code
DISM.exe/Online /Cleanup-image /Restorehealth
- Press enter to run the command.
- This command will now start restoring your Windows image files and fix them if there are any problems.

Step 6. Run System File Checker.
The System File Checker command will check the integrity of the system files and ensure that any corrupted Windows files are repaired.
- Run Command Prompt, but remember to run it as Administrator.
- From an open command prompt, just run sfc /scannow and press the enter key.
- Now it will check and repair corrupted system files and be complete.
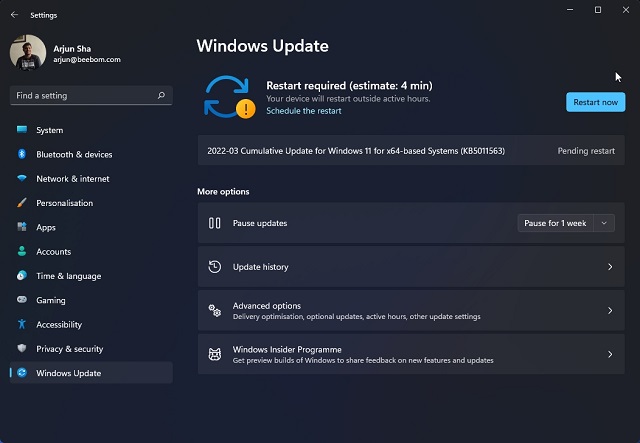
Step 7. Pause Windows updates
Since the update causes problems rather than fixes them, it’s best to stay away from it until Microsoft releases a fixed update and fixes all issues. Fortunately, in Windows 11, you can pause updates for up to 5 weeks. This is how you do it.
- Open the Start menu and click the Settings application icon.
- Now select the option Windows Update on the left pane.
- The Windows Update page will open on the right.
- You will see an option Pause update… Click the «Pause for 1 week» button.
- Updates have now been paused and the system will look for updates after 7 days.
- If the patch for the update has not been resolved, you can simply pause the updates for another week.
- Continue to pause them until an update patch is released.

Conclusion
That’s all. All the steps you need to follow if your system ever gets a message to discard the changes made to your computer. These steps are simple and easy to understand and follow. None of these steps will result in additional errors and blue screen messages.
Although updates may contain some bugs, it is always recommended to wait a few days after starting the update. This way you will know if the update is good or if it breaks your system and causes problems. This not only saves time, but it also gives you peace of mind knowing the update is perfect.
How to Fix «We couldn’t complete the updates. Undoing changes» Error in Windows 10
If you read this, you probably encountered the «We couldn’t complete the updates. Undoing changes» error message displayed on a blue screen. In this article, you will find several guides to help you resolve the issue causing this error.
We couldn’t complete the updates
Undoing changes
Don’t turn off your computer
Usually, Windows undoes the changes made, and users can start Windows without problems (and without updates). However, there are many cases where changes cannot be undone, and users cannot get past the «We couldn’t complete the updates. Undoing changes. Don’t turn off your computer» blue screen error.
It’s possible to solve this problem by launching the Advanced Startup screen and booting Windows into Safe Mode or performing certain actions using Advanced Startup tools. So, you need to boot into Safe Mode or Advanced Startup screen first and then try to apply different solutions.
To access the Advanced Startup screen, use a DVD or USB which contains your Windows installation media. Insert it and restart your computer. You should get an on-screen message saying that you need to press any key to boot from CD or DVD. Simply press any key on your keyboard and follow the instructions.
Select the installation language and click «Next,» you should see the «Repair your computer» option in the next step. Find it and click it. Once you are in the Advanced Startup (Automatic Repair) menu, you can apply the following steps described in our guide below.
Video Tutorial on How to Fix «We couldn’t complete the updates. Undoing changes» Error
Table of Contents:
- Introduction
- Restore Your System Using Restore Points
- Run a Startup Repair
- Run DISM Tool
- Remove SoftwareDistribution Folder’s Contents
- Reset Your PC
- Video Tutorial on How to Fix «We couldn’t complete the updates. Undoing changes» Error
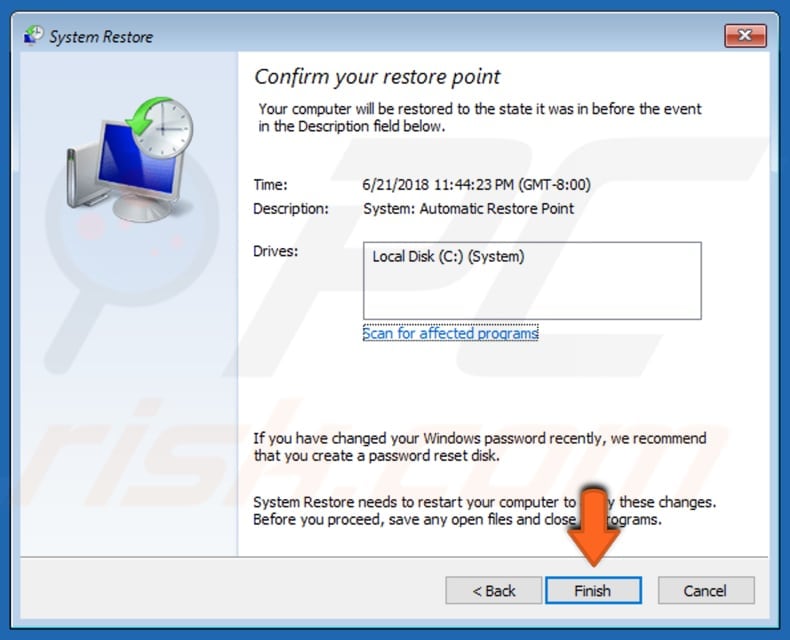
Restore Your System Using Restore Points
System Restore reverts everything to a saved restore point, but first, you must have one recorded. If you have any system restore points created before the «We couldn’t complete the updates. Undoing changes. Don’t turn off your computer» blue screen error, you will likely be able to solve this problem by restoring your system.
To restore your system, click «Troubleshoot».
In Troubleshoot menu, select «Advanced options».
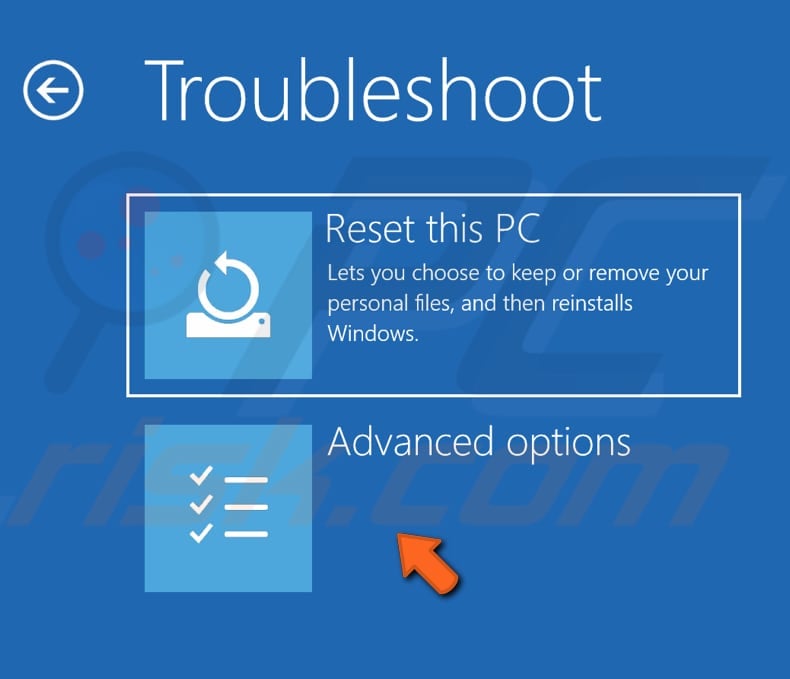
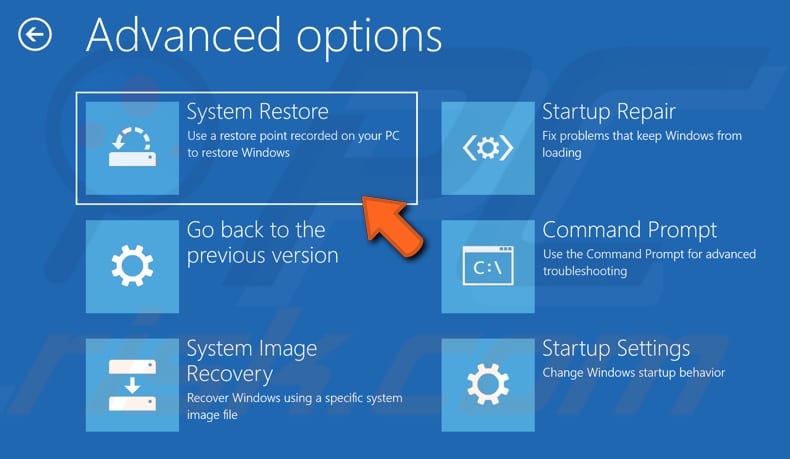
In the Advanced options menu, select «System Restore». Windows will restart and open the System Restore window. You will need to use your account’s password to be able to proceed.
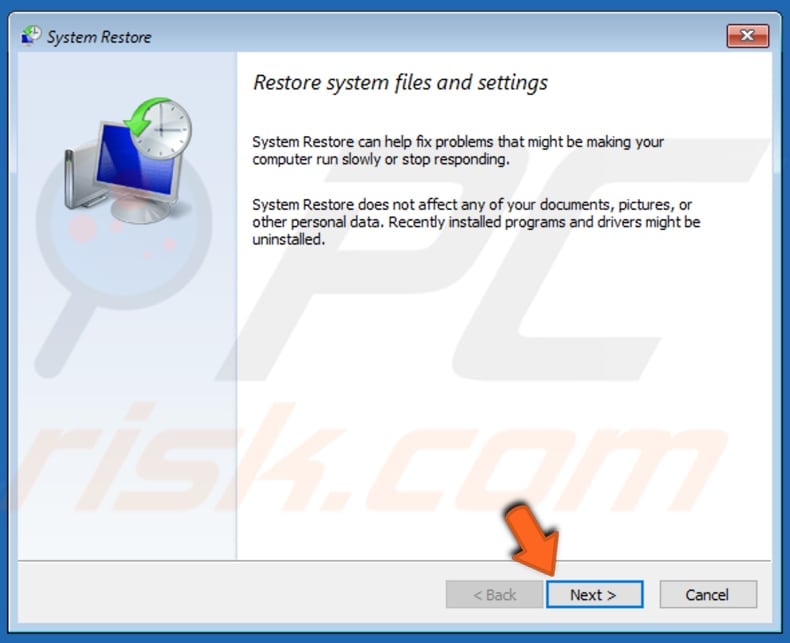
Now click «Next».
If there are restore points created, you will see a list of them. Mark the «Show more restore points» checkbox, and it should display more restore points.
Select the restore point that suits you best (depending on the time created etc.) and click «Next».
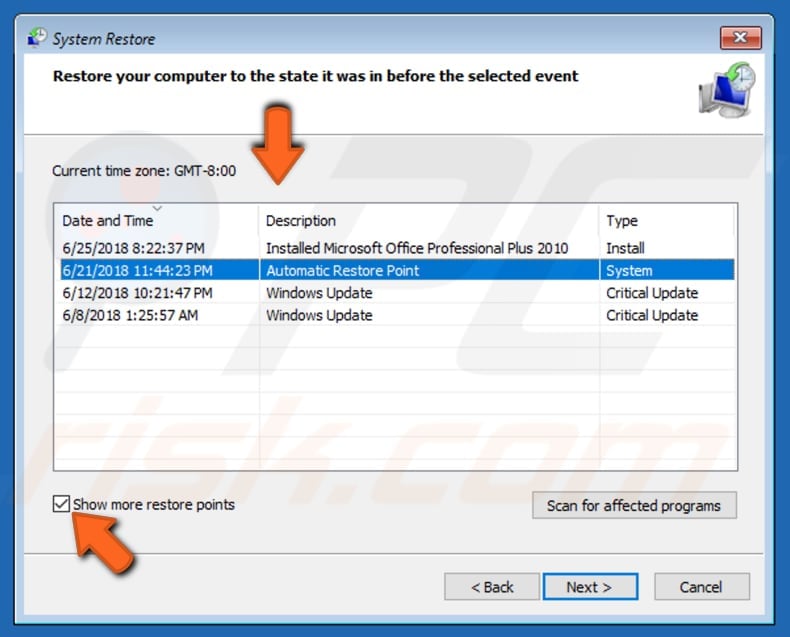
Confirm your restore point. Your computer will be restored to the state before the event detailed in the «Description» field. If you are happy with your choice, click «Finish» and begin the system restore process.
[Back to Table of Contents]
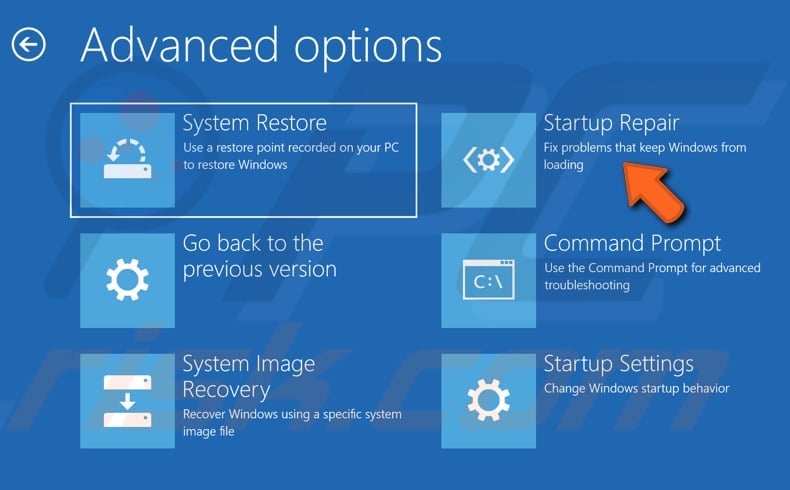
Run a Startup Repair
Startup Repair is a Windows diagnostics-based troubleshooting tool used to repair the Windows operating system when something prevents users from starting it. It is usually able to fix problems when there are some damaged or missing system files and could fix the «We couldn’t complete the updates. Undoing changes. Don’t turn off your computer» blue screen error as well.
Open the Advanced Startup/Automatic Repair window again and go to the «Advanced options» menu again by following the previously described steps.
Click Startup Repair. It will start diagnosing your PC, see if this tool can fix the problem for you.
[Back to Table of Contents]
Run DISM Tool
DISM stands for Deployment Image Servicing and Management, and it can be used to repair and prepare Windows images, including the Windows Recovery Environment, Windows Setup, and Windows PE. To run the DISM scan, you need to open Command Prompt first.
To do so, open the Advanced Startup/Automatic Repair window again and go to the «Advanced options» menu again by following the previously described steps. In the Advanced options window, select «Command Prompt».
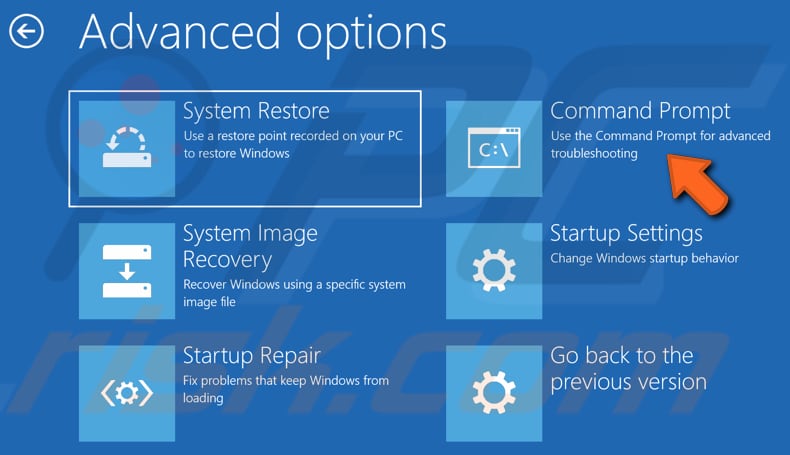
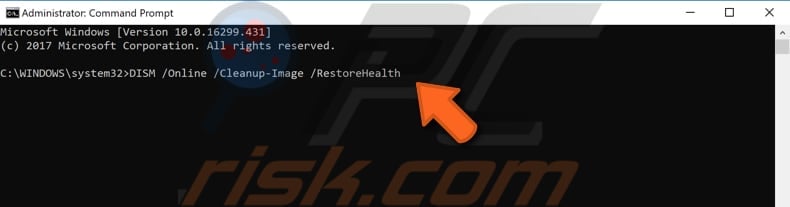
Once the Command Prompt is open, type the «DISM /Online /Cleanup-Image /RestoreHealth» command and press Enter.
Restart your computer and see if executing the DISM command fixed the «We couldn’t complete the updates. Undoing changes. Don’t turn off your computer» blue screen error.
[Back to Table of Contents]
Remove SoftwareDistribution Folder’s Contents
Software Distribution folder is a temporary folder in which Windows stores the update files until they are completely downloaded. Then, Windows starts the updating process. In this case, removing the SoftwareDistribution folder’s contents might solve the problem and fix the «We couldn’t complete the updates. Undoing changes. Don’t turn off your computer» blue screen error.
To remove update files, you will need to boot your Windows into Safe Mode. To do so, open the Advanced Startup/Automatic Repair window again and go to the «Advanced options» menu again by following the previously described steps. In the Advanced options menu, click «Startup Settings».
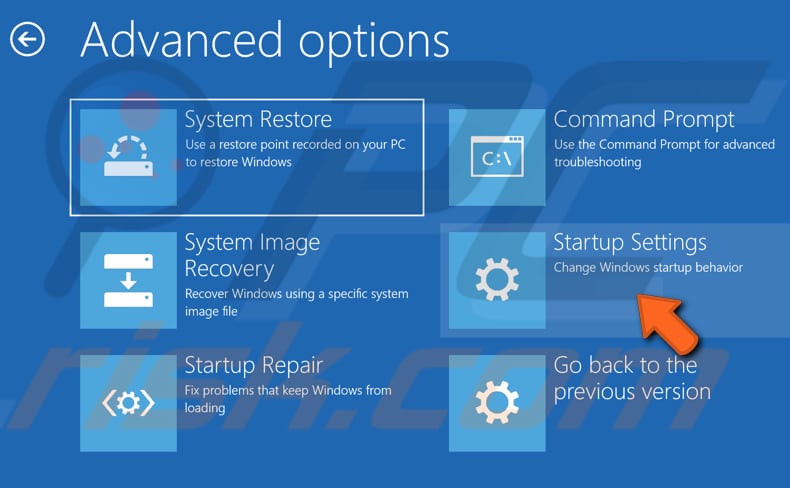
In Startup Settings, click «Restart». After restart, you will be able to choose how to start your Windows.
You will be presented with a list of options. To choose an option, press the number on your keyboard or use function keys from F1 to F9. Press F5 or 5 to enable Safe Mode with Networking. Or you can choose the fourth option if you like. Windows now will start in Safe Mode.
To delete the SoftwareDisribution folder’s contents, you need to stop a couple of services by executing several commands.
Type «command prompt» in Search and right-click the Command Prompt result. Select the «Run as administrator» option from the contextual menu.
Now type the «net stop wuauserv» and press Enter. Then type the «net stop bits» command and press Enter again.
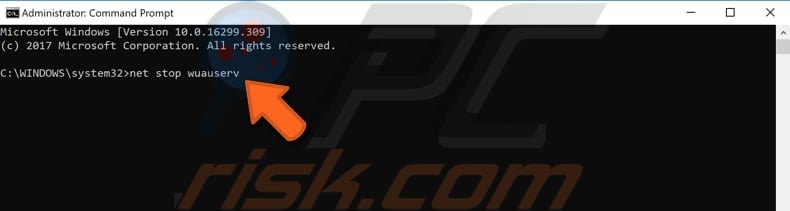
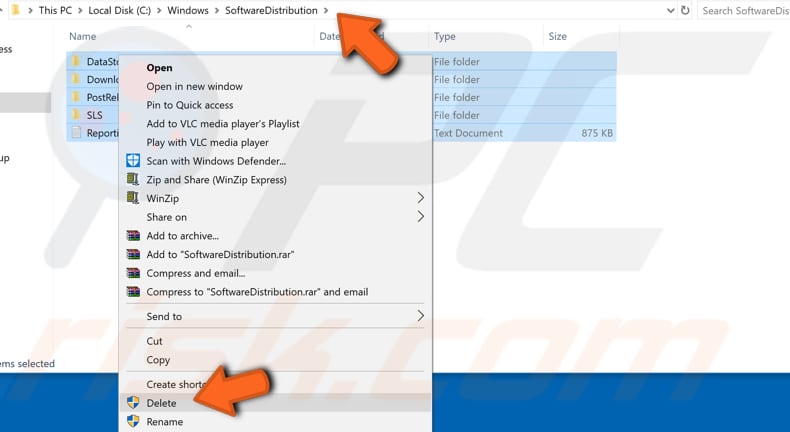
Now go to the «C:WindowsSoftwareDistribution» location in your Windows and select all of the contents, right-click them and select «Delete» from the contextual menu.
Restart your computer and see if you are still getting the «We couldn’t complete the updates. Undoing changes. Don’t turn off your computer» blue screen error.
[Back to Table of Contents]
Reset Your PC
We suggest you use this method as a last resort only. It is perhaps not as drastic as it may sound since this process maintains personal files while deleting installed programs/applications. «Reset This PC» is a repair tool for serious operating system problems.
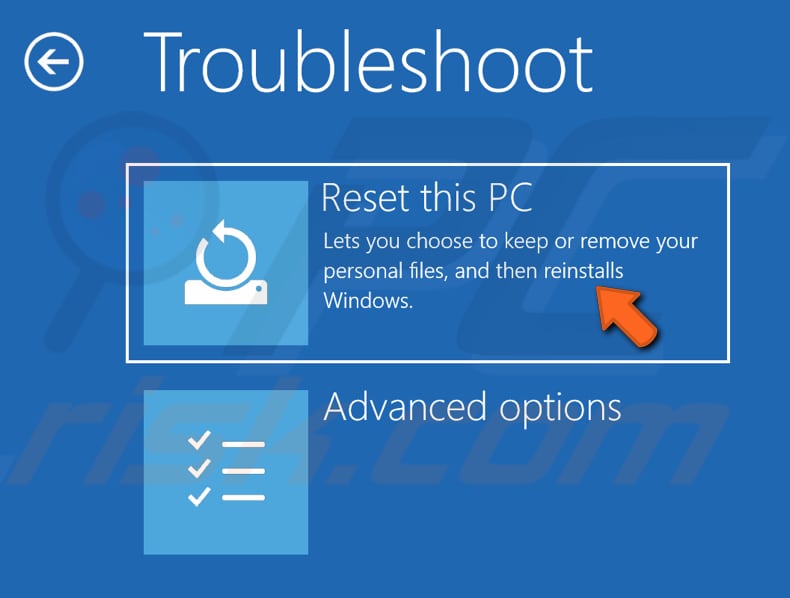
To do so, open the Advanced Startup/Automatic Repair window again, select «Troubleshoot», and then click the «Reset this PC» option.
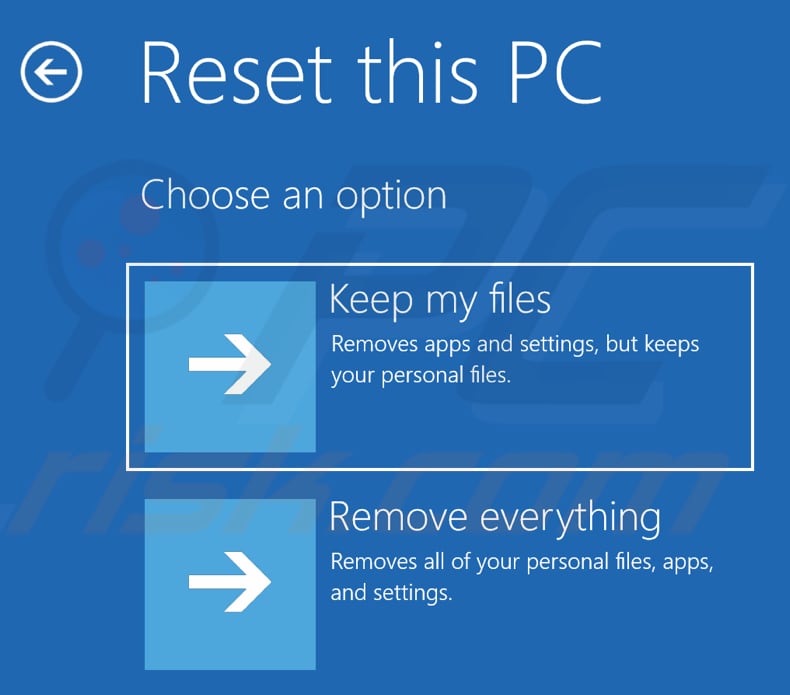
Select whether you want to remove apps and settings, but keep your personal files by clicking the «Keep my files» option, or to remove everything — your files, apps, and settings by clicking the «Remove everything» option.
That’s it, we hope that one of the methods solved the problem for you and you are now able to use your Windows operating system without problems.
If there is another way to fix the «We couldn’t complete the updates. Undoing changes. Don’t turn off your computer» blue screen error and it is not mentioned in our guide — do not hesitate to share it with us and with the others by leaving a comment in our comment section below.
[Back to Top]