Содержание
- Unity assets explorer error wrong size dds
- Unity assets explorer error wrong size dds
- Unity assets explorer error wrong size dds
- Unity assets explorer error wrong size dds
Unity assets explorer error wrong size dds
I spend some hours making this texture, just for fun.
I Hope you guys enjoy! 😀
Programs used:
Paint.net
Unity Asset Explorer

Thanks! I’ll test it tomorrow, screenshots look awesome!

Thanks! I’ll test it tomorrow, screenshots look awesome! :golden:
Thanks! I’ll test it tomorrow, screenshots look awesome!
Thanks for The information mate!

I started with beer textures too 😀
Thanks for The information mate!
Pizza: It was nothing! thank you for making it! Huge Simpsons fan here. :Pizza:
I started with beer textures too 😀
Kinda cool and fun right? 😀
Btw can you remind me how to replace texture in unity assets explorer? Few months ago i was using it but now i dont remember how i was doing it i exported texture modified it saved in dxt1 (same as original) import from dds and it won’t replace in unity assets explorer ;/
Ok, First let’s see if you are using a working version of the Unity Assets Explorer (UAE), the game has recieve some updates in December and some versions of UAE doesn’t work too well.
I’ll provide you a link for what I’ve used to make this texture:
Unity Assets Explorer
https://www.dropbox.com/s/2qorsfd50ixvn6o/UnityAssetsExplorer.exe
In Unity Assets Explorer, open the «sharedassets2.assets» inside your My Summer Car steam folder in «mysummercar_Data»
Find in the texture type the name «beer_bottle.tex» and «beercase.tex» (enable «DDS preview» to see if you are extracting the right texture), extract both files and try to find a folder called «sharedassets2», I’m not sure if will be in your Download folder or in the My Summer Car steamapps.
(Close the Unity Assets Explorer, to make the changes you will need open the assets again later).
Inside this folder you will see 4 files:
Take the Duff Beer .tex and .dds files that you find in the Dropbox and try just deleting the original extracted from UAE and paste the Duff Beer files inside the «sharedassets2» folder.
Now open again the «sharedassets2.assets» with Unity Assets Explorer (enable DDS preview), find the same names «beer_bottle.tex» and «beercase.tex».
Right click>Import This File from original-format
Right click again>Import This File from DDS (PAY ATTENTION TO THE «DONE» APPEAR)
If works, both DONE will appear, click on any texture and click back on the beer_bottle.tex see with preview if the image was changed.
IMPORTANT: Don’t forget to «Save as Assets-file» and save the original assets found in the mysummercar_Data
If the «ERROR! Wrong size dds» appear when you ‘Import This File from DDS’, delete all the .tex and .dds files inside your sharedassets2 folder and extract again with Unity Assets Explorer, now let’s try another way!
Open the original extracted .dds files with paint.net, and open the Duff Beer .dds with paint.net too, cut the Duff Beer and try to paste in the original beer texture and Save the changes with DXT5 type and check the option «Mip Maps» with the original file names.
It’s was pain to change the bottle texture I don’t know why because when you delete the original and use the other texture you got the «ERROR! Wrong size dds» but just changing the original texture it works.
Источник
Unity assets explorer error wrong size dds
I spend some hours making this texture, just for fun.
I Hope you guys enjoy! 😀
Programs used:
Paint.net
Unity Asset Explorer
Thanks! I’ll test it tomorrow, screenshots look awesome!
Thanks! I’ll test it tomorrow, screenshots look awesome! :golden:
Thanks! I’ll test it tomorrow, screenshots look awesome!
Thanks for The information mate!
I started with beer textures too 😀
Thanks for The information mate!
Pizza: It was nothing! thank you for making it! Huge Simpsons fan here. :Pizza:
I started with beer textures too 😀
Kinda cool and fun right? 😀
Btw can you remind me how to replace texture in unity assets explorer? Few months ago i was using it but now i dont remember how i was doing it i exported texture modified it saved in dxt1 (same as original) import from dds and it won’t replace in unity assets explorer ;/
Ok, First let’s see if you are using a working version of the Unity Assets Explorer (UAE), the game has recieve some updates in December and some versions of UAE doesn’t work too well.
I’ll provide you a link for what I’ve used to make this texture:
Unity Assets Explorer
https://www.dropbox.com/s/2qorsfd50ixvn6o/UnityAssetsExplorer.exe
In Unity Assets Explorer, open the «sharedassets2.assets» inside your My Summer Car steam folder in «mysummercar_Data»
Find in the texture type the name «beer_bottle.tex» and «beercase.tex» (enable «DDS preview» to see if you are extracting the right texture), extract both files and try to find a folder called «sharedassets2», I’m not sure if will be in your Download folder or in the My Summer Car steamapps.
(Close the Unity Assets Explorer, to make the changes you will need open the assets again later).
Inside this folder you will see 4 files:
Take the Duff Beer .tex and .dds files that you find in the Dropbox and try just deleting the original extracted from UAE and paste the Duff Beer files inside the «sharedassets2» folder.
Now open again the «sharedassets2.assets» with Unity Assets Explorer (enable DDS preview), find the same names «beer_bottle.tex» and «beercase.tex».
Right click>Import This File from original-format
Right click again>Import This File from DDS (PAY ATTENTION TO THE «DONE» APPEAR)
If works, both DONE will appear, click on any texture and click back on the beer_bottle.tex see with preview if the image was changed.
IMPORTANT: Don’t forget to «Save as Assets-file» and save the original assets found in the mysummercar_Data
If the «ERROR! Wrong size dds» appear when you ‘Import This File from DDS’, delete all the .tex and .dds files inside your sharedassets2 folder and extract again with Unity Assets Explorer, now let’s try another way!
Open the original extracted .dds files with paint.net, and open the Duff Beer .dds with paint.net too, cut the Duff Beer and try to paste in the original beer texture and Save the changes with DXT5 type and check the option «Mip Maps» with the original file names.
It’s was pain to change the bottle texture I don’t know why because when you delete the original and use the other texture you got the «ERROR! Wrong size dds» but just changing the original texture it works.
Источник
-

DA
Registered- Joined:
- Oct 5, 2010
- Messages:
- 266
- Likes Received:
- 11
Приветствую! Конвертируя трассу в rFactor 2, столкнулся с проблемой DDS File Size Error.
• Текстуры в rF1 и rF2 обязательно должны быть в формате DDS.
Типы сжатия DDS в rF2:
— DX1 (малый размер файла и нет альфа-канала) — Пример: текстура уличного туалета.
— DX5 (большой размер файла и обязательно присутствует альфа-канал) — Пример: текстура стёкол на пит-билдинге.• Все текстуры должны быть в равных пропорциях 8 16 32 64 128 256 512 1024 2048. Пример: 512*512 — файл будет загружаться, 512*312 — файл не загрузится и появится ошибка DDS File Size Error.
• Для просмотра DDS (разрешение и тип сжатия) файлов без загрузки в Photoshop рекомендую использовать программу Windows Texture Viewer от Nvidia. В нижней строке состояния появится необходимая информация.
Виды DDS File Size Error:
А) Нет файла текстуры в папке с трассой. Игра пишет название текстуры, а затем can’t loading [название текстуры] for material [название материала].
Б) Файл текстуры имеет неправильные пропорции. Игра пишет название Error loading [название текстуры] for material [название материала].
Решение проблем с DDS File Size Error:
А) В любом графическом редакторе создать недостающий файл текстуры. Я создал обычный квадрат 128*128 и сохранил его под тем названием, которое требовалось игре. Не забудьте указать тип сжатия DX1 или DX5.
Б) В любом графическом редакторе сделайте равные пропорции файла. Пример: Файл 1024*512, вы делаете 512*512 или 1024*1024.

Share This Page
![]()
This page shows you how to mod textures, models and sounds in My Summer Car.
New license plate texture.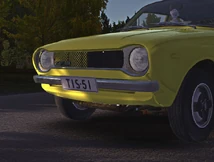
Even though the game doesn’t have official modding support, there are some textures that you can change without additional programs, as well as adding your own music. For more advanced modding you can use the Unity Asset Explorer to export and import assets out of the game to modify them.
For the Steam version, the game files can be found from *steam_install_directory*steamappscommonMy Summer Car
Importing Custom Music
The radio is only compatible with .ogg files. Placing the files in the «Radio» folder will allow the music to play after pressing the «Import Music» from the main menu and tuning into the right Radio Station. Be sure to change the name of the files to «track1.ogg, track2.ogg and track3.ogg» etc, Theres a limit of 99 songs.
Once done, enable the Import of player songs on the game’s start menu.
You can also use custom songs in CDs.
Changing Default Images
In the «Images» folder you can change your drivers license photo, the «Custom paint made by artist» and the rear window stickers for the Satsuma, your garage flag, the posters in your room and Jonnez ES skin.
NOTE: Make sure all the files are saved as .png’s or they will not show in-game, keep the original file name.
Garage Flag
")
Example flag #1
")
Example flag #2
")
Example flag #3
Garage flags must be named flag_garage.png
Posters
Posters must be named poster1.png, poster2.png and poster3.png respectively
Car Skin
A lot of Satsuma skins can be found at the /r/MySummerCar Satsuma skin thread. You can also make your own skins by using the templates below.
")
Stock Template
")
Semi Transparent Overlay
")
Example custom skin #1
")
Example custom skin #2
Car skins must be named car.png
Car Window Sticker
After Steam update 13.03.17 you no longer have to use UAV to mod window stickers!
")
Old sticker
")
Default sticker
Window stickers must be named window_sticker.png
Jonnez ES Skin
Jonnez ES skins must be named jonnez.png
Texture Editing
Use this guide to edit texture that aren’t changeable by default, you will need UAE and software able to edit DDS textures. Paint.net is a good free option, GIMP and Photoshop both require a free plug-in to edit DDS files.
Using Unity Asset Explorer, select «Open Assets-file» and open an .assets file (sharedassets1, 2 or 3 for the latest version, 1 or 2 for pre-13.03.17 builds, 0 or 1 for pre-08.11.16 builds). After the load is done, right click on the file you want to extract and select «Extract This File». All texture files will be type «Texture: 2D». Your extracted file will be found in a folder next to UAE’s executable corresponding to the asset file name. To import it back, right click the file in Unity Asset Explorer and select «Import this file from DDS». After you are done, select «Save assets-file» and overwrite the .assets file.
You can enable DDS preview to help you find the correct textures from the right.
The DDS files are upside down, so either deal with it or when loading the file to photoshop select «Load Flipped Vertically» and then when saving «Save Flipped Vertically». When saving an edited DDS file; make sure ‘Generate MIP Map’ is enabled, as it is disabled by default on some software.
Notes for texture-editing
- DXT5 files have an additional monochrome alpha channel for transparency hidden with the RGB channels.
- Textures ending in «_spec» are specular maps which are used to set how reflective/shiny something is.
- Textures ending in «_emission» are used for glowing surfaces, like lights and screens.
- Some texture replacements work with quit & continue, some need you to close the game completely.
- UAE doesn’t work with ARGB4444 or RGB565 textures. Try UAV, however this can cause texture bugs.
Sample textures

Visual guide to motorparts_atlas texture.
You can find an Imgur album with some rather quick and crude example changes here.
Niche mod examples can be found here , with an imported flair. (Sli.mg broke, here’s an image dump from the album)
Model Editing
Extracting and importing models is quite complicated, this guide will reference using Blender but it’s fully compatible with 3DS, Maya, or any other software that can import and edit .obj files. There’s plenty of online resources if you’re new to model editing and want to learn.
General knowledge of 3D modeling is recommended. Including: How to set a UV Map, naming an object, editing nodes and Normalizing/Smoothing/Dissolving/Triangulating objects. If you only want to lightly edit an object and not create a new model, naming and general editing is all you really need.
Software use is UABE, Unity 5.4 (Unity Personal) and UAE — Knowledge of UAE is recommended.
To avoid flooding this page with images, check this guide here as it’s got many. Full credit to Roman Evgenev for the linked images.
You’ll need Unity Assets Bundle Extractor. Select File -> Open -> sharedassetsX.assets (X = 1, 2 or 3). From here a new window will open with a long list of all the assets, sorted by their type. The search function can be found under View -> Search by Name, your item must be spelled perfectly though so it’s recommended to use UAE to find the model, then copy the name into UABE’s search.
All models are Type: Mesh, select the item’s name and click ‘Plugins’ on the right, then ‘Export to .obj’. Save it anywhere outside of the games folder. Some in game items use multiple models to create an object (for example, wheels and tires are a separate mesh).
Editing the Model
Blender with example Dice replacement
Import your newly extracted .obj into your favorite editing software, for blender this is File -> Import -> Wavefront (.obj). Remember to delete that daft cube first though (you’ll see what I mean). Once your item is in, feel free to edit the object, here’s Blenders guide page if you’re stuck or new to Blender. You must create a UV map if you’re making a completely new model, make sure it’s the same resolution as the original models texture and saved as the originals name.
Using the smooth function will make sure your texture looks nice, remember to normalize all the nodes to avoid transparent textures (unless this is your aim). Unity uses triangular faces, so if you’re creating new faces as squares, use Blender’s triangulate function as it’ll do a better job than Unity turning squares into two triangles.
Once you’re happy with the new model, use File -> Export -> Wavefront (.obj) to save over the old model.
Importing the Model
This is the hardest part, it’s silly how long-winded the technique is. Brace yourself!
Create a new blank scene in Unity Personal, then go find the Assets folder for this new scene in Windows Explorer. Copy your new model .obj into this Assets folder, you will now see the model in Unity’s assets section, drag the model onto the scene. Click File -> Save Scene… And save it. The name and location do not matter. Now click File -> Build Settings… A new window will open, leave everything as it is and click ‘Build’. Save the .exe anywhere, the name doesn’t matter, the folder that opens up when complete will have your *SceneName*_Data folder inside. Inside that _Data folder will be your scene’s sharedassets0.assets file, just like My Summer Car has one.
Now go back to UABE and open up your new assets0 file, there will be a model inside, it’s your new model! Highlight it and click «Export Raw», save the .dat file as the models name. Now re-open up My Summer Car’s Assets file from before and highlight the model you want to replace, click ‘Import Raw’ using your .dat file. Now click File -> Save and save the assets file as anything EXCEPT it’s original name (stick an X on the end or something).
In game mod example
Now, using Windows Explorer, cut the original assets file from MSC’s Data folder and replace it with your new re-named assets file, get rid of that X on the end so it’s the same name as the original.
If all has gone to plan your new model will be in game!
If you’ve made a new model or edited the UV Map (texture) then you’ll need to use UAE to replace the original game’s texture with the updated one (See texture editing above).
Issues
- If your model has texture artifacts, try normalizing the nodes or checking the resolution of your new texture.
- If your model has weird lines all over, try using Limited Dissolve and make sure your item is Triangulated in Blender/3Ds/Maya. Can’t help to normalize the model either, normalizing solves many issues.
- If your texture is missing a random section of the model, it maybe cause you’ve extruded a section or added a new section to the model and the UV map is ignoring it. Try re-assigning/creating a UV Map for the new model, it should find the bald spots.
- When you make a change to body panels or other deformable items, you may need to delete the meshsave.txt from your AppData folder. It’s under %AppData%/Amistech/My Summer Car
- Updates for MSC often re-arrange the contents of the .assets files, a mesh previously in assets2 may now be in assets3.
Audio Editing
A fantastic guide is available over on RaceDepartment. Full credit to ajanhallinta for his wonderful work.
To avoid making this page any bigger, use the above guide. Feel free to ask questions on here or at racedepartment regarding Audio Editing.
Issues
- Make sure your new edited .resource file is in the _Data folder next to the assets files and that M-Source is spelled exactly correct (including .resource on the end).
- It’s common that the executable builder will give errors, that part isn’t necessary unless you want to release your mod to the public easily. Click ‘Save’ instead, save as sharedassetsX.assets, remove the original assets file and rename your saved assets file as the original was.
Downloads
| Type | File | Creator | Description | Screenshots |
|---|---|---|---|---|
| Parts | Clean Satsuma (requires login) | Glien | No rust/clean parts | SS1, SS2, SS3 |
| Motor | Yellow Engine Paint (outdated) | RAD32X | Yellow Cover/Block/Filter | — |
| Lights | TrackTape Headlamps | Some sort of username | Crossed tape headlamps. | SS1, SS2 |
| RegPlate | ‘TIS-51’ Reg plate | JohnEdwa | TIS-51 plate from Napapiirin Sankarit | SS1 |
| Misc | Cleaner Windows V1 | JohnEdwa | Greatly reduces the amount of dirt and scratches in the windows. | SS1 |
| Dice | Fluffy Fox Dice | Some sort of username | Replace those drab dice with fluffy foxes | SS1 |
| Wheel
Skin |
Momo Rally Wheel | MicrowaveOven♔ | Momo steering wheel skin for rally wheel | SS1 |
| Wheel skin | Nardi Wooden Wheel | RAD32X | Wooden rally steering wheel | SS1 |
| Plugin | Developer Toolkit | zamp | A toolkit to read and tweak game logic/variables | x |
| Tire skin | Dirty Gobra tires | Some sort of username | Dusty Finnish gravel on worn tires | SS1, SS2 |
More texture and model modifications can also be found on RaceDepartment’s MSC Mod section
Tools
| Type | File | Creator | Description | Screenshots | ||
|---|---|---|---|---|---|---|
| Backup | MSC Save/Load | Auksasful | Backs up and saves multiple saves | SS1 | ||
| Editor | MSCeditor
[1] |
durkhaz | My Summer Car savegame editor | SS1 | ||
| Explorer | UAE | Haoose | Unity Assets Explorer 1.6 (Recommended)
DXT1, DXT3, DXT5 Compatible |
SS1 | ||
| Explorer | UAV | Alex Sadonis | Unity Assets Viewer
ARGB4444, ARGB32 Compatible |
SS1 | ||
| Explorer | UABE | DerPopo | Unity Assets Bundle Extractor
Model and Audio extraction |
SS1 | ||
| Editor | Unity — Ver. Archive | UT SF | Unity Personal — Ver. 5.4.x confirmed working | x | ||
| Editor | Blender | SBF | Blender Free model editor | SS1 SS2 | ||
| Plugin Loader | MSC Mod Loader | piotrulos | Mod Loader for My Summer Car | x | ||
| Plugin
Loader |
MSC Mod Loader Pro | MSCLoader Pro Team | Mod Loader for My Summer Car | x |
General FAQ and other Issues
- Error Wrong Size DDS: Make sure you have MIP Maps enabled and the texture is the correct TYPE (usually DXT1 or DXT5), also that you haven’t accidentally resized the canvas. Rarely a texture will have no MIP Maps so try with them disabled too (usually with textures like repair shop orders, inspection paper and car parts magazine…) .
- Transparent Texture: This can happen if a DXT5 DDS opens in your editor as the Alpha Channel, usually in a program like Paint.net. You can solve this by using programs like DXTBmp with Paint.net or try another image editing software.
- Texture upside down: You forgot to flip the canvas back round! DDS’ are flipped by default, save them upside down.
- White marks on body: Even with rust removed, the metallic sheen texture has the rusk marks overlaying the body, causing white marks in sunlight. Edit the body_metallic.text (sharedassets1) to be a solid black texture. For a metallic effect without singling the Alpha, make it an opaque black; lighter = more metallic.
- Missing texture on edited model: If you changed a model in game, but the texture is wrong, it’s because your model isn’t tagged to the correct UV map. Create a new UV map with your chosen texture, make sure it’s the same resolution as the game’s original model. You’ll then need to re-name and insert your new UV map as whatever the original model’s texture was using UAV.
- Texture turns white at distance: This could be caused by using UAV. Only use UAV for ARGB# files and use UAE for other textures.
- Your Unity assets won’t open in UABE: This is usually caused by using Unity 5.5.x, try using Unity 5.4.x from here . Your version of UABE may also have an effect, always use the latest.
- Your assets2 files have broke: A recent steam update moved some files out of assets2 and into a new assets3. Create a new sharedassets3 folder in UAE’s exe location and move the affected files there.
- Error building executable: UABE’s executable builder is rather rickety, there’s a high chance it will fail. Try reloading the application, or skipping this part if you don’t with to publicise your mod.
Updates
As of Steam Update 08.11.16 the location of textures in sharedassets has changed, the update will have replaced your modified textures with the original game ones. Be wary of this for future updates.
As of Steam Update 13.03.17 the location of some sharedassets2 textures have been moved to sharedassets3. This means you may have to relocate some texture save locations using UAE.
References
- ↑ MSCeditor — a Savegame Editor for My Summer Car
| Author | Message |
|---|---|
|
Post subject: Re: Unity Assets Explorer [v 1.3] PostPosted: Wed Oct 28, 2015 10:35 am |
|
|
|
adabada wrote: Does anyone else has issues opening files bigger than 1GB? This can be done, but it is slow down program. Maybe think of something. These restrictions Delphi -_- _________________ |
| Top |
Profile Reply with quote |

|
hackspeedok |
Post subject: Re: Unity Assets Explorer [v 1.3] PostPosted: Sat Dec 12, 2015 2:29 am |
|
|
I get a trouble with an unitygame: cfm.qq.com http://rghost.net/7TDzJyCWR (include original .tex and .ktx converted by Disunity) |
| Top | |
|
steve0503 |
Post subject: Re: Unity Assets Explorer [v 1.3] PostPosted: Fri Apr 15, 2016 4:18 am |
|
|
Is this can export scripts? |
| Top | |
|
BrutezBloxikin |
Post subject: Re: Unity Assets Explorer [v 1.3] PostPosted: Sat Apr 23, 2016 7:15 pm |
|
|
Is there a way to extract the mesh files and unconvert them from file extension .43? For instance, I have a file called «o_Cop_hand.43» and I don’t know how to convert it to .b3d or .mdl. I’m using Unity Assets Explorer [v 1.5]. |
| Top | |

|
BrutezBloxikin |
Post subject: Re: Unity Assets Explorer [v 1.3] PostPosted: Sun Apr 24, 2016 10:35 am |
|
|
Uhh, how do I use the script plugin? Nevermind, I think I got it, thanks! Last edited by BrutezBloxikin on Sat Jun 18, 2016 3:32 pm, edited 1 time in total. |
| Top | |
|
Viscerus |
Post subject: Re: Unity Assets Explorer [v 1.3] PostPosted: Thu Apr 28, 2016 5:11 pm |
|
|
Hi I just tried Unity Assets Explorer v1.5. Thanks for the application! I am using it to try out some modding on Subnautica. I am able to extract .tex files and autoconvert to .DDS. The issue I am having is that I cannot open any of the extracted .DDS files (in Photoshop with the Nvidia .DDS plugin). It reports an incompatible file format. Can anyone help me solve this? |
| Top | |
|
Viscerus |
Post subject: Re: Unity Assets Explorer [v 1.3] PostPosted: Fri Apr 29, 2016 2:48 pm |
|
|
Okay I am able to open the .dds files now from my extracted Subnautica directory (was a bad plugin installation in photoshop). Now I have found a new problem, and I *think it is related to the DDS conversion done in UAE. When I open any extracted and converted .DDS file in Photoshop they open as what can be described best as a big blue grid image. They also sometimes completely freeze up my computer if I click on them in the open file dialog. I have tried this on 2 different PCs with same issue occurring both times. Has anyone else seen this or know a solution? Is there another tool which can do a .tex to .dds conversion? |
| Top | |
|
demon |
Post subject: Re: Unity Assets Explorer [v 1.3] PostPosted: Sun May 01, 2016 8:52 am |
|
|
Hi Haoose I only registered because of you and your brilliant work for which I really need your help. Link_of_Hyrule already mentioned it on page 2 that some texture resource types can not be extracted at all. I know you said unity 5 support is still in development and I’ve gone from version 1.3 of the UAE up to the latest 1.5 testing you provided but can’t get a successful export at all. Any information or ETA about being able to extract those? Would _highly_ apprecate seeing those now unsupported types to be supported |
| Top | |
|
webful |
Post subject: Re: Unity Assets Explorer [v 1.3] PostPosted: Thu Oct 27, 2016 8:36 am |
|
|
Hello. Best regards. |
| Top | |
|
Mighty Otaku |
Post subject: Re: Unity Assets Explorer [v 1.3] PostPosted: Wed Dec 14, 2016 1:08 am |
|
|
I got .155 files, what do i suppose to do next? |
| Top | |
|
oddMLan |
Post subject: Re: Unity Assets Explorer [v 1.3] PostPosted: Mon Dec 26, 2016 1:37 am |
|
|
This tool is great, but there should be an option to batch open/convert TEX files to DDS. I’m having a hard time opening every TEX file every time! |
| Top | |

|
AMG |
Post subject: Re: Unity Assets Explorer [v 1.3] PostPosted: Mon Dec 26, 2016 2:18 pm |
|
|
oddMLan wrote: I’m having a hard time opening every TEX file every time! Just wondering, how are you managing to convert those .tex files? |
| Top | |
|
ffleader1 |
Post subject: Re: Unity Assets Explorer [v 1.3] PostPosted: Tue Jan 24, 2017 3:21 pm |
|
|
Hi. I am currently having problem with extracting a file. I got this weird error: |
| Top | |

|
Zhenyok |
Post subject: Re: Unity Assets Explorer [v 1.3] PostPosted: Thu Apr 13, 2017 6:34 pm |
|
|
Привет! В программе (1.5 test), обнаружился баг. Делаю небольшой мод, всё было хорошо, пока не дошёл до текстурки в формате RGB565. Делаю извлечение текстурки, и сразу, ничего в ней не меняя импорт. А получаю ошибку — Wrong size dds! https://www.dropbox.com/sh/ji08vusp2hhn … 8vfoa?dl=0 текстурка называется radar_plate04.tex |
| Top | |
|
binlv1 |
Post subject: Re: Unity Assets Explorer [v 1.3] PostPosted: Sat Apr 15, 2017 9:52 am |
|
|
How to extract the font file to edit the language, I need to translate language? |
| Top | |
|
computerguy19 |
Post subject: Re: Unity Assets Explorer [v 1.3] PostPosted: Mon Jun 19, 2017 2:59 am |
|
|
whenever i try to extract sound i always get «Stream read error» pls help |
| Top | |
|
Voider |
Post subject: Re: Unity Assets Explorer [v 1.3] PostPosted: Mon Jul 03, 2017 4:31 am |
|
|
Haoose wrote: Unity Assets Explorer Unity Assets Explorer is used to view the contents of Assets-files (Unity 3D engine) Latest version: https://www.dropbox.com/s/2qorsfd50ixvn … plorer.exe UnityAssetsExplorer 1.3 test (08.08.2014).rar Enjoy =) How to work with the program: Добрый День, Haoose, хотел спросить: а работает ли программа с файлами .mat? |
| Top | |

|
MrPixel92 |
Post subject: Re: Unity Assets Explorer [v 1.3] PostPosted: Fri Nov 24, 2017 3:36 pm |
|
|
Haoose wrote: Unity Assets Explorer How to work with the program: Не работает. Говорит что TProgressBar Property out of range. Объясните пожалуйста, как это исправить и что это вообще значит? |
| Top | |
How to import custom textures into Unity based games.
So, a lot of people (4) asked me how to edit game textures, and as I am too lazy to explain it to each of them in detail via private message, I created this simple guide. I took a few screenshots to underline my explanations aswell.
In this guide I will go through editing a simple texture extracted from the MSC asset files. I will NOT, however, teach you how to use photoshop or other editing software. This tutorial should apply to any basic Unity based game out there.
This guide applies to the game after the update on 08.11.2016
Programs
You will, of course, need to install a few programs before you can start editing textures to your heart’s content:
-
Unity Assets Explorer
Unity Assets Explorer (I’ll be calling it «UAE»), is the tool you should use to quickly export and import .tex files from the .asset files of the game, but more on that later. -
Adobe Photoshop (or any other image editing program that can edit .dds files)
Photoshop will be your go-to editing software for texture files. A free alternative is GIMP.
Note that you need to install the NVIDIA Texture Tools when using photoshop, GIMP needs the DDS Plugin.
Making backups
Whenever you mess with game files, you should create backups to restore the game back to it’s original state if anything should go wrong. Make a backup of the following files found in the mysummercar_Data folder in your install directory:
*sharedassets0.assets
*sharedassets1.assets
*sharedassets2.assets
Extracting .tex files
After you set up Unity Assets Explorer and the image editing software of your choice, it’s time to extract a texture from the game files to edit it. To do this, you want to open up UAE, and make sure that both «Convert TEX to DDS» and «TEX to DDS test version» are checked.
-
First, you need to open an asset file. In this tutorial, I will edit the license plate texture, which is an easy to start texture to edit. This texture can be found in «sharedassets2.assets», so click on «Open Asset File» in the top left corner, and navigate to your install directory. Open up «sharedassets2.assets» in the «mysummercar_Data» folder.
Screenshot -
You will see a lot of files. Don’t worry about the .mat or other files, it’s the .tex filey you’re after. Scroll down until you find a file called «reg_plate3.tex». Alternatively, search for this file in the search bar, and click «Find next» until you arrive at the file you want to extract. Before extracting, tanke a note of the DDS-type the texture uses. In this case, it’s DXT1. You will need to know this later. Right-click the file and select «Extract this file». This will create a directory called «sharedassets2» in your «mysummercar_Data» folder.
Screenshot. -
Navigate to this folder, and you should see a .tex file, and a .dds file. Leave the .tex file alone for now, and open up the .dds file in your image editing software.
Editing and saving .dds files
-
When you open the .dds file, it will look something like this (This isn’t the default texture, as I already replaced that.), flipped horizontally and rotated by 180°. To fix this (in Photoshop), look at the top menu bar, and click on Image>Image Rotation>180°, and Image>Image Roatation>Flip Canvas Horizontal.
-
Now it’s your time to shine, and edit the texture. For this tutorial, I colored parts of the license plate in a bright green.
Make sure to keep the original proportions and size of the image. -
When you’re done editing, undo step 1, rotate the image again by 180°,and flip it horizontal. Now go to File>Save As, and save the image as .dds. Save it inside the folder you extracted the texture into, in this case «sharedassets2». Make sure the filename is the same as the one you extracted.
-
Upon saving, this window will pop up. Here you need to remember the type you saw when extracting the file, in this case DXT1. Leave everything else as it is. If you forgot the type, open UAE again and check again. If you save your image as the wrong type, you cannot import it into the game.
Importing the textures
You want to open UAE again, and select the texture you want to replace. Check if there’s a .tex and a .dds file inside the «sharedassets2» folder, and if the name matches. Now you want to right-click on the texture in UAE, and select «Import this file from dds». If all goes right, a window should pop up saying «DONE». Close it, and save the file by clicking on «Save as Assets-file» in the top right corner. Select sharedassets2.assets, and save over it. After a few seconds, the «DONE» window should pop up again. Now you can close UAE and open My Summer Car, or any other Unity game you just replaced a texture for. And, as you can see here, the license plate of the car now has a big chunk of green on it.
That’s all, some textures are a bit harder to edit, and if you want to replace a specific texture in the game, you’ll probably need to search for it quite a bit. One more tip, use the «DDS preview» that comes with UAE, but make sure to disable it again when scrolling through textures, as it makes browsing them a lot slower.
Have fun!
disunityIt is a command-line tool (open source) for parsing Unity asset and asset bundle files (streaming loading, hot update support) written in Java (jdk1.8 is required, that is, Java8)
disunity0.3.4 supports untiy5 and below. In addition to analyzing and analyzing files, you can also use extract parameters to extract certain types of resources (models, textures)
The latest disunity0.5 reorganized the command line parameters and refactored them. Unfortunately, this version removes the resource extraction function
java.exe -jar "disunity.jar" bundle-extract "F:\Resourcesunity_builtin_extra"
Disunity Gui HelperIs a gui tool that encapsulates disunity (open sourced), the latest version 0.21 can work with disunity 0.3.4 version
After downloading DisunityGui.exe, place it in the directory where disunity.jar is located

UnityAssetsExplorerSome types of resources (such as shader, tex, etc.) in Unity asset and asset bundle files can be extracted
And it also supports writing back to Unity asset and asset bundle files after the resource is modified
This tool provides automatic conversion of dds for tex texture
The latest version isv1.5, Support untiy5 and below


Select the corresponding resource item, click the right-click menu «Extra This File», a new folder with the file name of the currently opened Asset will be created in the directory where UnityAssetsExplorer.exe is located, and the decompressed file will be saved in it
For example: the resource UnityWatermark-dev.tex shown in the figure above will be generated in the unity default resources directory
UnityWatermark-dev.tex
UnityWatermark-dev.tex.dds
Modified dds (can be usedPaint.netTo modify), you can use the right-click menu «Import This File From DDS».
Note 1: The exported dds pixel format and mipmap should be consistent with the original dds (you can use nVidiaWindows Texture ViewerTool to view)
Note 2: When the length and width of dds are not 2 to the power of n, the import will fail, prompting: ERROR! Wrong size dds!
This situation can only be imported by modifying UnityWatermark-dev.tex and importing it through the right-click menu «Import This File From original-format»
AssetsBundleExtractorIt is a tool for analyzing Unity asset and asset bundle files (open sourced)
And it also supports writing back to Unity asset and asset bundle files after the resource is modified
The latest version is 2.2 stable d, which supports untiy2019.2.0f1 and below
UABE development log records:https://github.com/DerPopo/UABE
Version download:Unity Assets Bundle Extractor github

Unity3d ObfuscatorCan extract unity web player.unity3d, webplayer platform resources
The author of this tool has also developed some more powerful cracking tools (for a fee), see:DevXDevelopment

AssetStudio, Also called UnityStudio, is a very powerful tool written in C# to extract resources in Unity asset and asset bundle files (open source)
Support Unity2.5~2019.1 version, supported resource types include: Texture2D, Sprite, AudioClip, Font, Mesh, TextAsset, Shader, MovieTexture, VideoClip, MonoBehaviour, Animator
The project has been kept active, the github address is:https://github.com/Perfare/AssetStudio
AssetStudio export texture format is dds, need to be converted to other formats, can be usedDDS Converter


ProjectExodus GitHub open source Untiy to UE4 tool
https://github.com/NegInfinity/ProjectExodus
Finally, some graphics-related resources can be obtained with frame grabbing debugging tools such as Tegra Graphics Debugger, Qualcomm Adreno, RenderDoc, etc.
View the current Unity version from the Unity asset file

The current game is made by Unity 2018.3.11f1 version
View the current Unity version from the asset bundle file

The current game is made by Unity 2018.4.13f1 version
The asset bundle will have a manifest text file corresponding to it, such as: suitcase_plastic_lootable.bundle.manifest
Unity PC game XXX_Data directory structure

ManagedDirectory: store unity engine, third-party and game logic hosting dll, such as: Assembly-CSharp.dll, Assembly-CSharp-firstpass.dll
MonoDirectory: Mono virtual machine related files
PluginsDirectory: Third-party Native dll library
Resourcesunity default resources: unity engine comes with default resources
Resourcesunity_builtin_extra: Built-in shader (such as Standard.shader), default material, etc. 99% of them are shader files
StreamingAssetsWindowsDirectory: The contents of the StreamingAssets folder in the project project will not be compressed and copied to this directory intact
globalgamemanagers: Overview and setting information of all gameobjects, shaders, monobehaviour scripts, mesh, material, transform, audio, texture, spirit, etc.
globalgamemanagers.assets: resources used in playersetting
resources.assets: The contents of the Resources folder in the project project will be packaged into this file, but if a resource is used by a scene, the resource will be stored in the sharedassets<0~n>.assets corresponding to the scene
level0, level1, level2, level44, level165: map level files, there are several maps corresponding to several level files
sharedassets0.assets, sharedassets1.assets, sharedassets2.assets, sharedassets44.assets, sharedassets165.assets: texture, material, shader, material, animator, monobehaviour script and other external resources referenced by each level
reference
[Decompile U3D] Decompile Unity Resources
The three tools for extracting game resources of the Unity3D Research Institute support Unity5 (84)
Analysis of Unity3D asset bundle format
What are the files after unity packaging