Colors can set the tone of scenes in your game. Using the right colors for the right atmosphere is important. When it comes to changing the color of an object, Unity has made it quite simple to do so, manually and programmatically.
Changing the color of a 3D object can simply be done by setting the Albedo (RGB value) of a material set in the Mesh Renderer component of the 3D object. A new Material must be created and set to the Mesh Renderer component to do this as you are not allowed to edit the default material. Changing color can also be done programmatically by setting the color value of the target material.
You can even change the color of a 3D object that has a texture applied to it. Let me get into the details on how to properly do this, both via the inspector in Unity Editor and via setting the color value programmatically through a script.
Table of Contents
- How To Change The Color Of A 3D Object In Unity
- How To Change The Color Of A 3D Object Programmatically In Unity
1. Create a 3D object
First of all, let’s create a simple 3D object, a cube. You can do this by right-clicking on the hierarchy window in the editor and selecting 3D Object > Cube.

This can also be done by clicking on the plus sign on the top-left corner of the hierarchy window and selecting 3D Object > Cube.
Let’s scale it up a bit so it’s easier to see. I set its scale on X-axis and Z-axis to 100 for this but you can set it to whatever you want as long as it’s easy to see.

2. Create a Material
Here you’ll see that the new cube we’ve created comes with a renderer component called Mesh Renderer, and it comes with a default material.

This default material cannot be edited. You need to create a new Material and use that instead.
To create a new Material, right-click on the project window and select Create > Material.

Alternatively, you can create a Material by clicking on the plus icon at the top-left corner of the project window and selecting Material.
3. Attach the material to the object’s Mesh Renderer component
Now, we attach the newly created Material to the object’s Mesh Renderer component by dragging and dropping it over the default material in the inspector window.

Once attached, it should look something like this:

4. Change the color
Click on the Material file in the project window to inspect its properties. You should be able to see something similar to this in the inspector window:

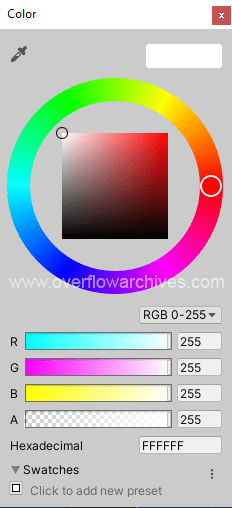
Click on the color picker (the white rectangle you see in the image above) next to the word “Albedo” and pick whatever color you want. You can also set how metallic and how smooth the object looks.

Adjust it until you get your desired result. Changes can be seen in real-time.

This also works on a textured 3D object. Take a look at this brick wall textured object:

When a color is applied to a textured object, the selected color will be applied on top of the texture.

And that’s it! Easy, right? Now, let’s take a look at how to do it via a script.
How To Change The Color Of A 3D Object Programmatically In Unity
It is possible to change the color of a 3D object programmatically. You can do so by setting the color value of the material attached to the object.
1. Create a 3D object
Here, let’s create a sphere. Right-click on the hierarchy window and select 3D Object > Sphere and you’ll get a nice and round 3D game object. Name it whatever you want.

2. Create a new script file and attach it to the object
Now we need to give the newly created object a script for it to run. Right-click on the project window and select Create > C# Script.

Alternatively, you can click on the plus icon at the top-left corner of the project window and select C# Script to create a script file.
Attach the script by dragging and dropping it onto the object in the hierarchy window. Confirm that the script is properly attached by looking in the inspector window of the object. If you can see the script there, you’re good to go.

Once you’ve confirmed that the script has been properly attached, double-click on the script file to open it and start coding.
3. Write the script
Let’s start coding! The color can be changed by setting the color value of the renderer’s material.
We’ll put the code inside the Start function so we can see the result as soon as the object finishes loading.
Code language: C# (cs)
using System.Collections; using System.Collections.Generic; using UnityEngine; public class Ball : MonoBehaviour { private Renderer mr; void Start() { // We want the renderer component of this object // so we call GetComponent<Renderer>() to get it. // In this case, it will return the Mesh Renderer // of this sphere object. mr = GetComponent<Renderer>(); // Set a new color to the material of the object. mr.material.color = new Color(1f, 0f, 1f, 1f); } }
Let me explain it in more detail.
Code language: C# (cs)
mr = GetComponent<Renderer>();
This gets the Renderer component of the object that this script is attached to. In our case, the Mesh Renderer component will be returned and stored in a variable.
Code language: C# (cs)
mr.material.color = new Color(1f, 0f, 1f, 1f);
This line sets the color of the material to pink. The Color class takes 4 parameters: Red, green, blue, and alpha (transparency), respectively. Each parameter can have a value from 0 to 1.
Code language: C# (cs)
new Color(red, green, blue, alpha);
Save the script file and go back to Unity Editor and run the game. You should be able to see the color changes as soon as the game starts.

Note that you don’t have to create a Material file and attach it to the renderer to change the color of an object via a script, but I recommend you to do it as it will give you more control.
And that is all! Let me know in the comment section below what you think, or if I miss anything.
Thank you for reading and happy coding!
Attribution
- Brick Wall texture by designer_thinks on Freepik
- Paint Bucket icon made by Smashicons from www.flaticon.com

Join the Discord. Talk about Game Dev. Talk about Gaming.
If you’ve ever wanted to write a script that could make your sprite flash a different colour or turn them transparent in Unity, there’s an easy way. I did this in various ways in my game Puzzledorf. One example is the fireworks that explode when you do something right:

Or making the Press Any Key text fade in and out on the Titlescreen, or the fading button highlights on the menus:

Sprite Renderer
You’re sprite is contained in a component called the Sprite Renderer.
![]()
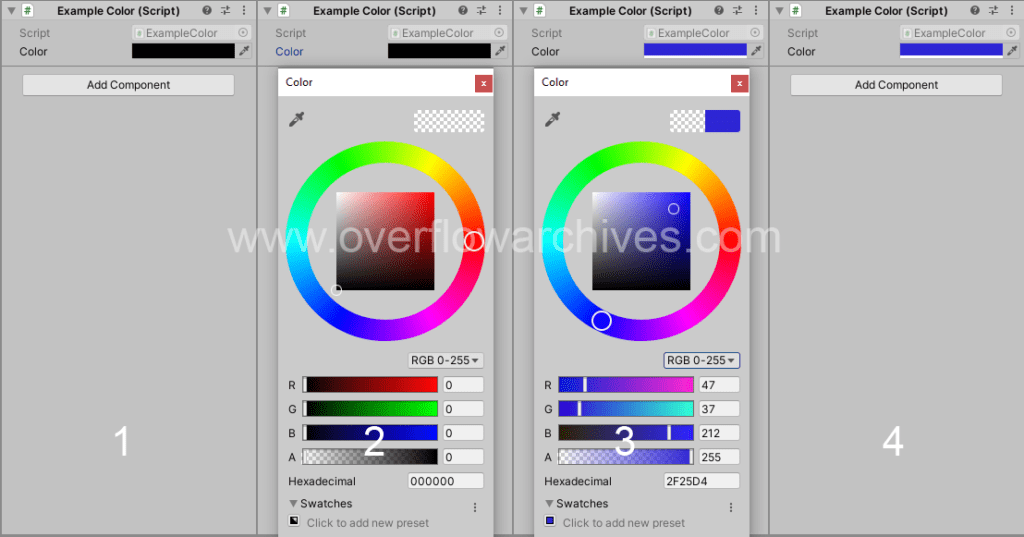
Now if you click on “Color”, you can manually change the sprites transparency in the colour changer by turning alpha down to 0, or tint the sprite by modifying how much red, blue and green is in the image.

Confusingly, if it’s set to all white, the sprite is its normal colour, while all black will make the sprite black. You’ll notice also that the colours range from 0 to 255, with 0 being no colour and 255 being full colour.
Now unfortunately if you turn blue and green off, the sprite won’t be all red, just tinted red. If you want to completely change colours, you’ll have to start with a white sprite, otherwise it will just tint.
Coding Colour Changes
To change the colour in a script, you will need to get the Sprite Renderer in your code, and then we can easily change it’s color property. (Color is the American spelling whereas colour is the Australian spelling).
Create a scene with a game object that has a sprite renderer / sprite attached. Then create a new script called ColourChange and add the following code:
    SpriteRenderer sprite;

    void Start()
    {
        sprite = GetComponent<SpriteRenderer>();
    }

    void Update()
    {
        if(Input.GetKeyDown(KeyCode.C))
        {
            // Change the 'color' property of the 'Sprite Renderer'
            sprite.color = new Color (1, 0, 0, 1);
        }
    }
The very first thing we do is create a variable to store the Sprite Renderer, and we call this sprite. Then in Start() we get the component for the Sprite Renderer, so this way we can access it’s color property. If your sprite is in a child game object of where you attached this script, instead of GetComponent, use GetComponentInChildren like this:
sprite = GetComponentInChildren<SpriteRenderer>();
Now in Update() we first of all check to see if the key C is being pressed on the keyboard. If you’re confused with how that works, read the Unity documentation on it here; it’s helpful.
Then we change the color property of our Sprite Renderer by creating a new Color. This literally just means we’re changing those same colour properties from earlier, but with code. It looks like this:
sprite.color = new Color (Red, Green, Blue, Alpha);
Confusingly, instead of being a value between 0 and 255, like it was in the editors colour changer, now we have to give it a value between 0 and 1 for each colour property, 0 being no colour, 1 being full colour for that property.
So in other words, if you run your game and test it now, it will tint your sprite red, because we told it to be:
- Full Red
- No Green
- No Blue
- Fully Visible
Likewise if we changed our colour property like this:
sprite.color = new Color (0, 1, 0, 1);
It would tint our sprite green. Try it.
Then if you did this:
sprite.color = new Color (1, 1, 1, 0);
Your sprite would be its normal colour, but it would be transparent, because we turned the alpha all of the way down. So that’s a nice way to make your sprite invisible, but still enabled.
You should be able to use this to create some nice effects in your games now like a character flashing when it’s hurt.
In this post, we will learn how to change/update the color of an image, text, and other 2D UI elements. Before going in-depth let’s have a brief on Unity’s Color. In Unity 3D the Color.color having the combination of RGB with an Alpha value which is responsible for the transparency of the color.
To create a color you need four input values like
r – Red color value
g – Green color value
b – Blue color value
a – Alpha value,
these values are range between 0 – 255 on the Unity’s color picker window.
RGB vs Hexadecimal Color
RGB is a color scope of light using Red, Green, and Blue to render the colors onscreen. RGB is the primary color that provides different colors when mixed. Hexadecimal color code is similar to the RGB combination but it mentioned with the hex value of RGB input. The first two digits represent the Red color, the third and fourth digits for Green color, the last two digits represent Blue color. In most programming tools the color input will be in hexadecimal value, also it is easy to handle the color combination.
Create Color in C#
To create a new color variable do the following
When using color code in C# the input value range from 0 – 1, the method can be used without alpha value also.
The above two example are using the RGB values, we can also use the Hexadecimal color code as following.
Parse Hexadecimal Color Code
To create color from the hexadecimal value we need to use a inbuilt method to handle.
ColorUtility.TryParseHtmlString helps to parse the hex color code to the color variable.
Create Color Variable in Unity Editor
To create a color variable from the Inspector you need to create a public variable for color.
Add pick your desire color from the color picker window.
Changing Color of UI Elements
To change the color of image, button, text and other UI elements first access the game object and update the color with new one.
Hope this post will helpful to you, Happy Coding!.
Итак у нас есть один блок и 8 картинок которые по каким нибудь причинам будут заменяться друг на друга. Для того чтобы писать логику поведения игрового объекта в Unity3D используются скрипты на языке программирования. Для моего примера возьмем язык C#.
Начнем в Assert Store ( хранилище ресурсов ) нажмем правую кнопку мыши и выберем из меню создать C# скрипт.
Unity3D попросит назвать этот скрипт. Назовем его Change по английски изменить. Как бы понятное название.
Далее выделим наш prefab Box добавим этот скрипт как компонент для этого жмем на кнопку
add componenet >> Scripts >> Change
Таким образом мы связали код который будет описан в этом файле с элементом Box. И при игре Unity3D будет выполнять различные команды описанные нами для этого элемента. Далее откроем код и будем его править. Для этого нажимаем двойным щелчком мыши по файлу Change он откроется в редакторе MonoDevelop либо какой настроен у Вас. Либо нажимаем правую клавишу мыши и выбираем пункт Open

Ура вот и сам код который для нас подготовила Unity3D автоматически
Стартовый код
using UnityEngine;
using System.Collections;
public class Change : MonoBehaviour {
// Функция срабатывает 1 раз при создании объекта
void Start () {
}
// Функция срабатывает каждый раз при обновлении экрана
void Update () {
}
}
Наши картинки они двухмерные и в параметрах когда Unity3D из вносила в реестр ресурсов она им выставила тип
![]()
Итак в теле нашего кода мы объявим динамический ( безразмерный ) массив в котором разместим все нужные нам для игры картинки. Для этого пишем следующий код.
Объявим список картинок
Теперь наш текст будет выглядеть следующим образом:
Объявляем массив картинок
using UnityEngine;
using System.Collections;
public class Change : MonoBehaviour {
//Объявим список картинок
public Sprite[] ImgList;
// Функция срабатывает 1 раз при создании объекта
void Start () {
}
// Функция срабатывает каждый раз при обновлении экрана
void Update () {
}
}
Сохраняем код и переходим обратно в окно Unity3D далее выделяем наш prefab который мы создали и видим что у скрипта появилось какое то значение.

Когда мы объявили массив картинок мы перед типом данных указали специальное слово Public которое заставляет опубликовать значения данной переменной для всеобщего обозрения. И теперь мы не только можем настроить параметры через редактор но и получать доступ к этим значениям из других игровых объектов но об этом позже.
А сейчас в параметре Size указываем размер массива картинок как мы помним их у нас 8 штук.

Unity3D автоматически создаст 8 элементов массива картинок. Далее чтобы окно не менялось при выделении других элементов в верхней его части нажмем кнопку замка и он примет форму закрытого замочка.

Далее смело выделяем мышкой наши картинки и тащим их на поля их в элементы созданного массива. Расстановка происходит следующим образом в нулевой элемент мы поместим Blank ( пустой ) пустую картинку а все остальные можно расставить так как хочется у меня получилось следующее.

Критично только нулевая ячейка так как она будет отображать пустое поле а остальные можно расставлять как угодно.
Отлично теперь в наш код добавим номер который будет обозначать какую картинку показывать в данный момент. Для этого возвращаемся обратно в скрипт Change и вписываем следующую строку. И снимаем замочек обратно чтобы разморозить окно.
Добавляем номер картинки
using UnityEngine;
using System.Collections;
public class Change : MonoBehaviour {
//Объявим список картинок
public Sprite[] ImgList;
//номер выбранного элемента массива
public int IndexImg=0;
// Функция срабатывает 1 раз при создании объекта
void Start () {
}
// Функция срабатывает каждый раз при обновлении экрана
void Update () {
}
}
Теперь нужно добавить код который будет менять картинку в зависимости от номера. Для этого нужно понять одно в Unity3D у каждого игрового объекта есть набор стандартных значений таких как позиция (Transform) в мире или имя объекта (name) или имя группы объекта (tag) но некоторые элементы такие как наши картинки или коды скриптов нужно получать через специальную команду которая может вернуть весь запрошенный элемент и далее позволит с ним что то сделать.
![]()
Итак наша картинка для Prefab является не стандартным компонентом поэтому будем ее получать следующим образом. Смотрим на название компонента как он называется в свойствах (Sprite Renderer) и пишем его без пробелов SpriteRenderer. Далее пишем название переменной в которую поместим этот компонент и пишем команду GetComponent<SpriteRenderer>(); она позволит нам получить данные.
Объявляем переменную для доступа к картинке
using UnityEngine;
using System.Collections;
public class Change : MonoBehaviour {
//Объявим список картинок
public Sprite[] ImgList;
//Объявляем переменную для доступа к картинке
SpriteRenderer Sprite;
//номер выбранного элемента массива
public int IndexImg=0;
// Функция срабатывает 1 раз при создании объекта
void Start () {
}
// Функция срабатывает каждый раз при обновлении экрана
void Update () {
}
}
Далее при создании нашего элемента в игре будем получать доступ к компоненту Sprite Renderer. Раньше это делать не имеет смысла. Для этого модифицируем функцию Start()
void Start()
// Функция срабатывает 1 раз при создании объекта
void Start () {
//получаем доступ к компоненту
Sprite = GetComponent<SpriteRenderer> ();
}
Ура у нас теперь есть переменная через которую мы можем задать картинку взятую из массива. Для этого в функции Update напишем следующий код.
Модифицируем функцию Update
// Функция срабатывает каждый раз при обновлении экрана
void Update () {
/*при обновлении экрана задаем картинку по номеру из списка*/
Sprite.sprite = ImgList [IndexImg];
}
Итак чего мы этим добились. Для того чтобы увидеть результат разместим наш Prefab в точке (0 0 0) как раз перед камерой.

И запустим проект. Если все написано верно то мы должны увидеть следующий результат.

Когда у нас параметр IndexImg равен 0 то мы ничего не видим потому что наша картинка полностью прозрачна. Далее мы можем прямо в режиме реально времени выбрать в окне Hierarchy наш Box мы увидим его параметры и значение IndexImg если поставить его на 1 то наша сцена уже преобразиться вот так:

Итак благодаря 1 параметру в котором мы можем менять значение от нуля до восьми мы меняем цвет нашего блока. Все это конечно хорошо но в игре цвет блока должен меняться случайным образом и это сейчас мы добавим. Итак теперь заходим снова в наш код Change и в функции Start добавим вызов функции которая будет генерировать случайное число от 1 до 8 таким образом при старте уровня каждый раз элемент будет окрашиваться в случайный цвет.
Создаем случайности
// Функция срабатывает 1 раз при создании объекта
void Start () {
/*получаем случайное число от 0 до 8*/
IndexImg = Random.Range (1, 8);
//получаем доступ к компоненту
Sprite = GetComponent<SpriteRenderer> ();
}
А для проверки рядом с нашим квадратиком набросаем еще несколько штук и посмотрим как работает. Как видим при запуске каждой фигуре назначен случайный цвет. Как раз то что нужно для создания карты.