Suggest a change
Success!
Thank you for helping us improve the quality of Unity Documentation. Although we cannot accept all submissions, we do read each suggested change from our users and will make updates where applicable.
Close
Submission failed
For some reason your suggested change could not be submitted. Please <a>try again</a> in a few minutes. And thank you for taking the time to help us improve the quality of Unity Documentation.
Close
Your name
Your email
Suggestion*
Cancel
Switch to Manual
Description
The world space position of the Transform.
The position property of a GameObject’s Transform, which is accessible in the Unity Editor and through scripts. Alter this value to move a GameObject. Get this value to locate the GameObject in 3D world space.
using UnityEngine;public class ExampleClass : MonoBehaviour
{
    //movement speed in units per second
    private float movementSpeed = 5f;    void Update()
    {
        //get the Input from Horizontal axis
        float horizontalInput = Input.GetAxis("Horizontal");
        //get the Input from Vertical axis
        float verticalInput = Input.GetAxis("Vertical");        //update the position
        transform.position = transform.position + new Vector3(horizontalInput * movementSpeed * Time.deltaTime, verticalInput * movementSpeed * Time.deltaTime, 0);        //output to log the position change
        Debug.Log(transform.position);
    }
}
The example gets the Input from Horizontal and Vertical axes, and moves the GameObject up/down or left/right by changing its position.
Как через скрипт поменять позицию компонента RectTransform
Привет, в канвасе есть картинка, нужно чтобы при нажатии на кнопку картинка переместилась, нужно менять позицию, не вращать, а перемещать, как можно через код все это дело реализовать?
Пример:
Public RectTransform Obj;
хочу у Obj менять позицию, а именно двигать Obj по осям: Left, Right, Top , Bottom , раньше вместо этих Left, Bottom, были X и Y итд.
- Shakhban
- UNIт
- Сообщения: 62
- Зарегистрирован: 01 ноя 2017, 04:33
Re: Как через скрипт поменять позицию компонента RectTransform
![]() lawson 03 дек 2018, 06:48
lawson 03 дек 2018, 06:48
Используется csharp
obj.transform.localPosition = new Vector2(100, 100);
- lawson
- UNIверсал
- Сообщения: 481
- Зарегистрирован: 14 сен 2012, 21:20
Re: Как через скрипт поменять позицию компонента RectTransform
![]() DimaJoke 03 дек 2018, 18:23
DimaJoke 03 дек 2018, 18:23
Попробуй где transform.position написать RectTransform.position, если честно-хз, как это именно надо в коде писать, но типо того.
Что бы повзрослеть, человек должен преодолеть ошибки юности.
Поэтому я снова здесь..
-

DimaJoke - UNITрон
- Сообщения: 293
- Зарегистрирован: 12 авг 2018, 18:59
- Откуда: Ульяновск
-
- Сайт

Re: Как через скрипт поменять позицию компонента RectTransform
![]() Shakhban 04 дек 2018, 00:39
Shakhban 04 дек 2018, 00:39
не выходит, даже пробовал obj.rect.Set (100,19,18,0); все равно ничего не работает, а obj.transform.localposition работает неправильно, на оф сайте про этот компонент ничего, только написано про якоря и прочью дичь которая уже устарела
- Shakhban
- UNIт
- Сообщения: 62
- Зарегистрирован: 01 ноя 2017, 04:33
Re: Как через скрипт поменять позицию компонента RectTransform
![]() Anonymyx 04 дек 2018, 01:11
Anonymyx 04 дек 2018, 01:11
С каких пор якоря устарели?
То что вы видите в инспекторе — значения смещения элемента относительно якоря, который вы установили. Установите якорь в центр, тогда вернутся Х и Y.
А раз там смещения, то очевидно за эти значения отвечают поля rectTransform.offsetMin и offsetMax.
-
Anonymyx - Адепт
- Сообщения: 1973
- Зарегистрирован: 05 апр 2015, 15:55

Re: Как через скрипт поменять позицию компонента RectTransform
![]() Shakhban 04 дек 2018, 02:02
Shakhban 04 дек 2018, 02:02
я хотел сказать что там про якоря, и про те вещи которые уже устарели, у них на скринах одно, а у меня в инспекторе другое
- Shakhban
- UNIт
- Сообщения: 62
- Зарегистрирован: 01 ноя 2017, 04:33
Re: Как через скрипт поменять позицию компонента RectTransform
![]() Shakhban 04 дек 2018, 21:23
Shakhban 04 дек 2018, 21:23
Вопрос закрыт, я разобрался с этим, как всегда методом тыка
- Shakhban
- UNIт
- Сообщения: 62
- Зарегистрирован: 01 ноя 2017, 04:33
Re: Как через скрипт поменять позицию компонента RectTransform
![]() Friend123 04 дек 2018, 23:44
Friend123 04 дек 2018, 23:44
Shakhban писал(а):Вопрос закрыт, я разобрался с этим, как всегда методом тыка
Признак хорошего тона на форуме — это писать решение проблемы, вдруг кому пригодится, вас еще и поблагодарят
-

Friend123 - Старожил
- Сообщения: 701
- Зарегистрирован: 26 фев 2012, 22:12
- Откуда: Тверь
-
- ICQ

Re: Как через скрипт поменять позицию компонента RectTransform
![]() Alex777 30 апр 2021, 17:18
Alex777 30 апр 2021, 17:18
Вот кому-то и пригодилось!)) Спасибо!
- Alex777
- UNец
- Сообщения: 6
- Зарегистрирован: 15 дек 2020, 12:30
Вернуться в Почемучка
Кто сейчас на конференции
Сейчас этот форум просматривают: Yandex [Bot] и гости: 17
Moving an object in Unity can be very straightforward.
It typically involves modifying the properties of an object’s Transform component, which is used to manage a game object’s scale, rotation and position in the world.
However, there are many different ways you can do that…
And while most methods of moving an object in Unity involve modifying the object’s Transform in some way, the exact method you use will vary depending on the type of movement you want to create.
But don’t worry, because in this article, you’ll learn how and when to use each of the different methods for moving an object in Unity, so that you can use the one that’s right for your project.
Here’s what you’ll find on this page:
- How to move an object in Unity
- How to use Transform Translate in Unity
- How to move an object with the keyboard in Unity
- How to move an object, relative to the camera
- How to move an object to a position in Unity
- How to move an object to a position at a set speed (using Move Towards)
- How to move an object to a position in a set time (using Lerp)
- How to move an object to a position using animation
- How to move an object using physics
Let’s get started.
Moving Objects in Unity explained (video)
For a general overview of how to move objects in Unity try my video, or continue to the full article below.
How to move an object in Unity
The most straightforward method of changing an object’s position in Unity is to set it directly, which will instantly move it to a new vector 3 position in the world.
This works by setting the Position property of an object’s Transform component to a new position.
Like this:
// Moves an object to the set position
transform.position = new Vector3(10, 0, 5);
Or you can add a vector to an object’s position, to move it by a set amount in a specific direction.
Like this:
// Moves an object up 2 units
transform.position += new Vector3(0, 2, 0);
Which looks like this:

Adding a vector to an object’s position moves it by that amount.
It’s possible to modify the properties of an object’s Transform from a script that’s attached to it by using the Transform Property:
Transform myTransform = transform;The Transform property, which is typed with a lower case ‘t’, allows you to reference the Transform component of an object from a script that’s attached to it, without getting a reference to it first.
Which is useful, as it allows you to easily reference, or change, an object’s own position from a script.
Like this:
Vector3 myPosition = transform.position;Modifying a Transform’s position is the most straightforward method of creating movement in Unity.
Either by modifying it directly, over time, or by using the Translate function which allows you to move an object in a specific direction.
How to use Transform Translate in Unity
The Translate function in Unity moves an object by a set amount, relative to its current position and orientation.
Like this:
void Start()
{
    // Moves the object forward two units.
    transform.Translate(0,0,2);
}
This is different to simply adding a vector to the object’s position, which would move it relative to world space, while Translate will, by default, move an object relative to its own local space.
This means that, when using Translate, passing in a forward vector will move the object in the direction of its blue axis, the Z-Axis.
When it’s called once, Translate moves an object by a set amount one time.
However, by calling it every frame, it’s possible to create continuous movement.
Like this:
void Update()
{
    // Moves the object forward two units every frame.
    transform.Translate(0,0,2);
}
However, there’s a problem with this method.
Because framerates vary between devices and, because each frame often takes a different amount of time to process than the last, the speed of an object’s movement would change depending on the framerate when moving an object in this way.
Instead, multiplying the movement amount by Time.deltaTime, which is the amount of time since the last frame, creates consistent movement that’s measured in units per second.
Like this:
void Update()
{
    // Moves the object forward at two units per second.
    transform.position = new Vector3(0,0,2) * Time.deltaTime;
}
Which looks like this:

Adding a scaled vector over time creates movement.
This works fine, however, it can sometimes be more convenient to manage movement direction and speed separately, by using a Unit Vector to determine the direction and a separate float value to control the speed.
Like this:
public float speed = 2;
void Update()
{
    // Moves the object forward at two units per second.
    transform.Translate(Vector3.forward * speed * Time.deltaTime);
}
This has the same effect as manually typing out the vector, except that the speed is now separate and can easily be changed.
In this example, Vector3.forward is shorthand for (0,0,1) which is the forward direction in world space.
Multiplying Vector3.forward by the speed value, in this case 2, creates the vector (0,0,2) which, when multiplied by Delta Time, creates a forward movement of two units per second.
The result is the same as when manually typing out the vector, except that the speed is now separate and can easily be controlled.
Direction vectors in Unity
A normalised vector, or unit vector, in Unity is simply a vector with a length of 1 that describes a direction. For example the unit vector (0,0,1) describes the forward direction in world space.
Normalised vectors can be extremely useful for calculating distance and speed.
For example, you could multiply a unit vector by 10 to get a position that’s ten units away in a certain direction.
Or you can multiply a vector by a speed value and by Delta Time to create movement at an exact speed in units per second.
While you can type unit vectors manually, you’ll find a number of shorthand expressions for common directional vectors in the Vector 3 class.
For example:
Vector3.forward   // (0,  0,  1)
Vector3.back      // (0,  0,  -1)
Vector3.up        // (0,  1,  0)
Vector3.down      // (0,  -1, 0)
Vector3.right     // (1,  0,  0)
Vector3.left      // (-1, 0,  0)
These relate to common directions in world space, however, it’s also possible to get a normalised direction vector relative to an object’s local position and rotation.
Like this:
transform.forward  // object forward
-transform.forward // object back
transform.up       // object up
-transform.up      // object down
transform.right    // object right
-transform.right   // object left
These can be extremely useful for creating object relative movement.
Such as moving an object forward in the direction that it’s facing.
Like this:
public float speed = 2;
void Update()
{
    // Moves an object forward, relative to its own rotation.
    transform.position += transform.forward * speed * Time.deltaTime;
}
In this case, the object is still moving forward at a speed of two units per second.
The difference is that the direction is based on the object’s orientation, not the world. Which means that if the object rotates, it’ll turn as it moves.
However…
While using a Transform’s local directions can be useful for getting the orientation of a specific object, some functions already operate in local space by default.
Such as the Translate function which, by default, applies movement relative to the object’s local position and orientation, unless you set otherwise.
Which means that, if you use transform.forward with the Translate function, you’ll get a compounded effect, where turning the object throws off its forward vector.
Creating object-relative movement in this way can be useful for adding player controls, where the player can move an object forward, backwards or sideways using input axes, such as from the keyboard.
How to move an object with the keyboard in Unity
To move an object with the keyboard, or with any other input device, simply multiply the direction of movement you want to apply, such as forward, for example, by the Input Axis you want to use to control it.
In Unity, when using the default Input Manager, you’ll find an Input Axis for Horizontal and Vertical movement already set up and mapped to the WASD keys and arrow keys on the keyboard.
- Input in Unity made easy (a complete guide to the new system)
Each axis returns a value between -1 and 1, which means that you can use the value that’s returned to create a movement vector.
Like this:
public float speed = 2;
void Update()
{
    float x = Input.GetAxis("Horizontal");
    float z = Input.GetAxis("Vertical");
    Vector3 movement = new Vector3(x, 0, z);
    transform.Translate(movement * speed * Time.deltaTime);
}
This allows you to create object-relative movement controls using the keyboard or any other input device.
Which looks like this:

The Horizontal and Vertical input axes can be used to create movement control.
Even movement controls with Clamp Magnitude
When moving an object using horizontal and vertical axes it’s possible to create diagonal movement that is faster than the speed of movement of a single axis.
This is because the length of the vector that’s created from a forward vector of 1 and a sideways vector of 1 is longer than either one on their own, at around 1.4.
Which means that holding forward and right on a keyboard, for example, would move the player 1.4 times faster than just moving forwards or sideways alone, causing uneven 8-way movement.
So how can you fix it?
One option is to normalise the vector, like this:
Vector3 movement = new Vector3(x, 0, z).normalized;However, while this does work, it means that the length of the vector is always one, meaning that any value less than one, such as analogue movements, or the gradual acceleration that Unity applies to digital axis inputs, is always rounded up to one, no matter what.
This might not be a problem for your game if, for example, you’re using the Raw Input values and are deliberately creating tight digital controls.
Otherwise, to also support values that are lower than 1, you can limit the length of the vector instead, using Clamp Magnitude.
Like this:
public float speed = 2;
void Update()
{
    float x = Input.GetAxis("Horizontal");
    float z = Input.GetAxis("Vertical");
    Vector3 movement = new Vector3(x, 0, z);
    movement = Vector3.ClampMagnitude(movement, 1);
    transform.Translate(movement * speed * Time.deltaTime);
}
This will limit the length of the vector to one, while leaving lower values intact, allowing you to create analogue 8-way movement that’s even in all directions.
The Translate function creates movement that’s relative to the Transform component that it’s called from.
However, you may not always want to create player-relative movement.
So how can you move an object in a direction that’s relative to a different object, such as the camera, for example?
How to move an object, relative to the camera
It’s possible to move an object relative to the position of the camera in Unity by using the camera’s forward vector in place of the object’s forward vector.
Like this:
public float speed = 2;
void Update()
{
    Transform camTransform = Camera.main.transform;
    Vector3 forwardMovement = camTransform.forward * Input.GetAxis("Vertical");
    Vector3 horizontalMovement = camTransform.right * Input.GetAxis("Horizontal");
    Vector3 movement = Vector3.ClampMagnitude(forwardMovement + horizontalMovement,1);
    transform.Translate(movement * speed * Time.deltaTime, Space.World);
}
Because the movement is relative to the camera’s position, the Relative To parameter in the Translate function needs to be set to World Space for this to work.
However, there’s a problem…
The forward vector of the camera may, in some cases, be facing at an angle, down towards the player, meaning that any movement that’s applied will also push downwards, instead of along a flat plane, as you might expect.
To fix this, you’ll need to manually calculate the direction between the camera and the object, while leaving out any rotation that you want to ignore.
To calculate a direction, all you need to do is subtract the position of the origin from the position of the target and then, normalise the result.
Like this:
Vector3 direction = (transform.position - Camera.main.transform.position).normalized;To ignore the difference in height between the camera and the object it’s looking at, simply create a new Vector 3 that replaces the camera’s height with the object’s instead.
Like this:
Transform camTransform = Camera.main.transform;
Vector3 camPosition = new Vector3(
    camTransform.position.x,
    transform.position.y,
    camTransform.position.z);
Vector3 direction = (transform.position - camPosition).normalized;
This will return a direction that is looking towards the object, but isn’t looking up or down.
You can then use the corrected direction that’s created to calculate movement that’s relative to the camera on a flat plane.
Like this:
public float speed = 2;
void Update()
{
    Transform camTransform = Camera.main.transform;
    Vector3 camPosition = new Vector3(camTransform.position.x, transform.position.y, camTransform.position.z);
    Vector3 direction = (transform.position - camPosition).normalized;
    Vector3 forwardMovement = direction * Input.GetAxis("Vertical");
    Vector3 horizontalMovement = camTransform.right * Input.GetAxis("Horizontal");
    Vector3 movement = Vector3.ClampMagnitude(forwardMovement + horizontalMovement, 1);
    transform.Translate(movement * speed * Time.deltaTime, Space.World);
}
Which looks like this:
You can create camera relative movement by using the camera’s forward direction in place of the object’s.
By understanding the relative direction of an object, it’s possible to create any kind of movement control that you want.
However, a lot of the time, you may want to move an object in a different way, that’s not directly controlled by the player.
For example, moving an object to a set position or towards another object.
How to move an object to a position in Unity
Generally speaking, there are two different ways to move an object into a specific position.
- By speed, where the object moves towards a target at a specific speed,
- By time, where the movement between the two points takes a specific amount of time to complete.
The method you use will depend on how you want to control the object’s movement, by time or by speed.
Here’s how both methods work…
How to move an object to a position at a set speed (using Move Towards)
It’s possible to move an object towards another object or a specific position in the scene using the Move Towards function.
Move Towards is a function of the Vector 3 Class that will modify a Vector 3 value to move towards a target at a set speed without overshooting.
Which works great for moving an object towards a position in the world at a speed you can control.
Like this:
public Vector3 targetPosition;
public float speed=10;
void Update()
{
    transform.position = Vector3.MoveTowards(transform.position, targetPosition, speed * Time.deltaTime);
}
The movement can also be smoothed, by using the Smooth Damp function, which eases the movement as it starts and ends.
Like this:
public Vector3 targetPosition;
public float smoothTime = 0.5f;
public float speed = 10;
Vector3 velocity;
void Update()
{
    transform.position = Vector3.SmoothDamp(transform.position, targetPosition, ref velocity, smoothTime, speed);
}
This works by setting the position of the object to the Vector 3 result of the Smooth Damp function, passing in a target, the current position and a reference Vector 3 value, which the function uses to process the velocity of the object between frames.
This can be useful for smoothed continuous movement, where the target position may change from one moment to the next such as when following the player with a camera.
Such as in this example of a smooth camera follow script using Smooth Damp:
public Transform player;
public float cameraDistance = 5;
public float cameraHeight = 3;
public float smoothTime = 0.5f;
public float speed = 10;
Vector3 velocity;
void Update()
{
    transform.LookAt(player.transform);
    Vector3 offset = (Camera.main.transform.position - player.position).normalized * cameraDistance;
    Vector3 targetPosition = player.position + offset;
    targetPosition.y = cameraHeight;
    transform.position = Vector3.SmoothDamp(transform.position, targetPosition, ref velocity, smoothTime, speed);
}
In this example, the camera will smoothly move towards the player and turn to face them, while keeping at a height of 3 units and trying to stay at a distance of 5 units away.
Move Towards works great as a way to move an object towards a position dynamically.
This is because the movement is speed-based, and can be controlled even if the target position moves or is unknown.
However, there are many times where you may simply want to move an object to a known position over a set period of time.
Such as moving a platform, or opening a door.
So how so you create time-based movement in Unity?
How to move an object to a position in a set time (using Lerp)
Lerp, or Linear Interpolation, is used to find a value between a minimum and maximum based on a position value, ‘t’, which is a float between zero and one.
The value that’s returned depends on the value of t where, if t is 0 the minimum value is returned, while 1 returns the maximum value.
Any other value in-between 0 and 1 will return a representative value between the minimum and maximum ends of the scale.
float lerpedValue = Mathf.Lerp(float minValue, float maxValue, float t);Typically, Lerp is used to change a value over a period of time, by incrementing t every frame to return a new value on the scale.
This can be used to change a colour, fade an audio source or move an object between two points.
- The right way to use Lerp in Unity (with examples)
It works by passing in the amount of time that has elapsed during the Lerp, divided by the total duration. This returns a 0-1 float that can be used for the t value, and allows you to control the length of the Lerp movement by simply choosing how long you’d like it to take.
Like this:
float timeElapsed;
float lerpDuration = 3;
float lerpedValue;
void Update()
{
  if (timeElapsed < lerpDuration)
  {
    lerpedValue = Mathf.Lerp(0, 100, timeElapsed / lerpDuration);
    timeElapsed += Time.deltaTime;
  }
}
Vector3.Lerp works in the same way except that, instead of returning a float, it returns a point in the world between two others, based on the t value.
This can be useful for moving an object between two different positions, such as a door with an open and closed state.
Like this:
public float openHeight = 4.5f;
public float duration = 1;
bool doorOpen;
Vector3 closePosition;
void Start()
{
    // Sets the first position of the door as it's closed position.
    closePosition = transform.position;
}
void OperateDoor()
{
    StopAllCoroutines();
    if (!doorOpen)
    {
        Vector3 openPosition = closePosition + Vector3.up * openHeight;
        StartCoroutine(MoveDoor(openPosition));
    }
    else
    {
        StartCoroutine(MoveDoor(closePosition));
    }
    doorOpen = !doorOpen;
}
IEnumerator MoveDoor(Vector3 targetPosition)
{
    float timeElapsed = 0;
    Vector3 startPosition = transform.position;
    while (timeElapsed < duration)
    {
        transform.position = Vector3.Lerp(startPosition, targetPosition, timeElapsed / duration);
        timeElapsed += Time.deltaTime;
        yield return null;
    }
    transform.position = targetPosition;
}
In this example, I’ve used a coroutine to move the door object up by a set distance from the door’s starting position, whenever the Operate Door function is called.
Which looks like this:

Lerp can be used to move an object between two states, such as the open and closed positions of a door.
This creates a linear movement from one position to another, however, it’s also possible to smooth the Lerp’s movement using the Smooth Step function.
This works by modifying the t value with the Smooth Step function before passing it into Lerp.
Like this:
float t = Mathf.SmoothStep(0, 1, timeElapsed / moveDuration);This will ease the movement of the object at the beginning and end of the Lerp.
How to move an object to a position using animation
Depending on how you’d like to control the movement of objects in your game, it can sometimes be easier to simply animate the object you’d like to move.
This typically involves modifying properties of an object and storing them in Keyframes, which are then smoothly animated between over time.
For example, you could use animation to move an object between two points, such as a floating platform.
This would need three Keyframes to work, one for the starting position, another for the platform’s end position and a final Keyframe to return the platform to its original position, looping the animation.
To animate an object you’ll need to add an Animator and an Animation Clip, which you can do from the Animation window.

Next, select a position on the Animation Timeline, this will be the position of the 2nd Keyframe, when the platform is furthest away..
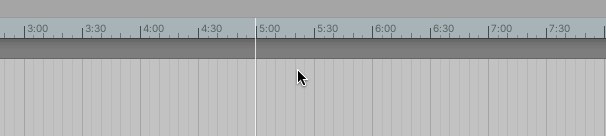
Assuming that, at zero seconds, the platform is at its starting position, this will be the halfway point of the animation which, in this case, is 5 seconds.
Next, enable Keyframe Recording by clicking the record button:
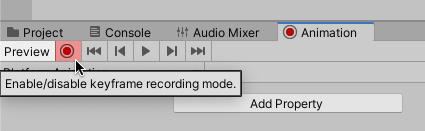
While Keyframe Recording is enabled, any changes you make to an object will be saved to a Keyframe at that timeline position, such as changing its position:

Create a final Keyframe at ten seconds, setting the object’s position to its original values to complete the animation (remembering to disable Keyframe Recording when you’re finished).
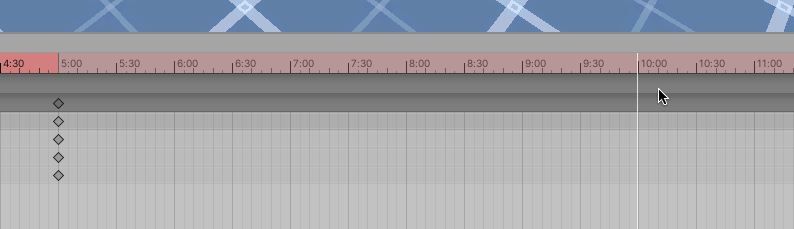
The end result is a platform that moves smoothly, and automatically, between its Keyframe positions.
These methods work well for creating controlled precise movements in Unity.
But, what if you don’t want to control an object’s movement precisely?
What if you’d rather push, pull or throw an object, to create movement using physical forces instead?
How to move an object using physics
Most rendered objects in Unity have a Collider component attached to them, which gives them a physical presence in the world.
However, an object with only a Collider is considered to be static, meaning that, generally speaking, it’s not supposed to move.
To actually move an object under physics simulation, you’ll also need to add a Rigidbody component to it, which allows it to move, and be moved, by physical forces, such as gravity.
You can also move a physics object by applying force to its Rigidbody using the Add Force function.
Like this:
Rigidbody.AddForce(Vector3 force);This works in a similar way to the Translate function except that the vector you pass in is a physical force, not a movement amount.
How much the object moves as a result will depend on physical properties such as mass, drag and gravity.
There are two main ways to apply physical force on an object.
You can either apply force continuously, building momentum and speed over time, or all at once in an impulse, like hitting an object to move it.
By default, the Add Force function applies a continuous force, like a thruster gradually lifting a rocket.
Like this:
public Rigidbody rb;
public float forceAmount = 10;
void FixedUpdate()
{
    rb.AddForce(Vector3.up * forceAmount);
}
Notice that I’ve used Fixed Update, and not Update, to apply the force to the object.
This is because Fixed Update is called in sync with the physics system, which runs at a different frequency to Update, which is often faster and can vary from frame to frame.
Doing it this way means that the application of force is in sync with the physics system that it affects.
Alternatively, you can also apply force in a single burst, using the Impulse Force Mode.
Like this:
public Rigidbody rb;
public float forceAmount = 10;
void Start()
{
    rb.AddForce(Vector3.up * forceAmount, ForceMode.Impulse);
}
This will apply an amount of force to an object all at once:

Add Force can be used to push objects gradually, or apply force in a single hit, like this.
Which can be useful for faster, more explosive movements, such as making an object jump.
- How to jump in Unity (with or without physics)
Now it’s your turn
How are you moving objects in your game?
Are you moving them using their Transform components?
Or are you moving them with physics?
And what have you learned about moving objects in Unity that you know others will find helpful?
Whatever it is, let me know by leaving a comment.

Get Game Development Tips, Straight to Your inbox
Get helpful tips & tricks and master game development basics the easy way, with deep-dive tutorials and guides.
My favourite time-saving Unity assets
Rewired (the best input management system)
Rewired is an input management asset that extends Unity’s default input system, the Input Manager, adding much needed improvements and support for modern devices. Put simply, it’s much more advanced than the default Input Manager and more reliable than Unity’s new Input System. When I tested both systems, I found Rewired to be surprisingly easy to use and fully featured, so I can understand why everyone loves it.
DOTween Pro (should be built into Unity)
An asset so useful, it should already be built into Unity. Except it’s not. DOTween Pro is an animation and timing tool that allows you to animate anything in Unity. You can move, fade, scale, rotate without writing Coroutines or Lerp functions.
Easy Save (there’s no reason not to use it)
Easy Save makes managing game saves and file serialization extremely easy in Unity. So much so that, for the time it would take to build a save system, vs the cost of buying Easy Save, I don’t recommend making your own save system since Easy Save already exists.
Movement is one of the most common things you will need to know more about when it comes to frameworks and engines.
This is the reason I’ve decided to do a small write up of the most common ways on how to move a object.
The most common way of moving objects in Unity is to set transform.position to a Vector2 or a Vector3. This will change the position of the GameObject that holds the component from which the code is called from. But it is also possible to call transform.Translate(vector), which will add the vector the current position. In order to move a object towards another position you can use a several methods that are callable on the Vector3 or Vector2 structs. Such as Vector3.MoveTowards(a,b,distance) or Vector3.Lerp(a,b,t). A example of moving a object to a point would be “transform.position = Vector3.MoveTowards(transform.position, point, Time.Deltatime * speed);”. People also often use libraries to move objects, an example of a good tweening library would be DOTween.
setting transform.position
The quickest way to move a object to a specific position is to set the transform.position field.
This will change the position of the game object that the component is attached to.
Another way of moving the object, opposed to setting it’s position is to call transform.Translate(direction).
| using UnityEngine; | |
| public class MoveObject : MonoBehaviour | |
| { | |
| void Start() | |
| { | |
| // Changes the position to x:1, y:1, z:0 | |
| transform.position = new Vector3(1, 1, 0); | |
| // It is also possible to set the position with a Vector2 | |
| // This automatically sets the Z axis to 0 | |
| transform.position = new Vector2(1, 1); | |
| // Moving object on a single axis | |
| Vector3 newPosition = transform.position; // We store the current position | |
| newPosition.y = 100; // We set a axis, in this case the y axis | |
| transform.position = newPosition; // We pass it back | |
| } | |
| private void Update() | |
| { | |
| // We add +1 to the x axis every frame. | |
| // Time.deltaTime is the time it took to complete the last frame | |
| // The result of this is that the object moves one unit on the x axis every second | |
| transform.position += new Vector3(1 * Time.deltaTime, 0, 0); | |
| } | |
| } |
EASY WAY TO SET SINGLE AXIS USING EXTENTION METHODS
In case you want to move a object on a single axis, and don’t want to create a local variable each time you do it. You can use extention methods. Extention methods give extended functionality to existing classes and structs. These are useful particually since some classes are not modifyable within Unity. Such as the Vector3 struct.
When you import the script below, you are able to set the X position of a object to 20 by calling:
transform.SetX(20);
| using UnityEngine; | |
| public static class TransformExtentions | |
| { | |
| public static void SetX(this Transform transform, float x) | |
| { | |
| transform.position = new Vector3(x, transform.position.y, transform.position.z); | |
| } | |
| public static void SetY(this Transform transform, float y) | |
| { | |
| transform.position = new Vector3(transform.position.x, y, transform.position.z); | |
| } | |
| public static void SetZ(this Transform transform, float z) | |
| { | |
| transform.position = new Vector3(transform.position.x, transform.position.y, z); | |
| } | |
| } |
using Vector3.Movetowards
Sometimes you want an object to move to a specific destination. Vector3.Movetowards is the simplest way of achieving this.
You specify your initial point from which you want to move. And the point which you want to move toward, along with a variable that specifys at what speed it should move.
| using UnityEngine; | |
| public class MoveTowardsExample : MonoBehaviour | |
| { | |
| [SerializeField] private Vector3 target = new Vector3(1, 1, 1); | |
| [SerializeField] private float speed = 1; | |
| private void Update() | |
| { | |
| // Moves the object to target position | |
| transform.position = Vector3.MoveTowards(transform.position, target, Time.deltaTime * speed); | |
| } | |
| } |
Linear interpolation with Vector3.LERP
How linear interpolation works is that it interpolates between two points. A, B based on a input value (T).
So for example A:0, B:10, and T: 0.5 would return the value of 5.
This is often used in a wrong way by developers, this is because they call Vector3.Lerp(posA,posB, Time.Deltatime).
Which results in a object that eases towards the target, without ever fully reaching it.
Calling it in that way would be the same as calling transform.position += distance* 0.1f; .
Constantly adding a portion of the remaining distance, which will eventually be 0.052131 and then 0.025… etc.
The example given below is the correct way to make a object move from point A to B.
As a addition to this I’ve also included the code on how this function is made.
| using UnityEngine; | |
| public class LerpExample : MonoBehaviour | |
| { | |
| [SerializeField] private Vector3 pointA = new Vector3(—2, 0, 0); | |
| [SerializeField] private Vector3 pointB = new Vector3(2, 0, 0); | |
| [SerializeField] private float speed = 1; | |
| private float t; | |
| private void Update() | |
| { | |
| t += Time.deltaTime * speed; | |
| // Moves the object to target position | |
| transform.position = Vector3.Lerp(pointA, pointB, t); | |
| // Flip the points once it has reached the target | |
| if (t >= 1) | |
| { | |
| var b = pointB; | |
| var a = pointA; | |
| pointA = b; | |
| pointB = a; | |
| t = 0; | |
| } | |
| } | |
| // What Linear interpolation actually looks like in terms of code | |
| private Vector3 CustomLerp(Vector3 a, Vector3 b, float t) | |
| { | |
| return a * (1 — t) + b * t; | |
| } | |
| } |
Using the easing functions script below (Click on view raw to see full script), you can ease the t value.
Which you would write like this: Vector3.Lerp(pointA, pointB, Easing.Quadratic.InOut(t)); This will make the movement of the object very smooth as displayed below.
| */ | |
| public delegate float EasingFunction(float k); | |
| public class Easing | |
| { | |
| public static float Linear (float k) { | |
| return k; | |
| } | |
| public class Quadratic | |
| { | |
| public static float In (float k) { | |
| return k*k; | |
| } | |
| public static float Out (float k) { | |
| return k*(2f — k); | |
| } | |
PLUGIN TO MAKE IT EASY: DOTween
Personally when I’m working I don’t like to spend more time then necessary on movement code. Preferably I move a object within a single line of code.
This is why I like to use easing libraries. DoTween is my favourite so far, and I implement it in almost any game I develop for. Including MASKED, Tiny Gems and BOXKILL. It won’t be used in any of the templates I put on the asset store. This is because it adds complexity for the users.
Aside from moving objects it also helps with scale, rotation, fading of canvas groups. And many other things.
So I definitely reccomend it to take a look. They also have a free version of the plugin available with less features.
As an example, I’ve written the same code as above, but then in DOTween. As you can see it requires less code to get the same results.
It also has the benefit that you don’t have to use many Update() loops in your game, which results in less overhead.
| using DG.Tweening; | |
| using UnityEngine; | |
| public class DoTweenLerpExample : MonoBehaviour | |
| { | |
| [SerializeField] private Vector3 pointA = new Vector3(—2, 0, 0); | |
| [SerializeField] private Vector3 pointB = new Vector3(2, 0, 0); | |
| [SerializeField] private float speed = 1; | |
| private void Start() | |
| { | |
| transform.position = pointA; | |
| Tweener tweener = transform.DOMove(pointB, speed); | |
| tweener.SetEase(Ease.InOutQuad); | |
| tweener.SetLoops(int.MaxValue, LoopType.Yoyo); | |
| } | |
| } |
There’s many ways to move objects in Unity and this guide explains how and when each option is best used.
This guide focuses on setting object positions. Rotation and scale are only briefly mentioned but still give a basic overview allowing you to manipulate them too!
Transform Component
All game objects in Unity have a transform component. This is used to store the position, rotation and scale of your object. The transform can be read to get this information, or can be set which will change the position, rotation or scale of the game object in the scene.
You can interact with a transform component in a script by either directly assigning a Transform to a variable or if you have a Game Object variable you can access the transform component with myObject.transform.
Setting the position of a transform overview
Once you have a variable referencing the target transform there’s a few ways you can move it. These methods are explained in more detail below!
- Directly set the position property to change the world position of the object.
- Directly set the localPosition property to change the local position of the object.
- Use the translate method to move the object a certain direction and distance.
- Attach an object to another object to be moved as a group. (parenting)
Directly moving a transform to a world position
The world position is a location in the scene which is always the same, no matter where your gameobjects are or the depth of your objects. For example X:0, Y:0, Z:0 will always be the same position in the center of the world.
To set the world position you use the position property and simply set it to a vector3 type.
transform.position = new Vector3(120f, 50f, 45f);
This example will instantly move your object to X:120, Y:50 and Z:45 in world space. It sets the position of the transform to a new Vector3 variable (which is a variable type which stores X, Y and Z coordinates used for positioning in 3D space) and we’re initializing the variable with the defined X, Y and Z values.
If you’re wanting to slowly move objects in unity into a position rather than instantly teleport then check out this guide which explains lerping and interpolation in more detail! https://www.unity3dtips.com/unity-fix-movement-stutter/
Directly moving a transform to a local position
Before explaining more about local positions you need to understand how depth, parents and children work in Unity. The local position is a position which is different depending on the location of the parents. (which allows you to do movement within a separate space, such as moving an object inside a moving spaceship without recalculating position based on the spaceship position)
To set the local position of an object similarly to setting the world position you assign a vector3 value, however this vector3 is relative to the center of the object parents rather than the center of the world.
transform.localPosition = new Vector3(120f, 50f, 45f);
Using the car hierarchy example from above as an example, if we were setting the localPosition of the ‘Parts’ object here and the parent ‘Car’ object was positioned at X:50, Y0, Z:0 in world space then our ‘Parts’ object would end up being positioned at X:170, Y:50, Z:45 in world space.
How Unity depth works (parenting and child gameobjects)
In your Unity hierarchy gameobjects can be put inside each other (either by directly dragging them on to each other or via scripting). An object inside another object it is called the child and the containing object is called the parent. (and the process of moving an object inside another object is called parenting)
 Explanation of a colour coded screenshot of a Unity hierarchy for a car
 Explanation of a colour coded screenshot of a Unity hierarchy for a car
- The lowest depth; depth 0 is marked with green. This is the root of our car and all other objects used with the car are children of the car object. If we moved the car around the scene all the children will move with it too.
- Depth 1 gameobjects are marked in blue. In the example they’re being used to sort the different categories of components the car needs. This is useful to keep the hierarchy clean so it’s easier to work with as well as allowing you to move, rotate, scale or disable each of the object groups (for example if you wanted to completely disable lights for the lowest quality setting in your game you could just .SetActive(false); the Lights gameobject.
- Depth 2 are marked in orange. These objects are used as some of the final depths in some cases but where there’s multiple objects which should be grouped together I decided to use them as another grouping object to keep the hierarchy organized.
- Finally depth 3 are marked with red. These are objects which are/could be multiple similar objects placed at different positions on the car. I could have taken the depth even further too if I wanted to group objects even further such as having front and rear lights in their own groups too!
Moving an object with the Transform Translate method
The translate method allows you to move an object based on direction and distance. You can also set whether you want to move in local or world space with the second Space parameter.
The main parameter of the translate method is the translation which is a Vector3 value defining how much your object should move from its current position.
First you need to know which direction you want to move in. You can either use a world direction such as Vector3.forward, Vector3.right or Vector3.up or a local direction relative to an existing transform such as myTransform.forward, myTransform.right or myTransform.up (Use a negative value to reverse the direction, -myTransform.forward is backwards relative to the object for example)
Once you have the direction you want to move in you then need to multiply it by your distance.
myTransform.Translate(myTransform.forward * 10f);
This will move the target transform forward by 10 meters.
Rigidbody Component
Rigidbody components are used when you want to give your objects physics. You add them manually in the inspector by adding the rigidbody component to a gameobject and reference them in scripts by either assigning a public Rigidbody variable or by calling GetComponent<Rigidbody>() from the gameobject or transform which the rigidbody component is attached to.
Directly set the rigidbody position
Similarly to setting the transform position, rigidbodies have position and localPosition properties which will directly move the object into world or local positions. HOWEVER this isn’t just a shortcut to setting the transform position! It uses the physics engine to set the position of the rigidbody and will update the transform position in the next physics update. You can read more about physics and timesteps here: https://www.unity3dtips.com/unity-fix-movement-stutter/
Using the rigidbody MovePosition method
The rigidbody MovePosition method uses the interpolation mode set on the rigidbody to move the rigidbody into the requested position over time, generally you would call it per FixedUpdate() and the value would change per frame with a value similar to how the transform translation method works.
myRigidbody.MovePosition(myTransform.position + myTransform.forward * 10f);
This will move the target rigidbody forward by 10 meters. Realistically the 10 value here would be multiplied by deltatime to gain a smooth movement, for more information check out this guide which explains this in more detail: https://www.unity3dtips.com/unity-fix-movement-stutter/
Using the rigidbody AddForce method
Adding force to a rigidbody works like you might expect by adding a thrust in a certain direction. Note that if your rigidbody has gravity enabled then your force will be fighting against gravity.
myRigidbody.AddForce(myTransform.forward * 10f, ForceMode.Force);
This will add an acceleration force to the rigidbody which is affected by the mass of the rigidbody. The force is being applied in the forward direction with a strength of 10.
Force modes
- ForceMode.Force — This will accelerate in the target direction and also taking the mass of the rigidbody into account. (higher mass = heavier)
- ForceMode.Acceleration — This will accelerate in the target direction but will ignore the mass of the rigidbody.
- ForceMode.Impulse — Adds an instant force to the rigidbody cancelling out any accelerative force, this also takes the mass of the rigidbody into account.
- ForceMode.VelocityChange — Adds an instance force to the rigidbody cancelling out any accelerative force, this will ignore the mass of the rigidbody.
Acceleration force applied to an object will get stronger as more force is applied — set the drag of your rigidbody to allow your rigidbody to lose force over time!
Additional notes
More information on the transform translation method: https://docs.unity3d.com/ScriptReference/Transform.Translate.html
More information on the rigidbody AddForce method: https://docs.unity3d.com/ScriptReference/Rigidbody.AddForce.html
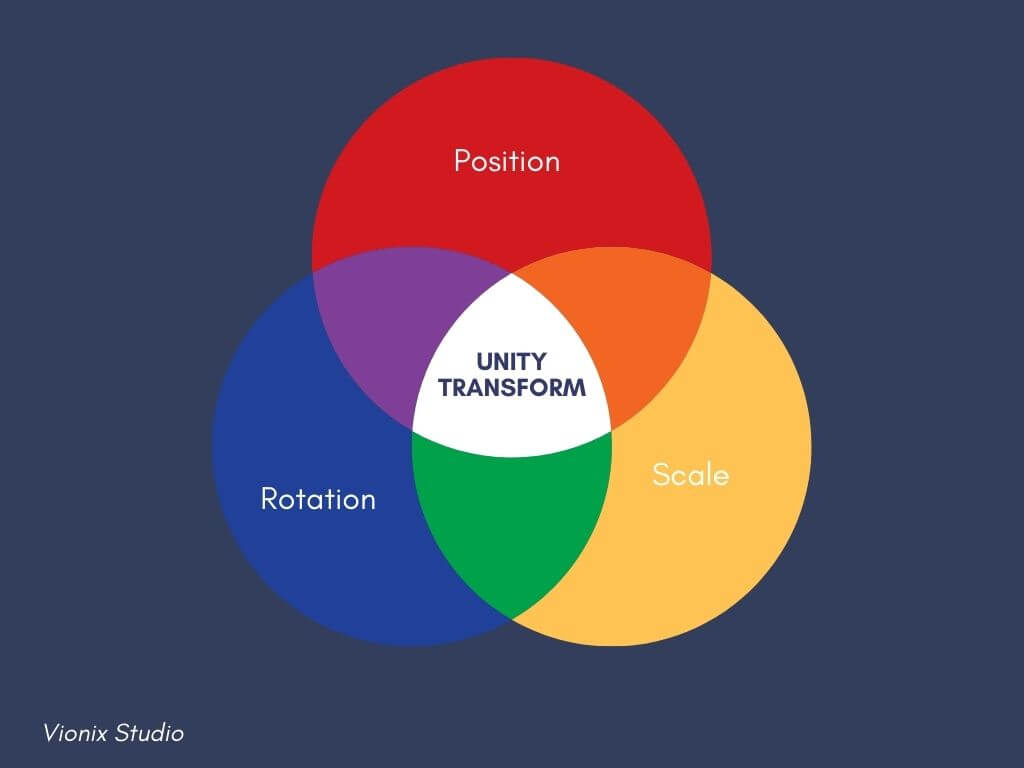
When you add a Gameobject in the Unity scene the first thing that you notice in the inspector window is the Transform component. Unity transform defines the position, rotation, and size of a Gameobject in the game world. Transform is the most basic component in Unity but it’s also the most important. You cannot define a Gameobject in Unity without Transform. Even an empty Gameobject has the Transform component. In this post, we will see what the Unity transform component does and how you can use it in your game.
What is Transform in Unity?
Unity Transform is a class like any other component in Unity. This class contains three important properties. These are position, rotation, and scale.
Position defines the X, Y, and Z coordinates of the Gameobject. Rotation is the degree of rotation of the Gameobject in the X, Y, and Z-axis. The scale is the size of the Gameobject in these coordinates. One important thing to take note of here is all these values are relative to the Gameobject’s parent object. Say, the transform position of the Gameobject is 0,0,5 and it’s a child of another object which is at the position 0,0,5 then the overall position of the child is 0,0,10 from the origin.
Unity Transform major properties
Unity Transform position
Position as the name suggests is used to change the position of the object in the scene. But it cannot be used to move players with physics as when you change the transform position the object is teleported from the initial position to the target position.
You can use it in the following cases
- Find the location of any Gameobject in the scene.
- To spawn a Gameobject to a particular location.
- Move an object without satisfying physics laws.
- To make the camera follow the player.
- Define target location of moving objects.
Example script
in Unity Transform position requires a Vector3 for a 3D object and a Vector2 for a 2D object.
vector3 newpos= new vector3(0,10,0);
Void Start()
{
transform.position= newpos;
}
Above code moves the object to 0,10,0 when the object is initialized.
Unity Transform Rotation
Rotation specifies the orientation of the Gameobject in the scene. Depending upon the axis of rotation the value of the X, Y, and Z coordinates will vary. Rotation is described in Euler angles in Unity and quaternion is used to store the data. Don’t get afraid of the name Quaternion, it’s just a variable type to store the rotation data. If you want to get into the mathematics part of quaternion you can read this article from mathworld.
Rotation can be used for many things in a game. Some examples are below
- Rotate the camera in the game to change the view.
- You can spin an object continuously using rotation.
- Rotate light to get day and night cycle.
- Get the object orientation.
- Tilt an object.
Sample Rotation script
Even though a quaternion is needed to save the rotation data you can save individual axis data in float variable.
quaternion rot;
float xrot;
float yrot;
float zrot;
void Start()
{
rot=transform.rotation;
xrot=rot.x;
yrot=rot.y;
zrot=rot.z;
}
Void Update()
{
xrot+=5;
rot.x=xrot;
transform.rotation=rot;
}
This script takes the rotation of the object into a variable rot and then saves the individual axis data in xrot, yrot and zrot when the script is initialized. It then rotates the object by 5 degrees every frame along the x axis.
Unity Transform Scale
Transform scale is the least used transform. Mostly the object transform is set at the beginning in the inspector window and then left untouched. The reason why the scale is not disturbed during gameplay is it can make the object look absurd and might interfere with other gameobjects. So, unless you are very sure of the outcome of changing the scale it’s better to set it beforehand.
Understanding Local Transform
In Unity or 3D space in general, there are two spaces used for reference. One is global space and the other is local space. Let’s see an example to understand it better. Say there is a ball in the coordinate 10,0,0 and you want to move it to 0,0,0 in world space. But the ball has a parent to it which is in the coordinate -20,0,0. Now to move the ball to 0,0,0 you must know the object’s location with respect to world space.
The coordinates of the child are always with respect to the parent. So, the actual position of the child ball object in world space is -10,0,0 but in local space, it is 10,0,0. So to move the object to 0,0,0 in the world space you need to add 10,0,0 to the position of the child.
In Unity, this difference is obtained using the local keyword. If you want to move the object relative to the parent then you should use transform.localPosition rather than transform.postion. Local space can be confusing in the beginning but you will understand it as you apply it in your game.
There are many other features of Unity Transform but this summarizes the basics you need to understand to make simple games. If you have any queries leave them in the comment below.
Unity transform other important properties
Transform.Up
Returns the axis representing the top of the gameobject. In other words, the red axis in the gizmo.
Transform.Right
Returns the axis representing the right side of the gameobject. Unlike Vector3 in Unity, transform considers the rotation of the game object.
Transform.forward
Returns the direction in which the game object is facing. You can use this to move the object in the direction it’s facing.
Transform.parent
Returns the parent of the game object.
Transform.eulerAngles
Returns the rotation of the game object in Euler angle degrees.
Transform.childCount
Returns the number of children the gameobject has in the hierarchy.
Important public methods of Unity transform
Transform.Find
This method is very similar to Gameobject.find but can only be used to find the child of this gameobject. You can find the gameobject’s child using its name in this method. You can also find the child using Transform.GetChild but it takes the index as input.
Transform.Lookat
This is used to set the forward direction of the gameobejct. Can be very useful to make your gameobject point towards the required direction.
Transform.Rotate
Tranform rotation which we came across in the beginning takes a quaternion as input. In order to set the rotation by a few Euler angles you can use Transform.Rotate. You can also use Transform.RotateAround to rotate an object around a axis.
Transform.Translate
It’s used to move an object in Unity in the direction of a vector at a speed equal to the magnitude of the vector.
В данной статье будут приведены примеры кода и их описания.
Два основных компонента у объекта в Unity3D — это Transform и GameObject.
GameObject
GameObject — основа, контейнер, который содержит в себе все компоненты любой объект в Unity3D. Чтобы удалить, к примеру, игровой объект — удалять нужно именно GameObject этого объекта. Для доступа к GameObject — используется переменная, которая присутствует по умолчанию в любом скрипте, унаследованном от MonoBehaviour (то есть в любом скрипте, созданном через Unity3D).
Получение ссылки на игровой объект
|
var myGo = gameObject; // мы получили ссылку на GameObject объекта // однако возможно использовать напрямую через gameObject |
Данным способом можно из одного скрипта получить ссылку на другие игровые объекты и управлять ими, их дочерними объектами, а также их компонентами.
Уничтожение игрового объекта
|
Destroy(gameObject); // уничтожает данный объект со сцены |
Данным способом можно удалить игровой объект.
Активация/деактивация игрового объекта
|
gameObject.SetActive(false); // выключает данный объект (и все его дочерние) gameObject.SetActive(true); // включает данный объект (и все его дочерние) |
Деактивация объекта аналогична снятия галочки инспекторе Unity3D, которая обведена красным цветом на скриншоте ниже.
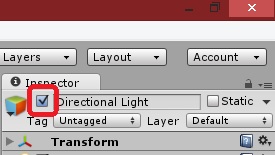
Деактивация элемента деактивирует также все его дочерние объекты и останавливает выполнение в их скриптов.
Добавление новых компонентов и скриптов игровому объекту
|
gameObject.AddComponent<BoxCollider>(); // добавляет к данному объекту компонент BoxCollider gameObject.AddComponent<Listener>(); // добавляет к данному объекту скрипт Listener |
Таким образом можно добавить абсолютно любой компонент, либо скрипт, который можно добавить в редакторе Unity3D.
Получение доступа к компоненту игрового объекта
|
var objectBoxCollider = gameObject.GetComponent<BoxCollider>(); // получение ссылки на компонент BoxCollider |
Таким же образом можно получить доступ к любому компоненту игрового объекта.
Переименование игрового объекта. Считывание имени объекта
|
gameObject.name = «ObjectNewName»; // меняем имя объекта var objectName = gameObject.name; // считываем имя объекта |
Сделать объект статичным
|
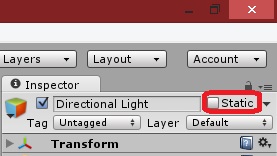
gameObject.isStatic = true; // делаем объект статичным var isObjectStatic = gameObject.isStatic; // считываем — является ли объект статичным |
Данный код аналогичен установке/снятию галочки в редакторе Unity3D (на скрине ниже).
Установить слои игровому объекту, а также считать их
|
gameObject.layer = LayerMask.GetMask(new[] {«Environment», «Tree»}); // устанавливает слой var objectLayer = gameObject.layer; // получает числовое представление слоев, к которым относится объект |
Установить тэг игровому объекту, а также его считывание
|
gameObject.tag = «newTag»; // устанавливает тэг объекту var objectTag = gameObject.tag; // считывает тэг объект |
Transform
С трансформом всё немного проще — этот компонент не является основой, но тем не менее — является основной и, главное, неотъемлемой частью GameObject’а. Он отвечает за месторасположение объекта на сцене, его «вращении», размерах, а также содержит информацию о дочерних и родительском объектах.
Это единственные компонент, который невозможно удалить из GameObject.
Изменение положение объекта
За положение объекта на сцене отвечает элементы transform.position и transform.localPosition.
Они оба являются переменной типа Vector3 и имеют в себе 3 главных составляющих x,y и z, которые соответствуют координатам в трехмерном пространстве. Следует учитывать, что x, y и z невозможно менять напрямую — они только для чтения. Чтобы добавить единичку к x — нужно добавить к самому transform.position новый Vector3, который равен (1,0,0), что добавить к x единицу, а к y и z — нули.
Чем же отличаются transform.position и transform.localPosition?
Их главное (и единственное отличие) заключается в том, что position — показывает и принимает координаты объекта, относительно мировых координат, а localPosition — относительно родительского объекта. Если же игровой объект является «корневым», то есть у него нет родительских объектов, то position и localPosition будут равны.
Движение объекта
Сначала рассмотрим элементарные варианты.
Как мы уже говорили — position (буду далее использовать именно его, так как отличия от localPosition только в том, относительно чего эти координаты) является переменной типа Vector3. Поэтому для его изменения нужно либо прибавить к нему другой вектор, либо вычесть другой вектор, либо заменить его другим вектором.
|
transform.position += new Vector3(1,0,0); // добавляем к X единицу transform.position -= new Vector3(1,1,0); // вычитаем из X и Y единицу transform.position = new Vector3(10,20,30); // устанавливаем объекту координаты 10,20,30 (x,y,z) |
Рекомендуется использовать функцию transform.Translate.
Это уже не переменная, как transform.position — это функция. У неё есть два входящих параметра:
- Vector3, который отвечает за то, в каком направлении будет двигаться объект;
- Space.Self/Space.World — то, относительно чего будет двигаться игровой объект. Space.Self — аналогичен transform.localPosition, а Space.World — аналогичен transform.position.
Вращение объекта
За вращение объекта отвечает компонент transform.rotation, transform.localRotation и функция transform.Rotate.
Здесь все аналогично transform.position. Кроме одного, несмотря на то, что в редакторе Unity3D Rotation представляет собой Vector3, то есть вращение относительно оси X, оси Y, оси Z. Но в коде оно представлено в виде кватернионов. Что такое кватернион — отдельная история. И обычно её изучают в вузах. По факту — знание кватернионов не обязательно для разработки игр. К счастью разработчики Unity3D это понимают и сделали две удобные для программистов вещи:
- Функция transform.Rotate(Vector3 vector, Space.World(либо Self));
- Функция Quaternion.Euler(float x,float y,float z), которая как раз возвращает кватернион;
Меньше слов — больше кода:
|
var myRotation = Quaternion.Euler(1, 1, 1); //поворачиваем объект по всем трем осям на единицу за такт transform.rotation *= myRotation; // обращаем внимание, что кватернионы не складывают, а умножают. Делить их нельзя. Поэтому для вычета просто делаем значения вектора отрицательными |
Вместо rotation можно применять localRotation, аналогично position.
|
transform.Rotate(new Vector3(1,0,0),Space.Self); // либо Space.World |
Такой подход аналогичен transform.Translate и также является более производительным.
Поиск других объектов на сцене
Есть два подхода поиска объекта на сцене.
- GameObject.Find(«имяОбъекта»); Он же «пушка по воробьям». Несмотря на кажущуюся скорость — метод является достаточно прожорливым и при частом использовании на большой сцене может стать большой проблемой. Однако он же самый простой способ (хотя и ненадежный). А ненадежный он потому, что редактор Unity3D позволяет давать одинаковые имена объектам. А GameObject.Find возвращает только один элемент, который он найдет первым.
- transform.FindChild(«имяДочернегоОбъекта») — функция возвращает переменную типа transform нужного объекта. Для доступа к GameObject этого объекта особых усилий прилагать не нужно, так как ссылка на него уже содержится в transform (как и ссылка на transform содержится в GameObject’е).
|
var childTransform = transform.FindChild(«myChild1»); var childGameObject = childTransform.gameObject; var anotherTransformLink = childGameObject.transform; |
Также можно запрашивать дочерние элементы по их номеру:
|
var childCount = transform.childCount; for (var i = 0; i < childCount; i++) { Debug.Log(transform.GetChild(i).name); } |
Также дочерний элемент может запросить родительский, а также родительский родительского и так далее:
|
var myParent = transform.parent; var rootObject = transform.parent.parent.parent; |
В следующих статьях будет информация о том, что такое private, public, static, отправление сообщений игровым объектам.
Доброго времени суток.
Сегодня поговорим про движение объекта по нажатию кнопки на экране в Unity3D. Эта тема очень проста, но часто используется в разного рода играх.
Для начала давайте создадим пустой 3D проект. Открываем Unity, нажимаем кнопку в правом верхнем углу с надписью «New». В поле «Project name» указываем название проекта. В строке «Location» указываем расположение проекта на диске. Ниже поля «Location» ставим флажок «3D» и нажимаем «Create project».

Затем создаем куб который будет заменять нам землю (GameObject->3D Object->Cube). Потом сделаем его более плоским и растянем. Открываем окно «Inspector», выделяем наш куб, в параметре «Transform» пункт «Scale» задаем x:10, y:0.2, z:10. У нас должно получится такое полотно:

Теперь перемещаем камеру на координаты x:0,y:5,z:0. Затем поворачиваем ее на 90 градусов по оси x. Затем нам нужно создать объект который мы будем перемещать. Создаем сферу (GameObject->3D Object->Sphere), задаем параметр «Position» в «Transform» как x:0, y:1, z:0. После этого чтобы лучше видеть нашу сцену ищем на вкладке «Hierarchy» объект с именем «Directional Light» и задаем ему параметр «Rotation» в «Transform» как x:180, y:-30, z:0. Наш проект теперь должен выглядеть вот так:

Теперь нам нужна кнопка, по нажатию которой мы будем определять двигать ли наш объект. Сначала создаем экран на котором будет располагаться наша кнопка (GameObject->UI->Canvas). Следующий этап — создаем кнопку (GameObject->UI->Button). Затем надо написать скрипт для перемещения нашей сферы. В окне «Project» выбираем «Create», а там выбираем C# Script. Далее приведен код:
using System.Collections;
using System.Collections.Generic;
using UnityEngine;

public class Move : MonoBehaviour {

    //Наш объект.
    public GameObject Sphere;

    //Целочисленная переменная определяющая дистанцию перемещения.
    public int S;

    //Метод который будет выполнятся по нажатию нашей кнопки.
    public void OnButtonDown()
    {
        //Задаем нашей переменной целочисленное значение 1 или 2.
        S = Random.Range(1, 2);
        //Перемещаем наш объект на S расстояние по оси x.
        Sphere.transform.Translate(S, 0, 0);
    }
}
Сначала создаем переменную нашего объекта для перемещения. Вторая переменная — это расстояние на которое мы будем перемещать объект. Публичный метод «OnButtonDown» отвечает за перемещение при нажатии кнопки. Сначала задаем переменной S значение 1 или 2, после чего двигаем объект по оси X на S расстояние.
Затем выделяем нашу кнопку, в панели «Inspector» в самом низу нажимаем кнопку «Add Component», выбираем в «Scripts» наш код. Далее в компоненте «Button» снизу в пункте «On Click ()» нажимаем «+». Нажимаем на получившееся окно в параметре «On Click ()» в поле, где стоит «None (Object)». В нем выбираем нашу кнопку. Вот как это должно выглядеть:
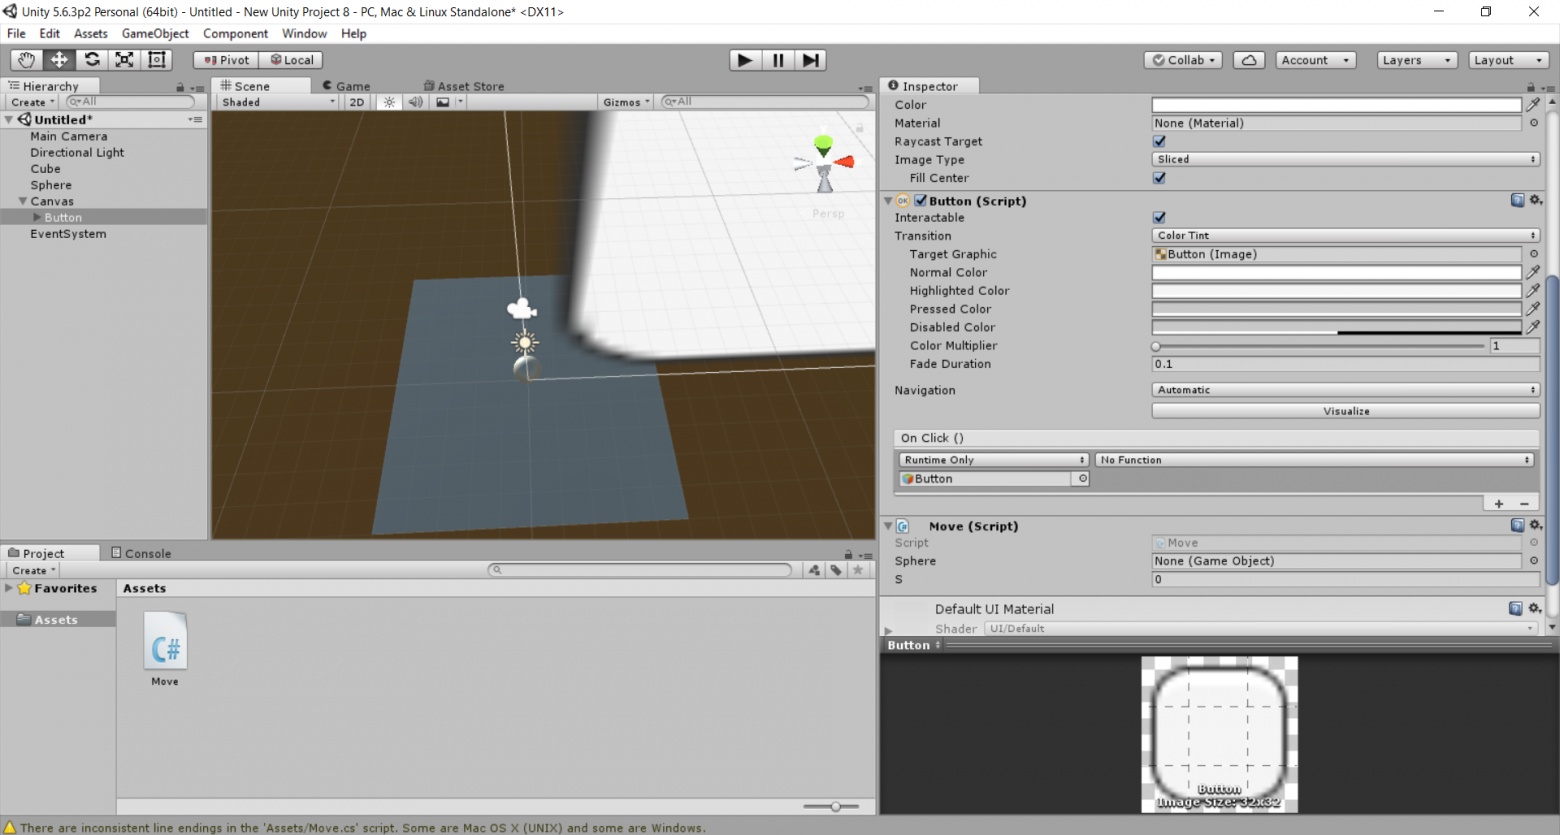
Потом в нашем параметре «On Click ()» выбираем блок в котором стоит «No Function», внутри него выбираем название нашего кода, а в нем выбираем метод «OnButtonDown()». Теперь когда кнопка настроена переходим к коду. В окне «Inspector» должен отображаться компонент с названием нашего кода. В поле «Sphere» выбираем нашу сферу. Вот что должно получится:
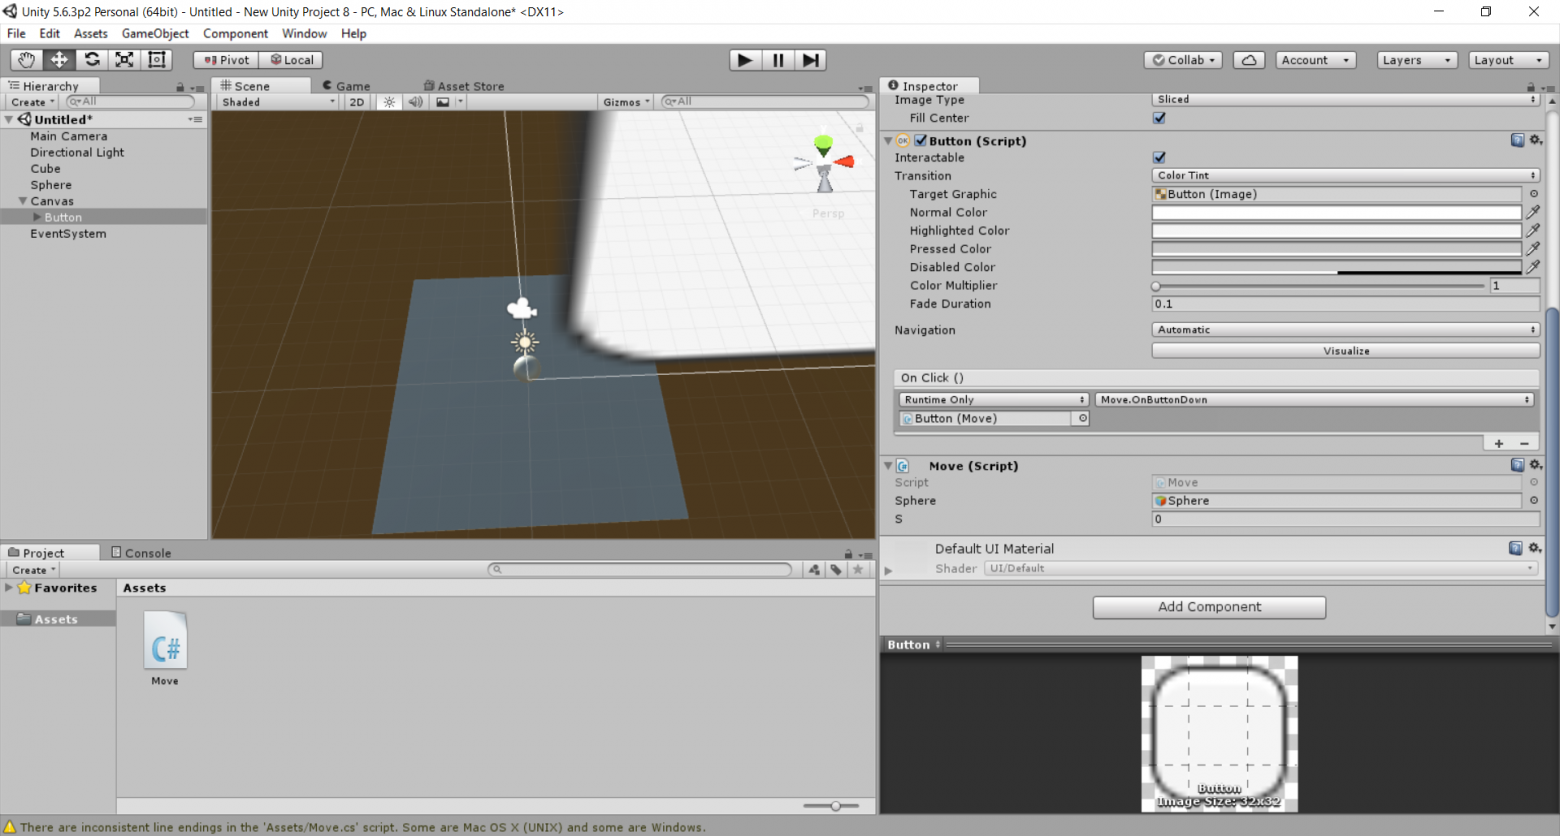
Затем в окне «Game» нажимаем на «Maximize On Play». Теперь нажимаем на кнопку запуска игры. На экране отображается наша кнопка. Если кликнуть по ней, то наша сфера переместится по оси X.
До нажатия:

После нажатия:

Большое спасибо за прочтение публикации. Надеюсь, Вы приобрели для себя новые знания.