In Unity, a skyboxA special type of Material used to represent skies. Usually six-sided. More info
See in Glossary is a Material that uses a skybox ShaderA program that runs on the GPU. More info
See in Glossary. For information on what skybox Shaders are available, see skybox Shaders.
Render pipeline compatibility
| Feature | Built-in Render PipelineA series of operations that take the contents of a Scene, and displays them on a screen. Unity lets you choose from pre-built render pipelines, or write your own. More info See in Glossary |
Universal Render Pipeline (URP) | High Definition Render Pipeline (HDRP) |
|---|---|---|---|
| Skyboxes | Yes (1) | Yes (1) | No (2) |
Notes:
- The Built-in Render Pipeline, and the Universal Render Pipeline (URP) both exclusively use skyboxes to render a sky. These skyboxes are Materials that use a skybox Shader.
- The High Definition Render Pipeline (HDRP) does not support skybox Materials and instead includes multiple sky generation solutions.
Creating a skybox Material
To create a new skybox Material:
- From the menu bar, click Assets > Create > Material.
- In the Shader drop-down, click Skybox then the skybox Shader you want to use.
- You can now fill out the properties on the Material to set up the skybox. The properties available on the Material depend on the skybox Shader the Material uses.
Note: Each skybox Shader has its own set of prerequisite Textures that differ in number and Texture formatA file format for handling textures during real-time rendering by 3D graphics hardware, such as a graphics card or mobile device. More info
See in Glossary. For information on the Textures a particular skybox Shader requires, see the documentation for that skybox Shader. You can find the list of skybox Shaders and their documentation on the skybox Shaders page.
Drawing a skybox in your Scene
After you create a skybox Material, you can render it in your SceneA Scene contains the environments and menus of your game. Think of each unique Scene file as a unique level. In each Scene, you place your environments, obstacles, and decorations, essentially designing and building your game in pieces. More info
See in Glossary. To do this:
- From the menu bar, click Window > Rendering > Lighting Settings.
- In the window that appears, click the Environment tab.
- Assign the skybox Material to the Skybox Material property.
This draws the skybox in the background of every CameraA component which creates an image of a particular viewpoint in your scene. The output is either drawn to the screen or captured as a texture. More info
See in Glossary in your Scene. If you instead only want to draw the skybox for a particular Camera, see Drawing a skybox for a particular Camera.
Using a skybox Material for ambient light settings
After you create a skybox Material, Unity can use it to generate ambient lighting in your Scene. To make Unity do this:
- Open the Lighting window (menu: Window > Rendering > Lighting Settings).
- Assign your chosen skybox to the Skybox Material property.
- Click the Source drop-down and, from the list, click Skybox.
You can also specify when Unity updates the ambient lighting. To do this, change the Ambient Mode. The two values are:
- Realtime: Unity constantly regenerates ambient lighting for your Scene. This is useful if you alter the skybox at run-time
- Baked: Unity only generates ambient lighting for your Scene when you click the Generate Lighting button at the bottom of the Lighting window. This is useful if your skybox does not change during run-time because it saves computational resources.
Drawing a skybox for a particular Camera
If you only want to draw a skybox in the background of a particular Camera, use the Skybox component. When you attach this component to a GameObjectThe fundamental object in Unity scenes, which can represent characters, props, scenery, cameras, waypoints, and more. A GameObject’s functionality is defined by the Components attached to it. More info
See in Glossary with a Camera, it overrides the skybox that the Camera draws. To attach and set up the Skybox component:
- Select a Camera in your Scene and view it in the InspectorA Unity window that displays information about the currently selected GameObject, asset or project settings, allowing you to inspect and edit the values. More info
See in Glossary window. - Click Add Component > Rendering > Skybox.
- On the Skybox component, assign the skybox Material to the Custom Skybox property.
Best Practices
If your Skybox includes a sun, moon, or other light in it, set up a Directional Light that points in the same direction as the light. This makes it appear as though the light in your skybox creates shadows in your Scene. If there are multiple Directional Lights in your Scene, you can choose which Directional Light the Skybox uses. To do this:
- From the menu bar, click Window > Rendering > Lighting Settings.
- Click the Scene tab.
- Assign the Directional Light you want to use to the Sun Source property.
If you want to have fog in your Scene, match the fog color to the color of the skybox. This makes the fog blend to the color of the Scene sky. To do this:
- From the menu bar, click Window > Rendering > Lighting Settings.
- Click the Environment tab.
- In the Other Settings section, enable the Fog checkbox.
- Set the Color property to a color that suits your skybox. For this, you can use the ink dropper tool to select a color from the Scene.
Предлагаю читателям «Хабрахабра» перевод публикации «Unity — Using Skyboxes» из блога компании Unity.
Дополнительные материалы к статье Skybox и Cubemap
Skybox является панорамной текстурой, которая находится за всеми объектами в сцене, что бы симулировать небо или большой город или любую другую перспективу на большом расстоянии (своего рода фон). Этот урок объясняет, как использовать skybox в Unity.
Что такое Skyboxes?
Skybox — панорамный вид разделенный на шесть текстур, представляющие шесть видимых направлений вдоль основных осей (вверх, вниз, влево, вправо, вперед и назад) (up, down, left, right, forward and backward). Если Skybox создан правильно, текстурные изображения будут как единое целое по краям, чтобы дать непрерывный окружающий образ, который можно рассматривать «изнутри» в любом направлении. Панорама оказывается позади всех остальных объектов в сцене и вращается в соответствии с текущей ориентации камеры (не путайте с положением камеры, которое всегда берется, чтобы быть в центре панорамы). Skybox таким образом, простой способ добавить реализма к сцене с минимальной нагрузкой на видеокарту.
Использование Skybox в Unity
Unity поставляется с рядом высококачественных Skybox в пакете Standard Assets (меню: Assets > Import Package > Skyboxes), но вы также можете подобрать подходящие наборы панорамных изображений из интернет-источников или создать свой собственный, используя программное обеспечение 3D-моделирования. Предполагаем, что вы уже имеете шесть текстур изображения для Skybox, вы должны импортировать их в Unity. После переходим к нашему skybox, затем переходим в панель Inspector. И устанавливаем его свойства, свойство Wrap Mode установим значение Clamp (если вы установите значение Repeat, края изображений не будут образовывать «бесшовную» текстуру).
Сам Skybox на самом деле тип материала, который использует один из шейдеров в подменю RenderFX. Если вы выберите Skybox Shader, вы увидите в панели инспектора (inspector), что то вроде следующего, с шестью примерами текстур:

Skybox Cubed шейдер работает в основном так же, но требует текстуры, которые будут добавлены к cubemap asset (меню:Assets > Create > Cubemap). Cubemap имеет шесть слотов текстур с теми же значения, как и Skybox в панели инспектора материалов (material inspector) .
После того, как он будет создан, вы можете установить новый Skybox, как Skybox по умолчанию (для всего проекта) в инспекторе настройки визуализации (меню: Edit> Render Settings). Вы можете переопределить Skybox по умолчанию для каждой камеры, назначив новый Skybox в компоненте Camera > Skybox (видно в инспекторе камеры).
Introduction — What is the Skybox in Unity?
The Skybox is like an image that completely surrounds a scene in Unity and remains fixed no matter how hard we try to get close to it. The purpose of the Skybox is to represent the distant horizon of the scene and it is possible to choose a texture to do so.
In this article we will see how to change the Skybox that comes by default in Unity. This will allow us to customize the skybox for our game. In the following video you can see the process.

ABOUT THIS VIDEO
In this video we see how to replace the DEFAULT SKY in UNITY using an environment texture.
HERE MY UNITY PLAYLIST
👇🏽
CONSIDER SUBSCRIBING TO THE CHANNEL

First Step — Get an HDR Texture to use as Skybox
To modify the Skybox of the scene we will need special textures, one of them is the HDR (High Dynamic Range) textures, they are textures that have more information than the ones we commonly use and they are useful to illuminate scenes, because you can increase or decrease their intensity and the texture responds properly.
I usually download textures from the HDRI Haven page, they have a quite interesting gallery with this kind of images, the downloads are free and you can also choose between qualities ranging from 1K to 8K textures, as you can see in figure 2.
HDRI Haven
How to change the Skybox in Unity — Step by Step
Before showing the complete process I will put a list of steps to summarize the process, if you already have experience with Unity you may find it useful.
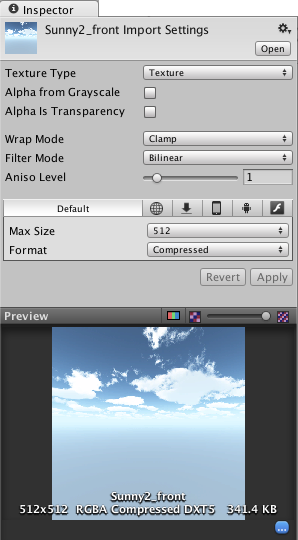
1. Import the HDR texture into Unity and in the inspector set its «Texture Shape» parameter to «Cube».
2. Create a new material and set the Shader type as Skybox > Cubemap.
3. Assign the HDR texture to the «Cubemap HDR» field of our material. With this we have the Skybox ready to use it.
4. Go to the Window > Rendering > Lighting window, Environment section and in the Skybox field select the material you have configured in the previous step.
5. (Optional) If the texture does not have good quality, modify the compression format or download a higher resolution HDR texture.
CHECK OUT THIS CRAZY EXPERIMENT
Detailed procedure on how to change the Skybox in Unity
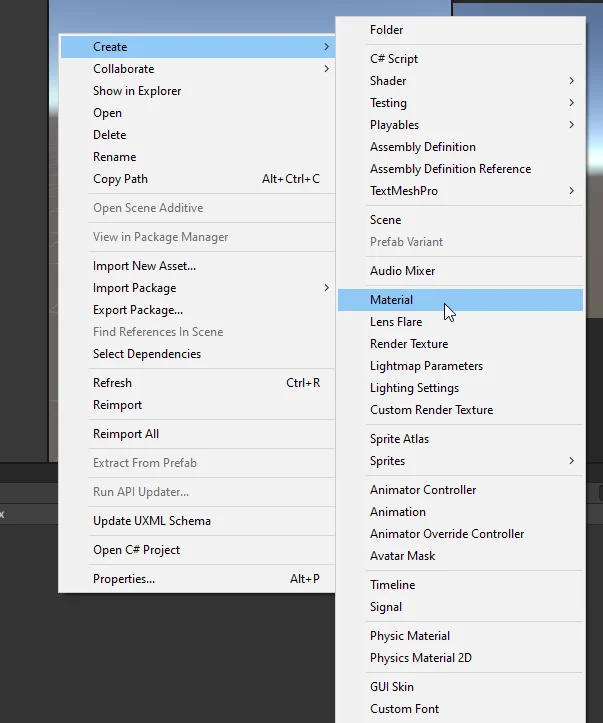
Once we import the HDR texture into Unity we will create a new material, in the Assets folder, right click, create and then select material.
We give it a name and then select it to see its properties in the inspector.
In the header of the inspector, we locate the field «Shader» which by default is set to «Standard» and change it to the type Shader «Skybox > Cubemap», as shown in figures 5 and 6.
Now the inspector for this material will be shown with other parameters than before, as we see in figure 7.

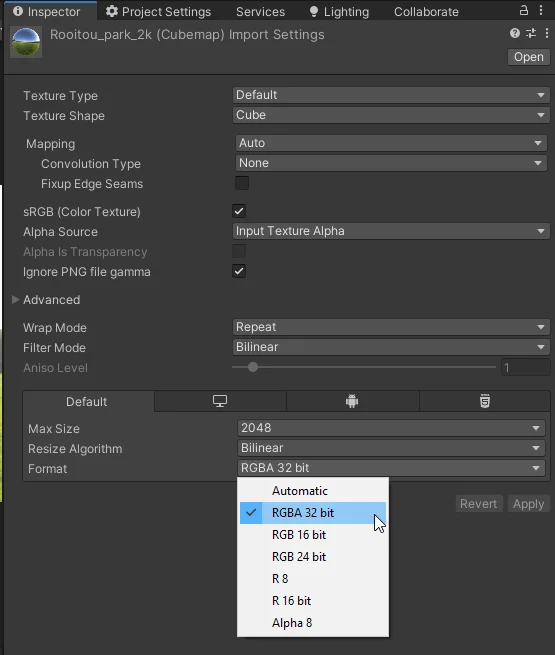
In principle we are interested in assigning our HDR texture to the «Cubemap HDR» field but first we have to make some adjustments to the image. We select the HDR texture that we have imported.
We changed the «Texture Shape» field to Cube and applied the changes
This will allow us to use the texture for the Skybox material, we can either drag the texture directly into the field or press the «Select» button and select it from the popup window.
If everything goes well, you should see a result like the one in figure 13.

Now that we have the Skybox material set up, let’s apply it to the scene. For that we have to open the «Lighting» tab, in figure 14 you can see where that window is if you don’t have it open.
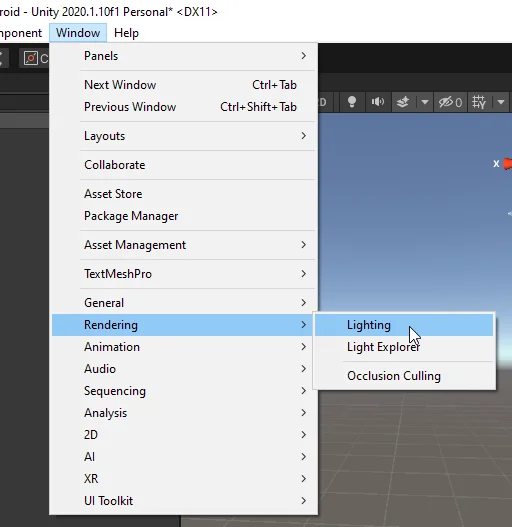
Inside the Lighting window we go to the «Environment» section and in the first field called «Skybox Material» we assign the Skybox material that we have previously configured.
In figure 17 you can see the first result of doing this, the texture does not look good at all due to the type of compression.

We can select it and in the inspector change the compression to «RGB 16», «RGB 24» or «RGBA 32», this will bring an increase in the quality but also in the weight of the image. You can try downloading different qualities of HDR texture and try different formats to find a balance between quality and performance.
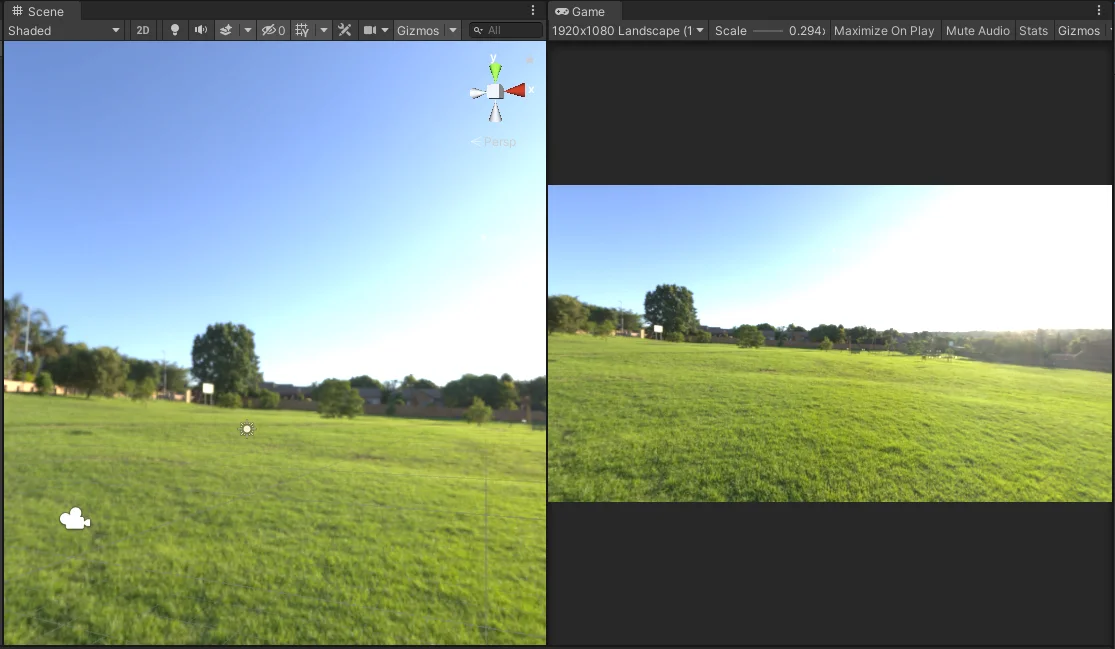
In figure 19 we see the final result that I have reached. Now that we have changed the new Skybox in the scene, we will be able to do lighting bakes to get better results.
В Unity – небесный ящикОсобый тип материала, используемый для представления неба. Обычно шестигранник. Подробнее
See in Словарь — это Материал, в котором используется скайбокс ШейдерПрограмма, работающая на графическом процессоре. Подробнее
См. в Словарь. Информацию о доступных шейдерах скайбокса см. в разделе шейдеры скайбокса.
Совместимость конвейера рендеринга
| Характерная черта | Встроенный конвейер рендеринга | Универсальный конвейер рендеринга (URP) | Конвейер рендеринга высокого разрешения (HDRP) |
|---|---|---|---|
| Skyboxes | Да (1) | Да (1) | Нет (2) |
Примечания:
- Встроенный конвейер рендеринга и Универсальный конвейер рендеринга (URP) оба используют исключительно скайбоксы для рендеринга неба. Эти скайбоксы представляют собой материалы, в которых используется шейдер скайбокса.
- Конвейер рендеринга высокого разрешения (HDRP) не поддерживает материалы скайбокса и вместо этого включает несколько решений для создания неба.
Создание материала для скайбокса
Чтобы создать новый материал скайбокса:
- В строке меню нажмите Ресурсы > Создать > Материал.
- В раскрывающемся списке Шейдер нажмите Skybox, а затем шейдер Skybox, который вы хотите использовать.
- Теперь вы можете заполнить свойства материала, чтобы настроить скайбокс. Свойства, доступные для материала, зависят от шейдера скайбокса, который использует материал.
Примечание. Каждый шейдер скайбокса имеет собственный набор необходимых текстур, которые различаются номером и форматом текстурыПодробнее
См. в Словарь. Информацию о текстурах, требуемых для конкретного шейдера скайбокса, см. в документации к этому шейдеру скайбокса. Вы можете найти список шейдеров скайбокса и документацию по ним на странице шейдеров скайбокса.
Отрисовка скайбокса в вашей сцене
После создания Материала скайбокса вы можете визуализировать его в своей СценеСцена содержит окружение и меню вашей игры. . Думайте о каждом уникальном файле сцены как об уникальном уровне. В каждой сцене вы размещаете свое окружение, препятствия и декорации, по сути проектируя и создавая свою игру по частям. Подробнее
См. в Словарь. Для этого:
- В строке меню нажмите Окно > Рендеринг > Настройки освещения.
- В появившемся окне перейдите на вкладку Сцена.
- Назначьте материал скайбокса свойству Материал скайбокса.
При этом на фоне каждой Камерыкомпонента, который создает изображение определенной точки обзора в вашей сцене, отображается скайбокс. Вывод либо рисуется на экране, либо фиксируется в виде текстуры. Подробнее
См. Словарь в вашей сцене. Если вместо этого вы хотите нарисовать скайбокс только для определенной камеры, см. раздел Рисование скайбокса для конкретной камеры.
Использование материала скайбокса для настройки внешнего освещения
После того как вы создадите материал скайбокса, Unity может использовать его для создания окружающего освещения в вашей сцене. Чтобы заставить Unity сделать это:
- Откройте окно Освещение (меню: Окно > Рендеринг > Настройки освещения).
- Назначьте выбранный скайбокс свойству Материал скайбокса.
- Нажмите раскрывающееся меню Источник и в списке выберите Skybox.
- В реальном времени: Unity постоянно восстанавливает окружающее освещение для вашей сцены. Это полезно, если вы изменяете скайбокс во время выполнения.
- Запеченное: Unity создает окружающее освещение для вашей сцены только тогда, когда вы нажимаете кнопку Создать освещение в нижней части окна Освещение. Это полезно, если ваш скайбокс не меняется во время выполнения, потому что это экономит вычислительные ресурсы.
- Выберите камеру в своей сцене и просмотрите ее в инспектореокне Unity, в котором отображается информация о выбранном в данный момент игровом объекте, настройки актива или проекта, что позволяет просматривать и редактировать значения. Дополнительная информация
См. в окне Словарь. - Нажмите Добавить компонент > Рендеринг > Skybox.
- В компоненте Skybox назначьте Материал Skybox свойству Пользовательский Skybox.
- В строке меню нажмите Окно > Рендеринг > Настройки освещения.
- Перейдите на вкладку Сцена.
- Назначьте направленный свет, который вы хотите использовать, свойству Sun Source.
- В строке меню нажмите Окно > Рендеринг > Настройки освещения.
- Перейдите на вкладку Сцена.
- В разделе Другие настройки установите флажок Туман.
- Установите для свойства Color цвет, который подходит вашему скайбоксу. Для этого вы можете использовать инструмент «Пипетка», чтобы выбрать цвет из сцены.
Вы также можете указать, когда Unity будет обновлять окружающее освещение. Для этого измените Ambient Mode. Два значения:
Отрисовка скайбокса для конкретной камеры
Если вы хотите нарисовать скайбокс только на фоне определенной камеры, используйте компонент Skybox. Когда вы присоединяете этот компонент к GameObjectфундаментальному объекту в сценах Unity, который может представлять персонажей, реквизит, декорации, камеры, путевые точки , и больше. Функциональность GameObject определяется прикрепленными к нему компонентами. Подробнее
См. в Словарь с камерой, он переопределяет скайбокс, который рисует камера. Чтобы подключить и настроить компонент Skybox:
Рекомендации
Если в вашем скайбоксе есть солнце, луна или другой источник света, установите направленный источник света, направленный в том же направлении, что и источник света. Это создает впечатление, что свет в вашем скайбоксе создает тени в вашей сцене. Если в вашей сцене есть несколько направленных источников света, вы можете выбрать, какой из них использует скайбокс. Для этого:
Если вы хотите, чтобы в вашей сцене был туман, сопоставьте цвет тумана с цветом скайбокса. Это заставляет туман сливаться с цветом неба сцены. Для этого:
Unity3D How To Change Skybox With Script
Unity3D How To Change Skybox With Script
I wanted to change the skybox when a certain event happened. In my case, I wanted a new, random skybox each time a new enemy appeared to fight. First, I will show you how to change the skybox. Second, I will show you how to choose a random skybox and use it. Both scripts are stand alone so choose what works best for you.
To change the skybox using a c# script you have to store the skybox material reference in the Inspector and then assign it during runtime.
Create a public material, save the script to a GameObject, and then drag/drop the skybox material in your Inspector.
Further down in your Start or a function that you call in your code, make the change:
using System.Collections;
using System.Collections.Generic;
using UnityEngine;

public class ChangeSkybox : MonoBehaviour {

 public Material skybox1;

 // Use this for initialization
 void Start () {
    RenderSettings.skybox = skybox1;
 }

 // Update is called once per frame
 void Update () {
 }
}
That is it. Next I’ll add a few changes to choose a random skybox each time. Using the following code, you will need to select the script or GameObject with the script attached and look for the “skyboxes” array in the Inspector. Click the arrow to expand it and change the 0 to however many skybox materials you have. Now you’ll have a few fields to drag/drop your skybox materials. The following script will choose one randomly at start up. To make the random change again, simply call the function ChangeMySkybox();
using System.Collections;
using System.Collections.Generic;
using UnityEngine;

public class ChangeSkybox : MonoBehaviour {

public Material[] skyboxes;

// Use this for initialization
 void Start () {
    ChangeMySkybox();
 }

 // Update is called once per frame
 void Update () {
 }

void ChangeMySkybox()
 {
    int x = Random.Range(0, skyboxes.Length - 1);
    RenderSettings.skybox = skyboxes[x];
 }
}
Unity3D How To Change Skybox With Script
Share This Story, Choose Your Platform!
Related Posts
Page load link
Go to Top
Предлагаю читателям «Хабрахабра» перевод публикации «Unity — Using Skyboxes» из блога компании Unity.
Skybox является панорамной текстурой, которая находится за всеми объектами в сцене, что бы симулировать небо или большой город или любую другую перспективу на большом расстоянии (своего рода фон). Этот урок объясняет, как использовать skybox в Unity.
Что такое Skyboxes?
Skybox — панорамный вид разделенный на шесть текстур, представляющие шесть видимых направлений вдоль основных осей (вверх, вниз, влево, вправо, вперед и назад) (up, down, left, right, forward and backward). Если Skybox создан правильно, текстурные изображения будут как единое целое по краям, чтобы дать непрерывный окружающий образ, который можно рассматривать «изнутри» в любом направлении. Панорама оказывается позади всех остальных объектов в сцене и вращается в соответствии с текущей ориентации камеры (не путайте с положением камеры, которое всегда берется, чтобы быть в центре панорамы). Skybox таким образом, простой способ добавить реализма к сцене с минимальной нагрузкой на видеокарту.
Использование Skybox в Unity
Unity поставляется с рядом высококачественных Skybox в пакете Standard Assets (меню: Assets > Import Package > Skyboxes), но вы также можете подобрать подходящие наборы панорамных изображений из интернет-источников или создать свой собственный, используя программное обеспечение 3D-моделирования. Предполагаем, что вы уже имеете шесть текстур изображения для Skybox, вы должны импортировать их в Unity. После переходим к нашему skybox. И устанавливаем его свойства, Wrap Modeустановим Clamp, если вы установите Repeat (края изображений не будут образовывать «бесшовную» текстуру).

Сам Skybox на самом деле тип материала, который использует один из шейдеров в подменю RenderFX. Если вы выберите Skybox Shader, вы увидите в панели инспектора (inspector), что то вроде следующего, с шестью примерами текстур:

Skybox Cubed шейдер работает в основном так же, но требует текстуры, которые будут добавлены к cubemap asset (меню:Assets > Create > Cubemap). Cubemap имеет шесть слотов текстур с теми же значения, как и Skybox в панели инспектора материалов (material inspector) .
После того, как он будет создан, вы можете установить новый Skybox, как Skybox по умолчанию (для всего проекта) в инспекторе настройки визуализации (меню: Edit> Render Settings). Вы можете переопределить Skybox по умолчанию для каждой камеры, назначив новый Skybox в компоненте Camera > Skybox (видно в инспекторе камеры).
Автор: patch1
Источник