Содержание
- Troubleshooting
- Error messages in the Package Manager window
- Missing MonoBehaviour errors
- Package Manager missing or window doesn’t open
- Problems after upgrading Unity to new version
- Package installation fails
- Packages not recognized
- Loading error for hostfxr.dll on Windows
- Resetting your project’s package configuration
- Resetting a clone of your project
- Authentication issues with Git URLs
Troubleshooting
This section provides information on the following issues:
You can also run the Unity Package Manager Diagnostics tool if you are experiencing problems that might be network-related. For more information, see Network issues.
Error messages in the Package Manager window
The Package Manager displays error indicators in the Package Manager window when it encounters problems:
System-wide issues
Error messages that appear in the status bar indicate the Package Manager has detected an issue that is not related to a specific package. For example, if the Package Manager cannot access the package registry server, it displays this message in the status bar:
 Network error message
If your network cannot reach the package registry server, it is probably because there is a connection problem with the network. When you or your system administrator fix the network error, the status bar clears.
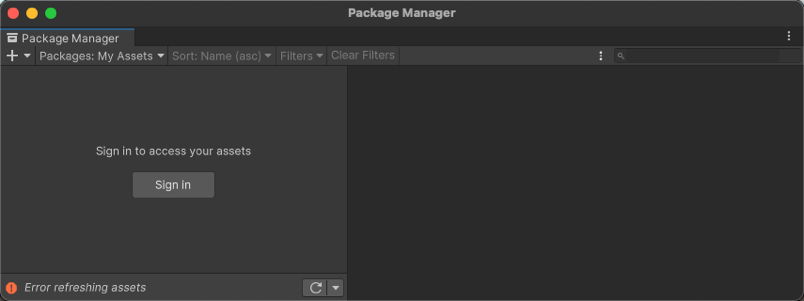
If your network connection is working, but you are not signed into your Unity account, the Package Manager doesn’t display any Asset Store A growing library of free and commercial assets created by Unity and members of the community. Offers a wide variety of assets, from textures, models and animations to whole project examples, tutorials and Editor extensions. More info
See in Glossary packages. When you try to use the My Assets scope, the Package Manager displays an error in the status bar:
 Logged out of Unity account
Click the Sign in button inside the list view to sign into your Unity account through the Unity Hub.
Package-specific issues
If a specific package has a problem when loading or installing (for example, when determining which package versions to load), the error icon ( ) appears in the package list next to the compromised package (A). To find out what the problem is, open the compromised package’s details view to see the detailed error message (B):
 Dependency error message
Missing MonoBehaviour errors
While building, if there are a lot of errors about Missing Behavior, the UnityLinker might be mistakenly stripping out a component that it thinks is unreferenced. It often does this because the stripping level is too aggressive. For example, if you have a prefab An asset type that allows you to store a GameObject complete with components and properties. The prefab acts as a template from which you can create new object instances in the scene. More info
See in Glossary in an AssetBundle that references the SpriteShape component in the 2D SpriteShape package, the object might be missing and might generate compiler warnings.
To fix this, you can either lower the stripping level for the UnityLinker or declare the package’s assemblies inside the link.xml file in order to preserve them from being stripped:
For more information on stripping levels and the UnityLinker, see Managed code stripping.
Package Manager missing or window doesn’t open
If your package.manifest file is malformed, an error similar to this appears in your Unity console:
You can use the information contained in the error message to fix the JSON. There are a number of online validators that you can use to try to correct the problem. Once you save the corrected file, Unity reloads the Package Manager window.
As of 2019.3, your manifest.json file should not contain any references to the com.unity.package-manager-ui package. You can either reset your project’s package configuration or remove the following line from the manifest’s dependencies list:
If you are still experiencing problems, check to see if your project manifest Each Unity project has a project manifest, which acts as an entry point for the Package Manager. This file must be available in the
/Packages directory. The Package Manager uses it to configure many things, including a list of dependencies for that project, as well as any package repository to query for packages. More info
See in Glossary uses “exclude” as a package version. This is an obsolete value for the dependencies
See in Glossary property. If you find any lines like these, remove the entire line. Package Manager only installs packages that are explicitly included as a dependency in your project, so once you remove that entry, Package Manager ignores the package and doesn’t install it.
If the Package Manager still fails to load, follow the procedures under Packages not recognized and Resetting your project’s package configuration.
Problems after upgrading Unity to new version
When you upgrade a project to a newer Unity version, the Package Manager automatically updates incompatible packages to newer compatible versions. However, if your package doesn’t compile, the Package Manager displays error messages in the Console.
To correct these messages, read the error messages and fix any problems you can. For example, a package might be missing a dependency on another package or version. In that case, you can try and install the package yourself.
You can also try the following sequence of solutions until you find something that works:
- Back up and then delete the Packages folder under your project.
- Back up and then delete the package sources in your project’s Packages folder, leaving only the manifest.json file. Then try to reload the project.
- Create a new empty project. If the Package Manager window loads successfully, replace the Library/PackageCache/com.unity.package-manager-ui@ folder in the failing project with the same folder from the newly created project.
- As a last resort, you can reset your project to the default package Unity automatically pre-installs a select number of default packages (for example, the Analytics Library, Unity Timeline, etc.) when you create a new project. This differs from a bundled package because you don’t need to install it and it differs from a built-in package because it extends Unity’s features rather than being able to enable or disable them.
See in Glossary configuration and add back packages one at a time until it works.
Package installation fails
If you are trying to install a new package from the registry and it is not working, it might be due to permission problems.
You must have full permissions on the cache folder:
- Windows: C:UsersyournameAppDataLocalUnitycache
- MacOS:
It might be a problem with the network. Check your firewall and proxy settings.
Sometimes institutional environments, such as schools, government offices, or network-protected workplaces set up proxy servers to control traffic between the network and the Internet, and use their own server certificates which are not recognized by Unity or the Package Manager. Talk to your network administrator.
Packages not recognized
If you see a lot of compilation errors, this might indicate that Unity is not recognizing the packages in your existing project. In this case, you might be missing a .NET component.
- Download and install Visual Studio 2017 version 15.9.0 or higher with the .NET Core cross-platform development workload selected under Other Toolsets.
- Download and install the .NET SDK v2.2.101 component.
Download and install the .NET SDK v2.2.101 component.
Install any recommended updates in Visual Studio
Use homebrew to brew and install mono:
If necessary, delete the Library/obj/temp folder under your project and restart Unity.
If you are still experiencing difficulties, try rebooting your computer as well.
Loading error for hostfxr.dll on Windows
If the Console reports that the hostfxr.dll library was found, but Unity failed to load it from C:
hostfxr.dll , you can fix this error on Windows 7 or Windows Server 2008 R2 by installing both KB2999226 and KB2533623 patches.
Resetting your project’s package configuration
If a project has too many package issues, you can reset your project back to the default package configuration for the Editor’s version of Unity. This operation resets all packages in your project. This might not fix the source of the problem, but it can help you figure out what the problem is.
Note: You can’t undo resetting your package configuration, so make sure you back up the manifest.json file first or make sure your project is under source control. You can also take extra precautions by cloning your project and testing out the operation on the clone before proceeding.
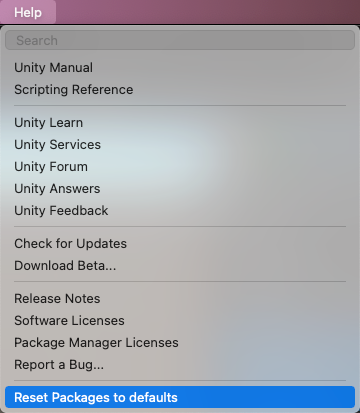
To return to the default package configuration, select Reset Packages to defaults from the Help menu.
 Reset Packages to defaults»> Help > Reset Packages to defaults
Resetting a clone of your project
You can also test the return to the default packages before you perform the final change:
Clone your project by copy-pasting your project folder and renaming it so that it is easy to find (for example, if your project is called MyProject then you could use something like clone_MyProject ).
Load your newly cloned project.
From the Help menu, select Reset Packages to defaults.
Depending on the size of your project, this might take a few minutes.
Check that it successfully reset the packages. If so, you can perform the operation safely on the original project.
Authentication issues with Git URLs
If you are using the SSH protocol to install a package by Git URL, you might get an authentication error from Git, even if you are running an ssh-agent in the background and your PID environment variables are set properly.
While your script can successfully start the ssh-agent in the background, the exported environment variables are only available to the Bash shell running the script and to any child process it launches from that point on. This is because your script cannot change environment variables from parent processes, unrelated processes, or previously created child processes. And even if the script is located in .bashrc , it only gets executed in Bash shells.
When you launch Unity or the Unity Hub (both in Windows and macOS) by double-clicking the Unity icon or using the Hub, it is not running in a shell, so the script is not executed. This means that the Unity Editor process doesn’t have these variables set, so ultimately the Git process invoked by Unity doesn’t have them either.
To solve this issue, you can either:
- Open a Bash shell first (before opening the Hub) and manually launch the Unity Editor from that shell.
- If you are on Windows, you can use the setx command to permanently set the environment variables in the Windows registry before the Hub process starts. This solution works best if you can ensure that the script runs once on startup and that the Hub does not start with Windows. For example:
Источник
Troubleshooting
This section provides information on the following issues:
You can also run the Unity Package Manager Diagnostics tool if you are experiencing problems that might be network-related. For more information, see Network issues.
Error messages in the Package Manager window
The Package Manager displays error indicators in the Package Manager window when it encounters problems:
System-wide issues
Error messages that appear in the status bar indicate the Package Manager has detected an issue that is not related to a specific package. For example, if the Package Manager cannot access the package registry server, it displays this message in the status bar:
 Network error message
If your network cannot reach the package registry server, it is probably because there is a connection problem with the network. When you or your system administrator fix the network error, the status bar clears.
If your network connection is working, but you are not signed into your Unity account, the Package Manager doesn’t display any Asset Store packages. When you try to use the My Assets scope, the Package Manager displays an error in the status bar:
 Logged out of Unity account
Click the Sign in button inside the list view to sign into your Unity account through the Unity Hub.
Package-specific issues
If a specific package has a problem when loading or installing (for example, when determining which package versions to load), the error icon ( ) appears in the package list next to the compromised package (A). To find out what the problem is, open the compromised package’s details view to see the detailed error message (B):
 Dependency error message
Missing MonoBehaviour errors
While building, if there are a lot of errors about Missing Behavior, the UnityLinker might be mistakenly stripping out a component that it thinks is unreferenced. It often does this because the stripping level is too aggressive. For example, if you have a prefab in an AssetBundle that references the SpriteShape component in the 2D SpriteShape package, the object might be missing and might generate compiler warnings.
To fix this, you can either lower the stripping level for the UnityLinker or declare the package’s assemblies inside the link.xml file in order to preserve them from being stripped:
For more information on stripping levels and the UnityLinker, see Managed code stripping.
Package Manager missing or window doesn’t open
If your package.manifest file is malformed, an error similar to this appears in your Unity console:
You can use the information contained in the error message to fix the JSON. There are a number of online validators that you can use to try to correct the problem. Once you save the corrected file, Unity reloads the Package Manager window.
As of 2019.3, your manifest.json file should not contain any references to the com.unity.package-manager-ui package. You can either reset your project’s package configuration or remove the following line from the manifest’s dependencies list:
If you are still experiencing problems, check to see if your project manifest uses “exclude” as a package version. This is an obsolete value for the dependencies property. If you find any lines like these, remove the entire line. Package Manager only installs packages that are explicitly included as a dependency in your project, so once you remove that entry, Package Manager ignores the package and doesn’t install it.
If the Package Manager still fails to load, follow the procedures under Packages not recognized and Resetting your project’s package configuration.
Problems after upgrading Unity to new version
When you upgrade a project to a newer Unity version, the Package Manager automatically updates incompatible packages to newer compatible versions. However, if your package doesn’t compile, the Package Manager displays error messages in the Console.
To correct these messages, read the error messages and fix any problems you can. For example, a package might be missing a dependency on another package or version. In that case, you can try and install the package yourself.
You can also try the following sequence of solutions until you find something that works:
- Back up and then delete the Packages folder under your project.
- Back up and then delete the package sources in your project’s Packages folder, leaving only the manifest.json file. Then try to reload the project.
- Create a new empty project. If the Package Manager window loads successfully, replace the Library/PackageCache/com.unity.package-manager-ui@ folder in the failing project with the same folder from the newly created project.
- As a last resort, you can reset your project to the default package configuration and add back packages one at a time until it works.
Package installation fails
If you are trying to install a new package from the registry and it is not working, it might be due to permission problems.
You must have full permissions on the cache folder:
- Windows: C:UsersyournameAppDataLocalUnitycache
- MacOS:
It might be a problem with the network. Check your firewall and proxy settings.
Sometimes institutional environments, such as schools, government offices, or network-protected workplaces set up proxy servers to control traffic between the network and the Internet, and use their own server certificates which are not recognized by Unity or the Package Manager. Talk to your network administrator.
Packages not recognized
If you see a lot of compilation errors, this might indicate that Unity is not recognizing the packages in your existing project. In this case, you might be missing a .NET component.
- Download and install Visual Studio 2017 version 15.9.0 or higher with the .NET Core cross-platform development workload selected under Other Toolsets.
- Download and install the .NET SDK v2.2.101 component.
Download and install the .NET SDK v2.2.101 component.
Install any recommended updates in Visual Studio
Use homebrew to brew and install mono:
If necessary, delete the Library/obj/temp folder under your project and restart Unity.
If you are still experiencing difficulties, try rebooting your computer as well.
Loading error for hostfxr.dll on Windows
If the Console reports that the hostfxr.dll library was found, but Unity failed to load it from C:
hostfxr.dll , you can fix this error on Windows 7 or Windows Server 2008 R2 by installing both KB2999226 and KB2533623 patches.
Resetting your project’s package configuration
If a project has too many package issues, you can reset your project back to the default package configuration for the Editor’s version of Unity. This operation resets all packages in your project. This might not fix the source of the problem, but it can help you figure out what the problem is.
Note: You can’t undo resetting your package configuration, so make sure you back up the manifest.json file first or make sure your project is under source control. You can also take extra precautions by cloning your project and testing out the operation on the clone before proceeding.
To return to the default package configuration, select Reset Packages to defaults from the Help menu.
 Reset Packages to defaults»> Help > Reset Packages to defaults
Resetting a clone of your project
You can also test the return to the default packages before you perform the final change:
Clone your project by copy-pasting your project folder and renaming it so that it is easy to find (for example, if your project is called MyProject then you could use something like clone_MyProject ).
Load your newly cloned project.
From the Help menu, select Reset Packages to defaults.
Depending on the size of your project, this might take a few minutes.
Check that it successfully reset the packages. If so, you can perform the operation safely on the original project.
Authentication issues with Git URLs
If you are using the SSH protocol to install a package by Git URL, you might get an authentication error from Git, even if you are running an ssh-agent in the background and your PID environment variables are set properly.
While your script can successfully start the ssh-agent in the background, the exported environment variables are only available to the Bash shell running the script and to any child process it launches from that point on. This is because your script cannot change environment variables from parent processes, unrelated processes, or previously created child processes. And even if the script is located in .bashrc , it only gets executed in Bash shells.
When you launch Unity or the Unity Hub (both in Windows and macOS) by double-clicking the Unity icon or using the Hub, it is not running in a shell, so the script is not executed. This means that the Unity Editor process doesn’t have these variables set, so ultimately the Git process invoked by Unity doesn’t have them either.
To solve this issue, you can either:
- Open a Bash shell first (before opening the Hub) and manually launch the Unity Editor from that shell.
- If you are on Windows, you can use the setx command to permanently set the environment variables in the Windows registry before the Hub process starts. This solution works best if you can ensure that the script runs once on startup and that the Hub does not start with Windows. For example:
Источник
Classes ordered by ID number
The following sections explain how to troubleshoot and prevent problems with the Unity editor in different situations. In general, make sure your computer meets all the system requirements, it’s up-to-date, and you have the required user permissions in your system. Also make backups regularly to protect your projects.
Versions
You can install different versions of the editor in different folders. However, make sure you backup your projects as these might be upgraded by a newer version, and you won’t be able to open them in an older version of Unity. See the manual page on installing Unity for further information.
Licenses of add-ons are valid only for the Unity versions that share the same major number, for example 3.x and 4.x. If you upgrade to a minor version of Unity, for example 4.0 to 4.1, the add-ons will be kept.
Activation
Internet Activation is the preferred method to generate your license of Unity. But if you are having problems follow these steps:
- Disconnect your computer from the network, otherwise you might get a “tx_id invalid” error.
- Select Manual Activation.
- Click on Save License Request.
- Choose a known save location, for example the Downloads folder.
- Reconnect to the network and open https://license.unity3d.com/
- In the file field click Browse, and select the license request file.
- Choose the required license for Unity and fill out the information requested.
- Click Download License and save the file.
- Go back to Unity and select Manual Activation if required.
- Click on Read License and then select the downloaded license file.
If you still have problems with registering or logging in to your user account please contact support@unity3d.com.
Failure to Start
If Unity crashes when starting then firstly make sure that your computer meets the minimal system requirements. Also update to the latest graphic and sound drivers.
If you get disk write errors, you should check your user account restrictions. When in MacOS, note the “root user” is not recommended and Unity hasn’t been tested in this mode. Unity should always have write permissions for its folders, but if you are granting them manually check these folders:
On Windows:
- Unity’s installation folder
-
%AllUsersProfile%Unity(typically C:ProgramDataUnity) C:Documents and Settings<user>Local SettingsApplication DataUnityC:Users<user>AppDataLocalUnity
MacOS:
- Package contents of Unity.app
/Library/Application Support/Unity~/Library/Logs/Unity
Some users have experienced difficulties when using hard disks formated with non-native partitions, and using certain software to translate data between storage devices.
Fonts
Corrupt fonts can crash Unity, you can find damaged files following these steps:
On Windows:
- Open the fonts folder on your computer, located in the “Windows” folder.
- Select “Details” from the “View” menu.
- Check the “Size” column for fonts with a “0” size, which indicates a problematic file.
- Delete corrupt fonts and reinstall them.
On MacOS:
- Launch your Font Book application.
- Select all the fonts.
- Open the “File” menu and choose “Validate Fonts” -> problematic fonts will be shown as invalid.
- Delete corrupt fonts and reinstall them.
The system might have resources constrained, for example running in a virtual machine. Use the Task Manager to find processes consuming lots of memory.
Corrupt Project or Installation
Unity could try to open a project that is corrupt, this might include the default sample project. In such case rename or move the folder of the project. After Unity starts correctly you can restore the project’s folder if wished.
In the event of a corrupt installation, you may need to reinstall Unity — see the instructions below.
In Windows, there could be problems like installation errors, registry corruption, conflicts, etc. For example, error 0xC0000005 means the program has attempted to access memory that it shouldn’t. If you added new hardware or drivers recently, remove and replace the hardware to determine if it’s causing the problem. Run diagnostics software and check information on trouble-shooting the operating system.
Performance and Crashes
If the editor runs slowly or crashes, particularly on builds, this might be caused by all of the available system resources being consumed. Close all other applications when you build the project. Clean up the system using its utilities, and consult the Task Manager (Windows) or Activity Monitor (MacOS) to find out if there are processes using lots of resources, for example memory. Sometimes virus protection software can slow down or even block the file system with its scanning process.
Project Loss
There are many factors that can destroy a project, you should constantly backup your projects to prevent unfortunate accidents. When in MacOS, activate the TimeMachine using an external hard disk reserved for this sole purpose. After a loss you can try any of the file recovery utilities that exist, but sometimes this is irreversible.
Re-installation
Follow these steps to reinstall the editor:
-
Uninstall Unity. When in MacOS, drag the Unity app to trash.
-
Delete these files if present:
- Windows:
-
%AllUsersProfile%Unity(typically C:ProgramDataUnity)
-
- MacOS:
/Library/Application Support/Unity/
- Windows:
-
Restart the computer.
-
Download the latest version from our website, since your original install might be corrupt: http://unity3d.com/unity/download/archive
-
Reinstall Unity.
Classes ordered by ID number
Local folder or tarball paths
This section provides information on the following issues:
| Type of error: | Error message: |
|---|---|
| General startup issues | — Error messages in the Package Manager window — Package Manager missing or window doesn’t open — Problems after upgrading Unity to new version — Resetting your project’s package configuration |
| Package installation issues | — Package installation fails — Packages not recognized — Unable to add package from Git URL |
| Problems installing git dependencies | — No ‘git’ executable was found — git-lfs: command not found — Repository not found — Could not read Username: terminal prompts disabled — Can’t update Git version |
| Asset StoreA growing library of free and commercial assets created by Unity and members of the community. Offers a wide variety of assets, from textures, models and animations to whole project examples, tutorials and Editor extensions. More info See in Glossary packages (My Assets) |
— ‘Failed to parse Http response’ in My Assets context |
| Scoped registries | — Missing ‘My Registries’ in the Package Manager window |
| Issues when building packages | — Missing MonoBehaviour errors — Loading error for hostfxr.dll on Windows |
You can also run the Unity Package Manager Diagnostics tool if you are experiencing problems that might be network-related. For more information, see Network issues.
Error messages in the Package Manager window
The Package Manager displays error indicators in the Package Manager window when it encounters problems.
System-wide issues
-
Network connection issues
Error messages appear in the status bar when the Package Manager has detected an issue that isn’t related to a specific package. For example, if the Package Manager can’t access the package registry server, it displays this message in the status bar:

Network error message -
Error refreshing assets (or Error refreshing packages)
If your network can’t reach the package registry server, it’s probably because there is a connection problem with the network. When you or your system administrator fix the network error, the status bar clears.
If your network connection is working, but you aren’t signed into your Unity account, the Package Manager doesn’t display any Asset Store packages. When you try to use the My Assets context, the Package Manager displays an error in the status bar:
Logged out of Unity account Click the Sign in button inside the list view to sign into your Unity account through the Unity Hub.

Package-specific issues
-
If a specific package has a problem when loading or installing (for example, when determining which package versions to load), the error icon (
) appears in the package list next to the compromised package (A). To find out what the problem is, open the compromised package’s details view to see the detailed error message (B):Dependency error message
 ) appears in the package list next to the compromised package (A). To find out what the problem is, open the compromised package’s details view to see the detailed error message (B):
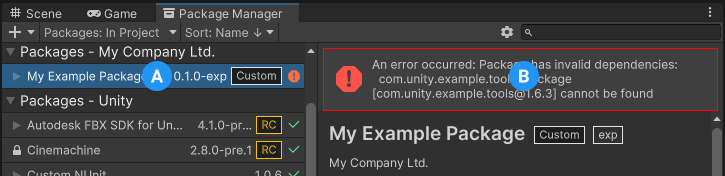
Package Manager missing or window doesn’t open
The Package Manager window might get moved offscreen or hidden by another window. When this happens, it looks like the Package Manager window failed to open. In this case, you can try to reset the window layout (Window > Layouts > Default) and reopen the Package Manager window again.
If the Package Manager window still doesn’t appear, check your Unity Console windowA Unity Editor window that shows errors, warnings and other messages generated by Unity, or your own scripts. More info
See in Glossary:
Failed to resolve packages: The file [<project-path>/Packages/manifest.json] is not valid JSON:
  Unexpected token '}' at 44:1
  }
This error message indicates that your manifest.json file is malformed. It also tells you the line number where the Package Manager failed to parse the file, so you can fix the JSON. There are a number of online validators that you can use to try to correct the problem. Once you save the corrected file, Unity reloads the Package Manager window.
If you upgraded from an early version of the Unity Editor, there may be other problems with your package manifestEach package has a manifest, which provides information about the package to the Package Manager. The manifest contains information such as the name of the package, its version, a description for users, dependencies on other packages (if any), and other details. More info
See in Glossary file:
-
As of 2019.3, your
manifest.jsonfile should not contain any references to the com.unity.package-manager-ui package. You can either reset your project’s package configuration or remove the following line from the manifest’s dependencies list:"com.unity.package-manager-ui": "2.1.1", -
Check to see if your project manifestEach Unity project has a project manifest, which acts as an entry point for the Package Manager. This file must be available in the
<project>/Packagesdirectory. The Package Manager uses it to configure many things, including a list of dependencies for that project, as well as any package repository to query for packages. More info
See in Glossary uses “exclude” as a package version. This is an obsolete value for the dependenciesIn the context of the Package Manager, a dependency is a specific package version (expressed in the formpackage_name@package_version) that a project or another package requires in order to work. Projects and packages use the dependencies attribute in their manifests to define the set of packages they require. For projects, these are considered direct dependencies; for packages, these are indirect, or transitive, dependencies. More info
See in Glossary property. If you find any lines like these, remove the entire line. Package Manager only installs packages that are explicitly included as a dependency in your project, so once you remove that entry, Package Manager ignores the package and doesn’t install it.
If the Package Manager still fails to load, follow the procedures under Packages not recognized and Resetting your project’s package configuration.
Problems after upgrading Unity to new version
When you upgrade a project to a newer Unity version, the Package Manager automatically updates incompatible packages to newer compatible versions. However, if your package doesn’t compile, the Package Manager displays error messages in the Console.
To correct these messages, read the error messages and fix any problems you can. For example, a package might be missing a dependency on another package or version. In that case, you can try and install the package yourself.
You can also try the following sequence of solutions until you find something that works:
- Back up and then delete the
Packagesfolder under your project. - Back up and then delete the package sources in your project’s
Packagesfolder, leaving only themanifest.jsonfile. Then try to reload the project. - Create a new empty project. If the Package Manager window loads successfully, replace the
Library/PackageCache/com.unity.package-manager-ui@<version>folder in the failing project with the same folder from the newly created project. - As a last resort, you can reset your project to the default packageUnity automatically pre-installs a select number of default packages (for example, the Analytics Library, Unity Timeline, etc.) when you create a new project. This differs from a bundled package because you don’t need to install it and it differs from a built-in package because it extends Unity’s features rather than being able to enable or disable them.
See in Glossary configuration and add back packages one at a time until it works.
Resetting your project’s package configuration
If a project has too many package issues, you can reset your project back to the default package configuration for the Editor’s version of Unity. This operation resets all packages in your project. This might not fix the source of the problem, but it can help you figure out what the problem is.
Note: You can’t undo resetting your package configuration, so make sure you back up the manifest.json file first or make sure your project is under source control. You can also take extra precautions by cloning your project and testing out the operation on the clone before proceeding.
To return to the default package configuration, select Reset Packages to defaults from the Help menu.
Resetting a clone of your project
You can also test the return to the default packages before you perform the final change:
-
Clone your project by copy-pasting your project folder and renaming it so that it is easy to find (for example, if your project is called
MyProjectthen you could use something likeclone_MyProject). -
Load your newly cloned project.
-
From the Help menu, select Reset Packages to defaults.
Depending on the size of your project, this might take a few minutes.
-
Check that it successfully reset the packages. If so, you can perform the operation safely on the original project.
Package installation fails
If you are trying to install a new package from the registry and it is not working, it might be due to permission problems.
You must have full permissions on the cache folder:
- Windows:
C:UsersyournameAppDataLocalUnitycache - macOS:
~/Library/Unity/cache - Linux:
~/.config/unity3d/cache
It might be a problem with the network. Check your firewall and proxy settings.
Sometimes institutional environments, such as schools, government offices, or network-protected workplaces set up proxy servers to control traffic between the network and the Internet, and use their own server certificates which are not recognized by Unity or the Package Manager. Talk to your network administrator.
Packages not recognized
If you see a lot of compilation errors, this might indicate that Unity is not recognizing the packages in your existing project. In this case, you might be missing a .NET component.
For Windows:
- Download and install Visual Studio 2017 version 15.9.0 or higher with the .NET Core cross-platform development workload selected under Other Toolsets.
- Download and install the .NET SDK v2.2.101 component.
For MacOS:
-
Download and install the .NET SDK v2.2.101 component.
-
Install any recommended updates in Visual Studio
-
Use homebrew to brew and install mono:
brew update brew install mono # optional brew upgrade mono -
If necessary, delete the
Library/obj/tempfolder under your project and restart Unity. -
If you are still experiencing difficulties, try rebooting your computer as well.
Unable to add package from Git URL
See Repository not found.
No ‘git’ executable was found
If you try to install a package from a git URL, a message similar to this appears:
Cannot perform upm operation: Unable to add package
[https://github.example.com/myuser/myrepository.git]:
No 'git' executable was found. Please install Git on your system and restart Unity [NotFound]
UnityEditor.EditorApplication:Internal_CallUpdateFunctions()
git-lfs: command not found
If you are trying to download a package that uses Git LFS (Large File Storage), you might see this error message:
Error when executing git command. git-lfs filter-process: command not found.
This indicates that Git LFS is probably not installed on your machine. To make sure, you could test it on the command line:
git lfs --version
If you see something like this, Git LFS is installed:
git-lfs/2.8.0 (GitHub; darwin amd64; go 1.12.7)
Otherwise, you can install it by following the Bitbucket GitHub instructions.
Repository not found
If you specify a location that does not exist, a message similar to this one appears in the Unity Console:
Cannot perform upm operation: Unable to add package [https://mycompany.github.com/gitproject/com.mycompany.mypackage.git]:
  Error when executing git command. fatal: repository 'https://mycompany.github.com/gitproject/com.mycompany.mypackage.git/' not found
 [NotFound]
UnityEditor.EditorApplication:Internal_CallUpdateFunctions() (at /Users/builduser/buildslave/unity/build/Editor/Mono/EditorApplication.cs:310)
Check your spelling. To make sure you are using the correct URL, go to the repository’s page and copy the URL from the Clone button:

Click the button to the right of the URL on GitHub (A) or GitLab (B) to copy the URL to your clipboard.
If the location of the repository is correct, there may be another problem with the URL:
- If you are targeting a specific revision, make sure your revision comes last. For example:
https://github.example.com/myuser/myrepository1.git#revision - If you are targeting a revision and the package is not at the root, make sure the
pathquery parameter precedes the revision anchor. For example:https://github.example.com/myuser/myrepository.git?path=/example/folder#v1.2.3
Could not read Username: terminal prompts disabled
If you are trying to install a package from a private repository that requires authentication, a message similar to this one appears in the Unity Console:
Cannot perform upm operation: Unable to add package [https://mycompany.github.com/gitproject/com.mycompany.mypackage.git]:
  Error when executing git command. fatal: could not read Username for 'https://mycompany.github.com': terminal prompts disabled
 [NotFound]
UnityEditor.EditorApplication:Internal_CallUpdateFunctions() (at /Users/builduser/buildslave/unity/build/Editor/Mono/EditorApplication.cs:310)
This message is likely due to the fact that Package Manager does not provide an interactive terminal or dialog where you can enter your username and password for HTTP, or your passphrase to unlock your SSH key:
-
With HTTP(S), every time you log onto BitBucket, GitHub or GitLab you need to enter your username and password in a terminal or a dialog box. However, the Package Manager does not provide an interactive terminal or dialog where you can enter your username and password for HTTP(S).
To bypass this, use one of the workarounds suggested in Solutions for HTTPS.
-
SSH uses a pair of public and private SSH keys. You can add your public SSH key to Bitbucket, GitHub or GitLab and then access repositories without having to enter a username and password.
However, if you have set up a passphrase to keep your SSH key safe, you still have to enter that passphrase in a terminal or a dialog box in order to authorize your key. In that case, you can use an SSH agent that can unlock your SSH key to authenticate with the Package Manager on your behalf.
Solutions for HTTPS
The Package Manager does not provide an interactive terminal or dialog where you can enter your HTTP(S) username and password. To bypass this, use one of these workarounds:
- Use a credential manager (Git Credential Manager for Windows or OSXKeyChain). Credential managers handle sending the password without having to use a terminal or a command prompt.
- Use git-credentials from a terminal or command prompt. Then launch the Hub from the same terminal so that Unity has access to the cached or stored credentials.
- Use SSH to authenticate instead. If you set up your SSH key without a passphrase, the Package Manager doesn’t have to decrypt it in order to authenticate with the Git server. If you decide to use a passphrase for added security, you can still get around the authentication problem by using the ssh-agent on either macOS or Windows.
Solutions for SSH
If you are using the SSH protocol to install a package by Git URL, you might get an authentication error from Git. This typically happens when you set up a private SSH key on your local machine that is protected by a passphrase.
The solution to this problem is to set up an SSH agent that can unlock your SSH key to authenticate with the Package Manager on your behalf. Follow the instructions in the section that corresponds to your operating system:
- Setting up OpenSSH for Windows
- Adding SSH keys to your SSH Agent for macOS
Setting up OpenSSH for Windows
The native Windows OpenSSH version of the ssh-agent works better than the version available by default with Git for Windows. This procedure explains how to set up the OpenSSH client and add your key to its ssh-agent. If you are using Git for Windows, you can also prioritize the native Windows OpenSSH over the Git for Windows SSH agent:
-
Make sure the OpenSSH Client is installed by searching for it in the Windows Settings Optional features window (Start > Settings, then search for “Optional features”). This applies to Windows 10+.
-
Check your
%PATH%environment variable to make sure the native Windows OpenSSH location appears (for example,C:WINDOWSSystem32OpenSSH).Note: If you are already using Git for Windows, make sure the native Windows OpenSSH location appears before the Git for Windows SSH location in your
%PATH%variable. This ensures that Windows uses the native Windows OpenSSH agent over the Git for Windows SSH agent. -
In a PowerShell terminal, start the
ssh-agentprocess and make sure it starts automatically:# Set the ssh-agent service to start automatically and manually start it now Get-Service ssh-agent | Set-Service -StartupType Automatic # Run the ssh-agent process to start the ssh-agent service ssh-agent -
Import your key into the ssh-agent by running
ssh-addon the command line and then following the instructions. By default, the agent adds the%USERPROFILE%.sshid_rsakey and prompts you for the password.# Import the key ssh-addTo use a different key, you can specify it as an argument:
# Set the ssh-agent service to start automatically and manually start it now
ssh-add <your-secure-ssh-key-name>
If you can’t remember the name of your key, you can ask the agent to list them:
ssh-add -l -
If you installed Git for Windows, reset the
%GIT-SSH%environment variable to make sure that Git always uses the native Windows OpenSSH version of the ssh-agent:[Environment]::SetEnvironmentVariable("GIT_SSH", "$((Get-Command ssh).Source)", [System.EnvironmentVariableTarget]::User)
Adding SSH keys to your SSH Agent for macOS
Use the ssh-add command to add your SSH keys to the ssh-agent running on your macOS system. The command parameter you use depends on your version of macOS:
-
Prior to macOS 12, use:
ssh-add -K ~/.ssh/<your-secure-ssh-key-name> -
Starting with macOS 12, use:
ssh-add --apple-use-keychain ~/.ssh/<your-secure-ssh-key-name>
After you run this command, the terminal asks for the password to unlock your SSH key and then adds it to the macOS keychain. However, once you restart your system, every key stored in the ssh-agent is reset.
To prevent re-entering your password after restarting your system, open the ~/.ssh/config file (or create one if you don’t find it), and add the following:
Host *
    UseKeychain yes
    AddKeysToAgent yes
    IdentityFile ~/.ssh/<your-secure-ssh-key-name>
Restart your machine to apply these changes.
Can’t update Git version
If you are trying to update your Git dependencyThe Package Manager retrieves Git dependencies from a Git repository directly rather than from a package registry. Git dependencies use a Git URL reference instead of a version, and there’s no guarantee about the package quality, stability, validity, or even whether the version stated in its package.json file respects Semantic Versioning rules with regards to officially published releases of this package. More info
See in Glossary to a newer version from the repository, but it’s not working, it’s probably because your Git dependency is locked. If you want to update your Git dependency to a newer version from the repository, use the Add package from git URL button and enter a Git URL. For more information, see Locked Git dependencies.
‘Failed to parse Http response’ in My Assets context
If you see the following message in the Console window when trying to download an Asset Store package, there might be a problem with your Asset Store cache:
[PackageManager] Error Failed to parse response. UnityEditor.AsyncHTTPClientone(State, Int32)
To solve this problem, delete all downloaded assets from the Asset Store package directory and then try downloading the assets again.
Warning: If your project contains a lot of asset data, this might take a lot of time and bandwidth to re-download everything.
Missing ‘My Registries’ in the Package Manager window
Not all registry providers are compatible with Unity’s Package Manager. If the package registry server you added does not implement the /-/v1/search or /-/all endpoints, your scoped registry is not compatible with Unity’s Package Manager, and doesn’t appear in the My Registries context in the Package Manager window.
Missing MonoBehaviour errors
While building, if there are a lot of errors about Missing Behavior, the UnityLinker might be mistakenly stripping out a component that it thinks is unreferenced. It often does this because the stripping level is too aggressive. For example, if you have a prefabAn asset type that allows you to store a GameObject complete with components and properties. The prefab acts as a template from which you can create new object instances in the scene. More info
See in Glossary in an AssetBundle that references the SpriteShape component in the 2D SpriteShape package, the object might be missing and might generate compiler warnings.
To fix this, you can either lower the stripping level for the UnityLinker or declare the package’s assemblies inside the link.xml file in order to preserve them from being stripped:
<linker>
    <assembly fullname="Unity.2D.SpriteShape.Runtime" preserve="all"/>
    <assembly fullname="Unity.2D.Common.Runtime" preserve="all"/>
 </linker>
For more information on stripping levels and the UnityLinker, see Managed code stripping.
Loading error for hostfxr.dll on Windows
If the Console reports that the hostfxr.dll library was found, but Unity failed to load it from C:<path_to_app>hostfxr.dll, you can fix this error on Windows 7 or Windows Server 2008 R2 by installing both KB2999226 and KB2533623 patches.
Local folder or tarball paths