-
Patrick795
- Posts: 6
- Joined: Fri Jun 14, 2019 2:32 pm
- ZCS/ZD Version: Release 8.8.12.GA.3794.UBUNTU16.64
Mailboxd start problem
Hi,
i’ve got a problem with my zimbra installation.
A few days ago i installed updates with «apt-get upgrade». Also zimbra packages were updated.
After this i never restarted zimbra. Yesterday i renewed (successfull, like thousand times before) the letsencrypt ssl cert and restarted zimbra with «zmcontrol restart» to use the new certificate.
Zimbra started «ldap», «zmconfigd» and «logger» successful, but «mailbox» doesn’t want to start.
In «zmmailbox.out» there is the following error message:
Code: Select all
Unrecognized option: --module-path
Error: Could not create the Java Virtual Machine.
Error: A fatal exception has occurred. Program will exit.
So the used java version doesnt’t know the option «—module-path».
Other (newer) versions like openjdk 9 say the same.
Does anybody know what could be the problem with my zimbra installation?
Additional Infos:
zimbra version:
Release 8.8.12.GA.3794.UBUNTU16.64 UBUNTU16_64 FOSS edition, Patch 8.8.12_P3
java version:
openjdk version «1.8.0_172-zimbra»
-

DualBoot
- Elite member

- Posts: 1326
- Joined: Mon Apr 18, 2016 8:18 pm
- Location: France — Earth
- ZCS/ZD Version: ZCS FLOSS — 8.8.15 Mutli servers
-
Contact:


Re: Mailboxd start problem
Postby DualBoot » Fri Jun 14, 2019 3:30 pm
Hello,
can you check your localconfig :
zmlocalconfig | grep java | grep module
to see where java is calling module-path . On a ZCS 8.7, there is no such option.
Regards,
-
Patrick795
- Posts: 6
- Joined: Fri Jun 14, 2019 2:32 pm
- ZCS/ZD Version: Release 8.8.12.GA.3794.UBUNTU16.64
Re: Mailboxd start problem
Postby Patrick795 » Fri Jun 14, 2019 7:04 pm
DualBoot wrote:Hello,
can you check your localconfig :
zmlocalconfig | grep java | grep module
to see where java is calling module-path . On a ZCS 8.7, there is no such option.Regards,
Hello,
the command «zmlocalconfig | grep java | grep module» results in no output ![]() .
.
The result of «zmlocalconfig | grep java» is:
Code: Select all
imapd_java_heap_new_size_percent = ${mailboxd_java_heap_new_size_percent}
imapd_java_heap_size =
imapd_java_options =
javamail_imap_debug = false
javamail_imap_enable_starttls = true
javamail_imap_test_timeout = 20
javamail_imap_timeout = 60
javamail_pop3_debug = false
javamail_pop3_enable_starttls = true
javamail_pop3_test_timeout = 20
javamail_pop3_timeout = 60
javamail_smtp_debug = false
javamail_smtp_enable_starttls = true
javamail_smtp_timeout = 60
javamail_zparser = true
javamail_zsmtp = true
mailboxd_java_heap_new_size_percent = 25
mailboxd_java_heap_size = 2995
mailboxd_java_options = -server -Dhttps.protocols=TLSv1,TLSv1.1,TLSv1.2 -Djdk.tls.client.protocols=TLSv1,TLSv1.1,TLSv1.2 -Djava.awt.headless=true -Dsun.net.inetaddr.ttl=${networkaddress_cache_ttl} -Dorg.apache.jasper.compiler.disablejsr199=true -XX:+UseConcMarkSweepGC -XX:SoftRefLRUPolicyMSPerMB=1 -verbose:gc -XX:+PrintGCDetails -XX:+PrintGCDateStamps -XX:+PrintGCApplicationStoppedTime -XX:-OmitStackTraceInFastThrow -Xloggc:/opt/zimbra/log/gc.log -XX:-UseGCLogFileRotation -XX:NumberOfGCLogFiles=20 -XX:GCLogFileSize=4096K -Djava.net.preferIPv4Stack=true
mailboxd_truststore = /opt/zimbra/common/lib/jvm/java/jre/lib/security/cacerts
spnego_java_options = -Djava.security.krb5.conf=${mailboxd_directory}/etc/krb5.ini -Djava.security.auth.login.config=${mailboxd_directory}/etc/spnego.conf -Djavax.security.auth.useSubjectCredsOnly=false
zimbra_java_home = /opt/zimbra/common/lib/jvm/java
zimbra_zmjava_java_ext_dirs =
zimbra_zmjava_java_library_path =
zimbra_zmjava_options = -Xmx256m -Dhttps.protocols=TLSv1,TLSv1.1,TLSv1.2 -Djdk.tls.client.protocols=TLSv1,TLSv1.1,TLSv1.2 -Djava.net.preferIPv4Stack=true
-
DualBoot
- Elite member
- Posts: 1326
- Joined: Mon Apr 18, 2016 8:18 pm
- Location: France — Earth
- ZCS/ZD Version: ZCS FLOSS — 8.8.15 Mutli servers
- Contact:
Re: Mailboxd start problem
Postby DualBoot » Mon Jun 17, 2019 8:02 am
Hello,
check if module-path option is present into /opt/zimbra/bin/zmmailboxdctl
And post also the output of the following command as Zimbra user :
which java
Regards,
-
Patrick795
- Posts: 6
- Joined: Fri Jun 14, 2019 2:32 pm
- ZCS/ZD Version: Release 8.8.12.GA.3794.UBUNTU16.64
Re: Mailboxd start problem
Postby Patrick795 » Mon Jun 17, 2019 1:00 pm
DualBoot wrote:Hello,
check if module-path option is present into /opt/zimbra/bin/zmmailboxdctl
And post also the output of the following command as Zimbra user :
which javaRegards,
Hi,
you mean if i open the file? No there is no module-path option:
Code: Select all
#!/bin/bash
#
# ***** BEGIN LICENSE BLOCK *****
# Zimbra Collaboration Suite Server
# Copyright (C) 2005, 2006, 2007, 2008, 2009, 2010, 2011, 2012, 2013, 2014, 2015, 2016 Synacor, Inc.
#
# This program is free software: you can redistribute it and/or modify it under
# the terms of the GNU General Public License as published by the Free Software Foundation,
# version 2 of the License.
#
# This program is distributed in the hope that it will be useful, but WITHOUT ANY WARRANTY;
# without even the implied warranty of MERCHANTABILITY or FITNESS FOR A PARTICULAR PURPOSE.
# See the GNU General Public License for more details.
# You should have received a copy of the GNU General Public License along with this program.
# If not, see <https://www.gnu.org/licenses/>.
# ***** END LICENSE BLOCK *****
#
source `dirname $0`/zmshutil || exit 1
zmsetvars
if [ ! -d ${mailboxd_directory} ]; then
exit 0
fi
if [ ! -x /opt/zimbra/common/bin/mysql ]; then
exit 0
fi
if [ ! -d ${zimbra_java_home} ]; then
exit 0
fi
NC=`which nc 2>/dev/null`; NC=${NC:-`which netcat 2>/dev/null`}
platform=`/opt/zimbra/libexec/get_plat_tag.sh`
#
# Memory for use by JVM.
#
javaXmx=${mailboxd_java_heap_size:=512}
javaXms=${javaXmx}
mailboxd_java_heap_new_size_percent=${mailboxd_java_heap_new_size_percent:=25}
javaXmn=$(expr ${javaXmx} '*' ${mailboxd_java_heap_new_size_percent} / 100)
#
# Spnego - the spnego_options_file is written by zmconfigd
# to avoid a zmprov call here.
#
spnego_options_file=/opt/zimbra/conf/spnego_java_options
if [ -e ${spnego_options_file} ]; then
spnegoJavaOptions=$(cat $spnego_options_file)
fi
#
# Expand war files.
#
mk_download_dir() {
if [ -d "${mailboxd_directory}/webapps/zimbra/downloads" ]; then
/opt/zimbra/libexec/zmupdatedownload
fi
}
#
# Main
#
case "$1" in
'start')
mk_download_dir
if [ "x$2" = "x" ]; then
/opt/zimbra/bin/zmtlsctl > /dev/null 2>&1
fi
sudo /opt/zimbra/libexec/zmmailboxdmgr status
if [ $? = 0 ]; then
echo "mailboxd already running."
exit 0
fi
mkdir -p ${mailboxd_directory}/work/service/jsp
mkdir -p ${mailboxd_directory}/work/zimbra/jsp
mkdir -p ${mailboxd_directory}/work/zimbraAdmin/jsp
if [ ! -d ${mailboxd_directory}/webapps/zimlet/WEB-INF ]; then
mkdir -p ${mailboxd_directory}/webapps/zimlet/WEB-INF
fi
mailboxd_thread_stack_size=${mailboxd_thread_stack_size:=256k}
if [ -z "`echo ${mailboxd_java_options} | grep Xss`" ]; then
mailboxd_java_options="${mailboxd_java_options} -Xss${mailboxd_thread_stack_size}"
fi
networkaddress_cache_ttl=${networkaddress_cache_ttl:=60}
if [ -z "`echo ${mailboxd_java_options} | grep sun.net.inetaddr.ttl`" ]; then
mailboxd_java_options="${mailboxd_java_options} -Dsun.net.inetaddr.ttl=${networkaddress_cache_ttl}"
fi
echo -n "Starting mailboxd..."
sudo /opt/zimbra/libexec/zmmailboxdmgr start
-Dfile.encoding=UTF-8 ${mailboxd_java_options} ${spnegoJavaOptions} -Xms${javaXms}m
-Xmx${javaXmx}m -Xmn${javaXmn}m < /dev/null > /dev/null 2>&1
status=$?
if [ $status != 0 ]; then
echo "failed."
exit $status
fi
status=1
MPORT=`/opt/zimbra/bin/zmprov -l gs ${zimbra_server_hostname} zimbraMailPort | grep zimbraMailPort: | awk '{print $2}'`
if [ x$platform = "xRHEL7_64" ]; then
ncOpt="--send-only --recv-only"
else
ncOpt="-z"
fi
for ((i=0; i < 12; i++)); do
$NC $ncOpt localhost ${MPORT} >/dev/null 2>&1
if [ $? = 0 ]; then
status=0
break
fi
sleep 5
done
if [ $status = 0 ]; then
echo "done."
else
echo "failed."
fi
exit $status
;;
'kill'|'stop')
echo -n "Stopping mailboxd..."
sudo /opt/zimbra/libexec/zmmailboxdmgr status
if [ $? != 0 ]; then
echo "mailboxd is not running."
exit 0
fi
/opt/zimbra/bin/zmthrdump -i -o /opt/zimbra/log/stacktrace.$$.$(date +%Y%m%d%H%M%S) 2> /dev/null
sudo /opt/zimbra/libexec/zmmailboxdmgr stop
if [ $? = 0 ]; then
echo "done."
else
echo "failed."
fi
exit 0
;;
'restart'|'reload')
$0 stop
$0 start $2
;;
'status')
echo -n "mailboxd is "
sudo /opt/zimbra/libexec/zmmailboxdmgr status
if [ $? = 0 ]; then
echo "running."
exit 0
else
echo "not running."
exit 1
fi
;;
'update')
mk_download_dir
;;
*)
echo "Usage: $0 start|stop|kill|restart|reload|status|update"
exit 1
;;
esac
Result of «which java»:
Code: Select all
/opt/zimbra/common/lib/jvm/java/bin/java
-
DualBoot
- Elite member
- Posts: 1326
- Joined: Mon Apr 18, 2016 8:18 pm
- Location: France — Earth
- ZCS/ZD Version: ZCS FLOSS — 8.8.15 Mutli servers
- Contact:
Re: Mailboxd start problem
Postby DualBoot » Mon Jun 17, 2019 1:27 pm
quite weird … Sorry I have no more idea
-
Patrick795
- Posts: 6
- Joined: Fri Jun 14, 2019 2:32 pm
- ZCS/ZD Version: Release 8.8.12.GA.3794.UBUNTU16.64
Re: Mailboxd start problem
Postby Patrick795 » Mon Jun 17, 2019 2:11 pm
DualBoot wrote:quite weird … Sorry I have no more idea
Hm ok, nevertheless thank you!
Maybe i’m going to try a fresh install and try to «import» my data. I don’t know how yet or if it’s possible without loosing data, but i will find it out.
If sombody else have any idea, please let me know!
-
Patrick795
- Posts: 6
- Joined: Fri Jun 14, 2019 2:32 pm
- ZCS/ZD Version: Release 8.8.12.GA.3794.UBUNTU16.64
Re: Mailboxd start problem
Postby Patrick795 » Tue Jun 25, 2019 4:06 pm
After a lot of work and many hours my zimbra server is finally running again.
My server is running a really long time, so there were a lot of zimbra updates and also distribution upgrades in the past.
To get it running again i needed to change the java version of zimbra manually, also change some binary files of the installation. I also changed a lot of configurations.
There were so many things to do, that i cannot list the things here. After one error was fxed, i got the next one.
There was also a problem with not updated databases files. I updated them with update scripts which come with the zimbra installation manually.
This topic can be closed.
Return to “Installation and Upgrade”
Who is online
Users browsing this forum: No registered users and 13 guests
In this article, we will find something out about how to create JavaFX project with Maven. It will help us improving productivity, performance when we can program automatically small task with desktop applications.
Let’s get started.
Table of contents
- What is JavaFX
- Creating JavaFX Project with Maven
- Wrapping up
What is JavaFX
According to wikipedia.com, we have:
JavaFX is a software platform for creating and delivering desktop applications, as well as rich Internet applications that can run across a wide variety of devices.

JavaFX is intended to replace Swing as the standard GUI library for Java SE, but both will be included for the foreseeable future. JavaFX has support for desktop computers and web browsers on Microsoft Windows, Linux, and macOS. Since the JDK 11 release in 2018, JavaFX is part of the open-source OpenJDK, under the OpenJFX project.

Oracle 'Premier Support' for JavaFX is also available, for the current long-term version (Java JDK 8), through March 2022.
-
Use
archetypein maven to create projectWhen we refer to this link, we can find that there are so many packages for JavaFX. But in this section, we need to focus on two archetypes that are supported by Maven.
They include:
-
FXML JavaFX Maven Archetype
<dependency> <groupId>org.openjfx</groupId> <artifactId>javafx-archetype-fxml</artifactId> <version>0.0.3</version> </dependency> -
Simple JavaFX Maven Archetype
  <dependency>
      <groupId>org.openjfx</groupId>
      <artifactId>javafx-archetype-simple</artifactId>
      <version>0.0.3</version>
  </dependency>
Both archetypes for JavaFX have three version, from
0.0.1to0.0.3.So, in our project, we find that
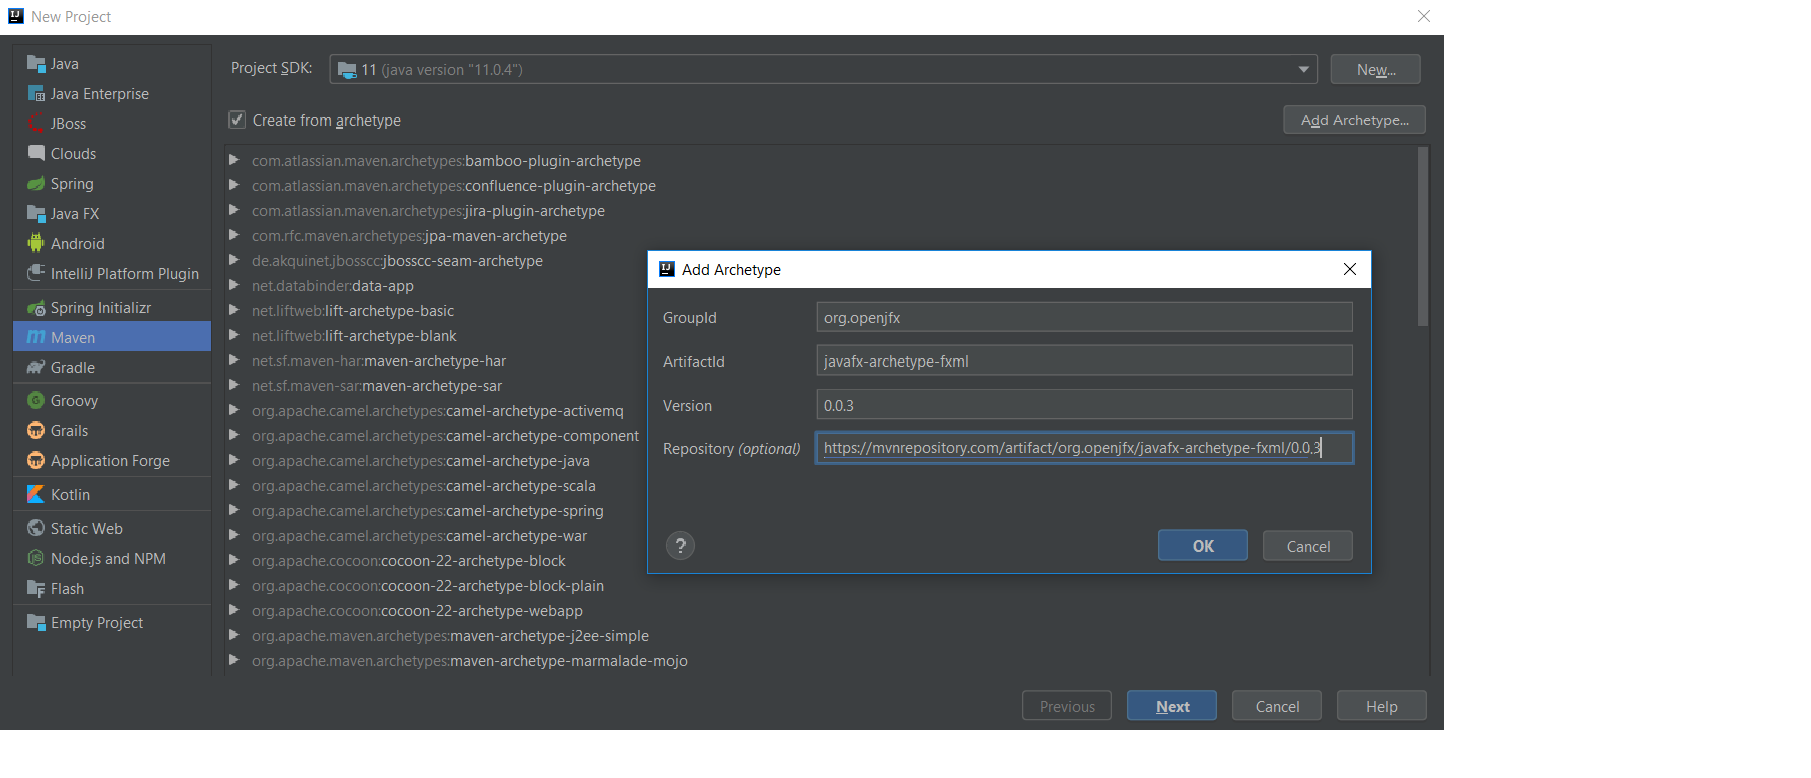
javafx-archetype-fxmldoes not belong to current archetypes of Maven. So, we need to addjavafx-archetype-fxmlin our Maven.First, select
File -> New -> Project -> Maven, and enableCreate from archetype.If the JavaFX
javafx-archetype-fxmlhas not installed yet, selectAdd archetype ..., and fill information to follow a below dialog:Once installed, select this artifact, and Next button.
-
-
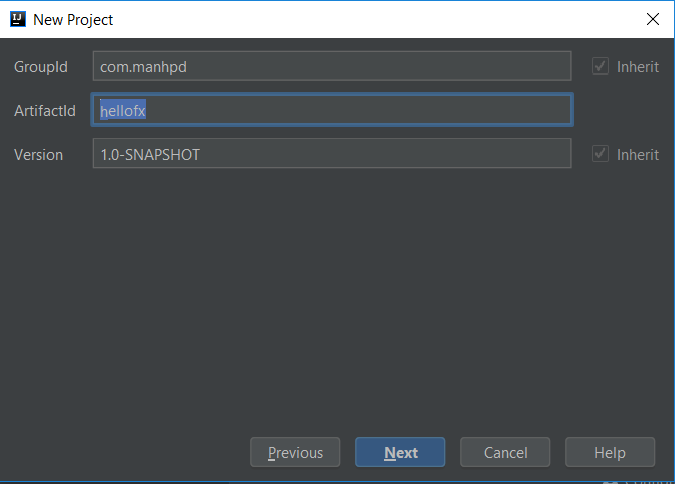
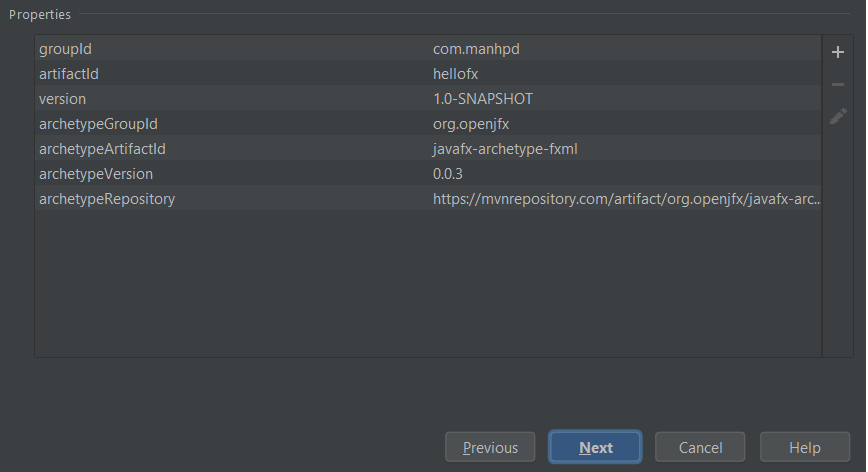
Create groupId, artifactId, version for our project and confirm again
-
After finishing to creat javafx project, move on
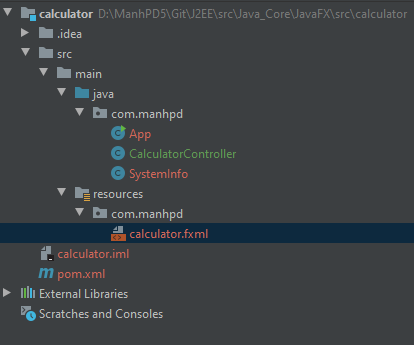
pom.xmlfile.First, we can see the structure of javafx project with Maven:
Second, content of
pom.xmlfile:<project xmlns="http://maven.apache.org/POM/4.0.0" xmlns:xsi="http://www.w3.org/2001/XMLSchema-instance" xsi:schemaLocation="http://maven.apache.org/POM/4.0.0 http://maven.apache.org/maven-v4_0_0.xsd"> <modelVersion>4.0.0</modelVersion> <groupId>com.manhpd</groupId> <artifactId>hellofx</artifactId> <version>1.0-SNAPSHOT</version> <properties> <project.build.sourceEncoding>UTF-8</project.build.sourceEncoding> <maven.compiler.source>11</maven.compiler.source> <maven.compiler.target>11</maven.compiler.target> </properties> <dependencies> <dependency> <groupId>org.openjfx</groupId> <artifactId>javafx-controls</artifactId> <version>13</version> </dependency> <dependency> <groupId>org.openjfx</groupId> <artifactId>javafx-fxml</artifactId> <version>13</version> </dependency> </dependencies> <build> <plugins> <plugin> <groupId>org.apache.maven.plugins</groupId> <artifactId>maven-compiler-plugin</artifactId> <version>3.8.0</version> <configuration> <release>11</release> </configuration> </plugin> <plugin> <groupId>org.openjfx</groupId> <artifactId>javafx-maven-plugin</artifactId> <version>0.0.3</version> <configuration> <mainClass>com.manhpd.App</mainClass> </configuration> </plugin> </plugins> </build> </project>Finally, we also insert some dependencies such as
javafx-graphics, andjavafx-media. -
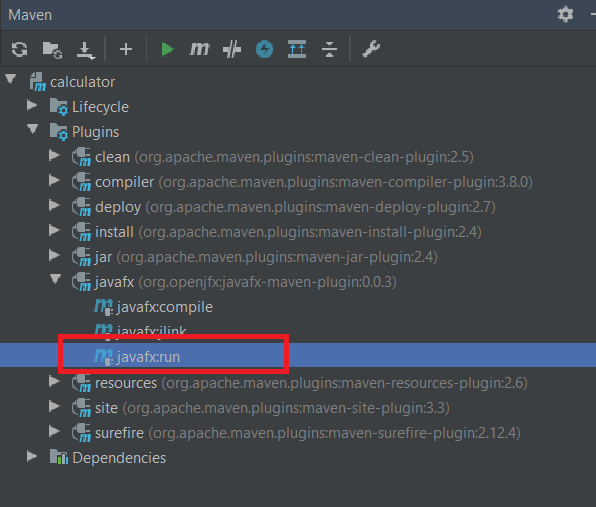
Run our project
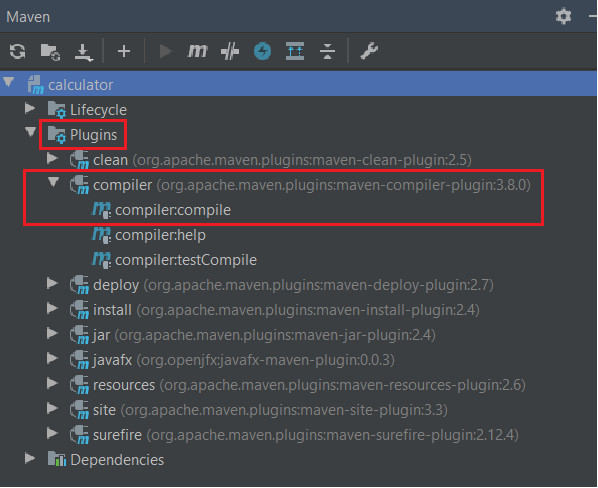
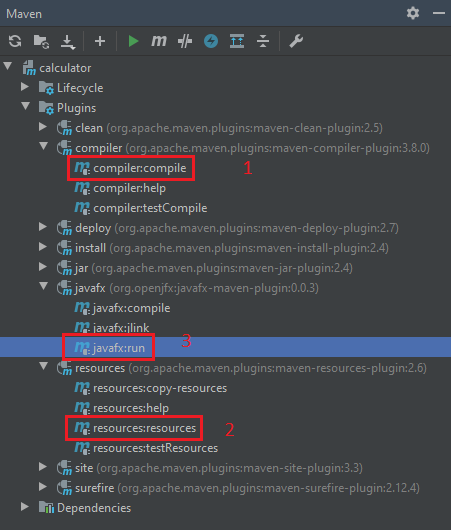
In Maven tab, we choose
Plugins, thencompilerparent in hierarchy project. Selectcompiler:compile.After compiling , we need to run
Plugins -> javafx -> javafx:run. -
Common problems when creating JavaFX project
-
Location is requiredSolution:
-
First way, we can specify the path of our
fxmlfile such as:URL url = new File("src/main/resources/fxml/calculator.fxml").toURI().toURL(); Parent root = FXMLLoader.load(url); -
Second way, we will do the following steps:
-
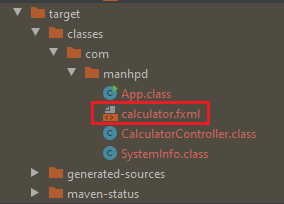
Assuming that our project have structure and some plugins:
We created
com.manhpdinresourcesfolder to put all.fxmlfiles into the same folder with our source.classfiles.So, in our code, we only need to use relative path in segment code:
getClass().getResource("calculator.fxml"); -
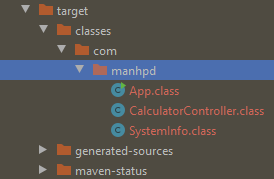
Run
mvn compiler:compileIt belongs to
maven-compiler-plugin.After run this command, we have:
It does not have
calculator.fxmlfile. So, after run commandmvn javafx:run, our program do not find this file, it will throw an exceptionLocation is requiredorNullPointerExceptioningetClass().getResource("calculator.fxml");.So, to solve this problem, we will move on the next steps.
-
Run
mvn resources:resourcesIt belongs to
maven-resources-plugin.Refer to this link.
The Resources Plugin handles the copying of project resources to the output directory.
There are two different kinds of resources: main resources and test resources. The difference is that the main resources are the resources associated to the main source code while the test resources are associated to the test source code.
resources:resourcescopies the resources for the main source code to the main output directory.This goal usually executes automatically, because it is bound by default to the process-resources life-cycle phase. It always uses the
project.build.resourceselement to specify the resources, and by default uses theproject.build.outputDirectoryto specify the copy destination.After running
mvn resources:resources, our built folder can have: -
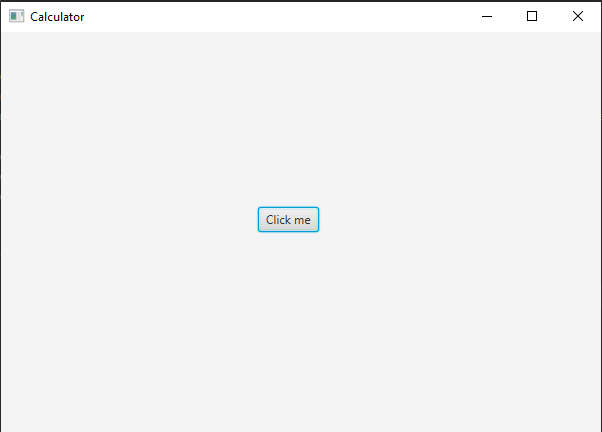
Run
mvn javafx:runWe have result:
-
-
-
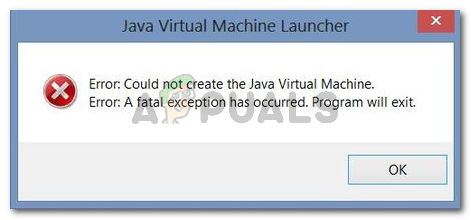
Command execution failed.After run all above steps, we can encounter error like a below image:
  Error: Could not create the Java Virtual Machine.
  Error: A fatal exception has occurred. Program will exit.
  Unrecognized option: --module-path
  [ERROR] Command execution failed.
Unrecognized option: --module-pathmeans that you are running with Java 1.8. We need to set JDK 11/12 before runningmvn javafx:run.To fix this problem, we should insert
<configuration><executable>/path/to/jdk-11-12/bin/java</executable></configuration>into javafx-maven-plugin of pom.xml file.<plugin> <groupId>org.openjfx</groupId> <artifactId>javafx-maven-plugin</artifactId> <version>0.0.3</version> <configuration> <mainClass>org.openjfx.App</mainClass> <executable>C:Program FilesJavajdk-11.0.4binjava</executable> </configuration> </plugin>
Note:
-
getClass().getClassLoader().getResource(...)will load a resource from a path relative to the classpath. Since you placed the FXML file in theapplicationpacakge, you need:Parent root=FXMLLoader.load(getClass().getClassLoader().getResource("application/Main.fxml"));If you just use
getClass().getResource(...), and do not prefix the path with/, it will load from a path relative to the current class. So,Parent root=FXMLLoader.load(getClass().getResource("Main.fxml"));Make sure that our FXML file is being exported to the build folder, along with the
.classfiles.
-

Wrapping up
- Understanding about how to create our javafx project.
Refer:
https://openjfx.io/openjfx-docs/#maven
https://github.com/openjfx/samples
https://github.com/openjfx/javafx-maven-plugin
https://stackoverflow.com/questions/52906773/intellij-idea-error-javafx-runtime-components-are-missing-and-are-required-t
https://mvnrepository.com/artifact/org.openjfx
Some users are encountering the Could Not Create The Java Virtual Machine error when trying to launch an application that is using Java. This particular issue is reported to occur with Minecraft and several other applications that are built around Java.
Error: A fatal exception has occurred. The program will exit.
What is causing the Could Not Create The Java Virtual Machine error?
We investigated this particular issue by looking at various user reports and the troubleshooting strategies that they used to resolve the same error message. Based on their conclusions, there are a couple of scenarios that will trigger this particular issue:
- Java is invoked by the wrong arguments or options – This can occur if you’re running a home-brewed application or you’re trying to open an open-source application that is known to cause system instability.
- Java global maximum heap memory is not high enough – One of the most common causes of why you can encounter this particular error is if you try to start a Java application with a maximum heap memory size larger than the one set as the System Variable.
- Java executable and/or application require administrative privileges – This might happen with applications that need admin access in order to function properly.
If you’re currently looking for a way to resolve the, Could Not Create The Java Virtual Machine error, this article will provide you with several verified troubleshooting strategies. Below you have a collection of methods that other users in a similar situation have used to get the issue resolved.
To ensure the best results, follow the methods below in the order that they are presented until you discover a method that is effective in resolving the error for your particular scenario.
Method 1: Adding the _JAVA_OPTIONS to System Variables
Most affected users have managed to get the issue resolved by creating a System Variable for Java called _JAVA_OPTIONS and setting it’s value to Xmx512M. What this essentially does is it sets the global maximum heap memory size for Java.
This will resolve any error message that occurs because the started Java application’s maximum heap memory size is larger than the one set as the System Variable. Several users encountering the same issue have reported that the issue was resolved entirely after they performed the steps below.
Here’s what you need to do to add a _JAVA_OPTIONS entry in System Variables to enlarge the global maximum heap memory size:
- Press Windows key + R to open up a Run dialog box. Then, type “sysdm.cpl” and press Enter to open up the System Properties screen.
- Inside the System Properties screen, go to the Advanced tab and click on Environment Variables.
- In the Environment Variables window, click on New (under System Variables).
- Inside the New System Variable window, set the Variable name to _JAVA_OPTIONS and the Variable value to –Xmx512M and click Ok to save the changes.
- Close the previously opened windows and restart your machine to enforce the changes.
- At the next startup, open the application that was previously showing you the Could Not Create the Java Virtual Machine error and see if is now functioning properly.

If you’re still seeing the same error message at the start of the application, try adding the Java Bin path which might be similar to “%USER PATHJavajdk1.6.0_39bin” to the environment variable as indicated in the above method and see if that works.
Method 2: Opening java.exe with admin rights
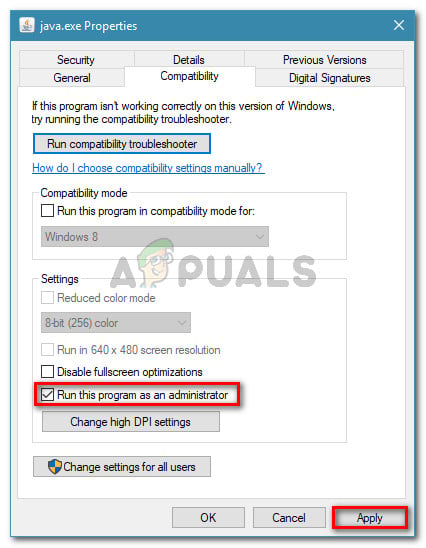
Several users struggling to resolve the same issue have managed to get the issue resolved after forcing the main Java executable (java.exe) to open with administrative privileges.
Some users reported that they were able to resolve the issue after applying this fix on both the main java executable and the executable of the application that is showing the error message.
Here’s a quick guide through the whole thing:
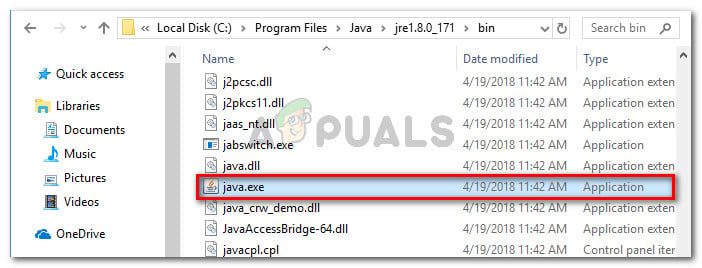
- Open File Explorer and navigate to the location of your java installation. We’ll need to arrive at the location of the main Java executable (java.exe). By default, you should find it in Program Files/Java/*JRE build version*/bin. The exact location will differ depending on which Java Runtime Environment you’re using.

Navigate to the location of java.exe Note: If you installed Java in a custom location, navigate the custom location instead.
- Right-click on java.exe and choose Properties. Then, go to the Compatibility tab and check the box associated with Run this program as an administrator (under Settings). Click Apply to save the changes.

go to the Compatibility tab and enable Run this program as an administrator - Right-click on the application executable (the one that is triggering the error) and repeat the same procedure: Compatibility > Run this program as an administrator > Apply.
- Run the application and see if the error message is resolved.
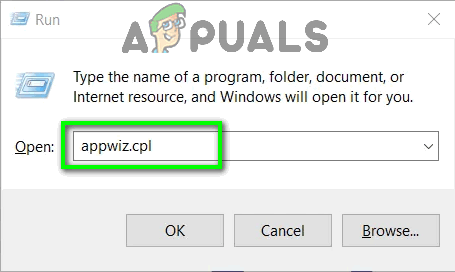
Method 3: Reinstalling Java
In some cases, the error is triggered because Java might not be installed properly or its installation might have been corrupted over time. Therefore, in this step, we will be reinstalling Java after uninstalling it completely. For that:
- Press Windows key + R to open up the Run prompt and type in “Appwiz.cpl”.

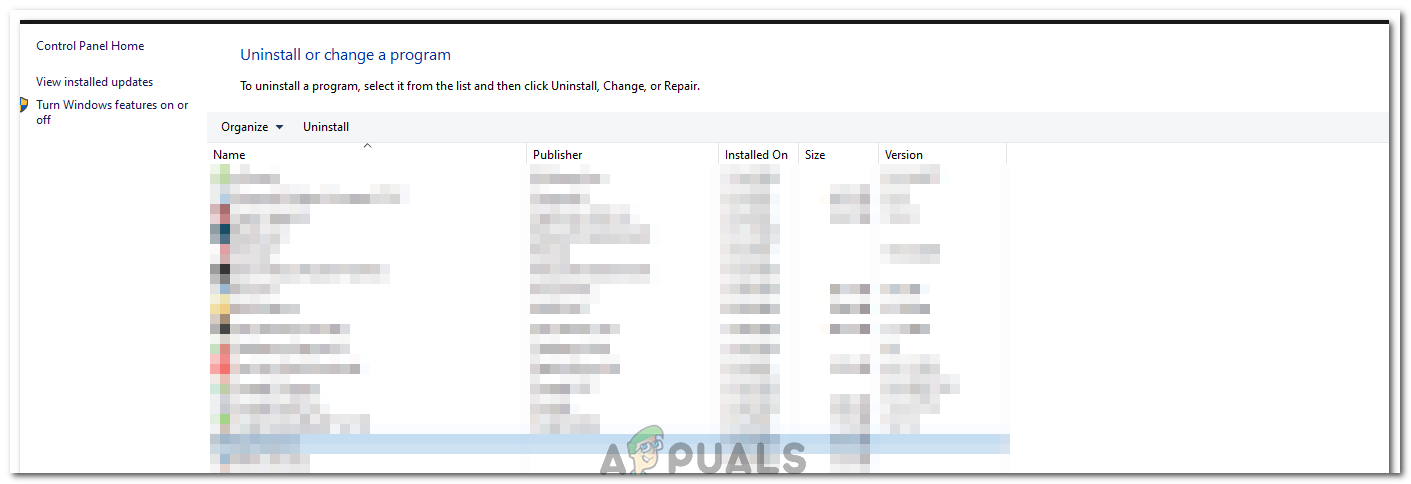
Type “appwiz.cpl” into the Run dialog and press Enter - Press “Enter” and the Programs and Features screen will open up.
- At the Programs and Features screen, scroll through the installed application list until you find Java.

Checking the Programs and features screen - Right-click on it and select “Uninstall” to remove it completely from the system
- First, delete the primary Java installation and later you should also remove all other Java installations such as updates and other versions.
- After uninstalling all installation, restart your computer.
- After booting up, visit this link and download the latest version of JRE.
- Check to see if the issue persists.
- If the error still persists, download and install the latest version of JDK from here.
Note: If you are already using JDK, try changing its versions or uninstalling the JRE that has been installed along with it. - Verify if the issue still exists.
Method 4: Fixing Errors With Code
There are different reasons behind this error and some of them include if you have some particular errors with your code. We will highlight some below.
- Remove Hyphen: Some users noted that the error was fixed by changing the double hyphen “–” to a single one “-” in their code. For example:
Change the code
“sony@sony-VPCEH25EN:~$ java –version
Picked up JAVA_TOOL_OPTIONS: -javaagent:/usr/share/java/jayatanaag.jar
Unrecognized option: –version
Error: Could not create the Java Virtual Machine.
Error: A fatal exception has occurred. Program will exit.”
To
“sony@sony-VPCEH25EN:~$ java -version
Picked up JAVA_TOOL_OPTIONS: -javaagent:/usr/share/java/jayatanaag.jar
Unrecognized option: –version
Error: Could not create the Java Virtual Machine.
Error: A fatal exception has occurred. Program will exit.” - Also, Try removing the following line from your argument
-Djava.endorsed.dirs=”C:Program FilesApache Software FoundationTomcat 8.5endorsed” - Open your eclipse.ini file and make sure that you add the “-vm” entry above the vm args otherwise, JVM V6 will be selected in env vars.
- If on Ubuntu, you should know that Java 8 is the only version that is supported. Therefore, using the third method. Uninstall Java, and install the previous version.
Method 5: Editing Eclipse.ini File
We can also tweak things inside the Eclipes.ini File to get rid of this issue. There might be a couple of issues with its configuration that need to be addressed therefore, we have divided it into separate issues. Follow the one which suits your scenario the best.
Lowering Memory Use
- Open the Eclipse.ini file inside the Eclipse folder with notepad.
- Find the line similar to “-Xmx256m” (It might be -Xmx1024m or -Xmx 512m).
- Now change the default value to a more reasonable figure depending upon the RAM installed on your computer and add the version number to it as well. For Example:
-Xmx512m
-Dosgi.requiredJavaVersion=1.6
OR
-Xmx512m
-Dosgi.requiredJavaVersion=1.7
OR
-Xmx512m
-Dosgi.requiredJavaVersion=1.8
- Also, try removing the “256m” value from the “-launcher.XXMaxPermSize” line.
- Check to see if the issue persists.
Tinkering Around
- Try to remove the following lines from your file.
-vm P:Programsjdk1.6bin
- Also, change the following lines.
set -Dosgi.requiredJavaVersion=1.5
TO
set -Dosgi.requiredJavaVersion=1.6
- Also, try adding the following line above “-vmargs!” line.
-vm C:Program Files (x86)Javajre6binjavaw.exe
- Also, point to JVM.dll using the following line.
-vm
C:Program FilesJavajre7binclientjvm.dll
- Open the Eclipse file and replace “-vmargs” with the path of javaw.exe. For Example:
-startup
plugins/org.eclipse.equinox.launcher_1.3.0.v20120522-1813.jar
--launcher.library
plugins/org.eclipse.equinox.launcher.win32.win32.x86_1.1.200.v20120522-1813
-product
com.android.ide.eclipse.adt.package.product
--launcher.XXMaxPermSize
256M
-showsplash
com.android.ide.eclipse.adt.package.product
--launcher.XXMaxPermSize
256m
--launcher.defaultAction
openFile
**-vm “c:Program FilesJavajdk1.7.0_07binjavaw.exe”**
-Dosgi.requiredJavaVersion=1.6
-Xms40m
-Xmx768m
-Declipse.buildId=v21.1.0-569685
- Also, you can place the following line at the end and check if that works.
-vmargs
-Xms40m
-Xmx512m
-XX:MaxPermSize=256m
- Furthermore, try removing the following lines from the eclipse.ini and check if that works.
-XX:+UseStringDeduplication
-XX:+UseG1GC
- You can also try removing the eclipse.ini file if the issue still persists as that has reportedly fixed the issue for some but remember to back it up first just in case you need it. Also, try closing all the power-hungry applications before starting Java to make sure proper resources are available.
Checking for JDK Corruption
- Press “Windows” + “R” to open the Run prompt and type in “cmd”.
- Type in the following command and check if that gives an error.
c:> java -version
- If it does give an error, reinstall the JDK completely.

Kevin Arrows
Kevin is a dynamic and self-motivated information technology professional, with a Thorough knowledge of all facets pertaining to network infrastructure design, implementation and administration. Superior record of delivering simultaneous large-scale mission critical projects on time and under budget.
Hello Guys, How are you all? Hope You all Are Fine. I just Newly Installed IntelliJ IDEA But When I am run my main class I am facing the following error Error: Could not create the Java Virtual Machine in java. So Here I am Explain to you all the possible solutions here.
Without wasting your time, Let’s start This Article to Solve This Error.
Contents
- How Error: Could not create the Java Virtual Machine Error Occurs ?
- How To Solve Error: Could not create the Java Virtual Machine Error ?
- Solution 1: Just Go back to JDK8
- Summery
I just Newly Installed IntelliJ IDEA But When I am run my main class I am facing the following error.
Abnormal build process termination: /usr/lib/jvm/java-1.8.0-openjdk-amd64/bin/java -Xmx700m -Djava.awt.headless=true -Djava.endorsed.dirs="" -Dcompile.parallel=false -Drebuild.on.dependency.change=true -Djdt.compiler.useSingleThread=true -Daether.connector.resumeDownloads=false -Dio.netty.initialSeedUniquifier=-5972351880001011455 -Dfile.encoding=UTF-8 -Duser.language=en -Duser.country=US -Didea.paths.selector=IntelliJIdea2021.2 -Didea.home.path=/home/pm/idea-IU-212.4746.92 -Didea.config.path=/home/pm/.config/JetBrains/IntelliJIdea2021.2 -Didea.plugins.path=/home/pm/.local/share/JetBrains/IntelliJIdea2021.2 -Djps.log.dir=/home/pm/.cache/JetBrains/IntelliJIdea2021.2/log/build-log -Djps.fallback.jdk.home=/home/pm/idea-IU-212.4746.92/jbr -Djps.fallback.jdk.version=11.0.11 -Dio.netty.noUnsafe=true -Djava.io.tmpdir=/home/pm/.cache/JetBrains/IntelliJIdea2021.2/compile-server/rfg-survey-api_cc70fc05/_temp_ -Djps.backward.ref.index.builder=true -Djps.track.ap.dependencies=false --add-opens=jdk.compiler/com.sun.tools.javac.code=ALL-UNNAMED --add-opens=jdk.compiler/com.sun.tools.javac.comp=ALL-UNNAMED --add-opens=jdk.compiler/com.sun.tools.javac.file=ALL-UNNAMED

Unrecognized option: --add-opens=jdk.compiler/com.sun.tools.javac.code=ALL-UNNAMED
Error: Could not create the Java Virtual Machine.
Error: A fatal exception has occurred. Program will exit.
How To Solve Error: Could not create the Java Virtual Machine Error ?
- How To Solve Error: Could not create the Java Virtual Machine Error?
To Solve Error: Could not create the Java Virtual Machine Error Here After the new update release of IntelliJ IDEA, Some Config is changed that’s why This error occurs. Just go back to JDK8. Here is How. Go to file. Select Project Structure. Choose Project Settings then Select Project There You can see Project language level Just put it back to 8. The project language level is changed in the new update of IntelliJ update that’s why This error Occurs Now just try to run your Code.
- Error: Could not create the Java Virtual Machine
To Solve Error: Could not create the Java Virtual Machine Error Here After the new update release of IntelliJ IDEA, Some Config is changed that’s why This error occurs. Just go back to JDK8. Here is How. Go to file. Select Project Structure. Choose Project Settings then Select Project There You can see Project language level Just put it back to 8. The project language level is changed in the new update of IntelliJ update that’s why This error Occurs Now just try to run your Code.
Solution 1: Just Go back to JDK8
Here After the new update release of IntelliJ IDEA, Some Config is changed that’s why This error occurs. Just go back to JDK8. Here is How.
- Go to file.
- Select Project Structure.
- Choose Project Settings then Select Project
- There You can see Project language level
- Just put it back to 8.
- Project language level is changed in new update of InteliJ update thats why This error Occurs
- Now just try to run your Code.
Summery
It’s all About this issue. Hope all solution helped you a lot. Comment below Your thoughts and your queries. Also, Comment below which solution worked for you?
Also, Read
- SyntaxError: invalid syntax to repo init in the AOSP code.